GoPro CHDHX301 HERO3 BLACK EDITION User Manual HERO3 UM silver Edition ENG MASTER indd
GoPro, Inc. HERO3 BLACK EDITION HERO3 UM silver Edition ENG MASTER indd
UserManual.wiki
>
GoPro
>
CHDHX301 User Manual
>
User Manual 1
Contents
1.
User Manual 1
2.
User Manual 2
User Manual 1
Navigation menu
Upload a User Manual
Namespaces
Wiki Guide
HTML
PDF
Info
Views
User Manual
Discussion / Help
Navigation


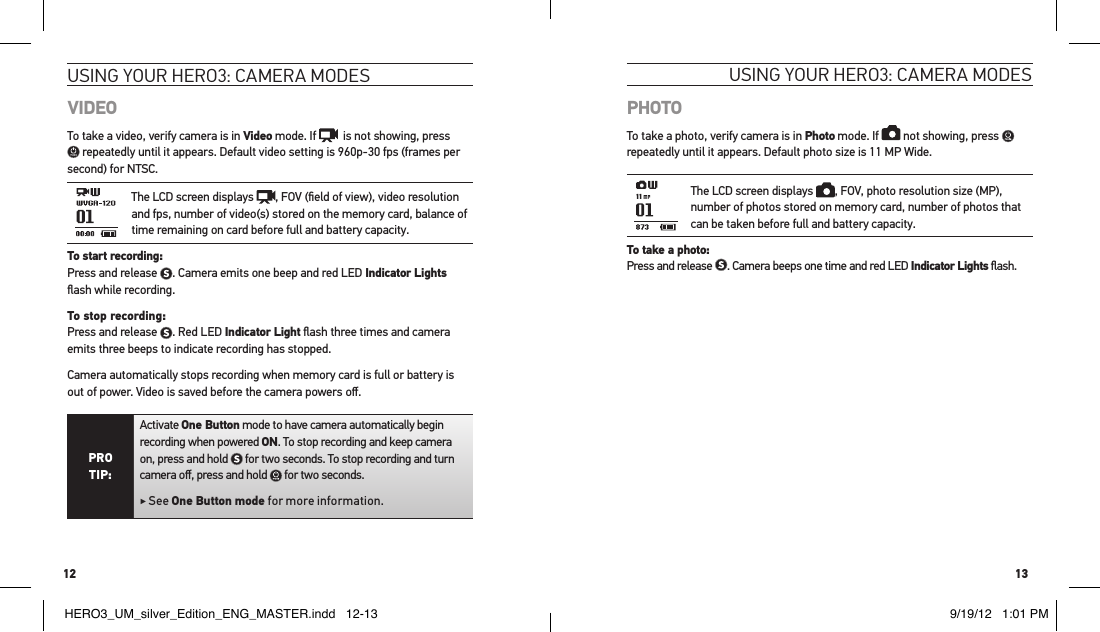

![16 17UsInG yoUr Hero3: caMera MoDesUsInG yoUr Hero3: caMera MoDesVIEW VIDEOS AND PHOTOS ON TV/HDTVConnect HERO3 to TV/HDTV using accessory cable such as HDMI Micro HDMI cable or mini-USB-to-composite cable (not included). Once connected: With the camera powered ON, navigate to Playback using . Press to enter Playback menu. • With camera powered ON, navigate to Playback using . Press to enter Playback menu. • HERO3 displays thumbnail previews of all videos and photos on card. Photo sets taken in Photo Burst or Time Lapse Photo display first photo in series as thumbnail for entire set.• Within thumbnail screen, use to toggle through thumbnails and to start playback or view highlighted file. Use NEXT and PREVIOUS to navigate to additional thumbnail screens. Sorting Thumbnails Using “Sort By” [i] Quickly find files of the same type using sorting function. From thumbnails screen:1. Using , cycle through thumbnails until cursor is on [sort icon].2. Select [sort icon] by pressing .3. Use to cycle through ALL, Video, Photo, XXX.4. Select highlighted option by pressing . 5. To cycle through selections, use . 6. Select highlighted option by pressing . 7. xxxxxxPLAYBACK OF VIDEO FILESSelect the thumbnail of the video to be viewed. The video playback screen appears with video paused and Play button highlighted. Press [S] to begin playback. While video is playing, the on screen icons shown include: PAUSE, REWIND, FAST FORWARD, [SLOW ICON NAME] and RETURN TO THUMBNAILS. To REWIND or FAST FORWARD, highlight the icon with [mode] then press and hold [S]. Release [S] when you want to return to regular playback.To play video in slow motion, highlight [ICON NAME] and press [S]. While the video is paused, you can use [mode] to cycle throughthe icons for the NEXT file on the microSD card, the PREVIOUS file, [SLOW ICON NAME] or RETURN TO THUMBNAILS. Press [S] to select the highlighted option. PLAYBACK OF SINGLE PHOTO FILESAer selecting a photo file thumbnail with [S], your photo will display along with on-screen buttons to select the NEXT file on the microSD card, the PREVIOUS file, AUTO-PLAY and RETURN TO THUMBNAILS. Use [mode] to cycle throughthe icons then press [S] to select the highlighted option.See AUTO PLAY for information about using the Auto Play “slideshow” mode.PLAYBACK OF BURST AND TIME LAPSE FILESAer selecting a Burst or Time Lapse file thumbnail with [S], the first image in the sequence to display with VIEW highlighted. Press [S] to view the first photo in the series and access the individual playback controls, NEXT or PREVIOUS to move to other files on your microSD card, or THUMBNAILS to return to the thumbnail menu.On the individual playback screen, you can select PLAY to view each photo in the series, NEXT or PREVIOUS to access other photos in the series, or BACK to HERO3_UM_silver_Edition_ENG_MASTER.indd 16-17 9/19/12 1:01 PM](https://usermanual.wiki/GoPro/CHDHX301.User-Manual-1/User-Guide-1808026-Page-9.png)
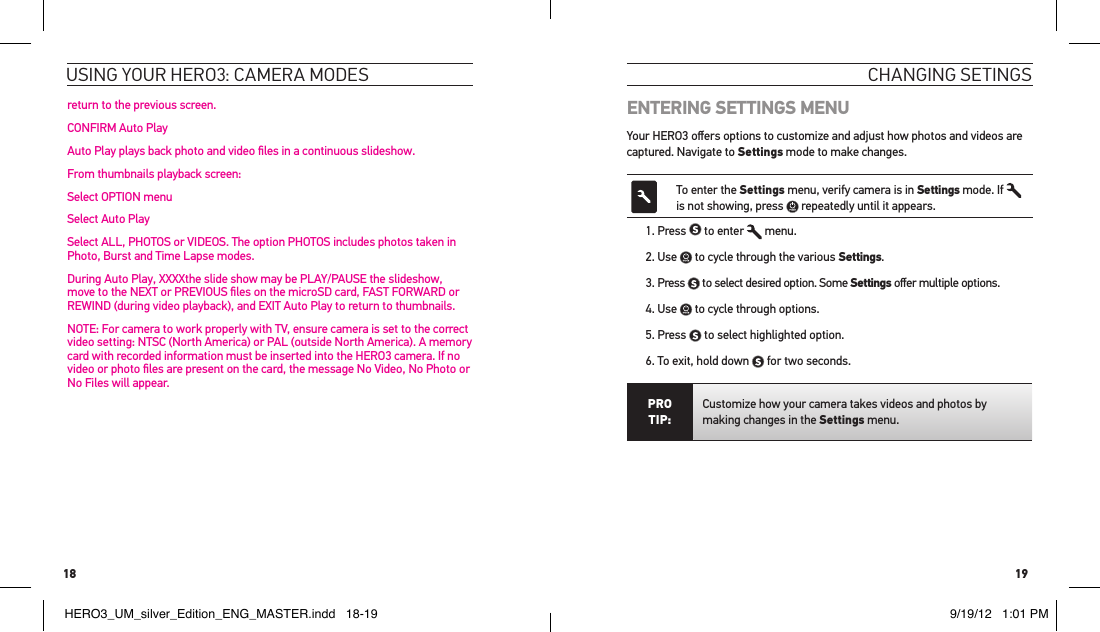
![24 25TIME LAPSESeveral time interval settings are available for Time Lapse Photo mode, including 0.5, 1, 2, 5, 10, 30 and 60 seconds. Aer selecting interval, specify whether to optimize for VIDEO or STILLS. To change Time Lapse Photo mode, verify camera is in Settings menu. If is not showing, press repeatedly until it appears:1. Press to enter menu.2. Use to cycle through Settings menu to locate .3. Press to enter Time Lapse Photo menu.4. Use to cycle through options. 5. Press to select highlighted option.6. Use to cycle through sub-menu options VIDEO and STILLS; press to select highlighted option.7. To exit, hold down for two seconds.cHanGInG settInGs: caPtUre settInGscHanGInG settInGsCAPTURE SETTINGS MENUCapture Settings [icon] allows advanced customization options to be made to the camera that will ease video and photo capture. CAMERA ORIENTATIONMounting camera upside down but wish files to appear upright when viewing or transferring? This setting eliminates need to flip video or photo.Camera right side up (default)Camera upside downTo change Camera Orientation, verify camera is in Settings menu. If is not showing, press repeatedly until it appears:1. Press to enter menu.2. Use to cycle through Settings menu to locate [Capture Settings Icon].3. Press to enter Capture Settings. 4. Use to locate . 5. Press to enter Camera Orientation sub-menu. 6. Use to cycle through options.7. Press to select hightlighted option. 8. To exit, hold down for two seconds.HERO3_UM_silver_Edition_ENG_MASTER.indd 24-25 9/19/12 1:01 PM](https://usermanual.wiki/GoPro/CHDHX301.User-Manual-1/User-Guide-1808026-Page-13.png)
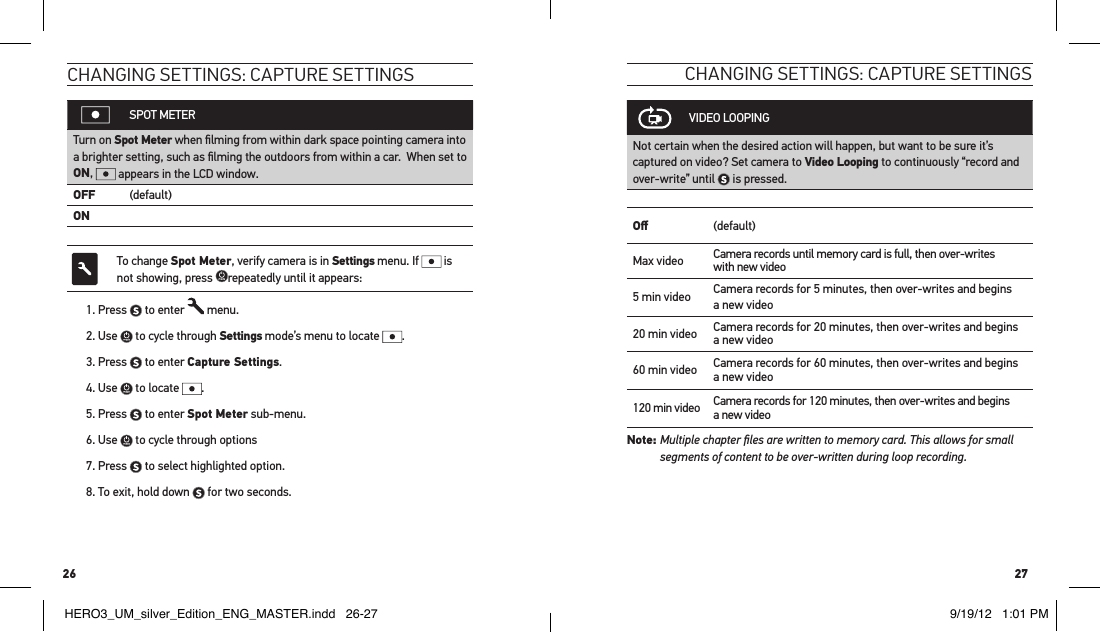
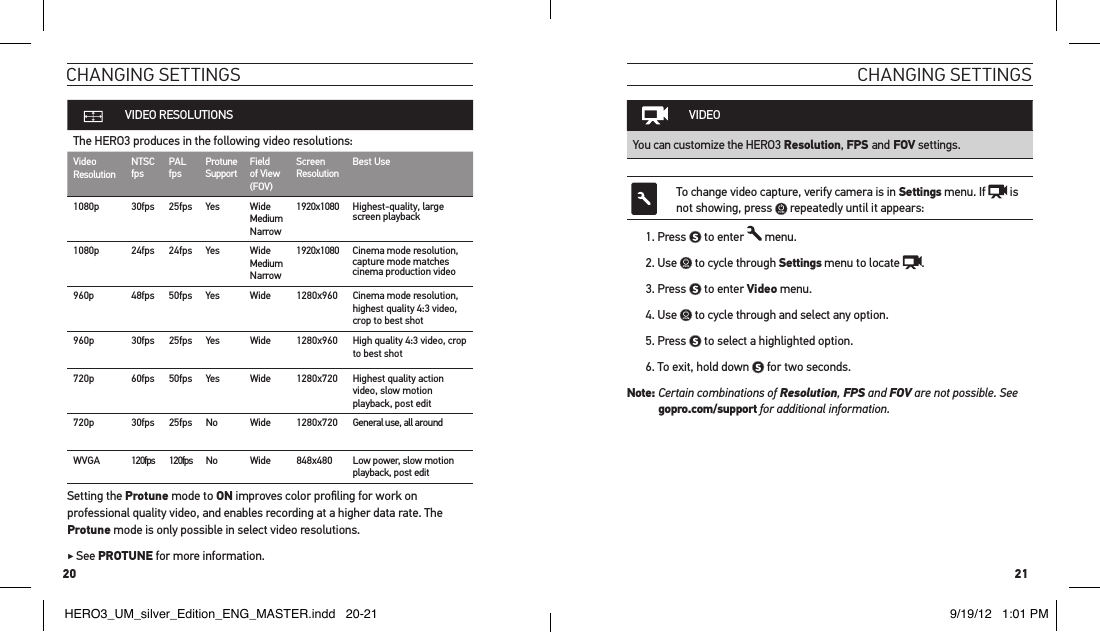
![28 29To turn Video Looping ON, verify camera is in Settings menu. If is not showing, press repeatedly until it appears:1. Press to enter menu.2. Use to cycle through Settings menu to locate [CAPTURE SETTINGS ICON].3. Press to enter Capture Settings. 4. Use to locate .5. Press to enter Video Looping sub-menu. 6. Use to cycle through options 7. Press to select highlighted option. 8. To exit, hold down for two seconds.PRO TIP:Not sure when a “can’t miss” moment will happen? Set camera to Video Looping.cHanGInG settInGs: caPtUre settInGs cHanGInG settInGs: caPtUre settInGsPROTUNEThe HERO3 camera can record video in Protune mode. Protune enables video recording at a higher data rate of 35Mbps, and shooting at 24fps, for easier intercut to other source files. Protune also improves color profiling for work on professional quality video created using major post-production platforms. Turning Protune ON affects several settings and features, such as Video Resolution, Frames Per Second and Field of View. Protune cannot be used during playback to a smart device.OFF (default)ONTo turn Protune ON/OFF, verify camera is in Settings menu. If is not showing, press repeatedly until it appears:.1. Press to enter menu.2. Use to cycle through Settings to locate [ICON Capture Settings].3. Press to enter Capture Settings sub-menu.4. Use to cycle through to locate .5. Press to enter Protune sub-menu. 6. Use to cycle through options.7. Select highlighted option by pressing .8. To exit, hold down for two seconds.HERO3_UM_silver_Edition_ENG_MASTER.indd 28-29 9/19/12 1:01 PM](https://usermanual.wiki/GoPro/CHDHX301.User-Manual-1/User-Guide-1808026-Page-15.png)
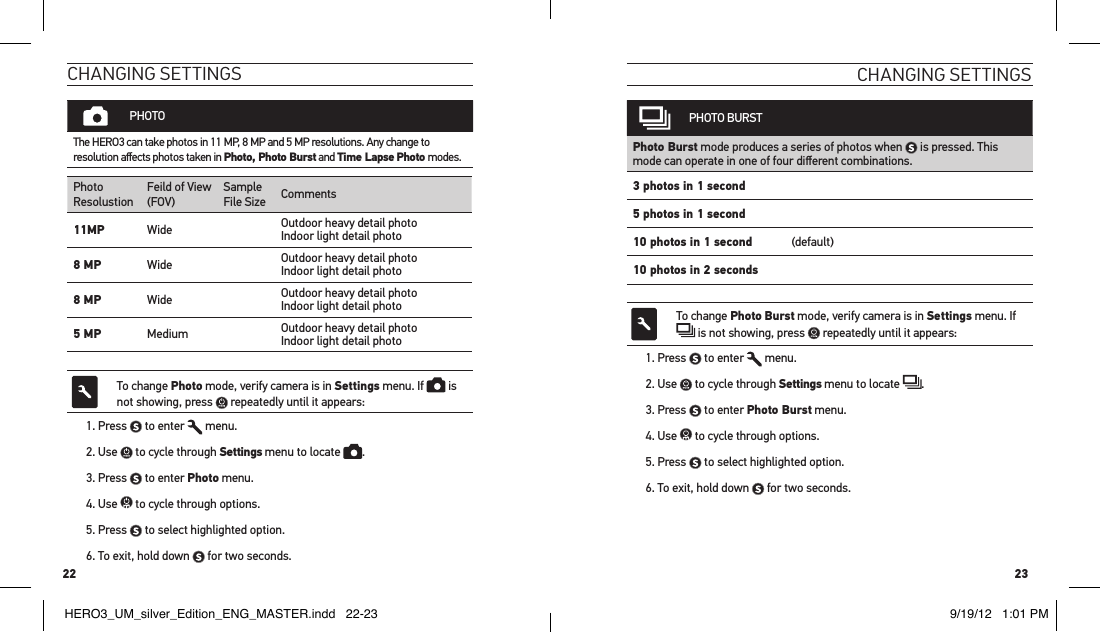
![30 31ICON WHITE BALANCEWhite Balance is an in-camera setting that adjusts the overall color tone of videos and photos. The default setting is AUTO.To adjust White Balance, verify camera is in Settings menu. If [ICON] is not showing, press repeatedly until it appears.1. Press to enter menu.2. Use to cycle through Settings to locate [ICON Capture Settings].3. Press to enter Capture Settings.4. Use to locate [WB ICON].5. Press to enter White Balance sub-menu. 6. Use to cycle through options.7. Press to select highlighted option.8. To exit, hold down for two seconds.cHanGInG settInGs: setUP cHanGInG settInGs: setUP PRO TIP:Consider manually setting White Balance when operating in the following conditions:· 3000K for incandescent or sunrise/sunset lighting· 5500K for daylight or sunlit shooting· 6500K for cool white fluorescent skylight lighting· Cam RAW for optimized color files HERO3_UM_silver_Edition_ENG_MASTER.indd 30-31 9/19/12 1:01 PM](https://usermanual.wiki/GoPro/CHDHX301.User-Manual-1/User-Guide-1808026-Page-16.png)
![32 33SETUP MENUSet Up allows advanced customization options to be made to the camera that will ease video and photo capture. ICON LAST/STARTUP DEFAULT SETTINGSet which camera mode is immediately active when camera is powered ON. TABLE xxxxxxx xxxxxxTo adjust LAST/STARTUP setting, verify camera is in Settings menu. If is not showing, press repeatedly until it appears.1. Press to enter menu.2. Use to cycle through Settings to locate .3. Press to enter Setup.4. Use to locate [default ICON].5. Press to enter LAST/STARTUP sub-menu. 6. Use to cycle through options.7. Press to select highlighted option.8. To exit, hold down for two seconds.Note: Option LAST configures camera to start up in mode active when camera was last powered OFF.ONE BUTTON MODEWith One Button mode selected, camera automatically begins recording video as soon as powered ON.OFF (default)ONTo turn One Button mode ON, verify camera is in Settings menu. If is not showing, press repeatedly until it appears:1. Press to enter menu.2. Use to cycle through Settings to locate .3. Press to enter Set Up.4. Use to cycle through to locate .5. Press to enter One Button sub-menu. 6. Use to cycle through options.7. Press to select highlighted option.8. To exit, hold down for two seconds.(continued on next page)cHanGInG settInGs: setUP cHanGInG settInGs: setUP HERO3_UM_silver_Edition_ENG_MASTER.indd 32-33 9/19/12 1:01 PM](https://usermanual.wiki/GoPro/CHDHX301.User-Manual-1/User-Guide-1808026-Page-17.png)
![34 35To turn One Button mode OFF:1. Press and hold until shows in LCD window.2. Press to enter Settings menu.3. Use to cycle through Settings to locate [ICON Set Up].4. Press to enter Set Up.5. Use to cycle through to locate .6. Press to enter One Button sub-menu. 7. Use to highlight OFF.8. Press to select highlighted option.9. To exit, hold down for two seconds.Note: When in One Button mode, camera will start taking video as soon as turned on. NTSC / PALThe NTSC and PAL settings govern video recording frame rate and playback when viewing video on a TV/HDTV. Select NTSC when viewing on a TV in North America. Select PAL if viewing on a PAL TV (most televisions outside of North America) or if viewing on a PAL TV in any region.NTSC (default) PAL1080p/30 1080p/25960p/48 960p/50960p/30 960p/25720p/60 720p/50720p/30 720p/25WVGA/120 WVGA/120cHanGInG settInGs: setUP cHanGInG settInGs: setUP HERO3_UM_silver_Edition_ENG_MASTER.indd 34-35 9/19/12 1:01 PM](https://usermanual.wiki/GoPro/CHDHX301.User-Manual-1/User-Guide-1808026-Page-18.png)