GoPro WIFIRC-001 WiFi Remote User Manual
GoPro, Inc. WiFi Remote
UserManual.wiki
>
GoPro
>
WIFIRC 001 User Manual
User Manual
Navigation menu
Upload a User Manual
Namespaces
Wiki Guide
HTML
PDF
Info
Views
User Manual
Discussion / Help
Navigation
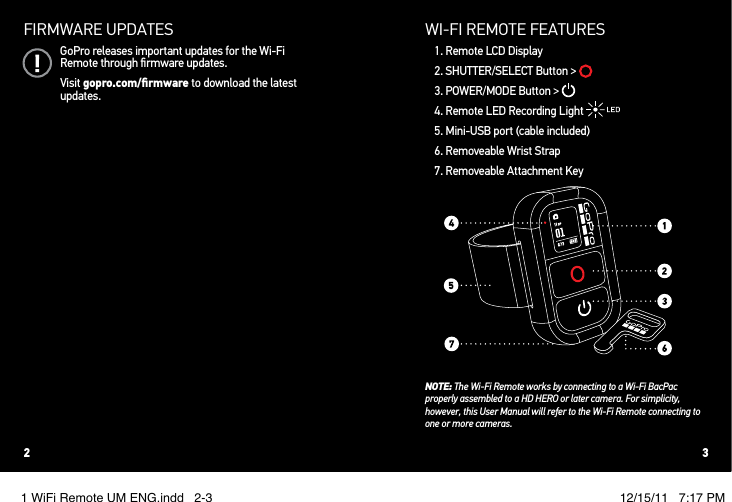
![SETTING UP YOUR WI!FI REMOTEPAIRING WITH YOUR CAMERAFollow these steps the first time you use your Wi-Fi Remote with a HD HERO or later camera. It is recommend that you charge your Wi-Fi Remote for two hours before first use. ! See BATTERY LEVEL AND CHARGING.[DEFINE USAGE RULES AROUND WORDS “PAIRING” AND “CONNECTING” HERE AND IN WI-FI BACPAC MANUAL]1. Power on the Wi-Fi Remote by pressing .2. The Remote LCD Display will show the connection animation. Press to tell the Wi-Fi Remote to begin pairing with a camera. You can press again to cancel pairing.3. Put the camera’s Wi-Fi BacPac into connection mode. ! See the Wi-Fi BacPac User Manual for details.4. The Wi-Fi Remote will automatically connect to the camera and display the default status screen. 5. The connection needs to occur within two minutes or the Wi-Fi Remote will return to the default status screen. Press again to restart pairing.A"er this first connection is made, the Wi-Fi Remote will automatically connect to the camera(s) with which it last connected, assuming they are within range. To connect to a camera manually, ! see PAIRING ADDITIONAL CAMERAS. [double check wording here]PAIRING ADDITIONAL CAMERASThe Wi-Fi Remote remains in connection mode (! see PAIRING YOUR CAMERA) for two minutes, giving you time to set up and connect multiple cameras. A single Wi-Fi Remote can control up to 50 HD HERO or later cameras. To connect to additional cameras when the Wi-Fi Remote is no longer in connection mode:1. Press to scroll through the Wi-Fi Remote modes to CONNECTION [comfirm screen graphic].2. Press to begin searching for cameras within range for two minutes. The Remote LCD Display will show the connection animation. If no connection is made during the two minute window, you will need to reactivate connection mode by pressing .3. Put each additional camera’s Wi-Fi BacPac into connection mode. ! See the Wi-Fi BacPac User Manual for details.4. The Wi-Fi Remote will automatically connect to the new camera(s) and display the default status screen showing the number of cameras currently connected. [confirm screen image]PROTIP: Your cameras do not have to be in the same Camera Mode. Experiment with using a mix of Video and Photo modes like Time Lapse or Burst. ! See CHANGING CAMERA MODES below for details on changing camera modes using the Wi-Fi Remote.4 51 WiFi Remote UM ENG.indd 4-5 12/15/11 7:17 PM](https://usermanual.wiki/GoPro/WIFIRC-001/User-Guide-1675592-Page-3.png)
![CONTROLLING YOUR CAMERA DIRECTLYWhen the Wi-Fi Remote is connected to a single HD HERO2 or later camera, the remote mirrors the controls on the camera: pÐÐ2FCÐ0CKMRCÐ*!"Ð"GQNJ?WÐQFMUQÐRFCÐQ?KCÐGLDMPK?RGMLÐas the camera’s LCD DisplaypÐÐ2FCÐ5G$GÐ0CKMRC¦QÐ and buttons work the same as those on the camera! See your camera’s User Manual for instructions. ACCESSING REMOTE SETTINGS WHEN CONNECTED TO ONE HD HERO2 OR LATER CAMERAWhen the Wi-Fi Remote is connected to a single camera, a REMOTE SETTINGS menu [screen icon?] is available. Scroll through camera modes using and select REMOTE SETTINGS [screen graphic?] using . Within the REMOTE SETTINGS menus, press to scroll through the settings screens in the following order:Battery Level Displays the Wi-Fi Remote battery’s remaining charge.Connection Press to tell the Wi-Fi Remote to beginning pairing with additional cameras. Firmware UpdateNote: Only available when connected to a computer via USB. See FIRMWARE UPATES above for details. Need to review with internal team againExit Exit REMOTE SETTINGS. The Wi-Fi Remote will return to mirroring the camera’s LCD Display.8 91 WiFi Remote UM ENG.indd 8-9 12/15/11 7:17 PM](https://usermanual.wiki/GoPro/WIFIRC-001/User-Guide-1675592-Page-5.png)
![USING YOUR WI!FI REMOTE WITH MULTIPLE CAMERASUSING REMOTE MODES WITH A HD HERO OR WITH MULTIPLE CAMERASWhen the Wi-Fi Remote is connected to a single HD HERO camera or to multiple cameras, it does not mirror the controls of a single camera. Instead, use Remote Modes to control the Wi-Fi Remote and connected camera(s).Press to advance through the Wi-Fi Remote’s modes in the following order:Default StatusDisplays the number of cameras currently connected and the MULTI mode icon. [fact check]Remote Camera ModeChange the Camera Modes of connected cameras. See CHANGING CAMERA MODES below. This screen will not appear if no cameras are connected.Battery LevelDisplays the Wi-Fi Remote battery’s remaining charge.Connection Manually start polling for new connections. See MANUALLY CONNECTING ADDITIONAL CAMERAS below.Firmware UpdateUpdate the Wi-Fi Remote firmware. See FIRMWARE UPDATES above.CHANGING CAMERA MODESWhen the Wi-Fi Remote is connected to a single HD HERO or to multiple cameras, use REMOTE CAMERA MODE to change the camera mode of each connected camera:1. Press on the Wi-Fi Remote to cycle through mode screens until REMOTE MODE screen appears. 2. Press to select REMOTE MODE.3. Press to cycle through camera modes.4. Press to select the mode. 5. All cameras will now be set to the selected photo or video mode.10 111 WiFi Remote UM ENG.indd 10-11 12/15/11 7:17 PM](https://usermanual.wiki/GoPro/WIFIRC-001/User-Guide-1675592-Page-6.png)
![USING MULTI MODE The Wi-Fi Remote remembers each camera’s Camera Mode when it connects to the remote. MULTI MODE is a quick way to return each camera to its “startup” mode a"er you have changed camera modes using the REMOTE MODE menu.To activate MULTI MODE, follow the directions in CHANGING CAMERA MODES and select MULTI from the menu.MANUALLY CONNECTING ADDITIONAL CAMERASYou can connect to additional cameras a"er the two-minute connection period ends by manually starting the connection process.1. Press to scroll through the Wi-Fi Remote modes to Connection [screen graphic?].2. Press to begin searching for cameras within range. The Remote LCD Display will show the connection animation.3. Put each additional camera’s Wi-Fi BacPac into connection mode. See the Wi-Fi BacPac User Manual for details.4. The Wi-Fi Remote will automatically connect to the new camera(s) and display the default status screen. "BLANK PAGE#12 131 WiFi Remote UM ENG.indd 13 12/15/11 7:17 PM](https://usermanual.wiki/GoPro/WIFIRC-001/User-Guide-1675592-Page-7.png)