Goldsound Electronic BSS862 Bluetooth Speaker with PLL Radio and USB/SD User Manual BSS 862 charging
Goldsound Electronic Limited Bluetooth Speaker with PLL Radio and USB/SD BSS 862 charging
User Manual
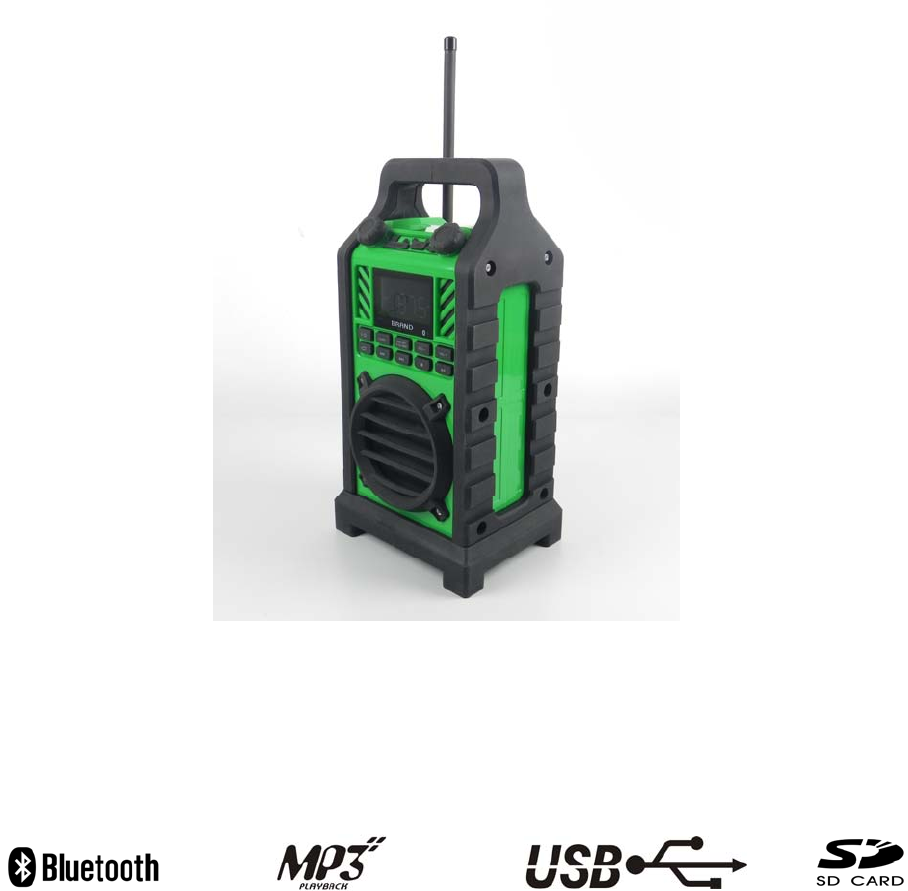
Bluetooth speaker with
PLL radio and USB/SD
BSS-862
INSTRUCTION MANUAL

IMPORTANT SAFETY INSTRUCTIONS:
1. Follow all instructions
2. Clean only with a dry cloth.
3. Read the instructions. All uses guidelines must be read before start device.
4. Keep the instructions for future use.
5. Attention, use and security guidelines must be respected.
6. The device must not be used near water or be put in contact with moisture.
7. Make sure has no liquid is spilled on device and device openings.
8. Move device carefully, avoid shocks.
9. Do not block the breakdown of the device outputs.
10. Do not place the device near from a heat source (e.g. radiator). Do not expose it to the Sun.
11. Plug the device as indicate on this information form.
12. For cleaning the device, please follow the recommendations of the notice.
13. The sector cord should be unplugged a long period of use.
14. Device shall be repaired by a qualified person when:
a. the power cord is damaged,
b. objects have fallen into the apparatus or a liquid has been spilled into device,
c. device was exposes to the rain,
d. device does not work correctly without notable exterior change,
15. The user shall not try to maintain device beyond that which is described in this information form. The
guarantee would negate.
16. Unpack all parts and remove protective material.
17. Do not connect the unit to the mains before checking the mains voltage and before all other connections
have been made.
18. Do not cover any vents and make sure that there is a space of several centimeters around the unit for
ventilation.
19. The AC/DC adaptor and apparatus shall not be exposed to dripping or splashing and that no objects filled
with liquids, such as vases, shall be placed on the AC/DC adaptor and apparatus.
L’adaptateur AC/DC de l’appareil et l’appareil ne doit pas être exposé aux écoulements ou aux
éclaboussures et aucun objet ne contenant de liquide, tel qu’un vase, ne doit être placé sur l’objet.
20. The ventilation should not be impeded by covering the ventilation openings with items, such as
newspapers, table-cloths, curtains, etc.
21. No naked flame sources, such as lighted candles, should be placed on the apparatus.
22. The AC/DC adaptor is used as the disconnect device, the disconnect device shall remain readily operable.
23. Do not defeat the safety purpose of the polarized or grounding - type plug. A polarized plug has two blades
with one wider than the other. A grounding type plug has two blades and a third grounding prong. The wide
blade or the third prong are provided for your safety. When the provided plug does not fit into your outlet,
consult an electrician for replacement of the obsolete outlet.
24. Protect the power cord from being walked on or pinched particularly at plugs, convenience receptacles, and
the point where they exit from the apparatus.
25. Only use attachments/accessories specified by the manufacturer.
26. Use only with a cart, stand, tripod, bracket, or table specified by the manufacturer,
or sold with the apparatus. When a cart is used, use caution when moving the
cart/apparatus combination to avoid injury from tip-over.
27. To reduce the risk of fire or electric shock, do not expose this apparatus to
rain or moisture.
Avertissement: pour réduire le risque d’incendie ou de choc électrique, ne pas
exposer cet appareil sous la pluie et l’humidité.
28. Caution Marking was located at bottom enclosure of the apparatus.
Les marquages sont inscrits en bas de l'appareil.
Les précautions d'emploi sont inscrites en bas de l'appareil.
29. The AC/DC adaptor is used as disconnect device. The AC/DC adaptor of apparatus should not be obstructed
OR should be easily accessed during intended used. To be completely disconnect the power input, the
AC/DC adaptor of apparatus shall be disconnected from the mains.

L’adaptateur AC/DC de l’appareil est utilisé pour déconnecter le système. L’adaptateur AC/DC de l’appareil
ne doit pas être obstrué ou doit être facilement accessible pendant son utilisation. Pour être complètement
déconnecté de l’alimentation d’entrée, l’adaptateur AC/DC de l’appareil doit être déconnecté du secteur.
30. Battery shall not be exposed to excessive heat such as sunshine, fire or the like.
Les piles ne doivent pas être exposées à de forte chaleur, tel qu'à la lumière du soleil, au feu ou autres
choses de semblable
31. This device should match the provided AC/DC adaptor AS360-120-AA200 of KINGWALL
1
COMPLIANCE WITH FCC REGULATIONS
This device complies with Part 15 of the FCC Rules. Operation is subject to the following two
conditions:
(1) This device may not cause harmful interference, and
(2) This device must accept any interference received, including interference that may cause
undesired operation.
Warning: Changes or modifications to this equipment not expressly approved by
the party responsible for compliance could void the user’s authority to operate the
equipment.
This equipment has been tested and found to comply with the limits for a Class B Digital
Device, pursuant to Part
15 of the FCC Rules. These limits are designed to provide
reasonable protection against harmful
interference in a residential installation. This
equipment generates, uses and can radiate radio frequency energy
and, if not installed and
used in accordance with the instructions, may cause harmful interference to radio
communications. However, there is no guarantee that interference will not occur in a
particular installation. If this equipment does cause harmful interference to radio or television
reception, which can be determined by turning
the equipment off and on, the user is
encouraged to try to correct the interference by one or more of the
following measures:
z Reorient or relocate the receiving antenna.
z Increase the separation between the equipment and receiver.
z Connect the equipment into an outlet on a circuit different from that to which the receiver
is connected.
z Consult the dealer or an experienced radio/TV technician for help.
Adaptor with ferrite must be used with this equipment to ensure compliance with the Class
B FCC limits
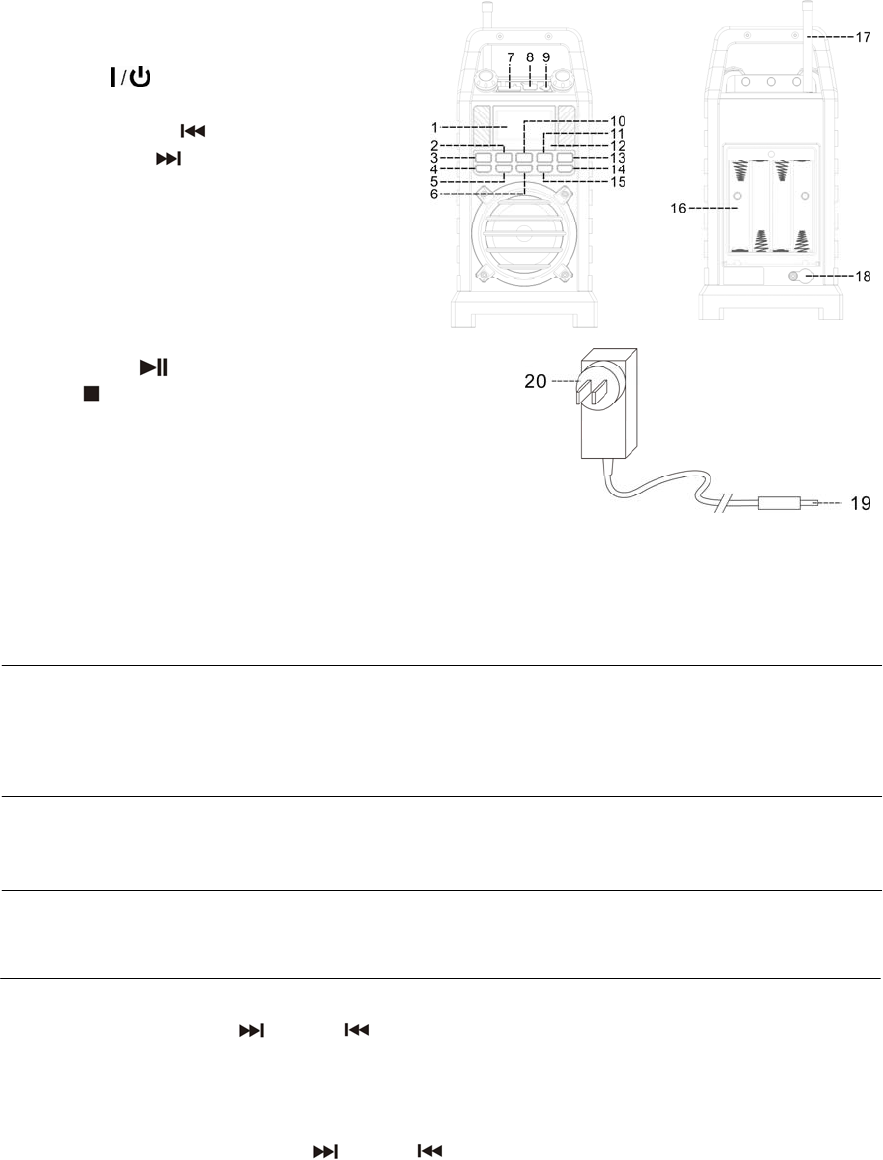
LOCATION OF CONTROLS
1) LCD display
2) Function button
3) On / Off button
4) Repeat/random play button
5) Tune/Skip down button
6) Tune/Skip up button
7) SD card slot
8) USB socket
9) 3.5mm Aux-in jack
10) Pre up/+10/Pro button
11) Volume down
12) Bluetooth LED indicator
13) Volume up button
14) Play/pause button
15) Stop button
16) Battery compartment
17) FM wire antenna
18) DC in jack
19) DC plug
20) AC/DC adaptor
Caution:
Usage of controls or adjustments or performance of procedures other than those specified herein may result in
hazardous radiation exposure. This unit should not be adjusted or repaired by anyone except qualified service personnel.
Precautions for use
Installation
• Unpack all parts and remove protective material.
• Do not connect the unit to the mains before checking the main voltage and before all other connections have been
made.
• Do not cover any vents and make sure that there is a space of several centimeters around the unit for ventilation.
AC connection
1. Connect the DC plug (19) to the DC jack (18) of the main unit, then, connect the AC/DC adaptor (20) to the AC outlet.
2. Turn on the unit by On/Off (3), if the LCD display (1) is on with backlighting, it means the power supply is normal.
Now your system is ready to play the music.
DC connection
For DC operation, please insert 8 pcs size C (UM-2) battery to the battery compartment (16) as the indication in battery
compartment and remove the DC plug (19) from the DC jack (18).
Listening to radio
Manual tuning
1. Turn on unit by On/Off button (3) & then press the Function button (2) to select “ FM ” mode.
2. Press the Tune / Skip up “ or down ” (6/5) button to change the received frequency in order to reach your
desired FM channel
3. Adjust volume up/down button (11/13) to the desired volume level.
Auto tuning
1. Press Function button (2) to select “ Tuner ” mode.
2. Press and hold the Tuning / Skip up “ or down ” button (6/5), the unit will start searching until reach receive a
FM channel, repeat this step until the desired radio station is being reached.
3. Adjust volume up/down button (11/13) to the desired volume level.
Hints for best reception:-
The receiver has a build-in FM rod antenna (17) on top of the unit. Extend it as long as possible to get best reception.
Preset stations
You can store up to total of 20 FM radio stations in the memory.
1. Set to FM mode by “Function” (2).
2. Turn to the desired FM station according the above “Listening Radio” instruction.
3. Press and hold “ Pre-up/+10/Pro ” button (10) few second to active program state. Display will flash with “ P 01 “.
1
4. Press Tuning / Skip up “ or down ” button (6/5), to select the desired station memory position for storage.
5. Press Pre-up/+10/Pro ” button (10) once again to confirm the setting.
6. Repeat step 2 to 5 to store other stations.
7. Now you can select the presets stations in order by pressing the “ Pre-up/+10/Pro” button (10).
¾ The pre-set memories will be cancelled completely if dis-connecting the main power supply. You are recommended
to switch the system into standby mode for convenience usage.
¾ There are 3 seconds for program state, after 3 sec. This state would resume to normal tuner mode automatically.
¾ You can overwrite a present station by storing another frequency in its place.
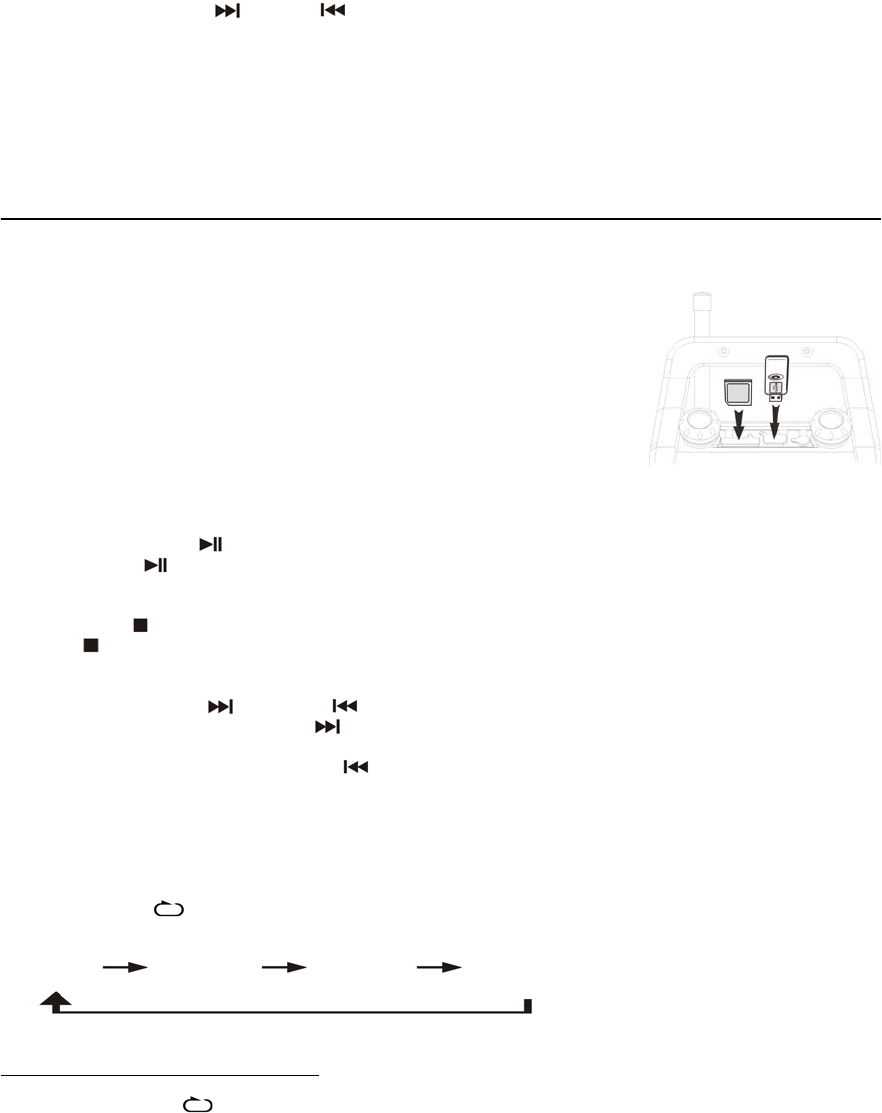
Playback of MP3 song via USB storage media or memory card
Connecting
The system is able to decode and playback all MP3 file which stored in the memory media with USB connecting port or
SD/MMC card.
1. Set the system at off mode first or other function except USB/SD mode.
2. Open the USB socket cover then plug-in the USB pen-drive with the face in &
make sure it going into completely or open the SD slot cover then insert the
memory card in the direction of the arrow as shown in the cover of the memory
card slot. Insert straight without bending.
z Connecting the USB pen drive upside down or backwards could damage
the audio system or the storage media (USB thumb drive). Check to be
sure the direction is correct before connection.
3. Turn on the unit again by On/Off button (3) and press Function button (2) to
“ USB ” or “ SD ” mode. The system will start reading the storage media automatically after connecting, and LCD
display (1) will show the running time of MP3 files.
z Play / pause mode
1. If Play/Pause button (14) is pressed during playback, system go to pause mode and the playing time will start
flashing at the LCD display (1). Press again to resume normal playback.
z Stop mode
1. If Stop button (15) is pressed during play or pause mode. Go to stop mode and display total number of track on the
LCD display (4).
z Skip mode (skip up /skip down )
1. During play or pause mode, if skip up button (5) is pressed it will go to next track and display the track no. and
will change to play mode.
2. During play or pause mode, if Skip down button (6) is pressed, it will go to the previous track and change to play
mode.
z +10 tracks
1. Press “Pre-up/+10/Pro” button (10) to skip 10 track to your favorite track more convenience.
z Repeat/Random mode
Press the “ Rep/Ran “ button (4) during playback to select repeat/ random or intro function, a single track, random and
intro can be played as follow:-
(1) Random (2) Repeat 1 (3) Intro (4) Off mode
Indicator
Play mode on LCD display
Random RAN
Repeat track
Intro INTRO
Off mode --------------
z Repeat play
You can listen the desired tracks by this function.
z Random play
You can listen all the tracks in a random order by this function.
z Intro play
You can listen the beginning (10 seconds) of each file by this function & saving your time to search the desire
song
2

z Repeat all
As this unit repeat all mode was defaulted, if any play mode did not selected, MP3 playback will continuously.
Remark
- The system can detect and read the file under MP3 format only at USB mode but not other music file format.
- If connect the system to MP3 player via the USB socket, due to variances in MP3 encoding format, some
MP3 player may not be able to play via the USB socket. This is not a malfunction of the system.
- USB port does not support connection with USB extension cable and is not designed for communication
with computer directly
Removing of USB pen drive
To remove the USB pen drive, turn off the power or switch the function mode to either Aux or FM first. For USB port –
un-plug it by pulling out from the USB socket directly.
Remark:-
MP3 track format requirement:-
- Bit rate : 32 kbps~320kbps, sampling rate : 32kHz, 44.1kHz and 48 kHz decodable
- The performance of playing MP3 disc is various from the quality of recording disc and the method of recording.
Furthermore, the searching lead-time for MP3-CD is longer than normal CD due to difference format.
USB charging
This unit can provide DC5V/1A for another electronic device charging (such as mobile phone) through USB
port but USB charging not available during battery operation or USB mode.
Remark : Due to firmware/software of mobile phone was various and update time to time, maybe some of
mobile phone cannot compactible with charging function. This is not the malfunction.
Bluetooth connecting and Playback
1. Select the Main Function selector (2) to “ BT ” mode.
2. The Bluetooth LED indicator (12) will flashing, it means the Bluetooth in non connection / searching mode.
3. Switch on the Bluetooth feature of your Bluetooth device (such as mobile phone) and select “ Goldsound ” Bluetooth
equipment to connecting.
4. Once the connecting was finish and connect successfully, the Bluetooth LED (12) will change to light up.
5. Start to playback your Bluetooth device and enjoy the music by the main unit.
Aux-in connection
Connect another audio device, e.g. (portable) CD player, MP3 player, (portable) cassette player, iPod, etc. To this system
via a cord with 3.5mm dia jack plugs (not supplied). Connect one end of this cord to the headphone jack of the external
device and the other end to the aux-in jack (9) at the side of the unit. Then press Function button (2) to “ AUX ” mode.
Start to playback your external device to enjoy your music.
Remark : Due to ErP stage two requirement and protect the environment. The unit
will switch to standby mode automatically once no any music playing over 15
minutes.
3