Good Way Technology TD1110Z1 Z-Wave Window/Door Detector User Manual
Good Way Technology Co., Ltd. Z-Wave Window/Door Detector Users Manual
Users Manual
Z-Wave Window/Door Detector
User’s Manual
TD1110Z1
i
ABOUT THIS MANUAL
This manual is designed for use with the Z-Wave Window / Door Detector. Information in this
document has been carefully checked for accuracy; however, no guarantee is given to the
correctness of the contents. The information in this document is subject to change without notice.
The manufacturer does not make any representations or warranties (implied or otherwise)
regarding the accuracy and completeness of this document and shall in no event be liable for
any loss of profit or any commercial damage, including but not limited to special, incidental,
consequential, or other damage.
SAFETY INSTRUCTIONS
Always read the safety instructions carefully:
Keep this User’s Manual for future reference
Keep this equipment away from humidity
If any of the following situation arises, get the equipment checked by a service technician:
• The equipment has been exposed to moisture.
• The equipment has been dropped and damaged.
• The equipment has obvious sign of breakage.
• The equipment has not been working well or you cannot get it to work according to the
User’s Manual.
COPYRIGHT
This document contains proprietary information protected by copyright. All right are reserved. No
part of this manual may be reproduced by any mechanical, electronic or other means, in any
form, without prior written permission of the manufacturer.
TRADEMARKS
All trademarks and registered trademarks are the property of their respective owners or
companies.

a. for FCC 15b devices
b. FCC Part 15.21 information for user
c. for mobile devices without co-location condition ( the transmitting antenna is installed or
located more than 20cm away from the body of user and near by person )
FCC RF Radiation Exposure Statement:
1. This Transmitter must not be co-located or operating in conjunction with any other antenna or transmitter.
2. This equipment complies with FCC RF radiation exposure limits set forth for an uncontrolled environment. This equipment
should be installed and operated with a minimum distance of 20 centimeters between the radiator and your body.
This equipment has been tested and found to comply with the limits for a Class B digital device, pursuant to part 15 of the FCC
rules. These limits are designed to provide reasonable protection against harmful interference in a residential installation. This
equipment generates, uses and can radiate radio frequency energy and, if not installed and used in accordance with the
instructions, may cause harmful interference to radio communications. However, there is no guarantee that interference will not
occur in a particular installation. If this equipment does cause harmful interference to radio or television reception, which can be
determined by turning the equipment off and on, the user is encouraged to try to correct the interference by one or more of the
following measures:
-Reorient or relocate the receiving antenna.
-Increase the separation between the equipment and receiver.
-Connect the equipment into an outlet on a circuit different from that to which the receiver is connected.
-Consult the dealer or an experienced radio/TV technician for help.
You are cautioned that changes or modifications not expressly approved by the party responsible for compliance could void your
authority to operate the equipment.
ii
Table of Contents
1. Introduction............................................................................................................1
Features.............................................................................................................................2
Package Contents..............................................................................................................3
LED Indicator ...................................................................................................................3
Z-Wave..............................................................................................................................4
Wireless Range..................................................................................................................5
2. Installation..............................................................................................................6
Hardware Connection .......................................................................................................6
Product Description...........................................................................................................8
Installation Requirements ...............................................................................................14
Installing the Z-Wave Window / Door Detector .............................................................14
3. Specifications.......................................................................................................19
4. Regulatory Compliance.......................................................................................21
FCC Conditions ..............................................................................................................21
WEEE Information .........................................................................................................21
1
1. Introduction
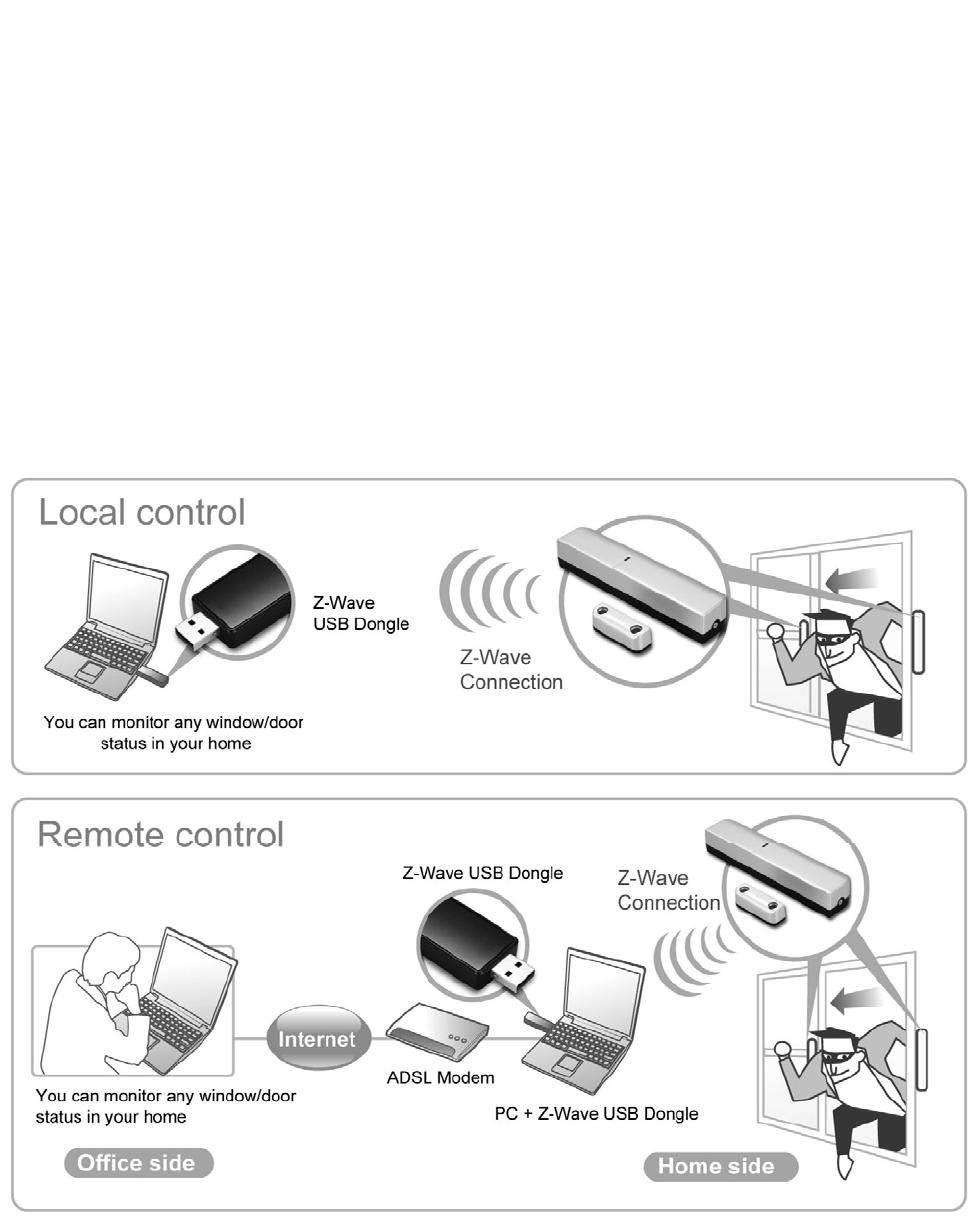
This detector enables you to detect when your window/door is opened or closed. This
detector allows you to assign lights or appliances to turn on and off when the attached
window/door is being opened or closed. You can monitor any window/door status in
your home through PC connectivity using a Z-wave USB dongle when you are away
from home.

2
Features
Simple plug and play installation.
Support device linking for triggering multiple devices to provide maximum
security.
Fully compatible with Z-wave enabled network, capable of communicating
with any Z-wave certified device
Package Contents
Z-Wave Window / Door Detector x1
1.5 V AAA battery x2
User’s Manual x1
LED Indicator
Color Description
Red Light : When the window or door is open.
Flash: When the window or door is open above 10
minutes, the LED will become flashing to remind user
close the window or door.
Green When the batteries of device is at low power position.
Z-Wave
Z-Wave is a state-of-the-art wireless technology used as a standard for wireless
home control. It is a next-generation wireless ecosystem that lets all your home
electronics talk to each other, and to you, via a controller or gateway. It uses
simple, reliable, low-power radio waves that easily travel through walls, floors and
cabinets. All products featuring the Z-Wave logo are certified to work with one
another.
3
Wireless Range
The Z-Wave Lamp Dimmer Switch is made wireless by Z-Wave technology.
Typical range for a wireless module is approximately 100 feet. When installing the
module consider an open area with little obstruction for the best signal and
performance. Avoiding the obstruction between the module and controller may
make a negative effect on wireless performance and range.
4
2. Installation
Hardware Connection
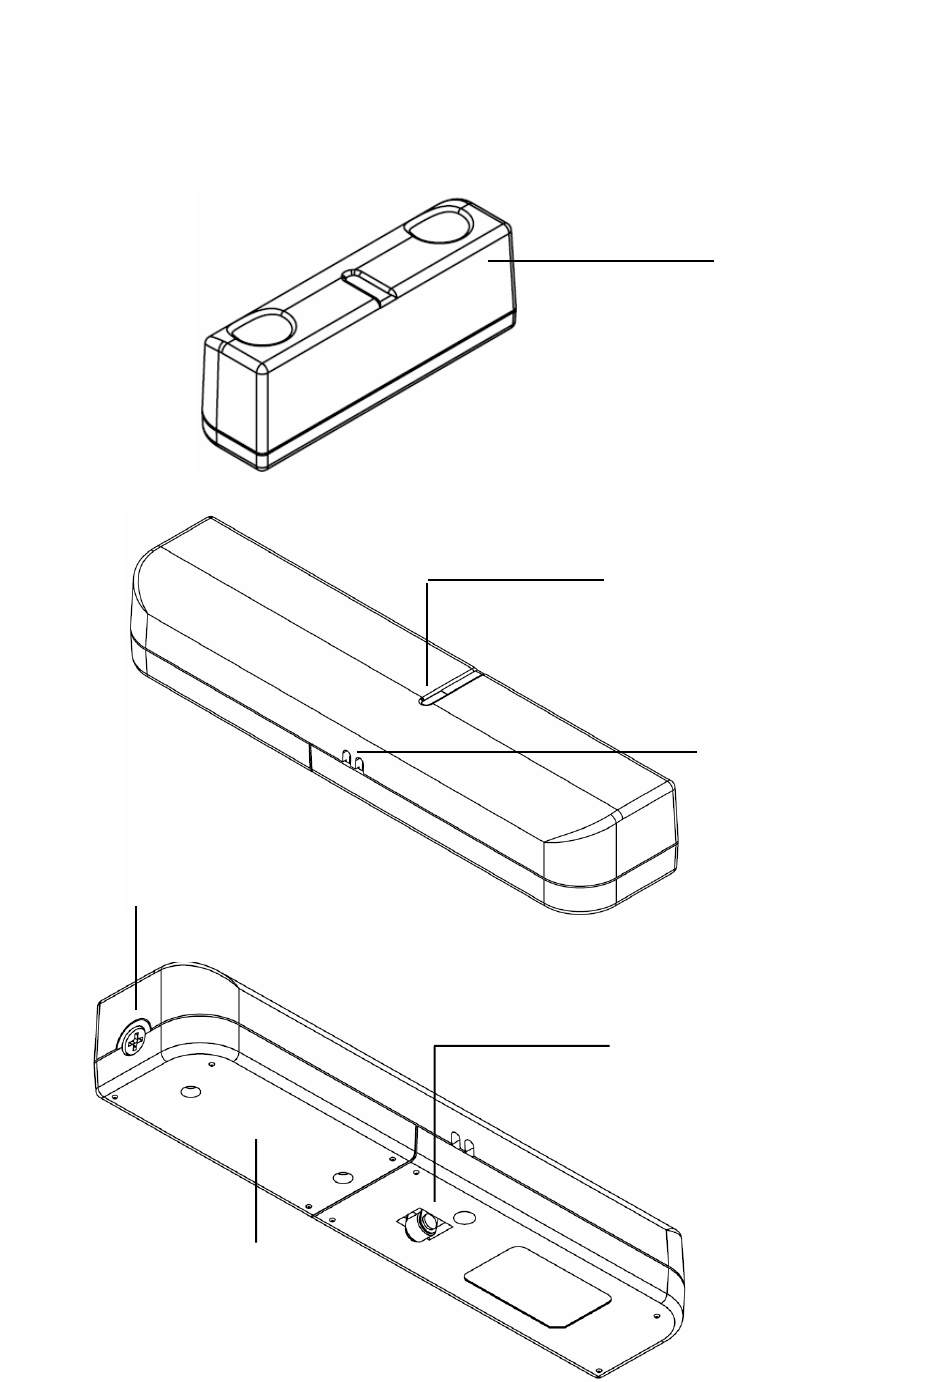
Battery Lid
Contact Magnet
LED
Program Button
Battery Lid Screw
Cable Conduit
5
Product Description
Below is a description of button, light and plugs for the Z-Wave Window / Door
Detector.
LED
The light will blink to indicate that the module has been entered “Program Mode”
or when it is communicating wirelessly to the Z-Wave controller, such as Z-Wave
Dongle.
Contact Magnet
The magnet is used to detect if the window or door are open. Magnetic contact is
placed next to the Window / Door Detector.
Program Button
Pressing this button down will put the Z-Wave Window / Door Detector into
“Program Mode”.
Battery Lid Screw
Located on the back of the Window / Door Detector, the battery lid is fastened by
the battery lid screw on the bottom of the unit. Remove this lid to install the
batteries for the Window / Door Detector.
6
Cable Conduit
This product provides extending switch function for user’s use. Please purchase
a normal on/off switch first and in order to maximize the utility and use of this
product, please take the following steps to install this additional function.
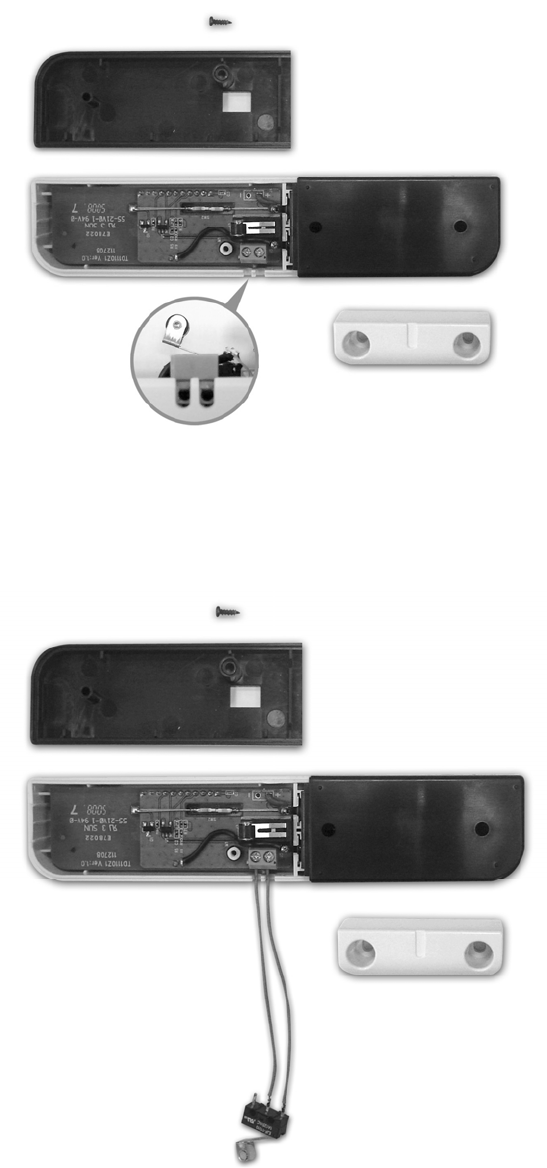
1. Please open the battery lid by prepared screwdriver. User can see two hole
beside this product clearly.
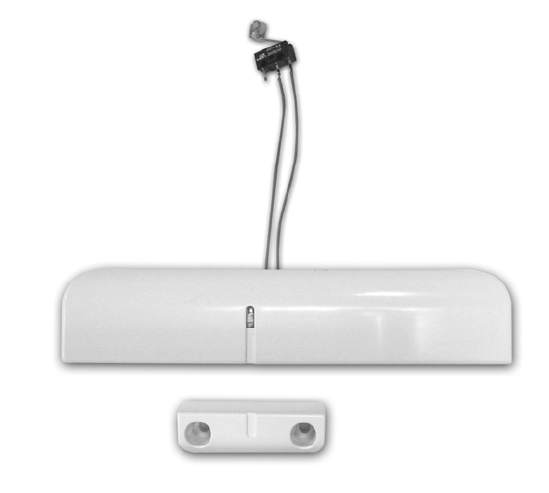
2. Now connect prepared normal switch to this two hole by screwdriver as
instruction.
7
3. Make sure the operation and status of LED indicator are working, please put
the battery lid back and ready to use.
8
Installation Requirements
To install this product you must have Z-Wave enabled controller, such as
Z-Wave Dongle, to make an association with Z-Wave Window / Door Detector.
Installing the Z-Wave Window / Door Detector
NOTE =======================================================
Before you install or use this Z-Wave Window / Door Detector, please install
your Z-Wave controller first and make an inclusion for your Z-Wave device. Not
all Z-Wave enabled remote controls have the same installation process. Actual
instructions may vary, it depends on the software that Z-Wave controller
provided.
============================================================
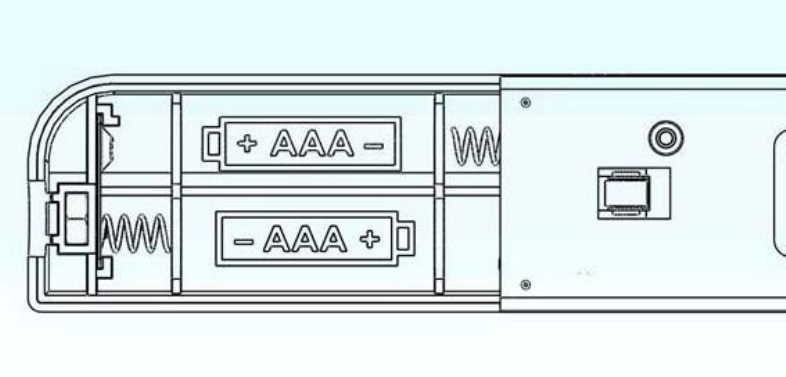
To install the batteries
1. Use your screwdriver to open the battery lid.
2. Slide the battery lid down and insert your 2*AAA batteries into the Z-Wave
Window / Door Detector according to the instructions in the battery
compartment.
3. Slide the batter lid back on the Z-Wave Window / Door Detector and fasten
the lid by using the screw.
9
To mount your Z-Wave device
The Z-Wave Window/Door Detector can be mounted on any location that
can be open or closed, such as closets, doors, windows, safes. The Z-Wave
Window/Door Detector can be mounted in two ways: Double Sided Tapor
Screws. These instructions will go over the screw mounting method.
1. Unscrew the Battery Lid from the Door/ Window Sensor and slide the lid off.
2. Use the screws that provided in the mounting kit to screw the lid onto your
desired location.
3. Slide the Z-Wave Window/Door Detector back on the lid and fasten the lid
back on the device.
4. Please make sure your window or door is closed. Use the remaining screws
to mount the contact magnet adjacent to the Z-Wave Window/Door Detector.
For best performance, please also make sure that there is as little space
between Z-Wave Window/Door Detector and the contact magnet as
possible.
Z-Wave Window/Door Detector enables you to make sure the safety of
anywhere you desire to control in door. When the window or door is open, the
LED will light red because of the detector can’t detect the contact magnet.
10
3. Specifications
Item Description
Protocol Z-Wave
Sensor Type Magnet
Power Mode Self Power
Power Battery 1.5V AAA size * 2
LED Indicator
(Dual color)
Low battery indicator : Battery indicator shows when the
battery voltage falls below at normal position
Red color : Door/Window open status
Green color : Low battery status.
Frequency 908.42MHZ( US)/ 868.24 MHZ(EU)
Operation Range Up to 100 feet (about 30m)
Data Rate 40kbps
Protection Indoor use
Working Environment
Operation temperature: 0 ~ 45 °C
Storage temperature: -10 ~ 80 °C
Dimensions (Lx W x H) Detector : 130x28x21.8mm
Contact Magnet : 45x14x12.7mm
Weights 75 g ( Contact Magnet included)
Housing Plastic
Flame Class Silver + black
Surface Processing Painting
Compliance FCC,
Specifications are subject to change without further notice

11
4. Regulatory Compliance
FCC Conditions
This device complies with Part 15 of the FCC Rules. Operation is subject to the following two conditions:
(1) this device may not cause harmful interference and
(2) this device must accept any interference received, including interference that may cause
undesired operation
WEEE Information
For EU (European Union) member users:
According to the WEEE (Waste electrical and electronic equipment) Directive,
do not dispose of this product as household waste or commercial waste. Waste
electrical and electronic equipment should be appropriately collected and
recycled as required by practices established for your country. For information
on recycling of this product, please contact your local authorities, your
household waste disposal service or the shop where you purchased the product.