Good Way Technology UB1200B1GW USB Bluetooth V2.0+EDR Dongle Class 2 User Manual UB1200B1 Manual
Good Way Technology Co., Ltd. USB Bluetooth V2.0+EDR Dongle Class 2 UB1200B1 Manual
User Manual
USB Bluetooth Dongle
User’s Manual
i
Copyright Statement
No part of this publication may be reproduced in any form by any means without the prior written
permission. Other trademarks or brand names mentioned herein are trademarks or registered
trademarks of their respective companies.
Disclaimer
Information in this document is subject to change without notice. The manufacturer does not make
any representations or warranties (implied or otherwise) regarding the accuracy and completeness
of this document and shall in no event be liable for any loss of profit or any commercial damage,
including but not limited to special, incidental, consequential, or other damage.
July 2006, Rev1.0
ii
Safety Instructions
Always read the safety instructions carefully
Keep this User’s Manual for future reference
Keep this equipment away from humidity
Lay this equipment on a reliable flat surface before setting it up
If any of the following situation arises, get the equipment checked by a service
technician:
• The equipment has been exposed to moisture.
• The equipment has been dropped and damaged.
• The equipment has obvious sign of breakage.
• The equipment has not been working well or you cannot get it work
according to User’s Manual.
iii
Table of Contents
1. Introduction .......................................................................................................5
2. Installation .........................................................................................................7
3. Basic Operations.............................................................................................10
Bluetooth Tray Icon ........................................................................................................ 10
Starting or Stopping Bluetooth........................................................................................ 10
Creating a Connection..................................................................................................... 11
Option 1. Use Quick Connect via the Bluetooth Icon .............................................................11
Option 2. Use the Bluetooth Setup Wizard..............................................................................12
Option 3. From the Entire Bluetooth Neighborhood ...............................................................12
4. Configuring Your Bluetooth ...........................................................................14
General Settings .............................................................................................................. 14
Accessibility Settings...................................................................................................... 15
Allow Other Devices to Discover this Computer ....................................................................15
Control the Types of Devices that are Allowed to Connect to this Computer .........................15
Choose an Audio Notification File ..........................................................................................15
Discovery Settings .......................................................................................................... 16
Periodic Search for Devices.....................................................................................................16
Determine the Devices that Will be Reported .........................................................................17
Local Services Settings ................................................................................................... 17
Client Applications.......................................................................................................... 18
Diagnostics...................................................................................................................... 18
5. Using Bluetooth Applications ........................................................................20
Printer.............................................................................................................................. 20
Configure .................................................................................................................................20
Install a Bluetooth Printer........................................................................................................20
Delete a Printer ........................................................................................................................21
Imaging ........................................................................................................................... 21
Overview .................................................................................................................................21
Image Format Conversion .......................................................................................................22
Create an Imaging Connection ................................................................................................22
Close an Imaging Connection..................................................................................................22
Configure .................................................................................................................................22
Remote Camera Operation ......................................................................................................23
Install an Imaging Device........................................................................................................23
iv
Uninstall an Imaging Device ...................................................................................................23
Audio Gateway ............................................................................................................... 23
Overview .................................................................................................................................23
Create an Audio Gateway Connection.....................................................................................24
Close an Audio Gateway Connection ......................................................................................24
Configure .................................................................................................................................24
Headset............................................................................................................................ 24
Overview .................................................................................................................................24
Create a Headset Connection...................................................................................................25
Close a Headset Connection ....................................................................................................25
Configure .................................................................................................................................25
PIM Synchronization ...................................................................................................... 26
Configure PIM Synchronization..............................................................................................26
Fax................................................................................................................................... 27
Overview .................................................................................................................................27
Close a Fax Connection ...........................................................................................................28
Configure .................................................................................................................................28
File Transfer .................................................................................................................... 28
Copy To/From a Remote Device .............................................................................................28
Other File Operations ..............................................................................................................28
Configure .................................................................................................................................29
PIM Item Transfer........................................................................................................... 29
Close a PIM Item Transfer Connection ...................................................................................31
Configure PIM Item Transfer ..................................................................................................31
Dial-up Networking ........................................................................................................ 32
Close a Dial-up Networking Connection.................................................................................32
Configure .................................................................................................................................32
Network Access............................................................................................................... 33
Create a Network Access Connection......................................................................................33
Close a Network Access Connection .......................................................................................33
Configure .................................................................................................................................33
Bluetooth Serial Port....................................................................................................... 34
Create a Bluetooth Serial Port Connection ..............................................................................34
Close a Bluetooth Serial Port Connection ...............................................................................34
Configure .................................................................................................................................34
6. FCC Compliance and Advisory Statement....................................................36

1. Introduction
5
1. Introduction
This Bluetooth USB Adapter adds Bluetooth technology to your existing USB PC or
notebook. Simply plug it into the USB port of your machine for seamless
connectivity with other Bluetooth devices.
The Bluetooth® wireless technology provides short-range wireless
communications that replace the physical cable connections that traditionally link
electronic devices.
• Network access points
• Computers (desktop, notebook, PDA, etc.)
• Imaging devices (printer, camera)
• Audio devices (headset, speakers)
Bluetooth wireless technology also enables communication between the above
devices and Bluetooth enabled phones (example: cellular, cordless, smart phones).
The Bluetooth for Windows software consists of the following components:
• Microsoft® Windows® Explorer Extensions - provides access to Bluetooth
devices in the immediate vicinity using Windows Explorer.
• My Bluetooth Places - graphical user interface (GUI) that provides access to
Bluetooth devices in the immediate vicinity. Also provides access to configure the
local devices and access to perform other Bluetooth tasks.
• BTTray Security Manager - controls and manages Bluetooth security levels.
Enables user to grant or deny access and to filter what can be accessed on a
Bluetooth device.
• Bluetooth for Windows Configuration Panel - configures Bluetooth for Windows
(BTW) software using Windows Control Panel.
• Stack Server - provides an interface for the operating system to control Bluetooth
devices and to ensure that Bluetooth connections operate together correctly. The

USB Bluetooth Dongle User’s Manual
6
stack server has a built-in Security Manager that protects the Bluetooth device from
unauthorized access.
• Bluetooth Setup wizard - facilitates the configuration and modification of
Bluetooth environment. The wizard can be used to configure or change local
services or to establish connections to remote devices based on service type or
device type.
• Quick Connect - facilitates fast connections based on service type. Enables user
to quickly find devices that support a particular service and establish a connection
to that service. During this process, a shortcut to the service is created in My
Bluetooth Places, which can be used for subsequent connections.
FCC RF Radiation Exposure Statement
This equipment complies with FCC RF radiation exposure limits set forth for an
uncontrolled environment.
This equipment must not be co-located or operating in conjunction with any other antenna
or transmitter.
2. Installation
7
2. Installation
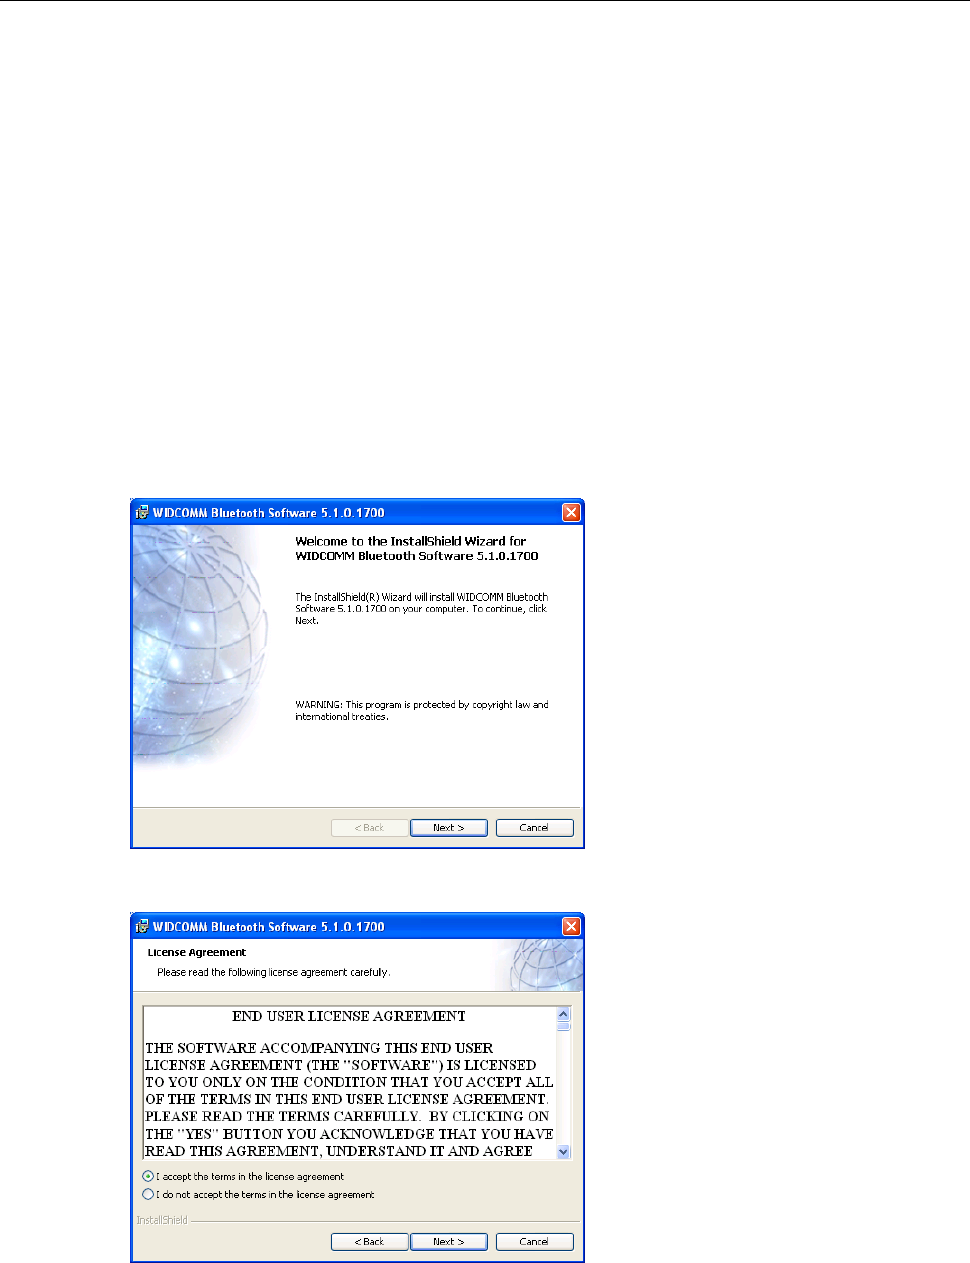
1. Insert the Bluetooth software installation CD into the CD drive of your computer.
The setup program will start automatically. If not, locate and double-click the
Setup.exe file in Software folder to launch the setup program.
2. When the welcome screen appears, click Next.
3. Select I accept the terms in the license agreement and click Next.
4. You can select to install the program in default directory or click Change to
specify another directory. After specifying the location, click Next.
USB Bluetooth Dongle User’s Manual
8
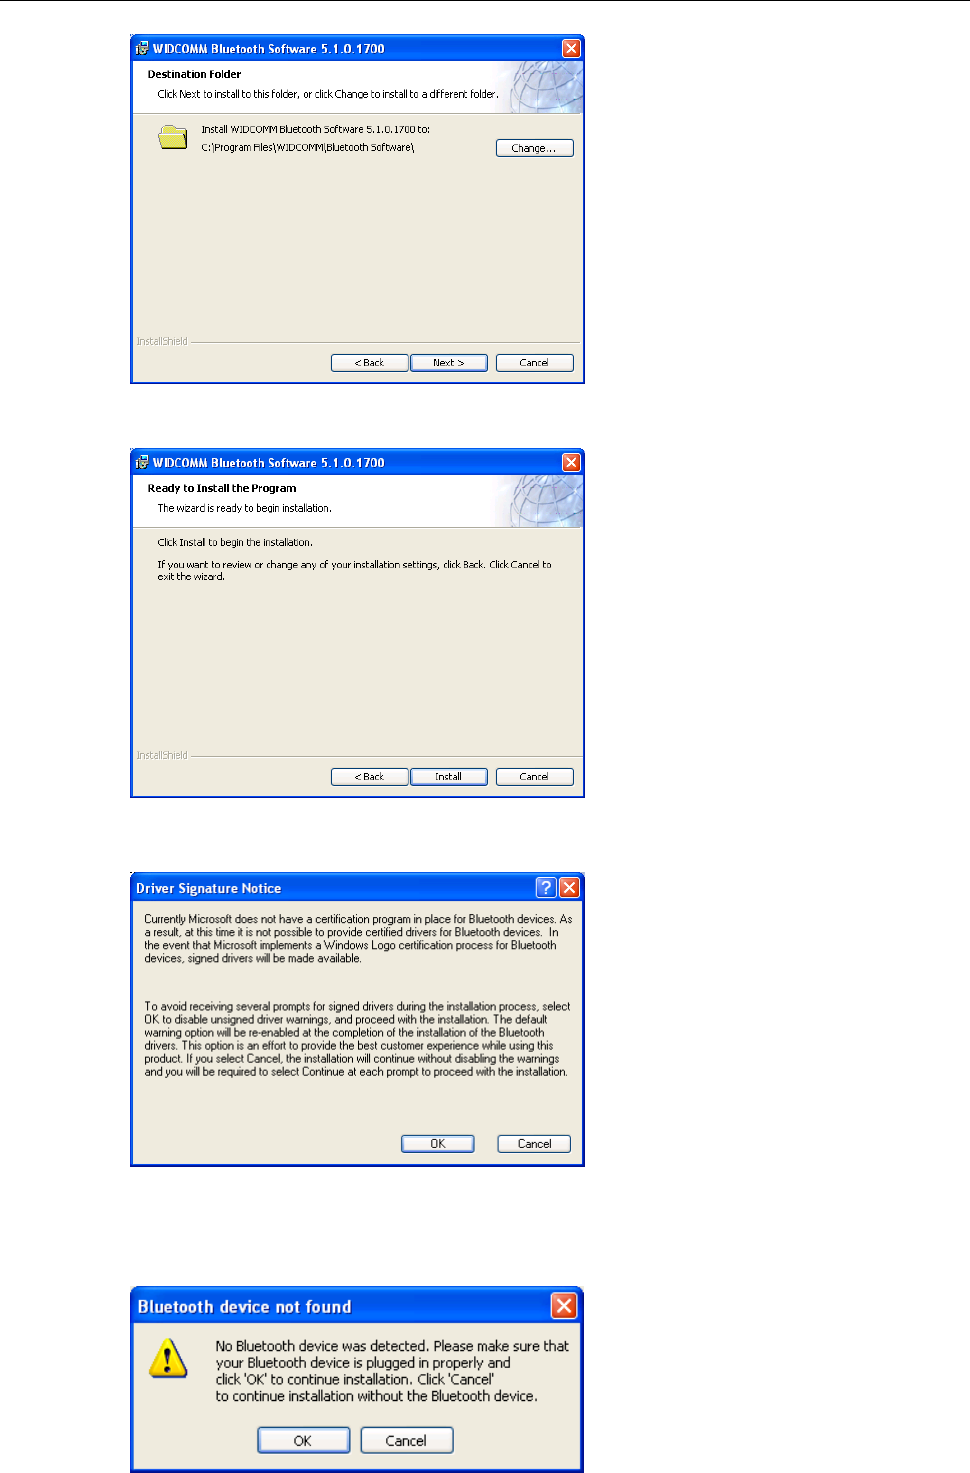
5. Click Install to begin the installation.
6. When the Driver Signature Notice window appears, click OK.
7. When prompted, plug your Bluetooth dongle to your computer and then click
OK.
2. Installation
9
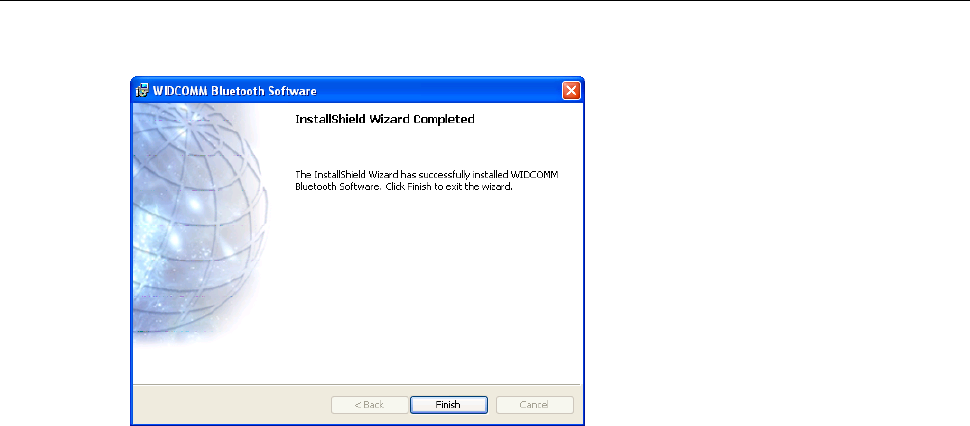
8. Click Finish to complete the installation.
USB Bluetooth Dongle User’s Manual
10
3. Basic Operations
Bluetooth Tray Icon
The Bluetooth icon in the notification area, at the far right of the taskbar provides
feedback about Bluetooth status as described in the table below.
Icon Status
Bluetooth dongle found and enabled.
Bluetooth dongle not found or disabled.
Connected to a service.
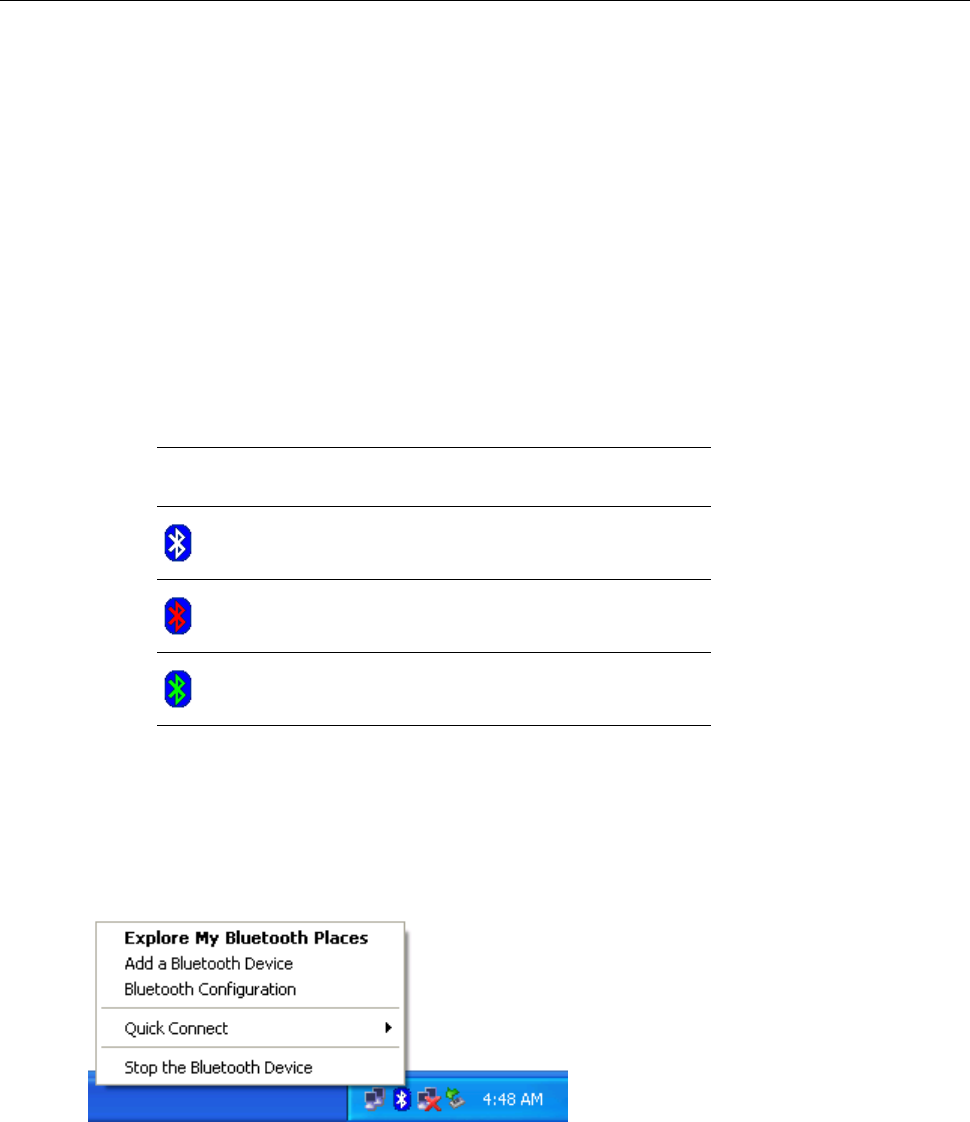
The Bluetooth tray also provides fast access to most Bluetooth operations. You can
double-click it to access My Bluetooth Places or right-click it to pop up the
shortcut menu and access the provided functions.
Starting or Stopping Bluetooth
To start Bluetooth - Right-click the Bluetooth icon and select Start the Bluetooth
Device. The Bluetooth icon is blue in color with a white insert when Bluetooth is
running.
To stop Bluetooth - Right-click the Bluetooth icon and select Stop the Bluetooth
Device.
3. Basic Operations
11
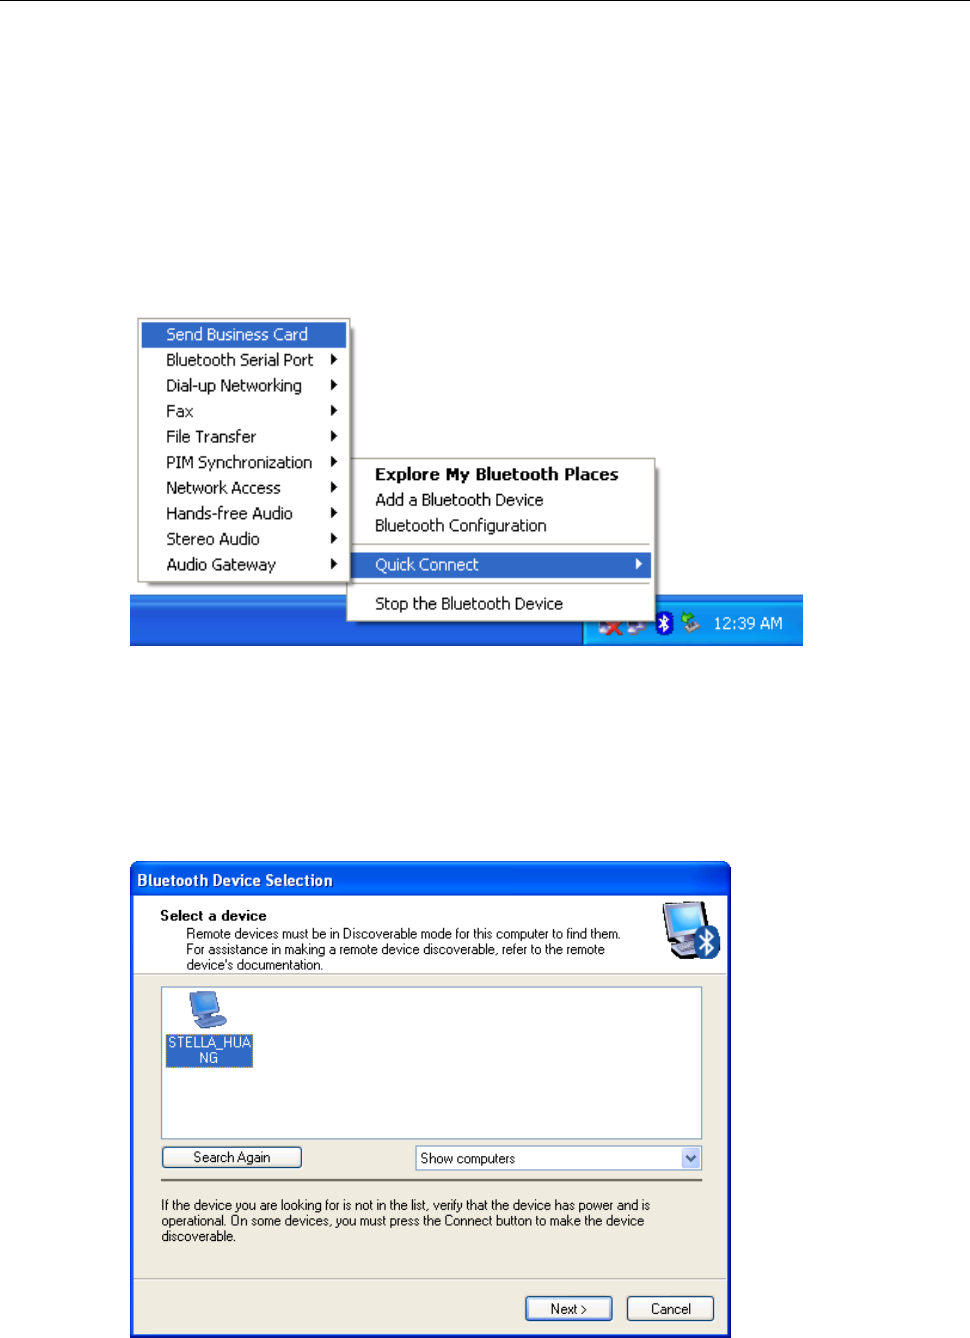
Creating a Connection
Option 1. Use Quick Connect via the Bluetooth Icon
Right-click the Bluetooth icon in the system tray and select Quick Connect and
then select the desired Bluetooth service.
If selected service is never connected:
1. Select Find Devices on the shortcut menu.
2. The utility will search for devices that potentially provide the desired service.
Highlight the desired one and click Next.
3. The succeeding steps vary according to the service you selected. Just follow
the on-screen prompts to proceed.

USB Bluetooth Dongle User’s Manual
12
If selected service has been connected in the past:
The options on the shortcut menu are:
The name(s) of any device(s) with which prior connections to this type of
service have been established. Select a name from the list to re-establish the
connection.
Other Devices - select this option to search for additional devices that
potentially provide the desired service, select a device from the list, and then
click Next to proceed.
Option 2. Use the Bluetooth Setup Wizard
You can open the setup wizard by either of these methods:
Right-click the Bluetooth icon and select Add a Bluetooth Device
Double-click the Bluetooth icon to open My Bluetooth Places and select Add
a Bluetooth Device.
When the wizard window pops up, follow the on-screen instructions to proceed:
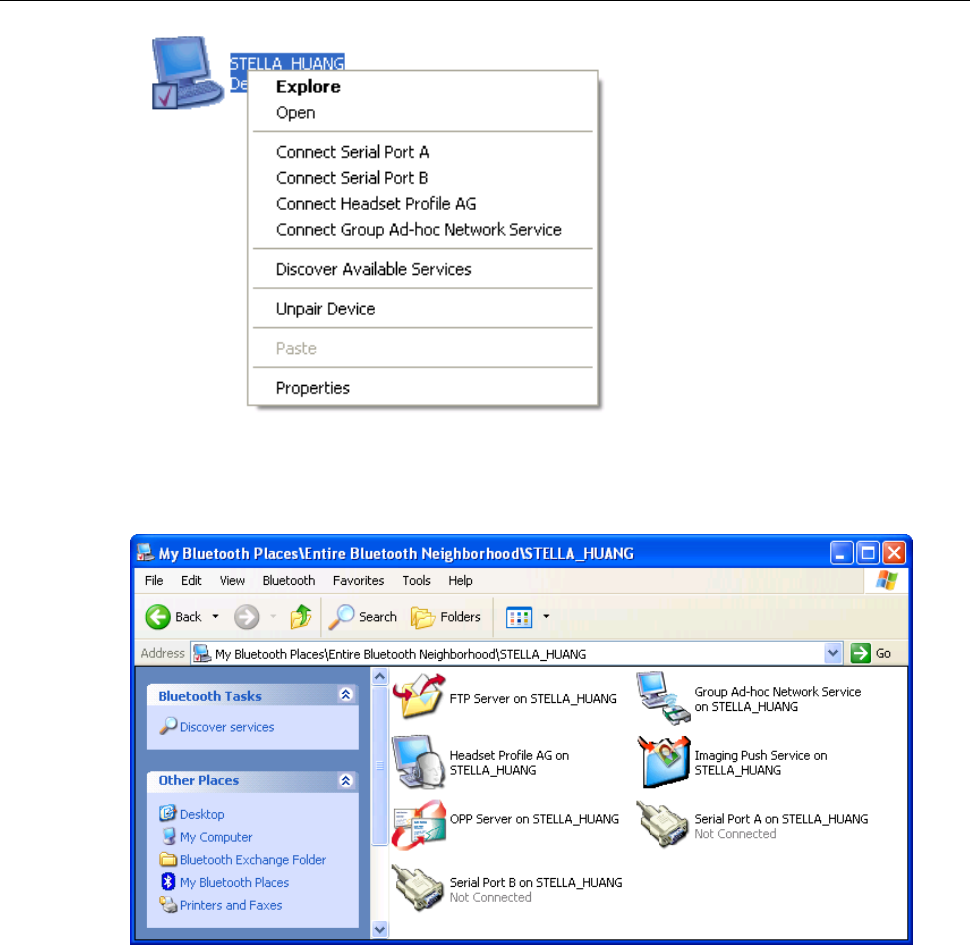
Option 3. From the Entire Bluetooth Neighborhood
1. Right-click the Bluetooth icon and select View Devices in Range in the left
pane of My Bluetooth Places.
2. Available Bluetooth devices should appear in the right pane. If not, click Search
for devices in range to start searching.
3. Right-click a desired Bluetooth device.
If a prior service discovery was performed on the selected device, the services
that were found will be listed in the device’s shortcut menu. You may just select
to connect that service.
If the selected device has added or reconfigured a service, or if the desired
service is not an option in the shortcut menu, select the Discover Available
Services option to update the list of services offered by the device.
3. Basic Operations
13
4. Available services will be displayed. Just double-click the service to make the
connection.
USB Bluetooth Dongle User’s Manual
14
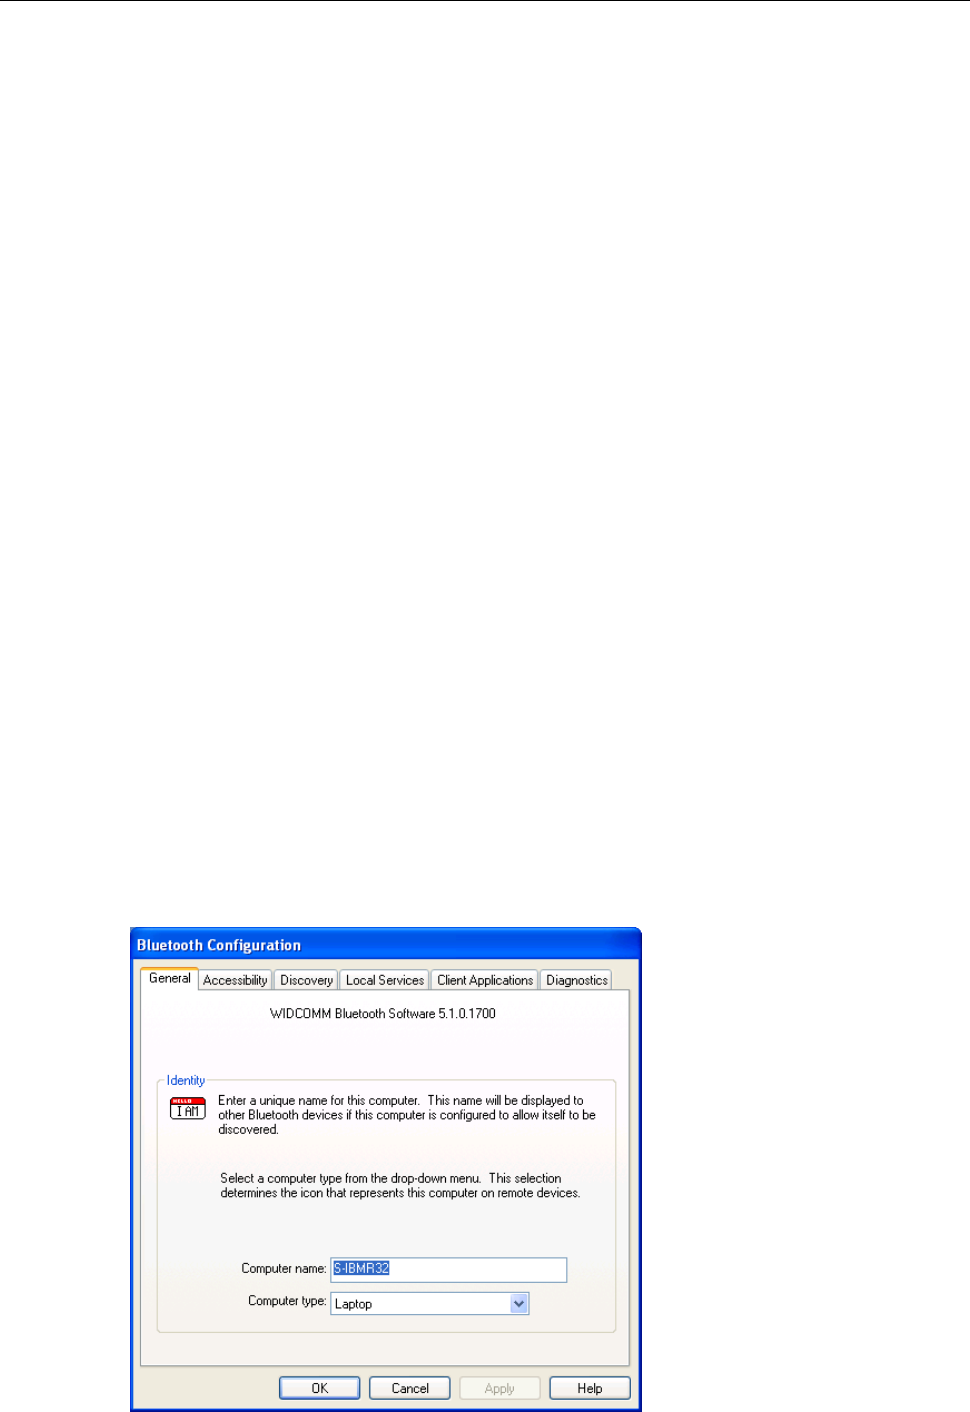
4. Configuring Your Bluetooth
The Bluetooth Configuration Panel provides access to settings for Bluetooth
services, client applications, hardware, security, discovery, accessibility, default
paths, event notification, and other Bluetooth related items.
You can open the Bluetooth configuration panel by either of the following ways:
Right-click the Bluetooth tray icon and select Bluetooth Configuration.
Double-click the Bluetooth tray icon to open My Bluetooth Places and select
View or modify configuration.
General Settings
The settings on the General tab determine information that is displayed to remote
devices.
Computer name - enter a unique name to identify this computer to other
Bluetooth devices in the vicinity; this field cannot be left blank.
Computer type - select either Desktop or Laptop from the shortcut menu to
set the type of icon remote devices will use to represent this computer.

4. Configuring Your Bluetooth
15
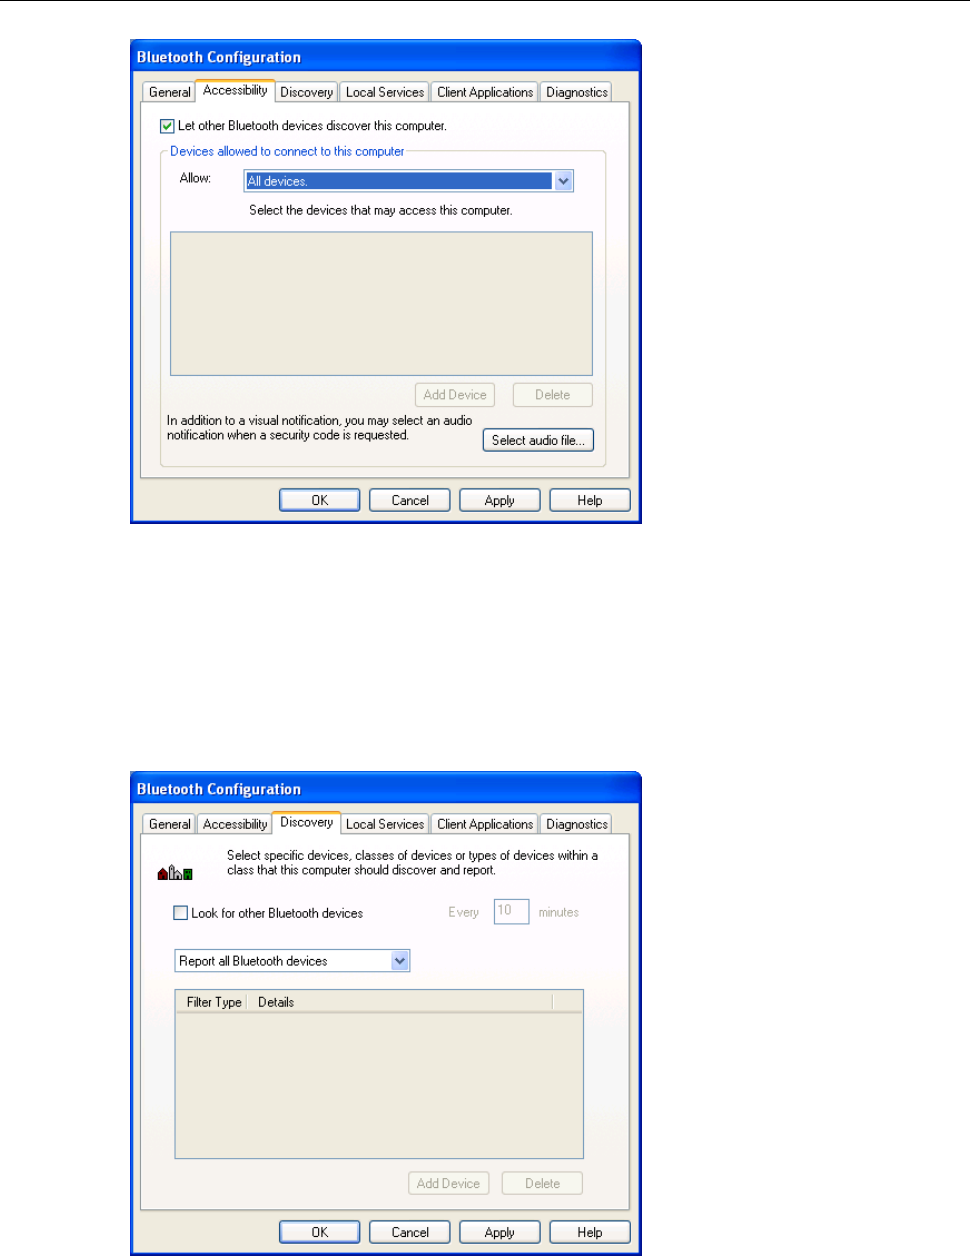
Accessibility Settings
The Accessibility tab lets you specify whether remote devices may access this
computer, which remote devices have access, and whether an audio warning is
played when a Personal Identification Number (PIN code) is required.
Allow Other Devices to Discover this Computer
Select Let other Bluetooth devices discover this computer to permit remote
Bluetooth devices to find and report this computer. If Allow No devices (below) is
selected, this option is not available.
Control the Types of Devices that are Allowed to Connect to
this Computer
From the Devices allowed to connect to this computer menu, select:
No devices - no remote devices are permitted to initiate a connection with this
computer. However, this computer can still initiate connections with remote
Bluetooth devices.
All devices - all remote devices are permitted to connect to this computer.
Connections are subject to additional security restrictions, such as
authentication and authorization, which may be required by the individual
services provided by this computer.
Only devices listed below - only the listed devices are allowed to connect to
this computer. Use Add Device and Delete buttons to edit the list.
Choose an Audio Notification File
When Secure Connection is enabled for any of the Bluetooth services on this
computer, a PIN code is required before that service can be accessed. To chose a
notification sound that will play when a remote device attempts to access a service
that requires a secure connection, click Select audio file and select the sound
(*.wav) file to be played.
USB Bluetooth Dongle User’s Manual
16
Discovery Settings
The Discovery tab determines whether this computer looks for other Bluetooth
devices automatically, how often it looks for devices, and what type of devices it
looks for.
Periodic Search for Devices
When Look for other Bluetooth devices is selected, Bluetooth automatically
searches for devices every X minutes. X is a whole number between 1 and 60.
4. Configuring Your Bluetooth
17
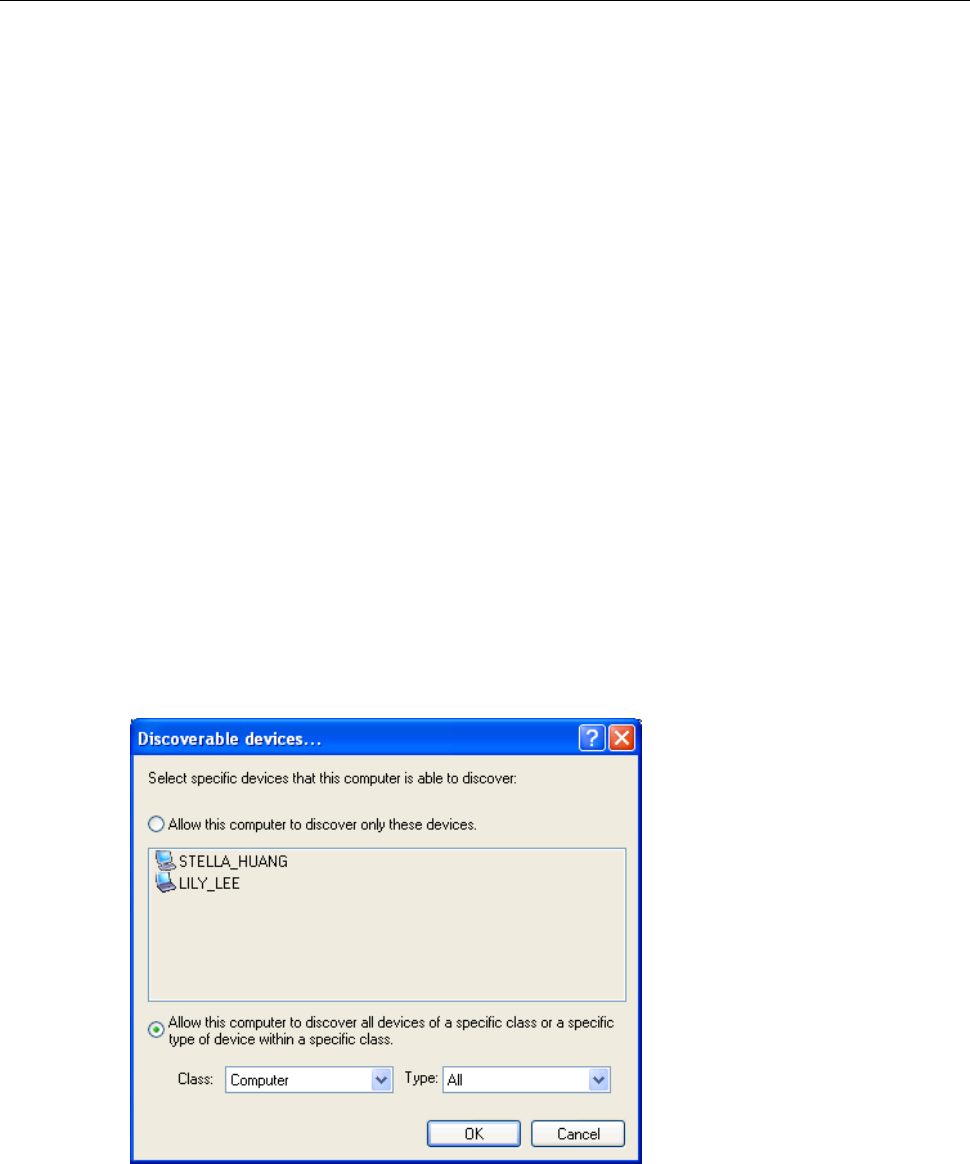
Determine the Devices that Will be Reported
By default, this computer will discover and report all the Bluetooth services.
Bluetooth can be configured to report only specific devices, specific classes of
device, or specific types of device within a class.
To do this, select Report only selected Bluetooth devices from the drop-down list
and click Add Device.
At the Discoverable devices… window, you can limit the remote devices reported.
Specific devices - an individual computer or Bluetooth cellular telephone are
examples of specific devices.
Specific class of device - computer is an example of a class of devices.
Specific type of device within a class - laptop is an example of a specific type
of device within the computer class of devices.
The devices to be discovered can be mixed and matched; you can discover one or
more specific devices, classes of devices and types of devices within a class at the
same time.
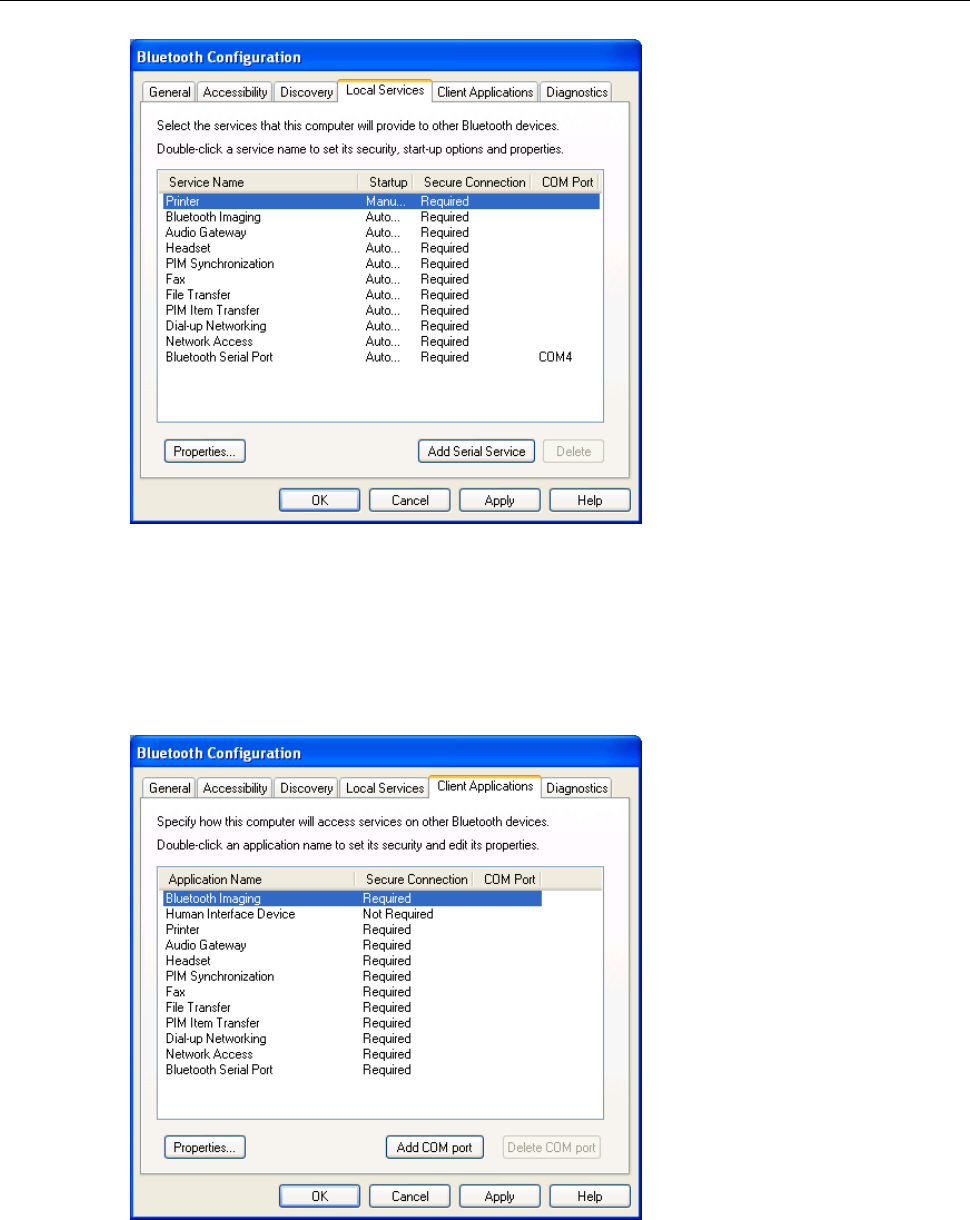
Local Services Settings
This tab allows you to select the services that your computer will provide to other
Bluetooth devices. You can also double-click a service name to set its properties or
click Add Serial Service to add serial service.
USB Bluetooth Dongle User’s Manual
18
Client Applications
This tab specifies how your computer will access services on other Bluetooth
devices.
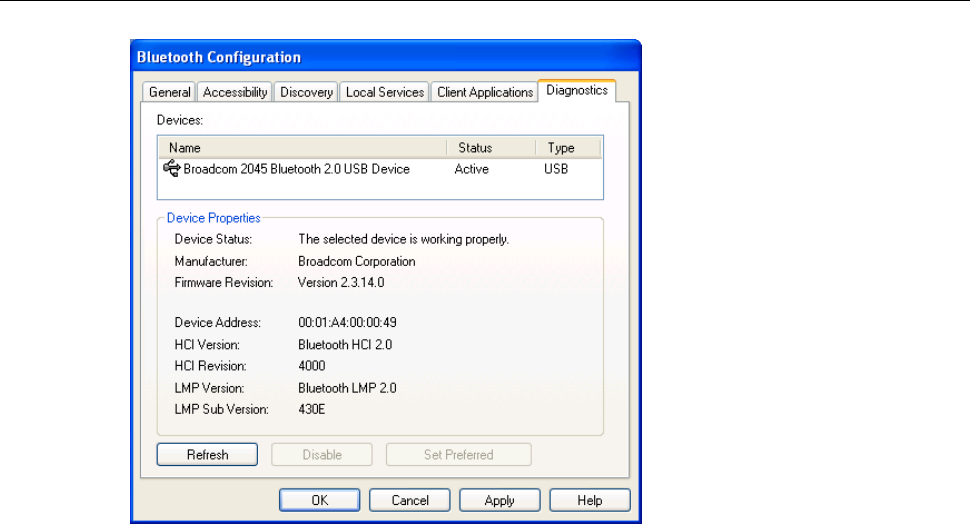
Diagnostics
This tab allows you to refresh the Bluetooth dongle hardware information, disable
the dongle and set the dongle as the preferred Bluetooth device on your computer.
4. Configuring Your Bluetooth
19

USB Bluetooth Dongle User’s Manual
20
5. Using Bluetooth Applications
Printer
The Bluetooth Printer application allows this computer to use a Bluetooth printer.
Once a Bluetooth printer has been properly installed, it can be used from this
computer in the same way as any other printer would be.
Configure
The Bluetooth Configuration Panel > Client Applications > Printer > General tab
provides options to configure:
• The application name - to change it, highlight the existing name and enter the
new name.
• Enable or disable secure connection - to enable secure connection, place a
checkmark in the box.
Install a Bluetooth Printer
Option One:
1. Perform a search for devices and then, from Entire Bluetooth Neighborhood,
right-click a Bluetooth printer, select Add Printer from the shortcut menu and follow
the on-screen instructions.
2. Select the printer make and model at the prompt. If your printer is not in the list of
options, click Have Disk…, insert the driver disk for the printer, and then navigate to
the drive and directory that contains the driver initiation file (*.inf) for the printer.
3. Follow the on-screen instructions to complete the installation.
Option Two:
1. From the Windows Control Panel, select Printers > Add Printer > Next > Local
printer > Next.

5. Using Bluetooth Applications
21
2. On the Select the Printer Port window of the wizard:
• Select Create a new port.
• In the Type shortcut menu, select Bluetooth Printer Port, and then click Next.
3. On the next screen, select the printer by name, and then click Connect.
4. Install the driver: Select the printer make and model at the prompt. If your printer
is not in the list of options, click Have Disk…, insert the driver disk for the printer,
and then navigate to the drive and directory that contain the driver initiation file (*.inf)
for the printer.
5. Follow the on-screen instructions to complete the installation.
Delete a Printer
Click Start > Settings > Printers, right-click the printer to be deleted, and then select
Delete from the shortcut menu.
or
In Entire Bluetooth Neighborhood, right-click an installed Bluetooth printer and
select Delete Printer from the shortcut menu.
Imaging
Overview
The Bluetooth Imaging application allows this computer to send images to remote
devices that provide the Bluetooth imaging service.
Possible uses include the transfer of images to a Bluetooth camera, camera/phone,
or any other device that offers the Bluetooth Imaging service. The supported image
formats are:
• BMP
• GIF
• PNG
• JPG

USB Bluetooth Dongle User’s Manual
22
Image Format Conversion
Some devices, particularly battery-powered devices such as phones and cameras,
may only be able to accept images in one format and at a single fixed resolution. In
that case, the image is converted to the required format and resolution before it is
transferred to the remote device.
Create an Imaging Connection
Imaging application connections are created automatically on an as-needed basis.
To send an image to the remote imaging device:
• In Entire Bluetooth Neighborhood, drag and drop the image file onto the
destination’s device icon.
• In Windows Explorer, right-click an image file and, from the shortcut menu, select
Copy. Then, in Entire Bluetooth Neighborhood, right-click the destination
device, and, from the shortcut menu, select Paste.
• If a shortcut to the remote device’s imaging service exists in My Bluetooth Places,
drag and drop, or, copy and paste, to that shortcut.
Note: Battery-powered remote devices, such as a cell phones or cameras, may
require that Bluetooth be specifically enabled before they can accept an image;
see the battery-powered device’s documentation for more information.
Close an Imaging Connection
Imaging connections close automatically when the image transfer is complete. To
abort the image transfer, click Cancel in the transfer dialog box.
Configure
The Bluetooth Configuration Panel > Client Applications > Imaging > General tab
provides options to configure:
• The application name - to change it, highlight the existing name and enter the
new name.
• Secure connection - to enable secure connection, select the option box. To
disable secure connection, clear the option box.

5. Using Bluetooth Applications
23
Remote Camera Operation
Remote operation of the Bluetooth imaging device, such as the ability to trip a
camera’s shutter or browse the images on a device, may be possible, depending
on the functions supported by the remote device.
There are three prerequisites:
• This computer must be running under the Windows XP operating system.
• The remote imaging device must support the action. See the remote imaging
device’s documentation for information about the remote functions the device
supports.
• The remote imaging device must be installed on this computer (see below).
Install an Imaging Device
Perform a search for devices and then, from Entire Bluetooth Neighborhood,
right-click a Bluetooth imaging device, and select Add Camera from the shortcut
menu.
Windows installs the camera and adds it to the Cameras and Scanners section of
My Computer.
Uninstall an Imaging Device
In Entire Bluetooth Neighborhood, right-click an installed Imaging device and then
select Delete Camera from the shortcut menu.
Note: Only Windows XP can install an imaging device; previous operating systems
do not have native support for this option.
Audio Gateway
Overview
The Audio Gateway Application allows a remote Bluetooth device to use this
computer’s microphone and speakers as the remote device’s audio input and
output devices.

USB Bluetooth Dongle User’s Manual
24
Create an Audio Gateway Connection
Open a connection to the Audio Gateway service that is provided by another
Bluetooth device using one of these techniques:
• Notification area, at the far right of the taskbar, Bluetooth icon
• From My Bluetooth Places
• Using the Bluetooth Setup wizard
Close an Audio Gateway Connection
If the connection was established from the Bluetooth icon in the Notification area, at
the far right of the taskbar; click the Bluetooth icon, select Quick Connect, Audio
Gateway and then select the device that is providing the service (active
connections have a checkmark in front of them).
or
No matter how the connection was created, in My Bluetooth Places, right-click the
service name and select Disconnect.
Configure
The Bluetooth Configuration Panel > Client Applications > Audio Gateway >
General tab provides options to configure:
• The application name - to change it, highlight the existing name and enter the
new name.
• Secure connection - to enable secure connection, select the option box. To
disable secure connection, clear the option box.
Headset
Overview
The Headset application allows this computer to use a Bluetooth headset (or any
other device that offers the Bluetooth headset service) as the audio input and
output device for this computer.

5. Using Bluetooth Applications
25
Possible uses include:
• If this computer has on-board telephone hardware, a Bluetooth headset might be
used as the audio input/output device to make/receive telephone calls.
• If this computer has voice recognition capabilities, a Bluetooth headset might be
used as the audio input device.
• If this computer has high quality audio capabilities, a Bluetooth stereo headset
might be used to listen to the output.
• Any other scenario that requires audio input/output can potentially take
advantage of a Bluetooth headset to replace a hardwired microphone and/or
speakers.
Create a Headset Connection
Establish a connection using one of these techniques:
• Notification area, at the far right of the taskbar, Bluetooth icon.
• From My Bluetooth Places.
• Using the Bluetooth Setup Wizard.
Close a Headset Connection
• In My Bluetooth Places, right-click the service name and select Disconnect.
• If the connection was established from the Bluetooth icon in the notification area,
at the far right of the taskbar: click the Bluetooth icon, select Quick Connect,
Headset and then select the device that is providing the service (active connections
have a checkmark in front of them).
Note: This topic also applies to high quality audio.
Note: Most Bluetooth headsets ring when a connection is attempted; answer the
ring to complete the connection and begin using the headset as the audio
input/output device for this computer.
Configure
The Bluetooth Configuration Panel > Client Applications > Headset > General tab
provides options to configure:

USB Bluetooth Dongle User’s Manual
26
• The application name - to change it, highlight the existing name and enter the
new name.
• Secure connection - to enable secure connection, select the option box. To
disable secure connection, clear the option box.
PIM Synchronization
The PIM Synchronization Application is used to synchronize the Personal
Information Manager (PIM) database of this computer with the PIM database of a
remote Bluetooth device. The supported PIMs are:
• Microsoft Outlook
• Microsoft Outlook Express
• Lotus Notes
The supported data types are:
• Business cards
• Calendar items
• Email (with or without attachments)
• Notes
Configure PIM Synchronization
The Bluetooth Configuration Panel > Client Applications > PIM Synchronization >
General tab provides options to configure:
• The application name - to change it, highlight the existing name and enter the
new name.
• Secure connection - to enable secure connection, select the option box. To
disable secure connection, clear the option box.
• The PIM items to be synchronized and the PIM on this computer with which
those items should be synced.
The data item types that can be synchronized are:
• Business cards
• Calendar items

5. Using Bluetooth Applications
27
• Email (with or without attachments-see below)
• Notes
Possible synchronization options for each of these data item types include:
• Do Not Synchronize - this item type will not be synchronized.
• Synchronize Microsoft Outlook - this item type will be synchronized with its
matching entry in Microsoft Outlook, regardless of the PIM that contains this entry
on the remote device. If a matching Outlook entry does not exist, it will be created.
• Synchronize Outlook Express - this item type will be synced with its matching
entry in Express, regardless of the PIM that contains this entry on the remote
device. If a matching Express entry does not exist, it will be created.
• Synchronize Lotus Notes - this item type will be synced with its matching entry in
Lotus Notes, regardless of the PIM that contains this entry on the remote device. If
a matching Notes entry does not exist, it will be created.
• Email attachments - the only option is to include or not to include attachments
with email that is sent or received on this computer using this service.
Fax
Overview
The Bluetooth Fax service allows this computer to send a fax using a Fax/Modem
that is physically connected to a remote device. To send a Fax:
1. Open a connection to the Fax service that is provided by another Bluetooth
device, using one of these techniques:
• Notification area, at the far right of the taskbar, Bluetooth icon
• From My Bluetooth Places
• Using the Bluetooth Setup Wizard
2. Open or create the document to be faxed, and then select the Print, Send to Fax
Recipient or a similar command that is available in most applications.
Note: The fax application needs to use the Bluetooth Fax Modem.

USB Bluetooth Dongle User’s Manual
28
Close a Fax Connection
Fax connections close automatically when the Fax transmission is complete.
Configure
The Bluetooth Configuration Panel > Client Applications > Fax > General tab
provides options to configure:
• The application name - to change it, highlight the existing name and enter the
new name.
• Secure connection - to enable secure connection, select the option box. To
disable secure connection, clear the option box.
File Transfer
The Bluetooth File Transfer application allows this computer to perform file
operations on the Bluetooth exchange folder (and the folders and files it contains)
of a remote device.
Copy To/From a Remote Device
1. In the Folders pane of Windows Explorer, from the Entire Bluetooth
Neighborhood branch, select a device and expand that branch to view the File
Transfer folder of the remote device.
2. Use drag-and-drop to copy any file or folder contained in the file transfer folder of
the remote device to the desired folder on this computer.
You can also drag-and-drop files or folders from this computer to the file transfer
folder (and its sub-folders) on the remote device.
Other File Operations
Right-click a file or folder in the remote device’s file transfer folder for a context
sensitive menu. All potential menu options may not be available at all times.
Potential menu options include:
• Open - opens the selected file on this computer, using the default application for
this type of file.

5. Using Bluetooth Applications
29
• Print - sends the selected file to this computer’s default printer.
• Send To
• 3 ½ floppy (A) - sends the selected file to the 3 ½ inch diskette drive on this
computer
• Bluetooth Exchange Folder - sends the selected file to the Bluetooth exchange
folder on this computer.
• Rename - applies only to empty folders; file names and the names of folders that
contain objects cannot be changed using this technique.
• Cut, Copy, Paste, Delete, Refresh, View, and New - standard Windows functions.
Configure
The Bluetooth Configuration Panel > Client Applications > File Transfer > General
tab provides options to configure:
• The application name - to change it, highlight the existing name and enter the
new name.
• Secure connection - to enable secure connection, select the option box. To
disable secure connection, clear the option box.
Note: If File Transfer is not available, the remote device is not configured to allow
remote file operations.
PIM Item Transfer
The Bluetooth PIM Item Transfer application allows this computer to send and
receive Personal Information
Manager items to and from a remote Bluetooth device.
The supported items are:
• Business cards (*.vcf or *.vcd)
• Notes (*.vnt)
• Email (*.vmg)
• Calendar (*.vcs)

USB Bluetooth Dongle User’s Manual
30
• Other Types (refer to “Configure Bluetooth” on page 12. Files can be sent by
drag and drop on the OBEX service.)
Item transfer can be accomplished several ways:
• From Windows Explorer, My Bluetooth Places, highlight the PIM Item Transfer
service on a remote device, and then, from the Bluetooth menu on the Windows
menu bar, select the appropriate action.
• From within a supported Personal Information Manager:
• Select one or more items and then, from the PIM's File menu, select Send to
Bluetooth.
Note: If synchronization is enabled for a specific item type, but is not enabled for
that item type on the remote device, synchronization will not take place for that
item.
Note: Not all choices are available for all items. For example, Note items can only
be synchronized in Microsoft Outlook. Therefore Lotus Notes and Outlook Express
are not displayed as options in the
“Notes” item shortcut menu. Personal Information Managers that are not installed
on this computer are not displayed as options in the shortcut menus.
or
• Drag-and-drop a supported item directly from your PIM to the PIM Item Transfer
service icon of a remote device.
• For business cards:
• From Windows Explorer, My Bluetooth Places, right-click the PIM Item Transfer
service on a remote device and select the appropriate option.
or
• In the Notification area, at the far right of the taskbar, right-click the Bluetooth
icon, select Quick Connect > Business Card Exchange, select a device from the list,
select the appropriate option from the shortcut menu, and then click OK.
Whether sent items are accepted by the remote device is determined by how the
remote device's PIM Item Transfer service is configured.

5. Using Bluetooth Applications
31
Close a PIM Item Transfer Connection
This application closes the open connection automatically when its task is
complete.
Configure PIM Item Transfer
The Bluetooth Configuration Panel > Client Applications > PIM Item Transfer >
General tab provides options to configure:
• The application name - to change it, highlight the existing name and enter the
new name.
• Enable or disable secure connection - to enable secure connection, place a
checkmark in the box.
• How your business card is handled when it is requested by a remote device - the
Send My Business Card options are:
• Choose a business card as needed - each time a remote device requests your
business card you must select a card from your PIM. If you ignore the request the
remote device will receive a timeout notice.
• Always send the same business card - when this option is selected a dialog box
is displayed that allows you to set a default business card that will be sent
automatically when requests are received.
• Where to store received business cards. The Received Business Cards options
are:
• Microsoft Outlook
• Outlook Express
• Lotus Notes
• Email attachments - the only option is to include or not to include attachments
with email that is sent or received on the computer using this service.
Note: The selected Received Business Cards option does not influence the
settings on other PIM related property pages. Example: even if the PIM Item
Transfer service business card option on this computer is configured to Do Not
Accept, the PIM Item Transfer application will still accept business cards that the
application has specifically requested from its Receive or Exchange functions.

USB Bluetooth Dongle User’s Manual
32
Dial-up Networking
The Bluetooth Dial-up Networking application allows this computer to use a modem
that is physically connected to a remote device to access the Internet or log on to a
remote network.
Open a connection to the Dial-up Networking service that is provided by another
Bluetooth device using one of these techniques:
• Notification area, at the far right of the taskbar, Bluetooth icon
• From My Bluetooth Places
• Using the Bluetooth Setup Wizard
After the Bluetooth dial-up networking connection is established it can be used the
same way as any other networking connection. For example, you can open a
browser and explore the World Wide Web, if the remote computer has Internet
access.
Close a Dial-up Networking Connection
• In My Bluetooth Places, right-click the service name and select Disconnect.
• If the connection was established from the Bluetooth icon in the Notification area,
at the far right of the taskbar; click the Bluetooth icon, select Quick Connect,
Dial-up Networking and then select the device that is providing the service (active
connections have a checkmark in front of them).
Configure
The Bluetooth Configuration Panel > Client Applications > Dial-up Networking >
General tab provides options to configure:
• The application name - to change it, highlight the existing name and enter the
new name.
• Secure connection - to enable secure connection, select the option box. To
disable secure connection, clear the option box.
• The Bluetooth virtual device (modem) to be used.
Note: Unless you have a specific reason to do so, DO NOT CHANGE the default
Bluetooth device or alter the device's configuration.

5. Using Bluetooth Applications
33
Network Access
The Bluetooth Network Access application makes it possible for this computer:
• To connect to a Local Area Network (LAN) using the physical connection on a
remote Bluetooth device.
or
• To connect to an ad hoc network provided by a remote Bluetooth device. When
joining an ad hoc network, it can take up to one minute after the connection is
established to obtain an IP address and automatically self-configure.
The type of network connection that is available is determined by the configuration
of the remote Bluetooth device.
Create a Network Access Connection
Establish a connection using one of these techniques:
• Notification area, at the far right of the taskbar, Bluetooth icon.
• From My Bluetooth Places.
• Using the Bluetooth Setup Wizard.
Close a Network Access Connection
• In My Bluetooth Places, right-click the service name and select Disconnect.
• If the connection was established from the Bluetooth icon in the Notification area,
at the far right of the taskbar; click the Bluetooth icon, select Quick Connect,
Network Access and then select the device that is providing the service (active
connections have a checkmark in front of them).
Configure
The Bluetooth Configuration Panel > Client Applications > Network Access >
General tab provides options to configure:
• The application name - to change it, highlight the existing name and enter the
new name.

USB Bluetooth Dongle User’s Manual
34
• Secure connection - to enable secure connection, select the option box. To
disable secure connection, clear the option box.
Bluetooth Serial Port
The Bluetooth Serial Port application allows this computer to establish a wireless
serial connection with a remote Bluetooth device.
The applications on both this computer and the remote device must be configured
to send and receive data to and from the respective communications port (COM
port) assigned to the Bluetooth serial port. The wireless serial connection may then
be used by the applications as though a physical serial cable connected the
devices.
Create a Bluetooth Serial Port Connection
Establish a connection using one of these techniques:
• Notification area, at the far right of the taskbar, Bluetooth icon
• From My Bluetooth Places
• Using the Bluetooth Setup Wizard
Close a Bluetooth Serial Port Connection
If the connection was established from the Bluetooth icon in the Notification area, at
the far right of the taskbar; click the Bluetooth icon, select Quick Connect, Bluetooth
Serial Port and then select the device that is providing the service (active
connections have a checkmark in front of them).
or
No matter how the connection was created, In My Bluetooth Places, right-click the
service name and select Disconnect.
Configure
The Bluetooth Configuration Panel > Client Applications > Bluetooth Serial Port >
General tab provides options to configure:
• The application name - to change it, highlight the existing name and enter the
new name.

5. Using Bluetooth Applications
35
• Secure connection - to enable secure connection, select the option box. To
disable secure connection, clear the option box.
• The communications port (COM port) to be used.
Note: Unless you have a specific reason to do so, DO NOT CHANGE the default
COM Port setting.

USB Bluetooth Dongle User’s Manual
36
6. FCC Compliance and Advisory
Statement
This device complies with Part 15 of the FCC rules. Operation is subject to the
following two conditions:
1) this device may not cause harmful interference, and
2) this device must accept any interference received, including interference that
may cause undesired operation.
This equipment has been tested and found to comply with the limits for a Class B
digital device, according to Part 15 of the FCC rules. These limits are designed to
provide reasonable protection against harmful interference in a residential
installation. This equipment generates, uses and can radiate radio frequency
energy and if not installed and used in accordance with the instructions, may cause
harmful interference to radio communications. However, there is no guarantee that
interference will not occur in a particular installation. If this equipment does cause
harmful interference to radio or television reception, which can be determined by
turning the equipment off and on, the user is encouraged to try correct the
interference by one or more of the following measures:
1.Reorient the receiving antenna.
2.Increase the separation between the equipment and receiver.
3.Connect the equipment into and outlet on a circuit different from that to which the
receiver is connected.
4.Consult the dealer or an experienced radio/TV technician for help.
Any special accessories needed for compliance must be specified in the instruction
manual.
Warning: A shielded-type power cord is required in order to meet FCC emission
limits and also to prevent interference to the nearby radio and television reception.
It is essential that only the supplied power cord be used. Use only shielded cables
to connect I/O devices to this equipment.

6. FCC Compliance and Advisory Statement
37
CAUSION: Any changes or modifications not expressly approved by the party
responsible for compliance could void your authority to operate the equipment.