Good Way Technology WA2600 Wireless Skype Phone User Manual 1 Introduction
Good Way Technology Co., Ltd. Wireless Skype Phone 1 Introduction
Users Manual
Wireless USB Phone
User’s Manual

Wireless USB Phone User’s Manual
Safety Instructions
Always read the safety instructions carefully
Keep this User’s Manual for future reference
Keep this equipment away from humidity
If any of the following situation arise, get the equipment checked by a service technician:
• The equipment has been exposed to moisture.
• The equipment has been dropped and damaged.
• The equipment has obvious signs of damage.
• The equipment has not been working well or you cannot get it working according to User’s
Manual.
Copyright Statement
No part of this publication may be reproduced in any form by any means without prior written
permission. Other trademarks or brand names mentioned herein are trademarks or registered
trademarks of their respective companies.
Disclaimer
Information in this document is subject to change without notice. The manufacturer does not make
any representations or warranties (implied or otherwise) regarding the accuracy and completeness
of this document and shall in no event be liable for any loss of profit or any commercial damage,
including but not limited to special, incidental, consequential, or other damage.
Skype is a registered trademark of Skype Technologies SA. Windows is a registered trademark of
Microsoft Corporation.
About User’s Manual
This user’s manual and the provided software on the CD are based on Skype 2.0. As Skype
upgrades occasionally, for the software compatible with the latest Skype version, please contact
your supplier.
May 2006, Rev1.0
i

Table of Contents
Table of Contents
1. Introduction .......................................................................................................1
Features ............................................................................................................................. 1
Package Contents .............................................................................................................. 2
System Requirements........................................................................................................ 2
Exterior Overview............................................................................................................. 3
Keypads and Controls................................................................................................................3
USB Dongle LED Status ...........................................................................................................4
2. Installation on Host Computer .........................................................................5
Installing Skype Software ................................................................................................. 5
Installing SkyWin Software .............................................................................................. 5
Installing the USB Dongle ................................................................................................ 7
Accessing SkyWin Functions ........................................................................................... 8
Managing SkyWin Access to Skype ................................................................................. 9
3. Establishing the Connection.......................................................................... 11
Step 1. Ensure the link status on the host computer........................................................ 11
Step 2. Power on the Wireless Phone Handset................................................................ 11
Verifying the Link Status via the LCD............................................................................ 12
Notes on Establishing Wireless Link .............................................................................. 13
4. Getting Started ................................................................................................14
LCD Screen..................................................................................................................... 14
LCD Indicators ........................................................................................................................14
LCD Language.........................................................................................................................15
Charging the Phone......................................................................................................... 15
Standby Mode ................................................................................................................. 16
Always Link Function..................................................................................................... 17
Resetting the Wireless Phone.......................................................................................... 18
About the Speaker and Microphone Volume .................................................................. 18
5. Using the Phone with Skype ..........................................................................19
Calling a Skype User....................................................................................................... 19
Initializing a Call from Host Computer .......................................................................... 20
Speed Dialing.................................................................................................................. 20
Answering a Call............................................................................................................. 21
Ending / Rejecting a Call ................................................................................................ 21
Holding a Call ................................................................................................................. 21
Muting............................................................................................................................. 22
Clearing the Entered Numbers........................................................................................ 22
ii

Wireless USB Phone User’s Manual
Using SkypeOut to Call Regular Phones ........................................................................ 22
Making a SkypeOut Call .........................................................................................................23
Using the Key Pad to Enter SkypeOut Number.........................................................23
Adding a SkypeOut Number to Contact List.............................................................23
Loading Phone Number via Contact Info ..................................................................24
Missed Calls.................................................................................................................... 25
Loading Calls List........................................................................................................... 26
Clearing Calls List .......................................................................................................... 27
Skype Status and Response Mode .................................................................................. 27
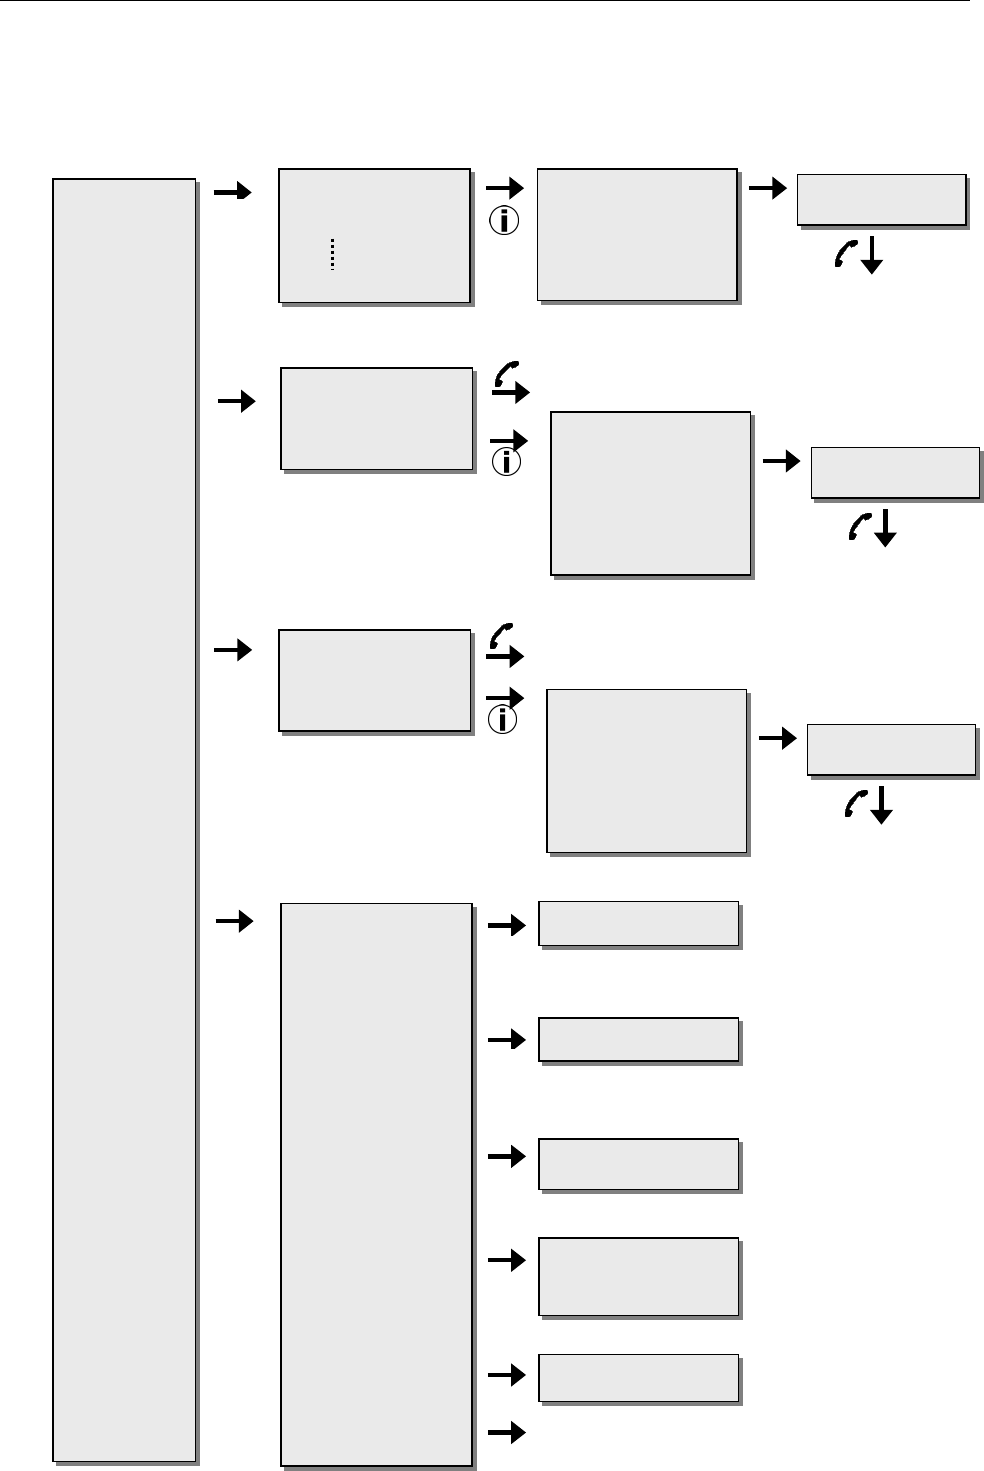
6. Using the LCD Setting Menu..........................................................................28
Viewing Information of Your Contact............................................................................. 28
Using Options Menu to Adjust Phone Settings............................................................... 29
Menu Navigation............................................................................................................. 31
7. Using with Instant Messenger Software........................................................32
8. Troubleshooting ..............................................................................................34
9. Specifications..................................................................................................37
10. Regulatory Compliance ................................................................................39
FCC Conditions .............................................................................................................. 39
CE ................................................................................................................................... 39
WEEE Information ......................................................................................................... 39
iii

1. Introduction
1. Introduction
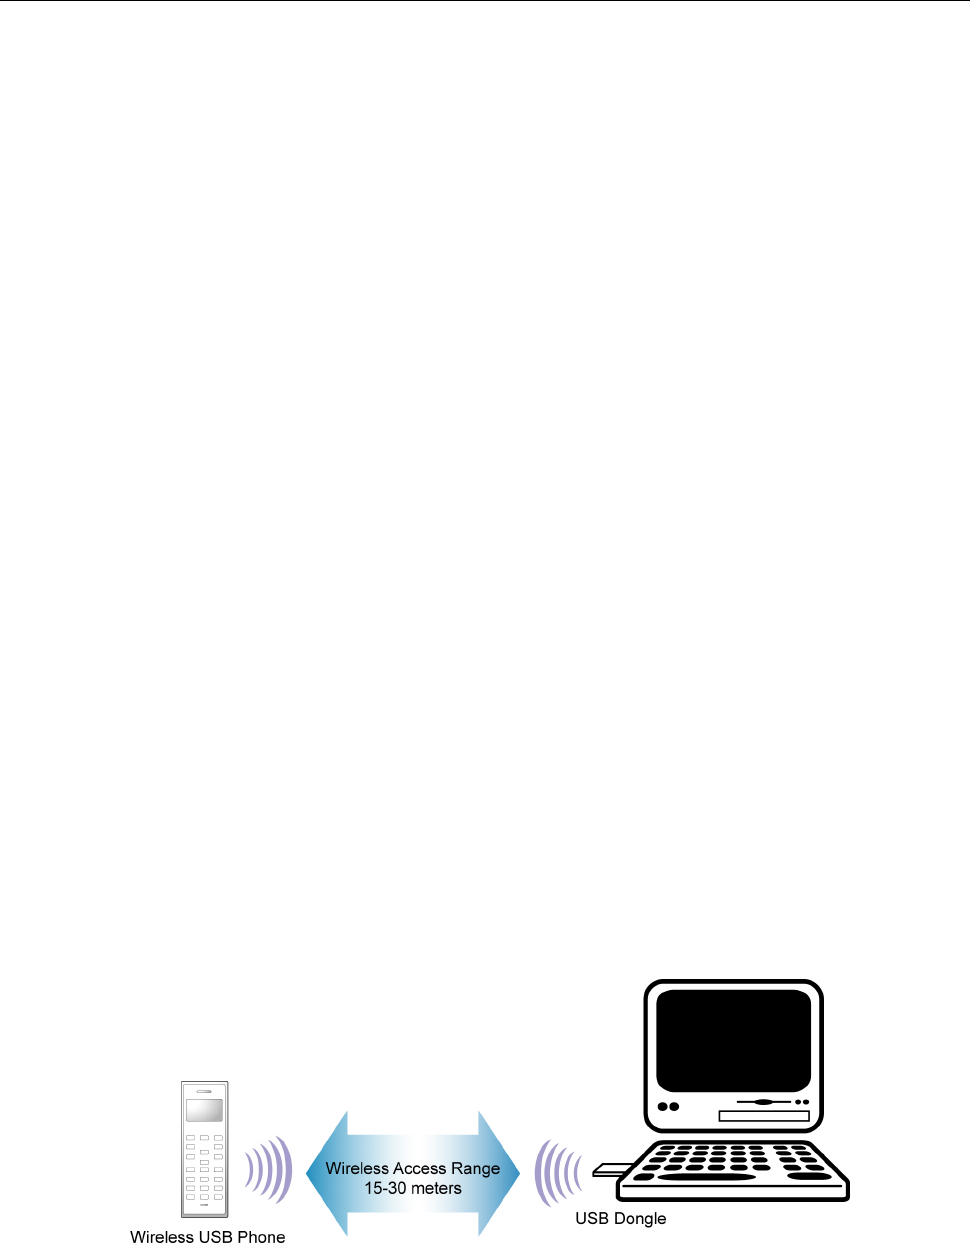
Utilizing 2.4 GHz RF technology, this Wireless USB Phone allows you to freely
roam around when making Skype calls over the Internet; no need to be bound
with USB cable anymore! If you have SkypeOut credits, you can even make calls to
regular phones, turning this wireless phone into a regular mobile phone.
The wireless phone handset is paired with one transceiver dongle. Just plug the
dongle to your computer, install the software and it’s ready to use. The handset
implements a display with an easy-to-use interface and a couple of editable
settings, such as ringtones, ringing volume and so on, so that you can personalize
the wireless phone to adapt to your needs.
What’s more, the wireless phone features Adaptive frequency hopping (AFH)
solution to mitigate radio interference in the popular 2.4GHz frequency band. This
ensures you a stable wireless communication while experiencing the wireless
convenience.
Features
Extends your Skype by wireless technology, bringing you more convenience
Utilizing RF 2.4GHz radio frequency
Using Adaptive frequency hopping (AFH) solution to mitigate radio interference
in 2.4GHz frequency band
Wireless transmission range of up to 30M (outdoor) and 15M (indoor)
Supports Skype hot-keys functions that are as easy as dialing normal
telephone
Dials to regular phone number using SkypeOut credits
LCD with multiple languages support
As compact as a mobile phone, easy to carry
Echo-cancellation for better sound quality
Selectable wireless phone settings, e.g. calling/holding ringtone
Li-Polymer battery rechargeable via USB
Standby mode to reduce power consumption
1
Wireless USB Phone User’s Manual
Package Contents
Wireless USB Phone x1
USB Dongle x1
USB Cable x1
Software Utility CD* x1
Quick Installation Guide x1
* The provided software and User’s Manual on the CD are based on Skype 2.0. As Skype
upgrades occasionally, for the software compatible with the latest Skype version, please contact
your supplier.
System Requirements
Computer with an available USB 1.1 port or higher
To use Skype with the wireless phone, your computer must meet the following
minimum system requirements**:
• PC running Windows 2000 or XP.
• 400 MHz processor
• 128 MB RAM
• 15 MB free disk space on your hard drive
• Internet Connection
* The requirements are subject to Skype software. For the latest requirements, please visit the
Skype website.
2
1. Introduction
Exterior Overview
The appearance of your handset varies depending on your model. The following
illustration is an example providing you with the keypad functions at a glance:
Speaker
Reset hole (on
the side)
LCD Screen
Clean, Hold
Skype on/Tab Switch
Info
Dial, Answer, Always Link Hang up, Power On/Off
Scroll up, Calls List Hotkey
Menu, O
K
Back
Scroll Down, Contact List Hotke
y
Dial pad
USB connecto
r
Microphone
Keypads and Controls
Icon Function Description
i Info Displays contact information/status menu (when a
contact is displayed on the LCD).
Skype on/
Tab Switch
Opens the Skype window and switches between tabs.
Long press to close Skype window.
CLS (C)
HOLD
Clear
Hold
Press briefly to clear the last one of entered number.
Long press to clear all the entered number.
Places a call on hold. Pressing it again resumes the call.
Dial/Answer
Always Link
Dials or answers a call.
Enables always link function.
3
Wireless USB Phone User’s Manual
Icon Function Description
Hang Up/Reject
Power On/Off
Long press the key to power on/off the wireless phone.
Ends or rejects a call.
Disables always link function.
MENU Menu, OK Displays main menu.
Enters a menu item or activate a selection.
BACK Back Back to previous menu.
S Scroll Up Scroll up. Hotkey to calls list.
T Scroll Down Scroll down. Hotkey to contact list.
0~9, #, Dial pad. Dial pad. Long pressing 0 enters + sign.
Vol / Volume
Up/Down
Increases/decreases the speaker volume during a call.
Mute Mutes on/off the microphone during a call.
USB Connector USB Mini B type female connector for power charge.
* The key function is activated by pressing the key briefly if not otherwise specified.
** The key icons shown above are for reference only. Actual color and appearance depends on your
model.
USB Dongle LED Status
The USB dongle’s LED should be lit when plugged to a power-on computer. It
shows the RF link status between the wireless phone and the dongle as follows:
Status Description
Blink once every three seconds RF link disconnected, standby mode
Solid Receiving/sending data over the RF link
Always link enabled
4
2. Installation on Host Computer
2. Installation on Host Computer
To use Skype with the wireless phone in Windows 2000/XP, you should install
Skype and the provided utility, SkyWin. SkyWin is a tool that enables your wireless
phone to communicate with Skype so as to access Skype functionality.
Please follow the instructions in this chapter to complete the installation.
Installing Skype Software
1. If Skype is not yet installed on your computer, please download Skype
installation file from www.skype.com.
2. Double-click the installation file you’ve downloaded and then follow the
on-screen prompts to complete the installation.
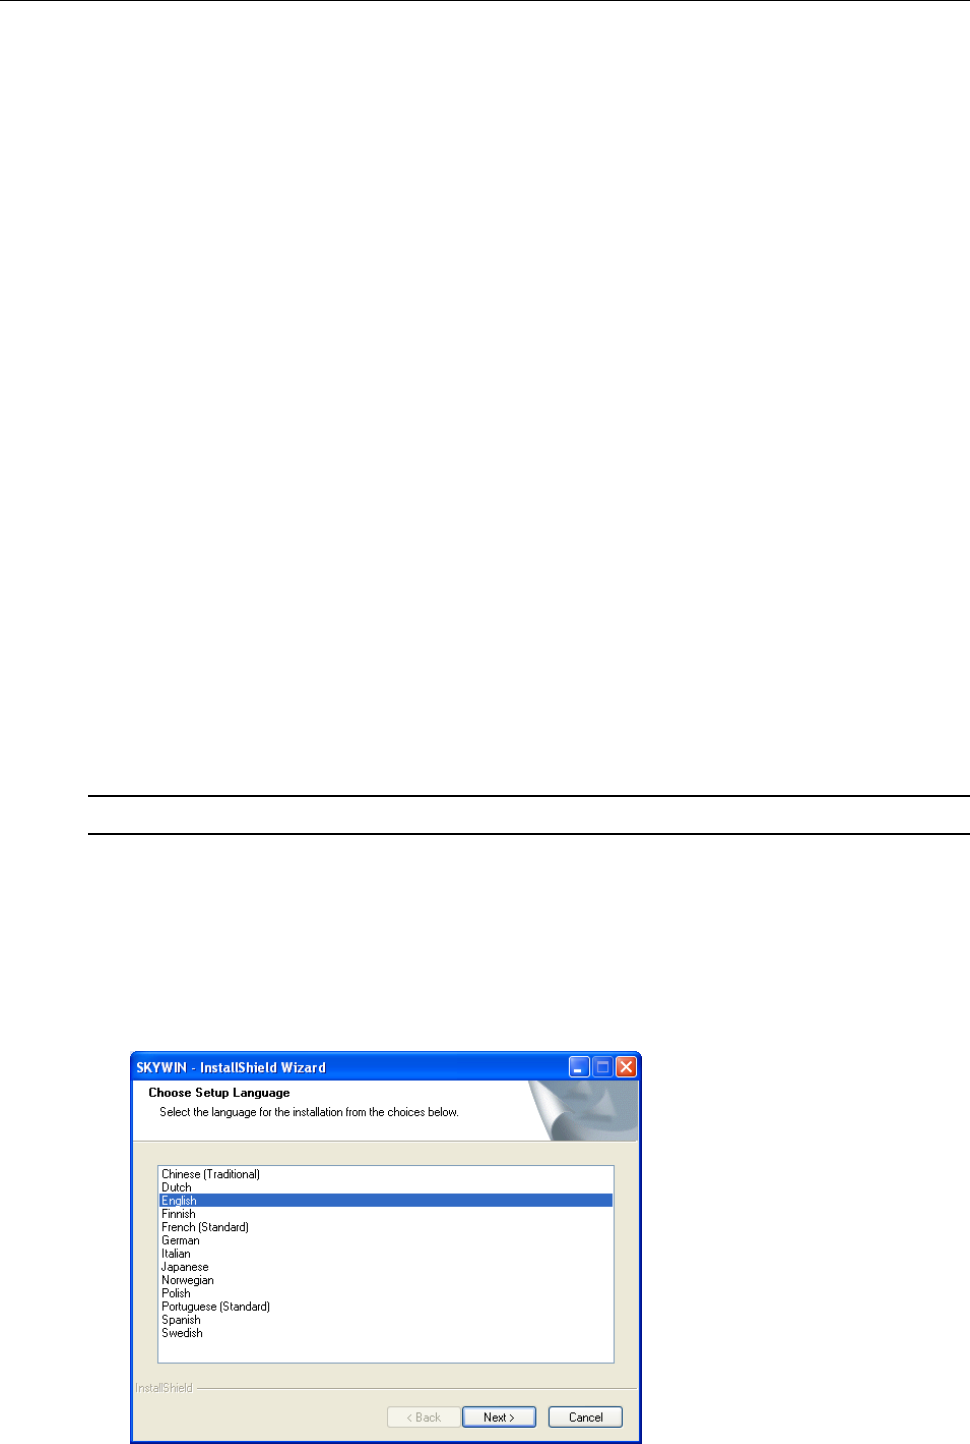
Installing SkyWin Software
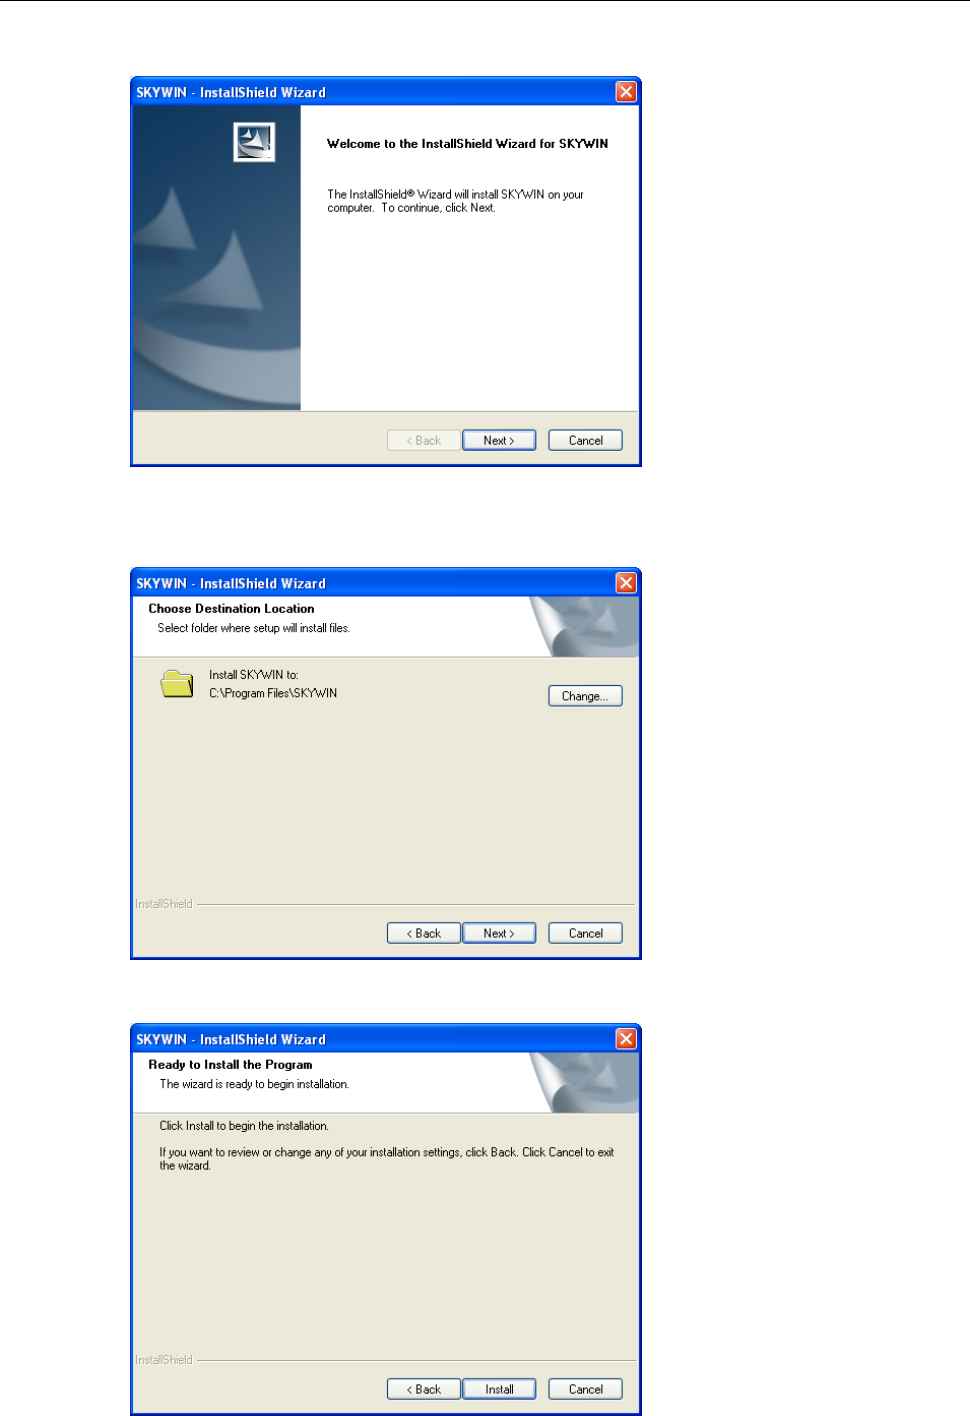
Important: You must install the software before you plugging the USB dongle.
1. Insert the provided Software Utility CD into your CD-ROM drive. The setup
program will start automatically. If not, locate and double-click the Setup.exe
file in Software folder to launch the setup program.
2. When the language screen appears, select a language for the installation and
then click Next.
5
Wireless USB Phone User’s Manual
3. When the welcome screen appears, click Next.
4. Select to install the program in default directory or click Change to specify
another directory. Then click Next.
5. Click Install to begin the installation.
6
2. Installation on Host Computer
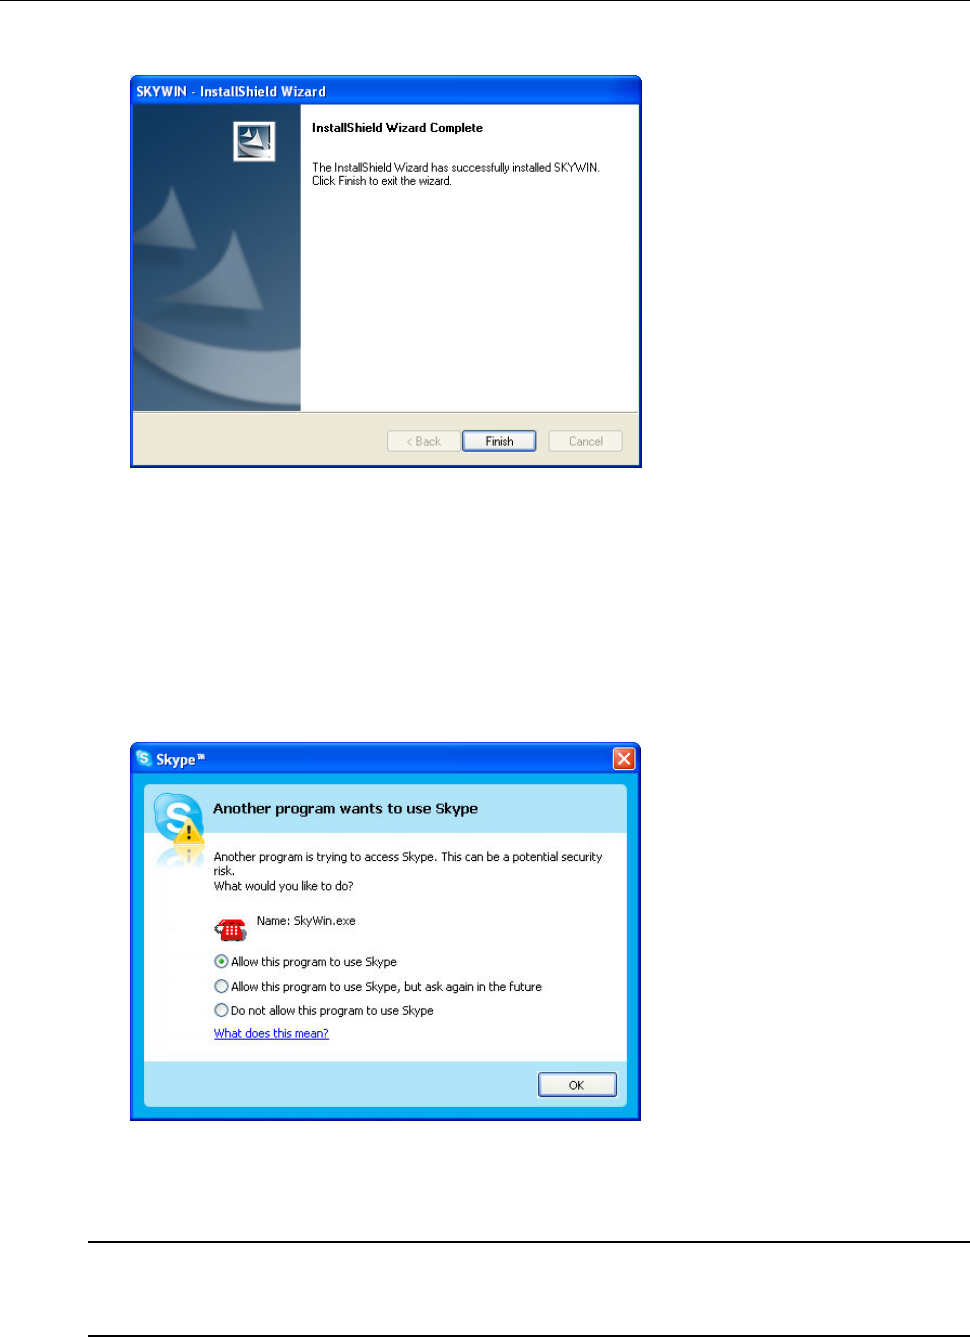
6. Click Finish to complete the installation.
Installing the USB Dongle
Plug the USB dongle to your computer’s USB port. The system will automatically
install Windows built-in driver. Whenever the following screen appears, always
select Allow this program to use Skype and click OK. If prompted for system
restart, click Yes.
Throughout this manual, the computer that is plugged with the USB dongle is
referred to as a “host computer”.
Note: You will not see this screen if Skype is not active. You can configure it later
in Skype window. Refer to “Managing SkyWin Access to Skype” on page 9 for
details.
7
Wireless USB Phone User’s Manual
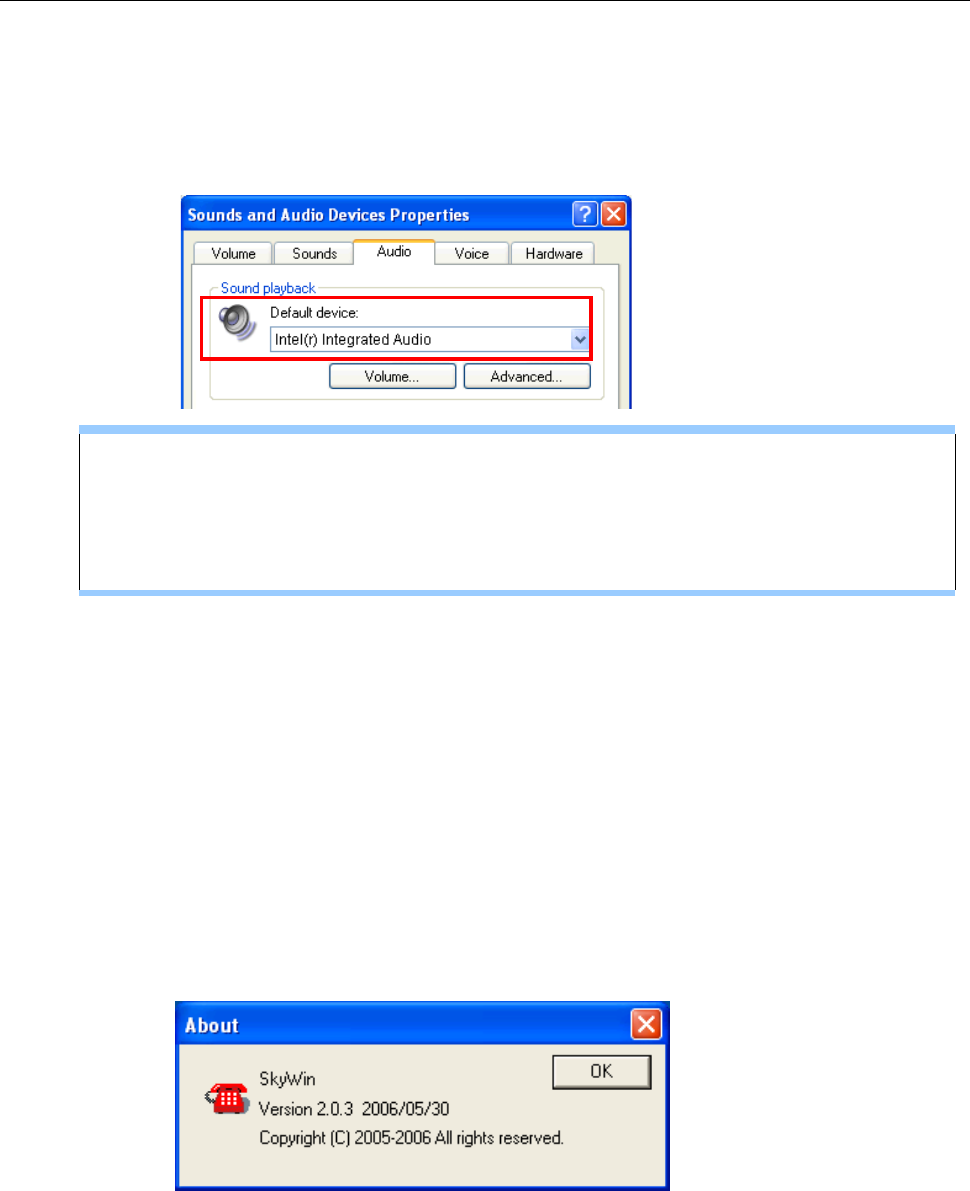
It is possible that Windows Sound and Audio Devices Properties window
appears at this point. In such a case just click the Audio tab and make sure your
original audio setting is kept. For example, system sound card is used as the
default playback device in most cases for PC music playback.
When the dongle is plugged to a USB hub…
If the dongle is plugged to your computer via USB hub, make sure the hub is
connected to its power adapter, otherwise insufficient power supply may cause
the phone to generate noise during a conversation.
Accessing SkyWin Functions
When you are done with the SkyWin installation, SkyWin starts automatically with
its icon located in the system tray. It also starts automatically at system startup. You
can right-click the icon and perform the following task:
Click Select Language to change the user interface language in SkyWin as
well as in the LCD.
Click Exit to quit SkyWin.
Click About to view the version information.
* Actual version number depends on the SkyWin version.
8

2. Installation on Host Computer
In addition, a SkyWin program group is added to Windows programs menu. Using
the programs menu, you can perform these tasks:
If SkyWin is closed, you can restart it by selecting Start > Programs >
SKYWIN > SkyWin.
Uninstall SkyWin by selecting Start > Programs > SkyWin > Uninstall.
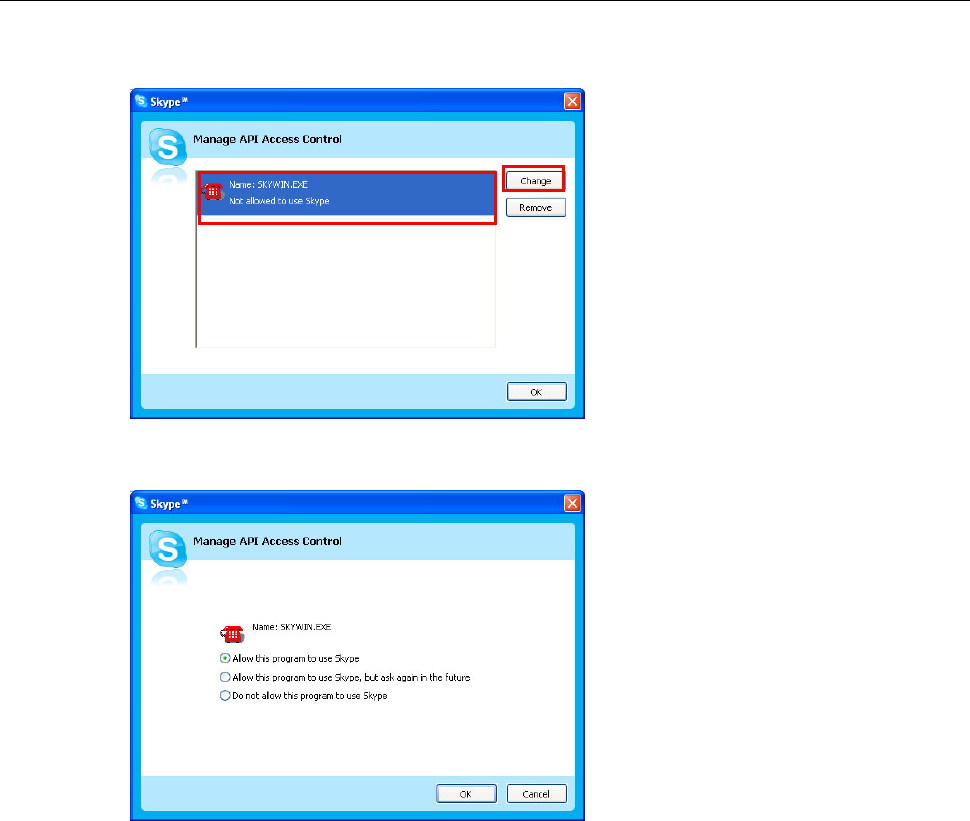
Managing SkyWin Access to Skype
You should always let your SkyWin use Skype so that you can use the wireless
phone. If you accidentally select the Do not allow this program to use Skype
option, open Skype window and take these steps:
1. Click Tools > Options > Privacy > Manage other program’s access to
Skype.
9
Wireless USB Phone User’s Manual
2. Select SKYPEWIN.EXE and click Change.
3. Re-select a proper option to let the provided program access Skype.
10
3. Establishing the Connection
3. Establishing the Connection
Before you start to use the phone, you should first establish the link between the
wireless phone and the dongle. The procedures are as follows:
Step 1. Ensure the link status on the host computer.
Make sure that both SkyWin and Skype are active on your host computer and the
USB dongle is properly plugged.
Before using the wireless phone, always make sure the link between the USB
dongle, SkyWin and Skype is properly established on your host computer. Placing
the cursor over SkyWin systray icon provides you with the communication status as
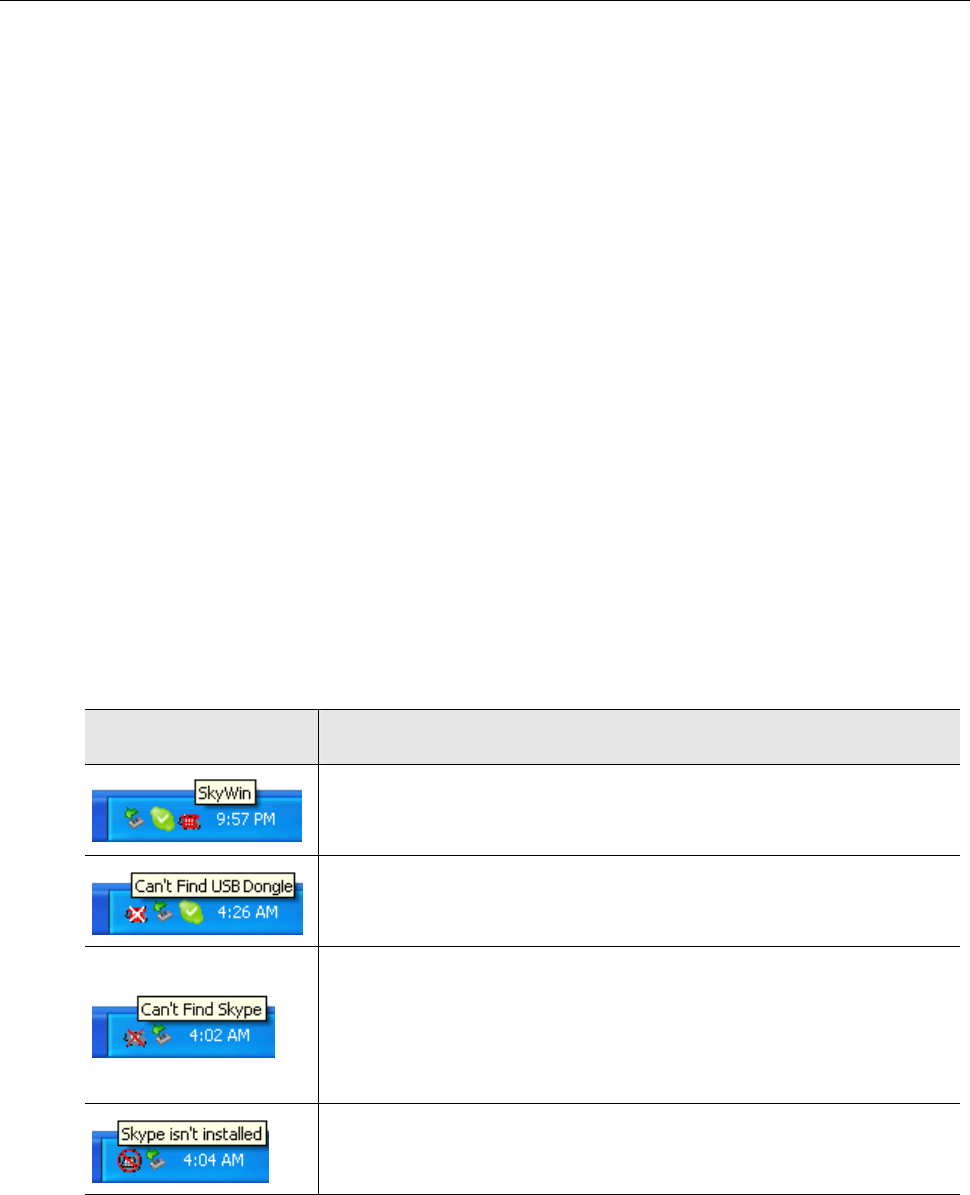
described in the table below.
SkyWin Icon Link Status
The USB dongle is plugged. SkyWin and Skype are active. The
link is ready now.
The USB dongle is un-plugged or not properly plugged.
Action: Make sure the USB dongle is properly plugged.
Skype is not active or accidentally terminated or SkyWin is not
allowed to access Skype.
Action: Launch and log in to Skype and allow SkyWin to access
Skype.
Skype is not installed on your computer.
Action: Install Skype on your computer.
Step 2. Power on the Wireless Phone Handset.
To power on the wireless phone, long press the Power key until the main screen
appears on the display.
11
Wireless USB Phone User’s Manual
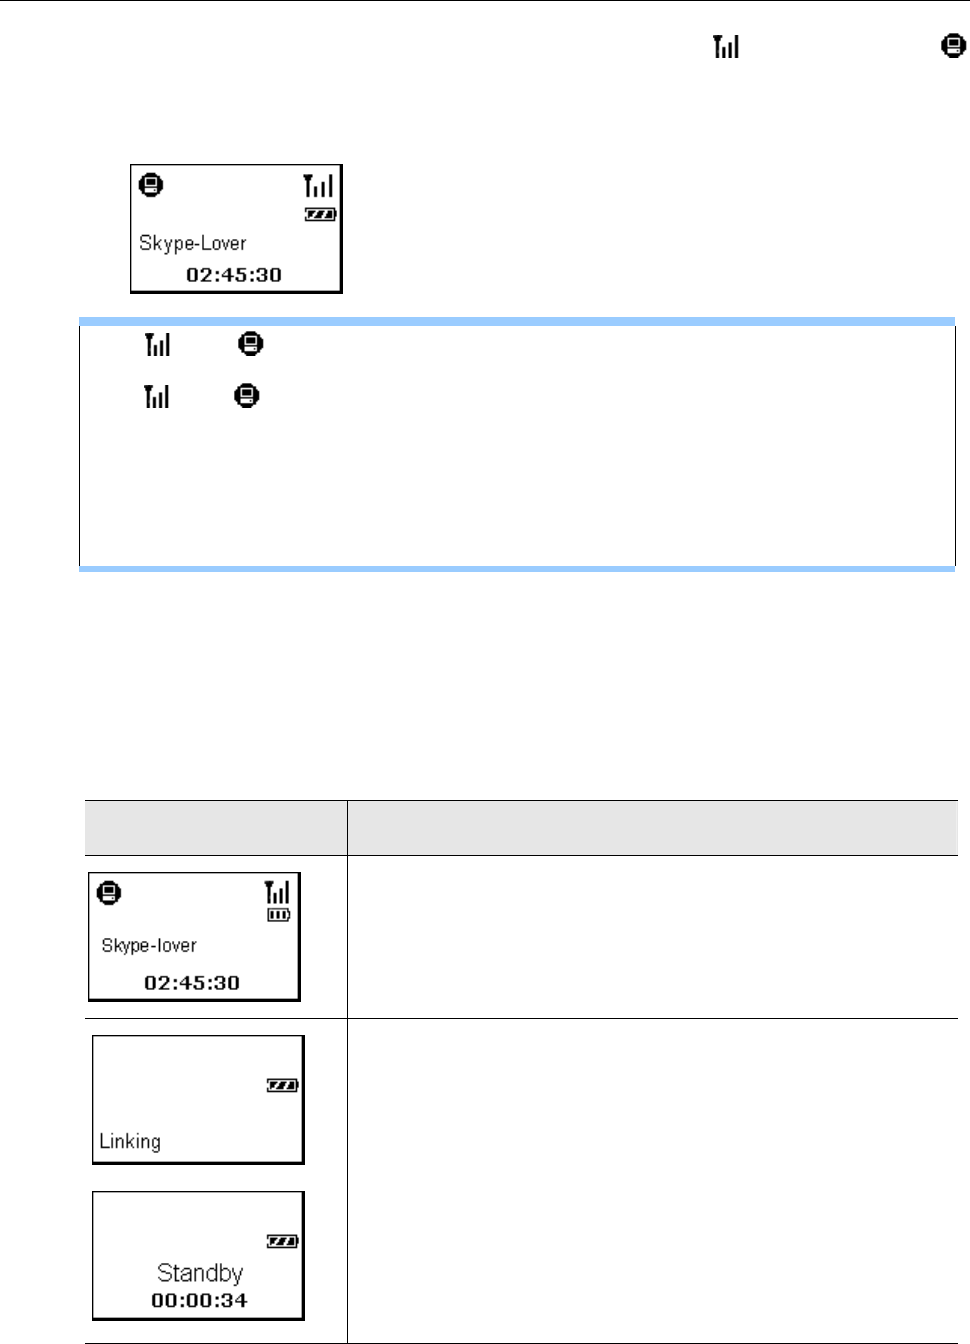
When starting up your wireless phone, the signal indicator and PC indicator
should be displayed on the wireless phone’s LCD. Your Skype name and the time
of the computer plugged with the dongle should also be displayed.
The and indicators disappeared ?
The and indicators will disappear in standby mode. If not operated for 20
seconds, the wireless phone automatically enters standby mode and the RF iink
is temporarily disconnected.
To resume from standby mode, just press the OK key on the wireless phone.
The RF link will be re-established and the indicators should appear again.
Verifying the Link Status via the LCD
The wireless phone LCD will also display related messages if the communication
cannot be established. The following table lists possible screens you will see. Refer
to the table to verify the link status and take required action.
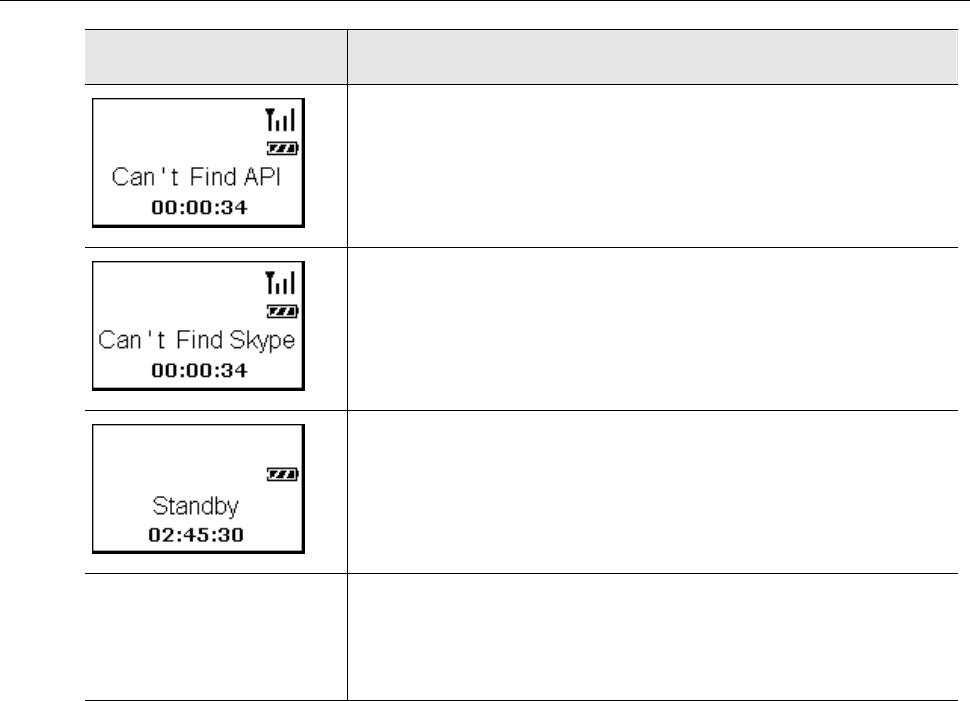
Wireless Phone Display Link Status
The RF link is established and everything is OK. The wireless
phone successfully loads Skype data via the activated
SkyWin.
You are ready to use the wireless phone.
No RF link. The wireless phone cannot find the dongle at
startup.
Action:
y It could be the signal is too weak. Move closer to the dongle
until the signal indicator appears.
y Ensure USB dongle is plugged.
y Make sure the host computer is not in standby or hibernation
mode.
12
3. Establishing the Connection
Wireless Phone Display Link Status
The RF link is established but SkyWin is not active.
Action: Launch SkyWin.
The RF link is established but Skype is not active or SkyWin is
not allowed to access Skype.
Action: Launch Skype. Also, allow SkyWin to access Skype
(refer to “Managing SkyWin Access to Skype” on page 9).
Standby mode.
To resume for standby mode, just press the OK key on the
phone.
N/A
The wireless phone is switched off or running off the power.
Action: Power on your wireless phone or charge the wireless
phone.
Notes on Establishing Wireless Link
Your wireless phone and dongle are packaged as an exclusive pair. They
share a unique ID to communicate only to each other. This means your
wireless phone cannot link to a dongle other than the one delivered with the
wireless phone and vice versa. Likewise, you cannot expect the wireless
phone to work with multiple dongles and vice versa.
Currently up to 7 pairs of wireless phone and dongle can co-exist within one
radio range. The more pairs are present, the more likely interference will occur
and thereby reduce the transmission range.
The maximum outdoor wireless range is about 30 meters while indoor range is
about 15 meters in an open-air environment. If you cannot make the link, move
the wireless phone closer to the dongle.
Other Bluetooth adapters may detect the presence of your wireless phone and
USB dongle (which are identified as WBPA-G-Remote and WBPA-G-Dongle).
But they cannot build a connection with either of them.
13
Wireless USB Phone User’s Manual
4. Getting Started
Before you start to use the wireless phone, get acquaintance with the phone
features and the LCD user interface so that you can get the most of the wireless
phone.
LCD Screen
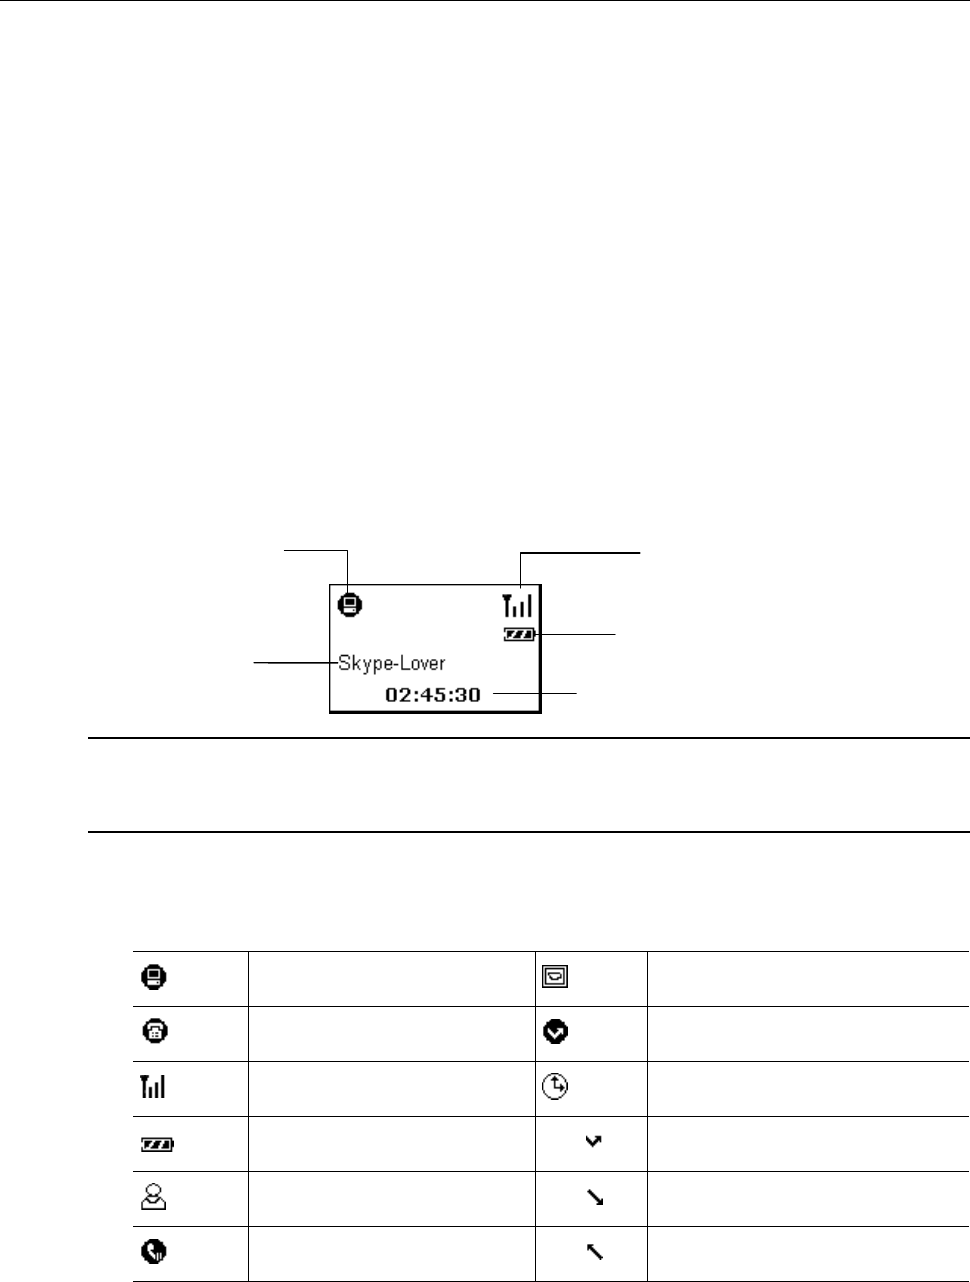
A typical main screen is as below:
SkyWin Connection Signal availability
Current time of the host computer.
Battery Level, Charging indicator
Your Skype name
Note: The Skype name here refers to the Skype name that Skype users will see,
which is configured via File > My Profile > Full Name in Skype. If the field is blank,
your account name is displayed.
LCD Indicators
SkyWin availability Options menu
Always link Missed call
RF signal availability Calls list
Battery level Missed call
Contact Incoming call
Holding a call Outgoing call
14

4. Getting Started
LCD Language
If you want to change the LCD user interface language, right-click on the SkyWin
systray icon and click Select Language. Then select a language as required. You
selection takes effect immediately and will reflect on the systray menu as well as
the LCD user interface.
Note: This selection will not change the popup message language of SkyWin
systray icon. The systray message language depends on the language you select
during the SkyWin installation process.
About the Contact Name Language
As for the contact names, as long as they are correctly displayed in Skype on the
host computer, they should also be correctly displayed in the LCD, regardless of
your user interface language.
The character of your contact name is not properly displayed?
If a language is not correctly displayed in Skype, you need to install additional
language on your system. Refer to Windows online help for more information.
Charging the Phone
The wireless phone is powered by an internal rechargeable battery. You need to
charge the wireless phone battery when:
15
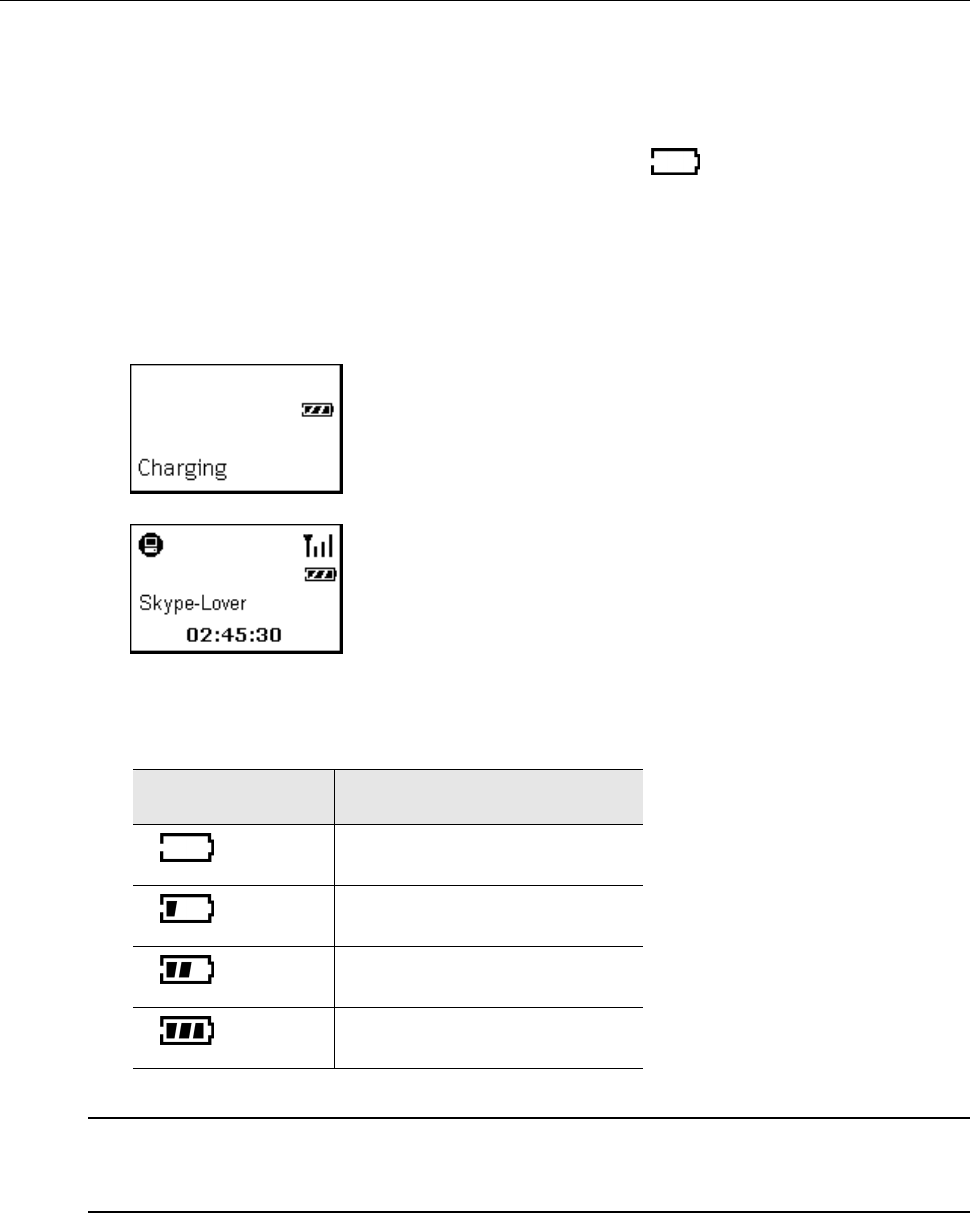
Wireless USB Phone User’s Manual
Using the wireless phone for the first time (the battery may be not fully charged
when shipped).
The battery is totally flat.
The battery icon indicates low-battery condition ( ).
To charge the phone, use a USB cable to connect the phone to a USB port on a
power-on computer. During the charge the charging indicator keeps flashing and
you can still power on the wireless phone and use it. Once the charge is complete,
the charging indicator stops flashing.
When charging a power-off phone
The charging indicator keeps flashing. Once the charge is
complete, the LCD turns off automatically.
When charging a power-on phone
The charging indicator keeps flashing. Once the charge is
complete, the indicator stops flashing.
The charging time depends on the power remaining. A totally flat battery takes
approximately 3 hours to be fully charged.
Battery Indicator Battery Level
10% ~ 40%
40% ~ 80%
80% ~ Full
Full
Note: The phone’s USB port is only for power charging but not for data transfer.
Therefore if you want to use the phone during the charge, you should still have the
USB dongle plugged as a medium for communication.
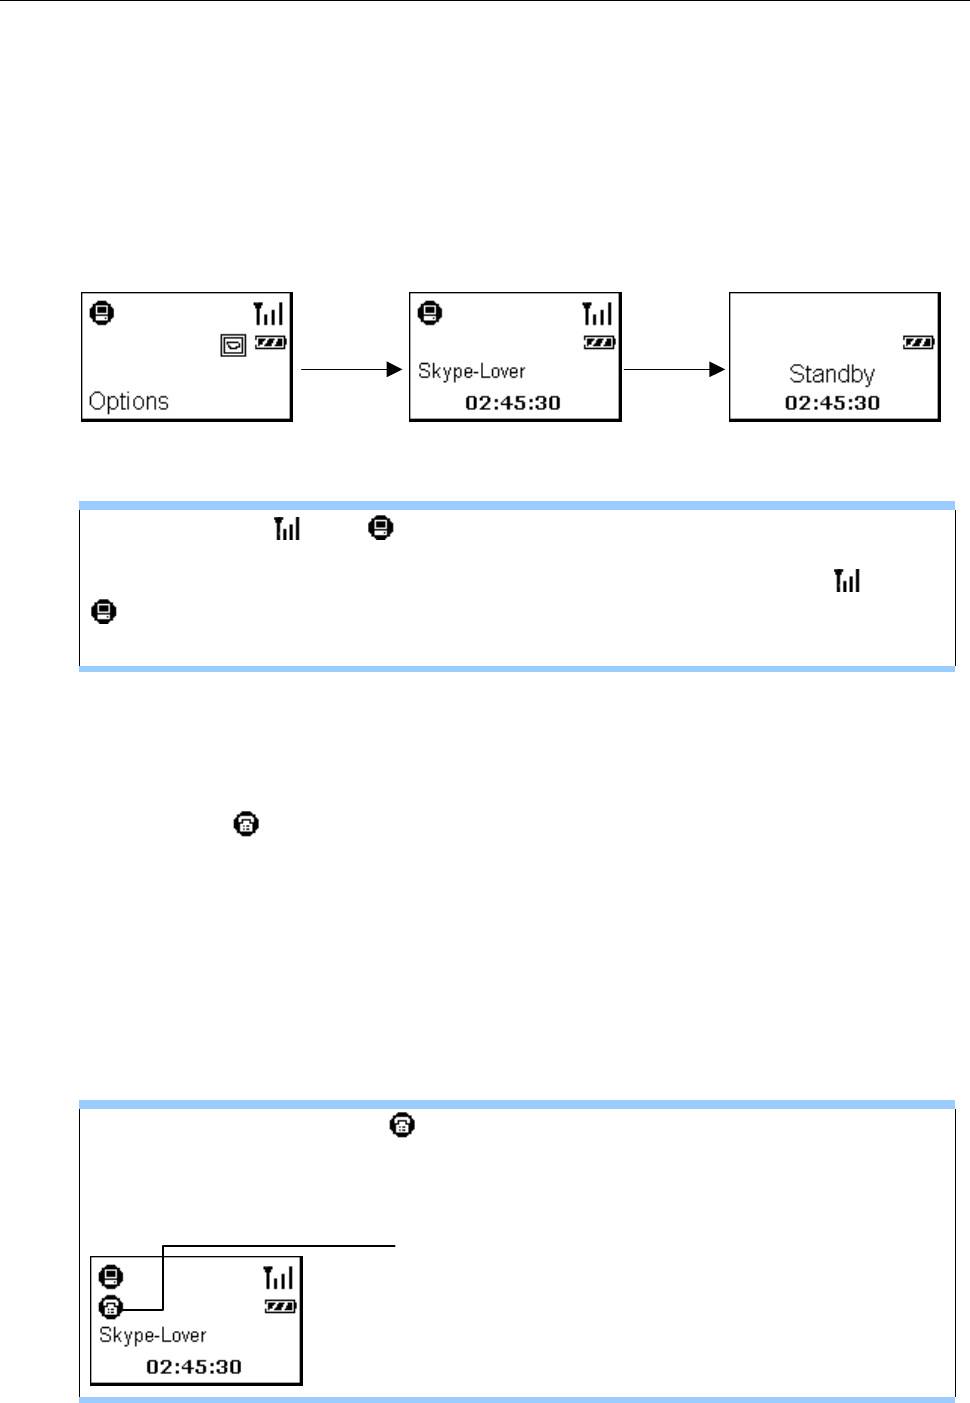
Standby Mode
In order to reduce the power consumption, the LCD backlight automatically turns
off after 5 seconds of no operation. If no operation lasts for 20 seconds the VoIP RF
phone enters standby mode.
16
4. Getting Started
If you have entered a menu, if not used for 30 seconds, the screen returns to the
main screen and after a sequential 20 seconds of inactivity, the phone enters
standby mode.
To resume from standby mode, just press the OK key on the wireless phone. The
message “Linking” will be briefly displayed and the phone will re-establish the RF
link with the USB dongle.
30 seconds
of inactivity
20 seconds
of inactivity
Under any menu item Returns to main screen Enters standby mode
Cannot see the and indicators on the display?
In standby mode the RF link is temporarily disconnected, causing the and
indicators to disappear from the dispaly. Once you resume from standby
mode and the RF link is re-established, the indicators appear again.
Always Link Function
When you press the Dial / Answer key, the always link function will be enabled and
the indicator will appear. This function is automatically disabled when you
press the Hang Up key to end a conversation. However, if a call is hanged up by
the other party and you did not press the Hang Up key, the always link will not be
disable unless you press the Hang Up key.
When always link is active, the wireless phone will not enter standby mode and
thus cause the phone to keep consuming the battery power. Therefore, when you
are not phoning, it is important that you disable the always link function.
The always link indicator appears when you are not phoning…
Make suer to press the Hang Up key to disable the always lnk function to save
your battery power.
If this icon appears when you
are not phoning, make sure to
press Hang Up to disable
always link
17

Wireless USB Phone User’s Manual
Resetting the Wireless Phone
You will need to reset your wireless phone in case any of the following situations
occur:
The wireless phone hands up.
The LCD display responds slowly.
To reset your phone, insert a pin or paperclip into the Reset hole on the side. Press
lightly and then release to power off the phone. Then power on the phone again by
long-pressing the Power key.
About the Speaker and Microphone Volume
The wireless phone’s speaker and microphone volume is not adjustable on
Windows via Control Panel > Sounds and Audio Devices. The microphone
volume is fixed and not adjustable. As for the speaker volume, it is only adjustable
on the phone device:
During the conversation, press the Vol Up or Vol Down key on the side of the
device to adjust the volume.
Or, you can predefine the setting via Menu > Options > Speaker Vol.
18
5. Using the Phone with Skype
5. Using the Phone with Skype
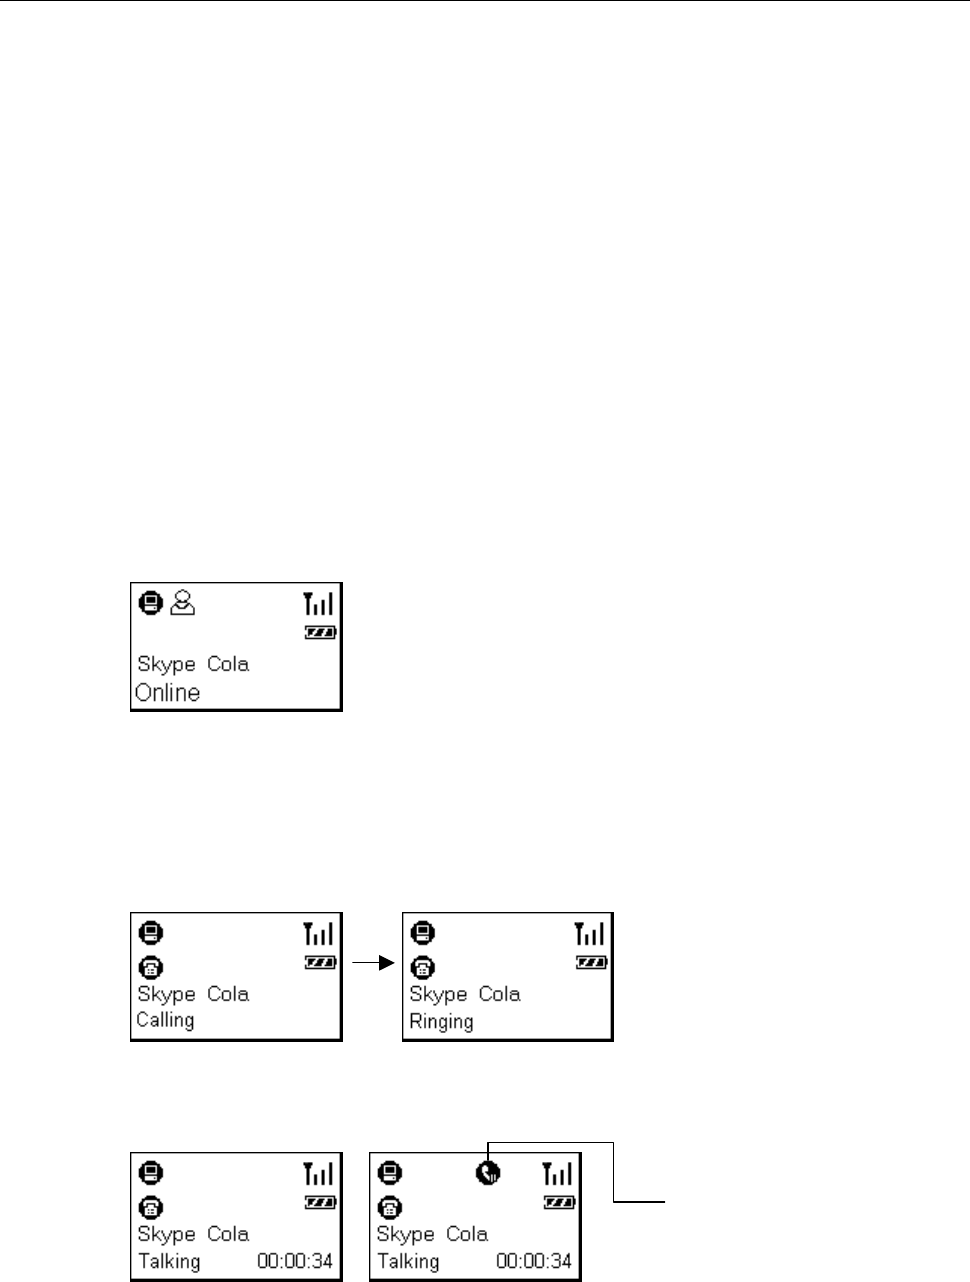
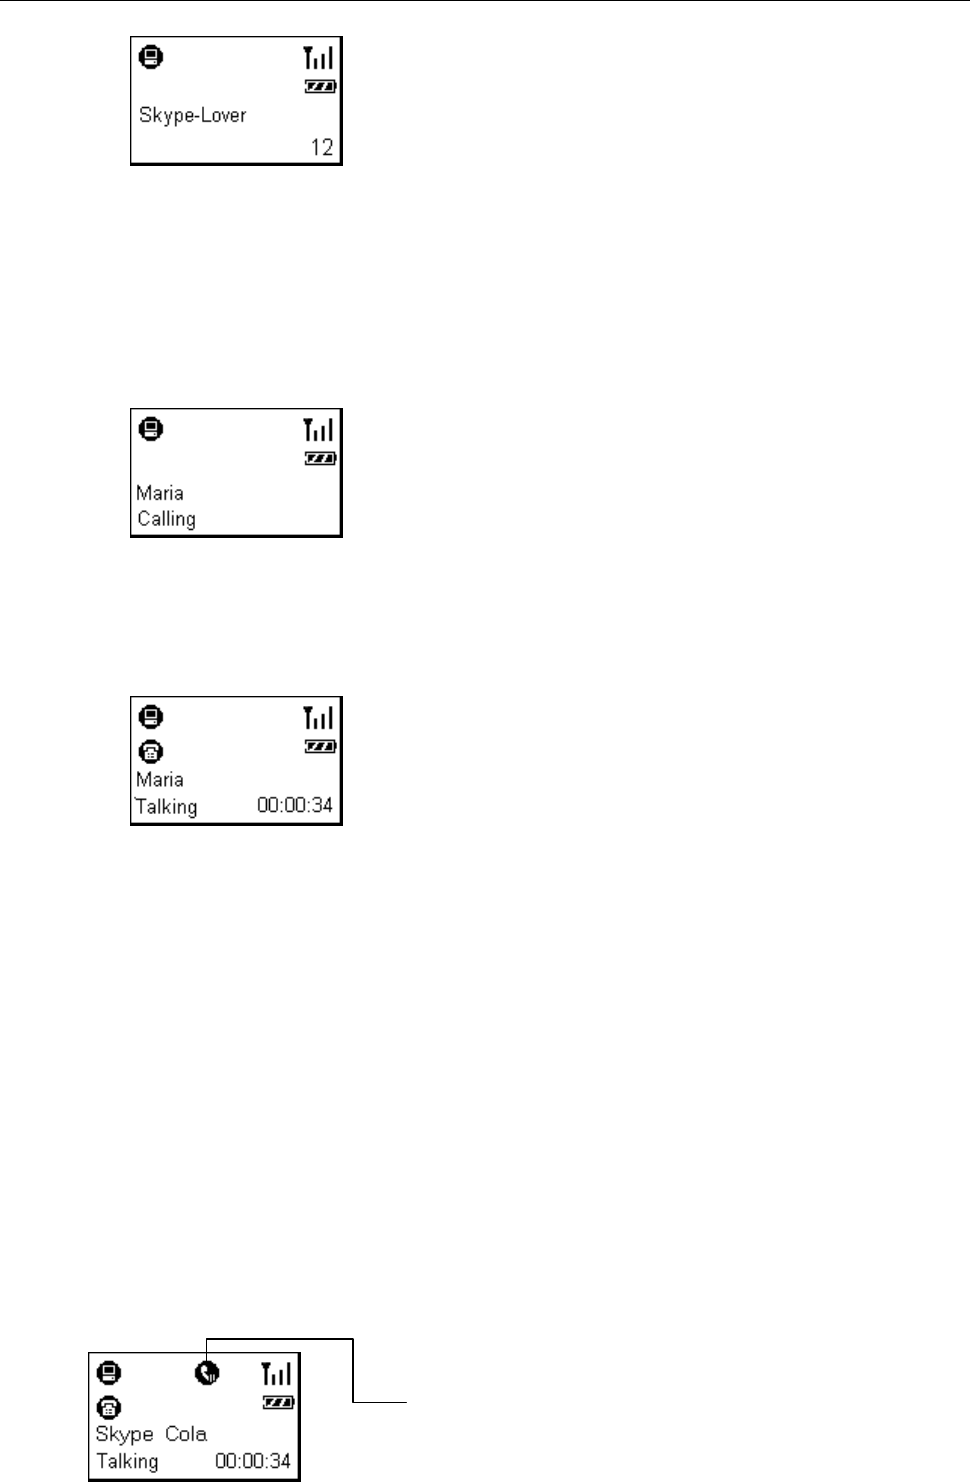
Calling a Skype User
To call a Skype user, you have to launch Skype and log in to Skype. And you
should have added desired Skype user(s) to your contact list. Then take the steps
below to call a Skype user:
1. Press the Contacts hotkey to display the Skype contact list.
2. Scroll with Up / Down to reach the desired contact.
3. Once your target contact is displayed, press Dial to make the call.
The communication process is as follows. The connecting time depends on the
network traffic. You will not hear the ringing tone until the connection is
established.
4. Once the call is answered, the duration timer will display the time elapsed of the
call in process. You can press Hold to hold the call if required.
Hold indicator
5. To end the call, press the Hang Up key. The call duration timer will be shown
briefly.
19
Wireless USB Phone User’s Manual
Initializing a Call from Host Computer
If your Skype contact list is long, you may want to spare the hassle of scrolling
through the contact list. In such a case, you may initialize a call from Skype window
on the host computer first and then communicate via the phone.
Note: When you use the Skype key to open Skype window and switch to the
Conatcts tab, if you want to use the Up / Down key to scroll through list, you
should press the Contacts hotkey first.
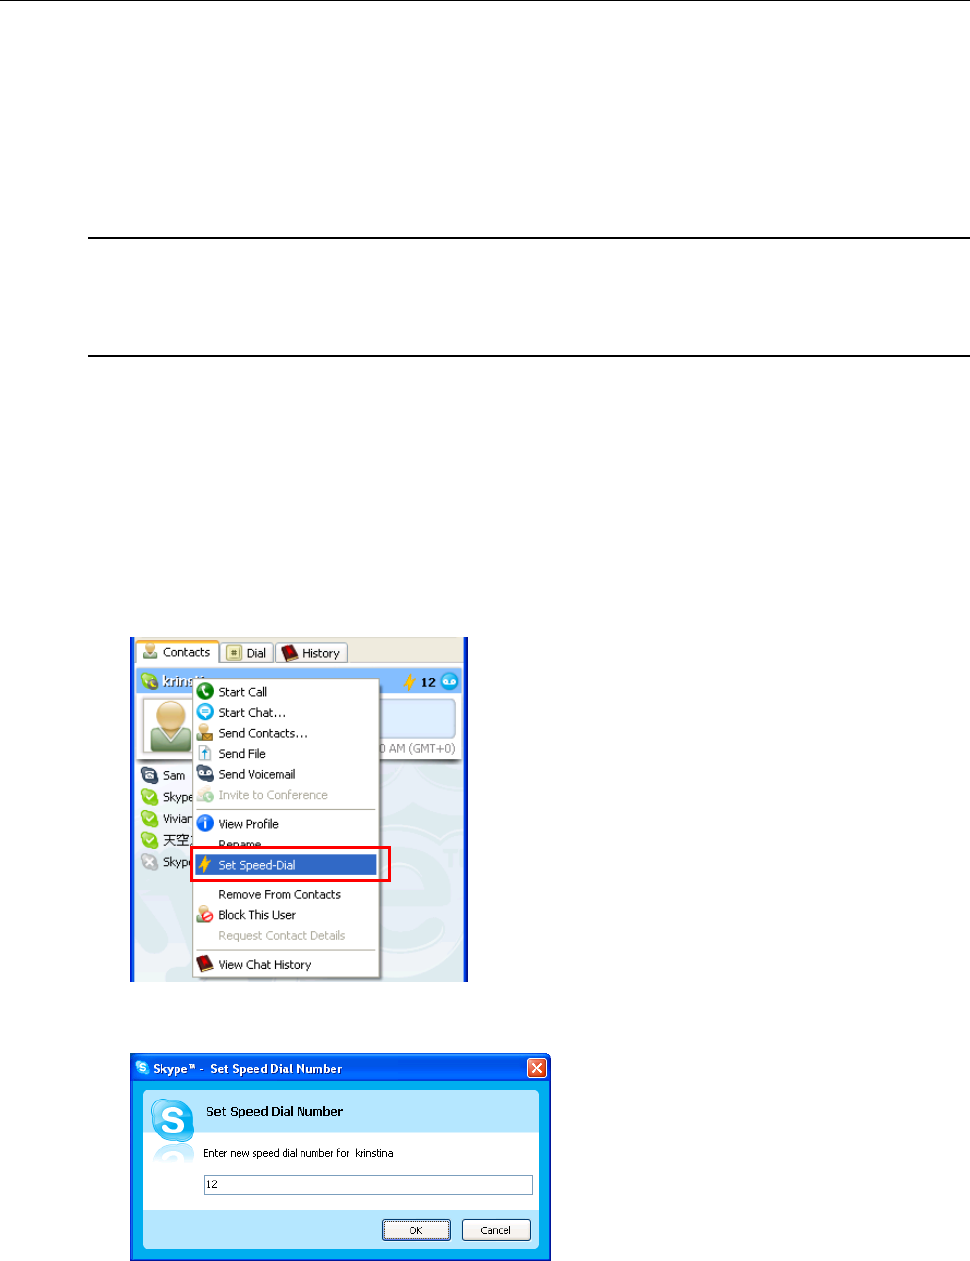
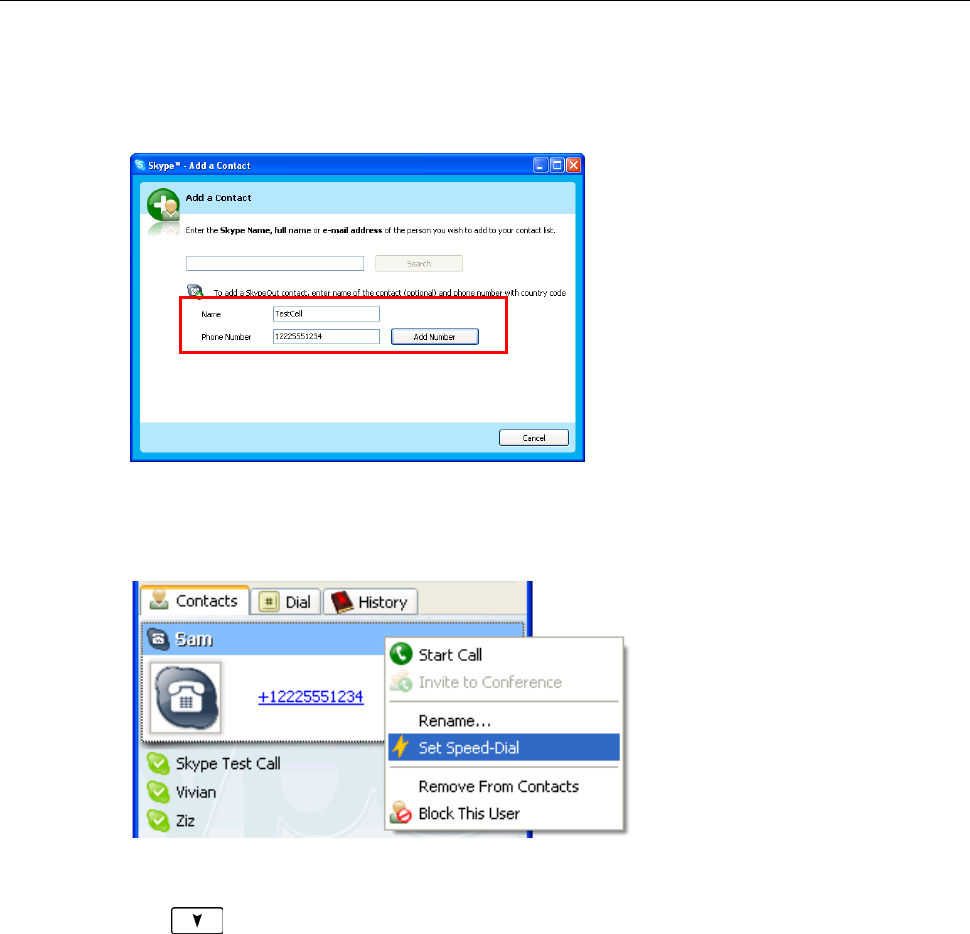
Speed Dialing
To use the speed dialing function, you should assign the speed dial number to your
target contact via Skype window first.
1. In Skype window, go to the Contacts tab and select your desired contact.
Right-click the contact and select Set Speed-Dial.
2. Assign a number as a speed dial number using your keyboard.
Once the speed dial number is assigned, just use the wireless phone’s keypad to
dial the number and then press Dial to make the call.
In case you want to clear the number you entered, press CLS. Each press will
erase the last number. Or you can long press CLS to clear all the entered numbers
at a time.
20
5. Using the Phone with Skype
Answering a Call
On an incoming call, the wireless phone will be ringing and the LCD backlight will
light on with the caller ID displayed (if available). Press the Answer key to answer
the call.
Once you answer the call, the duration timer will display the time elapsed of the call
in process. You can press Hold to hold the call if required. To end a call, press the
Hang Up key.
Ending / Rejecting a Call
To end or reject a call, press the Hang Up key.
Holding a Call
To place a call on hold, just press the HOLD key. Pressing the HOLD key again can
resume the call.
When holding a call, if a second call is coming you will hear a knocking sound
(which is configured via Skype > Sound > Knocking.) You can press Answer key
to answer the call; but this will also terminate the first call.
Hold indicator
21
Wireless USB Phone User’s Manual
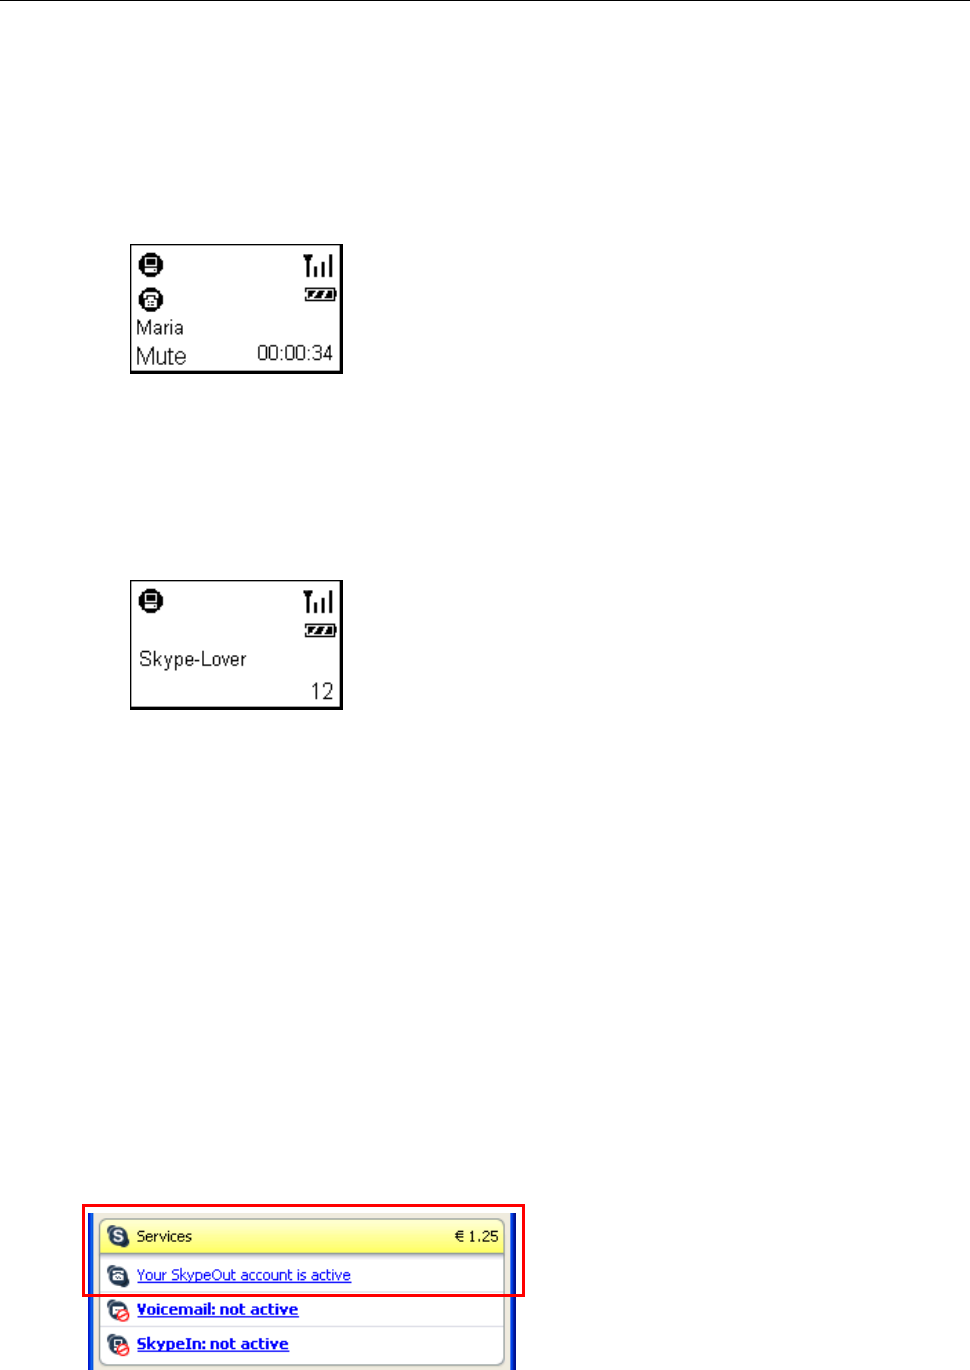
Muting
To mute the microphone during a call, press the Mute key on the side of the device.
When mute is on, the message Mute is displayed on the screen. To turn mute off,
just press the Mute key again.
Clearing the Entered Numbers
To erase the numbers you’ve just entered, press CLS. Each press will clear the last
character. Or you can long press CLS to clear all the entered numbers at a time.
Using SkypeOut to Call Regular Phones
SkypeOut allows you to place calls to regular telephones or mobile phones. This
feature allows you to call from Skype to friends who are not using computers but
still use regular phones.
To use SkypeOut, you should buy SkypeOut credits first. To do this, click Tools >
Go to My Account Page. Sign in and find the link to SkypeOut credits page. Then
follow the instructions to purchase the credits.
After you have purchased SkypeOut credits, log out from the Skype web page.
Open your Skype and check the Services section for verification that your
SkypeOut account has been activated.
To make a SkypeOut call, you must enter the number in the following way (whether
for domestic or international calls):
22
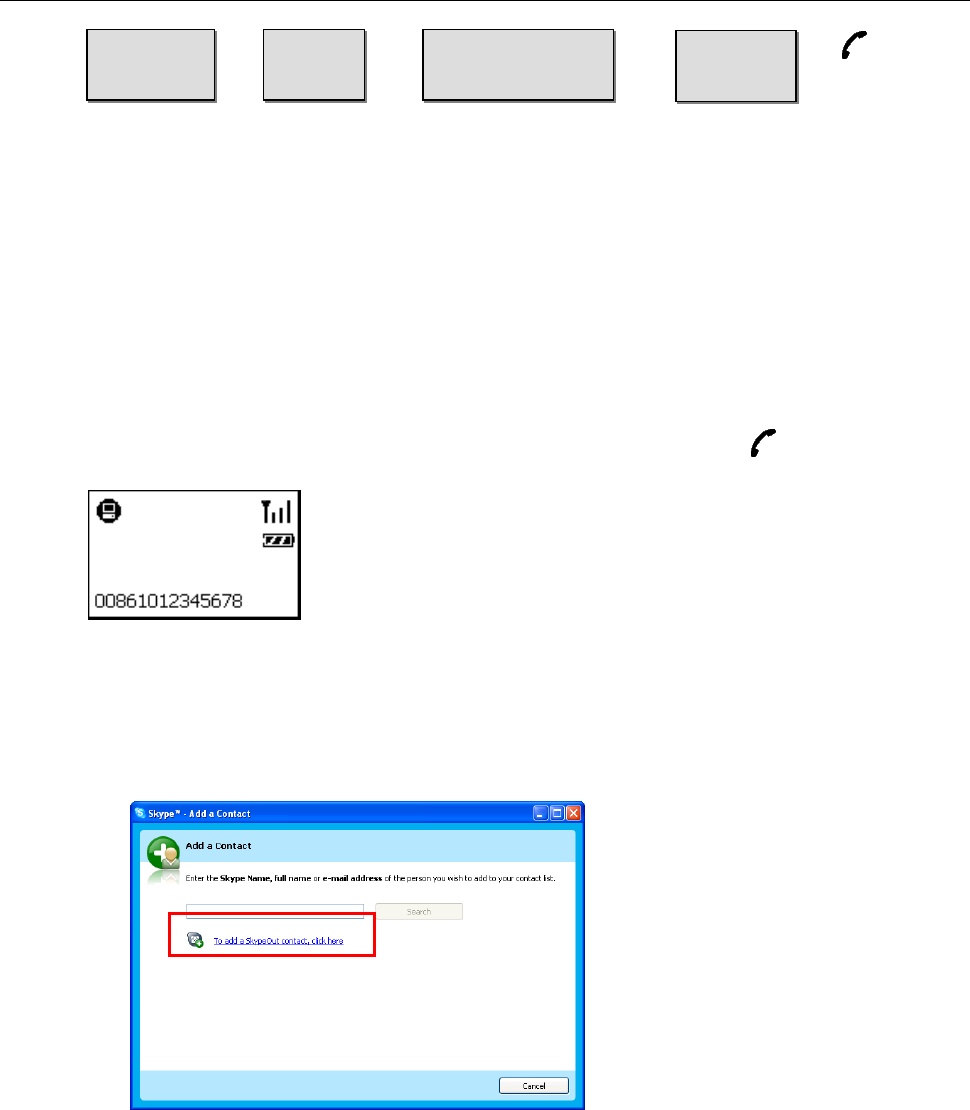
5. Using the Phone with Skype
+ + + +
Example 1: Placing a USA domestic call 222-5551234.
00-1-222-5551234 or +1-222-5551234
“00” or “+” Country
Code
City Code
(omit 0 if applicable)
Phone
Number
Example 2: Calling China (010-12345678 ) from USA.
00-86-10-12345678 or +86-10-12345678 (*Omit the preceding 0 from the local code)
Making a SkypeOut Call
Using the Key Pad to Enter SkypeOut Number
Enter the SkypeOut number using the keypad and then press .
Adding a SkypeOut Number to Contact List
1. To add a SkypeOut number, click Tools > Add a Contact.
2. Click the item for adding a SkypeOut contact.
23
Wireless USB Phone User’s Manual
3. Type in a name or description for this phone number and enter the phone
number. Then click Add Number. (No need to enter "+" or "00" before the
actual number; Skype will automatically add it to make it SkypeOut compatible.)
After adding the SkypeOut number to your contacts list, you can also assign a
speed-dial number to the contact.
Once the SkypeOut number is saved as a contact, you can press the Contacts
hotkey to display the Skype contact list. Then press Dial key to make the
call.
Loading Phone Number via Contact Info
1. Press the Contacts hotkey to display the Skype contact list.
2. Scroll with Up / Down to reach the desired contact.
3. Press the Info key to enter the information menu.
4. Scroll with Up / Down to reach the required item, e.g. Mobile Phone, Office
Phone or Home Phone.
5. Press OK key to display the number.
6. Press Dial to make the call.
24
5. Using the Phone with Skype
“No Number” is displayed for Mobile Phone, Office Phone or Home
Phone ?
The availibility of Mobile Phone, Office Phone and Home Phone depends on
whether your target contact provides these information in his/her profile settings,
which is accessed via File > Edit My Profile in Skype. Your contact must
provide these information in SkypeOut compatible format so that you can dial
these numbers.
Highlight a Skype contact and you can see the
personal info, if any, provided by the contact.
Fail to make a SkypeOut call?
The telephone number must be in SkypeOut compatible format othewise you
cannot succesfully make the call.
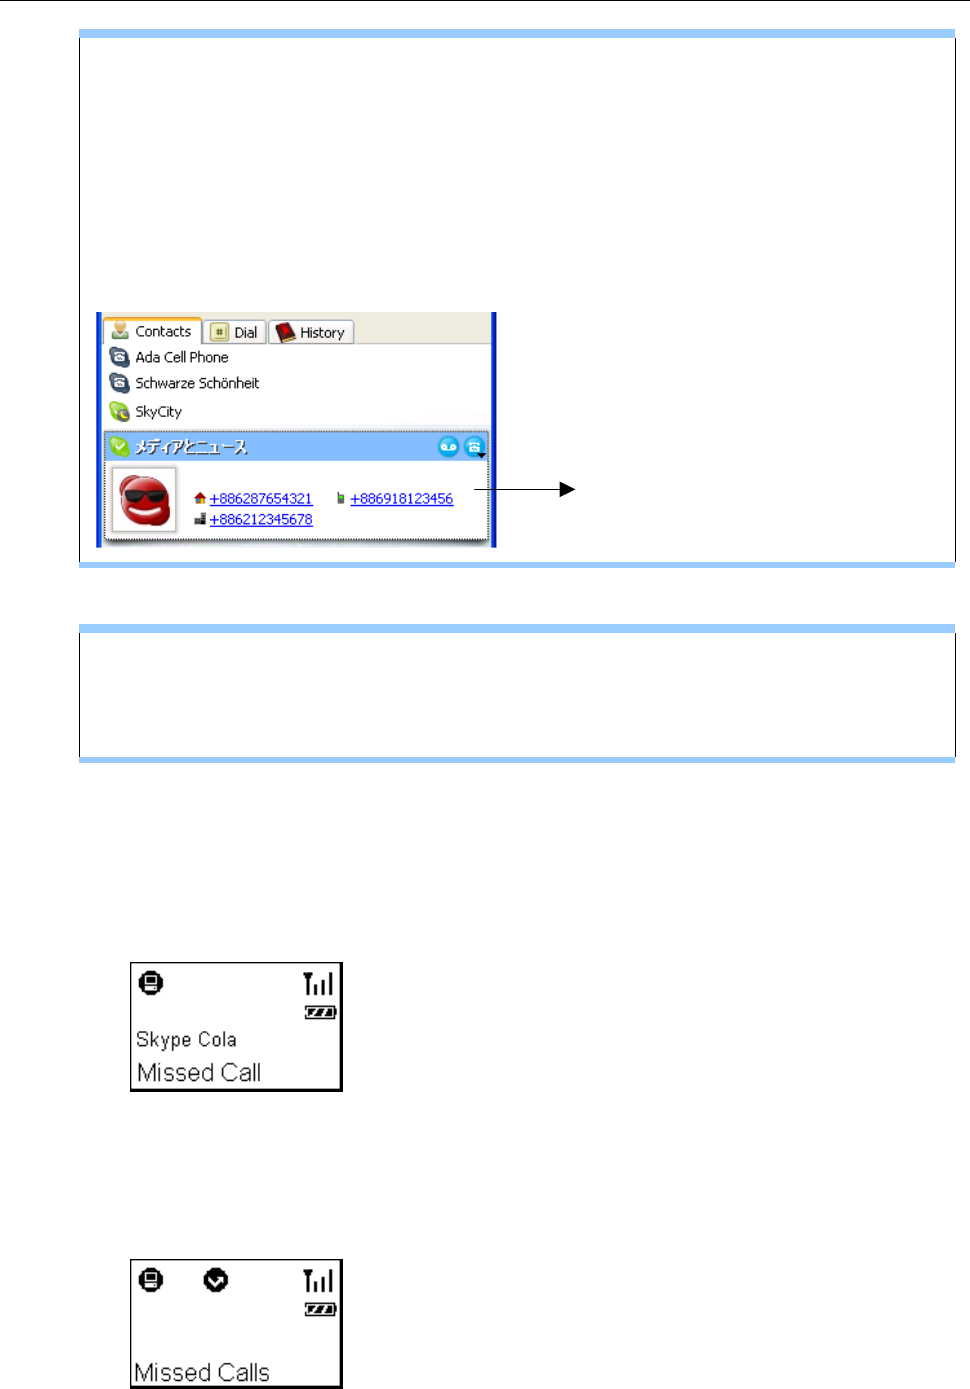
Missed Calls
In case you have a missed call, the LCD will display a notification of the latest
missed call.
There may be more than one missed call on the phone. To view missed calls list:
1. Press the MENU key and the use Up / Down to reach the Missed Calls menu.
Press OK to access the list content.
25
Wireless USB Phone User’s Manual
2. The caller and time of each missed call will be displayed. At the missed calls
screen, you can:
• Use Up / Down to scroll through the missed calls list.
• Press Dial to call the contact being displayed.
• Press Info to access the information menu for the contact being displayed.
Then you can use Up / Down to switch between Status, Office Phone,
Home Phone, Mobile Phone and Username and then press OK to enter
a desired item. If a SkypeOut compatible telephone number is provided,
you can press Dial to make a SkypeOut call.
Loading Calls List
Pressing the Calls List hotkey allows you to load the calls list, which includes
incoming, outgoing and missed calls. The calls are sorted in time order with the
most recent at the start.
Missed Call Outgoing Call Incoming Call
At the calls list screen, you can:
• Use Up / Down to scroll through the calls list.
• Press Dial to call the contact being displayed.
• Press Info to access the information menu for the contact being displayed.
26
5. Using the Phone with Skype
Then you can use Up / Down to switch between Status, Office Phone,
Home Phone, Mobile Phone and Username and then press OK to enter
a desired item. If a SkypeOut compatible telephone number is provided,
you can press Dial to make a SkypeOut call.
Clearing Calls List
To clear the calls records, open the Skype window and click the History tab. Select
the calls record you want to delete and press delete key to delete it.
Note: The wireless phone’s calls list corresponds to that on the Skype window. If
you clear the list entries on the Skype window, it will be also cleared from the
wireless phone.
Skype Status and Response Mode
The wireless phone’s respond mode varies according to your Skype status as
described in the table below:
Skype Status Phone Ringer Phone LCD Backlight
Offline No Ring No
Online Ring Flash
Skype Me Ring Flash
Away Ring Flash
Not Available Ring Flash
Do Not Disturb No Ring Flash
Invisible Ring Flash
27

Wireless USB Phone User’s Manual
6. Using the LCD Setting Menu
The wireless phone comes with a setting menu allowing you to verify or modify the
settings to adapt the phone to your requirements. Refer to the relevant sections for
the descriptions.
Viewing Information of Your Contact
This feature allows you to view the personal information of your contact, including
mobile phone, username, office phone and home phone. These information are
only available if your contact enter them via File > Edit My Profile in Skype.
If a telephone number is provided, you can even make a SkypeOut call providing
you have SkypeOut credits.
To view the information of a contact:
1. Press the Contacts hotkey to display the Skype contact list.
2. Scroll with Up / Down to reach the desired contact.
3. Press the Info key to enter the information menu.
4. Use Up / Down to scroll through the options: Mobile Phone, Username,
Office Phone and Home Phone.
5. To view the setting, press OK.
If a telephone number is provided, you can also place a SkypeOut call by just
pressing the Dial key providing you have valid SkypeOut credits.
6. To return to your main screen, just keep pressing Back
28
6. Using the LCD Setting Menu
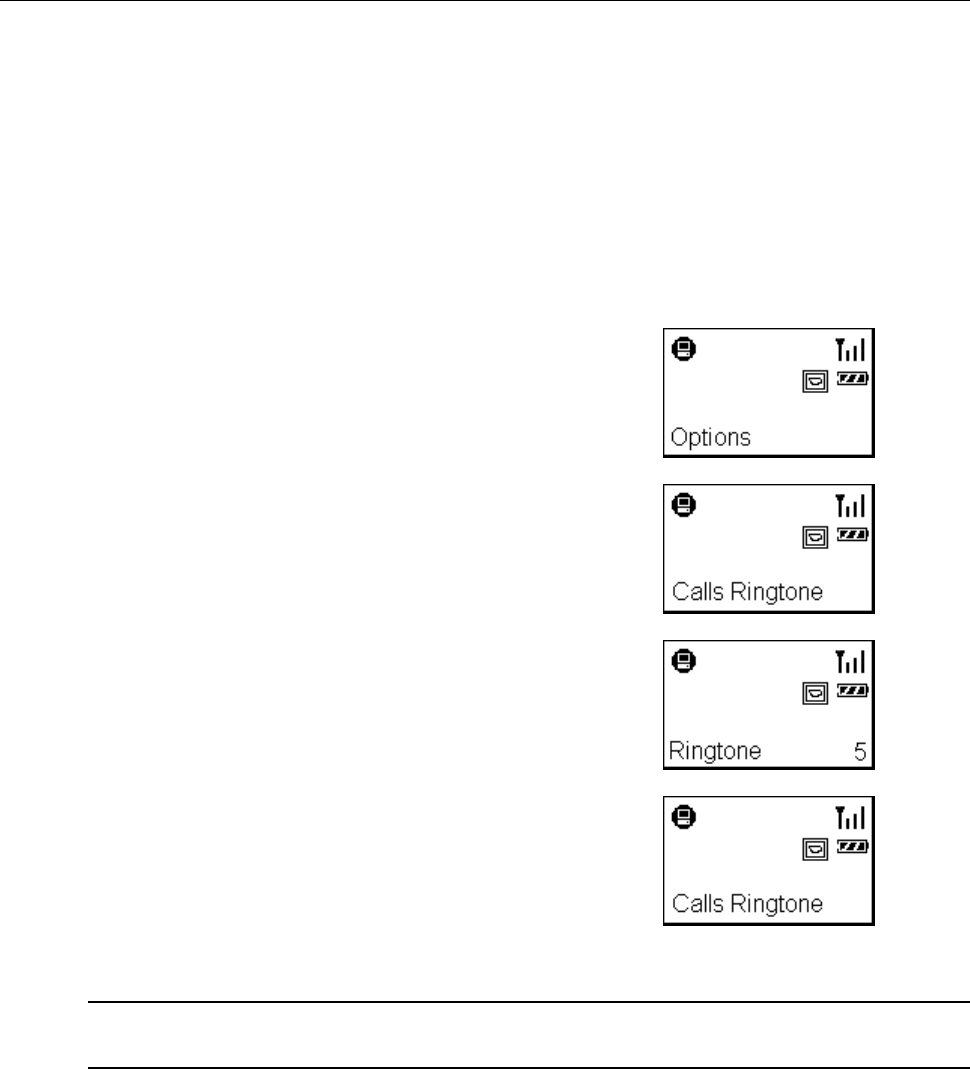
Using Options Menu to Adjust Phone Settings
The Options menu comes with a couple of wireless phone settings. You can
modify these settings as required to adapt the phone to your personal requirements.
To use the Options menu:
1. Press the MENU key and then use Up / Down to
reach the Options menu.
2. Press OK to enter the Options menu.
3. Use Up / Down to scroll through the menu.
Once the desired menu is reached, press OK.
4. Press Up / Down to change the setting.
5. Press OK to activate the setting.
The screen will return to previous menu.
Note: You must press OK to activate the settings otherwise the settings will not be
changed.
29

Wireless USB Phone User’s Manual
Available items under Options menu and the selectable choices for each item are
given in the table below:
Option Function Available Settings
Speaker Vol Adjusts speaker and keypad tone volume.
Note: Pressing the Vol Up / Vol Down key
on the side of the phone will override this
setting.
Vol 1 ~ 7
Hold Ringtone Selects holding ringtone. When you
placing a call on hold, the phone will play
the holding ringtone you specify here.
Ringtone 1-3
Calls Ringtone Selects the ringtone to be played when
you get a call.
Ringtone 1-5
Key Tone Turns on/off the keypad tone. Tone On
Tone Off
Ringing Vol Adjusts the volume of the ringtone. Vol 1 ~ 3
Reset Reset all the options settings to the
defaults.
30
6. Using the LCD Setting Menu
Menu Navigation
* Use Up and Down
to scroll through.
OK
+886229123456
* Use Up and Down to
scroll through.
Mobile Phone
Username
Office Phone
Home Phone
Mr. Wang
Abby
Contacts
Missed
Calls
Call List
Options
OK
Make SkypeOut call
OK
Make SkypeOut call
+886229123456
Status
Mobile Phone
Username
Office Phone
Home Phone
Make a call
Ann
Bill
OK
* To enable the setting, press OK.
Make SkypeOut call
Status
Mobile Phone
Username
Office Phone
Home Phone
OK
+886229123456
OK
Make a call
Mr. Wang
Abby
OK
OK
Speaker Vol
Hold Ringtone
Calls Ringtone
Key Tone
Ringing Vol
Reset
OK
OK
OK
OKOK
Vol 1~7
Ringtone 1~3
Ringtone 1~5
Tone On
Tone Off
Vol 1~3
Reset all the options settings to the defaults.
31
Wireless USB Phone User’s Manual
7. Using with Instant Messenger
Software
The wireless phone can be used as an audio device with instant message (IM)
software, such as MSN Messenger and Yahoo Messenger. To do this, you should
first configure the software to use the wireless phone as the audio device.
MSN Messenger
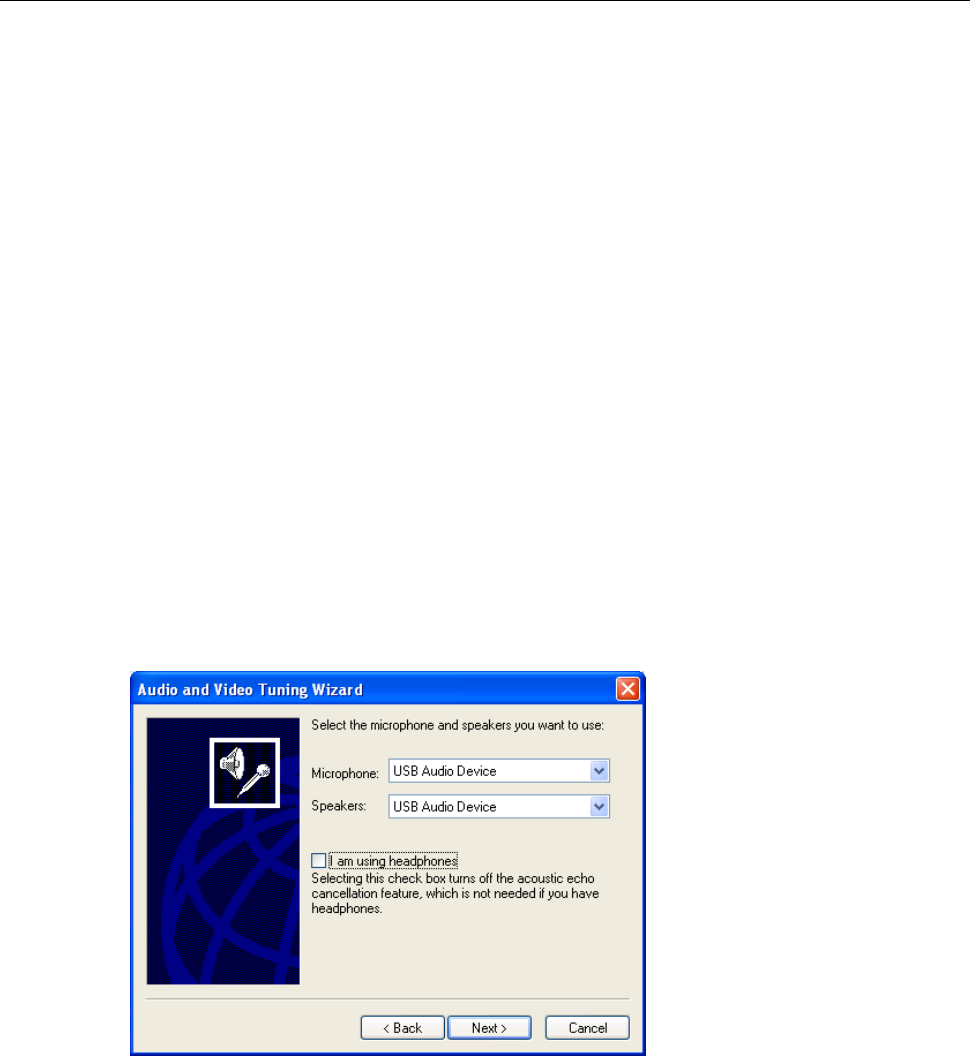
Select Tools > Audio and Video setup to open the Audio and Video Setup
dialog box and then proceed as prompted. Make sure the audio and video devices
are correctly configured as shown by the figure below.
Yahoo Messenger
Select Messenger > Preferences > Calling & Audio and select USB Audio
Device as the microphone and the speaker.
After the configuration:
1. Use the instant messenger to initiate the audio conversion on your computer
side.
2. Press the Dial (Always Link) key and start your conversation via the wireless
phone. When the conversation ends up, press the Hang Up key.
32

7. Using with Instant Messenger Software
Important: After the conversation, make sure the press the Hang Up key to disable
the always link function; otherwise the phone will keep consuming the battery
power due to power-saving function is disabled.
33

Wireless USB Phone User’s Manual
8. Troubleshooting
Q1. When I try to operate the wireless phone, the LCD keeps showing “Linking”.
A1. If the RF indicator disappears from the screen in working mode, it means the
wireless connection cannot be made. Move your wireless phone closer to the
dongle to see if the problem is solved.
If the RF indicator remains absent, verify if any of the following situations
occurs:
• The dongle has been un-plugged or not properly plugged.
• Your computer enters standby or hybernation mode.
Q2. I’ve got noise and hiss on my phone conversion.
A2. There are a couple of reasons that might degrade the sound quality, such as
distance, obstacle and network traffic. You may try to improve the sound quality
by first moving closer to your host computer.
Also, a partition wall or window in your home or office may be obstacle to the
RF signal. Keep away from possibel obstacle and try move closer to the
dongle.
If you intend to use more than one pair of wireless phone and transceiver
dongle within a wireless radio range, try to increase the distance between the
dongles.
Q3. The phone doesn’t work at all.
A3. Check these items first:
• Make sure the battery is not running off.
• Make sure the dongle, SkyWin and Skype communicate well on the host
computer.
• If the problem persists, reset the phone by inserting a paperclip into the
Reset hole. Press lightly and then release to power off the phone. Then
re-power on the phone by long-pressing the Power key.
34

8. Troubleshooting
Q4. While using the wireless phone:
• There is no dial tone after pressing the dial key.
• I cannot hear the other party on my wireless phone.
• I hear the other party on my PC’s sound card (or another USB speaker)
instead of the wireless phone.
• The other party cannot hear me.
A4. Make sure your software is configured to use wireless phone as the audio
in/out device.
In Skype window, click Tools > Options > Sound Devices. Make sure the
Audio In (microphone) and Audio Out (speaker) and are correctly configured
to use USB Audio Device, i.e. the wireless phone.
Q5. When the phone’s USB port is connected to a computer for charging purpose,
can I unplug the dongle and allow the phone to directly communicate with the
host computer?
A5. No. The phone’s USB port is only for power charging but not for data transfer. It
always needs a USB dongle as a data transceiver.
Q6 Will the Wi-Fi devices interference with the phone?
A6. Although the wireless phone shares 2.4 GHz frequency band with Wi-Fi
devices (such as the popular IEEE 802.11x wireless network device in office
use), the phone has implemented Adaptive frequency hopping (AFH) solution
to mitigate radio interference so that the phone can co-exist with Wi-Fi devices
without degrading the wireless performance.
Q7. Why cannot my contact’s name correctly displayed? The name is in one of the
supported languages of the phone.
A7. Make sure the language is correctly displayed in Skype, If not, you need to
install related language on your system. (Refer to Windows Online help for
more information.)
Q8. While using the wireless phone to make/answer a call in Skype, can I still play
music by my PC’s sound card or USB speaker?
A8. Yes. Just set your sound card or preferred audio device as the playback device
in Windows.
35
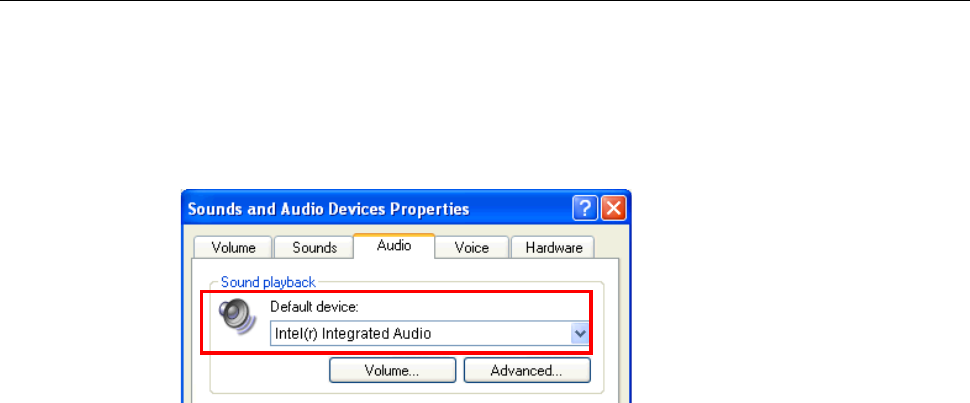
Wireless USB Phone User’s Manual
1. Under Control Panel, double-click the Sounds and Audio Devices (or
Sounds and Multimedia) icon and then click the Audio tab.
2. Select the sound card or preferred audio device as the sound playback
device.
Q9. I try to adjust the phone’s speaker/microphone volume value using Windows
Sounds and Audio Devices Properties window but cannot move the slider.
A9. The phone’s speaker/microphone volume is designed not to be adjusted via
Windows. You can only adjust the speaker volume using the phone’s option
menu (Options > Speaker Vol.).
36

9. Specifications
9. Specifications
Wireless Interface 2.4GHz Radio Frequency Technology
Dongle Interface USB 1.1 (A type male connector)
Operating Range Indoor: > 15 meters, Outdoor: > 30 meters
(in an open environment)
Transmitter power +17 dBm
RSSI -35 to -80 dBm
RF Out Power 50 mW
Operating Channels Supports frequency hopping on 79 channels
RF
Features • Up to seven simultaneous connections within
effective range
• RF interface baud rate 1Mbps transmit &
receive
• Adaptive Frequency Hopping (AFH), support
for Bluetooth + Wi-Fi co-existence
Voice • Full duplex
• Toll quality (8KHz, 16bit voice)
• CVSD encode/decode for voice bits stream passing through host
Power Source One 850 mAh Li-Polymer rechargeable battery
Operating Voltage: DC 5V (Bus-Powered)
Battery Life Standby Mode: 60 hours
Continuous use: 6 hourser-off Mode: 1-3 Months
Power Saving Enters standby mode after 20 secs of inactivity
Battery
Charging Method USB bus power, USB 1.1 Mini B type connector.
37

Wireless USB Phone User’s Manual
Phone Controls • Volume Up, Volume Down, Hold, Mute
• Switch on/off
• Control interaction with Skype AP
• Numerical keys
• Telephone control-like keys
Resolution 128 x 32 pixels
Size 31 X 19 mm
Backlight Blue
Display Mode FSTN, POSITIVE, TRANSFULECTIVE
LCD Screen
Language Support English, French, German, Italian, Spanish,
Portuguese, Polish, Swedish, Dutch, Finnish,
Norwegian, Traditional Chinese, Japanese
Size Size: 13 mm
Response Frequency: 300 ~ 3.4K Hz
Output Impedance: 150 ohm
Speaker
Signal-To-Noise Ratio 90 dB
Sensitivity - 40 +/- 2 dB
Directivity Onmidirectional
Microphone
Response Frequency 20 ~ 20K Hz
Selectable Settings Speaker Volume, Holding sound, Ringtone, Key Tone, Ringing Volume
Temperature Operating: 0~40 °C
Storage: -20~60 °C
Humidity
(Non-Condensing)
Operating: < 90%
Storage: < 95%
*Specifications are subject to change without notice.
38

10. Regulatory Compliance
10. Regulatory Compliance
FCC Conditions
This equipment has been tested and found to comply with Part 15 of the FCC
Rules. Operation is subject to the following two conditions:
(1) This device may not cause harmful interference, and
(2) This device must accept any interference received. Including interference that
may cause undesired operation.
CE
This equipment is in compliance with the requirements of the following regulations:
EN 55 022: CLASS B
WEEE Information
For EU (European Union) member users:
According to the WEEE (Waste electrical and electronic equipment) Directive, do
not dispose of this product as household waste or commercial waste. Waste
electrical and electronic equipment should be appropriately collected and recycled
as required by practices established for your country. For information on recycling
of this product, please contact your local authorities, your household waste
disposal service or the shop where you purchased the product.
39
Warning
This equipment has been tested and found to comply with the limits for a Class B digital device, pursuant to part 15 of
the FCC rules. These limits are designed to provide reasonable protection against harmful interference in a residential
installation. This equipment generates, uses and can radiate radio frequency energy and, if not installed and used in
accordance with the instructions, may cause harmful interference to radio communications. However, there is no
guarantee that interference will not occur in a particular installation. If this equipment does cause harmful interference
to radio or television reception, which can be determined by turning the equipment off and on, the user is encouraged
to try to correct the interference by one or more of the following measures:
-Reorient or relocate the receiving antenna.
-Increase the separation between the equipment and receiver.
-Connect the equipment into an outlet on a circuit different from that to which the receiver is connected.
-Consult the dealer or an experienced radio/TV technician for help.
This device complies with Part 15 of the FCC Rules. Operation is subject to the following two conditions:
(1) This device may not cause harmful interference.
(2) This device must accept any interference received, including interference that maycause undesired
operation.
Any changes or modifications (including the antennas) made to this device that are not expressly approved by
the manufacturer may void the user’s authority to operate the equipment.
FCC RF Radiation Exposure Statement: This equipment complies with FCC RF radiation exposure limits set
forth for an uncontrolled environment. This device and its antenna must not be co-located or operating in
conjunction with any other antenna or transmitter.