Google S10 Signaling Apparatus User Manual voltage
Nest Labs Inc Signaling Apparatus voltage
UserManual.wiki
>
Google
>
S10 User Manual
>
user manual voltage
Contents
1.
user manual battery
2.
user manual voltage
user manual voltage
Navigation menu
Upload a User Manual
Namespaces
Wiki Guide
HTML
PDF
Info
Views
User Manual
Discussion / Help
Navigation

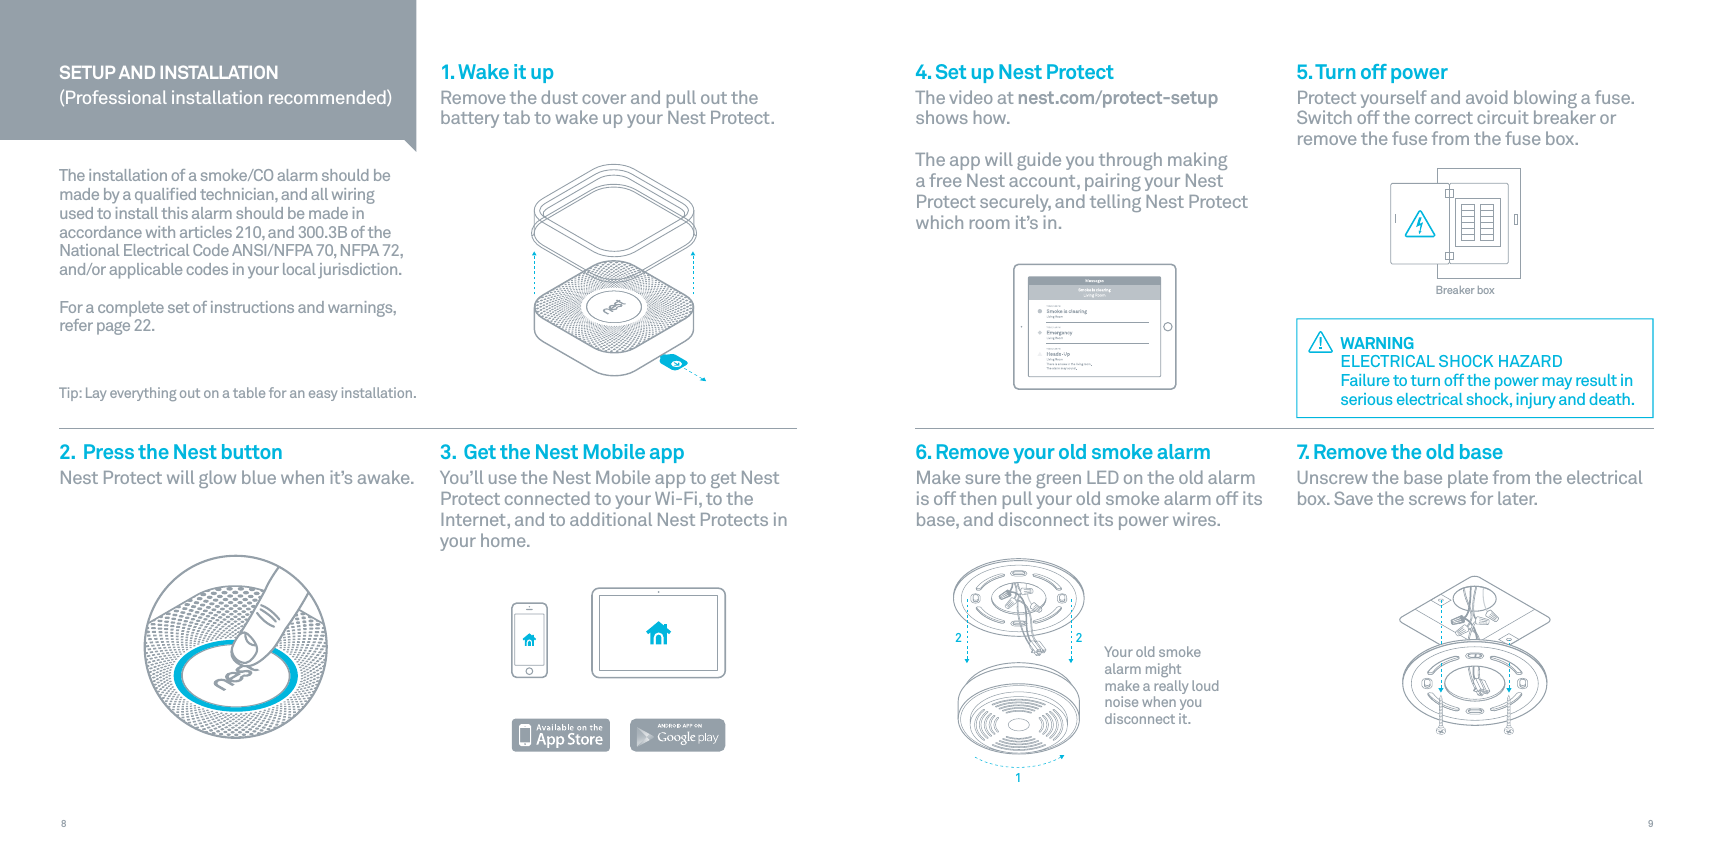
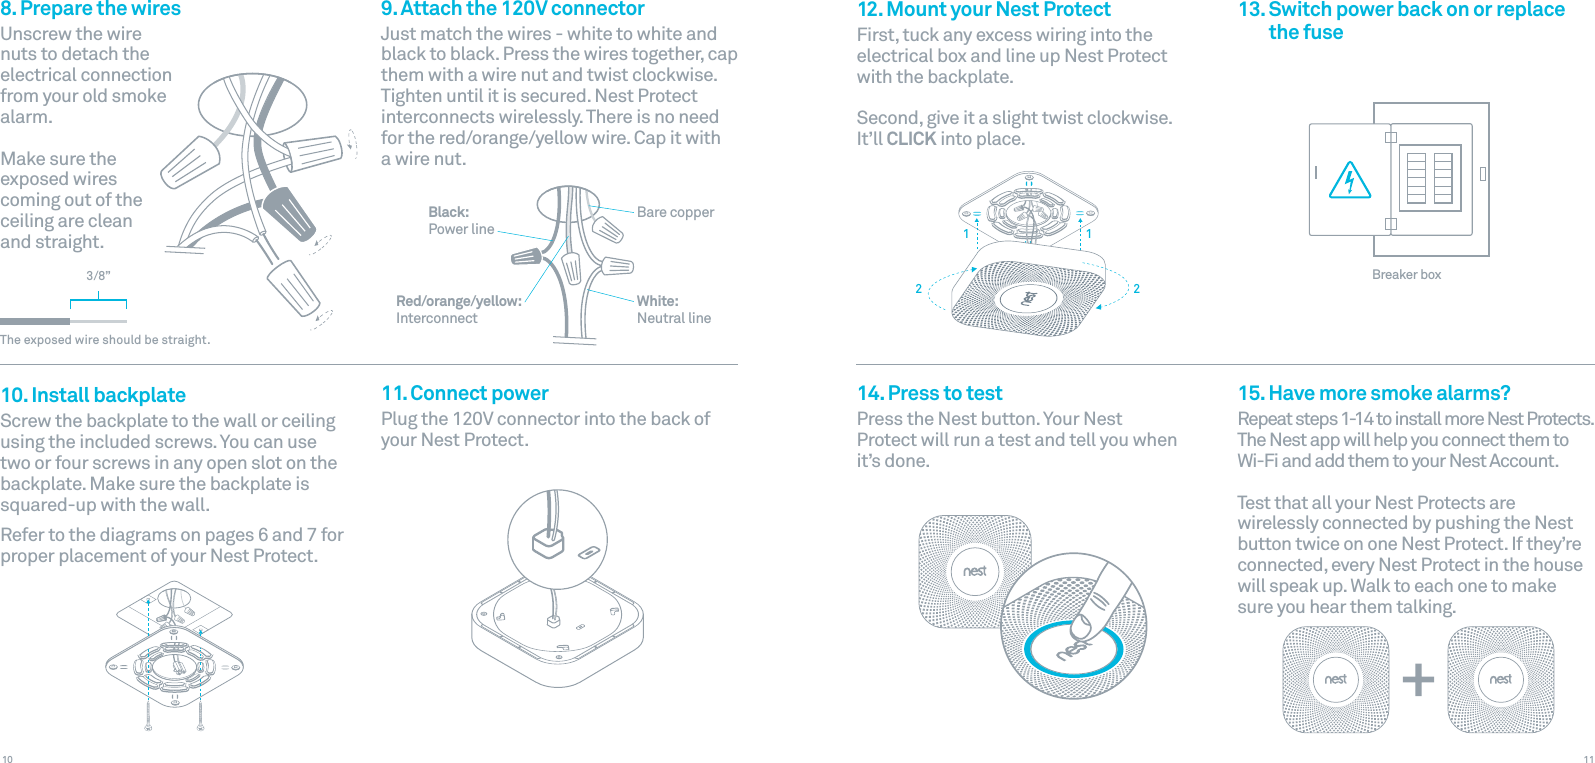
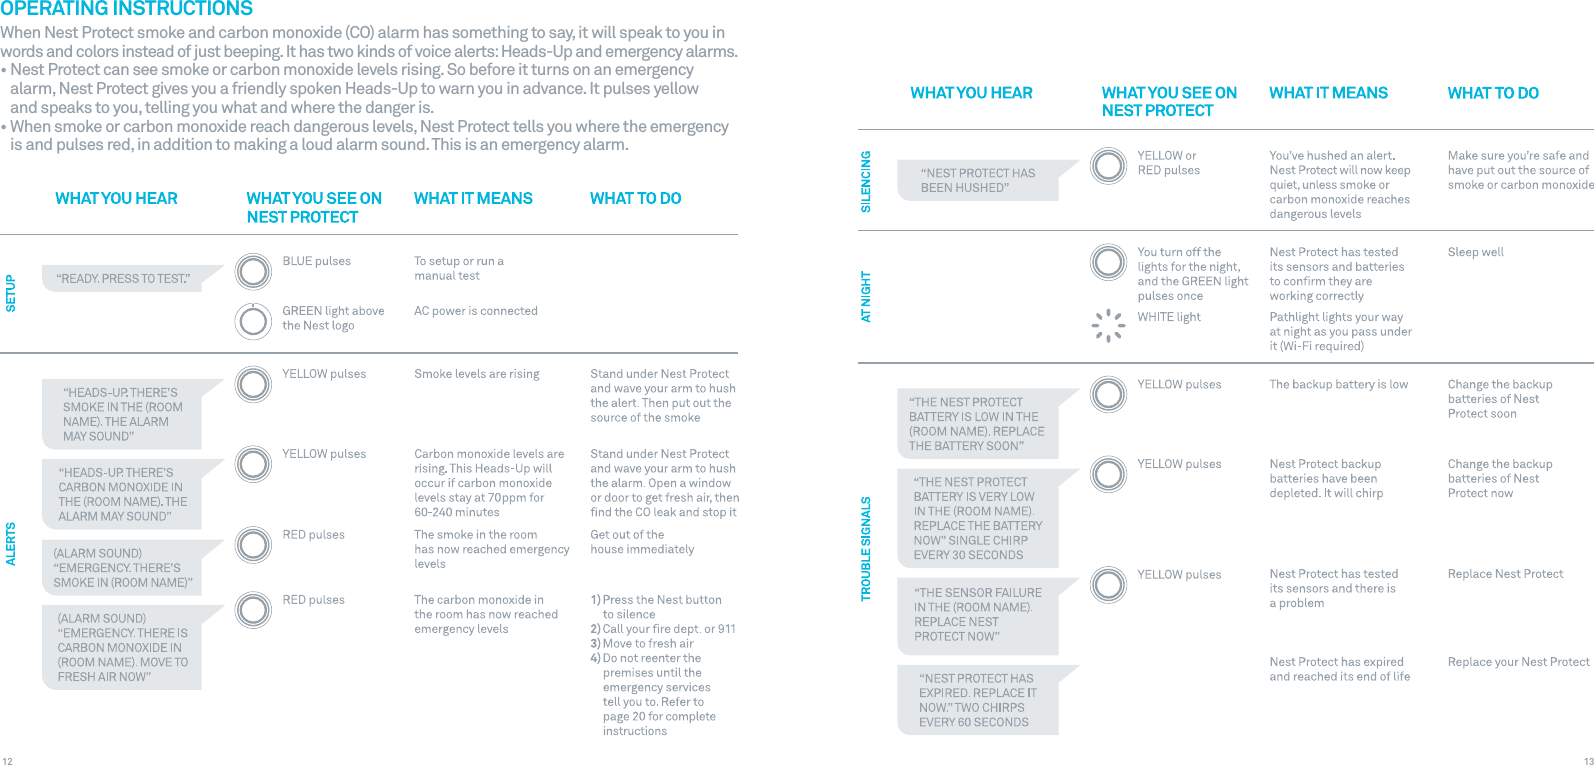
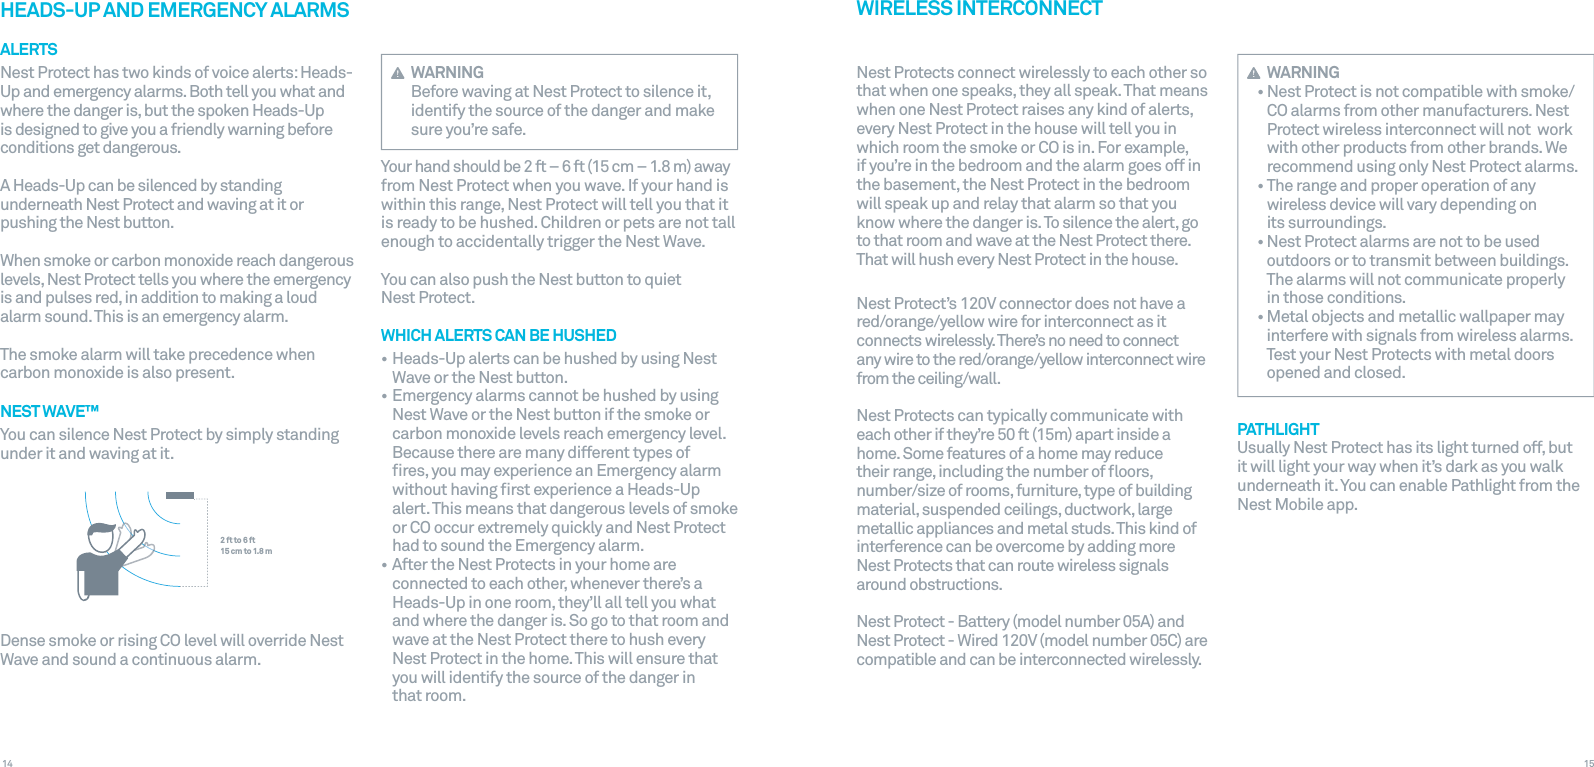

![25 24 vehicles are not, and have not been, operating in an attached garage or adjacent to the residence.This information is available as a label provided in the box. Stick it in a spot where everyone can see it, like the refrigerator.THE FOLLOWING CONDITIONS CAN RESULT IN TRANSIENT CO SITUATIONS1. Excessive spillage or reverse venting of fuel burning appliances caused by: I) Outdoor ambient conditions such as wind direction and/or velocity, including high gusts of wind; heavy air in the vent pipes (cold/hu mid air with extended periods between cycles). II) Negative pressure differential resulting from the use of exhaust fans. III) Simultaneous operation of several fuel burning appliances competing for limited internal air. IV) Vent pipe connection vibrating loose from clothes dryers, furnaces, or water heaters. V) Obstructions in or unconventional vent pipe designs which amplify the above situations.2. Extended operation of unvented fuel burning devices (range, oven, fireplace, etc.) 3. Temperature inversions which can trap exhaust gases near the ground.4. Car idling in an open or closed attached garage, or near a home.5. NEVER bring a charcoal grill inside and ALWAYS operate a portable generator outside, a safe distance from the house, and well away from windows.PHONE NUMBER:PHONE NUMBER:WHAT TO DO IN CASE OF A CARBON MONOXIDE ALARMWARNINGActuation of your CO alarm indicates the presence of carbon monoxide (CO) which can KILL YOU. If alarm signal sounds:1) Press the Nest button;2) Call your emergency services [fire dept. or 911];3) Immediately move to fresh air – outdoors or by an open door/window. Do a head count to check that all persons are accounted for. Do not reenter the premises nor move away from the open door/window until the emergency services responders have arrived, the premises have been aired out, and your alarm remains in its normal condition.4) After following steps 1 – 3, if your alarm reactivates within a 24 hour period, repeat steps 1 – 3 and call a qualified appliance technician to investigate for sources of CO from fuel burning equipment and appliances, and inspect for proper operation of this equipment. If problems are identified during this inspection have the equipment serviced immediately. Note any combustion equipment not inspected by the technician and consult the manufacturers’ instructions, or contact the manufacturers directly, for more information about CO safety and this equipment. Make sure that motor WARNINGThe alarm only indicates the presence of carbon monoxide gas at the sensor. Carbon monoxide gas may be present in other areas.Individuals with certain medical problems should consider using detection devices with lower COHb alarming capabilities and consider warning devices which provide audible and visual signals for carbon monoxide concentrations under 30 ppm.SYMPTOMS OF CO POISONINGThe following symptoms are related to CARBON MONOXIDE POISONING and are to be discussed with ALL members of the household:• Mild Exposure: Slight headache, nausea, vomiting, fatigue (often described as ‘Flu-like’ symptoms).• Medium Exposure: Severe throbbing headache, drowsiness, confusion, fast heart rate.• Extreme Exposure: Unconsciousness, convulsions, cardiorespiratory failure, death.• Many cases of reported CARBON MONOXIDE POISONING indicate that while victims are aware they are not well, they become so disoriented they are unable to save themselves by either exiting the building or calling for assistance. Young children and household pets are typically the first affected.CARBON MONOXIDE (CO) PRECAUTIONSWHAT IS CARBON MONOXIDE?Carbon Monoxide (CO) is an invisible, odorless, tasteless gas produced when fuels do not burn completely, or are exposed to heat (usually fire). These fuels include: wood, coal, charcoal, oil natural gas, gasoline, kerosene, and propane. Common appliances are often sources of CO. such as oil or gas burning furnaces, gas ovens, wood-burning fireplaces, and charcoal grills. If they are not properly maintained, are improperly ventilated or malfunction, CO levels can rise quickly. CO is a real danger now that homes are more energy efcient. “Air-tight” homes with added insulation, sealed windows, and other weatherproong can “trap” CO inside. Electrical appliances typically do not produce CO.The Nest Protect CO sensor meets the alarm response time requirements of the American Na-tional Standard ANSI/UL 2034. Standard alarm times are as follows: • At 70 PPM, the unit must alarm within 60-240 minutes. • At 150 PPM, the unit must alarm within 10-50 minutes. • At 400PPM, the unit must alarm within 4-15 minutes. WARNINGThis carbon monoxide alarm is designed to detect carbon monoxide from any source of combustion. It is NOT designed to detect any other gas. Page: 25 Page: 24](https://usermanual.wiki/Google/S10.user-manual-voltage/User-Guide-2103368-Page-13.png)