Google S30 Wireless Protect User Manual 2
Nest Labs Inc Wireless Protect 2
UserManual.wiki
>
Google
>
S30 User Manual
>
User manual 2
Contents
1.
User manual 1
2.
User manual 2
User manual 2
Navigation menu
Upload a User Manual
Namespaces
Wiki Guide
HTML
PDF
Info
Views
User Manual
Discussion / Help
Navigation

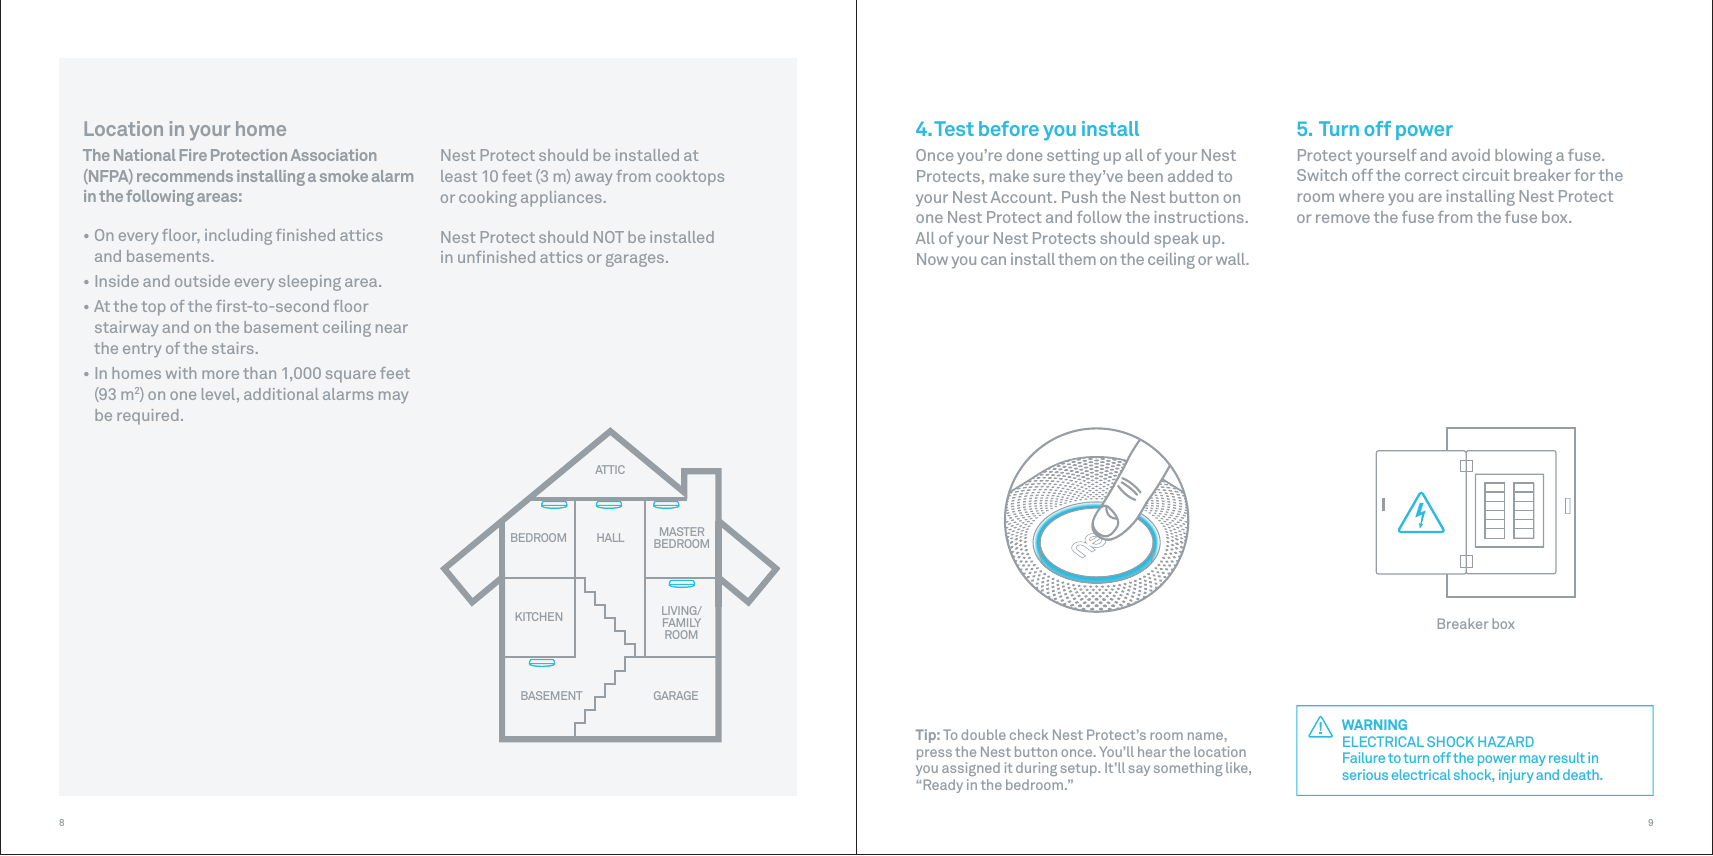
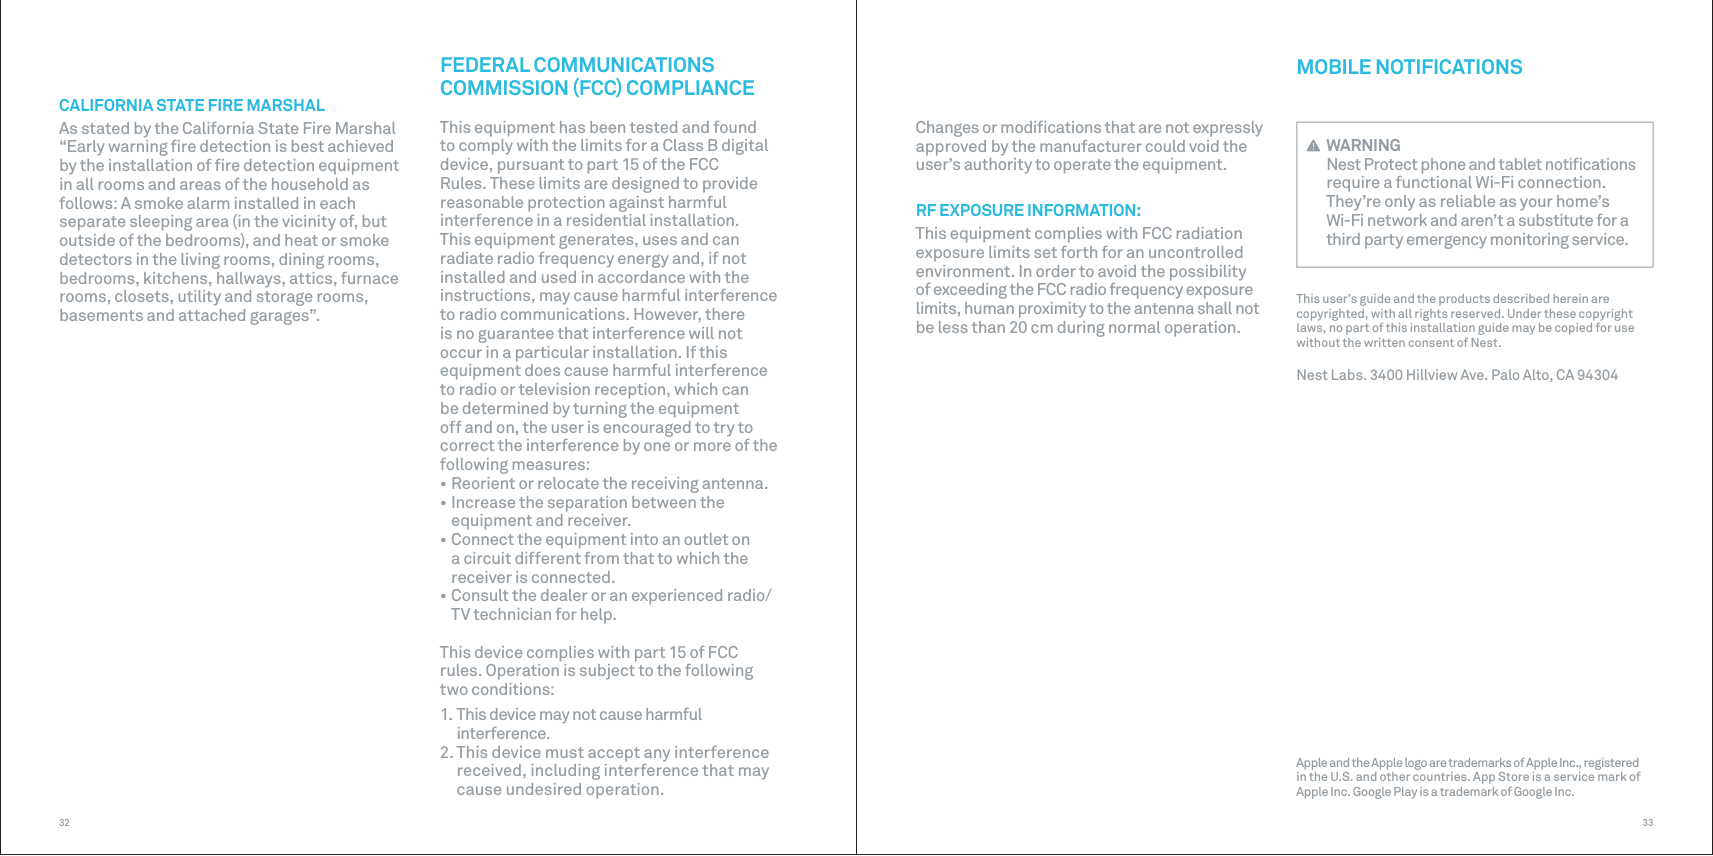
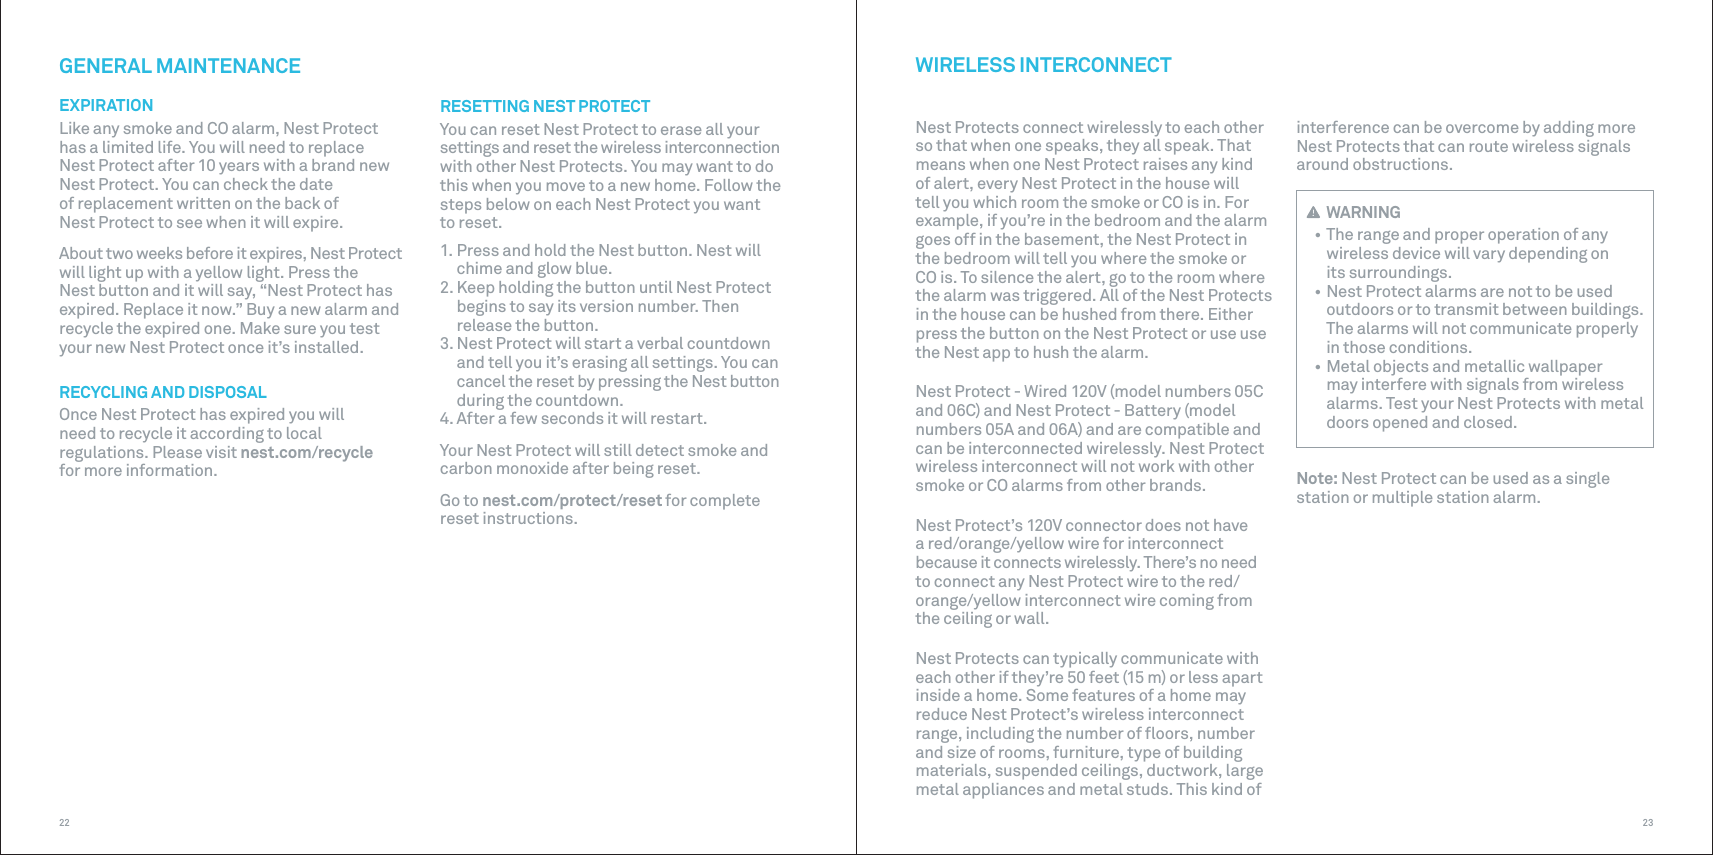
![WHAT YOU HEARALERTSSILENCINGWHAT IT MEANS WHAT TO DO“HEADS-UP. THERE’S SMOKE IN THE [ROOM NAME]. THE ALARM MAY SOUND.”Smoke levels are rising. Put out the source of the smoke. Then use the Nest app or press the Nest button to hush the alert.Open a window or door to get fresh air. Then use the Nest app or press the Nest button to hush the alert.Get out of the house immediately.Make sure you’re safe and have put out the source of smoke or carbon monoxide.1) Operate reset/silencebutton (Nest button).2) Call your fire dept. or 911.3) Move to fresh air.4) Do not reenter the premises until the emergency services tell you to. Refer to page 30 for complete instructions.Carbon monoxide levels have been high for a while.You’ve hushed an alert.Nest Protect will now keep quiet, unless smoke or carbon monoxide remains at critical levels.The carbon monoxide in the room has reached critical levels.“HEADS-UP. THERE’S CARBON MONOXIDE IN THE [ROOM NAME]. THE ALARM MAY SOUND.” (Alarm sound)“EMERGENCY. THERE’S CARBON MONOXIDE IN [ROOM NAME]. MOVE TO FRESH AIR.” (Alarm sound)“EMERGENCY. THERE’S SMOKE IN [ROOM NAME]”“SMOKE ALARM HUSHED.”“CARBON MONOXIDE ALARM HUSHED.”“THE ALARM IS OVER.”YELLOW pulses.YELLOW pulses.RED pulses.RED pulses.YELLOW orRED pulses.GREEN pulses.WHAT YOU SEEHEADSUP AND EMERGENCY ALARMSThe smoke in the room has reached critical levels.Make sure you’re safe and have put out the source or smoke or carbon monoxide.Smoke or carbon monoxide levels are decreasing.1716HEADSUP AND EMERGENCY ALARMSALERTSWhen Nest Protect has something to say, it will speak to you in words and light up instead of just beeping. Nest Protect has two kinds of voice alerts: Heads-Up and Emergency Alarms.When smoke or carbon monoxide levels are heightened but haven’t yet reached Emergency Alarm levels, Nest Protect can sound a Heads-Up as an early warning. Nest Protect will pulse yellow and tell you where there’s smoke or carbon monoxide. You’ll get an Emergency Alarm when smoke or carbon monoxide reach critical levels. Nest Protect will pulse red, sound a loud alarm, and tell you what room the emergency is in. If there’s both smoke and CO present, the smoke alarm will take priority.SILENCINGHeads-Up alerts and some Emergency Alarms can be hushed by using the Nest app or pressing the Nest button. In some cases, the smoke level may be too high for the Emergency Alarm to be hushed. Only silence an alarm once you have checked conditions at the Nest Protect that first sounded the alarm. Do not silence Nest Protect by disconnecting it from line voltage and removing the batteries. This will disable the alarm so it cannot sense smoke or carbon monoxide, leaving you at risk.Because there are many different types of fires, you may experience an Emergency Alarm without having first experienced a Heads-Up alert. This means that critical levels of smoke or CO occurred extremely quickly and Nest Protect has to sound the Emergency Alarm.HAVE MORE THAN ONE NEST PROTECT?After all the Nest Protects in your home are connected to each other, if there’s a Heads-Up or an Emergency Alarm in one room, they’ll all tell you what the danger is and which room it’s in.If multiple Nest Protects are interconnected, a Heads-Up alert or Emergency Alarm can be silenced only at the Nest Protect that originally sounded the alert. You’ll need to go to that room to hush all the Nest Protects in your home. Always check the conditions near the Nest Protect that first detected the smoke or carbon monoxide before silencing it.](https://usermanual.wiki/Google/S30.User-manual-2/User-Guide-2648522-Page-9.png)

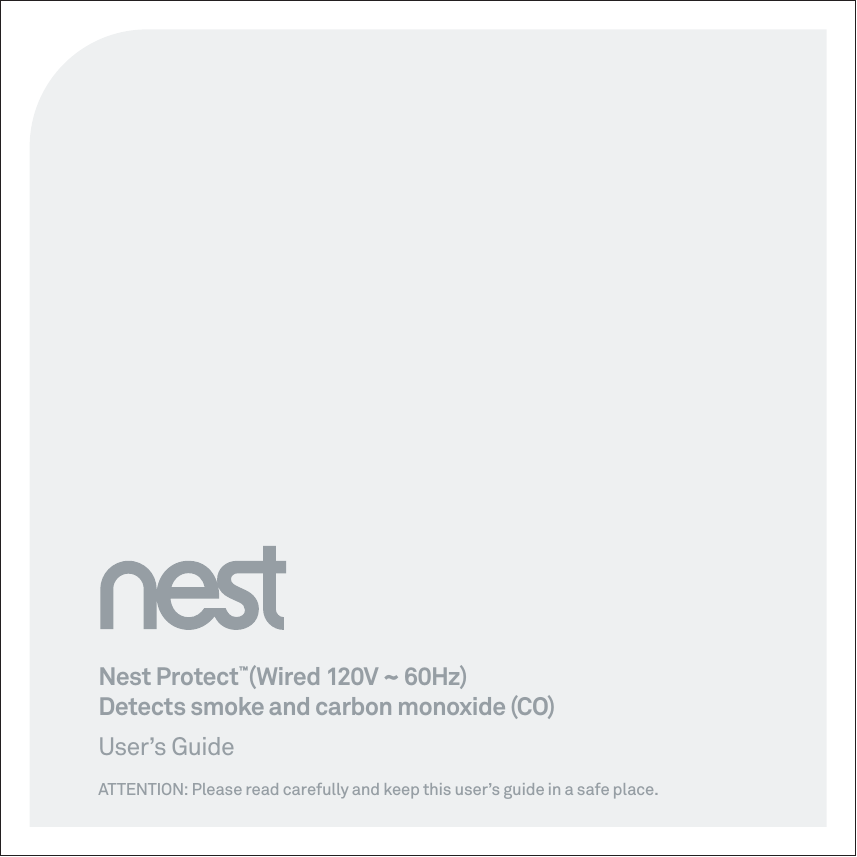
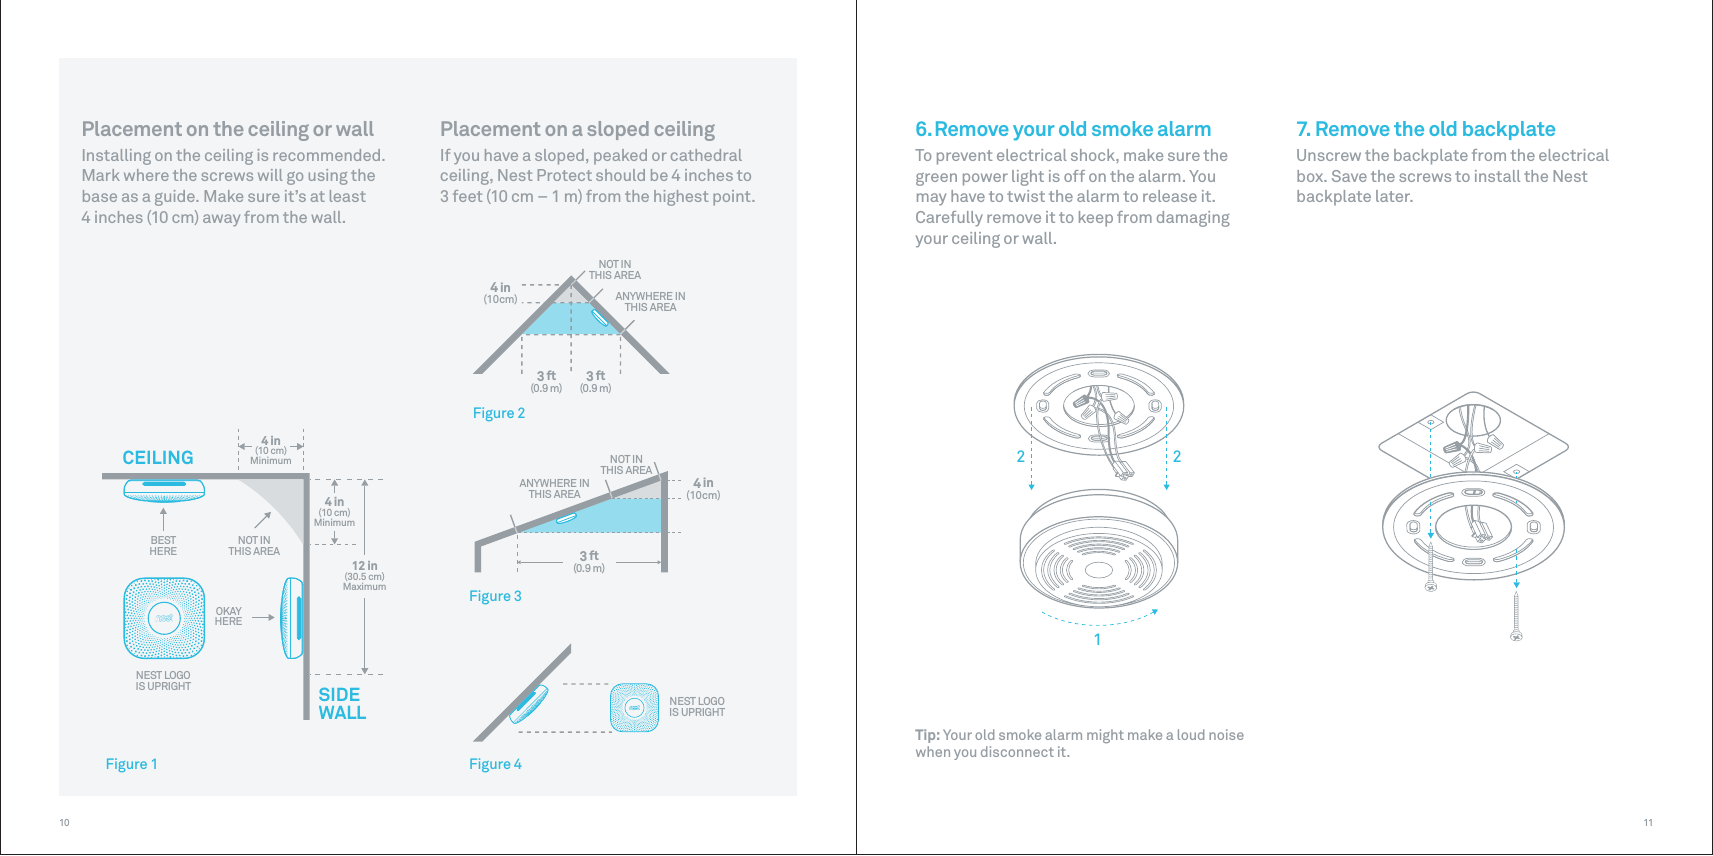
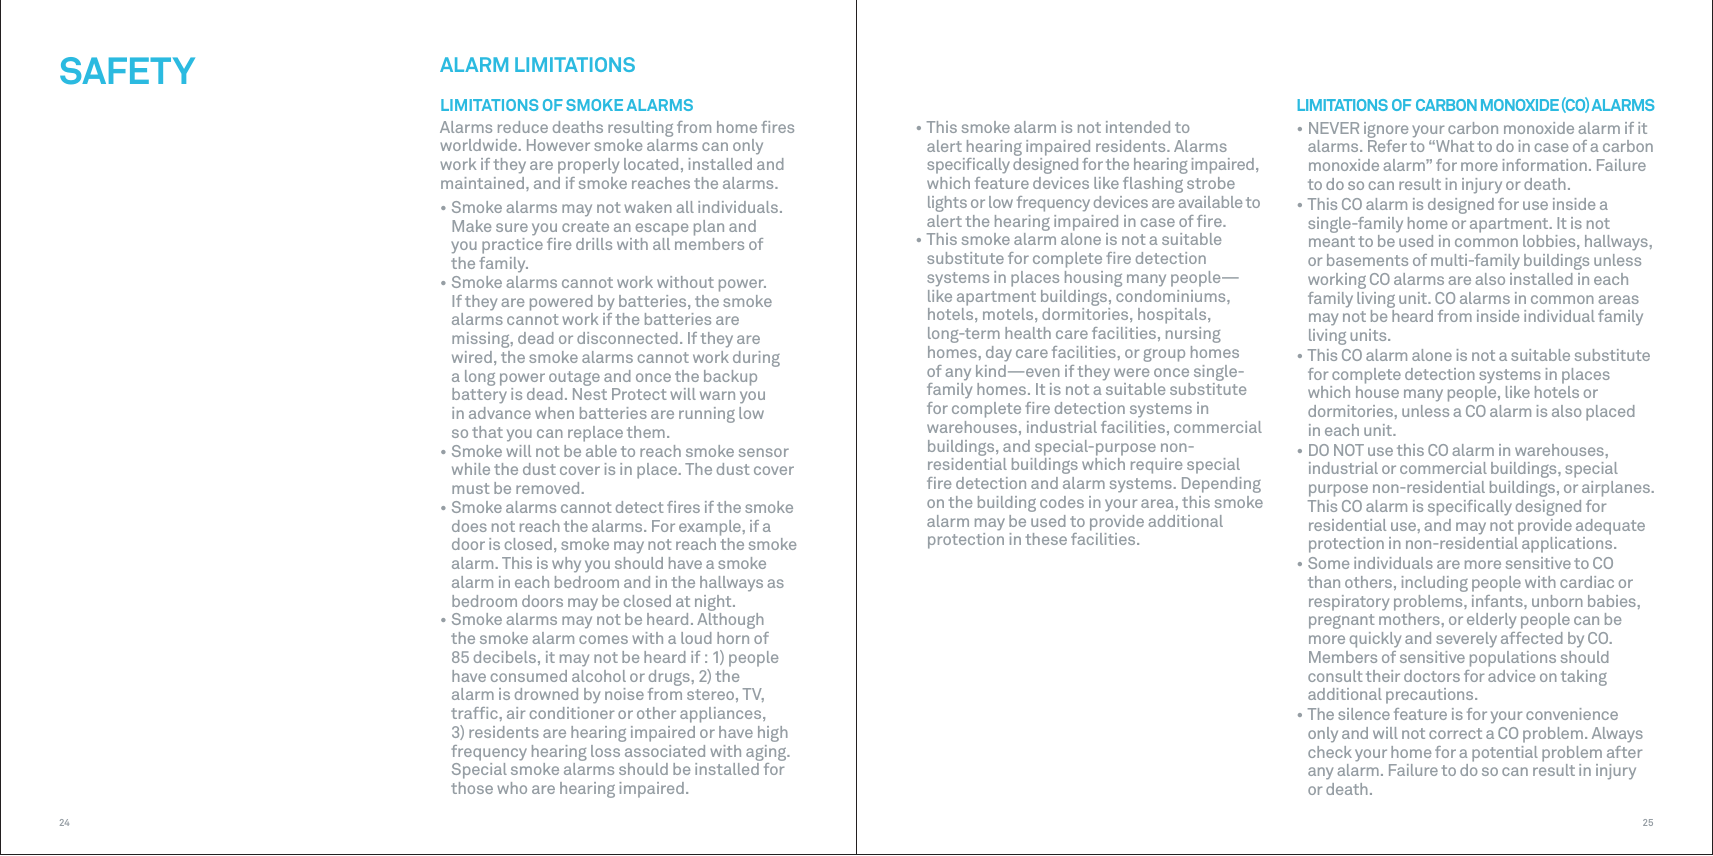
![21203213212. Twist Nest Protect counterclockwise untilit disconnects from the backplate.3. Detach the power connectorfrom the back of Nest Protectand open the battery door.4. Replace the batteries. Align the + positive and - negative ends with themarkings in the battery compartment.5. Close the battery compartment.Do not force the door closed.6. Reattach the power connector.7. Push Nest Protect onto the backplate andturn it clockwise until you feel it grip.8. Turn power to Nest Protect back on at thebreaker box.9. Press the Nest button twice.SERVICING1. Before sending Nest Protect for service,visit nest.com/support2. If your Nest Protect needs servicing,first contact our support team to get a return number3. Send your Nest Protect to:Nest Labs(YOUR RETURN NUMBER)4 East Stow RoadMarlton, NJ 08053 USAGENERAL MAINTENANCECLEANING YOUR NEST PROTECTNest Protect has been designed to be as maintenance free as possible, but you should keep it clean. As with any smoke alarm, dust buildup on the outside or inside of Nest Protect can stop it from working properly.To clean Nest Protect:1. Turn off power to Nest Protect at thebreaker box (see p.9)2. Remove it from the wall or the ceiling (turncounterclockwise until it comes off the backplate and detach the power connector).3. Wipe the outside with a clean, slightlydamp cloth. Don’t use any soaps or solvents.4. Place Nest Protect on a soft, dry cloth withthe Nest button facing down. Open the battery compartment door and remove the batteries. Remove the screws and lift off the back. Be careful to not lose the screws.5. Gently vacuum the inside. Make sureto clean all the way around the mesh sides of the smoke chamber (the large metal circle). Note: Never use detergents or solvents (like glass cleaner) on your Nest Protect and do not spray air fresheners, hair spray or other aerosols near it. Do not get water inside the alarm or paint over it.REPLACING THE BACKUP BATTERIESIn case of a power outage, Nest Protect will use three AA Energizer® Ultimate Lithium batteries (L91) for backup. These batteries can be purchased at your local retailer.1. Turn off power to Nest Protect at thebreaker box (see p.9) WARNING• Use only batteries specified by Nest.Use of a different battery model will have a detrimental effect on the smoke alarm operation. • Never disconnect a wired alarm to stop an unwanted alarm (caused by cooking smoke, etc.) Removing power disables the alarm so it cannot sense smoke or carbon monoxide (CO). Instead open a window or fan the smoke away from the unit.• The batteries cannot work until you installthe batteries in the correct position (Match + to + and - to -).• Once Nest Protect has expired you’ll nolonger be protected from smoke or CO if you don’t replace it.GENERAL MAINTENANCEYELLOW pulses. Low battery. Change the batteries of Nest Protect now.“THE BATTERY IS LOW IN THE [ROOM NAME]. REPLACE THE BATTERY NOW.” Single chirp every 60 seconds.Nest Protect has tested its sensors and there is a problem.Clean according to instructions on page 20. If the problem persists, replace Nest Protect.“THE SENSORS HAVE FAILED IN THE [ROOM NAME]. REPLACE NEST PROTECT NOW.” Single chirp every 60 seconds.Nest Protect has expired and reached the end of its life.Replace Nest Protect now.“NEST PROTECT HAS EXPIRED. REPLACE IT NOW.” Two chirps every 60 seconds.There’s a problem with the horn of Nest Protect. Replace Nest Protect now.“NEST PROTECT CAN’T SOUND THE ALARM IN THE [ROOM NAME].”Two chirps every 60 seconds.YELLOW pulses. Change the batteries of Nest Protect soon.Low battery.“THE BATTERY IS LOW IN THE [ROOM NAME].REPLACE THE BATTERY SOON.”YELLOW pulses.YELLOW pulses.WHAT YOU HEAR WHAT IT MEANS WHAT TO DOWHAT YOU SEEGENERAL MAINTENANCEYELLOW pulses.](https://usermanual.wiki/Google/S30.User-manual-2/User-Guide-2648522-Page-11.png)
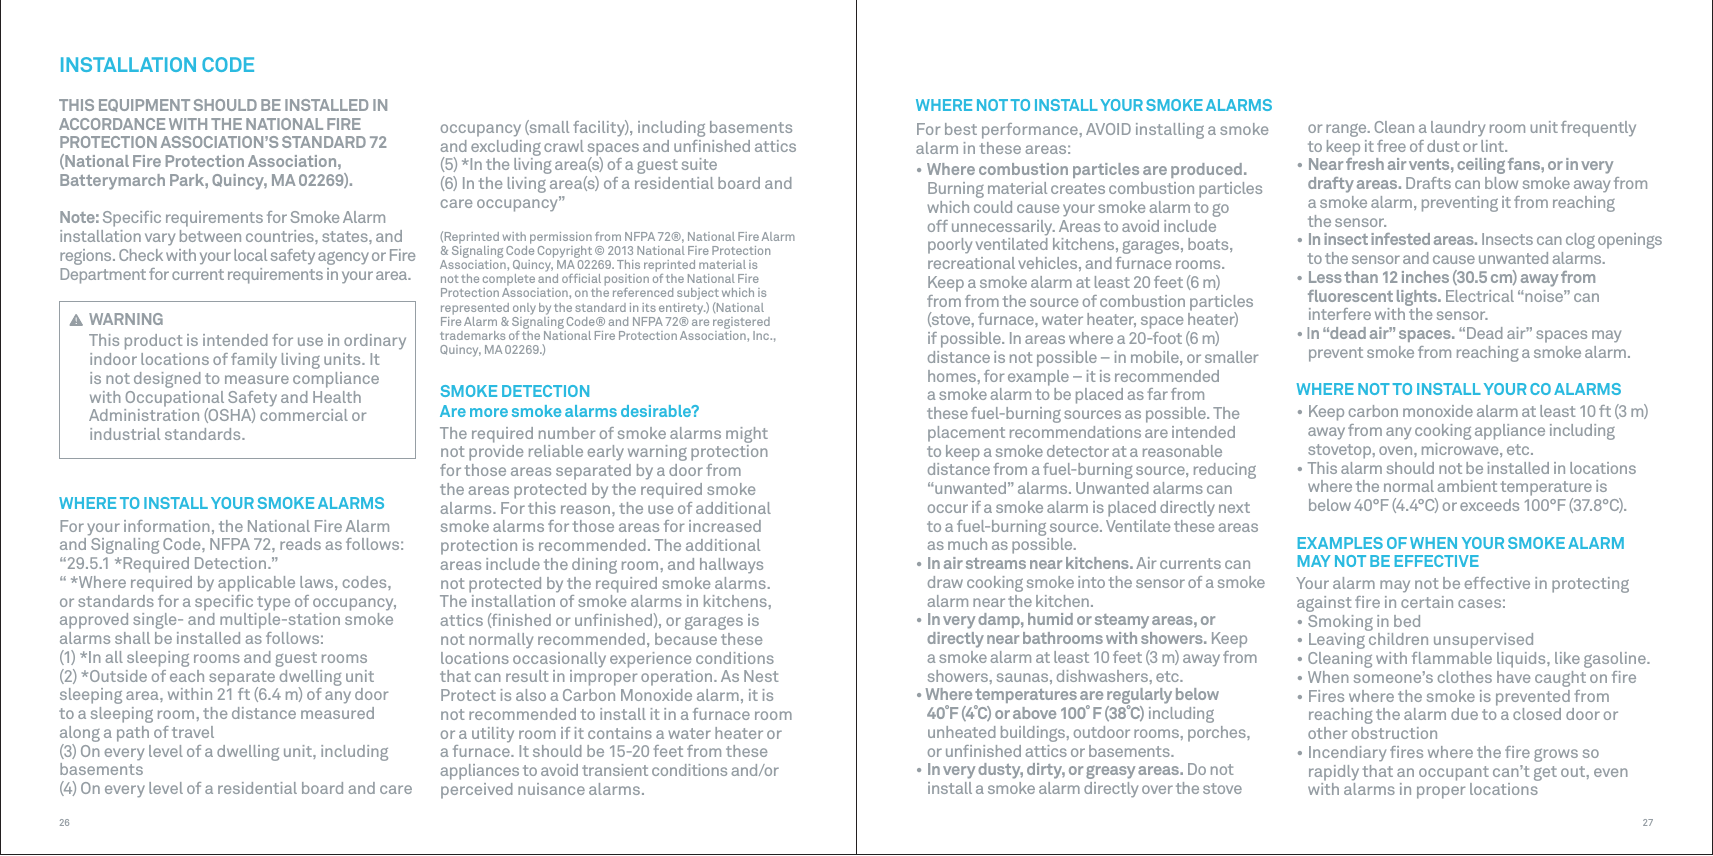
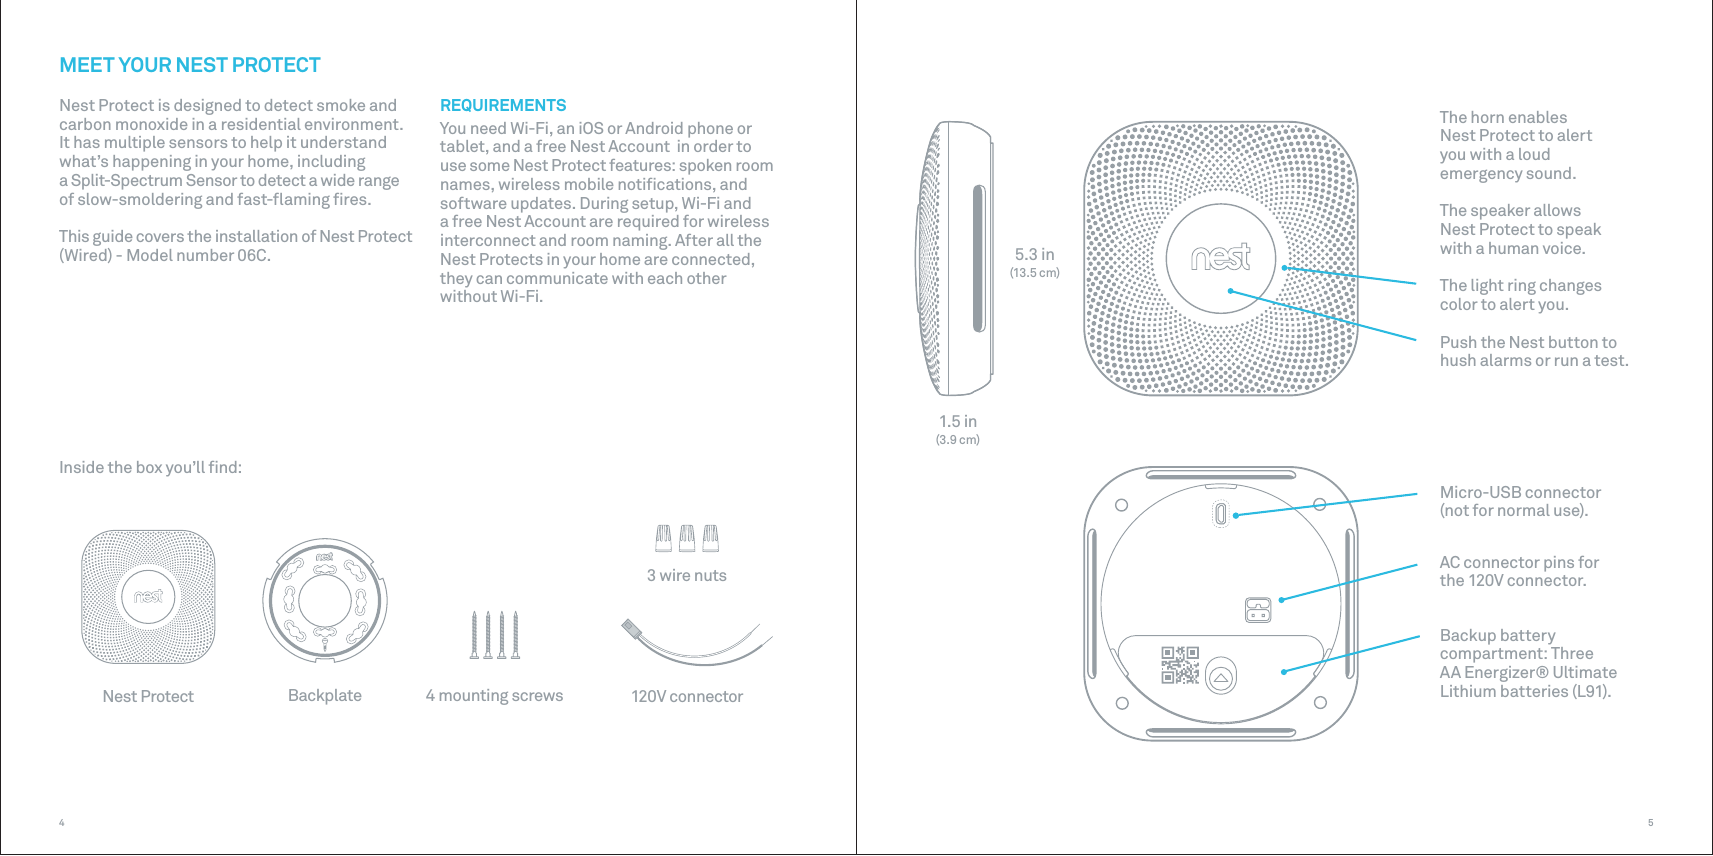
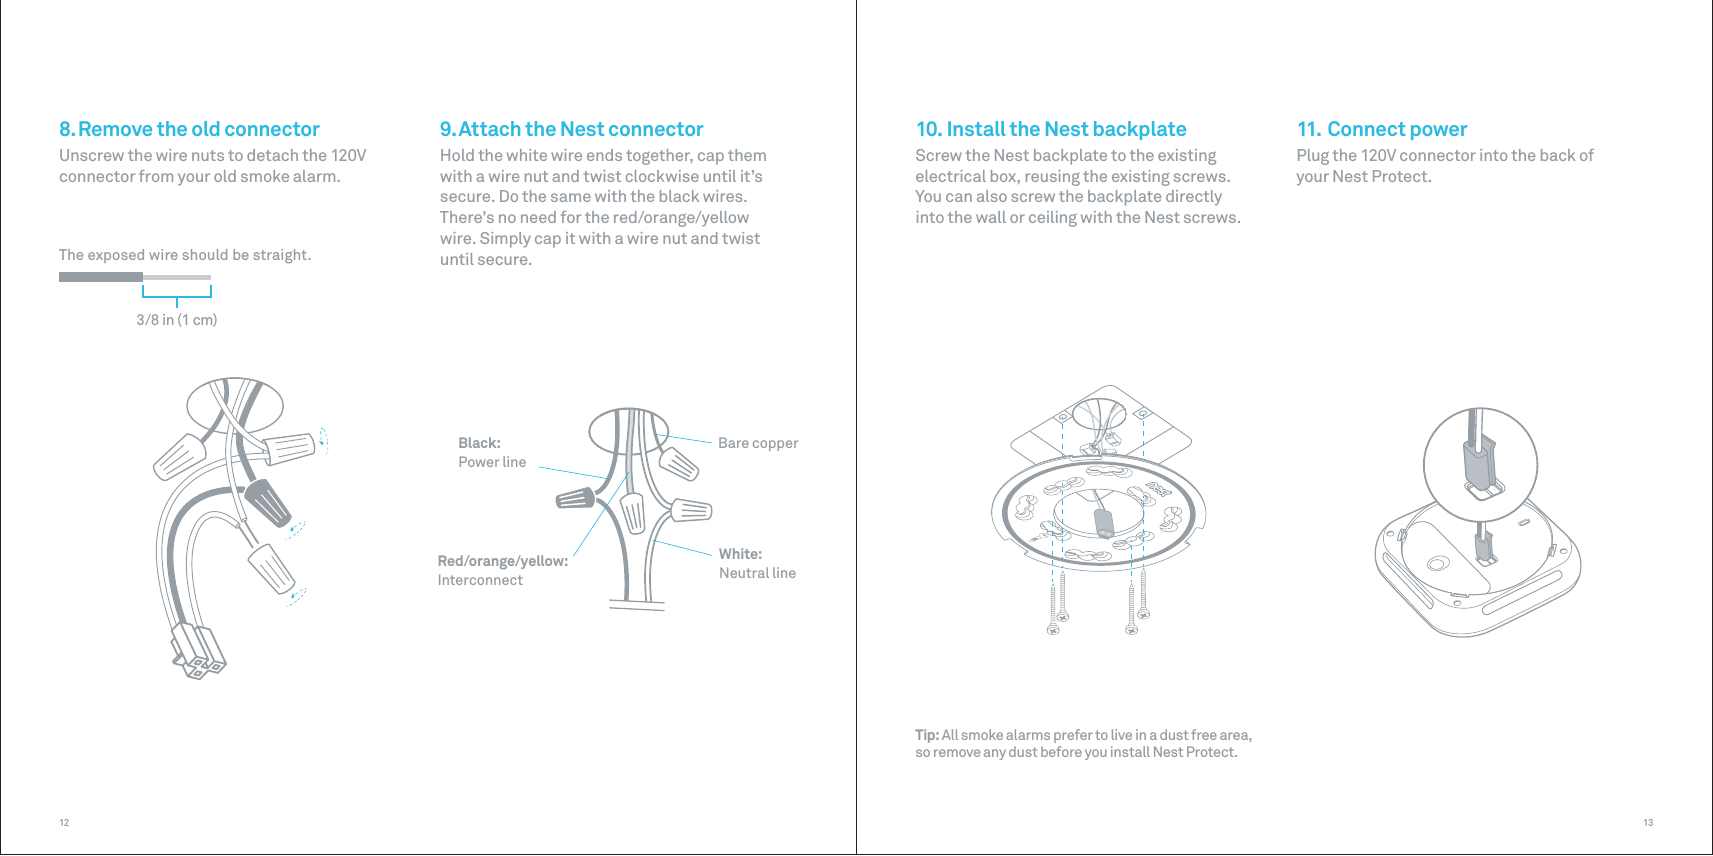
![3130more information about CO safety and this equipment. Make sure that motor vehicles are not, and have not been, operating in an attached garage or adjacent to the residence.This information is available as a label provided in the box. Stick it in a spot where everyone can see it, like the refrigerator.THE FOLLOWING CONDITIONS CAN RESULT IN TRANSIENT CO SITUATIONS1. Excessive spillage or reverse venting of fuelburning appliances caused by:I) Outdoor ambient conditions such as winddirection and/or velocity, including high gusts of wind; heavy air in the vent pipes (cold/humid air with extended periods between cycles).II) Negative pressure differential resultingfrom the use of exhaust fans. III) Simultaneous operation of several fuelburning appliances competing for limited internal air.IV) Vent pipe connection vibrating loose fromclothes dryers, furnaces, or water heaters.V) Obstructions in or unconventional vent pipedesigns which amplify the above situations.2. Extended operation of unvented fuel burningdevices (range, oven, fireplace, etc.).3. Temperature inversions which can trapexhaust gases near the ground.4. Car idling in an open or closed attachedgarage, or near a home.5. NEVER bring a charcoal grill inside andALWAYS operate a portable generator outside, a safe distance from the house, and well away from windows.WHAT TO DO IN CASE OF A CARBON MONOXIDEALARM WARNINGActuation of your CO alarm indicates the presence of carbon monoxide (CO) which can KILL YOU.If alarm signal sounds:1) Operate reset/silence button (PressNest button);2) Call your emergency services [fire dept. or 911];PHONE NUMBER:3) Immediately move to fresh air – outdoors or by an open door/window. Do a head count to check that all persons are accounted for. Donot reenter the premises nor move away from the open door/window until the emergency services responders have arrived, the premises have been aired out, and your alarmremains in its normal condition.4) After following steps 1 – 3, if your alarmreactivates within a 24-hour period, repeat steps1 – 3 and call a qualified appliance technicianPHONE NUMBER:to investigate for sources of CO from fuel burning equipment and appliances, and inspect for proper operation of this equipment. If problems are identified during this inspection have the equipment serviced immediately. Note any combustion equipment not inspected by the technician and consult the manufacturers’ instructions, or contact the manufacturers directly, for FIRE SAFETY PRECAUTIONSCREATE AN ESCAPE PLAN TO PRACTICEBe prepared when your smoke/CO alarm sounds its alarm. Develop a family escape plan, discuss it with all household members, and practice it regularly.• Make sure everyone is familiar with the soundof your smoke/ CO alarm and explain what the sound means.• Determine TWO exits from each room andhave an escape route to the outside from each exit.• Teach all the members in your household tocheck doors for heat with the back of your hand before opening them, and to use the alternate exit if the door is hot. Make sure they do not open the door if it is hot.• Teach household members to crawl alongthe floor to avoid dangerous smoke, fumes and gases.• Determine a safe meeting place for allhousehold members to regroup at outside the building.PRACTICE FIRE SAFETYPractice your escape plan at least twice a year, making sure that everyone is involved – from kids to grandparents. Practice the escape plan with children, including holding one at night when they are sleeping. If children or others do not wake up to the sound of the smoke alarm, or if there are infants or family members with mobility limitations, make sure that someone is assigned to help them for the fire drill and in the event of an emergency. Current studies have shown smoke alarms may not awaken all sleeping individuals, and that it is the responsibility of individuals in the household that are capable of assisting others to provide assistance to those who may not be awakened by the alarm sound, or to those who may be incapable of safely evacuating the area unassisted.WHAT TO DO IN CASE OF FIRE• Get out now.• Don’t panic; stay calm.• Operate your safety plan as previouslyplanned.• Alert small children in the home and thosewho may need extra assistance.• Leave the building as quickly as possible.Touch doors with the back of your hand andmake sure they are not hot before opening them. Use an alternate exit, if necessary. In case of smoke, crawl along the floor, and DO NOT stop to collect anything. Close the doors behind you.• Meet at a pre-arranged meeting place outsidethe building.• Once outside, do a head count, and call thefire department.• DO NOT reenter the house, unless a fireofficial says it’s safe to reenter.](https://usermanual.wiki/Google/S30.User-manual-2/User-Guide-2648522-Page-16.png)