Gospell Smarthome Electronic T5925HCA HD Outdoor WiFi Camera User Manual T5925HCA Manual 20170630
Shenzhen Gospell Smarthome Electronic Co., Ltd. HD Outdoor WiFi Camera T5925HCA Manual 20170630
Users Manual
Quick Start Guide
ID QR code
Outdoor WiFi Camera
HD
Before using the product, please read the guide carefully to avoid
any damages to the product in virtue of faulty operation or misuse.
Model:T5925HCA/T5925GCA
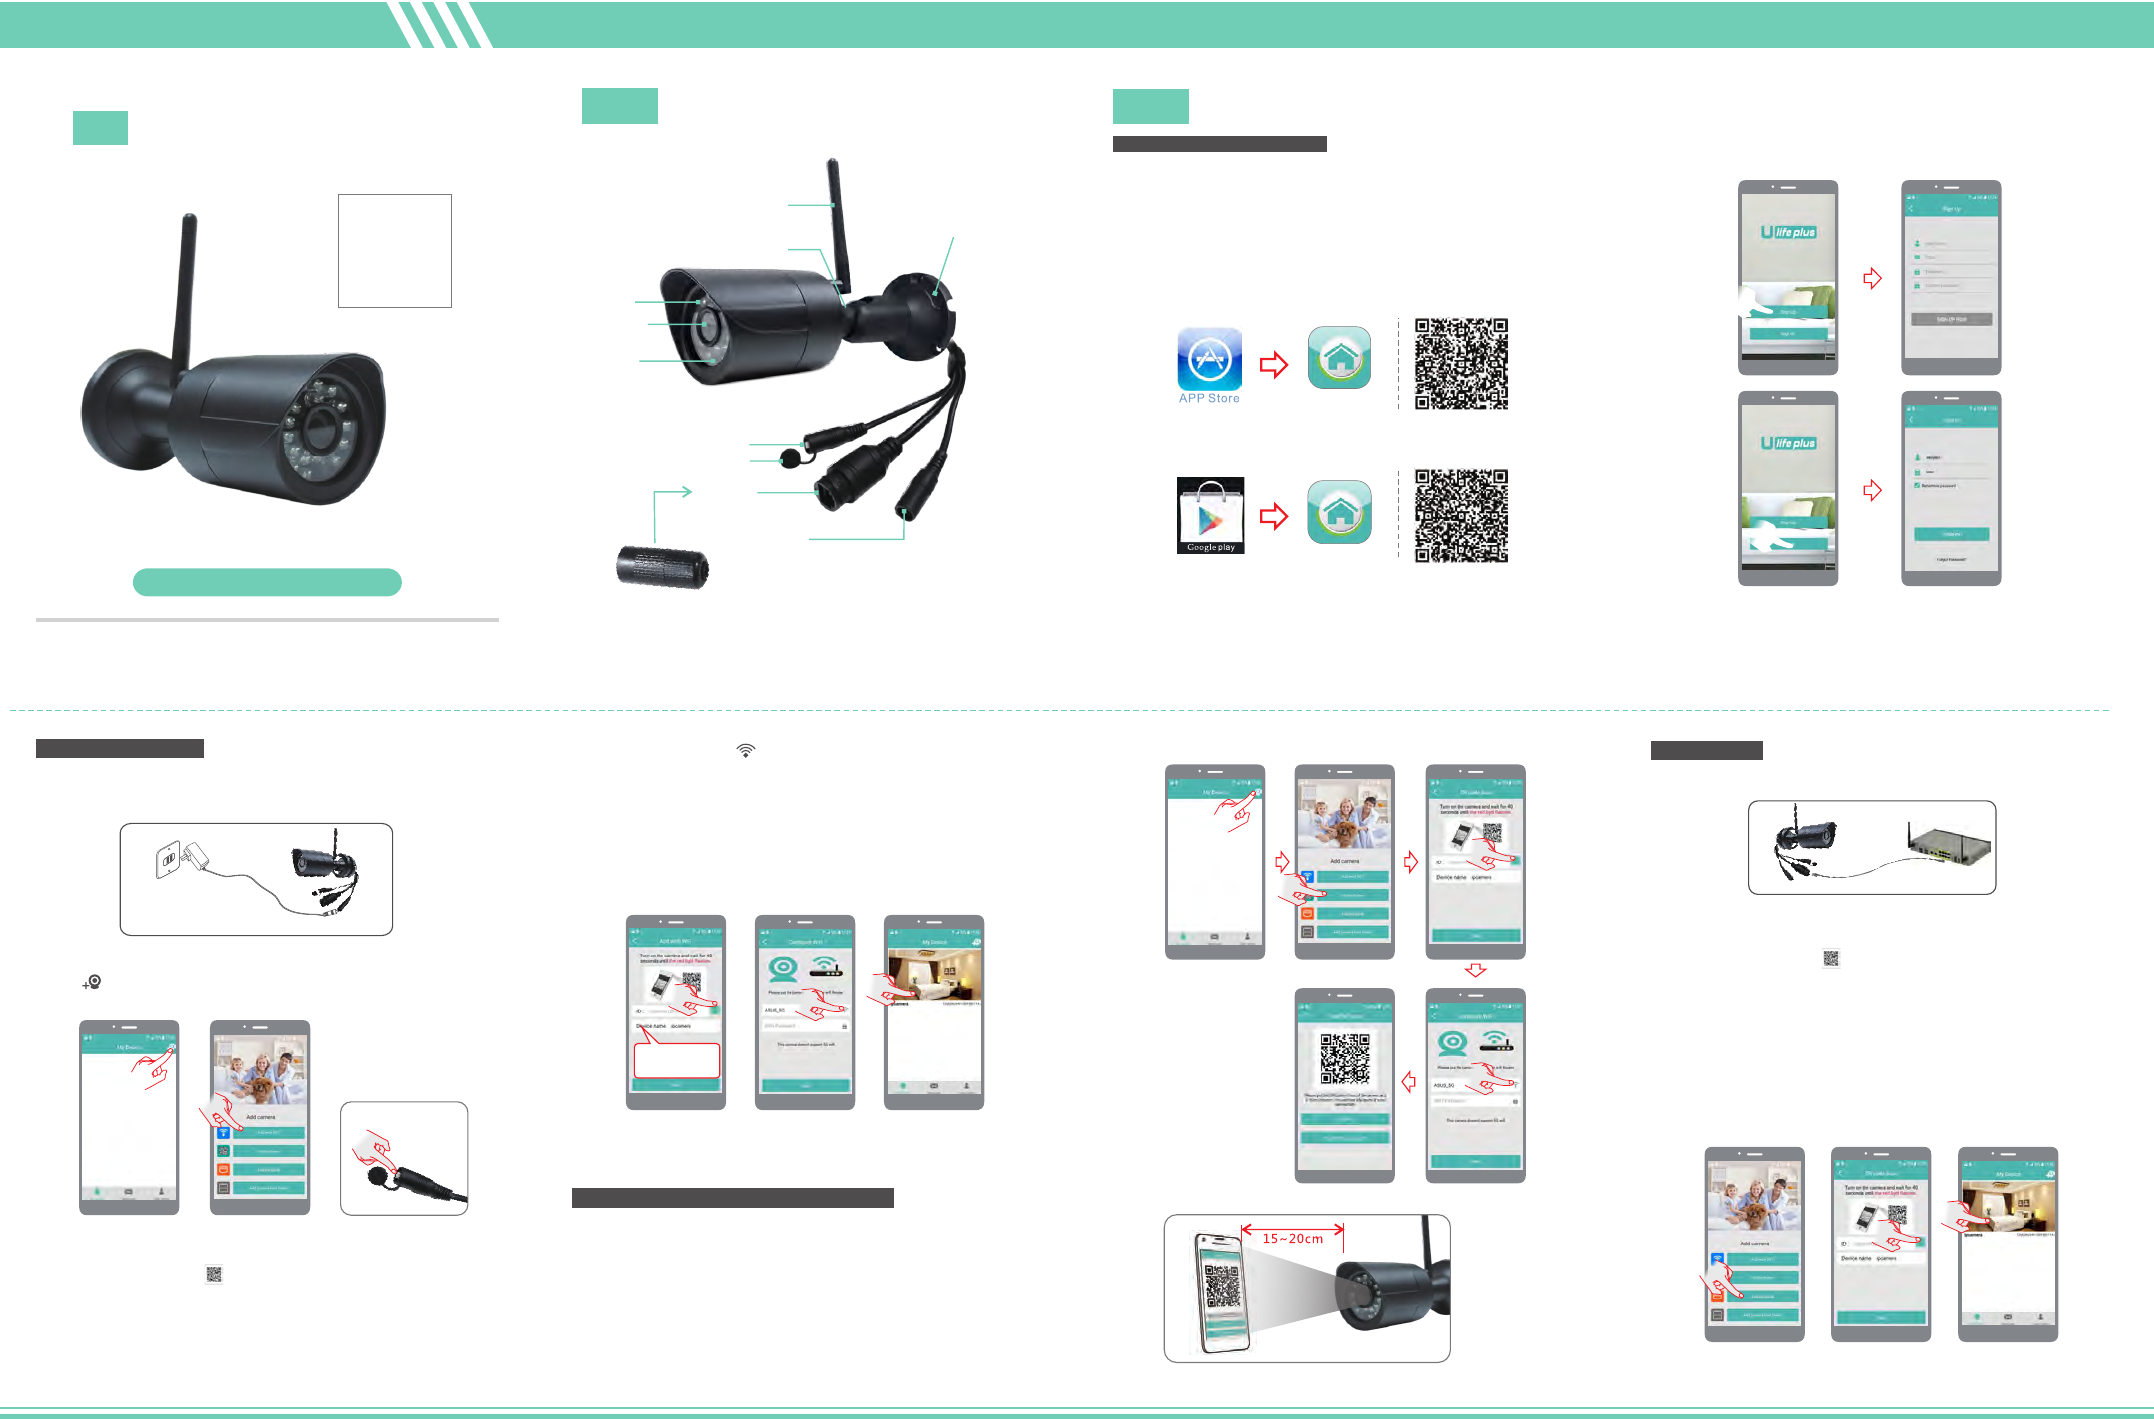
Installation
II
5.Take the operation of Android client-end as example, and refer to
Android client-end for IOS client-end.
U-life Plus
A.Open the App Store on iPhone/iPad, search for "U-life Plus" and
install.Or scan the QR code to install it directly.
U-life Plus
B.Enter the "Google Play" store on Android smartphone. Search for
"U-life Plus" and install.Or scan the QR code to install it directly.
Pre-Installation Preparation
2.Requirements of version: Android 4.4, iOS 8.0, and later versions.
3. 2.4G wireless router should connect to the Internet; smartphone
should connect the Wi-Fi of the router. When connecting to the
camera, both the smartphone and camera should be within the range
of this wireless router.
4.Download and install client-end APP
Prompt: please use a valid and useable mailbox during user
registration, for recovering the password.
1.Please connect the camera to the power and turn in on, and then
the red indicator light will twinkle slowly. (Fig.1)
2. Click to add equipment; (Fig. 2)
(Fig. 1)
Camera
Power
adapter
Power
source
3.Click “ Add with ". (Fig. 3)WiFi
(Fig.2) (Fig.3) (Fig. 4)
5.Press the Set button for 1-2s on the camera, and Link light
turns red and flashes. (Fig.4)
4.Click the QR code icon and scan the QR code of the
camera ID on the camera. The default name of the
camera is “ipcamera” and can be modified. Finally,
click "Next". (Fig. 5)
8.When the green light twinkles, the equipment is linked to the WiFi
router. When the green light shines continuously, it means the
U-life Plus platform is linked successfully. After successful
connection, in the interface of the mobile phone, the list of
equipment will automatically pop out. (Fig.7)
Click the list of equipment to enter into the interface of real-time
monitoring operations.
7.Please click the icon to choose the name of your phone router,
type in the right WiFi password, then click "Next". (Fig.6)
(Fig. 5) (Fig. 6) (Fig. 7)
Adding mode by WiFi
1.Power camera on > Press SET for 1 second > Click Add by
the QR code to add the camera > Scan device ID > Enter the name
and password for access to WiFi. Perform operations as instructed.
(Figure 8 series)
scanning
2.Point camera to the QR code page on cell phone at a distance of about
15~20cm (as shown in Figure 9).
If it beeps, scanning succeeds, and then click on I heard it to finish
device binding operations.
(Fig.8 series)
(Fig. 9)
Adding mode by scanning the QR code
Camera Network cable Router
(Fig. 10)
3.Click the QR code icon and scan the QR code of the camera ID
on the camera. The default name of the camera is “ipcamera” and
can be modified. Finally, click "Next". (Fig. 12)
4.Press the Set button for 1-2s on the camera, and Link light turns red
and flashes. (Fig.4)
5.When the green light twinkles, the equipment is linked to the WiFi
router. When the green light shines continuously, it means the
U-life Plus platform is linked successfully. After successful
connection, in the interface of the mobile phone, the list of
equipment will automatically pop out. (Fig.13)
Click the list of equipment to enter into the interface of real-time
monitoring operations.
(Fig. 11) (Fig. 12) (Fig. 13)
6.Open APP, register an ID first, then please login.
(special characters (such as "%","\","<>" etc...)
are not allowed.)
1.Camera can be connected to Mobile APP in three modes, namely:
WiFi Add, QR Scan Add and Wired Add.
Wired Add
2.Power on the camera for startup → press SET for 1s →click "Add
net cable" when adding the camera (Figure 11)
1.Connect the camera to the router via the wire. And connect the
mobile to the Wifi of the router. (Figure 10)
Note: After successful connection to the platform via wired add, it
cannot be automatically switch to WiFi Connection after pulling out
the wire.
The default
ipcamera can
be modified.
The default
ipcamera can
be modified.
Appearance
I
Antenna (Install the antenna
by screwing it up and make
it point upward.)
Indicator light
(Below the antenna.)
Infrared
lamp
Camera
lens
Sense
human IR
Screw hole
Set button
Waterproof plug
Internet
cable port
12V/1A Power
supply interface
Water proof cap (The Internet cable run through this cap,
then stick to the Internet cable port. When fixed, the cap
is water proof.)
Quick Start Guide
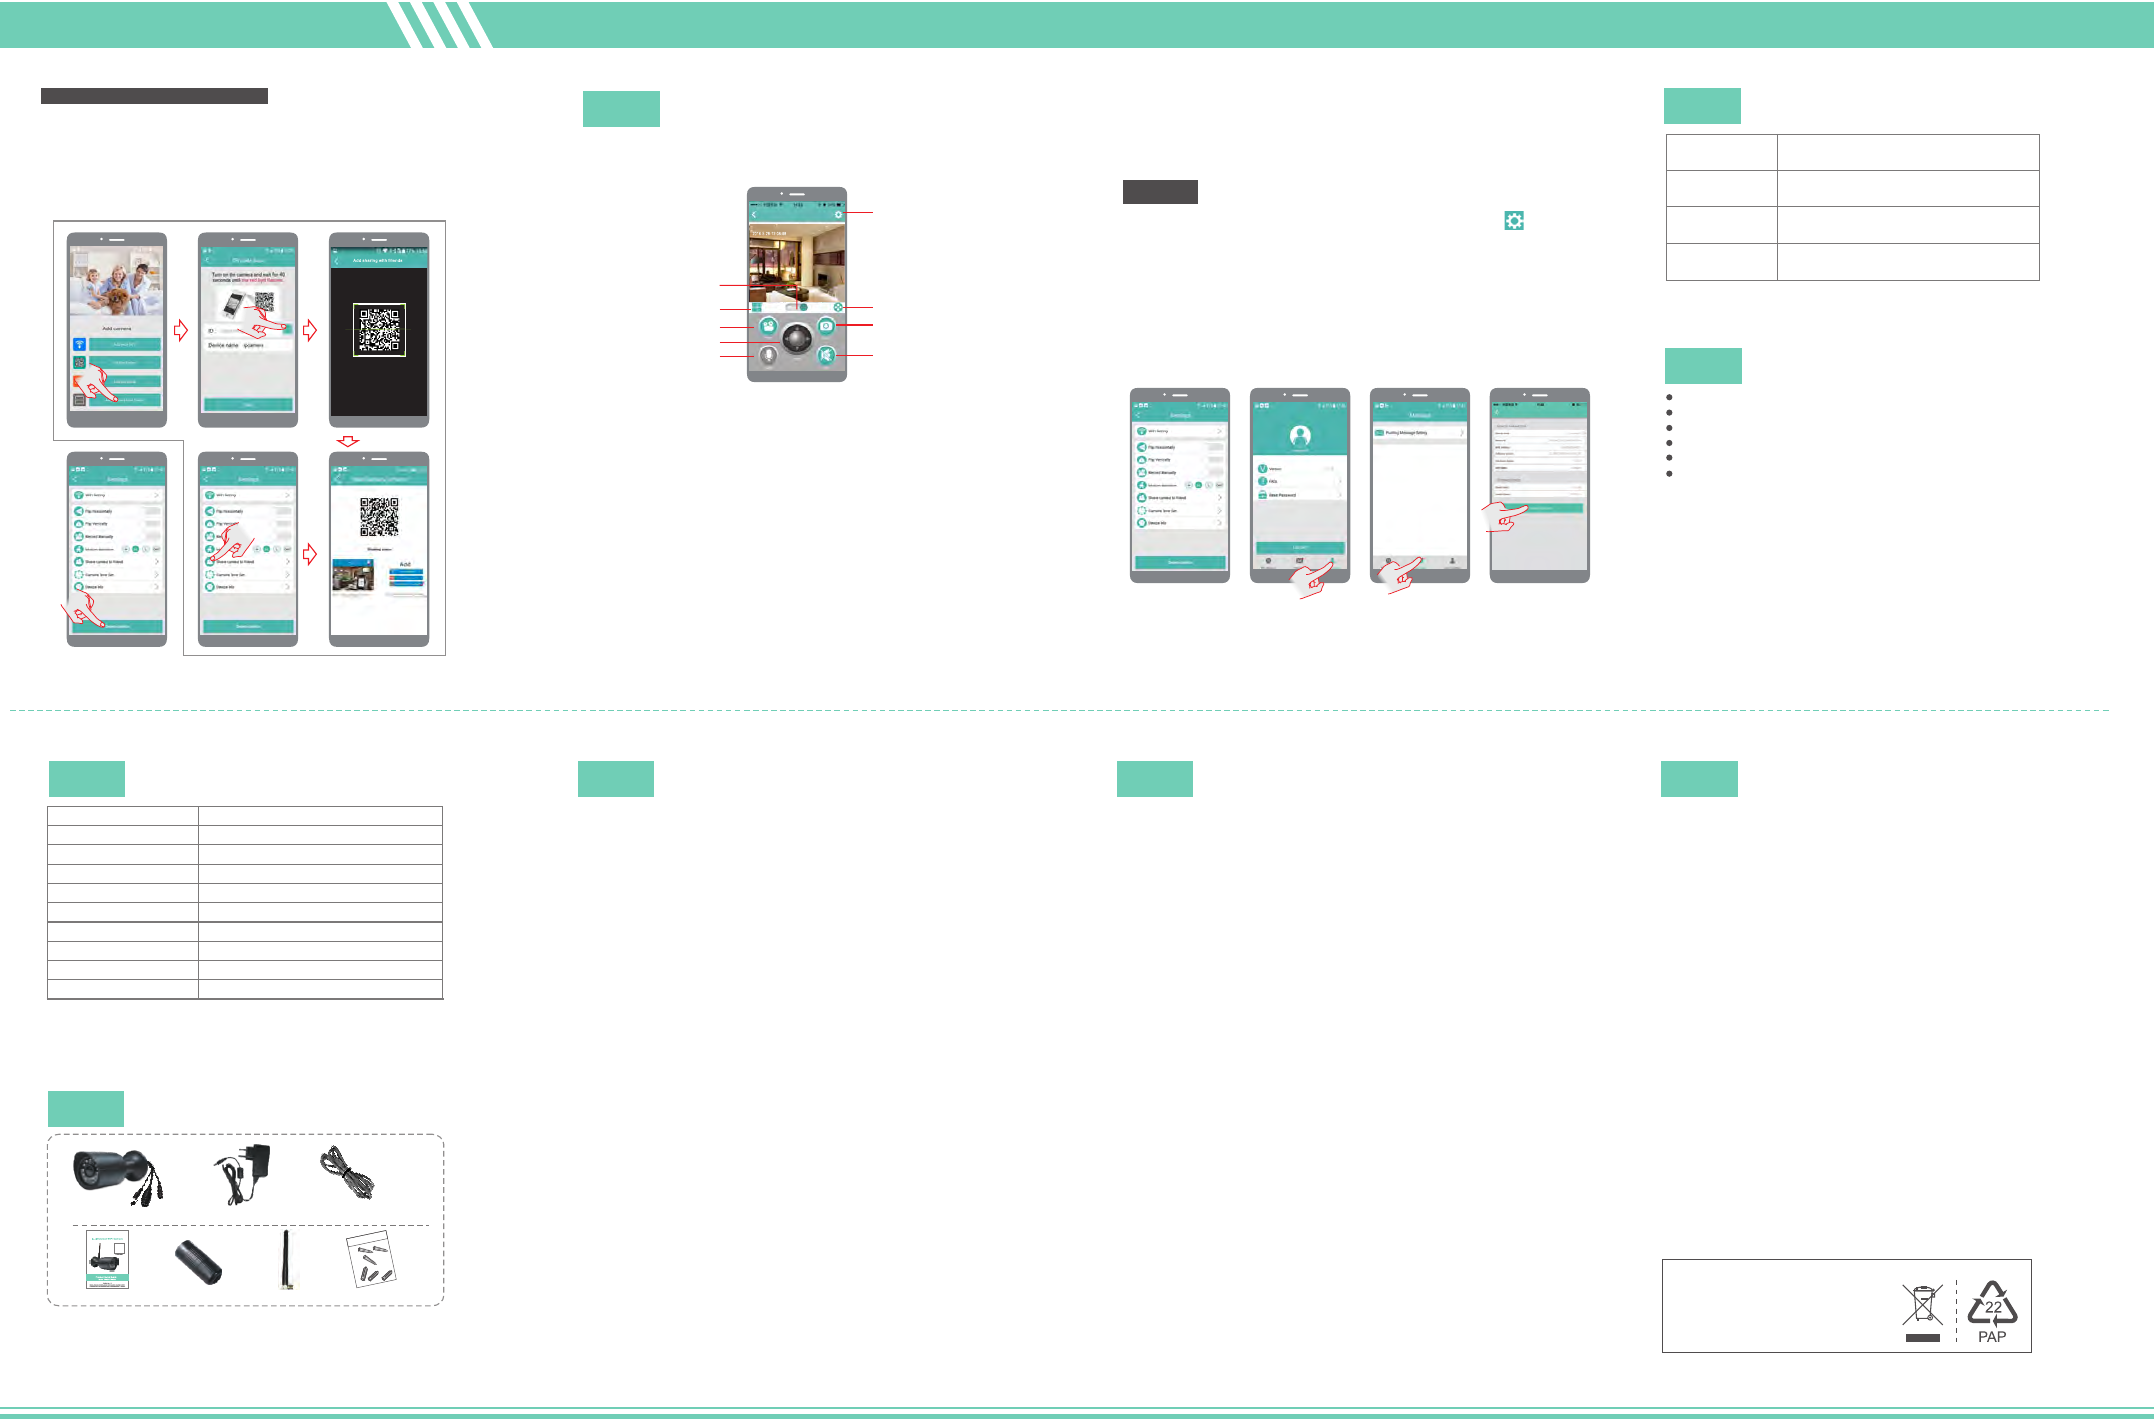
Add camera for multi-users.
1.
. (Fig.14 series)
2.You can delete the device first, and unbind your ID with the camera,
then others can add the camera freely. (Fig.15)
If your cell phone APP has added camera and connected successfully,
next time when others adds,You click "Share your camera to friends".
and then there will be a QR code in your APP. You share this QR code
to your friends. And he/she click "Add camera from friend" to scan the
QR code you provided
With a successful connection, monitor view supports real-time
monitoring, taking photos, recording videos, modifying setting and
other operations.
Monitor View and Operations
III
1.Click to switch between standard definition and high definition of
real-time video.
2.Click to enter multi-video view, monitor at most 4 real-time video.
3.Click to start recording video, click again to stop recording. Video
will be saved in smartphone.
4. drag adjust camera view angle .
5.Not support voice intercom.
6.Click to enter setting.
7.Click to view and download photos & videos saved in camera
micro-SD card.
8.Click to take a photo. Photo will be saved in smartphone.
9.Click to mute the audio from camera. Click again to cancel.
Not supported
(Fig. 16)
Notes:
1.Photos and videos taken in the APP will be saved in smartphone.
2.Automatic photos and videos of movement detection will be
saved in micro-SD card of camera.
Settings
※ This camera is compatible with universal , actual function
is subject to camera.
APP
(Fig. 17) (Fig. 18) (Fig. 19)
2.Open the APP, enter “User center” page to check version
info etc. (Fig .18)
3.Open the APP, enter “message” page to set message pushing.
(Fig .19)
APP
1.On the real-time monitoring interface, click the setting icon
for entering into the camera setting menu. The user can set up the
relevant functions for the “Camera time check’ and others.(Fig. 17)
Camera Indicator Instruction
Red light
twinkles slowly
Which means its
successfully turned up.
Red light
twinkles fast
Which means its configuring
the network.
Green light
flashes.
Which means WiFi or the Internet is
linked, in summary, the router is linked.
Green light is
often on.
This indicates that the platform is
connected to view remote videos.
IV
Product Features
24/7 live video streaming
HD 1080P provides excellent video quality
Smart motion detection and notification
Advanced video recording on built-in 8G micro-SD card
Night vision (10m visibility)
Quick & easy to set up
Product Specifications
Image sensor CMOS
Camera resolution
View angle horizontal: 80°±5 °
Night vision range ≤10m
Waterproof grade IP66
Operation voltage DC+12V/1A
※No additional notice will be made in case of any minor change.
Our company reserves the right of final interpretation.
1920x1080
Operation humidity 15% ~ 85% RH
Size (LxWxH)
Net weight
Operation temperature -10℃ ~ + 50℃
396g
V
184x70x70mm
V I
Packing Content
Manual
※Pictures are for reference only, and the real object prevails.
Camera
Antenna
Power adapter
VII
Water proof cap Screw pack
Network Cable
Tips
VII I
1.In setting page of APP (Fig. 15), click “Delete device” to remove the
connected camera, can remove the bonding with the account.
2.Movement detection: when movement is detected within the scope
of camera, the camera will record video and take photos
automatically. Videos and photos will be saved in micro-SD card.
9.Special Note: This QR code is same as the one sticked on the
outdoor camera. It is used when user need to re-do the set up and
scan this QR code to add the camera. Please safe keeping this
camera ID QR code on the manual, in case QR code on camera may
fall off after daily use under the sun and rain.
8.When this machine has a crash fault or other abnormal conditions
influencing the usage, it is recommended to cut out the power and
restart; or press SET key for 10 seconds, which can restore factory
settings, and then please reconnect the router.
5.Push message: when movement is detected, alarm message can
be sent to server and pushed to your phone.
6.Remote monitoring: after the camera is connected to Internet
successfully, app can view the monitor via Internet, anytime,
anywhere.
3.Sharing with Friends: Share QR code of the device with your friends.
4.Cancel sharing with friends: Delete the camera and cancel sharing
with friends. (You have to re-add the camera to use it again)
Troubleshooting
IX
1.Wi-Fi cannot be connected
a) Ensure that the antenna of camera is fixed well.
b) Ensure that camera is in range of router. Keep the distance less
than 40fts between router and indoor camera, less than 65fts for
outdoor camera.
h) Ensure that Wi-Fi signal is 2.4GHz.
i )
Ensure that there is no MAC filter on router or add MAC address
to router whitelist
2.Red Indicator remains, network connection is failed.
a) Ensure that the password of Wi-Fi is correct.
b) Ensure that the network connects to Internet freely.
c) Ensure that the camera is in range of Wi-Fi hotspot.
3.Green Indicator flashes, connection to server failed.
a) Ensure that Wi-Fi signal is strong enough and bandwidth is
enough for connection. Move near to Wi-Fi hotspot or increase
the bandwidth.
b) Ensure that camera is not under interferon of other 2.4GHz signal.
c) Ensure that SSID and password of Wi-Fi contains no special
characters. Modify the SSID and password of Wi-Fi with only
English characters, no special characters.
g) Ensure that Wi-Fi encryption method is WPA2-PSK/WPA-PSK
or AES.
d) Ensure that SSID and password are no longer than 16 characters
e) Ensure that SSID is broadcasted.
f ) Ensure that the DHCP is enabled on router.
j )
We suggest rebooting the router, and the "security settings,
encryption method" of WiFi password should never choose
"auto-select".
k)
Reset the camera to set up connection again. Press and hold
SET key for 10 seconds.
FCC/CE Certification Information
X
The Maximum Permissible Exposure (MPE) level has been calculated based on a
distance of d=20 cm between the device and the human body. To maintain compliance
with RF exposure requirement, use product that maintain a 20cm distance between the
device and human body. Hereby, we declares that this device is in compliance with the
essential requirements and other relevant provisions of Directive 2014/53/EN.
Notice: Observe the national local regulations in the location where the device is to be
used. This device may be restricted for use in some or all member states of the
European Union (EU)
NOTE: This equipment has been tested and found to comply with the limits for a Class
B digital device, pursuant to part 15 of the FCC Rules.
These limits are designed to provide reasonable protection against harmful interference
in a residential installation. This equipment generates uses and can radiate radio
frequency energy and, if not installed and used in accordance with the instructions, may
cause harmful interference to radio communications. However, there is no guarantee
that interference will not occur in a particular installation. If this equipment does cause
harmful interference to radio or television reception, which can be determined by turning
the equipment off and on, the user is encouraged to try to correct the interference by
one or more of the following measures:
EU Environmental Provisions
E-waste cannot be mixed with
household garbage; corresponding
local government sector or recycling
stations shall be responsible for
circular process.
7.Only support the special characters in English mode, such as:
" @, #, &, *, ~, {, }, -, =, +, /, ?, (, )", Dont support the special
characters, such as:"%", "\", "<>".
(Fig. 15) (Fig.14 series)
Scanning
- Reorient or relocate the receiving antenna.
- Increase the separation between the equipment and receiver.
- Connect the equipment into an outlet on a circuit different from that to which the
receiver is connected.
- Consult the dealer or an experienced radio/TV technician for help
Changes or modifications not expressly approved by the party responsible for
compliance could void the user's authority to operate the equipment.
This device complies with Part 15 of the FCC Rules. Operation is subject to the
following two conditions:
(1) this device may not cause harmful interference, and
(2) this device must accept any interference received, including interference that may
cause undesired operation.
7
8
9
6
3
4
5
1
2
4.TF card Instruction: Brand TF card is recommended. Pls format the
TF card before use. If error occurs in storage reading, Please format
the TF card as Fig .20.
(Fig. 20)
T5925
中性
汪敏 2017-05-24
电子档1:1
英文说明书
新版本
变更时间 变更前
1.1
变更后
说明:
折叠后成品尺寸:95*128mm
展开尺寸:380*256mm
材质:105g铜版纸
颜色:4C 正反两面印刷
95mm
128mm
Folding Schematic Front side Size of the finished product after folding: 95*128 mm
Display size: 380*256mm
Material: 105g art paper
Color: 4C printing on front and back sides
折叠后成品尺寸:95*128mm
展开尺寸:380*256mm
材质:105g铜版纸
颜色:4C 正反两面印刷
1.120170626 III 设置页面APP功能不支持声音 III 设置页面APP功能支持声音
有底坐盖 去掉底坐盖
增加TF格式化描述