Graco My Size 70 Child Restraint Pd247312A Users Manual
Graco Car Seat PD247312A PD247312A
PD247312A to the manual 526c139b-4276-484c-bd5e-bc9f3c155ac7
2015-01-25
: Graco Graco-My-Size-70-Child-Restraint-Pd247312A-Users-Manual-235084 graco-my-size-70-child-restraint-pd247312a-users-manual-235084 graco pdf
Open the PDF directly: View PDF ![]() .
.
Page Count: 120 [warning: Documents this large are best viewed by clicking the View PDF Link!]
www.gracobaby.com
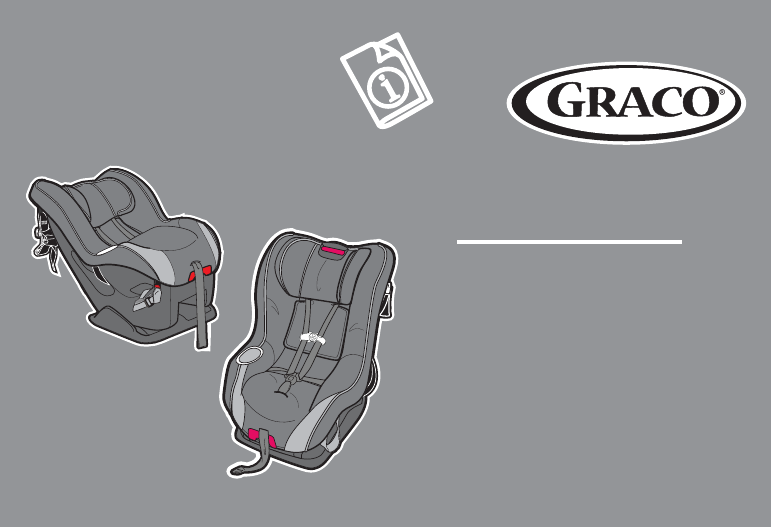
My Size™ 70
Child Restraint
Owner’s Manual
FAILURE TO PROPERLY USE THIS
CHILD RESTRAINT INCREASES THE
RISK OF SERIOUS INJURY OR DEATH IN
A SUDDEN STOP OR CRASH.
READ THIS MANUAL.
Do not install or use this child restraint
until you read and understand the
instructions in this manual.
PD247312A
© 2013 Graco 6/13 US

2
TABLE OF CONTENTS
Important Information...................4-6
Warnings...................................7-10
Basic Information............................11
What is LATCH?..........................12-13
LATCH System.................................14
Before You Begin
Use
Height & Weight Limits.............15-17
Features...................................18-19
Rear-Facing Installation
With LATCH.............................20-21
Forward-Facing Installation
With LATCH.............................22-23
Rear-Facing Installation With
Vehicle Seat Belts.....................24-25
Forward-Facing Installation With
Vehicle Seat Belts.....................26-27
Placing Child in Child Restraint..28-31
Operations and Adjustments......32-40
s(ARNESS3TRAPS32
s#HEST#LIP33
s"UCKLE33
s#ROTCH3TRAP!DJUSTMENT34-35
s2ECLINE5PRIGHT0OSITIONS36-38
s2EMOVINGLATCH from Vehicle
Anchor Points...............................39
sLATCH Storage.............................40

3
Vehicle Seat Belts.......................41-48
s,OCKING#LIP46-47
Additional Information...............49-57
s4ETHER3TORAGE49
s"ODY3UPPORTONCERTAINMODELS50
s(EAD0ILLOWONCERTAINMODELS51
s(ARNESS#OVERSONCERTAINMODELS51
s#AREAND#LEANING52-56
s"UCKLE#LEANING0ROCESS55
s!IRCRAFT5SE56
s3ECOND(AND#HILD2ESTRAINT56
Replacement Parts...........................60
s,OCKING#LIP3TORAGE60
s)NSTRUCTION-ANUAL3TORAGE60
TABLE OF CONTENTS

4
Read and understand instruction
manual and child restraint labels.
)NFANTSLESSTHANLBSKGmust
use child restraint rear-facing.
Infants or toddlers 20 to 40 lbs.
KGTOKGmay be rear-facing.
Do not use child restraint rear-facing
INVEHICLESEATWITHAIRBAG
Secure children in rear seat of
VEHICLEWHENEVERPOSSIBLE
.EVERLEAVECHILDUNATTENDED
Install child restraint securely with
VEHICLESEATBELTORLATCH belt.
Do not use after the useful life date
SHOWNONBACKOFCHILDRESTRAINT
$ONOTALLOWANYONEBABYSITTER
RELATIVESETCTOUSECHILDRESTRAINT
without first understanding all
instructions.
No child restraint can guarantee protection from injury in every
situation, but proper use helps reduce the risk of serious injury or death.
READ THIS MANUAL CAREFULLY.
IMPORTANT INFORMATION
5
IMPORTANT INFORMATION
0LEASElLLINTHEABOVEINFORMATION4HEMODELNUMBERANDDATEOF
manufacture can be found on a label on the child restraint. Fill out the prepaid
registration postcard attached to the harness and mail it today.
Child restraints could be recalled for safety reasons. You must register this
RESTRAINTTOBEREACHEDINARECALL3ENDYOURNAMEADDRESSANDTHERESTRAINTS
model number and date of manufacture to:
Graco Children’s Products, Inc.
Attn: Customer Service, 3 Glenlake Parkway Atlanta, GA 30328
or call 1-800-345-4109 or register online at
http://www.gracobaby.com/carseatregistration
Registration Information
Model Number:
Date of Manufacture:
Purchase Date:
Register Your Child Restraint
CONTINUED
6
For recall information:
#ALLTHE53'OVERNMENTS6EHICLE3AFETY(OTLINEAT
449nnnORGOTOhttp://www.NHTSA.gov
If You Need Help:
)NTHE53!PLEASECONTACTOUR#USTOMER3ERVICE$EPARTMENTWITHANY
QUESTIONSYOUMAYHAVECONCERNINGPARTSUSEORMAINTENANCE7HENYOU
CONTACTUSPLEASEHAVEYOURPRODUCTSmodel number and date of
manufactureREADYSOTHATWEMAYHELPYOUEFlCIENTLY4HESENUMBERSCANBE
FOUNDONASTICKERONTHEUNDERSIDEOFYOURCHILDRESTRAINT
1-800-345-4109 or www.gracobaby.com
www.cpsc.gov
www.NHTSA.gov
www.seatcheck.org
IMPORTANT INFORMATIONCONTINUED
7
NEVER PLACE THIS CHILD RESTRAINT IN A
VEHICLE SEATING LOCATION THAT HAS A
FRONT AIR BAG. If an air bag inflates, it can
hit the child and child restraint with great
force and cause serious injury or death to
your child. Refer to your vehicle owner’s
manual for information about side air bags
and child restraint installation.
WARNINGS - Prevent serious injury or death:
8
Failure to follow these
instructions and child restraint
labels can result in child
striking the vehicle’s interior
during a sudden stop or crash.
Secure child restraint with a
vehicle seat belt or LATCH that is
properly routed as shown in this
manual.
Select a suitable location for the
child restraint in your vehicle.
Choose the correct mode of use
for the child restraint depending
on your child’s size. Infants less
than 20 lbs. (9.1kg) must use this
child restraint rear-facing.
Serious crippling injury or death
can result if infant faces front of
vehicle.
The American Academy of
Pediatrics (AAP) recommends that
children be rear-facing until age 2
or until they reach the maximum
rear-facing height and weight
rating for their seat.
Vehicle seat belt system MUST
hold child restraint securely. Not
all vehicle seat belts can be used
with a child restraint.
If vehicle seat belt does not hold
child restraint securely, read
“Vehicle Seat Belts” section.
WARNINGS- Prevent serious injury or death:
(continued)
9
Never put a child restraint in a
front vehicle seat unless
recommended by vehicle owner’s
manual. National Highway Traffic
Safety Administration (NHTSA)
alerts vehicle owners that
according to accident statistics,
children are safer in the rear seat.
For vehicles with air bags, refer to
vehicle owner’s manual for child
restraint installation information.
If child restraint is in a crash, it
must be replaced. DO NOT use it
again! A crash can cause unseen
damage and using it again could
result in serious injury or death.
DO NOT use child restraint if it is
damaged or missing parts.
DO NOT use accessories or parts
other than those provided by
Graco. Their use could alter the
performance of the child restraint.
Rear-facing child restraint must be
properly leveled:
s4OORECLINEDCANRESULTIN
injury or ejection.
s4OOUPRIGHTCANRESULTIN
breathing difficulties.
WARNINGS- Prevent serious injury or death:
(continued)
10
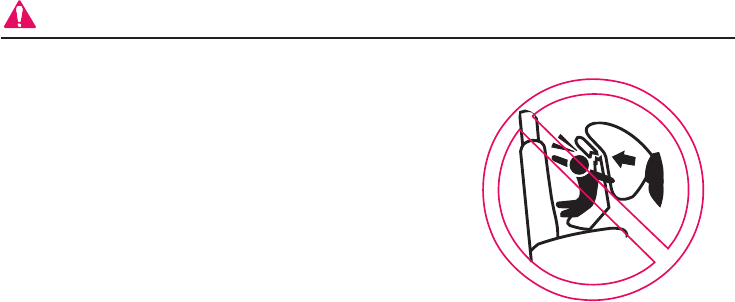
Never leave child unattended,
even when sleeping. Child may
become tangled in harness straps
and suffocate or strangle.
DO NOT remove LATCH system
from child restraint. If using
vehicle seat belt to secure child
restraint, LATCH connectors must
be stored. (see section “LATCH
storage”)
Never attach two
LATCH connectors
to one vehicle
lower anchor
point unless
specifically
allowed by the
vehicle manufacturer.
NEVER use the rear-facing LATCH
belt and the forward-facing
LATCH belt at the same time. You
can only use one LATCH belt at a
time depending on which mode
you install the child restraint.
WARNINGS- Prevent serious injury or death:
(continued)
11
BASIC INFORMATION
Certification
4HISCHILDRESTRAINTMEETSOREXCEEDSALL
applicable requirements of Federal
-OTOR6EHICLE3AFETY3TANDARDFOR
USEINMOTORVEHICLESANDAIRCRAFT
Unoccupied Child Restraint
Dangerous Vehicle Seats
Child Restraint Useful Life
Always secure child restraint to LATCH
ORAVEHICLESEATBELTEVENWHEN
UNOCCUPIED)NACRASHANUNSECURED
child restraint can injure passengers.
Do not use child restraint on rear-facing
ORSIDEFACINGVEHICLESEATS
STOP using this child restraint and
THROWITAWAYYEARSAFTERTHEDATEOF
manufacture. ,OOKFORTHISSTICKERON
rear of child restraint:
Warm Weather
#HILDRESTRAINTPARTSCANGETVERYHOTIN
the sun or warm weather.
To avoid burns, always check
before putting child in child
restraint.
Vehicle Seat Protection
0ROTECTVEHICLESEAT5SEACHILDRESTRAINT
MATTOWELORTHINBLANKETUNDERAND
behind child restraint.
MODEL
Date of Manufacture
GRACO CHILDREN'S PRODUCTS, INC.
ATLANTA, GA 30328 1-800-345-4109
Made in China
PD206938A
NAME
year month day

12
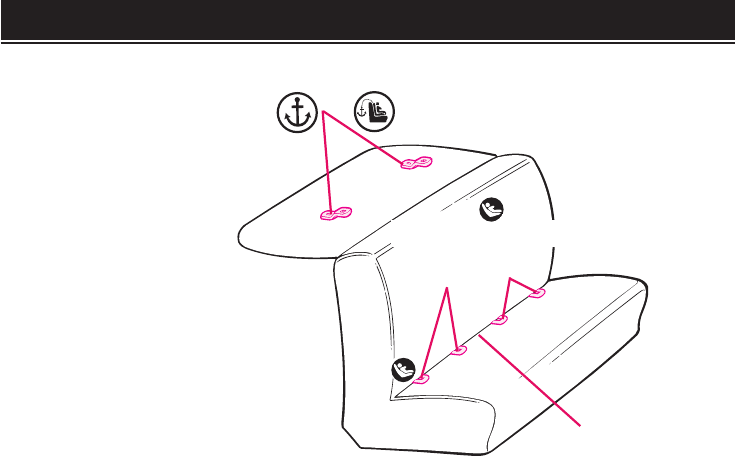
WHAT IS LATCH?
5NITED3TATES&EDERAL-OTOR6EHICLE
3AFETY3TANDARDSHAVEDElNEDA
system for installing child restraints in
VEHICLES4HESYSTEMISCALLED LATCH.
LATCH stands for:
Lower Anchors and Tethers for CHildren.
LATCHINTHEVEHICLECONSISTSOFATOP
tether anchor point and two lower
anchor points.
3OMEVEHICLEOWNERMANUALSUSETHE
term ISOFIX to identify the new child
RESTRAINTANCHORSYSTEM4HISCHILD
restraint with LATCH can also be used
INVEHICLESEATINGPOSITIONSEQUIPPED
with ISOFIX.
.EWERVEHICLESMAYHAVEONEOR
more seating positions equipped with
LATCH anchor points.
)FVEHICLEISEQUIPPEDWITHLATCHTHE
VEHICLELOWERANCHORPOINTSMAYBE
VISIBLEATTHEVEHICLESEATCREASE)FNOT
VISIBLETHEYMAYBEMARKEDWITHA
symbol or a colored dot.
#HECKVEHICLEOWNERSMANUALFORVEHICLE
TOPTETHERANCHORLOCATIONS4HEYMAY
be identified using one of the anchor
symbols .
5SEVEHICLEBELTNOTLATCHCONNECTORS
for installations with children weighing
MORETHANPOUNDSKG
NOTE:3OMEVEHICLEMANUFACTURERS
HAVELOWERMAXIMUMWEIGHTRATINGS
for LATCHANCHORSSOYOUMUSTCONSULT
YOURVEHICLEOWNERSMANUALORCALLTHE
VEHICLEMANUFACTURERTOCONlRMTHE
LIMITSONYOURVEHICLESLATCH anchors.
13
Vehicle Top Tether
Anchor Points
Vehicle
Lower Anchor
Points
Vehicle
Seat Crease
4YPICALSEATINA
PASSENGERVEHICLE
/THERVEHICLETYPES
MAYHAVEDIFFERENT
LATCH locations.
See your vehicle
owner’s manual for
exact locations,
anchor identification,
and requirements
for use with a child
restraint.
WHAT IS LATCH?CONTINUED
14
LATCH SYSTEM
Child Restraint
Top Tether -
BLACK
LATCH consists of a permanently
attached lower anchor belt and a top
tether strap.
ONLY use LATCH in a seating position
RECOMMENDEDBYVEHICLE
manufacturer. NEVER use forward
facing and rear-facing LATCH belts at
the same time.
LATCHLOWERVEHICLEANCHORPOINTSARE
DEFINEDASINCHESCMFROMTHE
center of one LATCH anchor to the
center of another LATCH anchor.
LATCH can ONLY be used if LATCH
ANCHORSPACINGISINCHESCM
DO NOT use LATCH if anchor spacing
ISOVERINCHESCM
FORWARD-FACING LATCH BELT
- BLACK
Vehicle Top
Tether
Anchor
Point
Vehicle Lower
Anchor Points
Vehicle
Lower
Anchor
Points Forward-facing
Lower Anchor
Belt - BLACK
Rear-facing Lower
Anchor Belt - GRAY
REAR-FACING LATCH BELT - GRAY
15
HEIGHT & WEIGHT LIMITS
IMPORTANT:4HISCHILDRESTRAINTISCERTIlEDFORUSErear-facing with children up
TOLBSKG(OWEVERSOMECHILDRENAPPROACHINGLBSKGMAYBE
too tall to fit rear-facing. Child should use child restraint forward-facing only if
CHILDISOVERLBSKGANDCANSITUPRIGHTUNASSISTED
*SEE!MERICAN!CADEMYOF0EDIATRICS!!0RECOMMENDATIONSON
PANDP
Rear-facing: 4 to 40 lbs. (1.8kg-18.1kg)
4 lbs.
1.8kg) 40 lbs.
(18.1kg)
20 lbs.
(9.1kg) LBS
(31.8kg)
REAR-FACING
FORWARD-FACING
vBELOW
red handle
s)NFANTSWHOWEIGHLESSTHANLBSKGMUST be
rear-facing.
s)NFANTSORTODDLERSTOLBSKGTOKG
may be rear-facing.
s(ARNESSHEIGHTMUSTBEat or just belowCHILDS
shoulders.
s#HILDSHEADMUSTBEATLEASTvBELOWTHEREDHANDLE
16
Forward-facing: 20 to 70 lbs. (9.1kg to 31.8kg)
s#HILDMUSTNOTEXCEEDINCHESCM
s4ODDLERSTOLBSKGTOKGWHOARECAPABLEOF
sitting upright unassisted may be forward-facing. If unable to
SITUNASSISTEDUSErear-facing.
s4ODDLERSTOLBSKGTOKGANDUPTOINCHES
CMTALLMUST be forward-facing.
s(ARNESSHEIGHTMUSTBEat or just aboveCHILDSSHOULDERS
s#HILDSEARSAREBELOW top of head support.
3EEPFOR!MERICAN!CADEMYOF0EDIATRICS!!0RECOMMENDATIONS
HEIGHT & WEIGHT LIMITS CONTINUED

17
A preterm infant or low birth weight infant
PREEMIESMAYBEATSPECIALRISKINAVEHICLE
or aircraft.
According to the American Academy of
0EDIATRICS!!0THESEINFANTSMAYSUFFER
breathing difficulties if improperly reclined in
a child restraint.
When installing the child restraint
rear-facingUSECORRECTEDAGEFORPREEMIES
SEEPGFORMOREINFORMATION
'RACOADVISESTHATYOUHAVEYOUR
PHYSICIANORHOSPITALSTAFFEVALUATE
your infant and recommend the proper child
restraint or car bed before you and your infant
LEAVETHEHOSPITAL
Preterm or
Low Birthweight Infants *
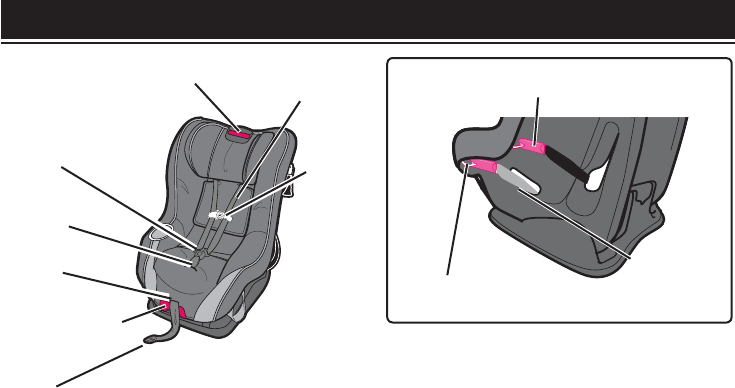
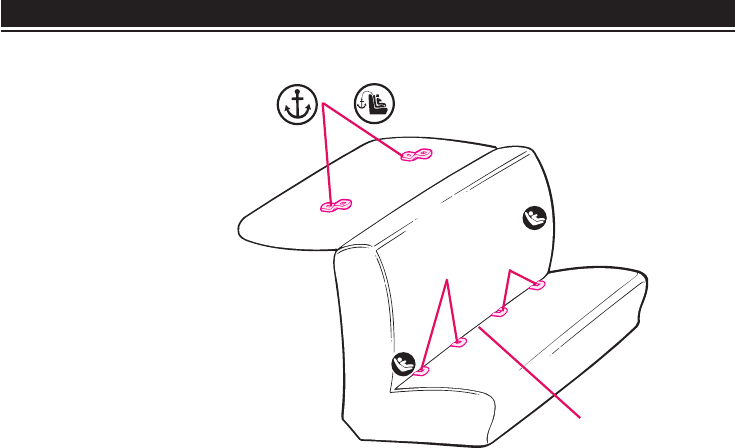
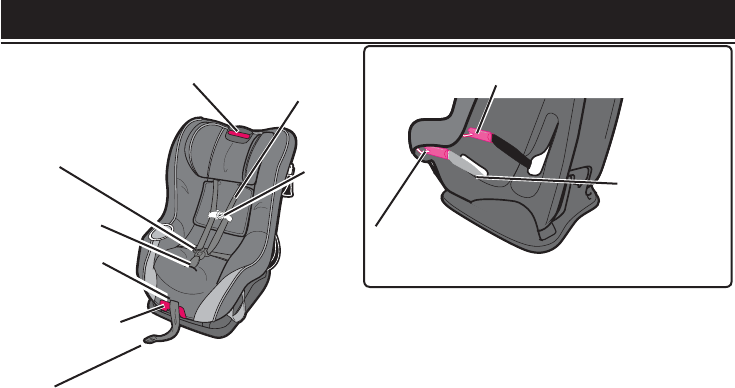
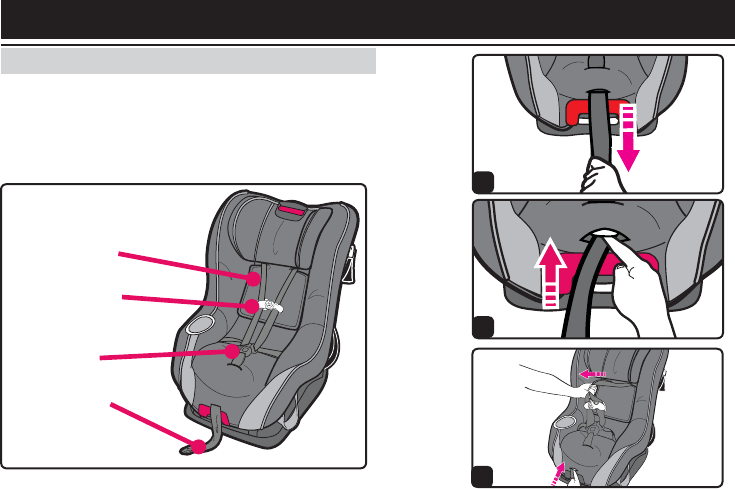
18
FEATURES
Forward-facing LATCH
beltSTORED
Rear-facing
LATCH belt
STORED
Rear-facing LATCH
storage bar
5NITED3TATES&EDERAL-OTOR6EHICLE3AFETY
3TANDARDSHAVEDElNEDASYSTEMFORINSTALLINGCHILD
RESTRAINTSINVEHICLES4HESYSTEMISCALLED LATCH.
LATCH may ONLY be used IN PLACE of vehicle
belt if vehicle is equipped with LATCH anchor
points. Please refer to vehicle owner’s manual
for LATCH locations in vehicles.
Harness
BUCKLE
Crotch
strap
Harness
release
LEVER
Harness
adjustment strap
Harness
strap
Chest
clip
Recline
Handle
Head support
adjustment handle
19
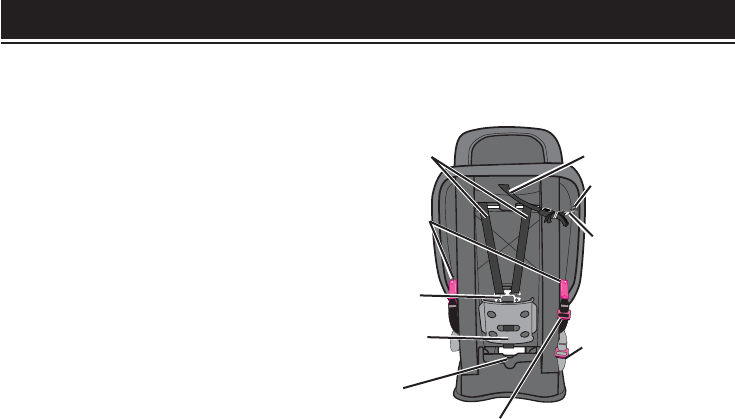
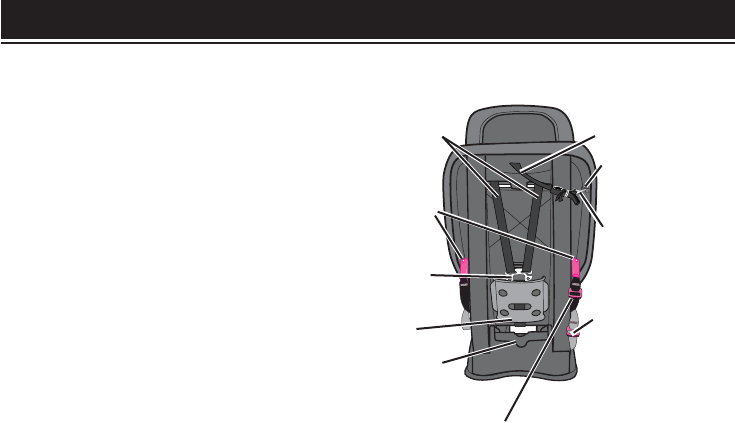
FEATURES
6EHICLESARENOWORCANBEEQUIPPED
with tether anchor points behind some
seats. A tether anchors the top of the child
RESTRAINTTOTHEBODYOFTHEVEHICLE7HEN
USEDPROPERLYWITHTHEVEHICLESEATBELTOR
LATCHATETHERHELPSREDUCEINJURYINA
sudden stop or crash.
4ETHERSTRAP
4ETHERHOOK
Forward-facing LATCH push
button adjuster release button
4ETHERSTORAGE
bar
Rear-facing
LATCH push
button adjuster
release button
Forward-facing
LATCH storage
bars
Splitter plate
Harness
straps
Harness
COVERPLATE
Instruction
manual storage
20
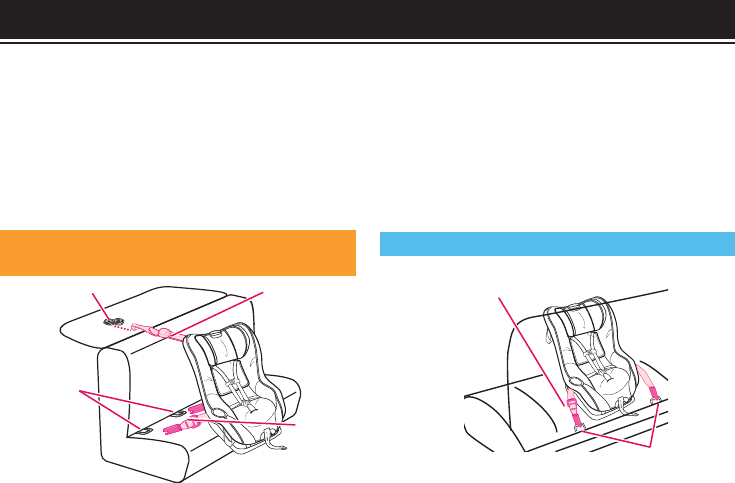
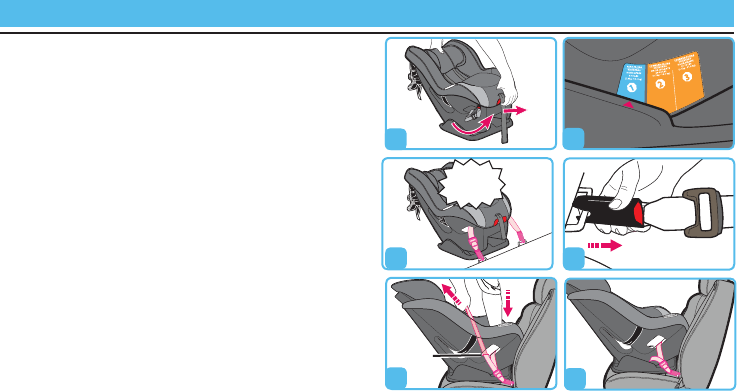
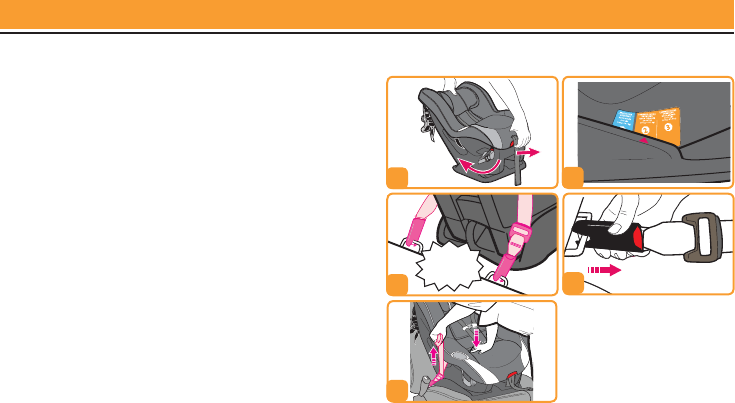
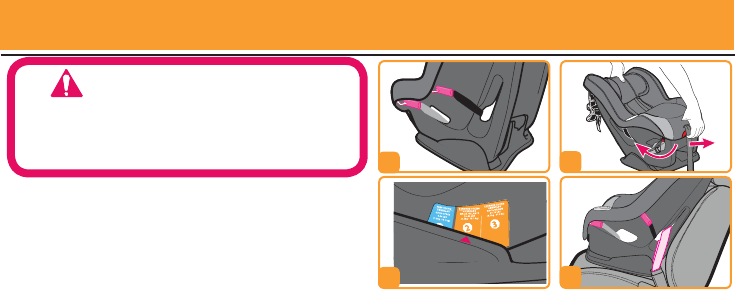
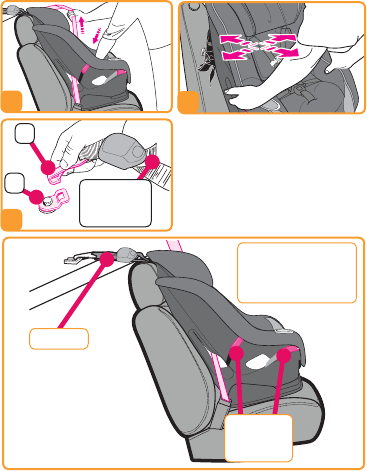
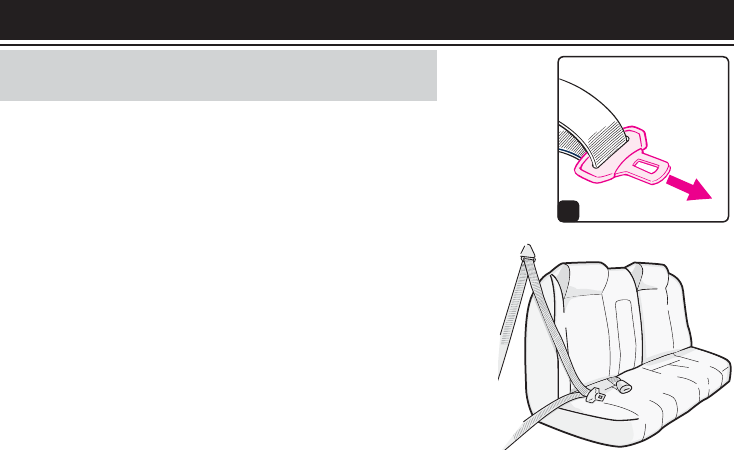
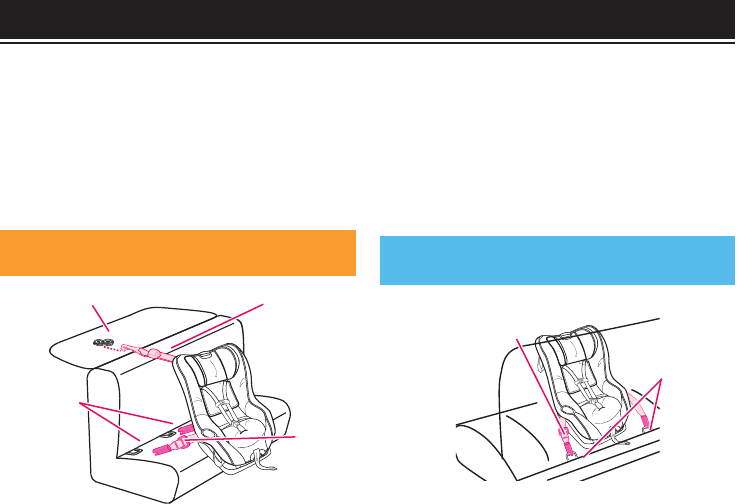
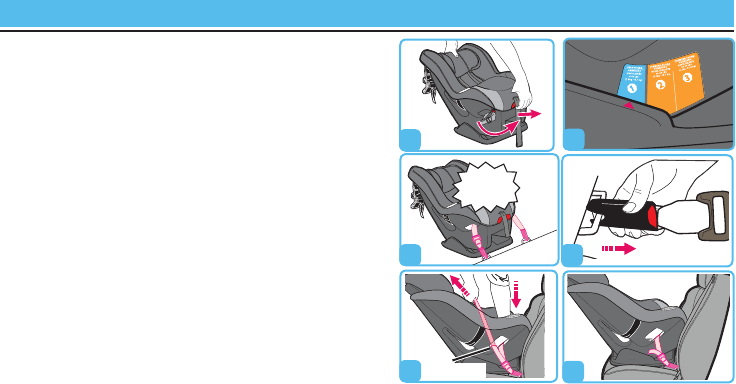
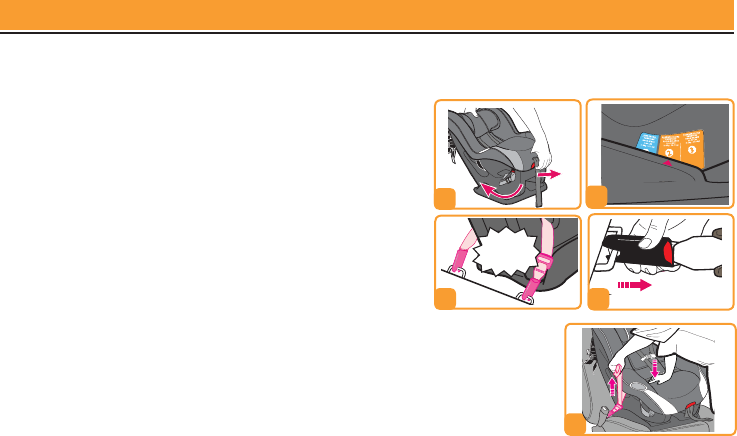
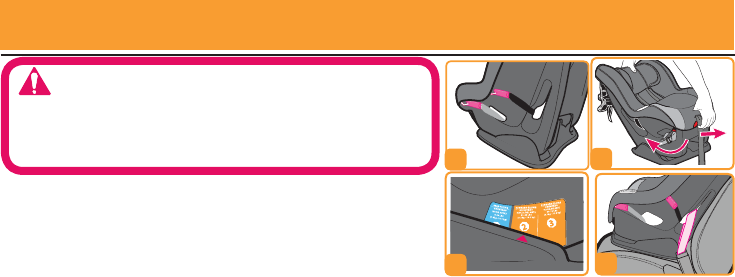
REAR-FACING INSTALLATION WITH LATCH
0ULLOUTONHANDLEONFRONTOFCHILD
restraint (a) and adjust to rear-facing
position 1 (b)-AKESURE
forward-facing LATCH belt is stored.
(see fig. c, pg. 40)
2. Place rear-facing ONVEHICLESEAT
equipped with LATCH anchors.
&OREASEOFINSTALLATIONEXTEND
LATCH BELTTOITSMAXIMUMLENGTH
4. Attach rear-facing connectors to
VEHICLELOWERANCHORS(c). Belt must lie
flat and not be twisted. Pull connectors
to be sure they are securely attached to
the anchor points. (d).
0RESSDOWNlRMLYINCENTEROFCHILD
restraint while pulling LATCH
adjustment belt through slot in
seat pad (e). 7HENlNISHEDTIGHTENING
MAKESUREFREEENDOFADJUSTMENTBELTIS
outside the seating area (f).
ab
d
e
c
f
CLICK!
Slot
21
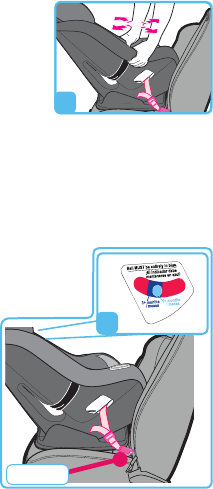
g
h
,!4#(
Hold seat and pULLFRONTTOBACKANDLEFTTORIGHTATBELTPATH
TOCHECKFORSECUREINSTALLATION(g)4HECHILDRESTRAINTSHOULD
NOTMOVESIDETOSIDEORFORWARDMORETHANINCHCM
#HECKTHATTHELOWERANCHORBELTSTAYSTIGHTANDDOESNOT
SLIPFROMTHETIGHTENEDPOSITION)FITDOESNOTSTAYTIGHTTRY
ANOTHERSEATINGPOSITIONORCONTACT#USTOMER3ERVICE
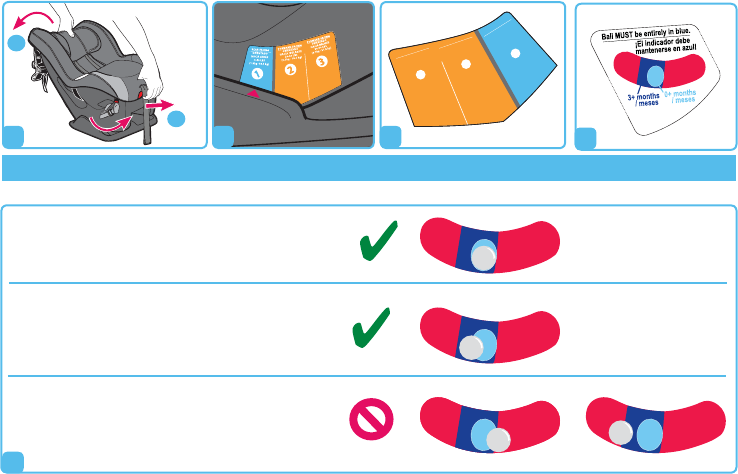
#HECKLEVELINDICATORONCHILDRESTRAINT(h).
Vehicle mustBEONLEVELGROUND and child in
CHILDRESTRAINTWHENCHECKINGLEVELINDICATOR
Ball MUST be entirely in blue zone (h). If
NECESSARYPLACEROLLEDTOWELSUNDERCHILD
RESTRAINTATVEHICLESEATCREASEUNTILENTIREBALLIS
INBLUEZONE4HENRECHECKLEVELINDICATOR
3EEPAGElGE
sDO NOT use tether rear-facing4ETHERmust be
STOREDSEEh4ETHER3TORAGEvPAGE
s0ERIODICALLYCHECKTHATCHILDRESTRAINTISSECURELY
INSTALLEDANDPROPERLYLEVELEDADJUSTIFNECESSARY
s4OREMOVE LATCHSEEh2EMOVINGLATCH from
6EHICLE!NCHOR0OINTSvP
22
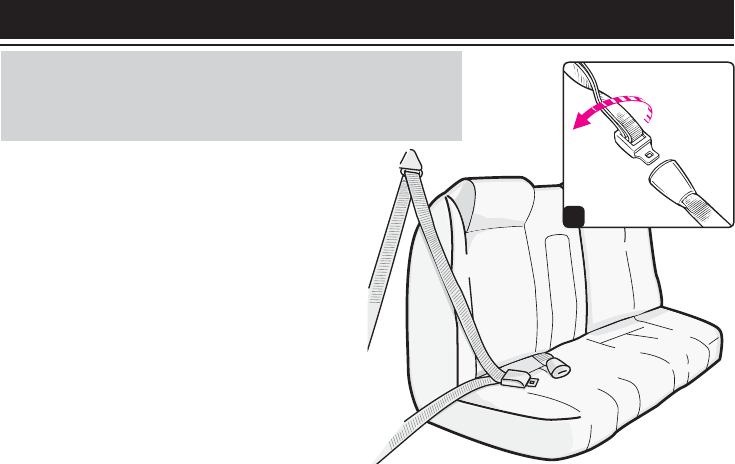
0ULLOUTONHANDLEONFRONTOFCHILDRESTRAINT(a) and adjust to forward-facing
position 2 or 3 (b) BASEDONYOURCHILDSSIZE
-AKESURErear-facing LATCH belt
is stored. (see fig. b, pg. 40)
5NHOOKTETHERFROMTETHERSTORAGESEE
PAGE
0LACEforward-facing ONVEHICLESEAT
equipped with LATCH anchors.
&OREASEOFINSTALLATIONEXTENDLATCH
BELTTOITSMAXIMUMLENGTH
4. Attach forward-facing connectors to
VEHICLELOWERANCHORS(c). Belt must lie
flat and not be twisted. Pull connectors
to be sure they are securely attached (d).
3LIDECHILDRESTRAINTBACKUNTILTHE
RESTRAINTISINCONTACTWITHTHEVEHICLE
SEATBACK
0RESSDOWNFIRMLYINCENTEROFCHILDRESTRAINTTOCOMPRESSVEHICLESEATCUSHION
while tightening LATCH belt by pulling the adjustment belt (e).
FORWARD-FACING INSTALLATION WITH LATCH
a
d
c
b
CLICK!
e
23
f
(OLDSEATANDPULLFRONTTOBACKAND
LEFTTORIGHTATBELTPATHTOCHECKFOR
secure installation (f)4HECHILD
RESTRAINTSHOULDNOTMOVESIDETOSIDE
ORFORWARDMORETHANINCHCM
#HECKTHATTHELOWERANCHORBELT
stays tight and does not slip from the
tightened position. If it does not stay
TIGHTTRYANOTHERSEATINGPOSITIONOR
CONTACT#USTOMER3ERVICE
!TTACHTETHERSTRAPHOOK(A) to anchor
hardware (B) and tighten adjustment
BELTTOREMOVEANYSLACK(g).
Belt must lie flat and not be twisted.
0ERIODICALLYCHECKTHATCHILDRESTRAINT
ISSECURELYINSTALLEDADJUSTIF
necessary.
s4OREMOVE LATCHSEEh2EMOVING
LATCHFROM6EHICLE!NCHOR0OINTSv
P
g
Pull to
4IGHTEN
A
B
4ETHER
,!4#(

24
0LEASEREFERTOPh6EHICLE3EAT"ELTSv
TODETERMINEWHATTYPEOFVEHICLESEAT
BELTISINYOURVEHICLE
3TORErear-facing and forward-facing
LATCH belt as shown (a). Pull out on
handle on front of child restraint (b)
and adjust to rear-facing position 1 (c).
2. Place rear-facing ONVEHICLESEAT
4HREADVEHICLESEATBELTTHROUGH
rear-facing openings under the seat
PADANDBUCKLEBELT(d)$/./4PASSVEHICLEBELTOVERTOPOFTHESEATPAD
0RESSDOWNlRMLYINCENTEROFCHILDRESTRAINTTOCOMPRESSVEHICLESEATCUSHION
WHILETIGHTENINGVEHICLESEATBELT(e).
LATCH belts MUST be stored when
USINGVEHICLESEATBELTTOINSTALLCHILD
restraint.
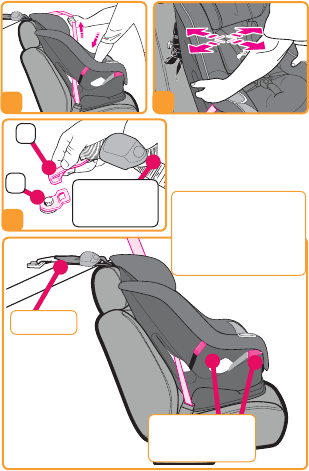
REAR-FACING INSTALLATION WITH VEHICLE SEAT BELTS
WARNING
ab
d
e
c
25
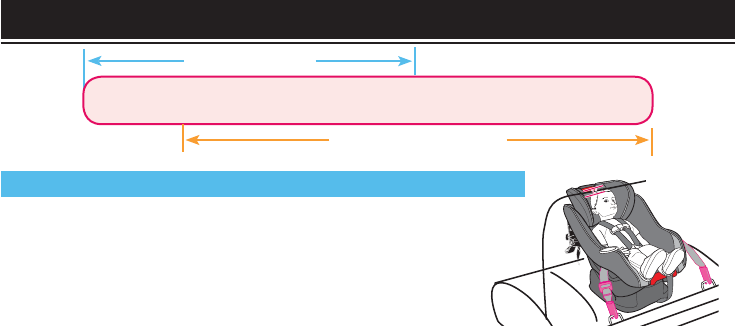
(OLDSEATANDPULLFRONTTOBACKANDLEFTTORIGHTATTHEBELT
PATHTOCHECKFORSECUREINSTALLATION(f)4HECHILDRESTRAINT
SHOULDNOTMOVESIDETOSIDEORFORWARDMORETHANINCH
CM6EHICLELAPBELTMUSTSTAYTIGHT)FNOTSECURESEE
h6EHICLE3EAT"ELTSvPAGE
#HECKLEVELINDICATORONCHILDRESTRAINTVehicle must be on
LEVELGROUND and child in child restraint when
CHECKINGLEVELINDICATOR
"ALLMUST be entirely in blue zone (g). If
NECESSARYPLACEROLLEDTOWELSUNDERCHILD
RESTRAINTATVEHICLESEATCREASEUNTILENTIREBALLIS
INBLUEZONE4HENRECHECKLEVELINDICATOR
3EEPAGElGE
DO NOT use tether rear-facing4ETHERmust be
STOREDSEEh4ETHER3TORAGEvPAGE
0ERIODICALLYCHECKTHATCHILDRESTRAINT
is securely installed and
PROPERLYLEVELEDADJUSTIF
necessary.
g
f
4OWEL
26
LATCH belts MUST be stored when
USINGVEHICLESEATBELTTOINSTALLCHILD
restraint.
0LEASEREFERTOPh6EHICLE3EAT"ELTSv
TODETERMINEWHATTYPEOFVEHICLESEAT
BELTISINYOURVEHICLE
3TORErear-facing and forward-facing
LATCH belt as shown (a). Pull out on
handle on front of child restraint (b)
and adjust to forward-facing position 2 or 3 (c).
5NHOOKTETHERFROMTETHERSTORAGESEEPAGE
0LACEforward-facing ONVEHICLESEAT
3LIDECHILDRESTRAINTBACKUNTILTHERESTRAINTISINCONTACTWITH
THEVEHICLESEATBACK
4HREADVEHICLESEATBELTTHROUGHforward-facingOPENINGSANDBUCKLEBELT(d).
FORWARD-FACING INSTALLATION
WITH VEHICLE SEAT BELTS
WARNING
ab
d
c
27
0RESSDOWNlRMLYINCENTEROFCHILD
RESTRAINTTOCOMPRESSVEHICLESEAT
CUSHIONWHILETIGHTENINGVEHICLESEAT
belt (e).
(OLDSEATANDPULLFRONTTOBACKAND
LEFTTORIGHTATBELTPATHTOCHECKFOR
secure installation (f)4HECHILD
RESTRAINTSHOULDNOTMOVESIDETOSIDE
ORFORWARDMORETHANINCHCM
Vehicle lap belt MUST stay tight. If not
SECURESEEh6EHICLE3EAT"ELTSvPG
!TTACHTETHERSTRAPHOOK(A) to anchor
hardware (B) and tighten adjustment
BELTTOREMOVEANYSLACK(g))FVEHICLE
DOESNOTHAVEANCHORPOINTSTOATTACH
TETHERHOOKTETHERHOOKSHOULDBE
STOREDSEEh4ETHER3TORAGEvPAGE
Belt must lay flat and not be twisted.
0ERIODICALLYCHECKTHATCHILDRESTRAINTIS
SECURELYINSTALLEDADJUSTIFNECESSARY
f
Installation with
,AP3HOULDER
belt
,!4#(
STORED
4ETHER
g
Pull to
4IGHTEN
A
B
e
28
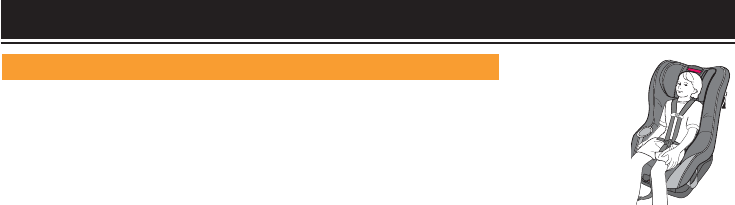
PLACING CHILD IN CHILD RESTRAINT
To prevent serious injury
or death:
sKeep harness straps snug and
positioned on shoulders with
CHESTCLIPATARMPITLEVEL
s$ONOTUSESTRAPCOVERS
BLANKETSCUSHIONSORPADDING
under harness straps or child
UNLESSPROVIDEDBY'RACO
sChild should be dressed in
clothing that does not interfere
WITHBUCKLINGTHEHARNESS
sFailure to properly adjust the
harness straps for your child
INCREASESTHERISKOFSERIOUS
INJURYORDEATHINTHEEVENTOFA
SHARPTURNSUDDENSTOPORCRASH
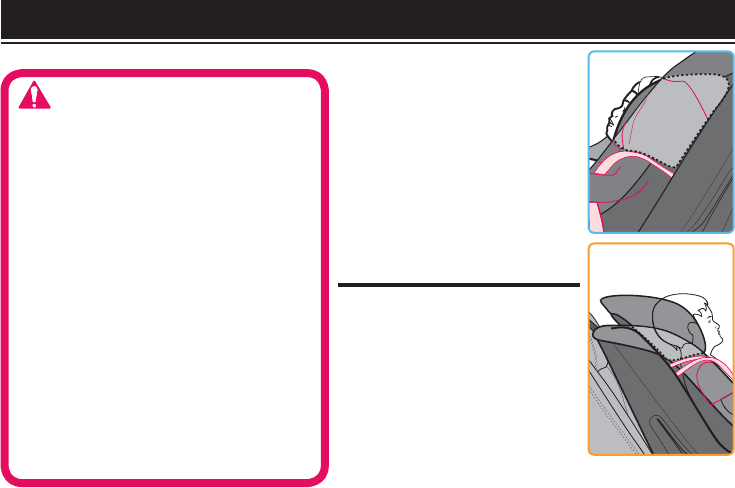
FORWARD-FACING
sLBSKGKG
Harness height must be
ATORJUSTABOVECHILDS
shoulders.
s#HILDSEARSAREBELOW
top of head support.
REAR-FACING
sLBSKGKG
s(ARNESSHEIGHTMUSTBEAT
ORJUSTBELOWCHILDS
shoulders. Body support *
MUST be used if shoulders
are below lowest harness
SETTING*SEEPAGE
s#HILDSHEADMUSTBEAT
LEASTvBELOWTHERED
handle.
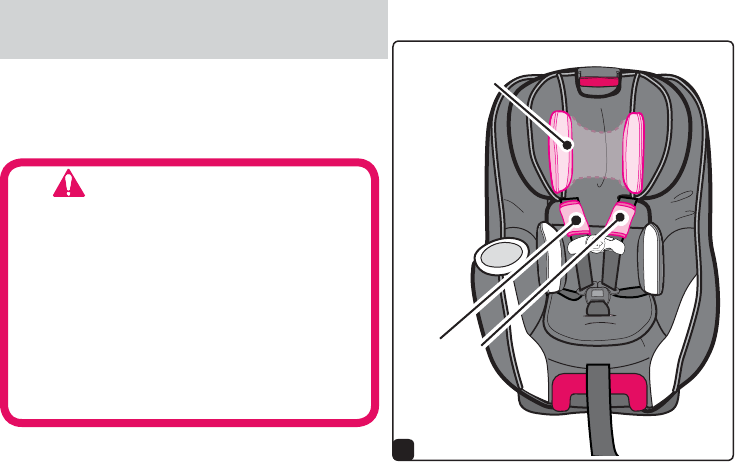
Check Harness System
WARNING
29
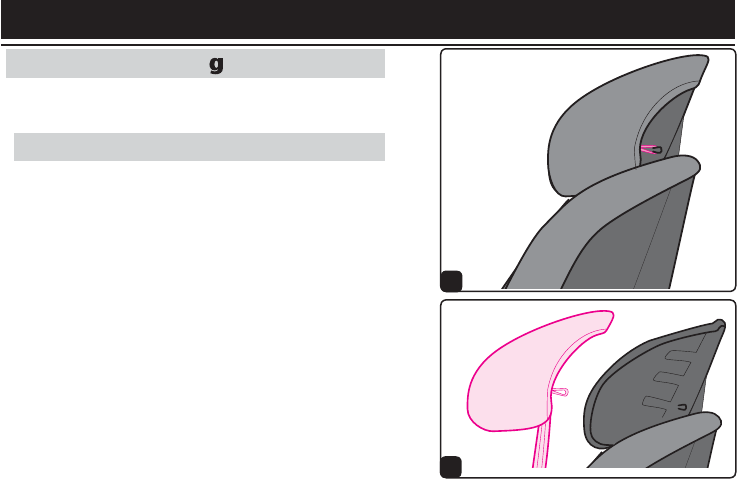
sBEFOREADJUSTINGTHEHEADSUPPORTHEIGHTHAVE
your child lean forward slightly.
s3QUEEZEANDPULLUPTHEREDHEADSUPPORTADJUSTMENT
handle (a) ONTOPOFSEATUNTILITLOCKSINTOONEOFTHE
HEIGHTPOSITIONS(b).
s4OLOWERSQUEEZEREDHEADSUPPORTADJUSTMENTHANDLE
and push head support down.
s7HENHEADSUPPORTISINLOWESTPOSITIONALWAYSPULL
flap forward as shown. (c).
Rear-facing
s(EADSUPPORTSHOULDBEPOSITIONEDSOTHEHARNESS
STRAPSAREATORJUSTBELOWTHESHOULDERSANDCHILDS
HEADMUSTBEATLEASTvBELOWTHEREDHANDLE
s-AKESURETHEHEADSUPPORTDOESNOTTOUCHTHEFRONT
VEHICLESEAT
Forward-facing
s(EADSUPPORTSHOULDBEPOSITIONEDSOTHATTHEHARNESS
STRAPSAREATORJUSTABOVETHECHILDSSHOULDERS
LBSKGKG
Refer to page 28 for harness strap placement.
Adjusting Head Support
a
b
c
Flap
30
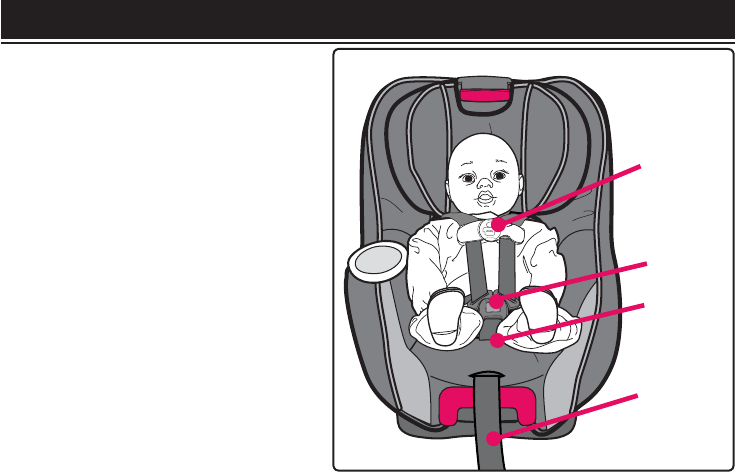
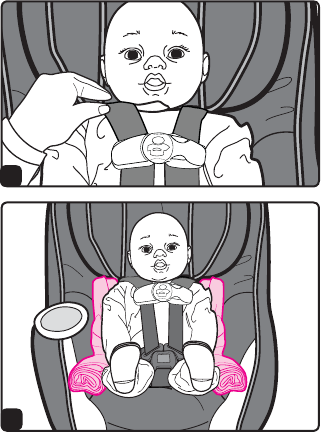
0LACECHILDINCHILDRESTRAINT
WITHCHILDSBACKmATAGAINST
BACKOFCHILDRESTRAINT
0LACEHARNESSSTRAPSOVERCHILDS
SHOULDERSANDINSERTTONGUES
INTOBUCKLESEEPAGE
0ULLUPONTONGUESTOBESURE
THEYARELOCKED
#LOSECHESTCLIP
Position chest clip at armpit
LEVELSEEPAGE
PLACING CHILD IN CHILD RESTRAINT CONTINUED
Chest
Clip
"UCKLE
Harness
Adjustment
Strap
Crotch
Strap
31
4. Adjust harness straps to be snug.
CHECK that the harness is snug. You
should not be able to pinch the
harness if it is snug. A snug strap
SHOULDNOTALLOWANYSLACK)TLIESINA
RELATIVELYSTRAIGHTLINEWITHOUT
sagging. It does not press on the
CHILDSmESHORPUSHTHECHILDSBODY
into an unnatural position (a)
#HECKTHATHARNESSSTRAPSONchest
and thighs are snug.
!ROLLEDTOWELCANBEUSEDONEACH
side to support small children (b).
Be sure towels do not interfere with
HARNESSSYSTEM4OWELSSHOULDNOT
be placed under child.
a
b

32
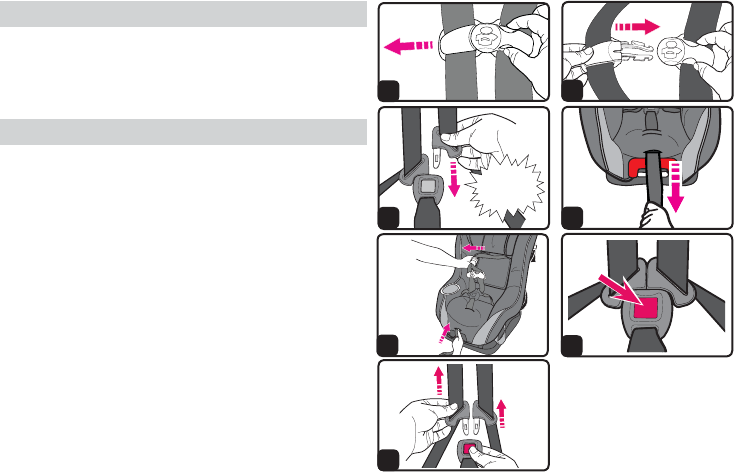
s4OTIGHTEN0ULLHARNESSADJUSTMENTSTRAP(a)
s4OLOOSEN,IFTLEVER(b) while pulling shoulder
harness straps (c).
OPERATIONS & ADJUSTMENTS
c
Harness Strap
Chest Clip
"UCKLE
Harness
Adjustment
Strap
a
b
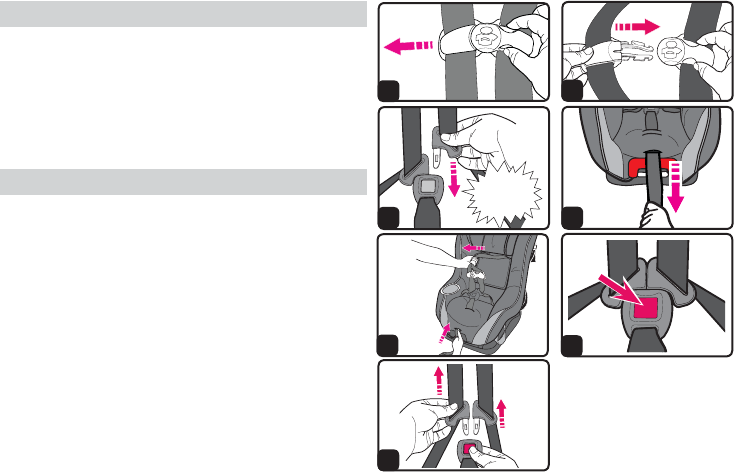
33
s4OOPEN0RESSTABSANDPULLAPART(d)
s4OCLOSE3NAPHALVESTOGETHER
-AKESURETHECHESTCLIPISLOCKED
by pulling out on each half. (e)
s4OBUCKLE)NSERTBOTHTONGUESINTO
BUCKLE0ULLUPONTONGUESTOBE
SURETHEYARELOCKED(f).
4OTIGHTEN0ULLHARNESSADJUSTMENT
strap (g)
s4OUNBUCKLE,OOSENBYLIFTINGLEVERAND
pulling shoulder harness straps (h).
Press in the red button (i) and
PULLTONGUESOUTOFBUCKLE(j)
Chest Clip:
Buckle:
de
f
h
g
i
CLICK!
j

34
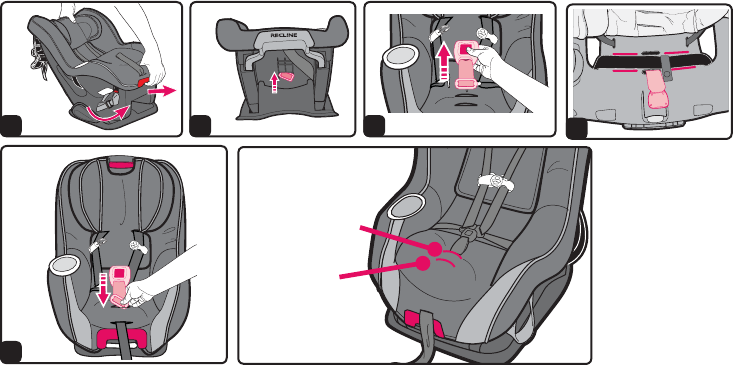
Check the crotch strap: Choose the
position that is closest to but not under
your child.
s2ECLINECHILDRESTRAINTTOPOSITION1 (k).
s&ROMBOTTOMOFCHILDRESTRAINTROTATE
retainer to side in order to push it
through slot easier (l).
s0ULLCROTCHSTRAPFROMCHILDRESTRAINT
as shown (m).
s7HENCHANGINGCROTCHBUCKLE
location LATCH belt must pass between
the LATCH belt lines as shown (n).
s)NSERTCROTCHSTRAPINTODESIREDSLOT(o).
Pull up on crotch strap to be sure it is
secure.
Crotch Strap Adjustment:
OPERATIONS & ADJUSTMENTS CONTINUED
35
o
klm
Rear Crotch
Strap Position
Front Crotch
Strap Position
n
36
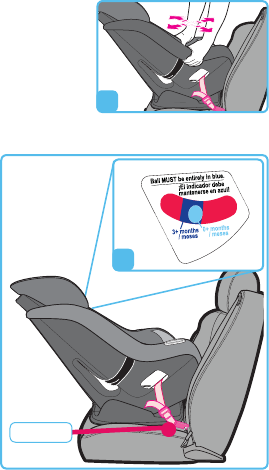
OPERATIONS & ADJUSTMENTS CONTINUED
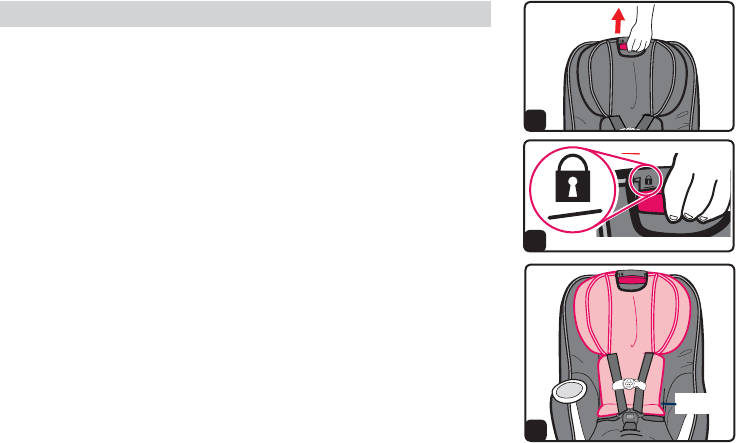
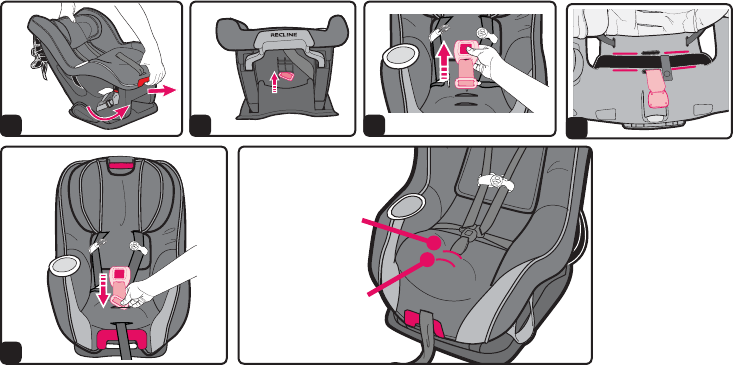
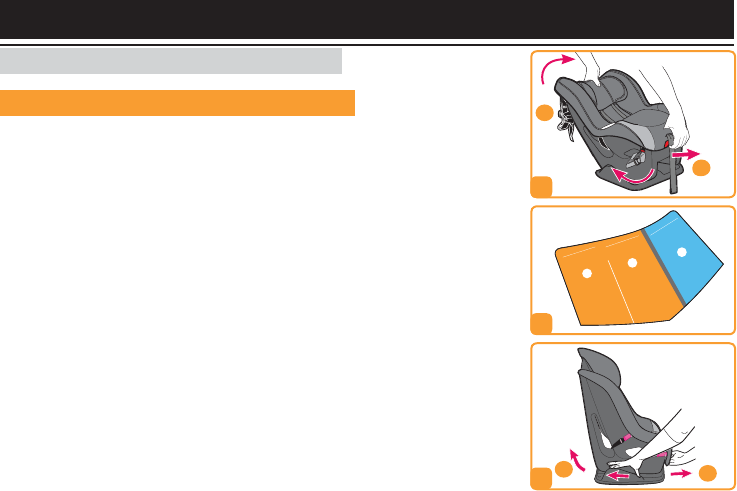
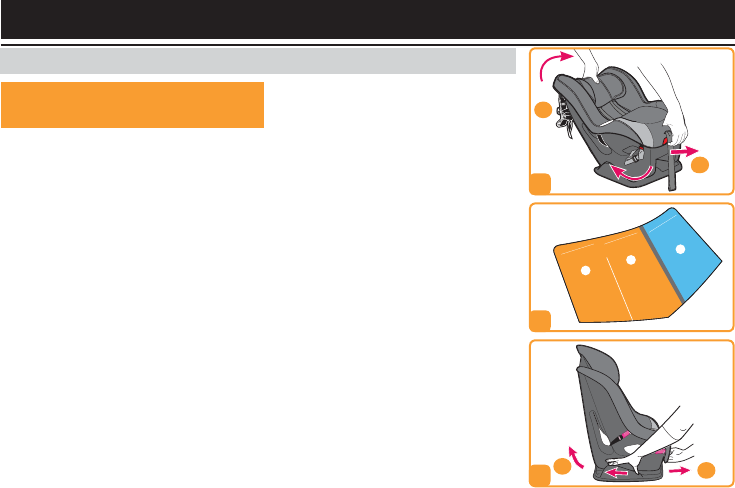
0ULLOUTONRECLINEHANDLEONFRONTOF
CHILDRESTRAINTANDROTATESEATBACK(a).
2. Child restraint must be in recline
position 1 (b) as indicated on label on
side of base (c).
"ALLINLEVELINDICATORMUSTBE
entirely in blue (d). See (e) for proper
LEVELINDICATORUSE)FNECESSARYUSEA
pool noodle or tightly rolled towel for
LEVELING
Rear-Facing
6EHICLEMUSTBEONLEVELGROUNDAND
CHILDINCHILDRESTRAINTWHENCHECKING
LEVELINDICATOR
NOTE: Level indicator is for
rear-facing use only.
FAILURE TO PROPERLYRECLINETHEINFANTRESTRAINTONTHEVEHICLESEAT
INCREASESTHERISKOFSERIOUSINJURYORDEATH
WARNING
37
e
a b
1
2
3
2
1
REAR-FACING
ORIENTADO
HACIA ATRÁS
4-40 LBS
(1.8kg - 18.1 kg)
FORWARD-FACING
ORIENTADO
HACIA /DELANTE
20-40 LBS
(9.1kg - 18.1 kg)
FORWARD-FACING
ORIENTADO
HACIA DELANTE
20-70 LBS
(9.1kg - 31.8 kg)
c
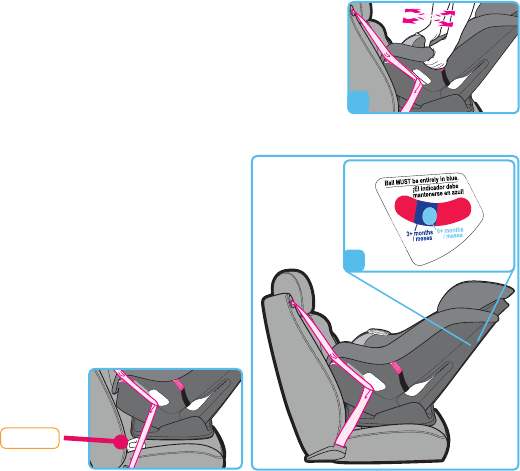
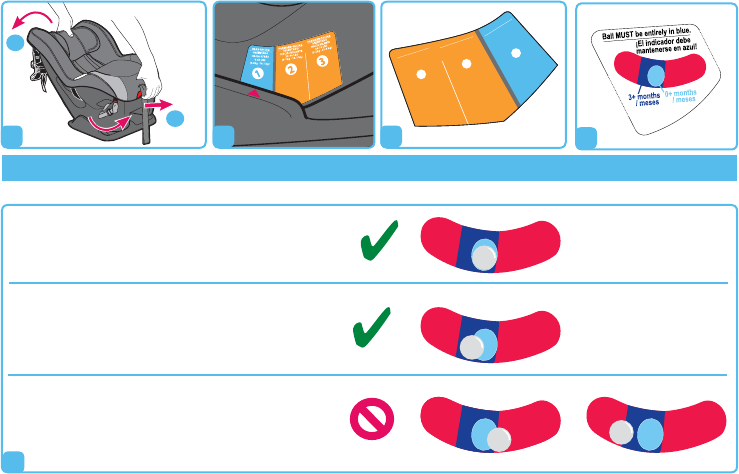
)FTHEBALLISENTIRELYINLIGHTBLUETHE
RESTRAINTISLEVELFORINFANTSMONTHS
in age.
d
WHEN READING THE LEVEL INDICATOR,
)FTHEBALLISINLIGHTBLUEANDDARK
BLUETHERESTRAINTISLEVELFORACHILD
MONTHSINAGE
- If the ball is in REDCHILDRESTRAINTIS
NOTLEVEL9OUMUSTADJUSTYOUR
recline position.
5SECORRECTEDAGEFORPREEMIES
38
a
1
2
c1
2
OPERATIONS & ADJUSTMENTS CONTINUED
0ULLOUTONRECLINEHANDLEONFRONT
OFCHILDRESTRAINTWHILEPULLINGUPAND
forward (a).
2. Adjust recline to position 2 or 3 as
indicated on label (b) on side of base.
4OREACHMOSTUPRIGHTPOSITION(c)PULL
OUTONTHEHANDLEANDPUSHSTRAIGHTBACK
UNTILTHESEATCLICKSINTOTHEUPRIGHT
position. If you change recline positions
YOUWILLNEEDTORECHECKINSTALLATIONTO
MAKESUREBELTISTIGHT
Forward-Facing
3
2
1
REAR-FACING
ORIENTADO
HACIA ATRÁS
4-40 LBS
(1.8kg - 18.1 kg)
FORWARD-FACING
ORIENTADO
HACIA /DELANTE
20-40 LBS
(9.1kg - 18.1 kg)
FORWARD-FACING
ORIENTADO
HACIA DELANTE
20-70 LBS
(9.1kg - 31.8 kg)
b
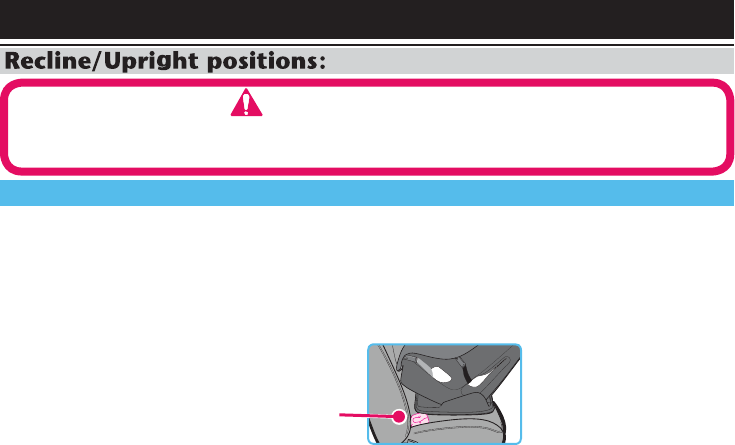
Recline / Upright Positions

39
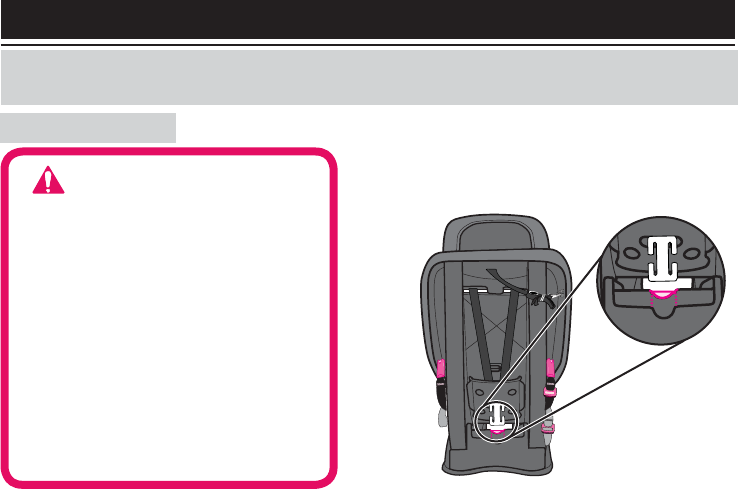
Removing LATCH from
Vehicle Anchor Points:
OPERATIONS & ADJUSTMENTS CONTINUED
2ELEASETHETENSIONONTHELATCH
connector by pushing button in as shown (a).
2. Press button on LATCH (b).
0ULLOUTAWAYFROMANCHORPOINT(c).
a
c
Removing Tether from Vehicle
2ELEASETHETENSIONONTHETETHERCONNECTOR
BYLIFTINGLEVERASSHOWN(d).
2. Press and hold tether release hinge. (e).
0USHCONNECTORINLIFTCONNECTORUPAND
PULLOUTAWAYFROMANCHORPOINT(e).
d e
b
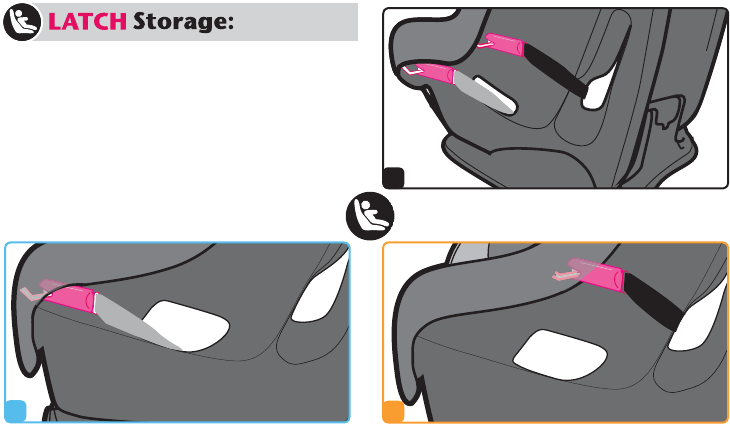
40
,OCATELATCH storage bars for
forward-facing and
rear-facing LATCH belts (a).
2. Fasten LATCH onto storage
bar as shown (b or c).
Repeat for other side of seat.
REAR-FACING STORAGE FORWARD-FACING STORAGE
a
b c
41
Not all vehicle seat belts
can be used with a child
restaint. The child
restraint must be held
securely at all times by a
lap belt (or lap belt
portion of a lap/shoulder
belt) that will not change
length while driving.
4OPROVIDETHEMOSTSECUREINSTALLATIONOFTHE
child restraint:
s2EADTHEVEHICLEOWNERSMANUAL
regarding child restraint installation
and seat belt use with child restraint.
s&OLLOWALLINSTRUCTIONLABELSONVEHICLE
seat belt and child restraint.
If child restraint is not held securely after
FOLLOWINGINSTRUCTIONSINTHISMANUALVEHICLE
SEATBELTLABELSANDVEHICLEOWNERSMANUAL
s-OVECHILDRESTRAINTTOANOTHER
SEATINGLOCATIONANDTRYAGAINOR
s/RYOUCANVISITTHEwww.seatcheck.org
website to find a child car seat inspection
station nearest you.
VEHICLE SEAT BELTS
WARNING
42
&OLLOWTHESESTEPSTODETERMINEIFYOUHAVEA
retractor system that will hold child restraint
securely:
a. Pull belt all the way out
B!LLOWBELTTORETRACTABOUTINCHESCM
C)FYOUHEARCLICKINGSLOWLYPULLOUTONBELTAGAIN
IFITLOCKSTHENYOUHAVEARETRACTORTHATCANBE
SWITCHEDTOAN!UTOMATIC,OCKING2ETRACTOR
-ODEANDCANBEUSEDTOSECUREYOURSEATTO
VEHICLE
)FYOUDONTHAVEARETRACTORTHATCANBESWITCHEDTO
AN!UTOMATIC,OCKING2ETRACTOR-ODE!.$YOUPULL
ONTHELATCHPLATEANDITSLIDESFREELYALOCKINGCLIP
MUST be used
SEE0Gh,OCKING#LIPvSECTION
VEHICLE SEAT BELTS CONTINUED
Lap/Shoulder Belt with Switchable
Retractor and Sliding Latch Plate
a
Pull
43
4HELOCKINGLATCHPLATEONSOMESEAT
belts may slip and loosen after being
BUCKLEDONCHILDRESTRAINTIFPOSITIONED
ATACERTAINANGLE)FTHISHAPPENSmIP
THELATCHPLATEOVER(a) and
REBUCKLE4ESTINSTALLATIONAGAINTOSEE
IFTHISWORKS)FNOTMOVECHILDRESTRAINT
to another seating position.
a
Flip
VEHICLE SEAT BELTS CONTINUED
Lap/Shoulder Belt with Emergency
Locking Retractor (ELR) and Locking
Latch Plate
44
a
Lap Belts - Manually Adjustable
4HELOCKINGLATCHPLATEONSOMESEATBELTSMAY
SLIPANDLOOSENAFTERBEINGBUCKLEDONCHILD
restraint if positioned at certain angle. If this
HAPPENSmIPLATCHPLATEOVER(a) and
REBUCKLE4ESTINSTALLATIONAGAINTOSEEIFTHIS
WORKS)FNOTMOVECHILDRESTRAINTTOANOTHER
seating position.
Flip
VEHICLE SEAT BELTS CONTINUED
45
Lap Belts - With Retractor
Lap belts with retractors may or may not hold
a child restraint securely.
&OLLOWTHESESTEPSTODETERMINEIFYOUHAVEA
retractor system that will hold child restraint
securely:
a. Pull belt all the way out
B!LLOWBELTTORETRACTABOUTINCHESCM
c. Slowly pull out on belt again.
)FBELTISLOCKEDANDYOUcannot pull the belt
OUTANYFURTHERYOUHAVEAN!UTOMATIC
,OCKING2ETRACTORWHICHMAYBEUSEDWITHA
CHILDRESTRAINT2EMEMBERWHENINSTALLINGA
CHILDRESTRAINTPULLBELTALLTHEWAYOUTBUCKLE
BELTANDTHENTIGHTEN
If you canPULLTHEBELTOUTAGAINSTEPC
ABOVEYOUMUSTHAVEAN%MERGENCY,OCKING
Retractor which MUST NOT be used with a
child restraint.
Retractor
VEHICLE SEAT BELTS CONTINUED
46
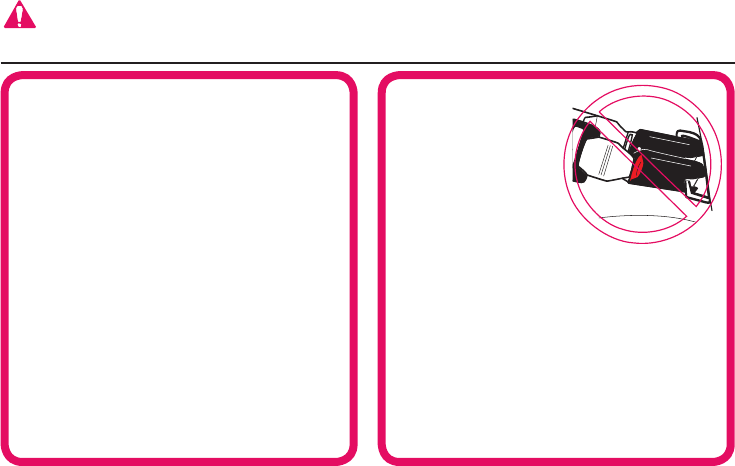
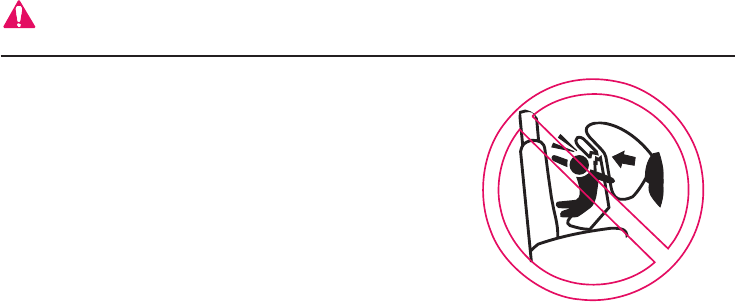
Avoid serious injury or death:
s&AILURETOUSELOCKINGCLIP
where required will result in
child restraint not being
securely held in place.
s2EMOVELOCKINGCLIPFROM
seat belts when not being
used with child restraint.
s$/./4USELOCKINGCLIPASA
vehicle seat belt shortener.
You MUSTUSELOCKINGCLIPPROVIDEDWITH
CHILDRESTRAINTWITHAVEHICLESEATBELTTHAT
slides freely through the latch plate or the
lap belt cannot be tightly secured.
Lap/Shoulder Belt with Emergency Locking Retractor (ELR)
and Sliding Latch Plate
VEHICLE SEAT BELTS CONTINUED
WARNING
Locking Clip
47
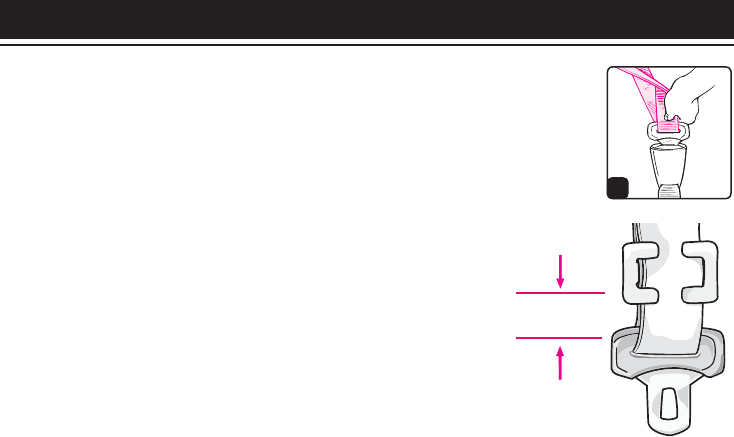
)NSTALLCHILDRESTRAINTANDTIGHTENVEHICLESEATBELT
2. Hold seat belts together at latch plate (a)THENUNBUCKLE
)FALOCKINGCLIPISNEEDEDSEE0Gh,OCKING#LIPvSECTION
SLIDELOCKINGCLIPONSEATBELTSAPPOXIMATELYINCH
CMANDUPTOINCHCMAWAYFROMLATCHPLATE
2EBUCKLESEATBELT
4ESTINSTALLATIONTOSEEIFCHILDRESTRAINTISSECURE
)FNOTSECUREADDITIONALBELTTIGHTENINGMAYBEREQUIRED
s5NBUCKLEVEHICLESEATBELT
s(OLDBELTSTOGETHERANDREMOVELOCKINGCLIP
s3HORTENLENGTHOFLAPBELTPORTION
slightly by pulling belt through latch plate
s2EATTACHLOCKINGCLIP
s"UCKLEVEHICLESEATBELT
0RESSCHILDRESTRAINTFURTHERDOWNINTOVEHICLESEAT
CUSHIONTOHELPBUCKLEVEHICLESEATBELT
4ESTINSTALLATIONTOSEEIFCHILDRESTRAINTISSECURE)FNOTSECURE
REPEATABOVESTEPUNTILSECURE
WITHINv
CM
a
VEHICLE SEAT BELTS CONTINUED
48
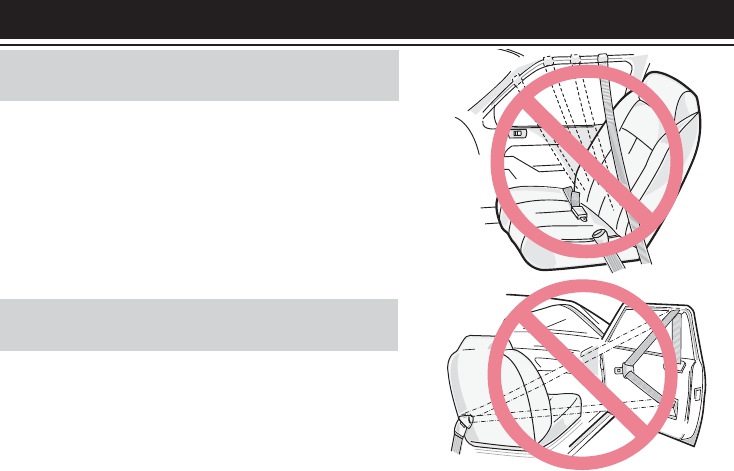
DO NOT use with any child restraint.
DO NOT use with any child restraint.
"ELTSWILLNOTSTAYTIGHTWHILEDRIVING
Passive Restraint - Lap Belt
with Motorized Shoulder Belt
Passive Restraint - Lap or
Shoulder Belt Mounted on Door
VEHICLE SEAT BELTS CONTINUED
49
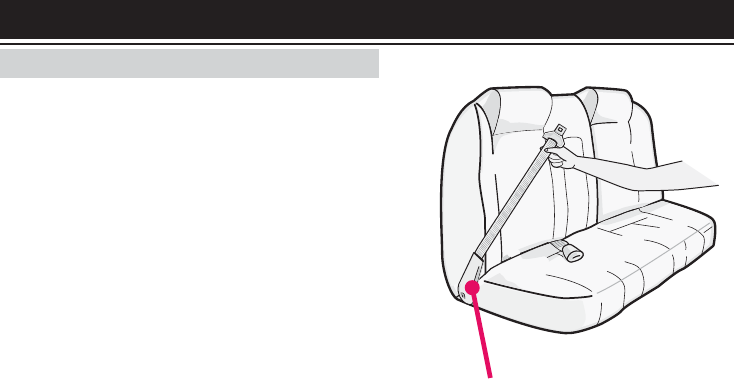
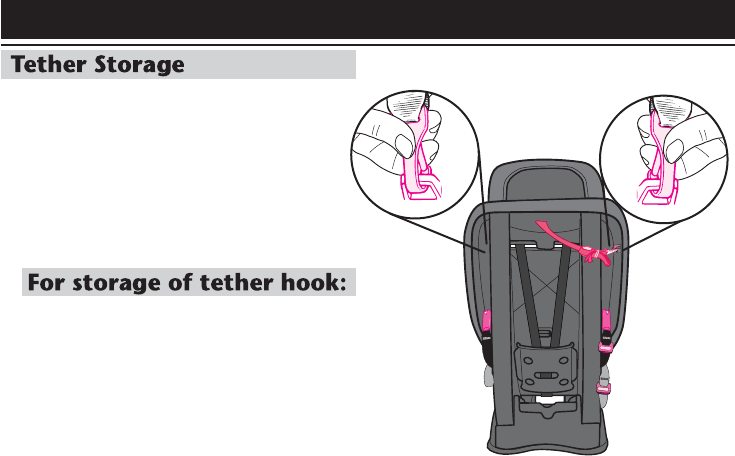
DO NOT anchor tether strap to
VEHICLEWHENUSINGCHILDRESTRAINT
rear-facing.
Tether hook must be attached to
child restraint for rear-facing use or
IFVEHICLEISNOTEQUIPPEDWITHTETHER
anchors.
s!TTACHTETHERHOOKTOBACKOFCHILD
restraint as shown.
s0ULLLOOSEENDOFADJUSTMENTSTRAPTO
REMOVEANYSLACK
s2OLLLOOSEENDOFADJUSTMENTSTRAP
up and secure with a rubber band.
ADDITIONAL INFORMATION

50
Body Support
(on certain models)
To prevent ejection in sudden stop or
crash:
s.EVERALLOWBODYSUPPORTTOBUNCHOR
fold behind child.
s Only use body support in rear-facing
mode.
s"ODYSUPPORT-534BEUSEDIFSHOULDERS
are below lowest harness setting.
WARNING
ADDITIONAL INFORMATIONCONTINUED
51
a
Slide head pillow into opening in head
support as shown (a). #URVEDBOTTOMOF
head pillow allows for head pillow to be
pulled down to fit smaller infants.
Head Pillow and Harness Covers
(on certain models)
Harness
covers
Head
pillow
To prevent serious head injury in
sudden stop or crash:
s-AKESURETHEHARNESSSYSTEMIS
properly secured.
s#HECKTHATTHEHARNESSSTRAPSARENOT
twisted.
s-AKESURETHATHARNESSCOVERSDONOT
interfere with placement of the chest
CLIPATARMPITLEVEL
WARNING
52
Head Support Cover: clean with a damp
sponge using mild soap and cool water. If
NECESSARYCOVERMAYBEREMOVEDFOR
cleaning.
2EMOVEELASTICLOOPSFROMHEADSUPPORTAS
indicated in (a).
2EMOVEHEADSUPPORTCOVERASSHOWN(b).
-ACHINEWASHCOVERINCOLDWATERON
DELICATECYCLEANDDRIPDRY$/./453%
",%!#(
4OPUTTHEHEADSUPPORTCOVERBACKON
REVERSEPRECEDINGINSTRUCTIONS
Head Support Cover
a
b
ADDITIONAL INFORMATION CONTINUED
Refer to seat pad care tag for washing
instructions.
Care and Cleanin

53
Seat Pad: clean with a damp sponge
USINGMILDSOAPANDCOOLWATER)FNECESSARY
SEATPADMAYBEREMOVEDFORCLEANING
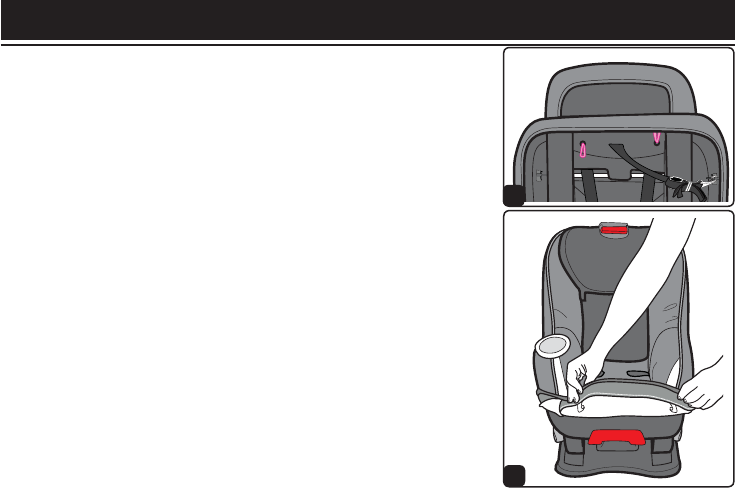
,OOSENHARNESSSTRAPSBYLIFTINGLEVERUP(a)
while pulling shoulder harness straps (b).
2EMOVEBOTHHARNESSSTRAPLOOPSFROM
SPLITTERPLATEONBACKOFCHILDRESTRAINT(c) and
PULLTHROUGHFRONTOFPAD/PENCHESTCLIP
RELEASETONGUESFROMBUCKLE
Seat Pad
ADDITIONAL INFORMATION CONTINUED
a
b
c
Care and Cleanin
54
ADDITIONAL INFORMATION CONTINUED
2EMOVEELASTICSTRAPSFROMHOOKSONBACK
of seat as shown (d).
2EMOVEHOOKSATFRONTOFSEATASSHOWN(e).
2EMOVESEATPADFROMSHELLBYPUSHINGHARNESS
straps and crotch strap through seat pad.
-ACHINEWASHPADINCOLDWATERON
DELICATECYCLEANDDRIPDRY$/./453%
",%!#(
4OPUTTHESEATPADBACKONREVERSE
preceding instructions.
d
e
55
WARNING
Prevent serious injury or death:
s"UCKLEMUSTBEPROPERLYLATCHED
s0ERIODICALLYINSPECTANDCLEANBUCKLETOREMOVE
OBJECTSORDEBRISTHATCOULDPREVENTLATCHING
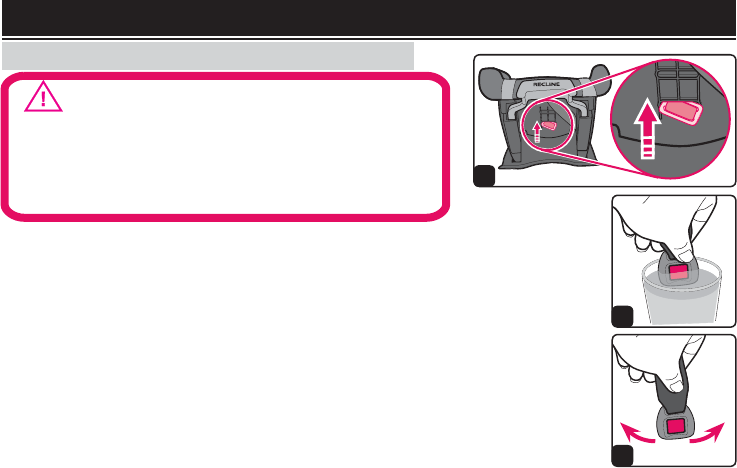
4URNRESTRAINTOVERPUSHRETAINERTHROUGHCROTCHSTRAPSLOT(a).
4OCLEANBUCKLEPLACEINACUPOFWARMWATERANDGENTLYAGITATE
THEBUCKLEPRESSTHEREDBUTTONSEVERALTIMESWHILEINTHEWATER(b).
DO NOT SUBMERGE THE HARNESS WEBBING.$/./453%
3/!03OR,5"2)#!.43$/./4USEHOUSEHOLDDETERGENTS.EVER
LUBRICATEBUCKLE
3HAKEOUTEXCESSWATERANDALLOWTOAIRDRYHARNESSWEBBING
should be dry before use (c).
2EPEAT3TEPANDASNEEDED"UCKLESHOULDFASTENWITHA
hCLICKv
2EATTACHBUCKLEINTOTHESAMESLOTFROM3TEP
2ECHECKHARNESSFORCORRECTINSTALLATIONBEFOREUSE
ADDITIONAL INFORMATION CONTINUED
Buckle Cleaning Process:
b
a
c

56
Surface wash only with mild soap
ANDDAMPCLOTH$/./4
)--%23%4(%(!2.%33342!03
or LATCH "%,4).7!4%2DOING
SOMAYWEAKENTHEHARNESSSTRAPS
or LATCH belt.
If harness straps or LATCH belt
AREFRAYEDORHEAVILYSOILEDTHEY
-534BEREPLACED
Harness Straps &
LATCH Belt:
Aircraft Use
Second Hand Child Restraint
4HISCHILDRESTRAINTISCERTIlEDFORUSEON
AIRCRAFTSEELABELONCHILDRESTRAINT#ONTACT
airline about their policy.
5SETHISCHILDRESTRAINTONLYONFORWARDFACING
aircraft seats.
Install child restraint on an aircraft the same
WAYITISINSTALLEDINAVEHICLEWHENUSINGA
VEHICLESEATBELT
'RACO#HILDRENS0RODUCTS)NCADVISESAGAINST
loaning or passing along a child restraint.
ADDITIONAL INFORMATION CONTINUED

57
NOTES

58
NOTES

59
NOTES
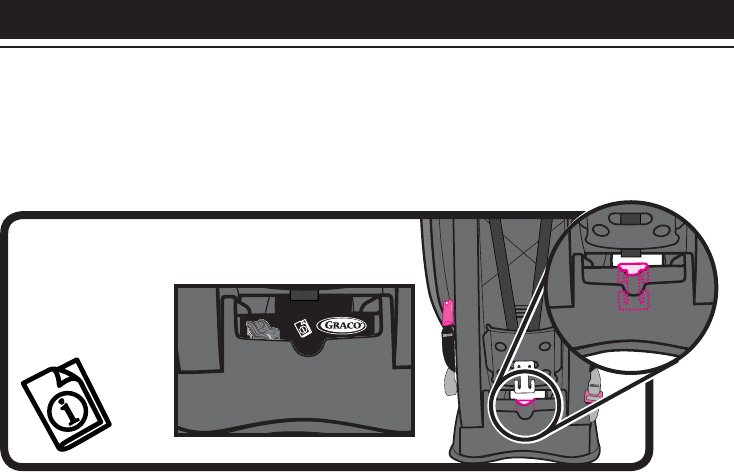
60
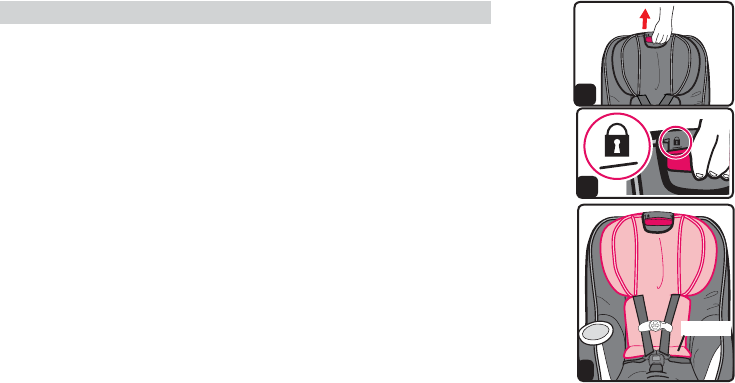
Child Restraint
Owner’s Manual
Store instruction
manual in the
slot with the
INSTRUCTIONBOOK
icon as shown.
,OCKING
Clip
Storage
4OPURCHASEPARTSORACCESSORIESINTHE5NITED3TATES
please contact us at the following:
www.gracobaby.com
or
1-800-345-4109
REPLACEMENT PARTS

www.gracobaby.com
My Size™ 70
Asiento de seguridad infantil
Manual del propietario
NO USAR DEBIDAMENTE ESTE SISTEMA
DE SEGURIDAD PARA NIÑOS AUMENTA
EL RIESGO DE LESIONES SERIAS O
FATALES EN UN ACCIDENTE O AL
DETENERSE DE REPENTE.
LEA ESTE MANUAL.
No instale ni use este sistema de
seguridad para niños hasta que haya
leído y entendido las instrucciones en
este manual.
PD247312A
© 2013 Graco 6/13 US

2
TABLA DE CONTENIDO
Información importante.................4-6
Advertencia.................................7-10
Información básica..........................11
¿Qué es el LATCH?....................12-13
El sistema LATCH............................14
Antes de Empezar
Utilización
Límites de altura y peso.............15-17
Características.......................18-19
Instalación orientada hacia atrás con
LATCH.......................................20-21
Instalación orientada hacia delante
con LATCH................................22-23
Instalación de orientacion trasera con
los cinturones de seguridad del
vehículo.....................................24-25
Instalación orientada hacia delante
con el cinturón de seguridad del
vehículo.....................................26-27
Colocar al niño en el asiento de
seguridad...................................28-31
Operaciones y ajustes..................32-40
s#ORREASDELARNÏS32
s0RESILLAPARAELPECHO33
s(EBILLA33
s!JUSTEDELACORREADE
la entrepierna..........................34-35
s0OSICIONESRECLINADAVERTICAL36-38
s2ETIRARELLATCH de los puntos
de anclaje del vehículo.................39
s!LMACENAJEDELLATCH..................40

3
Cinturones de seguridad
del vehículo...........................41-48
s#LIPDECIERRE46-47
Información adicional................49-57
s !LMACENAJE DEL ANCLAJE49
s3OPORTEDELCUERPOCIERTOSMODELOS
.............................................. 50
s!LMOHADAPARALACABEZA
CIERTOSMODELOS51
s&UNDASDEARNÏSCIERTOSMODELOS
....................................................51
TABLA DE CONTENIDO
s#UIDADOYLIMPIEZA52-56
s0ROCESODELIMPIEZA
de la hebilla............................. 55
s5SOENAERONAVES56
s!SIENTODESEGURIDADPARAAUTOS
de segunda mano........................56
2EPUESTOS60
s!LMACENAMIENTODELATRABADE
seguridad....................................60
s!LMACENAJEDEMANUAL
de instrucciones...........................60
Información adicional

4
Lea detenidamente este manual de
instrucciones y las etiquetas del asiento
de seguridad.
Los niños de peso inferior a 20 libras
KGdeben usar el asiento orientados
hacia atrás. Niños de 20 a 40 libras de
PESOKGAKGPUEDENSENTARSE
orientados hacia atrás.
No coloque el asiento orientados
hacia atrás en el asiento del vehículo
equipado con la bolsa de aire.
3IENTEALOSNI×OSCONSISTEMADE
seguridad en el asiento trasero del
vehículo siempre que sea posible.
No deje a los niños solos.
Coloque firmemente el asiento con
el cinturón de seguridad del
vehículo o el cinturón LATCH.
No use el asiento de seguridad
después de la fecha indicada en la
parte trasera del mismo.
.OPERMITAQUENADIENI×ERA
FAMILIARESETCUSEELASIENTODE
seguridad para autos sin haber
leído y comprendido primero todas
las instrucciones.
Lista de control de seguridad
Ningún asiento de seguridad garantiza la protección contra lesiones en
cualquier situación, pero su utilización correcta ayuda a reducir el riesgo de
lesiones graves o la muerte. LEA ATENTAMENTE ESTE MANUAL.
INFORMACIÓN IMPORTANTE
5
0ORFAVORCOMPLETELAINFORMACIØNQUESESOLICITAMÉSARRIBA%LNÞMERODEMODELO
y la fecha de fabricación pueden encontrarse en una etiqueta ubicada debajo del
sistema de seguridad para niños. Llene la tarjeta postal de registro prepagada que
se encuentra en el arnés y envíela hoy mismo.
,OSASIENTOSDESEGURIDADPARANI×OSASIENTOSPARAAUTOSSEPUEDENRETIRARPOR
RAZONESDESEGURIDAD$EBEREGISTRARESTEASIENTOENCASODEQUEDEBASERRETIRADO
PARAQUELEPUEDANLOCALIZAR%NVÓELAPORCORREOHOYOENVÓESUNOMBREDIRECCIØN
YELNÞMERODEMODELOYFECHADEFABRICACIØNDELASIENTODESEGURIDADPARA
niños a: Graco Children’s Products, Inc.,
Attn: Customer Service, 3 Glenlake Parkway Atlanta, GA 30328
o llame al 1-800-345-4109 o regístrelo en línea en
http://www.gracobaby.com/carseatregistration
INFORMACIÓN IMPORTANTE CONT
Información sobre el registro
Número de modelo:
Fecha de fabricación:
Fecha de compra:
Registro de su sistema de seguridad para niños
6
Para obtener información sobre las retiradas:
,LAMEALALÓNEAGRATUITADEINFORMACIØNDESEGURIDADAUTOMOTRIZDEL'OBIERNO
DE%%55AL449nnnOHTTPWWW.(43!GOV
Si necesita ayuda
%NLOS%%55PORFAVORCOMUNÓQUESECONNUESTRO$EPARTAMENTODE3ERVICIOAL
#LIENTECONCUALQUIERPREGUNTAQUEPUDIERATENERSOBREPIEZASUSOO
MANTENIMIENTO#UANDOSEPONGAENCONTACTOCONNOSOTROSPORFAVORTENGA
listo el número de modelo y la fecha de fabricación para que lo podamos
AYUDARMÉSEFICIENTEMENTE%STOSNÞMEROSPUEDENENCONTRARSEENUNAETIQUETA
ubicada en la parte inferior de su sistema de seguridad para bebés.
1-800-345-4109 o www.gracobaby.com
www.cpsc.gov www.NHTSA.gov
www.seatcheck.org
INFORMACIÓN IMPORTANTE CONT
7
NUNCA PONGA ESTE SISTEMA DE SEGURIDAD
PARA NIÑOS EN UN ASIENTO DEL VEHÍCULO
EQUIPADO CON UNA BOLSA DE AIRE
DELANTERA. Si la bolsa de aire se infla, puede
golpear al niño y al sistema de seguridad para
niños con mucha fuerza y causar lesiones serias
o la muerte de su niño. Consulte el manual del
dueño del vehículo para obtener información
sobre la instalación de las bolsas de aire
laterales y del sistema de seguridad para niños.
ADVERTENCIA
- Prevenga lesiones graves o
la muerte:

8
El incumplimiento de estas
instrucciones y de las indicaciones
de las etiquetas del asiento podría
causar el choque del niño contra el
interior del vehículo durante una
parada repentina o un accidente.
Sujete el asiento con un cinturón de
seguridad del vehículo o un sistema
LATCH que esté bien colocado
según las indicaciones de este
manual.
Elija el lugar adecuado para el
asiento de seguridad en su vehículo.
Elija el modo de empleo correcto
para el asiento de seguridad de
acuerdo al tamaño de su niño. Los
niños de peso inferior a 20 libras
(9kg) deben usar este asiento de
seguridad orientado hacia atrás.
La orientación de los niños hacia
la parte delantera del vehículo les
podría causar lesiones graves o la
muerte.
La Academia Norteamericana de
Pediatría (AAP por sus siglas en
inglés) recomienda que los bebés
estén sentados orientado hacia
atrás hasta los 2 años o hasta que
alcancen la altura y el peso máximo
para sentarse orientado hacia atrás
que se indica en el asiento.
El sistema de cinturones de
seguridad del vehículo DEBE
sujetar firmemente el asiento de
seguridad. No todos los cinturones
de seguridad de todos los vehículos
pueden utilizarse con los asientos
de seguridad.
ADVERTENCIA
- Prevenga lesiones graves o
la muerte: (cont.)
9
Si el cinturón de seguridad del
vehículo no sujeta firmemente el
asiento de seguridad, lea la
sección “Cinturones de seguridad
del vehículo”. No coloque nunca el
asiento de seguridad en el asiento
delantero del vehículo a menos
que lo recomiende el manual de
propietario del vehículo.
La Administración Nacional de
Seguridad de Tráfico en Carreteras
(National Highway Traffic Safety
Administration, NHTSA) advierte
a los propietarios de vehículos que
según las estadísticas de
accidentes, los niños viajan más
seguros en el asiento trasero.
Remítase al manual del propietario
del vehículo para obtener
información sobre la instalación
de los asientos de seguridad en los
vehículos con la bolsa de aire.
Se debe reemplazar el asiento de
seguridad si ha sufrido un
accidente. ¡NO lo use de nuevo! Un
accidente podría causar daños
ocultos y usarlo de nuevo podría
causar lesiones graves o la muerte.
NO use el asiento de seguridad
si ha resultado dañado o si faltan
piezas.
NO use accesorios o piezas que no
sean los proporcionados por Graco,
ya que ello podría alterar el
rendimiento del asiento de
seguridad.
ADVERTENCIA
- Prevenga lesiones graves o
la muerte: (cont.)
10
El asiento de seguridad de
orientación trasera debe nivelarse
correctamente:
s5NAPOSICIØNDEMASIADORECLINADA
podría causar lesiones o la
expulsión del asiento.
s5NAPOSICIØNDEMASIADOVERTICAL
podría causar dificultad
respiratoria.
No deje nunca al niño solo, ni
siquiera mientras duerme, ya que
se podría quedar atrapado entre las
correas y asfixiarse o estrangularse.
NO retire el sistema LATCH del
asiento de seguridad. Si usa el
cinturón de seguridad del
vehículo para sujetar el asiento
de seguridad, debe almacenar los
conectores LATCH (consulte la
sección“Almacenaje del LATCH”).
No conecte nunca
dos nconectores
LATCH a un punto
de anclaje inferior
del vehículo a
menos que el
fabricante del
vehículo lo especifique.
NUNCA use los cinturones LATCH
orientado hacia atrás y adelante al
mismo tiempo. Solamente puede
usar un cinturón LATCH por vez
según el modo de instalación del
sistema de seguridad para niños.
ADVERTENCIA
- Prevenga lesiones graves o
la muerte: (cont.)
11
INFORMACIÓN BÁSICA
Certificación
Este asiento de seguridad cumple o
excede todos los requisitos requeridos
PORLA.ORMA&EDERALDE3EGURIDAD
de Automóviles para uso en automóviles
y aeronaves.
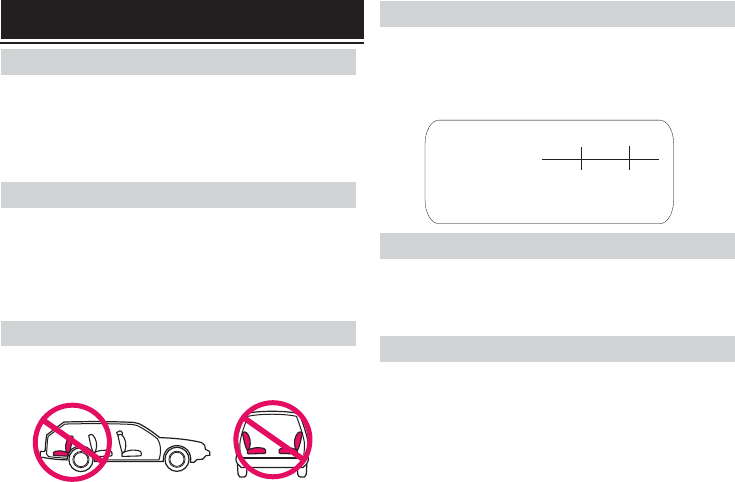
Asiento de seguridad desocupado
Asientos peligrosos del vehículo
Vida útil del asiento de seguridad
3UJETESIEMPREELASIENTODESEGURIDAD
con el sistema LATCH o el cinturón de
SEGURIDADDELVEHÓCULOINCLUSOCUANDO
esté desocupado. Al detenerse de
REPENTE3IELASIENTODESEGURIDADNO
está sujeto puede causar lesiones a los
pasajeros.
No use el asiento de seguridad en los
asientos del vehículo orientados hacia
atrás o hacia un lado.
Cuando hace calor
,ASPIEZASDELASIENTODESEGURIDADSE
pueden calentar mucho bajo el sol o
cuando hace calor.
Para evitar quemaduras, compruebe
siempre la temperatura del asiento
antes de sentar a los niños.
Protección del asiento del vehículo
0ROTEJAELASIENTODELVEHÓCULO5SEUNA
ALFOMBRILLAUNATOALLAOUNAMANTAlNA
debajo y detrás del asiento de seguridad.
DEJE de usar este sistema de seguridad
PARANI×OSYTÓRELOALABASURAA×OS
después de la fecha de fabricación.
Busque este etiqueta en el trasero del
asiento de
seguridad: MODEL
Date of Manufacture
GRACO CHILDREN'S PRODUCTS, INC.
ATLANTA, GA 30328 1-800-345-4109
Made in China
PD206938A
NAME
year month day
12
,AS.ORMAS&EDERALESDE3EGURIDAD
para Vehículos Automotor de Estados
5NIDOSHANDElNIDOUNSISTEMAPARA
la instalación de los sistemas de
seguridad para niños en los vehículos.
Este sistema se denomina LATCHQUE
son las siglas en inglés de:
Anclaje inferior y superior para niños.
El LATCH del vehículo consta de un
punto de anclaje superior y dos
puntos de anclaje inferiores.
Los manuales del propietario de
algunos vehículos emplean el término
ISOFIX para definir al nuevo sistema
de anclaje para asientos de seguridad
para autos. El asiento de seguridad
con LATCH también puede usarse en
asientos del vehículo equipados con
ISOFIX. Los vehículos nuevos suelen
tener uno o varios asientos equipados
con puntos de anclaje LATCH.
3IELVEHÓCULOVIENEEQUIPADOCONLATCH
se pueden ver los puntos de anclaje
inferiores en el pliegue del asiento del
VEHÓCULO3INOSEVENPUEDEQUEESTÏN
marcados con un símbolo o un punto
de color.
Compruebe las ubicaciones del anclaje
superior del vehículo en el manual del
PROPIETARIODELVEHÓCULO3EPUEDEN
LOCALIZARPORMEDIODELOSSÓMBOLOSDE
anclaje .
5SEELCINTURØNDELVEHÓCULONOLOS
conectores LATCHENINSTALACIONESPARA
NI×OSQUEPESENMÉSDELIBRASKG
NOTA: Algunos fabricantes de vehículos
usan calificaciones más bajas del peso para
los conectores LATCHDEMANERAQUE
debe consultar el manual del dueño del
vehículo o llamar al fabricante del vehículo
para confirmar los límites de los conectores
LATCH de su vehículo.
¿QUÉ ES EL LATCH?
Sistema LATCH para vehículos:
13
Puntos de anclaje
superior del vehículo
Pliegue del asiento
del vehículo
Asiento típico en un vehículo
de pasajeros. Otros tipos de
vehículos pueden tener otras
ubicaciones para el sistema
LATCH.
Vea el manual del
propietario de su vehículo
para informarse sobre las
ubicaciones exactas, la
identificación de los anclajes
y los requisitos para su uso
con el asiento de seguridad.
¿QUÉ ES EL LATCH?CONT
Puntos de anclaje
inferior del
vehículo
14
SISTEMA LATCH
Anclaje superior
del asiento de
seguridad -
NEGRO
El LATCH consta de un cinturón de
anclaje inferior permanente y una
CORREADEANCLAJESUPERIOR5TILICECON
LATCH ÚNICAMENTE en el asiento
recomendado por el fabricante del
vehículo. NUNCA use los cinturones
LATCH orientados hacia atrás y
adelante al mismo tiempo.
Los puntos de anclaje LATCH inferiores
DELVEHÓCULOSEDEFINENCOMOA
PULGADASCMDESDEELCENTRODEUN
anclaje El LATCH se puede usar
SOLAMENTE si el espacio del sujetador
LATCHTIENEPULGADASCMNO
use el LATCH si el espacio del sujetador
TIENEMÉSDEPULGADASCM
ORIENTADA HACIA DELANTE EL
CINTURÓN LATCH - NEGRO
Punto de anclaje
superior del
vehículo Puntos de
anclaje inferior
del vehículo
Puntos de
anclaje
inferior del
vehículo
Cinturón de anclaje
inferior orientado
hacia adelante -
NEGRO
Cinturón de anclaje
inferior orientado
hacia atrás - GRIS
ORIENTADA HACIA ATRÁ EL
CINTURÓN LATCH - GRIS
15
ORIENTADO HACIA DELANTE
IMPORTANTE: Este asiento de seguridad para autos cuenta con la certificación
PARAUTILIZARLOorientados hacia atrás con niños de hasta 40 libras de peso
KG3INEMBARGOESPROBABLEQUEALGUNOSNI×OSQUESEACERCANALAS
LIBRASKGRESULTENSERDEMASIADOALTOSPARAVIAJARorientados hacia
atrás3EDEBEAJUSTARSUASIENTODESEGURIDADorientado hacia delante
SOLAMENTESIPESAMÉSDELIBRASKGYESCAPAZDESENTARSEPORSÓMISMO
*VEARECOMENDACIONESDELA!CADEMIA.ORTEAMERICANADE0EDIATRÓA!!0
PÉGINASY
Orientado hacia atrás: 4 a 40 libras (1,8kg-18,1kg)
s.I×OSQUEPESANMENOSQUELIBRASKGDEBEN
sentarse orientados hacia atrás.
s.I×OSDEYLIBRASDEPESOKGAKG
pueden sentarse orientados hacia atrás.
s,AALTURADELARNÏSDEBEESTARa o apenas por debajo
de los hombros del niño.
s,ACABEZADELNI×ODEBEESTARPORLOMENOSCM
PULGADADEBAJODELAMANIJAROJA
4 libras
1.8kg) 40 libras
(18.1kg)
20 libras
(9.1kg) LIBRAS
(31.8kg)
ORIENTADO HACIA ATRÁS
LÍMITES DE ALTURA Y PESO
CM
PULGADA
por debajo de
la manija roja
16
Orientados hacia delante: de 20 a 70 libras (9,1kg a 31,8kg)
s%LNI×ONODEBEEXCEDERLASPULGADASCM
s,OSNI×OSDEALIBRASDEKGAKGQUESONCAPACES
de sentarse por sí mismos pueden sentarse orientados hacia
delante3INOSEPUEDENSENTARPORSÓSOLOSAJUSTEELASIENTODE
seguridad orientado hacia atrás.
s,OSNI×OSDEALIBRASDEKGAKGYHASTAPULGADAS
CM
de altura DEBEN sentarse orientados hacia delante.
s,AALTURADELARNÏSDEBEESTARa o apenas por encima de los hombros del
niño.
s,OSOÓDOSDELNI×OESTÉNDEBAJODELAPARTESUPERIORDELAAPOYACABEZA
6EALAPÉGPARAOBTENERLASRECOMENDACIONESDELAAcademia Norteamericana
DE0EDIATRÓA!!0.
LÍMITES DE ALTURA Y PESO CONT

17
5NBEBÏPREMATUROODEBAJOPESOALNACER
PREMATUROSCORREPELIGROADICIONALENUNVEHÓCULO
o avión.
3EGÞNLA!MERICAN!CADEMYOF0EDIATRICS!CADEMIA
DE0EDIATRÓADELOS%STADOS5NIDOSESTOSNI×OSPODRÓAN
sufrir dificultades de respiración si son recostados de
forma incorrecta en un asiento de seguridad.
Al instalar el sistema de retención infantil orientado
hacia atrásUTILICELAEDADCORREGIDAPARABEBÏS
PREMATUROS6EALAPÉGINAPARAOBTENERMÉS
información.
'RACOACONSEJAQUEPIDAASUMÏDICOOALPERSONALDEL
hospital que examinen a su niño y que le recomienden
un asiento o cama para auto adecuado antes de que
usted y su niño salgan del hospital.
Niños prematuros o de bajo peso de
nacimiento *
18
CARACTERÍSTICAS
(EBILLADELARNÏS
Correa del
entrepiernas
0ALANCAPARA
liberar el
arnés
Correa de
ajuste del arnés
Correa del
arnés
0RESILLA
para el
pecho
0ALANCADE
reclinación
Orientado hacia delante cinturón
del LATCH GUARDADO
Orientado
hacia atrás
cinturón
del LATCH
GUARDADO
Orientado
hacia atrás barra de
almacenamiento del LATCH
Manija del ajuste
del soporte de la
CABEZA
,AS.ORMAS&EDERALESDE3EGURIDADPARA6EHÓCULOS
!UTOMOTORDE%STADOS5NIDOSHANDETERMINADOUN
sistema de instalación de sistemas de seguridad para
niños en los vehículos. El sistema se denomina LATCH.
El LATCH debe usarse SOLAMENTE EN LUGAR del
cinturón del vehículo si el vehículo està equipado
con puntos de anclaje LATCH. Por favor, consulte
el manual del propietaro del vehículo para identi-
ficar las ubicaciones del LATCH en su vehículo.
19
Correa del
anclaje***
4RABADEL
anclaje
Botón de liberación del
ajuste del botón LATCH
orientado hacia adelante
Barra de
almacenamiento
del anclaje
Botón de
liberación
del ajuste del
botón LATCH
orientado hacia
atrás
Orientado hacia
delante barra de
almacenamientos
del LATCH
CARACTERÍSTICAS
La placa de
unión
Correa
del arnés
***Los vehículos ahora vienen equipados
OPUEDENESTAREQUIPADOSCONPUNTOS
de sujeción del anclaje detràs de algunos
ASIENTOS5NANCLAJESUJETALAPARTE
superior del sistem a de seguridad
para niños a la carrocería del vehículo.
Cuando se usa debidamente con el
cinturón de seguridad del vehículo o
el LATCHELANCLAJEAYUDAAREDUCIR
las lesiones en una parada repentina
o accidente.
0LACAQUE
cubre al arnés
Almacenaje de
manual de
instrucciones
20
4IREDELAMANIJADELFRENTEDELSISTEMA
de seguridad para niños (a)YAJÞSTELAEN
la posición orientada hacia atrás 1 (b).
!SEGÞRESEDEQUEELCINTURØNLATCH
orientado hacia adelante esté
GUARDADOVEALAlGCPÉG
2. Colóquelo orientado hacia atrás en el
asiento del vehículo equipado con
anclajes LATCH.
0ARAFACILITARLAINSTALACIØNEXTIENDAEL
cinturón LATCH hasta el máximo.
4. Enganche los conectores orientados
hacia atrás a los anclajes inferiores del
vehículo (c). El cinturón debe mantenerse
en posición plana sin doblarse. Jale los
conectores para asegurarse que están
bien sujetos a los puntos de anclaje (d).
/PRIMACONlRMEZAHACIAABAJOENELCENTRODELSISTEMADESEGURIDADPARA
niños mientras pasa el cinturón de ajuste LATCH por la ranura en la almohadilla
del asiento (e). #UANDOTERMINØDEAJUSTARLAASEGÞRESEQUEELEXTREMOLIBREDEL
cinturón de ajuste esté afuera del lugar para sentarse (f).
ab
d
e
c
f
2ANURA
INSTALACIÓN ORIENTADA HACIA ATRÁS CON LATCH
¡CLIC!
21
!GARREELASIENTOYTIREDEADELANTEHACIAATRÉSYDEIZQUIERDA
a derecha a nivel del pasaje del cinturón para asegurarse de
que esté perfectamente instalado (g). El sistema de seguridad
para niños no deberá moverse de un lado a otro ni hacia
ADELANTEMÉSDEPULGADACM!SEGÞRESEDEQUEEL
cinturón de anclaje inferior se mantiene apretado y no se
SUELTADELAPOSICIØNDEAPRETADO$ENOMANTENERSEAPRETADO
COLØQUELOENOTROASIENTOOPØNGASEENCONTACTOCON3ERVICIOAL#LIENTE
#OMPRUEBEELINDICADORDENIVELDELASIENTODESEGURIDAD(h). El vehículo DEBE
estar en una superficie plana con el niño dentro del asiento de seguridad al
comprobar el indicador de nivel. El indicador DEBE quedar completamente
DENTRODELAZONAAZUL(h)3IESNECESARIOCOLOQUETOALLAS
ENROLLADASDEBAJODELASIENTOEXACTAMENTEENELPLIEGUEDEL
ASIENTODELVEHÓCULOHASTAQUEQUEDECOMPLETAMENTEDENTRODELAZONAAZUL
6UELVAACOMPROBARELINDICADORDENIVEL6EAPAGlGE
sNO use el anclaje superior con el asiento de seguridad
orientado hacia atrás3Edebe almacenar el anclaje
SUPERIORVEAh!LMACENAJEDELANCLAJEvENLAPÉGINA
sCompruebe periódicamente si el asiento de seguridad
está perfectamente instalado y correctamente nivelado
YAJÞSTELOSIESNECESARIO
s0ARAREMOVARVEAh2ETIRARELLATCH de los puntos
DEANCLAJEDELVEHÓCULOvPÉGINA
g
h
,!4#(
22
4IREDELAMANIJADELFRENTEDELSISTEMADESEGURIDADPARANI×OS(a) YAJÞSTELAEN
la posición orientada hacia adelante 2 o 3 (b) SEGÞNELTAMA×ODESUNI×O
!SEGÞRESEDEQUEELCINTURØNLATCH orientado hacia atrás esté guardado.
(Vea la Fig. b, pág. 40)
$ESTRABELACORREADELALMACENAMIENTOVEA
LAPÉGINA
#OLØQUELOorientado hacia delante en el
asiento del vehículo equipado con anclajes
LATCH0ARAFACILITARLAINSTALACIØNEXTIENDA
el cinturón LATCH hasta el máximo.
4. Enganche los conectores orientado hacia
delante a los anclajes inferiores del vehículo
(c). El cinturón debe quedar plano y no estar
retorcido. Jale los conectores para asegurarse
de que están bien conectados a los puntos de anclaje (d).
$ESLICEELSISTEMADESEGURIDADPARANI×OSHASTAQUEESTÏ
en contacto con el respaldo del asiento del vehículo.
0RESIONEFUERTEMENTEENELCENTRODELASIENTODESEGURIDAD
para comprimir el cojín del asiento del vehículo al el
cinturón LATCH jalando la correa (e).
INSTALACIÓN ORIENTADA HACIA DELANTE CON LATCH
a
d
b
c
¡CLIC!
e
23
!GARREELASIENTOYTIREDEADELANTE
HACIAATRÉSYDEIZQUIERDAADERECHAA
nivel del pasaje del cinturón para
asegurarse de que esté perfectamente
instalado (f). El sistema de seguridad
para niños no deberá moverse de un
lado a otro ni hacia adelante más de
PULGADACM
!SEGÞRESEDEQUEELCINTURØNDEANCLAJE
inferior se mantiene apretado y no se
SUELTADELAPOSICIØNDEAPRETADO$ENO
MANTENERSEAPRETADOCOLØQUELOENOTRO
ASIENTOOPØNGASEENCONTACTOCON3ERVICIO
al Cliente.
#ONECTEELGANCHODELACORREADEANCLAJE
(A) al anclaje (B) y apriételo del todo (g).
El cinturón debe quedar plano y no estar
retorcido.
Compruebe periódicamente si el asiento de
seguridad está perfectamente instalado y
AJÞSTELOSIESNECESARIO
s0ARAREMOVARVEAh2ETIRARELLATCH de los
PUNTOSDEANCLAJEDELVEHÓCULOvPÉGINA
fg
A
B
,!4#(
Anclaje
Jale para
apretar
24
0ORFAVORCONSULTELASECCIØNh#INTURONESDE
SEGURIDADDELVEHÓCULOvENLAPÉGPARA
determinar qué tipo de cinturón de seguridad tiene
su vehículo.
'UARDEELCINTURØNLATCH orientado hacia
adelante y atrás como se indica (a). 4IREDELA
manija del frente del sistema de seguridad para
niños (b)YAJÞSTELAENLAPOSICIØNorientada
hacia atrás 1 (c).
2. Colóquelo orientado hacia atrás en el asiento del vehículo.
0ASEELCINTURØNDESEGURIDADDELVEHÓCULOPORLASABERTURASorientada hacia
atrás debajo de la almohadilla del asiento y abróchelo (d). NO pase el cinturón
del vehículo por encima de la parte de arriba de la almohadilla del asiento.
0RESIONEFUERTEMENTEENELCENTRODELASIENTODESEGURIDADPARACOMPRIMIREL
cojín del asiento del vehículo al tiempo que aprieta el cinturón de seguridad del
vehículo(e).
El cinturón LATCH DEBE almacenarse cuando se
utilice el cinturón de seguridad del vehículo para
instalar el asiento de seguridad.
INSTALACIÓN DE ORIENTACION TRASERA CON LOS
CINTURONES DE SEGURIDAD DEL VEHÍCULO
ab
e
ADVERTENCIA
cd
25
!GARREELASIENTOYTIREDEADELANTEHACIAATRÉSYDEIZQUIERDA
a derecha a nivel del pasaje del cinturón para asegurarse de
que esté perfectamente instalado (f). El sistema de
seguridad para niños no deberá moverse de un lado a otro
NIHACIAADELANTEMÉSDEPULGADACM%LCINTURØNDE
REGAZODELVEHÓCULODEBEMANTENERSEAPRETADO3INO
QUEDABIENSUJETOVEAh#INTURONESDESEGURIDADDEL
AVEHÓCULOvENLAPÉGINA
#OMPRUEBEELINDICADORDENIVELDELASIENTODESEGURIDADEl
vehículo debe estar en una superficie plana con el niño
dentro del asiento de seguridad al comprobar el indicador
de nivel.
%LINDICADORDEBEQUEDARCOMPLETAMENTEDENTRODELAZONA
AZUL(g)3IESNECESARIOCOLOQUETOALLASENROLLADASDEBAJO
DELASIENTOENELPLIEGUEDELASIENTODELVEHÓCULOHASTAQUE
QUEDECOMPLETAMENTEDENTRODELAZONAAZUL6UELVAA
comprobar el indicador de nivel. 6EAPAGlGE
NO use el anclaje superior con el asiento de seguridad
orientado hacia atrás3Edebe almacenar el anclaje superior
VEAh!LMACENAJEDELANCLAJEvENLAPÉGINA#OMPRUEBE
periódicamente si el asiento de seguridad está perfectamente
INSTALADOYCORRECTAMENTENIVELADOYAJÞSTELOSIESNECESARIO
g
f
4OALLA
26
0ORFAVORCONSULTELASECCIØNh#INTURONESDE
SEGURIDADDELVEHÓCULOvENLAPÉGPARA
determinar qué tipo de cinturón de seguridad
tiene su vehículo.
'UARDEELCINTURØNLATCH orientado hacia
adelante y atrás como se indica (a)4IREDELAMANIJADELFRENTEDELSISTEMADE
seguridad para niños (b) YAJÞSTELAENLAPOSICIØN orientada hacia adelante 2
o 3 (c).
$ESTRABELACORREADELALMACENAMIENTOVEALAPÉGINA
#OLØQUELOorientado hacia delanteENELASIENTODELVEHÓCULO$ESLICEEL
sistema de seguridad para niños hasta que esté en contacto con el respaldo del
asiento del vehículo.
0ASEELCINTURØNDESEGURIDADDELVEHÓCULOPORLASAPERTURASorientado hacia
delante. Abroche el cinturón (d).
d
El cinturón LATCH DEBE almacenarse
cuando se use el cinturón de seguridad del
vehículo para instalar el asiento de seguridad.
INSTALACIÓN ORIENTADA HACIA DELANTE CON
LOS CINTURONES DE SEGURIDAD DEL VEHÍCULO
ab
ADVERTENCIA
c
27
0RESIONEFUERTEMENTEENELCENTRODELASIENTO
de seguridad para comprimir el cojín del
asiento del vehículo al tiempo que aprieta el
cinturón de seguridad del vehículo (e).
!GARREELASIENTOYTIREDEADELANTEHACIA
ATRÉSYDEIZQUIERDAADERECHAANIVELDEL
pasaje del cinturón para asegurarse de que
esté perfectamente instalado (f). El sistema
de seguridad para niños no deberá moverse
DEUNLADOAOTRONIHACIAADELANTEMÉSDE
PULGADACM%LCINTURØNDEREGAZODEL
vehículo DEBEMANTENERSEAPRETADO3INO
QUEDABIENSUJETOVEAh#INTURONESDE
SEGURIDADDELVEHÓCULOvENLAPÉGINA
#ONECTEELGANCHODELACORREADEANCLAJE
(A) al anclaje (B) y apriételo del todo (g)3I
el vehículo no cuenta con puntos de anclaje
PARACONECTARELGANCHODEBEALMACENARLO
VEAh!LMACENAJEDELANCLAJEvENLAPÉGINA
%LCINTURØNDEBEQUEDARPLANOYNOESTAR
retorcido. Compruebe periódicamente si
el asiento de seguridad está perfectamente
INSTALADOYAJÞSTELOSIESNECESARIO
f
Instalación con
cinturón de
seguridad para la
CINTURAHOMBRO
,!4#(
ALMACENAR
Anclaje
g
Jale para
apretar
A
B
e
28
COLOCAR AL NIÑO EN EL ASIENTO DE SEGURIDAD
Para prevenir lesiones graves o
la muerte:
sMantenga las correas del arnés bien
apretadas y colocadas en los
hombros con el cierre del arnés
abrochado al nivel de las axilas.
s.OPONGAALMOHADILLASMANTASNI
cojines debajo de las correas o del
NI×OAMENOSQUESEAN
PROPORCIONADOSPOR'RACO
s%LNI×ODEBELLEVARROPAQUENO
estorbe al abrochar el arnés.
s.OAJUSTARDEBIDAMENTELASCORREAS
del arnés de su niño aumenta el
riesgo de lesiones serias o la muerte
ENUNACURVACERRADAPARADA
repentina o accidente.
ORIENTADO HACIA DELANTE
sLBSKGKG
La altura del arnés debe
estar a o apenas por
encima de los hombros
del niño.
s,OSOÓDOSDELNI×OESTÉN
DEBAJO de la parte superior
DELAAPOYACABEZA
ORIENTADO HACIA ATRÁS
sLBSKGKG
s,AALTURADELARNÏSDEBE
estar a o apenas por
debajo de los hombros
del niño. El soporte del
cuerpo * DEBE usarse si
los hombros están debajo de la posición
MÉSBAJADELARNÏS*VEAPÉGINA
s,ACABEZADELNI×ODEBEESTARPORLO
MENOSCMPULGADADEBAJODELA
manija roja.
Compruebe el sistema del arnés:
ADVERTENCIA
29
sANTESDEAJUSTARLAALTURADELAPOYACABEZAPIDAASUNI×O
que se mueva un poco hacia adelante.
s!PRIETELAMANIJAROJADEAJUSTEDELSOPORTEDELACABEZA(a) de
ARRIBADELASIENTOHASTAQUESETRABEENUNADELASPOSICIONES
de la altura (b).
s0ARABAJARLOAPRIETEYTIREHACIAARRIBADELAMANIJAROJADEAJUSTE
YEMPUJEELSOPORTEDELACABEZAHACIAABAJO
s#UANDOELSOPORTEDELACABEZAESTÉENLAPOSICIØNMÉSBAJATIRE
siempre la aleta hacia adelante como se indica (c).
Orientado hacia atrás
s%LSOPORTEDELACABEZADEBECOLOCARSEDEMANERATALQUELAS
correas del arnés estén a o apenas por debajo de los hombros y
LACABEZADELNI×ODEBEESTARPORLOMENOSCM
PULGADADEBAJODELAMANIJAROJA
s!SEGÞRESEDEQUEELSOPORTEDELACABEZANOTOCAELASIENTO
delantero del vehículo.
Orientado hacia delante
s%LSOPORTEDELACABEZADEBECOLOCARSEDEMANERATALQUELASCORREASDELARNÏSESTÏN
AOAPENASPORENCIMADELOSHOMBROSDELNI×OKGAKGALIBRAS
Consulte la página 28 para determinar la colocación de la correa del
arnés.
Ajuste del soporte de la cabeza
a
b
c
Aleta

30
#OLOQUEALNI×OENELASIENTO
de seguridad con la espalda
apoyada contra el respaldo del
asiento.
2. Coloque las correas del arnés
por encima de los hombros del
NI×OEINSERTELASLENGàETAS
ENLAHEBILLAVEAPÉGINA
*ALELASLENGàETASPARA
asegurarse de que están bien
SUJETAS
#IERRELAPRESILLAPARAELPECHO
0ONGALAPRESILLAPARAEL
pecho al nivel de las axilas
VEAPG
COLOCAR AL NIÑO EN EL ASIENTO DE SEGURIDAD
CONT
0RESILLA
para el
pecho
(EBILLA
Correa de
ajuste del
arnés
Correa de la
entrepierna

31
4. Ajuste las correas del arnés para que
estén apretadas. VERIFIQUE que el arnés
esté tensionado. NO debería poder
APRETARELARNÏSSIESTÉTENSO5NACORREA
TENSANODEBERÉESTARmOJA3EMANTIENE
en una línea casi recta sin doblarse. No
aprieta la carne del niño ni empuja el
cuerpo del niño en una posición que no
sea natural. (a)
Compruebe si las correas del arnés en el
pecho y los muslos están bien
ajustadas.
3EPUEDEUSARUNATOALLAENROLLADAEN
cada lado como soporte para los niños
pequeños (b)!SEGÞRESEDEQUELAS
toallas no interfieren en el sistema del
arnés. NO se deben colocar toallas
debajo del niño.
a
b
32
Correas del
arnés
0RESILLAPARA
el pecho
(EBILLA
Correa de
ajuste
del arnés
s0ARAAPRETAR4IRELACORREADEAJUSTEDELARNÏS(a).
s0ARASOLTAR,EVANTELAPALANCA(b) mientras tira las
correas del arnés del hombro (c).
OPERACIONES Y AJUSTES
Correas del arnés
c
a
b
33
s0ARAABRIRLA/PRIMALASLENGàETASY
sepárelas (d)
s0ARACERRARLA!BROCHELASDOSMITADES
!SEGÞRESEDEQUELAPRESILLAPARAEL
PECHOESTÏTRABADATIRANDODECADA
mitad. (e)
s0ARAABROCHAR)NSERTEAMBASLENGàETAS
ENLAHEBILLA*ALELASLENGàETASPARA
asegurarse de que están cerradas (f).
0ARAAPRETAR4IRELACORREADEAJUSTE
del arnés (g).
s0ARADESABROCHAR!mØJELOLEVANTANDO
la palanca mientras tira las correas del
arnés para los hombros (h). Oprima del
botón rojo (i) y tire las lenguas de la
hebilla. (j)
Presilla para el pecho:
Hebilla:
de
f
h
g
i
j
¡CLIC!

34
Verifique la correa para la entrepierna: Elija la posición que
esté más cercana pero no debajo de su niño.
s2ECLINEELSISTEMADESEGURIDADDELNI×OALAPOSICIØN1 (k).
s$ESDEABAJODELSISTEMADESEGURIDADPARAELNI×OGIREELRETÏN
hacia el costado para pasarlo con mayor facilidad por la ranura (l).
s4IRELACORREADELAENTREPIERNADELSISTEMADESEGURIDADPARAEL
niño como se indica (m).
s#UANDOCAMBIALAUBICACIØNDELAHEBILLADELAENTREPIERNAEL
cinturón del LATCH debe pasar entre las líneas del cinturón del
LATCH como se indica en (n).
s0ONGALACORREADELAENTREPIERNAENLARANURADESEADA(o)4IRE
de la correa de la entrepierna para asegurarse de que esté bien
instalada.
Ajuste de la correa de la entrepierna:
OPERACIONES Y AJUSTES CONT
35
0OSICIØN
trasera de la
correa de la
entrepierna
0OSICIØN
delantera de
la correa de
la entrepierna
klmn
o
36
NO INCLINAR DEBIDAMENTE el sistema de seguridad para bebés en el
asiento del vehículo aumenta el riesgo de lesiones serias o la muerte.
ADVERTENCIA
4IREHACIAAFUERADELAMANIJADERECLINACIØNALFRENTEDELSISTEMADESEGURIDAD
para niños y gire el asiento hacia atrás (a).
2. El sistema de seguridad para niños debe estar en la posición de reclinación 1 (b)
como se indica en la etiqueta en el costado de la base (c).
,ABOLAENELINDICADORDELNIVELDEBEESTARTOTALMENTEENAZUL(d). Vea (e) para
DETERMINARELUSOADECUADODELINDICADORDELNIVEL3IESNECESARIOUSEUNlDEO
para piscina o toalla enrollada apretadamente para nivelarlo.
4. El vehículo debe estar en una superficie plana con el niño
dentro del sistema de seguridad al comprobar el indicador de
nivel.
NOTA: El indicador del nivel debe usarse solamente
cuando está orientado hacia atrás.
Orientado hacia atrás
OPERACIONES Y AJUSTES CONT
Posiciones reclinada / vertical:
37
e
b
3
2
1
REAR-FACING
ORIENTADO
HACIA ATRÁS
4-40 LBS
(1.8kg - 18.1 kg)
FORWARD-FACING
ORIENTADO
HACIA /DELANTE
20-40 LBS
(9.1kg - 18.1 kg)
FORWARD-FACING
ORIENTADO
HACIA DELANTE
20-70 LBS
(9.1kg - 31.8 kg)
c
3ILABOLAESTÉTOTALMENTEENELAZUL
CLAROELSISTEMADESEGURIDADESTÉ
nivelado para recién nacidos.
d
CUANDO LEE EL INDICADOR DEL NIVEL,
3ILABOLAESTÉENTREELAZULCLAROY
OSCUROENLAVENTANAELSISTEMADE
seguridad está nivelado para niños
DEMESESYMÉSDEEDAD
3ILABOLAAPARECEENROJOEL
sistema de seguridad para niños NO
ESTÉNIVELADO$EBEAJUSTARSU
posición de reclinación.
use la edad corregida para prematuros.
a1
2
38
4IREHACIAAFUERADELAMANIJADERECLINACIØN
al frente del sistema de seguridad para niños
mientras tira hacia arriba y adelante (a).
2. Ajuste la reclinación en la posición 2 ó 3 que
se indica en la etiqueta (b) en el costado de la
base.
0ARALLEGARALAPOSICIØNMÉSVERTICAL(c)TIRELA
manija hacia afuera y empuje hacia atrás hasta
QUEELASIENTOSETRABEENLAPOSICIØNVERTICAL3I
CAMBIALASPOSICIONESDERECLINACIØNNECESITARÉ
evaluar la instalación para asegurarse de que el
cinturón esté tenso.
Orientado hacia
delante
OPERACIONES Y AJUSTES CONT
Posiciones reclinada / vertical:
a
1
2
c1
2
3
2
1
REAR-FACING
ORIENTADO
HACIA ATRÁS
4-40 LBS
(1.8kg - 18.1 kg)
FORWARD-FACING
ORIENTADO
HACIA /DELANTE
20-40 LBS
(9.1kg - 18.1 kg)
FORWARD-FACING
ORIENTADO
HACIA DELANTE
20-70 LBS
(9.1kg - 31.8 kg)
b
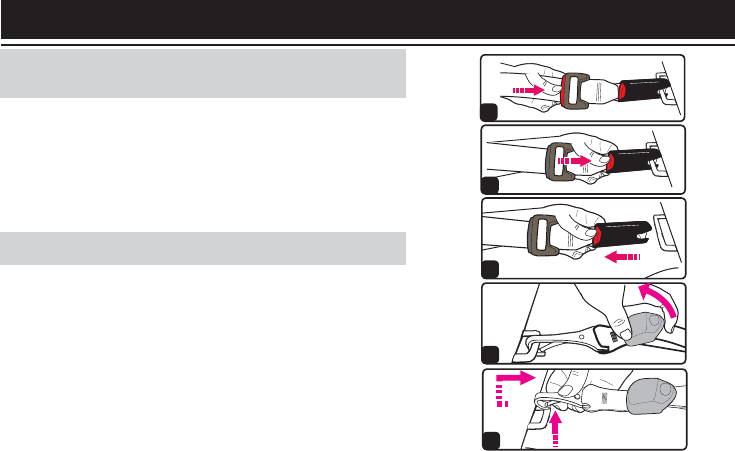
39
Retirar el LATCH de los puntos
de anclaje del vehículo:
OPERACIONES Y AJUSTES CONT
,IBERELATENSIØNDELCONECTORLATCH
empujando el botón como se indica (a).
2. Oprima el botón en el LATCH (b).
*ÉLELOENELSENTIDOOPUESTOALPUNTODEANCLAJE
(c).
a
c
b
d
e
Sacar la correa del vehículo
,IBERELATENSIØNDELCONECTORDELACORREA
levantando la palanca como se indica (d).
2. Oprima y sujete la bisagra de liberación de
la correa (e).
%MPUJEELCONECTORHACIADENTROLEVANTEEL
CONECTORYTIREHACIAAFUERAENELSENTIDOOPUESTO
ALPUNTODEANCLAJE(e).
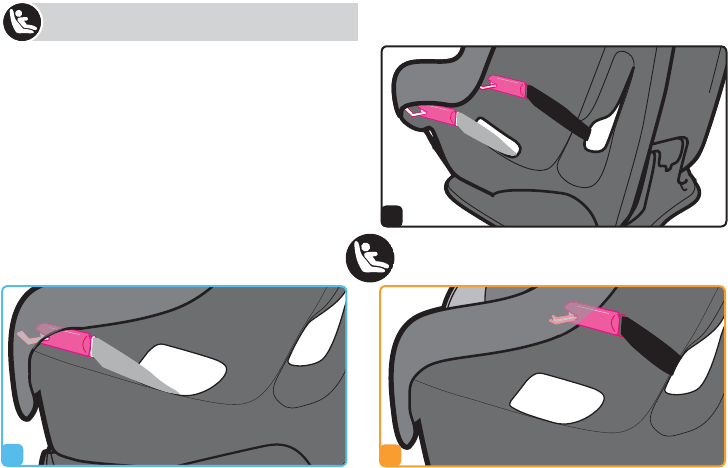
40
5BIQUELASBARRASDEALMACENAJEDEL
sistema LATCH de los cinturones
LATCH orientados hacia adelante o
hacia atrás (a).
2. Abroche el sistema LATCH en la barra
de almacenaje como se indica (b or c).
2EPITAPARAELOTROLADODELASIENTO
ALMACENAMIENTO ORIENTADO
HACIA ATRÁS
ALMACENAMIENTO
ORIENTADO HACIA ADELANTE
Almacenaje LATCH:
b c
a
41
No se pueden usar todos los
cinturones de seguridad de
vehículos con los asientos de
seguridad. Durante el manejo,
sujete siempre el asiento con
el cinturón de seguridad de
regazo o con una parte del
cinturón de regazo/hombro
que no cambie de longitud.
0ARALOGRARLAINSTALACIØNDELASIENTODE
seguridad más segura:
s,EALASECCIØNDELMANUALDELPROPIETARIO
del vehículo referente a la instalación de
los asientos de seguridad y el uso de los
cinturones de seguridad con los asientos.
s3IGALASINSTRUCCIONESDETODASLAS
etiquetas del cinturón de seguridad del
vehículo y del asiento de seguridad.
3IELASIENTONOQUEDABIENSUJETODESPUÏS
DESEGUIRLASINSTRUCCIONESDEESTEMANUAL
de las etiquetas de los cinturones de
seguridad del vehículo y del manual del
propietario del vehículo:
s#OLOQUEELASIENTODESEGURIDADENOTRO
ASIENTODIFERENTEEINTÏNTELODENUEVOO
s/PUEDEVISITARELSITIO7EB
www.seatcheck.org para encontrar la
estación de inspección de asientos de
automóvil para niños más cercana.
ADVERTENCIA
CINTURONES DE SEGURIDAD DEL VEHÍCULO
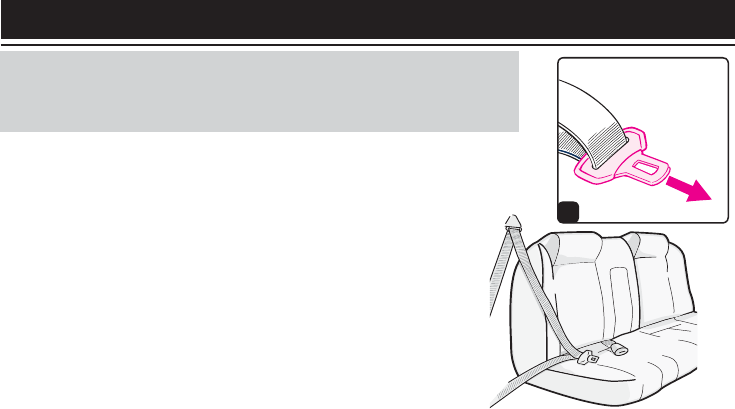
42
3IGAESTOSPASOSPARADETERMINARSISUSISTEMADE
retractor que sujeta el asiento firmemente :
A3AQUEELCINTURØNDESEGURIDADDELTODO
B$EJEQUEELCINTURØNSERETRAIGA
APROXIMADAMENTEPULGADASCM
C3IOYEUNSONIDOTIRELENTAMENTEDELCINTURØNDE
NUEVOSISETRABAENTONCESTIENEUNRETRACTORQUE
SEPUEDEPASARAL-ODODE4RABADO!UTOMÉTICODEL
2ETRACTORYSEPUEDEUSARPARAASEGURARELASIENTO
al vehículo.
3INOTIENEUNRETRACTORQUESEPUEDEPASARAL-ODODE
4RABADO!UTOMÉTICODEL2ETRACTOR9TIRADELAPLACADE
SEGURIDADYSEDESLIZALIBREMENTESEDEBE usar una
TRABADESEGURIDADVERh4RABADESEGURIDADvENLAPÉGINA
Cinturón para la falda y el hombro con
retractor activable y placa de seguridad
deslizable
a
Jale
CINTURONES DE SEGURIDAD DEL VEHÍCULO CONT
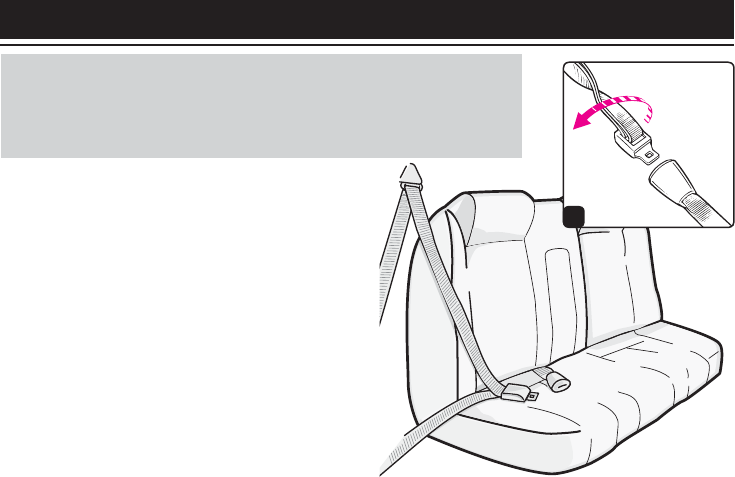
43
La placa de cierre fija de algunos
cinturones de seguridad se puede
DESLIZARYSOLTARTRASABROCHARLAAL
asiento en ciertos ángulos. En este
CASODÏLAVUELTAALAPLACADECIERRE
(a) y vuelva a abrocharla. Compruebe
la instalación de nuevo para ver si
FUNCIONA3INOFUNCIONACOLOQUEEL
asiento en otra posición diferente.
a
CINTURONES DE SEGURIDAD DEL VEHÍCULO CONT
Cinturón para la falda y el hombro con
retractor de seguridad para emergencias
(ELR por sus siglas en inglés) y placa de
seguridad con traba
Déle
la
vuelta
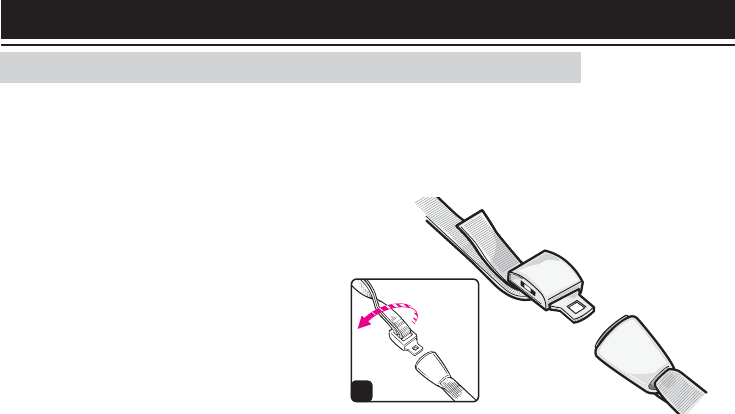
44
a
Cinturones de regazo - ajustables manualmente
La placa de cierre en algunos cinturones de
SEGURIDADSEPUEDEDESLIZARYSOLTARTRAS
abrocharla al asiento en ciertos ángulos. En este
CASODÏLAVUELTAALAPLACADECIERRE(a) y vuelva
a abrocharla. Compruebe la instalación
DENUEVOPARAVERSIFUNCIONA3INOFUNCIONA
coloque el asiento de seguridad en otra
posición diferente.
Déle
la
vuelta
CINTURONES DE SEGURIDAD DEL VEHÍCULO CONT

45
Cinturones de regazo - con retractor
,OSCINTURONESDEREGAZOCONRETRACTORPUEDENO
no sujetar el asiento firmemente.
3IGAESTOSPASOSPARADETERMINARSISUSISTEMADE
retractor que sujeta el asiento firmemente :
A3AQUEELCINTURØNDESEGURIDADDELTODO
B$EJEQUEELCINTURØNSERETRAIGA
APROXIMADAMENTEPULGADASCM
C3AQUEELCINTURØNDENUEVOLENTEMENTE
3IELCINTURØNSECIERRAATOPEYno puede jalarlo
MÉSUSTEDDISPONEDEUNRETRACTORDECIERRE
automático que se puede usar con el asiento.
2ECUERDECUANDOINSTALEELASIENTOSAQUEEL
CINTURØNDELTODOABRØCHELOYLUEGOAPRIÏTELO
Si puedeSACARELCINTURØNDENUEVOPASOC
ARRIBATIENEUNRETRACTORDECIERREPARA
emergencias que NO SE DEBE usar con el
asiento.
2ETRACTOR
CINTURONES DE SEGURIDAD DEL VEHÍCULO CONT
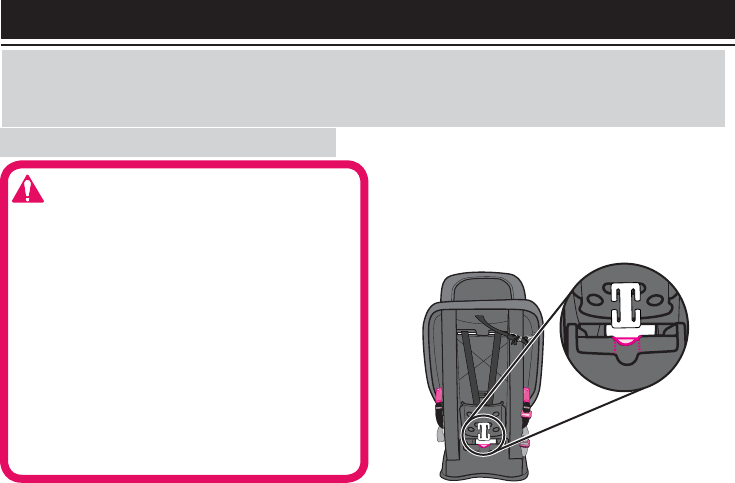
46
Evite lesiones graves o la muerte:
s.OUSARELCLIPDECIERRECUANDO
se requiere impide que el asiento
quede bien sujeto.
s1UITEELCLIPDECIERREDELOS
cinturones de seguridad cuando
no lo utilice con el asiento.
s./USEELCLIPDECIERREPARA
acortar la longitud del cinturón
de seguridad.
3%DEBE usar el clip de cierre que se
incluye con el asiento con el cinturón
de seguridad del vehículo que se
DESLIZAFÉCILMENTEPORLAPLACADE
CIERREOCUANDOELCINTURØNDEREGAZO
no se pueda mantener bien sujeto.
Clip de cierre
CINTURONES DE SEGURIDAD DEL VEHÍCULOCONT
ADVERTENCIA
Cinturón para la falda y el hombro con retractor de
seguridad para emergencias (ELR por sus siglas en inglés)
y placa de seguridad deslizable
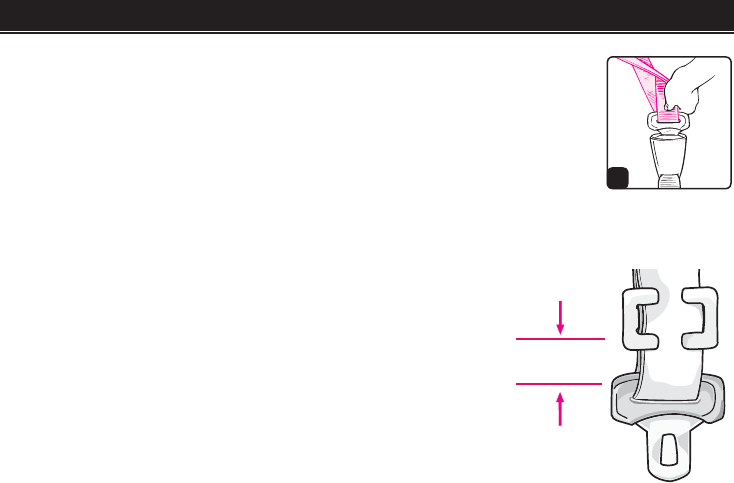
47
)NSTALEELASIENTOYAPRIETEELCINTURØNDESEGURIDADDELVEHÓCULO
3UJETELOSCINTURONESDESEGURIDADENLAPLACADECIERRE(a) y
desabróchelos.
3ISENECESITAUNATRABADESEGURIDADVEALASECCIØNh#LIPDE
CIERREvENLAPÉGINA$ESLICELATRABADESEGURIDADENLOS
CINTURONESDESEGURIDADAPROXIMADAMENTECMPULGY
HASTACMPULGENSENTIDOOPUESTOALAPLACADEUNIØN
4. Vuelva a abrochar el cinturón de seguridad.
#OMPRUEBELAINSTALACIØNPARAVERSIELASIENTOHAQUEDADOBIENSUJETO
3INOHAQUEDADOBIENSUJETOQUIZÉSEANECESARIOAPRETARMÉSELCINTURØN
s$ESABROCHEELCINTURØNDESEGURIDADDELVEHÓCULO
s3UJETELOSCINTURONESYQUITEELCLIPDECIERRE
s!CORTELALONGITUDDELAPARTEDELCINTURØNDEL
REGAZOJALÉNDOLOPORLAPLACADECIERRE
s6UELVAACOLOCARELCLIPDECIERRE
s!BROCHEELCINTURØNDESEGURIDADDELVEHÓCULO
Oprima el asiento en el cojín del asiento del vehículo para
poder abrochar el cinturón de seguridad del vehículo.
Compruebe la instalación para ver si el asiento ha quedado bien
SUJETO3INOREPITALOSPASOSANTERIORESHASTAQUEQUEDEBIENSUJETO
DENTRODECM
PULGADA
a
CINTURONES DE SEGURIDAD DEL VEHÍCULOCONT
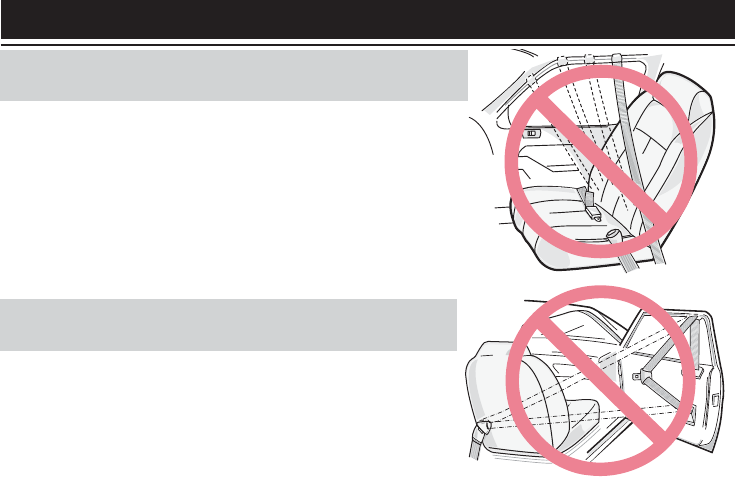
48
NO SE DEBEUSARCONNINGÞNASIENTO
NO SE DEBEUSARCONNINGÞNASIENTO
Los cinturones no se mantendrán
apretados durante el manejo del auto.
Cinturón pasivo - cinturón de regazo
con cinturón de hombro motorizado
Cinturón pasivo - cinturón de regazo
y hombro montado en la puerta
CINTURONES DE SEGURIDAD DEL VEHÍCULO CONT
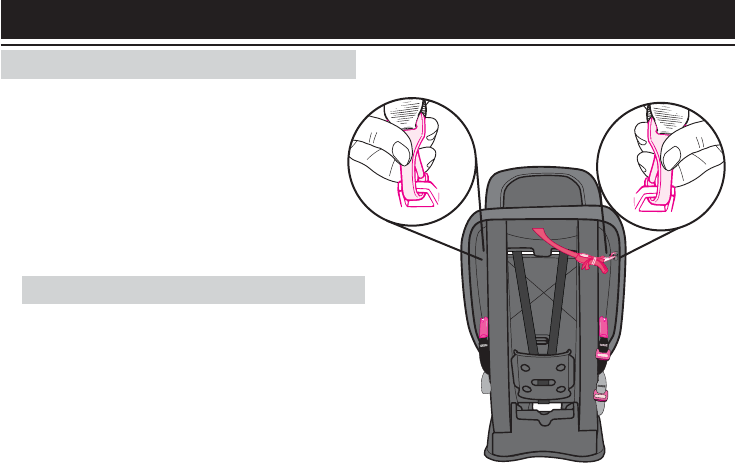
49
NO conecte la correa de anclaje
SUPERIORALVEHÓCULOALUTILIZARELASIENTO
orientado hacia atrás.
El gancho del anclaje debe
conectarse cuando el asiento se usa en
orientación trasera o si el vehículo no
viene equipado con los anclajes
correspondientes.
s#ONECTEELGANCHODELANCLAJEALA
parte trasera del asiento como se
indica.
s*ALEELEXTREMOSUELTODELACORREAPARA
apretarla.
s%NROLLEELEXTREMOSUELTODELACORREAY
sujétela con una goma.
INFORMACIÓN ADICIONAL
Almacenaje del anclaje
Para almacenar el gancho del anclaje:
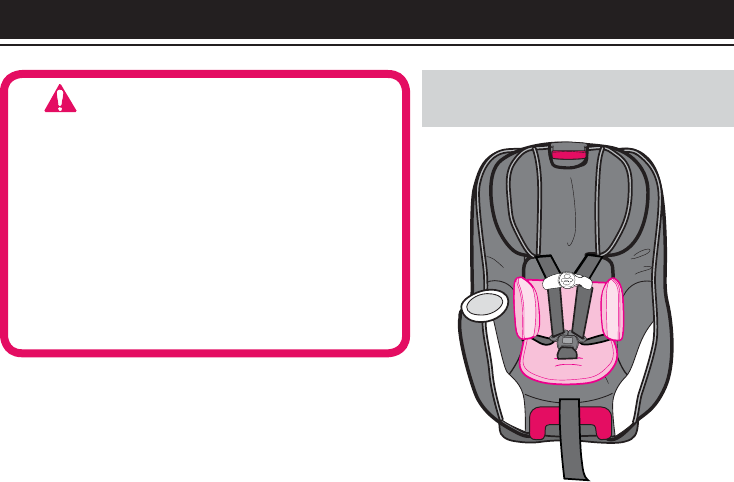
50
Soporte del cuerpo
(ciertos modelos)
Para prevenir la eyección en un
accidente o parada repentina:
s Nunca deje que el soporte del cuerpo
se apile o se doble detrás del niño.
s5SEELSOPORTEDELCUERPOSOLAMENTEEN
el modo orientado hacia atrás.
s%LSOPORTEDELCUERPO$%"%USARSESILOS
hombros están debajo de la posición más
baja del arnés.
ADVERTENCIA
INFORMACIÓN ADICIONAL CONT
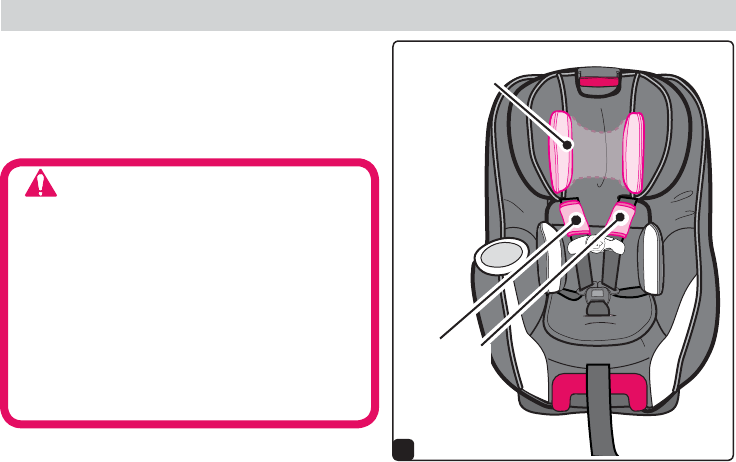
51
a
$ESLICELAALMOHADAPARALACABEZAHACIALA
ABERTURAENELSOPORTEDELACABEZACOMO
se indica (a). El fondo curvo de la almo
HADAPARALACABEZAPERMITEQUESEPUEDA
tirar hacia abajo en el caso de niño.
Almohada para la cabeza y fundas del arnés (ciertos modelos)
Fundas
del arnés
Almohada
para la
cabeza
Para prevenir la eyección en un
accidente o parada repentina:
s!SEGÞRESEDEQUEELSISTEMADELARNÏS
esté debidamente sujetado.
s2EVISEQUELASCORREASDELARNÏSNO
estén torcidas.
s!SEGÞRESEDEQUELASFUNDASDELARNÏS
no interfieran con la colocación de
la presilla del pecho a la altura de las
axilas.
ADVERTENCIA
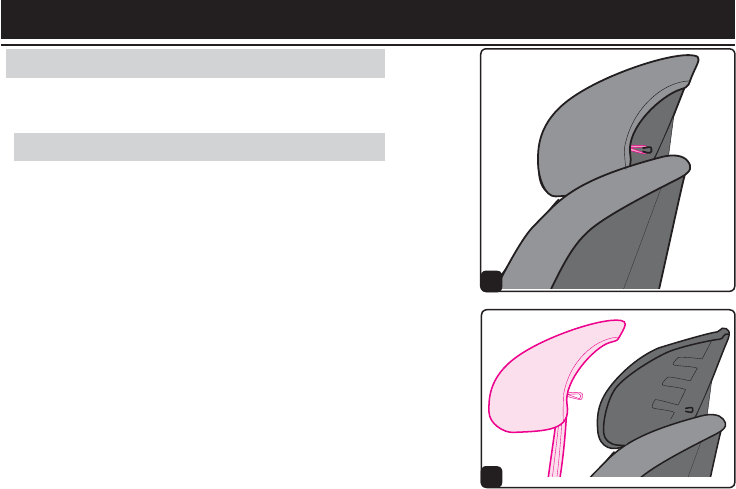
52
Funda del Apoyacabezas: limpiar con una
ESPONJAHÞMEDAUSANDOUNJABØNSUAVEYAGUA
FRESCA$ESERNECESARIOSEPUEDESACARLAFUNDA
para limpiarla.
3AQUELOSNUDOSELÉSTICOSDELAPOYACABEZAS
como se indica en (a).
3AQUELASFUNDASDELAPOYACABEZASCOMOSE
indica. (b).
,AVELAFUNDAAMÉQUINAENAGUAFRÓAENELCICLO
DELICADOYSÏQUELAALAIRE./53%
",!.15%!$/2
0ARAVOLVERAPONERLAFUNDADELASIENTOINVIERTA
las instrucciones anteriores.
Funda del Apoyacabezas
a
b
Consulte la etiqueta de cuidado de la almohadilla
del asiento para obtener las instrucciones de lavado.
Cuidado y limpieza
INFORMACIÓN ADICIONAL CONT
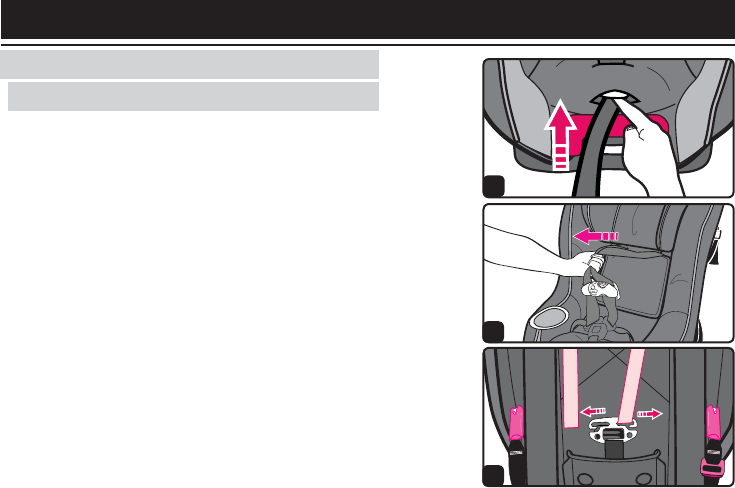
53
Almohadilla del asiento: limpie con una
ESPONJAHÞMEDAUSANDOUNJABØNSUAVEYAGUA
FRESCA$ESERNECESARIOSEPUEDESACARLA
almohadilla del asiento para limpiarla.
!mOJELASCORREASDELARNÏSLEVANTANDOLA
palanca hacia arriba (a) mientras tira las
correas del arnés para los hombros (b).
2ETIRELOSDOSBUCLESDELASCORREASDELARNÏS
de la placa de unión de la parte trasera del
asiento (c) y páselos por la parte delantera
DELAALMOHADILLA!BRALAPRESILLADELPECHO
libere las lenguas de la hebilla.
Almohadilla del asiento
INFORMACIÓN ADICIONAL CONT
Cuidado y limpieza
a
b
c

54
INFORMACIÓN ADICIONAL CONTI
3AQUELASCORREASELÉSTICASDELOSGANCHOSDEATRÉS
del asiento como se indica (d).
3AQUELOSGANCHOSDELFRENTEDELASIENTOCOMOSE
indica (e).
3AQUELAALMOHADILLADELASIENTODELARMAZØN
empujando las correas del arnés y la correa de la
entrepierna por la almohadilla del asiento.
,AVELAFUNDAAMÉQUINAENAGUAFRÓAENELCICLO
DELICADOYSÏQUELAALAIRE./53%",!.15%!$/2
0ARAVOLVERAPONERLAFUNDADELASIENTOINVIERTALAS
instrucciones anteriores.
d
e
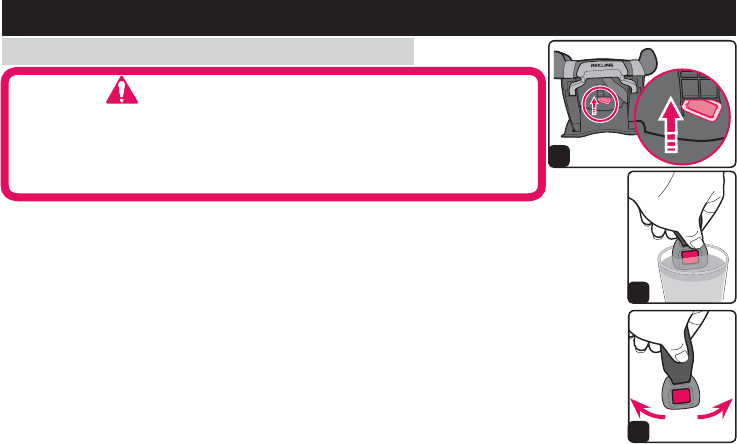
55
Prevenga lesiones graves o la muerte:
s,AHEBILLADEBEABROCHARSECORRECTAMENTE
s)NSPECCIONEYLIMPIELAHEBILLAPERIØDICAMENTEPARA
quitar objetos o desechos que podrían impedir la sujeción.
$EVUELTAELSISTEMADESEGURIDADPASEELRETÏNPORLARANURADE
la correa de la entrepierna (a).
0ARALIMPIARLAHEBILLAPØNGALEENUNATAZADEAGUATIBIAYAGITE
SUAVEMENTELAHEBILLAOPRIMAELBOTØNROJOVARIASVECESMIENTRASESTÏ
sumergida en el agua (b). NO SUMERJA LAS CORREAS DEL ARNÉS.
NO USE JABONES ni LUBRICANTES. NO use detergentes para uso
doméstico. Nunca lubrique la hebilla.
%LIMINEELEXCESODEAGUAYPERMITAQUESESEQUEALAIRELACORREA
del arnés debe estar seca antes del uso (c).
2EPITALOSPASOSYSEGÞNSEANECESARIO,AHEBILLADEBETRABARSE
HACIENDOUNhCLICv
6UELVAASUJETARLAHEBILLAENLAMISMARANURAQUEENEL0ASO
Vuelva a inspeccionar el arnés para determinar si la instalación es correcta antes de
usarlo.
INFORMACIÓN ADICIONAL CONT
Proceso de limpieza de la hebilla:
b
a
c
ADVERTENCIA

56
3ELAVALASUPERlCIESOLAMENTE
con un jabón suave y un paño
MOJADO./35-%2*!,!3
#/22%!3$%,!2.³3OLATCH
%.!'5!(ACERLOPODRÓAAmOJAR
las correas del arnés o LATCH.
3ILASCORREASDELARNÏSOLATCH
ESTÉNDESHILACHADASOMUYSUCIAS
$%"%.REEMPLAZARSE
Correas del arnés y del
sistema LATCH:
Uso en aeronaves
Asiento de seguridad para autos
de segunda mano
Este asiento ha sido certificado para uso en
AERONAVESVEALAETIQUETADELASIENTO
0ØNGASEENCONTACTOCONLASAEROLÓNEASPARA
obtener información sobre su política.
5TILICEESTEASIENTOSOLAMENTEENASIENTOSDE
aeronaves orientados hacia delante.
Instale el asiento en la aeronave de la misma
MANERAQUESEINSTALAENUNVEHÓCULOCUANDO
se usa el cinturón de seguridad del vehículo.
'RACO#HILDRENS0RODUCTS)NCDESACONSEJA
prestar o regalar el asiento.
INFORMACIÓN ADICIONAL CONT

57
NOTAS

58
NOTAS

59
NOTAS
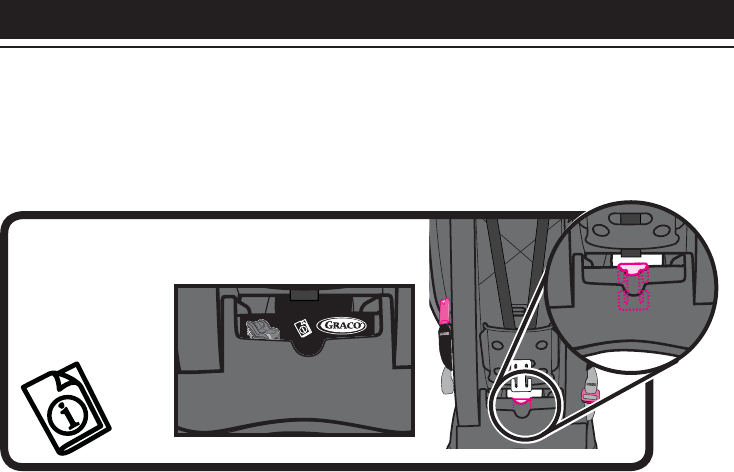
60
Child Restraint
Owner’s Manual
'UARDEELMANUALDE
instrucciones en la
ranura con
símbolo del libro
de instrucciones
como se indica.
Almacenamiento
del clip de cierre
0ARACOMPRARREPUESTOSOACCESORIOSENLOS%STADOS5NIDOSPORFAVOR
comuníquese con nosotros en:
www.gracobaby.com
o
1-800-345-4109
REPUESTOS
