Grandstream Networks GAC2500 Audio Conference Phone User Manual x0001
Grandstream Networks, Inc Audio Conference Phone x0001
Contents
- 1. User manual part 1
- 2. User manual part 2
User manual part 1

Audio Conference Phone
Grandstream Networks, Inc.
GAC2500 Audio Conference Phone for AndroidTM
User Guide

Firmware Version 1.0.1.x
GVC2500 User Guide
Page 1 of 88
GAC2500 User Guide
Index
CHANGE LOG .............................................................................................................................................. 9
FIRMWARE VERSION 1.0.1.X .............................................................................................................. 9
WELCOME .................................................................................................................................................. 10
PRODUCT OVERVIEW .............................................................................................................................. 11
FEATURE HIGHTLIGHTS ................................................................................................................... 11
SAFETY COMPLIANCES .................................................................................................................... 12
WARRANTY ......................................................................................................................................... 12
INSTALLING GAC2500 ............................................................................................................................... 13
EQUIPMENT PACKAGE CONTENT ................................................................................................... 13
PRODUCT APPEARANCE .................................................................................................................. 13
CONNECTING GAC2500 .................................................................................................................... 14
IP MODE ....................................................................................................................................... 15
USB SLAVE MODE ...................................................................................................................... 16
DAISY CHAIN MODE ................................................................................................................... 16
MOBILE PHONE MODE .............................................................................................................. 17
GETTING TO KNOW GAC2500 ................................................................................................................. 19
DESKTOP MENU ................................................................................................................................ 19
STATUS ICONS ................................................................................................................................... 19
USING THE ONSCREEN KEYBOARD ............................................................................................... 20
ENGLISH KEYBOARD ................................................................................................................. 20
CHINESE KEYBOARD ................................................................................................................. 21
NUMBERS AND SYMBOLS ......................................................................................................... 21
USING THE LED INDICATOR ............................................................................................................. 22
ASSISTIVE TOUCH .................................................................................................................................... 23
USING TOUCHSCREEN ..................................................................................................................... 23
SHORTCUT KEYS............................................................................................................................... 23
MANAGING STATUS BAR .................................................................................................................. 24
DESKTOP MENU ................................................................................................................................ 25
EDITING WALLPAPER................................................................................................................. 25
EDIT DESKTOP............................................................................................................................ 26
ADDING AN ITEM TO DESKTOP ................................................................................................ 26
MANAGING DESKTOP APPS AND ITEMS ................................................................................. 27
OPENING AN APP ................................................................................................................ 27
MOVING AN APP .................................................................................................................. 27
REMOVING AN APP ............................................................................................................. 28
MANAFERING APPLICATIONS ............................................................................................ 29
HOME SCREEN .................................................................................................................................. 30

Firmware Version 1.0.1.x
GVC2500 User Guide
Page 2 of 88
CONNECTING TO NETWORK AND DEVICES ......................................................................................... 32
NETWORK ........................................................................................................................................... 32
ETHERNET .......................................................................................................................................... 32
WI-FI .................................................................................................................................................... 32
TURNING WI-FI ON OR OFF ...................................................................................................... 33
BLUETOOTH ....................................................................................................................................... 33
TURNING BLUETOOTH ON OR OFF ......................................................................................... 33
PAIRING GAC2500 WITH A BLUETOOTH DEVICE .................................................................... 34
CONNECTING TO A BLUETOOTH DEVICE ............................................................................... 34
SENDING FILES VIA BLUETOOTH ............................................................................................. 35
VPN SETTINGS ................................................................................................................................... 35
VLAN SETTINGS ................................................................................................................................. 36
LLDP SETTINGS ................................................................................................................................. 36
802.1X MODE ...................................................................................................................................... 37
MAKING PHONE CALLS ............................................................................................................................ 38
ACCOUNT ........................................................................................................................................... 38
MAKING A CALL .................................................................................................................................. 38
DIRECT DIALING ......................................................................................................................... 38
REDIAL ......................................................................................................................................... 38
DIALING A NUMBER VIA CONTACT ........................................................................................... 39
DIALING A NUMBER VIA CALL HISTORY .................................................................................. 39
DIRECT IP CALL .......................................................................................................................... 39
PAGING/INTERCOM .................................................................................................................... 40
ANSWERING A CALL .......................................................................................................................... 40
CALL MANAGEMENT .................................................................................................................. 41
CALL HOLD AND CALL RESUME ...................................................................................................... 41
CALL HOLD .................................................................................................................................. 41
RESUME TO CALL ...................................................................................................................... 42
CALL RECORD.................................................................................................................................... 43
CALL TRANSFER ................................................................................................................................ 44
BLIND TRANSFER ....................................................................................................................... 44
ATTENDED TRANSFER .............................................................................................................. 45
CALL TRANSFER ................................................................................................................. 46
CALL FORWARD .................................................................................................................. 46
DND (DO NOT DISTURB) ................................................................................................................... 48
MISSED CALL ..................................................................................................................................... 49
CALL FORWARD ................................................................................................................................. 49
SET ON LCD ................................................................................................................................ 49
SET FROM WEB GUI ................................................................................................................... 49
7-WAY CONFERENCE ........................................................................................................................ 49
INITIATING CONFERENCE ......................................................................................................... 49

Firmware Version 1.0.1.x
GVC2500 User Guide
Page 3 of 88
CONFERENCE MANAGEMENT .................................................................................................. 52
INVITE MEMBERS TO CONFERENCE ............................................................................... 53
REMOVING MEMBER FROM CONFERENCE .................................................................... 53
THIRD PARTY APPLICATIONS ................................................................................................... 53
END CONFERENCE .................................................................................................................... 53
SCHEDULE ......................................................................................................................................... 54
VIEW CONFERENCE DETAILS .................................................................................................. 54
ADD SCHEDULED CONFERENCE ............................................................................................. 55
EDIT SCHEDULED CONFERENCE ............................................................................................ 56
RESCHEDULE CONFERENCE ................................................................................................... 56
DELETE SCHEDULED CONFERENCE ...................................................................................... 56
VOICEMAIL ......................................................................................................................................... 58
APPLICATIONS .......................................................................................................................................... 59
CONTACTS.......................................................................................................................................... 59
LOCAL CONTACTS...................................................................................................................... 59
ADD CONTACT ............................................................................................................................ 60
ADD SINGLE CONTACT ...................................................................................................... 60
BATCH IMPORT CONTACTS ............................................................................................... 60
SEARCH CONTACTS ........................................................................................................... 63
MANAGE CONTACTS .................................................................................................................. 63
DELETE CONTACT .............................................................................................................. 63
EXPORT CONTACTS ........................................................................................................... 63
SEND CONTACTS ................................................................................................................ 64
CONTACTS STORAGE STATUS .......................................................................................... 64
ADD GOOGLE ACCOUNT ........................................................................................................... 65
GROUPS ...................................................................................................................................... 67
ADD NEW GROUP ............................................................................................................... 67
CALL GROUPS ..................................................................................................................... 68
DELETE GROUP .................................................................................................................. 68
BLACKLIST .......................................................................................................................................... 68
LDAP .................................................................................................................................................... 70
BS CONTACTS .................................................................................................................................... 73
CALL HISTORY ................................................................................................................................... 73
ADD CONTACT FROM CALL HISTORY...................................................................................... 74
DELETE CALL HISTORY ............................................................................................................. 75
CONFERENCE SCHEDULE VIA CALL HISTORY ...................................................................... 75
MPK ..................................................................................................................................................... 75
EVENR LIST URL ................................................................................................................................ 76
FILEMANAGER ................................................................................................................................... 77
COPY FILE ................................................................................................................................... 77
SEND FILE ................................................................................................................................... 77

Firmware Version 1.0.1.x
GVC2500 User Guide
Page 4 of 88
DELETE FILE ............................................................................................................................... 77
RENAME FILE .............................................................................................................................. 77
RECORDER ........................................................................................................................................ 78
NORMAL RECORDER ................................................................................................................. 78
CALL RECORDER ....................................................................................................................... 79
RECORDER CONFIGURATION .................................................................................................. 80
DIAGNOSIS ......................................................................................................................................... 81
BROWSER .......................................................................................................................................... 81
GS MARKET ............................................................................................................................................... 82
SEARCH APPS .................................................................................................................................... 82
DOWNLOAD AND INSTALL APPS ...................................................................................................... 82
UPDATE APPS .................................................................................................................................... 82
GAC2500 WEB UI FEATURES ................................................................................................................... 83
ACCESSING GAC2500 WEB GUI ...................................................................................................... 83
SAVING CHANGES ............................................................................................................................. 83
DEFINITIONS ...................................................................................................................................... 83
CALL PAGE ......................................................................................................................................... 84
MAKING A CALL ........................................................................................................................... 85
CONFERENCE CONTROL .......................................................................................................... 85
CONTACTS PAGE ............................................................................................................................... 85
CONTACTS .................................................................................................................................. 85
GROUPS ...................................................................................................................................... 85
SCHEDULE .................................................................................................................................. 86
CALL HISTORY ............................................................................................................................ 86
EXPERIENCING GAC2500 ........................................................................................................................ 87

Firmware Version 1.0.1.x
GVC2500 User Guide
Page 5 of 88
Table of Tables
GAC2500 User Guide
Table 1 GAC2500 Technical Specifications .............................................................................................. 11
Table 2 GAC2500 Package List ............................................................................................................... 13
Table 3 GAC2500 Interfaces Explanations ............................................................................................... 13
Table 4 GAC2500 Status Icons Descriptions............................................................................................ 19
Table 5 GAC2500 LED Indicator Descriptions ......................................................................................... 22
Table 6 GAC2500 VPN File Parameters .................................................................................................. 35
Table 7 GAC2500 VLAN Configuration Parameters ................................................................................ 36
Table 8 GAC2500 LLDP Configuration Parameters ................................................................................. 36
Table 9 GAC2500 802.1X Mode Parameters ........................................................................................... 37
Table 10 GAC2500 Download Contacts Parameters ............................................................................... 63
Table 11 GAC2500 Export Contacts Parameters ..................................................................................... 64
Table 12 GAC2500 Blacklist Settings Parameters ................................................................................... 69
Table 13 GAC2500 LDAP Book Parameters ............................................................................................ 71
Table 14 GAC2500 Users Access Permissions........................................................................................ 84

Firmware Version 1.0.1.x
GVC2500 User Guide
Page 6 of 88
Table of Figures
GAC2500 User Guide
Figure 1 GAC2500 Host Interfaces .......................................................................................................... 13
Figure 2 GAC2500 Connection Mode ...................................................................................................... 15
Figure 3 GAC2500 Slave Mode Screen ................................................................................................... 16
Figure 4 GAC2500 Daisy Chain Mode Screen ........................................................................................ 16
Figure 5 GAC2500 Select line Screen ..................................................................................................... 17
Figure 6 GAC2500 Multi-screens ........................................................................................................... 19
Figure 7 GAC2500 Soft Keyboard - English Input Method ...................................................................... 21
Figure 8 GAC2500 English Keyboard-Uppercase .................................................................................. 21
Figure 9 GAC2500 Chinese Keyboard-Google Pinyin Method .............................................................. 21
Figure 10 GAC2500 Soft Keyboard-Symbols and Numbers .................................................................... 21
Figure 11 GAC2500 Soft Keyboard-More Symbols and Numbers ........................................................... 21
Figure 12 GAC2500 Finger Gestures ..................................................................................................... 23
Figure 13 GAC2500 Open Status Bar ...................................................................................................... 24
Figure 14 GAC2500 Status Bar-Notification ............................................................................................. 24
Figure 15 GAC2500 Idle Screen Menu .................................................................................................... 25
Figure 16 GAC2500 Choose Wallpaper ................................................................................................... 26
Figure 17 GAC2500 Weather Forecast Screen ....................................................................................... 27
Figure 18 GAC2500 Move Weather Forecast to Desktop ........................................................................ 28
Figure 19 GAC2500 Remove Weather Forecast from Desktop ............................................................... 29
Figure 20 GAC2500 Managing Applications ............................................................................................ 30
Figure 21 GAC2500 Home Screen .......................................................................................................... 31
Figure 22 GAC2500 Add Wi-Fi Screen ................................................................................................... 33
Figure 23 GAC2500 Bluetooth - Paired Device ....................................................................................... 34
Figure 24 GAC2500 Add VPN Files Screen ............................................................................................. 35
Figure 25 GAC2500 VPN Validation Screen .......................................................................................... 35
Figure 26 GAC2500 Registered Account Status ...................................................................................... 38
Figure 27 GAC2500 Single Incoming Call Screen ................................................................................. 40
Figure 28 GAC2500 New Incoming Call Screen .................................................................................... 41
Figure 29 GAC2500 Single Incoming Call Screen ................................................................................... 42
Figure 30 GAC2500 Call On Hold Screen ................................................................................................ 43
Figure 31 GAC2500 More-Start Recording .............................................................................................. 44
Figure 32 GAC2500 Transfer-Blind Transfer ............................................................................................ 45
Figure 33 GAC2500 Transfer-Attended Transfer ..................................................................................... 46
Figure 34 GAC2500 Call Forward-Select Forward Mode ........................................................................ 47
Figure 35 GAC2500 Call Forward-Transferring ....................................................................................... 48
Figure 36 GAC2500 Call Forward-Split .................................................................................................... 48
Figure 37 GAC2500 Call Forward Mode On Web GUI .......................................................................... 49
Figure 38 GAC2500 Manually Add Numbers To Conference ................................................................... 50
Figure 39 GAC2500 Add Party To Conference ........................................................................................ 51

Firmware Version 1.0.1.x
GVC2500 User Guide
Page 7 of 88
Figure 40 GAC2500 3-Way Conference .................................................................................................. 52
Figure 41 GAC2500 Schedule Screen ..................................................................................................... 54
Figure 42 GAC2500 Conference Details Screen ..................................................................................... 55
Figure 43 GAC2500 Add Conference Screen .......................................................................................... 55
Figure 44 GAC2500 Delete Conference Screen ...................................................................................... 57
Figure 45 GAC2500 Edit Conferences Screen ........................................................................................ 57
Figure 46 GAC2500 Voice Mail Application.............................................................................................. 58
Figure 47 GAC2500 Local Contacts Screnn ............................................................................................ 59
Figure 48 GAC2500 Add New Contact Screen ........................................................................................ 60
Figure 49 GAC2500 Import Contacts Screen ........................................................................................... 61
Figure 50 GAC2500 Import Contacts Parameters ................................................................................... 61
Figure 51 GAC2500 Download Contacts Screen ..................................................................................... 62
Figure 52 GAC2500 Export Contacts Screen ......................................................................................... 64
Figure 53 GAC2500 Contacts Status Screen ........................................................................................... 65
Figure 54 GAC2500 Account-Sync Interface ........................................................................................... 65
Figure 55 GAC2500 Add Google Account-Wizard 1 ................................................................................ 66
Figure 56 GAC2500 Add Google Account-Wizard 2 ................................................................................ 66
Figure 57 GAC2500 Groups Screen ........................................................................................................ 67
Figure 58 GAC2500 Add Group Screen ................................................................................................... 67
Figure 59 GAC2500 Dial Group Members Screen ................................................................................... 68
Figure 60 GAC2500 Edit Groups Screen ................................................................................................. 68
Figure 61 GAC2500 Blacklist Screen ....................................................................................................... 69
Figure 62 GAC2500 LDAP Book Screen ................................................................................................. 70
Figure 63 GAC2500 LDAP Settings ......................................................................................................... 71
Figure 64 GAC2500 Web GUI Maintenance-LDAP Book ........................................................................ 72
Figure 65 GAC2500 Add LDAP Contact To Local .................................................................................... 73
Figure 66 GAC2500 Call History Screen ................................................................................................ 74
Figure 67 GAC2500 Call History Details .............................................................................................. 74
Figure 68 GAC2500 Add MPK Number .................................................................................................... 75
Figure 69 GAC2500 MPK Number List .................................................................................................... 76
Figure 70 GAC2500 Add Number from Contacts ..................................................................................... 76
Figure 71 GAC2500 MPK Number Screen .............................................................................................. 76
Figure 72 GAC2500 Recorder Screen ..................................................................................................... 78
Figure 73 GAC2500 Normal Recorder ..................................................................................................... 78
Figure 74 GAC2500 Normal Record-Recording ...................................................................................... 79
Figure 75 GAC2500 Call Recordings ....................................................................................................... 80
Figure 76 GAC2500 Recorder Settings Screen ....................................................................................... 81
Figure 77 GAC2500 GS Market ............................................................................................................. 82
Figure 78 GAC2500 Web GUI-Login ........................................................................................................ 83
Figure 79 GAC2500 Web UI Tool Bar ...................................................................................................... 84
Figure 80 GAC2500 Web UI-Call ............................................................................................................. 84

Firmware Version 1.0.1.x
GVC2500 User Guide
Page 8 of 88
Figure 81 GAC2500 Web UI-Conference Control .................................................................................... 85
Figure 82 GAC2500 Web UI-Contacts ..................................................................................................... 85
Figure 83 GAC2500 Web UI-Groups........................................................................................................ 85
Figure 84 GAC2500 Web Page-Schedule ............................................................................................... 86
Figure 85 GAC2500 Web UI-Call History ................................................................................................. 86

Firmware Version 1.0.1.x
GVC2500 User Guide
Page 9 of 88
CHANGE LOG
This section documents significant changes from previous versions of GAC2500 user manuals. Only
major new features or major document updates are listed here. Minor updates for corrections or editing
are not documented here.
FIRMWARE VERSION 1.0.1.X
This is the initial version.

Firmware Version 1.0.1.x
GVC2500 User Guide
Page 10 of 88
WELCOME
Thank you for purchasing Grandstream GAC2500 Audio Conference Phone for AndroidTM. This User
Guide describes the basic concept and tasks necessary to use and configure your GAC2500. This
document covers the topics of conference environment setups, start conference and the relevant
operations like conference reservation. To learn the advanced features and configurations, please visit
http://www.grandstream.com to download the latest "GAC2500 Administration Guide".
GAC2500 is a next generation enterprise-grade 6-line Android IP conference phone with a 4.3" capacitive
touch screen that that runs the Android Operating System and therefore offers full access to the hundreds
of thousands of Android apps in the Google Play Store, including business productivity apps such as
Skype™, Skype for Business™, and Google Hangouts™. The phone features Gigabit ports, 7-way
conference, 3x microphones, 1 Micro USB port, integrated Wi-Fi and Bluetooth for network flexibility. The
GAC2500 delivers superior HD audio quality, rich and leading edge telephony features, automated
provisioning for easy deployment, advanced security protection for privacy, and broad interoperability with
most 3rd party SIP devices and leading SIP/NGN/IMS platforms. GAC2500 is a perfect choice for
enterprise users looking for a high performance, feature rich conference phone with superb audio quality
at competitive price.
---------------------------------------------------------------------------------------------------------------------
Caution:
Changes or modifications to this product not expressly approved by Grandstream, or operation of this
product in any way other than as detailed by this User Manual, could void your manufacturer warranty.
Warning:
Please do not use a different power adaptor with the GAC2500 as it may cause damage to the products
and void the manufacturer warranty.
---------------------------------------------------------------------------------------------------------------------
This document is subject to change without notice. The latest electronic version of this user manual is
available for download here:
http://www.grandstream.com/support
Reproduction or transmittal of the entire or any part, in any form or by any means, electronic or print, for
any purpose without the express written permission of Grandstream Networks, Inc. is not permitted.
---------------------------------------------------------------------------------------------------------------------
Firmware Version 1.0.1.x
GVC2500 User Guide
Page 11 of 88
PRODUCT OVERVIEW
FEATURE HIGHTLIGHTS
Runs Android™ 4.4 and offers full access to all Android™ conference apps in the Google Play Store
(e.g., Skype®, Skype for Business®, Google Hangouts™, etc.)
World-class high fidelity sound quality with audio bandwidth of up to 14Khz
4.3" capacitive touch screen LCD with support for flexible layout/content customization
3x microphones (12 ft. pickup range), 1x speaker (15 ft. coverage range)
Auto-sensing Gigabit Ethernet port, Wi-Fi, PoE+, Bluetooth, Micro-USB with 3.5mm audio interface
Supports standalone IP mode or USB slave mode
Supports daisy chain (up to 2 units via RJ48 CAT5) mode in large conference room for better audio
quality
NAT-T enables the phone being the Plug and Play device
Automated provisioning using TR-069 or AES encrypted XML configuration file, TLS/SRTP/HTTPS for
advanced security and privacy protection
Table 1 GAC2500 Technical Specifications
Specification
Description
Protocols/
Standards
SIP RFC3261,TCP/IP/UDP, RTP/RTCP,HTTP/HTTPS,ARP,ICMP,DNS (A
record ,SRV ,NAPTR) ,DHCP ,PPPoE ,SSH ,TFTP ,NTP ,STUN ,
SIMPLE ,LLDP ,LDAP ,TR-069 ,802.1x ,TLS ,SRTP , IPv6 (pending) ,
OpenVPN (pending)
Voice Codec
Support for G.711µ/a, G.722, G.726, iLBC, Opus, G.722.1, G.722.1c, in-band and
out-of-band DTMF (In audio, RFC2833, SIP INFO)
Platform Bridging
Bridge SIP calls with any Android™ VoIP apps such as Skype™, Skype for
Business (Lync), Google Hangouts™ and more
Telephony
Features
Hold, transfer, forward (unconditional/no-answer/busy/conditional), call park/pickup,
7-way audio conference, auto answer, downloadable XML phone book (up to 2000
entries), LDAP, call waiting, call history (up to 500 entries), flexible dial plan,
personalized music ringtones, server redundancy & fail-over
Sample
Applications
Skype™, Google Hangouts™, Skype for Business (Lync), Web browser,
Facebook™, Twitter™, YouTube, Google calendar, mobile phone data import/export
via Bluetooth, etc. API/SDK available for advanced custom application development
Application
Deployment
Allows Android 4.4 compliant applications to be deployed in the device with
provisioning control
QoS
Layer 2 QoS (802.1Q, 802.1p) and Layer 3 (ToS, DiffServ, MPLS) QoS
Security
User and administrator level passwords, MD5 and MD5-sess based authentication,
256-bit AES encrypted configuration file, TLS, 128/256-bit SRTP/TLS, HTTPS,
802.1x media access control
Multi-Language
English, German, Italian, French, Spanish, Portuguese, Russian, Turkish, Polish,

Firmware Version 1.0.1.x
GVC2500 User Guide
Page 12 of 88
Chinese, Korean, Japanese, and more
Upgrade/
Provisioning
Firmware upgrade via TFTP / HTTP / HTTPS or local HTTP upload, mass
provisioning using TR-069 or AES encrypted XML configuration file
Network Interface
1x auto-sensing Gigabit Ethernet port, integrated 2.4GHZ auto-band Wi-Fi and 3.0
Bluetooth.
HD Audio
3x microphones (12 ft. pickup range), 1x speaker (220-14,000 Hz, 15 ft. coverage
range up to 86dB )
Auxiliary Ports
3.5mm audio interface, Micro-USB interface, RJ48 interface, reset pin
Graphic Display
4.3"(800*480) capacitive touch screen LCD
Power & Green
Energy Efficiency
Universal power adapter included: Input: 100-240VAC 50-60Hz; Output: 12VDC, 2A
(24W)
Temperature and
Humidity
Operating: 32 - 104oF / 0 - 40oC
Storage: 14 - 140oF / -10 - 60oC
Humidity: 10% to 90% Non-condensing
Compliance
FCC: Part 15 (CFR 47) Class B; UL 60950 (power adapter)
CE:EN55022 Class B,EN55024,EN61000-3-2,EN61000-3-3,EN60950-1,
EN62479,RoHS
RCM:AS/ACIF S004;AS/NZS CISPR22/24;AS/NZS 60950;AS/NZS 4268
SAFETY COMPLIANCES
The GAC2500 complies with FCC/CE, RCM and various safety standards. The GAC2500 power adapter
is compliant with the UL standard. Use the universal power adapter provided with the GAC2500 package
only. The manufacturer’s warranty does not cover damages to the phone caused by unsupported power
adapters.
WARRANTY
If the GAC2500 phone is purchased from a reseller, please contact the company where the device is
purchased for replacement, repair or refund. If the phone is purchased directly from Grandstream, please
contact Grandstream Support for a RMA (Return Materials Authorization) number before the product is
returned. Grandstream reserves the right to remedy warranty policy without prior notification.
Firmware Version 1.0.1.x
GVC2500 User Guide
Page 13 of 88
INSTALLING GAC2500
EQUIPMENT PACKAGE CONTENT
The GAC2500 package contains the following items:
Table 2 GAC2500 Package List
Name
Number
GAC2500 Main Case
1
12V Universal Power Adapter with power cable
1
5m Ethernet Cable
1
1.5m Micro-USB Cable
1
5m RJ48 CAT5
1
Lens Cleaning Cloth
1
Quick Installation Guide
1
GPL license
1
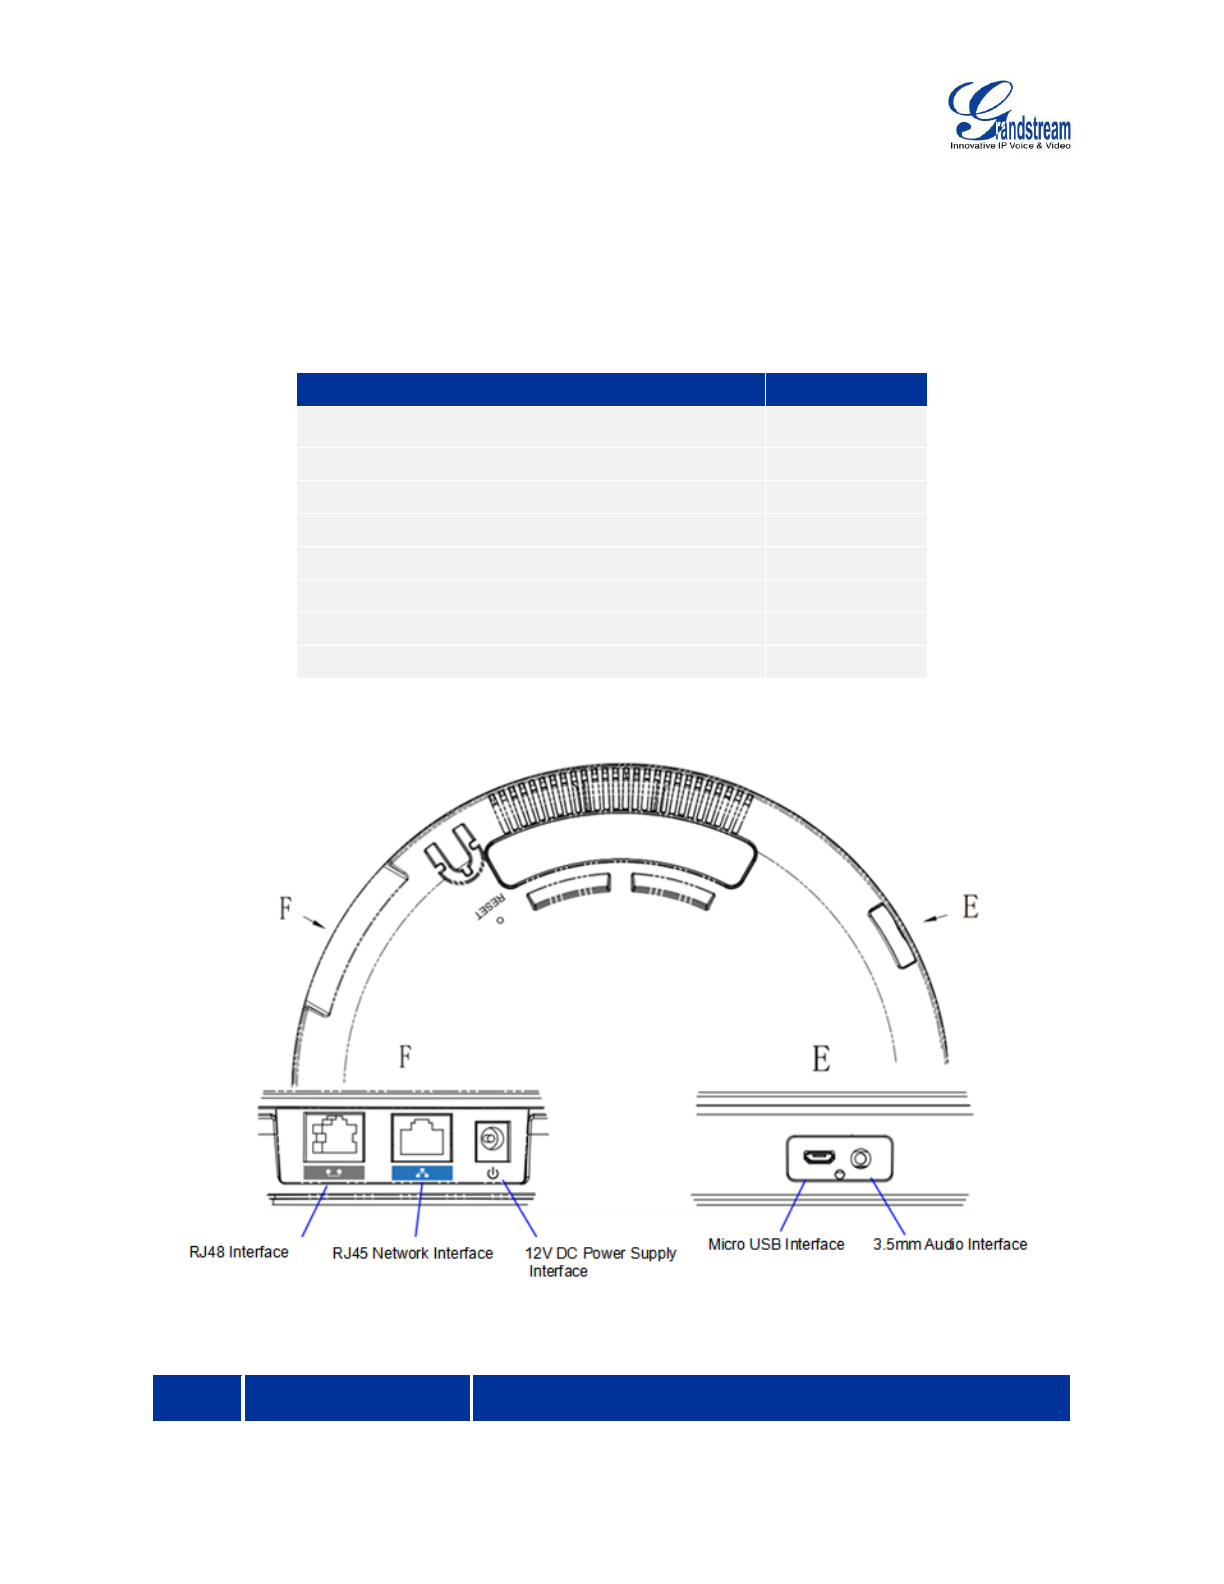
PRODUCT APPEARANCE
Figure 1 GAC2500 Host Interfaces
Table 3 GAC2500 Interfaces Explanations
NO.
Name
Explanation

Firmware Version 1.0.1.x
GVC2500 User Guide
Page 14 of 88
①
RJ48 Interface
Daisy chain (up to 2 units via RJ48 CAT5) mode in large
conference room for better audio quality
②
RJ45 Network
Interface
Connect to LAN port
③
12V DC Power
Supply Interface
Connect to Power Adaptor
④
Micro USB Interface
USB storage devices can be connected to the USB
Interface via USB cable. For example, connect a USB flash
drive to read data.
⑤
3.5mm Audio
Interface
Connect to 3.5mm devices like mobile phone or PC for mobile
audio pickup and play
⑥
Reset Pin
When the GAC2500 is powered up, use a small pin to press
the button one time to reboot.
When powering up GAC2500, long press the button for 4 to
9 seconds to update system.
When powering up GAC2500, long press the button for
more than 10 seconds to restore to factory settings.
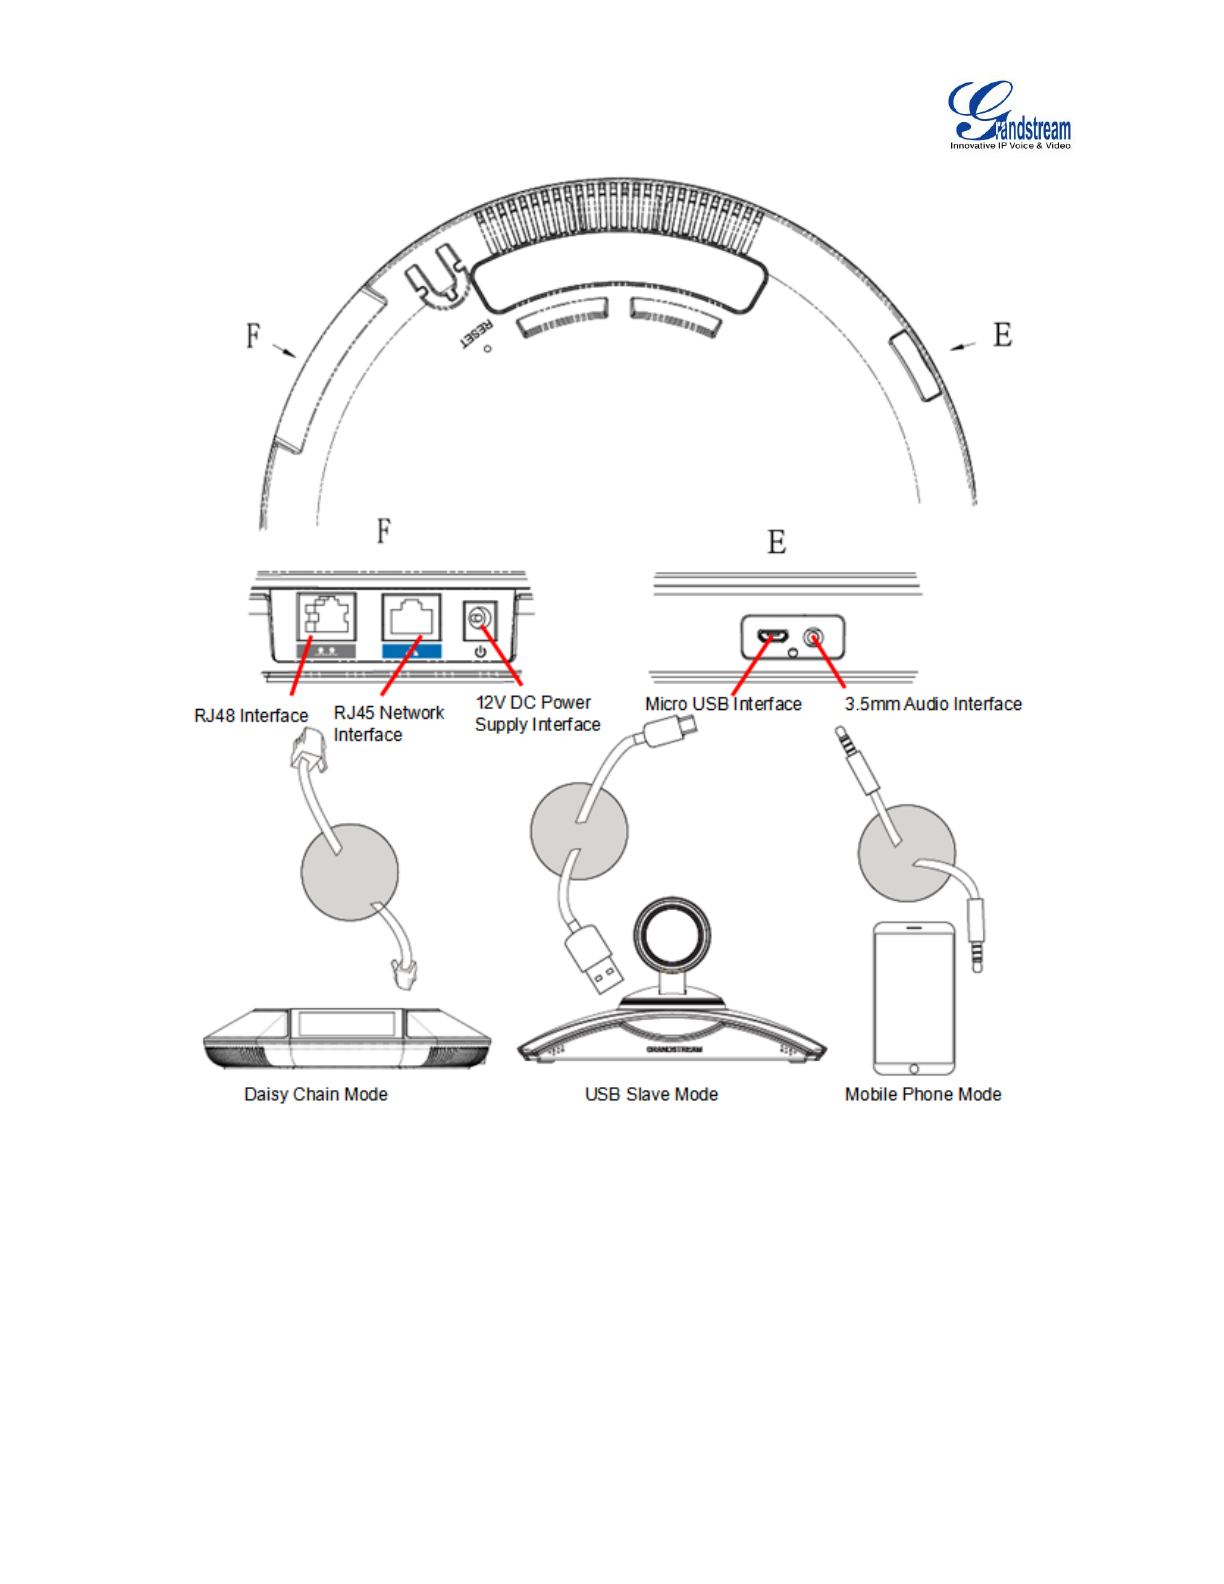
CONNECTING GAC2500
To deploy a working conferencing system, users could select standalone IP mode, USB slave mode,
daisy chain mode or mobile phone mode. Please connect the GAC2500 for each mode according to
different procedures.
Firmware Version 1.0.1.x
GVC2500 User Guide
Page 15 of 88
Figure 2 GAC2500 Connection Mode
IP MODE
The GAC2500 is used as an independent phone in IP mode.
1. Connect one end of the Ethernet cable to the LAN port of the device and the other end to the
external network port (the port in the office or at home);
2. Plug in the power adapter into the power supply interface. Power up the GAC2500.
---------------------------------------------------------------------------------------------------------------------
Firmware Version 1.0.1.x
GVC2500 User Guide
Page 16 of 88
Note:
It is recommended to use IP mode in room 7m*10m or smaller.
---------------------------------------------------------------------------------------------------------------------
USB SLAVE MODE
GAC2500 can be used as auxiliary device for GVC3200 or PC for audio pickup and play. The conference
feature will be disabled in USB slave mode. Follow the procedures below to connect GAC2500.
1. Connect one end of the USB cable to the Micro USB port of the device and the other end to the USB
port of GVC3200/PC;
2. Plug in the power adapter into the power supply interface. Power up the GAC2500.
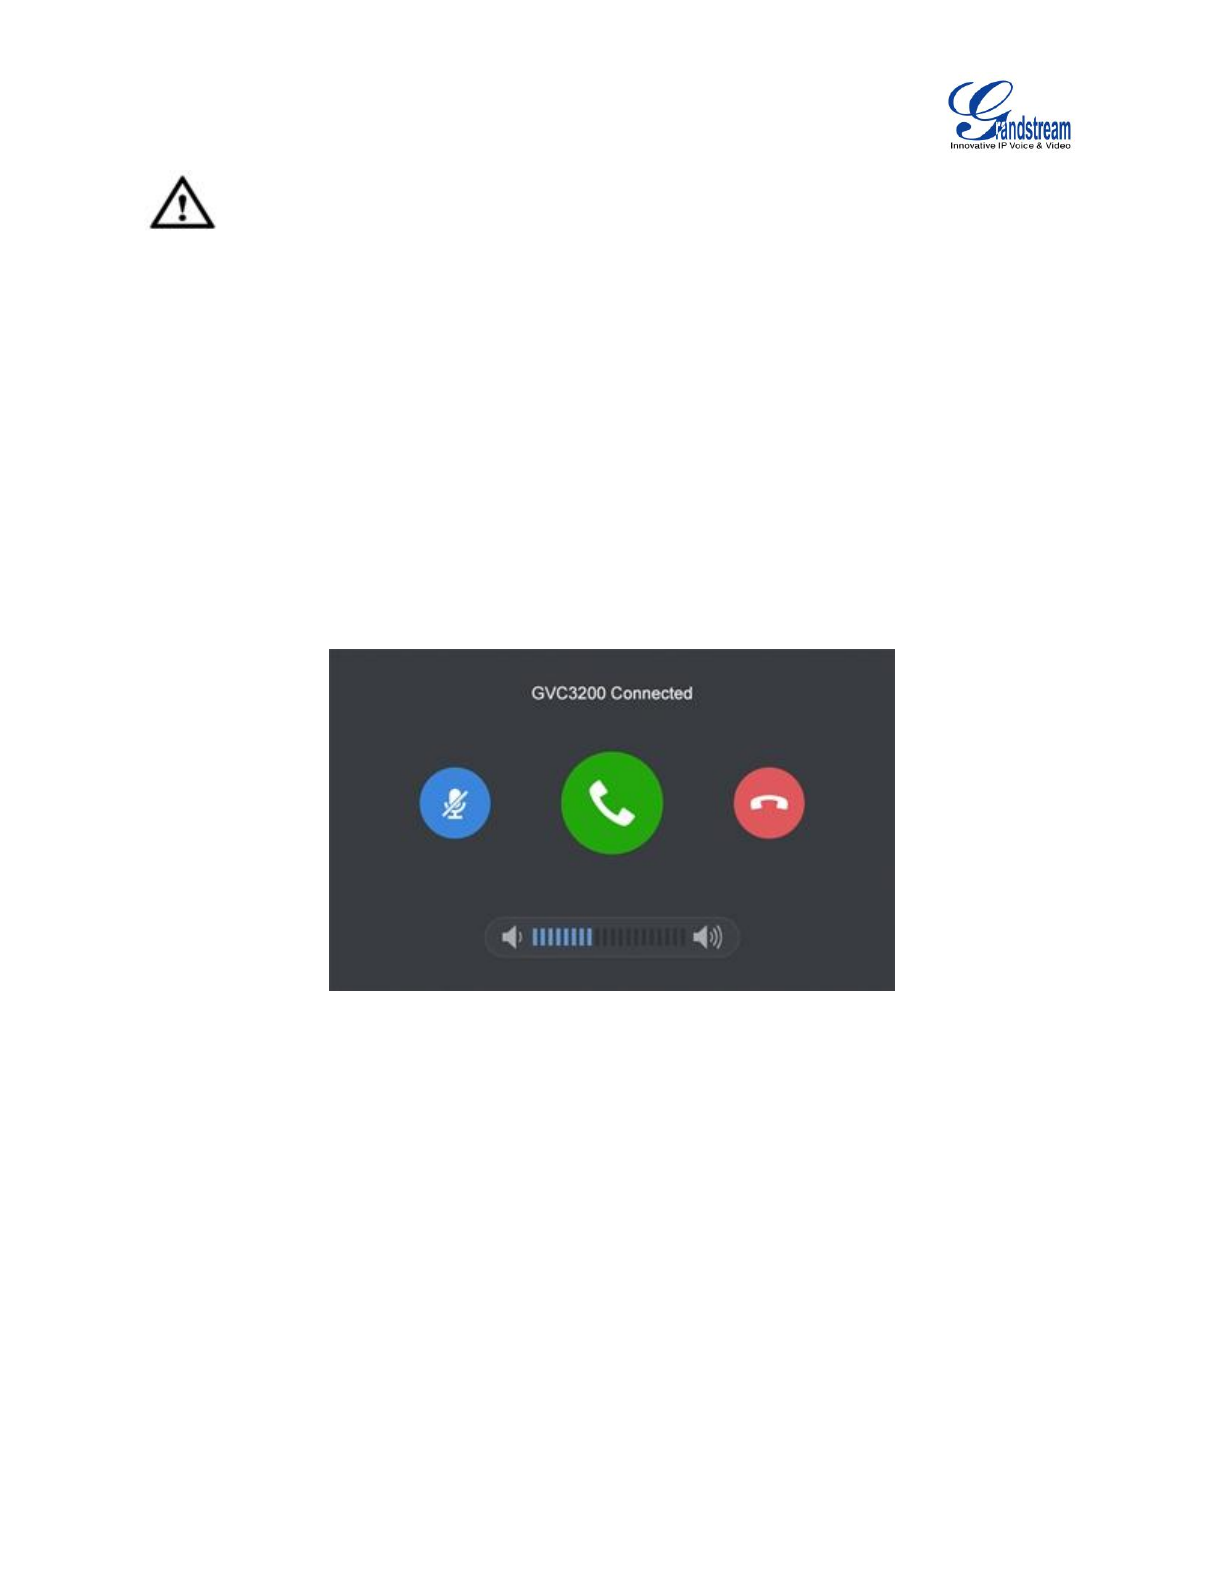
The GAC2500 screen is as shown below in USB slave mode, you can tap on the volume icon on screen
to adjust the volume of GVC320/PC. When connecting to GVC3200, tap on "Mute", "Answer" or "Hangup"
icons for more operations.
Figure 3 GAC2500 Slave Mode Screen
DAISY CHAIN MODE
Connect two GAC2500 via RJ48 CAT5 for larger space.
1. Connect one end of the Ethernet cable to the LAN port of the first device and the other end to the
external network port (the port in the office or at home);
2. Connect one end of the RJ48 CAT5 to the RJ48 port of the first device and the other end to the RJ48
port of the second device;
3. Plug in two power adapters into the power supply interfaces. Power up two devices.
4. The screen is as shown below. Tap on "Yes" on the first device and set it to be the master while the
other the slave.
Figure 4 GAC2500 Daisy Chain Mode Screen
--------------------------------------------------------------------------------------------------------------------------------------------
GVC3200 ;

Firmware Version 1.0.1.x
GVC2500 User Guide
Page 17 of 88
Note:
1. It is recommended to use daisy chain mode in room 7m*10m or smaller.
2. Please keep a distance of 5m among two devices.
3. Please make sure the network is connected for the master device or it may unable to work properly.
4. The slave device will synchronize with the master device, while their call screen will be shown
synchronously.
---------------------------------------------------------------------------------------------------------------------
MOBILE PHONE MODE
GAC2500 could be connected to mobile phone for expanded use. Follow the procedures to connect.
1. Connect one end of the Ethernet cable to the LAN port of the first device and the other end to the
external network port (the port in the office or at home);
2. Plug in the power adapter into the power supply interface. Power up the GAC2500.
3. Connect 3.5mm headset interface on the mobile phone to 3.5mm audio interface on GAC2500 via
3.5mm audio aux cable.
4. Hold the screen at the top of the status bar, drag and drop down to open the status bar, tap on line
sequence notifications and select the line sequence the same as the one of 3.5mm headset interface
on the mobile phone.
Figure 5 GAC2500 Select line Screen
5. Answer incoming call or dial out with mobile phone, the sound will be picked up and played via
GAC2500.
---------------------------------------------------------------------------------------------------------------------
Note:
1. The GAC2500 package contains no 3.5mm audio aux cable, you can get it at electronic gadgets
store.
2. The line sequence of GAC2500 must be the same as the one of your mobile phone, or the
microphone may work improperly.
3. You cannot dial mobile phone number via GAC2500 keypad directly.
4. Once enabled mobile phone mode, please hold the 3.5mm headset line before make the second call.
5. Once a conference is established, the 3.5mm aux device will occupy a party as one party of the
conference.
6. Please do not unplug the 3.5mm audio aux cable or it may cause call exception.
7. The audio quality may varies according to different types of 3.5mm audio aux cable and mobile

Firmware Version 1.0.1.x
GVC2500 User Guide
Page 18 of 88
phones.
8. Once the 3.5mm audio aux cable is inserted, some types of mobile phones may be detected by
GAC2500 after the call is established.
---------------------------------------------------------------------------------------------------------------------
Firmware Version 1.0.1.x
GVC2500 User Guide
Page 19 of 88
GETTING TO KNOW GAC2500
DESKTOP MENU
When the GAC2500 is on idle screen, tap on the 5 soft keys at the bottom of the screen to operate.
Figure 6 GAC2500 Multi-screens
Home Screen. GAC2500 Home screen displays 5 soft keys at the bottom of the screen for users to
easily make operations. It is by default and cannot be changed. You can dial up or start a conference
on this screen.
Widget. GAC2500 supports tools and apps like weather forecast, Clock, MPK, and etc.
Status Bar. The GAC2500 status bar is located on the top of the screen to indicate the current status
of the device. Please refer to chapter Status Icons for more details.
Soft Key. Including Volume+, Volume-, Back, Home, and Process Manager. These 5 soft keys always
display at the bottom of the screen.
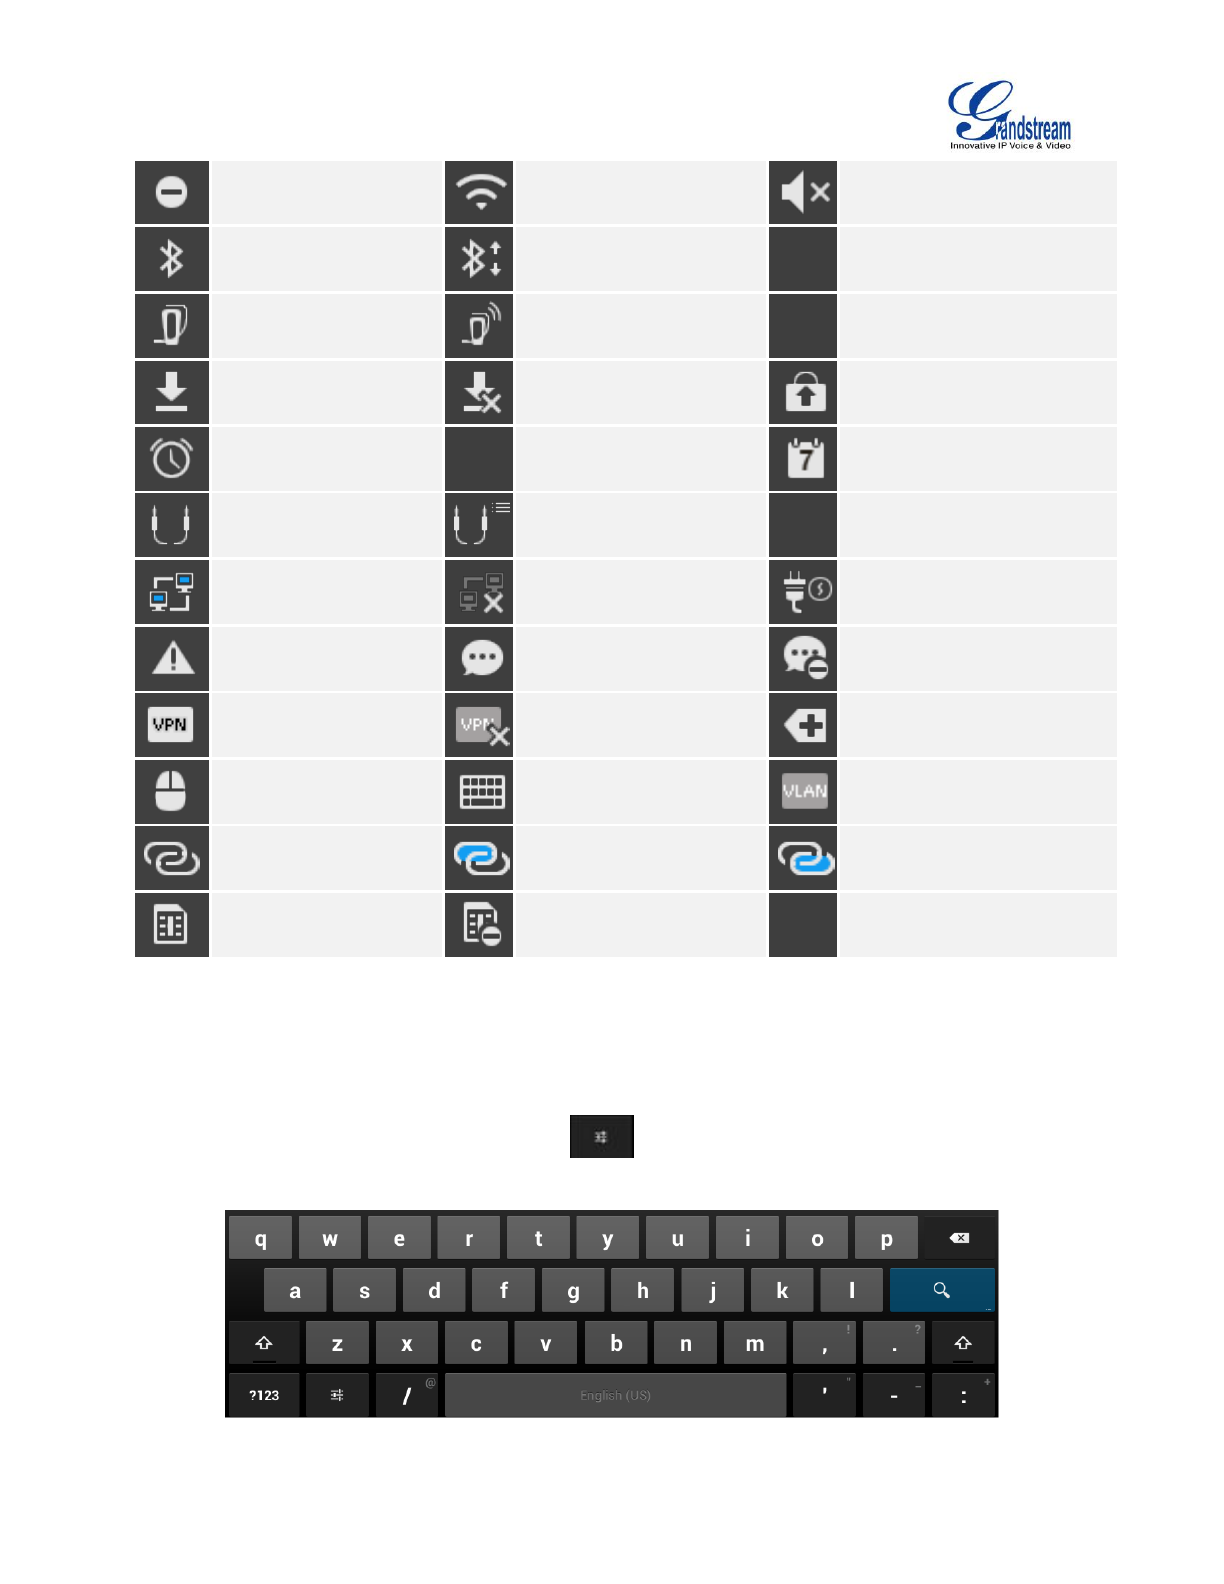
STATUS ICONS
Touch the status bar of GAC2500 and slowly drag it down to display the full status list. Users could view
status icons that indicate the current status of the device.
The following table lists the main status icons used on GAC2500.
Table 4 GAC2500 Status Icons Descriptions
Icon
Descriptions
Icon
Descriptions
Icon
Descriptions
Ethernet is connected
Trying to connect to the
Ethernet
Ethernet is disconnected
Missed call
One line is in active.
Unread voicemail.
Calls from blacklist.
Call forward is set up
Auto answer is set up
Firmware Version 1.0.1.x
GVC2500 User Guide
Page 20 of 88
DND mode is enabled
Wi-Fi is connected.
Volume is turned to silent
Bluetooth is connected
Sending files via
Bluetooth
Downloading files via
Bluetooth (Dynamic)
Bluetooth has been
plugged in.
Using Bluetooth headset
for calls.
Mute is enabled.
Downloading
Download failed
Updating Application.
The alarm is enabled
Alarm with snooze
Calendar event
3.5mm headset is
inserted.
Switch 3.5mm headset
lines
Full contacts storage.
PPPoE is connected
PPPoE connection is
failed
Powering the device with
PoE.
Warnings
New SMS
Full messages storage
VPN is connected
VPN connection is failed
More notifications
The USB mouse is
connected
The USB keyboard is
connected
VPN is connected
RJ48 CAT5 is
connected
Set GAC2500 as master
device
Set GAC2500 as slave
device
SD Card is inserted
SD Card space or USB
drive is full.
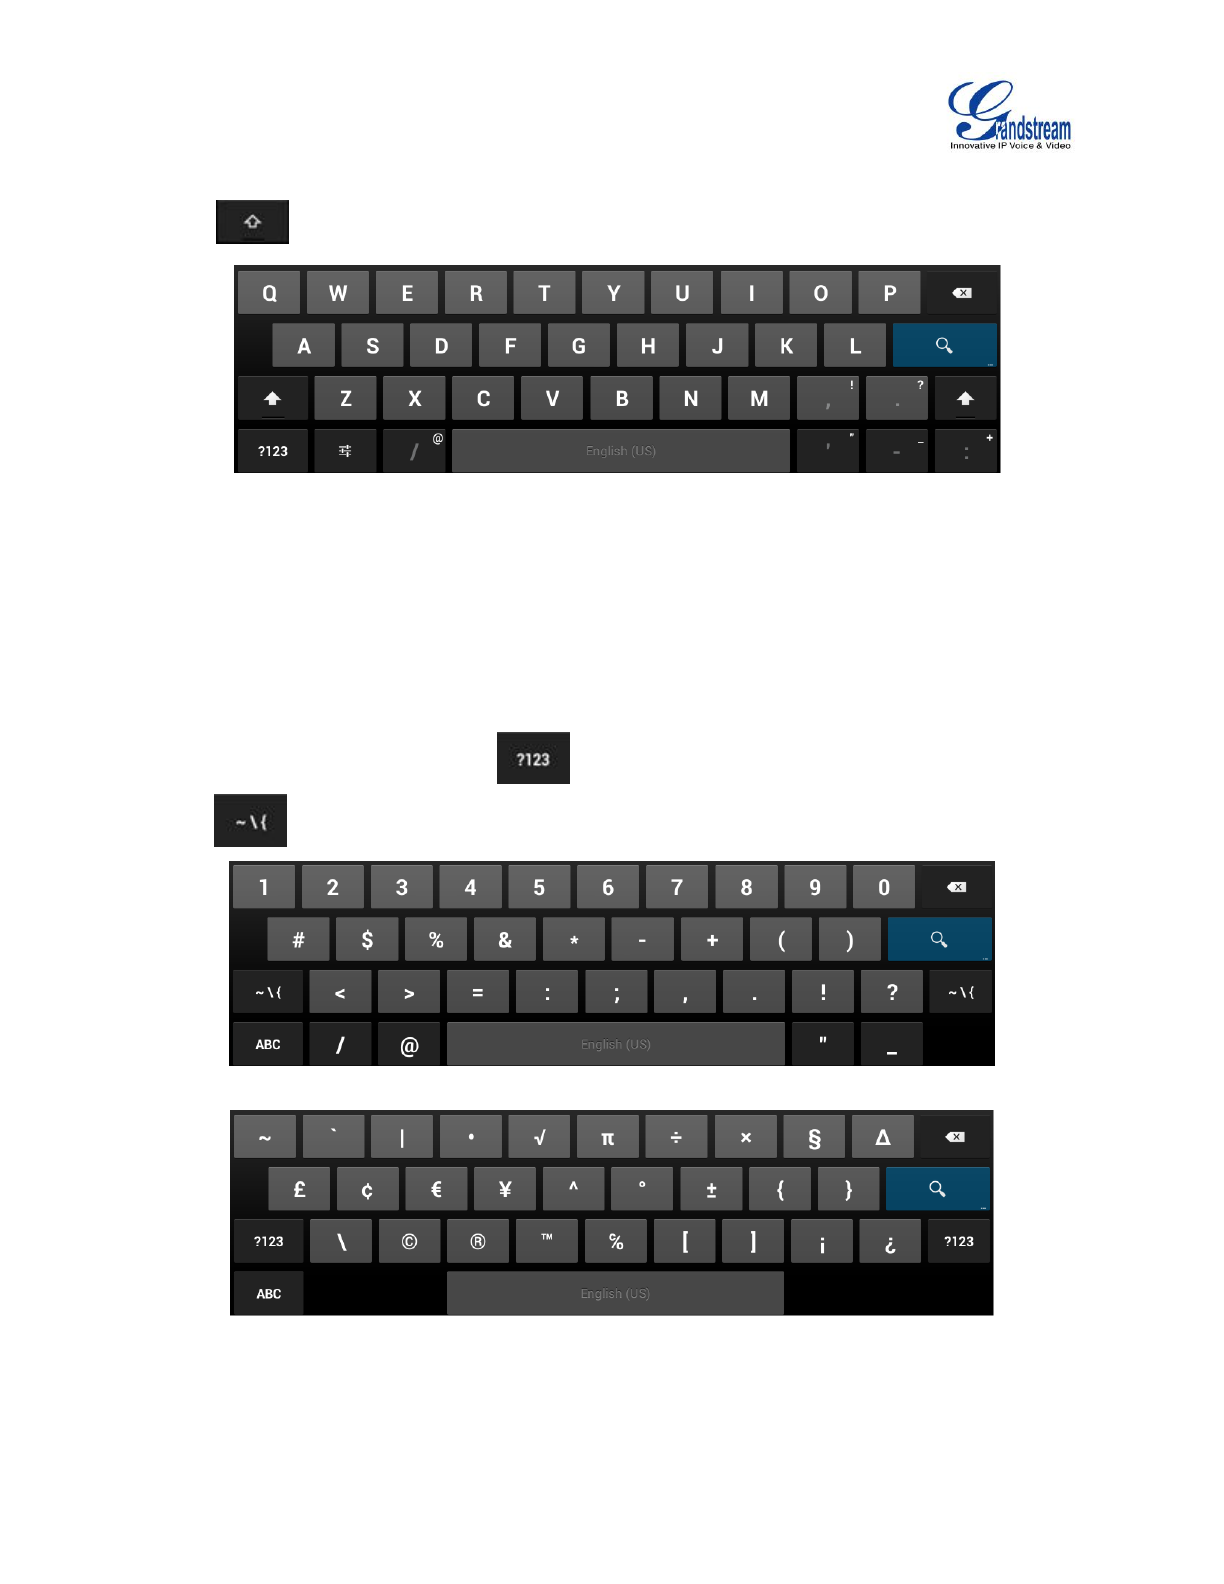
USING THE ONSCREEN KEYBOARD
ENGLISH KEYBOARD
This is the default keyboard on the GAC2500. The GAC2500 English keyboard supports multiple
languages input methods. Users could tap on to switch among different languages. See figure
below.
Firmware Version 1.0.1.x
GVC2500 User Guide
Page 21 of 88
Figure 7 GAC2500 Soft Keyboard - English Input Method
Tap on to switch CapsLock.
Figure 8 GAC2500 English Keyboard-Uppercase
CHINESE KEYBOARD
GAC2500 supports Google Pinyin Input, go to Settings->Language & Keyboard to configure.
Figure 9 GAC2500 Chinese Keyboard-Google Pinyin Method
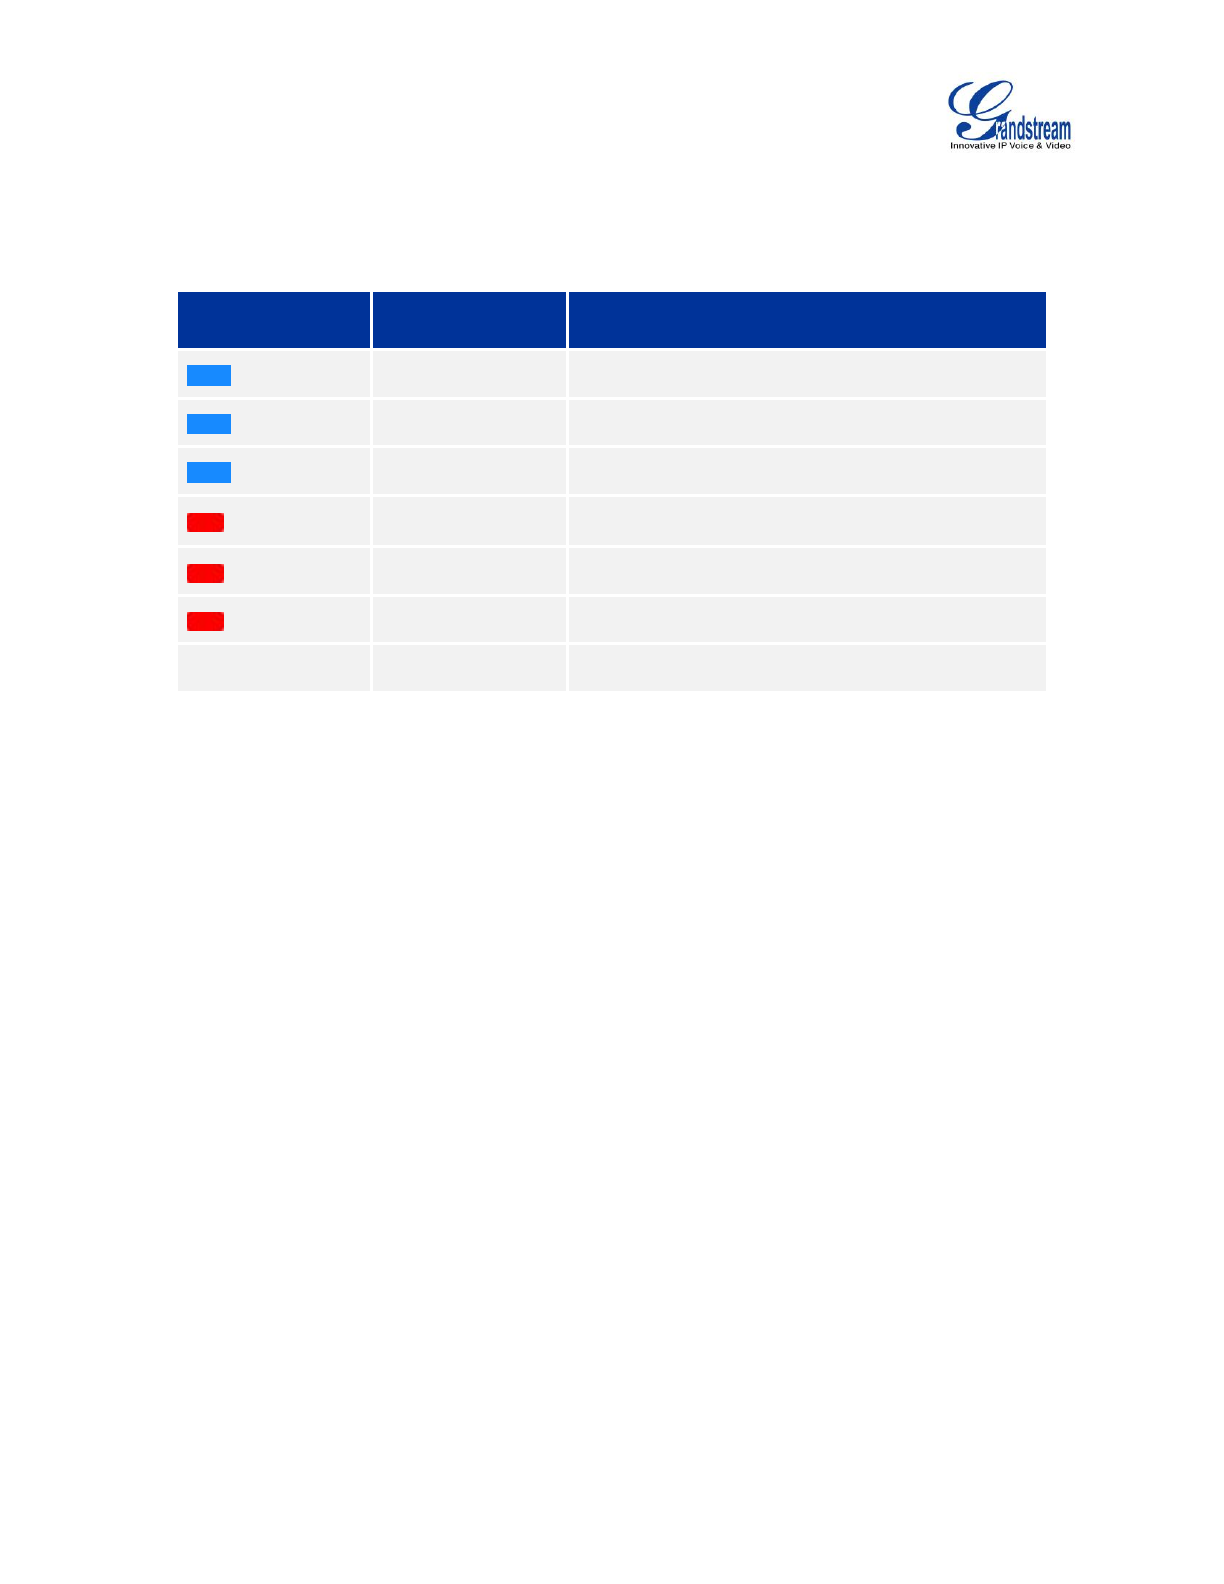
NUMBERS AND SYMBOLS
To input number and symbols, tap on on the default keyboard to switch to numbers/symbols.
Tap on for more numbers/symbols.
Figure 10 GAC2500 Soft Keyboard-Symbols and Numbers
Figure 11 GAC2500 Soft Keyboard-More Symbols and Numbers
Firmware Version 1.0.1.x
GVC2500 User Guide
Page 22 of 88
USING THE LED INDICATOR
The GGAC2500 LED indicator is located on the top part of the device. It can be used to notify the users
with current status of the device. The priority of the indicator from high to low is shown below.
Table 5 GAC2500 LED Indicator Descriptions
Color
LED Indicator
Status
Descriptions
Fast Flashing
Incoming call (including calls when conferencing
and when phone is busy)
Solid
Calling, Talking, Conferencing, Screensaver status
Slow Flashing
Call on hold
Flashing
Unhandled events. Including missed call (s), New
voicemail (s), New SIP Message (s).
Solid
High memory usage, maximum message number,
full contacts storage, network disconnection
Fast Flashing
Upgrading
None
OFF
Normal
Firmware Version 1.0.1.x
GVC2500 User Guide
Page 23 of 88
ASSISTIVE TOUCH
GAC2500 screen supports multi-touch in full screen, users could operate the GAC2500 with touch or drag
gestures.
USING TOUCHSCREEN
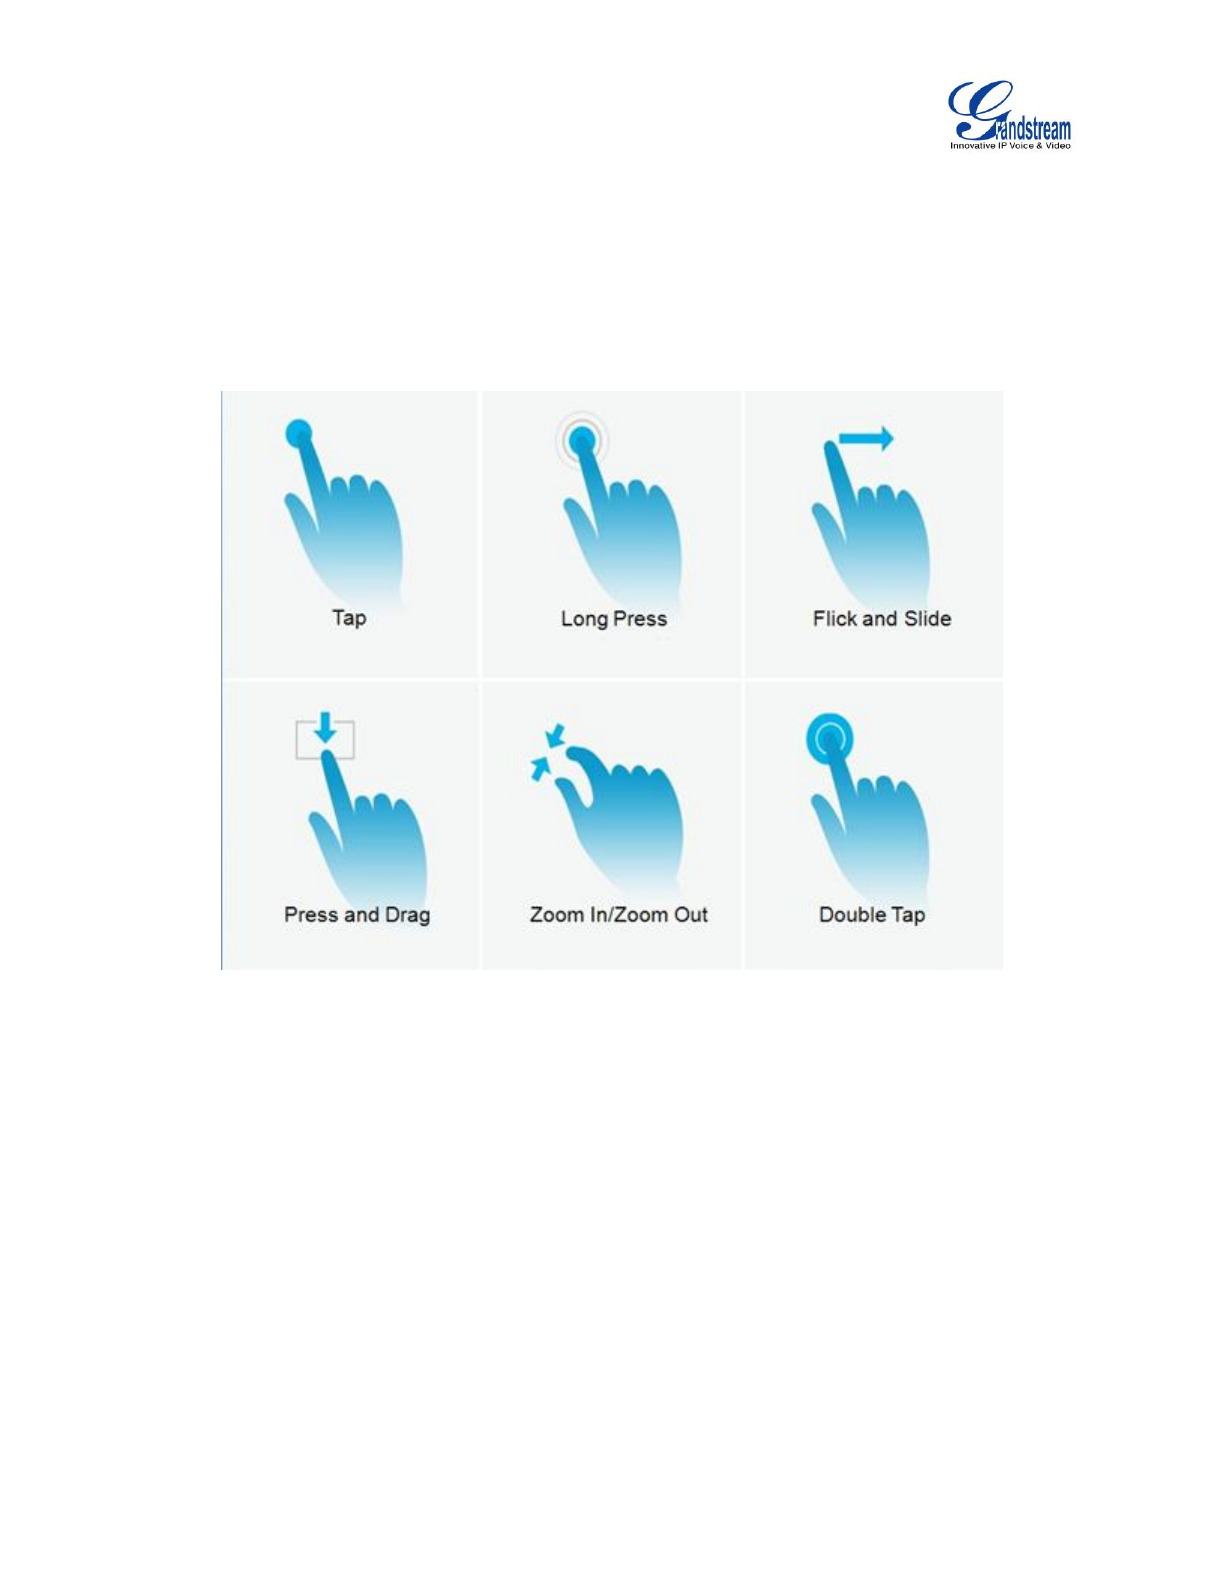
Figure 12 GAC2500 Finger Gestures
Use your fingers to operate the following gestures on the GAC2500 as shown in figure above:
Tap: Briefly touch surface with fingertip once to initiate the menu, options or applications.
Long Press:Touch the app for extended period of time for 2 seconds bring up operation options.
Flick and Slide:Touch surface with one finger and slide over surface down to open the pull-down
menu, slide over surface left,right or up to page up or make some operations.
Press and Drag: Press the item and move it by dragging the finger up and down, left and right.
Zoom In/Zoom Out: Touch surface with two fingers and bring them closer together to zoom out, Touch
surface with two fingers and move them apart to zoom in.
Double Tap:Rapidly touch surface twice with the fingertip to rearrange the zoomed page to fit the
screen when viewing photos or WebPages.
SHORTCUT KEYS
GAC2500 supports shortcuts for some special operation like Screenshots, Factory Reset, Upgrade and
Security.
Firmware Version 1.0.1.x
GVC2500 User Guide
Page 24 of 88
Screenshot: Long press the Applications icon on GAC2500 screen, the screenshot file will be
saved automatically in the screenshot folder under sdcard. Go to FileManager->Storage->Pictures-
>Screenshots to view files.
Factory Reset: When powering up GAC2500, long press the reset button more than 10 seconds to
restore to factory settings.
Upgrade: When powering up GAC2500, long press the button for 4 to 9 seconds to update system.
Security Mode: When the device displays the second GRANDSTREAM pattern after powered, long
press the menu button until the desktop appears to access the security mode.
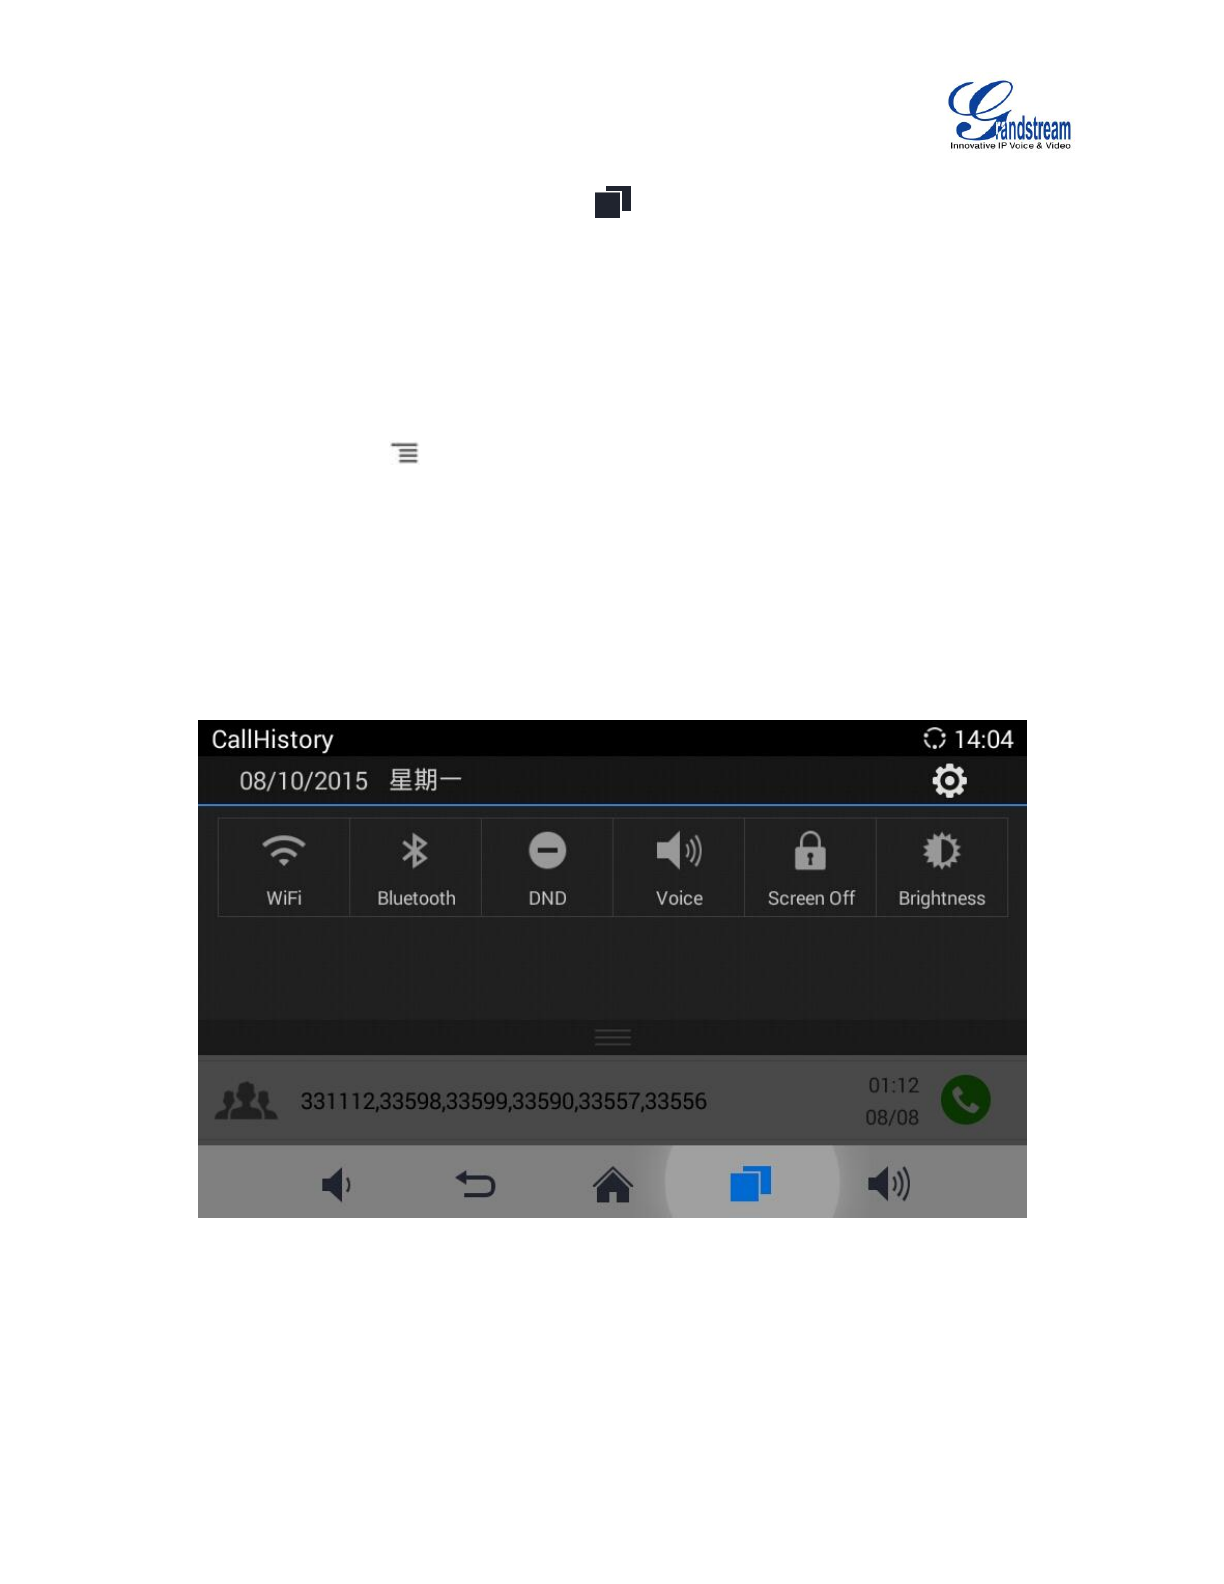
MANAGING STATUS BAR
The GAC2500 status bar is located on the top of the screen. Touch the bar and slowly drag it down to
display the full status list. Once the status bar is opened, users could view Notifications.
Figure 13 GAC2500 Open Status Bar
The Notifications in the Status Bar is as shown in figure below.
Figure 14 GAC2500 Status Bar-Notification
Click on the "Clear All" button on the upper right corner to clear all the notification messages.
Slide a notification message to left or right to delete it.
Click a notification message to view the details.
Tap on the corresponding icon on the top of the screen to quick turn on/off the applications.
Firmware Version 1.0.1.x
GVC2500 User Guide
Page 25 of 88
Drag the seekbar behind the icon to adjust LCD brightness.
Tap on the corresponding icon on the top of the screen to quick access the applications.
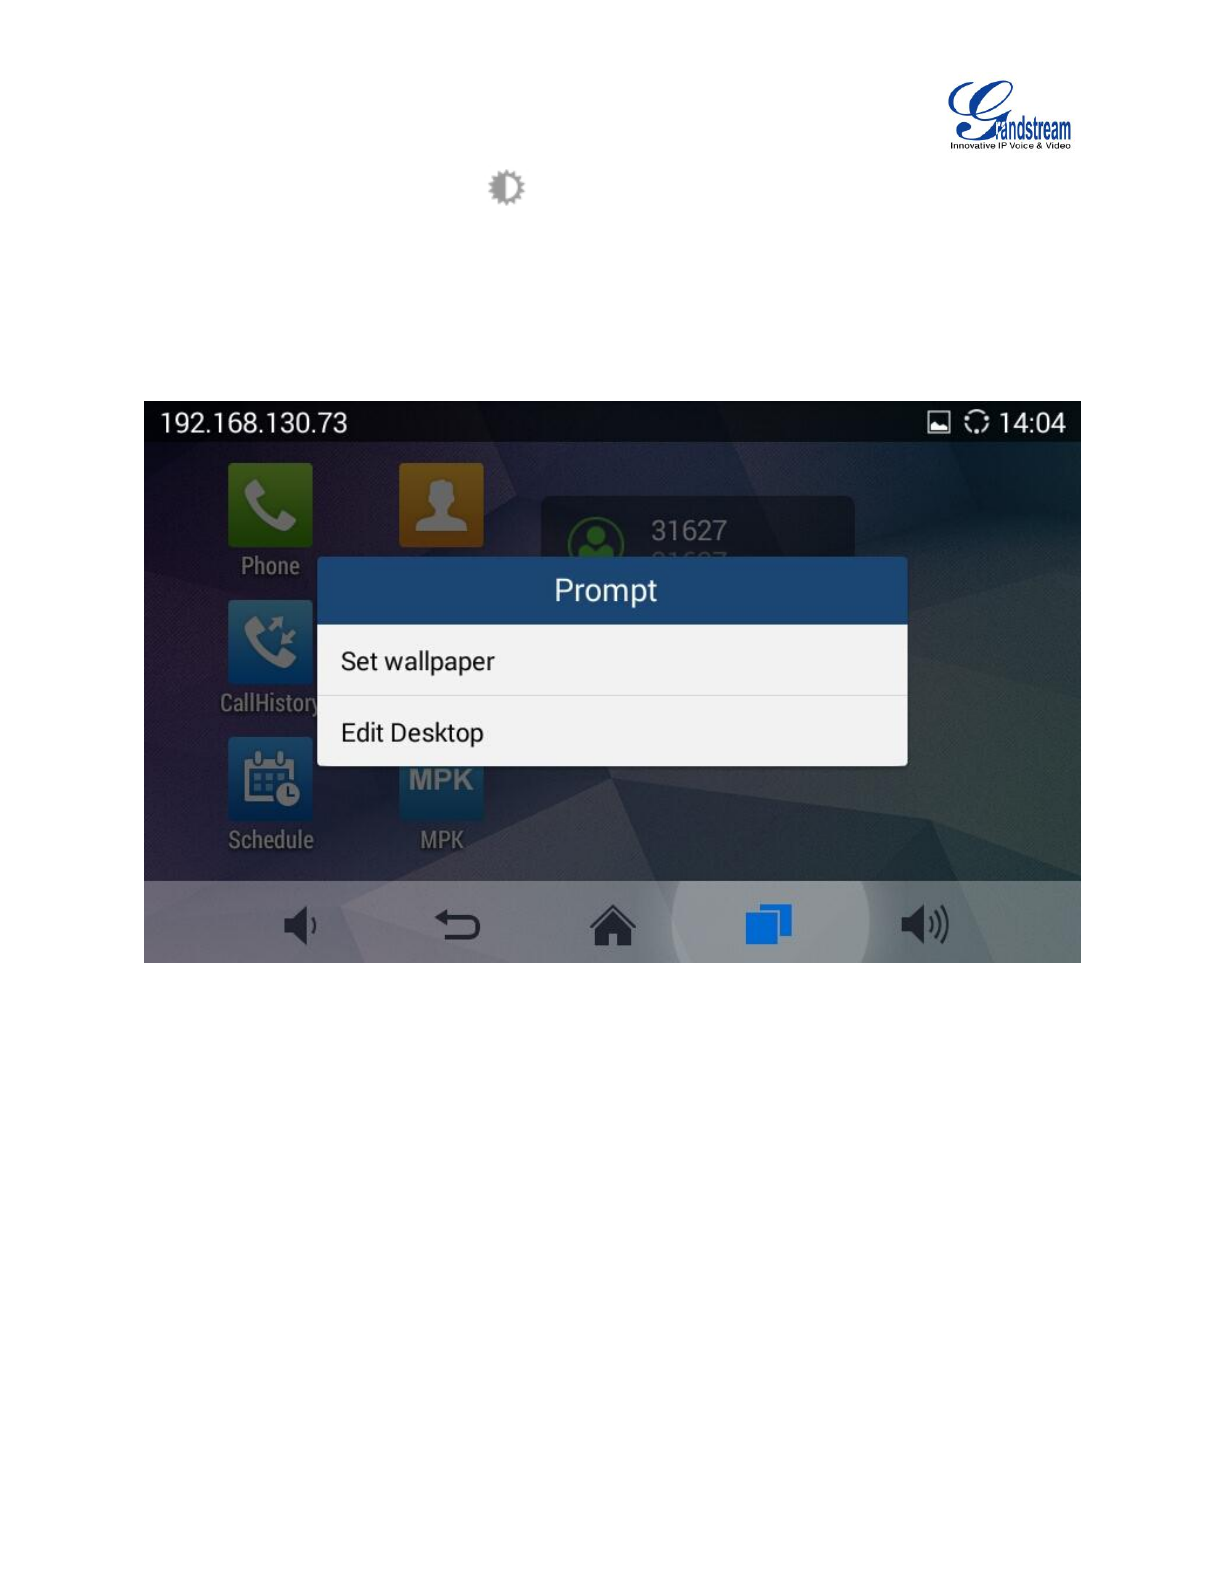
DESKTOP MENU
When the GAC2500 is running on idle screen, long press the blank area, then tap on "Edit Desktop" or
"Set Wallpaper".See figure below.
Figure 15 GAC2500 Idle Screen Menu
Edit Wallpaper: Edit the idle screen wallpaper.
Edit Desktop: Add, delete and edit desktop or add widgets on the desktop.
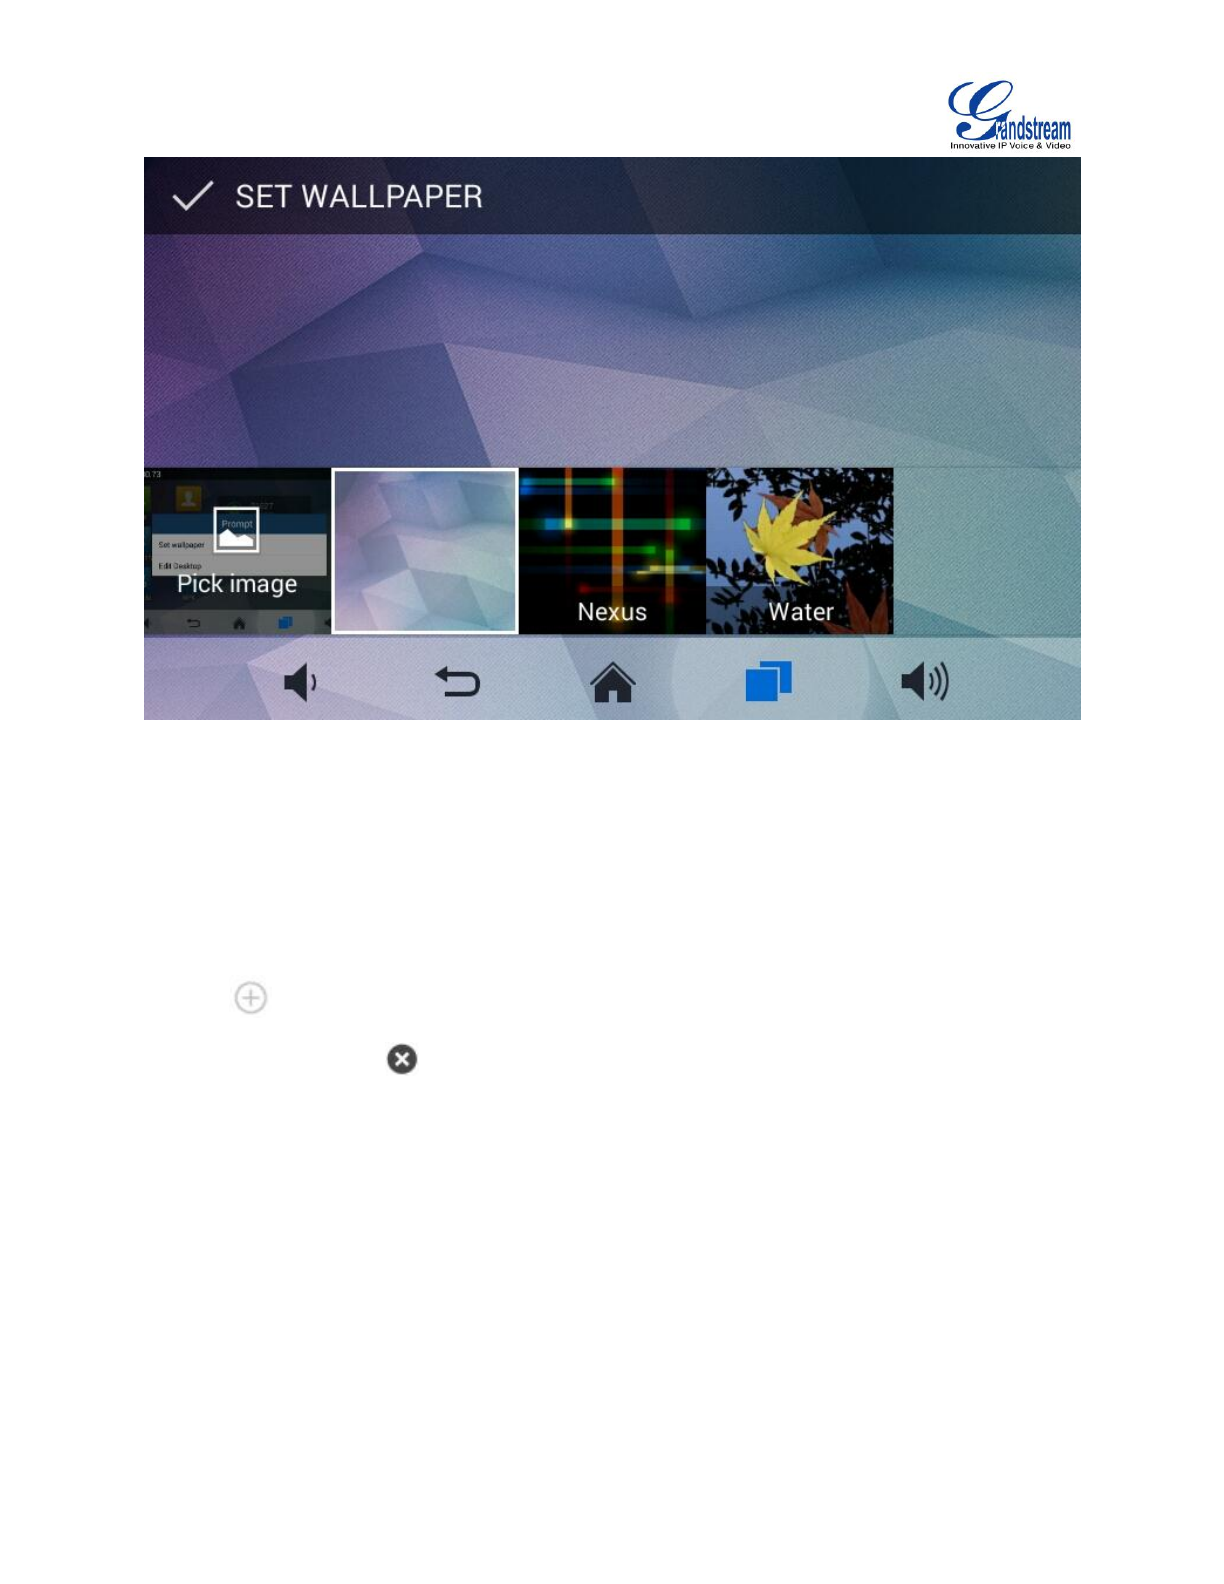
EDITING WALLPAPER
You can set wallpapers, live wallpapers or choose photo from gallery. See figure below.
Firmware Version 1.0.1.x
GVC2500 User Guide
Page 26 of 88
Figure 16 GAC2500 Choose Wallpaper
1. Long press the blank area on home screen then tap on "Set Wallpaper";
2. Slide wallpapers to left or right to view a list of sample wallpapers embedded in the GAC2500, tap on
wallpaper to preview,Tap on "Set Wallpaper" to confirm the selection. You can also select photo from
gallery or file manager, or set live wallpapers.
EDIT DESKTOP
Add Desktop: Press finger slightly in free space of the screen and fast slide to the last screen and
click on the middle screen to add a new desktop. Users could add up to 8 desktops.
Delete Desktop: Click on the upper right corner of the blank desktop to delete it. The desktop
with widgets and shortcuts on it is undeletable.
ADDING AN ITEM TO DESKTOP
Users could add commonly-used items (Weather Forecast, RSS News, etc.) to the desktop. Follow the
steps below:
1. When the GAC2500 is running on idle screen, long press the blank area, then tap on "Edit Desktop";
2. Slide left or right to view a list of options as shown in figure 18.
3. Tap and press the shortcut or widget you would like to add and drag it to the desktop you want to put
on.

Firmware Version 1.0.1.x
GVC2500 User Guide
Page 27 of 88
---------------------------------------------------------------------------------------------------------------------
Note:
1. Please ensure that there is enough space in the desktop when adding widget.
2. Users may need to select the specific items before add them to the desktop. i.e., browser, bookmark,
star-labeled contact, photos, etc.
---------------------------------------------------------------------------------------------------------------------
MANAGING DESKTOP APPS AND ITEMS
All the GAC2500 apps/items can be accessed /removed. Some apps support size editing. Take Weather
Forecast as an example in the following chapter.
OPENING AN APP
Tap on Weather Forecast icon to access screen as shown in figure 19.
Figure 17 GAC2500 Weather Forecast Screen
Users could edit Weather Forecast after accessing it.
MOVING AN APP
Touch and hold the Weather Forecast icon, when the icon begins to float, drag it to any desktop with free
space.
Firmware Version 1.0.1.x
GVC2500 User Guide
Page 28 of 88
Figure 18 GAC2500 Move Weather Forecast to Desktop
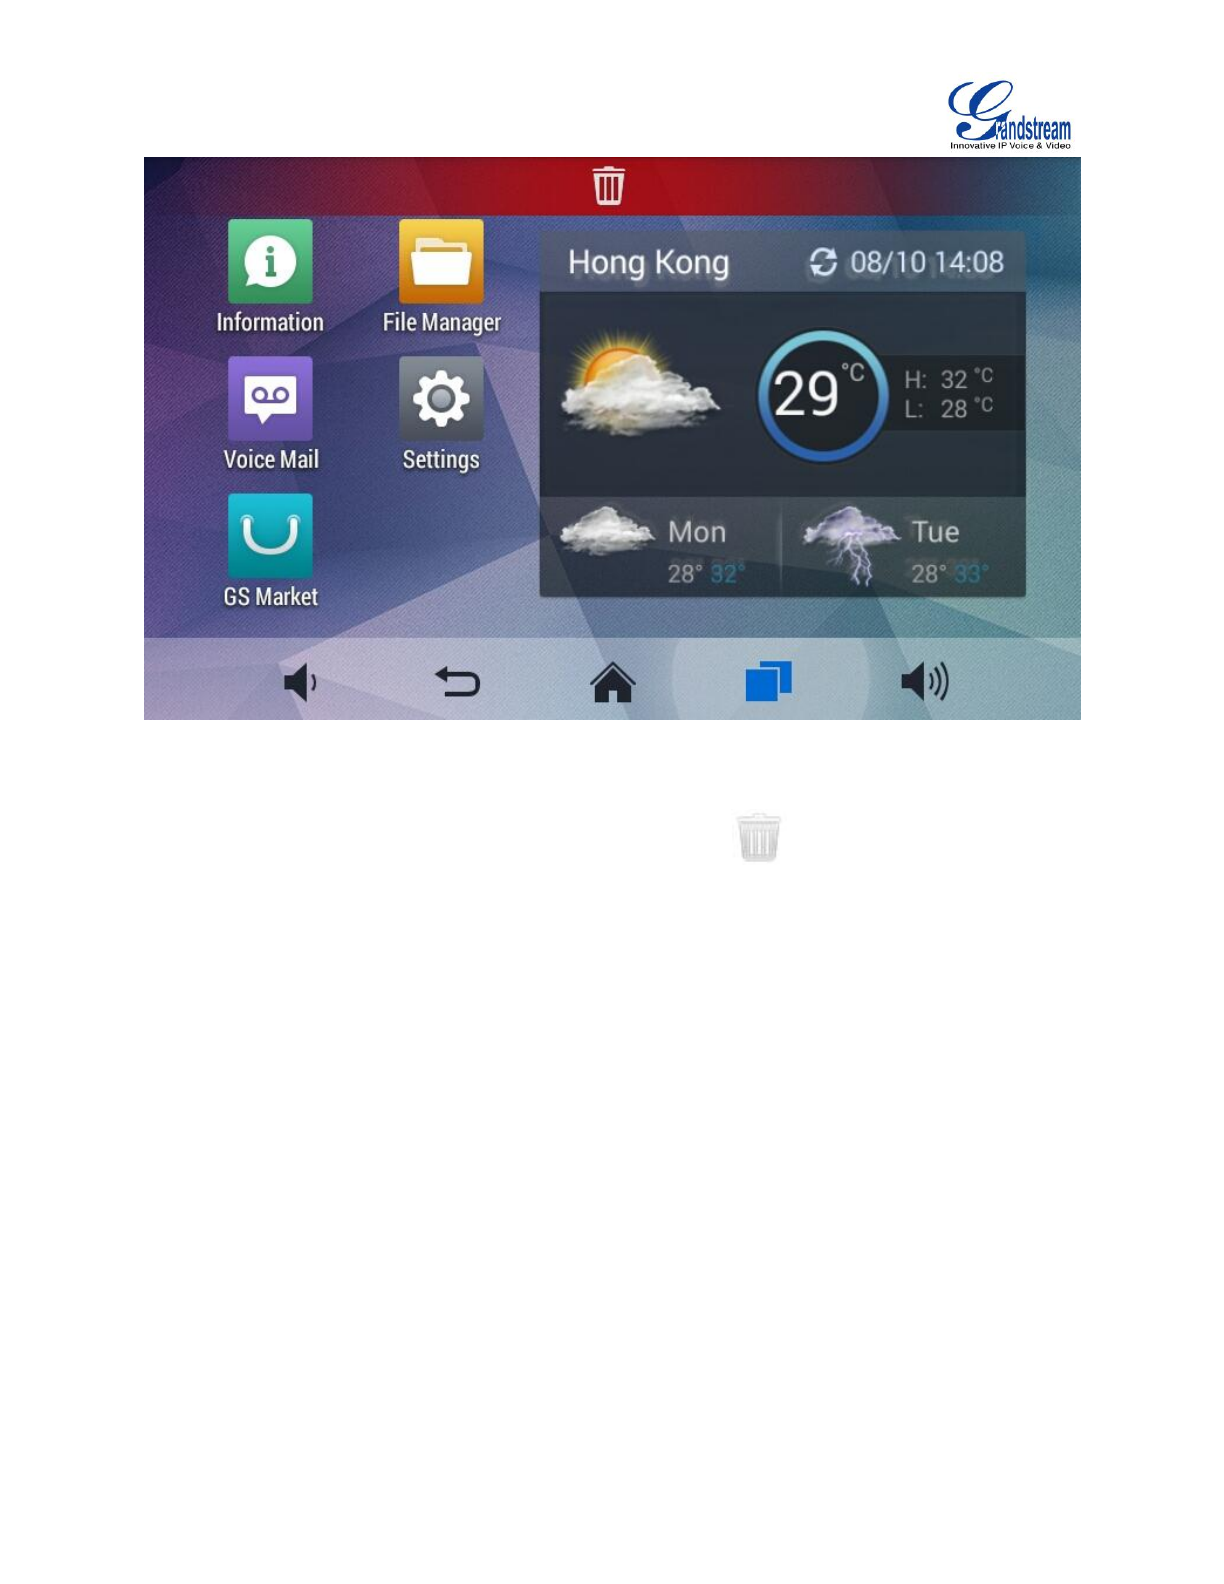
REMOVING AN APP
Touch and hold the Weather Forecast icon when the Recycle Bin icon displayed on the bottom as
shown in figure 21, drag the widget to the Recycle Bin, when the item gets close to the Recycle Bin, it will
turn red. Now lift your finger to release.
Firmware Version 1.0.1.x
GVC2500 User Guide
Page 29 of 88
Figure 19 GAC2500 Remove Weather Forecast from Desktop
---------------------------------------------------------------------------------------------------------------------
Note:
The Applications cannot be deleted.
---------------------------------------------------------------------------------------------------------------------
MANAFERING APPLICATIONS
Tap on the Applications icon on screen to view the running applications installed on the
GAC2500 as shown below.

Firmware Version 1.0.1.x
GVC2500 User Guide
Page 30 of 88
Figure 20 GAC2500 Managing Applications
Slide up/down to view the applications, select one application and slide left/right to turn it off , or tap on it
to access the corresponding interface.
Tap on to remove all running applications.
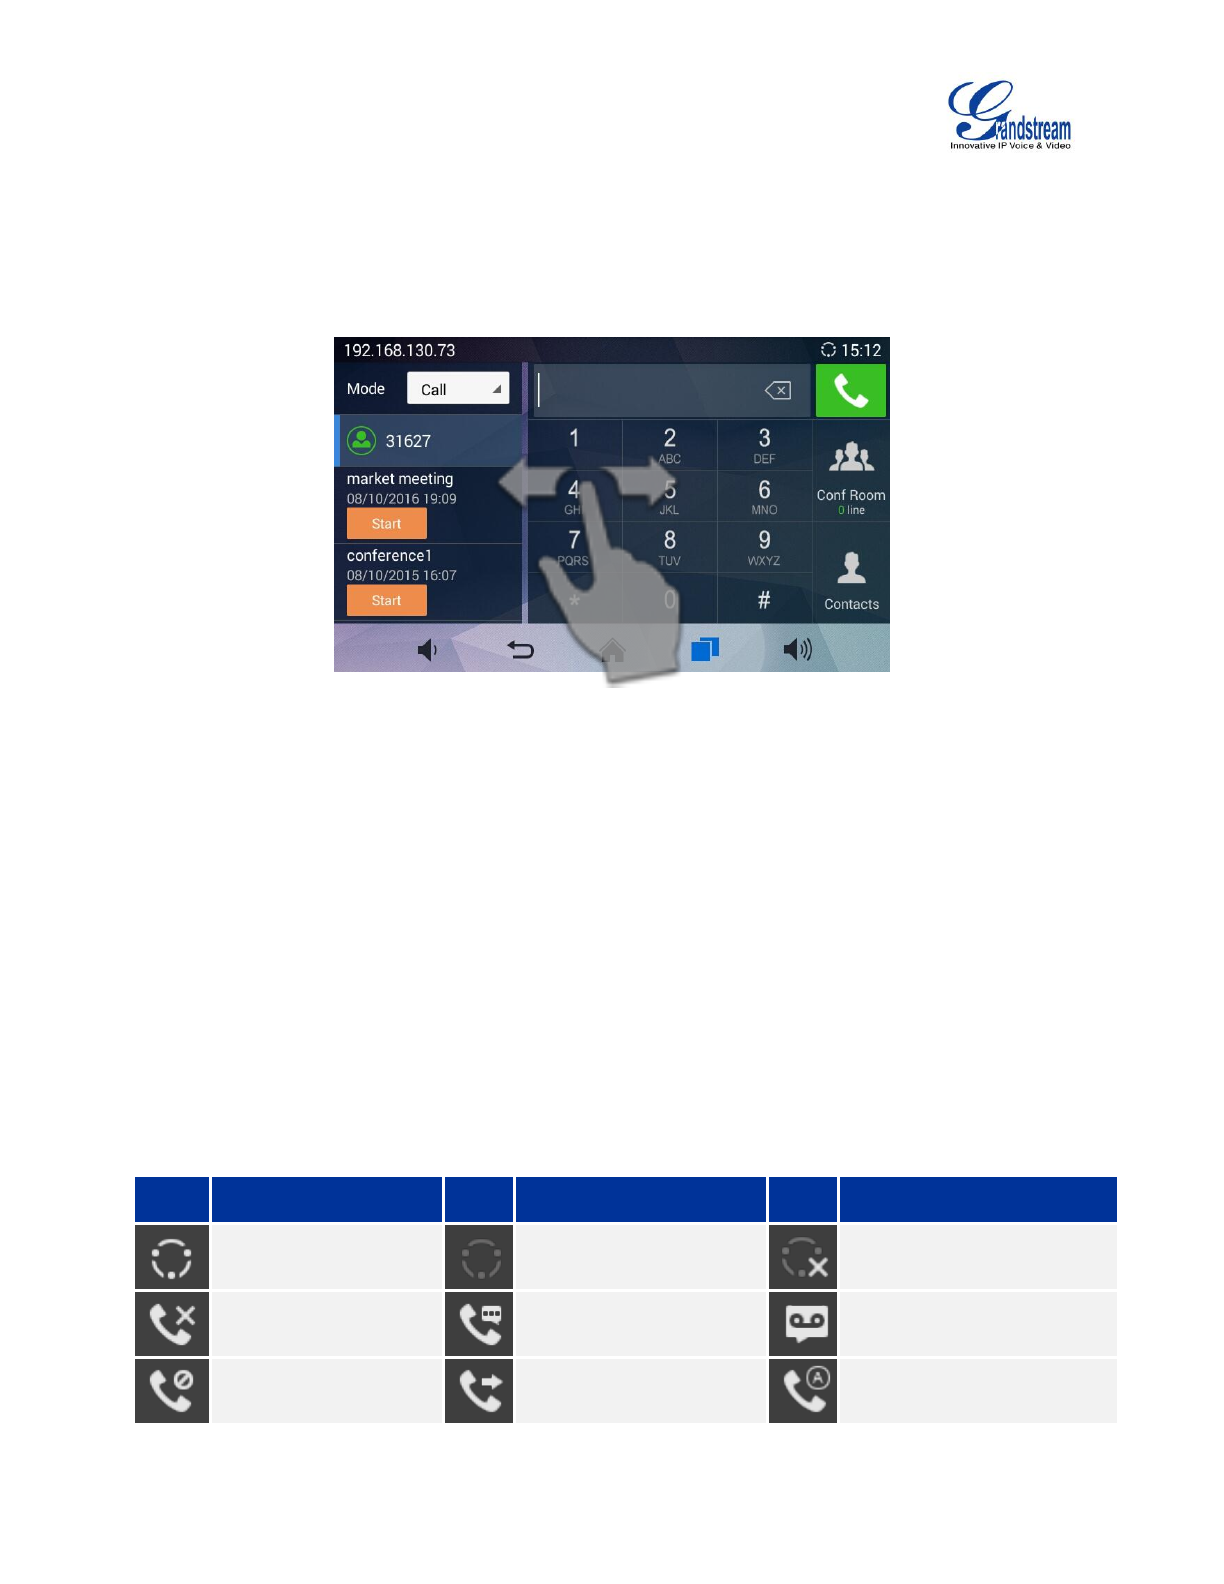
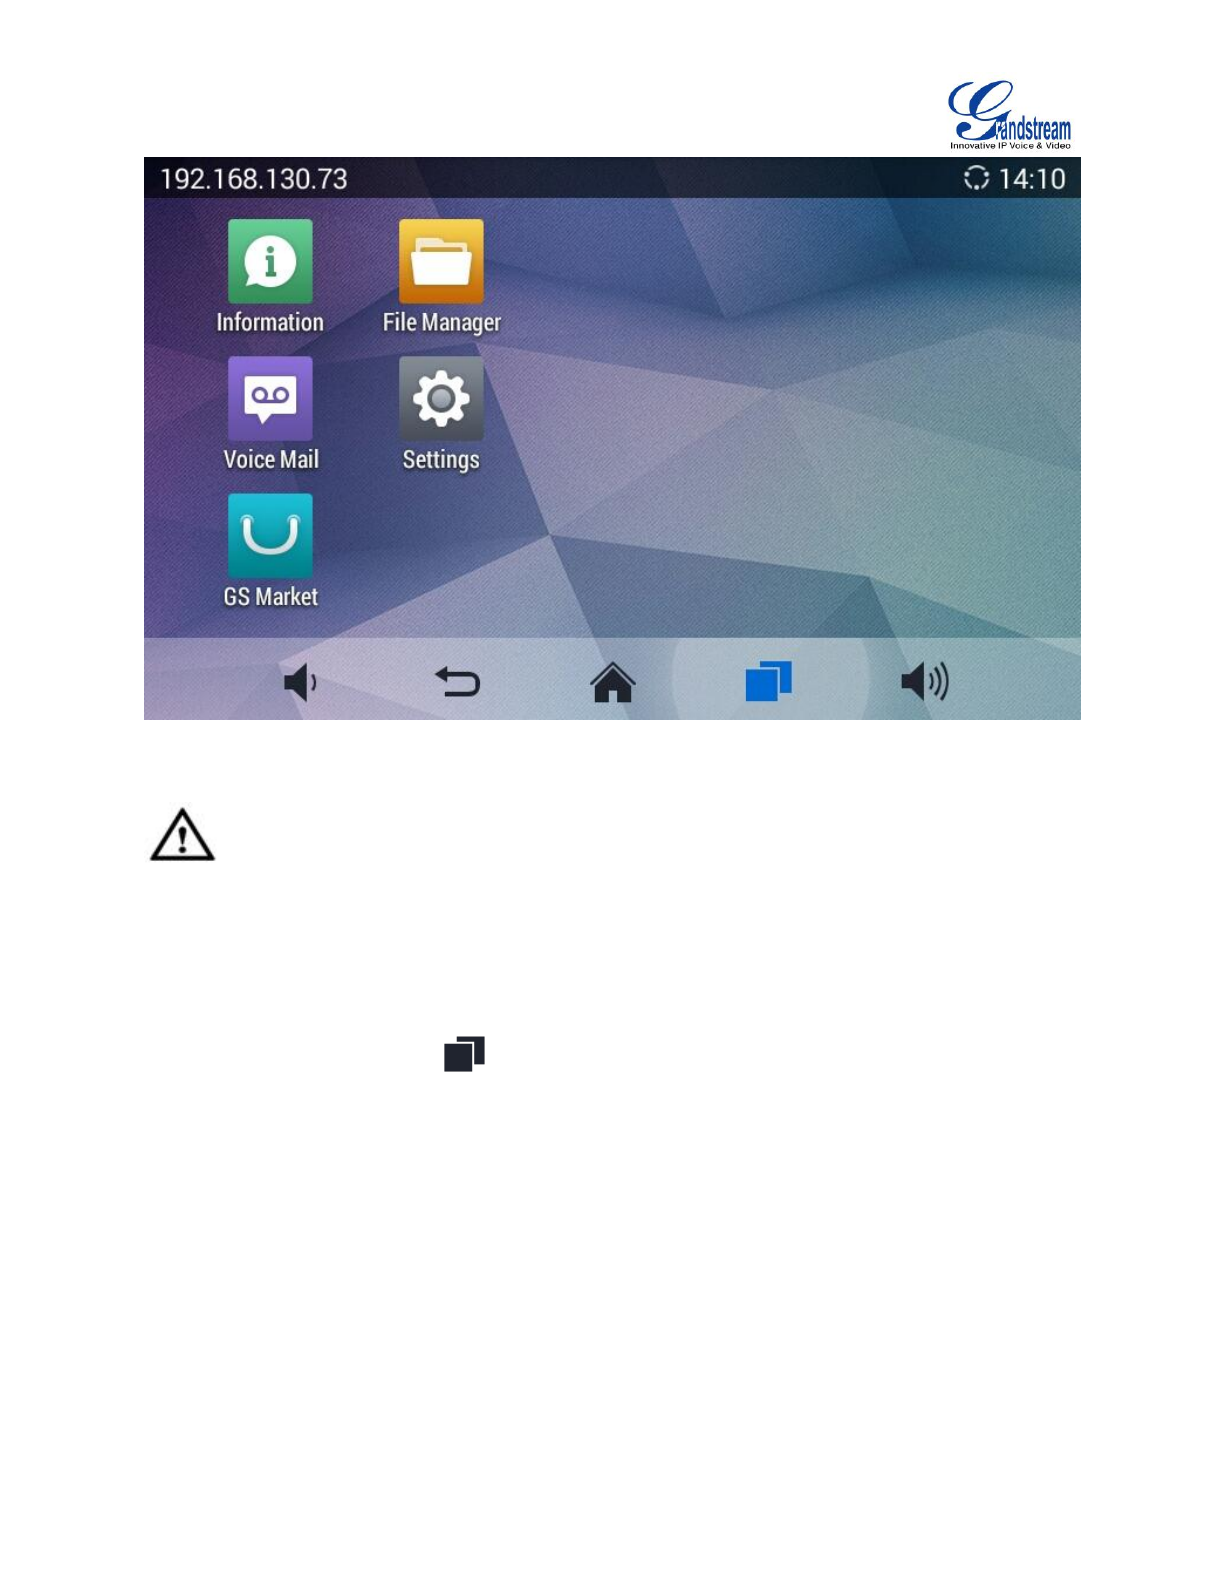
HOME SCREEN
GAC2500 has only one default home screen, Tap on the icon on the middle bottom of the screen
to go back to home screen anytime.
Firmware Version 1.0.1.x
GVC2500 User Guide
Page 31 of 88
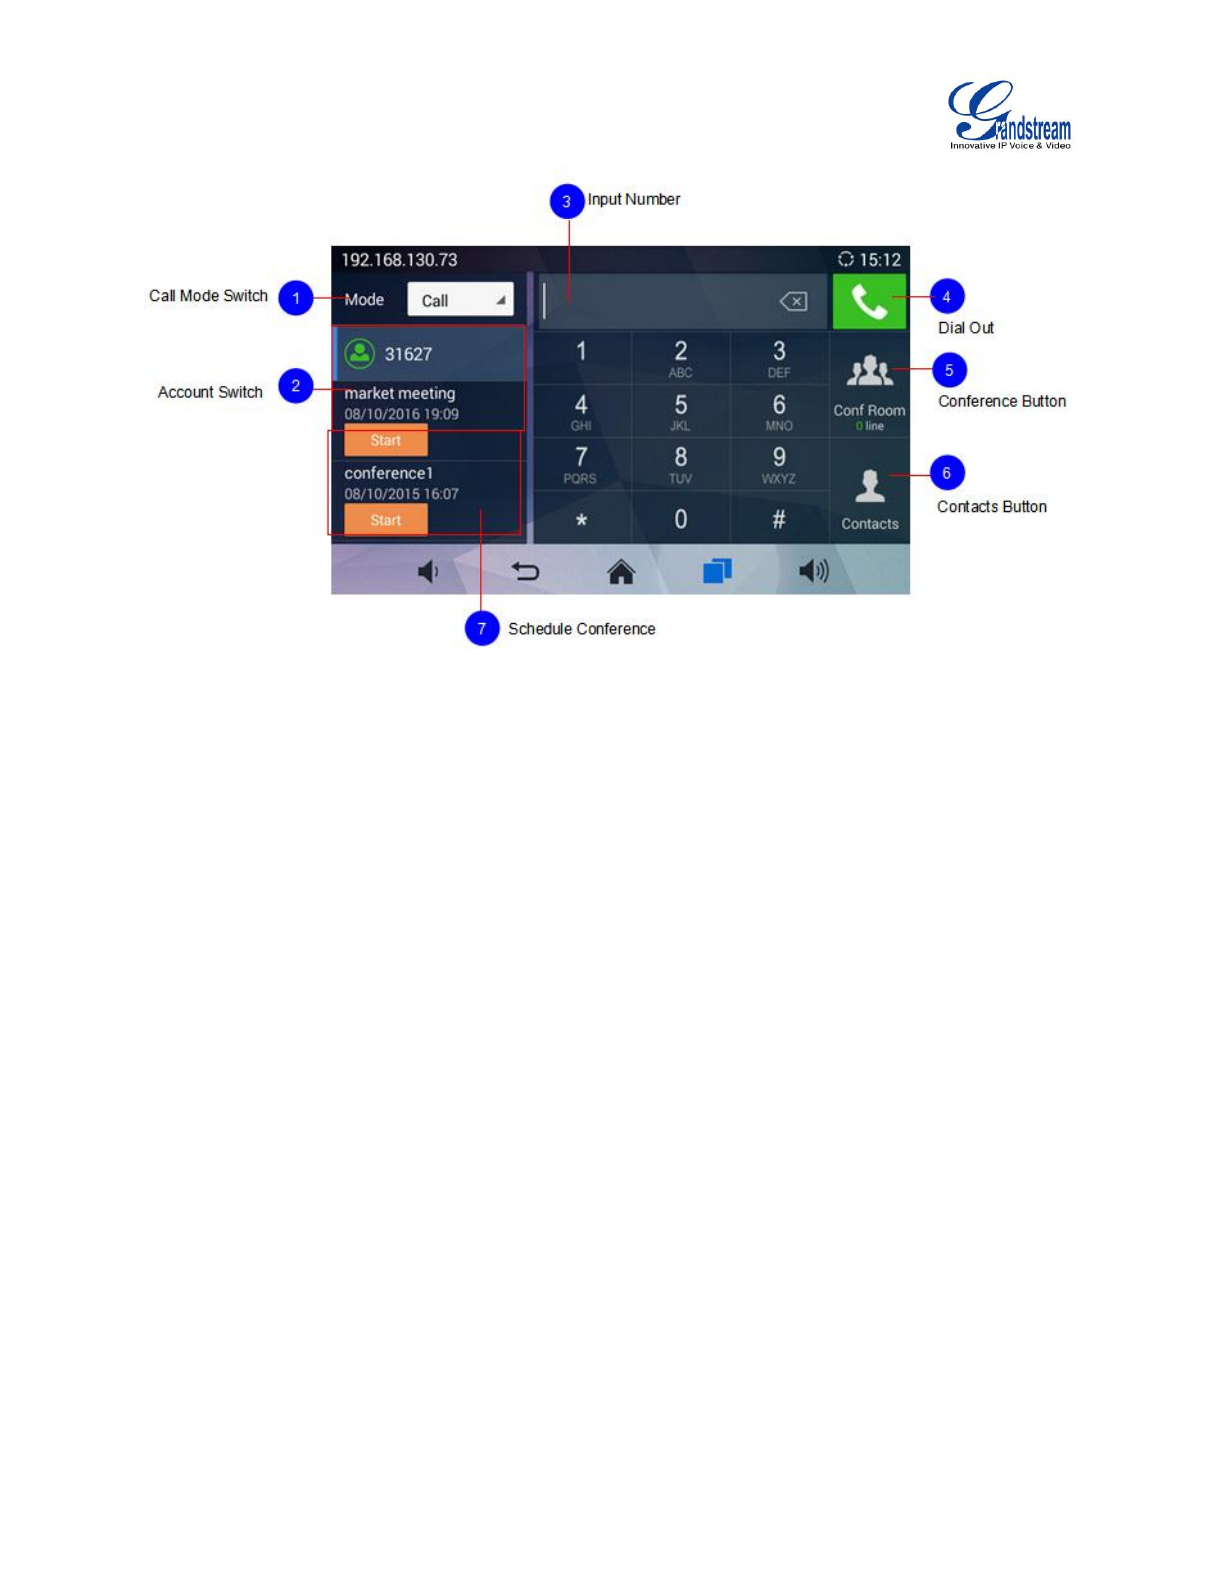
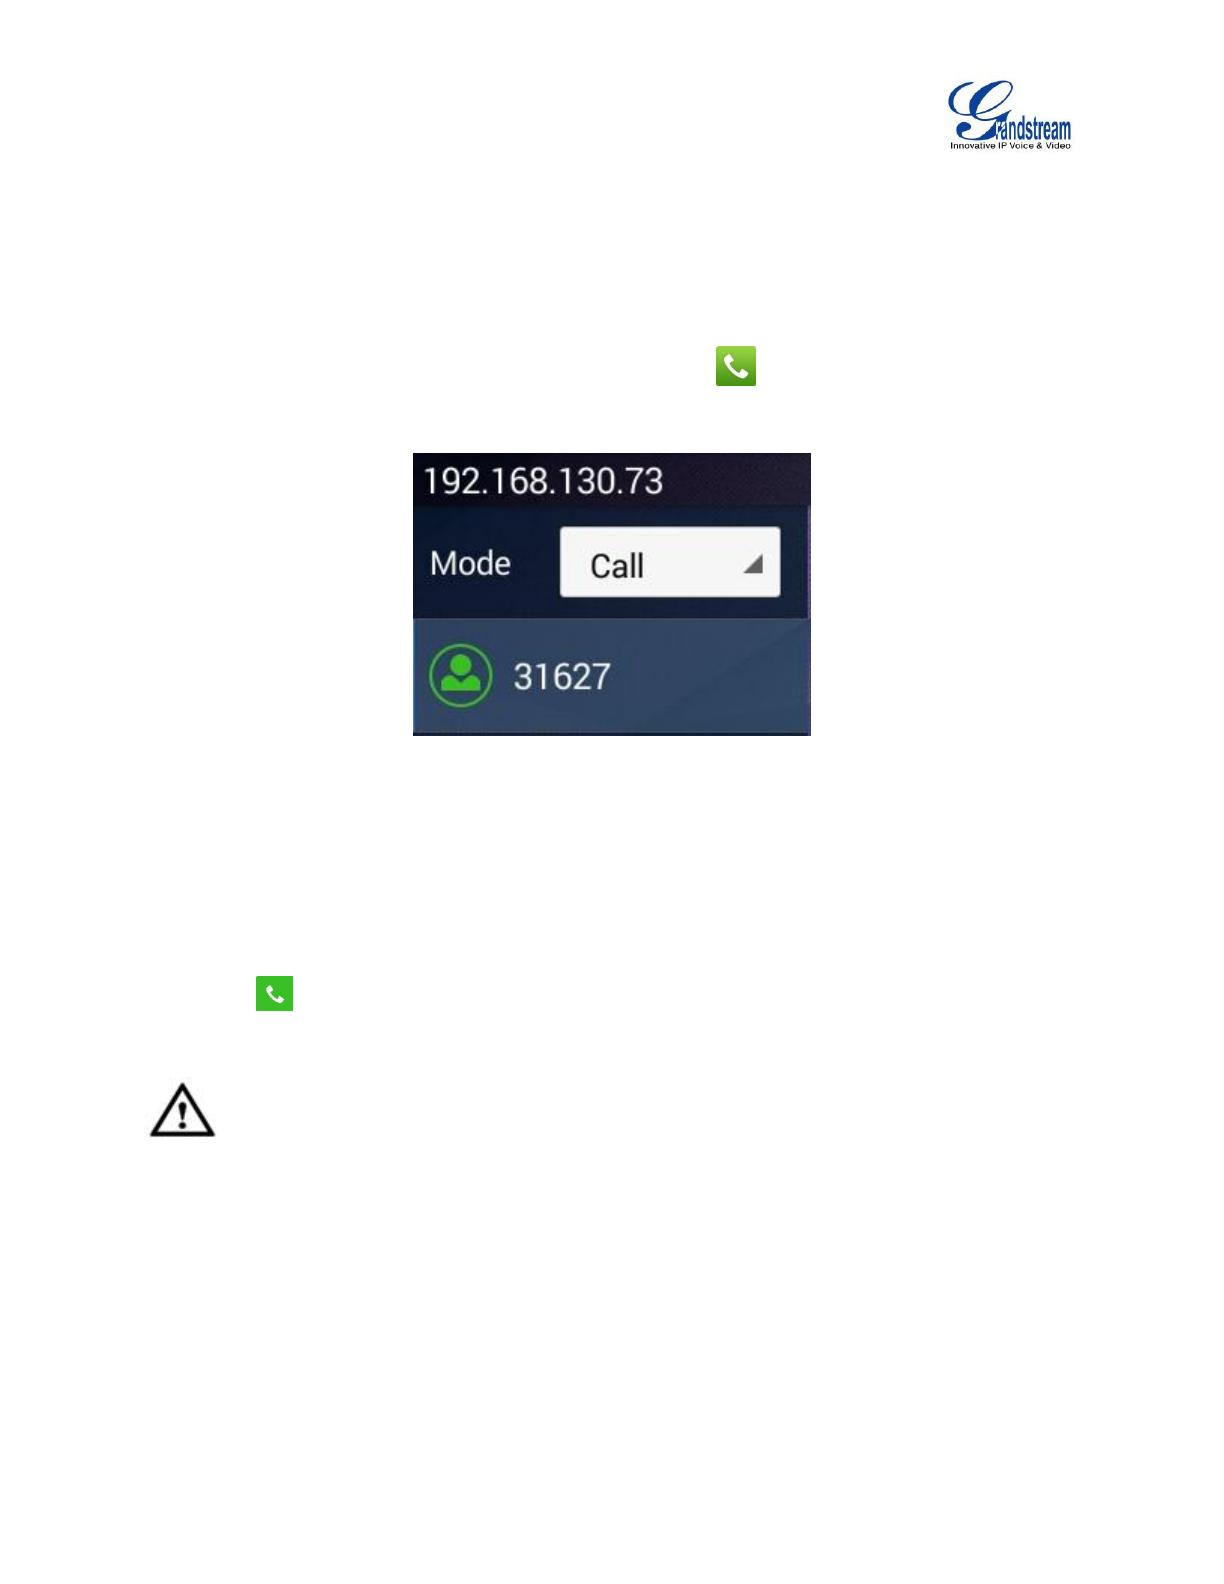
Figure 21 GAC2500 Home Screen
Mode. Set the call mode.
Account. Display all registered accounts. Tap to select account.
Textbox. Tap on digits below to input phone number, or tap on the textbox to bring out the soft
keyboard. You’ll see all the matching numbers on the left when you inputting digits, tap on the number
to add it to textbox directly, you can add up to 6 numbers.
Dial-up. Tap to dial out.
Conference. Display the conference line. Tap to access conference interface.
Contacts. Tap to access Contacts interface to add more contacts to the textbox.
Conference Schedule. Display the latest 2 scheduled conferences. Tao on "Start" to start conference
at once.
You can slide left or right to view applications and widgets on other desktops, or dial out or start
conference on home screen.

Firmware Version 1.0.1.x
GVC2500 User Guide
Page 32 of 88
CONNECTING TO NETWORK AND DEVICES
The GAC2500 supports a variety of network connections (Ethernet, Wi-Fi) and device connections, you
can configure on GAC2500 or log in the GAC2500 web UI to configure. For more information about using
web UI, please refer to the GAC2500 Administration Guide in www.grandstream.com.
NETWORK
Network connection has a variety of ways, one is wired connection via the cables, and the other way is to
connect via Wi-Fi.
ETHERNET
If the user would like to use Ethernet connection for network access, please plug the Ethernet cable to the
LAN port on the back of the GAC2500. Ethernet connection is turned on as DHCP by default.
To configure Ethernet settings on GAC2500:
1. Plug the Ethernet cable into the LAN port on the back of the GAC2500.
2. Go to LCD menu->Settings->Network->Ethernet->IPv4 Settings.
3. Tap on "Address Type" to select DHCP, Static IP or PPPoE as the address type.
For DHCP, save the setting and the GAC2500 should be able to get IP address from the DHCP
server in the network.
For static IP, enter IP Address, Subnet Mask, Default Gateway, DNS Server and Alternative DNS
server for the GAC2500 to correctly connect to the network.
For PPPoE, enter PPPoE account ID and password so the GAC2500 can get IP address from the
PPPoE server.
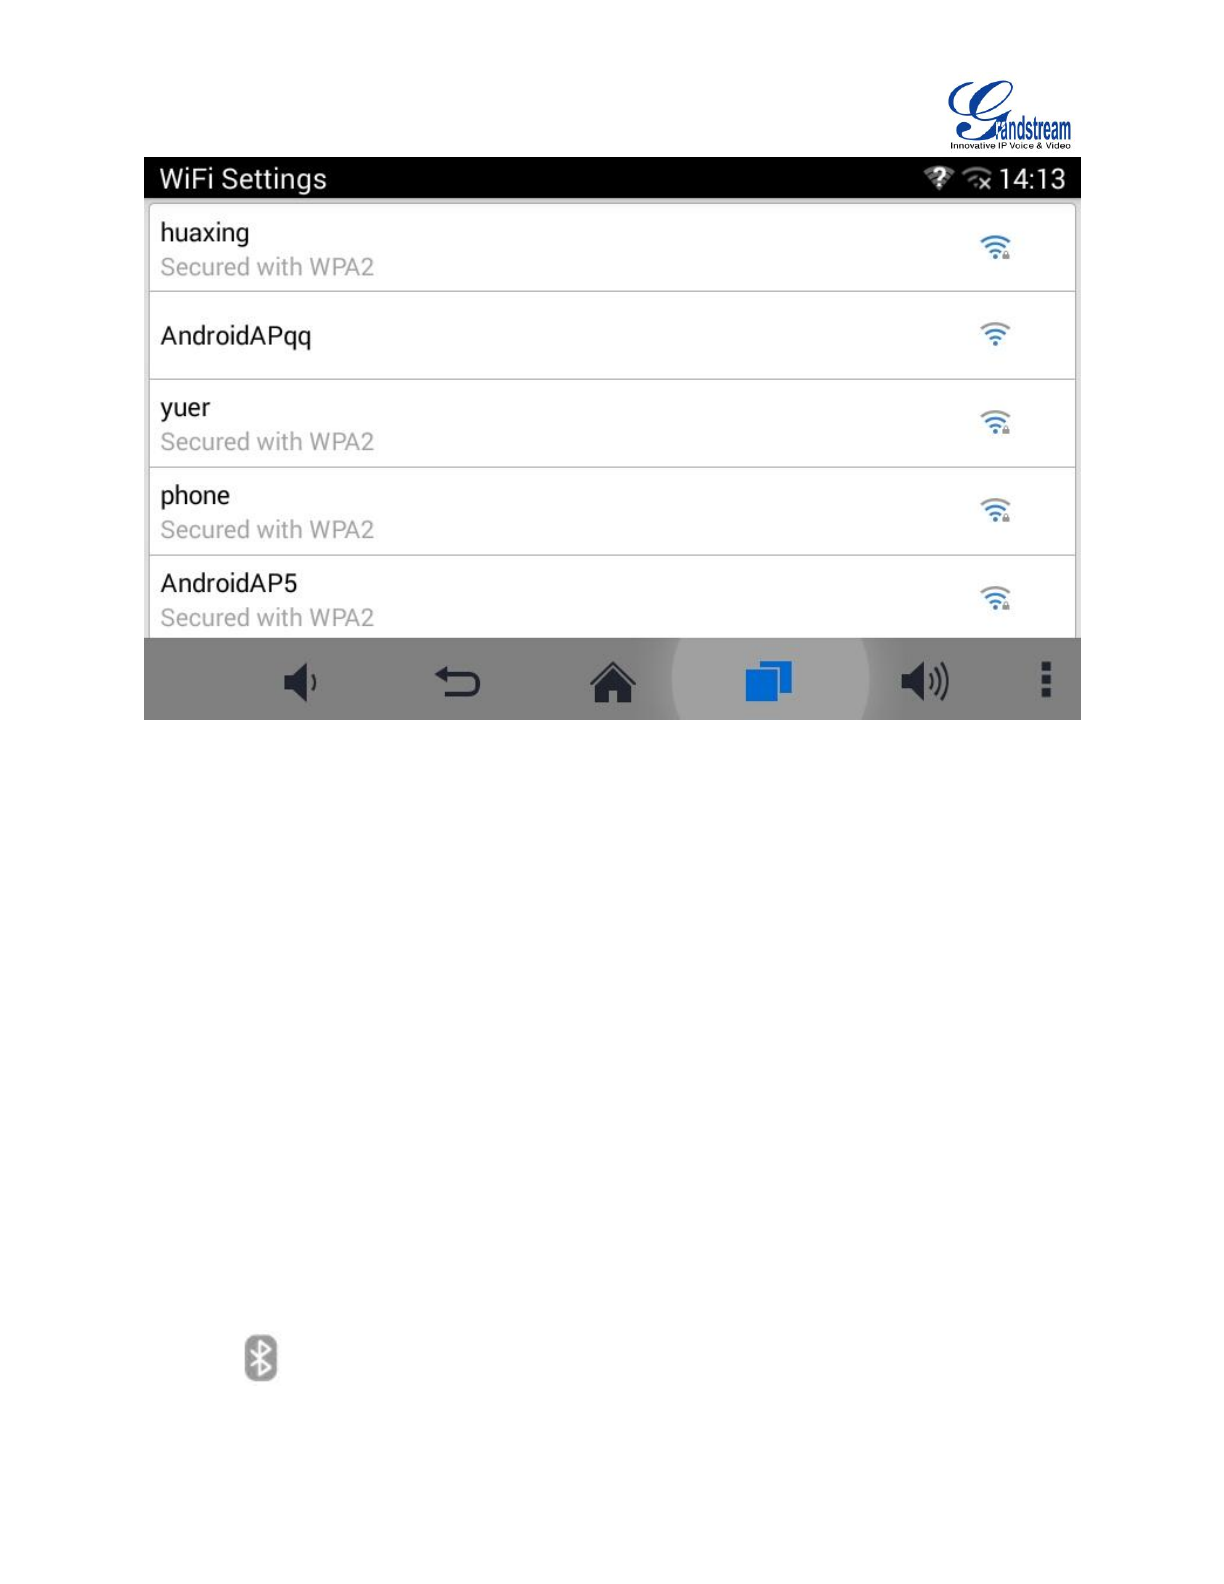
WI-FI
Wi-Fi is supported and built-in on the GAC2500. On the LCD display, go to Settings->Network-> Wi-Fi to
turn on and configure Wi-Fi.
Firmware Version 1.0.1.x
GVC2500 User Guide
Page 33 of 88
Figure 22 GAC2500 Add Wi-Fi Screen
TURNING WI-FI ON OR OFF
Once Wi-Fi is turned on, GAC2500 will automatically start the scanning within the range. A list of Wi-Fi
networks will be displayed as scanning result. Tap on the SSID and enter the correct password
information to connect to the selected Wi-Fi network.
Follow the steps below for static IP usage in Wi-Fi environment:
1. Tap on one Wi-Fi network in the scanned Wi-Fi list to bring up the dialog that shows signal strength,
security, password and option "Show advanced options".
2. Select "Show advanced options". The dialog will show additional option "IP settings".
3. In "IP settings", select Static IP, enter IP Address, Subnet Mask, and Default Gateway for the
GAC2500 to correctly connect to the network.
BLUETOOTH
Users could use the Bluetooth to send or receive files to cellphone, or use Bluetooth speaker and etc.
TURNING BLUETOOTH ON OR OFF
There are two ways to enable Bluetooth:
On the LCD display device, go to Settings->Network->Bluetooth.
Click to enable the Bluetooth in the drop-down status bar.
Firmware Version 1.0.1.x
GVC2500 User Guide
Page 34 of 88
PAIRING GAC2500 WITH A BLUETOOTH DEVICE
Before connecting GAC2500 with other Bluetooth device, users must pair them first. They will stay paired
afterwards unless they are manually unpaired. To pair Bluetooth device:
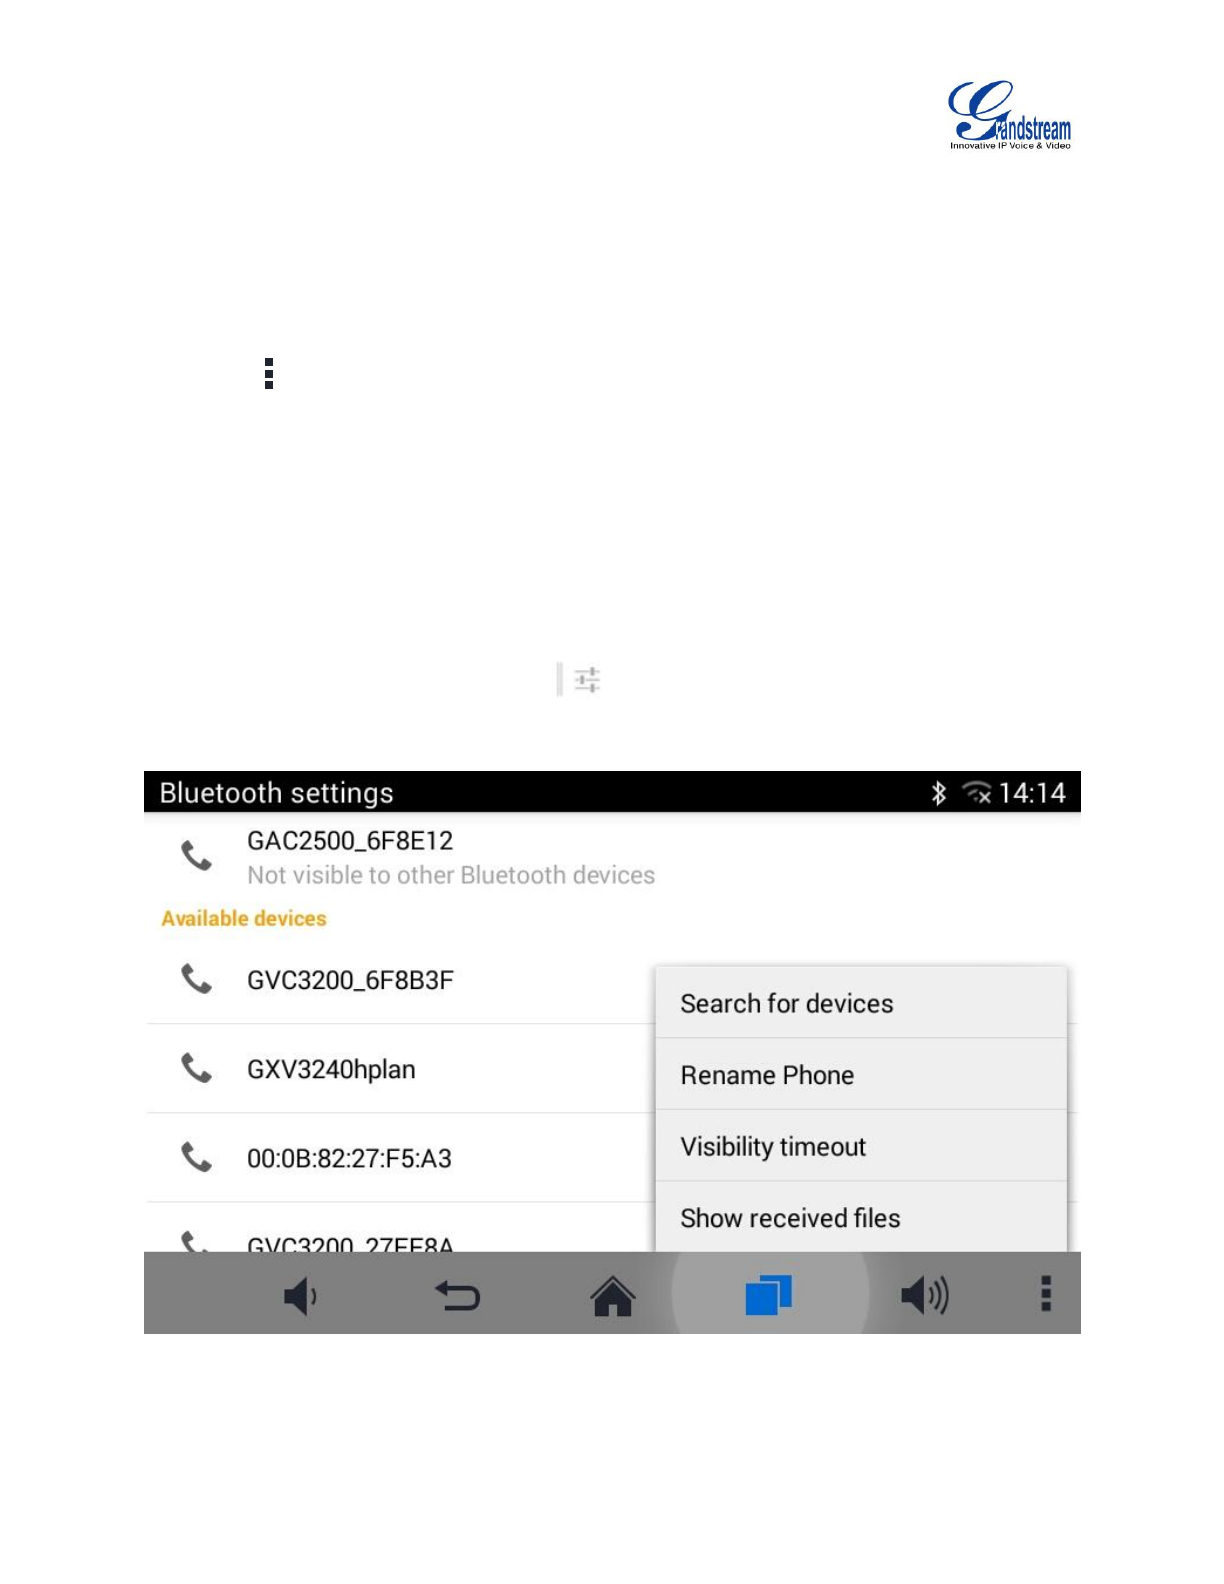
1. On the LCD display device, go to Settings->Network->Bluetooth.
2. Press button on the remote control and select "Search for devices".
3. The GAC2500 scans and displays the IDs of all available Bluetooth devices in range. Once the
Bluetooth device shows up in the result, tap on it to start pairing.
4. Confirm the passkey in the prompted message (if any). Or if passcode is required, please refer to the
device's documentation or other procedures to obtain the passcode.
CONNECTING TO A BLUETOOTH DEVICE
After successfully paired, the device will be connected to the GAC2500 immediately. Users will see this
device listed under "Paired Devices". Tap on next to the connected device. Users will see options
"Rename", "Unpair" and etc.
Figure 23 GAC2500 Bluetooth - Paired Device
If the connection is lost between the Bluetooth device and GAC2500, go to LCD menu->Settings-
>Network->Bluetooth and click on the device name under “Paired devices” again to reconnect.
Firmware Version 1.0.1.x
GVC2500 User Guide
Page 35 of 88
SENDING FILES VIA BLUETOOTH
Users could transfer files, share contacts information with other Bluetooth portable devices after pairing
and connection.A prompt for file transferring will be displayed on GAC2500 LCD display device when the
GAC2500 receives the file transferring request. Accept the request to receive file and the file will be
stored under SD Card/Bluetooth directory.
VPN SETTINGS
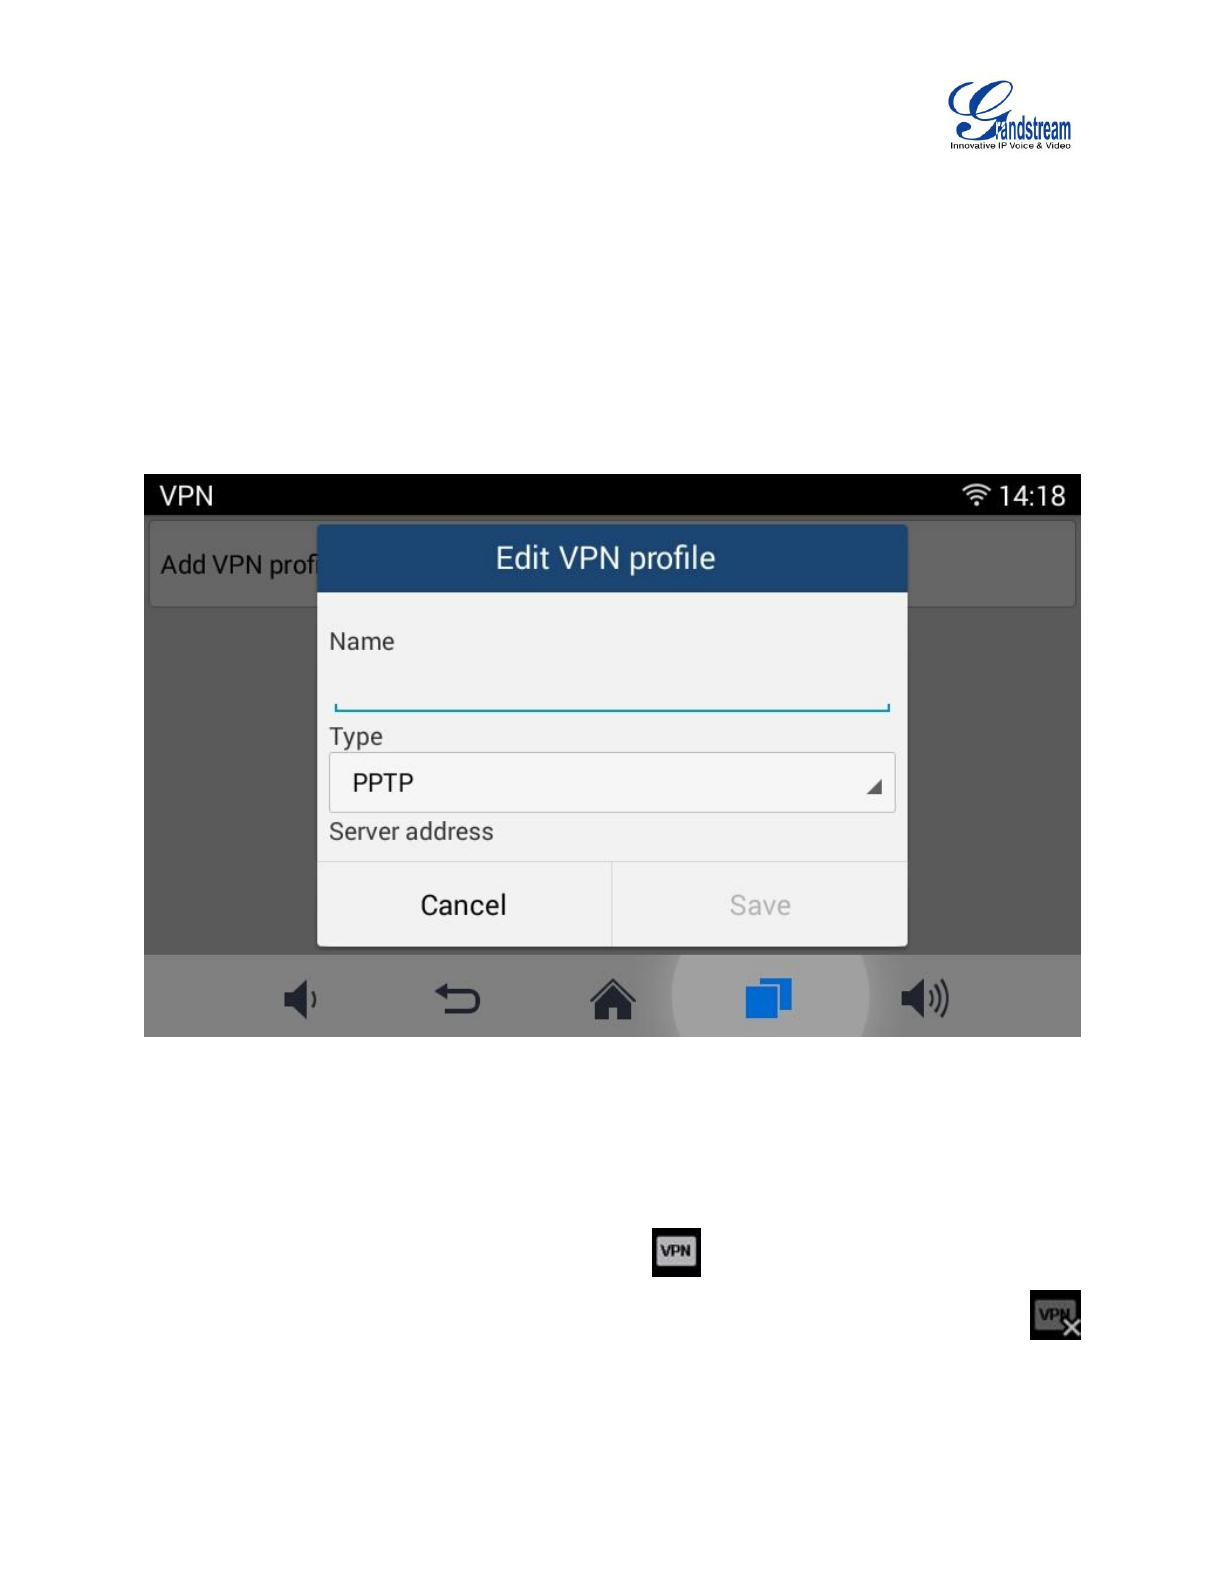
Users can add VPN using different protocols. Follow the steps below to set up VPN.
1. Access GAC2500 home screen, go to Applications ->Settings ->Network->VPN;
2. Tap on "Add VPN file" to access configuration page as shown below;
Figure 24 GAC2500 Add VPN Files Screen
3. Fill in parameters and save, go back to VPN page, you will find the new VPN file you just added;
4. Tap on the VPN file to open the validation page as shown below;
Figure 25 GAC2500 VPN Validation Screen
5. Fill in correct username and password to connect to VPN.
If the GAC2500 is connected to VPN successfully, icon will be shown in the top status bar; if the
connection is failed, a prompt box will pop up to remind users whether to connect again. If icon
displays in the top status bar, please check whether your VPN configuration is correct.
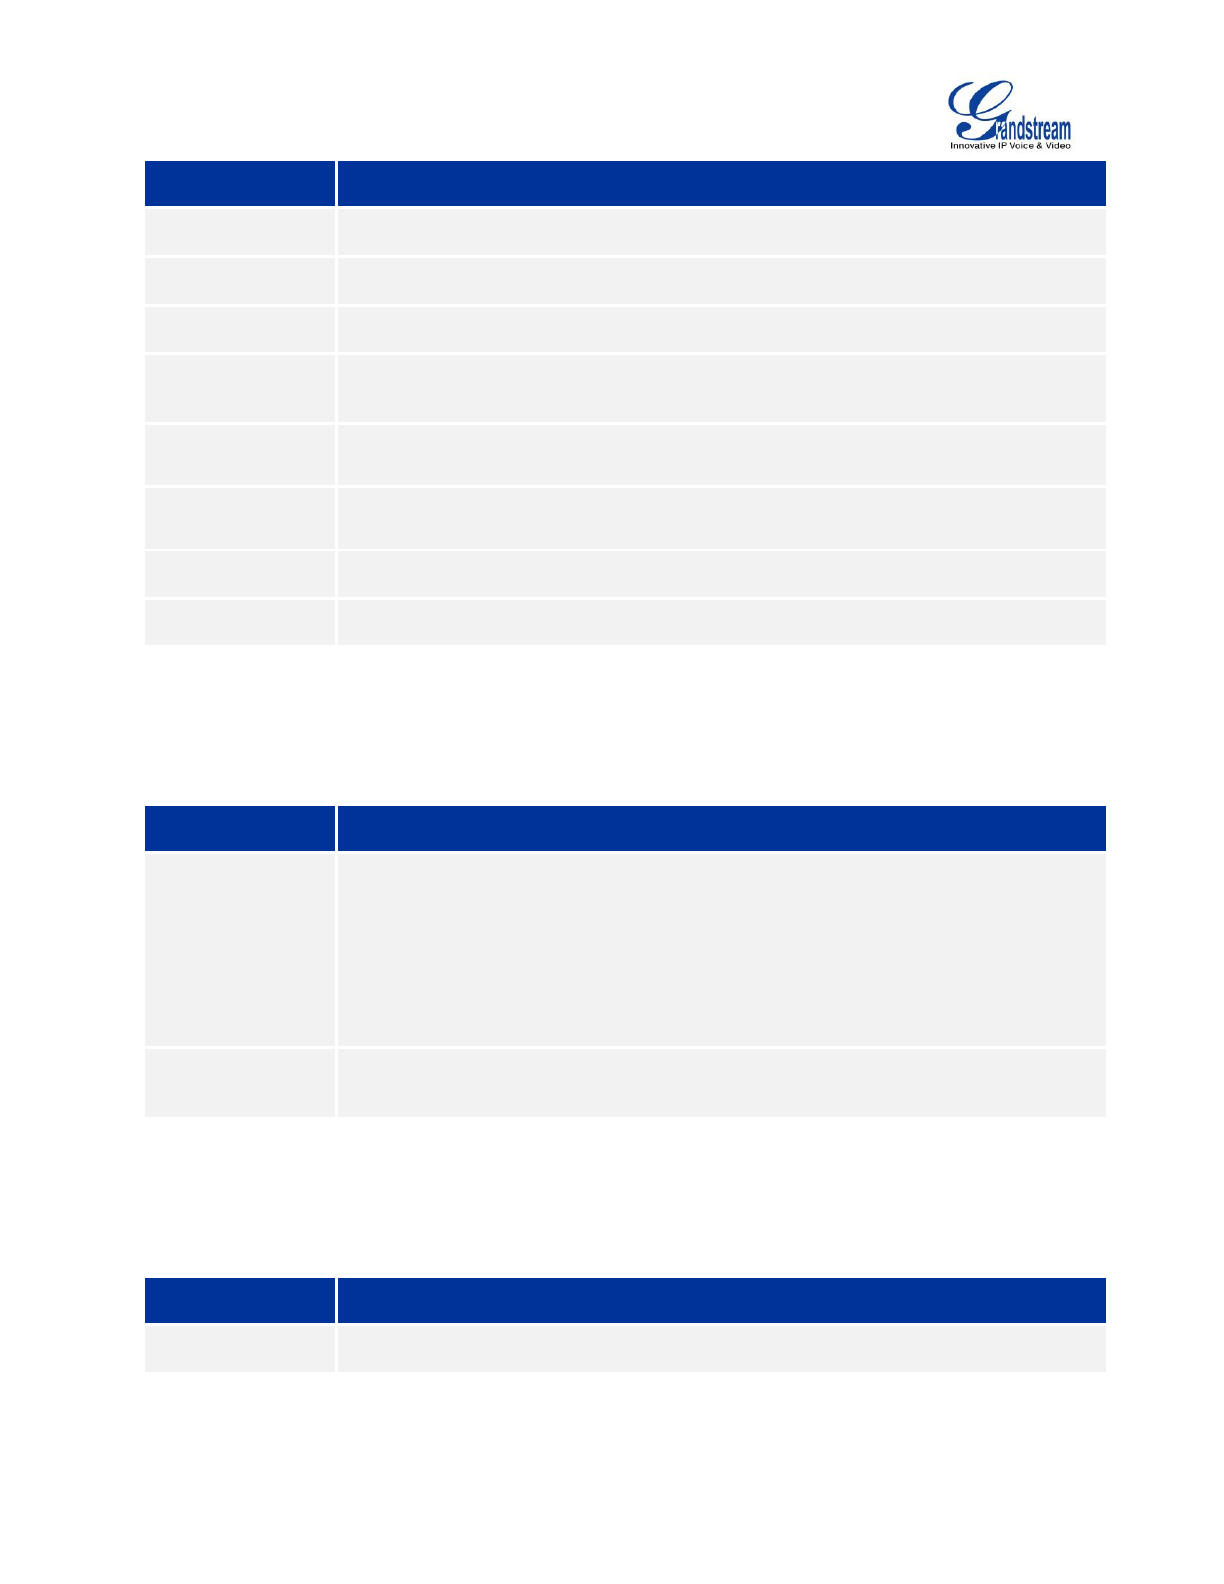
Table 6 GAC2500 VPN File Parameters
Firmware Version 1.0.1.x
GVC2500 User Guide
Page 36 of 88
Parameters
Descriptions
Name
Fill in your company address or the server you are connecting to.
Type
Set to PPTP, L2TP/IPSec PSK, L2TP/IPSec RSA, IPSec Xauth PSK, IPSeXauth
RSA or IPSec Hybrid RSA.
Server Address
Fill in the server URL or IP address.
PPP Encryption
(MPPE)
Define whether to use PPP encryption.
Show Advanced
Options
Check to display more options below.
DNS Search
Domains
Define search domain.
DNS Server
Input DNS server address.
Forwarding Routes
Input Forwarding Routes. For example, 10.0.0.0/8.
VLAN SETTINGS
Access GAC2500 home screen, go to Applications->Settings->Network->VLAN to configure VLAN
settings on the GAC2500.
Table 7 GAC2500 VLAN Configuration Parameters
Parameters
Descriptions
Layer 2 QoS
802.1q/VLAN Tag
Assigns the VLAN Tag of the Layer 2 QoS packets for LAN port. The default value is
0.
Note:
Please do not change the setting before understanding the VLAN's settings or
consulting the network administrator. Otherwise, the device might not be able to get
the correct IP address.
Layer 2 QoS
802.1p Priority
Assigns the priority value of the Layer 2 QoS packets. The default value is 0.
LLDP SETTINGS
Access GAC2500 home screen, go to Applications ->Settings ->Network->LLDP to configure LLDP
settings on the GAC2500.
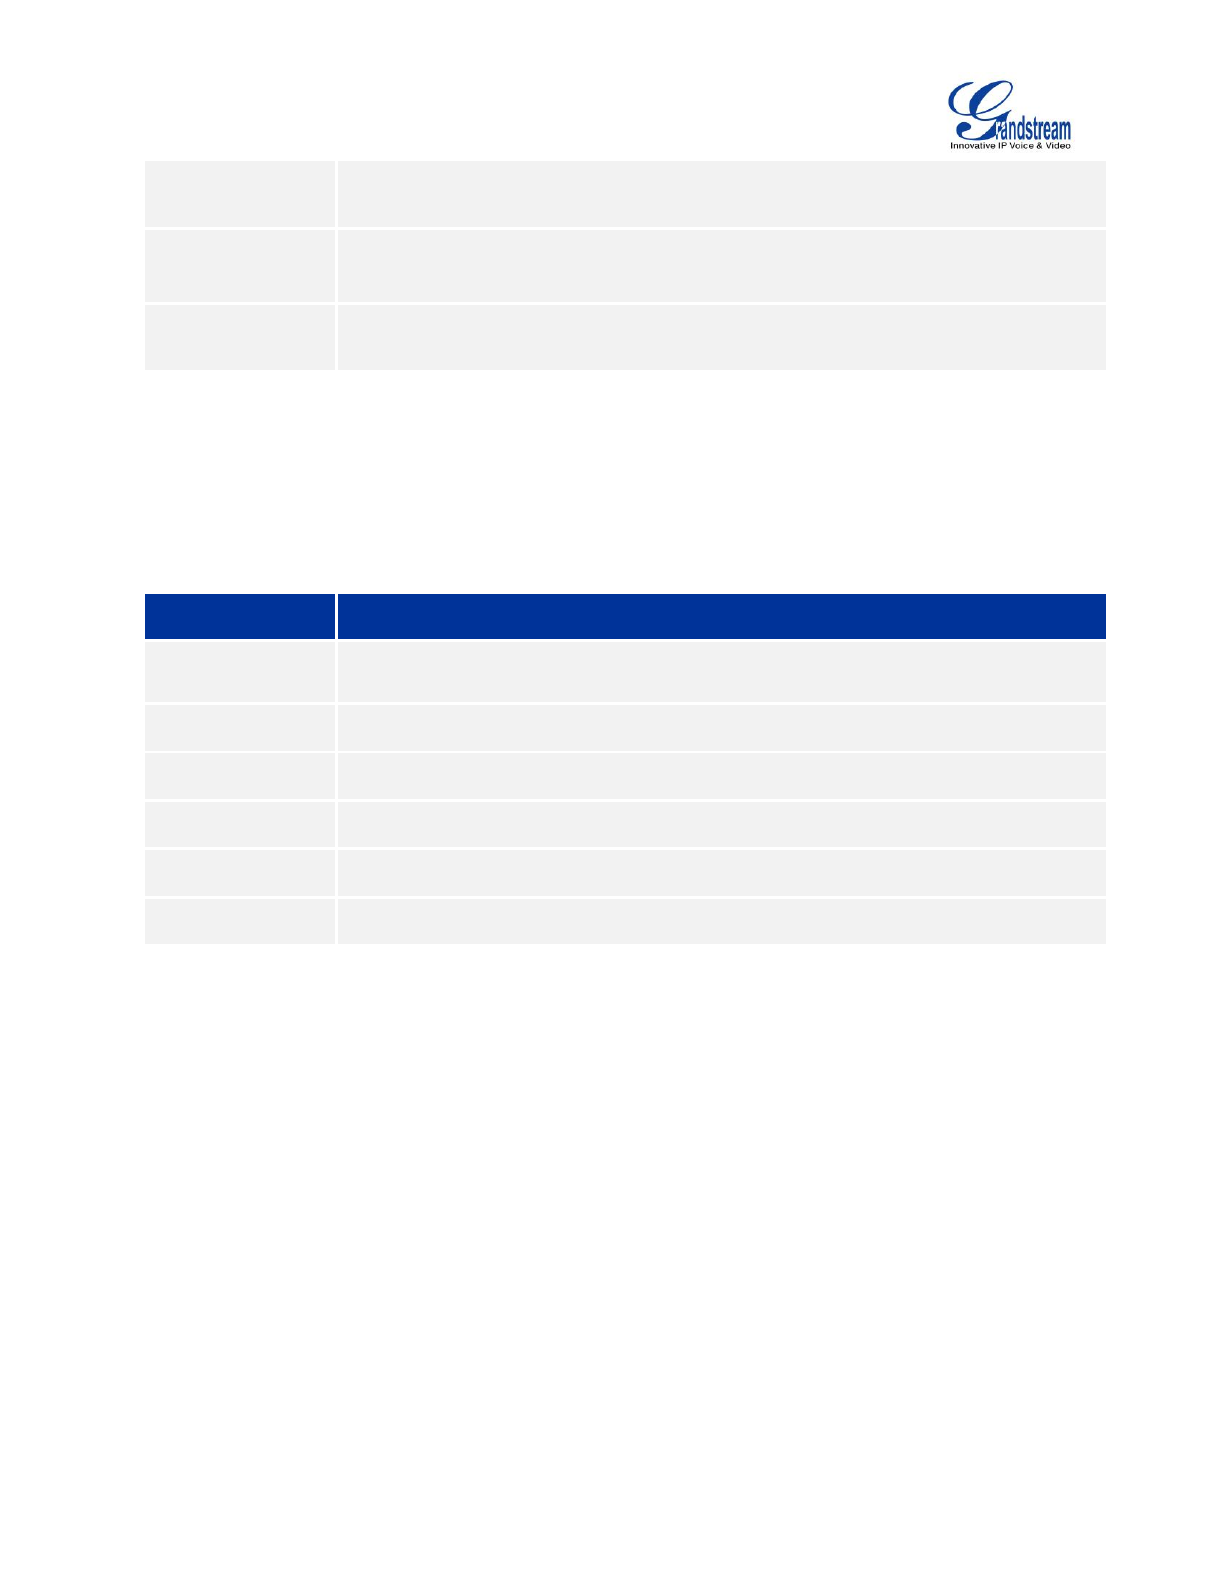
Table 8 GAC2500 LLDP Configuration Parameters
Parameters
Descriptions
LLDP
Enable or disable LLDP. The default setting is disabled.
Firmware Version 1.0.1.x
GVC2500 User Guide
Page 37 of 88
Layer 3 QoS for
SIP
This field defines the layer 3 QoS parameter for SIP packets. It is the value used for
IP Precedence, Diff-Serv or MPLS. The Default value is 48.
Layer 3 QoS for
Audio
This field defines the layer 3 QoS parameter for audio packets. It is the value used
for IP Precedence, Diff-Serv or MPLS. The Default value is 48.
Layer 3 QoS for
Video
This field defines the layer 3 QoS parameter for video packets. It is the value used
for IP Precedence, Diff-Serv or MPLS. The Default value is 48;
802.1X MODE
Access GAC2500 home screen, go to Applications ->Settings ->Network->802.1X Mode. By default
802.1X is disabled. Selecting 802.1X mode to "EAP-MD5", "EAP-TLS5" or "EAP-PEAP" to turn on 802.1X.
Once enabled, the user will be required to enter the identity and Password to be authenticated in the
network.
Table 9 GAC2500 802.1X Mode Parameters
Parameters
Descriptions
802.1x Mode
Allows the user to enable/disable 802.1X and configure 802.1X mode. The default
setting is disabled.
Identity
Enter the Identity information for the 802.1X mode.
MD5 Password
Enter the MD5 Password for the 802.1X mode.
CA Certificate
Upload the CA certificate for the 802.1X mode.
Client Certificate
Upload the CA certificate for the 802.1X mode.
Private Key
Upload the private key for the 802.1X mode.
Firmware Version 1.0.1.x
GVC2500 User Guide
Page 38 of 88
MAKING PHONE CALLS
ACCOUNT
Users could make single line calls on GAC2500, you can switch lines, or hold, mute and transfer your call,
etc. GAC2500 home screen is the dial screen or you can tap on on desktop to access dial screen.
The following figure shows the account is successfully registered (account icon is highlighted in green).
Figure 26 GAC2500 Registered Account Status
MAKING A CALL
DIRECT DIALING
1. Enter the call screen;
2. Enter the necessary digits on the keypad;
3. Tap on to dial out.
---------------------------------------------------------------------------------------------------------------------
Note:
1. GAC2500 allows users to configure the "#" key as the "Send" key. If users need to cancel this setting,
please log in the built-in Web page to set the parameter "use # as the dial key" to "No".
2. Enter digits in the dial-up box. If the digits or the letters for the digit matches contacts and call history,
a dropdown list of numbers will be displayed. For example, entering 5 (JKL), 6 (MNO), 4 (GHI) and 6
(MNO) will display 5646 or john if contact "john" exists. Users can then select it to dial out.
---------------------------------------------------------------------------------------------------------------------
REDIAL
Redial is to dial the last dialed-out number. It is only available when the call log exists.
Firmware Version 1.0.1.x
GVC2500 User Guide
Page 39 of 88
1. Enter the call Interface;
2. Press the button or tap on "#" to dial the last dialed-out number automatically.
DIALING A NUMBER VIA CONTACT
Follow the steps below to dial a number via Contacts.
1. On the LCD display device, access Contacts by tapping on on home screen.
2. Navigate and select in the Contacts entries using the remote control navigation keys.
3. Tap on the dial key to dial out.
DIALING A NUMBER VIA CALL HISTORY
1. On the LCD display device, access Applications on home screen and access call history by selecting
icon .
2. The LCD will display all call history types. Navigate in the call history list by selecting the call history
category. Select the call history entry you would like to dial out.
3. Press to dial out.
DIRECT IP CALL
Direct IP Call allows GAC2500 and another VoIP device to talk to each other in an ad-hoc fashion without
a SIP proxy. VoIP calls can be made between these two if:
Both GAC2500 and VoIP phone have public IP addresses
Or
Both GAC2500 and VoIP phone are on the same LAN / VPN using private or public IP addresses
Or
NAT is disabled or GAC2500 NAT is disabled.
Both devices can be connected through a router using public or private IP addresses (with necessary port
forwarding or DMZ).
To make a direct IP call, please follow the steps below:
1. Access the dial screen on GAC2500.
2. Set the mode to "IP Call".
3. Input the target IP address. For example, if the target IP address is 192.168.124.123 and the port is
5062, input the following:
192*168*124*123#5062
The * key represents the dot (.) and the # key represents the colon (:).
Firmware Version 1.0.1.x
GVC2500 User Guide
Page 40 of 88
4. Press to dial out.
PAGING/INTERCOM
Before placing paging/intercom, please make sure the callee has paging/intercom enabled so it can
automatically answer the paging/intercom call. To make paging/intercom call:
1. Access the dial screen on GAC2500.
2. Set the mode to "Paging".
3. Enter the number to dial.
4. Press to dial out.
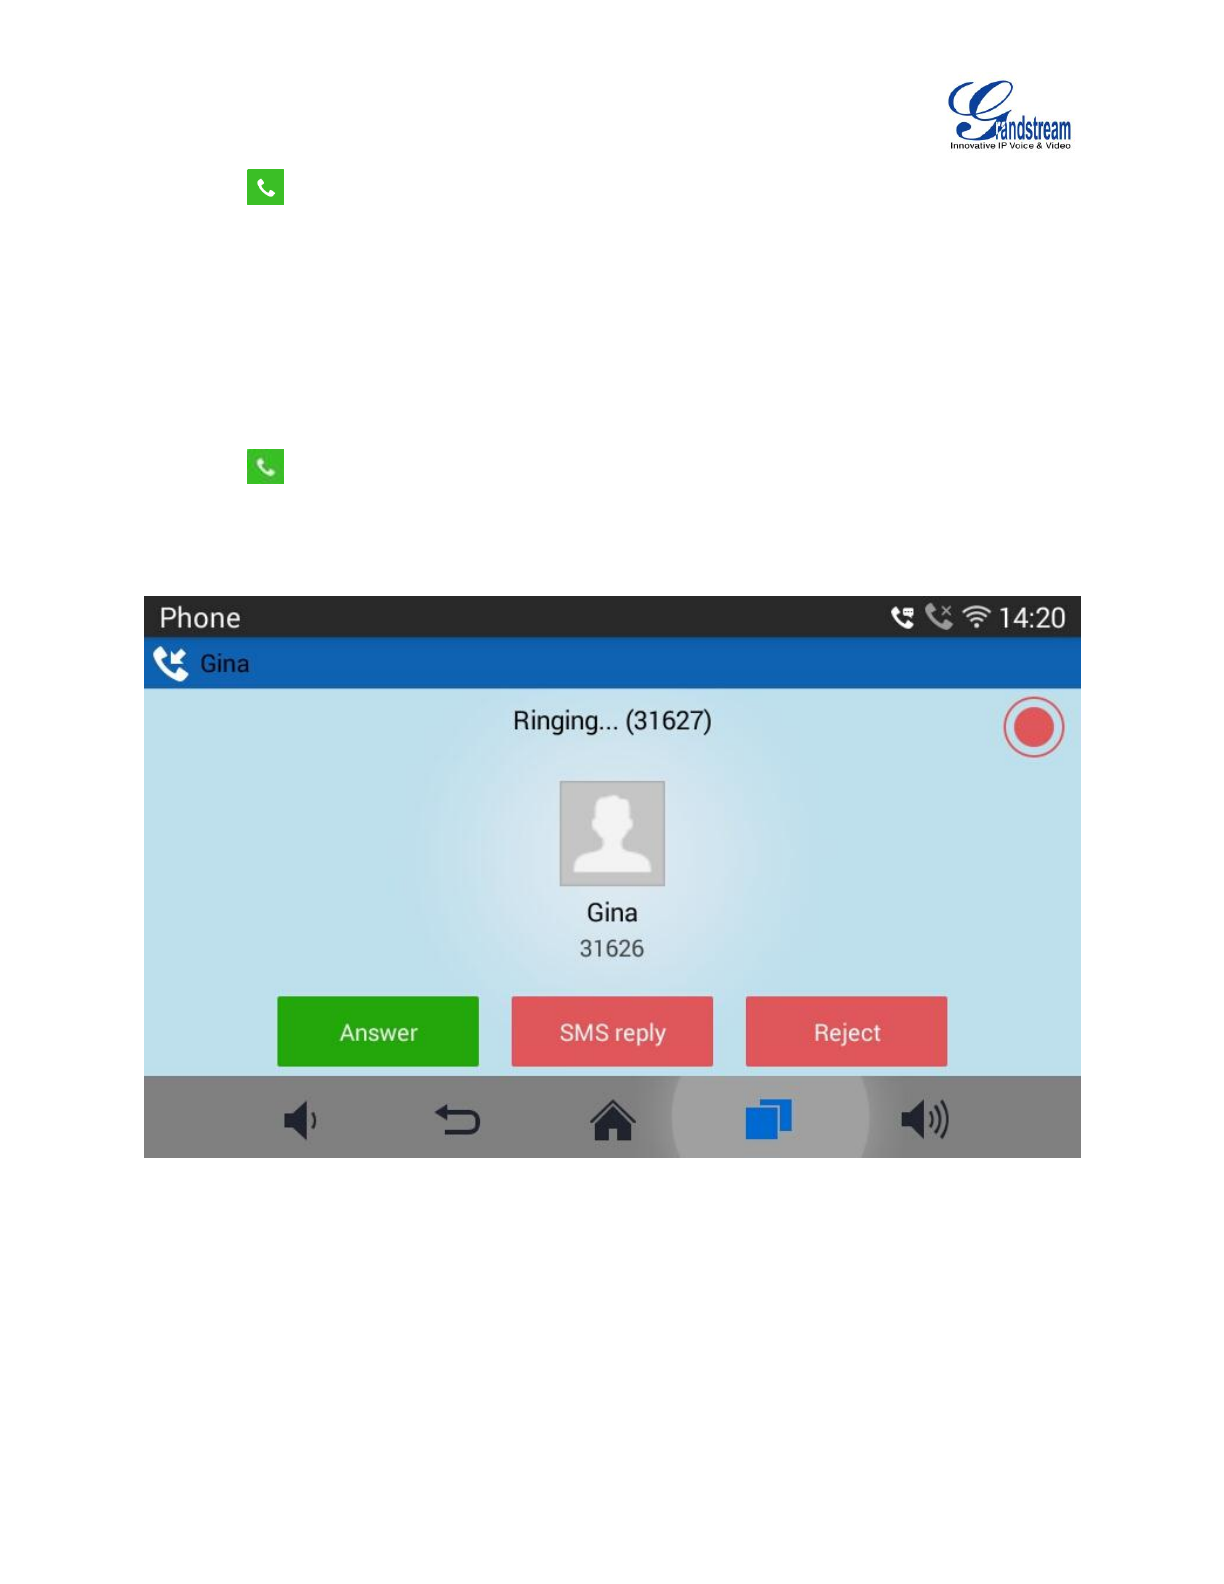
ANSWERING A CALL
When the device is in idle and there is an incoming call, the device will show the call screen as below.
Figure 27 GAC2500 Single Incoming Call Screen
Select "Answer" to answer the call, or refuse the call by pressing the button "End" to reject the call.
When there is an incoming call during an active call, users will hear a call waiting tone with the LCD
displaying the caller name and ID for the incoming call.
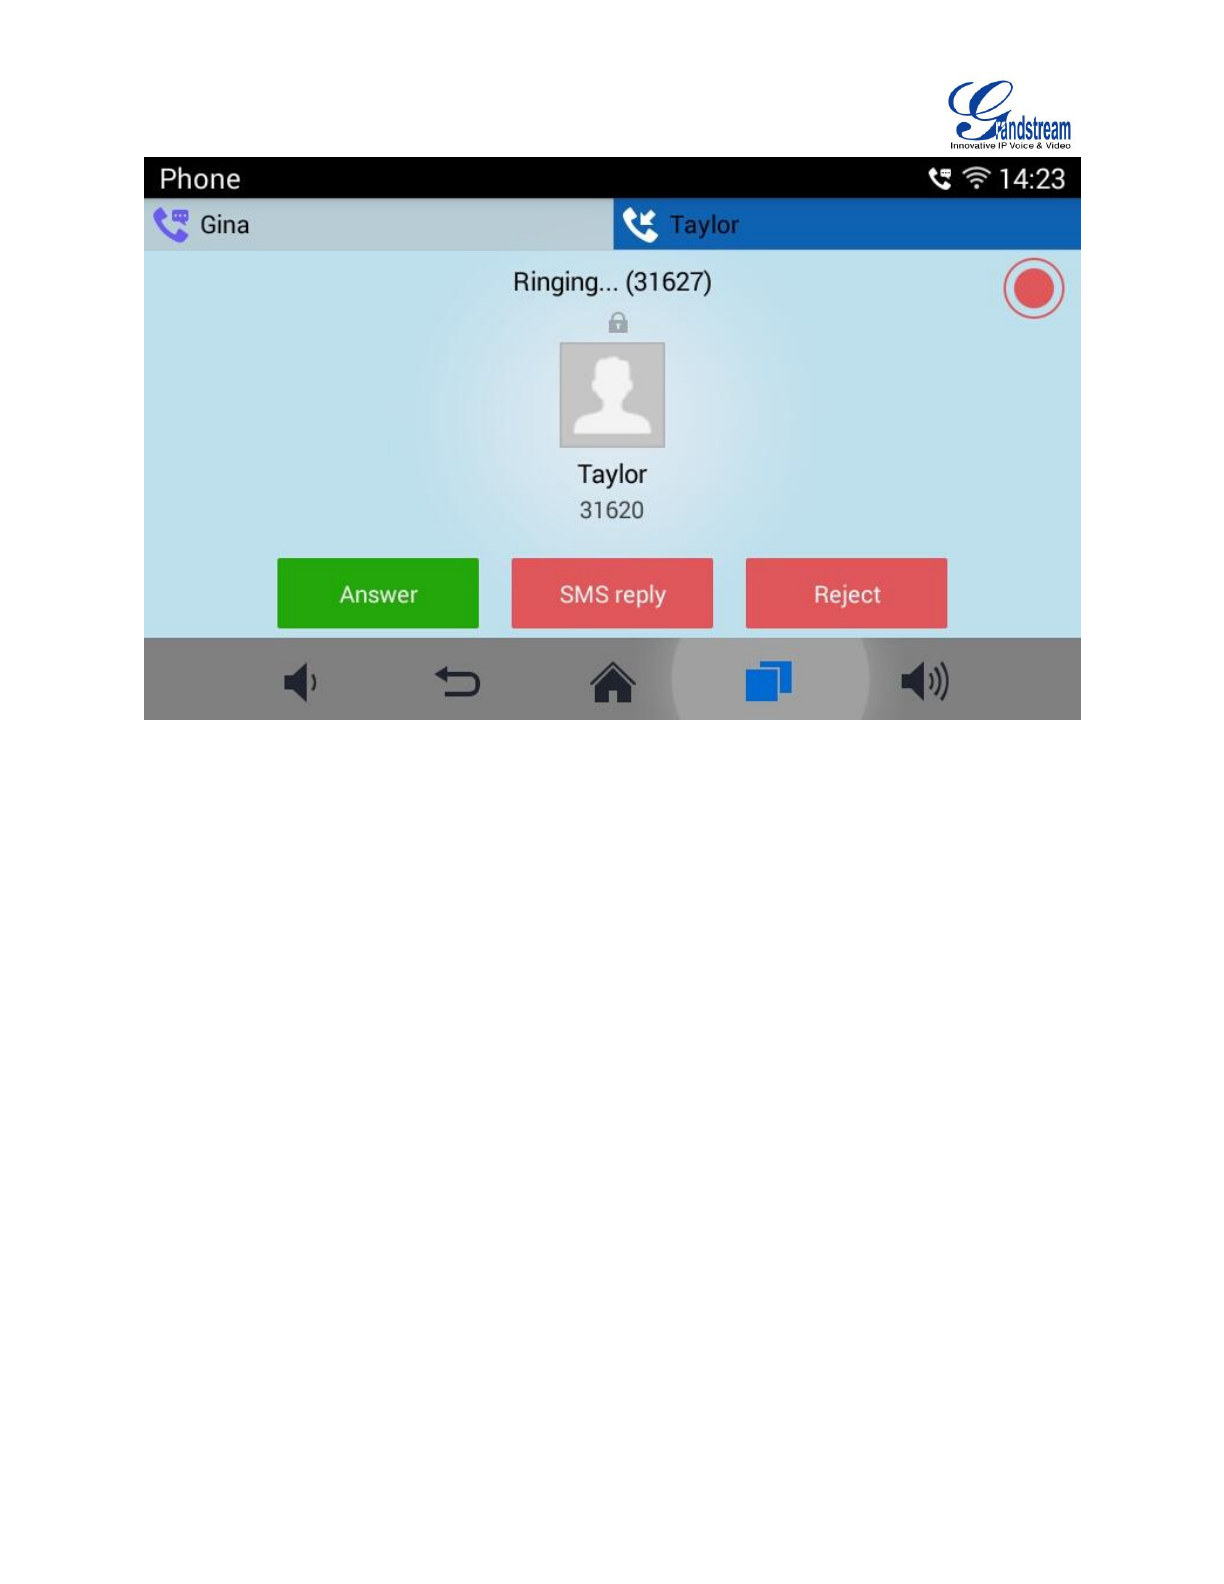
Firmware Version 1.0.1.x
GVC2500 User Guide
Page 41 of 88
Figure 28 GAC2500 New Incoming Call Screen
Users could select "Answer" to answer with audio only, , or refuse the call by pressing the button "End" to
reject the call.
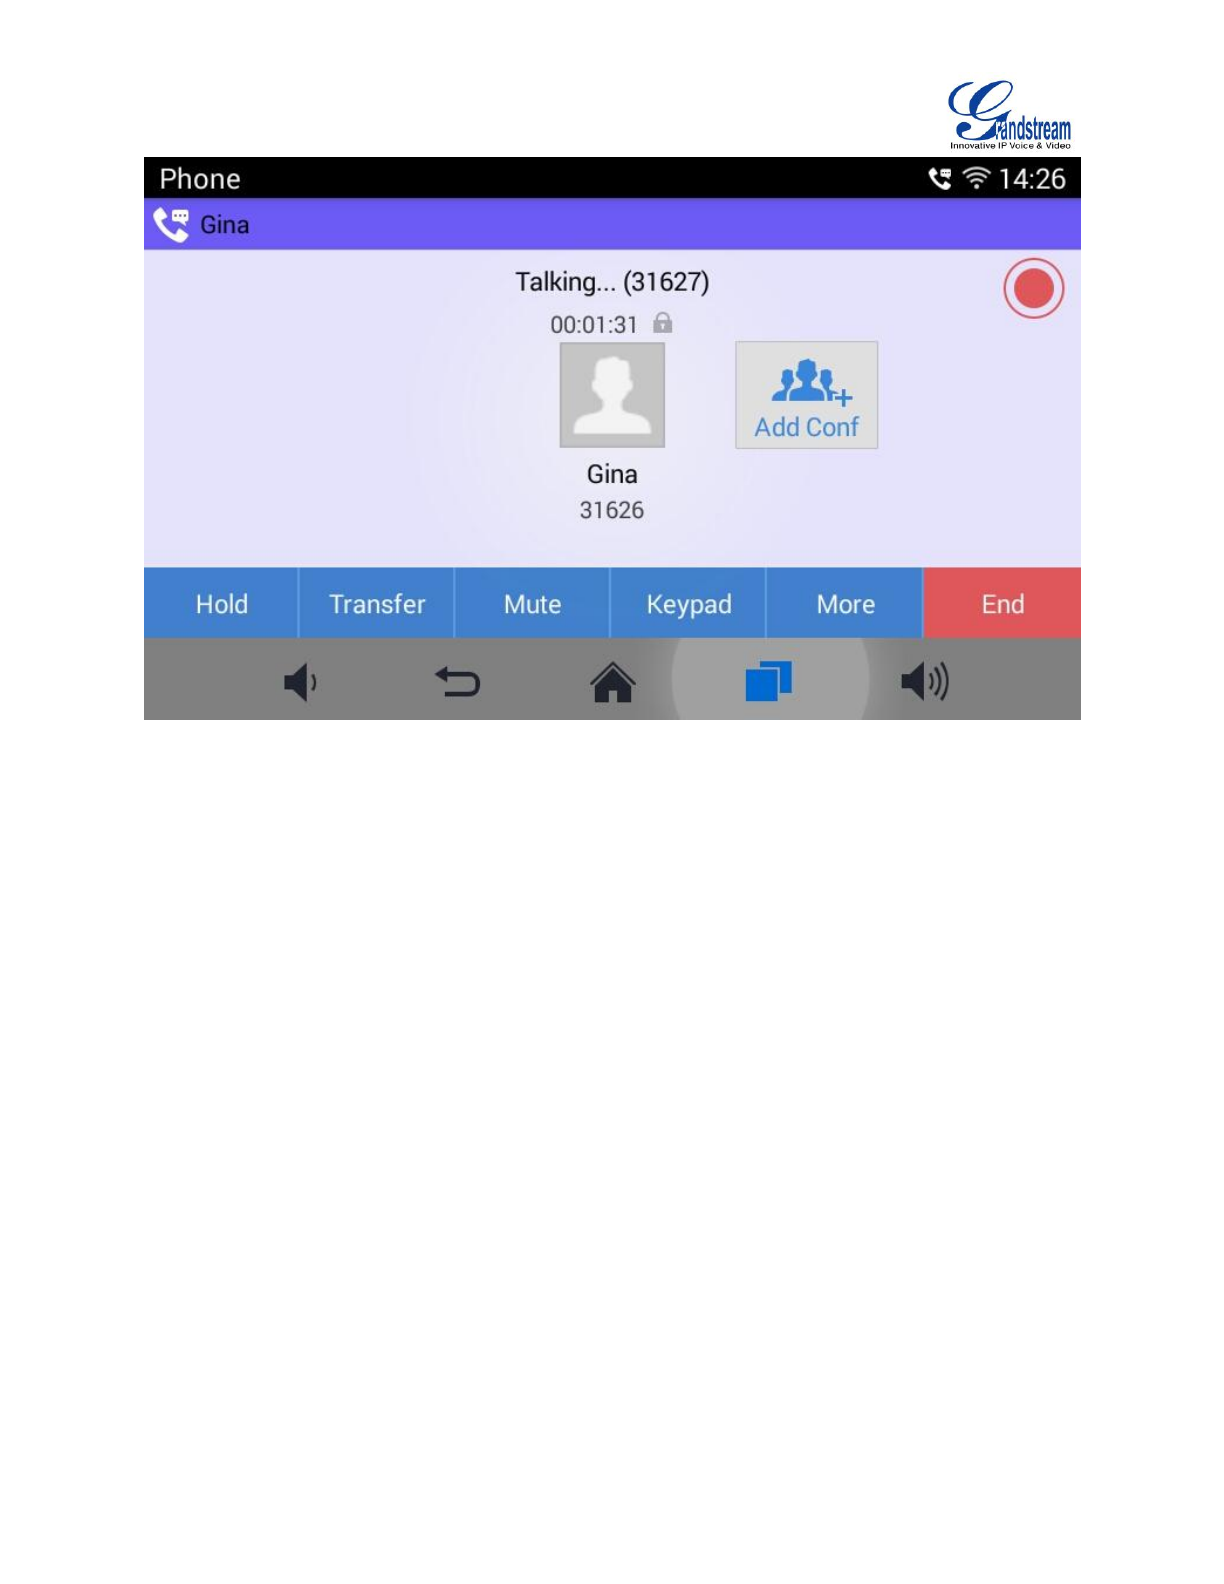
CALL MANAGEMENT
During an active call, you can make other operations like hold/hold, mute/unmute, call recording, add a
new call, start conference, or end the call.
Call Lines. Display the current line status: active, hold, incoming, outgoing.
Conference. Tap to add all active lines to conference members.
Hold/Unhold. Tap to hold/hold the call.
Mute/Unmute. Tap to mute/unmute the call.
Keyboard. Tap to bring up the soft keyboard to input DTMF.
More. Bring up more options including like Transfer, Recording, etc.
End. End the current line.
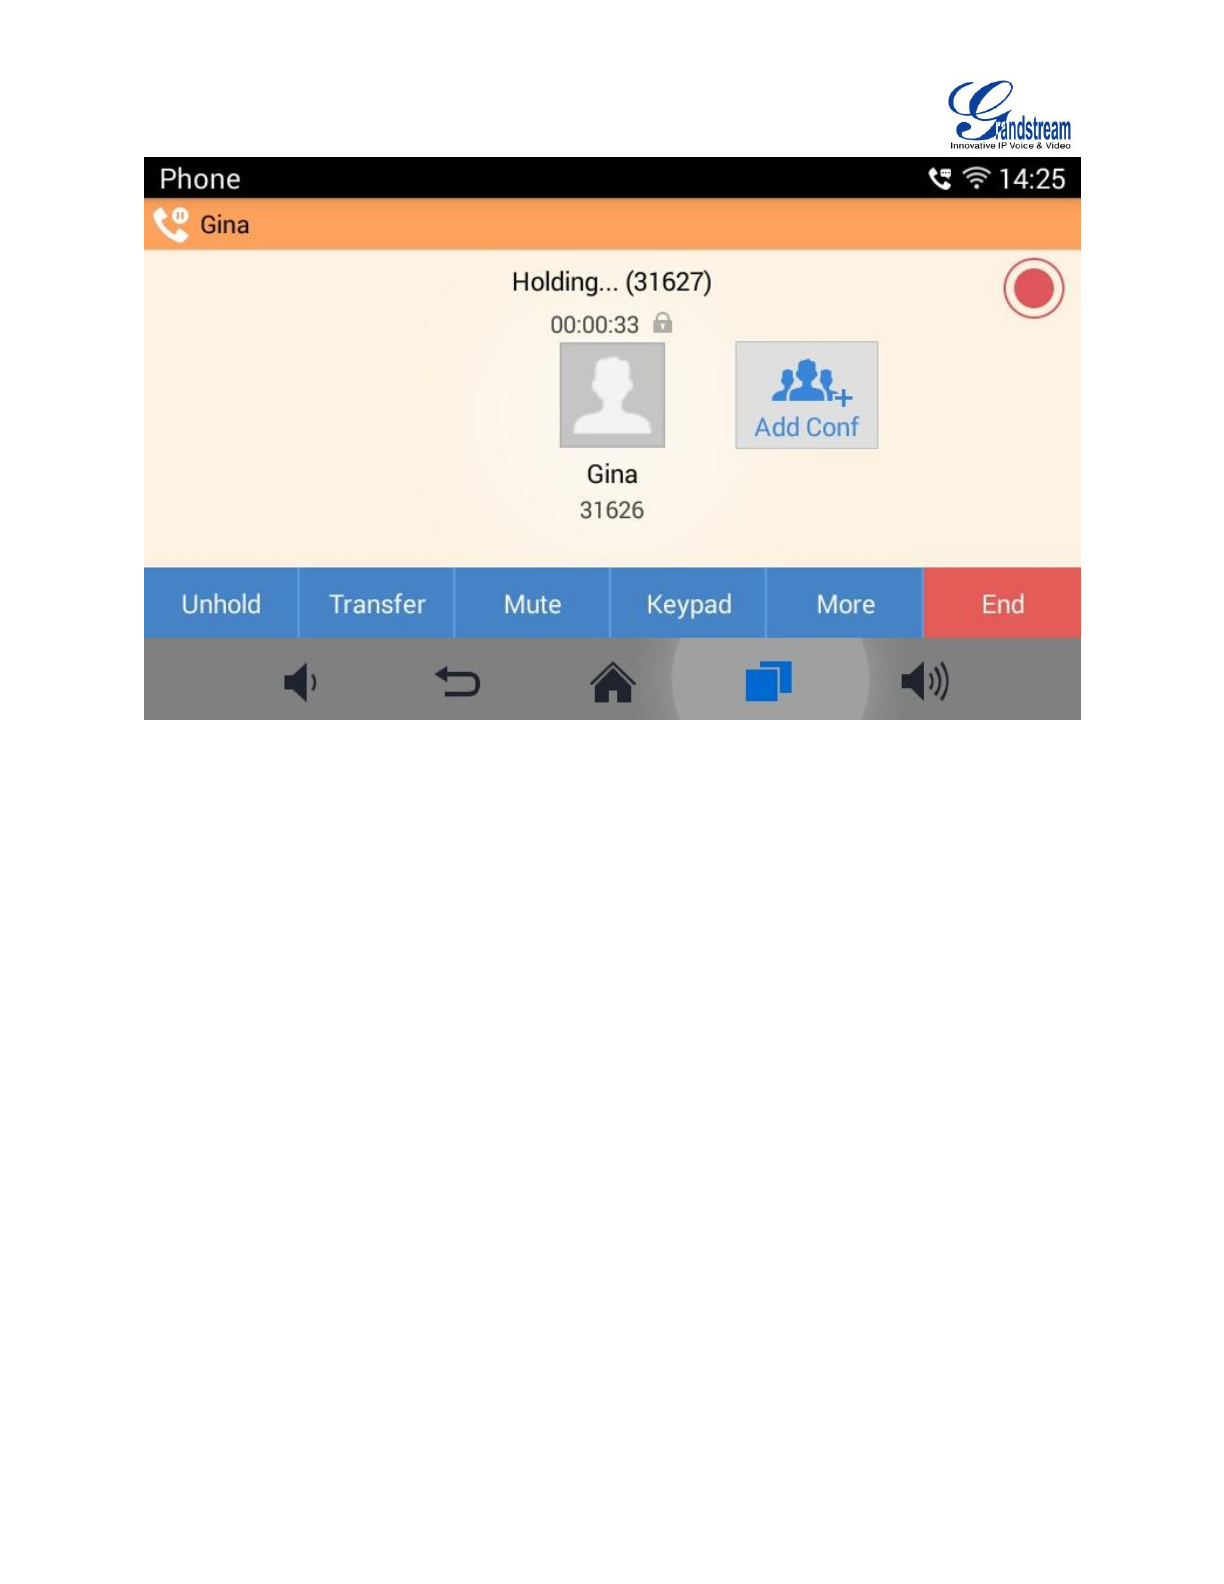
CALL HOLD AND CALL RESUME
CALL HOLD
During the active call, press HOLD button to put the current call on hold. Users could then make or
answer a new call. It shows as follows:
Firmware Version 1.0.1.x
GVC2500 User Guide
Page 42 of 88
Figure 29 GAC2500 Single Incoming Call Screen
RESUME TO CALL
If the active call is on hold, users could press the "Unhold" button to resume call or tap on the "End"
button to hang up the call.
Firmware Version 1.0.1.x
GVC2500 User Guide
Page 43 of 88
Figure 30 GAC2500 Call On Hold Screen
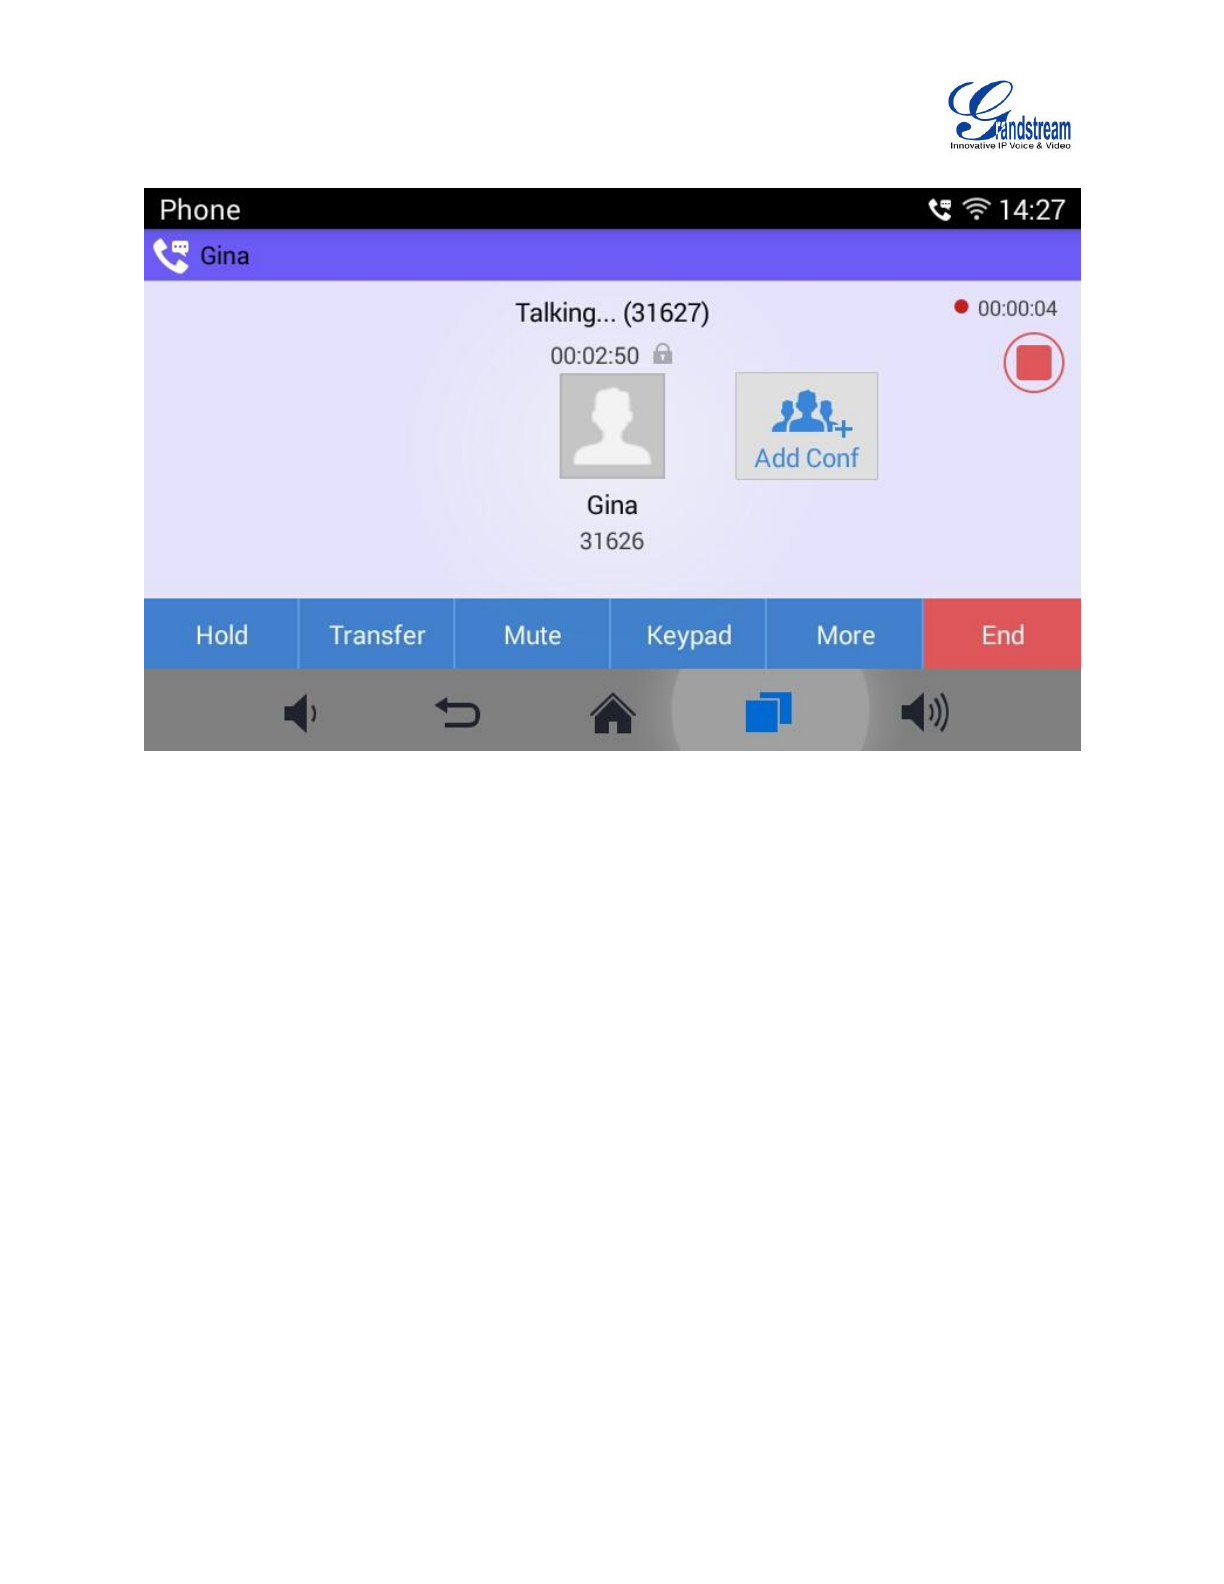
CALL RECORD
Users could save the call conversations to the GAC2500 by recording during an active call. You can listen
to the recordings from Recorder, please refer to the chapter Recorder for details.
1. During an active call, tap on the Record icon in the upper right corner to start recording as shown in
the figure 37 below:
Firmware Version 1.0.1.x
GVC2500 User Guide
Page 44 of 88
Figure 31 GAC2500 More-Start Recording
2. Tap on the icon again to stop recording.
CALL TRANSFER
Call transfer is to transfer one call to another call. Call transfer including blind transfer and attended
transfer according to different situations. For example, if user A wants to transfer the call with user B to
user C, blind transfer or attended transfer is optional.
BLIND TRANSFER
1. User A and user B are in an active call.
2. User A tap on Transfer button to bring up the transfer screen.