Grandstream Networks GXV3275V3 IP Multimedia Phone User Manual
Grandstream Networks, Inc. IP Multimedia Phone
UserManual.wiki
>
Grandstream Networks
>
GXV3275V3 User Manual
>
User manual
Contents
1.
User manual
2.
User Manual
User manual
Navigation menu
Upload a User Manual
Namespaces
Wiki Guide
HTML
PDF
Info
Views
User Manual
Discussion / Help
Navigation

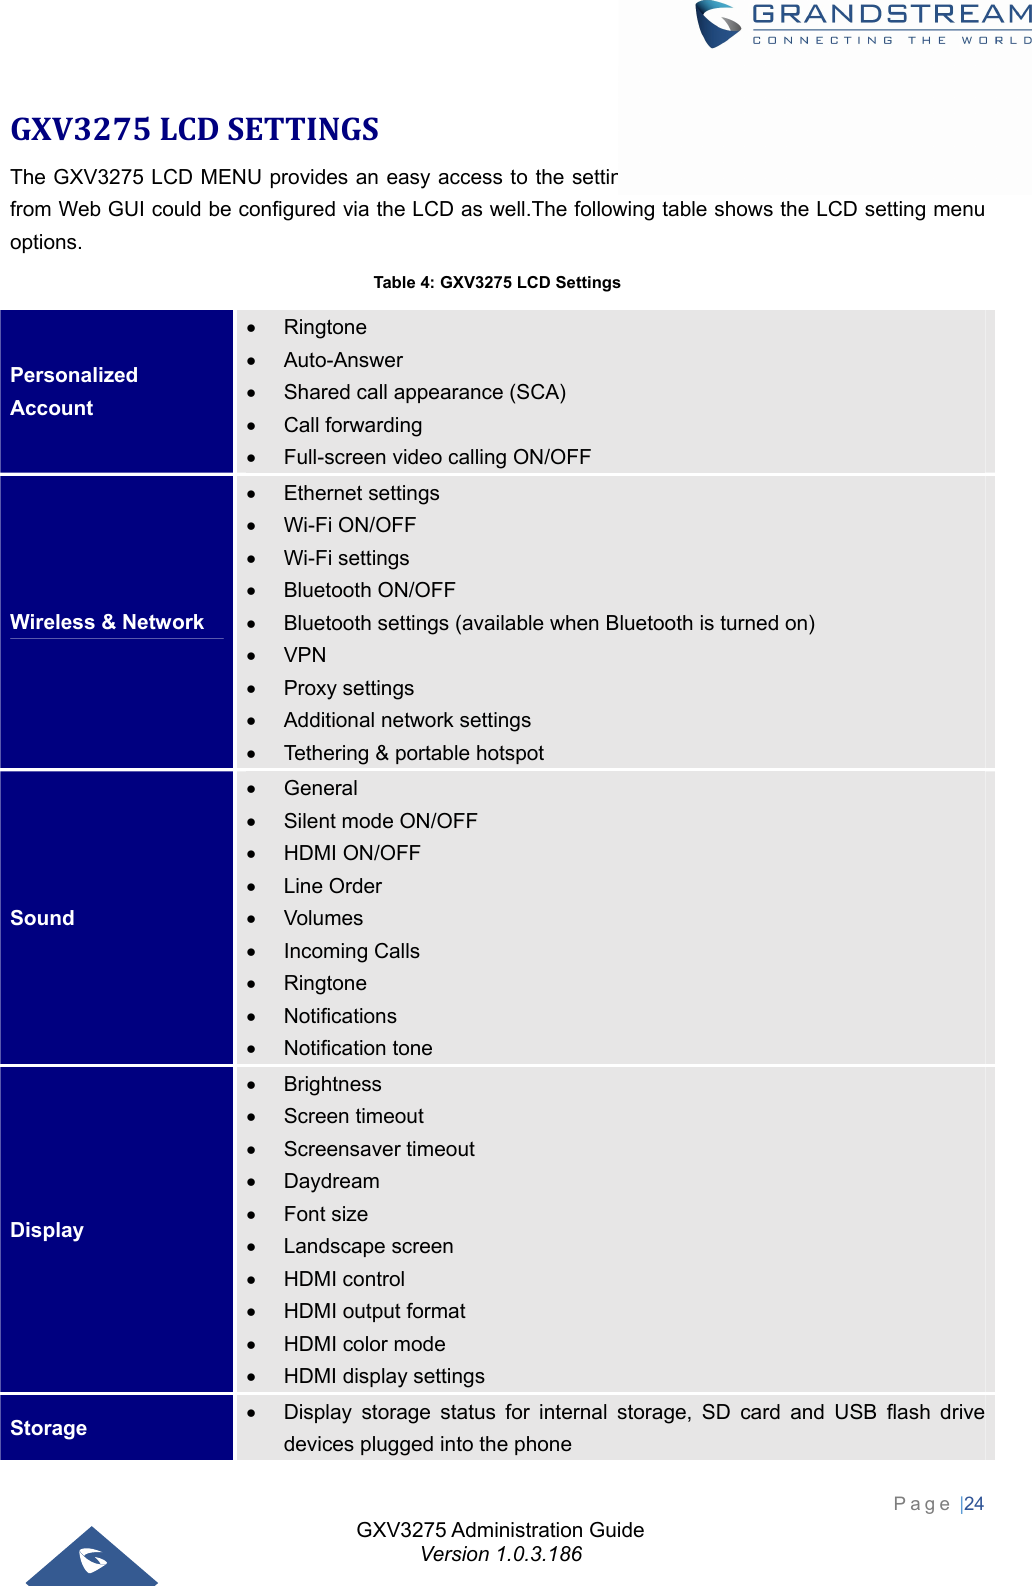
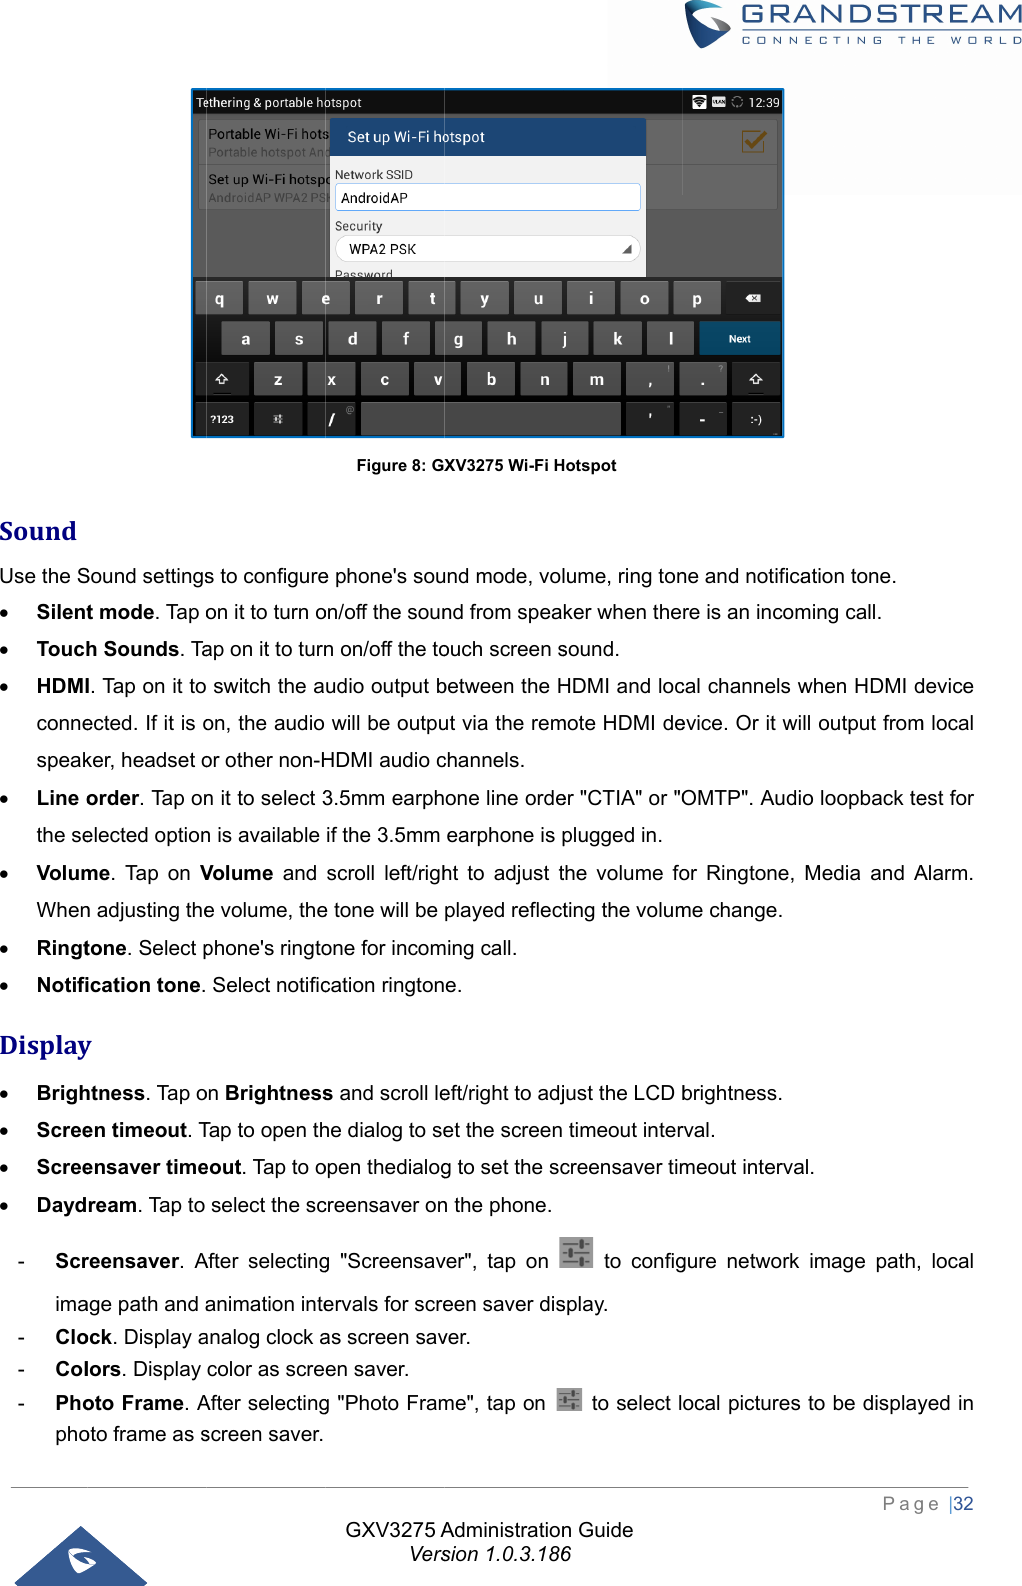
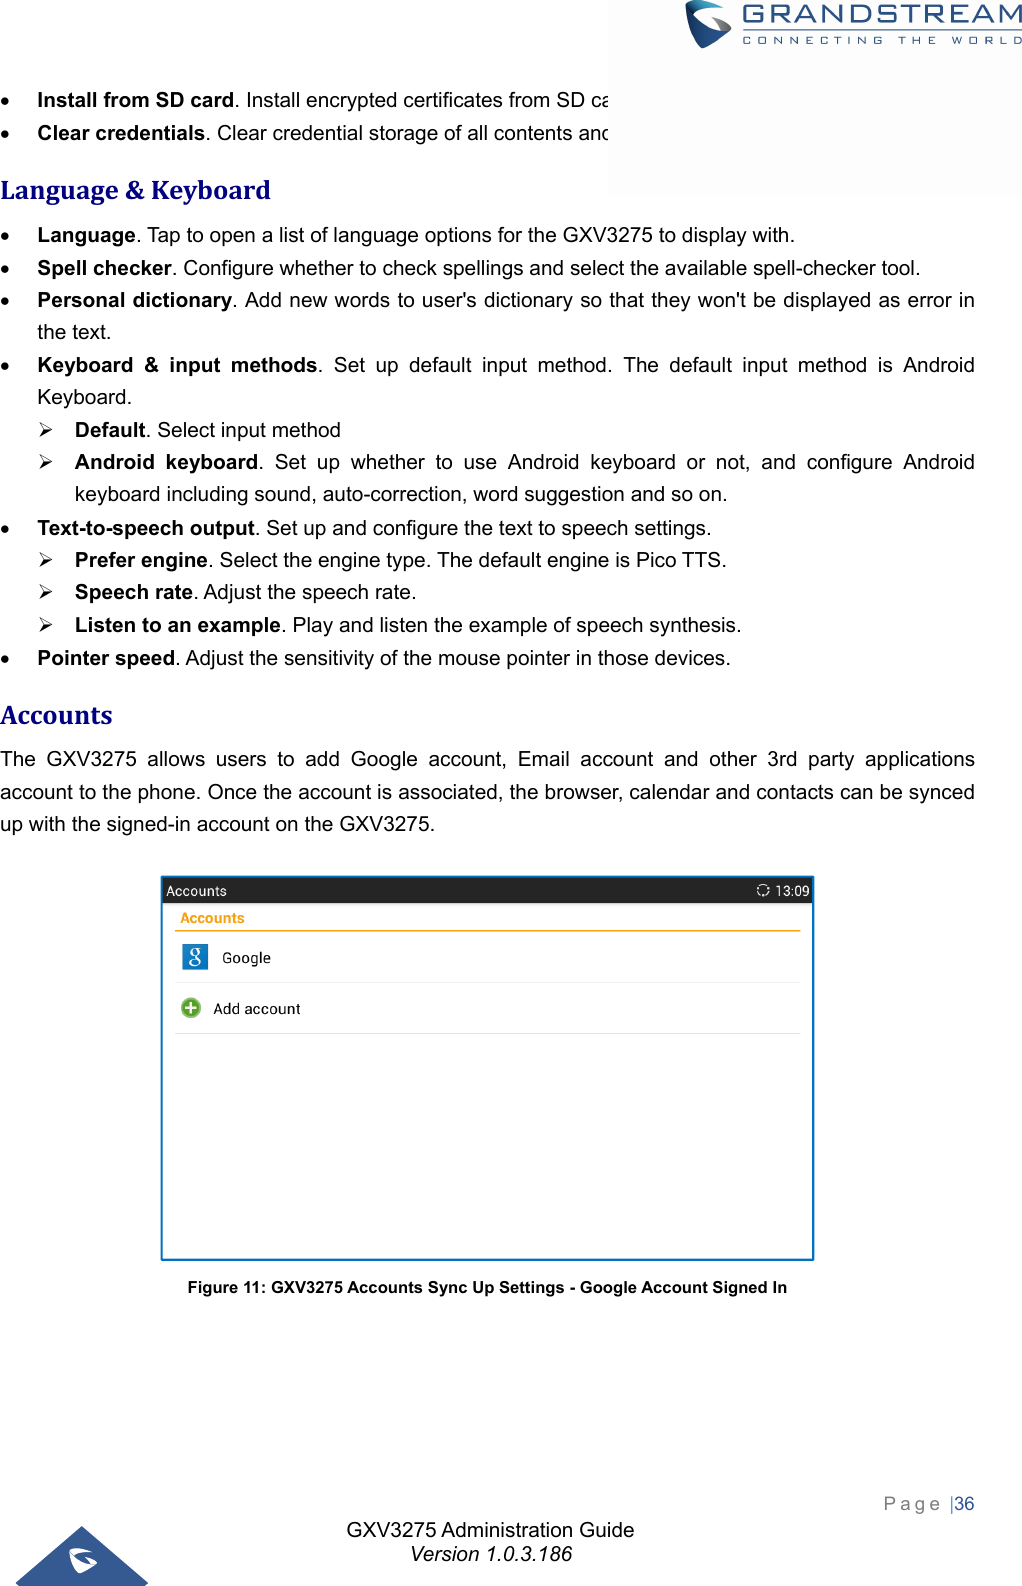
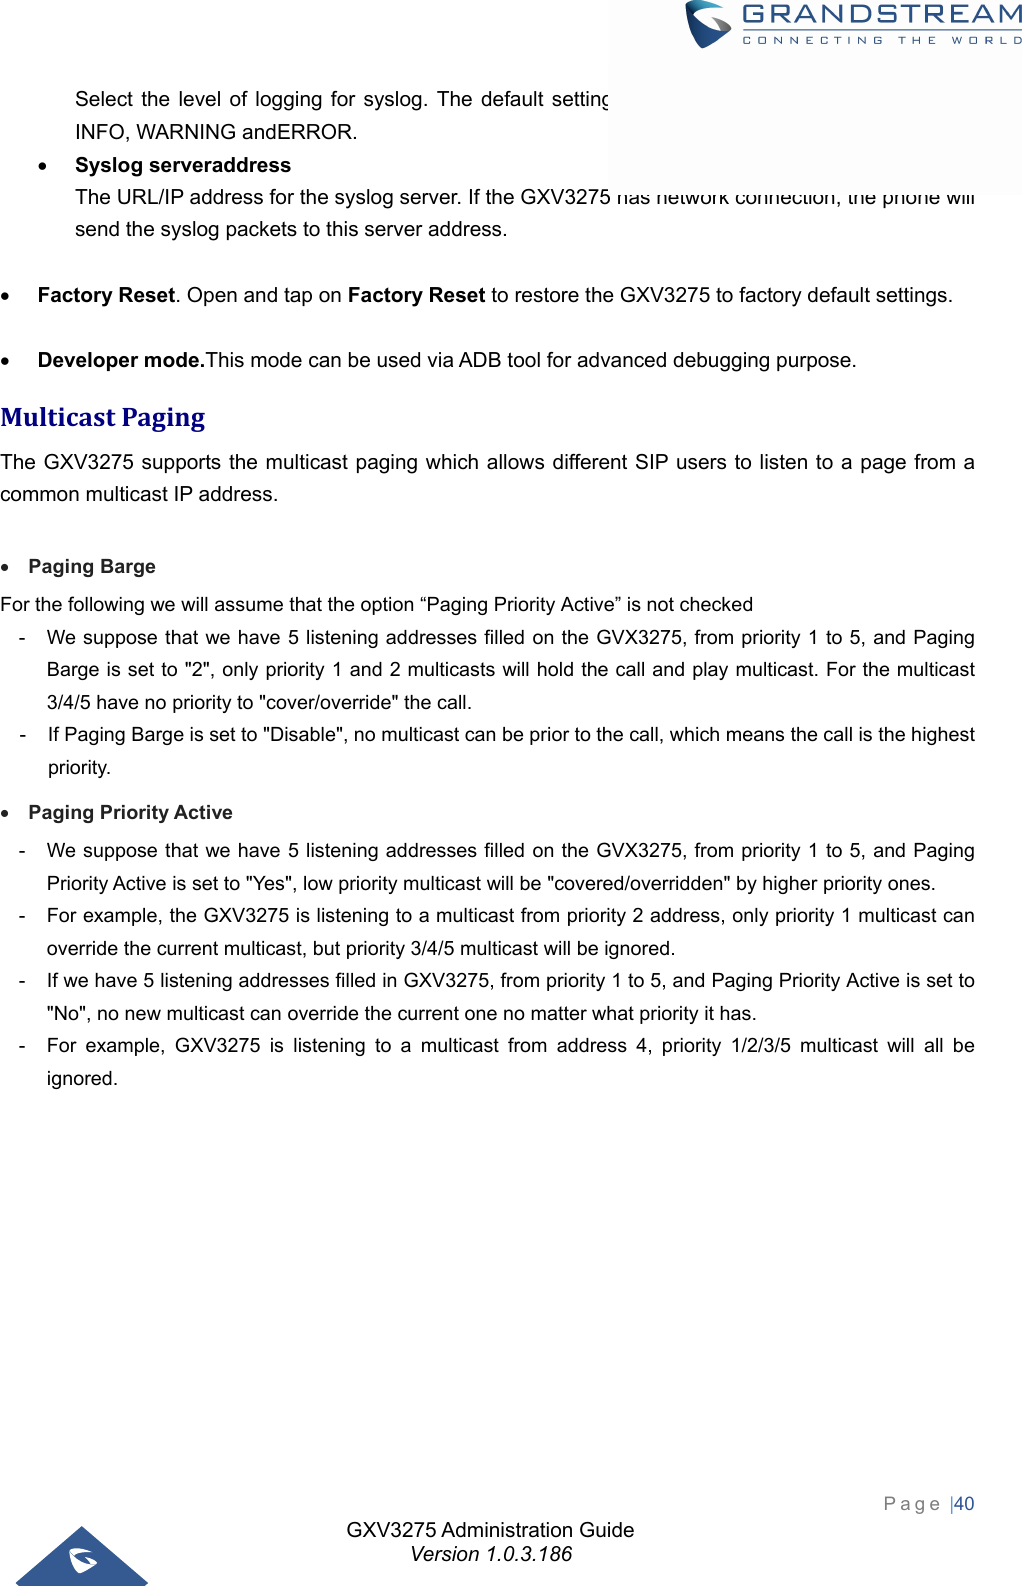
![GXV3275 Administration Guide Version 1.0.3.186 Page |11 CHANGELOGThis section documents significant changes from previous versions of administration guide for GXV3275. Only major new features or major document updates are listed here. Minor updates for corrections or editing are not documented here. FirmwareVersion1.0.3.186 Added Bluetooth patch for BlueBorne vulnerability. Added the option Play warning tone for Auto Answer Intercom. [Play warning tone for Auto Answer Intercom] Supported TLSv1.1 and TLSv1.2. Added option to allow device to ring when “Auto Preview” is enabled. [Auto Preview] Added support for auto downloading firmware/config randomly in time window. [Automatic Upgrade] Added support fordisplaying more Programmable keys in call interface. [Programmable Keys] Removed icon for reboot from web UI Advanced Settings General Settings “STUN Server”, “Use NAT IP” and “SIP TLS Private Key” settings.[General Settings] Added support for removing previous upgrade notification bar when doing manual upload upgrading.[Upload Firmware Locally] Added admin authentication for factory reset if Configuration via Keypad Menu is set to “Basic settings only” or “Constraint mode”. The input will take effect after about 10 seconds of input. [Configuration via Keypad Menu] FirmwareVersion1.0.3.180 Added the option to remove the Register's Authorization header after the first successful register [Add Auth Header On RE-REGISTER]. Supported new config file format: cfggxv3275.xml. Updated that previewing an incoming video call will display DTMF programmable key. FirmwareVersion1.0.3.177 Added support for Syslog over SSL/TLS. [Syslog Protocol] Added option for DNS SRV Failover mode [DNS SRV Fail-over Mode] Added option to set call forward when phone is set to DND. [Forward when DND] Updated to enable automatically trim the account name and display name on web UI. [Account Name] FirmwareVersion1.0.3.171 Added sending SIP INFO message with “record” header when record key is pressed. [Record Mode] Added “Record Mode” to specify the location for saving call recording. [Record Mode] Added support for displaying the account name on Click-To-Dial page. [Click-To-Dial] FirmwareVersion1.0.3.162 Added “Ignore Alert-Info header”. [Ignore Alert-Info header]](https://usermanual.wiki/Grandstream-Networks/GXV3275V3.User-manual/User-Guide-3709356-Page-11.png)
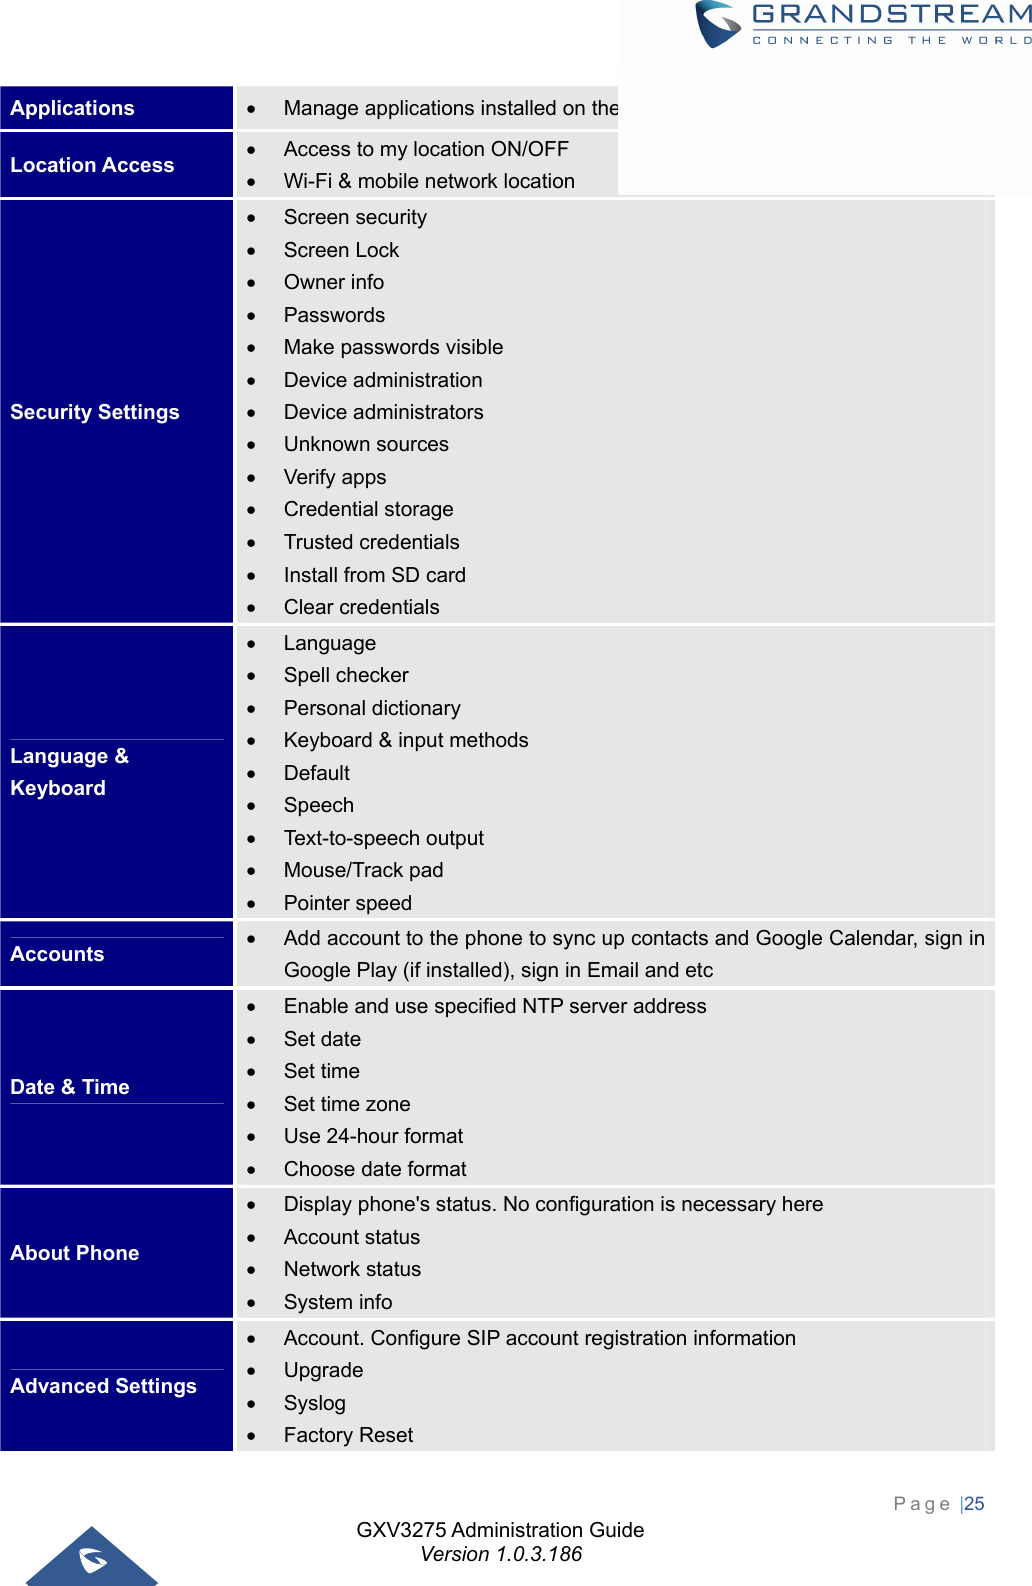
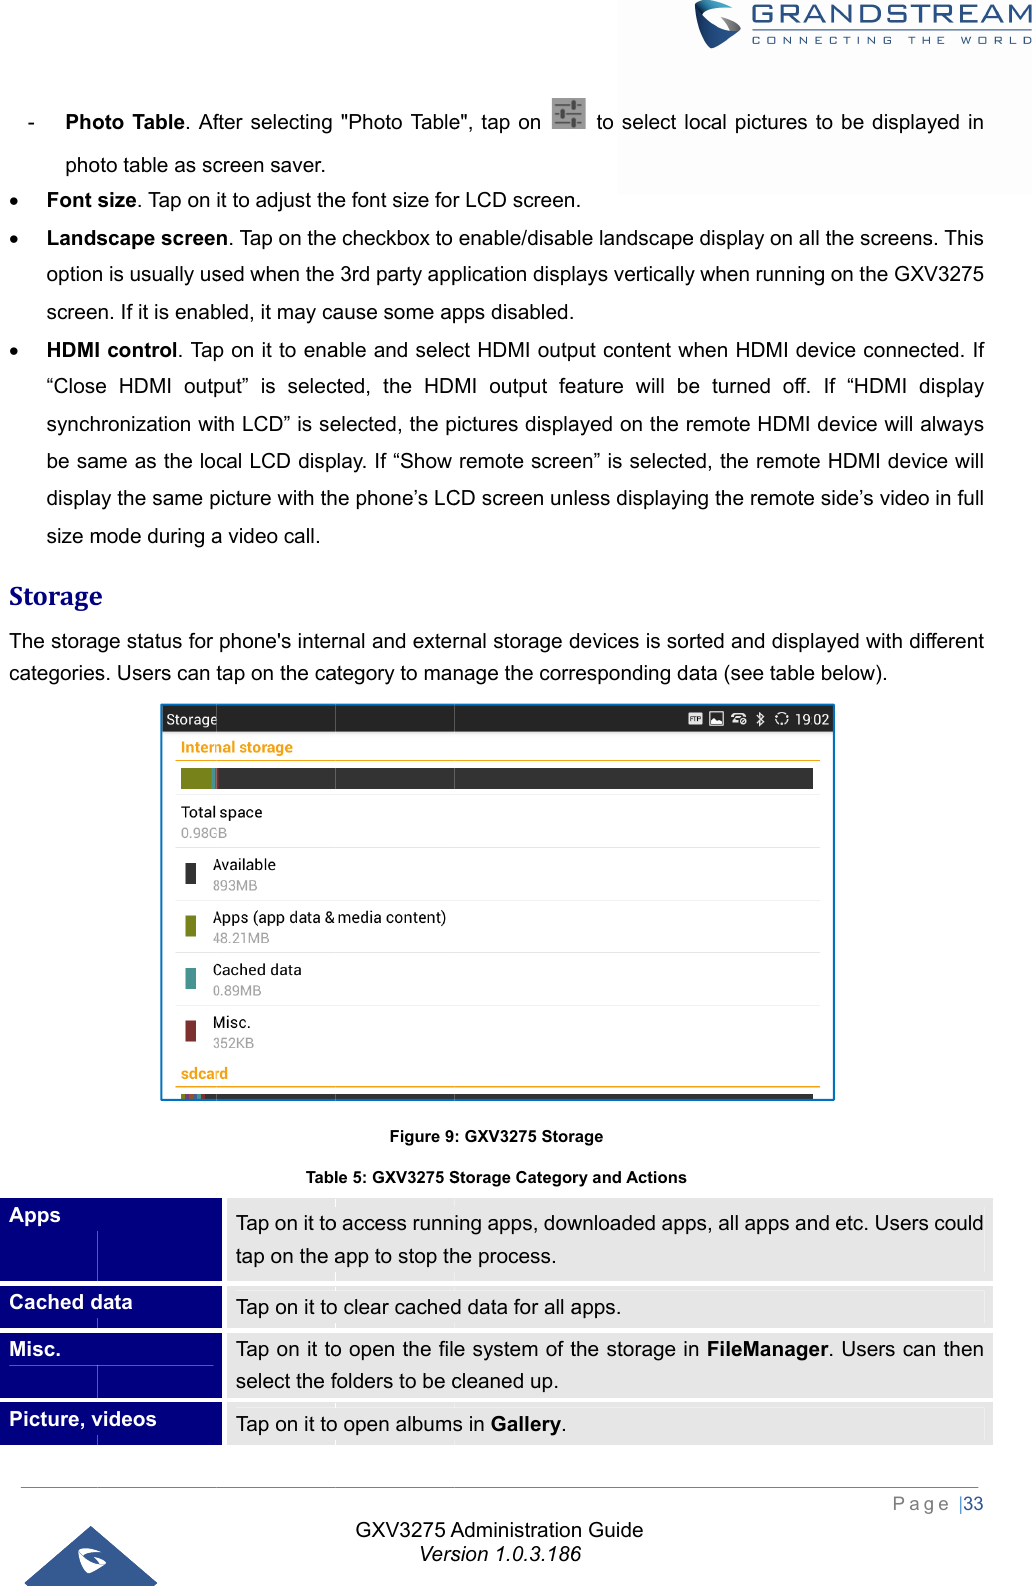
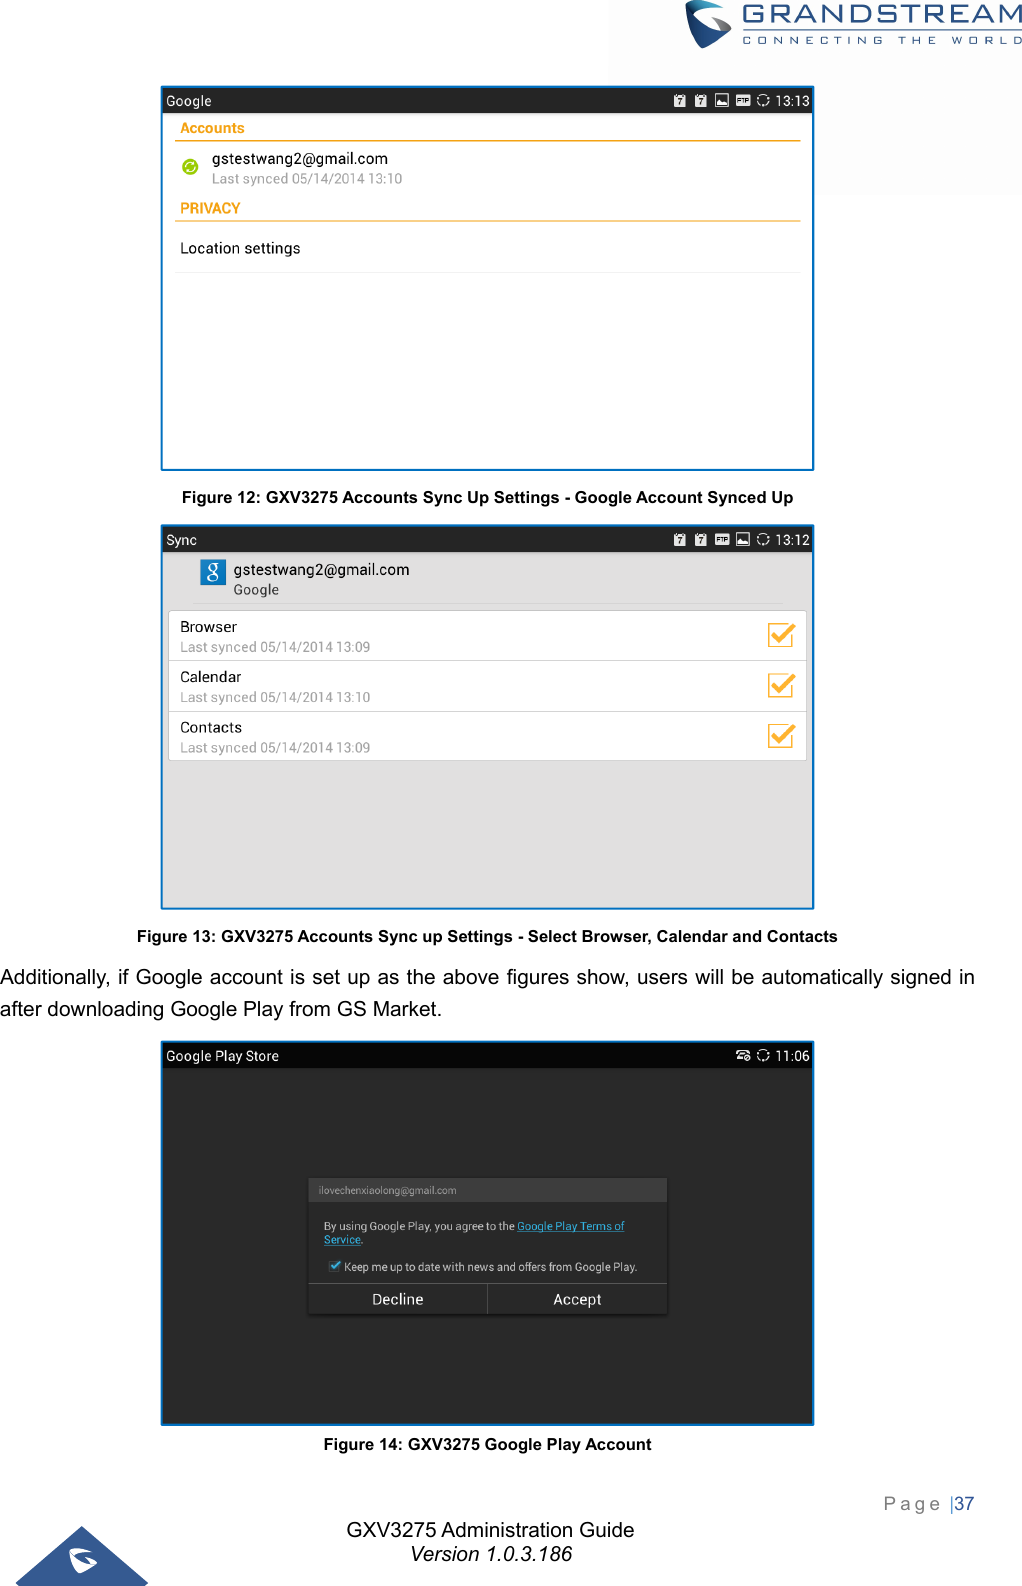
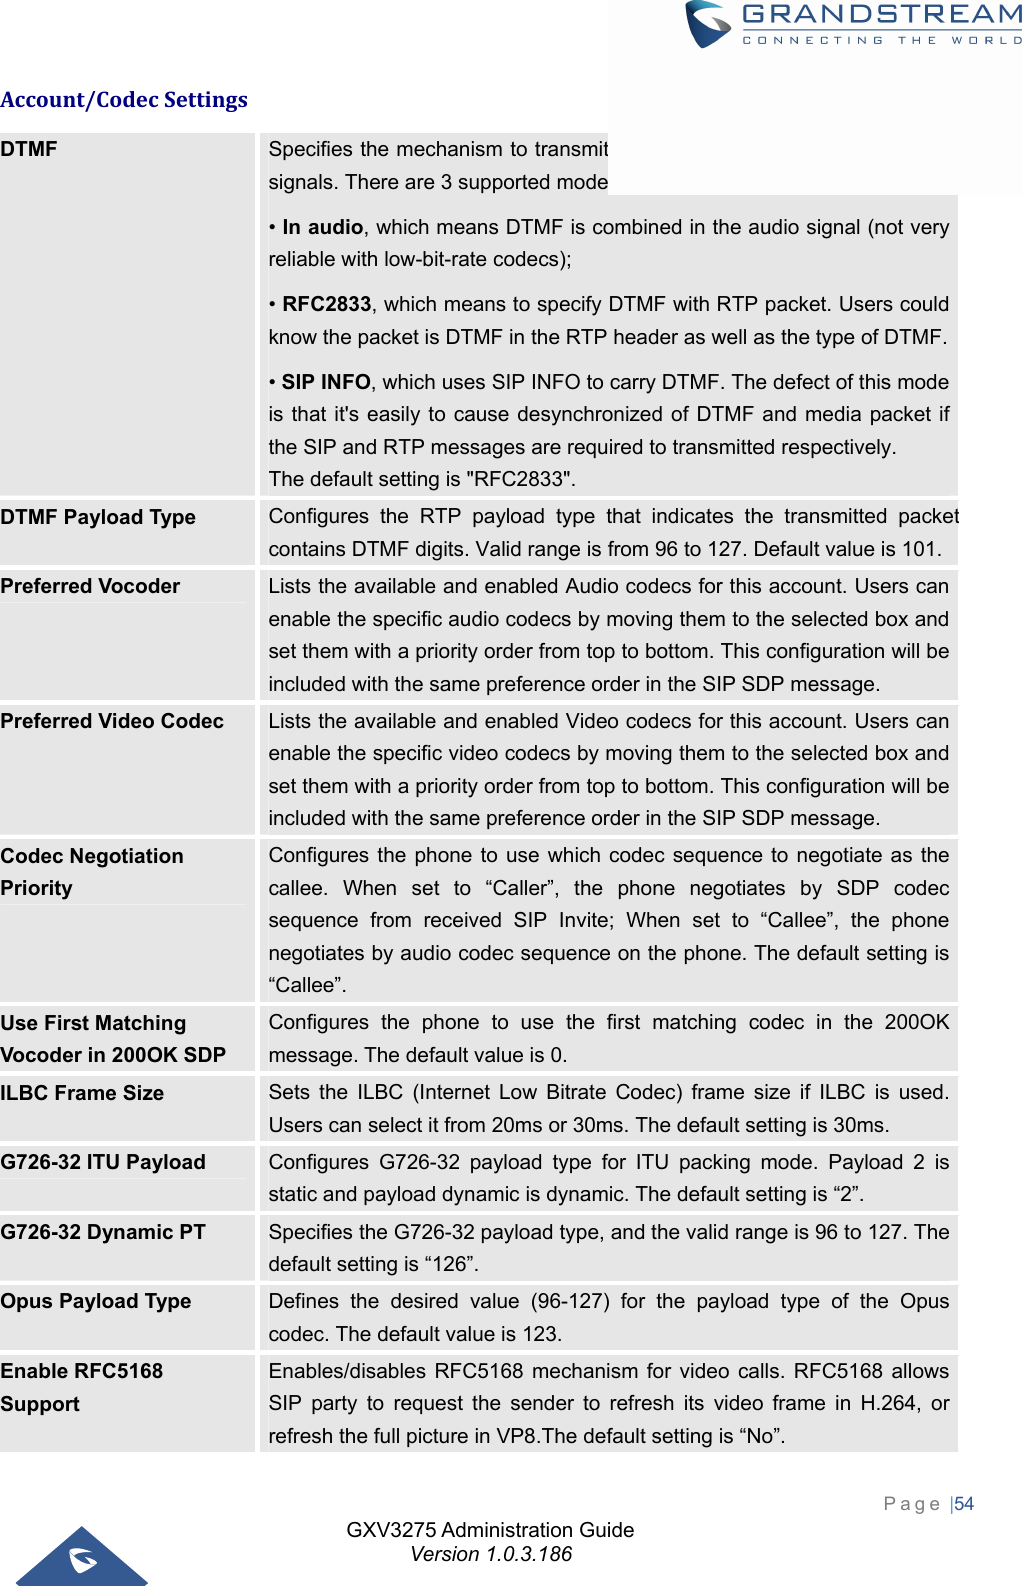
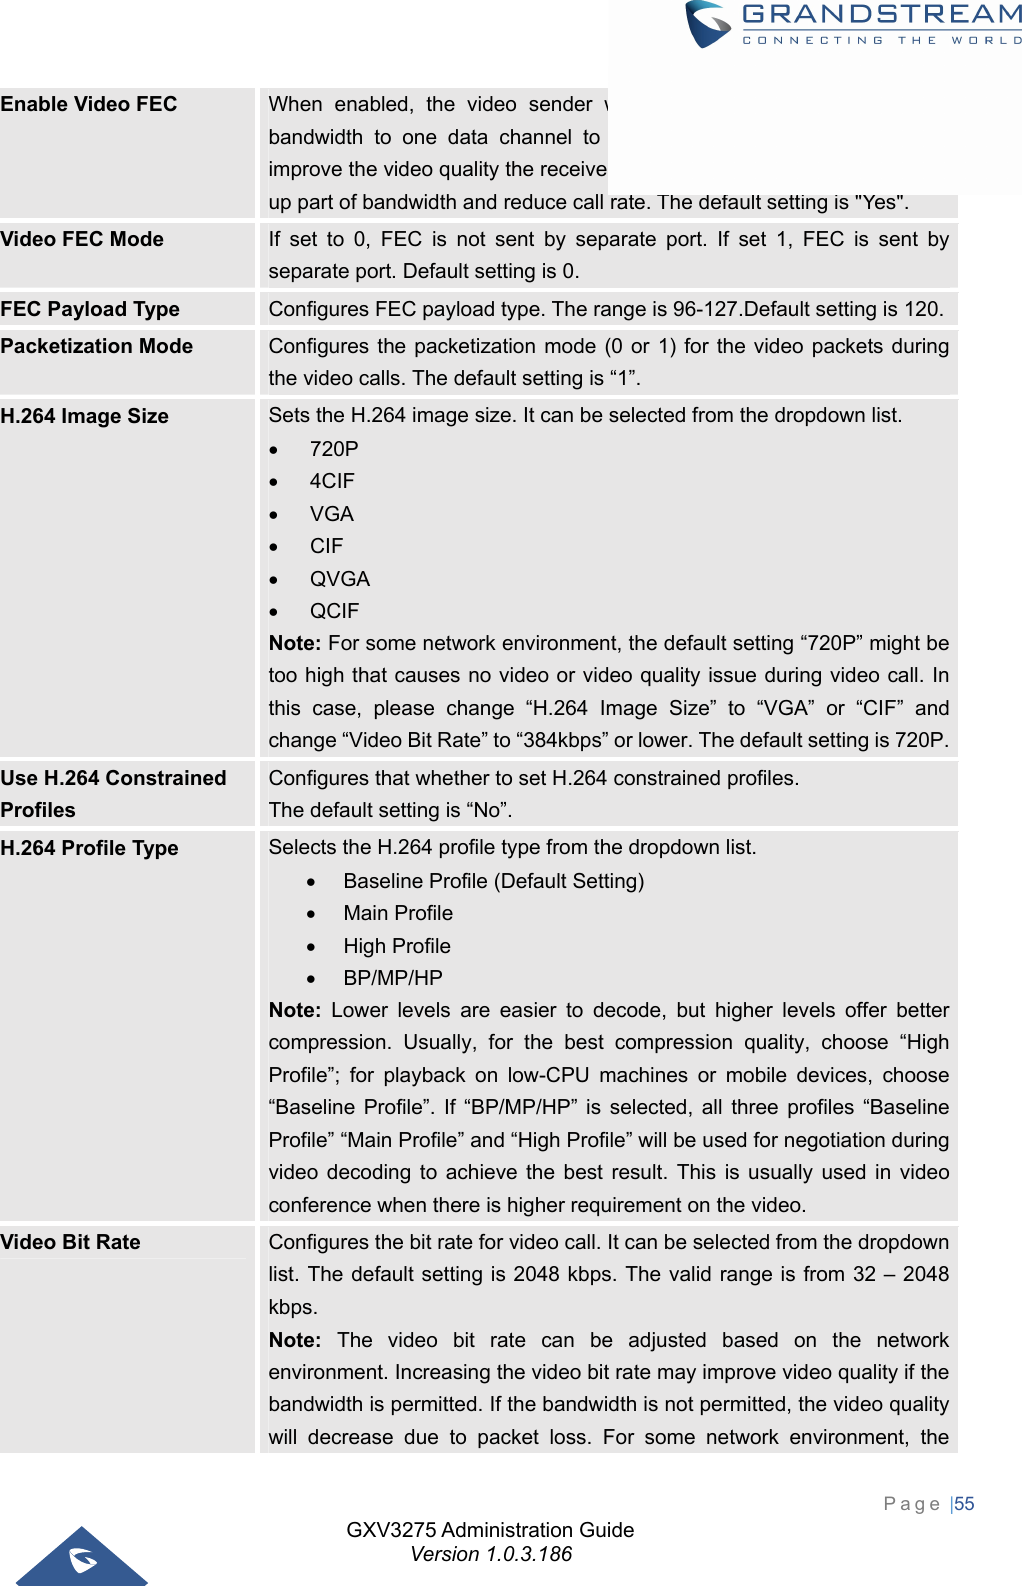
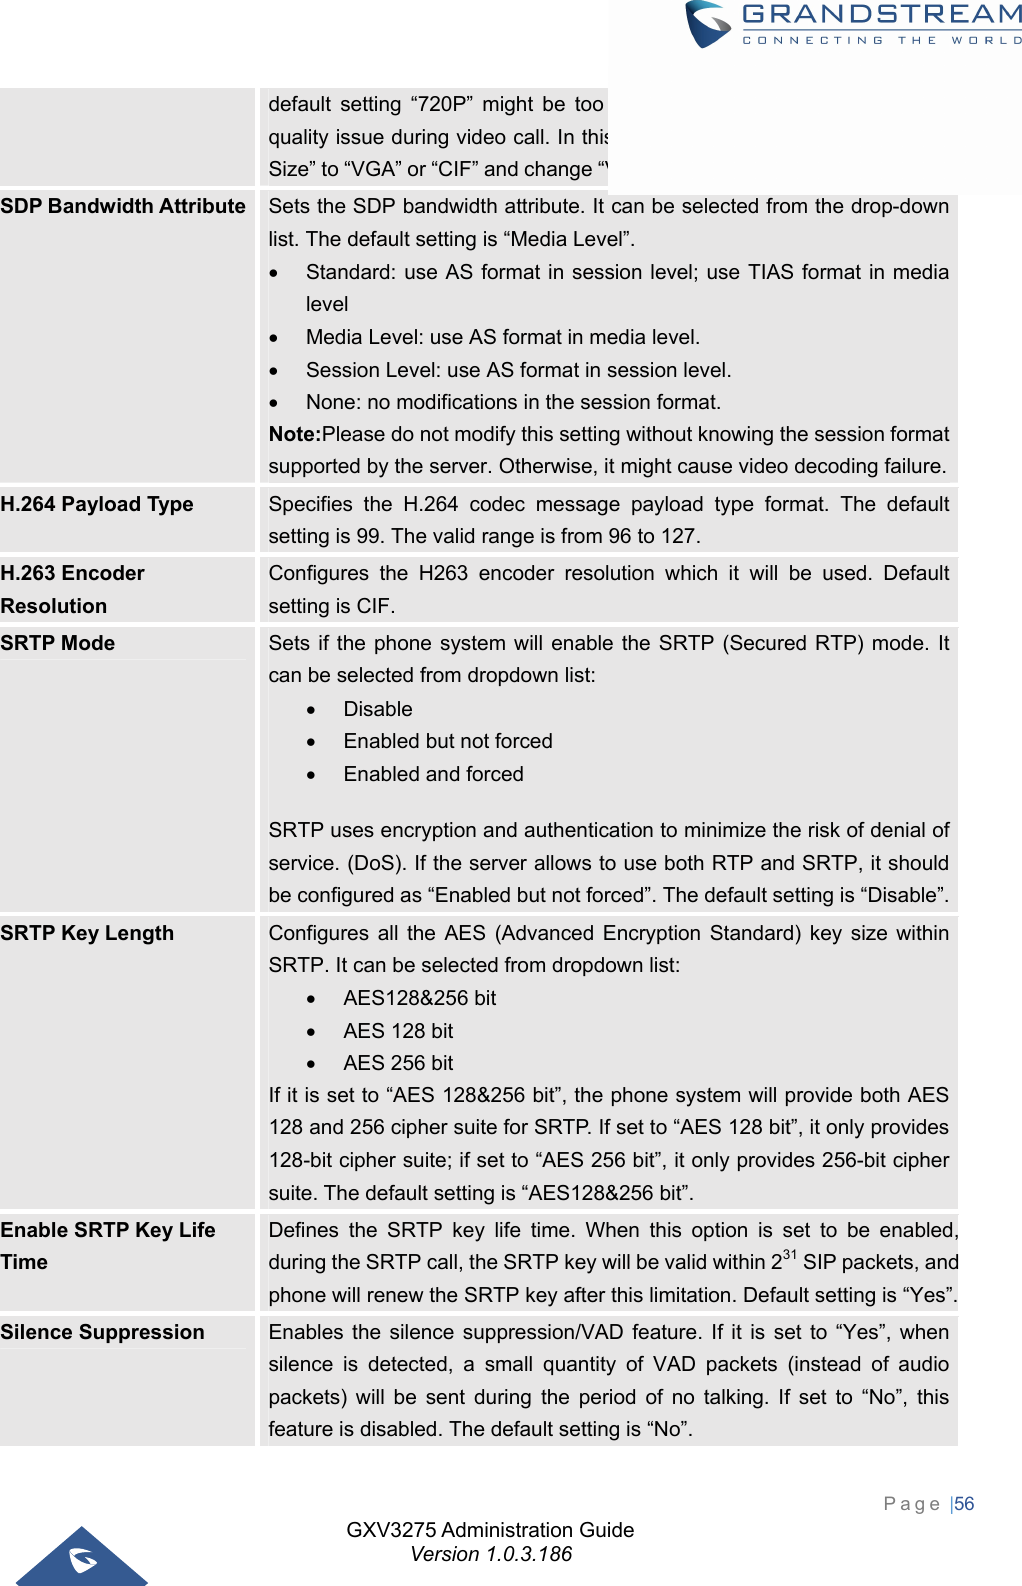
![GXV3275 Administration Guide Version 1.0.3.186 Page |12 Added support for GDS3710 integration. [Advanced Settings/GDS Settings] Added “Disable RJ9 Headset Auto Detect”. [Disable RJ9 Headset Auto Detect] Added support for HTTP URL authentication when challenged by camera for getting MJPEG stream. [Special Feature] Added support to SIP register to failover SIP server. [Register to Failover SIP Server] Added support to user secondary SIP server for guest login. [Guest Login] FirmwareVersion1.0.3.158 Added Account Call Settings Intercom barging. [Intercom Barging] Added support ‘{‘, ‘}’ as valid character in Maintenance Contacts Download Server. [Download Server] Added “Constraint Mode” in Maintenance Upgrade Configuration via Keypad Menu. Updated preview function before answering the call would keep playing ringback on caller side.[Enable Function for Incoming Call] Improving changing syslog level does not need reboot to take effect. [Syslog] Added “Data Wiping” in LCD Settings.[Data Wiping] Added support of SNI extension for TLS. [SNI] Updated the default NTP server. [Assign NTP Server Address] FirmwareVersion1.0.3.144 Improved web UI security by avoiding reading/writing cookie. Improved the utility of “Use # as Dial Key” to dial out. [Use # as DialKey] Added new option “Dial Prefix” under MPK Ext Settings Key Mode. [Key Mode] Added support of “Click to Dial” feature on web GUI. Set DHCP VLAN Override to "Encapsulated in DHCP Option 43" by default. [DHCP VLAN Override] Added support of sending only SIP log under syslog settings. [Syslog] Added “Enable Enterprise Contacts Timeout Auto Search”. [Enable Enterprise Contacts Timeout Auto Search] Removed “Jitter Buffer Maximum (ms)” option from codec settings. Added option “Custom Alert-Info for Auto Answer”. [Custom Alert-Info for Auto Answer] Set default value for option “Handset TX gain(dB)” to “-6”. [Handset TX Gain ] Set default value for option “Handset Equalizer RX” to “Fidelity”. [Handset Equalizer RX] Added “Attended Transfer Only” to Default Transfer Mode. [Default Transfer Mode] FirmwareVersion1.0.3.131 Added options “Enable Video FEC”, “Video FEC Mode”, and “FEC Payload Type. [Account/Codec Settings] Added option “Enable MPK Auto Arrangement”. Added support IPv6 on GXV32xx. [Maintenance/Network Settings] Added an option “Enable 3.5mm Headset Control”. [Maintenance/Device Manager] Added ability to configure the provisioning/firmware URL with variable.[Maintenance/Upgrade] Added ability to configure timeout on phone LCD for on-hook dialing.[Advanced Settings/Call](https://usermanual.wiki/Grandstream-Networks/GXV3275V3.User-manual/User-Guide-3709356-Page-12.png)
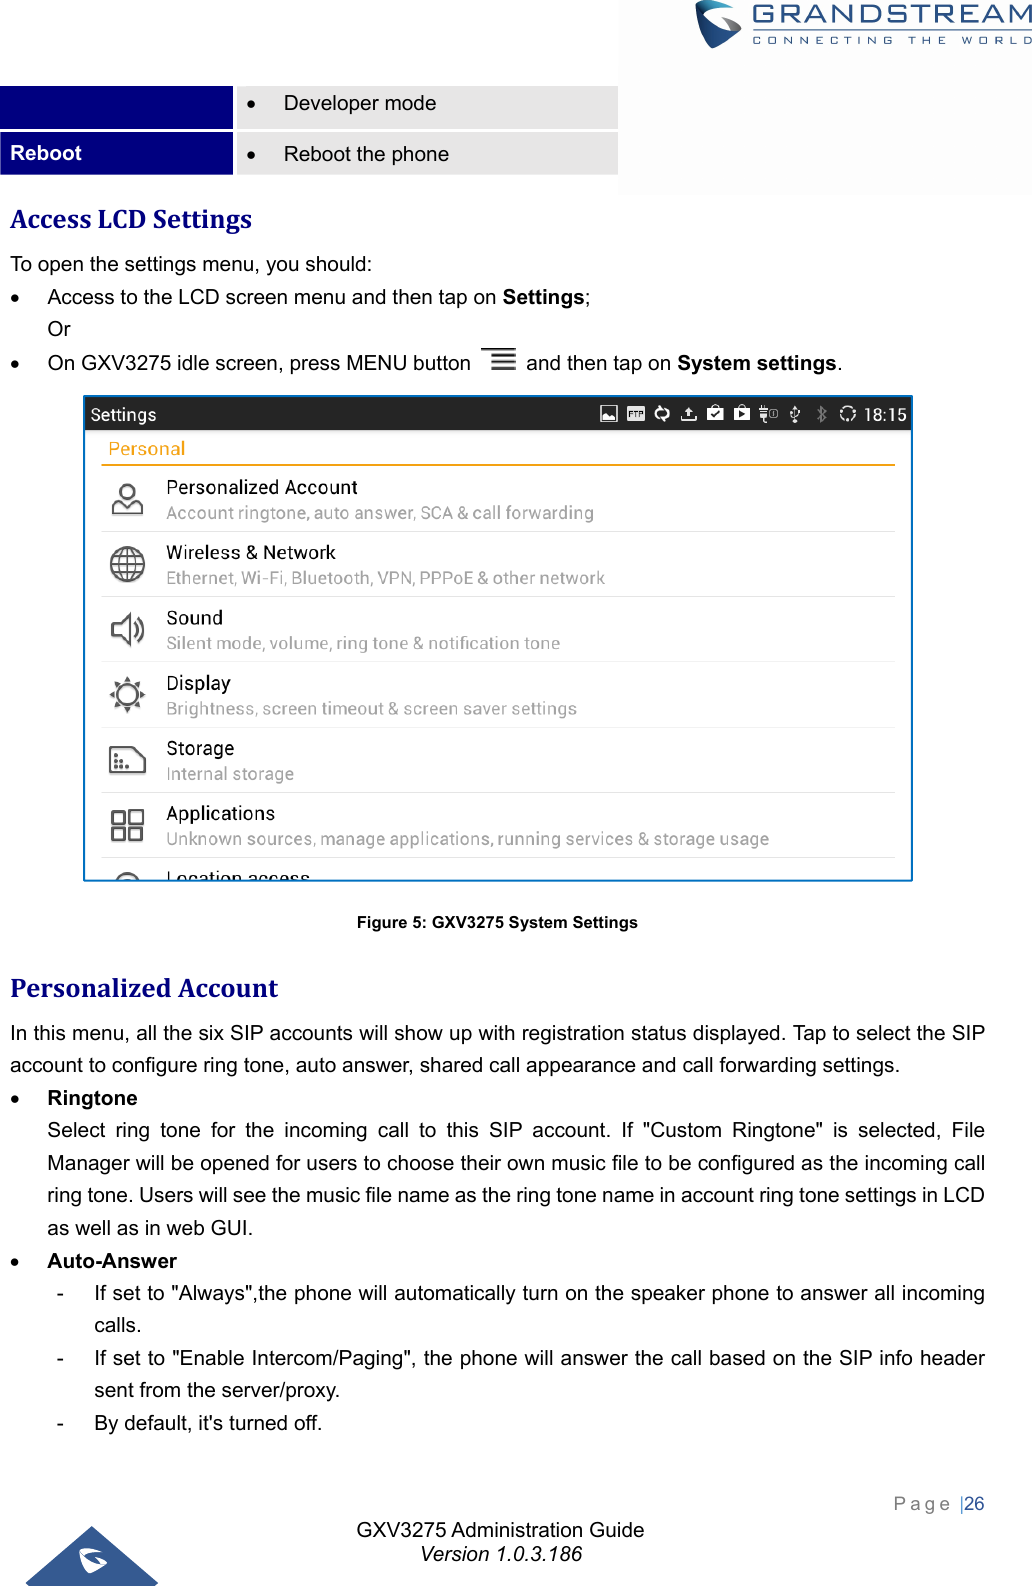
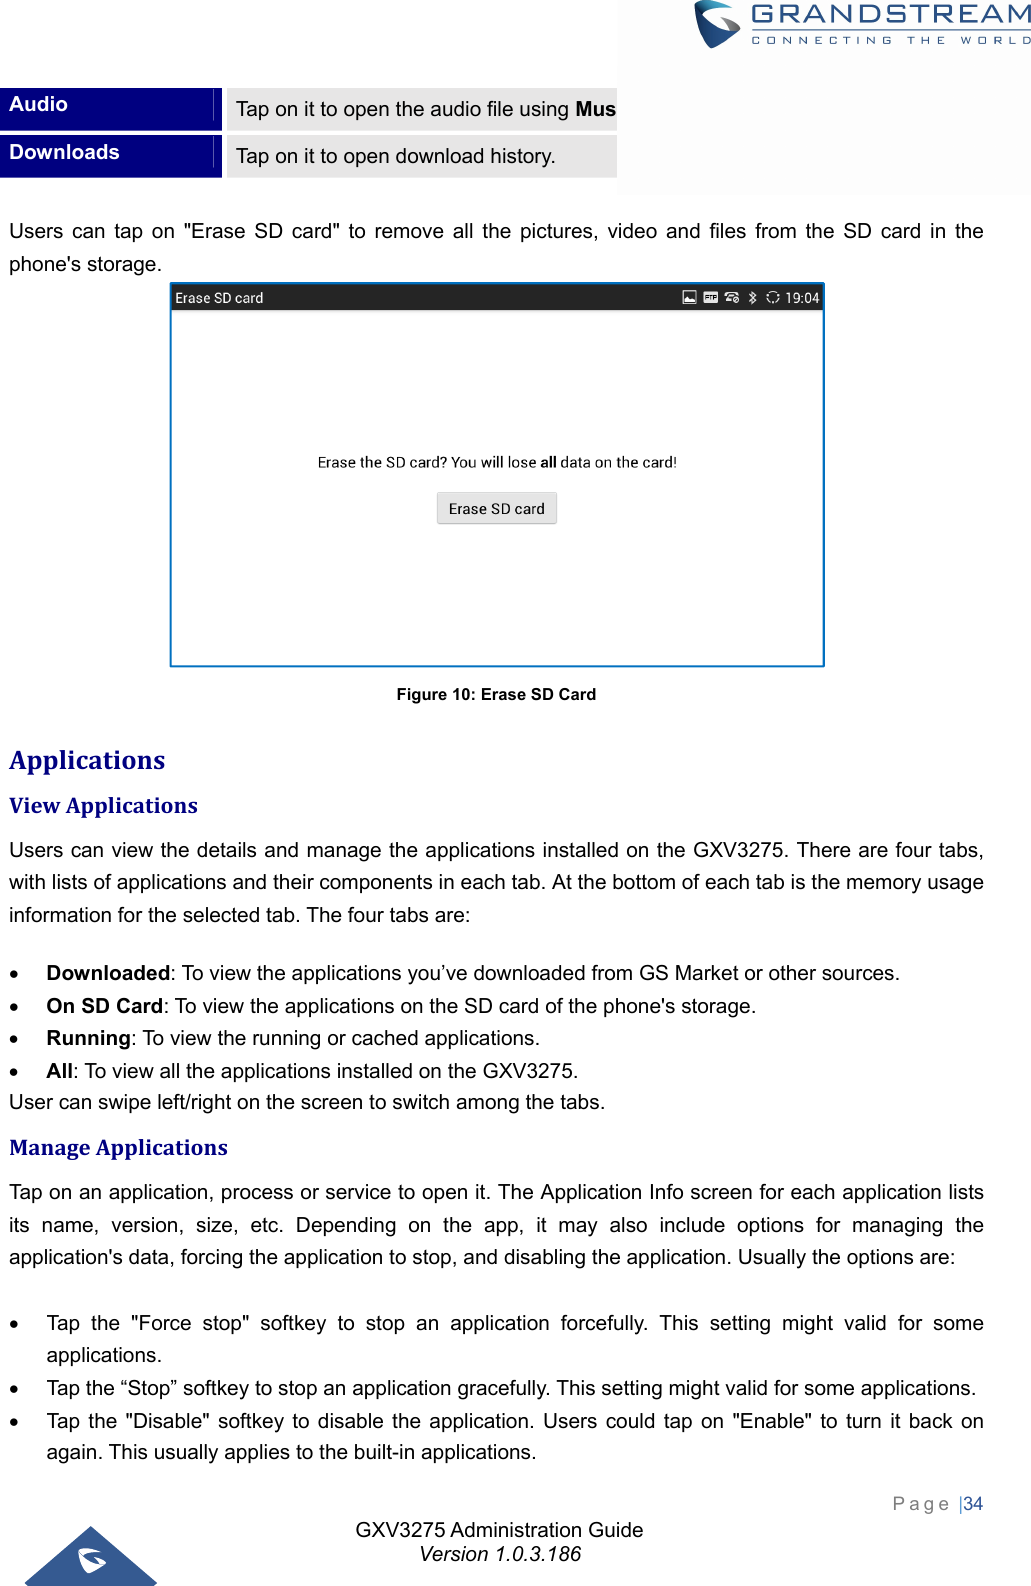
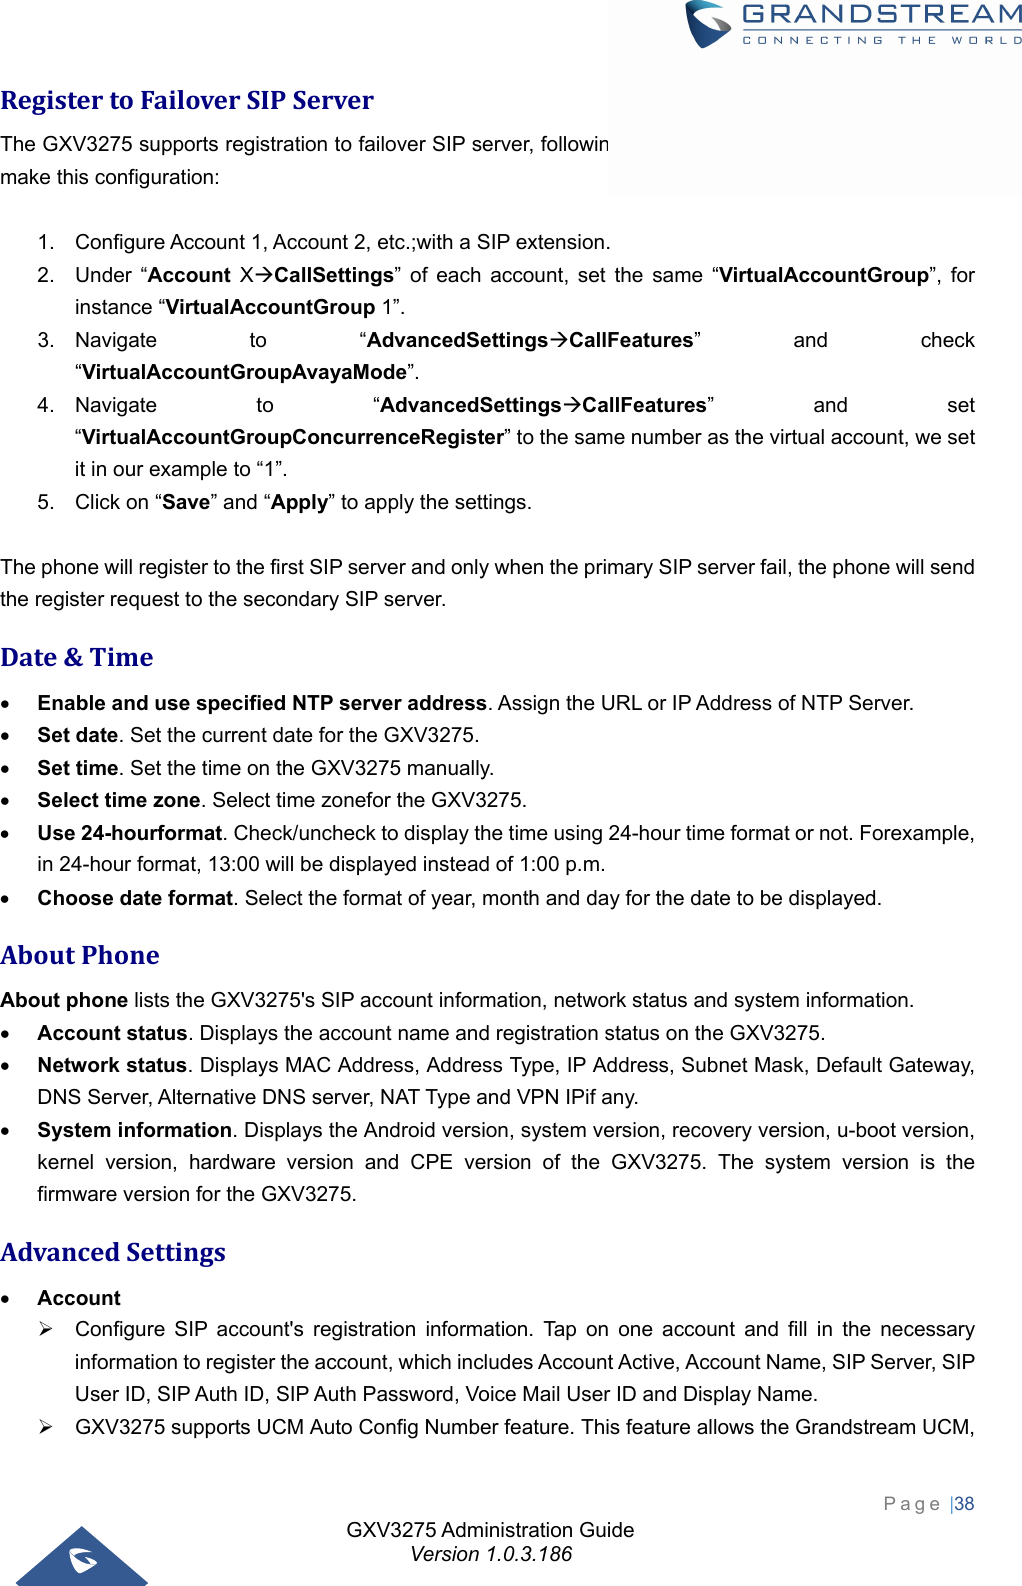
![GXV3275 Administration Guide Version 1.0.3.186 Page |13 Features] Added option “Enable CDP”. [Maintenance/Network Settings] Added options “GUI Customization File Download Mode”, “GUI Customization File URL”, “GUI Customization File HTTP/HTTPS Username”, “GUI Customization File HTTP/HTTPS Password”, and “Use Configuration of Config File Server”. [Maintenance/Upgrade] Added option “Disable Web GUI”. [Maintenance/Web/SSH Access] Added an option to mute the touch screen clicks only. [Sound] Added ability for “Users” to check/edit the MPK Extension when connectedwith user privilege. Added "Different Networks for Data and VOIP Calls" option.[Maintenance/Network Settings] Adjusted the RX/TX options for headsets. Added the RX/TX gain options for Virtual Sound Card. [Maintenance/Device Manager] Added support for RFC3605. Added the ability to connect to the nearest Wi-Fi Access Point. Added validation check for Multicast Address. Added "Dial DTMF Button Size" and "Dial DTMF Button Color" options.[Advanced Settings/Call Features] Added options “Show Dial DTMF Softkey” and “CID to Show Dial DTMF Softkey”. [Account/Call Settings] Added support for DHCP Option 132 and 133 tunneled through DHCP Option 43. [Maintenance/Network Settings] Added "Attended Conference", "Use 3rd Party App as Basic Phone", and "Auto UnHold When Press the Line Key" options. [Advanced Settings/Call Features] FirmwareVersion1.0.3.92 Changed default config file update method to HTTPS for security purpose.[Maintenance/Upgrade] Added H.263 support and RTCP packets loss tolerance.[Account/Codec Settings] Added option “Use First Matching Vocoder in 200OK SDP”. [Account/Codec Settings] Added option “Authentication Type”for Broadsoft XSI feature.[Maintenance/Broadsoft Directories] Added IEEE-48-addr and IEEE-EUI-64 support in PEI (P-Emergency-Info) header. FirmwareVersion1.0.3.75 Add Codec Negotiation Priority. [Account/Codec Settings] Add Video Display Mode. [Advanced Settings/Video Settings] Add Phonebook Key Function. [Maintenance/Contacts] Add Firmware HTTP/HTTPS User Name. [Maintenance/Upgrade] Add Firmware HTTP/HTTPS Password. [Maintenance/Upgrade] Update the “Upgrade” configuration options, “Firmware Upgrade Via” and “Config Via” have been separate to two options. [Maintenance/Upgrade] FirmwareVersion1.0.3.62 Add Configure Door System. [Account/Call Settings] Add Disable Video Call Feature. [Advanced Settings/Call Features]](https://usermanual.wiki/Grandstream-Networks/GXV3275V3.User-manual/User-Guide-3709356-Page-13.png)
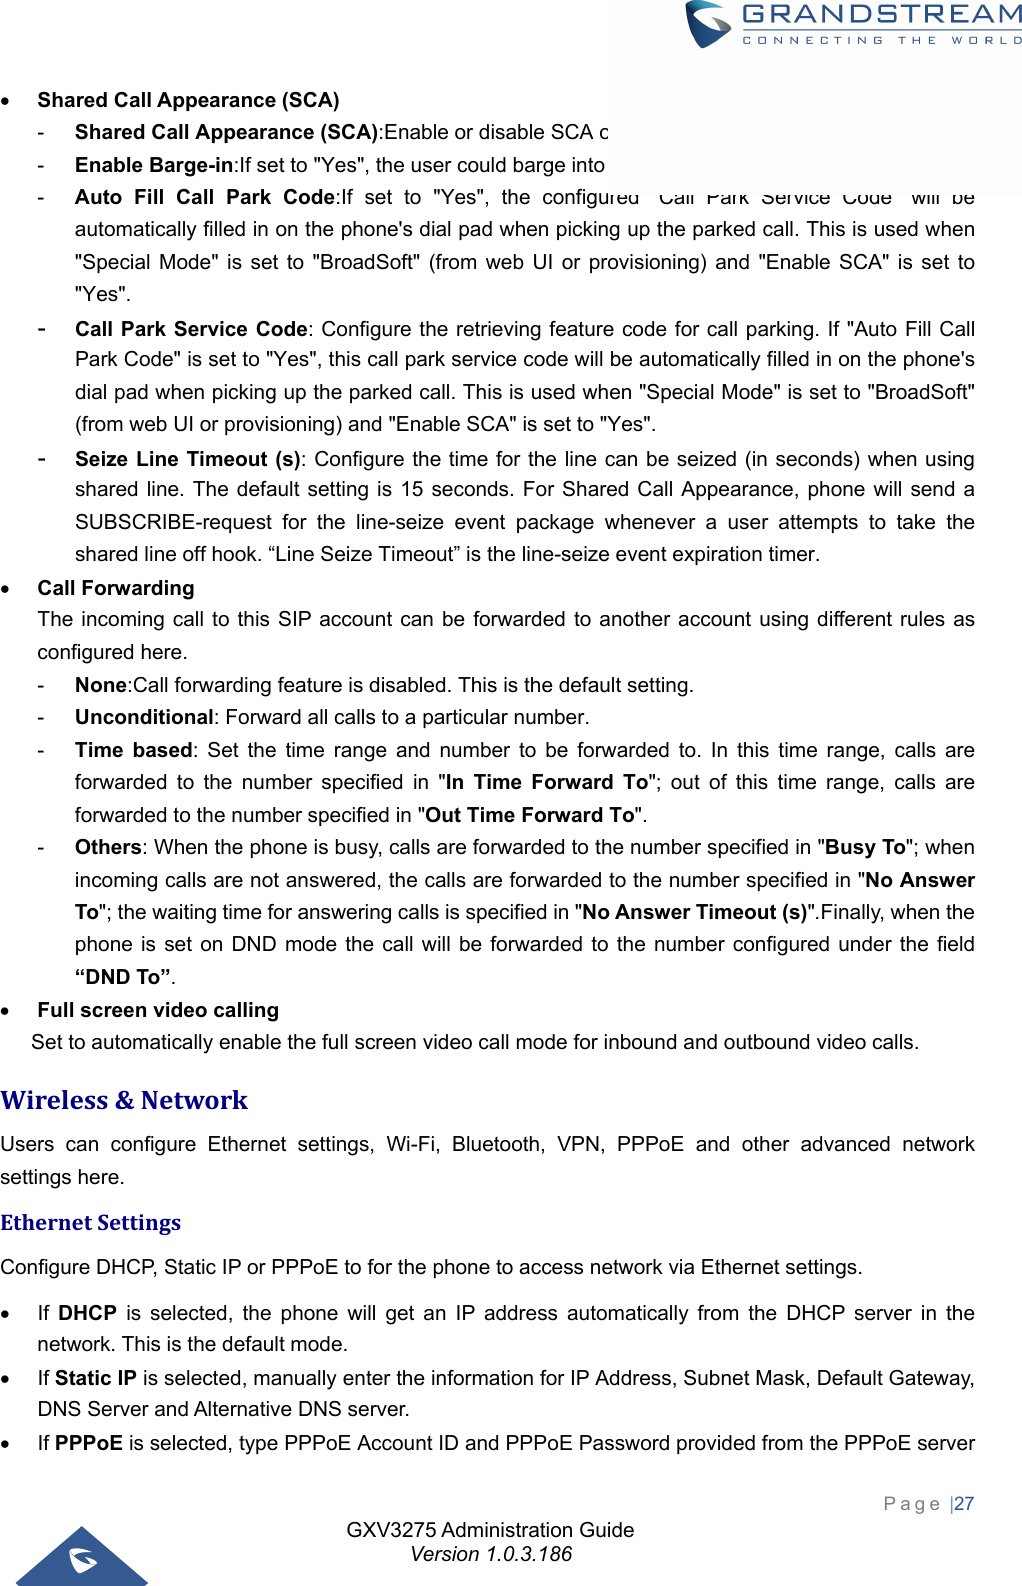
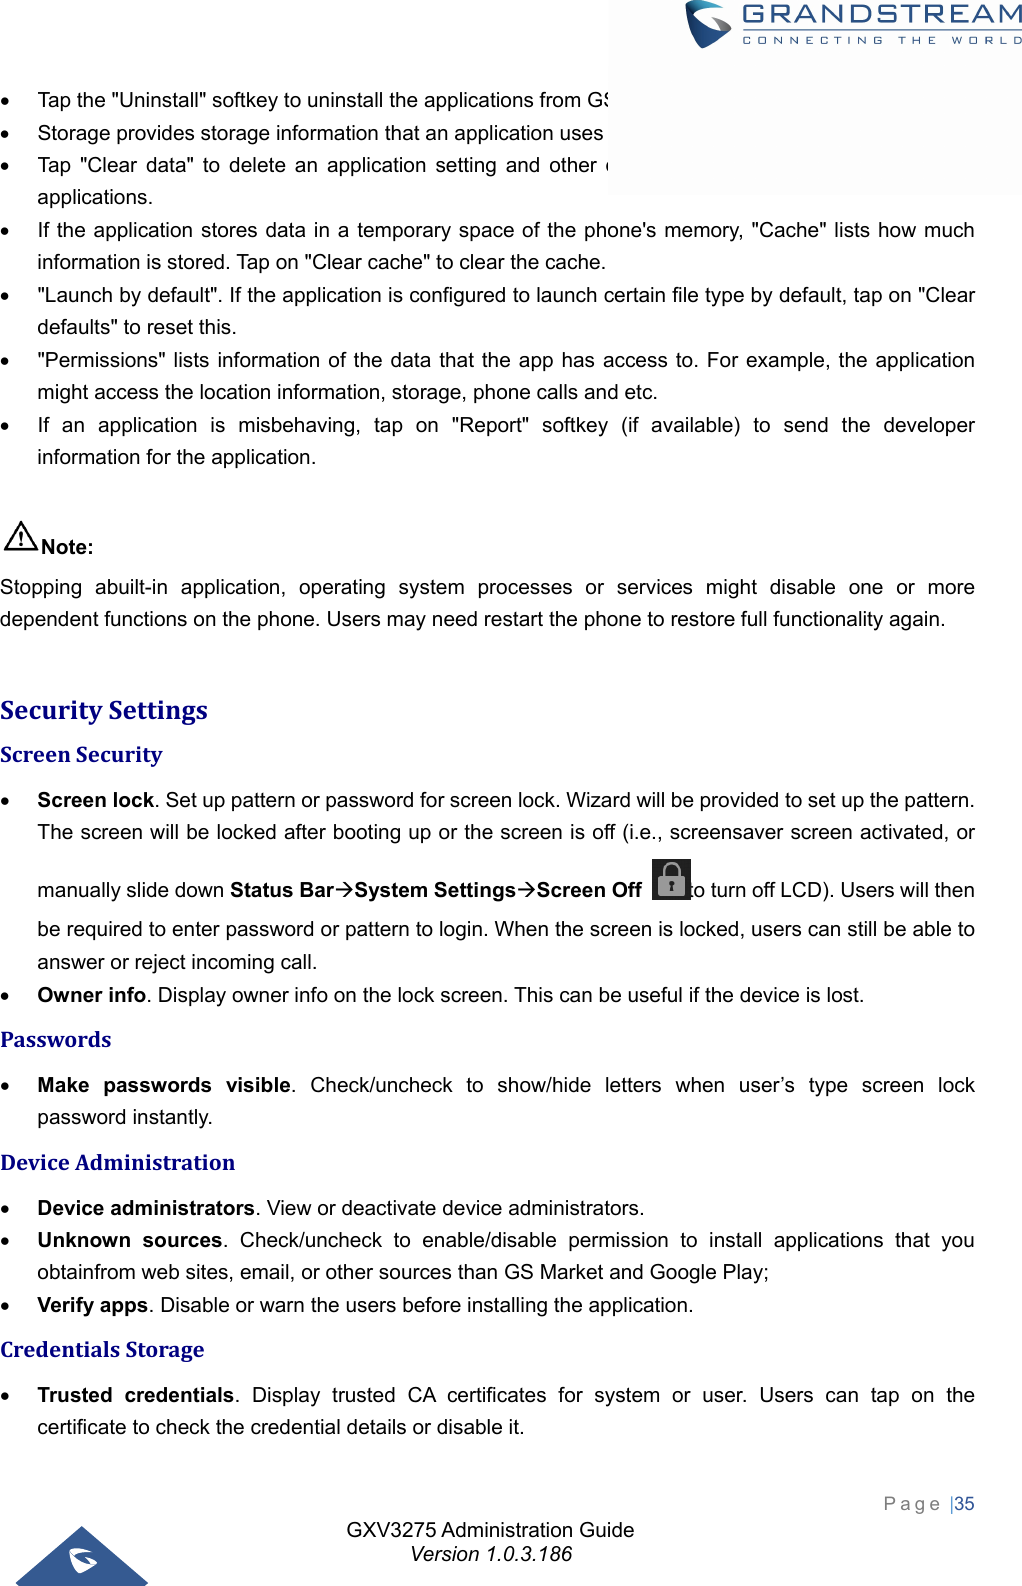
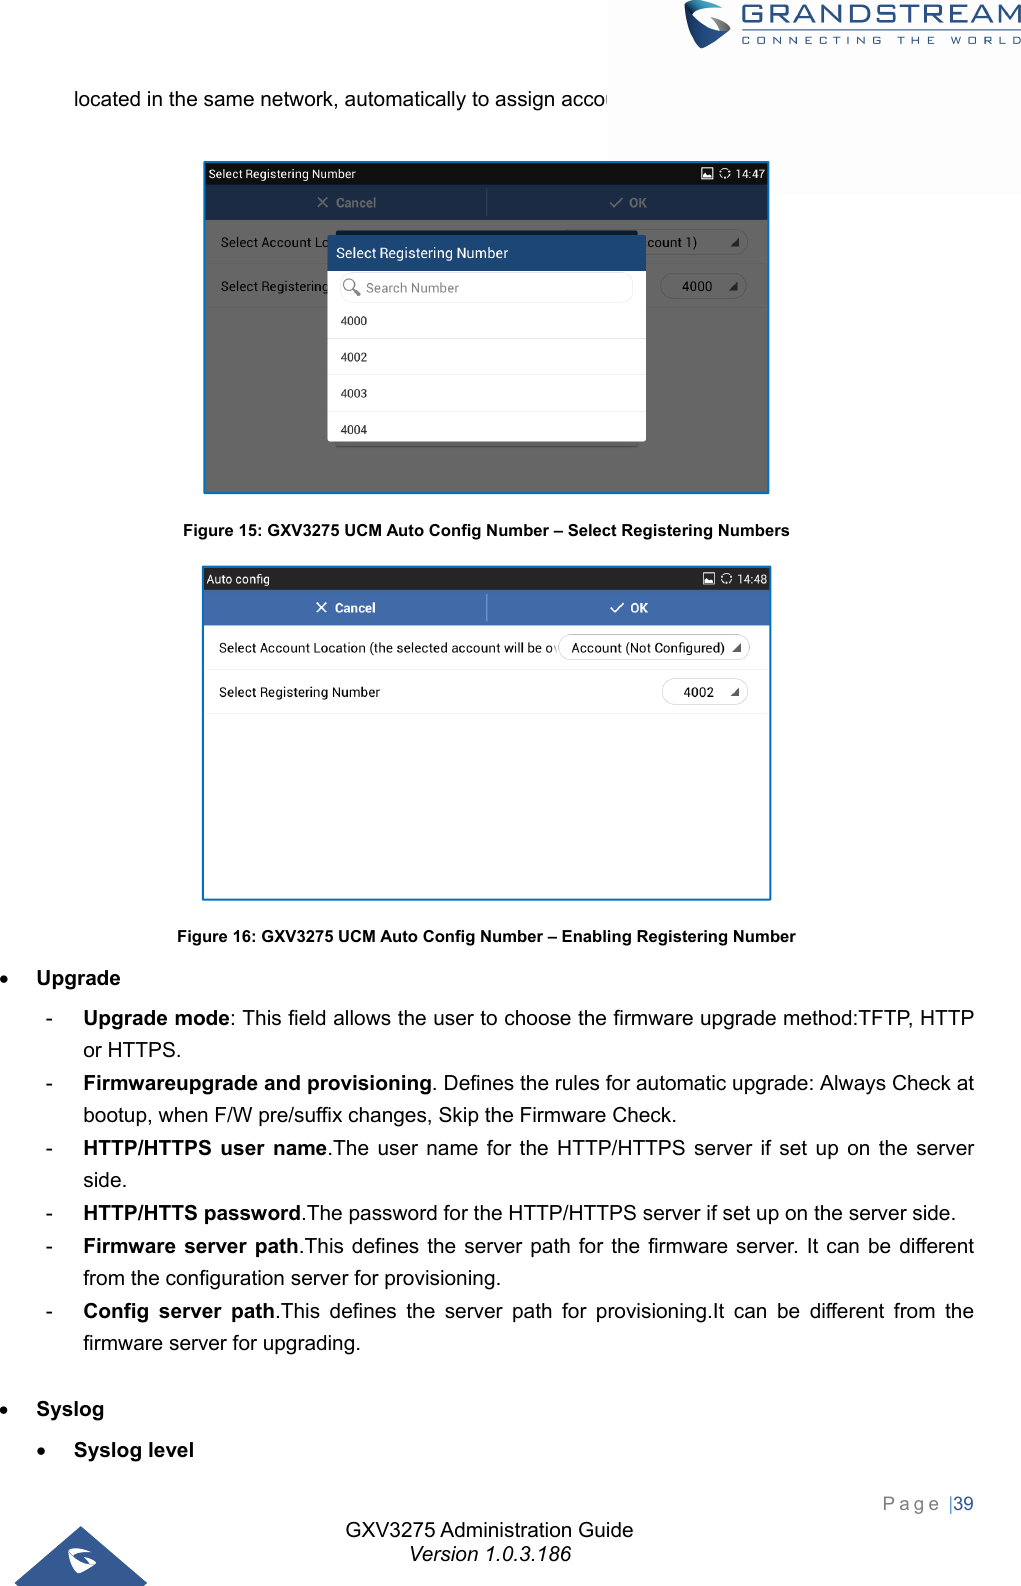
![GXV3275 Administration Guide Version 1.0.3.186 Page |14 FirmwareVersion1.0.3.55 Add Use H.264 Constrained Profiles. [Account/Codec Settings] Add HTTP/HTTPS User-Agent. [Maintenance/Network Settings] Add SIP User-Agent. [Maintenance/Network Settings] Add Allow DHCP Option 242 (Avaya IP Phones). [Maintenance/Upgrade] Add Authentication Type. [Maintenance/Broadsoft Directories] FirmwareVersion1.0.3.46 Add RTP IP Filter. [Account/SIP Settings] FirmwareVersion1.0.3.37 Add Allow Unsolicited REFER. [Account/SIP Settings] Add Allow SIP Reset. [Account/SIP Settings] Add Opus Payload Type. [Account/Codec Settings] Add Trusted CA Certificates. [Advanced Settings/General Settings] Add Import Trusted CA Certificates. [Advanced Settings/General Settings] Add Enable DHCP VLAN. [Maintenance/Network Settings] Add Layer 2 QoS 802.1Q/VLAN Tag (Wi-Fi). [Maintenance/Network Settings] Add Layer 2 QoS 802.1p Priority Value (Wi-Fi). [Maintenance/Network Settings] Add Upload Device Configuration.[Maintenance/Upgrade] FirmwareVersion1.0.3.30 Add Re-register before Expiration. [Account/SIP Settings] Add Enable SIP OPTIONS Keep Alive. [Account/SIP Settings] Add SIP OPTIONS Keep Alive Interval. [Account/SIP Settings] Add OPTIONS Keep Alive Maximum Tries. [Account/SIP Settings] Add Validate Certification Chain. [Account/SIP Settings] Update Domain Certificate to Trusted CA Certificates. [Account/SIP Settings] Add G726-32 ITU Payload. [Account/Codec Settings] Add G726-32 Dynamic PT. [Account/Codec Settings] Add Packetization Mode. [Account/Codec Settings] Add Enable SRTP Key Life Time. [Account/Codec Settings] Add Disable Presentation. [Account/Call Settings] Add Don’t Prompt Missed Call under Call Log. [Account/Call Settings] Add NEC / WorldStone / Baudisch Door System under Special Feature. [Account/Call Settings] Add Enable BroadSoft Call Park. [Account/Call Settings] Add Multicast Paging under Programmable Keys. [Account/Call Settings] Add SIP Domain.[Advanced Settings/General Settings] Add Call Forward under Enable Function for Incoming Call. [Advanced Settings/Call Features] Update Dialer Interface Priority to Always Display Dialer Interface. [Advanced Settings/Call Features] Add the Desktop Menu as Hook Dial. [Advanced Settings/Call Features]](https://usermanual.wiki/Grandstream-Networks/GXV3275V3.User-manual/User-Guide-3709356-Page-14.png)
![GXV3275 Administration Guide Version 1.0.3.186 Page |15 Add Call Function Buttons. [Advanced Settings/Call Features] Add Auto Config CPT by Region. [Advanced Settings/Tone Generator] Add Force BLF Call-pickup by Prefix. Add Show IP Address on Account Widget. [Maintenance/Network Settings] Add 802.1x Secret under EAP-MD5 and EAP-PEAP. [Maintenance/Network Settings] Add Validate Server Certificate.[Maintenance/Upgrade] Add Disable SIP NOTIFY Authentication. [Maintenance/Upgrade] Add Send SIP Log. [Maintenance/Syslog] Add EVENT NOTIFY. [Maintenance/Event Notif] Add HTTP/HTTPS User Name for downloading phonebook file. [Maintenance/Contacts] Add HTTP/HTTPS Password for downloading phonebook file. [Maintenance/Contacts] Update BroadSoft Directory Hits option under BroadSoft Directories. [Maintenance/Broadsoft Directories] Update BroadSoft Directory Order option under BroadSoft Directories. [Maintenance/Broadsoft Directories] Add LDAP Dialing Default Account. [Maintenance/LDAP Book] Add BroadSoft Directory User ID. [Maintenance/Broadsoft Directories] Add Handset TX Gain. [Maintenance/Device Manager] Add Handset RX Gain. [Maintenance/Device Manager] Add Handset Equalizer RX. [Maintenance/Device Manager] FirmwareVersion1.0.3.22 Update Wi-Fi Settings. [Wi-Fi Settings] Update Display. [Display] Update Status/System Info. [Status/System Info] Update General Settings. [Account/General Settings] Update Codec Settings. [Account/Codec Settings] Update Call Settings. [Account/Call Settings] Update Call Features. [Advanced Settings/Call Features] Update Tone Generator. [Advanced Settings/Tone Generator] Add Multicast Paging. [Advanced Settings/Multicast Paging] Update MPK General Settings. Update MPK LCD Settings. [Advanced Settings/MPK LCD Settings] Update Network Settings. [Maintenance/Network Settings] Update WIFI Settings. [Maintenance/Wi-Fi Settings] Update Contact Settings. [Maintenance/Contacts] Update LDAP Book Settings. [Maintenance/LDAP Book] Update BroadSoft Directories. [Maintenance/Broadsoft Directories] Add BroadSoft IM&P. [Maintenance/Broadsoft IM&P] Update Device Manager Settings. [Maintenance/Device Manager]](https://usermanual.wiki/Grandstream-Networks/GXV3275V3.User-manual/User-Guide-3709356-Page-15.png)
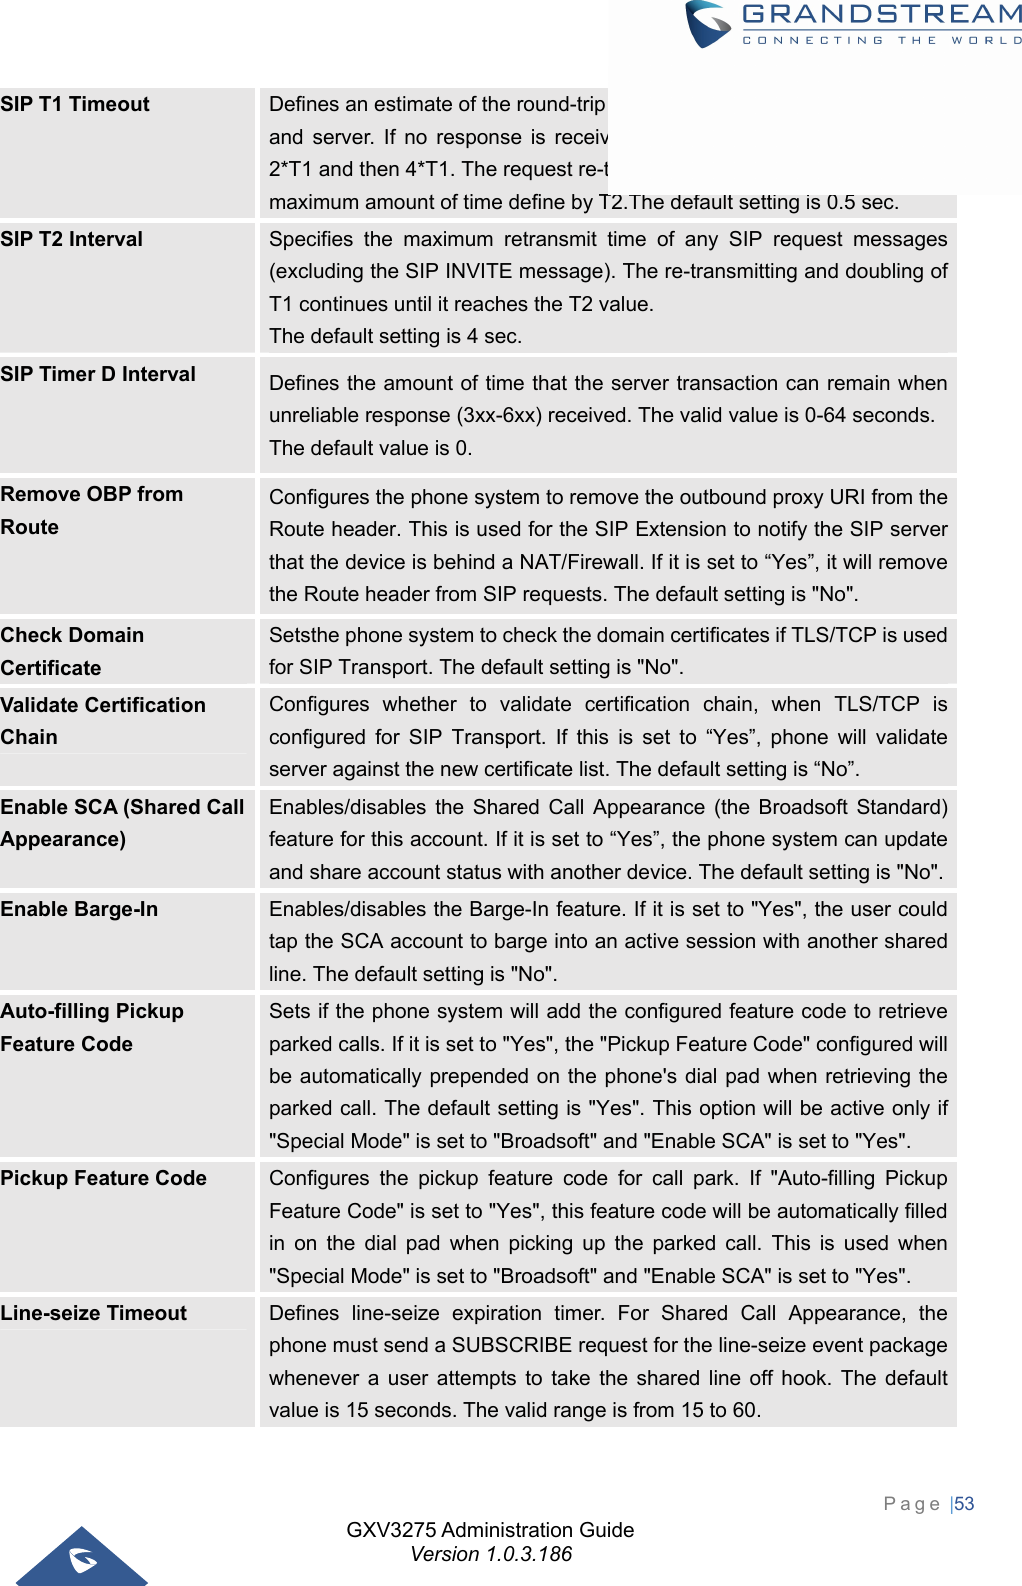
![GXV3275 Administration Guide Version 1.0.3.186 Page |16 FirmwareVersion1.0.3.6 Add Full-screen Video Calling. [Personalized Account] Add ICE Contacts. [Maintenance/Contacts] Add Session Expiration. [Account/SIP Settings] Add Caller ID display. [Account/SIP Settings] Add SIP timer D interval. [Account/SIP Settings] Add Check Domain Certificate. [Account/SIP Settings] Add Disable DialPlan. [Account/Call Settings] Add Multiply Server Mode Group. [Account/Call Settings] Add DND Call Feature On. [Account/Call Settings] Add DND Call Feature Off. [Account/Call Settings] Add Programmable keys. [Account/Call Settings] Add Display Soft Keyboard. [Advanced Settings/Call Features] Add BS Contacts Hits. [Maintenance/Broadsoft] Add BS Contacts Order. [Maintenance/Broadsoft] Delete Handset TX Gain (dB). [Maintenance/Device Manager] Delete Handset RX Gain (dB). [Maintenance/Device Manager] FirmwareVersion1.0.1.54 Add Hide LDAP Contacts. Add Hide Local Call History. Add BS Call Log Update Interval. Add SRTP Encryption Bit. Add BroadWorks Xsi features. Add Enable Function for Incoming Call. FirmwareVersion1.0.1.39 Add Check SIP User ID for Incoming INVITE setting. Add Only Accept SIP Requests from Known Servers setting. Add Configuration via Keypad Menu setting. Delete Configuration via LCD Menu setting. FirmwareVersion1.0.1.29 This is the initial version.](https://usermanual.wiki/Grandstream-Networks/GXV3275V3.User-manual/User-Guide-3709356-Page-16.png)

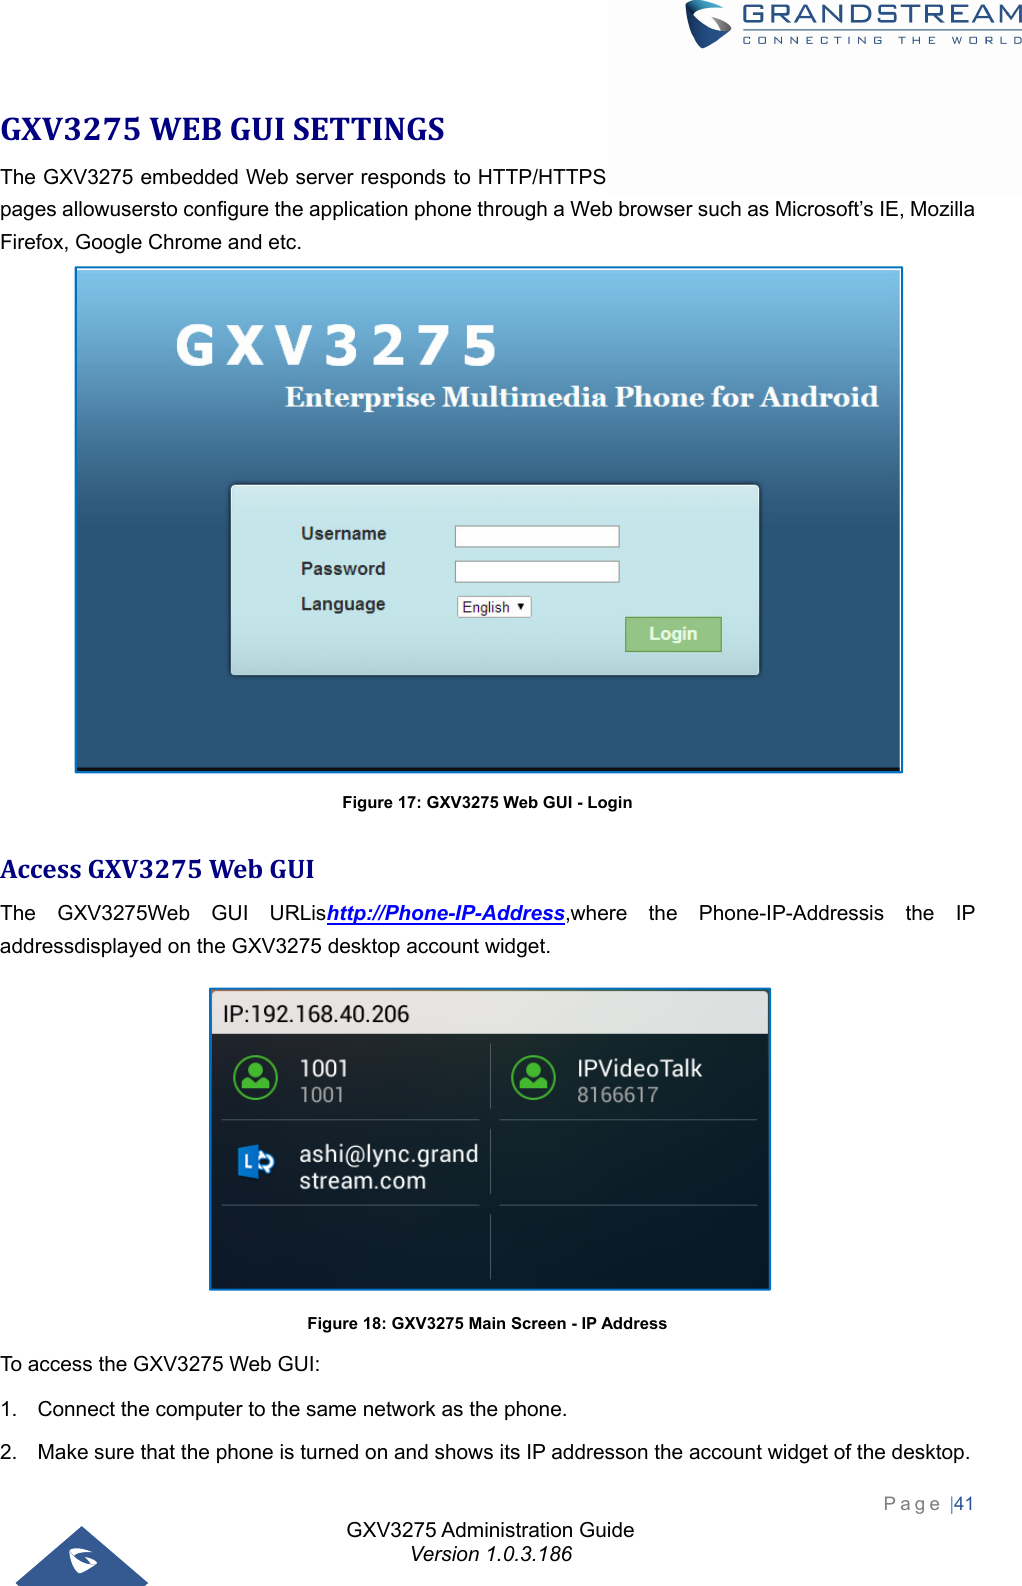


![GXV3275 Administration Guide Version 1.0.3.186 Page |58 Note: Starting from firmware 1.0.3.92, dial plan logic has been improved allowing the phone to dial out directly when there is only one rule perfectly matched. Dial Plan Rules: 1. Accepted Digits: 1,2,3,4,5,6,7,8,9,0 , *, #, A,a,B,b,C,c,D,d,+ 2. Grammar: x – any digit from 0-9; a) xx+ or xx. – at least 2-digit numbers b) xx – only 2-digit numbers c) ^ - exclude d) [3-5] – any digit of 3, 4, or 5 e) [147] – any digit of 1, 4, or 7 f) <2=011> - replace digit 2 with 011 when dialing g) | - the OR operand h) \+ - add + to the dialing number Example 1: {[369]11 | 1617xxxxxxx} Allow 311, 611, and 911 or any 10 digit numbers with leading digits 1617 Example 2: {^1900x+ | <=1617>xxxxxxx} Block any number of leading digits 1900 or add prefix 1617 for any dialed 7 digit numbers Example 3: {1xxx[2-9]xxxxxx | <2=011>x+} Allow any number with leading digit 1 followed by a 3 digit number, followed by any number between 2 and 9, followed by any 7 digit number OR allow any length of numbers with leading digit 2, replacing the 2 with 011 when dialed. 3. Default: Outgoing – { x+ | \+x+ | *x+ | *xx*x+ } Allow any number of digits, OR any number with a leading +, OR any number with a leading *, OR any number with a leading * followed by a 2 digits number and a *. To dial + from keypad, press on 0 until + appears on LCD. Example of a simple dial plan used in a Home/Office in the US: {^1900x. | <=1617>[2-9]xxxxxx | 1[2-9]xx[2-9]xxxxxx | 011[2-9]x. | [3469]11 } Explanation of example rule (reading from left to right): ^1900x. – prevents dialing any number started with 1900 <=1617>[2-9]xxxxxx – allow dialing to local area code (617) numbers by dialing 7 numbers and 1617 area code will be added automatically 1[2-9]xx[2-9]xxxxxx |- allow dialing to any US/Canada Number with 11 digits length 011[2-9]x. – allow international calls starting with 011 [3469]11 – allow dialing special and emergency numbers 311, 411, 611 and 911Note:In some cases, where the user wishes to dial strings such as *123 to activate voice mail or other applications provided by their service provider, the * should be predefined inside the dial plan feature. An example dial plan will be: {*x+} which allows the user to dial * followed by any length of numbers.](https://usermanual.wiki/Grandstream-Networks/GXV3275V3.User-manual/User-Guide-3709356-Page-58.png)
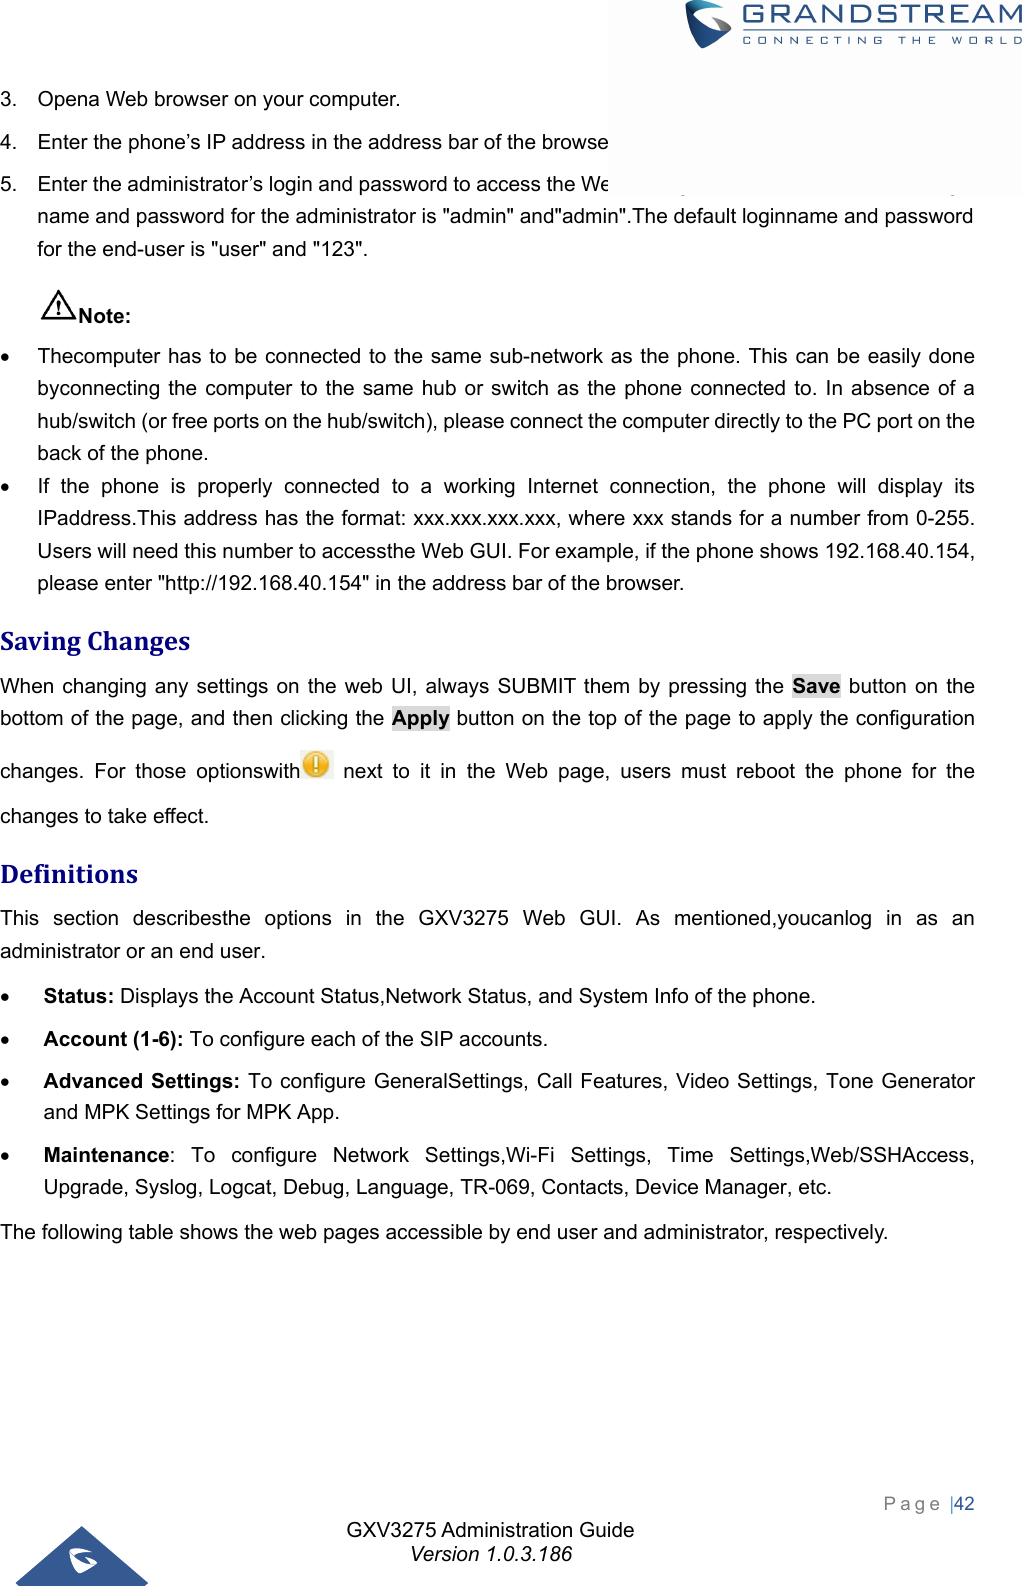
![GXV3275 Administration Guide Version 1.0.3.186 Page |63 xx+ : at least 2-digit number; xx : only 2-digit number; [345]xx: 3-digit number with the leading digit of 3, 4 or 5; [6-9]xx: 3-digit number with the leading digit from 6 to 9. Alert Info text Users could configure the matching rule as certain text (e.g., priority) and select the custom ring tone mapped to it. The custom ring tone will be used if the phone receives SIP INVITE with Alert-Info header in the following format: Alert-Info: <http://127.0.0.1>; info=priority Distinctive Ring Tone Selects the distinctive ring tone if the incoming caller ID matched the specified Matching Incoming Caller ID rule. If so, the phone will play the selected ringtone. Upload Local MOH Audio File Loads the MOH (Music on Hold) file to the phone. Click on “Browse” button to upload the music file from local PC. The MOH audio file has to be in .wav or .mp3 format. Note: Please be patient while the audio file is being uploaded. It could take more than 3 minutes to finish the uploading especially the file size is large. The button will show as “Processing” during the uploading. Once done, it will show as “Browse” again. Click on “Save” on the bottom of the web page and “Apply” on the top of the web page to save the change. Enable Local MOH Plays local MOH file if the call is being hold by the phone. Default setting is “No”.](https://usermanual.wiki/Grandstream-Networks/GXV3275V3.User-manual/User-Guide-3709356-Page-63.png)
![GXV3275 Administration Guide Version 1.0.3.186 Page |66 the user sets is "N", then the phone will register the first n accounts. Auto Conference Allows the phone system to invite all call parties into a conference by pressing the Conf key. If it is disabled, the end user has to add each call party to conference manually. The default setting is “No”. Display Soft Keyboard Enables the QWERTY soft keyboard in the phone app/dialer page. If it is set to “Yes”, the soft keyboard will pop up by tapping the input box. Default setting is “No”.It is recommended to disable the dial plan of the dial page on the Account Settings page, or the call may fail if dial characters not conform to the dial plan. Always Display Dialer Interface Forces the phone system to enter the dialer page on the LCD screen. If it is enabled, the phone LCD will display the dialer interface automatically from LCD screen idle mode (screen saver mode or screen sleep mode). It needs coordinate with Dialer Interface Display Interval setting. The default setting is “No”. Dialer Interface Display Interval (m) Configures the timer for the Dialer Interface Priority Display. The timer will be started from the LCD screen goes to idle mode (screen saver mode or screen sleep mode). If the Dialer Interface Priority Display feature is enabled, the phone LCD will display the dialer interface automatically from LCD screen idle mode (screen saver mode or screen sleep mode) after the timer expired.If it is configured with 0, the phone LCD screen will display the dialer interface when user wakes up the phone from the screensaver mode or screen sleep mode whatever the last apps is running. It needs coordinate with Dialer Interface Display. The default setting is 1. The Desktop Menu as On Hook Dial Sets the dial-up type to on-hook dial or off-hook dial via the dialing button on desktop. The default setting is “No”, which means click on the dialing button to access dialing screen to initialize off-hook dialing. Filter Characters Sets the characters for filter when dial out numbers. Users could set up multiple characters. For example, if set to “[()-]”, when dial (0571)-8800-8888, the character “()-“will be automatically filtered and dial 057188008888 directly. Disable Call-Waiting Disables the call waiting feature. If it is checked, the phone system will reject the second incoming call during an active session without user’s knowledge. But this missed call record will be saved to remind users. The default setting is “No”. Disable Call-Waiting Tone Sets the phone system to play the call waiting tone if there is another incoming call. If it is set to “Yes”, the phone will only display the indicator on the LCD screen for another incoming call. The default setting is “No”. Disable DND Reminder Ring Configures the phone system will play the DND reminder ringtone for the incoming call if the DND feature is enabled. If it set to “Yes”, the phone will](https://usermanual.wiki/Grandstream-Networks/GXV3275V3.User-manual/User-Guide-3709356-Page-66.png)
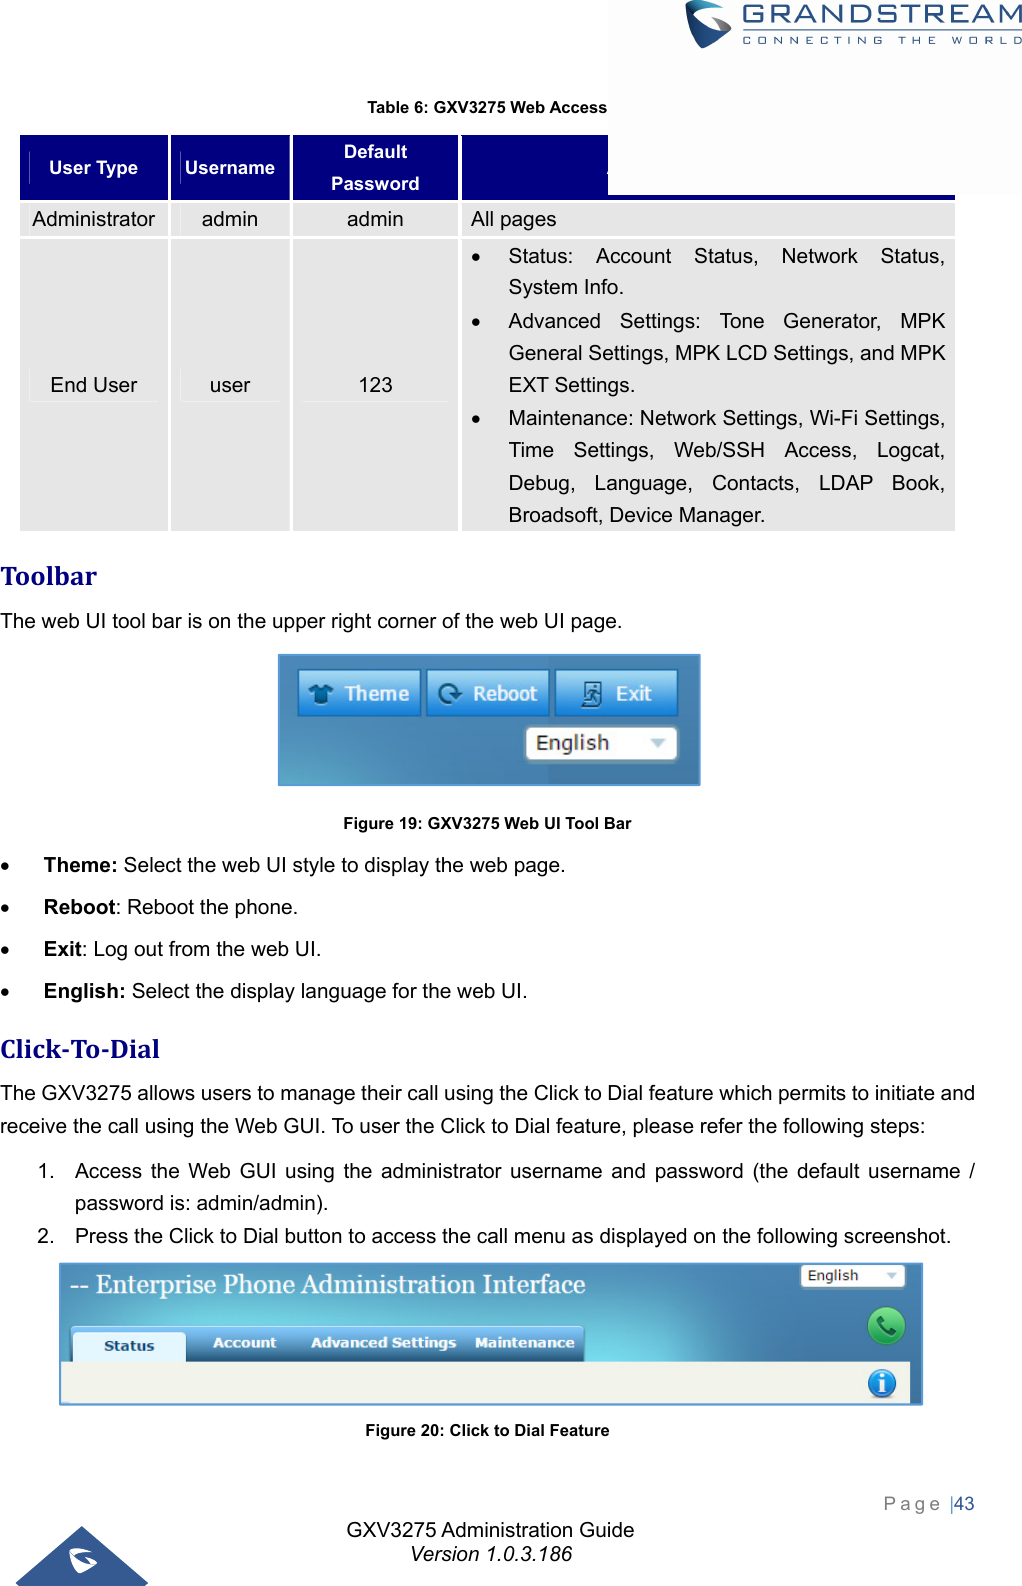
![GXV3275 Administration Guide Version 1.0.3.186 Page |69 3. Record on UCM: The phone will send the recording feature code to the UCM server to request for recording and the recording function will be executed by the UCM. The default setting is “Record Locally”. AdvancedSettings/VideoSettingsVideo Frame Rate Configures video frame rate for SIP video call from “5 frames/second”, “15 frames/second”, “25 frames/second”, “30 frames/second” and “Variable frames rate”. The default setting is 15 frames/second. The video frame rate is adjustable based on network conditions. Increasing the frame rate will significantly increase the amount of data transmitted, therefore consuming more bandwidth. The video quality will be affected due to packet loss if extra bandwidth is not allocated. Video Display Mode Configures the video display mode to "Original proportion", "Equal proportional cutting" or "Proportional add black edge". If set to "Original proportion", the phone displays video in its original proportion. If the video display proportion is different from the one of the phone, the phone will stretch or compress video to display it; If set to "Equal proportional cutting", the phone will cut video to meet its own display proportion; If set to "Proportional add black edge", the phone will display video in its original proportion. If it still exists spare space, the phone will add black edge on it. The default setting is "Equal proportional cutting". Enable Frame Skipping in Video Decoder Enables the phone system for frame skipping in video decoder. If it is enabled, the video decoder will skip the P frame and start decoding from the next I frame. Enabling this option will help reduce flickering in the video when the bandwidth is limited in the network environment. The default setting is "Yes". AdvancedSettings/ToneGeneratorAuto Config CPT by Region Configures whether to choose Call Progress Tone automatically by region. If set to "Yes", the phone will configure CPT (Call Progress Tone) according to different regions automatically. If set to "No", you can manual configure CPT parameters. The default setting is "No". Call Progress Tones: Dial Tone Second Dial Tone Ring Back Tone Busy Tone Reorder Tone Confirmation Tone Call-Waiting Tone Configures tone frequencies according to user preference. By default, the tones are set to North American frequencies. Frequencies should be configured with known values to avoid uncomfortable high pitch sounds. Syntax: f1=val,f2=val [,c=on1/off1[-on2/off2[-on3/off3]]]; (Frequencies are in Hz and cadence on and off are in 10ms) ON is the period of ringing ("On time" in "ms") while OFF is the period of silence. In order to set a continuous ring, OFF should be zero. Otherwise it will ring ON ms and a pause of OFF ms and then repeats the pattern.](https://usermanual.wiki/Grandstream-Networks/GXV3275V3.User-manual/User-Guide-3709356-Page-69.png)