Graphic orporated GPE01 GPECHO User Manual
Graphic Products Incorporated GPECHO
user manual

LARGE FORMAT PRINTER & ENLARGER
Graphic Products, Inc. | 800.788.5572
GraphicProducts.com
Contents
Introduction ............................................................................................................ 1
Copyright ................................................................................................................2
Warranty .................................................................................................................3
Safety Warnings .....................................................................................................5
1. Getting to Know Echo .......................................................................................7
1.1 Positioning .................................................................................................... 8
1.2 Parts and Terms ........................................................................................... 8
2. Setup Instructions .......................................................................................... 12
2.1 Normal Setup .............................................................................................12
2.2 Optional – Using an SD Memory Card ......................................................14
2.3 Optional – Preparing for PC Printing ........................................................14
3. Operating Instructions ................................................................................... 16
3.1 Printing from a Scanned Document .........................................................16
3.2 Printing from the Poster Gallery ................................................................17
3.3 Printing from a PC ...................................................................................... 18
4. Menu Options ................................................................................................. 20
4.1 Main Menu Options ....................................................................................20
4.2 Advanced Options ......................................................................................23
4.3 Setup Options ............................................................................................. 28
5. Echo Software ................................................................................................ 32
5.1 Echo’s Driver and Printing Preferences....................................................32
5.2 Echo Canvas ............................................................................................... 32
5.3 Word Plug-in for Echo ................................................................................32
6. Echo Poster Catcher ...................................................................................... 33
6.1 Installing the Poster Catcher .....................................................................33
6.2 Using the Poster Catcher ...........................................................................33
7. Maintenance and Troubleshooting ............................................................... 34
7.1 Cleaning Your Echo .................................................................................... 34
7.2 Troubleshooting ..........................................................................................34
8. Glossary ........................................................................................................... 38
9. Certifications .................................................................................................. 40
9.1 FCC Compliance .........................................................................................40
9.2 US, Canadian and European EMC and EMI standards ........................... 40
9.3 TUV Compliance .........................................................................................41
9.4 Printer Disposal/Recycling ........................................................................41

1
800.788.5572 GraphicProducts.com
INTRODUCTION
Introduction
Congratulations! Now that you have your Echo large format printer and enlarger,
you’ll be creating posters in no time.
In addition to helping you set up and use Echo, this User Guide will serve as a
reference document for maintaining the system, and for using its more advanced
features.
If you need supplies, or have questions about Echo, give us a call at 800.788.5572
(or, internationally, at 1.503.644.5572) and we’ll be happy to help.

2
GraphicProducts.com 800.788.5572
COPYRIGHT
Copyright
This manual is copyrighted with all rights reserved. No portion may be copied or
reproduced by any means without the prior consent of Graphic Products, Inc.
While every precaution has been taken in preparation of this document, Graphic
Products, Inc. assumes no liability to any party for any loss or damage caused by
errors or omissions or by statements resulting from negligence, accident or any
other cause. Graphic Products, Inc. further assumes no liability for incidental or
consequential damages arising from the use of this document. Graphic Products,
Inc. disclaims all warranties of merchantability or fitness for a particular purpose.
Graphic Products, Inc. reserves the right to make changes without further notice to
any product or system herein to improve reliability, function or design.
Reproduction of this material, in part or whole, is strictly prohibited without the
written permission of Graphic Products, Inc.

3
800.788.5572 GraphicProducts.com
WARRANTY
Warranty
Graphic Products’ printers are warrantied to be free from defects in materials or
workmanship for a period of one year from the date of purchase. Within this period,
Graphic Products, Inc. will, at its sole option, repair or replace any components
which fail in normal use. Such repairs or replacement will be made at no charge to
the purchaser for parts or labor, provided that the purchaser shall be responsible
for any transportation cost. This warranty does not cover loss, damages from
accident, equipment or parts which have been misused, altered, neglected,
carelessly handled, or used for purposes other than those for which the printer was
manufactured, or damages resulting from unauthorized service.
Repairs have a 90 day warranty, or will be covered under the original warranty
duration, whichever is longer.
The warranties and remedies contained herein are exclusive and in lieu of all other
warranties whether express, implied, or statutory, including any liability arising under
any warranty of merchantability or fitness for a particular purpose, statutory or
otherwise.
This warranty gives the purchaser specific legal rights, which may vary from state
to state. In no event shall Graphic Products be liable for any incidental, special,
indirect, or consequential damages, whether resulting from the use, misuse, or
inability to use the product for any reason including defect. Some states do not allow
the exclusion of incidental or consequential damages, so the above limitation may
not apply in all areas.
Graphic Products retains the exclusive right within all warranty periods to repair,
replace the product or offer a full refund of the purchase price at its sole discretion.
Such remedy shall be the purchaser’s sole and exclusive remedy for any breach of
warranty.
General maintenance and cleaning of the printer is the purchaser’s responsibility
and is not covered by the warranty. Expendable items or parts such as paper
supplies are not covered by this warranty.
NOTE: Some printers require specic preparation before shipping. Please contact
your Graphic Products representatives to ensure correct return procedure: call
800.788.5572 or visit GraphicProducts.com. Graphic Products, Inc. shall not be
responsible for any loss or damages incurred during shipping.

4
GraphicProducts.com 800.788.5572
WARRANTY
To prevent damage to Echo and to avoid nullifying the Echo warranty, please follow
these rules:
• Only use official Graphic Products paper supplies in Echo.
• Read all instructions and rules in this manual completely.
If something seems to be wrong with Echo, refer to the Troubleshooting section
at the back of this guide for help. If your problem is not resolved by following the
recommended steps, please contact Graphic Products for assistance.

5
800.788.5572 GraphicProducts.com
SAFETY WARNINGS
Safety Warnings
Please review the following safety instructions before using Echo.
• Echo is intended for indoor use only. Keep the printer away from humidity and
prolonged exposure to direct sunlight.
• Echo is designed for use at normal room temperatures of 50-105°F (10-40°C),
and at a maximum altitude of approximately 6500 feet (2000 meters) above
sea level.
• Check the power source voltage before connecting the printer to a power outlet.
Echo is designed for use with standard, grounded 110-240 VAC, 50-60 Hz
power outlets. Typical current consumption for Echo is 2.2 A.
• Only use the approved power cord with Echo. If a replacement cord is needed,
please contact Graphic Products for support at 800.788.5572.
• Before plugging the power cord into Echo, make sure the On/Off switch is set to
Off.
• Do not allow liquids or metals to contact any of Echo’s internal parts. For
ordinary cleaning, follow the instructions included in this guide.
• Only qualified service personnel should attempt to perform maintenance on the
printer.
• The printer must be turned off before any type of maintenance work is done.
• Echo may build a small static charge in static-sensitive environments. Do not
operate Echo near flammable materials.
• The power outlet should be near the printer and easily accessible for quick
power disconnection. Unplug the printer from the wall socket to completely
disconnect power.
• Power off and unplug Echo if:
◦Echo makes an unusual noise.
◦Liquids or metals are inserted into the system.
◦There is an electrical storm or power failure.
◦There is smoke or an unusual smell coming from Echo.
NOTE: Changes or modications not expressly approved by the party responsible
for compliance could void the user’s authority to operate the equipment.
WARNING: Do not place your ngers near the cutting blades. If you must clear a
paper jam, turn the printer off rst, and use a tool, such as a pencil, to remove
the jammed paper. Do not use your ngers.

6
GraphicProducts.com 800.788.5572
SAFETY WARNINGS
The cutting blade is located on the inside of the printing unit. The cutting blade is
sharp and may cycle automatically after a poster is printed. If Echo is powered off
while the cutter is moving, it may stop before returning to its home position on the
far right. Do not move the cutter by hand; instead, turn the system on and allow the
blade to move automatically. Do not attempt to load supply paper when the cutter is
not in its home position.
Under normal operating conditions, the blade poses no harm to a user. Echo's cutter
mechanism is equipped with an over-torque circuit that is meant to shut off the
cutter if too much resistance is sensed; however, the blade still has the potential to
cause injury if misused.
We recommend the use of the surge suppressor that is provided with Echo. It will
help protect Echo from possible damage during nearby lighting storms. It should be
installed between the AC wall outlet and the AC input to the device.
7
800.788.5572 GraphicProducts.com
GETTING TO KNOW ECHO
1. Getting to Know Echo
Echo is a Thermal Printer, meaning that it uses heat to activate ink that is included
in its special supply paper. You will never need to change an ink cartridge in this
system! Echo is a versatile device, and allows you to print large posters from several
different sources:
• Enlarge an existing document or picture, using the built-in scanner.
• Print from Echo’s Gallery of saved posters.
• Print from a computer, either using a USB cord or across a network.
Echo is larger than most desktop printers, and weighs about 57 pounds (about 25
kg). We recommend that you have two people work together to unpack and position
the system, one person at each end.
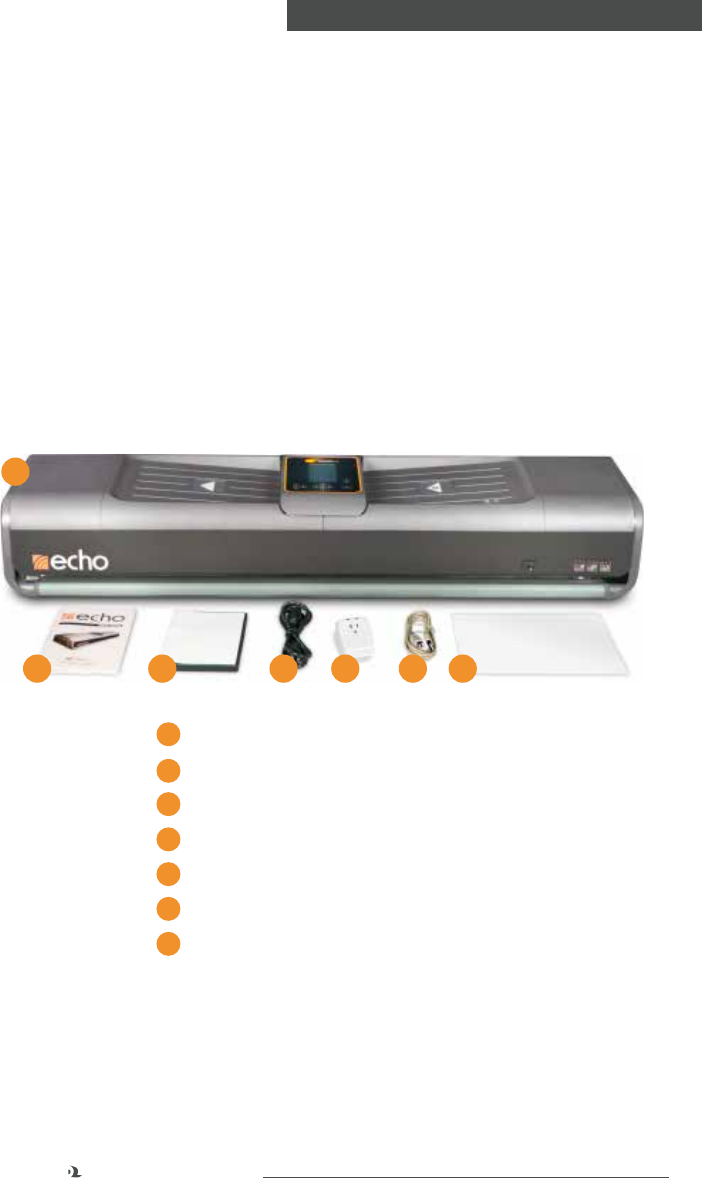
In Echo’s box, you will find the following materials:
3
1
2 4 5 6
1 Echo Large Format Printer & Enlarger
2 User Documentation
3 Software Installation CD
4 Electrical Power Cord
5 Surge Suppressor
6 USB Cable
7 Document Carrier Sheet
If any of these materials are not included, please contact Graphic Products at
800.788.5572.
Set aside the box and packaging material for future use. You may need the box and
packing material later, when moving or shipping Echo.
7
8
GraphicProducts.com 800.788.5572
GETTING TO KNOW ECHO
1.1 Positioning
There are a few things to keep in mind when deciding where to use Echo:
• Echo is a large device. Place it on a flat, level surface that can safely support its
weight. Have one person lifting at each end when you need to move Echo.
• Leave an open space of about 2" (5 cm) behind Echo, so that you can fully open
the lid to load supply paper, and so that the power and computer connection
cables do not bind or kink.
• Do not cover or block the air vents on the ends of Echo; they provide necessary
ventilation for the internal components. A space of at least 2" (5 cm) is
recommended here as well.
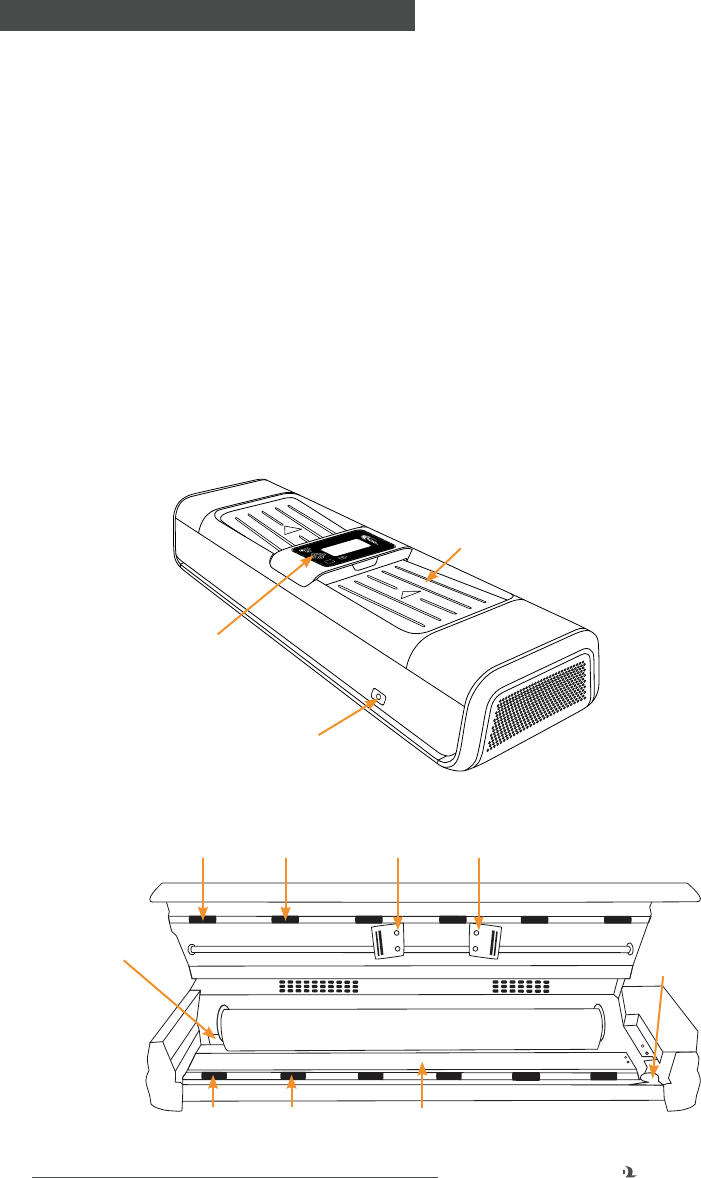
1.2 Parts and Terms
Echo is designed for ease of use. There are only a few basic parts for you to know
about. These parts are labeled here.
OK
Print
Lid Release Button
Control Panel
Scanning Tray
Platen
Left Paper
Bracket Cutter
Feed Rollers
Print HeadsPressure Rollers
9
800.788.5572 GraphicProducts.com
GETTING TO KNOW ECHO
Control Panel
3
2
OK
Print
9
8
7
4
5 6
1
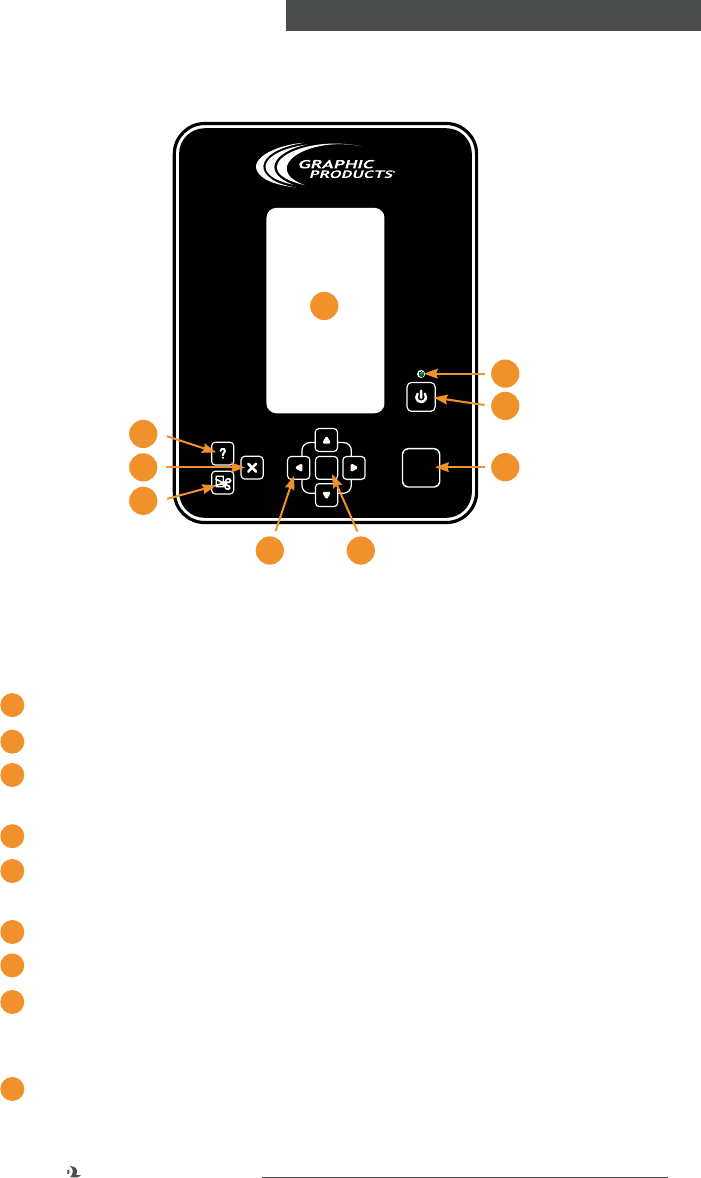
Echo’s Control Panel gives you easy access to all of Echo’s controls and settings.
Individual buttons and functions are labeled below. Detailed descriptions of the
different menu options appear in section 8.1, Main Menu Options.
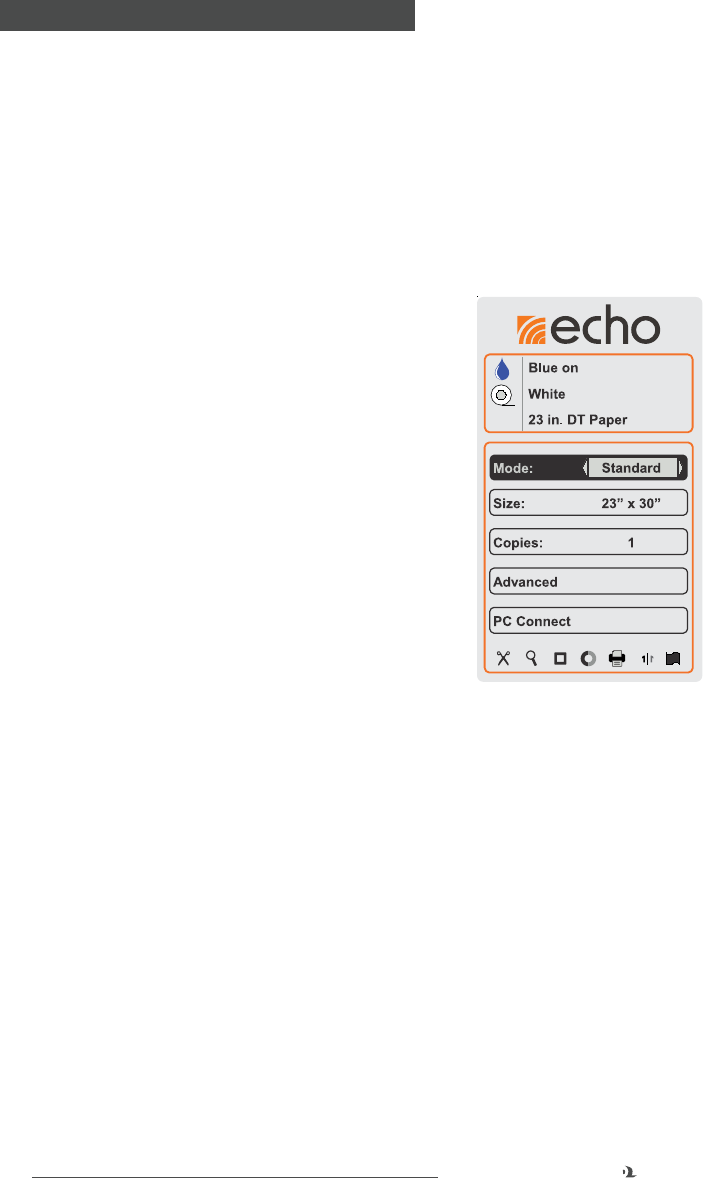
1 Control Screen – Displays menu options.
2 Help – Open Echo's on-screen Help menu.
3 Close – Close the current menu, cancel the current set of prints, or go back a
step when browsing folders.
4 Cut – Operate the motorized paper cutter.
5 Navigation Arrows – Four arrows (up, down, right, left) used to navigate through
the menus in the Control Screen.
6 OK Button – Press OK to activate or select a menu option.
7 Power Indicator LED – Glows green when Echo is ready to print.
8 Power On/Off Button – Turn Echo’s scanner and LCD display on or off. Note that
this is different from the Master Power Switch, which is located on the Connection
Panel on the rear of the printer. The Master Power Switch can be left on.
9 Print – Scan an original document from the scanning tray and print it as an
enlarged poster.
10
GraphicProducts.com 800.788.5572
GETTING TO KNOW ECHO
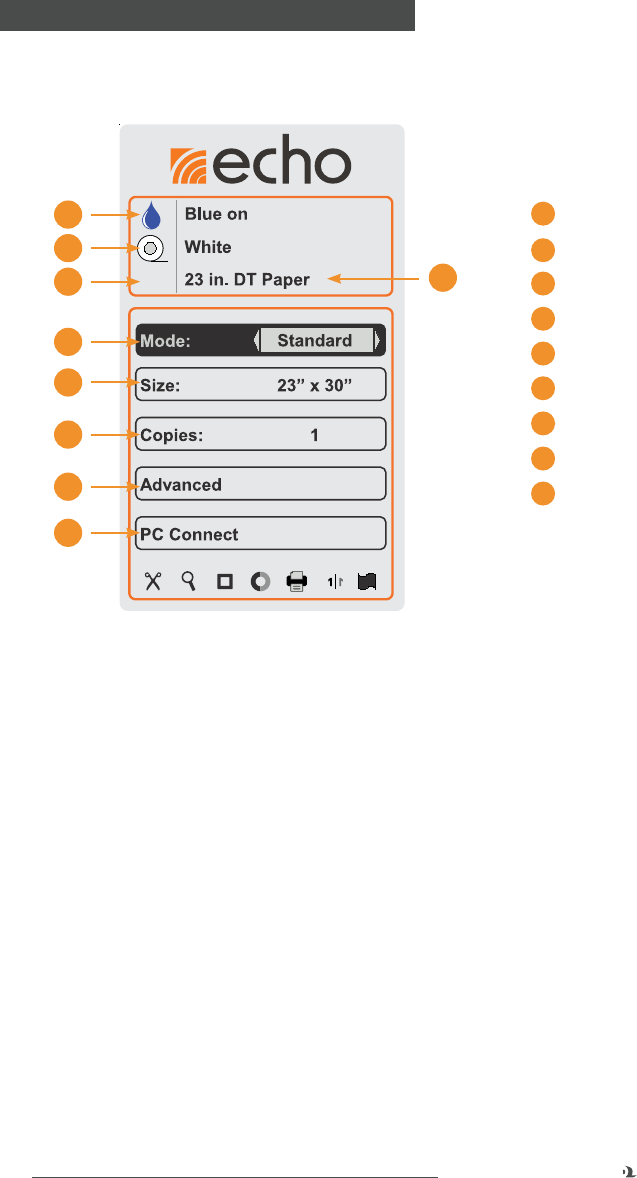
Control Screen
100'
3
1
2
9
8
7
4
5
6
1 Ink Color
2 Paper Color
3 Remaining Supply
4 Paper Width/Type
5 Printing Mode
6 Poster Size
7 Number of Copies
8 Advanced Menu
9 PC Connect Menu
The screen shows details about the current paper supplies, and displays the various
options that are available. This main menu appears when you turn on the system.
To navigate the options shown on the screen, use the Navigation Arrow buttons,
then use the OK button to select. Use the Up and Down arrow buttons to highlight
different options, and use the Right and Left arrow buttons to choose different
settings for the highlighted option.
In certain menus, you may see arrows at the top and bottom edges of the menu.
This indicates that the menu continues to another page; use the Up and Down arrow
buttons to cycle through options and continue to the next page. Pressing the Close
button will return you to the previous menu.
The following Indicator Icons, along the bottom of the screen, will only appear when
the represented option is enabled. Some of them will usually appear, as those
functions are on by default.
11
800.788.5572 GraphicProducts.com
GETTING TO KNOW ECHO
Indicator Icons
100'
1 2 3 4 5 6 7
1 Auto Cut – Each poster will be cut immediately after being printed. This option is
enabled by default.
2 Preview – A preview of your poster will appear on the screen before it is printed.
You will need to press OK or Print again to begin printing. This option is enabled by
default.
3 Border – A printed Border is being added to your poster.
4 Contrast – The default Contrast has been adjusted for this print.
5 Alignment/Darkness – The default Alignments or Darkness have been adjusted
for this print.
6 Mirror – This print will be reversed, as if seen in a mirror.
7 Banner – A series of original documents, or a single long document, are being
printed as a single long banner (rather than as a series of individual posters.)
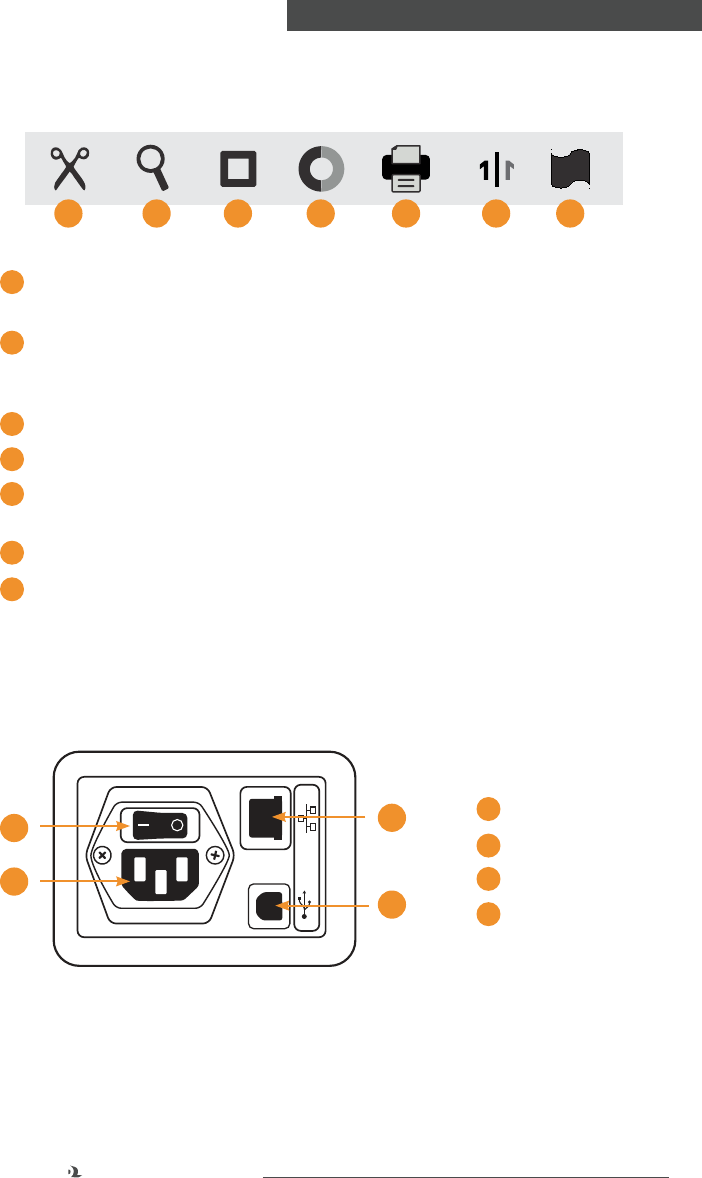
Connection Panel
3
1
2
4
1 Electricity on/off
2 3-prong outlet
3 Ethernet port
4 USB port
12
GraphicProducts.com 800.788.5572
SETUP INSTRUCTIONS
2. Setup Instructions
2.1 Normal Setup
To begin using Echo, you will need to follow several basic steps. There are also some
optional steps, which will prepare your Echo for more advanced uses.
Power
Echo needs power from a standard, grounded 110-240V wall socket. Before
connecting the power cord, make sure that the Master Power Switch is set to the
“Off” position. (The Master Power Switch is located on the Connection Panel, on the
back of the system.) Connect the surge suppressor to a wall socket. Then, connect
Echo’s power cable to the surge suppressor and to Echo’s power plug, next to the
Master Power Switch. You can then turn the Master Power Switch on.
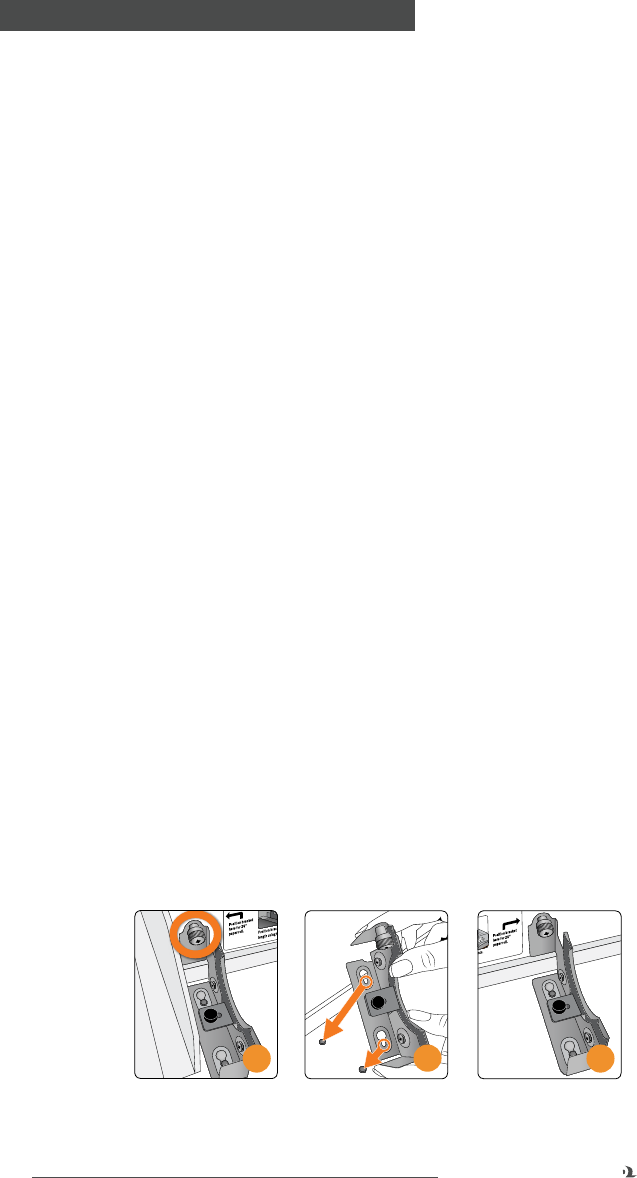
Moving the Left Paper Bracket
Echo can use supply paper rolls in two different sizes: 23" and 36". (The 23" width is
actually just over 23" wide; for simplicity, it is referred to as 23".)
When changing from one supply paper size to the other, you will need to move the
left paper bracket to the appropriate position inside the system.
1. Press the Lid Release button on Echo’s front panel, and raise the printer lid.
With the printer lid open, you can check the label inside the system to see if the
bracket is in the correct position for your paper.
2. The left paper bracket has an attached thumbscrew to secure it in place. If
you need to move the bracket, release the thumbscrew by turning it counter-
clockwise.
3. Pull the bracket toward the front of the printer, “unlocking” the bracket from its
alignment pins, and then lift it out. Be careful, as the edges of this bracket may
be sharp.
4. Position the left paper bracket over the appropriate set of alignment pins, and
push the bracket toward the back of the printer. The alignment pins and bracket
will “lock” together.
234
5. Secure the bracket with the thumbscrew, turning the screw clockwise until snug.

13
800.788.5572 GraphicProducts.com
SETUP INSTRUCTIONS
Loading Supply Paper
Echo uses special supply paper to print posters. You will need to load this paper
properly before beginning to use the system. You will also need to load a new supply
roll when the old one runs out, or when you want to change paper colors or types.
When you load supply paper, the cutter should be in its home position, at the far
right of the printer. If the cutter is not at the home position, do not move it by hand.
Instead, close the lid, and use the Power On/Off button to turn Echo on, prompting
the cutter to return home. Then, turn the system off again and continue.
1. Turn Echo off with the Power On/Off button. Press the Lid Release button on the
front of the system, and raise the lid.
2. If you are replacing an existing roll of supply paper, lift the existing roll out of its
place.
3. Make sure that the left paper bracket is in the correct position for the paper you
will be using. (See Moving the Left Paper Bracket in this section for details on
how to move the bracket, if necessary.)
4. Place your new roll of supply paper in the printer, with the end caps resting
in the paper brackets, and with the paper unrolling from beneath the roll, as
shown.
5. Pull the edge of the paper a few inches out of the printer, so that you can keep
the paper in place when you close the lid. Hold the edge of the paper with one
hand as you gently lower the lid, to keep the paper from curling back in. Then,
use both hands to press the lid fully closed.
6. Turn Echo back on with the Power On/Off button. At this point, Echo will be
ready to print. If preferred, you may use Echo’s cutter to trim the edge of the
paper with the Cut (scissors) button.
345
5
14
GraphicProducts.com 800.788.5572
SETUP INSTRUCTIONS
2.2 Optional – Using an SD Memory Card
In order to save your scanned posters for later reprinting, use a removable SD
Memory Card (not included). When no SD card is present, the functions that would
require it will be unavailable.
In order to use a memory card, insert the card in the slot at the left-hand side of the
Control Panel, as shown below. It is best to insert or remove a memory card while
Echo is turned off.
Echo will accept most common SD cards;
classes 4, 6, and 10, in sizes up to 32GB,
have been tested. A typical 23" × 30" poster
will occupy about 6MB of storage space,
while a typical 36" × 46" poster will occupy
about 16MB. For comparison, a common,
inexpensive SD card (2GB capacity) will hold
over 300 posters of the smaller size, or over
100 of the larger size.
2.3 Optional – Preparing for PC Printing
Echo can be connected to computers, just like other desktop printers. This allows
Echo to print posters directly from designs created on those computers.
Software Installation
Begin by installing the driver on your computer using the CD provided. Simply follow
the prompts onscreen. You may need help from your IT team, as these installations
typically require Administrative permissions. If there are any questions, please
contact our support team at 800.788.5572.
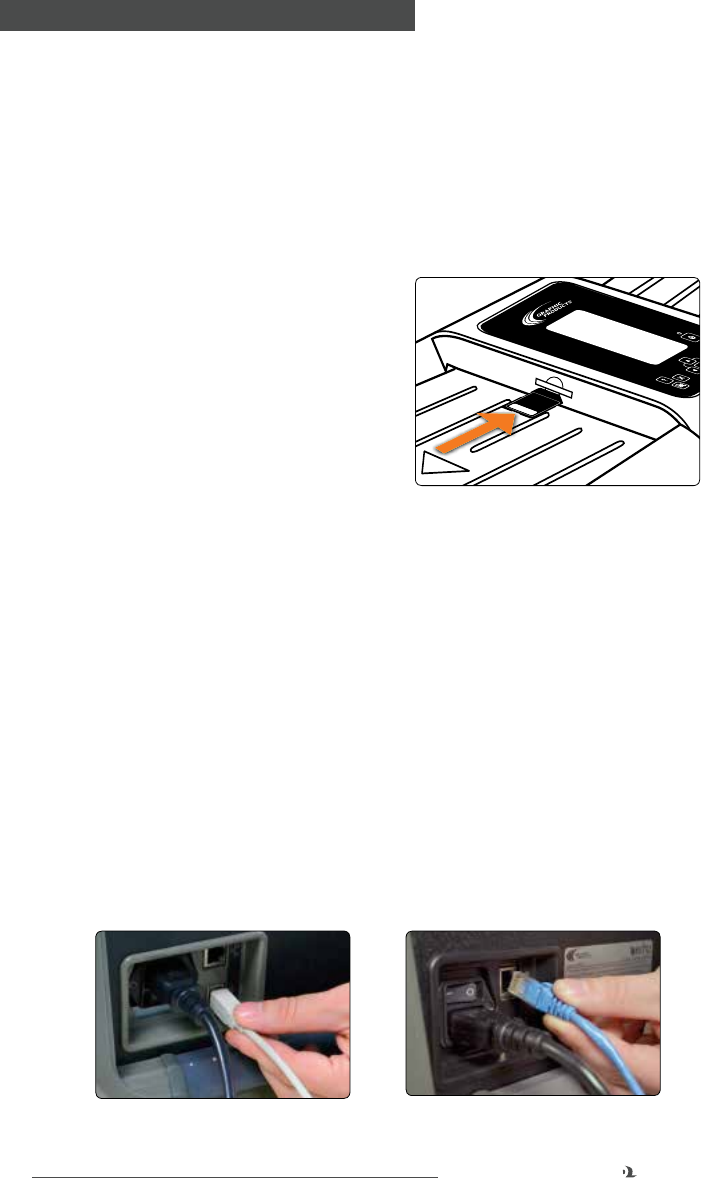
Physical Connections
If you will use Echo with a single computer, you will probably use a USB connection.
Plug the USB cord into both Echo and your computer.
Echo can also be connected to a network, so that multiple computers can print
remotely. If you would like to use this type of connection, plug an Ethernet cord (not
included) into Echo from your network.
CONNECTING A USB CORD TO ECHO CONNECTING AN ETHERNET CORD TO ECHO
OK

15
800.788.5572 GraphicProducts.com
SETUP INSTRUCTIONS
Network Settings
To use Echo with a network connection, you will need to set Echo’s network settings
appropriately for your network. Settings vary, so check with your IT team to make
sure that you have the right details. Once these settings have been entered, they will
be saved for later use.
1. Use the Up and Down arrow buttons to highlight the Advanced option on the
main menu, and press the OK button.
2. In the Advanced menu, highlight the Setup option, and press the OK button.
3. Highlight Network, and press the OK button.
4. Highlight IP Type, and use the Left and Right arrow buttons to select either
Static or DHCP.
5. If you are using the Static option, you will need to set the other network details
(Address, Gateway, and Mask.) In order to enter these details, highlight one of
the options and press the OK button. Then, use the Up and Down arrows to
adjust the value of the highlighted digit, and use the Left and Right arrows to
change which digit is highlighted. Press the Close (“X”) button when finished
with one setting, and continue to the next setting until all the appropriate details
have been entered.
If your network changes, you may need to update these settings as well. You can find
more details in section 8, Menu Options.
16
GraphicProducts.com 800.788.5572
OPERATING INSTRUCTIONS
3. Operating Instructions
Echo can be used several different ways:
• Use Echo as a standalone document enlarger. Place a letter-size original
document into the scan input tray at the top of the machine, and Echo can
print a poster-size version of that document or picture. This is the fastest and
easiest approach. You can also customize posters made this way using Echo’s
Advanced options, such as adding a printed border.
• Print popular posters, such as geographic maps, the periodic table of elements,
etc., from Echo’s PreMade Poster Gallery.
• Scan a letter-size original document, and save it as a poster design in Echo’s
User Gallery for later printing.
• Print designs directly from a computer, designing your poster in Echo Canvas or
another program. You can connect your computer to Echo with a USB cord or
over a local network.
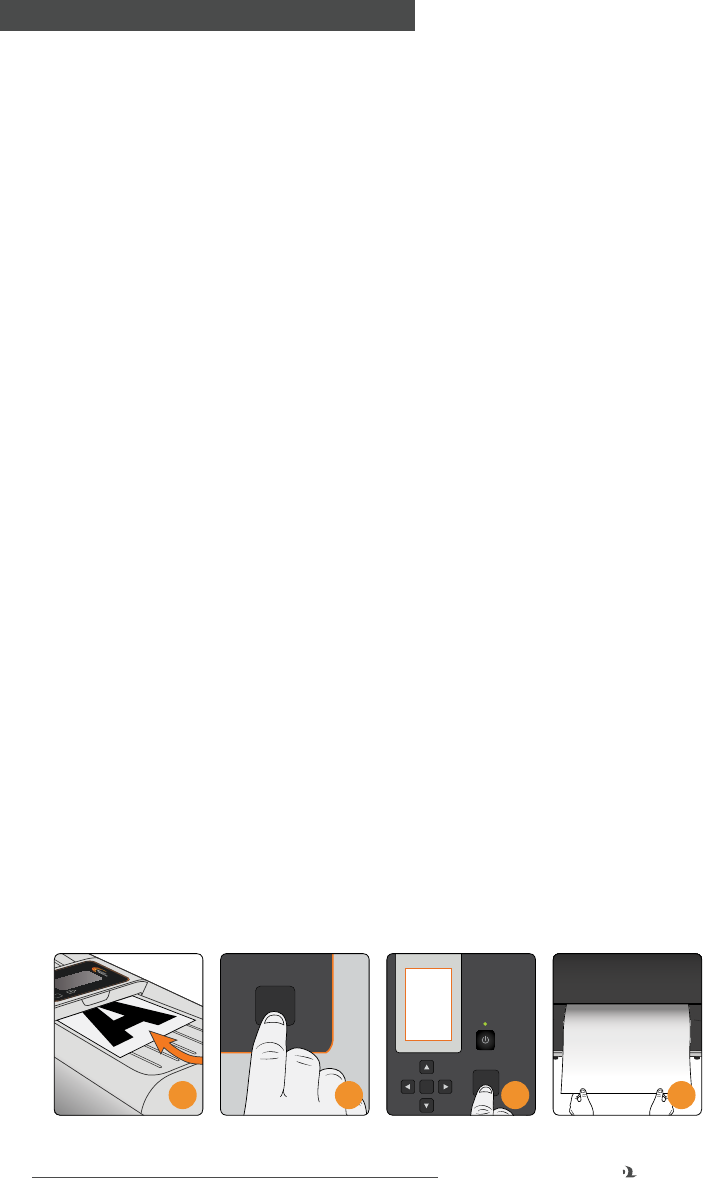
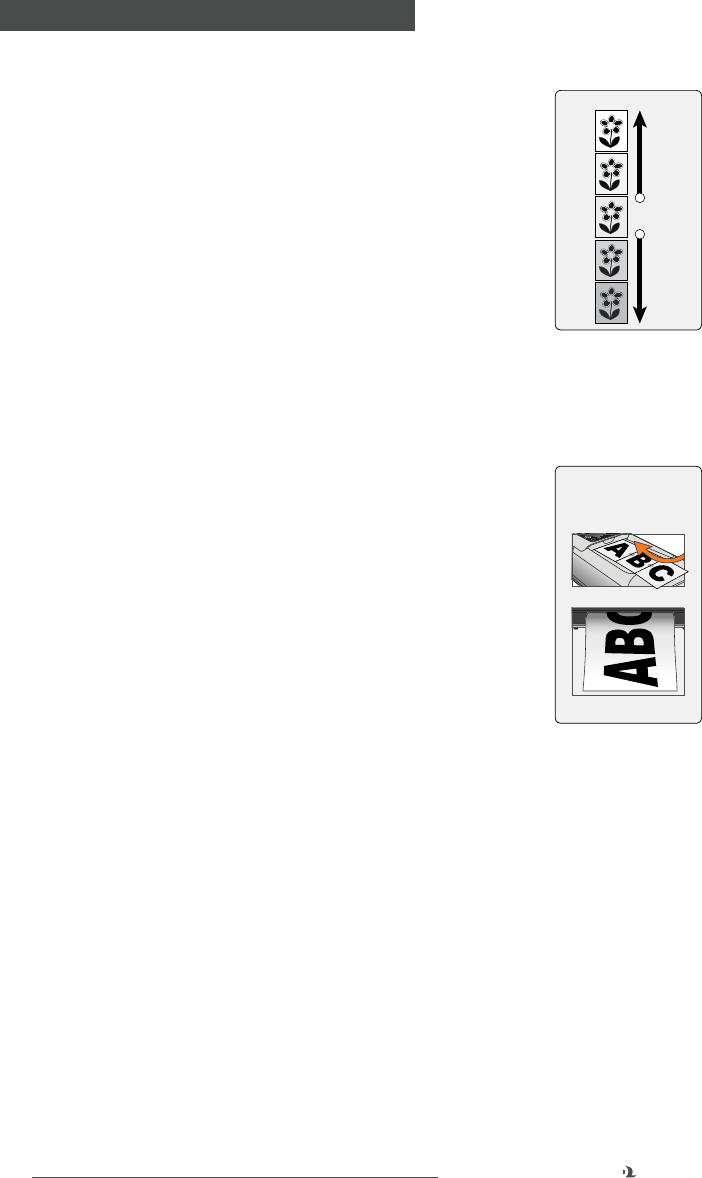
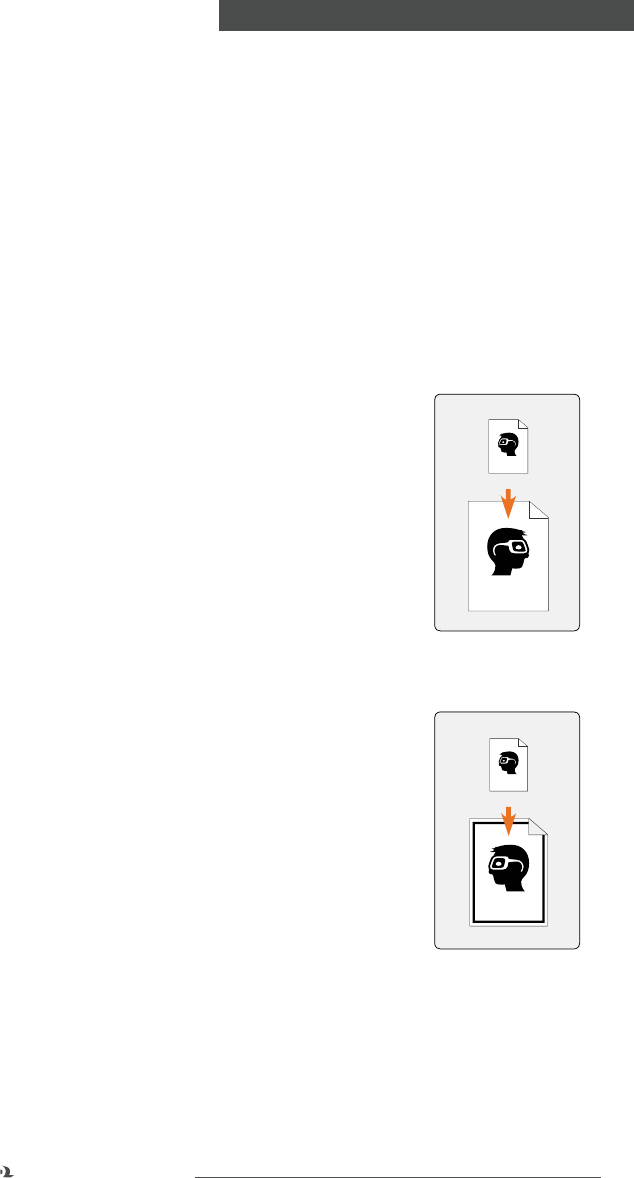
3.1 Printing from a Scanned Document
It’s incredibly easy to scan a letter-size page (a flyer, memo, picture, chart, etc.) and
enlarge it to a poster size. For smaller documents, use the included carrier sheet to
allow your document to feed through Echo’s scanner properly.
Once you understand the basic procedure, you can explore the Advanced options for
more customized prints. Before you begin, make sure that Echo is powered on and
has supply paper loaded.
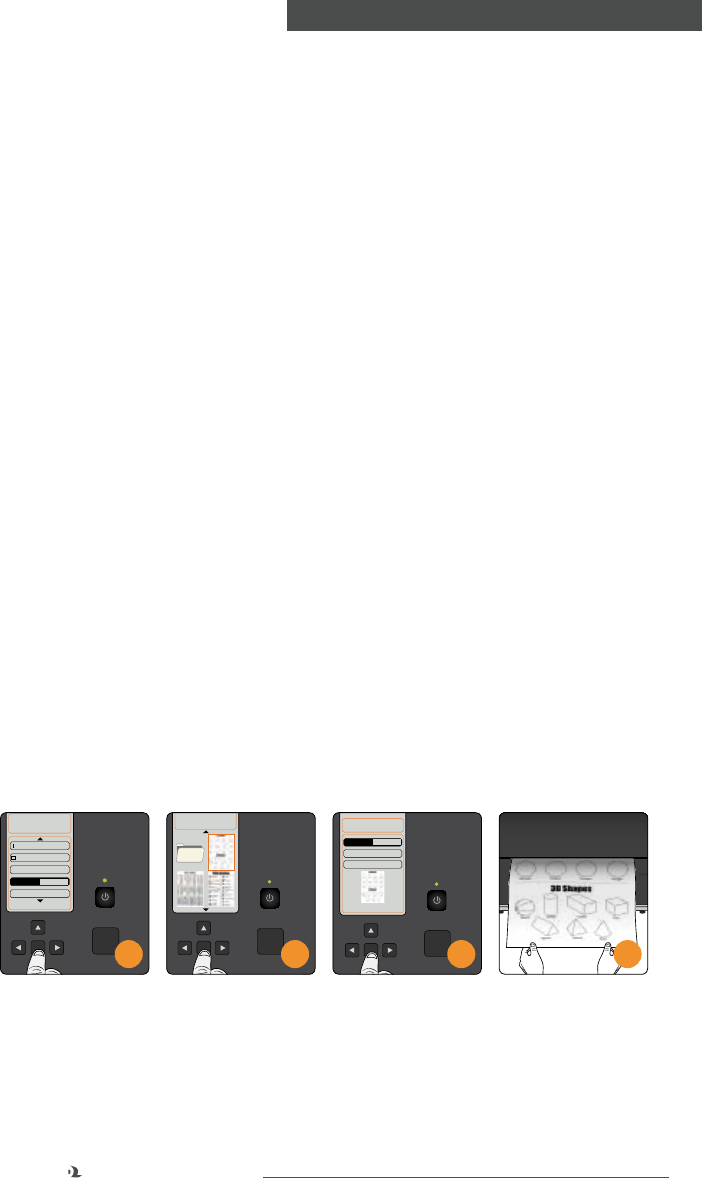
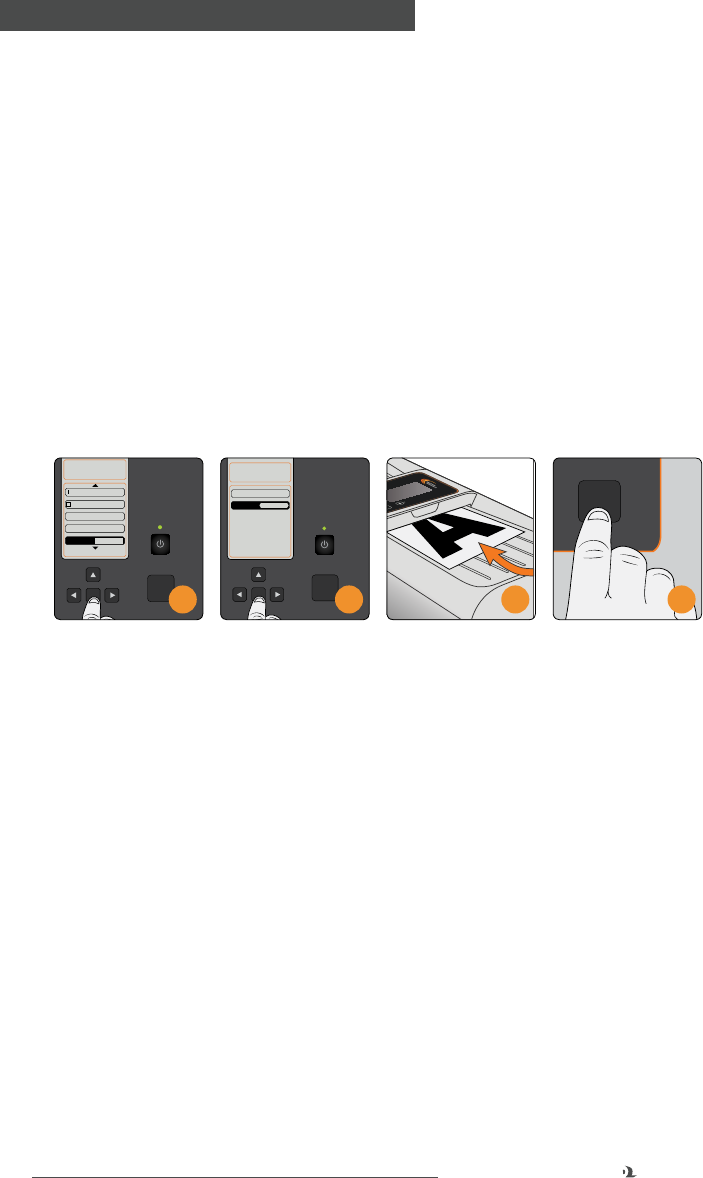
1. Place a letter-size picture or document face up in the scanning tray, feeding the
leading edge into the scanner. There is a mark on the scanning tray to show
how far your document should be fed.
2. Press the Print button on the Control Panel. Your original document will be
scanned and a preview will appear on the screen.
3. Press the Print button again to print the poster, or press the Close (“X”) button
to cancel.
4. Echo will print your poster and (by default) automatically cut it from the roll of
paper. Your finished poster is ready for display!
OK
OK
Print
1
Print
2
Print
OK
A
Preview
3
A
4
17
800.788.5572 GraphicProducts.com
OPERATING INSTRUCTIONS
While this process uses the default settings for the printer, there is a wide variety of
options available to help customize your poster. These options will be discussed in
the Menu Options section of this guide.
3.2 Printing from the Poster Gallery
Echo can store and print saved posters, either from pre-made designs that are
already included in your Echo’s PreMade Gallery or from documents that you have
scanned and saved into the User Gallery. The User Gallery is stored on an optional
SD Memory Card; without a memory card, you will be able to print posters from the
PreMade Gallery, but you will not be able to save your own scanned documents into
the Gallery for later printing.
Printing from the Gallery
Before you begin, make sure that Echo is powered on and has supply paper loaded.
1. Use the Up and Down arrow buttons to highlight the Advanced option on the
main menu, and press the OK button.
2. In the same way, scroll through the Advanced menu to highlight Gallery, and
press the OK button.
3. Highlight either the PreMade Gallery (for designs from Graphic Products) or the
User Gallery (for designs that you have scanned and saved.) Then, press the OK
button.
4. Browse through the posters in your selected gallery using the arrow buttons.
When you find the poster you want to print, highlight it and press the OK button.
5. Use the arrow buttons to set the desired size or number of copies. Then,
highlight Print and press the OK button to print the poster.
6. Echo will print your poster and (by default) automatically cut it from the roll of
paper. Your finished poster is ready for display!
Print
OK
Advanced
Mirror: Off
Border
Print Area
Save Scan
X: Back OK: Select
Gallery
1
1
OK
2
Print
OK
PreMade
Shapes
23" x 30"
Math
4
Print
OK
Shapes
Press OK to print
Copies: 1
Size: 23" x 30"
OK
Print
5 6
18
GraphicProducts.com 800.788.5572
OPERATING INSTRUCTIONS
Scan and Save
To scan a poster design and save it for later, make sure that Echo is powered on and
has an SD Memory Card inserted.
1. Use the Up or Down arrows to highlight the Advanced option on the main menu,
and press the OK button. Then, scroll through the Advanced menu to highlight
Save Scan, and press the OK button.
2. Use the arrow buttons to select the printing mode and poster size you want to
use for this poster.
3. Place your document in the scanner and press the Print button. The document
will be scanned and saved on your SD memory card.
4. When the save is complete, the file name assigned to your newly-scanned
poster will be shown. Press the OK button to finish the process. The design will
appear in your User Gallery for later printing!
Print
OK
Advanced
Mirror: Off
Border
Print Area
X: Back OK: Select
Gallery
OK
1
1
Save Scan
1
Print
OK
Save Scan
Place document in scanner
& press Print
Mode: Standard
Size: 23" x 30"
2
OK
OK
Print
3
Print
3
3.3 Printing from a PC
Echo can print posters directly from your computer. To print in this way, Echo will
need to be in Connection mode, waiting for instructions from a computer. While
in Connection mode, Echo will only accept commands from the USB or network
connection, as specified. When Echo is not in Connection mode, it will not receive
commands from any connected computer. You can enable or disable these
connections from Echo’s Control Panel.
Before you begin, make sure that Echo is powered on and has supply paper loaded.
You will also need to have Echo connected to your computer with a USB cord, or
connected to your network with an Ethernet cord. Your computer will also need the
Echo driver software installed. (These steps are described in the “Setup Instructions”
section of this guide.)
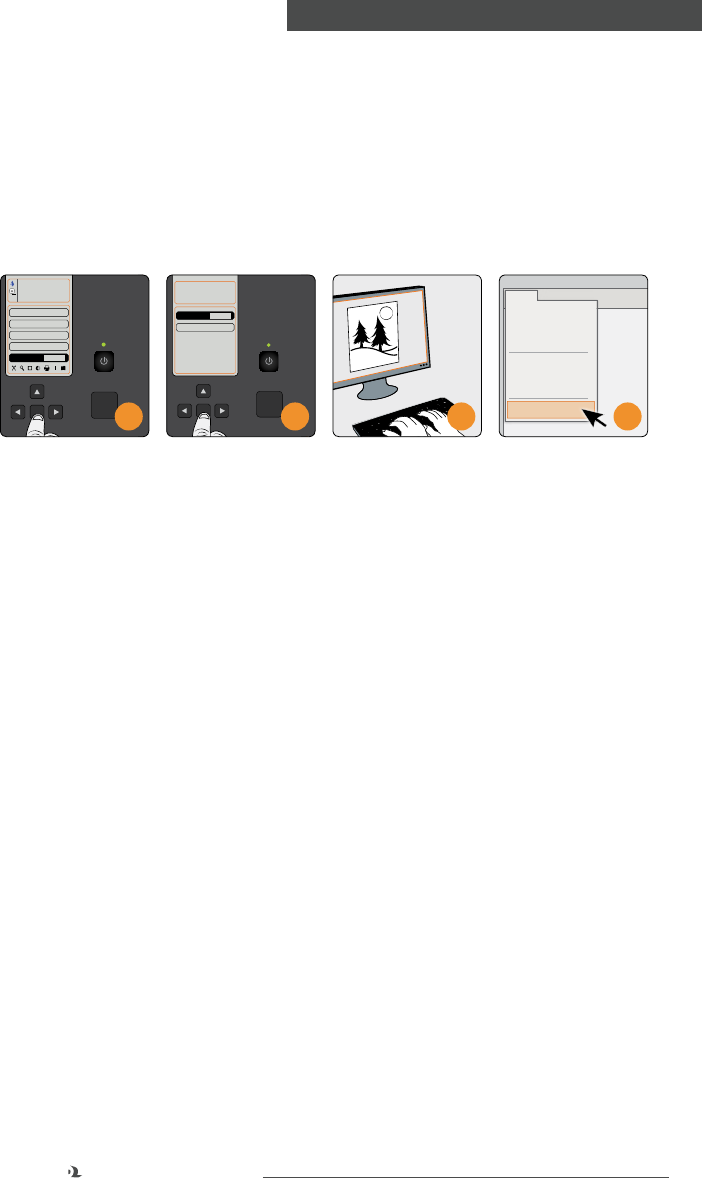
1. On the main menu, highlight “PC Connect” and press the OK button.
2. To use a direct connection to one computer, highlight “USB”, and press the OK
button. Echo will display the message, “Connection: USB.” To use a network
connection instead, highlight “LAN”, and press the OK button. Echo will display
the message, “Connection: LAN.”
19
800.788.5572 GraphicProducts.com
OPERATING INSTRUCTIONS
3. On your computer, open the design that you would like to print, and select
the Print function. (This process may vary slightly, depending on your design
program.)
4. Make sure that Echo is your selected printer, and that it is set for the correct
poster size and orientation. Then, click Print or OK, just like you would if you
were using a typical desktop printer. Your finished poster will soon be ready for
display!
Print
OK
Mode: Standard
Size: 23" x 30"
Copies: 1
Advanced
OK
PC Connect
1
1
Blue on
White
23 in. DT Paper
100'
1
Print
OK
LAN
OK
USB
PC Connect
2 3
OK
Edit ToolsFile
New
Open
Save
Save As...
Print...
4
Echo will remain in Connection mode, ready to print more designs from your
computer, until you press the Close (“X”) button. If the Auto-Off option has been
enabled and Echo does not receive any print jobs for the designated idle time, Echo
may shut down on its own. To resume printing, simply turn Echo back on with the
Power On/Off button.
20
GraphicProducts.com 800.788.5572
MENU OPTIONS
4. Menu Options
Many of Echo’s functions and features can be customized using these menus.
Remember to make any desired changes here before printing your poster.
4.1 Main Menu Options
The three most common options are available right from Echo’s main menu. These
options are Mode, Size, and Copies.
Mode
Echo can print in four different modes: Standard,
Photo Fast, Photo Best, and Inverse.
• Standard: Best for printing text and line
drawings in high contrast, with no shades of
gray or variations of color.
• Photo Fast: Quickly reproduces photos and art,
but does not provide as high a final print quality
as “Photo Best”.
• Photo Best: Reproduces photos and art with the
highest print quality, but takes about twice the
time to print in comparison to “Photo Fast”.
• Inverse: Creates a “negative” image, reversing
light and dark areas. An original page with black
text on a white background might be printed as
white text on a black background. (Actual printed colors will be determined by
the supply paper that is currently loaded.) Inverse printing gives a print quality
similar to Standard printing.
To change Echo’s current printing mode, follow these steps.
1. Use the Up and Down arrows on Echo’s Control Panel to highlight the Mode
option on the Main Menu. As this is the menu’s first option, it may already be
highlighted.
2. Use the Right and Left arrows to select the desired Mode.
Size
This option allows you to choose from a number of print sizes. The available size
settings depend on the size of the supply paper (23" or 36") that is currently loaded
in Echo. When 23" paper is loaded, the default poster size will be 23" × 30"; with
36" paper, the default poster size will be 36" × 46".
100'
21
800.788.5572 GraphicProducts.com
MENU OPTIONS
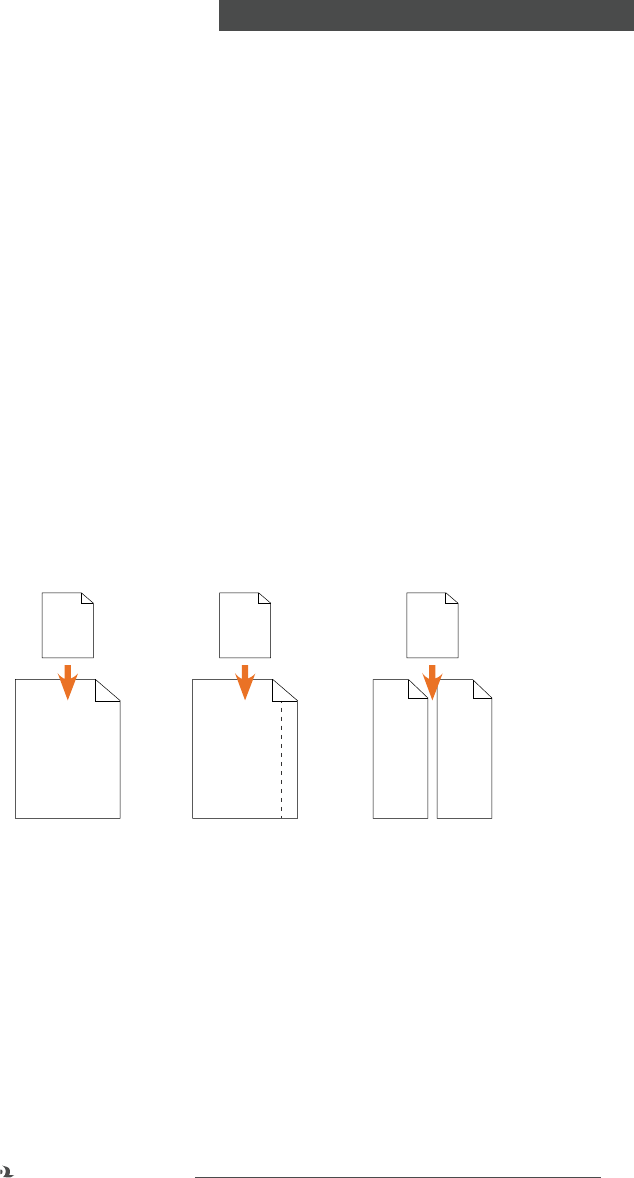
Echo determines the size of printed posters in three different ways: Full-Page, Cut
Lines, and Tiled Prints. These options are available for both the 23" and 36" supply
paper sizes.
• Full-Page: The printed image is formatted for the width of the supply paper
(23" or 36"), with a selection of different lengths. Because the printed poster
fits exactly on the supply paper, a poster made in this way is ready to display
immediately. Full-Page is the most common sizing method.
• Cut Line: Noted with the letter “C”, the Cut Line sizes create posters that do
not fill the entire width of the supply paper. Instead, there will be a blank space
along one side. Echo will print a dotted line at that point. You can then cut
along that line with scissors, a craft knife, or a paper cutter, removing the extra
material.
• Tiled Print: Noted with the letter “T”, the Tiled Print sizes create posters that
are larger than your supply paper. To do this, Echo will print two separate parts
to your large poster, which can be overlapped by about an inch and taped or
mounted together. The result is a poster that measures nearly twice the width of
your supply paper. When creating a Tiled poster, Echo will include a dotted line
at the margin of the poster to help line up the parts of the complete poster; cut
along this dotted line to remove any gaps in the print.
ABCD
1234
ABCD
1234
ABCD
1234
AB
12
CD
34
FULL-PAGE CUT LINE TILED PRINT
ABCD
1234
ABCD
1234
To change the size for your next poster printing, follow these steps.
1. Use the Down arrow to highlight the Size option on the main menu.
2. Use the Left and Right arrows to select the desired poster size.
22
GraphicProducts.com 800.788.5572
MENU OPTIONS
The available print sizes are listed here.
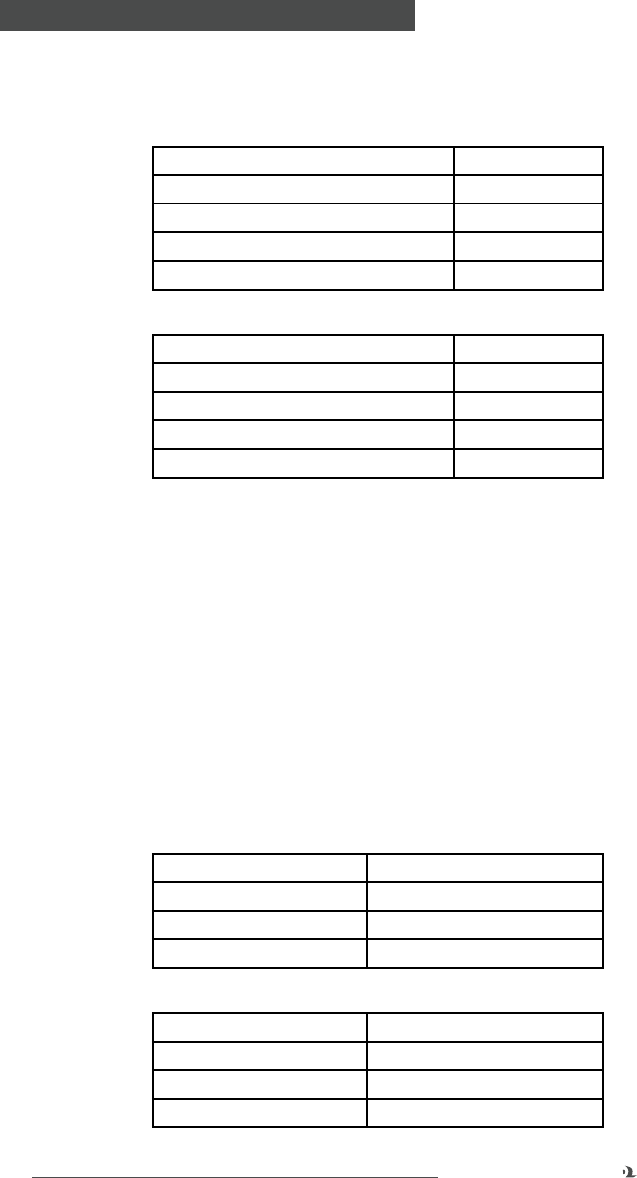
23" Supply Paper
23" × 30" (58 × 76 cm) Full-Page
23" × 18" (58 × 46 cm) Full-Page
C17" × 22" (43 × 56 cm) Cut Line
C20" × 26" (51 × 66 cm) Cut Line
T45" × 58" (114 × 147 cm) Tiled Poster
36" Supply Paper
36" × 46" (91 × 117 cm) Full-Page
36" × 28" (91 × 71 cm) Full-Page
C30" × 38" (76 × 97 cm) Cut Line
C34" × 44" (86 × 112 cm) Cut Line
T70" × 90" (178 × 229 cm) Tiled Poster
When creating Banner posters, the length will vary based on the supply size loaded
and the number or length of your original documents. Because of this, the “Size”
option will be “grayed out” and unavailable.
To determine the final length of a banner, use this formula:
(Supply Width ÷ Original Document Width) × Original Document Length = Banner
Length
For example, if you start with three letter-size pages (8.5" wide and 11" long per
page, for a total of 33" of length) to be printed end-to-end on 23" wide supply paper:
(23 ÷ 8.5) × 33 = 89.3
Your banner will be about 89.3" long, or about seven and a half feet. To save time,
this chart shows the approximate final lengths for some common sizes:
23" Supply Paper
2 letter-size pages About 60", or 5'
3 letter-size pages About 90", or 7.5'
4 letter-size pages About 120", or 10'
5 letter-size pages About 150", or 12.5'
36" Supply Paper
2 letter-size pages About 93", or 7.75'
3 letter-size pages About 140", or 11.5'
4 letter-size pages About 186", or 15.5'
5 letter-size pages About 233", or 19.5'
23
800.788.5572 GraphicProducts.com
MENU OPTIONS
Copies
The Copies option allows you to change the number of poster copies that will be
printed at one time, up to a maximum of ten copies. To print multiple copies, follow
these steps.
1. Highlight the Copies option on the main menu, using the Up and Down arrows.
2. Change the number of copies with the Left and Right arrows.
After printing a set of posters, the selected number of copies will automatically reset
to one. While using Banner mode, you can only print one copy at a time.
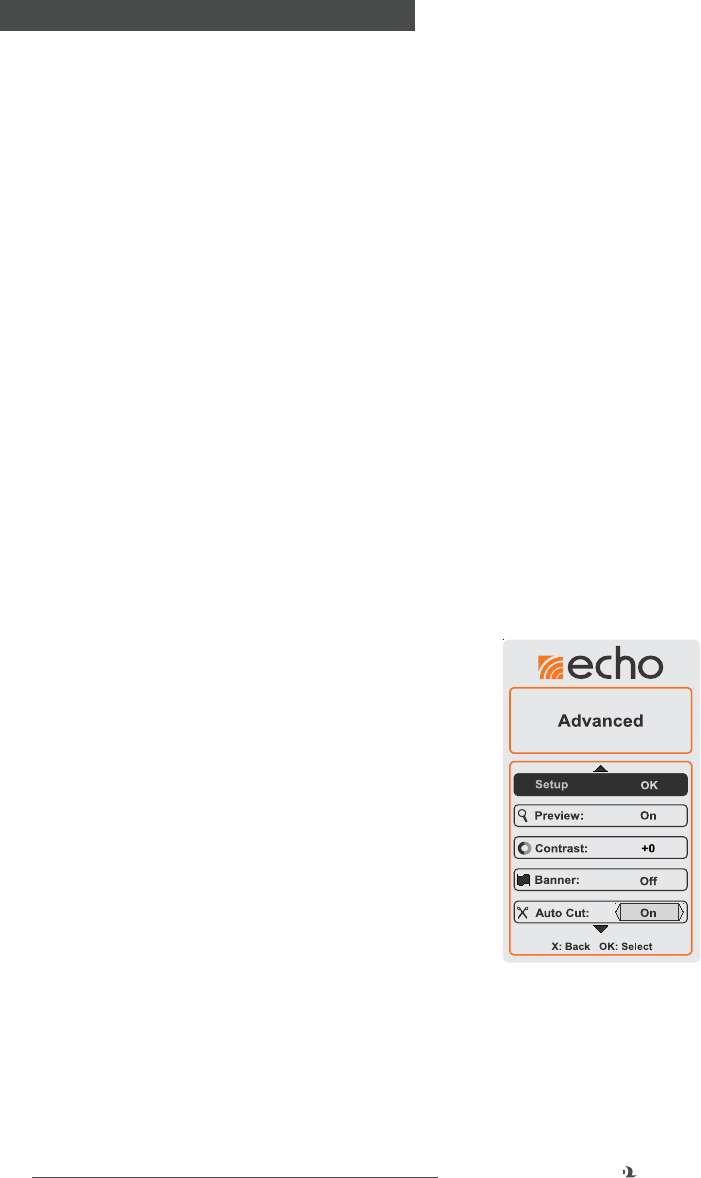
4.2 Advanced Options
The Advanced options let you adjust Echo’s default
settings, to customize your printing.
Setup
This entry in the Advanced menu provides access to
the Setup menu, which includes less common options.
Most of the options in the Setup menu are used
for initial setup or for troubleshooting. They will be
discussed in section 4.3, Setup Options.
Preview
With this feature, a preview of the document is
displayed on the screen after the original is scanned,
and Echo will wait for you to press the OK button or the Print button before printing.
By default, Preview is On.
• When scanning multiple sheets, the Preview function will prompt you for
approval after each scan, before printing that poster. If you choose to cancel the
print, none of the remaining documents in the scanning tray will be scanned or
printed until you start a new job.
• When printing a banner, the Preview function is not available.
In order to disable or enable Previews, follow these steps.
1. Highlight the Advanced option on the main menu and press the OK button.
2. Highlight Preview on the Advanced menu.
3. Use the Left or Right arrows on the Control Panel to toggle Preview Mode off or
on.
24
GraphicProducts.com 800.788.5572
MENU OPTIONS
Contrast
You can adjust the scanner’s contrast control to improve the
readability of your document or make your pictures look better.
To make Contrast adjustments, follow these steps.
1. Highlight the Advanced option on the main menu and
press the OK button.
2. Highlight Contrast on the Advanced menu.
3. Use the Left and Right arrows to decrease or increase
the contrast values for your poster print. Contrast settings
range from -5 (low contrast) to +5 (high contrast). The default value is 0.
Make sure to check the preview before printing, to determine if the contrast
adjustment will provide the intended result.
Banner
Using this option, you can create long banners instead of
normal-sized posters. You can make a banner by stacking
multiple sheets in the scan input tray, or by taping several
sheets of paper together for scanning; your original documents
(up to 15 pages) will be printed end-to-end. Note that any
blank margins on the original pages will be included as gaps in
the final banner; for long pictures, you may want to cut off the
blank area at the end of the page. To create a banner, follow
these steps.
1. Prepare a sequenced stack of documents you wish to use
for a banner, or tape together multiple sheets of paper to
create one long original document. Place the originals on the scan input tray.
2. Highlight the Advanced option on the main menu and press the OK button.
3. Highlight Banner on the Advanced menu.
4. Use the Left or Right arrows on the Control Panel to toggle Banner printing off
or on.
5. Once you have enabled Banner printing, return to the main menu by pressing
the Close (“X”) button.
6. Use the Left or Right arrows to select the desired Mode.
7. Feed your original documents into the scanning tray, and press the Print button.
After your banner finishes printing, Echo will return to its normal settings; to print
another banner, follow these steps again.
ORIGINAL
More
Contrast
+
Less
Contrast
-
Advanced Menu
Contrast
Banner
1. Enable banner mode.
2. Tape or stack several pages
together & insert into scanner.
3. Print banner.
OK
Print
Advanced Menu
25
800.788.5572 GraphicProducts.com
MENU OPTIONS
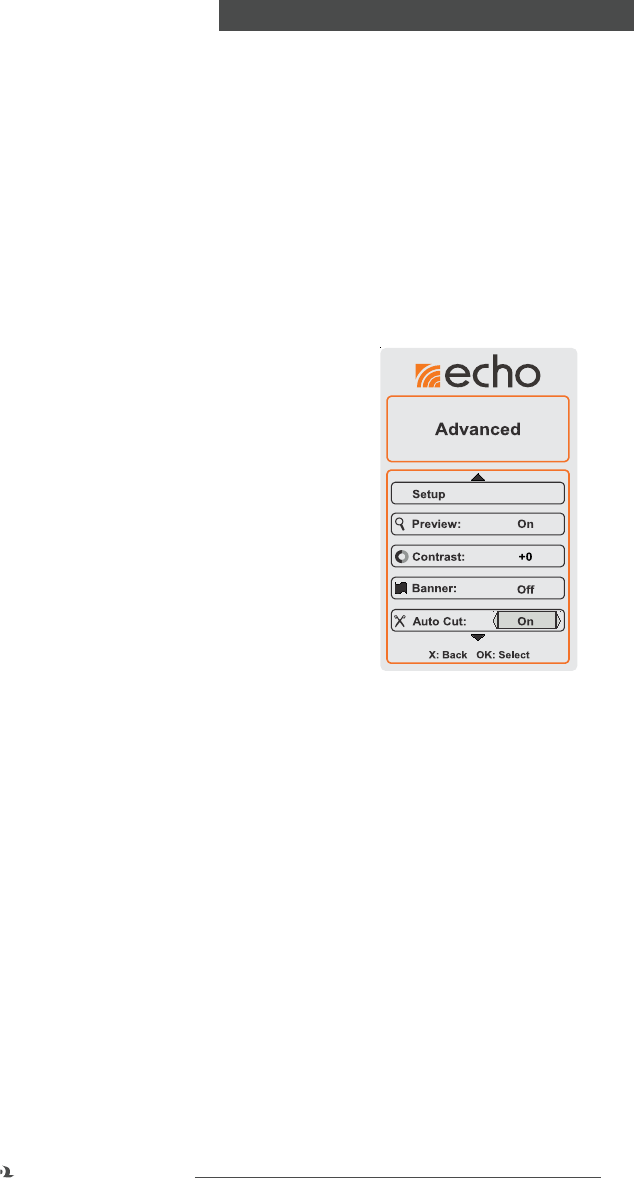
Auto Cut
With this feature, Echo will automatically cut a poster from the roll of supply paper
after the poster is printed. By default, Auto Cut is On. To disable or enable Auto Cut,
follow these steps.
1. Highlight the Advanced option on the main menu and press the OK button.
2. Highlight Auto Cut on the Advanced menu.
3. Use the Left or Right arrows to toggle Auto Cut off or on.
While Auto Cut is turned off, press the Cut (scissors) button on the Control Panel to
operate the cutter after your poster is finished. Auto Cut will turn back on after Echo
completes its next print job (either one poster or a set of copies of a poster).
Mirror
You can print a mirror image of your original document with
this option, creating a “backwards” poster, as if seen in a
mirror. This will make text difficult to read; usually, this option
is best for images or photos. To enable or disable Mirror
printing, follow these steps.
1. Highlight the Advanced option on the main menu and
press the OK button.
2. Use the Up or Down arrows to scroll through the Advanced
menu, and highlight Mirror.
3. Use the Left or Right arrows to toggle Mirror printing off or on.
Border
You can select one of several different border styles to add a
printed frame to your poster. To add one of these borders to
the print, follow these steps.
1. Highlight the Advanced option on the main menu and
press the OK button.
2. Use the Up or Down arrows to scroll through the Advanced
menu, and highlight Border. Then, press the OK button.
3. Use the arrow buttons to highlight the desired border
style, and press the OK button.
When you add a border, it will take up part of your poster’s area. If your original
document has important content near the edges of the page, it may be obscured
by the border. Make sure to check the preview before printing, to determine if the
border will print over something that you don’t want covered.
Advanced Menu
Original
Mirror
Poster
Text
Text
Border
Original
Text
Poster
Text
Advanced Menu

26
GraphicProducts.com 800.788.5572
MENU OPTIONS
Print Area
You can enlarge and print a specific portion of your original document by selecting a
specific Print Area. This option is especially useful when enlarging a small document
(like a picture or a business card) using the carrier sheet. This option is not available
with Banners. In order to change the Print Area of your poster, follow these steps.
1. Highlight the Advanced option on the main menu and press the OK button.
2. Use the Up or Down arrows to scroll through the Advanced menu, and highlight
Print Area. Then, press the OK button.
3. On this screen, you can choose a printing Mode, Size, and number of Copies
using the arrow buttons.
4. Place your original document in the scanning tray, and press the Print button.
5. Use the Up and Down arrows to adjust the size of your selection box on the
preview, and press the OK button.
6. Use the arrow buttons to move the selection box to the desired part of the
preview. Only the portion inside the selection box will be printed. If you need to
resize the box again, press the Close (“X”) button to go back a step.
7. Press the Print button. Echo will enlarge and print the area inside your selection
box.
Gallery
Echo has two different poster galleries.
• PreMade – The PreMade gallery is loaded with pre-designed posters. These are
stored internally in Echo’s permanent memory.
• User – The User gallery stores posters that you have scanned and saved. The
poster information is stored on your removable SD Memory Card.
PreMade Gallery
Posters in the PreMade Gallery can be resized to fit different areas; the size choices
available will change based on the size of supply paper currently in your Echo. To
print a poster from the PreMade Gallery, follow these steps.
1. Highlight the Advanced option on the main menu, and press the OK button.
2. Use the Up or Down arrows to scroll through the Advanced menu, and highlight
Gallery. Then, press the OK button.
3. Use the Up or Down arrows to highlight the PreMade gallery, and press the OK
button.

27
800.788.5572 GraphicProducts.com
MENU OPTIONS
4. While browsing the gallery, you can use the arrow buttons to highlight a folder
within the gallery and press the OK button to look in that folder. Press the Close
(“X”) button to return to the previous area of the gallery. When you see the
poster design that you want, highlight it and press the OK button.
5. Use the Up or Down arrows to highlight the Size option, and use the Left or
Right arrows to select the poster size that you would like. You can also set a
number of copies to print.
6. When the size and number of copies are correct, highlight the Print option and
press the OK button to print your poster.
User Gallery
If you are using an SD Memory Card, you can view and print posters that you have
previously saved using the Save Scan function. These posters appear in the User
Gallery, and are listed in the order in which they were saved. In order to print a
poster from your User Gallery, follow these steps.
1. Highlight the Advanced option on the main menu, and press the OK button.
2. Use the Up or Down arrows to scroll through the Advanced menu, and highlight
Gallery. Then, press the OK button.
3. Use the Up or Down arrows to highlight the User gallery, and press the OK
button.
4. When you see the poster design that you want, highlight it and press the OK
button.
5. You can set a number of copies to print. If you want more than one copy, use
the Up or Down arrows to highlight the Copies option, and use the Left or Right
arrows to choose a number of copies.
6. When you are ready, highlight the Print option and press the OK button to print
your poster.
The User Gallery will only show those saved posters that are sized for the supply
paper that is currently loaded. To print other saved posters, you will need to load
different supply paper; you can also re-scan your original document for the new size.
To remove a scanned poster from the User Gallery, select it from the Gallery as if you
were going to print it. Highlight the Delete option and press the OK button. Press the
OK button again to confirm your choice. This Delete option is only available in the
User gallery; you cannot delete posters from the PreMade gallery.
28
GraphicProducts.com 800.788.5572
MENU OPTIONS
Save Scan
Using this function, you can scan an original document and save it for printing at any
time. These saved posters will appear in the User Gallery, as described above. To
scan an original document and save it to the User Gallery, follow these steps.
1. Highlight the Advanced option on the screen, and press the OK button.
2. Use the Up or Down arrows to scroll through the Advanced menu, and highlight
Save Scan. Then, press the OK button.
3. On this screen, you can select a printing Mode and Size with the arrow buttons.
Your saved posters cannot be modified after scanning; if you would like to print
the poster in another size, you will need to follow these steps again with a
different size selected.
4. Place the document in the scanner and press the Print button.
The files created when you save a scan are stored on a replaceable SD Memory
Card. If Echo does not detect the SD Memory Card, it will display an error message
when you try to save a scan or view the User Gallery.
Echo will give each scanned design a numbered file name. Each file name will end
in “_23” or “_36”, indicating the size of supply paper needed to print the poster. If
you use the same SD card for other purposes, you can identify Echo’s saved poster
designs by the file extension “.eff”.
4.3 Setup Options
Inside the Advanced menu, there is another menu for
Setup. While the other options under Advanced offer
special tools to affect posters, the Setup menu allows
you to make changes to Echo’s settings that affect the
printer itself. Most of these Setup options are used for
initial setup or for troubleshooting.
Darkness
The Darkness option allows you to adjust the amount
of heat used by Echo’s print heads during the printing
process. You should normally leave this setting alone.
Echo will automatically adjust the heat to match the
supply paper that is loaded. If you see faint or “faded”
printing across your finished posters, then this setting may need to be adjusted. Our
support team may direct you to adjust this setting.

29
800.788.5572 GraphicProducts.com
MENU OPTIONS
V. Gap
The V. Gap option allows you to adjust the alignment of the print heads, relative
to each other. You should normally leave this setting alone. If this option needs
adjusting, you may see a “vertical gap” — a blank line, parallel to the feed of the
poster. Our support team may direct you to adjust this setting.
H. Gap
The H. Gap option allows you to adjust the alignment of the paths of the print
heads, relative to the feed of supply paper as it moves through the printer. You
should normally leave this setting alone. If this option needs adjusting, you may see
“horizontal gaps” — blank lines perpendicular to the feed of the poster. Our support
team may direct you to adjust this setting.
Units
This option allows you to display the poster dimensions in either Standard (inch/foot)
or Metric (cm/m) units. Poster and roll length measurements will be displayed in the
selected units of measure. The default setting is for Standard units. To change the
displayed units, follow these steps.
1. Highlight the Advanced option on the main menu, and press the OK button.
Then, highlight the Setup option and press the OK button.
2. In this menu, highlight Units.
3. Use the Left or Right arrows to toggle between Standard and Metric units.
Auto-Off
This option lets you set an idle time, after which Echo will automatically power down.
To turn Echo on again, simply press the Power On/Off button.
The idle time settings are Never, 1 hour, 2 hours, 4 hours, 8 hours, and 12 hours.
The default setting is "Never", which means Echo will not turn itself off. In order to
change this setting, follow these steps.
1. Highlight the Advanced option on the main menu, and press the OK button.
Then, highlight the Setup option and press the OK button.
2. In this menu, highlight Auto-Off.
3. Use the Left or Right arrows to select the desired idle time before Echo will shut
itself down.

30
GraphicProducts.com 800.788.5572
MENU OPTIONS
Language
In order to change the language setting for Echo’s menus and options, follow these
steps.
1. Highlight the Advanced option on the main menu, and press the OK button.
Then, Highlight the Setup option and press the OK button.
2. In this menu, highlight Language.
3. Use the Left and Right arrows to select the desired language, and press the OK
button. You will see a message that the language selection will take effect when
the system restarts.
4. Use the Power On/Off button on the Control Panel to turn off the system, wait
for a few seconds, and turn it on again.
English is currently the only language supported by Echo, but this will be updated in
the future.
Network
This menu allows you to adjust the necessary settings to connect Echo to a network.
Often, these network settings are managed by an IT team, so you may need their
help to ensure that these settings are correct. If these settings have not been
properly adjusted, you may not be able to print from computers on the network.
In order to reach the Network menu, follow these steps.
1. Highlight the Advanced option on the main menu, and press the OK button.
Then, Highlight the Setup option and press the OK button.
2. In this menu, highlight Network, and press the OK button.
Now, continue to the following sections as necessary.
IP Type
Here, you can select the IP Type that is appropriate for a new device on your network.
To set this option, reach the Network menu as described above, and then follow
these steps.
1. Reach the Network menu as described above.
2. In this menu, highlight IP Type.
3. Use the Left and Right arrows to select the network type. Choose DHCP if Echo
should request an IP Address assignment from your network’s server, or choose
Static if you will assign the IP settings manually.
If you are using DHCP, you may be finished with the network settings. With Static IP
assignment, you will need to continue to the other options under the Network menu
in order to finish the network setup.

31
800.788.5572 GraphicProducts.com
MENU OPTIONS
Address, Gateway, and Mask
When using Echo with a Static IP assignment, you will need to manually set the IP
Address, Gateway, and Mask (or “Subnet Mask”) using Echo’s Control Panel. For
these settings, reach the Network menu as described above, and then follow these
steps.
1. Highlight the needed option in the Network menu, and press the OK button.
2. Use the Up and Down arrows to adjust the value of the highlighted digit, and
use the Left and Right arrows to change which digit is highlighted.
3. Once you have finished entering this setting, press the Close (“X”) button to
return to the previous menu.
4. Repeat these steps for the remaining settings.
MAC Address
The MAC address of a device is unique and permanent, and is sometimes useful for
network setup and troubleshooting. To view the MAC address for your Echo, reach
the Network menu as described above. Then, highlight MAC, and press the OK
button. It may be helpful to write down the MAC address.
Test Page
A Test Page is a demonstration poster including a variety of printed elements. For
most purposes, you should confirm that Echo is working normally by printing a
desired poster, rather than the Test Page. For certain print quality issues, the Test
Page may be useful as part of a troubleshooting process, and our support team may
direct you to try this option.
Calibrate
This option calibrates Echo’s scanner. You should normally leave this setting alone.
For certain scan quality issues, or when updating the system, our support team may
direct you to use this option. To calibrate the scanner, you will need a single 8.5" ×
11" piece of clean white paper, with no folds or wrinkles.
Diagnostic
The Diagnostic menu offers additional tuning controls, and is locked to prevent
accidental damage to the system. If these tools are needed, a support agent will
provide the necessary steps.

32
GraphicProducts.com 800.788.5572
ECHO SOFTWARE
5. Echo Software
5.1 Echo’s Driver and Printing Preferences
The software that a computer uses to control a physical device is called the device’s
driver. Echo uses a standard Windows driver, which is compatible with Windows XP,
Vista, 7, and 8, in both 32-bit and 64-bit versions. In order to print from a computer
directly to Echo, that computer will need to have the driver installed. To install the
driver, insert the CD provided and follow the prompts onscreen; you may need help
from your IT team. If there are any questions, please contact our support team at
800.788.5572.
Printing Preferences
The driver software includes the settings called Printing Preferences (or Properties).
There are several of these options that may need adjusting when you print from a
PC.
The most important option is on the Page Setup tab of Echo’s Printing Preferences.
You can choose a poster size in the drop-down menu marked Name. The four most
common sizes are available for selection, or you can enter a custom poster size with
the “USER” option.
If you are using one of the four preset sizes, the Orientation option on the same tab
should be set to “Portrait.” This option refers to the direction of print, and not the
layout orientation. “Portrait” prints your design from top to bottom; “Landscape”
prints your design from left to right.
On the Stock tab there is a drop-down menu for Post-Print Action; this can be set to
“Cut” if you want Echo to cut each poster as it is completed, or “None” if you would
prefer to cut the poster yourself.
5.2 Echo Canvas
The custom poster design program included with Echo is called Echo Canvas. This
program includes its own help documentation; if you have any questions, use the
in-program Help menu, or call for support at 800.788.5572.
5.3 Word Plug-in for Echo
Echo’s software package also includes a plug-in for Microsoft Word, the most
popular word processing program. This allows you to design a poster in Word (as a
normal, letter-size page) and print it as a full-size poster. To use this plug-in, simply
install it from the software CD provided, design your poster in Microsoft Word, and
use the new “Print to Echo” button to create a full-sized poster.
33
800.788.5572 GraphicProducts.com
ECHO POSTER CATCHER
6. Echo Poster Catcher
This optional accessory for Echo catches posters as they are printed. This makes it
much easier to create batches of posters at once, or to print remotely, when you are
not able to catch the posters yourself.
In order to use the poster catcher, Echo should be resting at the edge of a table or
counter, so that posters feed out into open space.
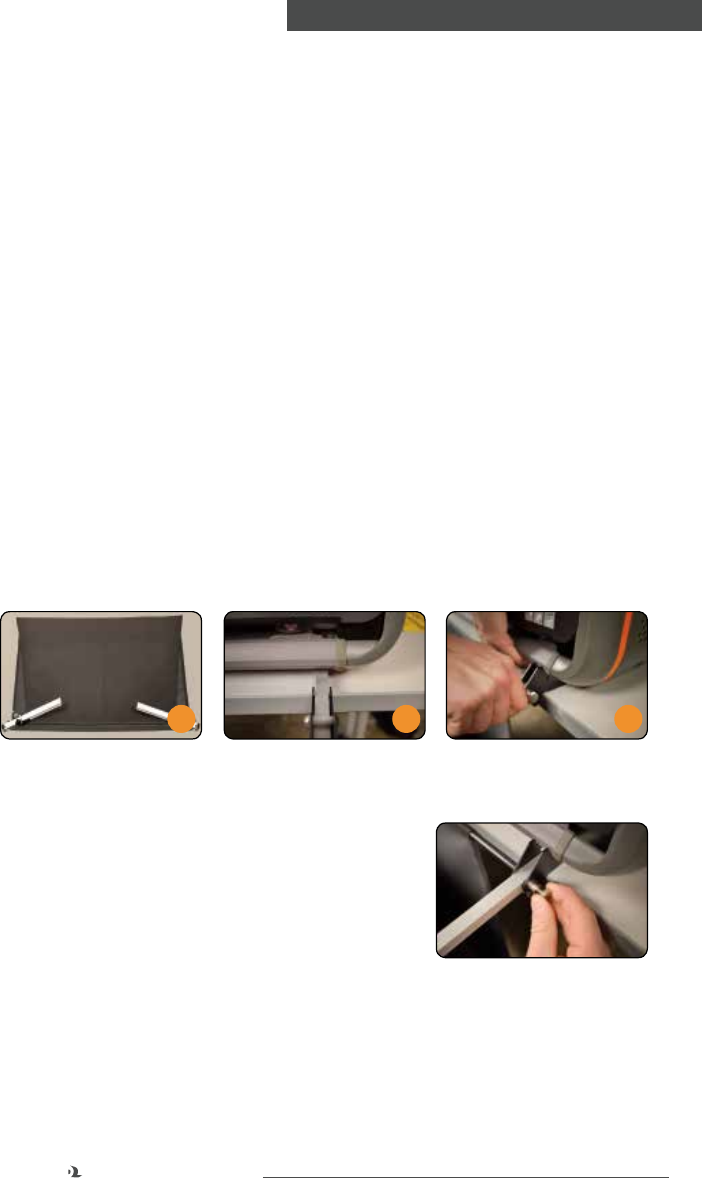
6.1 Installing the Poster Catcher
The poster catcher is designed to be lightweight, simple, and easy to use. Follow
these steps to install it.
1. The poster catcher is shipped in its collapsed state. Simply unroll the black
fabric and rotate the two metallic arms away from the fabric. They will rest at
90° angles.
2. Each of the metallic bars of the poster catcher will fit under Echo. They should
be inserted just inside the gray rubber markers, as shown. Slide the arms under
Echo and check that they are positioned correctly.
3. Each arm of the poster catcher includes a notch that secures its position under
Echo. Slide one arm fully into place, lifting that end of Echo slightly, until the
notch catches. Repeat the process for the other side.
6.2 Using the Poster Catcher
After installing the poster catcher, you can open or close it as needed. Slide the
catcher open by sliding the metallic arms forward
until the metal Quick Release Pins snap into place.
Close the catcher by pulling those pins to the outside
and then sliding the metallic arms under Echo.
Always apply pressure at the metallic arm, and not in
the center of the catcher, to avoid bending the frame.
2 31

34
GraphicProducts.com 800.788.5572
MAINTENANCE AND TROUBLESHOOTING
7. Maintenance and Troubleshooting
7.1 Cleaning Your Echo
We recommend cleaning your Echo system periodically, using our cleaning swabs
(provided at no charge with any supply order) or using isopropyl alcohol and a soft
cloth. Do not use any other cleaners or solvents.
Cleaning should be done periodically, after every few rolls of paper supply. It may be
easier to schedule cleaning “once each month” or “once each season”, depending
on your use of the system. The cleaning process should take only about five minutes.
To clean the system, start by turning Echo off. Then, follow these steps.
• Open the scanning module by lifting its right edge. (The scanner is hinged on
the left side.)
• Use a cleaning swab, or soft cloth and isopropyl alcohol, to wipe down the
scanning window and the scanner’s feed rollers.
• Allow these parts to dry for a minute or so. Then, close the scanner module.
• Use the Lid Release Button to open Echo’s lid. Remove any supply paper.
• Use a cleaning swab, or soft cloth and isopropyl alcohol, to wipe down the print
heads and the supply rollers.
• Again, allow the parts to dry for a minute or so. Then, load the supply paper
again, and close Echo’s lid.
You can now turn the system on, and resume printing.
7.2 Troubleshooting
The screen shows an error message: No Paper Loaded.
Echo is having trouble identifying its supply paper. To resolve this problem, follow
these steps.
• Press the Lid Release button and raise Echo’s lid.
• Check that the supply paper is loaded correctly, with the ends of the roll resting
in the paper brackets. Paper should feed from the bottom of the roll and
forward over the rubber rollers near the front of the printer. (More details can be
found in the “Setting Up Echo” section of this guide.)
• Close the lid again and press the Cut (scissors) button to cycle the cutter.
• If the problem persists, please contact Graphic Products’ support at
800.788.5572.

35
800.788.5572 GraphicProducts.com
MAINTENANCE AND TROUBLESHOOTING
My original document is not feeding into the scanner at all.
Your original document may not be fed far enough into Echo’s scanning tray. When
loading your original documents to be scanned, follow these steps.
1. If you are using a small document like a card instead of a letter-sized page,
insert your document into the carrier sheet provided. This will allow it to feed
through the scanner properly.
2. Insert your document into the scanning tray, and slide the edge into the opening
for the scanner.
3. Continue to insert the document until you feel the page stop. The back edge of
the page should align with one of the marks on the tray, to let you know it is in
the right place. If you are using the carrier sheet, it will fall between the marks
for A4 and Letter sizes.
4. Try your print job again. If the problem persists, please contact Graphic
Products’ support at 800.788.5572.
The scanner doesn’t feed my original document smoothly, or the scanned image
is smudged.
The scanner window and rollers probably need to be cleaned. To clean these parts
properly, follow these steps.
1. Open Echo’s scanner module by lifting its right edge. (The scanner is hinged on
the left side.)
2. Use one of the cleaning swabs provided with your paper supplies, or a soft cloth
and isopropyl alcohol, to wipe the rollers and scanner window. Allow these parts
to dry for a minute or so.
3. Close the scanner module by lowering it back into place.
This issue comes up most often when the same original document is scanned many
times. Some of the toner or ink can be rubbed away from the document and into the
scanner. If you need many copies of a poster, use the “Copies” function in Echo’s
main menu.
If you are using a carrier sheet, the sheet itself may be dirty or wrinkled. In that case,
try using a fresh carrier sheet. Common page sizes (letter and A4) do not need a
carrier sheet.

36
GraphicProducts.com 800.788.5572
MAINTENANCE AND TROUBLESHOOTING
The cutter is noisily jammed, or an error message appears: Cutter Jammed.
If the cutter mechanism jams, it may make a loud noise. This does not mean that
the cutter is broken, but the jam will need to be cleared before you can continue to
use Echo. To clear a jammed cutter, follow these steps.
1. Press the Lid Release button and raise Echo’s lid.
2. Remove any paper that is in the path of the cutter or has been partially cut, and
roll the supply paper back so that it does not feed out the front of Echo.
3. Close the lid again, and press the Cut (scissors) button to cycle the cutter and
ensure that it can move smoothly with no paper in the way.
4. Press the Lid Release button and raise Echo’s lid again; pull the supply paper
out so that it extends past the edge of the printer, and close the lid again. To cut
a clean edge to the paper, press the Cut (scissors) button.
5. Retry your print. If the jam persists, please contact Graphic Products’ support at
800.788.5572.
I’m trying to print from my computer, but nothing happens.
After the initial setup is completed, you should be able to print posters from Echo
Canvas and other design programs using the common “Print” function and selecting
Echo as the printer to be used. If Echo is not responding at all to commands from
your computer, there could be several possible causes; to check each possibility,
follow these steps.
1. First, make sure that Echo is powered on, and that the connection between
Echo and your computer is securely in place. A USB cable should connect Echo
directly to your computer, or an Ethernet cable should connect Echo into your
network.
2. Next, make sure that Echo is in the correct Connection mode. The screen
should display either “Connection: USB” (for a direct connection with a USB
cable) or “Connection: LAN” (for a network connection with an Ethernet cable).
3. If you are connecting your computer to Echo through a network, then Echo’s
network settings may need to be adjusted. Your IT team can provide the
necessary network information, and those settings are described in the “Setting
Up Echo” section of this guide.
4. If all settings seem to be correct, the problem may simply be a delay in the
communication between your computer and Echo. Turn off Echo using the
Master Power Switch, wait about ten seconds, and turn Echo back on. Then,
restart your computer.
5. Retry your print. If the problem persists, please contact Graphic Products’
support at 800.788.5572.

37
800.788.5572 GraphicProducts.com
MAINTENANCE AND TROUBLESHOOTING
Everything starts normally, but Echo stops partway through a print job.
This may be caused by a physical problem. Follow these steps to find the cause.
1. Open Echo’s lid and check the supply paper. If the paper has jammed, carefully
clear the jam, close the lid, and retry your print job.
2. If the supply paper has run out, remove the old paper core and insert a fresh
roll of supply paper.
3. If the supply paper is ready, close Echo’s lid again. The print job may resume
automatically.
4. If the job does not restart on its own, try printing your poster again. If
the problem comes back, please contact Graphic Products’ support at
800.788.5572.

38
GraphicProducts.com 800.788.5572
GLOSSARY
8. Glossary
Carrier Sheet – a sheet of white paper, attached along one edge to a clear plastic
film. Small documents can be inserted between the plastic and paper; this allows
them to feed through Echo’s scanner properly. Carrier sheets may be reused many
times; if a replacement is needed, please contact Graphic Products for help. The
carrier sheet included with Echo is “Document Carrier 099DC.”
Connection Panel – the set of plugs in the back of Echo. There is a power
connection, a USB plug, an Ethernet plug, and with the Master Power Switch.
Control Panel – the panel of buttons on the top of Echo. You can use the buttons
there to control most of the system’s functions, along with the Control Screen at the
center of the panel.
Control Screen – the information display at the center of the Control Panel, on top
of Echo. This screen shows details on the supply paper that is loaded, the options
that are available for you, and previews of the poster that you will be printing.
Direct Thermal (DT) – a type of thermal printing, in which heat is used to activate
“ink” that is carried inside a special supply paper. Wherever heat is applied, the ink
appears. The result is an instant print, without any separate supply of ink. However,
if the whole poster is heated (in a laminator, for instance) then all of the ink will be
activated, ruining the poster.
Feed Rollers – the rubber rollers in the bottom of your Echo, near the opening in
the front of the printer. These pull the supply paper through the printer during the
printing process.
Ethernet – a common type of networking connection. Ethernet cables physically
link different devices on a network, allowing computers and other devices to
communicate with each other.
IP Address – an identification for a device on a network. Much like a mailing
address, an IP Address is used to deliver information to the right place. IP Addresses
can be assigned in different ways, so your IT team may need to help.
LAN – “Local Area Network”, a way to connect multiple computers and other
devices together. When the Control Screen shows “Connection: LAN”, it means
that the printer is ready to receive commands (such as print jobs) over its network
connection.
Letter-Size – in the United States, a standard paper size of 8.5" × 11" (about
216mm × 279mm). This guide also uses “letter-size” to refer to documents of
roughly similar sizes, including the internationally-used A4 size. Smaller original
documents may be used with the included carrier sheet.

39
800.788.5572 GraphicProducts.com
GLOSSARY
Original Document – a letter-size page, from which Echo can create a much larger
poster. This original document may be a photo or a drawing, not just text, and it may
be a copy of another document. Original documents that are black-and-white, or
shades of gray, work best.
Platen – the flat section inside the printer that provides a working surface. The
paper is pressed against the platen as the print heads perform the print.
Print Heads – the parts of a printer that apply or activate ink, effectively making the
print happen. Echo is a thermal printer, which means that the print heads do their
work by heating up and cooling off at different points as they pass over the surface
of the supply paper.
Scanner Module – the component of Echo that includes the Control Panel and the
scanner. This component is hinged on the left; you can lift the scanner module by
raising the right side.
Scanning Tray – the place for original documents at the top of Echo. When scanning
or enlarging documents, place them face up at the right side of the Control Panel.
When finished, they will feed out the left side.
Thermal Transfer (TT) – a type of thermal printing, in which heat is used to move
“ink” from a carrier film onto the printed page. Where heat is applied, the ink sticks
to the page. The carrier film is removed and discarded after printing, and the result
is an instant, durable print.
USB – a common connection standard for devices, such as printers, that plug
directly in to a computer. When the Control Screen shows “Connection: USB”, it
means that the printer is ready to receive commands (such as print jobs) over a
direct connection.

40
GraphicProducts.com 800.788.5572
CERTIFICATIONS
9. Certications
9.1 FCC Compliance
This equipment has been tested and found to comply with the limits for a CLASS
A digital device, pursuant to Part 15 of the FCC Rules. Operation is subject to the
following two conditions: (1) This device may not cause harmful interference, and
(2) this device must accept any interference received, including interference that
may cause undesired operation. These limits are designed to provide reasonable
protection against harmful interference when the equipment is operated in a
commercial environment. This equipment generates, uses, and can radiate radio
frequency energy, and if not installed and used in accordance with instructions may
cause harmful interference to radio communications. Changes and modifications
could void the user’s authority to operate this equipment.
9.2 US, Canadian and European EMC and EMI standards
This equipment has been tested and passed with the requirements relating to
electromagnetic compliance based on the standards EN 55022: 2010, EN 55024:
2010, CISPR 22:2008, EN 301 489-01 V1.9.2:2011, EN 301 489-03 V1.6.1:2013,
EN 302 291-2 V1.1.1:2005, RSS-Gen:2010, RSS-210:2010, FCC 15.107:2014, FCC
15.109:2014, FCC 15.207:2014, FCC 15.225:2014, ANSI C63.4:2009, IEC 60950-
1:2005 (2nd Edition) and/or EN 60950-1:2006. Per RSS-Gen, Section 7.1.3 This
device complies with Industry Canada license-exempt RSS standard(s). Operation is
subject to the following two conditions: (1) this device may not cause interference,
and (2) this device must accept any interference, including interference that
may cause undesired operation of the device. This includes Industry Canada (IC)
certification number 9684A-GPECHO01.
Normes CEM et EMI américaines, canadiennes et
européennes:
Ce matériel a été testé et a répondu à toutes les exigences de conformité
électromagnétique fondées sur les normes EN 55022: 2010, EN 55024: 2010,
CISPR 22:2008, EN 301 489-01 V1.9.2:2011, EN 301 489-03 V1.6.1:2013, EN
302 291-2 V1.1.1:2005, RSS-Gen:2010, RSS-210:2010, FCC 15.107:2014, FCC
15.109:2014, FCC 15.207:2014, FCC 15.225:2014, ANSI C63.4:2009, IEC 60950-
1:2005 (2e édition) et/ou EN 60950-1:2006. Selon RSS-Gen, Section 7.1.3 Le
présent appareil est conforme aux CNR d’Industrie Canada applicables aux appareils
radio exempts de licence. L’exploitation est autorisée aux deux conditions suivantes:
(1) l’appareil ne doit pas produire de brouillage, et (2) l’utilisateur de l’appareil doit
accepter tout brouillage radioélectrique subi, même si le brouillage est susceptible
d’en compromettre le fonctionnement. Ceci comprend l'homologation d'Industrie
Canada (IC) numéro 9684A-GPECHO01.

41
800.788.5572 GraphicProducts.com
CERTIFICATIONS
9.3 TUV Compliance
The Echo poster printer has passed TUV compliance, which is in accordance with
UL standard 60950-1. These testing standards include CUE: CAN/CSA-C22.2 No.
60950-1:2007+A1:2011, UL 60950-1:2007+R:2011-12, EN 60950-11:2006 +A11
:2009+A1:2010+A12:2011+A2:2013 and CB IEC 60950-1:2005 (2nd Edition)
+A1:2009+A2:2013. The CB report is available upon request.
We recommend the use of the surge suppressor that is provided with Echo. It will
help protect Echo from possible damage during nearby lighting storms. It should be
installed between the AC wall outlet and the AC input to the device.
9.4 Printer Disposal/Recycling
For European Union member states: The following symbol of a crossed-out
wheeled bin indicates that the Echo printer must be disposed of properly and not
treated as general waste. Incorrect disposal could have a negative impact on human
health and the environment.
For more information on the correct disposal or recycling of this printer, please
contact Graphic Products at 800.788.5572.

42
GraphicProducts.com 800.788.5572
AVERTISSEMENTS DE SÉCURITÉ
Avertissements de sécurité
Passez attentivement en revue les consignes de sécurité suivantes avant d'utiliser
Echo :
• Echo est censée être utilisée seulement à l'intérieur. Conservez l'imprimante
à l'abri de l'humidité et de toute exposition prolongée à la lumière directe du
soleil.
• Echo est faite pour être utilisée à une température ambiante normale de 10-40
°C et à une altitude maximale d'environ 2 000 mètres au-dessus du niveau de
la mer.
• Vérifiez la tension de la source d'alimentation avant de raccorder l'imprimante à
une prise secteur. Echo doit être utilisée avec des prises électriques standard à
courant alternatif de 110-240 V, 50-60 Hz, reliées à la terre. La consommation
de courant d'Echo est généralement de 2,2 A.
• N'utilisez que des câbles d'alimentation homologués avec Echo. Si vous avez
besoin d'un câble de remplacement, veuillez contacter l'assistance de Graphic
Products au 800.788.5572.
• Avant de brancher le cordon d'alimentation dans Echo, veillez à ce que
l'interrupteur marche/arrêt soit sur arrêt.
• Ne laissez aucun liquide ou métal entrer en contact avec les pièces internes
d'Echo. Pour un nettoyage ordinaire, suivez les consignes incluses dans ce
guide.
• Seul du personnel d'entretien qualifié doit essayer d'entretenir l'imprimante.
• L'imprimante doit être mise hors tension avant d'effectuer un type quelconque
d'entretien.
• Une petite charge statique peut s'accumuler sur Echo dans les milieux sensibles
à l'électricité statique. Ne faites pas fonctionner Echo près de matières
inflammables.
• La prise électrique doit être située près de l'imprimante et facilement accessible
pour permettre une coupure d'alimentation rapide. Débranchez tout à fait
l'imprimante de la prise murale pour couper complètement l'alimentation.
• Mettez Echo hors tension et débranchez-la si :
◦l'imprimante fait un bruit inhabituel;
◦des liquides ou métaux ont pénétré dans le système;
◦il y a un orage ou une panne d'électricité;
◦Echo produit de la fumée ou une odeur inhabituelle.

43
800.788.5572 GraphicProducts.com
AVERTISSEMENTS DE SÉCURITÉ
REMARQUE : Les changements ou modications n’ayant pas été expressément
approuvés par la partie responsable de la conformité peuvent faire perdre à
l’utilisateur l’autorisation de faire fonctionner le matériel.
AVERTISSEMENT : Ne placez pas vos doigts près des lames de découpage. Pour
débloquer un bourrage papier, mettez d'abord l'imprimante hors tension, puis
utilisez un outil, comme un crayon par exemple, pour enlever le papier coincé.
Ne faites pas cela avec les doigts.
La lame de découpage est située à l'intérieur de l'unité d'impression. Cette lame est
très coupante et peut fonctionner automatiquement après l'impression d'une affiche.
Si Echo est mise hors tension alors que la lame est en déplacement, elle peut
s'arrêter avant de revenir à sa position de départ à l'extrémité droite. Ne déplacez
pas la lame à la main. Mettez plutôt le système sous tension et laissez la lame se
déplacer automatiquement. N'essayez pas de charger du papier quand la lame n'est
pas à sa position de départ.
Dans des conditions de fonctionnement normales, la lame ne pose pas de risque
pour l'utilisateur. Le mécanisme de découpe d'Echo est équipé d'un circuit de
surcouple qui est censé mettre hors tension la lame de découpage s'il capte un
excès de résistance ; toutefois, la lame peut quand même causer des blessures en
cas d'usage contraire aux consignes de sécurité.
Nous conseillons d'utiliser un limiteur de surtension avec Echo. Ceci permettra
de protéger Echo en cas de saute de courant (souvent causée par un éclair ou
des accidents). Un limiteur de surtension doit être installé entre la prise murale à
courant alternatif et le câble d'alimentation d'Echo.

44
GraphicProducts.com 800.788.5572
CONTACT US
Contact Us
Graphic Products, Inc. has been a leader in custom labeling, signage, and visual
communication solutions for over 40 years. Our commitment to providing world-class
service is at the heart of everything we do.
If you have any further questions, or if any problems arise that are not addressed in
this User Guide, please let us know. Graphic Products proudly offers free support to
all of our customers.
Call us at:
800.788.5572 (U.S.A. and Canada only)
1.503.644.5572 (International)
Visit our website at GraphicProducts.com
Email us at info@graphicproducts.com

Graphic Products, Inc. | 800.788.5572
GraphicProducts.com
© 2008 - 2014 Graphic Products, Inc. All Rights Reserved
v. 1.0 - 6/1/14