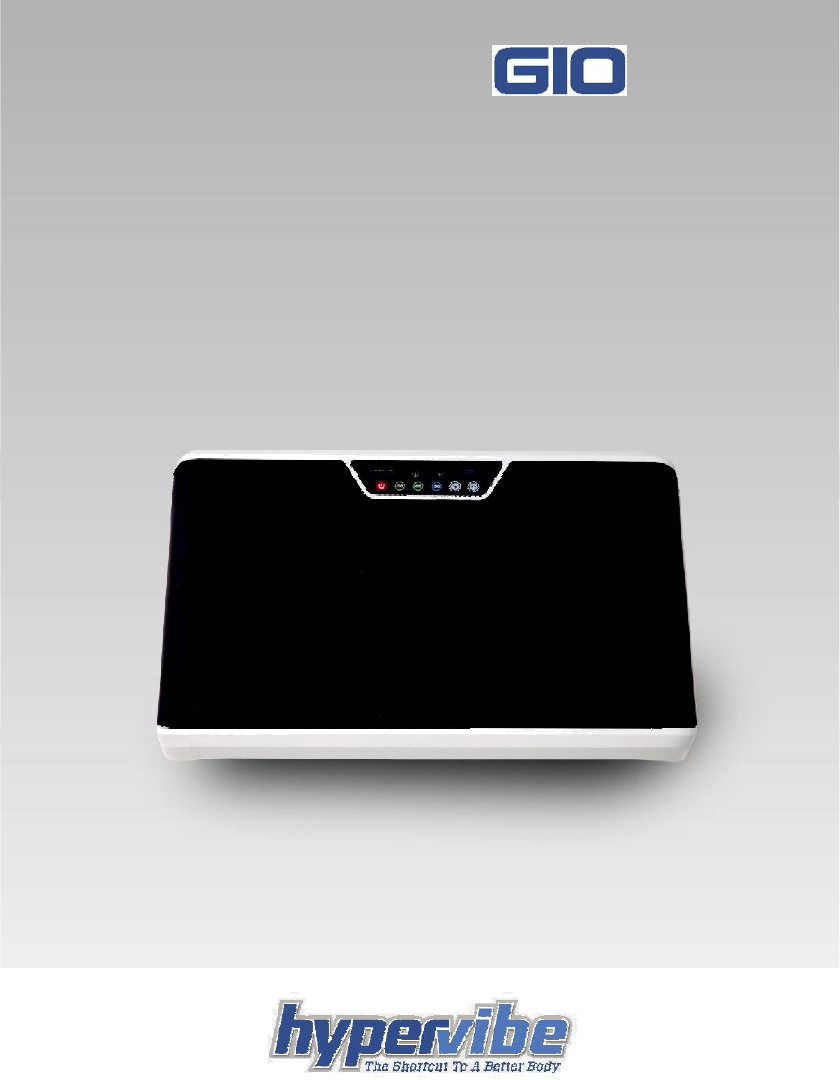
Gravity Health Solutions G10 whole body vibration machine User Manual
Gravity Health Solutions Limited whole body vibration machine
Users Manual
Model No.:
whole body vibration machine
Gravity Health Solution Limited
OWNERS MANUAL
1
Contents
Introduction 4
Gravity Resistance Training (GRT) 5
Instruction Manual 7
Important Product Safety Instructions 8
Grounding instructions 10
Places to avoid 11
Places to look for 11
Important Health Precautions 12
Machine Installation 14
Upper body resistance bands 16
Instructions 16
18
Intensity (G-Force) 18
Time 19
Exercise 20
Using the control panel & remote control 22
Getting started 24
Introduction 24
Senior 26
Total Body Conditioning 28
Cellulite treatment 31
Golf 33
Massage 35
2

36
Maintenance 37
Troubleshooting 38
3
Introduction
Congratulations on your purchase of the HyperVibe - G10 Mini,
Gravity Resistance Training machine. Small, lightweight and pow-
erful, the G10 Mini is a portable powerhouse coupled with innova-
tion. Not only does the G10 Mini bring you power that is typically
HyperVibe brings you a vibration machine with Bluetooth con-
nectivity that allows you to control or program the machine via
devices such as smartphones, MP3 players, and tablets. Simply
download the HyperVibe G10 app and the software will tell the
G10 Mini what to do, and show you how to workout through your
choice of 40 goal based programs.
The HyperVibe G10 Mini app includes live G-Force readings1 cor-
responding to a Low, Medium, and High position on the platform.
key to getting results. Yet other machines don’t provide you with
this crucial information, often it’s not even provided in the techni-
4

Gravity Resistance Training (GRT)
There is a wide spread myth about Whole Body Vibration originat-
ing in Russia during the 70’s and used for the health of their cos-
monauts and the performance of their olympic athletes. The reali-ty
is that modern Whole Body Vibration began in Germany during the
mid-nineties. The pioneering machines were very powerful and
designed to increase the gravitational forces acting on a user by
applying rapid pulses of vertical force under the users feet,
triggering a range of responses and benefits. Over the years as
more manufacturers started to release less powerful Whole Body
Vibration platforms, the original concept became somewhat lost.
Gravity Resistance Training refers to the actual training principle
by which users of a Whole Body Vibration platform experience
tremendous benefit to their muscles, bones, and bodies. What
sets apart a GRT machine from a regular vibration machine, is its
ability to produce high levels of gravity (acceleration), just like the
pioneering technology from Germany. In simple terms, this
means that the platform’s upward vertical force can simulate
more than 10 times the strength of Earth’s gravity.
While manufacturers of low powered machines attempt to use
smoke and mirrors, we at Hypervibe focus on the reality of Whole
Body Vibration technology and what sets it apart from other
approaches to health and fitness. We focus on its ability to
provide true Gravity Resistance!
After all, is not Gravity the force we fight against everyday in our
lives. Is not our failure to fight gravity responsible for many of the
physical issues we face? No matter how you look at it, the fun-
damental need to maintain our ability to counter gravity is what
defines our strength, stability, balance, function, and most
importantly, our healthy lifestyle. It’s time to stop just shaking the
5
body and begin to actually improve its performance and integrity.
It’s time for Whole Body Vibration to become Gravity Resistance
Training.
Benefits of GRT
for almost 20 years, with hundreds of clinical papers published in
Improved Balance
Improved Bone Density
Increased Muscle Strength
Increased Circulation
Increased Flexibility
Improved Body Composition
Cellulite Reduction
Increased Muscle Power
Pre-Exercise Warm-Up
Improved Exercise Recovery
Lower Back Pain Relief
Joint Protection
Reduced Swelling
Neurological Stimulation
Treatment Of Systemic Conditions
6

Instruction Manual
Familiarize yourself with this manual and look it over carefully. Be
sure you understand the control panel operation and the safe ex-
ercise positions before using the G10 Mini. This manual includes
basic information on starting an exercise program and safety tips
that will assist you in reaching your goals for a healthy lifestyle.
! NEITHER HYPERVIBE NOR ITS REPRESENTATIVES CAN AC-
CEPT RESPONSIBILITY FOR ANY DAMAGE OR INJURY IN-
CURRED AS A RESULT FROM INFORMATION PRESENTED IN
THIS MANUAL EXCEPT UNDER THE TERMS OF THE PROD-
UCT WARRANTY.
7

Important Product Safety Instructions
Danger: When using an electrical appliance, basic precautions
should always be followed, including the following:
! READ ALL INSTRUCTIONS BEFORE USING THIS MACHINE.
1. Always ensure proper operation of your HyperVibe, it is rec-
ommended that your HyperVibe machine be connected to a ded-
Europe) electrical circuit. DO NOT USE ELECTRICAL
EXTENSION CORDS OR POWER ADAPTORS.
2. Always unplug this machine from the electrical outlet immedi-
ately after using and before cleaning.
3. The machine should never be left unattended when plugged
in. Unplug from outlet when not in use and before putting on or
• Do not operate under blanket or pillow. Excessive heating
• Close supervision is necessary when this machine is used
by, on or near children, invalids or disabled persons.
• Use this machine only for its intended use as described in
this manual. Do not use attachments not recommended by
this manufacturer.
• Never operate this machine if it has a damaged cord or plug,
if it is not working properly, if it has been dropped or dam-
8

aged or dropped into water. Return the machine to a service
center for examination and repair.
• Do not carry this machine by supply cords or use cord as a
handle.
• Keep the cord away from heated surfaces.
4. Never operate the machine with the air openings blocked.
Keep the air openings free of lint, hair and the like.
5. Never drop or insert any object into any opening.
6. Do not use outdoors.
7. Do not operate where aerosol (spray) products are being used
or where oxygen is being administered.
8. To disconnect, turn all controls to the off position then remove
plug from outlet.
9. Avoid sprinkling water or cleaning the unit with a wet sponge.
10. Always unplug the power cord before cleaning the machine.
Use a damp cloth and immediately follow with a clean dry cloth.
11. Keep children away from the machine when in operation, and
avoid fingers near the platform gap.
! WARNING – Connect this appliance to a properly grounded outlet only. See
Grounding Instructions.
9
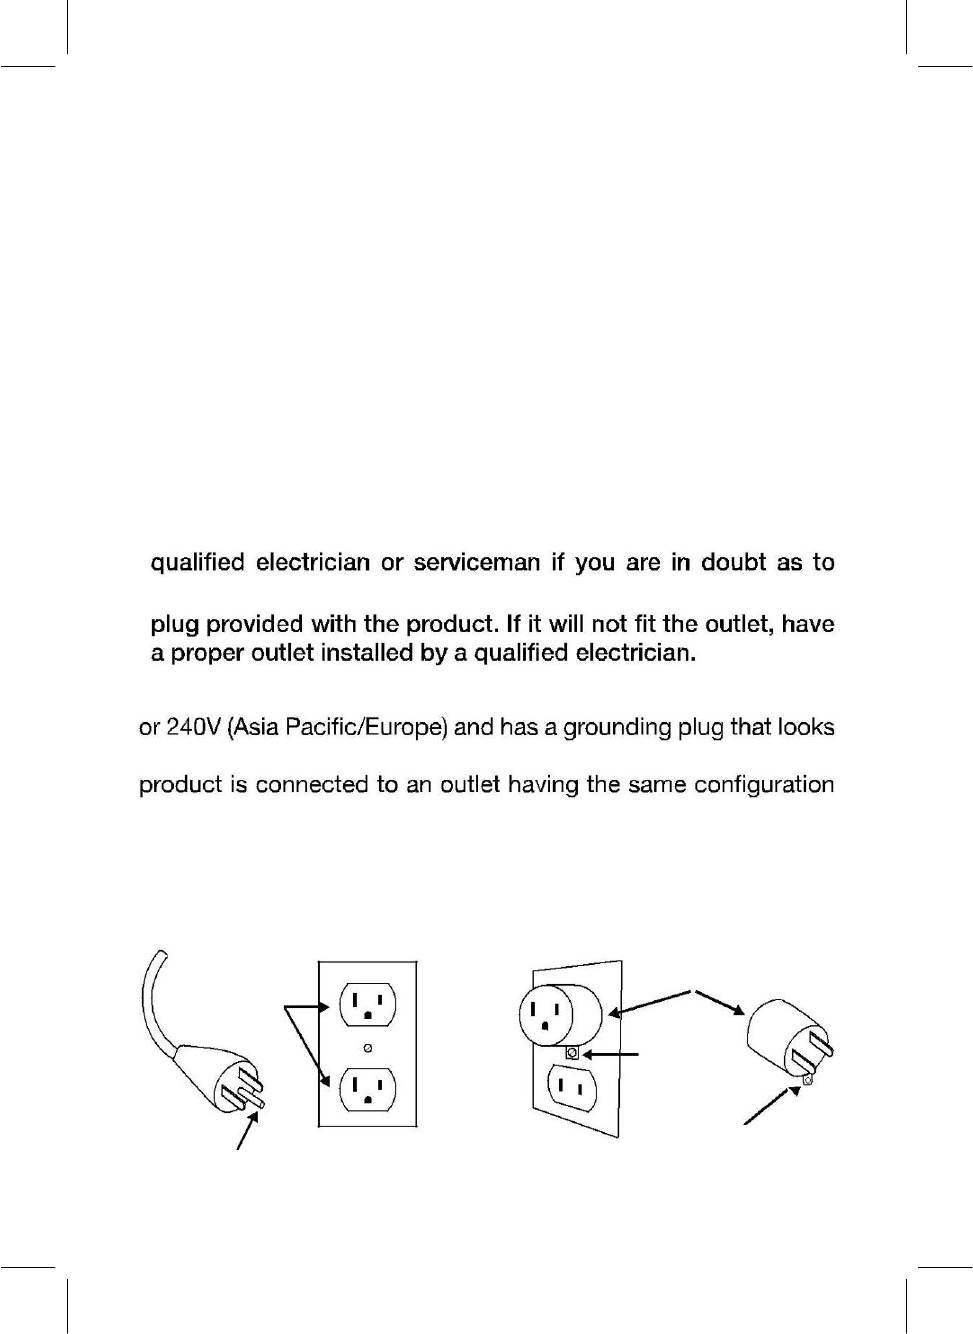
Grounding instructions
This product must be grounded. If it should malfunction or break-
down, grounding provides a path of least resistance for elec-tric
current to reduce the risk of electric shock. This product is
equipped with a cord having an equipment-grounding conductor
and a grounding plug. The plug must be plugged into an appro-
priate outlet that is properly installed and grounded in accordance
with all local codes and ordinances.
! DANGER - Improper connection of the equipment-grounding
! conductor can result in a risk of electric shock. Check with a
! whether the product is properly grounded. Do not modify the
This product is for use on a nominal 120V circuit (North America)
like the plug illustrated in sketch A in Figure 1. Make sure that the
as the plug. No adapter should be used with this product.
GROUNDING METHODS
A B
GROUNDED
ADAPTER
OUTLET
METAL
SCREW
TAB FOR
GROUNDING SCREW
GROUNDING PIN
Figure 1
10

Places to avoid
Avoid placing the machine anywhere that could become wet,
damp or subject to moisture, such as:
• Balcony or veranda
• Screened porch, porch or deck
• Carport
Places to look for
• Dry, dust free
• Hardwood, tile or carpet over solid concrete foundation
• Nearby standard, grounded three prong electrical outlet
Non-compliance with these warnings may lead to physical injury,
accidents, damaged to the machine or fire, and may void warran-
ty.
11
Important Health Precautions
The following conditions do not necessarily exclude you from us-
machine.
• Serious cardiovascular disease
• Metal implants
• Pacemaker
•
• Severe diabetes
• Recent infections
• Severe migraines
• Malignant tumors
• Recently placed IUD’s, metal pins, or plate Recently implant-
ed stents
Conditions that are not suitable for use on the Hypervibe
machine include:
• Acute thrombosis
• Acute hernia
• Pregnancy
• Epilepsy
• Gallbladder or kidney stones
• Recent wounds from an operation or surgery
• Recent fractures
•
If you experience chest pains, nausea, dizziness or shortness of
12

breath, stop exercising immediately and consult your physician
before continuing.
We do not recommend use for children unless your physician
has been consulted.
Possible side effects you may experience when using your
hyper-vibe machine include:
• Skin lesions or blisters - These can be prevented by wearing
shoes, socks or placing a foam mat on the platform.
• Nausea, dizziness or temporary drop in blood pressure -
Stop exercising immediately and reduce the intensity of your
train-ing program.
• A drop in blood sugar levels - Diabetics should be aware of
this and should not exercise on an empty stomach.
13
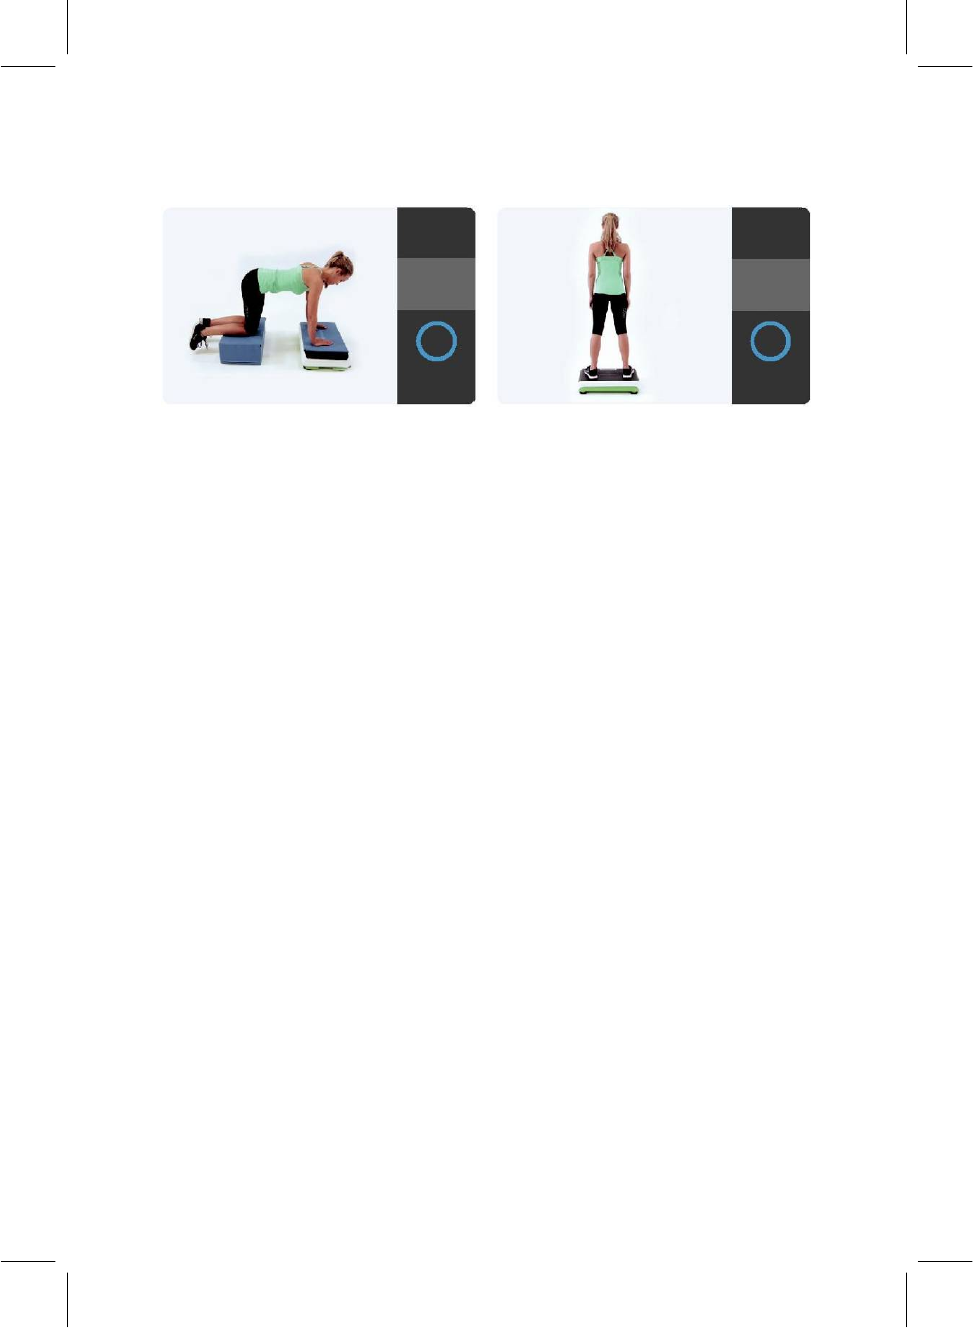
Machine Installation
The G10 Mini does not require assembly, however some consid-
eration needs to be given to installation. The G10 Mini includes a
docking plate, and certain surfaces may require use of this dock
(see Fig. 2).
The G10 Mini has rubber suction cap feet that are best suited to
• Polished concrete
•
•
If you have any of the following surfaces, the suction cap feet may
not make a solid bond, and the docking plate may be required:
• Carpeted surfaces
• Textured surfaces
You may also wish to install the docking plate on any of the
above surfaces simply to protect the surface from marks that may
be left by the black rubber feet.
14
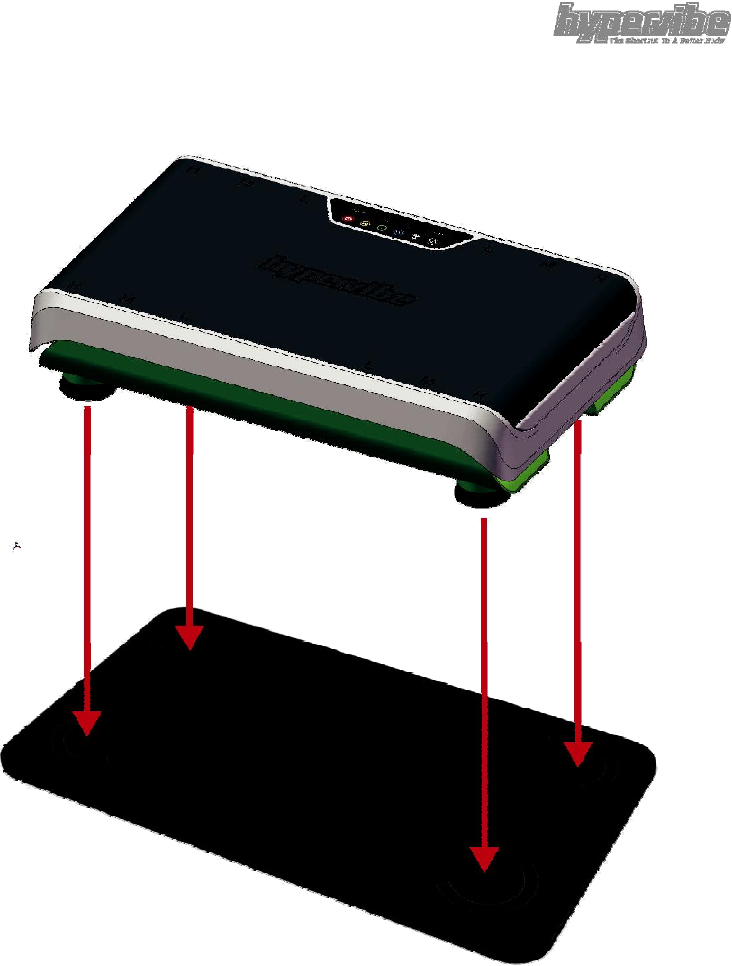
Fig. 2
15

Upper body resistance bands
The G10 Mini comes supplied with two upper body resistance
bands, which can be attached to the attachment points on the
vibration platform and used in a variety of upper body exercises.
Instructions
To connect the upper body resistance bands to the attachment
points on the machine (see Fig. 3), simply squeeze the D clip (1)
at the end of the resistance band and guide the clip through the
hole in the attachment point (2), then release the D clip.
Each resistance band can be adjusted to increase or decrease the
increasing and decreasing the resistance. To adjust, simply feed
the resistance band through the toggle to your requirements.
Note: The upper body resistance bands should only be connect-
ed to the machine when they are being used. If they are left con-
nected to the machine and are not in use, they may create
exces-sive noise.
16
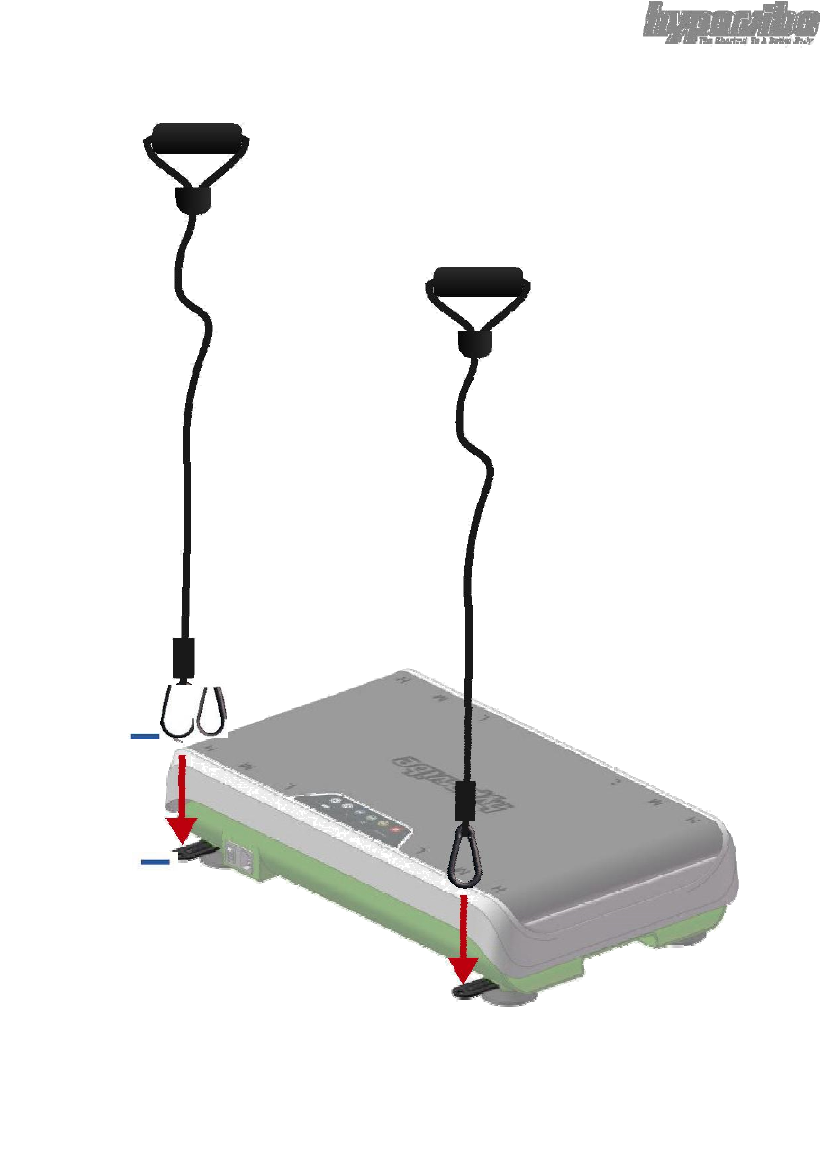
1
2
Fig. 3
17
Safe & Effective Use
If you are not excluded from using the machine due to a health
condition, the G10 Mini can be used by almost everyone. How-
ever, the key to success when using the G10 Mini is safe and
1. Intensity (G-Force)
2. Time
3. Exercise
Intensity (G-Force)
The G10 Mini can be adjusted through a wide range of intensi-ty
levels, from very low intensity (low frequency with low ampli-tude)
to high (high frequency with high amplitude). Intensity levels
should be chosen appropriately based on personal ability and
lev-el of conditioning.
The G10 Mini has a frequency range from 5 to 20Hz, and three
amplitude positions, L (Low), M (Medium), & H (High). Frequency
refers to the speed of the platform and can be adjusted at the
control panel in manual mode. Amplitude refers to the distance
the platform travels up and down, and can be adjusted by moving
your feet/hands between the L, M & H amplitude contact posi-
tions on the platform (See Fig. 4) .
When connected to the HyperVibe G10 app, the combined fre-
quency and amplitude settings determine the intensity level, and
the G10 Mini displays the intensity levels at the top of the screen
via the G Force panel.
As a general rule beginners should stay below 4g’s.
18
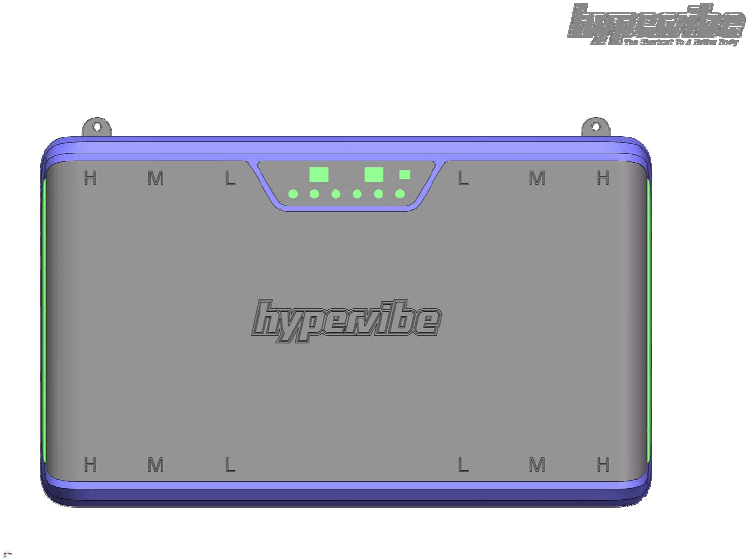
Fig. 4
Time
When referring to time on the G10 Mini, we can refer to the du-
ration of time that an exercise is performed for, the duration of
time you rest between exercises, and also the total time use of
machine in any given week in terms of number of sessions.
Just as we recommend low intensity vibration when new to GRT,
we also recommend short exercise durations and fewer sessions
per week. As little as 5 minutes, 2 to 3 times per week may be
enough stimulation initially, which should allow you to become
familiar with the effects of GRT without overloading your body. If
your body adapts well to GRT, longer exercise durations of 10-20
mins in total are possible, and it is also possible to use the ma-
chine everyday.
19

Allow adequate rest durations between exercises. Reducing the
rest periods will contribute to the intensity of the session.
It should also be noted that programs that are designed for relax-
Exercise
t is important you only choose to perform exercises which are ap-
propriate for your ability, and likewise performing those exercises
correctly, as incorrect posture can cause harm and injury. Switch-
ing on your core muscles by drawing your belly towards your
spine, will increase core stability and help maintain your posture.
It is important to maintain balance during exercises. For exercises
which use the handles of the machine for stability, the aim is to be
able to perform the exercise with minimal pressure on the handles
as possible. Your body should be positioned so that if you were to
let go of the handles, you would not lose balance.
Unless otherwise instructed, your weight should be distributed
evenly through your feet left to right, and front to back. You
should not be up on your toes, nor back on your heels.
You should never stand up tall and lock your knees during a high
intensity GRT machine setting. Sometimes locked knees may be
instructed for lower intensity vibration therapy exercises.
The G10 Mini has a pivotal platform, which means the platform
vibrates in the same motion as a see-saw. For standing
exercises where both feet are on the platform your feet should be
kept at equal distance from the middle platform pivotal point.
There are some exercises where should use the HyperVibe work-
out mat or similar product, such as kneeling, planking, and sitting
20

exercises. Some users will prefer a mat for upper body exercises
where hands are on the platform, but be aware that this will also
reduce the intensity to a degree. You may also wish to use the
HyperVibe workout mat when lying on the floor in front for your
comfort and protection.
For safety and maximum vibration transfer to the body, wear socks
or thin soled rubber shoes. Bare feet or hands on the platform be
the most efficient transfer of vibration, but can cause blistering.
Thicker soled shoes will absorb vibration and reduce the amount
of vibration transferred to the body, and hard soled shoes can
cause the user to “skid”.
21

Using the control panel & remote
control
SLEEP MODE
With the mains switch turned on at the rear of the machine, the
G10 Mini will be in standby mode. This will be indicated by the
fact that there is a blinking red light visible from the time window,
and that there will be no digits showing in either the time window
or the frequency window.
READY MODE
From sleep mode, pressing the power button will turn the G10
Mini to ready mode. From ready mode the frequency can be pre-
selected, by using the frequency UP/DOWN buttons, so that the
G10 Mini will start at tthe frequency preferred frequency for a
particular exercise.
Once you have chosen a frequency, select either 30, 60, or 90
seconds for the exercise duration.
Once a time selection has been made, the G10 Mini will provide
a 5 second countdown with an audible beep on the last 3
seconds. After the 5 second countdown, the platform will start
producing vibration and the time window will countdown the time
chosen for the exercise duration.
The frequency can be adjusted whilst the platform is producing
vibration via the use of the frequency UP/DOWN buttons. To stop
the vibration during an exercise, press the power button.
To turn the G10 Mini back to sleep mode, press and hold the
pow-er button for 3 seconds.
22

MUTE ON/OFF
From ready mode pressing both frequency UP and frequency
DOWN simultaneously will switch mute sounds ON and OFF.
BLUETOOTH
When a Bluetooth connection is made with the HyperVibe G10
software, the Bluetooth indicator will illuminate, and both the
timer and frequency window will indicate — which means that
machines controls and indicators are now controlled by an ex-
ternal device. During bluetooth connection, the only button that is
functional on the control panel and remote control is the power
button, which must be pressed and held for 3 seconds to break
the bluetooth connection and send the machine into sleep mode.
Timer
Bluetooth
Frequency
indicator
Power (On/O /Stop)
30 seconds
duration 60 seconds duration
90 seconds duration
Frequency DOWN
Frequency UP
Figure 4
23

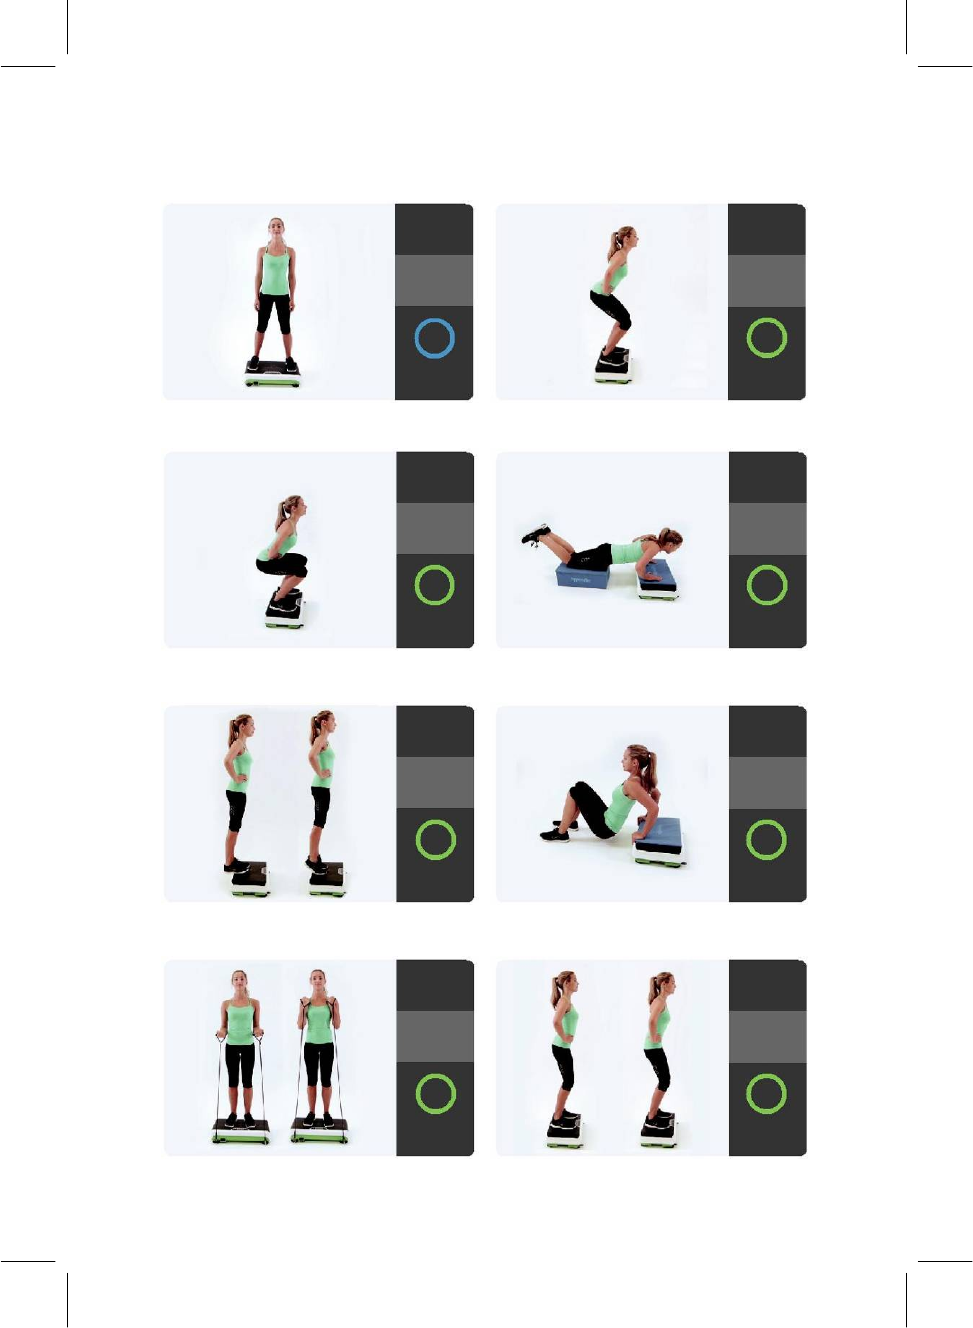
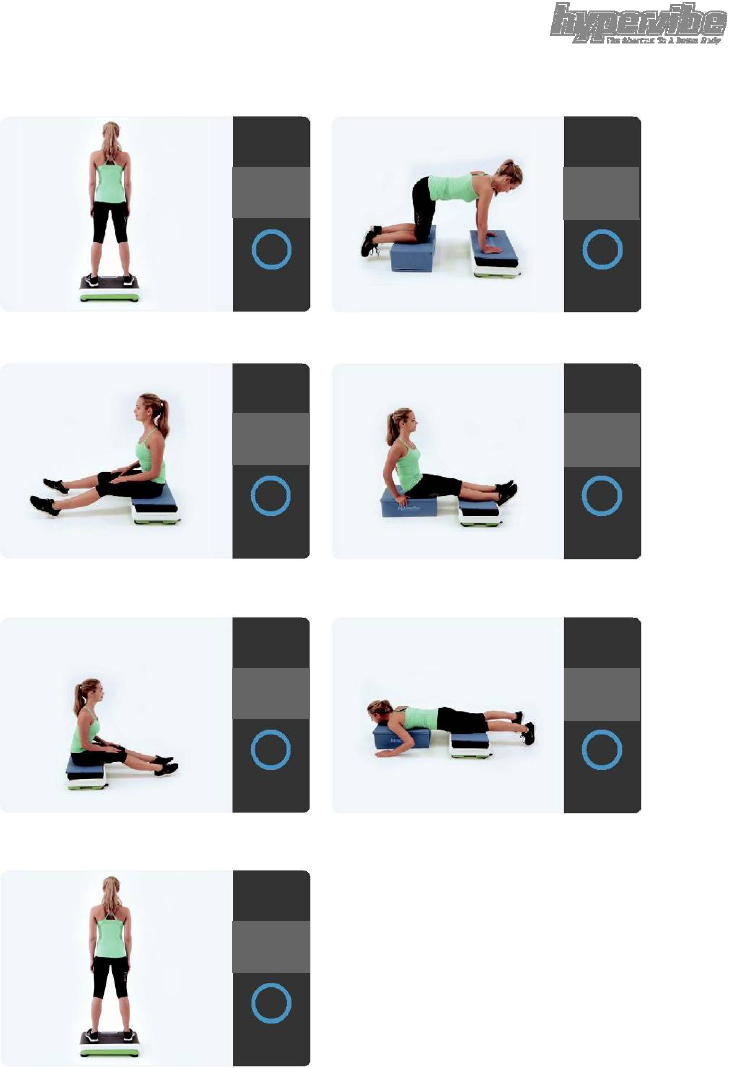
Getting started
If you have never used a vibration machine before, we recom-
mend you begin using the G10 Mini by starting with one of the
introduction program shown below, or from the G10 Mini app.
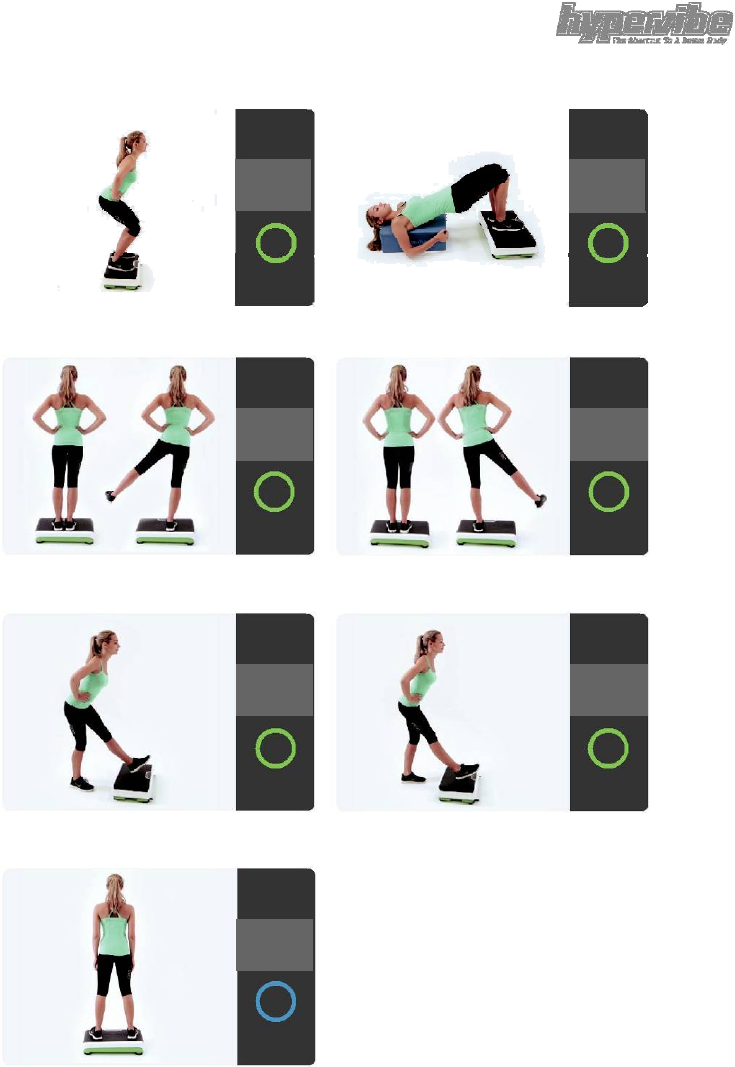
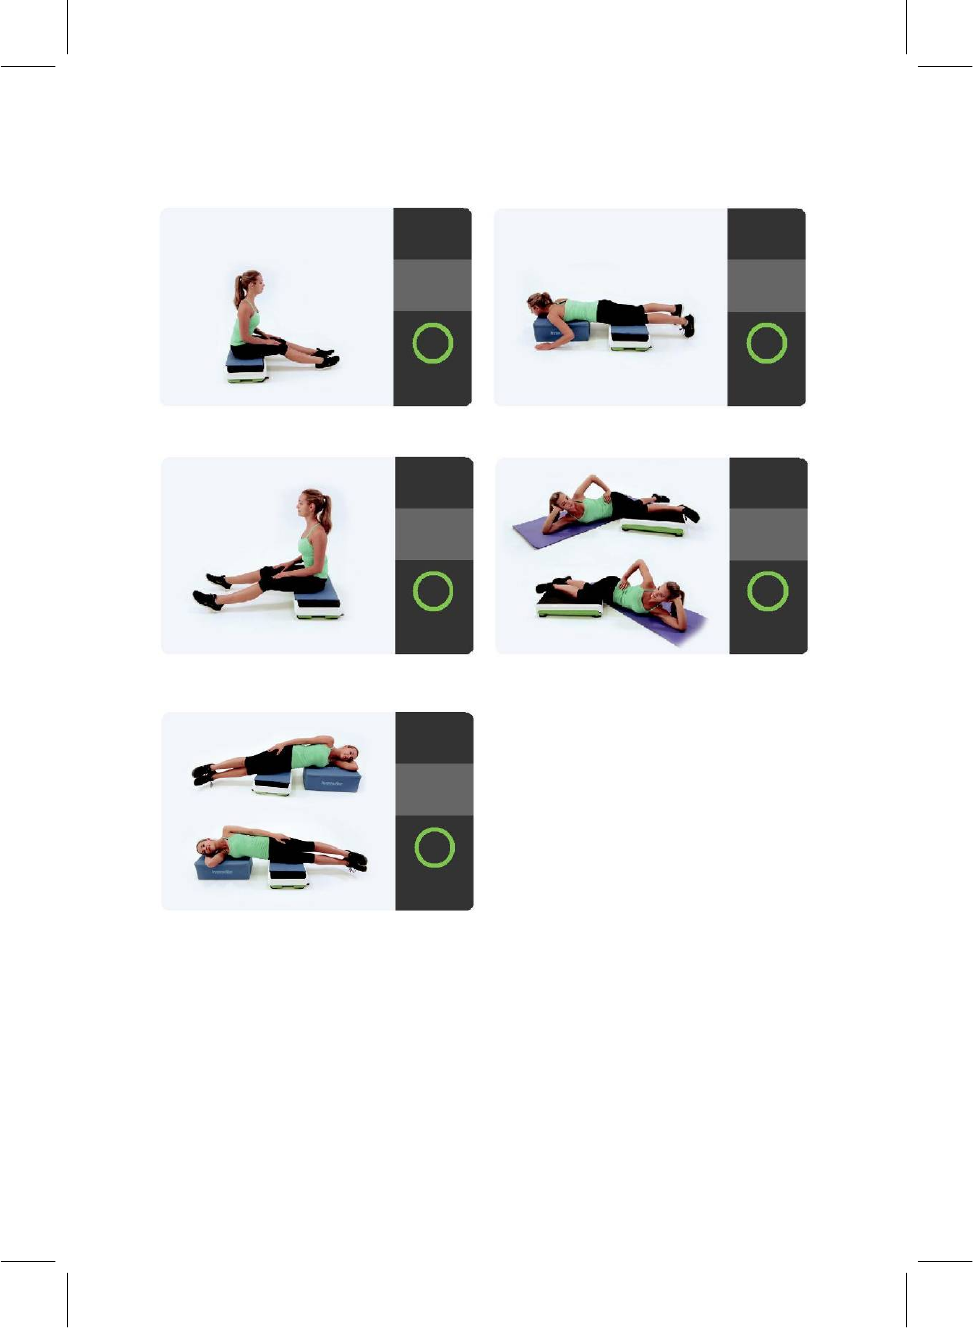
Introduction
AMPLITUDE AMPLITUDE
L
H
12Hz 8Hz
030
REST REST
30 30
Normal Stance
Wide Stance
AMPLITUDE AMPLITUDE
M M
15Hz 15Hz
30 30
REST
REST
30 30
Calf Raise
Mini Squat
AMPLITUDE AMPLITUDE
L
M
12Hz 8Hz
30 30
REST
REST
30 30
Standing Weight Shift
Shoulder Massage
24

12Hz
Seated Massage
Otherwise, we suggest you choose a program that is best suit-ed
to the goals you wish to achieve.
Using the G10 Mini app instead of the programs shown on the
next pages do provide an advantage. The built in instructional
videos will show you the correct way to perform each exercise.
More advanced users may wish to use manual mode and create
their own exercise routine.
25
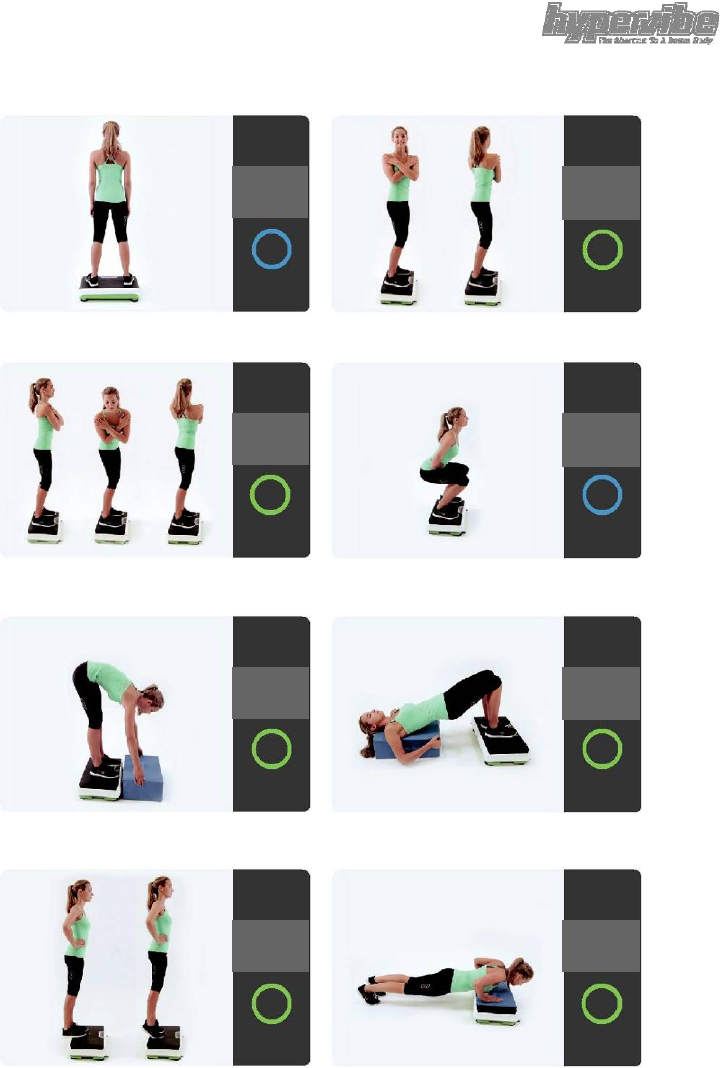
Senior
AMPLITUDE AMPLITUDE
H
M
15Hz 18Hz
90 0
REST
REST
45 45
Wide Stance
Mini Squat
AMPLITUDE AMPLITUDE
M
H
20Hz 15Hz
060
REST REST
45 45
Deep squat
Modified Push Up
AMPLITUDE AMPLITUDE
H
H
20Hz 15Hz
0 0
REST REST
45 45
Calf Raise
Triceps Dip
AMPLITUDE AMPLITUDE
M M
15Hz 15Hz
0 0
REST REST
45 45
Biceps Curl
Pelvic Tilts
26
AMPLITUDE AMPLITUDE
M M
20Hz 12Hz
REST
REST
45 45
Mini Squat Bridge
AMPLITUDE AMPLITUDE
L
L
18Hz 18Hz
60 60
REST
REST
45 45
Hip Abduction Left Hip Abduction Right
AMPLITUDE AMPLITUDE
M M
20Hz 15Hz
60 60
REST
REST
45 45
Standing Hamstring Stretch Left Standing Hamstring Stretch Right
AMPLITUDE
H
15Hz
90
REST
45
Lumbar Massage
27
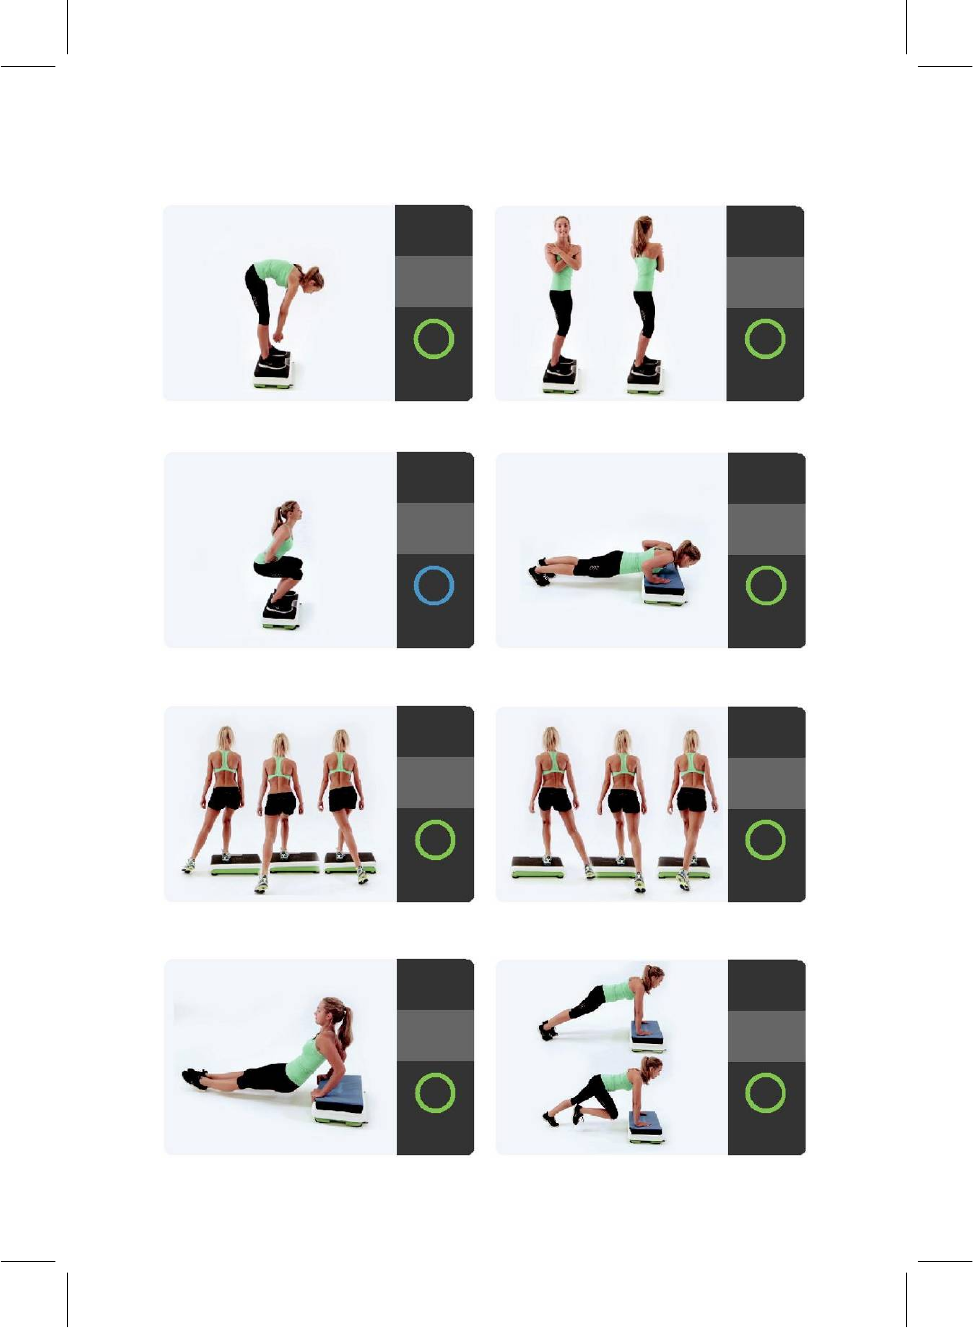
Total Body Conditioning
AMPLITUDE AMPLITUDE
L
L
15Hz 15Hz
0
REST
REST
45 45
Lumbar Roll
Lumbar Rotation
AMPLITUDE AMPLITUDE
H
H
20Hz 15Hz
90 60
REST REST
45 45
Deep squat
Push-Up
AMPLITUDE AMPLITUDE
M M
20Hz 20Hz
60 0
REST REST
45 45
3 Way Lunge Left 3 Way Lunge Right
AMPLITUDE AMPLITUDE
H
H
18Hz 20Hz
60 60
REST REST
45 45
Triceps Dip Advanced
Plank With Mountain Climber
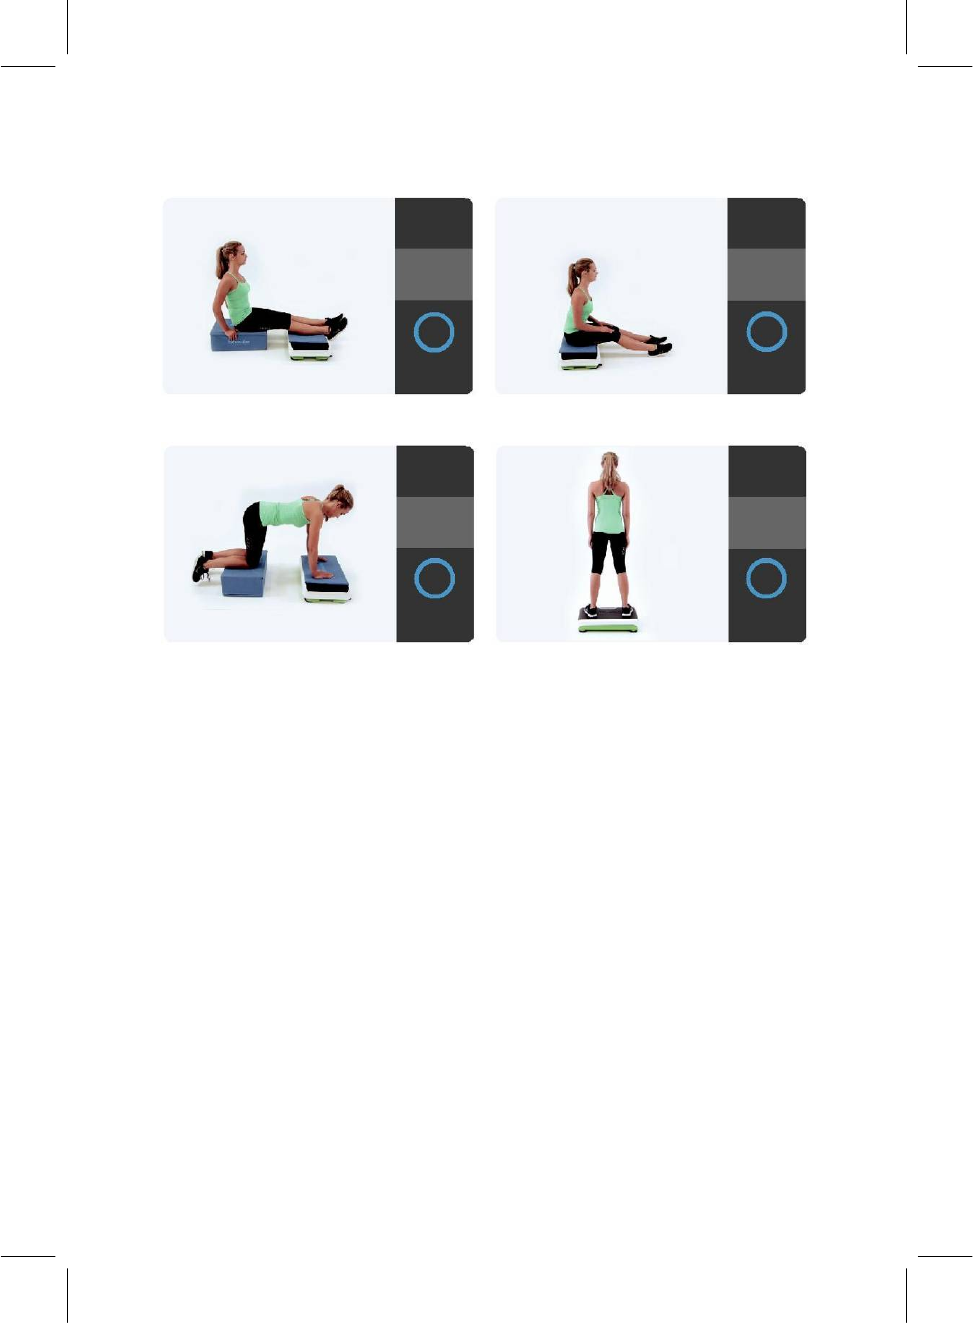
28

AMPLITUDE
H
20Hz 18Hz
REST
REST
45 45
Deep Squat
Abdominal Crunch
AMPLITUDE
M
18Hz 18Hz
REST REST
45 45
Abdominal Crunch Single Leg Bridge Left
AMPLITUDE AMPLITUDE
M H
18Hz 18Hz
REST REST
45 45
Single Leg Bridge Right
Lateral Raise
AMPLITUDE AMPLITUDE
L L
20Hz 20Hz
REST REST
45 45
Step Up with Knee Lift Left Step Up with Knee Lift Right
29
Hypervibe G10 MINI Owners Manual
AMPLITUDE
AMPLITUDE
M M
20Hz 20Hz
090
REST
REST
45 45
Calf Massage
Hamstring Massage
AMPLITUDE
AMPLITUDE
H
H
8Hz 8Hz
0
REST
45
Shoulder Massage Lumbar Massage
30
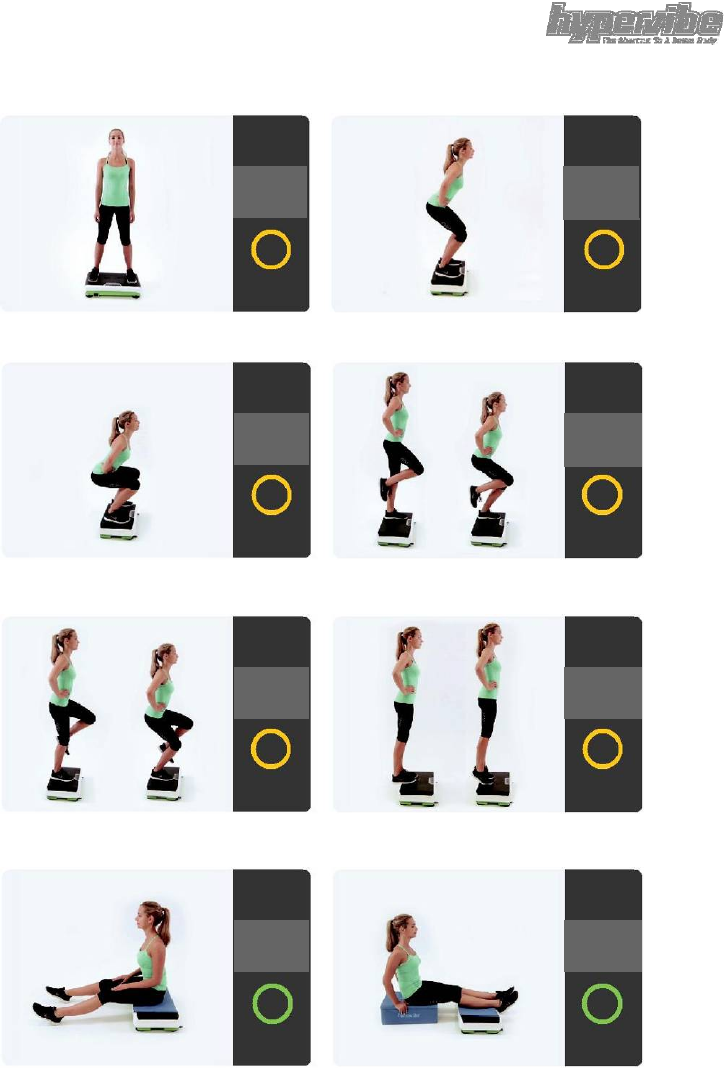
Cellulite treatment
AMPLITUDE AMPLITUDE
H
H
10Hz 20Hz
REST
REST
30 30
Wide Stance Mini Squat
AMPLITUDE AMPLITUDE
H
H
20Hz 20Hz
REST
REST
30 30
Deep squat
Single Leg Squat Left
AMPLITUDE AMPLITUDE
H
H
20Hz 20Hz
30
REST
REST
30 30
Single Leg Squat Right
Calf Raise
AMPLITUDE
M
20Hz 20Hz
60 60
REST
REST
30 30
Seated Massage
Calf Massage
31
AMPLITUDE
AMPLITUDE
M M
20Hz 18Hz
0
REST REST
30 30
Hamstring Massage Quadriceps Massage
20Hz 20Hz
0
REST REST
30 30
Seated Massage
Inner Thigh Massage
20Hz
60
Outer Thigh Massage
32
Golf
AMPLITUDE AMPLITUDE
M M
8Hz 18Hz
REST
REST
30 30
Lumbar Massage
Lumbar Rotation
AMPLITUDE AMPLITUDE
M M
15Hz 20Hz
REST
REST
30 30
Advanced Rotation Deep Squat
AMPLITUDE AMPLITUDE
L
M
15Hz 18Hz
REST
REST
45 45
Assisted Hamstring Stretch Bridge
AMPLITUDE AMPLITUDE
H
H
20Hz 18Hz
60 60
REST
REST
30 45
Calf Raise
Push-up
33
AMPLITUDE
AMPLITUDE
H H
8Hz 8Hz
90
REST
30
Shoulder Massage Lumbar Massage
34
Massage
AMPLITUDE AMPLITUDE
H
H
8Hz 8Hz
REST
REST
30 30
Lumbar Massage Shoulder Massage
AMPLITUDE
M
18Hz 20Hz
REST
REST
30 30
Seated Massage
Calf Massage
AMPLITUDE AMPLITUDE
M M
18Hz 20Hz
REST
REST
30 30
Hamstring Massage Quadriceps Massage
AMPLITUDE
H
8Hz
Lumbar Massage
35

Specifications
Platform Size (mm/in): 655/25.8 (w) x 395/15.5 (d)
Machine Size (mm/in): 655/25.8 (w) x 395/15.5 (d) x 150/6 (h)
Net weight (Kg/Lb): 24.4/54
Motor: 200W
Vibration frequency: 5-20Hz (adjustable in 1Hz increments)
Vibration amplitude: 12mm maximum (peak to peak)
Vibration acceleration: 9.7g maximum
Maximum user weight (Kg/Lb): 140/301
36

Maintenance
The G10 Mini is built to withstand home use, However, as the
owner, you are responsible for cleaning and maintaining the
unit’s integrity. If you fail to maintain the G10 Mini as described
below, it could affect or void the G10 Mini limited warranty.
! DANGER: To reduce the risk of electrical shock, always unplug the
unit from its power source before cleaning it or performing any
maintenance tasks.
! WARNING: The G10 Mini does not contain any user-service-
able parts. Any changes, modifications or unauthorized main-
tenance performed to or on the machine could void the prod-uct
warranty.
Check that the power lead is firmly pushed into the socket before
each use.
Vacuum the floor underneath the unit every week to prevent the
accumulation of dust and dirt.
Clean the machine only with soft brush or clean moist cloth using
a diluted solution of mild soap and water only.
! CAUTION: Never pour water or spray liquids directly onto the
machine. Allow the machine to dry completely before using.
37
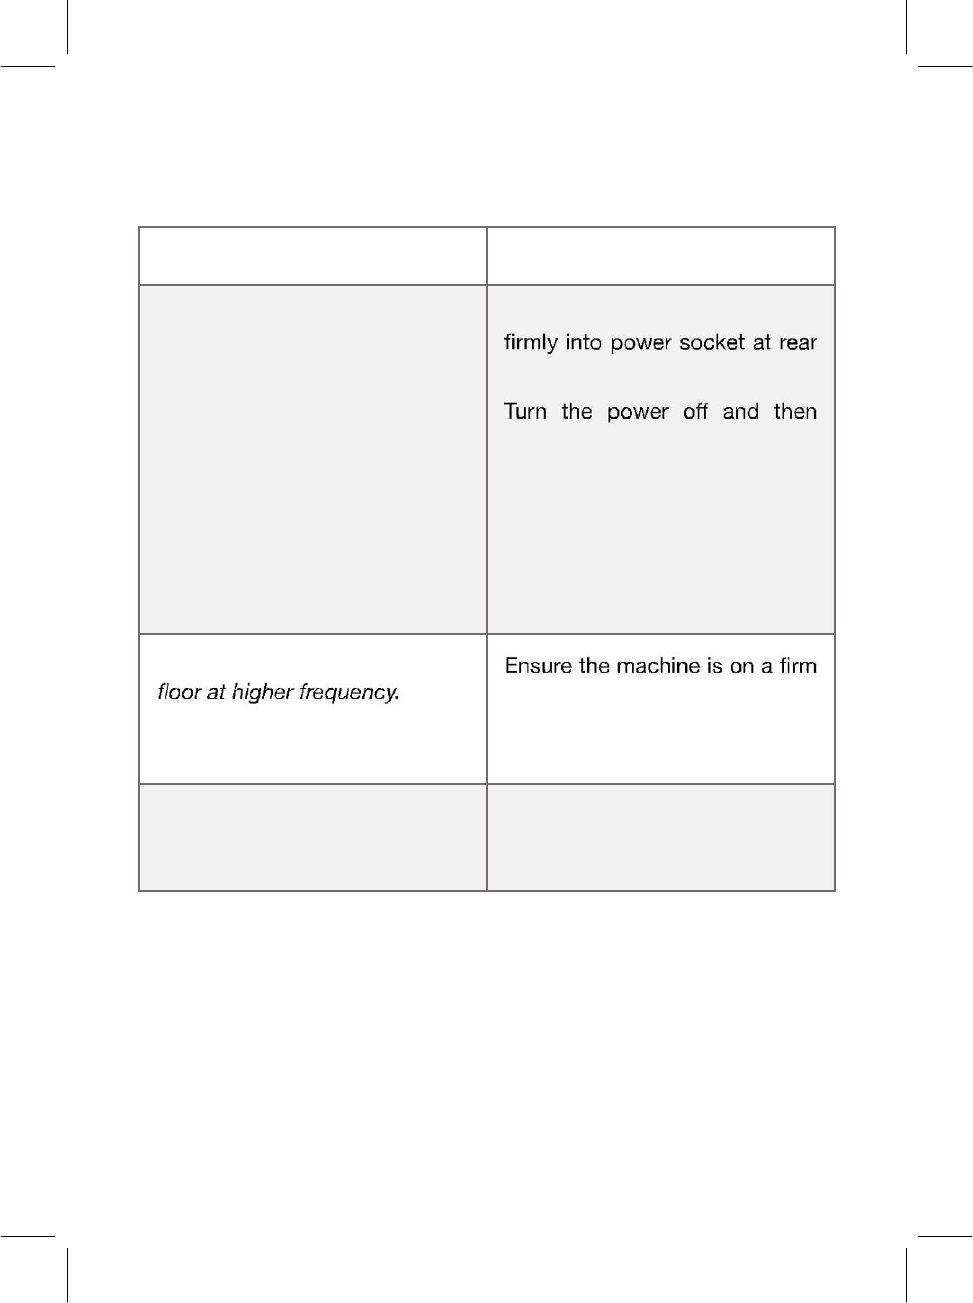
Troubleshooting
PROBLEM SOLUTION
There is no power to the LCD Check the power lead is pushed
display. of machine
back on again at the main pow-
er switch
If there is no light at the power
switch on the rear of the ma-
chine, change the fuse (spare
fuse is supplied inside fuse
holder in mains socket).
The machine is moving on the stable surface.
Install the machine onto the
docking plate.
The platform won’t move and I The internal fan belt may require
can hear the motor running, or adjustment, please contact Hy-
there is a squealing sound. perVibe.
38
FCC Warning:
This equipment has been tested and found to comply with the limits for a Class B
digital device, pursuant to part 15 of the FCC Rules. These limits are designed to
provide reasonable protection against harmful interference in a residential installation.
This equipment generates, uses and can radiate radio frequency energy and, if not
installed and used in accordance with the instructions, may cause harmful interference
to radio communications. However, there is no guarantee that interference will not
occur in a particular installation. If this equipment does cause harmful interference to
radio or television reception, which can be determined by turning the equipment off
and on, the user is encouraged to try to correct the interference by one or more of the
following measures:
• Reorient or relocate the receiving antenna.
• Increase the separation between the equipment and receiver.
• Connect the equipment into an outlet on a circuit different from that to which the
receiver is connected.
• Consult the dealer or an experienced radio/TV technician for help.
Caution: Any changes or modifications to this device not explicitly approved by
manufacturer could void your authority to operate this equipment.
This device complies with part 15 of the FCC Rules. Operation is subject to the
following two conditions: (1) This device may not cause harmful interference, and (2)
this device must accept any interference received, including interference that may
cause undesired operation.
IC warning statements:
-English Warning Statement:
“This device complies with Industry Canada licence-exempt RSS standard(s).
Operation is subject to the following two conditions: (1) this device may not
cause interference, and (2) this device must accept any interference, including
interference that may cause undesired operation of the device."
The digital apparatus complies with Canadian CAN ICES-3 (B)/NMB-3(B).
-French Warning Statement:
“Le présent appareil est conforme aux CNR d'Industrie Canada applicables
aux appareils radio exempts de licence. L'exploitation est autorisée aux deux
conditions suivantes : (1) l'appareil ne doit pas produire de brouillage, et (2)
l'utilisateur de l'appareil doit accepter tout brouillage radioélectrique subi, même
si le brouillage est susceptible d'en compromettre le fonctionnement."
Cet appareil numérique de la classe B est conforme à la norme NMB-003 du
Canada.