Green Badge d b a UgMO Technologies PH100WR Wireless Repeater User Manual Users manaul
Green Badge LLC d/b/a UgMO Technologies Wireless Repeater Users manaul
Users manaul

Installation Manual
WIRELESS REPEATER
PH100WR
UgMO Technoogies • 840 First, Suite 300 • King of Prussia, PA 19406 • www.UgMO.com

The UgMo ProHome Wireless Soil-Sensor-System has been
designed to deliver wireless range up to 600 feet from the base
station to its sensors.
However, there will be situations when a base station cannot
establish a connection with a sensor within that distance. This
can be caused by many factors that may not be within the control
of the installer.
There may be other times when additional range is required due
to the size of a property.
The UgMO ProHome PH100WR Repeater has been developed
to provide both improved and extended range between UgMO
PH100WS Soil Sensors and UgMO PH100BS Base Stations. .
The PH100WR Repeater is compatible with all generations of
UgMO Sensors and Base Stations.
No pairing, programing or other set-up is required. Just posi-
tion the Repeater and simply plug in the provided 12V AC/DC
transformer. The Repeater will automatically forward any sensor
packets it is able to receive.
Install a Repeater mid-way between Sensors and Base Stations
to enhance range.
Repeaters are suitable for mounted both inside or outside
provided the AC outlet provides proper protection for the AC/DC
transformer from the elements.
The AC adaptor can be placed up to 300’ away from the Repeater
by splicing suitable wire.
For long distances, multiple repeaters may be used to “hop” the
signal from the sensors to the base station.
Wireless Repeater Installation Manual
INTRODUCTION EASY INSTALLATION

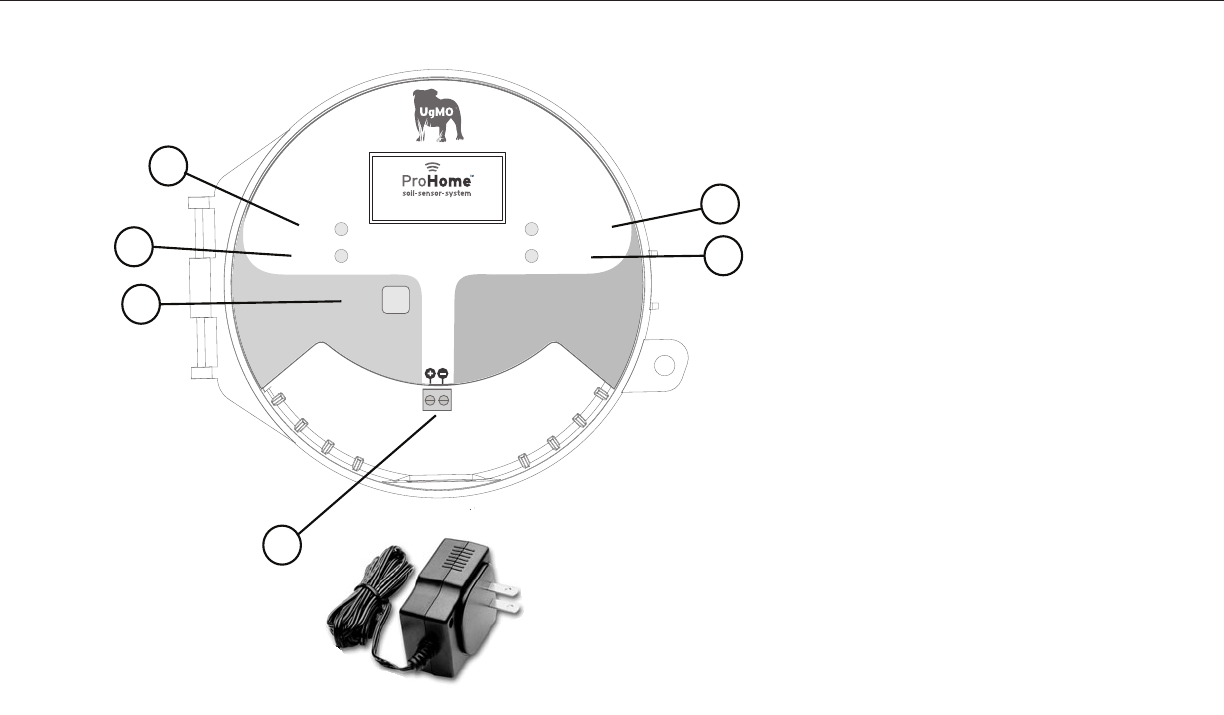
1 Power indicator
2
Receive
(Blinks when a sensor packet is received)
3
Offline
(Repeater will not transmit when lit)
4
Transmit
(Blinks when a sensor packet is transmitted)
5
Select Button
(Pressing the Select button for 3 seconds
stops the repeater from transmitting)
6
DC Terminals
(Terminals for attaching wires from AC/DC
Transformer
Components
FROM
CLOCK
ZONES ZONES TO
VALVES
UgMO Confidential
The Network Controller User Interface.
On power-up, you’ll see the following screen. This times out after 10 seconds, or press the Select Button to move on.
1 2 3 4 5 6
The major sections:
This catch-all view of the top screen shows the variety of information you may see. There are 6 columns
representing the 6 Zones controlled by the Network Controller. At the top of each column is a description of
the zone control: . At the very top, left corner, the Network controller indicates whether it is in
‘Automatic’ mode – where Sensors control watering, or ‘Bypass’ mode, where watering is
always allowed. At the top right is a calculation of average water savings:
4
3
6
5
2
1
SELECT
POWER
RECEIVE
OFFLINE
TRANSMIT
Wireless Repeater
DC

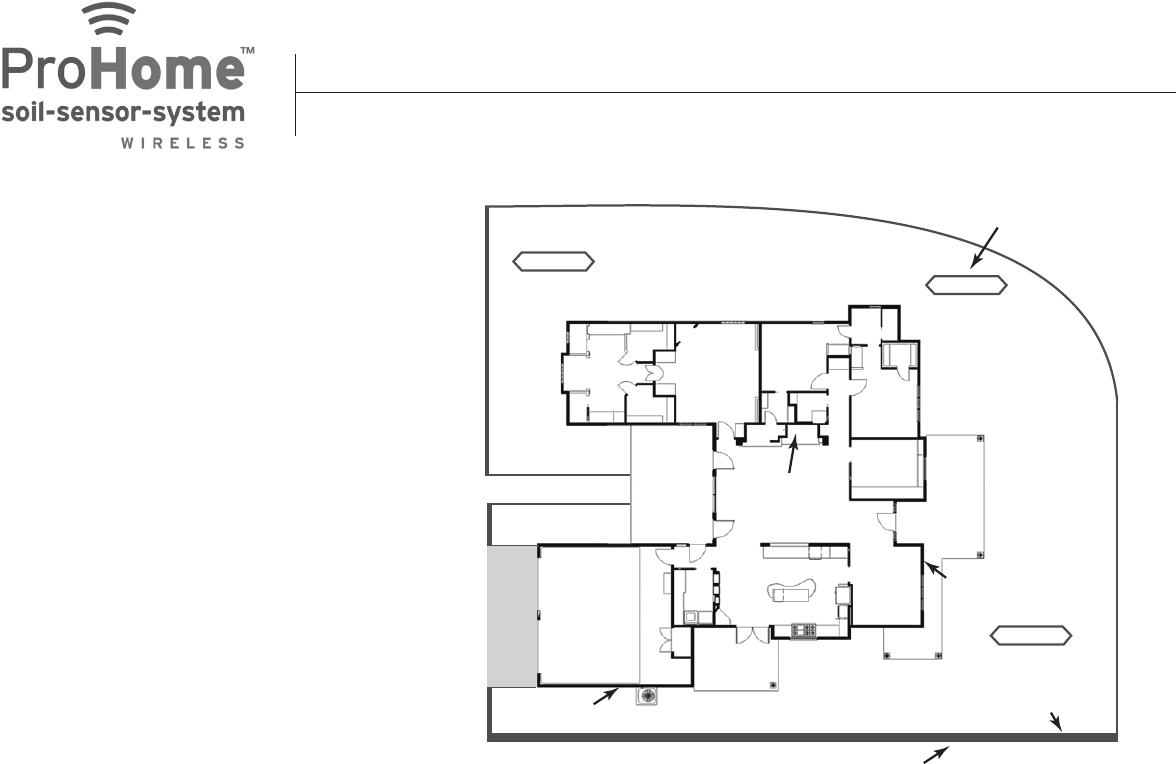
Placement of a Repeater
The optimal location of a repeater is half-way
between the base station and the hard-to-see
sensor (Sensor 2) at least 5 feet above the ground.
The repeater may be placed inside the building if a
suitable location can be found. It is OK to locate it
within a closet provided AC power is available.
(Option 1)
Alternatively, the repeater may be positioned outside
in a location with few obstructions between it and
the sensor and base station. (Option 2) Up to 300
ft of low voltage buriable wire may be spliced onto
the transformer wire to extend placement if the AC
outlet is not conveniently located at this position.
Should Option 1 or 2 not be available, a location on
the outside of the building near an AC outlet may be
used. (Option 3)
Placement may require some trial and error until
a reliable signal is established between the sensor
and the base station.
Sensor 1
Base Station
Wall
Option 1
Option 2
Option 3
Placement of a Repeater
The optimal location of a repeater is half-way
between the base station and the hard-to-see
sensor (Sensor 2) at least 5 feet above the ground.
The repeater may be placed inside the building
if a suitable location can be found. It is OK to
locate it within a closet provided AC power is
available. (Option 1)
Alternatively, the repeater may be positioned
outside in a location with few obstructions between
it and the sensor and base station. (Option 2) Up to
300 ft of low voltage buriable wire may be spliced
onto the transformer wire to extend placement if
an AC outlet is not conveniently located at this
position.
Should Option 1 or 2 not be available, a location
on the outside of the building near an AC outlet
may be used. (Option 3)
Placement may require some trial and error until
a reliable signal is established between the sensor
and the base station.
Hard-to-see sensor
Sensor 2
Sensor 3

Checking signal strength
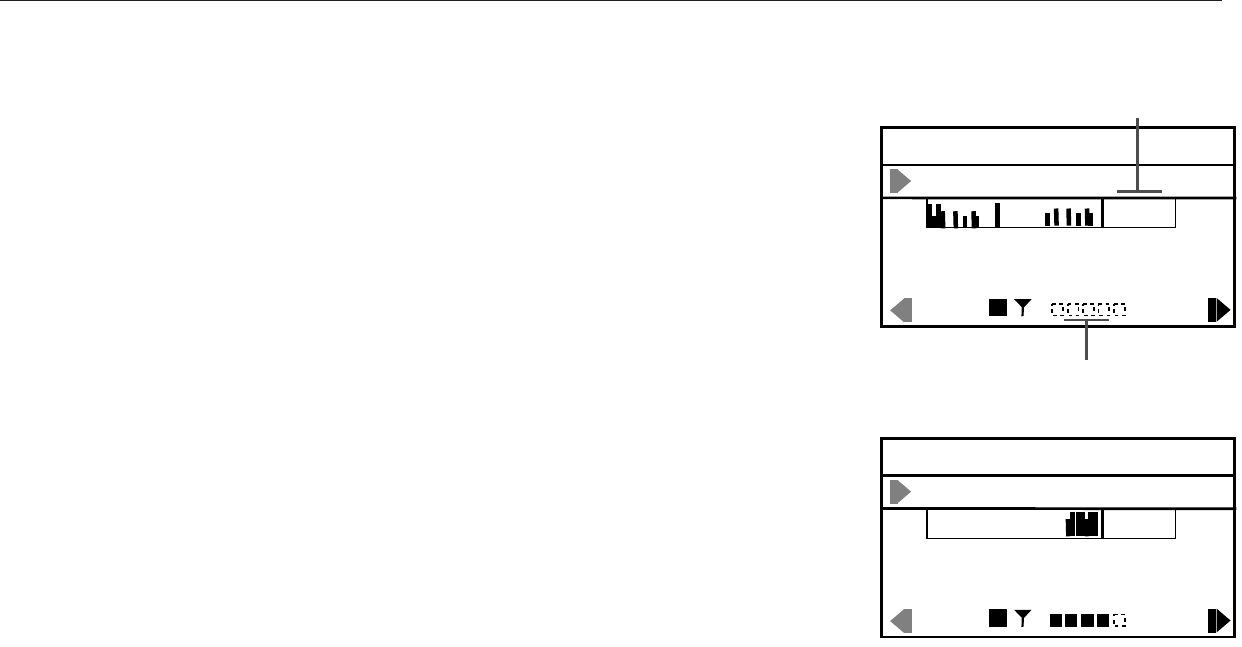
The top screen to the right is accessible on the ProHome Base Station.
(See page 27 -28 of the user manual)
Q-Value: This number represents the percent of the expected transmissions
received from a sensor over the past four days or since the Base Station was last
restarted - whichever is shorter. This value is “0” until the first 90 minute interval
has passed.
If the Q-Value, is below 40%, a Repeater may be advisable.
In this example, the Q-Value is 23%.
Short-Term Signal Quality Indicator: At the bottom of the screen, a series of
dashes and/or boxes will appear when a sensor has been paired to the Base
Station. This indicator displays the number of transmissions it has received from
the sensor over the past 60 minutes. The indicator draws a box on the right while
waiting for a transmission. Each time an expected transmission is received a solid
box is drawn to the left. If a transmission is not received with the expected time
period, an empty box is drawn.
Repeater Properly Installed: The same view sensor screen for the hard-to-see
sensor should look similar to the bottom screen to the right when the repeater is
properly installed. The short-term indicator shows solid boxes and the Q-Value
should be above 60%. (Remember that the Q-Value takes 90 minutes to populate)
Menu 5 / 6
View Sensors
R
10000042
X
Z:_______C 2
A01
Q089
T: +076.2F; W:+27.0% R099
Menu 5 / 6
View Sensors
R
10000042
X
Z:_______2
A01
Q023
T: +076.2F; W:+27.0% R015
Q Value
Short-term Signal
Strength Indicator
View Sensor Screen on Base Station
Q Value
Short-term Signal
Strength Indicator
POOR RECEPTION FROM SENSOR
GOOD RECEPTION FROM SENSOR THROUGH REPEATER

840 FIRST AVENUE, SUITE 300
KING OF PRUSSIA, PA 19406
www.UgMO.com
Customer Service:
Please visit UgMO.com or call 877-500-UgMO for customer service.
This product should not be used for anything other than what is described in this document. This product should only be serviced by trained and autho-
rized personnel.
FCC Notice: This device complies with Part 15 of the FCC Rules. Operation is subject to the following two conditions: (1) This device may not cause
harmful interference, and (2) This device must accept any interference received, including interference that may cause undesired operation.
This equipment has been tested and found to comply with the limits for Class B Digital Device, pursuant to Part 15 of the FCC Rules. These limits are
designed to provide reasonable protection against harmful interference in a residential installation.
This equipment generates and can radiate radio frequency energy and, if not installed and used in accordance with the
instructions, may cause harmful interference to radio communications. However, there is no guarantee that interference will not occur in a particular
installation. If this equipment does cause harmful interference to radio or television reception, which can be determined by turning the equipment off
and on, the user is encouraged to try to correct the interference by one or more of the following measures.
· Reorient or relocate the receiving antenna
· Increase the separation between the equipment and receiver
· Connect the equipment into an outlet on a circuit different from that to which the receiver is connected
· Consult the dealer or an experienced radio/TV technician for help
Any changes or modifications not expressly approved by the party responsible for compliance could void the user’s authority to operate the equipment.