Greenwave Reality d b a Greenwave Systems GCT10 Touch Remote Control User Manual en lighting user guide remote draft 2012 03 28
Greenwave Systems Pte. Ltd. Touch Remote Control en lighting user guide remote draft 2012 03 28
Z3M-GCT10_User manual rev1
Lighting Kit
with Remote Control

Table of Contents
Lighting Kit Overview 1
Basic Concepts of Wireless Lighting 1
Planning Your Lighting Network 2
Power Failure with Wireless Light Bulbs 4
Remote Control Overview 6
Indicators 7
Installation 8
Remote Control Operation 10
Turning Lights on and Off 11
Brightening and Dimming Lights 12
Changing a Light Bulb’s Lighting Group 12
Cloning a Remote Control 13
Replacing Batteries 14
Resetting the Remote Control to Factory Default
Settings 14
Light Bulb Tasks 16
Adding Light Bulbs to the Network 16
Removing Light Bulbs from the Network 18
Optional Lighting Gateway 21
Troubleshooting 22
Safety Information 25
About GreenWave 28
Product Specifications 29
1
Lighting Kit Overview
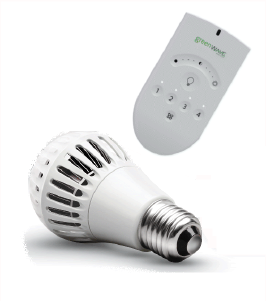
The GreenWave Reality lighting kit includes a wireless smart lighting
system that helps make the lighting in your home more energy efficient
and easier to manage. The kit includes LED or CFL light bulbs and a
remote control that work together to help you manage your lighting
wirelessly.
Basic Concepts of Wireless Lighting
Before setting up your wireless lighting network, you should take a few
minutes to read through these basic concepts to understand how wireless
lighting works and how it is different from standard lighting. Wireless light bulbs work with your light fixtures the
same way as standard light bulbs. They are different, however, in a couple of ways:
• The lighting element in the light bulb uses energy-efficient CFL technology or the more efficient
LED technology.

2
• The light bulb includes wireless technology that allows the light bulb to connect to a network and be
managed remotely.
Because the light bulbs can be connected to a network, you have greater flexibility in how you use them. For
example, you can program your lighting network so that when you press a button upon arriving home, an
entryway and a hallway light turn on. Or when you go to bed, your remote control can turn off all lights on the
network.
Planning Your Lighting Network
Whether you have only one wireless light bulb or you are replacing your entire home with wireless light bulbs,
you should plan how you want the lighting on your network to behave. For example, if you only have one light
bulb you might want to place it in a central location that would be optimum for turning on and off when you are
away or arrive home. If you have multiple light bulbs, however, you might want to set them up in lighting groups
to be able to better manage them across your home.
Note: Light fixtures that have dimmer controls are not recommended for your network light bulbs. However, they can be used if
the dimmer level is set to 100%.

3
Lighting Groups
A lighting group is a set of network light bulbs that you can control together through your remote control. For
example, you might have a lighting group that includes light bulbs on the same floor. Or you might have a group
that includes hallway and entryway lights, making it easy to turn on or off as you arrive or leave home. All light
bulbs in the same group turn on and off together and brighten or dim to the same level. The following limitations
apply when working with network light bulbs and lighting groups in a system using remote control only:
• One light bulb can belong to only one lighting group.
• One remote control can control up to four different lighting groups.
• One lighting group can contain up to 40 light bulbs (the maximum light bulbs allowed in a remote
control only network).
Note: By default, each light bulb in your lighting kit is pre-assigned to a lighting group. Numbering on the lighting kit package
shows the lighting group to which each light bulb is assigned.
Multi-fixture Lights
When installing light bulbs or setting up lighting groups, you should consider how you want multi-fixture lights to
behave. Since power to the light has to remain on (so the remote control can access the light bulb) you would
use either all network light bulbs in a multi-fixture light or no network light bulbs at all. If you are using network
light bulbs in a multi-fixture light, you should add them all to the same lighting group so that they turn on and off
together (though you do not have to).

4
Network Range
As with any remote control, your lighting kit’s remote control must be within range of your lighting network to be
able to control your lighting. However, this does not mean that it has to be within range of all network light bulbs.
Since the light bulbs are interconnected across the network, they can pass commands to each other as long as
they are within network range of each other. This means that a nearby light bulb can receive your remote control
command and pass that command across the network of connected light bulbs, ultimately to a light bulb you
want to control in a distant room. Because of this effect, larger homes would make better use of having more
network light bulbs spread across the home, maintaining a distance that allows each light bulb to communicate
with one another.
Maximum Number of Light Bulbs
You can install up to 40 light bulbs on the same network to work with your remote control.
Note: Networks that use a Lighting Gateway can hold more light bulbs. If you are interested in upgrading, you should refer to
the Optional Lighting Gateway chapter for more information about its features.
Power Failure with Wireless Light Bulbs
Wireless light bulbs are powered through light fixtures the same way standard light bulbs are. However, you must
leave the light fixtures in the on position so that power is available when using your remote control to turn the
wireless light bulbs on and off. If power is removed from a light bulb, whether from power failure or from manually
5
turning off the light fixture, the light bulb will of course turn off. When power is restored, all network light bulbs
affected by the power failure, regardless of whether they were previously on or off, will automatically turn on at
full brightness. The affected light bulbs will maintain their previous network and lighting group settings.
6
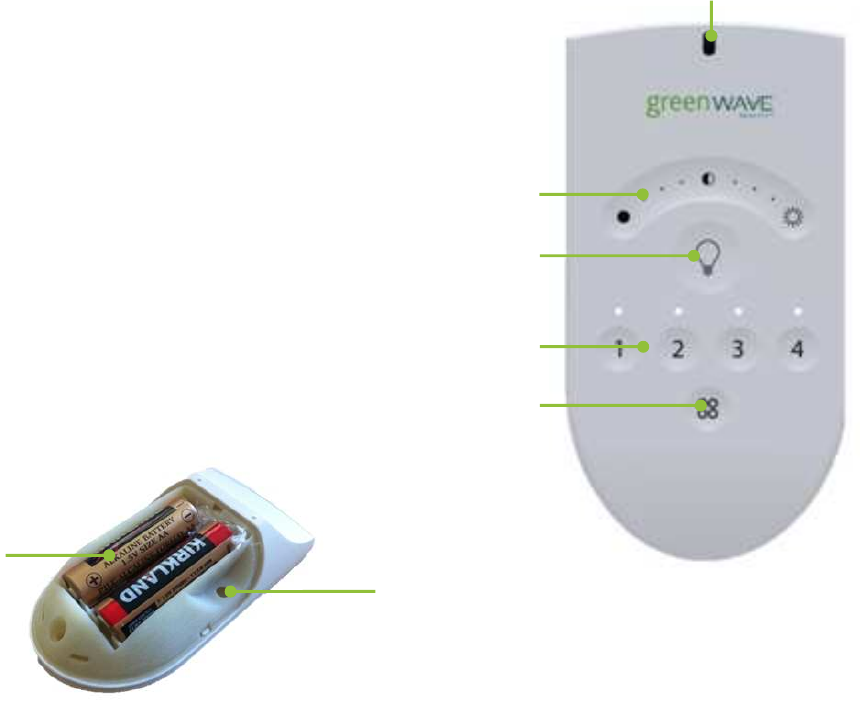
Remote Control Overview
The following illustration shows the different buttons on the remote control. You can use it as a reference while
following the instructions for performing tasks.
1. Press the
A
ll
G
roups
button to select all lighting groups to turn on, turn off, dim,
or brighten.
2. Press a Group Number button to select that lighting group to turn on, turn off,
dim, or brighten. Also use these buttons to program the lights in the
corresponding group. An LED light above each number indicates the group
number currently being used.
3. Press the On/Off button to turn on or off the lights in the selected lighting
group(s). Lights turn on to the previous dimming level.
4. Press and hold the Dimmer to dim or brighten the lights in the selected lighting
group(s). Lights get dimmer the further you press to the left and get brighter the
further you press to the right.
5. The primary LED status indicator lights or flashes during different activities with
the remote control.
6. The battery compartment on the back holds 2 AA batteries.
7. Press the Program button (inside battery compartment) to initiate programming
of lighting groups and other remote control programming functions.
4
2
5
1
3
6
7

7
Indicators
The remote control has four group number LED indicators and one primary LED status indicator that display the
following patterns to show you the remote control’s status during different processes:
Process LED Indication and Description
Initial Remote Control
Setup Primary indicator flashes steadily: During the process of installing batteries for the first time, the
remote control is determining the best signal for your lighting system.
Adding Light Bulbs to
Network Group number indicator flashes steadily: The corresponding lighting group is the active group for the
new light bulbs to join.
Primary indicator flashes rapidly: The remote control has found a new light bulb within range. After
the light bulb is successfully added to the network, the indicator stops flashing.
Primary indicator turns on solid: The light bulb has been successfully added to the network.
Removing Light Bulbs
from Network Group number indicator and primary indicator flash slowly for 30 seconds: One or more light
bulbs have been removed.
Working with One
Lighting Group Group number indicator turns on, and primary indicator remains off: The corresponding lighting
group has been selected, and its last state was off.
Group number indicator and primary indicator turn on: The corresponding lighting group has been
selected, and its last state was something other than off (for example, lighting group was on or was
dimmed to a certain level).
Working with All
Lighting Groups All group number indicators turn on, and primary indicator remains off: All lighting groups have
been selected, and their last state was off.
All group number indicators and primary indicator turn on: All lighting groups have been selected,
and their last state was something other than off (for example, lighting groups were on or were dimmed
to a certain level).
Cloning the Remote
Control Primary indicator flashes steadily: The remote control is in cloning mode.
Primary indicator flashes rapidly: The remote controls are transferring data between each other.
Primary indicator turns on solid: Both remote controls have finished the cloning process successfully.
Group number indicators flash steadily for 2 seconds: The cloning process timed out or failed.
8
Installation
Installation of your lighting kit includes installing the light bulbs into light fixtures and preparing the remote control.
Installation Steps
Before installing the light bulbs, determine the appropriate locations in your home for installing them. The
Lighting Kit Overview chapter provides information on planning your lighting network. When you are ready to
install the light bulbs, perform the following steps:
1. Turn power OFF to the light fixtures where you will be installing the network light bulbs.
2. Remove any existing light bulbs from the light fixtures.
3. Install each network light bulb into the light fixtures as you would any standard light bulb. When
removing each light bulb from the package, note the pre-assigned lighting group number on the
package and install the bulbs in the light fixtures based on your lighting group plan.
4. Turn power on to the light fixtures. The light bulbs turn on to full brightness. If a light fixture has a
dimmer control (not recommended), set the dimmer level to full brightness.
9
5. Remove the battery compartment cover from the back of the remote control, and insert two AA
alkaline batteries (included). The first time you insert batteries, the primary LED light flashes while
the remote control determines the best signal for your lighting system. When this process is
complete, the LED light will remain on for approximately five seconds. When the LED light turns off,
your remote control is ready. Note that this process occurs only during initial battery installation and
does not occur when you replace batteries in the future unless a factory reset is performed.
6. Leave the light fixture switches ON so that power is available when using your remote control to
turn the light bulbs on and off.
Once these steps are complete, you can use the remote control as discussed in the Remote Control Operation
chapter to operate your lighting network.
Installation Tips
Review the safety information. Be sure to review the information contained in the Safety Information chapter
for important safety information you should follow.
Keep radio signals clear. The hardware in your lighting kit has antennas built-in for radio communication. Just
as you might experience reception problems on your mobile phone inside a building, the hardware in your
lighting kit can have trouble communicating if their radio signals are blocked by obstacles such as large metal
panels or walls containing wire mesh. When placing these devices in your home, imagine invisible lines
connecting between them. Try to keep these lines clear from obstruction as much as possible.

10
Remote Control Operation
You can perform several tasks with the remote control, including:
• Turning on and off lights
• Dimming and brightening lights
• Changing the lighting group to which a light bulb is assigned
• Cloning the remote control to a new one
• Replacing batteries
• Resetting the remote control to factory default settings
Note: Some tasks require pressing the Program button, which is located inside the battery compartment on the back of the
remote control. Be sure to press this button only as directed in the instructions. Pressing it an additional time during remote
control programming mode immediately cancels the current operation.

11
Turning Lights on and Off
To turn lights on and off, you must turn on and off an entire lighting group:
1. Press the Group Number button for the lighting group you want to turn on or off. If you want to turn on
or off ALL lighting groups, press the All Groups button.
2. Press the On/Off button. If the lights were previously off, they will turn on. If the lights were previously
on, they will turn off.
Note: The previously selected group (or all groups, if selected) remains the active group on the remote control. To take action
on that same group again, you do not have to press the group button again.
Turning Lights on and off Without the Remote Control
If you need to turn on or off a light when the remote control is not available, you can do so by turning on or off the
power directly to the light fixture as you do with standard light bulbs. If the light switch is already turned on (to
support operation with the remote control), you must turn the switch off and then back on to turn the light bulb on.
When you turn power on this way, the network light bulb in the light fixture automatically turns on at full
brightness (regardless of whether the light bulb was previously on or off). The affected light bulb maintains its
previous network and lighting group settings when you return to using the remote control.

12
Brightening and Dimming Lights
You can brighten and dim your lights even if though they are not connected to a fixture with a dimmer switch.
CFL light bulbs, which typically do not brighten or dim, can also brighten and dim on your network. To set the
brightness level of lights, you must set the level for an entire lighting group:
1. Press the Group Number button for the lighting group you want to dim or brighten. If you want to dim or
brighten ALL lighting groups, press the All Groups button.
2. To dim the lights in the selected group(s), press and hold the left side of the dimmer button. Release the
button when the lights reach the level you want. Lights will dim more the further to the left you press.
3. To brighten the lights in the selected group(s), press and hold the right side of the dimmer. Release the
button when the lights reach the level you want. Lights will brighten more the further to the right you
press. They automatically stop when they reach full brightness.
The lights in the group will remember the latest brightness level when you turn them off and on.
Note: The previously selected group (or all groups, if selected) remains the active group on the remote control. To take action
on that same group again, you do not have to press the group button again.
Changing a Light Bulb’s Lighting Group
By default, each light bulb in your lighting kit is pre-assigned to a lighting group. You can change this setting to
assign the bulb to a different lighting group. You can even change multiple light bulbs so that they all belong to
13
the same lighting group (up to 40 light bulbs in the same group). To change a light bulb’s lighting group, you
must first remove the bulb from the network using the removal procedure in this chapter. After the light bulb is
removed, you can use the procedure in this chapter for adding the light bulb to the network and assign it to the
new lighting group.
Cloning a Remote Control
If you have an additional remote control, you can program it to be identical to your original remote control. This is
useful if you think you may need to replace your original remote control or if you simply want to have a backup.
When you clone an additional remote control, it will work the same way as your original remote control.
Before you get started, make sure you have your original remote control in addition to your new one. Both
remote controls must be in range of each other. Remove the battery covers from both remote controls so you
have access to the Program buttons. To clone the new remote control:
1. On the ORIGINAL remote control:
a. Press and hold the Program button.
b. While pressing the Program button, press the On/Off button three times.
c. Release the Program button. The primary LED indicator starts flashing steadily.
2. On the NEW remote control:
a. Press and hold the Program button.
b. While pressing the Program button, press the All Groups button three times.
c. Release the Program button. The primary LED indicator starts flashing rapidly.
14
Once the data transfer process begins between the remote controls, the primary LED indicator on the
original remote control starts flashing rapidly.
3. When the new remote control has finished obtaining the network information, the primary LED
indicators on both remote controls light solid for five seconds and then turn off.
4. You can now use the new remote control the same as you do your original. All of the lighting groups
and settings are the same.
If the remote controls’ group number LED indicators flash steadily for two seconds, the cloning process
timed out or failed and you must start over.
Replacing Batteries
Your remote control uses two AA 1.5V alkaline batteries (included). To replace the batteries, remove the battery
cover from the back of the remote control and remove the old batteries. Insert the new batteries as indicated in
the battery compartment.
CAUTION: RISK OF EXPLOSION IF BATTERY IS REPLACED BY AN INCORRECT TYPE.
DISPOSE OF USED BATTERIES ACCORDING TO THE INSTRUCTIONS.
Resetting the Remote Control to Factory Default Settings
You can reset the remote control back to the original default settings from the factory. This may be useful if you
want to put a cloned remote control back to its standalone settings. Typically, though, factory reset is not a
15
common procedure and you should be certain you want to do so since you will lose any network settings you
previously programmed onto the remote control.
If you are sure you want to reset the remote control, use the following steps:
1. Remove the battery cover from the back of the remote control.
2. Remove the batteries from the remote control.
3. Press and hold the Program button.
4. While still pressing the Program button, reinsert the batteries into the remote control.
5. Release the Program button.
The remote control is returned to its default factory settings. To use it again, you must follow the original
installation instructions. After the factory reset, you must reset all light bulbs in the network based on your group
plan by following the procedure in the Light Bulb Tasks chapter to remove light bulbs from the network, followed
by the procedure to add a new light bulb to the network.
16
Light Bulb Tasks
There are additional network tasks that you may find you must perform with your light bulbs, including:
• Adding light bulbs to your network
• Removing light bulbs from the network
Adding Light Bulbs to the Network
Your remote control can manage up to 40 light bulbs on the same lighting network. When you add a light bulb to
the network, you also assign it to a lighting group. To add light bulbs to the network:
1. Make sure your remote control is in range of the light bulb you are adding. Remove the battery cover
from the back of the remote control so that you have access to the Program button.
2. Make sure power to the fixture where you are installing the light bulb is turned OFF.
3. Remove any existing light bulb from the light fixture.

17
4. Install the network light bulb into the light fixture as you would any standard light bulb. If the light fixture
has a dimmer control (not recommended), set the dimmer level to full brightness.
5. Turn power to the light fixture on. The light bulb begins to brighten and dim while finding the remote
control’s network.
Note: If for any reason the light bulb does not brighten and dim (if it remains full bright), then turn power to the light
fixture on and off five times consecutively to reset the light bulb. During this process, only leave the power on or off
for less than two seconds. The light bulb should then start to brighten and dim.
6. On the remote control:
a. Press and hold the Program button.
b. While pressing the Program button, press the Group Number button for the lighting group
you want assigned to the light bulb.
c. Release both buttons. The group number LED indicator flashes slowly while the light bulb is
added.
When the light bulb is found and is being configured by the remote control, the remote control’s primary
LED indicator flashes rapidly. When the light bulb has been successfully added to the network, it will
turn on at full brightness and the remote control’s primary indicator will turn on solid. The LED group
number LED indicator on the remote control will continue to flash for up to five minutes to give you time
to install any additional light bulbs to that lighting group.
7. To add more light bulbs, repeat these steps. Remember, if the group number LED indicator on the
remote control is still flashing from step 6, then it will automatically find the new light bulb without you
18
pressing any buttons, and it will add the bulb to the same lighting group. However, if the LED indicator
has stopped flashing, then you must repeat step 6. Repeat this for each additional light bulb you are
adding.
8. When you are finished adding all new light bulbs, you can return the remote control back to normal
operation by pressing the Program button. Otherwise the remote control will automatically return to
normal operation in five minutes. Both the primary LED indicator and the group number LED indicator
turn off when the remote control returns to normal operation.
9. Leave the light fixture switches ON so that power is available when using your remote control to turn the
light bulbs on and off.
Removing Light Bulbs from the Network
When you remove light bulbs from the network, you remove all of its network settings. If you are removing light
bulbs assigned to different lighting groups, you must work with one lighting group at a time. However, if you are
removing light bulbs from ALL lighting groups, you can remove them all at the same time. To remove light bulbs
from the network:
1. Make sure your remote control is in range of the light bulb you are removing. Remove the battery cover
from the back of the remote control so that you have access to the Program button.
2. Make sure power to the fixtures containing the light bulbs you want to remove is turned ON. If there are
other light bulbs on the network that are assigned to the same lighting group, but you do NOT want to
remove those light bulbs from the network, then turn power to those light fixtures OFF (you can turn
them back on after you have finished removing light bulbs). If you do not turn the other light bulbs off,
19
then they will also be removed from the network since the action applies to the entire lighting group. If
you accidentally remove a light bulb from the network, you can simply add it back again using the
procedure in this chapter for adding light bulbs to the network.
3. On the remote control:
a. Press and hold the Program button.
b. While pressing the Program button, press and release the On/Off button (keep the Program
button pressed).
c. While still pressing the Program button, press and release the Group Number button for the
lighting group assigned to the light bulbs you want to remove; or, if you are removing light
bulbs from ALL lighting groups, press and release the All Groups button (keep the Program
button pressed, regardless of the group button you press).
d. While still pressing the Program button, press and release the On/Off button again.
e. Release the Program button. The group number LED indicator (or all group number LED
indicators if removing all groups) and the primary LED indicator flash slowly for 30 seconds
while the light bulbs are removed.
When the light bulbs have been removed from the network, they will brighten and dim.
4. Repeat these steps to remove light bulbs from another lighting group.
20
Removing a Light Bulb Without the Remote Control
If your remote control is not available you can remove a light bulb from the network by turning power to the light
fixture off and on five times consecutively to reset the light bulb. During this process, only leave the power on or
off for less than two seconds. When the light bulb has been removed from the network, it will brighten and dim.
21
Optional Lighting Gateway
This user guide explains how to use lighting kits that do not have a Lighting Gateway. A Lighting Gateway is an
optional device, similar to your home network router, that extends the range, features, and functionality of your
lighting network. You can upgrade your network to operate with a Lighting Gateway to gain the following benefits:
• The lighting network can support up to 250 light bulbs on the same network.
• Network light bulbs can be configured to remember their previous state when power is cycled.
• You can use a smartphone application or your Web browser to perform many tasks with your
lighting network and bulbs.
22
Troubleshooting
If you are having problems with your lighting system, refer to the following sections for possible troubleshooting
solutions.
Light Bulb Not Responding During Installation
When you add a new light bulb to the network (or if you add a previously existing light bulb that you removed
from the network), the light bulb should brighten and dim during the installation process to indicate that it is
searching for a network. If for any reason the light bulb does not brighten and dim (if it remains full bright), then
turn power to the light fixture on and off five times consecutively to reset the light bulb. The light bulb should then
start to brighten and dim once it is reset.
Light Bulb Accidentally Removed from Network
It is possible for a network light bulb to be accidentally removed from the network. For example, if someone turns
power on and off five times consecutively to the light fixture, the attached light bulb will reset and remove itself
23
from the network. If this happens, follow the procedure in the Light Bulb Tasks chapter to add a new light bulb to
the network.
Resetting Your Light Bulbs
If you are unable to fix issues that arise with your lighting system, you can reset your light bulbs as a last resort.
To do so, follow the procedure in the Light Bulb Tasks chapter to remove light bulbs from the network, followed
by the procedure to add a new light bulb to the network.
Problems with Remote Control
Depending on the problem you are having with the remote control, there are several possible solutions:
• Replace batteries. If the remote control is not functioning and the LEDs do not light when you
press the buttons, then the batteries may need replacement. Refer to the Remote Control
Operation chapter for instructions on inserting new batteries into the remote control.
• Turn power to light fixture on. If you manually turn the power switch off for a light fixture, then
power will not be available to the light bulb when you use the remote control to turn the light on and
off. Be sure the appropriate light fixtures are left in the on position. If necessary, refer to the section
on power failure in the Lighting Kit Overview chapter.
• Reset the remote control. If the remote control is not functioning correctly but the batteries are
new, then you may have to reset the remote control to its default factory settings. The factory reset
process is as discussed in the Remote Control Operation chapter.
24
• Replace a lost or broken remote control. If you have an additional remote control that was
previously programmed to be identical to the your original remote control (cloning your original
remote control, as discussed in the Remote Control Operation chapter), then you can use that
clone the same way as your original without losing any of your network or light settings. However, if
you do not have an additional identical remote control, then there is no way to retrieve your settings
from the lost or broken remote control. The only option in this case is to reset your entire lighting
system, as discussed earlier in this chapter.
25
Safety Information
Batteries
Use only AA 1.5V alkaline batteries.
WARNING: Batteries can explode, or leak, and can cause injury or fire. To reduce this risk:
• Carefully follow all instructions and warnings on the battery label and package.
• Always insert batteries correctly with regard to polarity (+ and -) marked on the battery and the
equipment.
• Do not short battery terminals.
• Do not mix old and new batteries. Replace all of them at the same time with new batteries of the
same brand and type.
• Remove dead batteries immediately and follow local regulations for safe disposal.
• Do not dispose of batteries in fire.
• Keep batteries out of reach of children.
26
• Transporting batteries can possibly cause fires if the battery terminals inadvertently come in contact
with conductive materials such as keys, coins, hand tools, etc. The US Department of
Transportation Hazardous Material Regulations (HMR) actually prohibits transporting batteries in
commerce or on airplanes (i.e. packed in suitcases and carryon luggage) UNLESS they are
properly protected from short circuits. So when transporting individual batteries, make sure that the
battery terminals are protected and well insulated from materials that could contact them and cause
a short circuit.
Indoor Use Only
The hardware in your lighting kit should be used only in dry, indoor locations. Do not use the hardware in high-
humidity locations such as greenhouses, saunas, washrooms, or patios. Do not use the hardware in locations
where it can get wet such as near aquariums or running water.
Do Not Disassemble
The hardware in your lighting kit has no user-serviceable parts inside. In case of persisting malfunction, please
contact Customer Service to arrange for repair at a certified service location. Do not attempt to disassemble the
hardware for any reason.
27
Disposing of Your Used Product
This product complies with the WEEE Directive (2002/96/EC) marking
requirements. The affixed label indicates that you must not discard this electrical /
electronic product in domestic household waste.
WEEE Product Category. With reference to the equipment types in the WEEE
Directive Annex 1, this product is classed as category 3 “IT and
Telecommunications Equipment.”
DO NOT DISPOSE IN DOMESTIC HOUSEHOLD WASTE. To return unwanted products, contact your local
GreenWave Reality office for more information (see contact information in the back of manual).
28
About GreenWave
GreenWave Reality is a global innovator in the emerging Home Energy Management market. GreenWave
Reality provides an affordable, easy-to-use, standards-based platform that allows utilities to enhance their
relationship with consumers and better balance energy on the grid while consumers can conserve energy with a
minimal impact to their lifestyle by easily monitoring and controlling their appliances and adding intelligent LED
lighting. GreenWave Reality is led by a diverse team of proven leaders with global experience.
NORTH AMERICA
39 Parker, Suite 100
Irvine, CA 92618
USA
Tel. +1 714 805 WAVE (9283)
na@greenwavereality.com
EUROPE
GreenWave Reality ApS.
Dr. Neergaardsvej 3
2970 Hørsholm
DENMARK
Tel. +45 6913 2333
eu@greenwavereality.com
ASIA
-
PACIFIC
41 Science Park Road
#03-01 The Gemini (Science Park II)
SINGAPORE 117610
Tel. +65 3157 1700
apac@greenwavereality.com

29
Product Specifications
Light Bulbs
LED CFL
Radio Frequency 2.4GHz 2.4GHz
Features On, Off, Dim On, Off, Dim
Light Intensity 470lm 1100lm
Color Temperature Warm White
(2700K) Warm White
(2700K)
Color Range Index 82 82
Wattage 8.5W 23W
Equivalent Wattage
(Incandescent Replacement) 40W 100W
Voltage 120V/60Hz 120V/60Hz
Remote Control
Radio Frequency 2.4GHz
Operating Temperature 0°C ~ +40°C
Storage Temperature -20°C ~ +60°C
Operating Humidity 20% ~ 85% RH
Storage Humidity 5% ~ 95% RH
Battery 2 x AA
Battery Lifetime
(For Included Batteries) Estimated 12 Months
30
Document Version
1.01

31
For Lighting Gateway (GL30000 / GL30002-A / GL32200 / GL32202-A)
Federal Communication Commission Interference Statement
This equipment has been tested and found to comply with the limits for a Class B digital device, pursuant to Part 15 of the FCC
Rules. These limits are designed to provide reasonable protection against harmful interference in a residential installation. This
equipment generates, uses and can radiate radio frequency energy and, if not installed and used in accordance with the
instructions, may cause harmful interference to radio communications. However, there is no guarantee that interference will not
occur in a particular installation. If this equipment does cause harmful interference to radio or television reception, which can be
determined by turning the equipment off and on, the user is encouraged to try to correct the interference by one of the following
measures:
• Reorient or relocate the receiving antenna.
• Increase the separation between the equipment and receiver.
• Connect the equipment into an outlet on a circuit different from that to which the receiver is connected.
• Consult the dealer or an experienced radio/TV technician for help.
FCC Caution: Any changes or modifications not expressly approved by the party responsible for compliance could void the
user's authority to operate this equipment.
This device complies with Part 15 of the FCC Rules. Operation is subject to the following two conditions: (1) This device may
not cause harmful interference, and (2) this device must accept any interference received, including interference that may
cause undesired operation.
IMPORTANT NOTE:
Radiation Exposure Statement:
This equipment complies with FCC radiation exposure limits set forth for an uncontrolled environment. This equipment should
be installed and operated with a minimum distance of 20cm between the radiator and your body.
32
For Remote Control (CT1UV-Y-XX)
This device complies with Part 15 of the FCC Rules. Operation is subject
to the following two conditions: (1) this device may not cause harmful
interference, and (2) this device must accept any interference received,
including interference that may cause undesired operation.
Le présent appareil est conforme aux CNR d'Industrie Canada applicables aux
appareils radio exempts de licence. L'exploitation est autorisée aux deux conditions
suivantes : (1) l'appareil ne doit pas produire de brouillage, et (2) l'utilisateur de
l'appareil doit accepter tout brouillage radioélectrique subi, même si le brouillage est
susceptible d'en compromettre le fonctionnement.
Changes or modifications not expressly approved by the party
responsible for compliance could void the user's authority to operate the
equipment.
This equipment has been tested and found to comply with the limits for
a Class B digital device, pursuant to part 15 of the FCC Rules. These
limits are designed to provide reasonable protection against harmful
interference in a residential installation. This equipment generates
uses and can radiate radio frequency energy and, if not installed and
used in accordance with the instructions, may cause harmful interference
to radio communications. However, there is no guarantee that interference
will not occur in a particular installation. If this equipment does cause
harmful interference to radio or television reception, which can be
determined by turning the equipment off and on, the user is encouraged
to try to correct the interference by one or more of the following
measures:
-Reorient or relocate the receiving antenna.
-Increase the separation between the equipment and receiver.
-Connect the equipment into an outlet on a circuit different from that
to which the receiver is connected.
-Consult the dealer or an experienced radio/TV technician for help.
Under Industry Canada regulations, this radio transmitter may only operate using an
antenna of a type and maximum (or lesser) gain approved for the transmitter by
Industry Canada. To reduce potential radio interference to other users, the antenna
type and its gain should be so chosen that the equivalent isotropically radiated power
33
(e.i.r.p.) is not more than that necessary for successful communication.
Conformément à la réglementation d'Industrie Canada, le présent émetteur radio peut
fonctionner avec une antenne d'un type et d'un gain maximal (ou inférieur) approuvé
pour l'émetteur par Industrie Canada. Dans le but de réduire les risques de
brouillage radioélectrique à l'intention des autres utilisateurs, il faut choisir le type
d'antenne et son gain de sorte que la puissance isotrope rayonnée équivalente
(p.i.r.e.) ne dépasse pas l'intensité nécessaire à l'établissement d'une communication
satisfaisante.

34
Declaration(s) of Conformity
These CE Marked GreenWave Reality products incorporating Radio and Telecoms Terminal Equipment functionality are in
compliance with the essential requirements and other relevant provisions of Directive 1999/5/EC.
A copy of the original CE Declaration of Conformity is on file and available upon request for all CE Marked GreenWave Reality
products. Please visit www.greenwavereality.com to obtain a copy of the Declaration.
The use of such device might not be harmonized throughout EU and EFTA Member States. The Final Integrator of the product
shall check that the use of such devices for power node are allowed for placing on the market in any particular Member State.
(Back Cover)