Greenwave Reality d b a Greenwave Systems GRPS10 Meter Reader User Manual
Greenwave Systems Pte. Ltd. Meter Reader
User Manual

DOCUMENT
TRACKING
–
REMOVE
THIS
SECTION
BEFORE
FINAL
PRODUCTION
Date By Notes
8/10/2011 Kevin Lewis New version 1.01.

Meter Reader
RPS1005
RPS1015

Table of Contents
Introduction 1
Pulse Reader Overview 2
Installation 3
Safety Information 7
About GreenWave 10
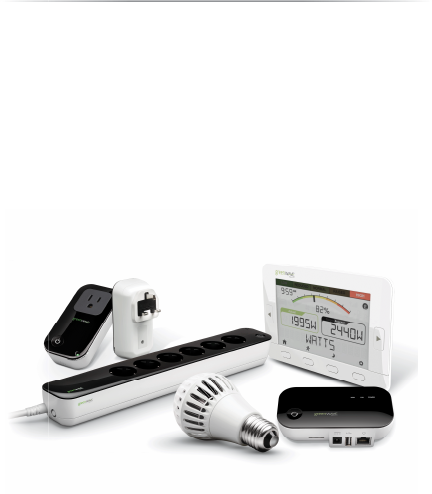
The GreenWave Reality platform helps create a smart, energy
controlling of your appliances and electronics (referred to as “devices”). You can conserve energy with minimal
impact to your lifestyle by using our products to easily manage your devices. Simply connect our Gateway to
your GreenWave Reality energy manage
and control the devices’ power usage through a Web browser or smartphone application.
Introduction
The GreenWave Reality platform helps create a smart, energy
-
efficient home through the monitoring and
controlling of your appliances and electronics (referred to as “devices”). You can conserve energy with minimal
impact to your lifestyle by using our products to easily manage your devices. Simply connect our Gateway to
your GreenWave Reality energy manage
ment system, plug your devices into our PowerNodes, and then monitor
and control the devices’ power usage through a Web browser or smartphone application.
1
efficient home through the monitoring and
controlling of your appliances and electronics (referred to as “devices”). You can conserve energy with minimal
impact to your lifestyle by using our products to easily manage your devices. Simply connect our Gateway to
ment system, plug your devices into our PowerNodes, and then monitor
2
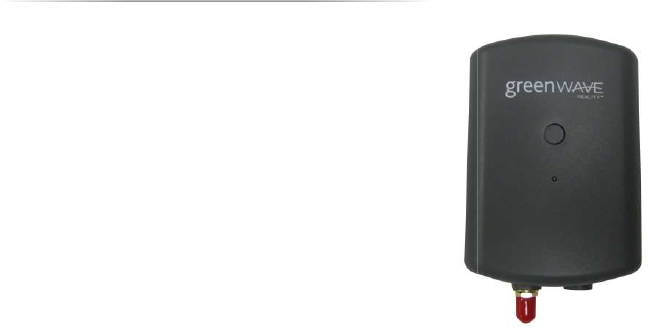
Pulse Reader
The GreenWave Reality
Pulse Reader
to measure energy usage. The
information
be transmitted to your GreenWave
R
control your energy use.
The Pulse Reader is weather-
resistant and designed to be mounted next to
electric and/or gas meters.
Pulse Reader
Overview
Pulse Reader
connects to your electric and/or gas meters
information
read through the Pulse Reader can then
R
eality Gateway so that you can monitor and
resistant and designed to be mounted next to
your

You must follow
several installation steps
•
Preparing for installation
• Attaching the self-
adhesive template to the meter to ensure accurate
•
Attaching the Pulse Reader sensors to your meter(s)
• Installing
batteries, if they are not already pre
•
Securing the Pulse Reader unit in place near your meter(s)
1.
Prepare for Installation
Before you can connect the Pulse
Reader, you must first locate the area on your meter(s) where you will attach
its sensors. You should clean the area to ensure it is free from dirt or grease. If your specific setup process
requires you to record your current meter readings, then make not
any obstructed view of the meter after
Installation
several installation steps
to connect your Pulse Reader to your meter.
These steps include:
Preparing for installation
adhesive template to the meter to ensure accurate
placement of the sensors
Attaching the Pulse Reader sensors to your meter(s)
batteries, if they are not already pre
-installed
Securing the Pulse Reader unit in place near your meter(s)
Prepare for Installation
Reader, you must first locate the area on your meter(s) where you will attach
its sensors. You should clean the area to ensure it is free from dirt or grease. If your specific setup process
requires you to record your current meter readings, then make not
e of them before you begin installation to avoid
any obstructed view of the meter after
attaching the Pulse Reader sensors. You may need to note
3
These steps include:
placement of the sensors
Reader, you must first locate the area on your meter(s) where you will attach
its sensors. You should clean the area to ensure it is free from dirt or grease. If your specific setup process
e of them before you begin installation to avoid
attaching the Pulse Reader sensors. You may need to note
both the

4
current reading and the base value: The exact target area on your meter depends on whether it is an electric or
gas meter, as well as the specific type.
2. Attach Template to Meter
Since placement of the Pulse Reader cable sensor on the meter is critical, your kit includes self-adhesive
templates to help you align the sensor. Visually align the marking on the template to the target placement on
your meter. When you are sure of the placement and where to align the marking on each template, remove the
adhesive backing from the template and stick it to the meter. Be careful to ensure that the template’s marking is
placed exactly over the target sensor placement on the meter.
After sticking the template to your meter, remove the middle portion of the template that contains the alignment
marking. This area is perforated to help you remove it. You should be left with two sides of the template still stuck
to your meter. This is the area where you will align the Pulse Reader sensor.

5
3. Attach Sensor to Meter
Before removing the adhesive backing from the cable sensor, make sure it aligns correctly over the open area of
the template. The grey-colored sensor attaches to your gas meter, and the white-colored sensor attaches to your
electric meter. As you align the sensor over the template, make sure there will be no overhang of the sensor that
might extend far over the template area.
If necessary, the edges of the sensor are perforated to allow you to break it to make the
surface area smaller.
When you are sure of the placement and fit of the cable sensor, remove its adhesive backing and stick the
sensor to the open area of the template. The sensor should stick directly to the meter and not to the template
edges. When the sensor is securely attached to the meter, you can remove the template edges by peeling them
off of the meter.
4. Install Batteries
Your Pulse Reader comes with four AA lithium (FR6) batteries. If these batteries are not already pre-installed,
then remove the cover from the battery compartment on the back of the Pulse Reader unit, insert the batteries as
indicated on the markings in the battery compartment, and then replace the cover.
CAUTION: RISK OF EXPLOSION IF BATTERY IS REPLACED BY AN INCORRECT TYPE. DISPOSE OF
USED BATTERIES ACCORDING TO THE INSTRUCTIONS.
6
5. Secure Pulse Reader Next to Meter
Using the self-adhesive Velcro strips, mount the Pulse Reader unit to a stable location near your meters. Make
sure there is no tension on the sensor cables attached to the meter.

Batteries
Use only lithium FR6 AA batteries.
WARNING:
Batteries can explode, or leak, and can cause injury or fire. To reduce this risk:
•
Carefully follow all instructions and warnings on the battery label and package.
•
Always insert batteries correctly with regard to polarity (+ and
equipment.
•
Do not short battery terminals.
•
Do not mix old and new batteries. Replace all of them at the same time with new batteries of the
same brand and type.
•
Remove dead batteries immediately and follow local
• Do not
dispose of batteries in fire.
•
Keep batteries out of reach of children.
Safety Information
Batteries can explode, or leak, and can cause injury or fire. To reduce this risk:
Carefully follow all instructions and warnings on the battery label and package.
Always insert batteries correctly with regard to polarity (+ and
-
) marked on the battery a
Do not short battery terminals.
Do not mix old and new batteries. Replace all of them at the same time with new batteries of the
Remove dead batteries immediately and follow local
regulations for safe disposal
dispose of batteries in fire.
Keep batteries out of reach of children.
7
Batteries can explode, or leak, and can cause injury or fire. To reduce this risk:
Carefully follow all instructions and warnings on the battery label and package.
) marked on the battery a
nd the
Do not mix old and new batteries. Replace all of them at the same time with new batteries of the
regulations for safe disposal
.

8
• Transporting batteries can possibly cause fires if the battery terminals inadvertently come in contact
with conductive materials such as keys, coins, hand tools, etc. The US Department of
Transportation Hazardous Material Regulations (HMR) actually prohibits transporting batteries in
commerce or on airplanes (i.e. packed in suitcases and carryon luggage) UNLESS they are
properly protected from short circuits. So when transporting individual batteries, make sure that the
battery terminals are protected and well insulated from materials that could contact them and cause
a short circuit.
Do Not Disassemble
Your Pulse Reader has no user-serviceable parts inside. In case of persisting malfunction, please contact
Customer Service to arrange for repair at a certified service location. Do not attempt to disassemble the Pulse
Reader for any reason.
Disposing of Your Used Product
This product complies with the WEEE Directive (2002/96/EC) marking
requirements. The affixed label indicates that you must not discard this electrical /
electronic product in domestic household waste.
WEEE Product Category. With reference to the equipment types in the WEEE
9
Directive Annex 1, this product is classed as category 3 “IT and Telecommunications Equipment.”
DO NOT DISPOSE IN DOMESTIC HOUSEHOLD WASTE. To return unwanted products, contact your local
GreenWave Reality office for more information (see contact information in the back of manual).

10
GreenWave Reality is a global innovator in the emerging
provides an affordable, easy-to-
use, standards
with consumers and better balance
energy on the grid while consumers can conserve energy with a minimal
impact to their lifestyle by easily monitoring and controlling their appliances and adding intelligent LED lighting.
GreenWave Reality is led by a diverse team of proven leaders with glo
NORTH AMERICA
39 Parker, Suite 100
Irvine, CA 92618
USA
Tel. +1 714 805 WAVE (9283)
na@greenwavereality.com
About GreenWave
GreenWave Reality is a global innovator in the emerging
home energy m
anagement market. GreenWave Reality
use, standards
-based platform that allows utilities to
enhance their relationship
energy on the grid while consumers can conserve energy with a minimal
impact to their lifestyle by easily monitoring and controlling their appliances and adding intelligent LED lighting.
GreenWave Reality is led by a diverse team of proven leaders with glo
bal experience.
EUROPE
GreenWave Reality ApS.
Dr. Neergaardsvej 3
2970 Hørsholm
DENMARK
Tel. +45 6913 2333
eu@greenwavereality.com
ASIA
-
PACIFIC
41 Science Park Road
#01-01 The Gemini (Science Park II)
SINGAPORE 117610
Tel. +65 3157 1700
apac@greenwavereality.com
anagement market. GreenWave Reality
enhance their relationship
energy on the grid while consumers can conserve energy with a minimal
impact to their lifestyle by easily monitoring and controlling their appliances and adding intelligent LED lighting.
EUROPE
GreenWave Reality ApS.
Dr. Neergaardsvej 3
2970 Hørsholm
DENMARK
Tel. +45 6913 2333
eu@greenwavereality.com
11
Document Version
1.01
Model Numbers
RPS1005-PD62, RPS1015-PD62

12
Federal Communication Commission Interference Statement
This equipment has been tested and found to comply with the limits for a Class B digital device, pursuant to Part 15 of the FCC
Rules. These limits are designed to provide reasonable protection against harmful interference in a residential installation. This
equipment generates, uses and can radiate radio frequency energy and, if not installed and used in accordance with the
instructions, may cause harmful interference to radio communications. However, there is no guarantee that interference will not
occur in a particular installation. If this equipment does cause harmful interference to radio or television reception, which can be
determined by turning the equipment off and on, the user is encouraged to try to correct the interference by one of the following
measures:
• Reorient or relocate the receiving antenna.
• Increase the separation between the equipment and receiver.
• Connect the equipment into an outlet on a circuit different from that to which the receiver is connected.
• Consult the dealer or an experienced radio/TV technician for help.
FCC Caution: Any changes or modifications not expressly approved by the party responsible for compliance could void the
user's authority to operate this equipment.
This device complies with Part 15 of the FCC Rules. Operation is subject to the following two conditions: (1) This device may
not cause harmful interference, and (2) this device must accept any interference received, including interference that may
cause undesired operation.
IMPORTANT NOTE:
FCC Radiation Exposure Statement:
This equipment complies with FCC radiation exposure limits set forth for an uncontrolled environment. This equipment should
be installed and operated with minimum distance of 20cm between the radiator and your body.
This transmitter must not be co-located or operating in conjunction with any other antenna or transmitter.

13
Declaration(s) of Conformity
These CE Marked GreenWave Reality products incorporating Radio and Telecoms Terminal Equipment functionality are in
compliance with the essential requirements and other relevant provisions of Directive 1999/5/EC.
A copy of the original CE Declaration of Conformity is on file and available upon request for all CE Marked GreenWave Reality
products. Please visit www.greenwavereality.com to obtain a copy of the Declaration.
The use of such device might not be harmonized throughout EU and EFTA Member States. The Final Integrator of the product
shall check that the use of such devices for power node are allowed for placing on the market in any particular Member State.

www.greenwavereality.com
www.greenwavereality.com