Greenwave Reality d b a Greenwave Systems GUBW1J1 Lighting Gateway User Manual gwr user guide lighting bridge 2014 01 14 v1 1
Greenwave Systems Pte. Ltd. Lighting Gateway gwr user guide lighting bridge 2014 01 14 v1 1
User Manual.pdf


Connected Lighting User
Guide
With Lighting Gateway and Remote Control
Introduction
The GreenWave Reality Smart Home Platform helps create a smart, energy-efficient home by monitoring
and controlling your appliances, electronics, and lighting. You can conserve energy with minimal impact to
your lifestyle by using our products to easily manage your devices.
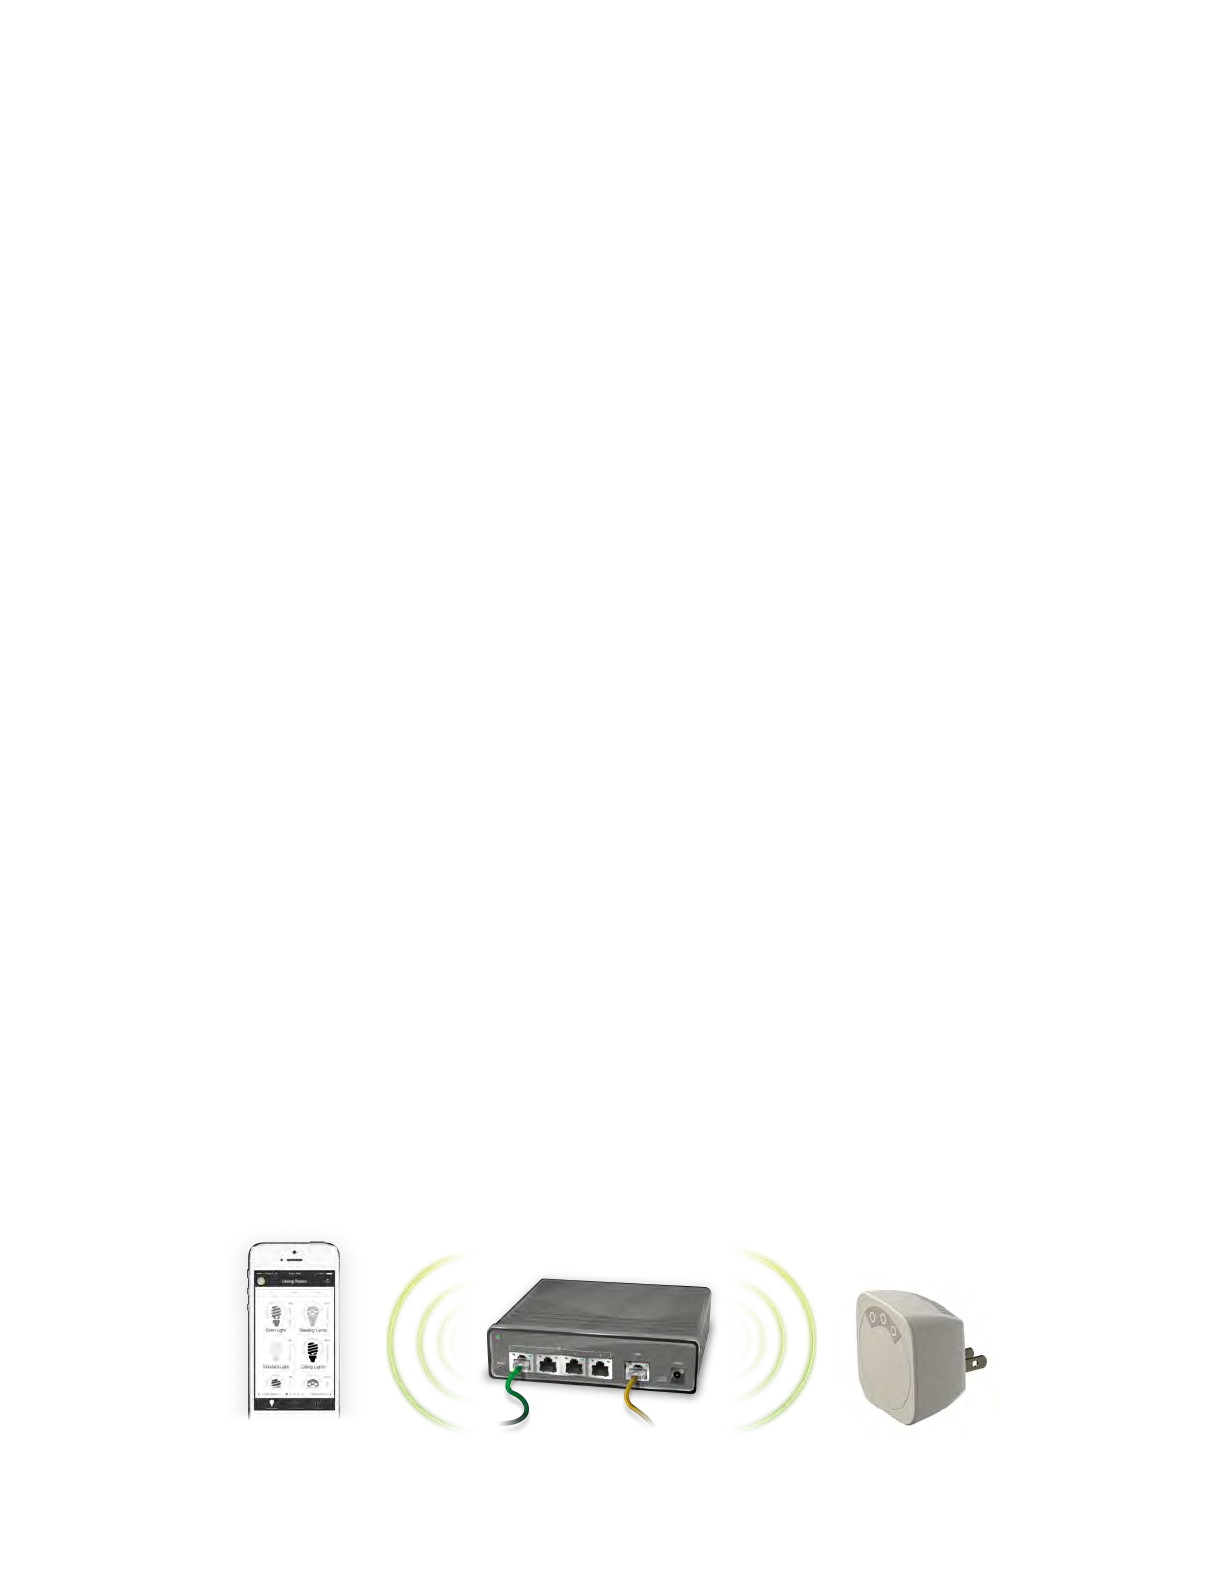
Simply connect the Gateway or Lighting Gateway to your home
network, plug your devices into our PowerNodes, connect your
network light bulbs, and then monitor and control the your
power usage through a smart device application.
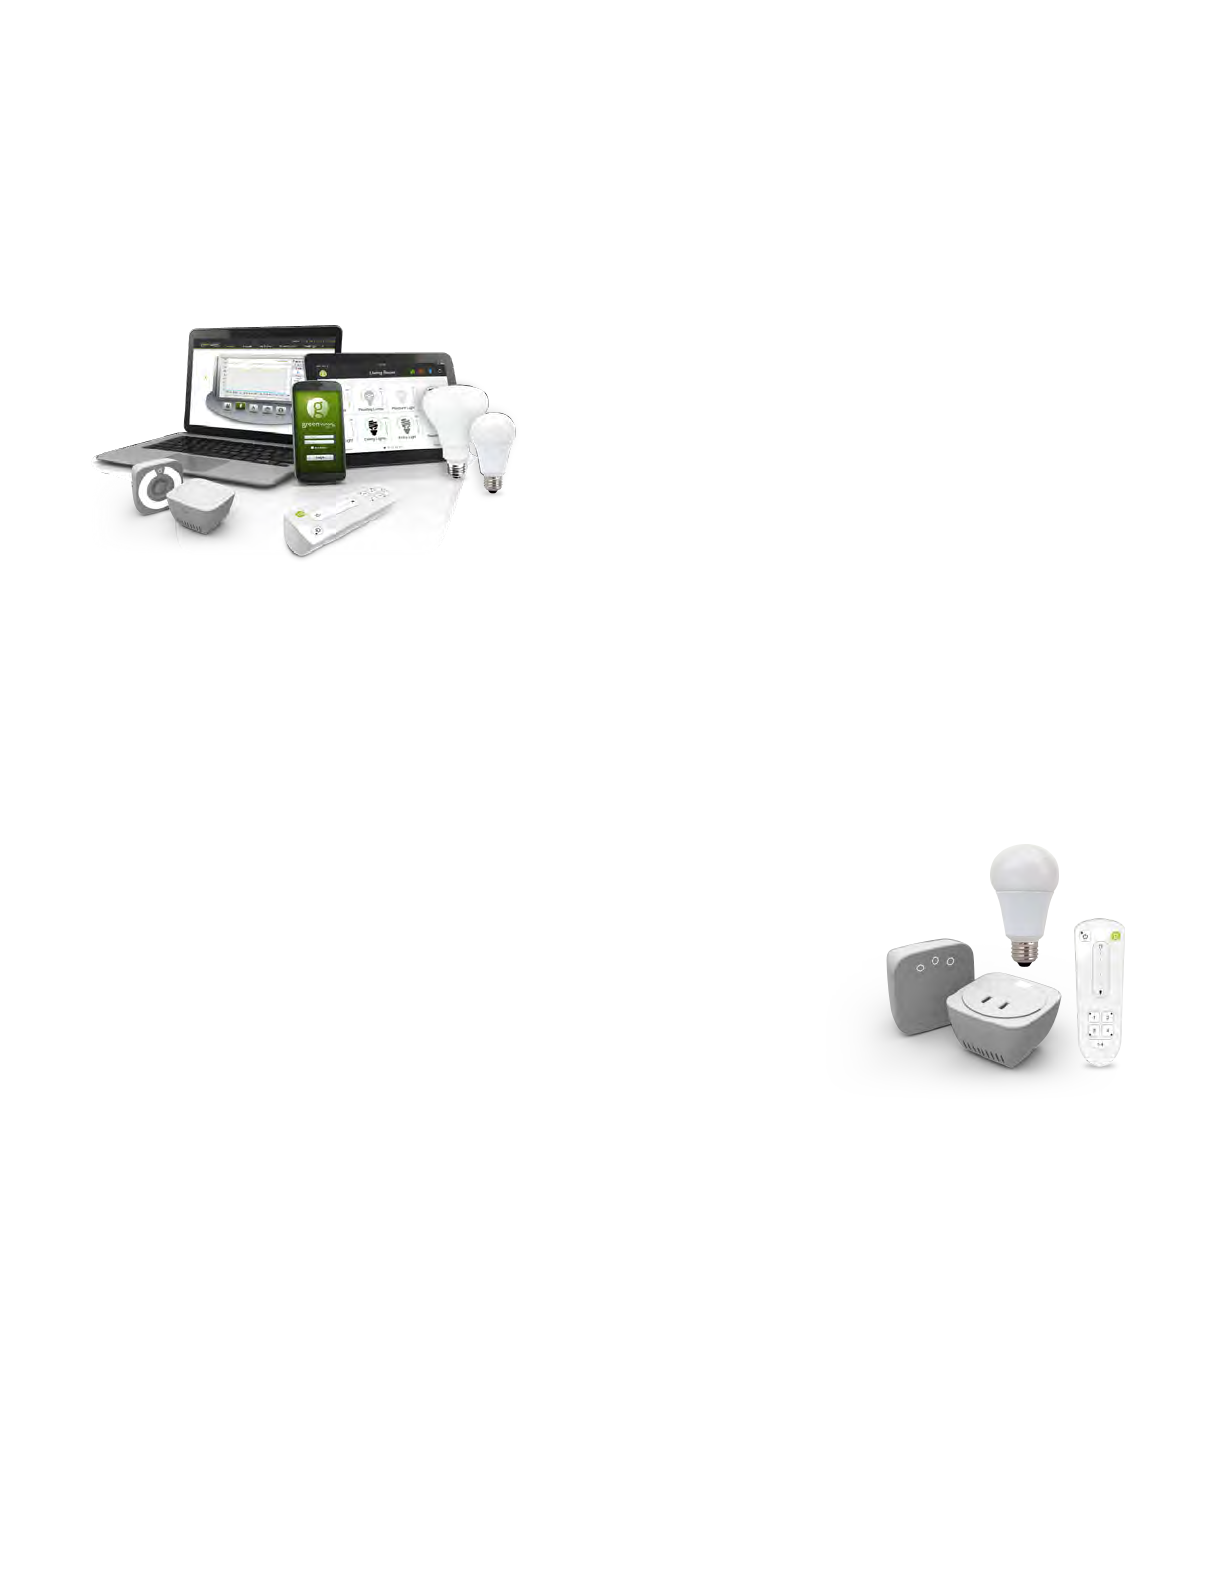
Connected Lighting Overview
The Connected Lighting kit includes a wireless smart lighting system that helps make the lighting in your
home more energy efficient and easier to manage wirelessly. The lighting solution consists of high-
quality, connected LED bulbs from our partners, a hand-held remote controller, and an optional Lighting
Gateway that allows for complete remote lighting control.
•The Energy Star connected LED or CFL light bulbs typically consume about 80% less energy
than an equivalent incandescent or halogen bulbs.
•The Lighting Remote can control four groups of bulbs and can turn lights on and off
or dim them with the touch of a finger. The remote can be used with or without the
Lighting Gateway.
•The Lighting Gateway is the hub that connects the smart bulbs to your
home network and manages powerful Smart Controls and remote
access to ensure your scheduled events get activated reliably.
•For added convenience and safety, the solution is light switch friendly,
meaning that existing wall switches will still turn the light on or off in all
circumstances.
Smart Device Requirements
To use a smart device, smart phone, tablet or tv to manage your Connected Lighting, your smart device
must meet the following minimum requirements. If not, you can still use your lighting kit with the remote
control.
•For Android devices:
oAndroid operating system 2.2 and above
Introduction
Connected Lighting User Guide | 1

oScreen resolution of 320 x 240 and above
•For Apple devices:
oiOS operating system 4.2.1 and above
Home Network Requirements
For the smart device application to manage your lighting locally within your home, your home network
must use a wireless router to which your smart device is connected.
There are no requirements for the type of wireless router, as long as your smart device and Lighting
Gateway are able to connect to it. For more information on connecting your smart device to your home
network, refer to your smart device’s documentation.
Product Specifications
Connected Lighting User Guide | 2
Components
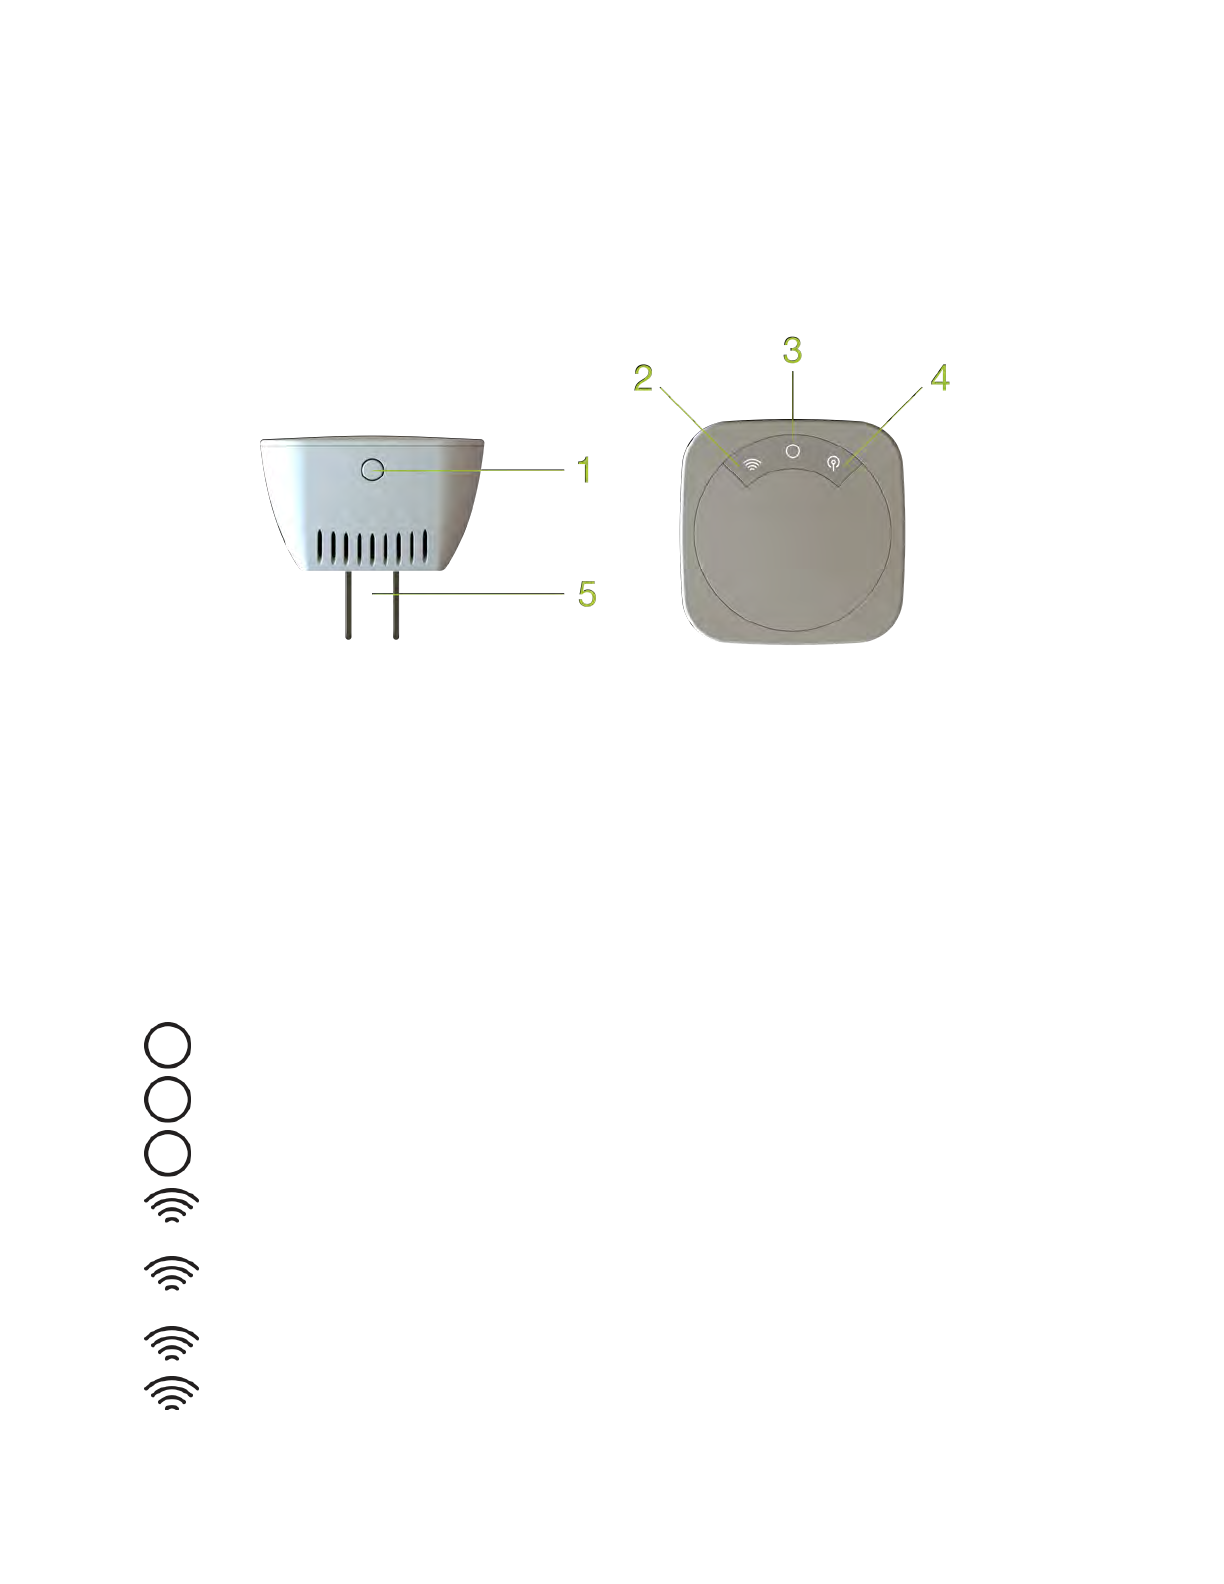
Lighting Gateway
1. WPS Button: Connect to home Wifi using WPS
2. Network Icon: indicates your Lighting Gateway is connected to the Wi-Fi network
3. Power Icon: indicates your Lighting Gateway is powered on.
4. Bulb Icon: indicates your light bulbs are connected to your Lighting Gateway.
5. AC Power Plug: plugs into a standard socket and connects your Connected Lighting to your Home
Network.
Activity Indicators
Your Lighting Gateway has power, network, and bulb indicators that show current status:
Power indicator—off (no color): Lighting Gateway is powered off.
Power indicator—white: Lighting Gateway is powered on.
Power indicator — white fading: Lighting Gateway is starting Wi-Fi connection.
Network indicator—off (no color): The Gateway is connected to your home network.
Network indicator—red: The Gateway is not connected to your home network. Check
that the Ethernet cable is plugged into the Gateway and your network router or modem.
Refer to the Installation and Setup chapter for more more information.
Network indicator—off (no color): Lighting Gateway is connected to the Wi-Fi
network.
Network indicator—flashing white: The Wi-Fi connection is not configured.
Product Specifications
Connected Lighting User Guide | 3
Network indicator—solid white for 5 seconds: Lighting Gateway has successfully
connected to your Wi-Fi network.
Network indicator—solid red for 5 seconds: Lighting Gateway failed to connected to
your Wi-Fi network. If no network is found for two consectutive minutes, the process
times out.
Network indicator—red: Lighting Gateway is not connected to the Internet. If your
network indicator is also red, then the problem may be with the Gateway’s connection to
your network router or modem (refer to the network indicator information above).
Otherwise, check that your network router or modem has an active Internet connection.
Bulb indicator—off (no color): Light bulbs are connected to your home network.
Bulb indicator—flashing white: Light bulbs are searching a connection to your home
network.
Indicators —flashing white in sync: Lighting Gateway software is updating. The
indicators flash white in order. commissioning mode to connect with network light bulbs.
The commissioning process continues until all light bulbs and devices searching for the
network have been found. If no devices are found for two consecutive mintues, the
commissioning process will time out.
Indicators —flashing white for 5 seconds in sync: The lighting kit was successfully
reset to the factory settings.
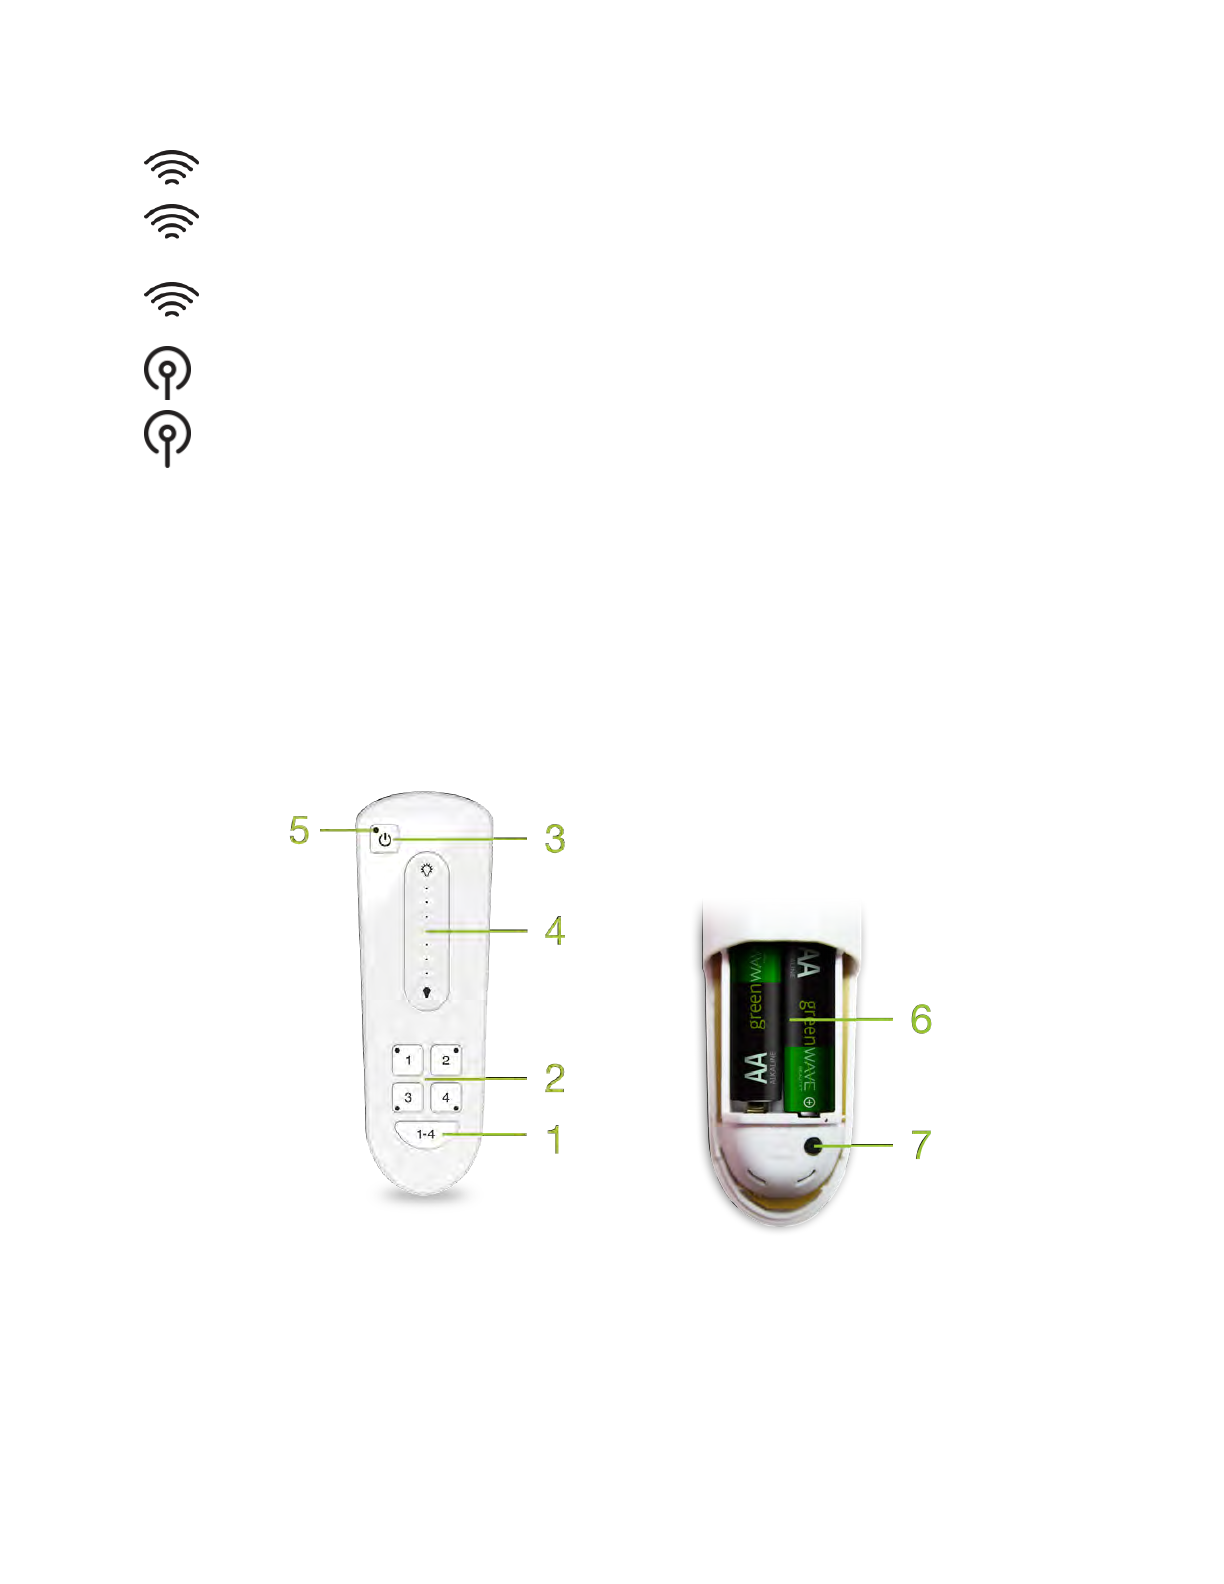
Remote Control
1. 1-4 button: selects all lighting groups to turn on, turn off, dim, or brighten.
2. Group number button: selects the specific lighting group to turn on, turn off, dim, or brighten
as well as programs the lights in the corresponding group. An indicator light above each
number indicates the group number currently being used.
Product Specifications
Connected Lighting User Guide | 4

3. On/Off button: turns on or off the lights in the selected lighting groups. Lights turn on to the
previous dimming level.
4. Dimmer control: dims or brightens the lights in the selected lighting groups.
5. Primary status indicator: lights or flashes during different activities with the remote control.
6. Battery compartment: holds 2 AA batteries to power the remote control.
7. Program button: initiate programming of lighting groups and other remote control
programming functions. The button is located inside battery compartment.
Product Specifications
Connected Lighting User Guide | 5
Remote Control Indicators
The remote control has four group number indicator lights and one primary status indicator.
Process
Indication and Description
Initial Remote Control Setup
Primary indicator flashes steadily:
During the process of installing batteries for the first time, the
remote control is determining the best signal for your lighting
system.
Working with One Lighting
Group
Group number indicator turns on, and primary indicator
remains off:
The corresponding lighting group is selected, and its last state was
off.
Group number indicator and primary indicator turn on:
The corresponding lighting group is selected, and its last state was
on or dimmed. .
Working with All Lighting Groups
All group number indicators turn on, and primary indicator
remains off: All lighting groups are selected, and their last state
was off.
All group number indicators and primary indicator turn on: All
lighting groups have been selected, and their last state was on or
were dimmed.
Product Specifications
Connected Lighting User Guide | 6

Installation and Setup
Before you install your Connected Lighting, make sure that your home network router is operating and
connected to the internet.
Installation Tips
Review the safety information. Be sure to review the information contained in the Safety Information
chapter.
Keep radio signals clear. Your Lighting Gateway and network lighting have antennas built-in for radio
communication with Internet services and other devices on your energy management system. Just as you
might experience reception problems on your mobile phone inside a building, your Lighting Gateway can
have trouble communicating with the network lighting if their radio signals are blocked by obstacles such
as large metal panels or walls containing wire mesh. When placing these devices in your home, imagine
invisible lines connecting between them. Try to keep these lines clear from obstruction as much as
possible. Also place your Lighting Gateway at least 5 feet (1.5 meters) above floor level to promote
reception.
Several factors could affect radio signal strength between a network light bulb and the Lighting Gateway:
•If the Lighting Gateway is too close to a wireless router, the radio signals from the router could
interfere with the signals the Gateway is processing from the network light bulb. However, the
network light bulb itself does not typically have problems when used close to wireless routers.
•If the Lighting Gateway is behind a metal object, the radio signals could be blocked.
•If a network light bulb is placed a significant distance or through several walls from the Lighting
Gateway or other network light bulb, the radio signals could lose strength.
•If the non-visible construction of a wall contains such things as large metal panels or wire mesh,
the walls could block the radio signal between the network lighting and Lighting Gateway. This
may apply to an entire wall or only specific areas of a wall.
Install Lighting Kit
You will walk through the following steps to install your lighting kit:
•Step 1: Reset Existing Network Light Bulbs Option
•Step 2: Install the Lighting Gateway
•Step 3: Download and Install the Smart Device Application
•Step 4: Set up Lighting Gateway
•Step 5: Set up Account
•Step 6: Install Light Bulb on Network
Product Specifications
Connected Lighting User Guide | 7
•Step 7: Set up Light Bulbs in Application
•Step 8: Set up Remote Control Option
Step 1: Reset Existing Network Light Bulbs Option
If you are resetting existing network light bulbs to work with your new lighting kit, you must follow the
following steps. If not, you can skip this step.
Use your original remote control that was supplied with your existing light bulbs. If the original remote
is not available, refer to the Remote Control chapter for additional details.
Perform these steps:
1. Make sure power to the fixtures containing the light bulbs you want to reset is turned ON.
2. Remove the battery cover from the back of the original remote control. This allows access to
the Program button.
3. On the remote control, press and hold the Program button while completing the following
steps.
a. Press and release the On/Off button.
b. Press and release the 1-4 button.
c. Press and release the On/Off button again.
4. Release the Program button.
All group number indicator lights and primary indicator light flash slowly for 30 seconds.
When the light bulbs are removed, they brighten and dim at which time you can add them to
your new network.
Step 2: Install the Lighting Gateway
Since the Lighting Gateway connects to your home network router, make sure you have space near
your router where you can plug in the Lighting Gateway.
Perform the following steps:
5. Make sure your router is already connected to your home network.
6. Power the Lighting Gateway by plugging it into an electrical wall outlet or power strip.
Product Specifications
Connected Lighting User Guide | 8

7. Verify that the Lighting Gateway is connected by checking the power indicator light is white.
Step 3: Download and Install the Smart Device Application
The smart device application installs like other applications you may already have.
To download the app:
8. At the application download site for your device, search for TCP Lighting. Download and
install the app.
9. Make sure your smart device is connected to and in range of your wireless router, and then
start the application on your smart device.
When the application starts, it automatically searches for your Lighting Gateway through your
wireless router and automatically connects to the associated lighting network.
Note: For future connections, if your smart device does not find a local Lighting Gateway, it will try to access your
Lighting Gateway remotely using the mobile data connection.
Step 4: Set up Lighting Gateway
The Lighting Gateway automatically scans and connects to your Wi-Fi network. You just need to confirm
the connection.
Perform the following steps:
10. Tap the Settings menu for the smart device application. The Account Information page
opens.
11. In the Username field, enter your email address, then tap OK.
12. Enter your password, then tap OK. A message opens when your account is created
successfully.
13. In the URL field, verify the URL,
14. Slide the Gateway Discovery field to ON. The Smart Device application automatically
discovers your Lighting Gateway.
15. Follow the instructions on your smart device to complete the setup.
Product Specifications
Connected Lighting User Guide | 9

16. If the Lighting Gateway is not found, scan for Wi-Fi networks on your smart device, as you
normally would.
In the list of networks that display, select the Lighting Gateway.
Enter the password to connect.
Step 5: Set up Account
You must first set up an online account to access your lighting kit remotely. You must remain
connected locally to your lighting network when you create your account.
To set up your account:
17. Tap the Settings menu at the bottom of the page. The Settings page opens.
18. Tap Setup Remote Access. The Account Setup page opens.
19. In the Username field, enter your email address, then tap OK.
20. Enter your password, then tap OK. A message opens when your account is created
successfully.
21. Tap OK to close the message. If an error should occur, a message opens to guide you
through correcting the issue.
When your account is created, we automatically send you an email to confirm your new
account and email address.
22. Follow the instructions in the confirmation email for your account to be activated.
Step 6: Install Light Bulbs on Network
The light bulbs in your lighting kit already come pre-connected to the Lighting Gateway; however, you
must still install the light bulbs. This allows the Lighting Gateway to locate them on the network.
Before installing the light bulbs, determine the appropriate locations in your home for installing them.
Perform the following steps:
23. Turn power OFF to the light fixtures where you are installing the network light bulbs.
24. Remove any existing standard light bulbs from the light fixtures.
25. Install each network light bulb into the light fixtures as you would any standard light bulb.
26. Turn power on to the light fixtures.
If you are installing only light bulbs that came with your kit, you can skip this step. However, if
you are also installing light bulbs that did not come with your kit, then you must connect them
to your Lighting Gateway:
•When you turn power on, the light bulbs brighten and dim while attempting to connect wirelessly
to your Lighting Gateway.
•When the light bulbs connected to your Lighting Gateway, they turn on to full brightness.
Product Specifications
Connected Lighting User Guide | 10
•The Lighting Gateway automatically stops the search process in two minutes after finding the
most recent light bulb.
27. If a light fixture has a dimmer control (not recommended), set the dimmer level to full
brightness.
28. Leave the light fixture switches ON so that power is available to the light bulbs.
Step 7: Set up Light Bulbs in Application
With your light bulbs, Lighting Gateway, and application installed, you can use your smart device to
set up the lights on your network:
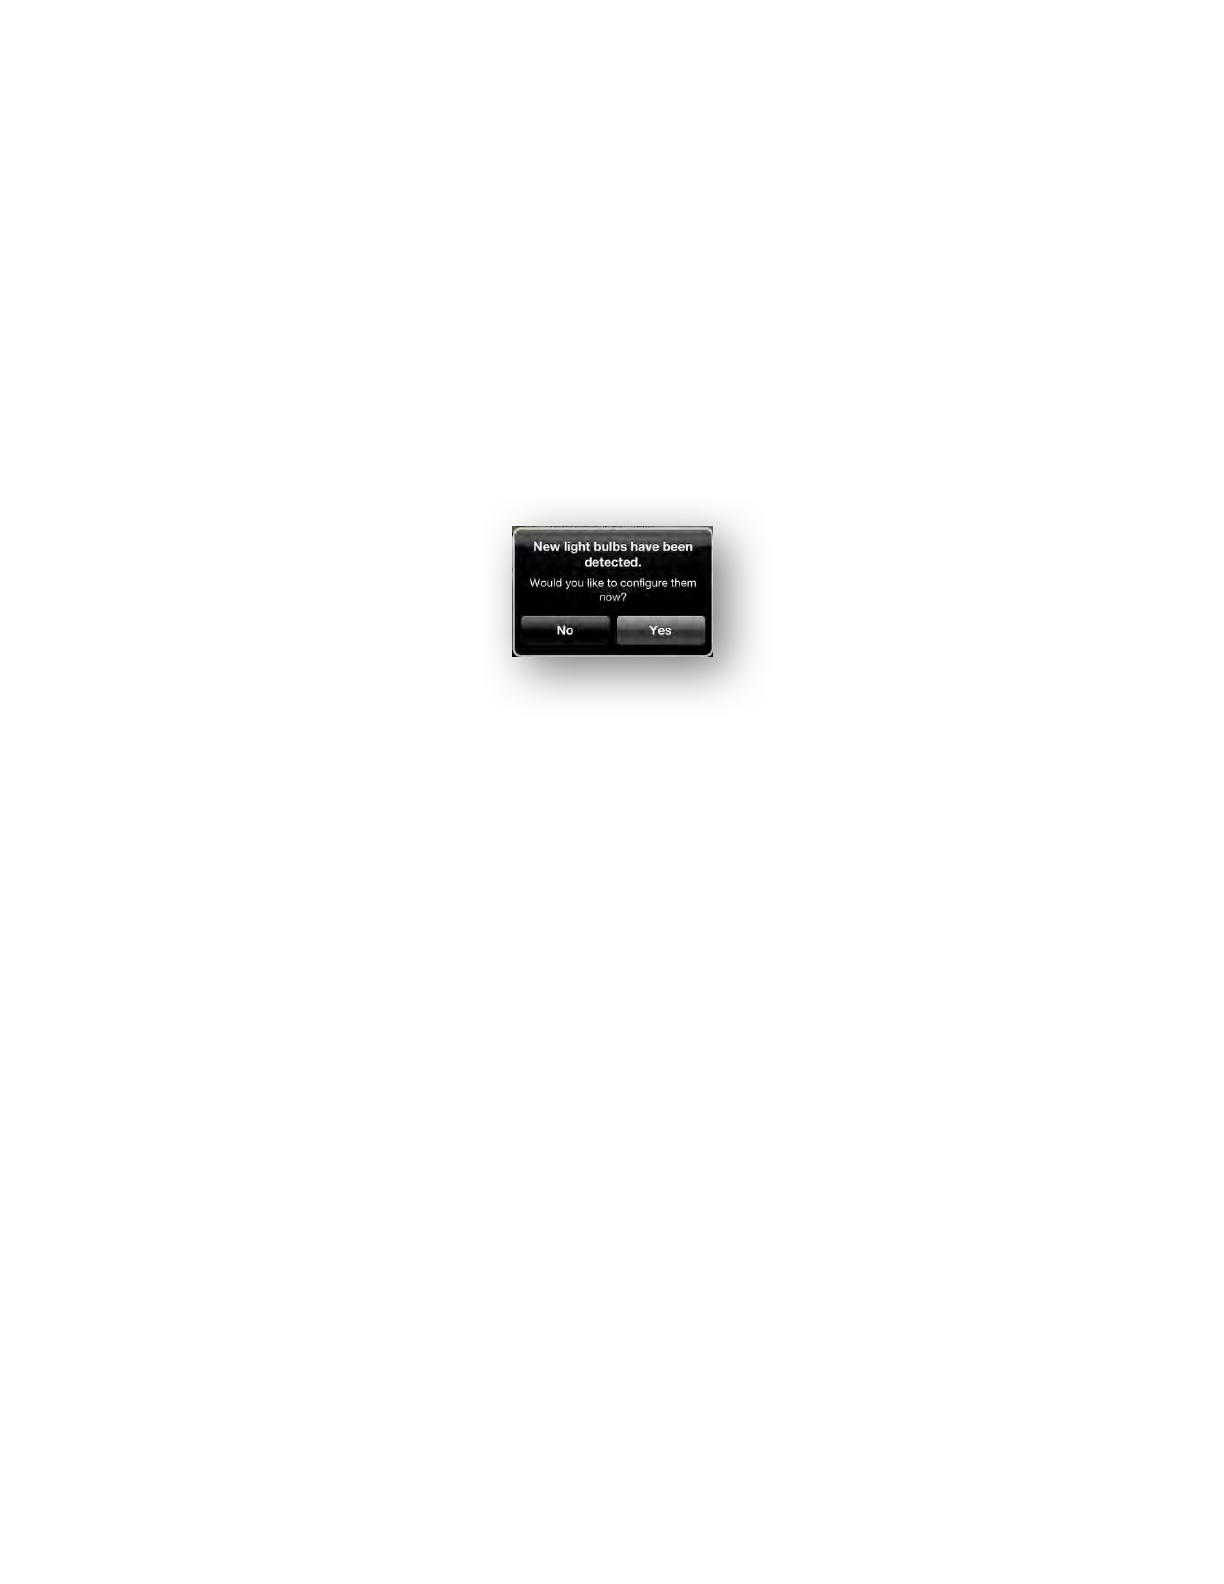
29. Open the application on your smart device. The application automatically finds the light bulbs
connected to the Lighting Gateway and prompts you to set them up:
30. Tap Yes. Your smart device then walks you through setting up each new light bulb.
Look for the light bulb that is dimming and fading. This is the light bulb you are currently
configuring on your smart device.
31. Follow the setup wizard through specifying a name light, assigning a room for the light, and
selecting an icon or taking a picture of the light to help identify the light.
32. Repeat these steps for each flashing light bulb.
Note: If you skip setting up light bulbs during installation, the light bulbs are automatically grouped under the black
room color. You can update the light bulb settings any time using the information in the Smart Device Application
chapter.
Step 8: Prepare the Remote Control Optional
If you will be using the remote control with your lighting network, then you must first prepare it for use.
For additional information on using the remote control, refer to the Remote Control chapter.
Perform these steps:
33. Remove the battery compartment cover from the back of the remote control.
34. Insert two AA alkaline batteries (included).
The first time you insert batteries, the primary indicator light flashes while the remote control
determines the best signal for your lighting system. The indicator light remains on for
approximately five seconds. When the indicator light turns off, your remote control is ready.
Congratulations! You have now installed and configured your Connected Lighting system. Now you can
schedule and manage your lighting system using Smart Controls and remote control.
Product Specifications
Connected Lighting User Guide | 11

Smart Device Application
The smart device application makes working with your Connected Lighting easy by allowing you to use
your smartphone, tablet, iPod touch, or TV to set up, manage, and control your lights. You can configure
lights into rooms and lighting groups, turn lights on and off, set up Smart Controls to automatically control
lights, and much more.
Network Connection
When you start the smart device application, it automatically searches for your Lighting Gateway through
your wireless router and connects to the lighting network.
If your smart device does not find a local Lighting Gateway, it tries to access your Lighting Gateway
remotely. For your smart device to connect remotely, you must have an online account and your Lighting
Gateway must be connected to the Internet through your router.
Note: This connection process applies to any local network and Lighting Gateway in range of your smart device. For
example, if you are at a friend’s home and they have a similar lighting kit set up, your smart device application will
connect to their lighting Gateway if you are connected to their local network through their wireless router (which
means your friend would have given you access to log in to their home network). To access your own network
remotely, you would have to log out of the application and then log in again using your online account information.
Lights and Fixtures
You can control your lighting network from your smart device by accessing the Lights and Fixtures page.
This page shows all of your light bulbs and fixtures available on your lighting network, sorted by rooms
and room colors.
Product Specifications
Connected Lighting User Guide | 12
Smart Controls
Smart Controls allow you to set up user-defined schedules and other controls for automatically turning
your lighting on or off. For example, you can set up a Smart Control schedule that automatically turns on
selected lights at sunset and then turns them back off at midnight. Smart Controls can control one or
more light bulbs, light fixtures, or entire rooms.
Keep in mind that activating a Smart Control is a different action than turning on lights. A Smart Control
could be set up to turn lights on, turn lights off, or a combination of both.
You can activate, create, and edit Smart Controls on the Smart Control page. This page includes default
Smart Controls as well as your own custom Smart Controls.
Product Specifications
Connected Lighting User Guide | 13
Light bulb dimmer
Drag left to dim or drag right to
brighten light bulb.
Room and room
color
Swipe screen left or right to
navigate rooms.
Light bulb/xture
control
Tap to turn light bulb/fixture on or off.
Light turns on to the most recent
dimmer setting. Swipe screen up and
down to access all light bulbs/fixtures
if the room contains more than can fit
on one page.
Room dimmer
Tap to open dimmer control to dim or
brighten all lights in room.
My Lights menu
Tap to access this page.
Room on/off
Tap corresponding button to turn
on or off all lights in the room.
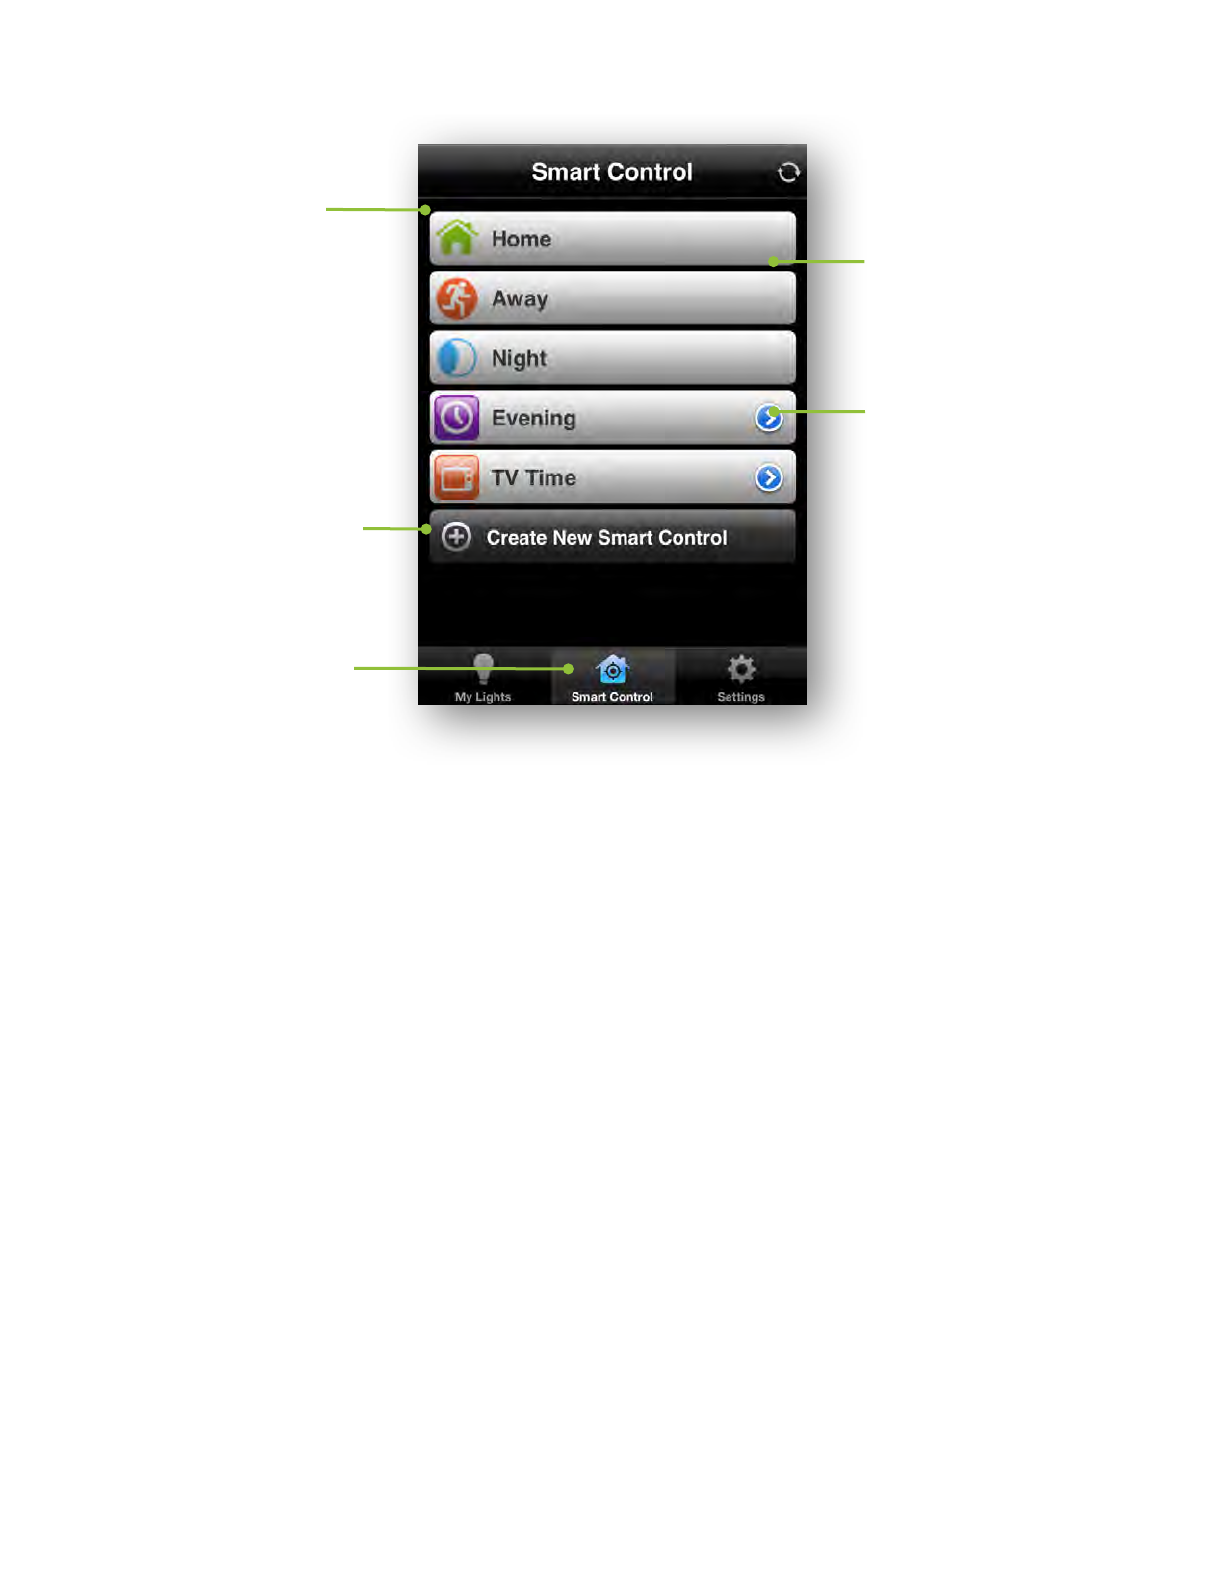
Default Smart Controls
The Smart Control page includes a set of default Smart Controls that come preconfigured within the
application:
•Home - typically used when people return home after being away.
This Smart Control turns on any light, along with their most recent dimmer level, that was
previously on when the Away Smart Control was activated. For example, when everyone left the
house.
•Away - typically used when everyone leaves the house. For example, when going to school or
work for the day.
This Smart Control saves the current state of the lights on your network (whether they are on or
off and what dimmer level they might be at) and then turns off all lights. Saving the current state
of your lights to make it easier for you when you return home and activate the Home Smart
Control.
•Night - typically used when everyone goes to bed for the night.
This Smart Control turns off all lights on your network. Unlike the Away Smart Control, the Night
Smart Control does not remember the state of your lights before turning them off.
Custom Smart Controls
In addition to the default Smart Controls, you can create your own custom Smart Controls. There are two
types of custom Smart Controls:
Product Specifications
Connected Lighting User Guide | 14
Smart Control menu
Tap to access this page.
Default Smart
Controls
Home, Away, and Night are
default Smart Controls that
come preconfigured.
Custom Smart
Controls
Swipe the arrow to edit the
settings of a custom Smart
Control or to access the delete
feature to remove the custom
Smart Control.
Smart Control list
Tap to activate the corresponding
Smart Control.
Create Smart Control
Tap to start wizard to create your
own custom Smart Control.

•Schedule - allows you to automatically turn on and off lights based on the day and time. For
example, you could use this Smart Control to have selected lights automatically turn on at sunset
and turn off at midnight.
• Lighting scene - allows you to set up combinations of lights to turn on and off. For example, you
could use this Smart Control to activate the Smart Control to turn on lights in some rooms while
turning off lights in other rooms.
To create a custom Smart Control:
35. Tap the Smart Control menu at the bottom of the page. The Smart Control page opens.
36. Tap Create New Smart Control. A setup wizard guides you through setting up your Smart
Control.
37. On the first page of the wizard, tap Choose Name to type a name for your new Smart
Control, and tap Choose Icon to select an icon to associate with it. To continue, tap Next.
38. In the Rooms & Devices page, tap to select the rooms, lights, and/or fixtures you want to
turn on or off with this Smart Control, and then tap Next.
39. Select the on/off and dimming level for your rooms and devices by tapping the light icon and
dragging the slider control to set dimmer level when light turns on.
To continue, tap Save. The Make Schedule pop-up displays.
40. To create a lighting Schedule Smart Control, tap Yes.
41. Select the time and days of the week when you this Smart Control occurs.
The options for setting this time are:
•Sunrise/Sunset activates the Smart Control at sunrise or sunset, depending on
which you select. By using this option the actual activation time will automatically
change as the time of sunrise and sunset changes throughout the year.
•Set Time activates the Smart Control at the exact time of day you specify.
42. To select the days the Smart Control runs, tap the specific days in the Days of the week
section. After the days and times are set, tap Save.
The Smart Control is activated.
Product Specifications
Connected Lighting User Guide | 15
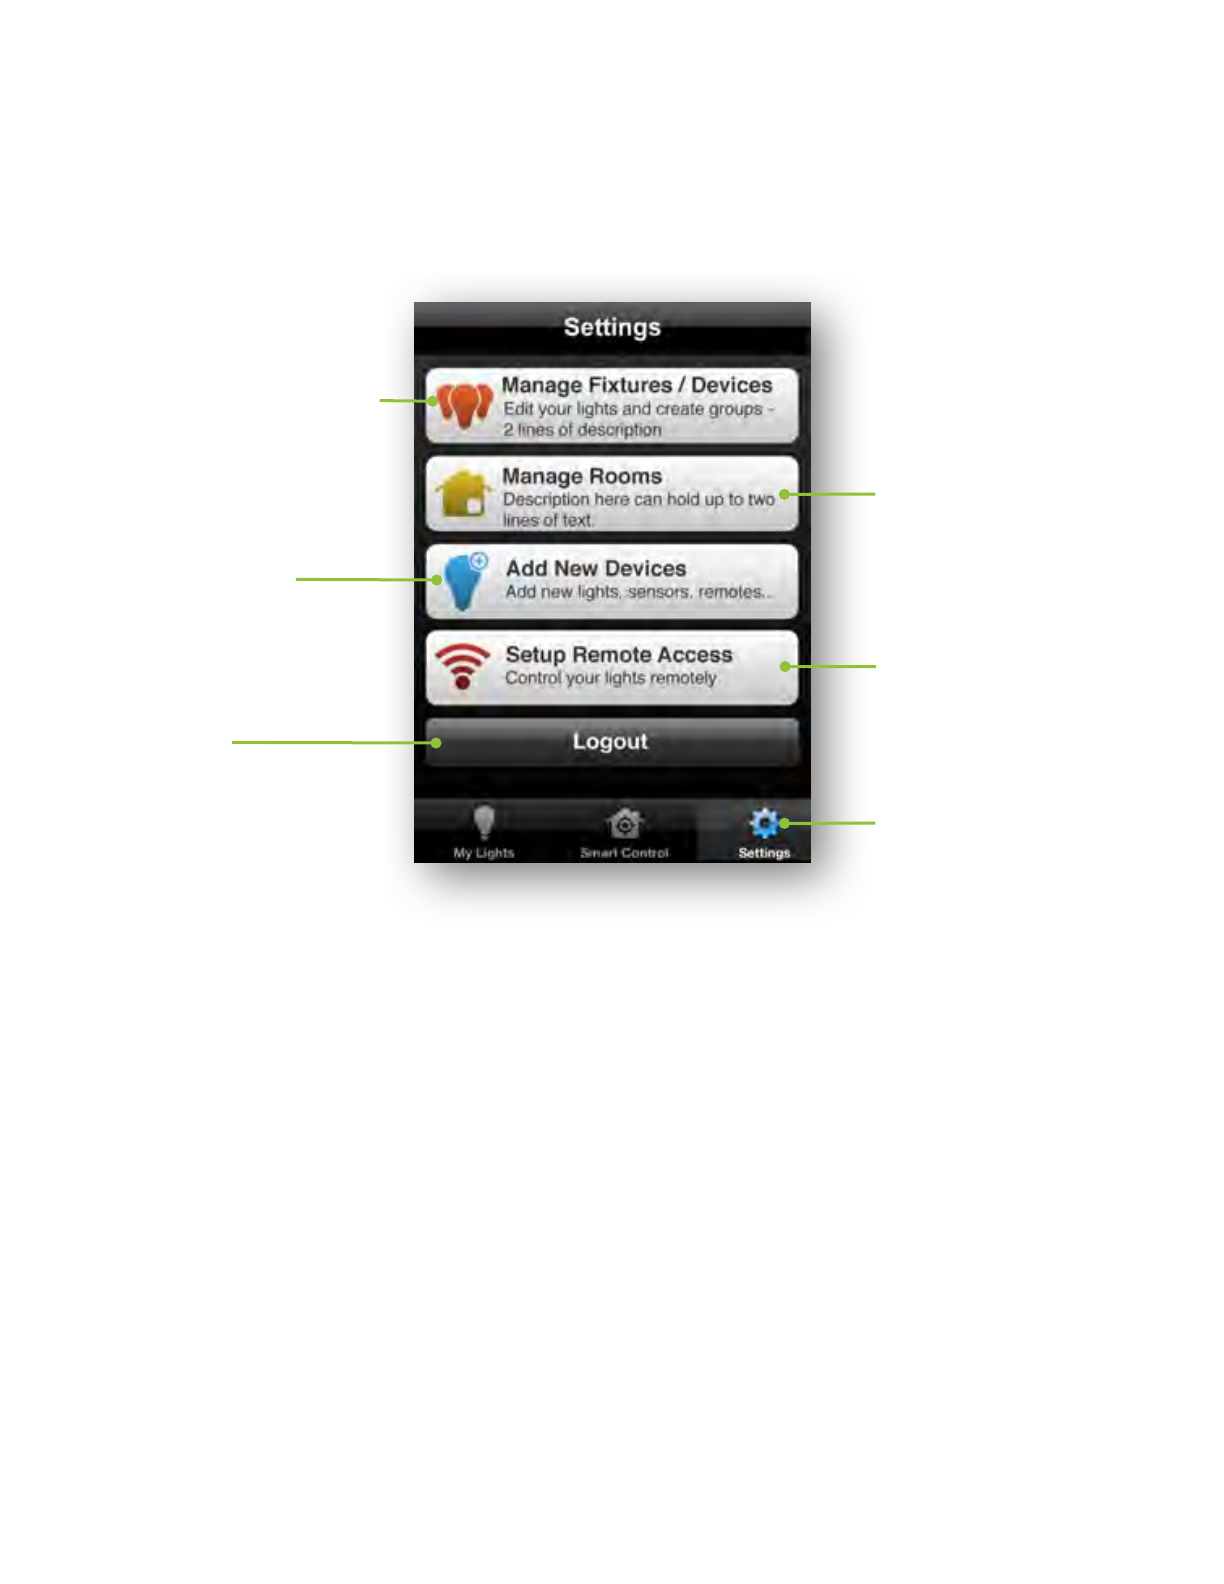
Settings
The Settings page allows you to edit lights, create fixtures, manage rooms, and add new light bulbs. You
can also set up your online account for remote access to your lighting network or to log out of the
application.
Managing Rooms
Creating a New Room
You can create rooms to represent the physical rooms in your home and group their corresponding lights.
To create a room:
43. Tap the Settings menu at the bottom of the page. The Settings page opens.
44. Tap Manage Rooms. The Manage Rooms page opens.
45. Tap Create New Room.
46. On the Create New Room page:
Tap Enter Room Name to type a name for your new room.
Tap Edit Color to select a color to represent the room.
Under Lights, select the lights and fixtures located in the room you are creating, or tap Add
More Lights if you added new light bulbs that have not yet been assigned to a room.
47. When you finished setting the room properties, tap Save.
Product Specifications
Connected Lighting User Guide | 16
Settings menu
Tap to access this page.
Set up remote
access
Tap to set up your online
account to access your lighting
network remotely
Manage rooms
Tap to perform such tasks as
create a new room, rename a
room, change a room color, and
organize lights into a room.
Your lights and xtures
Tap to view the list of all lights and
fixtures on your network, create a
new fixture, or edit settings for a light
or fixture.
Add new lights
Tap if you have added a new light
bulb to your network and need to
have the application connect it to the
Gateway.
Log out
Tap to log out of the application.
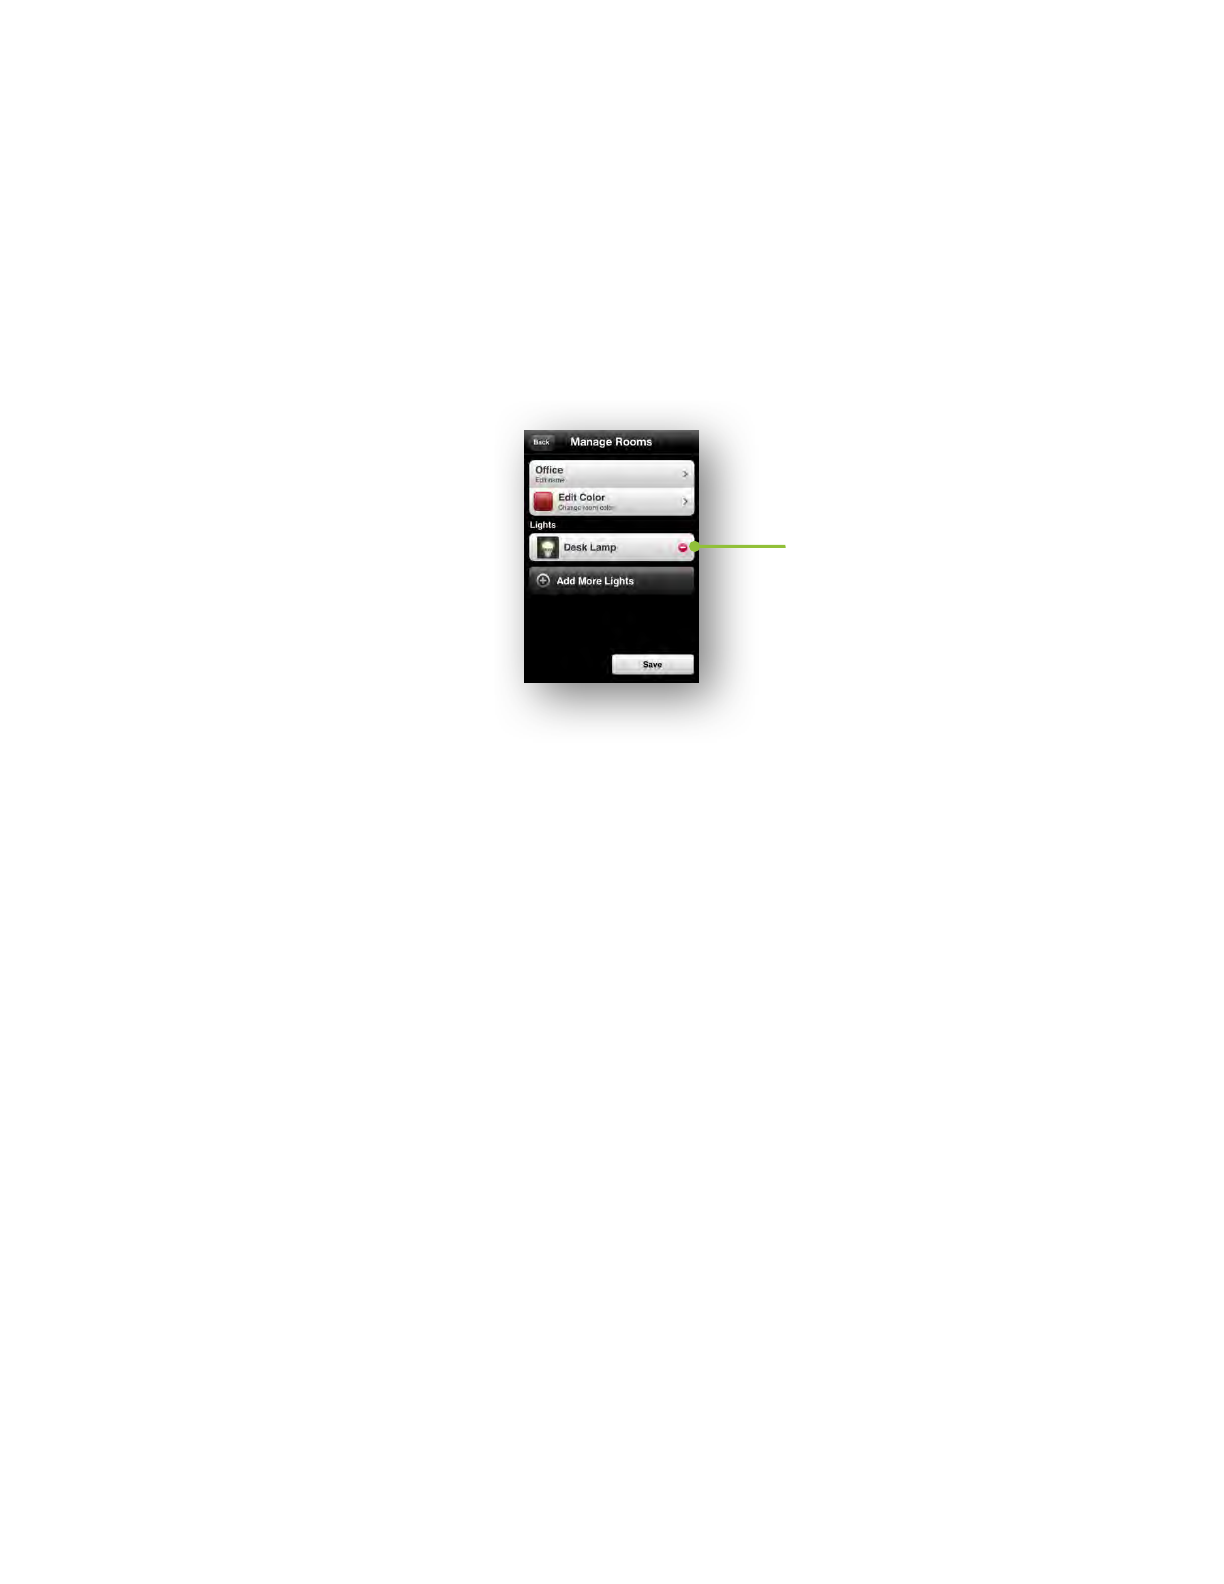
Editing a Room
To edit a room, including the lights and fixtures assigned to the room:
48. Tap the Settings menu at the bottom of the page. The Settings page opens.
49. Tap Manage Rooms. The Manage Rooms page opens.
50. Tap the room you want to edit. The room page opens.
51. Tap any item, such as room name or color, and make your changes.
52. To remove a light or fixture from the room, click that light’s or fixture’s removal icon:
53. To add a light or fixture to the room, tap Add More Lights.
54. When you are finished with your edits, tap Save.
About the Black Room Color
When new light bulbs are added to your network, they initially are assigned by default to the black room
color as an unknown room. Typically, during the setup wizard for a new light bulb, you assign a specific
room and room color for the new bulb.
However, if you skip the setup wizard process, the light bulb remains grouped under the black room color.
You can move a light bulb to a different room and room color at any time.
Managing Lighting Groups
You can organize your light bulbs into lighting groups so that you can control groups of them together
through your remote control.
To add or remove a light bulb from a lighting group:
1. Tap the Settings menu at the bottom of the page. The Settings page opens.
2. Tap Your Lights & Fixtures.
3. Tap the light bulb you want to add or remove from a lighting group. The Light page opens
and the selected light begins to dim and brighten to help you physically identify it.
4. Tap Choose Lighting Group.
Product Specifications
Connected Lighting User Guide | 17
Removal icon
Tap to remove the light or fixture from
room.
5. When the Lighting Groups page opens, tap the lighting group numbers to add or remove
the light bulb from those lighting groups. The light bulb belongs to a lighting group when the
number is shaded. This number corresponds to the group number on your remote control.
You can add the light bulb to as many as all four lighting groups.
Managing Lights and Fixtures
Adding Light Bulbs to Your Network
If you add a new light bulb to your network, you must connect to and set up that light bulb. For additional
information, refer to the user guide that was included with your device.
Creating a Fixture
You can set up any grouping of light bulbs to operate as one multi-socket light fixture. Typically you would
use this feature to set up an actual multi-socket light fixture.
However, you could also use it in cases where you have multiple lights that you want to behave as a
multi-socket light fixture. For example, you might have two separate desk lamps that you want to control
together. You could create a fixture that includes both of them and control them together as if they were
part of one light fixture. Then you could perform tasks on that fixture, such as turn it on or off, dim or
brighten the lights, or create a Smart Control that controls it.
To create a fixture:
55. Tap the Settings menu at the bottom of the page. The Settings page opens.
56. Tap Your Lights & Fixtures.
57. Tap Create New Fixture.
58. On the Fixture page:
a. Tap Choose Name to type a name for your new fixture.
b. Tap Choose Room to select or create the room where your fixture will be located.
c. Tap Do you have a remote? to configure your remove to control the lights.
Product Specifications
Connected Lighting User Guide | 18
Unselected Lighting
Group
The light bulb does not belong to a
lighting group if the number is not
shaded.
Selected Lighting
Group
The light bulb belongs to a lighting
group if the number is shaded. The
number corresponds to the group
number on your remote control.

d. Tap Select Additional Bulb to add each of the light bulbs you want to include in
the fixture.
59. When you finished setting the fixture properties, tap Save.
Editing a Light or Fixture
Before starting this procedure, make sure the light or fixture you are editing is powered on.
To edit a light or fixture on your network:
60. Tap the Settings menu, then tap Your Lights & Fixtures.
61. On the Lights & Fixtures page, tap the light or fixture you want to edit.
The Light/Fixture page opens. The selected light or fixture begins to dim and brighten to
help you physically identify it.
62. Tap any of the items, such as name, room, or remote, that you want to edit and make your
changes.
63. When you are finished with your edits, tap Save.
Removing a Light or Fixture from Your Network
Before starting this procedure, make sure the light or fixture you are removing is powered on.
To remove a light or fixture from your network:
64. Tap the Settings menu, then tap Your Lights & Fixtures.
65. On the Lights & Fixtures page, tap the light or fixture you want to remove.
The Light/Fixture page opens. The selected light or fixture begins to dim and brighten to
help you physically identify it.
66. Tap the Delete button.
67. When prompted, confirm that you want to delete the light or fixture.
Removing a Light Bulb Manually
If your smart device is not available, you can remove a light bulb from the network by turning power to the
light fixture off and on three times consecutively to reset the light bulb.
During this process, leave the power off for at least two seconds and then on for one to two seconds.
After the third cycle, leave the power on. When the light bulb has been removed from the network, it
brightens and dims continually.
Remote Access
You can access your lighting network remotely using your online account. When you start the application,
it automatically tries to find a Lighting Gateway on any network to which you may be connected.
Product Specifications
Connected Lighting User Guide | 19

If the application does not find a Lighting Gateway, it opens a login page for you to enter your user name
or email address and password. Once logged in, you can manage your lighting network the same way as
if you were connected locally.
If your application does find a Lighting Gateway, it connects to the lighting network attached to that
Lighting Gateway. For example, if you are at a friend’s home and they have a similar lighting kit set up,
your application will connect to their lighting Gateway if your friend gave you access to log in to their
home network. You would connect to their local network through their wireless router.
To access your own network remotely, you would have to log off of the application and then log in again
using your online account information.
To do so:
68. When you start the application, tap the Settings menu at the bottom of the page.
69. On the Settings page, tap Log Out. The application logs you off of the current network and
opens the login page for you to log in to your own account.
70. On the login page enter your user name or email address and password, and then tap
Login.
71. Manage your lighting network as if you were connected locally.
Forgotten Password
If you forget your password, you can reset it:
72. Access the login page.
73. Tap Login without entering your user information. When your login attempt fails, the Reset
Password page opens.
74. Type the email address associated with your account. This is the same as your user name.
Tap OK. A confirmation email is sent to your email address.
75. When you receive the confirmation email, click the link to approve the password reset and
specify a new password.
Product Specifications
Connected Lighting User Guide | 20

Remote Control
You can use the remote control to control your lighting. This chapter provides general concepts about
your remote control, steps for setting up your remote control for use, and steps for general remote control
operation.
Note: Some tasks in this chapter require pressing the Program button, which is located inside the battery
compartment on the back of the remote control. Be sure to press this button only as directed in the instructions.
Pressing it an additional time during remote control programming mode immediately cancels the current operation.
General Remote Control Concepts
While you will probably use your smart device to control your lighting most of the time, there may be times
when it is more convenient to use your remote control. During these times, you should understand a few
concepts that are specific to your remote control:
•Lighting groups
•Remote control range
Lighting Groups
When organizing your network light bulbs, you can set them up into lighting groups and use your remote
to turn on and off light bulbs in selected lighting groups. All light bulbs in the same group turn on and off
together and brighten or dim to the same level. Your remote control has controls for four lighting groups.
For example, you might have a lighting group that includes light bulbs on the same floor. Or a group that
includes hallway and entryway lights, making it easy to turn on or off with your remote as you arrive or
leave home.
Note: You can set up a lighting group using your smart device; however, you can only control lighting groups, such as
turn light bulbs on or off, through your remote control.
The following limitations apply when working with network light bulbs and lighting groups:
•If you use your remote control to set up your lighting groups, then a light bulb can belong to only 1
lighting group. If you use your smart device to set up your light bulbs, then a light bulb can belong
to 4 lighting groups.
•Your remote control can control up to 4 different lighting groups. If you add additional remote
controls to your network, each of them can control 4 additional lighting groups.
•Each lighting group can contain up to 40 light bulbs.
Remote Control Range
When using your remote control, you must be within range of your lighting network to control your lighting.
However, this does not mean that it has to be within range of all network light bulbs. Since the light bulbs
Product Specifications
Connected Lighting User Guide | 21

are interconnected across the network, they can pass commands to each other as long as they are within
network range of each other.
Remote Control Setup
When you select a group on the remote control, the group remains the active group on the remote
control. To take action on that same group again, you do not have to press the group button again.
Connecting a New or Pre-existing Remote Control
The remote control in your lighting kit is already connected to your Lighting Gateway by default.
If you are adding a new remote control to your network or if you are upgrading your lighting network from
a remote control kit and would like to use the old remote control with your new network, refer to the user
guide that was included with your device for further information.
Product Specifications
Connected Lighting User Guide | 22

Safety Information
Indoor Use Only
Your Gateway should be used only in dry, indoor locations. Do not use your Gateway in high-humidity
locations such as greenhouses, saunas, washrooms, or patios. Do not use your Gateway in locations
where it can get wet such as near aquariums or running water.
Do Not Disassemble
Your Gateway has no user-serviceable parts inside. In case of persisting malfunction, please contact
Customer Service to arrange for repair at a certified service location. Do not attempt to disassemble the
Gateway for any reason.
Disposing of Your Used Product
This product complies with the WEEE Directive (2002/96/EC) marking requirements. The affixed label
indicates that you must not discard this electrical / electronic product in domestic household waste.
WEEE Product Category. With reference to the equipment types in the WEEE Directive Annex 1, this
product is classed as category 3 “IT and Telecommunications Equipment.”
DO NOT DISPOSE IN DOMESTIC HOUSEHOLD WASTE. To return unwanted
products, contact your local GreenWave Reality reseller.
Product Specifications
Connected Lighting User Guide | 23

About GreenWave Reality
GreenWave Reality is a global innovator in the emerging Home Energy Management market. GreenWave
Reality provides an affordable, easy-to-use, standards-based platform that allows utilities to enhance their
relationship with consumers and better balance energy on the grid while consumers can conserve energy
with a minimal impact to their lifestyle by easily monitoring and controlling their appliances and adding
intelligent LED lighting. GreenWave Reality is led by a diverse team of proven leaders with global
experience.
North America
133 Technology, Suite 200
Irvine, CA 92618
USA
Tel. +1 714 805 WAVE (9283)
na@greenwavereality.com
Asia-Pacic
GreenWave Reality Pte. Ltd.
41 Science Park Road
#03-01 The Gemini (Science Park II)
SINGAPORE 117610
Tel. +65 3157 1700
apac@greenwavereality.com
Europe
GreenWave Reality ApS.
Bregnerødvej 96
3460 Birkerød
DENMARK
Tel. +45 6913 2333
eu@greenwavereality.com
Product Specifications
Connected Lighting User Guide | 24

Product Specications
For additional information on supported bulbs and peripherals, please access our GreenWave Reality
home page at www.greenwavereality.com or connectedbytcp.com
Product Specifications
Connected Lighting User Guide | 25
Federal Communication Commission Interference Statement
This device complies with Part 15 of the FCC Rules. Operation is subject to the following two conditions:
(1) This device may not cause harmful interference, and (2) this device must accept any interference
received, including interference that may cause undesired operation.
This equipment has been tested and found to comply with the limits for a Class B digital device, pursuant
to Part 15 of the FCC Rules. These limits are designed to provide reasonable protection against harmful
interference in a residential installation. This equipment generates, uses and can radiate radio frequency
energy and, if not installed and used in accordance with the instructions, may cause harmful interference
to radio communications. However, there is no guarantee that interference will not occur in a particular
installation. If this equipment does cause harmful interference to radio or television reception, which can
be determined by turning the equipment off and on, the user is encouraged to try to correct the
interference by one of the following measures:
•Reorient or relocate the receiving antenna.
•Increase the separation between the equipment and receiver.
•Connect the equipment into an outlet on a circuit different from that to which the receiver is
connected.
•Consult the dealer or an experienced radio/TV technician for help.
FCC Caution: Any changes or modifications not expressly approved by the party responsible for
compliance could void the user's authority to operate this equipment.
IMPORTANT NOTE:
FCC Radiation Exposure Statement:
This equipment complies with FCC radiation exposure limits set forth for an uncontrolled environment.
This equipment should be installed and operated with a minimum distance of 20cm between the radiator
and your body.
Product Specifications
Connected Lighting User Guide | 26

Industry Canada Notice to Users
This device complies with Industry Canada licence-exempt RSS standard(s). Operation is subject to the
following two conditions: (1) this device may not cause interference, and (2) this device must accept any
interference, including interference that may cause undesired operation of the device.
Under Industry Canada regulations, this radio transmitter may only operate using an antenna of a type
and maximum (or lesser) gain approved for the transmitter by Industry Canada. To reduce potential radio
interference to other users, the antenna type and its gain should be so chosen that the equivalent
isotropically radiated power (e.i.r.p.) is not more than that necessary for successful communication.
Product Specifications
Connected Lighting User Guide | 27
Declaration(s) of Conformity
These CE Marked GreenWave Reality products incorporating Radio and Telecoms Terminal Equipment
functionality are in compliance with the essential requirements and other relevant provisions of Directive
1999/5/EC.
A copy of the original CE Declaration of Conformity is on file and available upon request for all CE Marked
GreenWave Reality products. Please visit www.greenwavereality.com to obtain a copy of the Declaration.
The use of such device might not be harmonized throughout EU and EFTA Member States. The Final
Integrator of the product shall check that the use of such devices for power node is allowed for placing on
the market in any particular Member State.
Product Specifications
Connected Lighting User Guide | 28