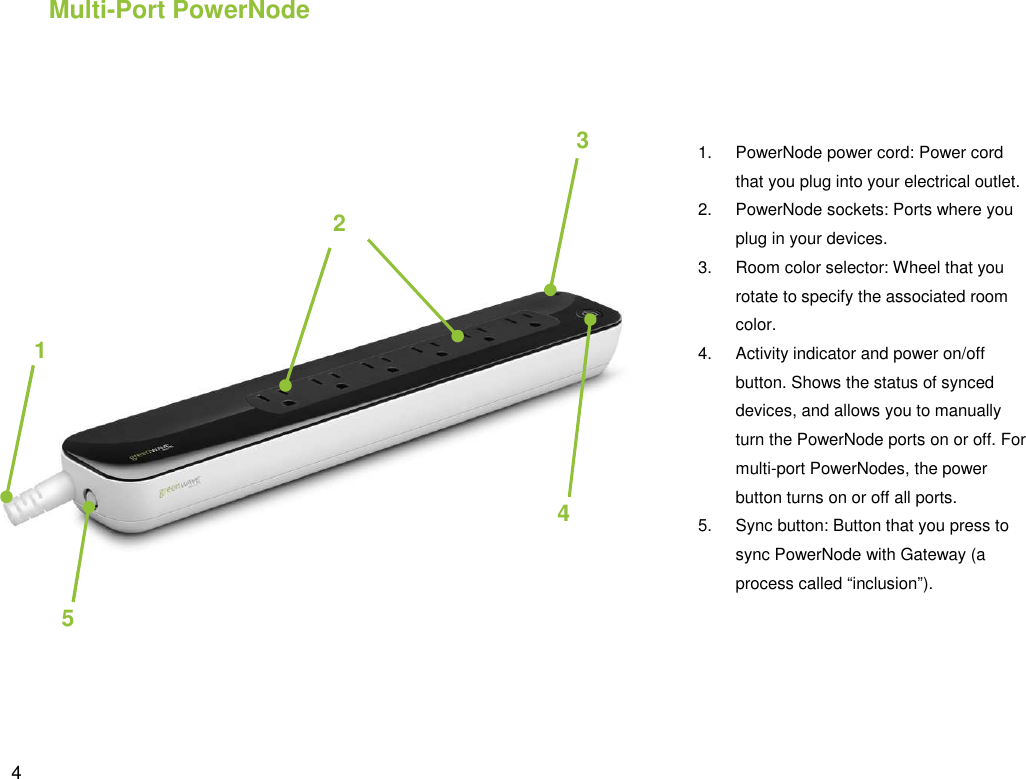
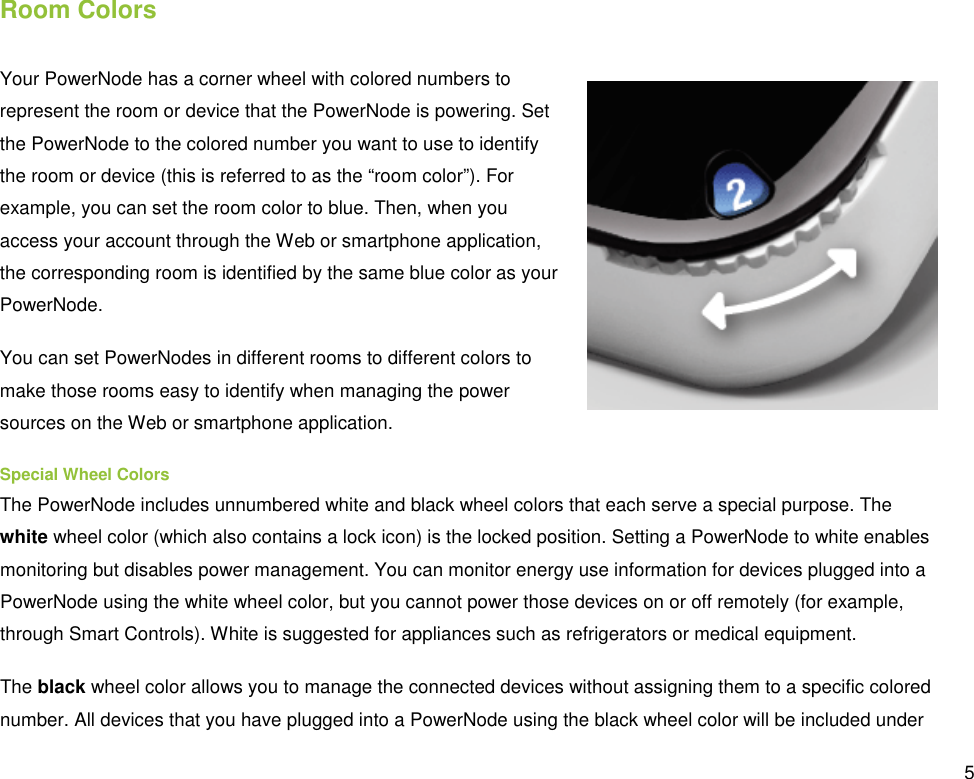
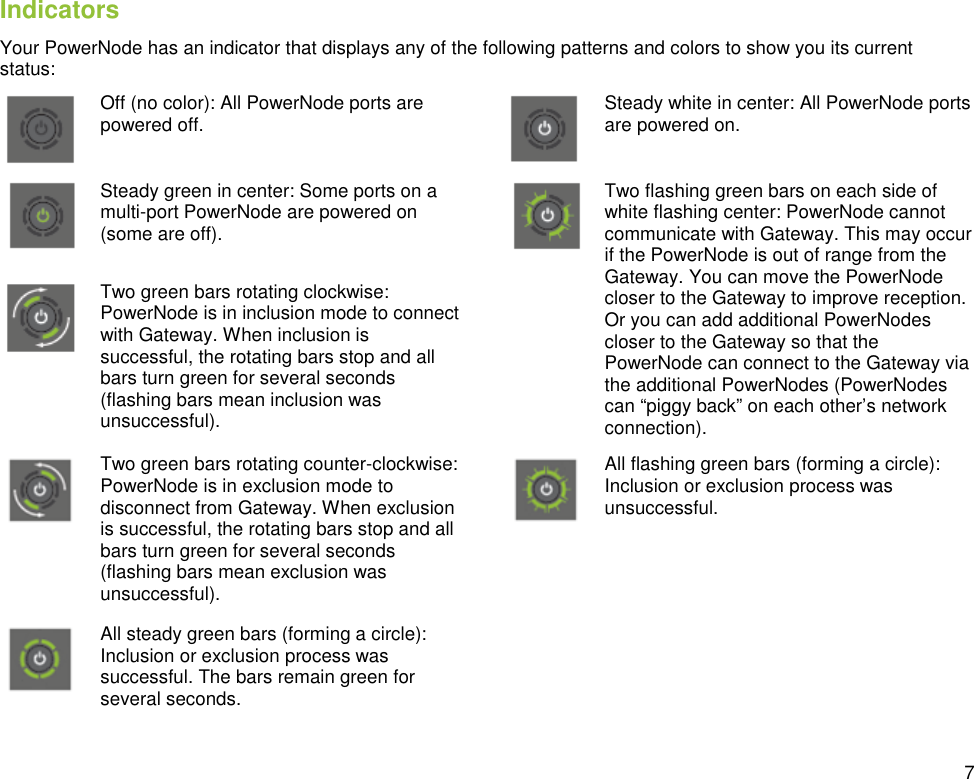
Greenwave Systems GNS22 Power Node User Manual powernodes user guide 2011 11 07

Greenwave Systems Pte. Ltd. Power Node powernodes user guide 2011 11 07

User Man_Z3M-GNS22

    PowerNodes NP220-B, NP222-B NS220-B, NS222-B
  Table of Contents Introduction  1 PowerNode Overview  2 One-Port PowerNode  3 Multi-Port PowerNode  4 Installation  9 Common Z-Wave Tasks  14 Network Inclusion Process  14 Network Exclusion Process  16 Safety Information  18 About GreenWave  19 Product Specifications  20
The GreenWave Reality platform helps create a smart, energycontrolling of your appliances and electronics (referred to as impact to your lifestyle by using our products to easily manage your devices. Simply connect our Gateway to your GreenWave Reality energy management systemand control the devices’ power usage through a Web browser or Introduction The GreenWave Reality platform helps create a smart, energy-efficient home through the monitoring and appliances and electronics (referred to as “devices”). You can conserve energy with minimal impact to your lifestyle by using our products to easily manage your devices. Simply connect our Gateway to GreenWave Reality energy management system, plug your devices into our PowerNodes, and then moand control the devices’ power usage through a Web browser or smartphone application.  1 efficient home through the monitoring and . You can conserve energy with minimal impact to your lifestyle by using our products to easily manage your devices. Simply connect our Gateway to , plug your devices into our PowerNodes, and then monitor
 2 PowerNode OverviewThe GreenWave Reality PowerNode is a smart outlet adapter that connects your your GreenWave Reality energy manusage remotely through a Web browser or multi-port configuration. The PowerNode automatically connects to your Greenhome network). This connection enables the Gateway to securely connect the devices you have powered through your PowerNode to your energy management system. The PowerNode collects data on the energy consumption of the connected devices and transmits the data to the Gateway. You can then control the energy consumption of each connected device automatically using GreenWave Reality Smart Controls. These user-defined Smart Controls allow you to turn devices on or off remotely through a Web browser or application or to set a schedule for automatically turning your devices on or off at pre-defined times. PowerNode Overview The GreenWave Reality PowerNode is a smart outlet adapter that connects your devices to electrical outlets and energy management system so that you can monitor and control your devices’ power usage remotely through a Web browser or smartphone application. PowerNodes are available with a oneThe PowerNode automatically connects to your GreenWave Reality Gateway (the device that connects to your home network). This connection enables the Gateway to securely connect the devices you have powered through your PowerNode to . The PowerNode collects data on the energy consumption of the connected devices and transmits the data to the Gateway. You can then control the energy consumption of each connected device automatically using GreenWave Reality fined Smart Controls allow you to turn devices on or off remotely through a Web browser or smartphone or to set a schedule for automatically turning your devices to electrical outlets and so that you can monitor and control your devices’ power PowerNodes are available with a one-port or Wave Reality Gateway (the device that connects to your
One-Port PowerNode  5 4  1. PowerNode pluginto your electrical2. PowerNode in your device.3. Room color selectorrotate to specify the associated room color. 4.  Sync buttonsync PowerNode with Gatewayprocess call5. Activity indicator and power on/offbutton. Shows the status of synced devices, and allows you to manually turn the PowerNode ports on or off.multi-port PowerNodes, the power button turns on1 2 3  3 PowerNode plug: Prongs that you plug electrical outlet. PowerNode socket: Port where you plug your device. Room color selector: Wheel that you specify the associated room button: Button that you press to sync PowerNode with Gateway (a process called “inclusion”). Activity indicator and power on/off button. Shows the status of synced devices, and allows you to manually turn the PowerNode ports on or off. For port PowerNodes, the power button turns on or off all ports.
 4 Multi-Port PowerNode   1.  PowerNode power cord: Power cord that you plug into your electrical outlet. 2.  PowerNode sockets: Ports where you plug in your devices. 3.  Room color selector: Wheel that you rotate to specify the associated room color. 4.  Activity indicator and power on/off button. Shows the status of synced devices, and allows you to manually turn the PowerNode ports on or off. For multi-port PowerNodes, the power button turns on or off all ports. 5.  Sync button: Button that you press to sync PowerNode with Gateway (a process called “inclusion”). 5 1 2 3 4
 5 Room Colors Your PowerNode has a corner wheel with colored numbers to represent the room or device that the PowerNode is powering. Set the PowerNode to the colored number you want to use to identify the room or device (this is referred to as the “room color”). For example, you can set the room color to blue. Then, when you access your account through the Web or smartphone application, the corresponding room is identified by the same blue color as your PowerNode. You can set PowerNodes in different rooms to different colors to make those rooms easy to identify when managing the power sources on the Web or smartphone application. Special Wheel Colors The PowerNode includes unnumbered white and black wheel colors that each serve a special purpose. The white wheel color (which also contains a lock icon) is the locked position. Setting a PowerNode to white enables monitoring but disables power management. You can monitor energy use information for devices plugged into a PowerNode using the white wheel color, but you cannot power those devices on or off remotely (for example, through Smart Controls). White is suggested for appliances such as refrigerators or medical equipment. The black wheel color allows you to manage the connected devices without assigning them to a specific colored number. All devices that you have plugged into a PowerNode using the black wheel color will be included under
 6 one generic grouping when you access your account through the Web or smartphone application. You can still monitor the devices’ energy use information and use them with Smart Controls as if they were categorized under a standard wheel color. The only difference is the manner in which they are grouped under your account.
 7 Indicators Your PowerNode has an indicator that displays any of the following patterns and colors to show you its current status:  Off (no color): All PowerNode ports are powered off.  Steady white in center: All PowerNode ports are powered on.  Steady green in center: Some ports on a multi-port PowerNode are powered on (some are off).  Two flashing green bars on each side of white flashing center: PowerNode cannot communicate with Gateway. This may occur if the PowerNode is out of range from the Gateway. You can move the PowerNode closer to the Gateway to improve reception. Or you can add additional PowerNodes closer to the Gateway so that the PowerNode can connect to the Gateway via the additional PowerNodes (PowerNodes can “piggy back” on each other’s network connection).  Two green bars rotating clockwise: PowerNode is in inclusion mode to connect with Gateway. When inclusion is successful, the rotating bars stop and all bars turn green for several seconds (flashing bars mean inclusion was unsuccessful).  Two green bars rotating counter-clockwise: PowerNode is in exclusion mode to disconnect from Gateway. When exclusion is successful, the rotating bars stop and all bars turn green for several seconds (flashing bars mean exclusion was unsuccessful).  All flashing green bars (forming a circle): Inclusion or exclusion process was unsuccessful.  All steady green bars (forming a circle): Inclusion or exclusion process was successful. The bars remain green for several seconds.
 8
Before you install your PowerNode and devices, make sure that your GreenWave Reality Gateway is already connected to your energy management systemGateway). The following process summarizes the steps to follow to install your PowerNode:1. Set the PowerNode room color.2. Choose the device to connect and its location.3. Sync the PowerNode with your GreenWave Reality Gateway, only if the PowerNode ipackage with your Gateway (packages are already synced at the factory).4. Prepare the PowerNode for the device.5. Plug in the device and turn on the PowerNode.   Installation Before you install your PowerNode and devices, make sure that your GreenWave Reality Gateway is already energy management system and operating (refer to the instructions that came The following process summarizes the steps to follow to install your PowerNode: Set the PowerNode room color. Choose the device to connect and its location. Sync the PowerNode with your GreenWave Reality Gateway, only if the PowerNode ipackage with your Gateway (packages are already synced at the factory). Prepare the PowerNode for the device. Plug in the device and turn on the PowerNode.  9 Before you install your PowerNode and devices, make sure that your GreenWave Reality Gateway is already s that came with your Sync the PowerNode with your GreenWave Reality Gateway, only if the PowerNode is not part of a
 10 1. Set the PowerNode Room Color Set the PowerNode to the colored number you want to use to identify the room or device (this is referred to as the “room color”).  The room color selection is strictly to help you identify the room when you monitor and control its power usage. Any color setting you use will work automatically with your Gateway. Refer to the section above on room colors. 2. Choose the Device and Location Choose the device you would like to connect to your PowerNode. Turn the device off and unplug it from any power source. As discussed in the “Installation Tips” section, you should attach only one device to each PowerNode port (one device for a single-port PowerNode or up to six devices for a multi-port PowerNode). Locate a suitable electrical outlet nearby where you would like to place the device. 3. Sync the PowerNode with Gateway (if Not Part of Package) Note: If your PowerNode came as part of a package with a GreenWave Reality Gateway, then you can skip this section since the PowerNode and Gateway were already connected at the factory. This section applies only for adding a new PowerNode or a PowerNode that you previously excluded.
 11 If the PowerNode is not part of a package with a GreenWave Reality Gateway, then you must sync it with your Gateway (a process called “inclusion”) so that the PowerNode and Gateway can communicate with each other. Verify that your Gateway is plugged in and working, and then perform the following steps: 1.  Plug the PowerNode into an electrical outlet. 2.  On the Gateway, press and release the sync button once. The activity indicator begins to display a clockwise rotating pattern. When this rotating “inclusion mode” pattern appears on the Gateway activity indicator, the Gateway is ready to be synced with the PowerNode. 3.  Locate the sync button on the PowerNode. It is a small round button on the side of the device, marked with the sync symbol. 4.  Press and hold the sync button for approximately one second until the PowerNode activity indicator begins to display a clockwise rotating pattern, indicating that the PowerNode is attempting inclusion. During this process, verify that the Gateway activity indicator still displays a clockwise rotating pattern from the first step you performed above. If not, then the Gateway is not in inclusion mode and you must return to step 2. 5.  After a few seconds, the rotating pattern on both the PowerNode and the Gateway should stop and all bars turn green (forming a circle) for several seconds to indicate successful inclusion. If all bars on the activity indicator flash instead of forming a solid circle, then the PowerNode inclusion process has failed, and you must start over.
 12 4. Prepare the PowerNode for the Device Make sure the PowerNode is plugged into the electrical outlet. Turn the PowerNode off by pressing the power button, which will illuminate white to indicate the power is off. 5. Plug in the Device and Turn on the PowerNode Plug the device you want to power into the PowerNode port. Turn the PowerNode on by pressing the power button, which will illuminate green to indicate the power is on. Turn the device on. The device is now part of your GreenWave home network. Installation Tips Review the safety information. Be sure to review the information contained in the “Safety Information” chapter for important safety information you should follow. Connect only one device per PowerNode port. For best results, attach only one device to each PowerNode port (one device for a single-port PowerNode or up to six devices for a multi-port PowerNode). Do not connect power strips and extension cords (or other PowerNodes) to the PowerNode. The PowerNode can only reliably monitor and control one device connected to one port at the time. Connecting more devices to one port interferes with power consumption monitoring and may cause risk of malfunction and damage to your PowerNode from
 13 overloading. If you would like to control more devices, you can easily add more PowerNodes to your energy management system. Keep radio signals clear. Your Gateway and PowerNodes have antennas built-in for radio communication with Internet services and other devices on your energy management system. Just as you might experience reception problems on your mobile phone inside a building, your Gateway can have trouble communicating with PowerNodes if their radio signals are blocked by obstacles such as large metal panels or walls containing wire mesh. When placing these devices in your home, imagine invisible lines connecting between them. Try to keep these lines clear from obstruction as much as possible. Also place your PowerNodes at least 1 foot (.3 meters) above floor level to promote reception.
 14 Common ZThe GreenWave Reality PowerNodes communicate wirelessly with the Gateway by use of Znetworking, which is a robust connection technology designed for home automation with security and privacy in mind. The more Z-Wave compatible devices installed in your home, the better coverage your private GreenWave Reality energy management systemZ-Wave enabled networks and hardware from other manufacturers.Network Inclusion ProcessNote: If your PowerNode came as part of a package with section since the PowerNode was already connected at the factory. This section applies only for adding additional PowerNodes or for including a PowerNode that you previously excluded.The process for adding a PowerNode to your home network is and you must have the Gateway plugged in and working first.Common Z-Wave Tasks The GreenWave Reality PowerNodes communicate wirelessly with the Gateway by use of Znetworking, which is a robust connection technology designed for home automation with security and privacy in Wave compatible devices installed in your home, the better coverage your private GreenWave energy management system will have. As a Z-Wave enabled device, the PowerNode is compatible with Wave enabled networks and hardware from other manufacturers. Network Inclusion Process Note: If your PowerNode came as part of a package with a GreenWave Reality Gateway, then you csection since the PowerNode was already connected at the factory. This section applies only for adding additional PowerNodes or for including a PowerNode that you previously excluded. The process for adding a PowerNode to your home network is called “inclusion.” It must only be performed once, and you must have the Gateway plugged in and working first. The GreenWave Reality PowerNodes communicate wirelessly with the Gateway by use of Z-Wave mesh networking, which is a robust connection technology designed for home automation with security and privacy in Wave compatible devices installed in your home, the better coverage your private GreenWave Wave enabled device, the PowerNode is compatible with Gateway, then you can skip this section since the PowerNode was already connected at the factory. This section applies only for adding called “inclusion.” It must only be performed once,
 15 To complete the inclusion process perform the following steps: 1.  Plug the PowerNode into an electrical outlet. 2.  On the Gateway, press and release the sync button once. The activity indicator begins to display a clockwise rotating pattern. When this rotating “inclusion mode” pattern appears on the Gateway activity indicator, the Gateway is ready to be synced with the PowerNode. If you attempt to include a PowerNode from another energy management system with an “alien” Gateway, the inclusion will fail and the indicator bars will flash rapidly. 3.  Locate the sync button on the PowerNode. It is a small round button on the side of the device, marked with the sync symbol. 4.  Press and hold the sync button for approximately one second until the PowerNode activity indicator begins to display a clockwise rotating pattern, indicating that the PowerNode is attempting inclusion. During this process, verify that the Gateway activity indicator still displays a clockwise rotating pattern. If not, then the Gateway is not in inclusion mode and you must return to step 2. 5.  After a few seconds, the rotating pattern on both the PowerNode and the Gateway should stop and all bars turn green (forming a circle) for several seconds to indicate successful inclusion. The PowerNode is now part of your energy management system, and you can connect a device (refer to the instructions that came with your PowerNode to plug in your device).
 16 If all bars on the activity indicator flash instead of forming a solid circle, then the PowerNode inclusion process has failed, and you must start over. Network Exclusion Process Note: If your PowerNode is new and has never been used before, then you should not need to perform the exclusion process. A PowerNode that has been previously used with a different Z-Wave network must have its association (homeID) with the other network removed before you can connect it to your GreenWave Reality energy management system. This process is called “exclusion” and requires you to perform steps with both the Gateway and the PowerNode. To complete the exclusion process perform the following steps: 1.  Plug the PowerNode into an electrical outlet. 2.  On the Gateway, press and hold the sync button until the activity indicator begins to display a counter-clockwise rotating pattern. When this rotating “exclusion mode” pattern appears on the Gateway activity indicator, the Gateway is ready to perform the exclusion of the PowerNode. 3.  Locate the sync button on the PowerNode. It is a small round button on the side of the device, marked with the sync symbol.
 17 4.  Press and hold the sync button for approximately one second until the PowerNode activity indicator begins to display a counter-clockwise rotating pattern, indicating that the PowerNode is attempting exclusion. During this process, verify that the Gateway activity indicator still displays a counter-clockwise rotating pattern. If not, then the Gateway is not in exclusion mode and you must return to step 2. 5.  Notice that all bars on both the PowerNode and the Gateway turn green (forming a circle) for several seconds, indicating that the exclusion process had completed. Your PowerNode is now free of its former association.  If all bars on the activity indicator flash instead of forming a solid circle, then the PowerNode exclusion process has failed, and you must start over.
 18 Indoor Use Only Your PowerNode should be used only in dry, indoor locations. Dlocations such as greenhouses, saunas, washrooms, or patios. Do not use your PowerNode in locations where it can get wet such as near aquariums or running water.Do Not Disassemble Your PowerNode has no user-servicCustomer Service to arrange for repair at a certified service location. Do not attempt to disassemble the PowerNode for any reason. Safety Information Your PowerNode should be used only in dry, indoor locations. Do not use your PowerNode in highlocations such as greenhouses, saunas, washrooms, or patios. Do not use your PowerNode in locations where it can get wet such as near aquariums or running water. serviceable parts inside. In case of persisting malfunction, please contact Customer Service to arrange for repair at a certified service location. Do not attempt to disassemble the o not use your PowerNode in high-humidity locations such as greenhouses, saunas, washrooms, or patios. Do not use your PowerNode in locations where it eable parts inside. In case of persisting malfunction, please contact Customer Service to arrange for repair at a certified service location. Do not attempt to disassemble the
GreenWave Reality is a global innovator in the emerging Home Energy Management market. GreenWave Reality provides an affordable, easyrelationship with consumers and better balance eneminimal impact to their lifestyle by easily monitoring and controlling their appliances and adding intelligent LED lighting. GreenWave Reality is led by a diverse team of proven leaders with global NORTH AMERICA 39 Parker, Suite 100 Irvine, CA 92618 USA  Tel. +1 714 805 WAVE (9283) na@greenwavereality.com About GreenWave GreenWave Reality is a global innovator in the emerging Home Energy Management market. GreenWave -to-use, standards-based platform that allows utilities to relationship with consumers and better balance energy on the grid while consumers can conserve energy with a minimal impact to their lifestyle by easily monitoring and controlling their appliances and adding intelligent LED lighting. GreenWave Reality is led by a diverse team of proven leaders with global experience. EUROPEGreenWave Reality ApS.Dr. Neergaardsvej 32970 HørsholmDENMARK Tel. +45 6913 2333eu@greenwavereality.comASIA-PACIFIC 41 Science Park Road #01-01 The Gemini (Science Park II) SINGAPORE 117610  Tel. +65 3157 1700 apac@greenwavereality.com  19 GreenWave Reality is a global innovator in the emerging Home Energy Management market. GreenWave to enhance their rgy on the grid while consumers can conserve energy with a minimal impact to their lifestyle by easily monitoring and controlling their appliances and adding intelligent LED experience. EUROPE GreenWave Reality ApS. Dr. Neergaardsvej 3 2970 Hørsholm DENMARK Tel. +45 6913 2333 eu@greenwavereality.com
 20 Product Specifications Model  NP220-B  NP222-B  NS220-B  NS222-B AC Voltage  120V ~ 60Hz  120V ~ 60Hz  120V ~ 60Hz  120V ~ 60Hz Maximum Load Current  15A  15A  15A  15A Standby Power  0.4W  0.4W  0.4W  0.4W Load Monitoring Precision  ±0.1W  ±0.1W  ±0.1W  ±0.1W Plug  NEMA 5-15  NEMA 5-15  NEMA 5-15  NEMA 5-15 Socket  6 x Type B  6 x Type B  1 x Type B  1 x Type B Overcurrent Protection  ● ● ● ● Surge Protection  ● ● ● ● Z-Wave Radio Frequency  908.42MHz  908.42MHz  908.42MHz  908.42MHz Z-Wave Maximum Inter-Node Range (measured with line of sight, no obstacles, and height of devices above floor >1m) 30m  30m  30m  30m GreenWave Reality DeviceDNA  v1.0  v1.0  v1.0  v1.0 Operating Temperature  0°C to +40°C  0°C to +40°C  0°C to +40°C  0°C to +40°C  Storage Temperature  -20°C to +60°C  -20°C to +60°C  -20°C to +60°C  -20°C  to +60°C Maximum Humidity  5% to 90% N/C  5% to 90% N/C  5% to 90% N/C  5% to 90% N/C IP-Class (Moisture Tolerance)  IP20  IP20  IP20  IP20 Z-Wave Command Classes Certified Binary Switch Power Meter Multichannel Firmware Metadata Binary Switch Power Meter Multichannel Firmware Metadata Binary Switch Power Meter Multichannel Firmware Metadata Binary Switch Power Meter Multichannel Firmware Metadata
 21 Document Version 1.03 Model Numbers NP220-B, NP222-B, NS220-B, NS220-B
 22  Federal Communication Commission Interference Statement This device complies with Part 15 of the FCC Rules. Operation is subject to the following two conditions: (1) This device may not cause harmful interference, and (2) this device must accept any interference received, including interference that may cause undesired operation.  This equipment has been tested and found to comply with the limits for a Class B digital device, pursuant to Part 15 of the FCC Rules. These limits are designed to provide reasonable protection against harmful interference in a residential installation. This equipment generates, uses and can radiate radio frequency energy and, if not installed and used in accordance with the instructions, may cause harmful interference to radio communications. However, there is no guarantee that interference will not occur in a particular installation. If this equipment does cause harmful interference to radio or television reception, which can be determined by turning the equipment off and on, the user is encouraged to try to correct the interference by one of the following measures:  • Reorient or relocate the receiving antenna. • Increase the separation between the equipment and receiver. • Connect the equipment into an outlet on a circuit different from that to which the receiver is connected. • Consult the dealer or an experienced radio/TV technician for help.  FCC Caution: Any changes or modifications not expressly approved by the party responsible for compliance could void the user's authority to operate this equipment.  IMPORTANT NOTE: FCC Radiation Exposure Statement: This equipment complies with FCC radiation exposure limits set forth for an uncontrolled environment. This equipment should be installed and operated with a minimum distance of 20cm between the radiator and your body.
  (Back Cover)

Navigation menu