Group Sense Mobile Tech B106 PDA with Wifi 802.11 b/g User Manual Master
Group Sense Mobile-Tech Limited PDA with Wifi 802.11 b/g Master
Users Manual

Copyright
1
Copyright
• Copyright © 2008 Group Sense Mobile-Tech Limited. All rights
reserved.
• Product specifications and features are for reference only and
are subject to change without prior notice.
Declaration
• This Quick Start Guide is published by Group Sense Mobile-
Tech Limited without any warranty. Improvement and changes
to this Quick Start Guide necessitated by typographical errors,
inaccuracies of current information, or improvements to pro-
grams and/or equipment, may be made by Group Sense Mobile-
Tech Limited any time and without notice. Such changes will,
however, be incorporated into new editions of this Quick Start
Guide.

Copyright
2
FCC Statement
This device complies with Part 15 of the FCC Rules. Operation is sub-
ject to the following two conditions: (1) this device may not cause
harmful interference, and (2) this device must accept any interference
received, including interference that may cause undesired operation.
Changes or modifications not expressly approved by the party respon-
sible for compliance could void the user's authority to operate the
equipment.
FCC Radiation Exposure Statement
The antennas used for this transmitter must be installed to provide a
separation distance of at least 20 cm from all persons and must not be
co-located or operating in conjunction with any other antenna or trans-
mitter.

Important safety information
3
Important safety information
PLEASE READ THIS CAREFULLY BEFORE USING WF35!
• Always treat your product with care and keep it in a clean and
dust-free place.
• Do not expose WF35 to moisture or humidity.
• Do not expose WF35 to extreme high or low temperatures.
• Do not attempt to disassemble your product.
• Use only the chargers and batteries approved by Group Sense
Mobile-Tech Limited. The use of any other type may invalidate
any approval and warranty. No reverse charging with other
chargers, they may have inverse polarity.
• Never use the charger if the plug is damaged.
• Never touch the charger if your hands/feet are wet.
• Do not expose the charger to water, it may cause electrical fires.
• Do not repair the charger yourself for your safety.

Important safety information
4
• To reduce the risk of fire or burns, do not disassemble, crush or
puncture the battery.
• Recycle or dispose of the battery safely and properly according
to local laws and regulations.
• Do not dispose of the battery in fire or water.
• Do not let the metal contacts on the battery touch other metal
object, it could lead to short-circuit and damage the battery.
• For WF35 model, only approved batteries, chargers that are
designed for the model can be used with WF35 unit.
• Do not exchange with wrong model battery, it may occurs to
explosion. Please dispose battery following instruction.

Contents
5
Contents
Getting to know WF35 7
WF35 overview . . . . . . . . . . . . . . . . . . . . . . . . . . . . . . . . . . 7
Battery. . . . . . . . . . . . . . . . . . . . . . . . . . . . . . . . . . . . . . . . . . 9
Installing/removing battery . . . . . . . . . . . . . . . . . . . . . . . 9
Charging battery . . . . . . . . . . . . . . . . . . . . . . . . . . . . . . . 11
Getting started 15
Turn on/off WF35. . . . . . . . . . . . . . . . . . . . . . . . . . . . . . . . 15
Wi-Fi connection settings. . . . . . . . . . . . . . . . . . . . . . . . . . 16
Using Bluetooth . . . . . . . . . . . . . . . . . . . . . . . . . . . . . . . . . 21
To enable Bluetooth . . . . . . . . . . . . . . . . . . . . . . . . . . . . 21
Bluetooth settings . . . . . . . . . . . . . . . . . . . . . . . . . . . . . . 23
Paired Bluetooth . . . . . . . . . . . . . . . . . . . . . . . . . . . . . . . 25
Searching for Bluetooth . . . . . . . . . . . . . . . . . . . . . . . . . 28
Bluetooth services . . . . . . . . . . . . . . . . . . . . . . . . . . . . . 29
Transferring files via Bluetooth . . . . . . . . . . . . . . . . . . . 30

Contents
6
WF35 settings 32
Screen rotation . . . . . . . . . . . . . . . . . . . . . . . . . . . . . . . . 32
Backlight settings . . . . . . . . . . . . . . . . . . . . . . . . . . . . . . 33
Power properties . . . . . . . . . . . . . . . . . . . . . . . . . . . . . . . 34
MSR settings . . . . . . . . . . . . . . . . . . . . . . . . . . . . . . . . . 35
Date/Time settings . . . . . . . . . . . . . . . . . . . . . . . . . . . . . 36
Dialing settings . . . . . . . . . . . . . . . . . . . . . . . . . . . . . . . . 37
Input methods . . . . . . . . . . . . . . . . . . . . . . . . . . . . . . . . . 38
Network and dial-up connection . . . . . . . . . . . . . . . . . . 44
Storage manager settings . . . . . . . . . . . . . . . . . . . . . . . . 47
System backup . . . . . . . . . . . . . . . . . . . . . . . . . . . . . . . . 49
Getting to know WF35
7
Getting to know WF35
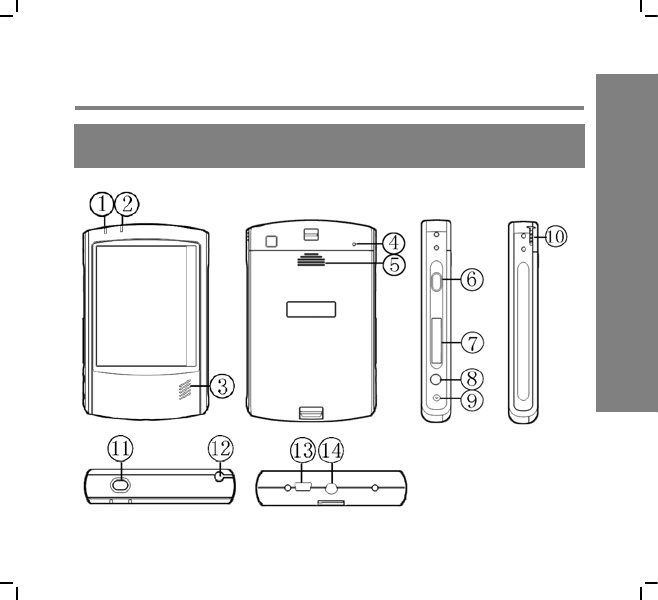
WF35 overview

Getting to know WF35
8
Name Description
1 LED light Show the status for Wi-Fi and battery
2 LED light Programmable LED
3 Speaker
4 Reset hole Reset device
5 Battery cover
6 Shortcut
7 SD card slot Insert external card
8 Earphone jack
9 Charging slot Connect the adapter to charge battery
10/12 Stylus
11 Power key Press to turn on WF35; press and hold to
turn off; if WF35 is on, press to suspend
13 USB socket Connect to PC for data synchronization
14 Mount slot Mount your device on other fixed place
Getting to know WF35
9
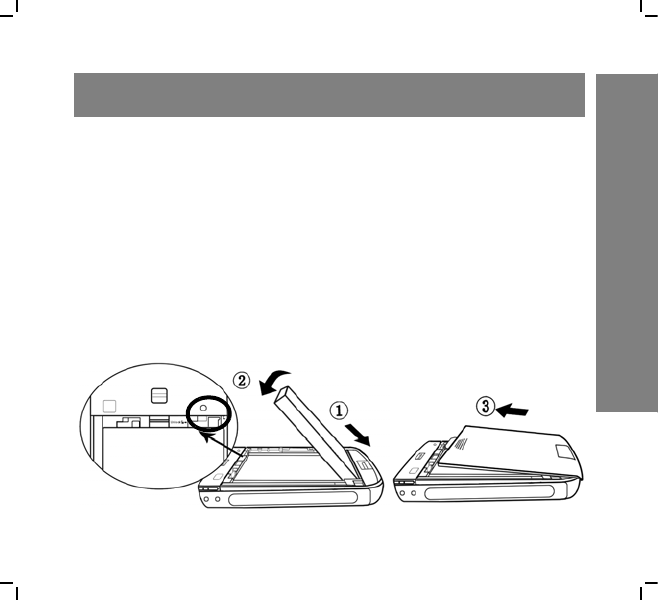
Installing/removing battery
To install battery
1. Align the metal contacts on the battery with the contacts
inside the battery compartment.
2. Press the battery downwards until it fits the battery com-
partment; push the battery lock leftwards.
3. Slide the battery cover upwards.
Battery
Getting to know WF35
10
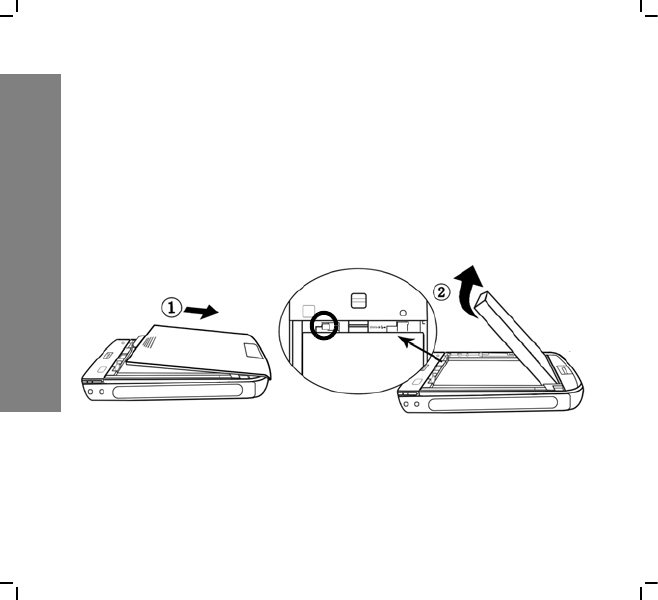
To remove battery
1. Press and hold the Power button to turn off WF35. (See
“Turn on/off WF35“.)
2. Remove the battery cover by sliding it downwards.
3. Push the battery lock rightwards to unlock battery; gently
lift the upper edge of the battery outwards and take it out.
Getting to know WF35
11
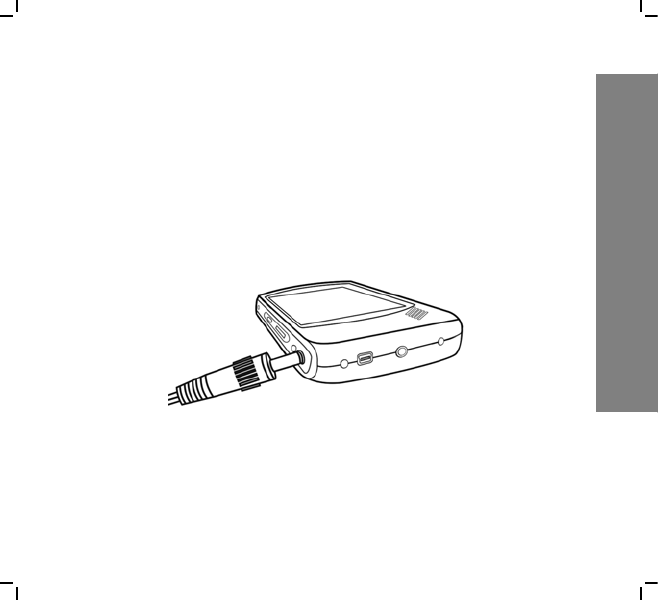
Charging battery
To charge the battery
1. Connect your charger to the charging slot (as below).
2. Plug the charger to the main electrical outlet.
3. The LED light turns orange.
4. When charging is complete, the LED light turns green.
Note: Charge the unit when the LED is RED.

Getting to know WF35
12
LED light description
There are two LED lights on the front of WF35, we will give
the information for the left one here:
• Red flash - Battery low
• Red - Battery very low
• Orange flash - Battery charging
• Green - Battery full
• Blue flash quickly - Wi-Fi searching
• Blue flash slowly - Wi-Fi connected
• Off - Wi-Fi disconnected
Getting to know WF35
13
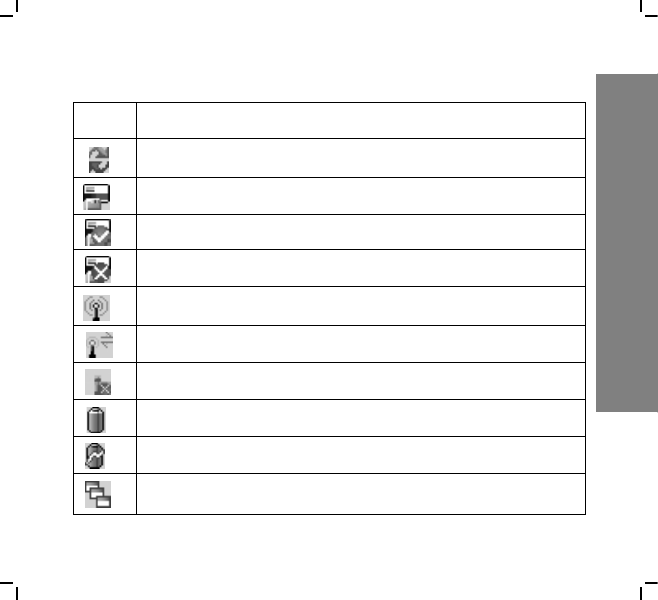
Description for icons on task bar
Icon Description
ActiveSync
MSR connected
Swipe the card successfully
Fail to swipe the card
WLAN connected
WLAN searching
WLAN disconnected
Battery indicator
Battery charging
Tap to switch application

Getting to know WF35
14
Short tap to hide/show current Input method keyboard
Tap and hold to select another Input method
Start menu
Icon Description

Getting started
15
Getting started
To turn on WF35
1. Press the Power button on the top of WF35.
2. The GREEN LED lights on for a second and the boot
logo is shown. It will boot to the WinCE OS.
To turn off WF35
1. Press and hold the Power button on the top of WF35 for 2
seconds to turn it off.
To suspend WF35
1. If WF35 has been turned on, press the Power button to
suspend, so as to save power.
Turn on/off WF35
Getting started
16
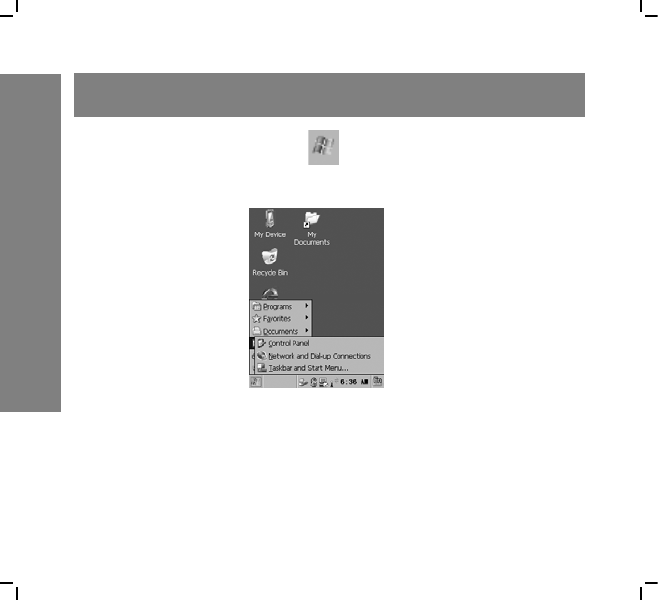
1. In WinCE desktop, tap in system tray, select “Control
Panel” in “Settings”.
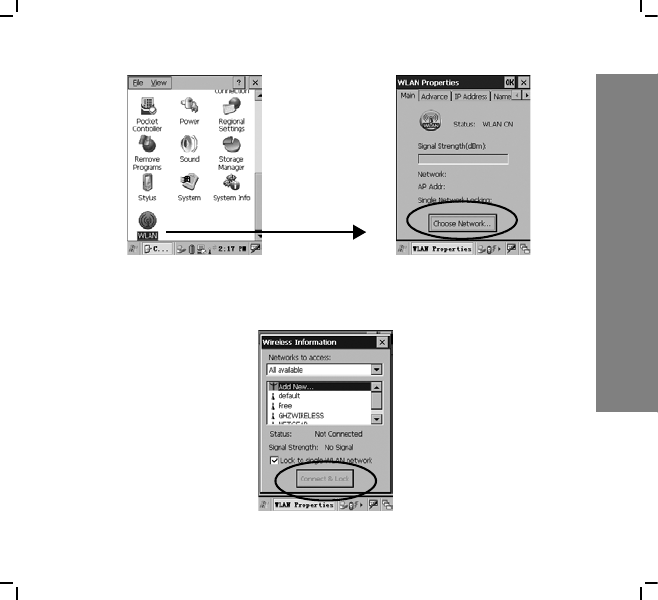
2. Select “WLAN” in control panel. Then tap “Choose Net-
work” button.
Wi-Fi connection settings
Getting started
17
3. Select an available WLAN in the list or add a new con-
nection. Tap “Connect & Lock”.
Getting started
18
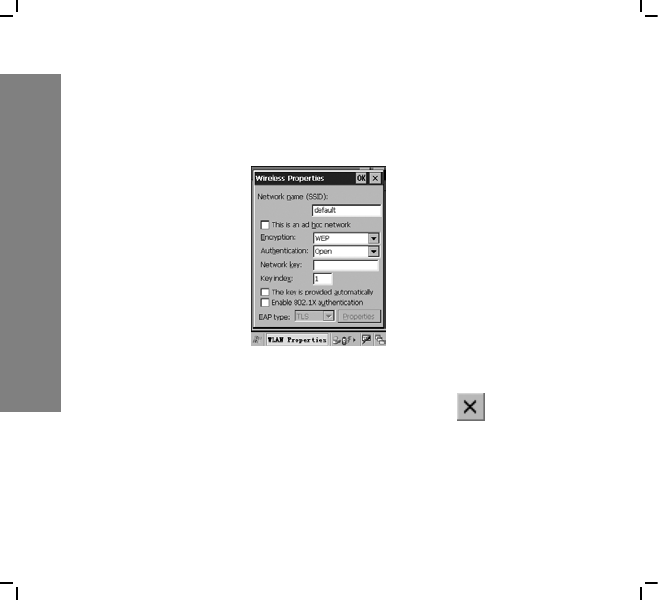
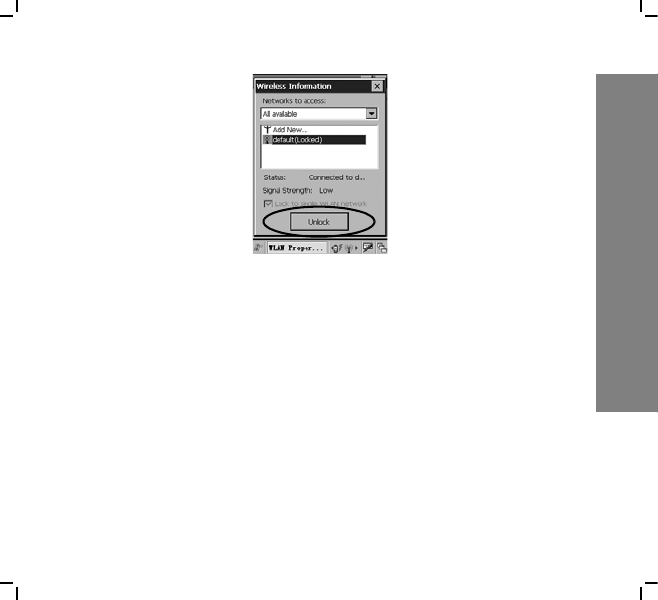
4. Input network password if needed. Tap input method
icon on system tray to open soft keyboard. Tap “OK” to
finish setting.
5. If connection succeeds, system will show on the status
field of Wireless Information screen. Tap to exit.
Getting started
19
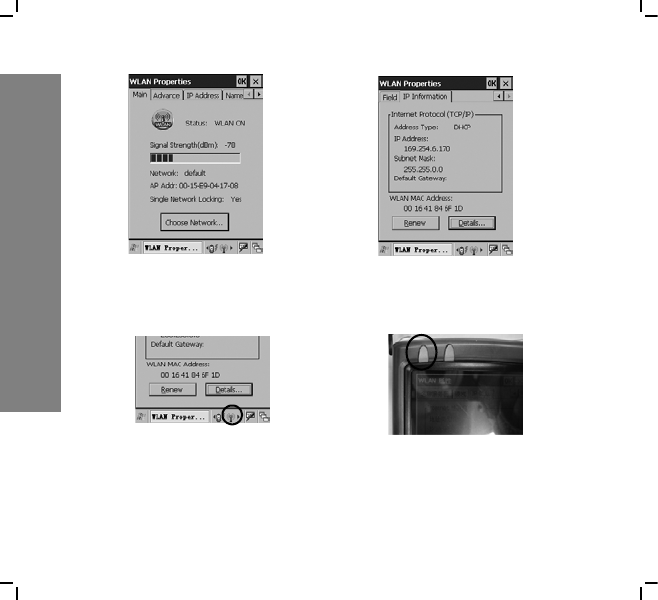
6. In WLAN setting main panel, you can perform Advance
Setting, IP Setting, DNS and WINS Setting, and viewing
IP info.
Getting started
20
7. When WLAN connected, there is a taskbar icon and top
left LED (blue) to indicate connection status.
Getting started
21
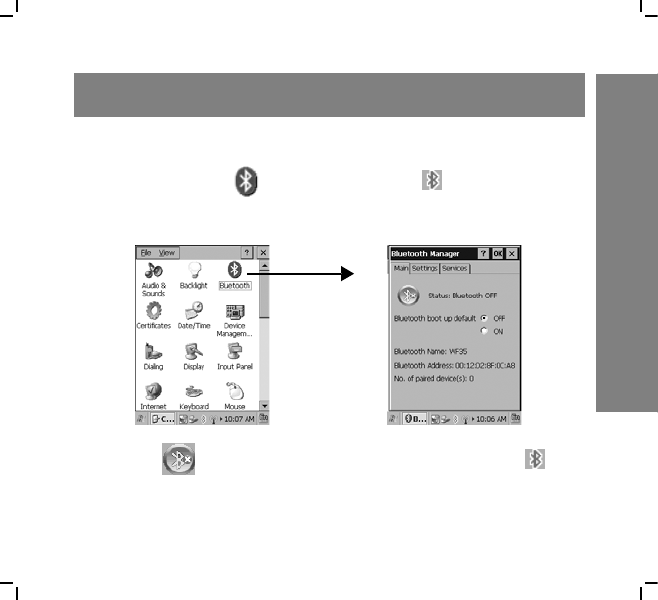
To enable Bluetooth
1. Double-click in Control Panel or on taskbar to
open Bluetooth Manager page.
2. Tap to enable Bluetooth, and Bluetooth icon on
taskbar will change accordingly.
Using Bluetooth
Getting started
22
3. Select ON in “Bluetooth boot up default” option to
enable Bluetooth automatically when turn on your device
each time.
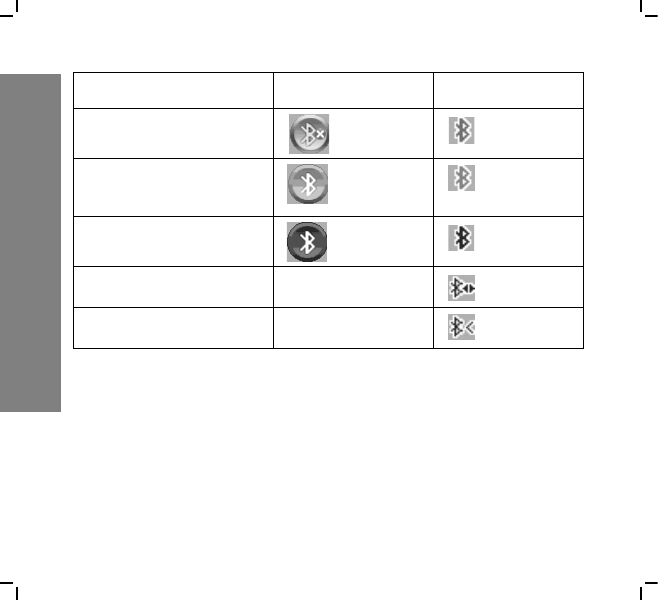
Status Main page Taskbar
Bluetooth Off
Bluetooth turning on
(yellow)
Bluetooth On (Blue)
Connecting
Receiving
Getting started
23
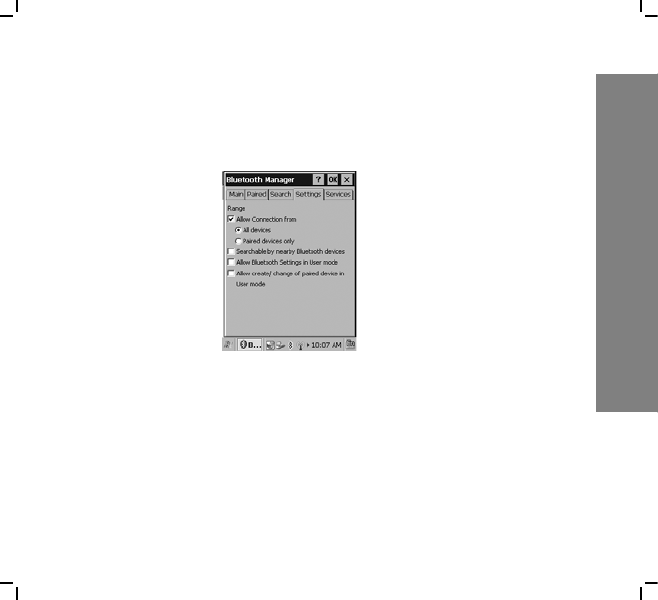
Bluetooth settings
Tap “Settings” tab in “Bluetooth Manager” page to set Blue-
tooth.
• Allow Connection from: you can select “All devices” to
connect all Bluetooth devices; or you can select “Paired
device only” to connect with paired Bluetooth only.

Getting started
24
• Searchable by nearby Bluetooth devices: check this
option, your device will be searchable by nearby Blue-
tooth devices.
• Check the option “Allow Bluetooth Settings in User
mode“ and “Allow create/change of paired device in User
mode“, all tabs (Main, Paired, Search, Settings, Services)
in Bluetooth Manager will be shown;
if only check “Allow Bluetooth Settings in User mode”,
Main, Settings and Service tabs will be shown;
if only check “Allow create/change of paired device in
User mode“, Main, Paired and Search tabs will be shown.
Getting started
25
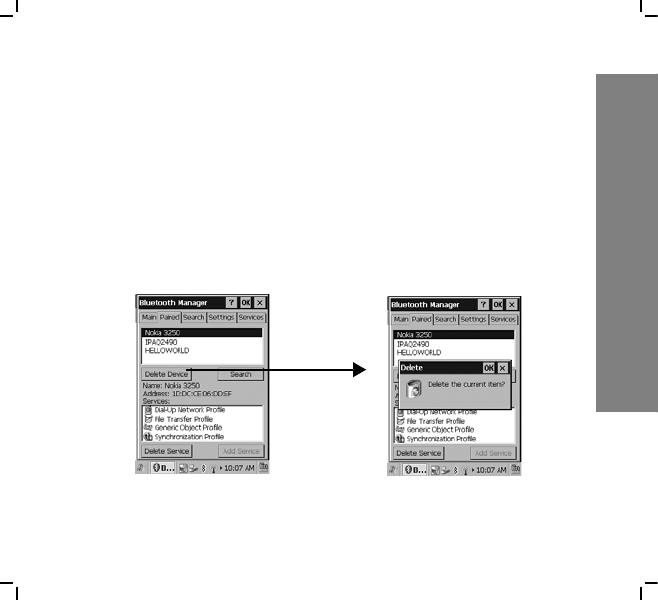
Paired Bluetooth
Tap “Paired“ tab in Bluetooth Manager to open Paired page. If
Bluetooth is disable, Paired tab will be hidden.
To delete a paired device
If you already have paired devices, select a paired device in
paired Bluetooth list, and tap “Delete Device“.
Getting started
26
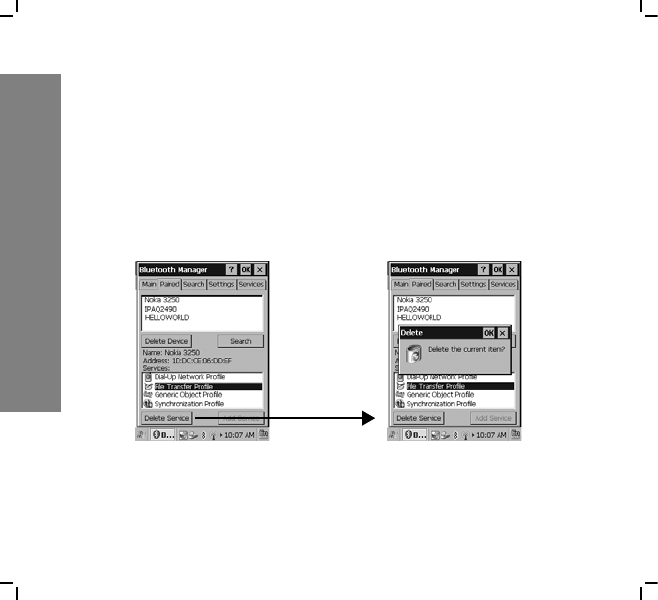
To delete a service
When select a device in the paired Bluetooth list, you can view
the device’s details, including the device name, address and the
service supplied by the device. (the icon before the unpaired
service will be gray)
Select a paired service, and tap “Delete Service“.
Getting started
27
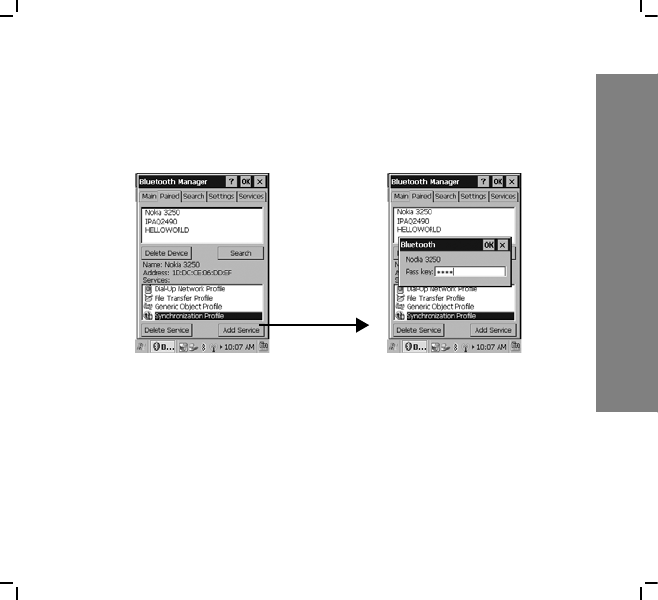
To add a service
Select a unpaired service and tap “Add Service“ to enter pass
key to complete pairing operation.
Getting started
28
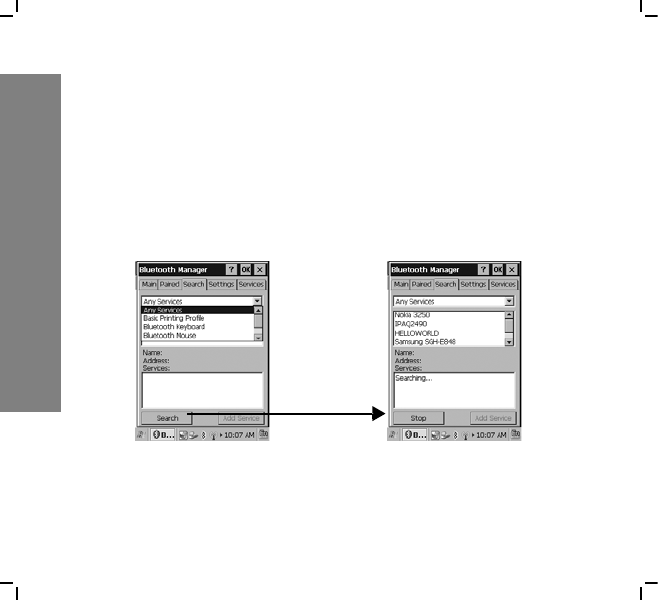
Searching for Bluetooth
Tap “Search“ tab or “Search“ button in Paired page to open
Search page, you can search other Bluetooth device here. If
Bluetooth is disable, this tab will be hidden.
Select range of searching Bluetooth device from the pull down
menu and tap “Search“.
Available devices will be displayed in the service list. Select an
unpaired service and tap “Add Service“ to add new service.

Getting started
29
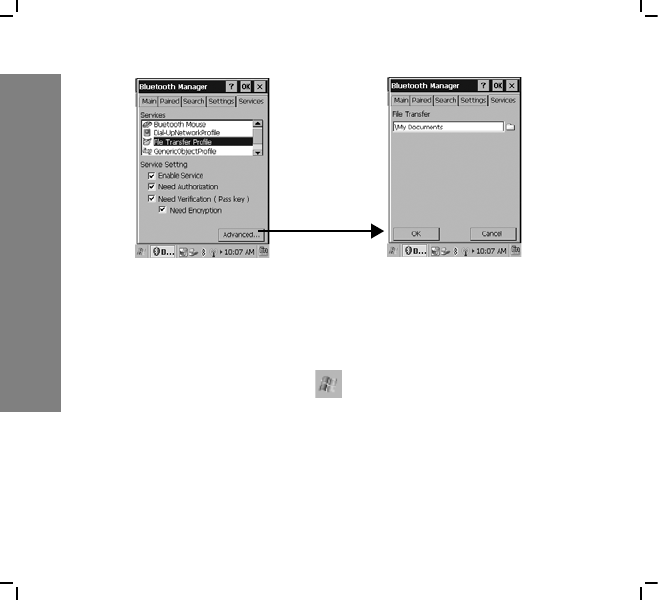
Bluetooth services
Tap “Services“ in Bluetooth Manager, all services that your
device supports are listed in the Services list.
Select “File Transfer Profile“ service and tap “Advanced...“ to
change the file transfer saving path (the default path is \My
Documents).
Getting started
30
Transferring files via Bluetooth
1. In WinCE desktop, tap in system tray, select “My
Documents“.
2. Press and hold the file you want to send and select “Send
via Bluetooth“ from the pop-up menu.

Getting started
31
3. Select the paired Bluetooth you want to send the file to, a
“Send File“ box will pop up to wait for confirmation
from your partner.
WF35 settings
32
WF35 settings
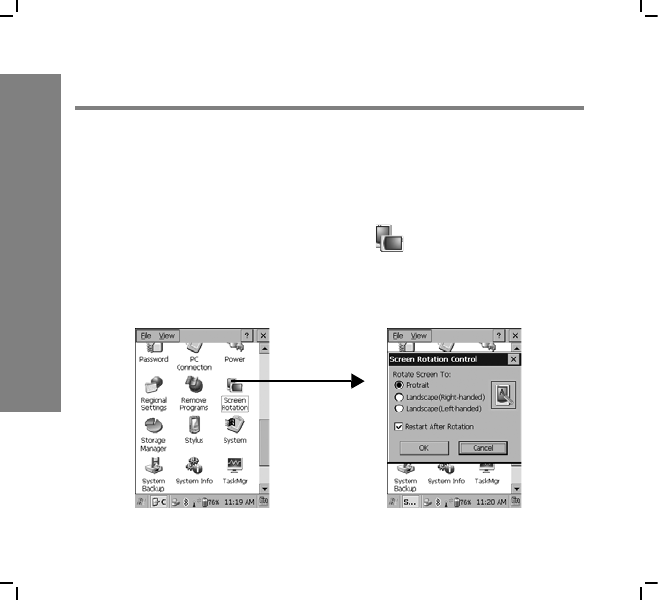
Screen rotation
Two screen view mode are supported in WF35, you can change
it as you like.
Double-click “Screen Rotation” icon in “Control Panel”,
select Portrait/Landscape (Right-handed)/Landscape (Left-
handed)
WF35 settings
33
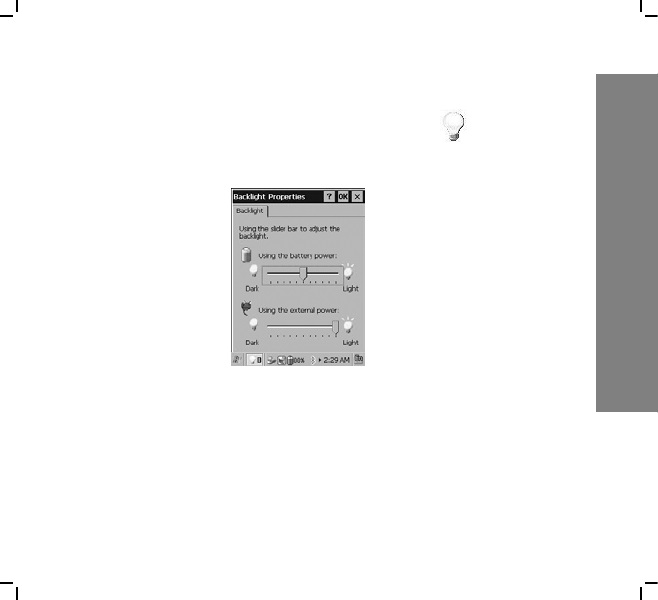
Backlight settings
In Control Panel, double-click Backlight icon to open Back-
light Properties page. Drag the scroll bar to adjust backlight.
WF35 settings
34
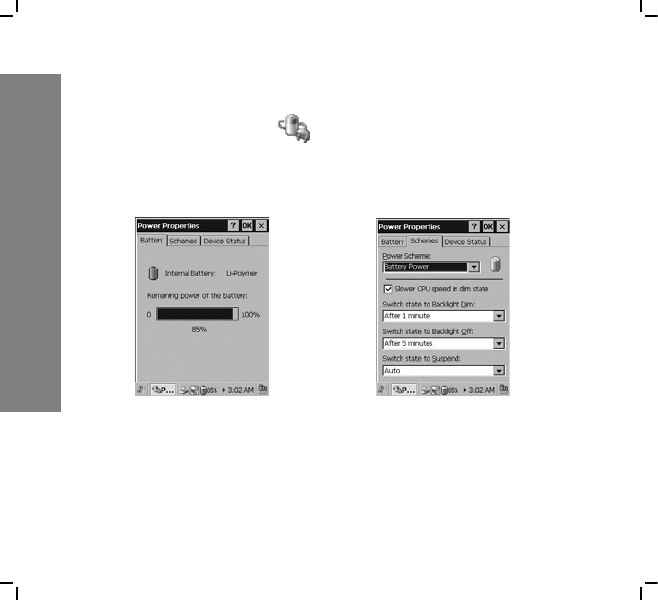
Power properties
Double-click Power icon in Control Panel to open Power
Properties page. you can view the battery information, set
scheme and view the device status.
WF35 settings
35
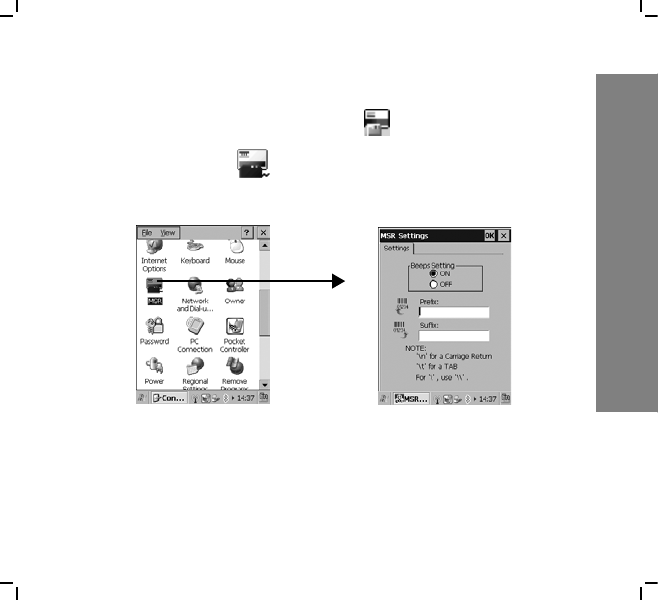
MSR settings
When connect to the MSR, the icon displays on taskbar.
1. Double-click in “Control Panel” to access “MSR
Settings”.
2. Select On/Off to set beeps on/off; input the prefix/suffix
for the information displayed on screen when you swipe
your card.
WF35 settings
36
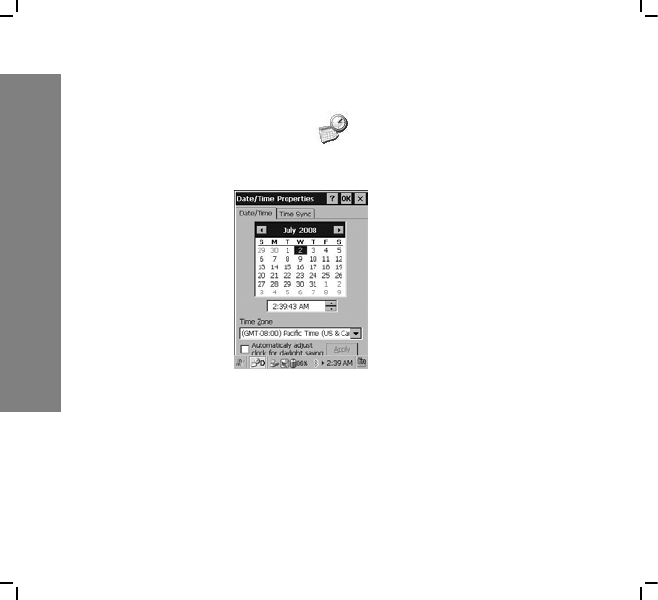
Date/Time settings
Double-Click Date/Time icon in Control Panel to open
Date/Time Properties page.
Tap the pull down arrow of Time zone to select the location
where you are, and then set the date and time, tap “Apply” to
finish setting.

WF35 settings
37
Dialing settings
Double-Click Dialing icon in Control Panel to set dialing
properties.
You can tap “Edit” to modify the dialing patterns if necessary.
WF35 settings
38
Input methods
You have English and Simplified Chinese to use in WF35.
Before using WF35, you can adjust input methods first.
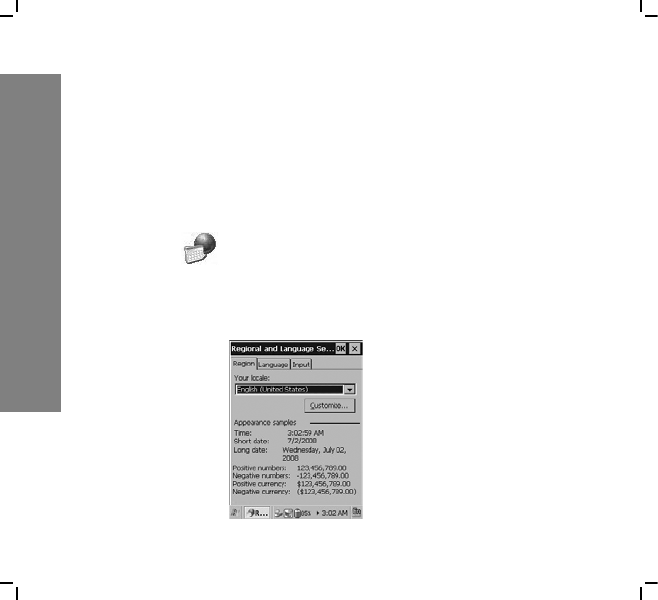
Regional settings
Double-click to open Regional and Laguage Settings page.
You can set your location, user interface language and input
methods.

WF35 settings
39
1. Tap the pull down arrow to select your location, and tap
“Customize“ to set your location details.
2. Tap “Language” tab to set the language used for menus,
dialogs and alerts.
3. Tap “Input“ tab to select the input method when you start
your device.
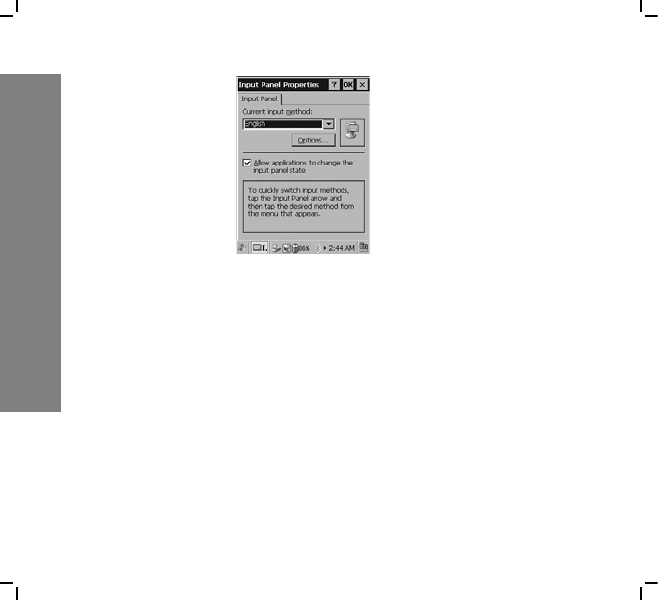
Input panel settings
Double-click Input Panel icon in Control Panel to change
input methods.
WF35 settings
40
You can tap “Options...“ to set details for your selected input
methods, but if you are using English or PinYin, “Options” is
invalid.
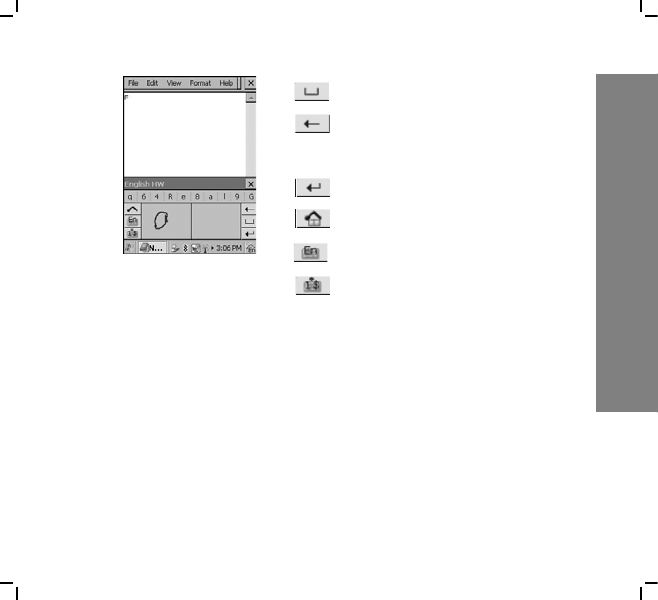
Handwriting
WF35 enables handwriting recognition in full screen or you can
write in Graffiti area. We give English HW as an example.
WF35 settings
41
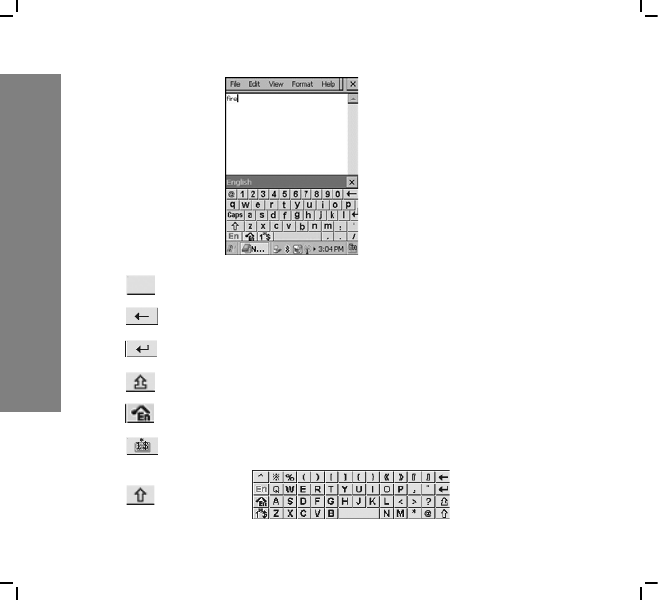
Soft-keyboard
Besides handwriting input, you also can input with soft-key-
board. We give English keyboard as an example.
• Space
• Delete a character before the
cursor
• Go to next line
• Switch to Graffiti area
• Switch to softkeyboard
• Switch to number keyboard
WF35 settings
42
• Space
• Delete a character before a cursor
• Go to next line
• Switch to upper case letter
• Switch to full screen input mode
• Switch to number keyboard
• Switch to

WF35 settings
43
Hard keyboard
You will have an external hard keyboard to connect with your
device, so you can input text via hard keyboard.
WF35 settings
44
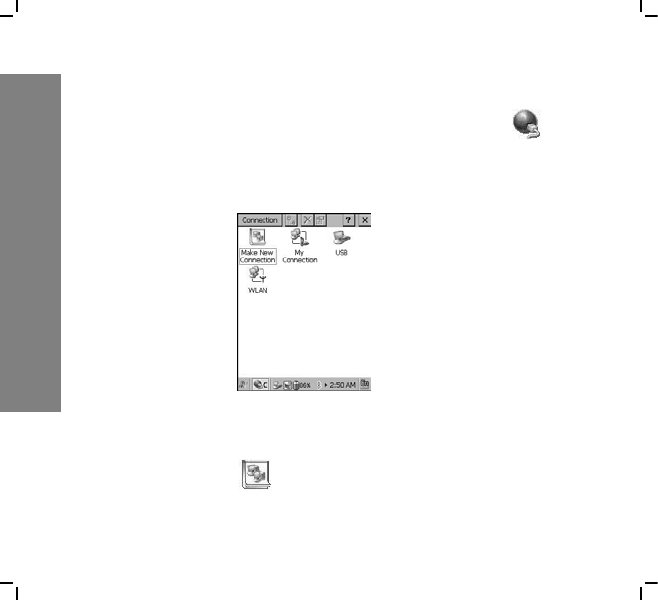
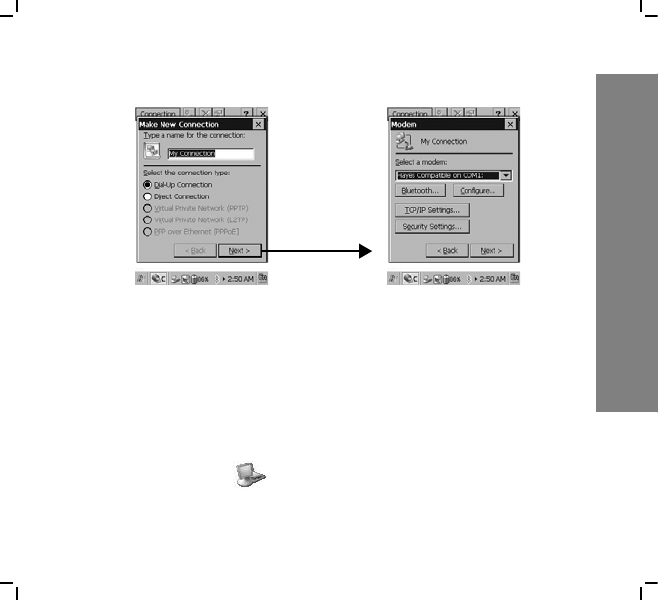
Network and dial-up connection
Double-click “Network and Dial-up Connection” icon to
open Connection page, you have three ways to set up connec-
tion: Make new connection, USB and WLAN.
To connect via making a new connection
1. Double-Click , enter a name for the connection and
select the connect type.
WF35 settings
45
2. Tap “Next“ to set details for your new connection.
3. Tap “Next“ to continue.
4. Tap “Finish“ to complete settings.
To connect via USB
1. Connect device to PC via USB.
2. Double-click to connect.

WF35 settings
46
To connect via WLAN
Double-click to set up connection.
WF35 settings
47
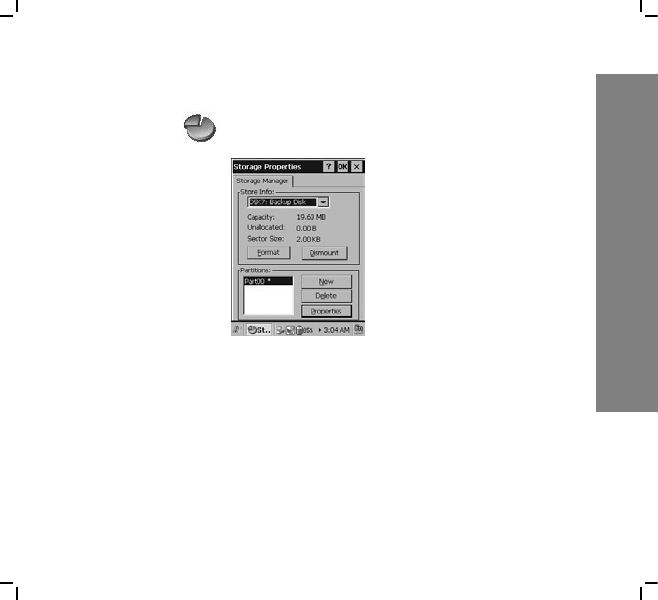
Storage manager settings
Double-click to open Storage Properties.
1. Tap “Format“ to to erase all data on the storage device
permanently.
2. Tap “New” to create a new partition.
3. Tap “Delete“ to delete all data on the partition perma-
nently.
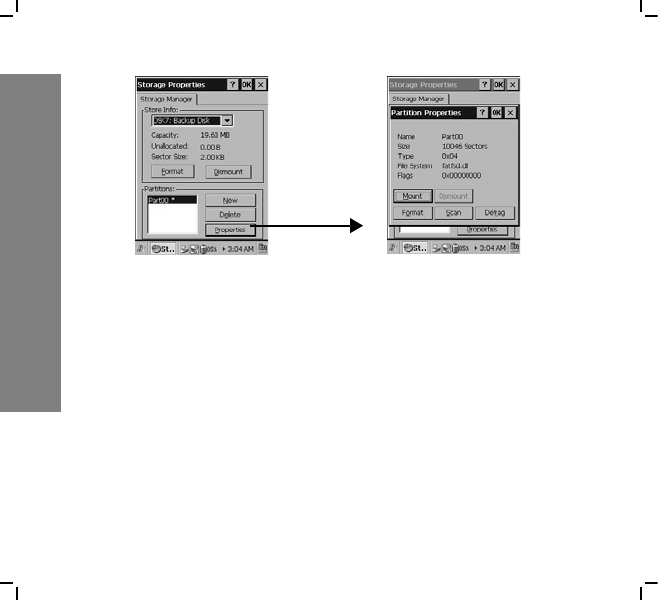
4. Tap “Properties“ to view the selected partition properties.
WF35 settings
48
5. Tap “Format“ in Partition Properties to set format param-
eters, and then tap “Start“ to format.
6. Tap “Scan“ to start scanning all FATs on volume.
7. Tap “Defrag“ to start defraging.

WF35 settings
49
System backup
Please close all active applications/programs before proceeding
to backup, it will ensure backup data the most up-to-date snap-
shot of the system.
Double-click to open System Backup page.
1. Tap the pull down arrow to select backup type and corre-
sponding options below, and then tap “Start“.

WF35 settings
50
2. Select “Restore“, tap “File“ to select files you want to
restore, tap “OK“ and tap “Start“ to start restore.
Note: Restore will overwrite all existing data in the system!