Group Sense Mobile Tech B176 Handheld POS User Manual DT4000 User Guide V1 0
Group Sense Mobile-Tech Limited Handheld POS DT4000 User Guide V1 0
User Manual
DT4000
User Guide
Copyright2013GroupSenseMobile-TechLimited.Allrightsreserved.
2
Contents
Copyright .......................................................................................................................................3
Disclaimer......................................................................................................................................3
RegulatoryInformation..................................................................................................................4
SafetyInformation .........................................................................................................................5
GettingStarted ...............................................................................................................................6
DeviceOverview ......................................................................................................................6
InstallingandRemovingtheBattery ........................................................................................7
BatteryCharging.......................................................................................................................8
LEDStatusDescription ............................................................................................................9
PoweringtheDeviceOnandOff............................................................................................10
SuspendingtheDevice ...........................................................................................................10
UsingtheDevice..........................................................................................................................11
StatusBarIcons......................................................................................................................11
ViewingSystemInformation..................................................................................................12
UsingWi-Fi ............................................................................................................................12
UsingBluetooth......................................................................................................................14
UsingNFC..............................................................................................................................16
AdjustingVolume ...................................................................................................................17
AdjustingBrightness ..............................................................................................................18
EnablingAuto-rotatescreen ...................................................................................................19
AdjustingScreentimeout&Screendimtimeout ...................................................................19
DefiningKeys.........................................................................................................................21
ChangingLanguage................................................................................................................21
AdjustingDate&Time ..........................................................................................................22
PerformingSystemBackup ....................................................................................................23
PerformingSystemRestore ....................................................................................................24
3
Copyright
Copyright2013GroupSenseMobile-TechLimited.Allrightsreserved.
No part of this document may be reproduced, distributed, translated, or stored in any form
without the prior written permission of Group Sense Mobile-Tech Limited. All brands and
productnamesmentionedhereinmaybetrademarksorregisteredtrademarksoftheirrespective
owners.Productspecificationsaresubjecttochangewithoutpriornotice.
Disclaimer
Thecontentsofthisdocumentareprovidedasis.GroupSenseMobile-TechLimitedmakesno
representationsorwarrantieswithrespecttothe contentshereinand specificallydisclaimsany
express or implied warranties of merchantability or fitness for any particular purpose. Group
SenseMobile-TechLimitedreservestherighttorevisethisdocumentatanytimewithoutprior
notice.

4
RegulatoryInformation
FCCStatement
ThisdevicecomplieswithPart15oftheFCCRules.Operationissubjecttothefollowingtwo
conditions:(1)Thisdevicemaynotcauseharmfulinterference,and(2)thisdevicemustaccept
anyinterferencereceived,includinginterferencethatmaycauseundesiredoperation.Changesor
modifications not expressly approved by the party responsible for compliance could void the
user’sauthoritytooperatetheequipment.
FCCRadiationExposureStatement
This device should be installed and operated with a minimum separation distance of5mm
between the radiator and all persons. This transmitter must not be co-located or operated in
conjunctionwithanyotherantennaortransmitter.
CEStatement
ThisdevicehasbeentestedandfoundtocomplywiththefollowingEUDirectives:
R&TTEDirective(1999/5/EC)
EMCDirective(2004/108/EC)
LowVoltageDirective(2006/95/EC)
TheassessmentofcomplianceofthedevicewasperformedaccordingtothefollowingEuropean
standards:
EMC:EN301489-1/-17
Health:EN50371
Safety:EN60950-1
Radio:EN300328

5
RadiationExposureStatement
Thisdeviseisdesigned,tested,andmanufacturedtocomplywiththelimitsforexposuretoRF
energy set by international regulatory agencies. “Specific Absorption Rate,” or SAR, refers to
therateatwhichthebodyabsorbsRFenergy.TheSARlimitsforWi-FiandBluetoothare1.6
wattsperkilogram(W/kg)fortheFCC,and2.0 W/kgfortheCounciloftheEuropeanUnion.
Thisdevicehasbeentested,andmeetstheFCCandEuropeanUnionRFexposureguidelinesfor
WiFiandBluetoothoperation.
SafetyInformation
Please read the following information carefully before using the device for the first time, and
keepthisQuickStartGuideinasafeplaceforfuturereference.
Alwaystreatthedevicewithcareandkeepitinacleananddust-freeenvironment.
Do not expose the device to extremely hot, cold or humid environment. The operation
temperatureisfrom–10 Cto50 C.
Donotusethedeviceinwetorrainyconditions.
Donotchargethedeviceinextremelyhot(over40 C)orcoldconditions(below0 C).
Donotattempttodisassembleormodifythedeviceincludingthecharger.
Donotoperatethedevicewhenyourhandsarewet.
Donotinsertforeignobjectsintotheopeningsofthedevice.
Useonlythechargerandbatteryapprovedforthedevice.
Installthecradleonaflatandstablesurface.
Donotcascadeover3cradlesinseries.
Donotusethechargerifthepowercordorplugisdamaged.
Donotdisassemble,crushorpuncturethebattery.
Donotexposethebatterytohightemperatures.
Donotletbatteryterminalstouchothermetalobjectsthatcouldleadtoshort-circuitofthe
battery.
Donotdisposeofthebatteryinfireorwater.
Disposeofusedbatteryproperlyaccordingtolocallawsandregulations.
6
GettingStarted
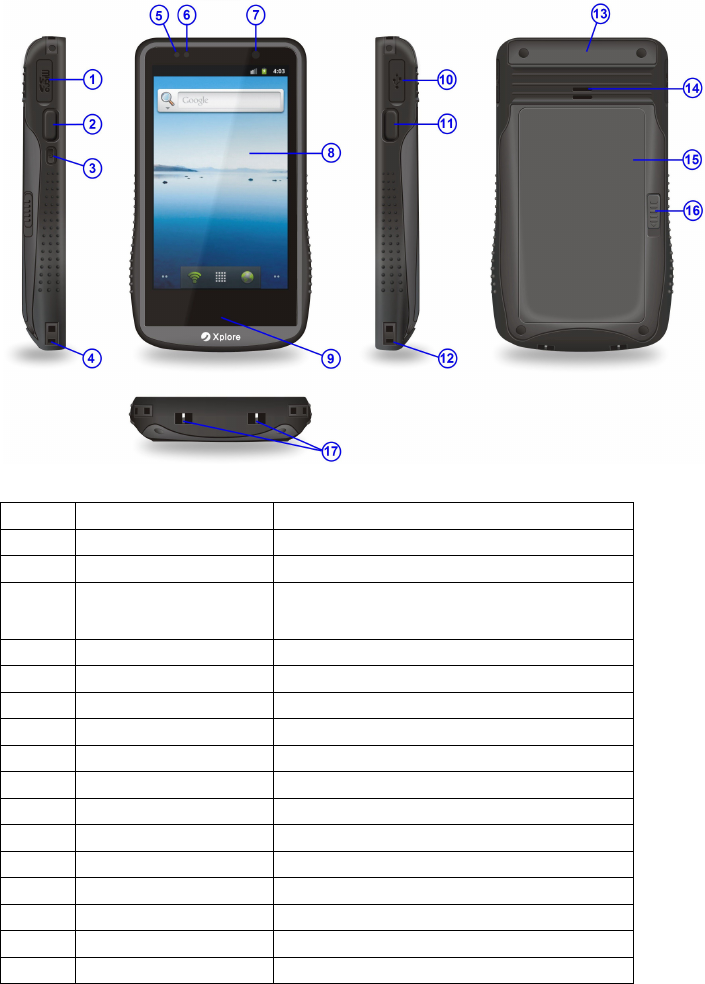
DeviceOverview
No. Item Description
1 MicroSDcardcover OpenthecovertoaccesstheMicroSDcardslot
2 Leftsidekey Configurableshortcutkey.DefaultasMenukey
3 Powerkey Pressandholdtoturnthedeviceonoroff.
Ifthedeviceison,presstosuspend.
4/12 Strapeyelet Attachtoanti-dropstring
5 ConfigurableLED SoftwareconfigurableLED
6 DeviceLED PowerandWiFiconnectionstatusindicator
7 Ambientlightsensor Autoscreenbrightnesscontrol
8 Touchscreen LCDwithcapacitivetouchscreen
9 NFCreader ScanningareaforNFCtag
10 USBcover OpenthecovertoaccesstheUSBconnector
11 Rightsidekey Configurableshortcutkey.DefaultasBackkey
13 Expansionslotcover RemovecoverforAdd-onmoduleconnection
14 Speaker Monospeaker
15 Batterycover Removethebatterycovertoaccessthebattery
16 Batterycoverlock Slidedowntoreleasethebatterycover
17 Chargingplates Contactplatesforcharginginthecradle

7
No. Item Description
1 SparebatteryLED Sparebatterychargingstatusindicator
2 PowerLED Cradlepowerconnectionindicator
3 Batteryslot Tochargesparebattery
4 Chargingcontactplates TochargethePDA
5 DCjack ConnectAC/DCAdaptororDCpowercable
6 DCpowercable Extensionpowercableforcascadingcradles
InstallingandRemovingtheBattery
InstallingtheBattery
1.Alignthebatterymetalcontactswiththecontactpinsinsidethebatterycompartment.
2.Pressthebatterydownuntilthebatterylockclicksintoplace.
3.Alignthebatterycoverwiththebatterycompartment;andpushthebatterycoverdownuntilit
islocked.
RemovingtheBattery
Note:Alwayspoweroffthedevicebeforeremovingthebattery.
1. Slidethebatterycoverlockdownuntilthebatterycoverejectsslightly.
8
2. Removethebatterycover.
3. Slidethebatterylocktotherightandholditattheunlockedposition.
4. Liftthethebatteryfromthebatterycompartment.
BatteryCharging
ChargingtheDevice
1. ConnecttheAC/DCadaptortotheDCjackofthecradle.
2. Plug the AC/DC adaptor into a suitable power socket. The cradle power LED will turn
greenwhenpowerissuppliedtothecradle.
3. Insertthedevicetothecradleslot.ThedeviceLEDwillflashamberwhilecharging,thenit
willturngreenwhenfullycharged.
ChargingtheSpareBattery
1. Alignthebatterymetalcontactswiththecontactplatesofthebatteryslot.
2. Slide thebatteryto the battery slot. Thecradle batteryLED willturn red whilecharging,
thenitwillturngreenwhenfullycharged.
CascadingtheDT4000Cradles
DT4000 cradles can be cascaded in series to charge the DT4000 devices and batteries
simultaneouslywithoneAC/DCadaptor.Eachadaptorsupportsmaximum3cascadedcradles.
Important:Donotcascadeover3cradlesinseries.
1. DisconnectAC/DCadaptor,andturnover2cradles.
2. ConnecttheDCpowercableofonecradletotheDCpowerconnectoroftheothercradle.
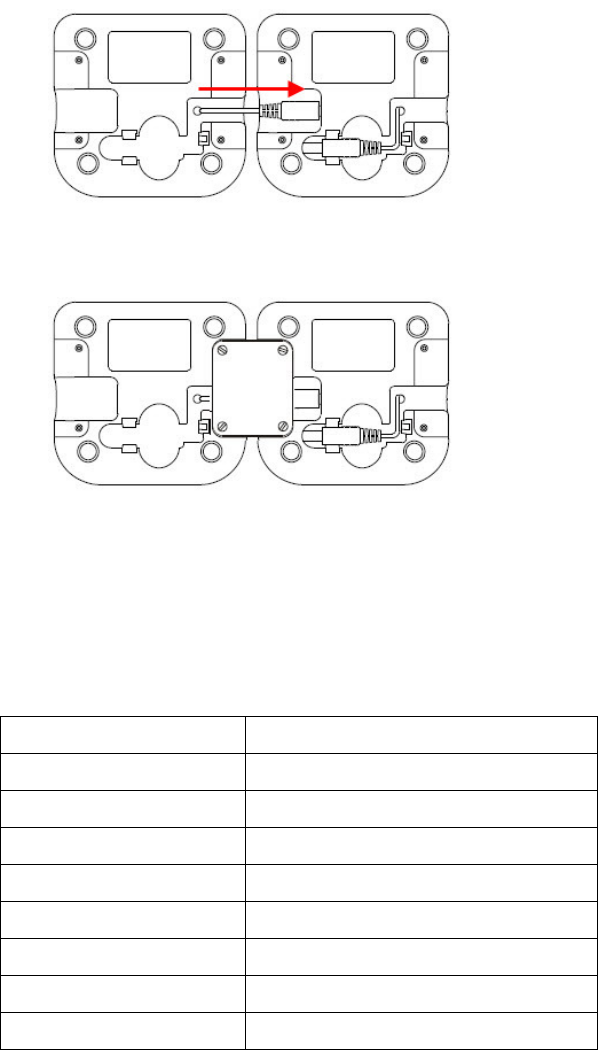
9
3. Applythemetalplateaccessorytotherecessareabetweenthecradles,andfastenthemetal
platescrewswithacoinorscrewdriver.
4. Re-connecttheAC/DCadaptortothecradle.
LEDStatusDescription
DeviceLED
LEDcolour Description
Red Batterylow
FlashingAmber Charging
Green FullyCharged
FlashingBlueQuickly Wi-FiSearching
FashingBlueSlowly Wi-FiConnected
Off Wi-FiDisconnected
AquaBlue PoweringOn
FlashingGreen Batterydoorisopen

10
CradlePowerLED
LEDcolour Description
Green Cradleispoweredon
Off Cradleispoweredoff
CradleBatteryLED
LEDcolour Description
Red Sparebatteryischarging
Green Sparebatteryisfullycharged
Off Batteryslotisempty
PoweringtheDeviceOnandOff
PoweringontheDevice
PressandholdthePowerkeyforatleast2secondsuntilthedeviceLEDturnsaquablue.
Note:Thedevicecanonlypoweronwhenthebatterycoverisclosed.
PoweringofftheDevice
PressandholdthePowerkeyforatleast2seconds,andfollowthescreeninstructionstopower
offthedevice.
SuspendingtheDevice
Ifthedeviceison,pressthePowerkeyonceorclosetheflipcovertosuspendthedevice(i.e.
enteringsleepmode),savingbatterypower.
Toresumeoperationfromsleepmode,pressthePowerkeyonceoropentheflipcover.
11
UsingtheDevice
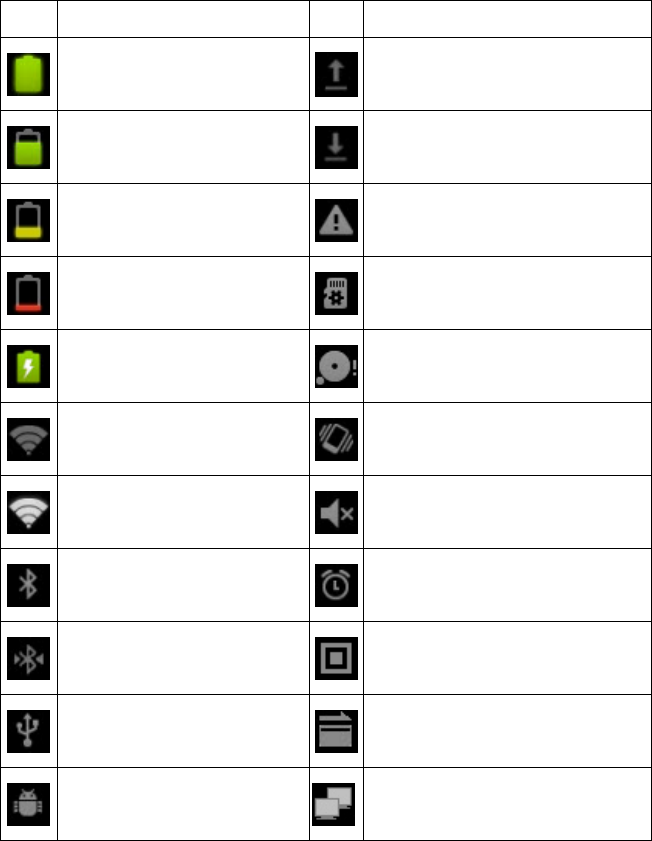
StatusBarIcons
Icon
Description Icon
Description
Batteryisfull.
Uploadingdata.
Batteryispartiallydrained.
Downloadingdata.
Batteryislow.
Warningnotification.
Batteryisverylow.
PreparingMicroSDcard.
Batteryischarging.
MicroSDcardorinternalmemoryis
full.
WLANfeatureison,butnot
connectedtoanetwork.
Vibratemodeison.
ConnectedtoaWLAN.
Silentmodeison.
Bluetoothison.
Alarmisset.
ConnectedtoaBluetoothdevice.
Connectedtotheadd-onBarcode
scannermodule.
USBconnected.
Connectedtotheadd-onMSRmodule.
USBdebuggingconnected.
EthernetoverUSB.
12
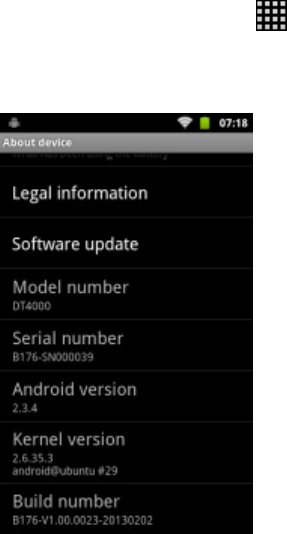
ViewingSystemInformation
1. SelectApplicationdrawer >Settings>Aboutdevice
2. Scrolltoviewmodelnumber,serialnumber,softwareversionetc.
UsingWi-Fi
ConnectingtoWLAN
1. SelectApplicationdrawer>Settings>WLAN
2. SelecttherequiredAPunderWLANnetworks.
3. Inputthenetworkkeywhenprompted.SelectLockSingleNetworkcheckbox,andselect
Connect.
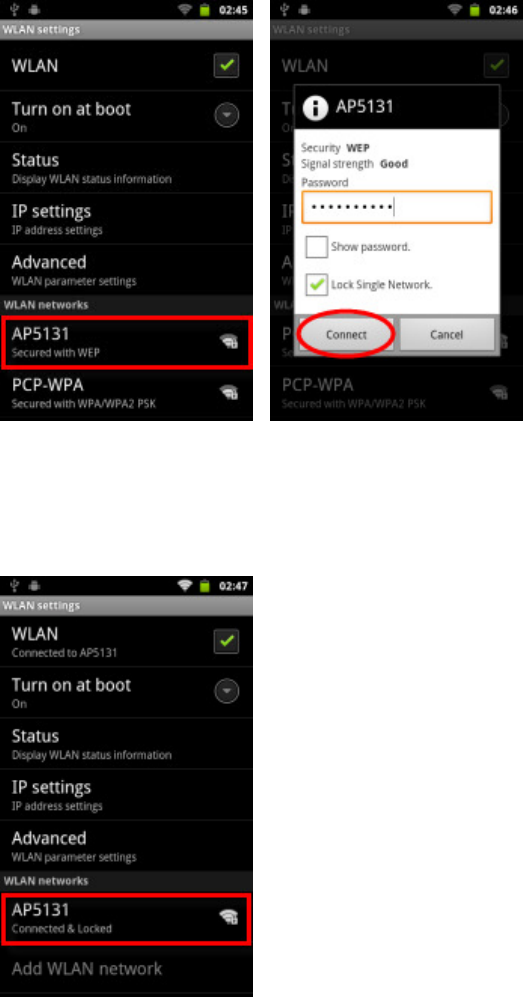
13
4. Onceconnected,theAPwillindicateConnected&Locked,andthedeviceLEDwillbe
blinkingblueslowly.
5. SelectAdvancedtoperformadvancedsettingsifrequired.

14
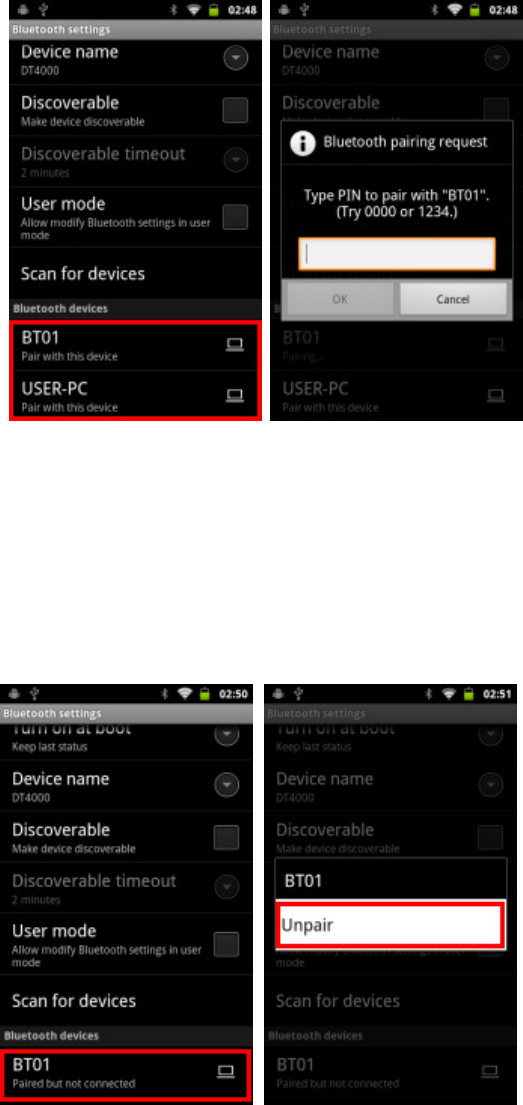
UsingBluetooth
ConnectingtoaBluetoothDevice
1. SelectApplicationdrawer>Settings>Bluetooth.
2. SelectBluetoothcheckboxtoturnonBluetooth.
3. SelectScanfordevices.
4. SelecttherequireddeviceunderBluetoothdevices.
5. InputPINwhenpromptedtopair.
15
UnpairingaBluetoothDevice
1. IntheBluetoothdeviceslist,touchandholdonapairedbluetoothdeviceuntilapopup
dialogboxappears.
2. SelectUnpair.
16
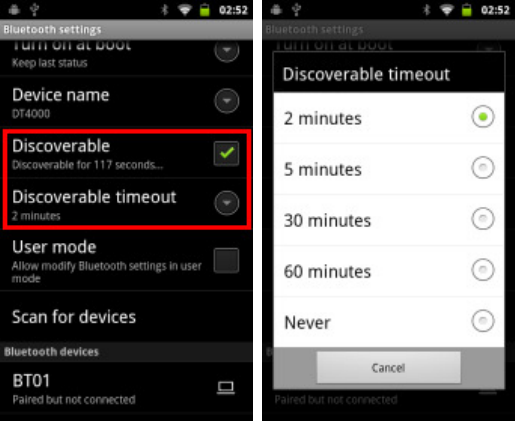
MakingtheDeviceDiscoverable
1. SelectDiscoverable.
2. SelectDiscoverabletimeouttoadjustthetimeoutperiodifneeded.
UsingNFC
1. SelectApplicationdrawer>Settings>NFC
2. SelectNFCcheckboxtoturnonNFC.

17
Note:Placetagswithin2mmoftheNFCscanningareatoensuresuccessfulscans.
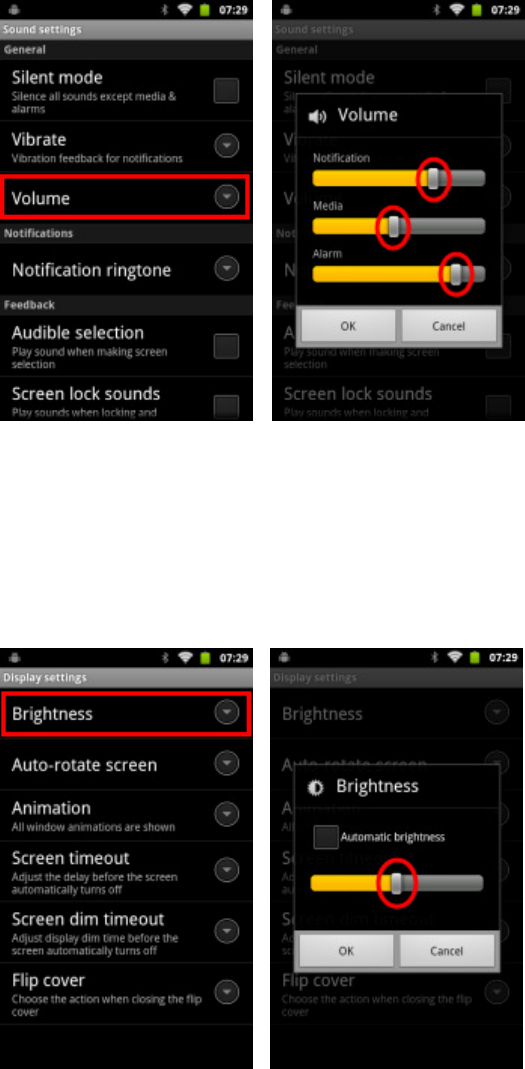
AdjustingVolume
1. SelectApplicationdrawer>Settings>Sound>Volume.
2. Dragtheslidebartoadjustthevolume
18
AdjustingBrightness
1. SelectApplicationdrawer>Settings>Display>Brightness.
2. Dragtheslidebartoadjustthebacklight,orselectAutomaticbrightnesscheckboxfor
autobrightnessadjustment.
19
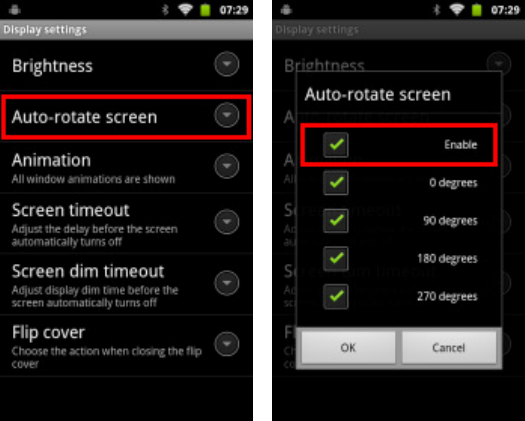
EnablingAuto-rotatescreen
1. SelectApplicationdrawer>Settings>Display>Auto-rotatescreen.
2. SelecttheEnablecheckbox.
3. Selecttherotationangles,andselectOK.
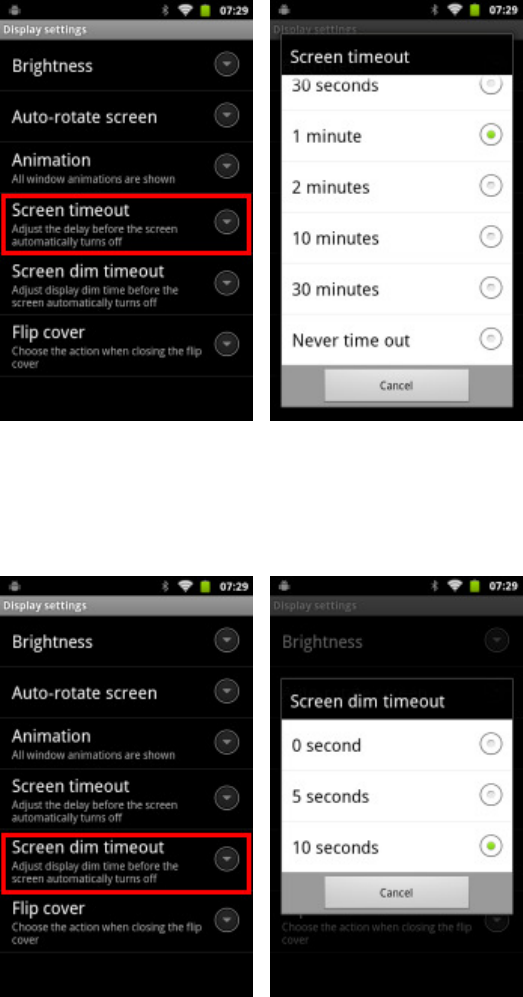
AdjustingScreentimeout&Screendimtimeout
1. SelectApplicationdrawer>Settings>Display>Screentimeouttoadjusttheidle
periodelapsedbeforeturningoffscreen.
20
2. SelectApplicationdrawer>Settings>Display>Screendimtimeouttoadjustthe
screendimperiodbeforescreenisturnedoff.
21
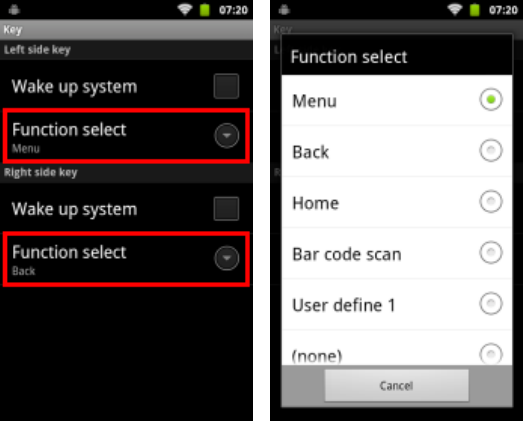
DefiningKeys
1.SelectApplicationdrawer>Settings>Key.
2.InLeftsidekeyandRightsidekeymenu,selectFunctionselecttochangethekeydefinition.
Note:TheLeftsidekeyandRightsidekeyaredefaultasMenukeyandBackkey.
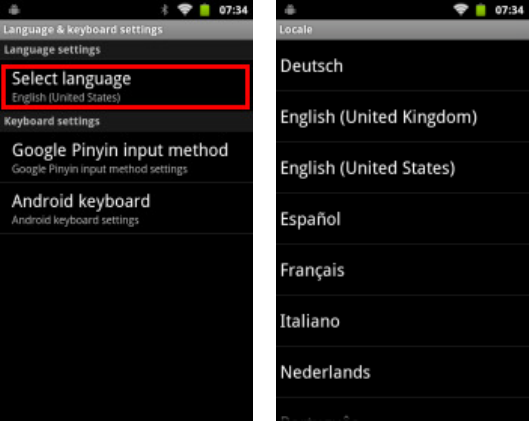
ChangingLanguage
1. SelectApplicationdrawer>Settings>Language&keyboard>Selectlanguage
2. Selectalanguage.
22
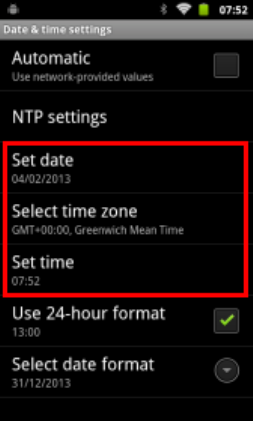
AdjustingDate&Time
1. SelectApplicationdrawer>Settings>Date&time.
2. Tosetthedateandtimemanually,adjustSetdate,Selecttimezone,Settimeaccordingly.
Alternatively,selecttheAutomaticcheckbox,andinputNTPserverdetailsinNTPsettingsfor
automatictimesync.
23
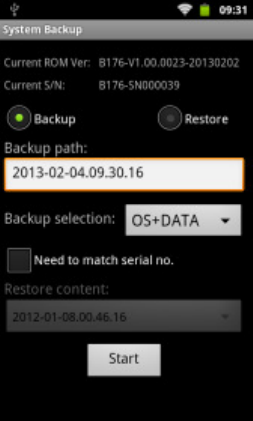
PerformingSystemBackup
1. InsertaMicroSDcardwithminimum400MBoffreespacetotheMicroSDcardslot.
2. SelectApplicationdrawer>SystemBackup.
3. SelecttheBackupbutton.
4. SelectbackupdataoptionfromBackupselectiondropdownmenu.
5. Torestorethebackupimageoncurrentdeviceonly,selectNeedtomatchserialno.
checkbox.
6. SelectStart.
Note:Closeallactiveprogramsbeforestartingbackuporrestore.
24
PerformingSystemRestore
1. InserttheMicroSDcardwithbackupimagetotheMicroSDcardslot.
2. SelectApplicationdrawer>SystemBackup.
3. SelecttheRestorebutton.
4. SelectthebackupimagefilefromRestorecontentdropdownmenu.
5. SelectStart.

25
26
Copyright2013GroupSenseMobile-TechLimited.
Allrightsreserved.
http://www.gsml.com.hk
FCC Statement
1ÿRF Exposure Information and Statement
The SAR limit of USA (FCC) is 1.6 W/kg averaged over one gram of tissue.
Device types DT4000 D: VRI-B176) has also been tested against this SAR
limit. The highest SAR value reported under this standard during product
certification when properly worn on the body is 0.118W/Kg. This device
was tested for typical body-worn operations with the back of the handset
kept 5mm from the body. To maintain compliance with FCC RF exposure
requirements, use accessories that maintain a 5mm separation distance
between the user's body and the back of the handset. The use of belt clips,
holsters and similar accessories should not contain metallic components
in its assembly. The use of accessories that do not satisfy these requirements
may not comply with FCC RF exposure requirements, and should be avoided.
This device complies with part 15 of the FCC rules. Operation is subject to
the following two conditions: (1) this device may not cause harmful interference,
and (2) this device must accept any interference received, including interference
that may cause undesired operation.
NOTE: The manufacturer is not responsible for any radio or TV interference
caused by unauthorized modifications to this equipment. Such modifications
could void the user’s authority to operate the equipment.
NOTE: This equipment has been tested and found to comply with the limits
for a Class B digital device, pursuant to part 15 of the FCC Rules.
These limits are designed to provide reasonable protection against harmful
interference in a residential installation. This equipment generates uses
and can radiate radiofrequency energy and, if not installed and used in
accordance with the instructions, may cause harmful interference to radio
communications. However, there is no guarantee that interference will not
occur in a particular installation. If this equipment does cause harmful
interference to radio or television reception, which can be determined by
turning the equipment off and on, the user is encouraged to try to correct
the interference by one or more of the following measures:
- Reorient or relocate the receiving antenna.
- Increase the separation between the equipment and receiver.
-Connect the equipment into an outlet on a circuit different from
that to which the receiver is connected.
-Consult the dealer or an experienced radio/TV technician for help
Changes or modifications made to this equipment not expressly approved
by Group Sense Mobile-Tech Limited may void the FCC authorization to
operate this equipment.