Grundig Business Systems GXR2100 Digta CordEx Microphone User Manual
Grundig Business Systems GmbH Digta CordEx Microphone Users Manual
UserManual.wiki
>
Grundig Business Systems
>
GXR2100 User Manual
Users Manual
Navigation menu
Upload a User Manual
Namespaces
Wiki Guide
HTML
PDF
Info
Views
User Manual
Discussion / Help
Navigation
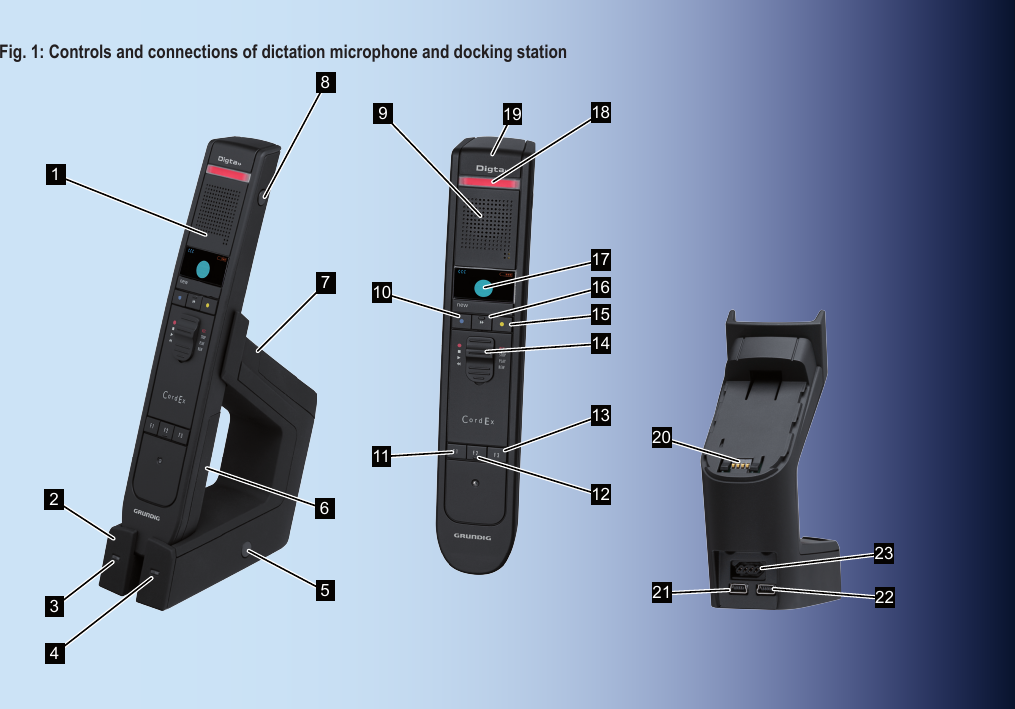
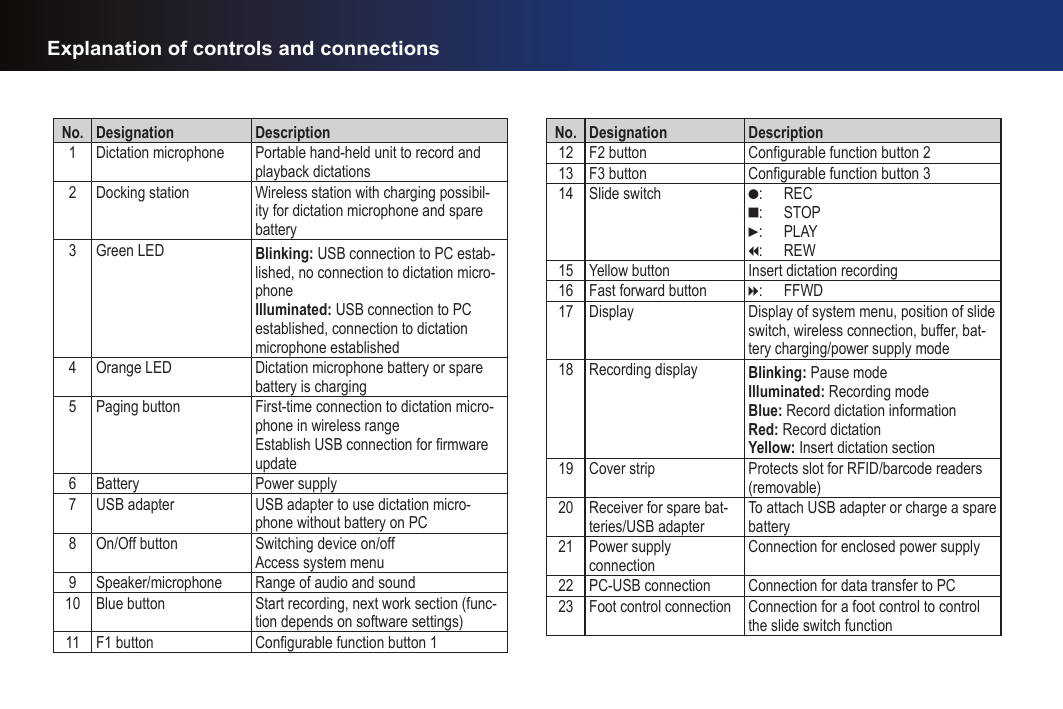
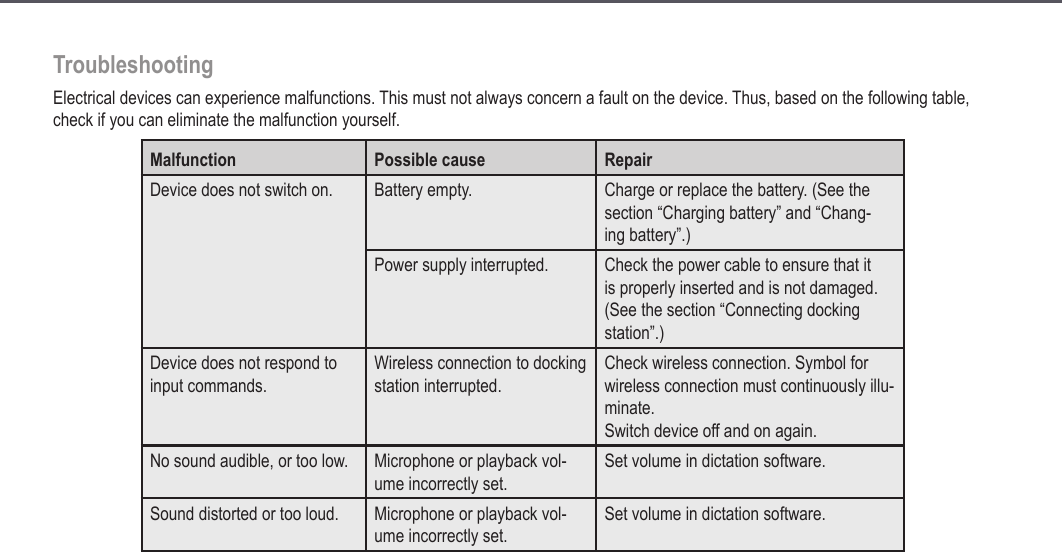
![12AccessoriesYou will find original accessories approved by the manufacturer for Digta CordEx under: www.grundig-gbs.comThe performance features described by Grundig only apply to genuine Grundig accessories. Please make sure to choose only genuine accessories from Grundig. Product liability and warran-ty service are provided only in this case. The use of non-Grundig accessories or those which are not recommended and approved by Grundig automatically void any warranty claims towards Grundig.Start-upSystem requirementsDigtaSoft/DigtaSoft Pro, as of V4.2.0 by Grundig Business Systems or compatible dictation software by other manufacturers.Processor (500 MHz or higher)Windows 2000 SP4 (Rollup 1), Windows XP SP2, Windows VistaUSB 1.1 or USB 2.0MAPI compatible e-mail program for e-mail connection (e.g. Microsoft Outlook)Connecting docking stationPlace docking station [2] near the PC.Connect plug of power supply (as seen from the back) to left jack on docking station.■■■■■►►Start-up](https://usermanual.wiki/Grundig-Business-Systems/GXR2100/User-Guide-1037216-Page-12.png)
![13 WARNING! Insert the plug of the power supply only into power sockets which provide the line voltage speci-fied on the rating label. Otherwise there is a danger of fire, explosion and overheating.The orange LED [4] on docking station briefly illuminates when current supply is available.Connect USB cable to PC and docking station. For this pur-pose, plug USB cable (as seen from the back) into right jack of docking station and the other end into USB connection of the PC.►►The green LED [3] on docking station blinks as soon as dock-ing station of Digta CordEx is properly recognized by the PC.Installing softwaredRecording and playback of dictations with Digta Cor-dEx requires dictation software to be installed on the PC, e.g. DigtaSoft or DigtaSoft Pro by Grundig Business Sys-tems. For additional installing information, see operation instructions of dictation software.Start-up](https://usermanual.wiki/Grundig-Business-Systems/GXR2100/User-Guide-1037216-Page-13.png)
![14Charging batteryWARNINGDanger of explosion and burns!Recharge the batteries only with the docking station or in the dictation microphone.Do not use damaged batteries.Disregarding these precautions means risking explosions and burns.The battery has to be attached to the receiver of the dictation microphone and must be charged for start-up. Alternatively the dictation microphone can be supplied with power by means of a special USB adapter (see section “Connecting dictation micro-phone directly to PC”).Push battery into receiver on back of dictation microphone in direction of arrow until it snaps into place.■■►Place dictation microphone [1] into docking station [2].The orange LED [4] indicates that battery is being charged. When LED goes out, the battery is completely charged.dThe charging process does not start immediately, rather after several minutes.Switching on dictation microphonePress On/Off button [8] on right side of dictation microphone [1] and hold until company logo appears in display [17].On docking station [2] the green LED [3] signals the successful registration of the dictation microphone at docking station by continuous illumination.►►Start-up](https://usermanual.wiki/Grundig-Business-Systems/GXR2100/User-Guide-1037216-Page-14.png)
![15dTo conserve the battery, the device switches to sleep mode if no button is pressed on the dictation microphone for an extended time. By pressing any button, the device becomes operational again.If device is not used for an extended time, it switches off completely.Setting languageThe dictation microphone features a system menu for internal settings. During initial start-up, it is practical to set the display language.Additional configuration options via system menu are described in section “Settings in system menu”.Briefly press On/Off button [8] on dictation microphone [1] until the text Menu appears at bottom left of display text.Press blue button Menu [10].Move selection (marker) from one menu item to the next via the yellow button (up) [15] and F3 button (down) [13] on dicta-tion microphone .Select Language and press fast forward h OK [16].►►►►The corresponding submenu appears.Select the desired language and press fast forward h OK.Press blue button CANC to exit system menu.►►Start-up](https://usermanual.wiki/Grundig-Business-Systems/GXR2100/User-Guide-1037216-Page-15.png)
![16OperationRecording new dictationSwitch on dictation microphone [1].Start dictation software.Move slide switch [14] to e position.Press blue button [10] on dictation microphone.The display [17] shows readiness to record by the pause symbol.At the same, the recording indicator [18] blinks red.The dictation microphone is now ready to record. Move the slide switch to position g and dictate into the micro-phone [9].The recording symbol appears on display, and recording indi-cator illuminates permanently red.dIf you leave the reception area of the docking station dur-ing recording, the wireless connection to the dictation microphone is interrupted and the dictation is placed in a buffer up to 1 minute (see section “How to deal with inter-rupted wireless connection”). Interrupting dictationMove slide switch [14] to e position. The pause symbol appears on the display [17]. The recording indicator [18] blinks red.►►Operation](https://usermanual.wiki/Grundig-Business-Systems/GXR2100/User-Guide-1037216-Page-16.png)
![17Continuing dictationMove the slide switch [14] on the dictation microphone [1] to position g and continue dictating into the microphone [9].Playing back dictationMove the slide switch [14] on the dictation microphone [1] to position i (rewind) or press fast forward h [16] to move to the desired location in the recording.During fast forward/rewind, the according symbols appear on the display [17]. Move slide switch to f position.The dictation is played back at the current position.Overwrite dictationMove the slide switch [14] on the dictation microphone [1] to position i (rewind) or press fast forward h [16] to move to the position in the dictation to overwrite.►►►►Move slide switch to e position.Move the slide switch to position g and dictate the changes.The recording indicator [18] will be lit red. The dictation will be overwritten as of the previously selected position.Adding to dictationMove the slide switch [14] on the dictation microphone [1] to position e.Press fast forward h [16] and locate the end of the dictation.Move the slide switch to position g and dictate the additions into the microphone [9]. The dictation addition will be at the end.Inserting recordingAdditional recordings can be inserted into an existing dictation without overwriting the old dictation.Move the slide switch [14] on the dictation microphone [1] to position i (rewind) or press fast forward h [16] to move to the position in the dictation where text is to be inserted.►►►►►►Operation](https://usermanual.wiki/Grundig-Business-Systems/GXR2100/User-Guide-1037216-Page-17.png)
![18dThe function can vary, depending on applied dictation software.Move slide switch to e position.Press yellow button Insert [15].Move the slide switch [14] to position g and dictate the text to be added into the microphone.Starting at preselected position, new text is integrated into existing dictation.Move slide switch to e position.The recording will be interrupted. To continue, move the slide switch to position g.Press yellow button Insert.The inserted recording is finished.dDepending on applied dictation software, it is possible to insert additional information text (info) into dictations.For additional information, see operating instructions of dictation software.►►►►►Finishing dictationStopping the recording: Move the slide switch [14] on the dictation microphone [1] briefly to position i (rewind) or press fast forward h [16].To finish dictation: Press blue button [10].dDepending on applied dictation software, function of the blue button can vary.For additional information, see operating instructions of dictation software.Switching off dictation microphoneKeep On/Off button [8] on dictation microphone [1] pressed until indication in display [17] goes out.►►►Operation](https://usermanual.wiki/Grundig-Business-Systems/GXR2100/User-Guide-1037216-Page-18.png)
![20Connecting dictation microphone directly to PCThe dictation microphone can be connected directly to PC by means of a special USB adapter for operation without battery. At time of delivery, the USB adapter is located in the docking station at the receiver for spare battery.Pull USB adapter [7] in direction of the arrow from docking sta-tion [2] .► NOTICE! Lift the cover plate of the adapter careful-ly using the point of a ballpoint pen or screwdriver. Using other tools may damage the cover plate.Connect USB plug to jack.Close cover plate. Ensure that the nibs of the cover plate prop-erly fit into the grooves of the adapter housing.Push USB adapter on back of dictation microphone [1] in direction of arrow into battery holder.►►►►Extended operation](https://usermanual.wiki/Grundig-Business-Systems/GXR2100/User-Guide-1037216-Page-20.png)
![21The dictation microphone is now ready.Changing batteryWARNINGDanger of explosion and burns!Recharge the batteries only with the docking station or in the dictation microphone.Do not use damaged batteries.Disregarding these precautions means risking explosions and burns.■■The useful life of Digta CordEx can be expanded by means of a replacement battery, without causing longer pauses by battery charging times. A replacement battery is available as accessory and not included in the scope of delivery.Switch off dictation microphone [1].Remove battery [6] on back of dictation microphone in direc-tion of arrow.Insert replacement battery into receiver of dictation micro-phone in reverse direction of arrow.The dictation microphone is now ready.An empty battery can be charged during operation at the dock-ing station.►►►Extended operation](https://usermanual.wiki/Grundig-Business-Systems/GXR2100/User-Guide-1037216-Page-21.png)
![22Remove already existing battery or USB adapter from dock-ing station.Insert battery to be charged completely into receiver of docking station in reverse direction of arrow.The orange LED indicates that battery is being charged. When LED goes out, the battery is completely charged.dThe battery on the docking station is only charged if dic-tation microphone is not located in docking station. Other-wise the battery in dictation microphone is charged first.The charging process does not start immediately, rather after several minutes.►►Setting up function buttonsFunction buttons F1 to F3 [11-13] can be assigned with spe-cial functions. Set-up is performed via software AdapterServer. Depending on applied dictation software, assignment of function buttons can vary.dFor additional set-up information, see operating instruc-tions of dictation software.Controlling dictation microphone via foot controlThe dictation microphone can be operated by means of a foot control (optionally available). This allows the control of dictation microphone functions without the use of hands.Connecting foot controlPlug connection cable of foot control into the provided connec-tion jack [23] on back of docking station.►Extended operation](https://usermanual.wiki/Grundig-Business-Systems/GXR2100/User-Guide-1037216-Page-22.png)
![24Remove existing cover strip [19] from dictation microphone [1].Attach new cover strip to dictation microphone.Connect barcode/RFID reader to dictation microphone. See operating instructions of accessory devices.dFor details on use of barcode/RFID reader see operating instructions of reader and dictation software.Operating several dictation microphones/docking stationsTo be able to record with one dictation microphone in different rooms with separate docking stations, a dictation microphone can be operated on different docking stations.►►►Registering at different docking stationsPresettingSwitch on dictation microphone [1].In system menu, set option Station allocation to Dynamic pair. (see section “Settings in system menu”).dThe setting Dynamic pair. is a factory setting.Switch off dictation microphone.RegisteringApproach docking station [2] with which connection is to be established, closely with dictation microphone [1].Switch on dictation microphone.The green LED [3] of docking station blinks fast when dictation microphone registers for the first time at the station.Press paging button [5] on docking station.The dictation microphone is now connected to docking station. Repeat the registration process for each docking station with which the dictation microphone is to be connected.►►►►►►Extended operation](https://usermanual.wiki/Grundig-Business-Systems/GXR2100/User-Guide-1037216-Page-24.png)
![25dRenewed registration is only required if dictation micro-phone has been disconnected from docking station for an extended time. Otherwise it is sufficient to switch on the dictation microphone in reception area of docking station to establish connection.Permanent registration at a docking stationIf several docking station are in close proximity (e.g. in one room), the dictation microphone may only be connected to one selected station when switched on.Switch on dictation microphone [1] near the permanently assigned docking station [2].The dictation microphone registers in variable mode at the docking station.In system menu, set option Station allocation to Static pair. (see section “Settings in system menu”).The dictation microphone is now permanently linked to the docking station and connects with it every time it is switched on.►►dThe setting can only be reversed by means of the perma-nently assigned dictation microphone.Installing firmware updates Firmware updates include important changes by the manufactur-er to the functions of the Digta CordEx. New firmware is available on the Internet site at:www.grundig-gbs.com An Internet connection is required for downloading.NOTICEThe device can be damaged if the update process is interrupted!Do not interrupt the update process!If the firmware is incomplete, the device may be rendered unusable.dPrior to an update check if a firmware with a higher ver-sion number is available.Switch on dictation microphone [1].■►Extended operation](https://usermanual.wiki/Grundig-Business-Systems/GXR2100/User-Guide-1037216-Page-25.png)
![26Check firmware version in dictation microphone (see section “Settings in system menu”).If a new firmware version for Digta CordEx is available online, download the corresponding file onto the PC.Keep paging button [5] on docking station [2] pressed down for several seconds.Now the Digta CordEx registers itself for data transfer at the PC and is assigned with a separate drive letter. Copy the new firmware file “CordEx.hex” to the Digta CordEx drive.The dictation microphone shows the progress of the update in display [17].After successful transfer, the dictation microphone is rebooted.Installation of firmware update is now complete and dictation microphone is ready.Settings in system menuThe dictation microphone features a system menu for internal settings.►►►►Accessing system menuBriefly press On/Off button [8] on dictation microphone [1] until the text Menu appears at bottom left of display text.Press blue button Menu [10].The system menu consists of the following menu items:Connection Start pairing Stop pairingConnects the dictation microphone to a docking station or discon-nects an existing connection. This function is required for multiple device operation (see section “Operating several dictation micro-phone/docking stations”).Version/Info Serial no. FW/UrloaderDisplay of serial number and firmware version. This function is required for firmware update (see section “Installing firmware update”).►►■■Extended operation](https://usermanual.wiki/Grundig-Business-Systems/GXR2100/User-Guide-1037216-Page-26.png)
![27LanguageSelecting display language.Station allocation Static pair. Dynamic pair.Depending on setting, the dictation microphone always perma-nently connects to a docking station or searches for a nearby sta-tion in the reception area. This function is required for multiple device operation (see section “Operating several dictation micro-phones/docking stations”).Changing settingsMove selection (marker) from one menu item to the next via the yellow button (up) [15] and F3 button (down) [13] on dicta-tion microphone [1].Select the entry and press fast forward h [16] OK.The corresponding submenu appears.Select the entry and press fast forward h OK.Press blue button CANC [10] to exit system menu.■■►►►►dIf no button is pressed for an extended time, system menu is automatically exited.Extended operation](https://usermanual.wiki/Grundig-Business-Systems/GXR2100/User-Guide-1037216-Page-27.png)