Grundig Business Systems GZS3000 Digta CordEx Station User Manual
Grundig Business Systems GmbH Digta CordEx Station Users Manual
Users Manual
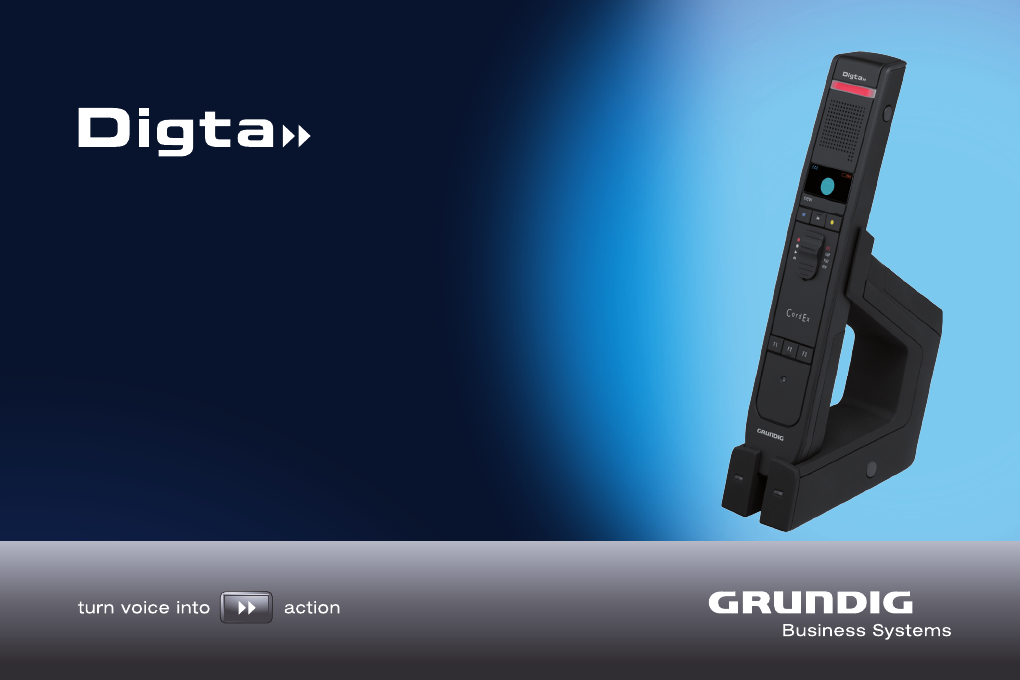
CordEx
>> Operating manual
English

This operating manual contains important instructions for
safe and efficient handling of the Grundig Digta CordEx (herein-
after referred to as “device”). This operating manual is part of the
device and must be kept accessible in the immediate vicinity of
the device for persons working on and with the device. Careful-
ly read and make sure you understand this operating manual and
all product safety labels prior to starting any work with the device.
The basic prerequisite for safe work is compliance with all specified
safety and handling instructions. In addition, all local accident pre-
vention guidelines and general safety regulations effective at the
implementation site of the device apply. Illustrations in this operat-
ing manual are provided for basic understanding and can vary from
the actual model of the device. No claims can be derived from the
illustrations in this operating manual.
Disclaimer
All information and instructions in this operating manual have been
provided under due consideration of applicable guidelines and reg-
ulations, the current and known state of the art, as well as our
many years of in-house experience. The manufacturer assumes no
liability for damages due to:
Failure to comply with the instructions in this operating manual
Improper use / misuse
Willful operation by non-authorized persons
■
■
■
Unauthorized conversions or non-approved technical
modifications
Use of non-approved spare parts
The originator is solely liable to the full extent for damages caused
by such conduct. The agreed upon obligations in the delivery con-
tract, the general terms and conditions, the manufacturer’s delivery
conditions, and the statutory regulations valid at the time the con-
tract was concluded, apply.
Copyright
This operating manual is protected by copyright. No part of this
operating manual may be reproduced in any form or incorporat-
ed into any information retrieval system without written permis-
sion of Grundig Business Systems GmbH (“the Manufacturer”).
Delivery of the operating manual to third parties, duplication in any
form - including excerpts - as well as exploitation and/or communi-
cation of the content, are not permitted without a written declara-
tion of release from the manufacturer. Actions to the contrary make
damage compensation mandatory. We reserve the right to enforce
additional claims.
The manufacturer
© Grundig Business Systems GmbH
Weiherstraße 10
D-95448 Bayreuth
holds the copyright.
■
■
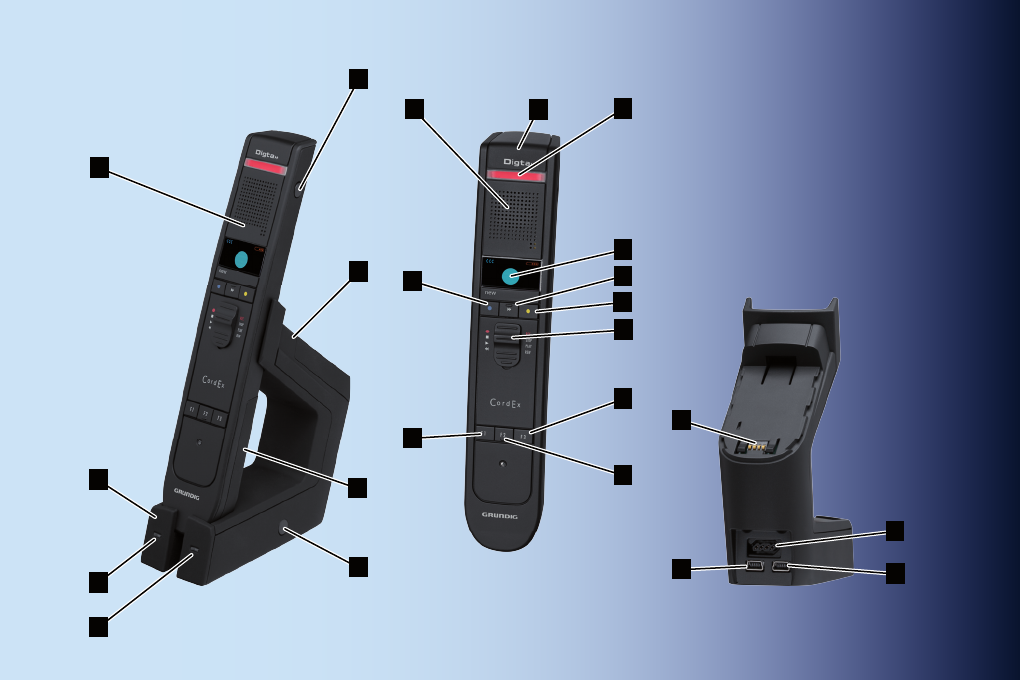
Fig. 1: Controls and connections of dictation microphone and docking station
1
8
7
5
6
4
19 18
17
15
14
12
22
23
11
21
13
16
9
10
20
3
2
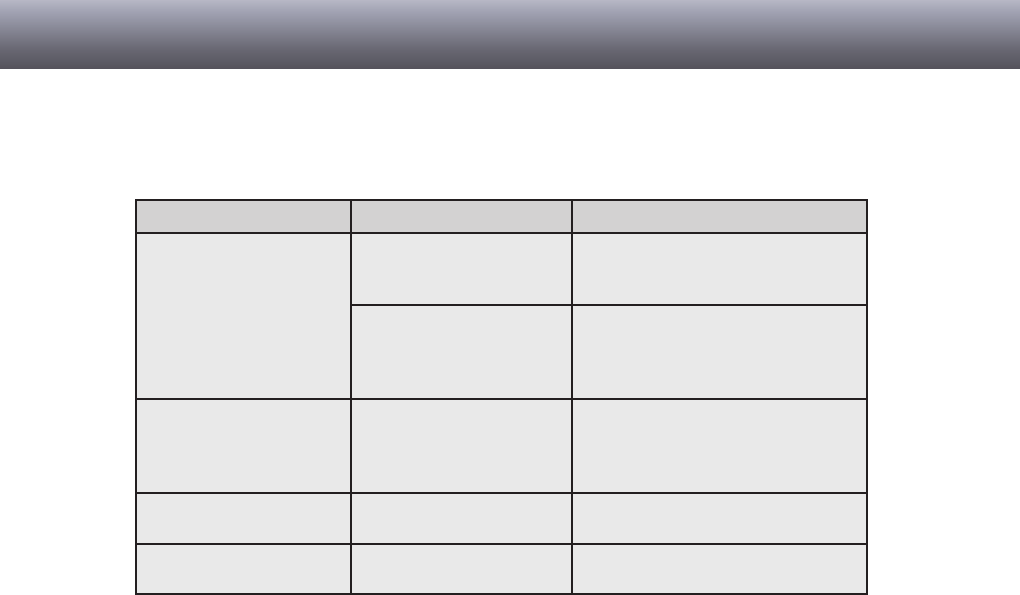
No. Designation Description
1 Dictation microphone Portable hand-held unit to record and
playback dictations
2 Docking station Wireless station with charging possibil-
ity for dictation microphone and spare
battery
3 Green LED Blinking: USB connection to PC estab-
lished, no connection to dictation micro-
phone
Illuminated: USB connection to PC
established, connection to dictation
microphone established
4 Orange LED Dictation microphone battery or spare
battery is charging
5 Paging button First-time connection to dictation micro-
phone in wireless range
Establish USB connection for rmware
update
6 Battery Power supply
7 USB adapter USB adapter to use dictation micro-
phone without battery on PC
8 On/Off button Switching device on/off
Access system menu
9 Speaker/microphone Range of audio and sound
10 Blue button Start recording, next work section (func-
tion depends on software settings)
11 F1 button Configurable function button 1
No. Designation Description
12 F2 button Configurable function button 2
13 F3 button Configurable function button 3
14 Slide switch g: REC
e: STOP
f: PLAY
i: REW
15 Yellow button Insert dictation recording
16 Fast forward button h: FFWD
17 Display Display of system menu, position of slide
switch, wireless connection, buffer, bat-
tery charging/power supply mode
18 Recording display Blinking: Pause mode
Illuminated: Recording mode
Blue: Record dictation information
Red: Record dictation
Yellow: Insert dictation section
19 Cover strip Protects slot for RFID/barcode readers
(removable)
20 Receiver for spare bat-
teries/USB adapter
To attach USB adapter or charge a spare
battery
21 Power supply
connection
Connection for enclosed power supply
22 PC-USB connection Connection for data transfer to PC
23 Foot control connection Connection for a foot control to control
the slide switch function
Explanation of controls and connections

5
Table of contents
Table of contents
General ....................................................... 6
Explanation of signalwords and symbols .... 6
Safety information ..................................... 7
Intended use ............................................... 7
Special hazards ........................................... 7
Electrical voltage ...................................... 7
Rechargeable batteries ............................ 8
Traffic ........................................................ 8
Particular groups of persons .................... 9
Obstacle ................................................... 9
Electronic components ............................. 9
Cleaning .................................................... 10
Disposal ..................................................... 10
FCC statement .......................................... 10
CE note ......................................................11
Scope of delivery ........................................11
Accessories ............................................... 12
Start-up ..................................................... 12
System requirements ................................ 12
Connecting docking station ....................... 12
Installing software ...................................... 13
Charging battery ........................................ 14
Switching on dictation microphone ............ 14
Setting language ....................................... 15
Operation .................................................. 16
Recording new dictation ............................ 16
Interrupting dictation .................................. 16
Continuing dictation ................................... 17
Playing back dictation ................................ 17
Overwrite dictation ..................................... 17
Adding to dictation ..................................... 17
Inserting recording ..................................... 17
Finishing dictation ...................................... 18
Switching off dictation microphone ............ 18
Extended operation ................................. 19
How to deal with interrupted wireless
connection ................................................. 19
Connecting dictation microphone directly
to PC ......................................................... 20
Changing battery ....................................... 21
Setting up function buttons ........................ 22
Controlling dictation microphone via foot
control ........................................................ 22
Connecting foot control .......................... 22
Using foot control ................................... 23
Connecting barcode/RFID reader ............. 23
Operating several dictation microphones/
docking stations ......................................... 24
Registering at different docking
stations ................................................... 24
Permanent registration at a docking
station ..................................................... 25
Installing firmware updates ...................... 25
Settings in system menu ........................... 26
Accessing system menu ........................ 26
Changing settings ................................... 27
Troubleshooting ...................................... 28
Technical data .......................................... 29

6
General
Explanation of signalwords and symbols
Warnings
Warnings are indicated by symbols. In addition they are intro-
duced with signal words that express the scope of the hazard.
All instructions must be strictly complied with!
When working always act cautiously to prevent accidents, per-
sonal injury, or property damage!
DANGER
DANGER indicates a hazardous situation which, if not avoid-
ed, will result in death or serious injury.
WARNING
WARNING indicates a hazardous situation which, if not avoid-
ed, could result in death or serious injury.
■
■
CAUTION
CAUTION, used with the safety alert symbol indicates a haz-
ardous situation which, if not avoided, could result in minor
or moderate injury.
NOTICE
NOTICE is used to address practices not related to personal
injury. It indicates specific actions which prevent from dam-
age to the device and from loss of dictations.
dIndicates useful tips and recommendations as well as
information for efficient and trouble-free operation.
General

Safety information
Intended use
The Digta CordEx is for exclusive use as a dictation microphone
to record and play back dictations. Any other use is considered
improper and not permitted.
Special hazards
Electrical voltage
DANGER
Danger of electric shock!
Do not touch the power supply with wet hands.
Do not insert metal objects or the like into the power
supply.
Never open the power supply or modify the plug or cable.
Do not use the power supply if the housing or connec-
tion cable is damaged or the power supply does not func-
tion properly.
■
■
■
■
If the power supply is dropped, have it checked by an
authorized dealer to ensure that it functions correctly and
safely.
Disregarding these precautions means risking a fatal elec-
tric shock.
WARNING
Danger of fire, explosion and overheating!
Use the power supply only with the line voltage specified
on the rating label.
Use the power supply only with its original connection
cable or adapter (European, UK and USA version). Nev-
er use other connection cables or adapters with different
plugs.
Do not place heavy objects on the power supply or con-
nection cable, and do not cover the power supply.
Use the power supply only in a dry indoor environment.
Protect the power supply from moisture in the form of
water and high humidity.
Do not bend the connection cable of the power supply.
■
■
■
■
■
■
7
Safety information

8
Do not operate or store the power supply near heaters or
direct sunlight. Ensure adequate ventilation. The permit-
ted temperature range is:
-4°F (-20°C) to 122°F (50°C) for storage
32°F (0°C) to 104°F (40°C) for operation
Grundig power supplies are only to be used with Grundig
office equipment.
Pull the power supply out of the socket to separate the
device from the power grid.
Unplug the power supply before cleaning it.
Clean the power supply only with a soft, dry cloth. Do not
use chemical cleaning agents such as alcohol, thinner,
gasoline or the like.
Disregarding these precautions means risking fire, explosion
or overheating.
■
■
■
■
■
Rechargeable batteries
WARNING
Danger of explosion and burns!
Do not throw rechargeable batteries into a fire. Do not
short-circuit the contacts.
Do not keep rechargeable batteries loose in pockets, take
them apart or modify them.
Recharge the batteries only with the docking station or in
the dictation microphone.
Do not use damaged batteries.
Disregarding these precautions means risking explosions
and burns.
Traffic
WARNING
Danger of accidents!
Do not use the device while operating vehicles (such as
cars, bicycles, motorcycles, ATVs, etc.).
Disregarding this precaution can lead to traffic accidents.
■
■
■
■
■
Safety information

9
Particular groups of persons
CAUTION
Risk of injury!
Do not leave the device unattended and use it with
extreme caution if children or persons who cannot assess
the dangers are nearby.
Keep the device away from persons (including children)
who are unable to use it safely due to their physical, sen-
sory or mental limitations, lack of experience or lack of
knowledge.
Disregarding these precautions means risking injury.
Obstacle
CAUTION
Stumbling hazard!
Ensure that the power supply is always in a safe position
and that neither the power supply nor any cables connect-
ed to the docking station constitute obstacles.
■
■
■
Disregarding these precautions may lead to a stumbling
hazard.
Electronic components
NOTICE
Risk of damage and void warranty!
Protect the device from moisture (such as rain or water
spray).
Do not place the device near a heater nor in direct
sunlight.
Do not open the device under any circumstances.
Do not modify the device.
Disregarding these points can cause the device to be dam-
aged and the warranty to become void.
■
■
■
■
Safety information

10
NOTICE
Loss of data!
Please check your recording to ensure that it is complete
and repeat it if necessary.
If you are electrostatically charged and touch a device which
is switched on, the device may switch off automatically to
protect against damage.
NOTICE
Signal interference!
Do not make recordings near mobile telephones. In case
of interference (such as hissing), increase the distance.
Disregarding this point may lead to disruption of the record-
ing by interference.
■
■
Cleaning
NOTICE
Risk of damage!
Clean the device only on the outside with a dry, soft cloth.
Do not use chemical cleaning agents.
Disregarding these instructions can cause the device to be
damaged.
Disposal
Rechargeable batteries are not to be disposed of in ordinary
household trash. Please dispose of them in an environmentally
sound manner by bringing them to an appropriate public collection
area or returning them to your dealer.
FCC statement
This device complies with Part 15 of the FCC Rules. Operation is
subject to the following two conditions:
(1) This device may not cause harmful interference, and
(2) this device must accept any interference received, including
interference that may cause undesired operation.
■
Safety information

11
Note: This equipment has been tested and found to comply with
the limits for a Class B digital device, pursuant to Part 15 of the
FCC Rules. These limits are designed to provide reasonable pro-
tection against harmful interference in a residential installation.
This equipment generates, uses and can radiate radio frequen-
cy energy and, if not installed and used in accordance with the
instructions, may cause harmful interference to radio communi-
cations. However, there is no guarantee that interference will not
occur in a particular installation. If this equipment does cause
harmful interference to radio or television reception, which can
be determined by turning the equipment off and on, the user is
encouraged to try to correct the interference by one or more of the
following measures:
Reorient or relocate the receiving antenna.
Increase the separation between the equipment and receiver.
Connect the equipment into an outlet on a circuit different
from that to which the receiver is connected.
Consult the dealer or an experienced radio/TV technician for help.
Caution: Any changes or modfications not expressly approved by
the party responsible for compliance could void the user‘s authori-
ty to operate the equipment.
■
■
■
CE note
The CE mark confirms that the device corresponds
to the relevant guidelines of the Eurpean Union.
Scope of delivery
Dictation microphone
Digta CordEx
■USB cable for docking station■
Docking station■Cover strip barcode/RFID reader
connection channel
■
Power supply ■USB cable for power supply of
dictation microphone without
battery
■
Rechargeable battery■
Safety information

12
Accessories
You will find original accessories approved by the manufacturer for
Digta CordEx under:
www.grundig-gbs.com
The performance features described by Grundig only apply to
genuine Grundig accessories. Please make sure to choose only
genuine accessories from Grundig. Product liability and warran-
ty service are provided only in this case. The use of non-Grundig
accessories or those which are not recommended and approved
by Grundig automatically void any warranty claims towards
Grundig.
Start-up
System requirements
DigtaSoft/DigtaSoft Pro, as of V4.2.0 by Grundig Business
Systems or compatible dictation software by other
manufacturers.
Processor (500 MHz or higher)
Windows 2000 SP4 (Rollup 1), Windows XP SP2,
Windows Vista
USB 1.1 or USB 2.0
MAPI compatible e-mail program for e-mail connection (e.g.
Microsoft Outlook)
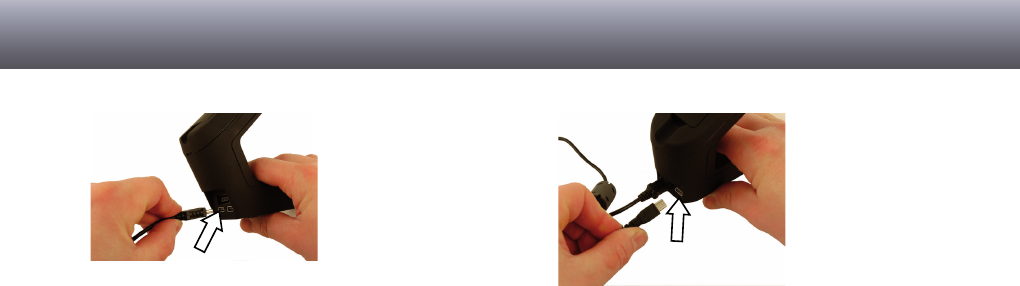
Connecting docking station
Place docking station [2] near the PC.
Connect plug of power supply (as seen from the back) to left
jack on docking station.
■
■
■
■
■
►
►
Start-up
13
WARNING! Insert the plug of the power supply only
into power sockets which provide the line voltage speci-
fied on the rating label. Otherwise there is a danger of fire,
explosion and overheating.
The orange LED [4] on docking station briefly illuminates when
current supply is available.
Connect USB cable to PC and docking station. For this pur-
pose, plug USB cable (as seen from the back) into right jack
of docking station and the other end into USB connection of
the PC.
►
►
The green LED [3] on docking station blinks as soon as dock-
ing station of Digta CordEx is properly recognized by the PC.
Installing software
dRecording and playback of dictations with Digta Cor-
dEx requires dictation software to be installed on the PC,
e.g. DigtaSoft or DigtaSoft Pro by Grundig Business Sys-
tems. For additional installing information, see operation
instructions of dictation software.
Start-up

14
Charging battery
WARNING
Danger of explosion and burns!
Recharge the batteries only with the docking station or in
the dictation microphone.
Do not use damaged batteries.
Disregarding these precautions means risking explosions
and burns.
The battery has to be attached to the receiver of the dictation
microphone and must be charged for start-up. Alternatively the
dictation microphone can be supplied with power by means of a
special USB adapter (see section “Connecting dictation micro-
phone directly to PC”).
Push battery into receiver on back of dictation microphone in
direction of arrow until it snaps into place.
■
■
►
Place dictation microphone [1] into docking station [2].
The orange LED [4] indicates that battery is being charged.
When LED goes out, the battery is completely charged.
dThe charging process does not start immediately, rather
after several minutes.
Switching on dictation microphone
Press On/Off button [8] on right side of dictation microphone
[1] and hold until company logo appears in display [17].
On docking station [2] the green LED [3] signals the successful
registration of the dictation microphone at docking station by
continuous illumination.
►
►
Start-up

15
dTo conserve the battery, the device switches to sleep
mode if no button is pressed on the dictation microphone
for an extended time. By pressing any button, the device
becomes operational again.
If device is not used for an extended time, it switches off
completely.
Setting language
The dictation microphone features a system menu for internal
settings.
During initial start-up, it is practical to set the display language.
Additional configuration options via system menu are described in
section “Settings in system menu”.
Briefly press On/Off button [8] on dictation microphone [1] until
the text Menu appears at bottom left of display text.
Press blue button Menu [10].
Move selection (marker) from one menu item to the next via
the yellow button (up) [15] and F3 button (down) [13] on dicta-
tion microphone .
Select Language and press fast forward h OK [16].
►
►
►
►
The corresponding submenu appears.
Select the desired language and press fast forward h OK.
Press blue button CANC to exit system menu.
►
►
Start-up
16
Operation
Recording new dictation
Switch on dictation microphone [1].
Start dictation software.
Move slide switch [14] to e position.
Press blue button [10] on dictation microphone.
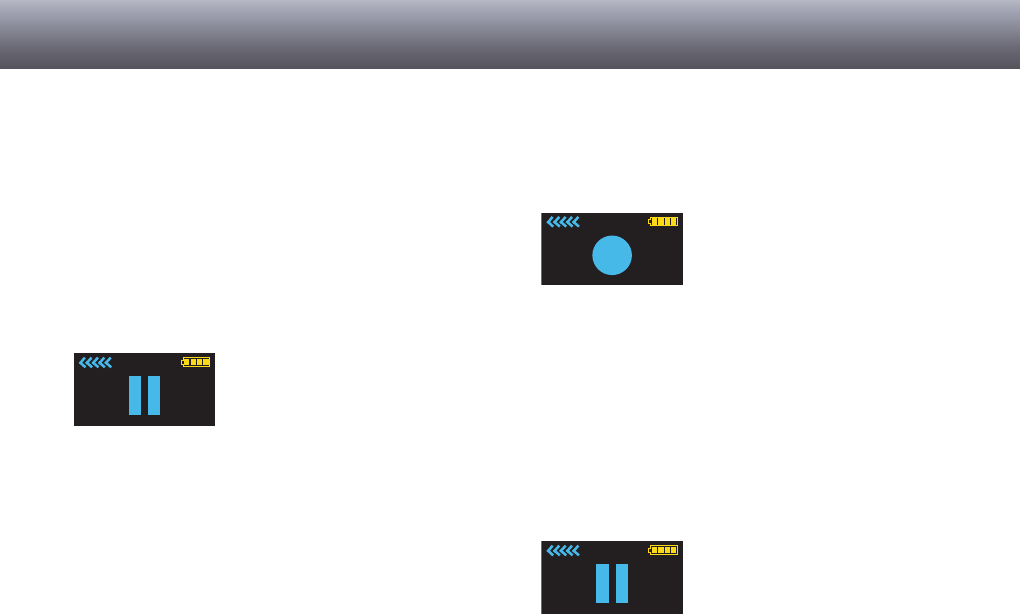
The display [17] shows readiness to record by the pause
symbol.
At the same, the recording indicator [18] blinks red.
The dictation microphone is now ready to record.
Move the slide switch to position g and dictate into the micro-
phone [9].
The recording symbol appears on display, and recording indi-
cator illuminates permanently red.
dIf you leave the reception area of the docking station dur-
ing recording, the wireless connection to the dictation
microphone is interrupted and the dictation is placed in a
buffer up to 1 minute (see section “How to deal with inter-
rupted wireless connection”).
Interrupting dictation
Move slide switch [14] to e position. The pause symbol
appears on the display [17]. The recording indicator [18] blinks
red.
►
►
Operation
17
Continuing dictation
Move the slide switch [14] on the dictation microphone [1] to
position g and continue dictating into the microphone [9].
Playing back dictation
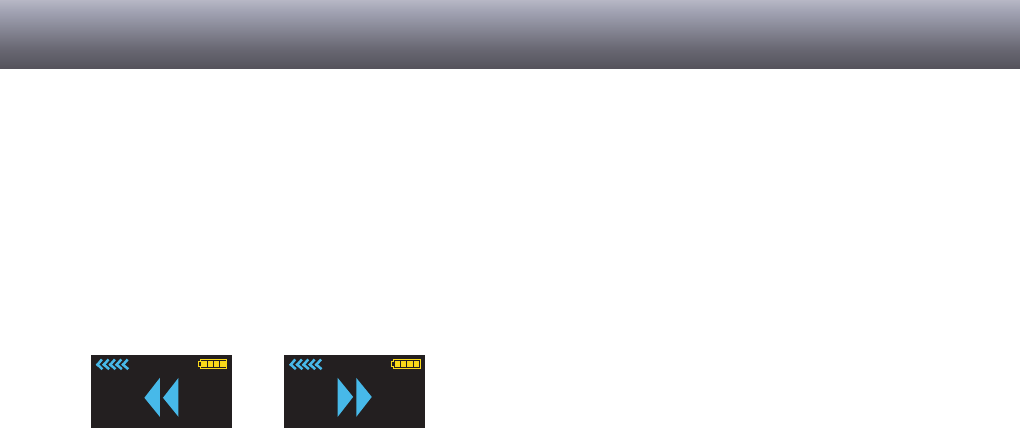
Move the slide switch [14] on the dictation microphone [1] to
position i (rewind) or press fast forward h [16] to move to the
desired location in the recording.
During fast forward/rewind, the according symbols appear on
the display [17].
Move slide switch to f position.
The dictation is played back at the current position.
Overwrite dictation
Move the slide switch [14] on the dictation microphone [1] to
position i (rewind) or press fast forward h [16] to move to the
position in the dictation to overwrite.
►
►
►
►
Move slide switch to e position.
Move the slide switch to position g and dictate the changes.
The recording indicator [18] will be lit red. The dictation will be
overwritten as of the previously selected position.
Adding to dictation
Move the slide switch [14] on the dictation microphone [1] to
position e.
Press fast forward h [16] and locate the end of the dictation.
Move the slide switch to position g and dictate the additions
into the microphone [9].
The dictation addition will be at the end.
Inserting recording
Additional recordings can be inserted into an existing dictation
without overwriting the old dictation.
Move the slide switch [14] on the dictation microphone [1] to
position i (rewind) or press fast forward h [16] to move to the
position in the dictation where text is to be inserted.
►
►
►
►
►
►
Operation

18
dThe function can vary, depending on applied dictation
software.
Move slide switch to e position.
Press yellow button Insert [15].
Move the slide switch [14] to position g and dictate the text to
be added into the microphone.
Starting at preselected position, new text is integrated into
existing dictation.
Move slide switch to e position.
The recording will be interrupted. To continue, move the slide
switch to position g.
Press yellow button Insert.
The inserted recording is finished.
dDepending on applied dictation software, it is possible to
insert additional information text (info) into dictations.
For additional information, see operating instructions of
dictation software.
►
►
►
►
►
Finishing dictation
Stopping the recording:
Move the slide switch [14] on the dictation microphone [1]
briefly to position i (rewind) or press fast forward h [16].
To finish dictation:
Press blue button [10].
dDepending on applied dictation software, function of the
blue button can vary.
For additional information, see operating instructions of
dictation software.
Switching off dictation microphone
Keep On/Off button [8] on dictation microphone [1] pressed
until indication in display [17] goes out.
►
►
►
Operation
19
Extended operation
How to deal with interrupted wireless connection
In case the wireless connection between dictation microphone and
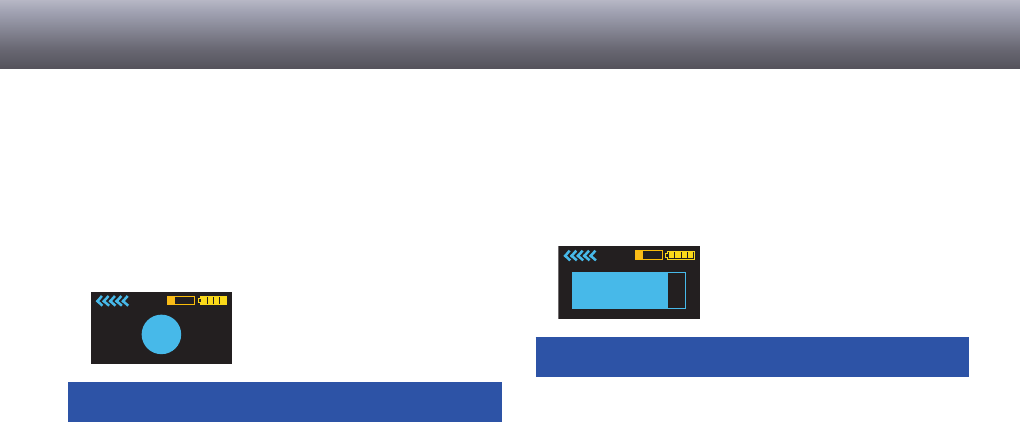
docking station becomes interrupted, a bar appears in the upper
part of the display that turns orange with increasing talk time. The
text is then stored in the dictation microphone. A signal sounds in
intervals of a few seconds, warning of a buffer overflow.
NOTICE
Loss of data due to interrupted wireless connection!
Re-enter the wireless range of the docking station with the
dictation microphone within a minute.
The maximum speaking time without a wireless connection to
the docking station is 1 minute. If the wireless connection is
interrupted for a longer period, recording will stop, signaled
by two brief sounds.
■
As soon as the dictation microphone is in the reception area of the
docking station again and slide switch is moved to e position, the
content of the buffer is transferred to the docking station.
A blue bar appears on the display, whose fill level corresponds to
the buffer content to be transferred. At the same time, the record-
ing indicator blinks red.
NOTICE
Loss of data if switched off too soon!
Wait until the buffer is transmitted completely.
Switching off the dictation microphone before the buffer con-
tent is transferred completely to the docking station can lead
to loss of data.
Dictation has been completely transferred to PC as soon as both
bars have disappeared from display.
■
Extended operation
20
Connecting dictation microphone directly to PC
The dictation microphone can be connected directly to PC by
means of a special USB adapter for operation without battery. At
time of delivery, the USB adapter is located in the docking station
at the receiver for spare battery.
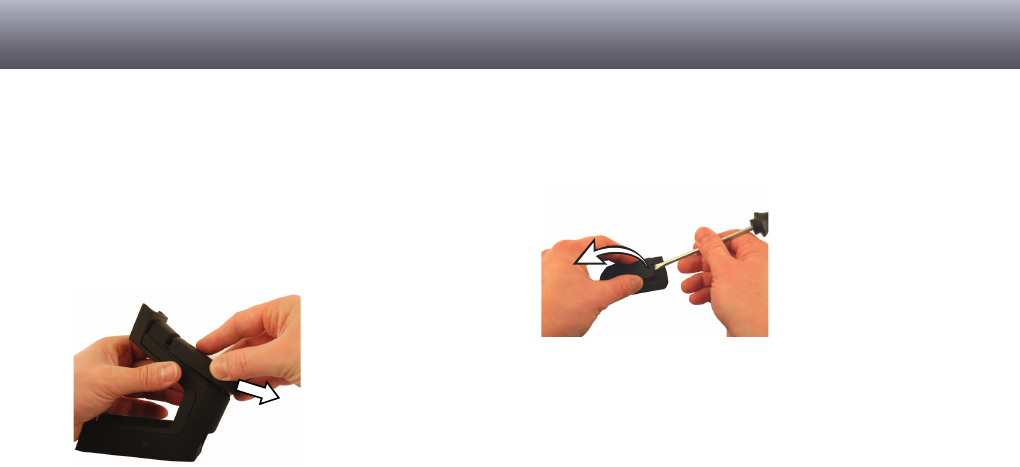
Pull USB adapter [7] in direction of the arrow from docking sta-
tion [2] .
►
NOTICE! Lift the cover plate of the adapter careful-
ly using the point of a ballpoint pen or screwdriver. Using
other tools may damage the cover plate.
Connect USB plug to jack.
Close cover plate. Ensure that the nibs of the cover plate prop-
erly fit into the grooves of the adapter housing.
Push USB adapter on back of dictation microphone [1] in
direction of arrow into battery holder.
►
►
►
►
Extended operation
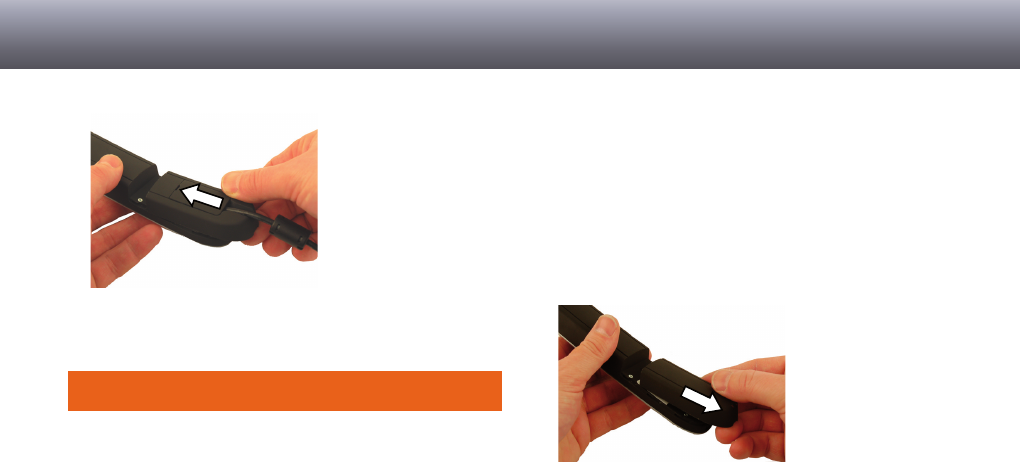
21
The dictation microphone is now ready.
Changing battery
WARNING
Danger of explosion and burns!
Recharge the batteries only with the docking station or in
the dictation microphone.
Do not use damaged batteries.
Disregarding these precautions means risking explosions
and burns.
■
■
The useful life of Digta CordEx can be expanded by means of a
replacement battery, without causing longer pauses by battery
charging times.
A replacement battery is available as accessory and not included
in the scope of delivery.
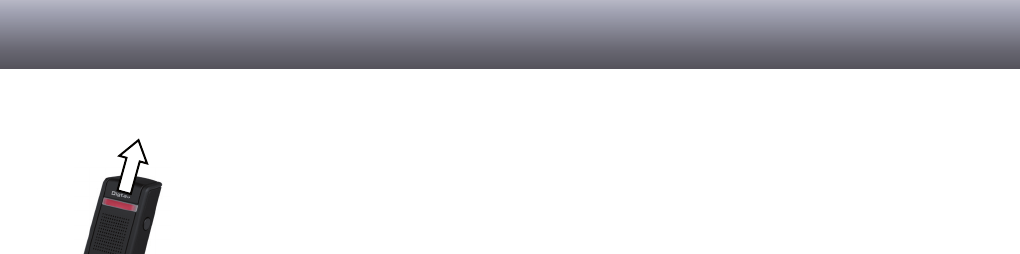
Switch off dictation microphone [1].
Remove battery [6] on back of dictation microphone in direc-
tion of arrow.
Insert replacement battery into receiver of dictation micro-
phone in reverse direction of arrow.
The dictation microphone is now ready.
An empty battery can be charged during operation at the dock-
ing station.
►
►
►
Extended operation
22
Remove already existing battery or USB adapter from dock-
ing station.
Insert battery to be charged completely into receiver of docking
station in reverse direction of arrow.
The orange LED indicates that battery is being charged. When
LED goes out, the battery is completely charged.
dThe battery on the docking station is only charged if dic-
tation microphone is not located in docking station. Other-
wise the battery in dictation microphone is charged first.
The charging process does not start immediately, rather
after several minutes.
►
►
Setting up function buttons
Function buttons F1 to F3 [11-13] can be assigned with spe-
cial functions. Set-up is performed via software AdapterServer.
Depending on applied dictation software, assignment of function
buttons can vary.
dFor additional set-up information, see operating instruc-
tions of dictation software.
Controlling dictation microphone via foot control
The dictation microphone can be operated by means of a foot
control (optionally available). This allows the control of dictation
microphone functions without the use of hands.
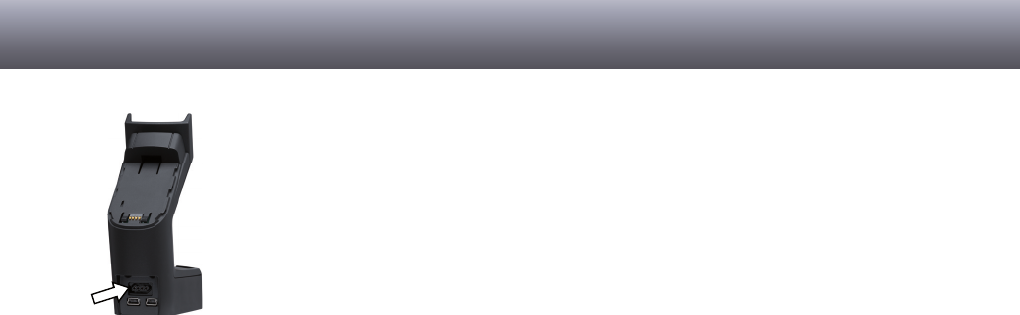
Connecting foot control
Plug connection cable of foot control into the provided connec-
tion jack [23] on back of docking station.
►
Extended operation
23
Using foot control
The foot control assumes the following functions:
Left pedal
i (REW)
To rewind the dictation, press the pedal.
Middle pedal
g (REC)
To create a new dictation, press the pedal down and wait until
the dictation software starts a new dictation.
To switch to recording mode, press the pedal briefly. To start/
pause recording and playback, press the pedal briefly.
■
►
■
►
►
dDepending on applied dictation software, function of the
foot control can vary.
Right pedal
e (STOP)
f (PLAY)
To start/pause recording and playback, press the pedal briefly.
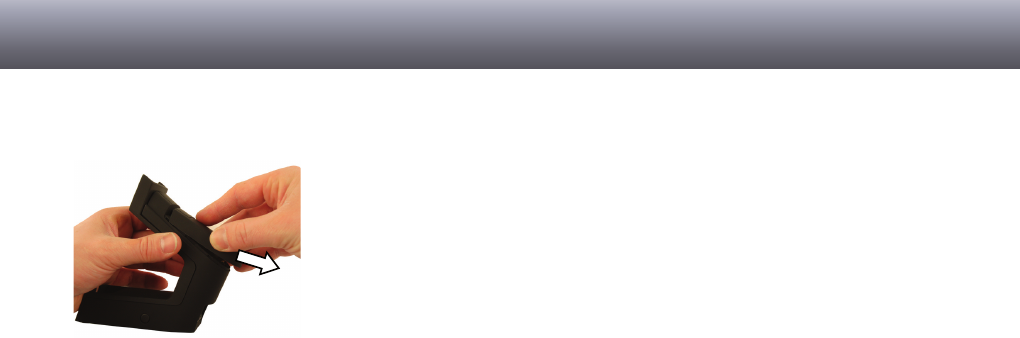
Connecting barcode/RFID reader
The dictation microphone is designed for connection of a barcode
or RFID reader. This allows identification of dictations by a code.
For connection, the existing cover strip must be replaced. The
device is equipped with a special cover strip that leaves the con-
nection slot for accessory devices open and supports the barcode/
RFID reader.
■
■
►
Extended operation
24
Remove existing cover strip [19] from dictation microphone [1].
Attach new cover strip to dictation microphone.
Connect barcode/RFID reader to dictation microphone. See
operating instructions of accessory devices.
dFor details on use of barcode/RFID reader see operating
instructions of reader and dictation software.
Operating several dictation microphones/docking
stations
To be able to record with one dictation microphone in different
rooms with separate docking stations, a dictation microphone can
be operated on different docking stations.
►
►
►
Registering at different docking stations
Presetting
Switch on dictation microphone [1].
In system menu, set option Station allocation to Dynamic pair.
(see section “Settings in system menu”).
dThe setting Dynamic pair. is a factory setting.
Switch off dictation microphone.
Registering
Approach docking station [2] with which connection is to be
established, closely with dictation microphone [1].
Switch on dictation microphone.
The green LED [3] of docking station blinks fast when dictation
microphone registers for the first time at the station.
Press paging button [5] on docking station.
The dictation microphone is now connected to docking station.
Repeat the registration process for each docking station with
which the dictation microphone is to be connected.
►
►
►
►
►
►
Extended operation

25
dRenewed registration is only required if dictation micro-
phone has been disconnected from docking station for an
extended time. Otherwise it is sufficient to switch on the
dictation microphone in reception area of docking station
to establish connection.
Permanent registration at a docking station
If several docking station are in close proximity (e.g. in one room),
the dictation microphone may only be connected to one selected
station when switched on.
Switch on dictation microphone [1] near the permanently
assigned docking station [2].
The dictation microphone registers in variable mode at the
docking station.
In system menu, set option Station allocation to Static pair.
(see section “Settings in system menu”).
The dictation microphone is now permanently linked to the
docking station and connects with it every time it is switched
on.
►
►
dThe setting can only be reversed by means of the perma-
nently assigned dictation microphone.
Installing firmware updates
Firmware updates include important changes by the manufactur-
er to the functions of the Digta CordEx. New firmware is available
on the Internet site at:
www.grundig-gbs.com
An Internet connection is required for downloading.
NOTICE
The device can be damaged if the update process is
interrupted!
Do not interrupt the update process!
If the firmware is incomplete, the device may be rendered
unusable.
dPrior to an update check if a firmware with a higher ver-
sion number is available.
Switch on dictation microphone [1].
■
►
Extended operation

26
Check firmware version in dictation microphone (see section
“Settings in system menu”).
If a new firmware version for Digta CordEx is available online,
download the corresponding file onto the PC.
Keep paging button [5] on docking station [2] pressed down for
several seconds.
Now the Digta CordEx registers itself for data transfer at the
PC and is assigned with a separate drive letter.
Copy the new firmware file “CordEx.hex” to the Digta CordEx
drive.
The dictation microphone shows the progress of the update in
display [17].
After successful transfer, the dictation microphone is rebooted.
Installation of firmware update is now complete and dictation
microphone is ready.
Settings in system menu
The dictation microphone features a system menu for internal
settings.
►
►
►
►
Accessing system menu
Briefly press On/Off button [8] on dictation microphone [1] until
the text Menu appears at bottom left of display text.
Press blue button Menu [10].
The system menu consists of the following menu items:
Connection
Start pairing
Stop pairing
Connects the dictation microphone to a docking station or discon-
nects an existing connection. This function is required for multiple
device operation (see section “Operating several dictation micro-
phone/docking stations”).
Version/Info
Serial no.
FW/Urloader
Display of serial number and firmware version. This function is
required for firmware update (see section “Installing firmware
update”).
►
►
■
■
Extended operation

27
Language
Selecting display language.
Station allocation
Static pair.
Dynamic pair.
Depending on setting, the dictation microphone always perma-
nently connects to a docking station or searches for a nearby sta-
tion in the reception area. This function is required for multiple
device operation (see section “Operating several dictation micro-
phones/docking stations”).
Changing settings
Move selection (marker) from one menu item to the next via
the yellow button (up) [15] and F3 button (down) [13] on dicta-
tion microphone [1].
Select the entry and press fast forward h [16] OK.
The corresponding submenu appears.
Select the entry and press fast forward h OK.
Press blue button CANC [10] to exit system menu.
■
■
►
►
►
►
dIf no button is pressed for an extended time, system
menu is automatically exited.
Extended operation
28
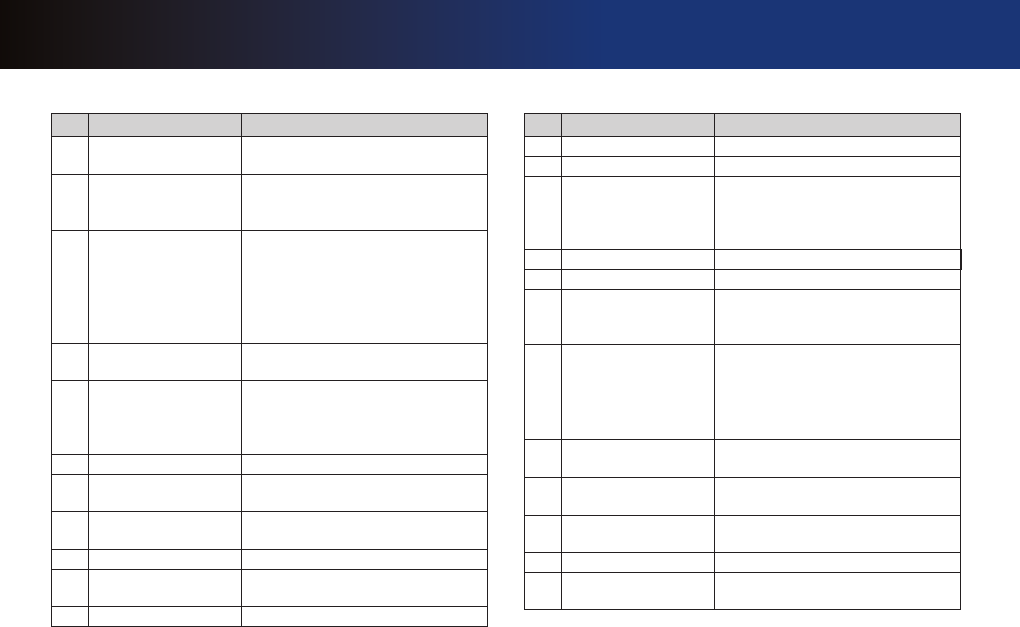
Troubleshooting
Electrical devices can experience malfunctions. This must not always concern a fault on the device. Thus, based on the following table,
check if you can eliminate the malfunction yourself.
Malfunction Possible cause Repair
Device does not switch on. Battery empty. Charge or replace the battery. (See the
section “Charging battery” and “Chang-
ing battery”.)
Power supply interrupted. Check the power cable to ensure that it
is properly inserted and is not damaged.
(See the section “Connecting docking
station”.)
Device does not respond to
input commands.
Wireless connection to docking
station interrupted.
Check wireless connection. Symbol for
wireless connection must continuously illu-
minate.
Switch device off and on again.
No sound audible, or too low. Microphone or playback vol-
ume incorrectly set.
Set volume in dictation software.
Sound distorted or too loud. Microphone or playback vol-
ume incorrectly set.
Set volume in dictation software.
Troubleshooting
29
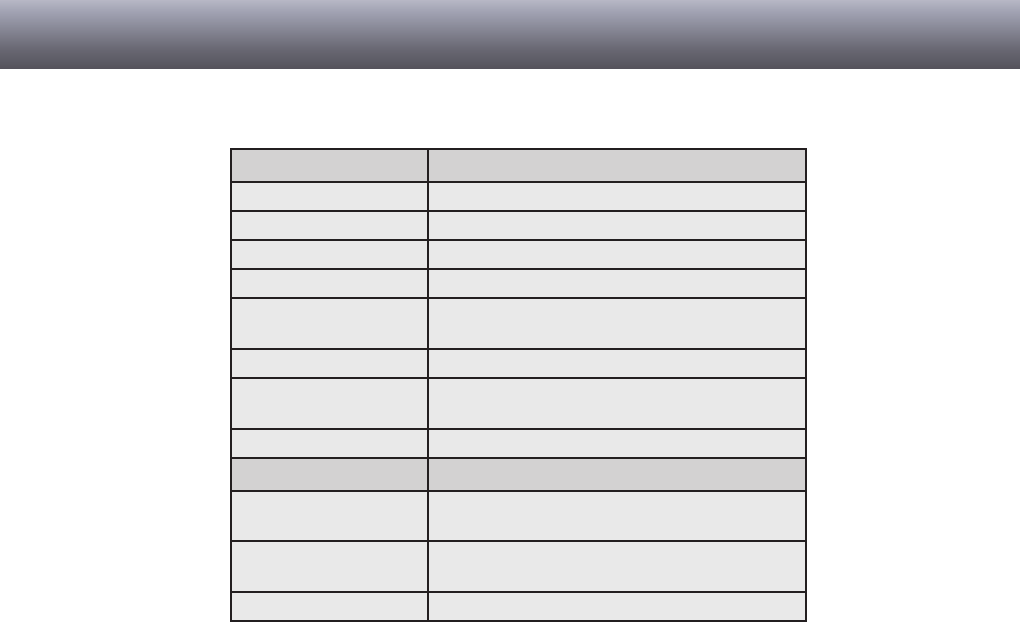
Technical data
Dictation microphone
Radio transmission RF 2.4 GHz transceiver, ISM band
Transmitting power max. 1 mW
Radio range up to 26 ft (8 m)
Frequency range 200 Hz – 7500 Hz ± 2 dB
Power supply Rechargeable lithium polymer battery
950 mA, 3.7 V
Operating time approx. 8 h recording time
Size (H x W x D) 8.35 in x 1.57 in x 0.79 in
(212 mm x 40 mm x 20 mm)
Weight 0.31 lb (140 g)
Docking station
Power supply USB (self-powered and mains/charger unit model 475
500 mA, 5 V
Size (H x W x D) 5.35 in x 1.81 in x 5.43 in
(136 mm x 46 mm x 138 mm)
Weight 0.64 lb (290 g)
Technical data

30

31

32


Grundig Business Systems GmbH
Weiherstraße 10
D-95448 Bayreuth
Germany
info@grundig-gbs.com
www.grundig-gbs.com
37335 941 0700 08/2008