GuangZhou SunFieldAimo Electronic Technology CG-1115 Single Axis Wireless Express Plus Controller User Manual Single Axis Follow Focus Kit Manual
GuangZhou SunFieldAimo Electronic Technology Co., Ltd Single Axis Wireless Express Plus Controller Single Axis Follow Focus Kit Manual
User Manual
MANUAL BOOK
© 2017 Cine Gears INC. All Rights Reserved.
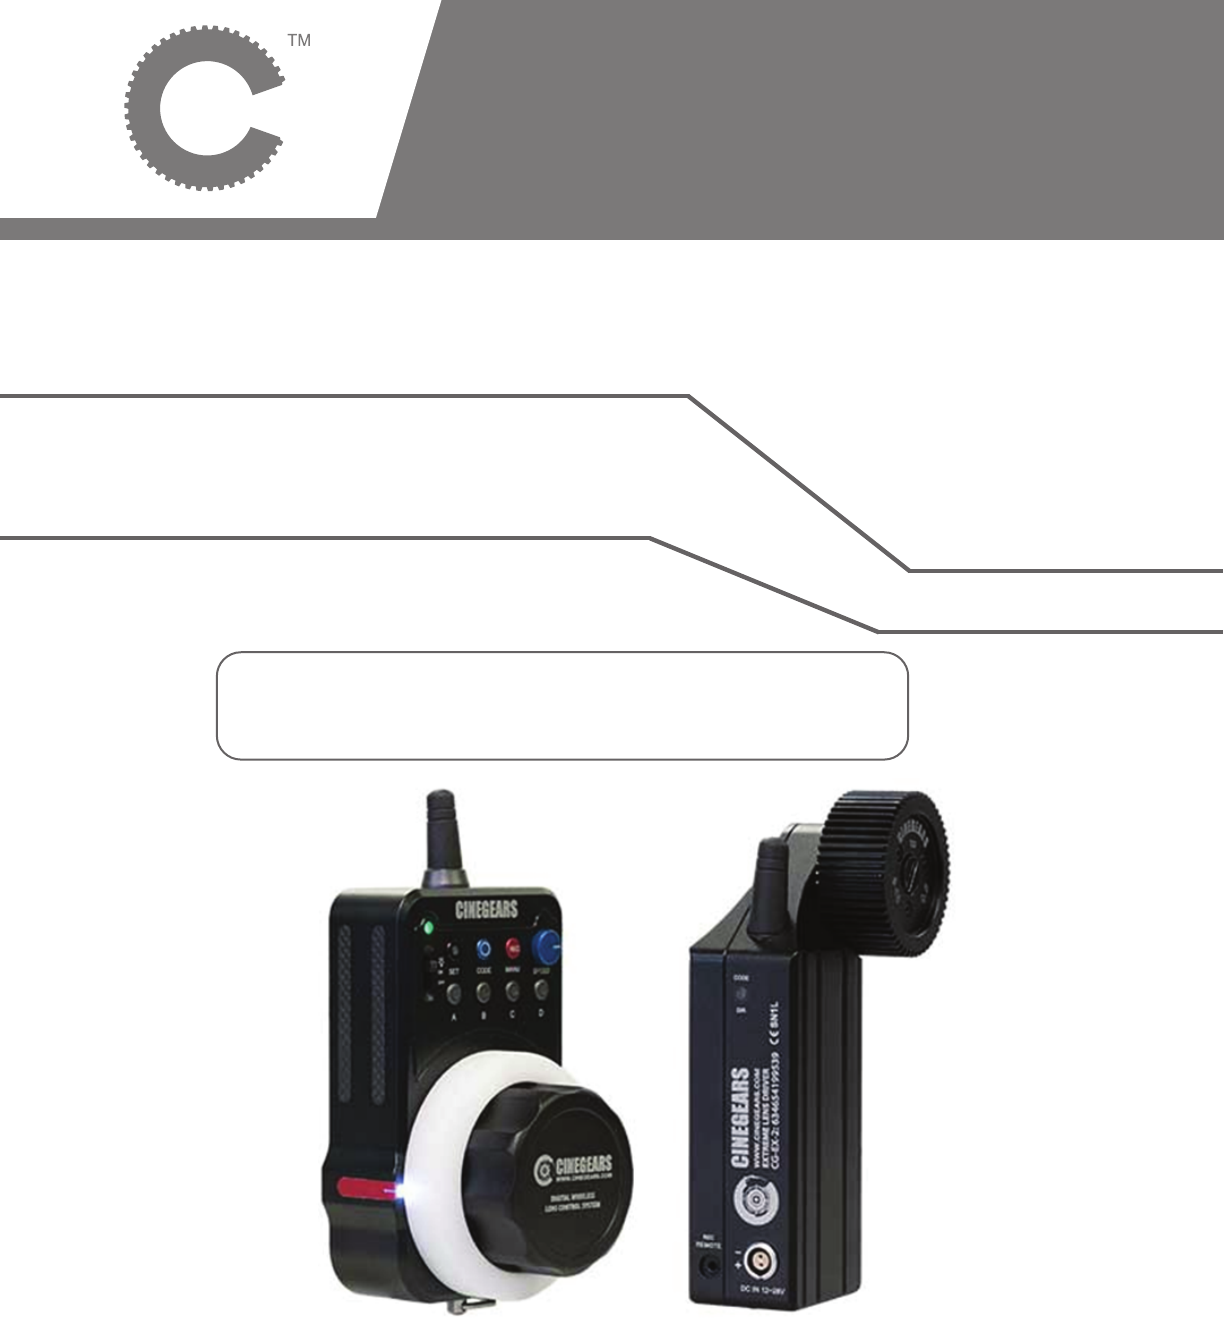
Single Axis Wireless
Express Plus Controller
Product Name: Single Axis Wireless Express Plus Controller
Brand: CINEGEARS
Model:CG-1115,CG-1114
Manufacture: GuangZhou SunFieldAimo Electronic Technology Co., Ltd

Instructions
Introduction
The Follow Focus system is made from an aluminum alloy using precision CNC machining. The design
allows the drive gear to be installed on both sides of the lens, enabling multiple drives. The product uses
an accurate and precise DC servo motor and 32-bit high-speed control chips. It has an input voltage
range of +12V to 30V, with an automatic voltage regulator circuit inside the controller. The controller
contains a lithium polymer battery that can work continuously for more than 20 hours on a full charge.
Recharge the controller using a mini USB cord.
Motor Direction
Press the indicator light briefly on the rear of the drive to change the spin direction of the gear to change
motor spin direction.
Synchronization
Turn on the remote control power switch and plug in the motor. Once both are on press the Code button
on the motor for three seconds until the indicator light will turn green. Then within 10 seconds, hold the
SET and CODE button on the controller at the same time for 3 seconds, the motor light will blink, and the
gear will shudder. This means that the controller and motor have been successfully synchronized. (Note:
This process is usually done before leaving the factory.)
Automatic Remapping
1) Before installing the drive onto the lens, please make sure the wireless remote controller and motor are
powered on and connected. DO NOT turn the wireless remote control dial, put the drive gear close to the
lens ring and tighten the screws.
2) The controller can automatically locate the start and end points of any lens. To calibrate your lens, hold
the (SET) and (A) button on the remote controller for 3 seconds. The whole process can usually be
completed within about 20 seconds. If the drive gear wasn’t installed close enough to the lens swivels
during the automatic calibration, or the swivel lens does not have a start or end point, please refer to the
semi-automatic calibration.
Automatic Lens Calibration
Hold (SET) and (A) buttons for 3 seconds, the motor will automatically find the start and end points of the
lens swivels.
Set Up Presets
Go to the focus point of your choosing, press and hold (A) button until it flashes, your point is now set.
Repeat with (B) (C) and (D) for multiple points. Press the same preset button to exit the preset mode.
Changing the Motor Speed between Preset Points.
Rotate speed knob on the controller to adjust the motor speed.
Switching from Speed Response Mode to Smooth Response Mode
On the controller, press (CODE) + (REC) + (A) (B) (C) or (D) at the same time will switch the motor to
response speed 1 2 3 or 4 mode. Lower numbers are speed-priority and higher are smoothness-priority.
Change Motor Spin Direction
Press the CODE button on the side of the motor to reverse the direction of the gear.
© 2017 Cine Gears INC. All Rights Reserved. 1

Instructions
© 2017 Cine Gears INC. All Rights Reserved. 2
Remote Record Triggers
Press (REC) on your controller to toggle Recording mode ON or OFF
Recalibrating your Controller
Rotate the focus ring clockwise to the end; hold (SET) + CODE + (REC) buttons together for 3 seconds.
Rotate to the opposite end and press the three buttons again.
Manual Calibration
Specifically used with infinity lenses that have no start or end point. Press the SET and REC button on the
wireless controller together for 3 seconds, and you will see the A, B, C, D lights turn on. Then use the (C)
button or (D) button to control the motor (Hold down the C or D key for more than 3 seconds it will
automatically rotate clockwise or counter clockwise.) Once it rotates to the proper position, click the (A)
button as a starting point, the gear will spin the opposite direction. Then when you find the desired end
point press the (B) button. Finally the (A, B, C, D) four buttons lights turn off to indicate the calibration has
been completed. After the lens calibration, the swivel will automatically shorten the distance for a slight
amount to avoid the noise of the motor stopping.
Blackouts
The controller and motor are able to store data in case of a sudden power loss or battery replacement. The
data from your shoot/lens calibration is saved and the operation can continue once the power is turned
back on. If the drive or Lens has been dismantled or replaced, or the corresponding position of gears has
been changed you will need to repeat the calibration.
Buttons and Lights
When blue (SET) and (COM) lights flash regularly at 3 times / sec, indicates
that it is communicating properly.
• The (SET) light stays dark when connection failed due to long distance, signal break or initialization
failure.
• SET+A (click for 3 sec) automatic calibration
• SET+ O (click for 3 sec) push to synch controller to motor
• REC (single click) record/pause
• SET+REC (click for 3 sec) manual calibration
• A,B,C,D (single click) move to the pre set focus point
• A, B, C, D, click for 3 sec, press and hold any one of them to set your focus point. The lights on all
four buttons will flash to indicate the preset has been saved.
• Once the preset has been set, push any of the lettered buttons. The indicator lights for A, B, C, or D
will turn on, it means their positions are being used, push another lettered button to move to that
point or push the one that is already lit up to return to manual mode.
• If the (COM) light on the motor is not on, it indicates that the controller is out of the range or there is
no power.
• The (COM) button on the motor is also used as an indicator. Pushing the button for 3 sec will turn
the blue light to green to signal you to connect to the controller. During normal operation, a single
push of the C-Code button can change the direction of the gear. The color of the light will change
with the direction of the gear.
FCC Caution.
This device complies with part 15 of the FCC Rules. Operation is subject to the following two
conditions:
(1) This device may not cause harmful interference, and
(2) this device must accept any interference received, including interference that may cause
undesired operation.
Any Changes or modifications not expressly approved by the party responsible for compliance
could void the user's authority to operate the equipment.
Note: This equipment has been tested and found to comply with the limits for a Class B digital
device, pursuant to part 15 of the FCC Rules. These limits are designed to provide reasonable
protection against harmful interference in a residential installation. This equipment generates
uses and can radiate radio frequency energy and, if not installed and used in accordance with the
instructions, may cause harmful interference to radio communications. However, there is no
guarantee that interference will not occur in a particular installation. If this equipment does
cause harmful interference to radio or television reception, which can be determined by turning
the equipment off and on, the user is encouraged to try to correct the interference by one or
more of the following measures:
-Reorient or relocate the receiving antenna.
-Increase the separation between the equipment and receiver.
-Connect the equipment into an outlet on a circuit different from that to which the receiver is
connected.
-Consult the dealer or an experienced radio/TV technician for help.
IC Warning
This device complies with Industry Canada licence-exempt RSS standard(s). Operation is subject to
the following two conditions:
(1) This device may not cause interference, and
(2) This device must accept any interference, including interference that may cause undesired
operation of the device.
Le présent appareil est conforme aux CNR d'Industrie Canada applicables aux appareils radio exempts
de licence. L'exploitation est autorisée aux deux conditions suivantes:
(1) l'appareil ne doit pas produire de brouillage, et
(2) l'utilisateur de l'appareil doit accepter tout brouillage radioélectrique subi, même si le
brouillage est susceptible d'en compromettre le fonctionnement