GuangZhou Walkera Technology WK-0405 Transmitter for Model Plane User Manual
GuangZhou Walkera Technology Co., Ltd Transmitter for Model Plane
users manual
RX-408

1
Contents
Introduction
Warning
Cautions
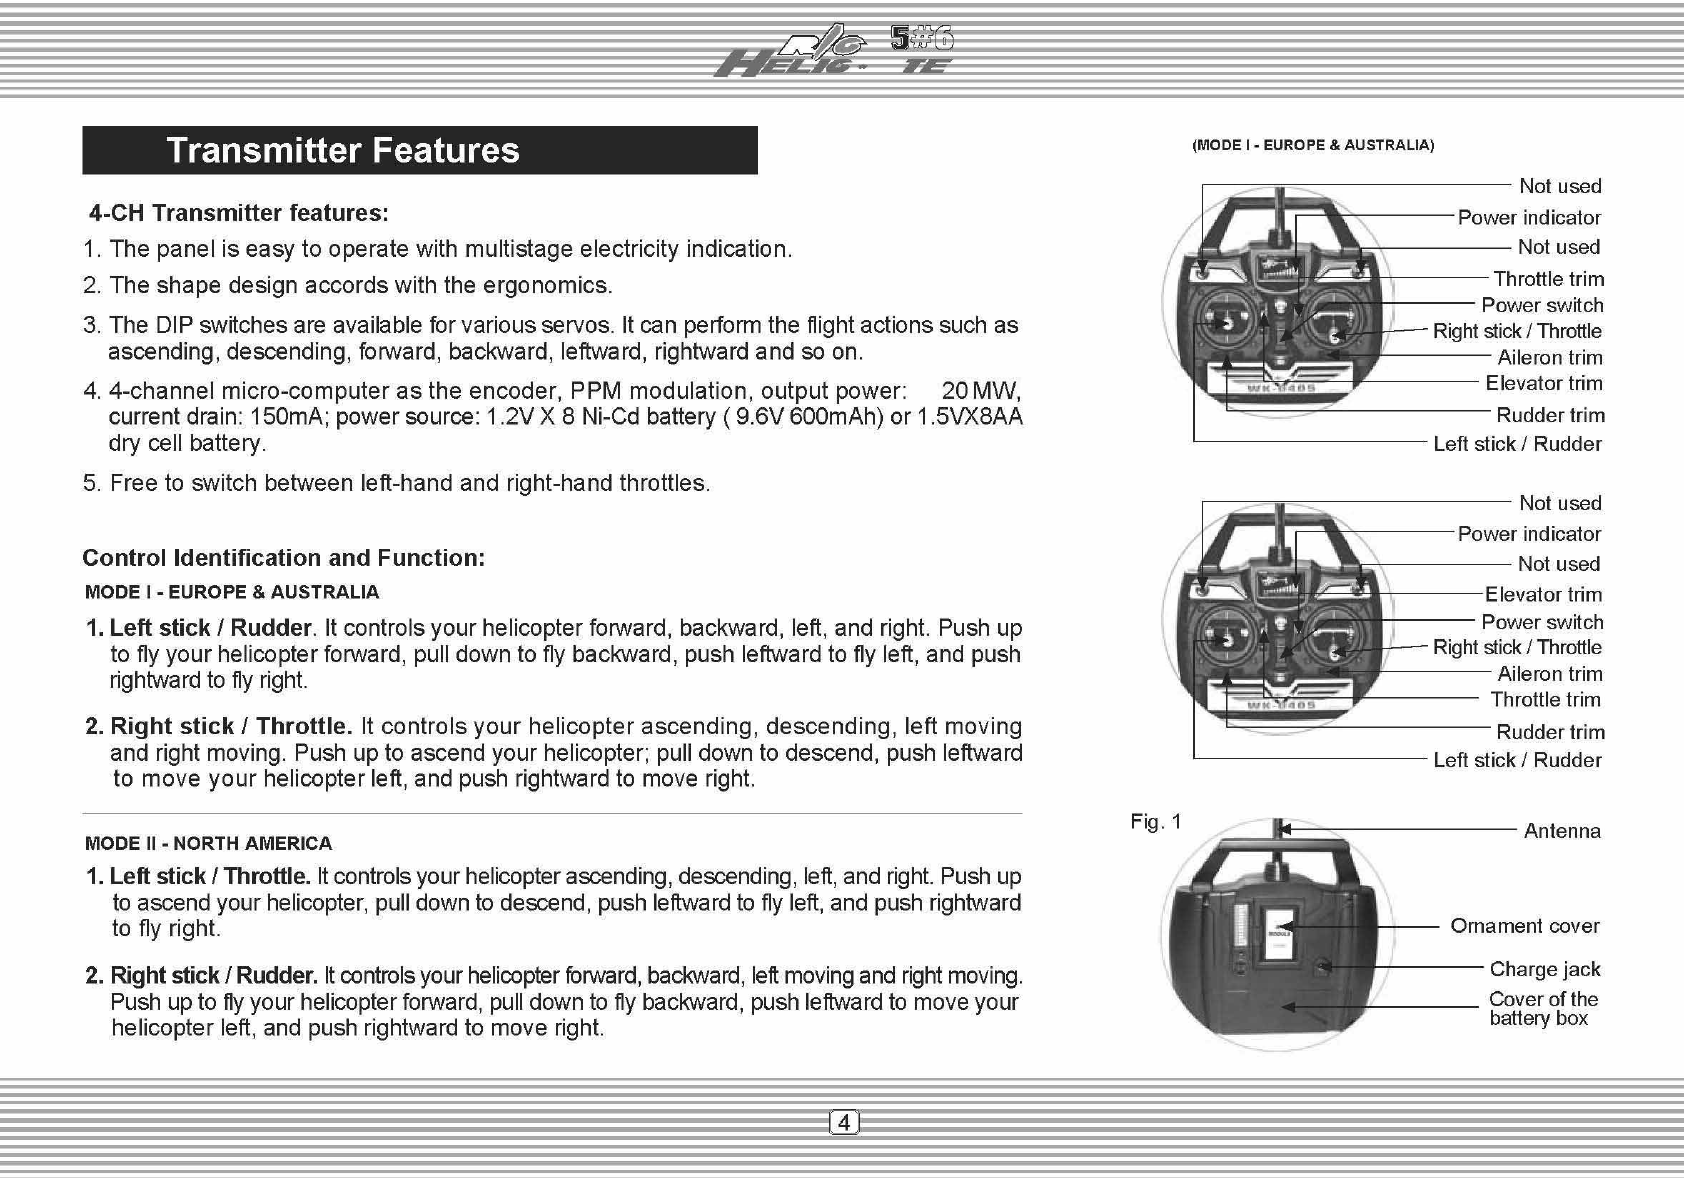
Transmitter Features
Receiver Identification
Switch Between Left-Hand and Right-Hand Throttles
Flybar Set Assembly
Battery Mounting and Adjustment
Swashplate Adjustment
Main Rotor Blade Adjustment
Flight Mode
2
2
3
4
6
6
7
7
8
9
10

2
Introduction
Thank you for your purchase of our product. In order to enjoy all the benefits of your helicopter, we recommend you carefully read the entire manual
before you begin working with this model. After you have read the manual please store it in a safe place for future reference.
Warning
5. Before flying your helicopter, please undraw the upper and lower blades and make sure the left and right blades are in line.
Notice: please let the motors cool 10 minutes after your helicopter flies every one of fully charged battery packs, and then continue your next flight;
otherwise, the motors of your helicopter will take a high risk of burning or damage!
1. Walkera helicopters are not toys. They are a complex combination of electronics and mechanics which produce an aerodynamic rotorcraft. All
models require proper setup and exacting adjustments to avoid accidents. We accept no liability for damage and/or consequent damage arising
from the use or misuse of the products due to improper construction methods, use or operation, It is your responsibility to operate this highly
advanced model in a safe manner.
2. When charging the battery, do not overcharge. Overcharging may result in fire or explosion. When the battery is hot during charging, please
stop charging at once. Use specified charger only. Never short circuit! Proper disposal of the battery is your responsibility.
3. Children under 14 years old are strictly forbidden from flying the helicopter. Please do not allow children or adults in the designated flying area.
4. Any situations that occur during flight, that cause the rotor blades to stop spinning or that result in a serious ground strike and cause damge to the
helicopter could initiate a fire or explosion. If this type of situation occurs, IMMEDIATELY move the throttle stick to it’s lowest position.
3
Cautions
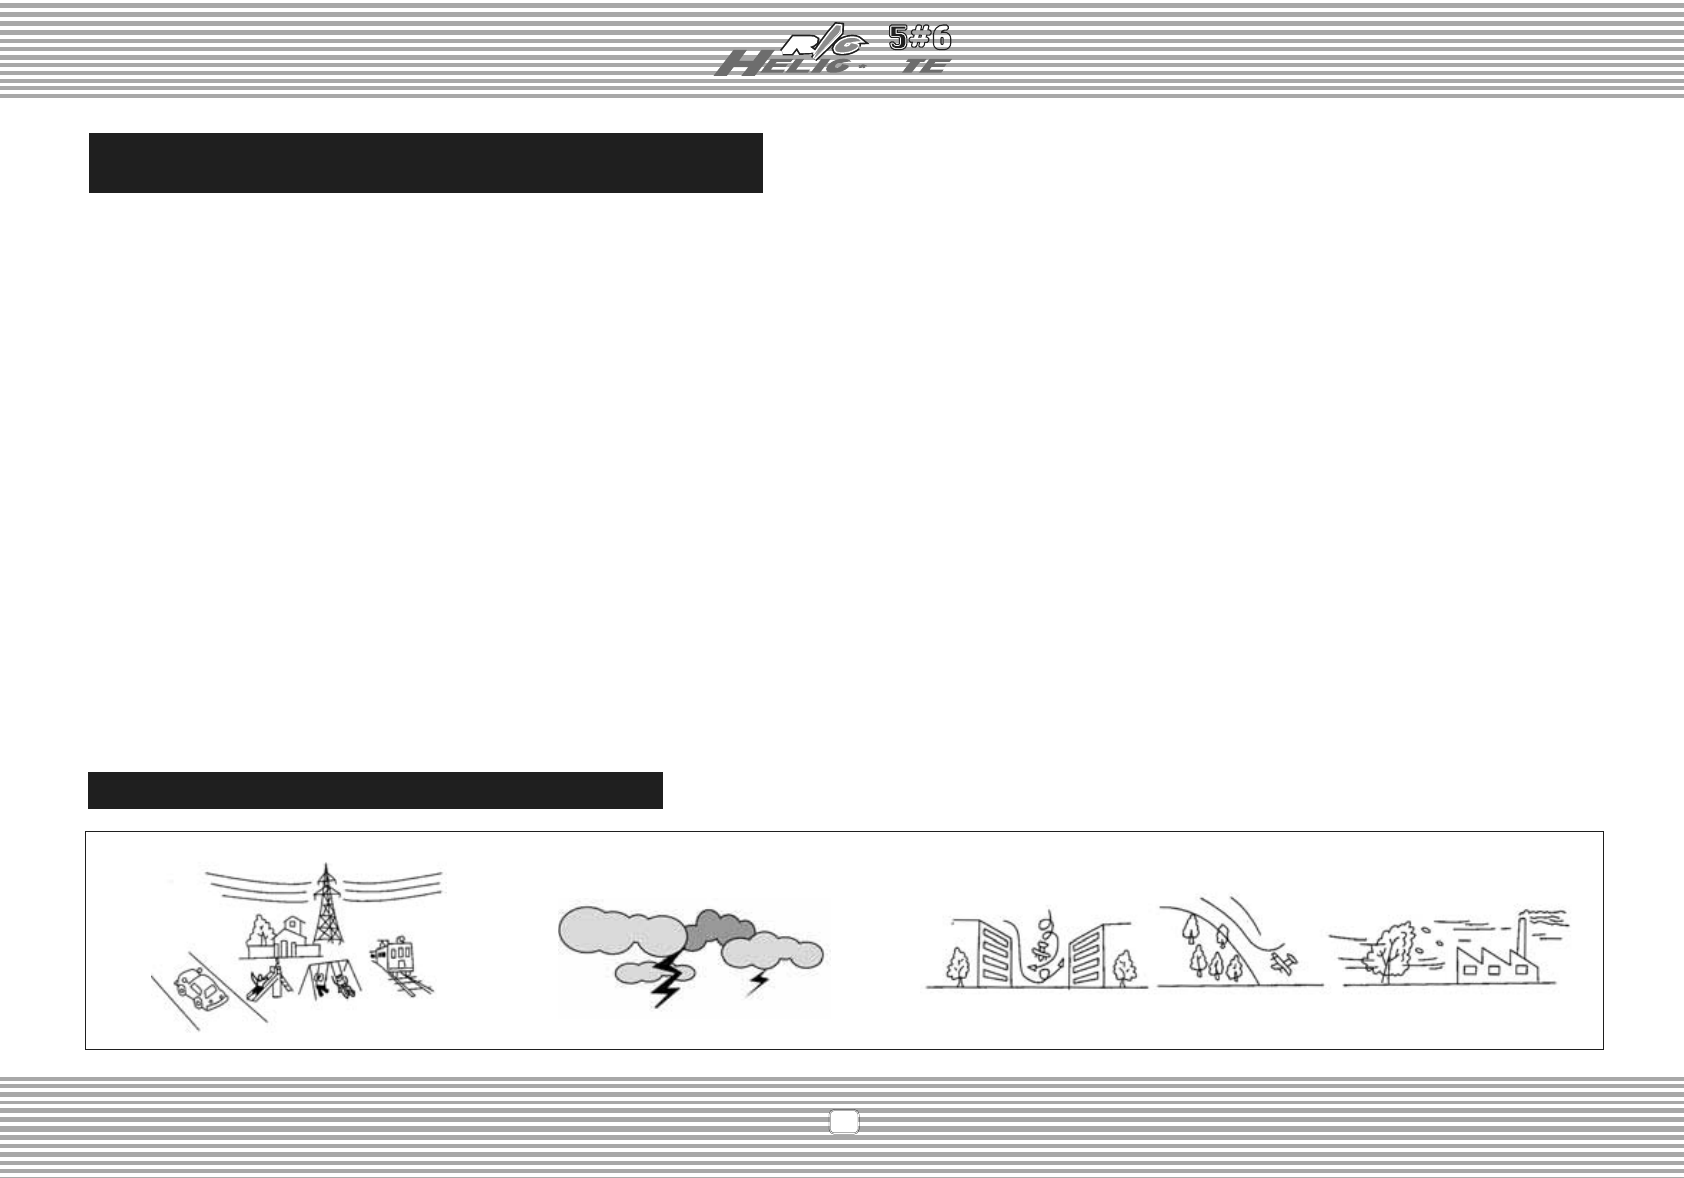
Don't fly your helicopter at the places with these signs
1. Because the helicopter is operated by radio control, it is important to make sure you are always using fresh and/or fully charged batteries.
Never allow the batteries to run low or you could lose control of the helicopter.
2. Do not allow any of the electrical components to get wet. Otherwise electrical damage may occur.
3. You should complete a successful range check of your radio equipment prior to each new day of flying, or prior to the first flight of a new
or repaired model.
4. If the helicopter gets dirty, don’t use any solvents to clean it. Solvents will damage the plastic and composite parts.
5. Always turn on the transmitter before plugging in the flight battery and always unplug the flight battery before turning off the transmitter.
6. Never cut the receiver antenna shorter or you could lose control of the helicopter during flight.
7. When flying the helicopter, please make sure that the transmitter antenna is completely extended and is pointed up toward the sky, not
down toward the ground.
6
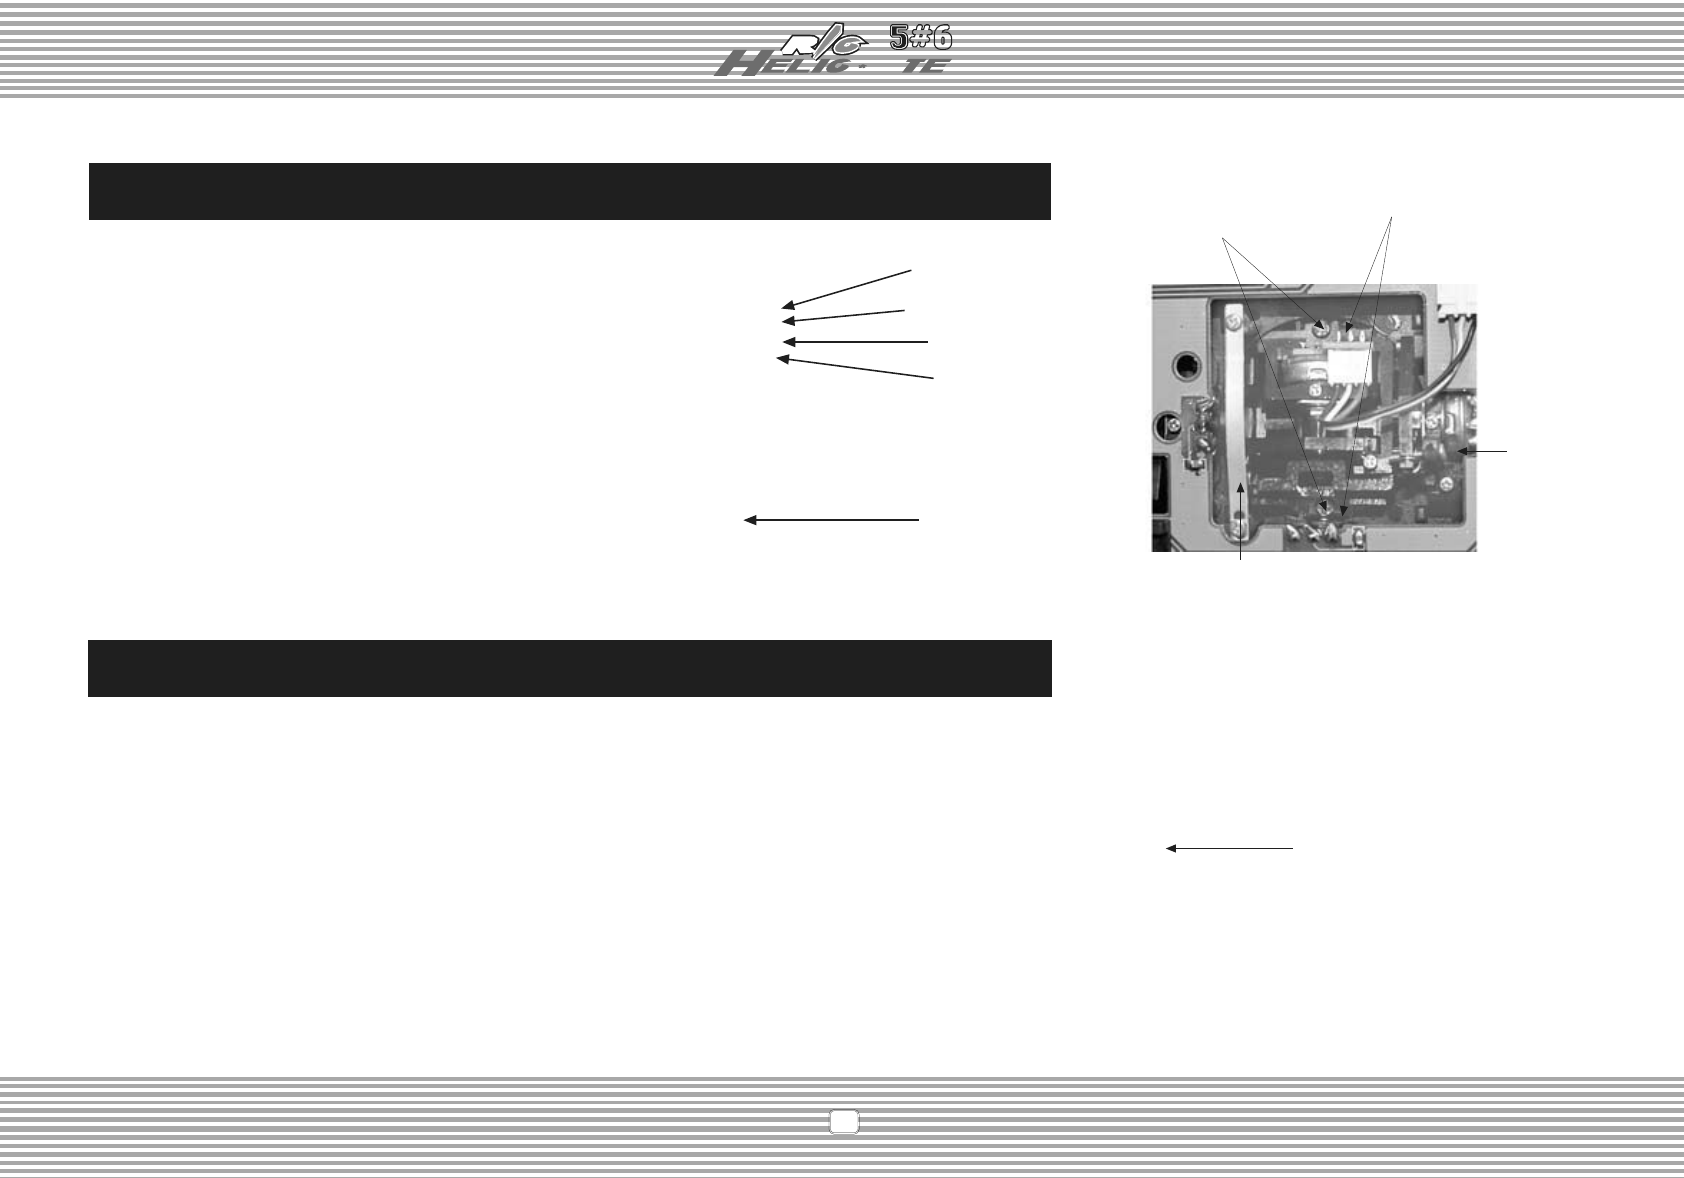
Receiver Identification
Receiver Identification (Fig. 3): Fig. 3 Fig. 4
1. Aileron servo. Connect to the aileron servo.
2. Elevator servo. Connect to the elevator servo.
3. Right motor. Connect to the right motor of
helicopter.
4. Left motor. Connect to the left motor of
helicopter.
5. Power cable. Connect to the battery.
Aileron servo
Elevator servo
Right motor
Left motor
Power cable
Switch Between Left-Hand and Right-Hand Throttles
Plastic flakes
Throttle arresting spring
Fixing screws
of Plastic flakes
Fixing
screw of
linkage
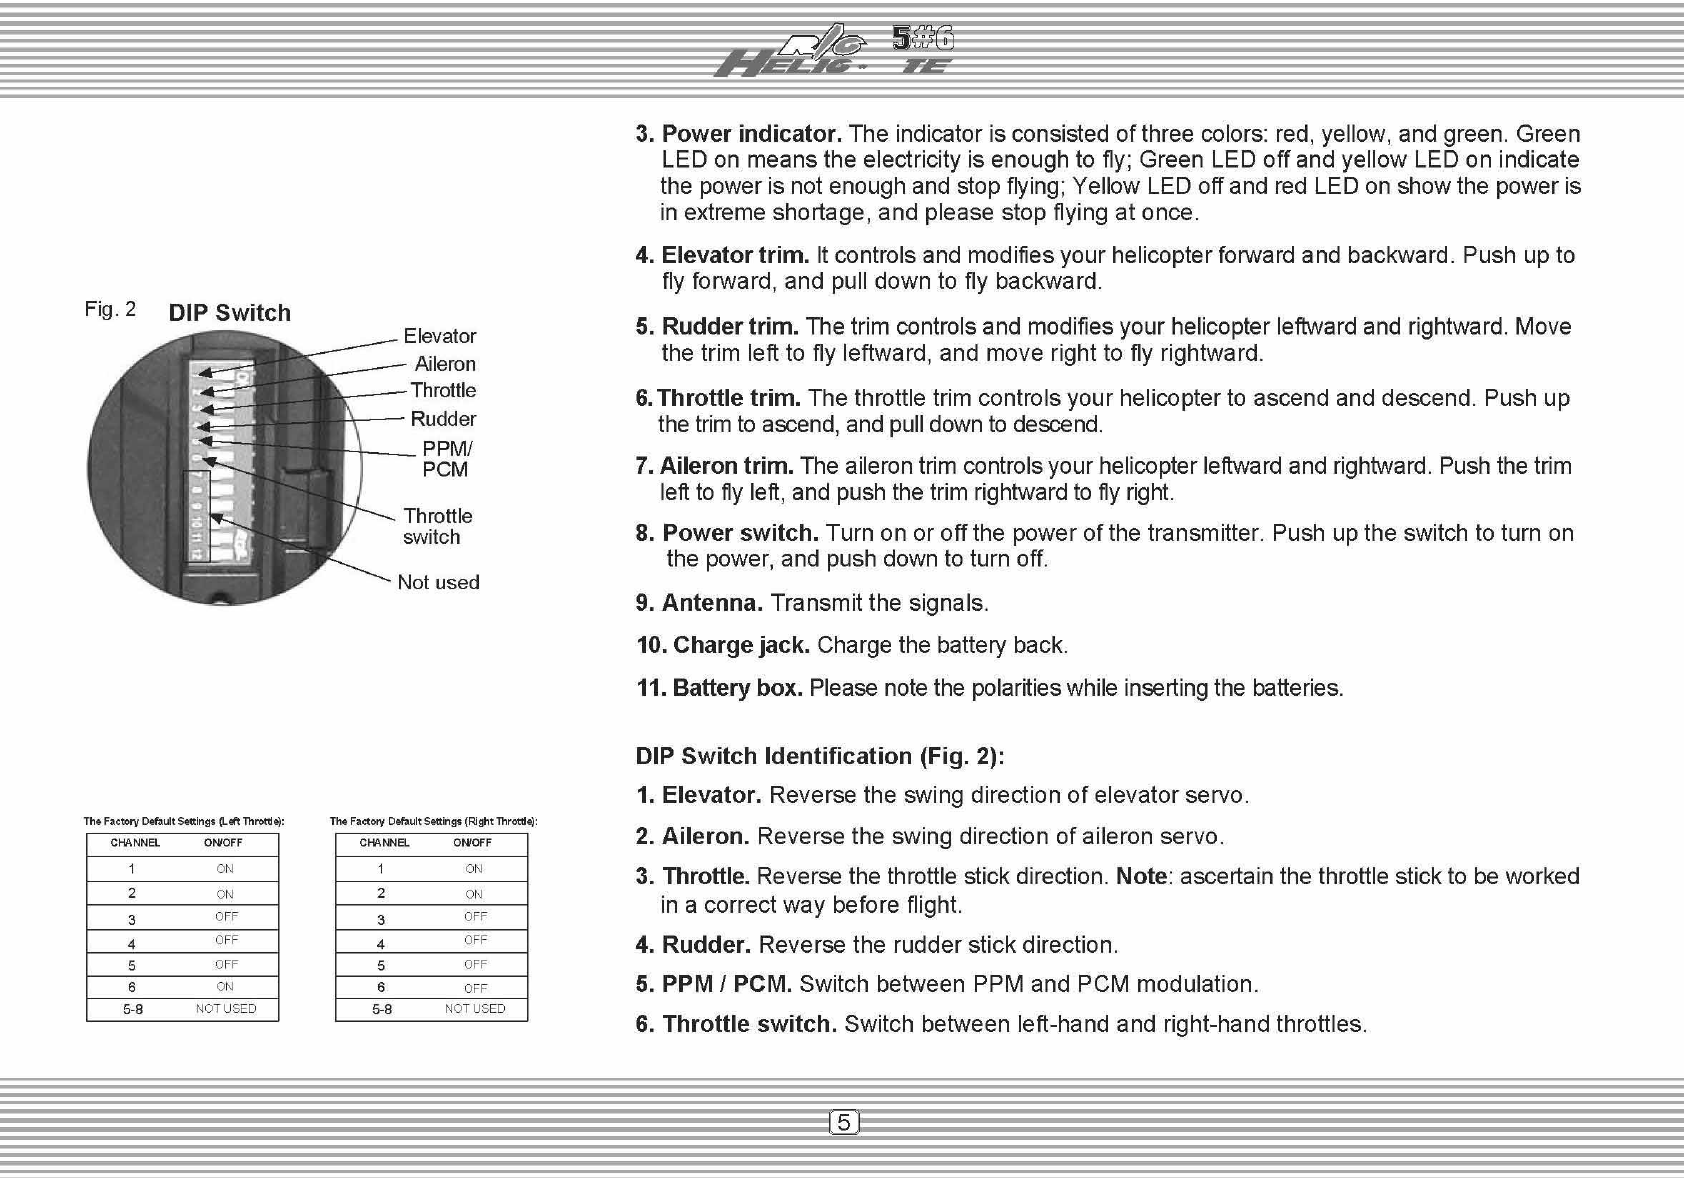
Throttle DIP Switch (switching
to left end fits right-hand throttle
control; switching to right end fits
left-hand throttle control).
Remove the battery pack, RF module and the 4 fixing screws in the back cover of
your WK-0405, and take off the back cover (Note: don't break cables inside). Unscrew
the fixing screw of linkage using cross screwdriver and fix the linkage of another side
using the screw. And then remove the throttle arresting spring to fix in your expecting
side. Unscrew the fixing screws of plastic flakes to remove the plastic flakes, and then
fix them in your expecting side using the screws. In this way physical refit has been
finished (Fig. 4).
7
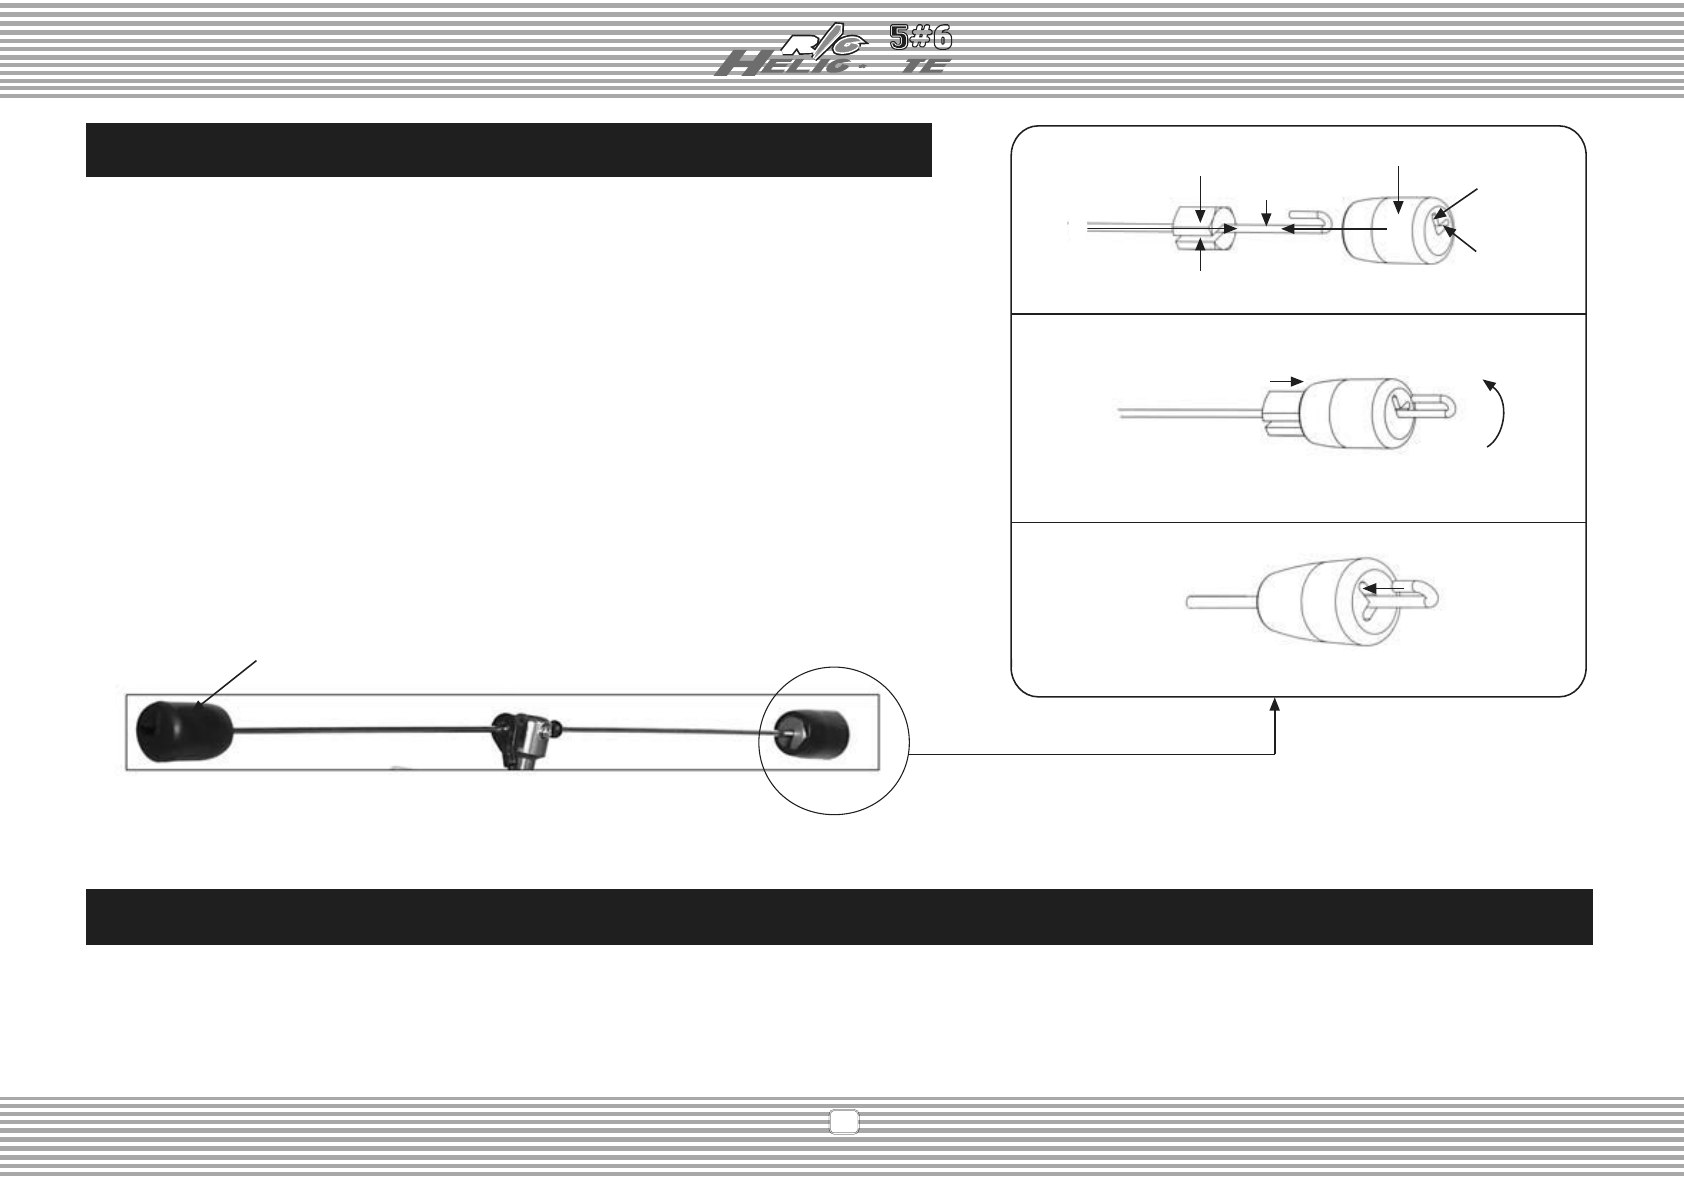
Flybar Set Assembly
1. Let the location notch of flybar block aim at the flybar, and press the flybar block
till the flybar reaches the end of notch; Insert one end of the flybar through hole
1 (Fig. 6-1);
2. Let the location notch of flybar block aim at the inner location mast of flybar block
sleeve, and press the flybar block along the inner location mast into the sleeve
(Fig. 6-2);
3. Counterclockwise rotate 90*the flybar block sleeve (Fig. 6-2), let the hole 1
of flybar block sleeve aim at the hook of flybar, and then push the flybar block set
outside and make the hook completely insert into the hole 2 (Fig. 6-3).
Note: the flybar set will be thrown off at high speed in flying when it is mounted
improperly. A serious damage to people or property may be taken place.
Fig. 6-1
Fig. 6-2
Fig. 6-3
90*
Flybar block
Location notch
Flybar block sleeve
*
*
Flybar
Flybar block sleeve
Fig. 5
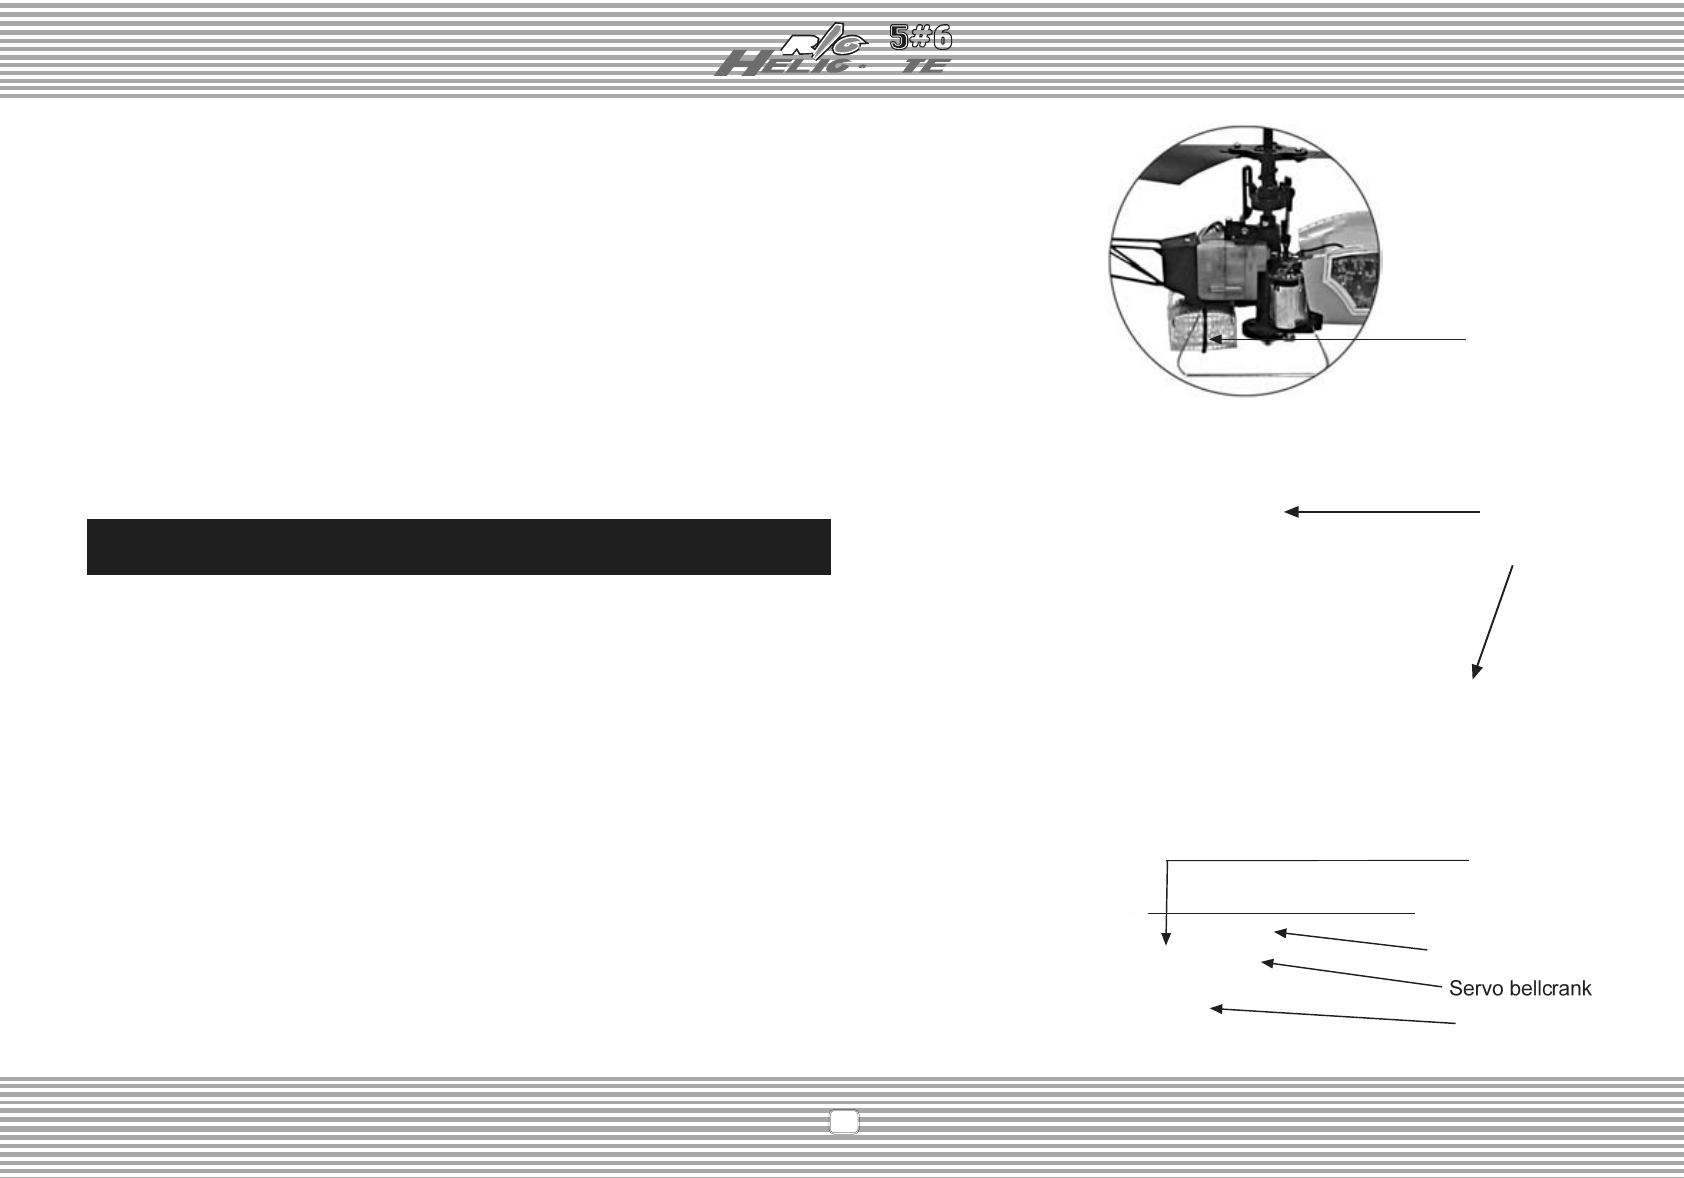
Battery Mounting and Adjustment
1. Battery pack mounting. Place the battery pack in the correct position of your helicopter (Fig. 7).
8
Battery pack
location
Flybar
Tail truss
Horizontal level of
the swashplate
Servo linkage rod
2. Swashplate adjustment. If the swashplate is not in a horizontal level,
adjust via the following steps: *Elevator servo and aileron servo
adjustment. Firstly unscrew the screw of servo bellcrank to take the
bellcrank off , and then re-connect to the helicopter battery pack and
await the servos reposition. After the reposition is ready, adjust the
bellcrank to be in horizontal state and then tighten the screw of bellcrank.
*Servo linkage rod adjustment. Adjust the servo linkage rod to parellel
to swashplate bottom level (Fig. 9) .
Fig. 7
Fig. 8
Fig. 9
Aileron servo
Elevator servo
Swashplate Adjustment
2. CG balance. Put your helicopter on a horizontal ground and make the
flybar perpendicular to the tail truss of your helicopter. Lift your helicopter
using your index fingers to support the two sides of flybar, and check
the balance. The tail boom should be level with the ground. If it is not,
move the battery pack backwards or forwards to balance. Always check
the Center of Gravity (CG) with the battery pack and canopy installed
(Fig. 8). Note: If you can not obtain a level condition a very small amount
of weight may be added the tail. It is possible with the battery upgrade
to a LiPo of 1250 mAh that a nose heavy condition may occur.
1. Swashplate check. Pull down the throttle stick and throttle trim to
the lowest position, and put the elevator trim and eileron trim in the
neutral position. Check whether the swashplate is in a horizontal level.

9
Fixing screw
Short ball linkage
Fig. 10
Main Rotor Blade Adjustment
1. Main rotor blade inspection. (1) Inspect whether the fixing screw of the main
rotor blades are too tight or loose. Extreme tightness or loosing of the blades
will result in instable flight. (2) Inspect the blade tracking problem. Blade tracking
will lead to instable flight.
2. Main rotor blade adjustment. (1) Keep the fixing screw of the main rotor blades
not too tight or too loose. (2) Lengthen or shorten the short ball linkage if the
blade tracking is existed (Fig. 10).
10
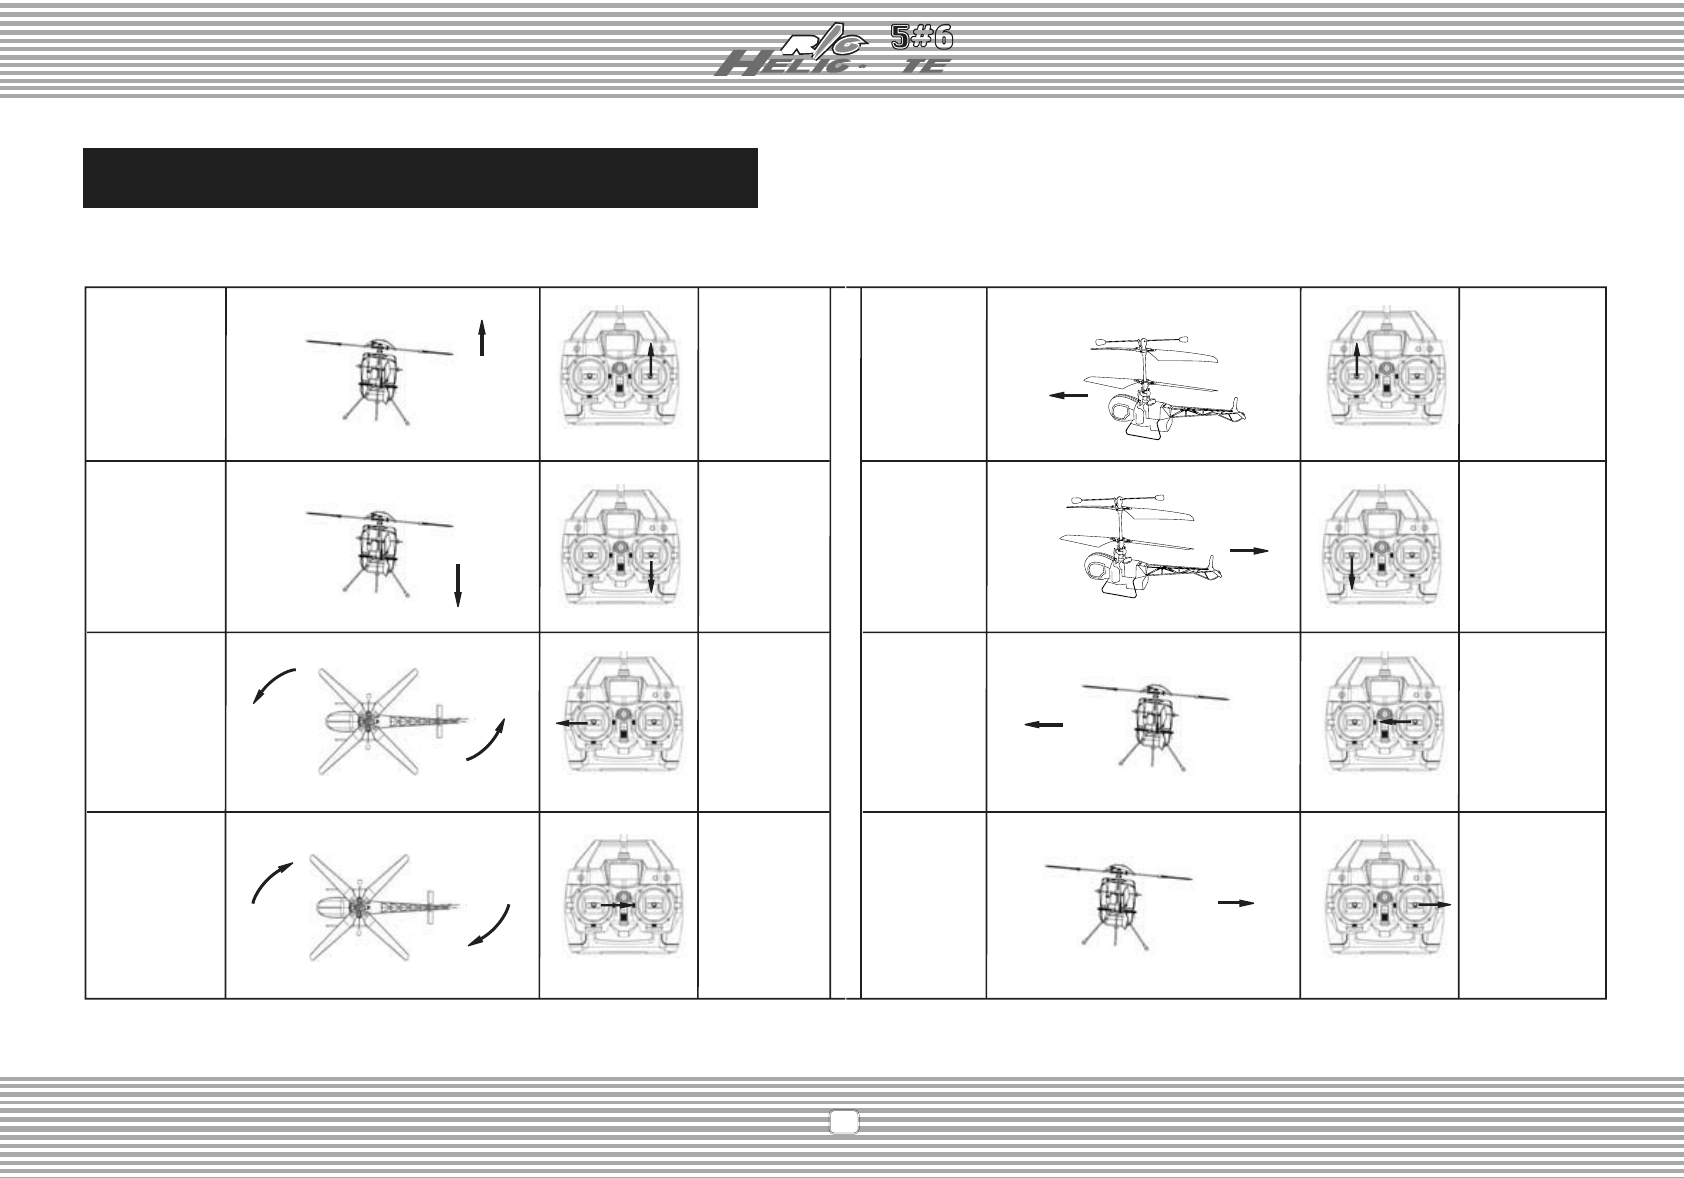
Normal Mode
Flight Mode
throttle
pushing
up
ascending
throttle
pulling
down
descending
rudder stick
moving left
head turning
left
rudder stick
moving right
head turning
right
head forward
head
backward
helicopter
moving left
elevator stick
pushing up
elevator stick
pulling down
aileron stick
moving left
aileron stick
moving right
helicopter
moving right