Guangzhou EHang Intelligent Technology 05220808 GHOST Aerial User Manual
Guangzhou Ehang Intelligent Technologies Co., Ltd. GHOST Aerial Users Manual
15_Ghost_Drone UserMan

Please refer to relevant regulations of the International Civil Aviation
Organization, local airspace control and UAV management rules. Other-
wise it may incur liabilities for violation of laws or regulations. Once this
product is used, it will be assumed that the user has acknowledged and
accepted all the contents of this statement.
Users will be held accountable for their actions or any direct or indirect
consequences caused by incompliance with the aviation restrictions of
this manual.
Aviation Restrictions
Reminder
Reading Instructions
Symbols
Suggested Use
Video
GHOST Basic
Introduction
Parts List
Preparation
Battery
G-Box
GHOST
Propeller
Prop guard
Gimbal
Landing Gears
Camera
GHOST APP
Voice Package
GHOST APP
The interface
Flight
Pre-flight Examination
Flight Environment
Flight Safety
Caution during Flight
After-sales
Contents
02
03
04
06-22
23-26
27-28
Reminder
Black Box
Each GHOST drone contains a black box which records all flight information
and working parameters of the engine, which is used for flying tests and
accidence analysis.
Operation
Please be careful when using the GHOST. The product contains sensitive
electronic components. Fall, damage or exposure to water may break the
GHOST.
Modification/Mounting
If you need to modify GHOST or mount other devices on GHOST, please
consult our customer service. Users will be held accountable for any conse-
quences caused by modification or mounting without permission.
Repair
Please do not disassemble or try repairing the GHOST, which may cause
damage to the GHOST or even injure yourself. If it is broken, malfunctions or
gets exposed to liquids, please contact EHANG or its authorized dealers.
Battery
Please do not dismantle, squeeze, strike, burn, drop or tread on EHANG
batteries. Avoid short circuit or exposing the battery terminal to metals. Do not
use the battery at a temperature above 60 degrees Celsius. Please use the
original GHOST charger. Please store the battery out of children’s reach and
keep it dry.
Storage
If GHOST and its parts are left idle for a while, please take out the battery and
store it in a dry, dark environment free from dampness, molds and electro-
magnetic interference (EMI).
02
Suggested Use
EHANG has a video and the following instructions teaching users how to
operate GHOST in order to make sure that you have a pleasant experience
with our product.
1.Video
Website: www.ghost-drone.com
2.Disclaimer
Website: www.ghost-drone.com
3.Quick-start Manual:To help you start easily and quickly
4.GHOST Aerial Advanced Manual: To provide detailed instructions
Video
Please visit our website www.ghost-drone.com to learn how to use GHOST
from the video.
Symbols
Do not operate Attention needed Tips
Reading Instructions
03
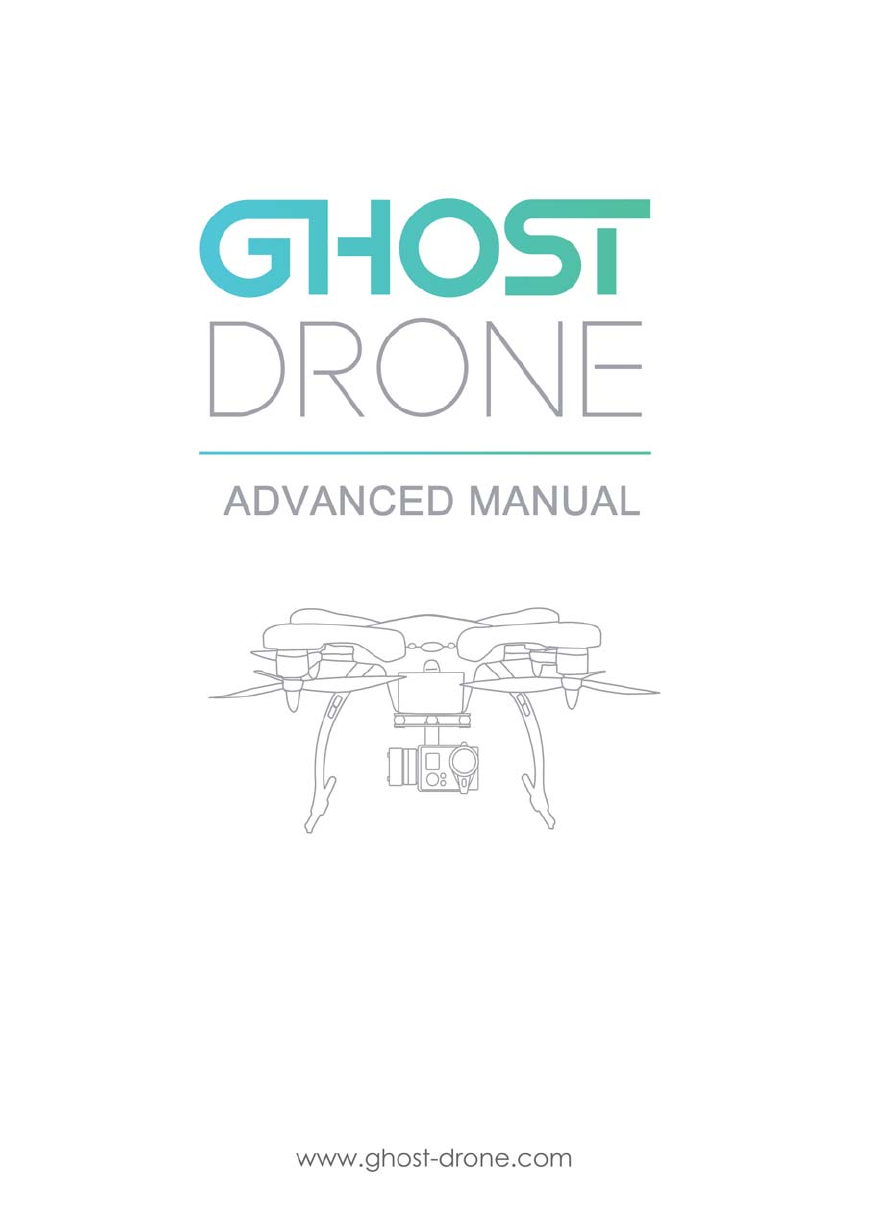
GHOST Aerial Plus
GHOST is a quadcopter completely controlled by a smartphone APP. It is
equipped with an advanced flight controller and the intelligent mobile device
can provide functions of flight directing, BVR flight and following. It is easy to
operate. With GHOST, flying is no longer a privilege.
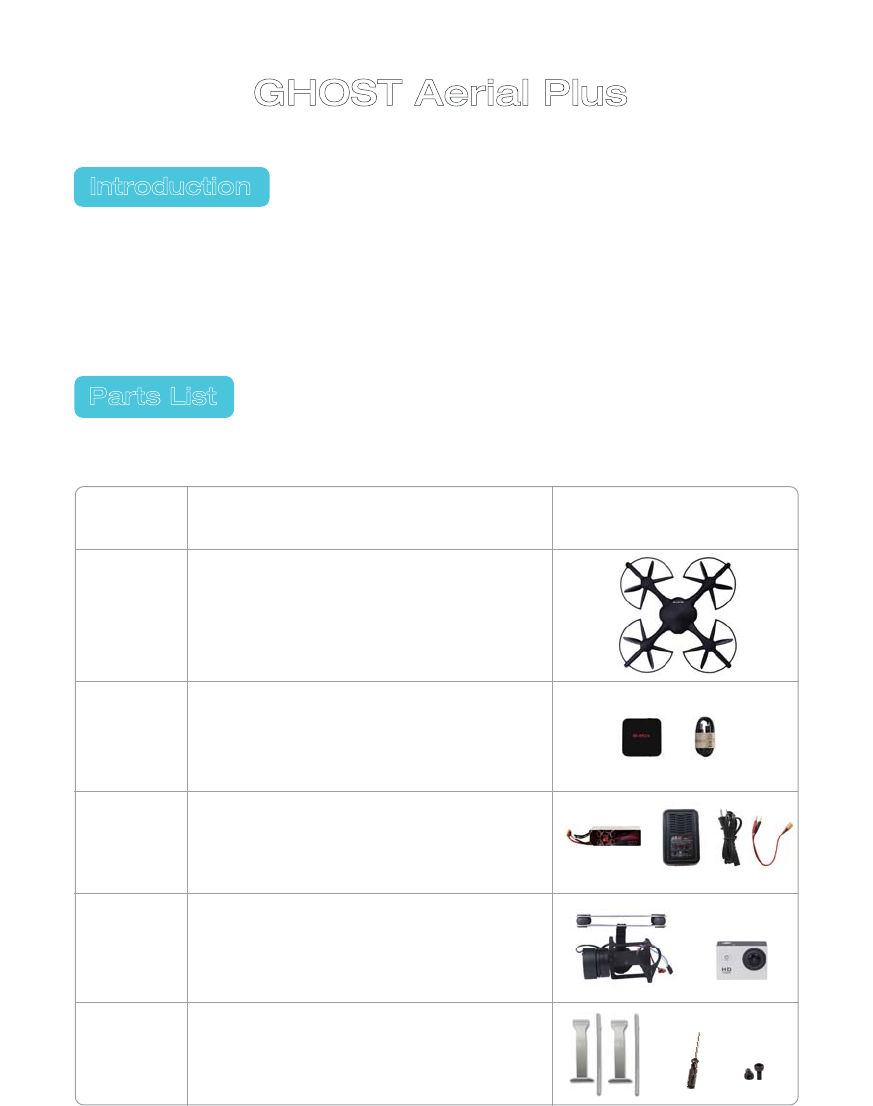
Please check the contents of the box before using.
GHOST (with two pairs of propellers
and four prop guards)
G-Box (with charging cable)
Battery and battery charger (with
two charging cables)
Number Item Picture
1
2
3
4
Introduction
Parts List
04
Gimbal and camera
5Landing gear, screwdriver, and
eight 2.0 screws
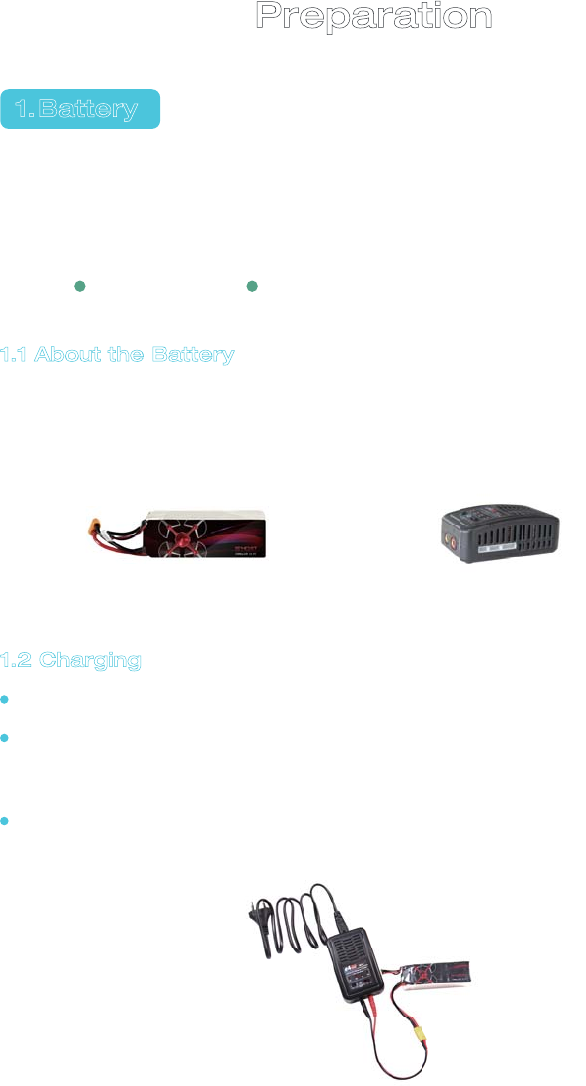
1.2 Charging
Battery type: LiPo
Charging: The indicators of 1S, 2S and 3S are the number of batteries
being charged; 1A, 2A and 3A are the current. The higher the value is,
the faster the battery will be fully charged.
State: When the red indicator is on, the battery is being charged.
When the green indicator is on, the battery is fully charged.
1.1 About the Battery
It is a charge-discharge, lithium polymer battery specially designed for
GHOST products, with a capacity of 5400mAh, cell voltage of 11.1v and an
XT60 connector. The battery must be charged with the original charger
provided by EHANG.
Battery Charger
Please make sure the following devices are fully charged before using
GHOST.
1.Battery
05
Preparation
Battery G-Box
1.4 Attention Needed
1 ) Please examine if there is any tear, damage or deformation on the battery;
2) Battery temperature is high immediately after use. Don’t start charging until
the battery cools down to room temperature;
3) Do not leave the battery charged unattended. If abnormal charging situa-
tion occurs, please stop charging the battery at once; if you cannot attend
the battery, remove the battery from the charger in case of unpredictable
danger;
4) Do not place or charge the battery in the sun. Temperature higher than
35ď might damage the battery or affect its performance;
5) Store the battery out of children’s reach. Please keep the battery away
from source of water and fire;
6) Avoid storing fully charged battery. It is suggested to use the battery within
24 hours after it is fully charged; if you determine not to use the battery for a
long period of time, keep its electric voltage between 11.4V and 11.6V
(single cell between 3.8V and 3.85V) ;
7) Do not apply external force on the battery; do not drop the battery from
high places;
do not disassemble or modify the battery;
8) Please replace the battery with new one if it bulges;
9) Please do not charge the battery for over three hours.
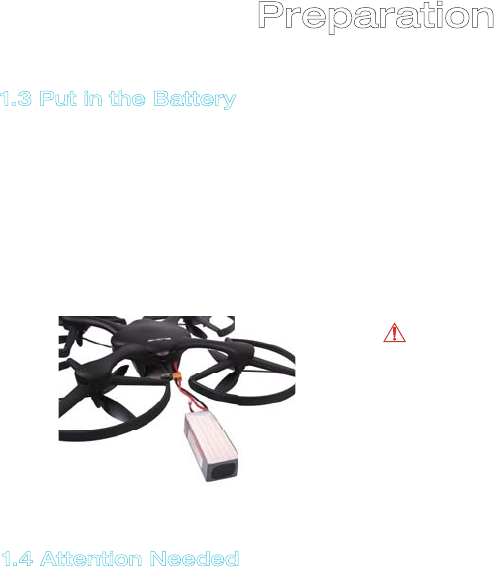
1.3 Put in the Battery
Put GHOST on level ground and connect it to battery cable. When the flicker
frequency is lowered (5 seconds per flicker), push the battery into the com-
partment in the right direction and make sure the battery is tightly stuck.
Close the cover and keep a safe distance (5 meters). Connect your smart-
phone to G-Box through Bluetooth, which makes it easier to unlock the
smartphone APP and avoids unlock failure.
If the battery is not tightly
stuck, there will be poor
contact with power source
or failure to obtain battery
information, which may
affect flight safety or cause
unsuccessful take-off.
06
Preparation
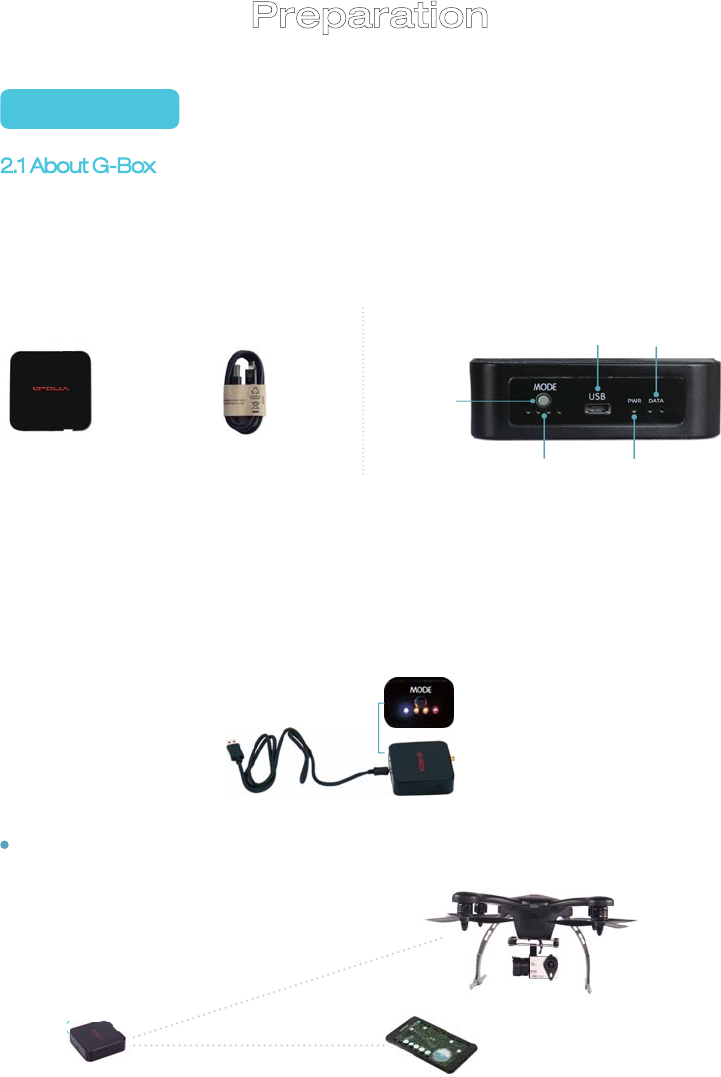
2 . G-Box
2.1 About G-Box
G-Box is a communication device specially designed for GHOST products.
Each GHOST is equipped with one G-Box;
Without G-Box, you cannot use GHOST APP on your smartphone to control
the GHOST; please keep the G-Box in good condition.
On: Tap the ON/OFF button
Off: Long press the ON/OFF button until the PWR light is off
Charging: Four indicators flicker in turn
Fully charged: Indicator on far left flickers; the other three are on
USB cable G-BOX
07
On/off
Charging cable port Data indicator
Charging indicator Power
indicator
Smartphone App
G-BOX
GHOST
G-Box is connected to
GHOST through radio wave
Smartphone App is connected
to G-Box
Preparation
After it is fully charged, connect G-Box and smartphone APP through
Bluetooth on your smartphone.
3.GHOST
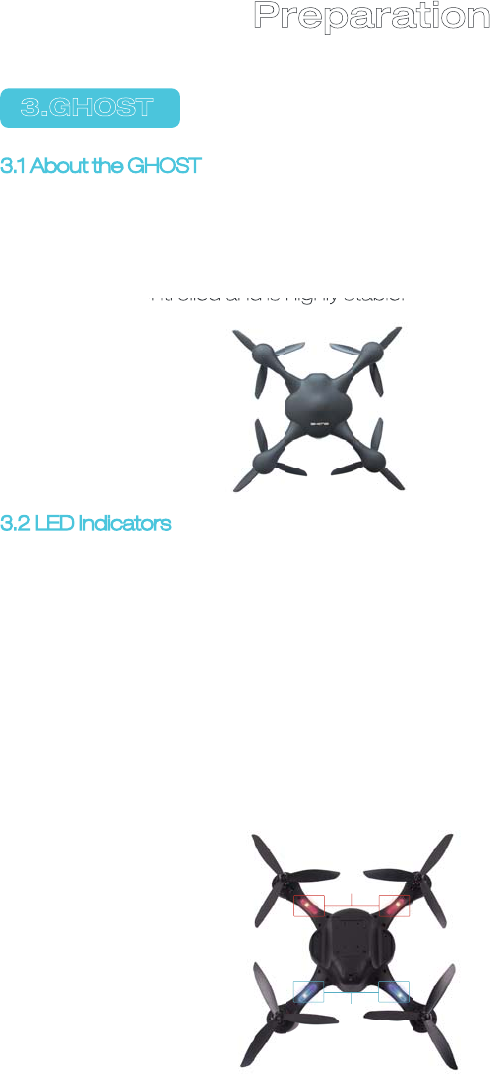
3.2 LED Indicators
1)There are red and blue indicators; Red indicates forward and
blue indicates backward;
2)Blue indicator is on when GHOST is searching for GPS
satellite;
3)Blue indicator stays on. Takeoff requires 6 or more available
GPS satellites.
4)When red indicator is on: It flickers before take-off, indicating
the GHOST is in normal state; it flickers during flight, indicating
there is something wrong with electricity consumption and
you must pay attention to low battery;
5)Red indicator stays on when GHOST is unlocked or during
flight.
3.1 About the GHOST
GHOST (without Gimbal and camera) has a built-in GHOST flight controller
and can move forwards, backwards, left, right, up and down, rotate or fly to a
certain point or make other movements controlled by a smartphone APP. It
can be easily controlled and is highly stable.
08
Red
Blue
Preparation
Preparation
09
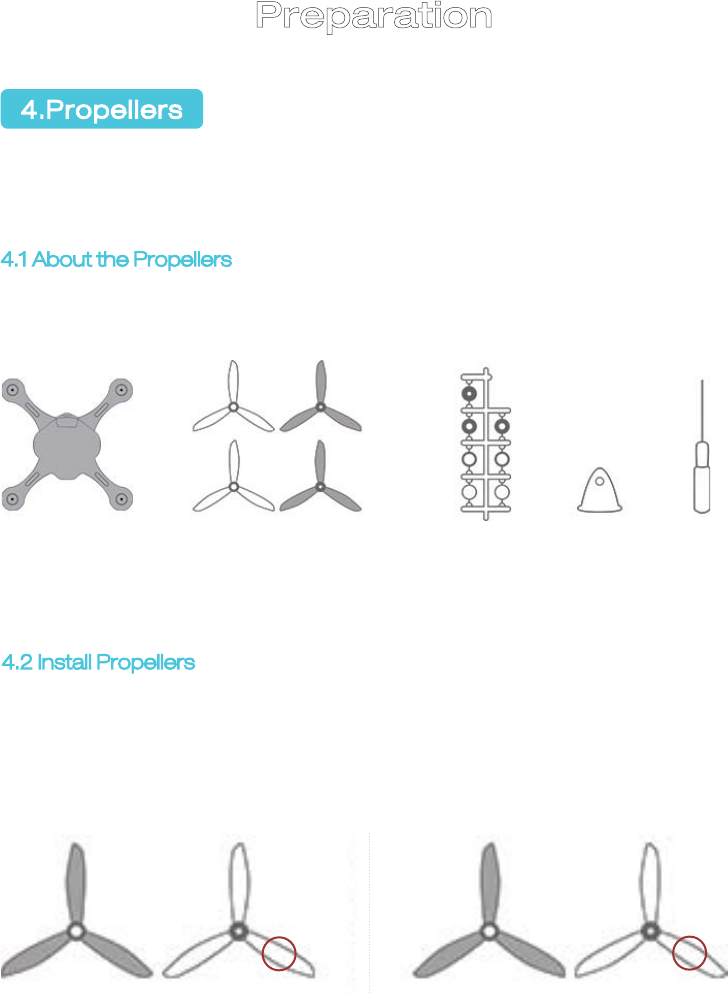
GHOST is equipped with 8-inch, 3-blade, co-rotating and counter-rotating
propellers. Please visit our website to purchase the propellers if necessary.
4.1 About the Propellers
Pictures of the propellers and the supporting tools (Notice: grey part indicates
the back sides of GHOST and parts)
4.2 Install Propellers
1)Identify front and back ends: R indicates right propeller. L indicates left
propeller. The character can be found on the propeller’s rim on the front
end. No character on the back of propellers.
LR
GHOST drone
Left Right
Back Front
Right propeller × 2
Left propeller × 2
Cushion × 4 Nut × 4 Screw-
driver
Back Front
4.Propellers
Preparation
10
4.3 Matters Needing Attention
1)Please check whether propellers are installed correctly and tightly before
flight;
2)Please check whether blades are intact; replace with new ones if there is
damage or aging;
3)Keep away from rotating blades and running motor in case of injury;
4)Please use original 3-blade, co-rotating and counter-rotating propellers
provided by EHANG to achieve optimal flight experience.
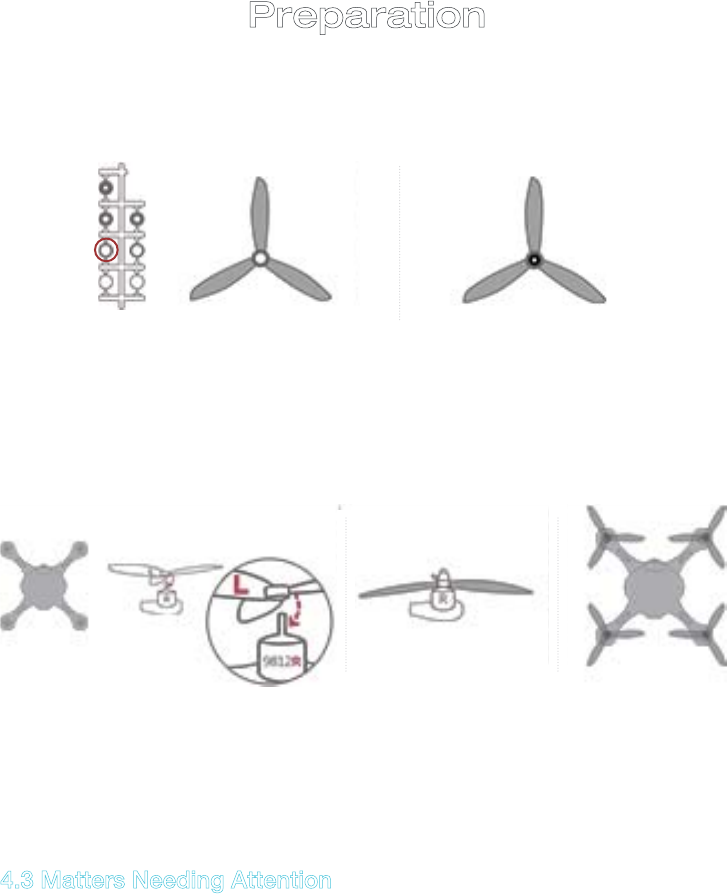
2)Assemble propellers: Pick the cushion in the red circle and fit it in the small
holes on the backside of propellers respectively.
Before After
3)Install propellers: Keep GHOST upside down. The propeller should be
placed on the motor with propeller’s front ends (with character) facing
downwards. L propeller should be fixed to the R motor and R propeller to L
motor; fasten the nuts at the back.
Notice: Please press the propeller with your left hand, tighten the nut with your
right hand, and fasten the nut with a screwdriver (follow similar techniques to
dissemble propellers).
Upside down Before After Finished

11
Preparation
5.Prop Guard
GHOST prop guard is made of intensified compound materials. Its lightness
contributes to better and safer flight, and protects the blades from strike.
5.1 Installation and Disassembly
Installation: Place the prop guard on GHOST and screw it down with three
2.0 screws.
Disassembly: Unscrew the three screws fastening the prop guard and take
the prop guards down.
6.Gimbal
GHOST Gimbal is anti-knock and anti-shake.
6.1 Gimbal Parameters
Weight: 178g
Precision: ±0.09°
Working voltage: 7V to 17V
Maximum angle: Roll angle ±55° Pitch angle -180° to +60°
Balance angle: Roll angle ±45° Pitch angle -90° to +30°
Supporting cameras: EHANG motion camera, Gopro3, Gopro3+ and Gopro4
12
Preparation
6.2 Installation
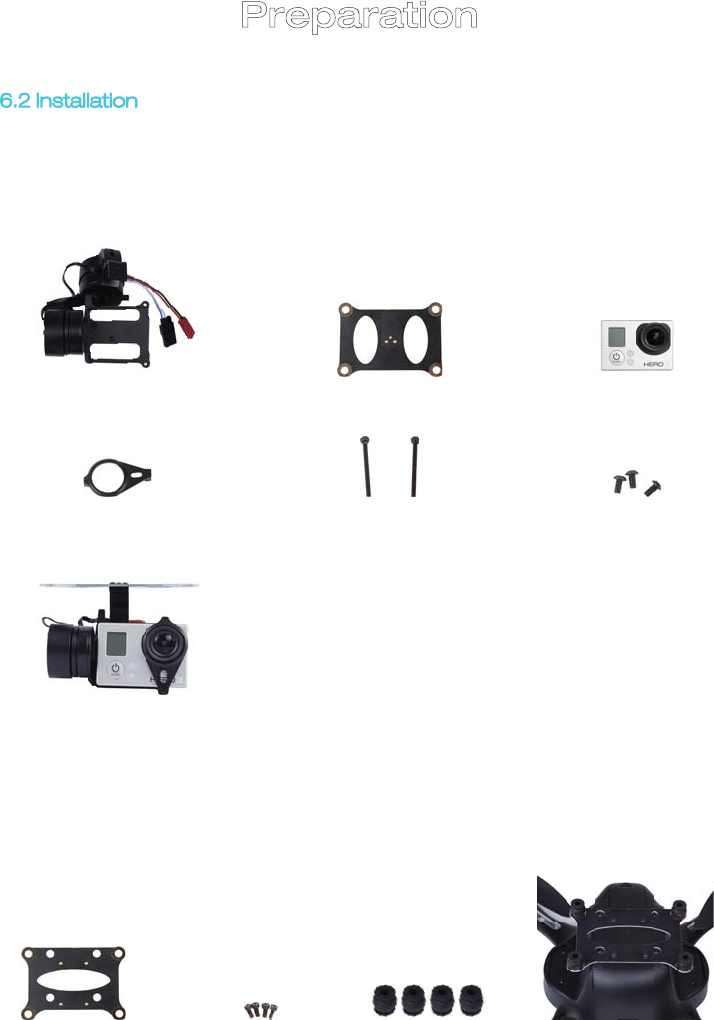
Gimbal Lower seat of Gimbal Camera
Camera prop guard 1.5 long screws 1.5 short screws
Step 1 Assemble the camera:
Use 1.5 long screws to fasten the camera
brace to the camera and 1.5 short screws to connect the camera (such as
GoPro) to the lower seat of Gimbal. (Notice: Parts must be fastened with
screwdriver).
Step 2 Install the upper seat of Gimbal:
Put the GHOST upper seat upwards,
use 2.0 screwdriver to fasten the upper seat to GHOST and cover the upper
seat with buffer balls.
Finished
Gimbal upper seat 2.0 short screws Buffer balls Finished
13
Preparation
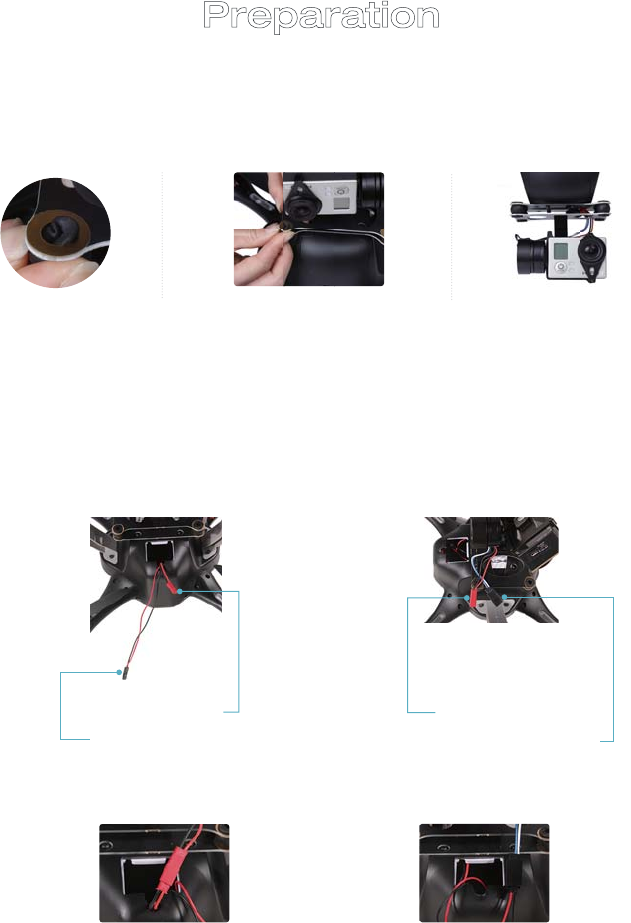
Step 3 Connect the upper/lower seat:
Connect the upper and lower seat
with buffer balls.ȡ
Step 4 Wiring (very important):
Pay attention to the colors of cable ends and
make sure each one is connected to the right color or there may be damage
to the Gimbal.
Finished
GHOST red plug
GHOST black plug
Gimbal red plug
Gimbal black plug
Connect to the red plug
GHOST red cable to Gimbal
red cable
GHOST black cable to Gimbal
black cable
Connect to the black plug
GHOST red cable to Gimbal
blue cable
GHOST black cable to Gimbal
white cable
14
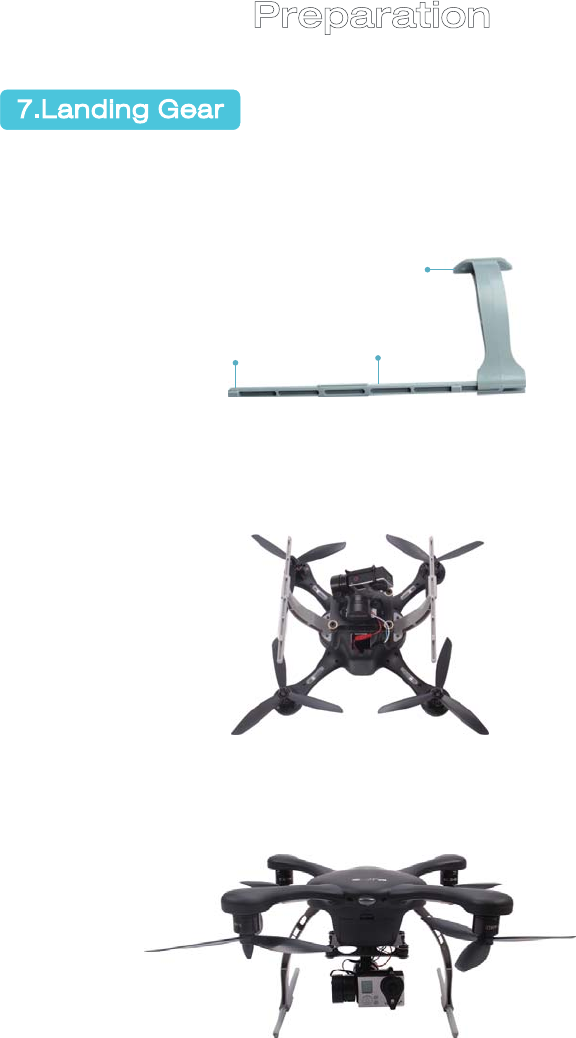
7.Landing Gear
Preparation
Assembly:
Assemble the landing gear; pay attention to the direction in which
the cross-bar is installed; the finished landing gear is as follows:
Base
Cross-bar
Head
Assembly
Seen from the bottom
Seen from the front side
15
8.EHANG Motion Camera
Preparation
Filming
Ultra-HD screen to play and replay your videos
Dismountable battery to extend its service life
Filming while being charged
Filming while being plugged in
12 Megapixel HD wide-angle lens
HDMI HD output
Web camera
Memory card support maximum of 32G
Video definition supported: 1080P/ 720P/ WVGA
MOV filming
Shooting modes: Stop-motion and continuous
capture
Lock during video recording
Mini size
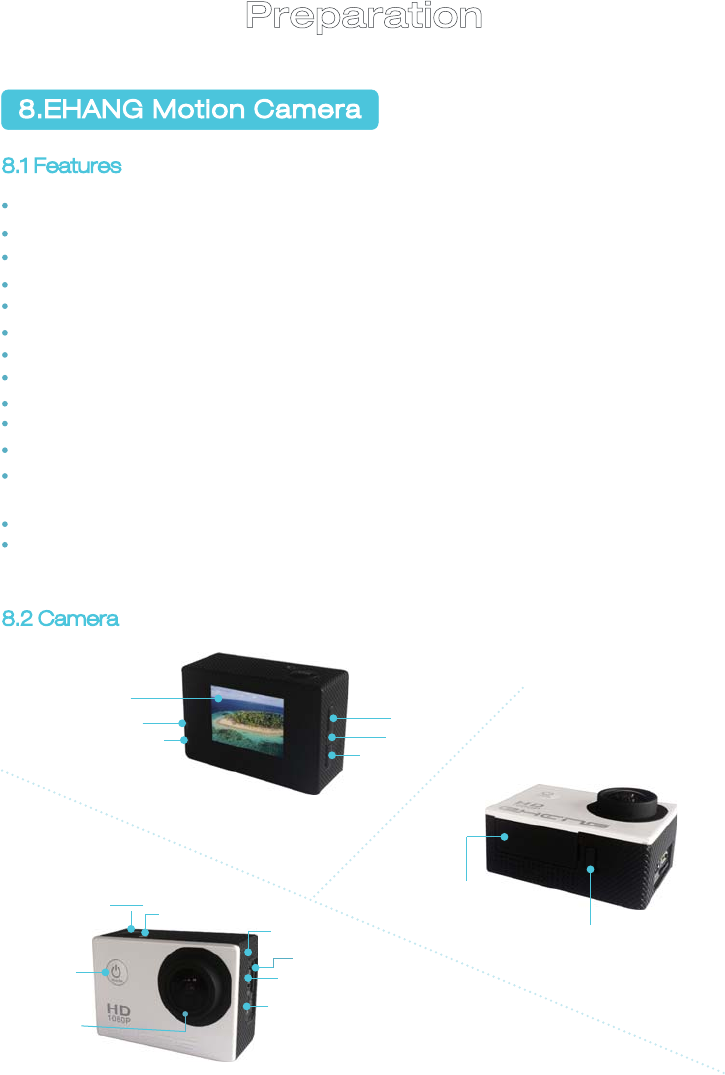
8.1 Features
8.2 Camera
Up
Down
Spreaker
Screen
Active indicator
Charging indicator
Battery lid
Locking key of battery door
Indicator
Confirm
MIC
MICRO SD
USB
HSMI
Lens
On/off
Mode
16
Preparation
8.3 How to Use the Camera
1)Insert Micro SD card
Notice: Please use qualified Micro SD
card; format it on computer into
exFAT32k; neutral card may not function.
2)Install and take battery out
01 Draw the lid downwards and open it;
02 Put the battery in the camera
according to symbols of cathode and
anode, there are arrows pointing how
you should insert the battery;
03 Push the lid and take the battery out;
3)Charging
01 Plug it to computer or power adapter
to charge;
02 Plug it to a car charger to charge;
03 Film while charging (set it at car mode
from the function menu);
04 Charge when turned off;
05 Current should be kept within 1000mA
or it may cause damage;
6)Charging
01 Filming and image setting;
During filming, there is a symbol on top
left corner of screen; tap “CONFIRM” to
start filming; during filming, is flickering;
tap “CONFIRM” again to stop filming;
the symbol on top left disappears.
02 Photographing and settings;
Turn it on and you can see mode
selection; when there is on top left
corner of the screen, you can take a
picture; tap “CONFIRM” to take
pictures: stop motion/ self-timer
(2/5/10 seconds)/ continuous capture;
03 Save and play;
Use USB cable to move the videos to
your computer; you can also take the
Micro SD card out and read the data
on a computer with a card reader.
4)Turn on/off the camera
There is ON/OFF button on the front side
(tap to turn it on; long press to turn it off
and you can see GOODBYE on screen);
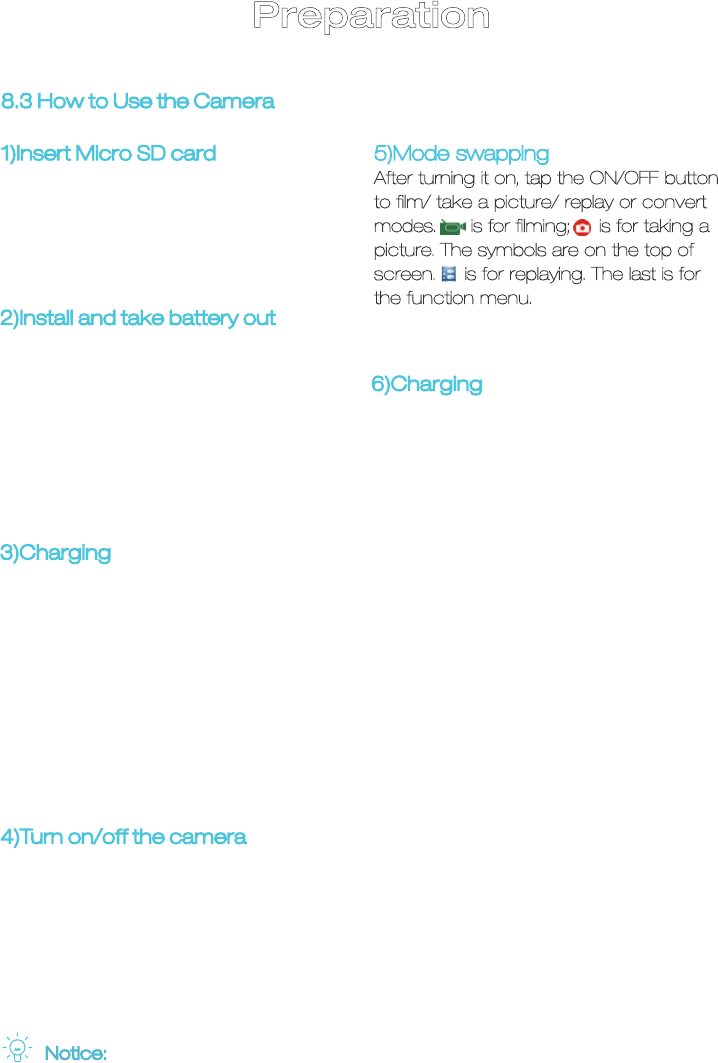
5)Mode swapping
After turning it on, tap the ON/OFF button
to film/ take a picture/ replay or convert
modes. is for filming; is for taking a
picture. The symbols are on the top of
screen. is for replaying. The last is for
the function menu.
Notice: After crash, take the battery out and put it back again to restore.

17
Preparation
8.4 Camera parameters
Parameters may be upgraded or changed. Specifications might defer contingent
upon real products.
Lens
Language
Filming
Filming format
Compressed
format
Resolution
Memory card
Picture mode
Light source
frequency
Power supply
Battery
capacity
Power
consumption
Maximum time
for filming
Time for
charging
Operating
system
Items Parameters
1.5LTPS
170° A+ high-resolution wide-angle lens
Simplified Chinese/ Traditional Chinese/ English/ German/ French/
Spanish/ Italian/ Portuguese/ Russian/ Japanese
1080P (1920*1080) 30FPSȠ720P (1280*720) 60FPSȠ
VGA (848*480) 60FPSȠQVGA (640*480) 60FPS
MOV
H.264
12M/8M/5M
Micro SD
Shot motion/ self-timer (2/5/10 seconds)/ continuous snapper
50Hz/60Hz
USB2.0
5VIA
900mAh
400mA@4.2V
1080P/ 70 minutes
About 3 hours
Windows XP/VistaorAbove/win7/Mac os 59.27*41.13*29.28
LCD
USB
Preparation
9.GHOST APP
GHOST APP is specially designed as an operating system for GHOST on a
smartphone. Download GHOST APP and you can control the flight on a
smartphone without a RC transmitter. All functions on the transmitter are now
realized by “One-click command” to make flight easy and pleasant.
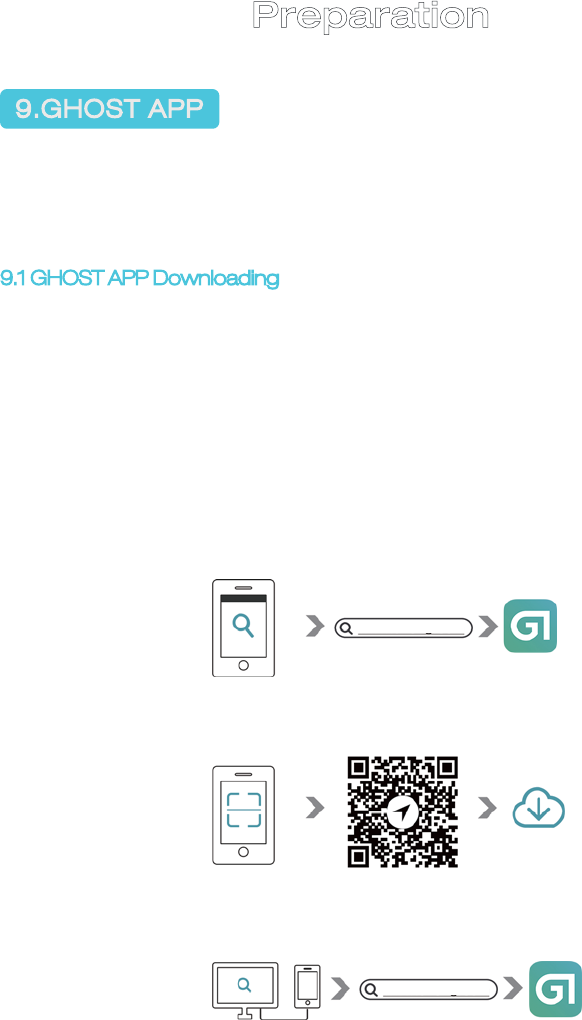
9.1 GHOST APP Downloading
Download GHOST APP
You must use GHOST APP to use GHOSTAerial/ Aerial Plus. You can down-
load the application in the following manners:
01: Visit www.ghost-drone.com to download EHANG GHOST APP (Pic 1).
02: Download GHOST APP from Google Play/ APP Store (Pic 2).
03: Visit downloading page on our website, connect your smartphone to
computer and tap “One-click Setup” button (Pic 3).
Smartphone: iPhone 4S (IOS 6.0 and above), Android 3.0 and above, iPad 3
(IOS 6.0 and above).
Pic 1
Pic 2
Pic 3
18
www.ghost-drone.com
www.ghost-drone.com
Preparation
9.3 Voice Notice
The voice notice warns about “Battery Level”, “Low battery. Please return”
and “Error” in case communication is lost or the GHOST crashes due to low
battery or operation error. EHANG should not be held accountable for acci-
dents that could have been avoided by following the voice notice.
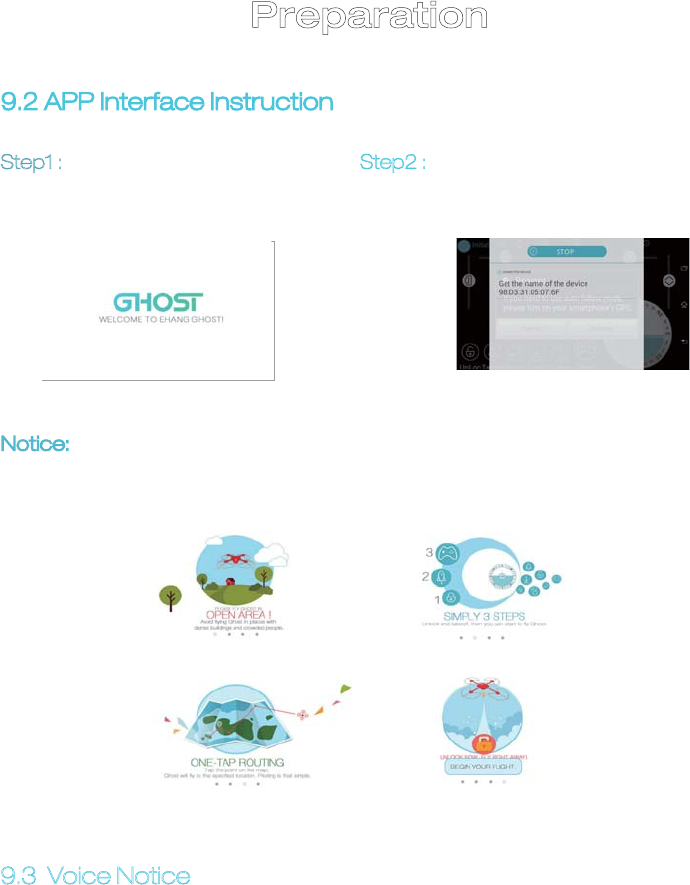
9.2 APP Interface Instruction
Step1 : Enter start-up page and
start the APP.
Step2 : With Bluetooth on, it will search
for devices automatically and
get connected.
Notice: You will see the following page if you log in for the first time before you
take step 2.
19
Preparation
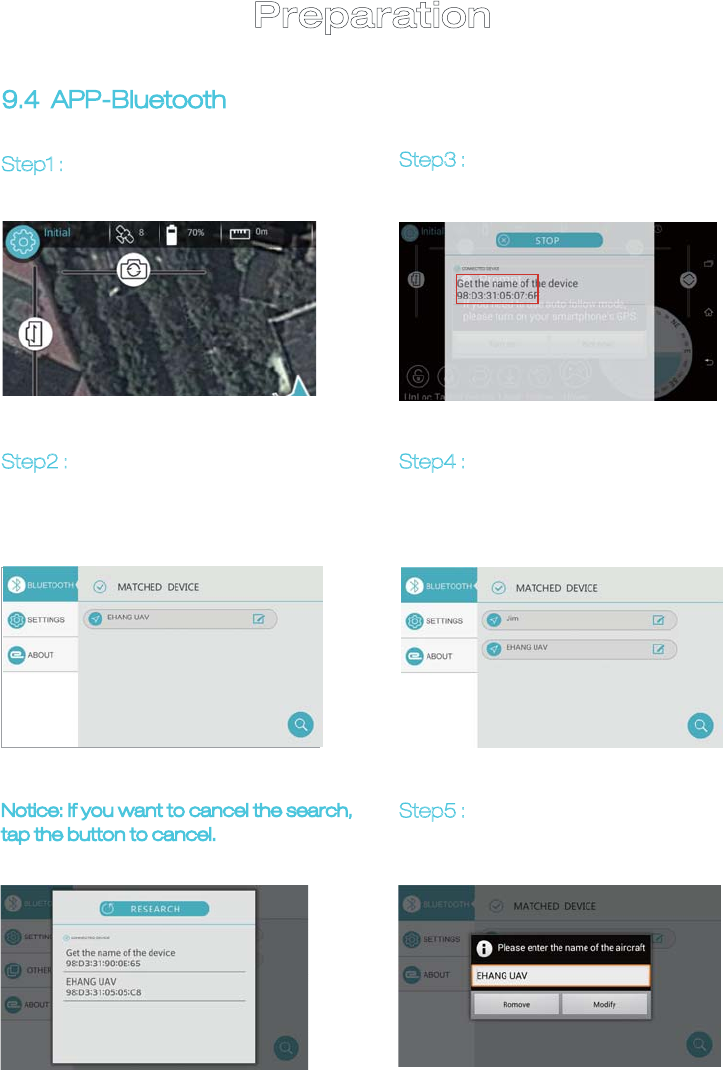
Step1 : Tap the Initial button on top
left corner to turn to setup page.
9.4 APP-Bluetooth
Step2 : Connected Bluetooth devic-
es will be shown on this page. Tap
“SEARCH” button on bottom right
corner to search for new devices.
Step3 : When new Bluetooth
device is detected, tap to get
connected.
Step5 : Tap the button on the right
to rename t he new Bluetooth
device.
Step4 : New Bluetooth device is
added.
Notice: If you want to cancel the search,
tap the button to cancel.
20
Preparation
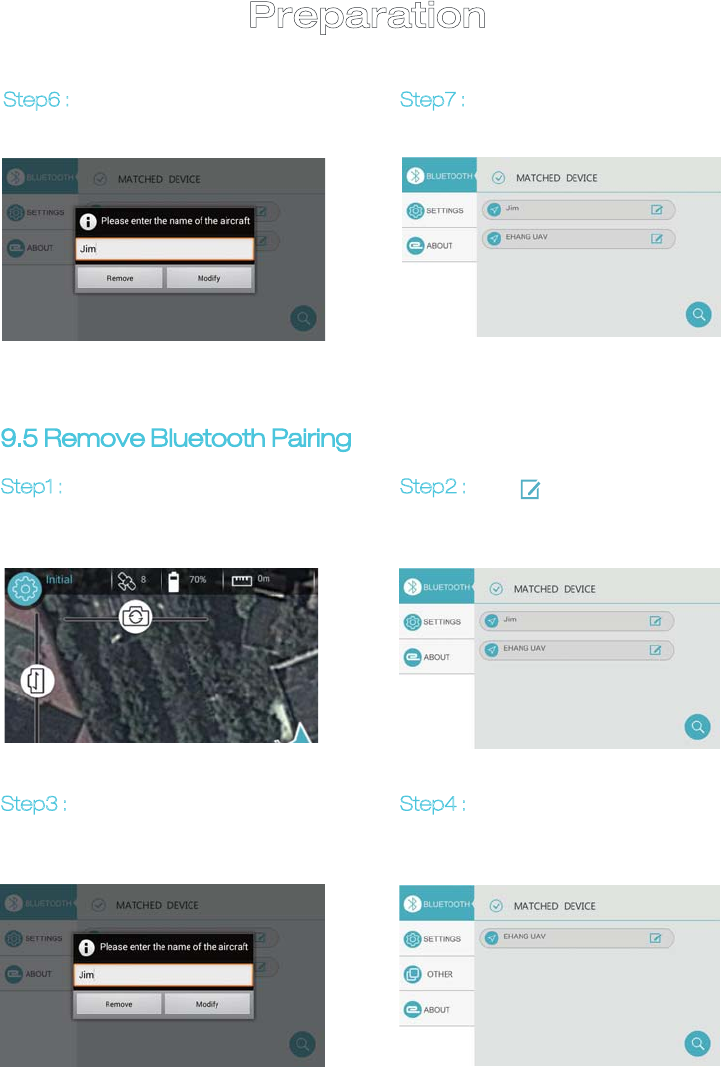
Step6 : Type in the new name
and tap “MODIFY”.
Step7 : Bluetooth device is
renamed.
Step1 : Tap “INITIAL” button on
top left corner to turn to
Bluetooth setup page.
Step3 : Tap “REMOVE” to remove
Bluetooth pairing.
Step4 : Bluetooth pairing is
removed.
9.5 Remove Bluetooth Pairing
21
Step2 : Tap“ ” button on the
right to turn to Bluetooth
editing page.
Preparation
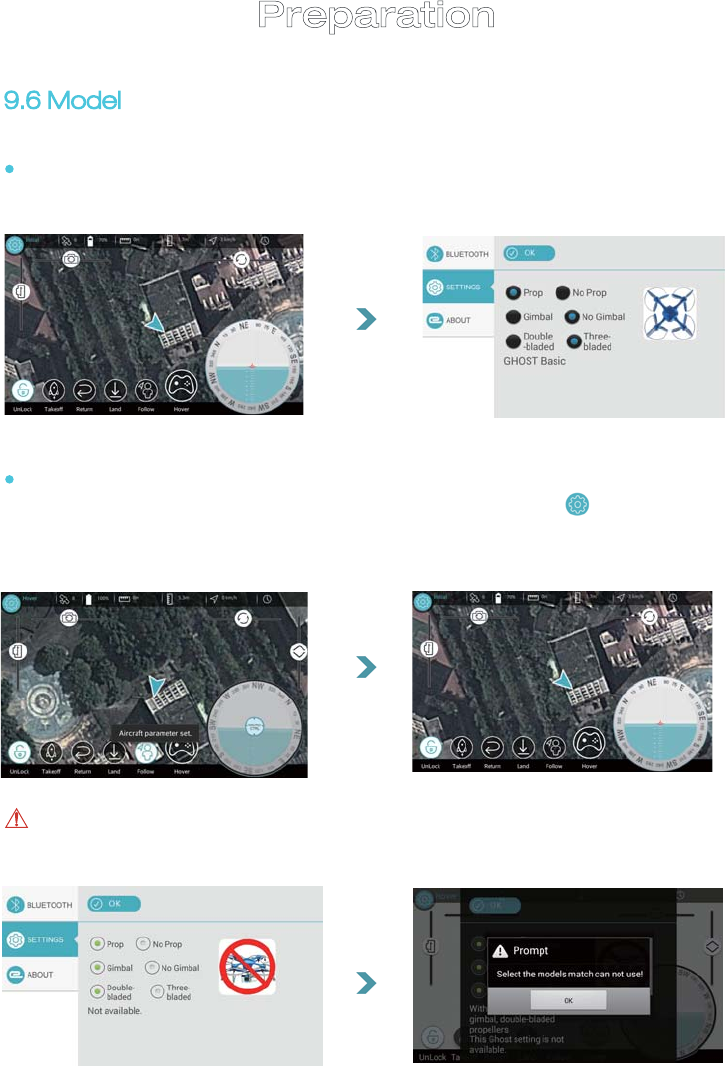
Notice: If you choose incorrect settings, you will see warning “Not
available”. In such case, tap “CONFIRM” and reset.
9.6 Model
After APP installation and Bluetooth pairing is completed, turn to the page
on the left. GHOST setting page will pop up
22
If you choose correctly, you will see “GHOST parameters set ”;
it turns to APP operation page; if you need to reset, tap “ ”button
on top left corner and choose GHOST settings(if with a certain model
recommended, you must proceed based on the GHOST actually used).
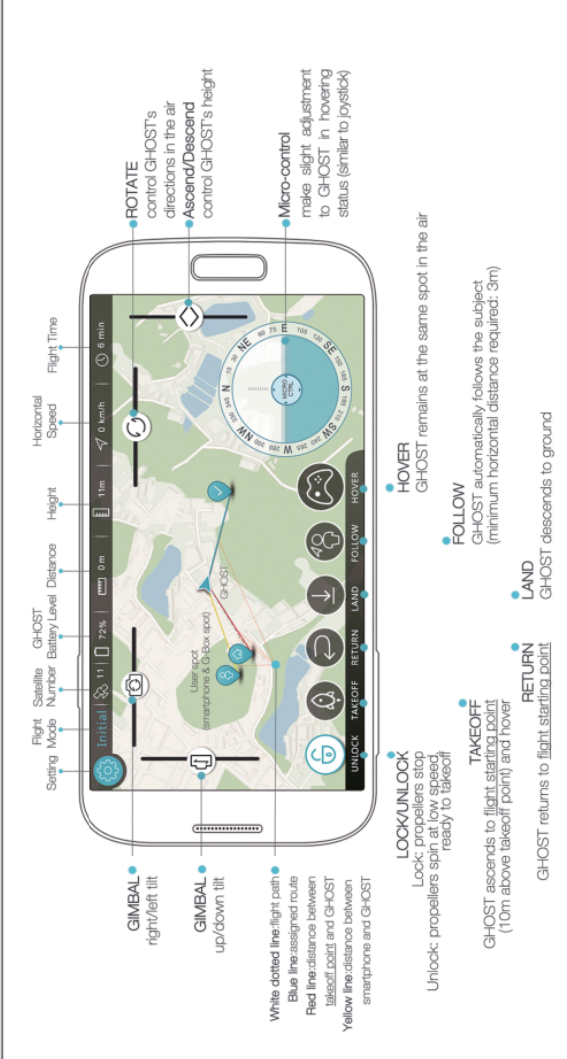
GHOST APP INTERFACE
23
Notice: Flight starting point: 10m above the takeoff point
The map above is for indicative purpose only. The actual map may differ. Buttons can’t be used when in grey.
GHOST APP Function
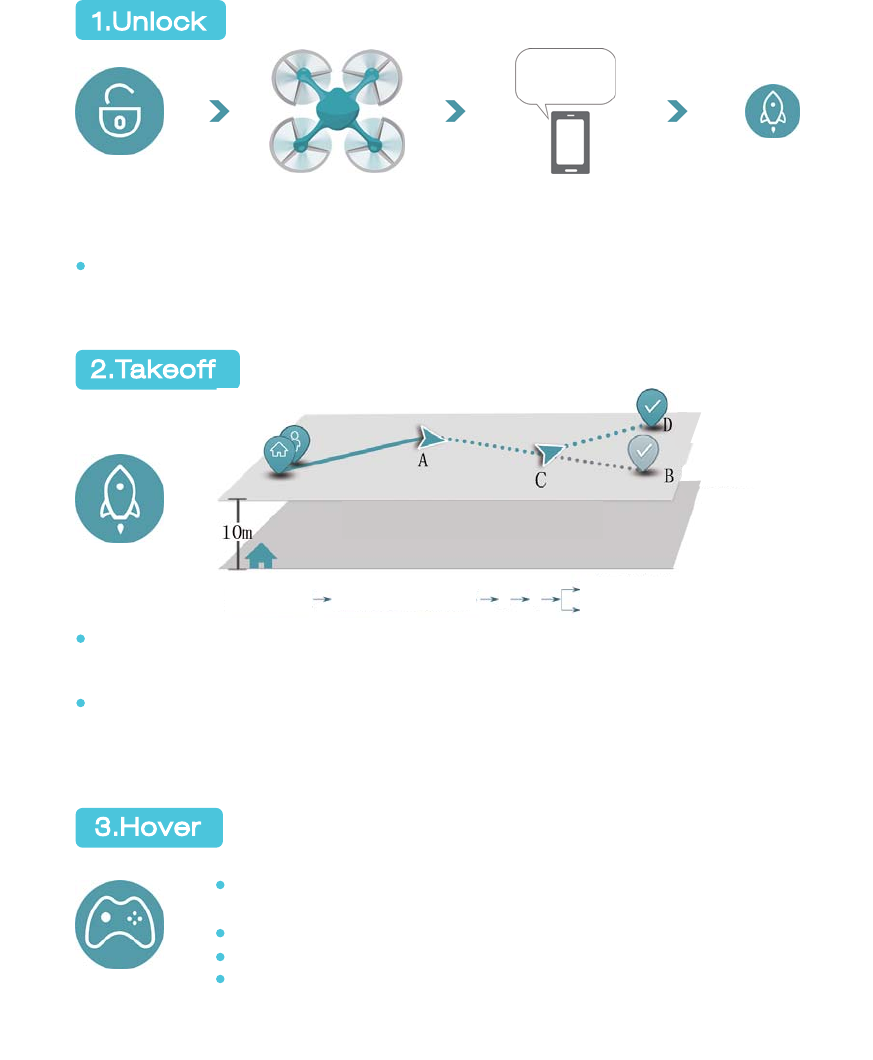
1.Unlock
2.Takeoff
3.Hover
Tap “TAKEOFF”
to fly GHOST
GHOST will beep if flight command is not received in three minutes and
thirty seconds. This is a normal notice. You can tap “UNLOCK” and “TAKE-
OFF” to fly GHOST or unplug the battery to extinguish this notice.
Voice noticePropellers spin at low speedUnlock
When satellite reaches 6 or above, GHOST can take off normally. When
user’s smartphone connects to Internet, the interface will display the
positions of user and GHOST on the GPS map.
See picture above: A is GHOST’s spot. Click any destination (B) on the
map to direct GHOST to B (from A to C to B). If the destination is updated
in midway, GHOST will fly from current spot C to the updated destination
D (from A to C to D).
Tapping “Hover” in any status will terminate the previous
command and keep GHOST hovering.
Ascend/Descend is not available during flight.
Estimate the height of barriers to avoid crushing.
Micro-control is available only in hovering status.
24
Unlocked,
ready to fly
updated destina-
tion spot
destination spot
A:GHOST spot C:Midway spot
Takeoff point ascend and hover
to 10m height ACB(destination)
D:updated destination spot
25
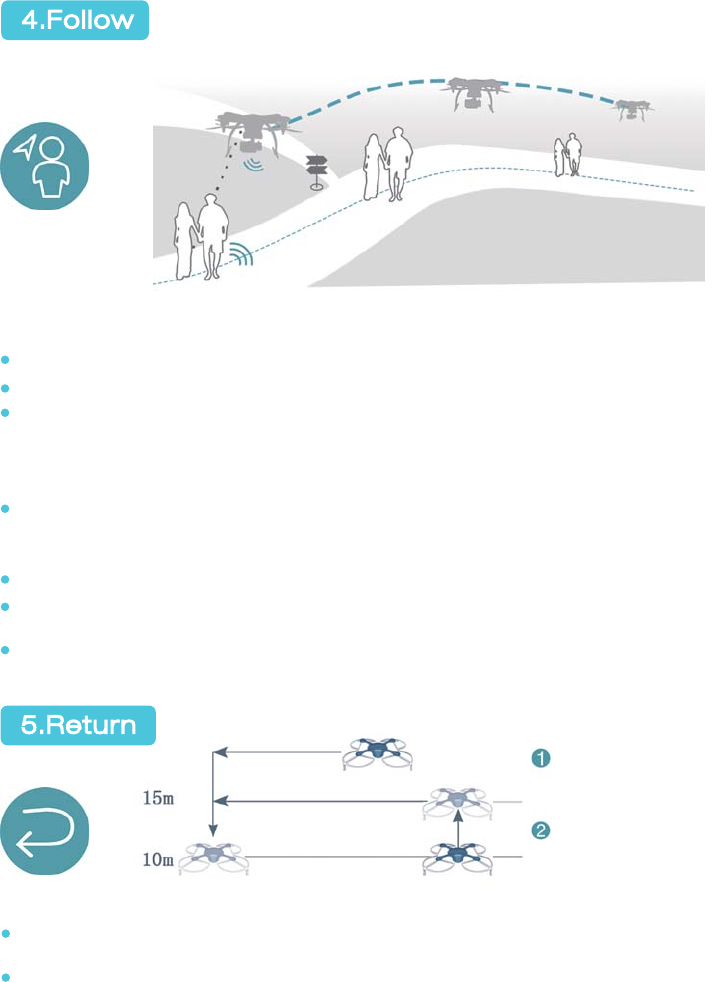
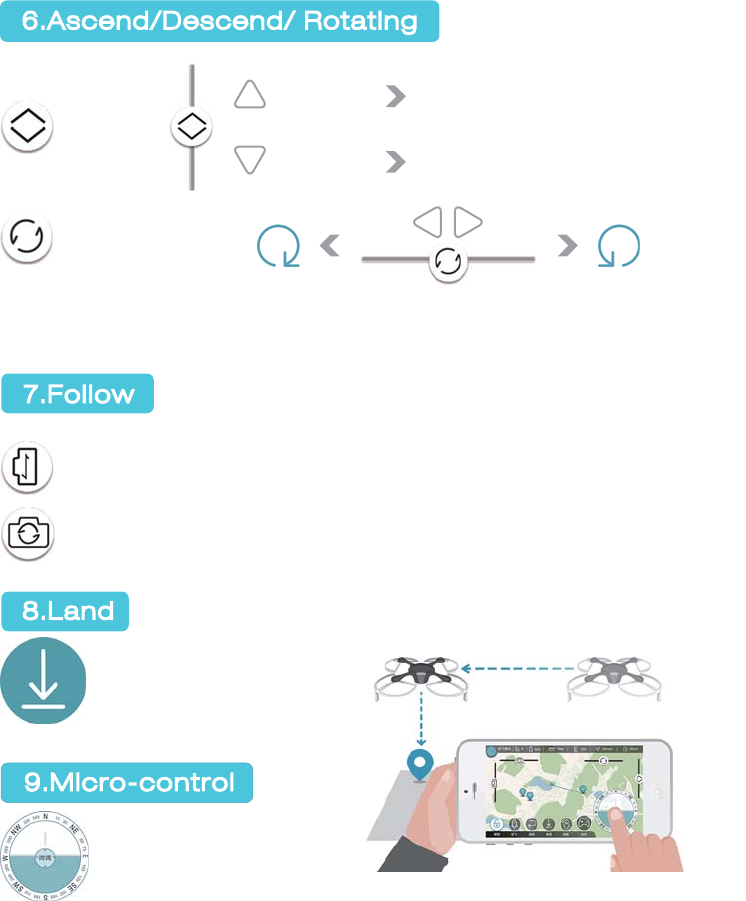
Tap “FOLLOW” to keep GHOST following you wherever you go and recording every amazing moment!
GPS on smartphone is required to activate this feature.
Available only in HOVERING status.
At minimum 3m (up to smartphone GPS accuracy) horizontal distance
from the user (smartphone and G-Box), GHOST begins to follow the user
automatically. The farther apart GHOST is from the user, the faster GHOST
flies (maximum speed: 49mph).
To stop, user should lower his/her pace gradually. Do not stop immediately
(or GHOST will fly over the user at high speed as it has no brakes).
To terminate auto following, tap any available button on screen.
Investigate surroundings before using auto following (GHOST cannot
automatically dodge).
While climbing, adjust GHOST’s height accordingly (GHOST cannot auto-
matically adjust height). It is recommended to fly GHOST at a height higher
than the user.
Two situations of return: GHOST’s height is over 15m; GHOST’s height is less than
15m.
Heights in this illustration are the vertical distance above takeoff point.
5.Return
4.Follow
GHOST APP Function
ʈS
GHOST directly returns.
ʇS
-.59:YIKTJYZUS
and returns .
26
ࡶ/䭼
ᒯ̹䪮៸
ᒯ̺䪮៸
不㵻̹ࡶ
不㵻̹ࡶ
䒛 不㵻
䶩ᬥ䦷䒛
不㵻
䔵ᬥ䦷䒛
ᒯጕ
䪮៸
ᒯढ
䪮៸
Height control is only accessible in hovering status. During flight, the height
control bar is hidden on right side of the APP interface.
Horizontal slidebar: Gimbal tilts right and left (no automatic reposition
after release)
Vertical slidebar: Gimbal tilts upward and downward (no automatic
reposition after release)
GHOST locks automati-
cally five seconds after
landing.
Micro-control enables
accurate landing.
GHOST will move horizontally. Red lights mark the front, blue lights mark the
rear. Drag the virtual compass to the destination spot and release to direct
GHOST to the destination.
6.Ascend/Descend/ Rotating
GHOST APP Functions and
How to Use GHOST APP
7.Follow
8.Land
9.Micro-control
Ascend/
descend
Rotating
Pull upward
Pull downward
GHOST ascends
GHOST descends
Rotate
clockwise
Pull
leftward
Pull
rightward Rotate
anti-clockwise
27
Flight
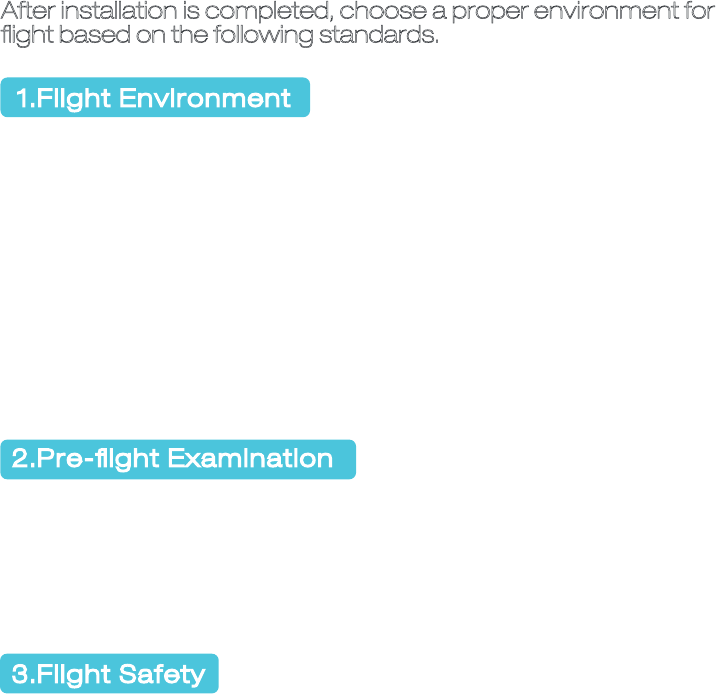
After installation is completed, choose a proper environment for
flight based on the following standards.
1.Flight Environment
1.1 GHOST might experience errors due to poor signal when flying too high or
in an environment with dense buildings. It is suggested that you choose
an open area to fly GHOST to reduce drifting mistake.
1.2 Please stay away from barriers, crowds, high-tension lines, trees and
water.
1.3 Do not fly GHOST in restricted airspace as stipulated by laws and
regulations.
1.4 Please stay over 200m away from complex electromagnetic environment
(such as a place with a signal tower or base station) in case of takeoff
failure or crash due to intense electromagnetic interference (EMI).
1.5 Do not fly GHOST in extreme weather including high temperature, snow,
strong wind (over scale 5) and heavy fog.
2.Pre-flight Examination
2.1 Check whether G-Box and battery are fully charged.
2.2 Check whether propellers are installed correctly.
2.3 Check whether motor starts normally after unlocking.
Please contact EHANG dealers or customer service in case of any trouble
during installation or use.
3.Flight Safety
3.1 Make sure that there is a minimal of 5m distance between you and
GHOST. Please stay away from dangerous obstacles such as barriers,
crowds and high-tension lines. Please be a responsible flyer.
3.2 During the flight, keep GHOST within your sight to avoid accidents caused
by oversight of surroundings.
3.3 Children must be accompanied by professionals when operating GHOST.
3.4 GHOST aerial must operate without prop guards and equipped with
landing gear; put GHOST upside down on a cotton cloth to avoid
scratching.

28
Flight
4.Caution during Flight
4.1 Limit the distance between G-Box and the smartphone to 5m or less
(holding in hand is recommended). Communication will lose beyond the
limited distance.
4.2 Ascend/Descend is only accessible in hovering status. During flight, the
Ascend/Descend signal is hidden on the right side of APP interface.
Height control is only accessible in hovering status. During flight, the height
control bar is hidden on right side of the APP interface.
4.3 It is normal for the battery level to rise again after landing. It is not advisable
to launch your GHOST when battery level is less than 30%. It is best to fly
GHOST with a fully charged battery.
4.4 Please tap “HOVER” immediately in times of emergency. If GHOST fails to
hover, please ensure your own safety before attending to GHOST.
5.After-sales
5.1 GHOST products are guaranteed by after-sales service (please see
details on after-sales card).
5.2 Visit our website: www.ghost-drone.com to learn more about APP
updates, newsletters, product development progress and after-sales
service. EHANG will be at your service.

NOTE: This equipment has been tested and found to comply with the limits for a Class B digital
device, pursuant to part 15 of the FCC Rules. These limits are designed to provide reasonable protection
against harmful interference in a residential installation. This equipment generates, uses and can radiate
radio frequency energy and, if not installed and used in accordance with the instructions, may cause
harmful interference to radio communications. However, there is no guarantee that interference will not
occur in a particular installation. If this equipment does cause harmful interference to radio or television
reception, which can be determined by turning the equipment off and on, the user is encouraged to try to
correct the interference by one or more of the following measures:
—Reorient or relocate the receiving antenna.
—Increase the separation between the equipment and receiver.
—Connect the equipment into an outlet on a circuit different from that to which the receiver is
connected.
—Consult the dealer or an experienced radio/TV technician for help.
Thisdevicecomplieswithpart15oftheFCCrules.Operationissubjecttothefollowingtwo
conditions:
(1)thisdevicemaynotcauseharmfulinterference,and
(2)thisdevicemustacceptanyinterferencereceived,includinginterferencethatmaycause
undesiredoperation.
Changesormodificationstothisunitnotexpresslyapprovedbythepartyresponsiblefor
compliancecouldvoidtheuser'sauthoritytooperatetheequipment.
In order to comply with RF exposure requirements, a minimum
all persons distance of 10mm must be
maintained between the antenna and