Guangzhou EHang Intelligent Technology 05224340 G-BOX (iOS-WiFi) User Manual Manual
Guangzhou EHang Intelligent Technology Co., Ltd. G-BOX (iOS-WiFi) Manual
Manual
OPERATING | MANUAL
www.ehang.com
Congratulations on purchasing your new GHOST Drone!
For customer service and support,
please e-mail support@ehang.com.
Connect With Us Online:
www.ehang.com
www.twitter.com/theghostdrone
www.facebook.com/theghostdrone
www.instagram.com/theghostdrone
FCC STATEMENT
FCC Radiation Exposure Statement
This device complies with Part 15 of the FCC Rules. Operation is subject to the follow-
ing two conditions:
(1) This device may not cause harmful interference, and
(2) This device must accept any interference received, including interference that may
cause undesired operation.
Warning: Changes or modifications not expressly approved by the party responsible for
compliance could void the user's authority to operate the equipment.
NOTE: This equipment has been tested and found to comply with the limits for a Class
B digital device, pursuant to Part 15 of the FCC Rules. These limits are designed to
provide reasonable protection against harmful interference in a residential installation.
This equipment generates uses and can radiate radio frequency energy and, if not
installed and used in accordance with the instructions, may cause harmful interference
to radio communications. However, there is no guarantee that interference will not occur
in a particular installation. If this equipment does cause harmful interference to radio or
television reception, which can be determined by turning the equipment off and on, the
user is encouraged to try to correct the interference by one or more of the following
measures:
Reorient or relocate the receiving antenna.
Increase the separation between the equipment and receiver.
Connect the equipment into an outlet on a circuit different from that to which the receiver
is connected.
Consult the dealer or an experienced radio/TV technician for help.
This equipment complies with FCC radiation exposure limits set forth for an uncon-
trolled environment. This equipment should be installed and operated with minimum
distance 20cm between the radiator & your body.
TABLE OF CONTENTS
Disclaimer & Warning ----------------------------------------------------------------------------01
Ghost Drone Diagram----------------------------------------------------------------------------02
Accessories and Assembly --------------------------------------------------------------------04
Flight Instructions ---------------------------------------------------------------------------------14
GHOST App ----------------------------------------------------------------------------------------19
FAQ---------------------------------------------------------------------------------------------------25
Owner Support ------------------------------------------------------------------------------------26
Battery ------------------------------------------------------------------------------------------------------------ 04
G-BOX ----------------------------------------------------------------------------------------------------------- 06
Camera ---------------------------------------------------------------------------------------------------------- 07
Gimbal ---------------------------------------------------------------------------------------------------------- 08
Landing Gear --------------------------------------------------------------------------------------------------- 10
Propellers ------------------------------------------------------------------------------------------------------- 10
Propeller Guards -----------------------------------------------------------------------------------------------12
LED Legend ---------------------------------------------------------------------------------------------------- 13
Parts --------------------------------------------------------------------------------------------------------------02
In the Box -------------------------------------------------------------------------------------------------------02
Product Type --------------------------------------------------------------------------------------------------- 03
Specifications --------------------------------------------------------------------------------------------------- 03
App Download -------------------------------------------------------------------------------------------------14
Binding with GHOST Drone ----------------------------------------------------------------------------------14
Compass Calibration ------------------------------------------------------------------------------------------ 15
Drone Configuration -------------------------------------------------------------------------------------------17
Acquiring GPS ------------------------------------------------------------------------------------------------- 18
First Flight --------------------------------------------------------------------------------------------------------18
Mobile App Explained ----------------------------------------------------------------------------------------- 20
Unlock and Lock ----------------------------------------------------------------------------------------------- 20
Takeoff ------------------------------------------------------------------------------------------------------------21
Hover ------------------------------------------------------------------------------------------------------------ 21
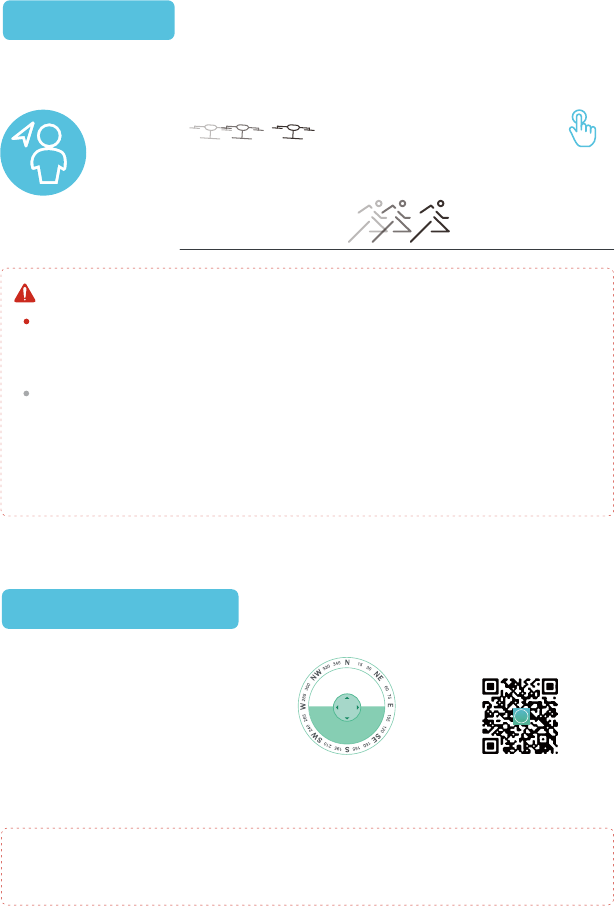
Follow-Me-------------------------------------------------------------------------------------------------------- 21
Micro-Control --------------------------------------------------------------------------------------------------- 22
Elevation and Yaw --------------------------------------------------------------------------------------------- 23
Controlling the Gimbal ---------------------------------------------------------------------------------------- 23
Return ------------------------------------------------------------------------------------------------------------ 24
Land -------------------------------------------------------------------------------------------------------------24
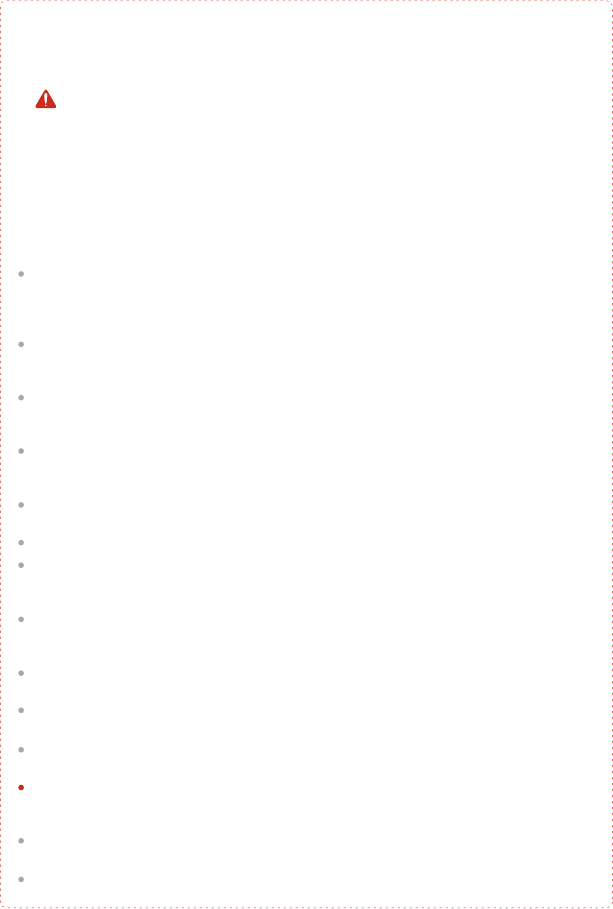
WARNING!
DISCLAIMER & WARNING
The GHOST Drone is equipped with a “black box” that records flight data. (Please Note:
This data is only accessible by the staff in our service department). If the user fails to land
when the battery is depleted and causes damage to the GHOST Drone, the user is
responsible for the cost of any repairs that might be necessary.
Disassembling and/or modifying the GHOST Drone is prohibited. If the user requires
custom modifications, please contact the GHOST team before attempting to modify the
GHOST.
When storing the GHOST Drone, remove the battery. Store all GHOST-related parts at
room-temperature, out of direct sunlight, and away from magnetic interference and
moisture. Pay special attention to the storage of the Lithium Polymer (LiPo) battery.
The GHOST Drone may not fly normally near high-rise buildings due to GPS interfer-
ence.Please fly in open spaces, away from densely populated urban areas, to minimize
GPS interference and maintain safe flight.
Do not fly near obstacles, people, crowds, power lines, trees, water, or anything else that
may cause interference with your GHOST Drone.
Do not fly in restricted air space.
Do not fly in or around congested electromagnetic (EM) environments. The GHOST Drone
must be kept at least 200m (656 ft.) away from strong EM sources to operate normally.
EM interference can cause a loss of communication with the GHOST Drone and result in
damage to the GHOST and/or objects and people in the flight environment.
Do not operate in bad weather, including extremely high temperatures, heavy snow, high
wind, or rain.
Before unlocking your GHOST, stand at least 5m (16 ft.) away from the Drone and ensure
that people or animals do not approach the GHOST.
When flying, the user must retain line-of-sight with the GHOST Drone. Losing sight of the
GHOST Drone can result in dangerous operating conditions.
Do not touch spinning propellers as they may cause injury. To ensure the best flying
experience, use only EHANG-supplied propellers.
Do not operate the GHOST with the propeller guards and landing gear both installed. For
users who purchased the GHOST Aerial or Aerial Plus, practice flying with the basic
configuration before you fly with a camera attached.
To ensure safe flying, calibrate the GHOST Drone’s compass with the GHOST App before
each flight.
Adult supervision is required when the GHOST Drone is operated by a minor.
01
Before flying, please consult flight documentation from the International Civil
Aviation Organization (ICAO) and Federal Aviation Administration (FAA) regard-
ing unmanned aircraft operation. The user is responsible for his or her actions
and any ensuing consequences. Users are hereby advised that they are liable
for the use of the GHOST Drone and any and all liability is solely theirs. Please
fly responsibly.
02
1 2
4 5 6
8
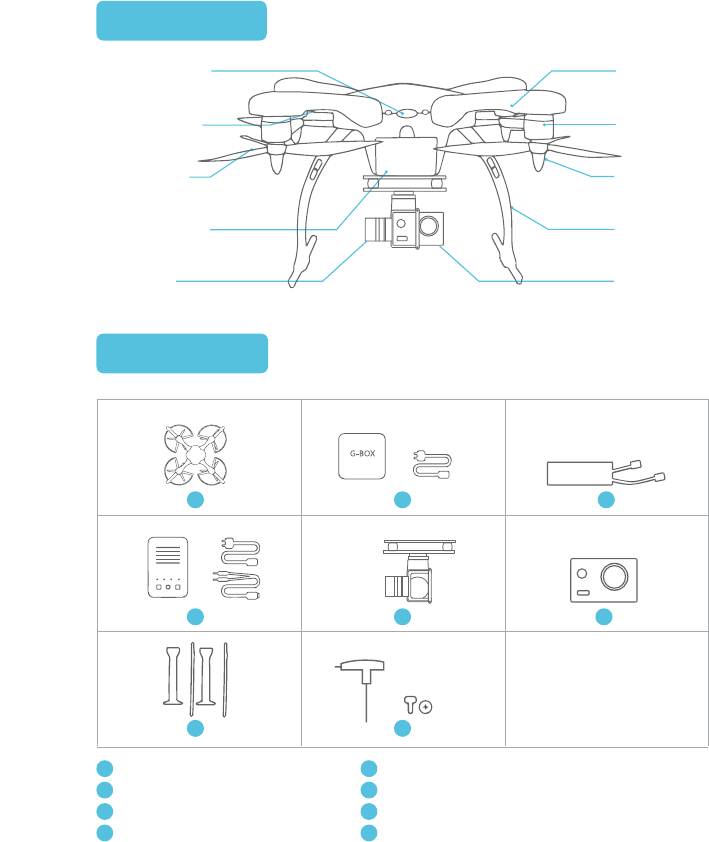
Aircraft
1G-BOX (Charging Cable Included)
2
7
3
GHOST DIAGRAM
PARTS LIST
IN THE BOX
Body Cover
Motor
Top Cover
Landing
Gear
Camera
LED Cover
Front Cover
Propeller Prop Nut
Gimbal
3Battery 4Battery Charger (Two Charging Cables Included)
5Gimbal 6Camera (16 GB Micro SD Card Included)
Hex Driver & Screws (8 Pieces)
87 Landing Gear
4
3Battery Battery Charger
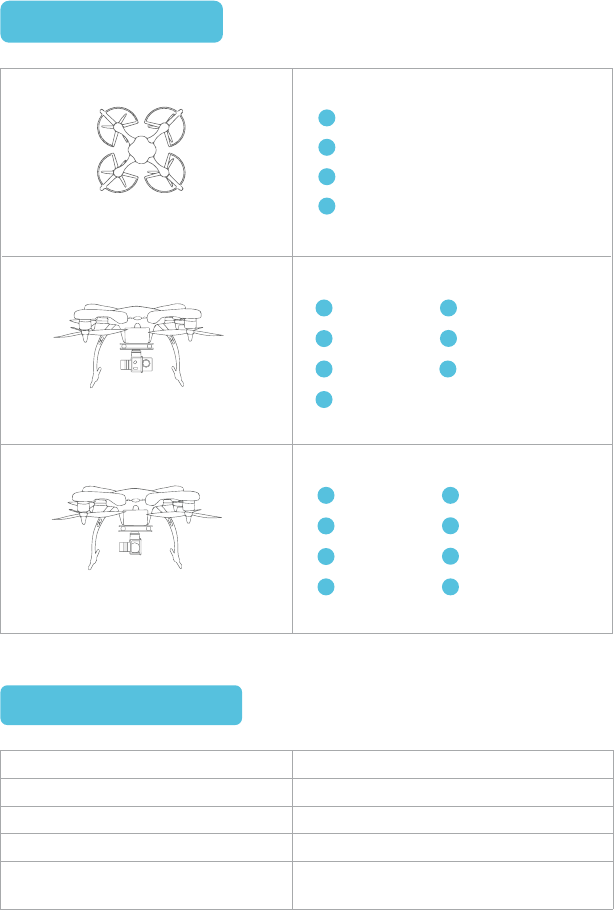
GHOST AERIAL PLUS
5Gimbal 6Camera
8Hex Driver & Screws
7Landing Gear
2G-BOX
1Aircraft
GHOST AERIAL
4
3Battery Battery Charger
8Hex Driver & Screws
5Gimbal 7Landing Gear
2G-BOX
1Aircraft
03
Diagonal Wheelbase
Aircraft Height
Aircraft Height with Landing Gear
Weight
Propellers
350mm
90mm
200mm
780g
8-Inch High-Efficiency 8045 Tri-Blade
Propellers (CW and CCW)
SPECIFICATIONS
PRODUCT TYPE
Aircraft
G-BOX
Battery
Battery Charger
1
2
4
3
GHOST BASIC
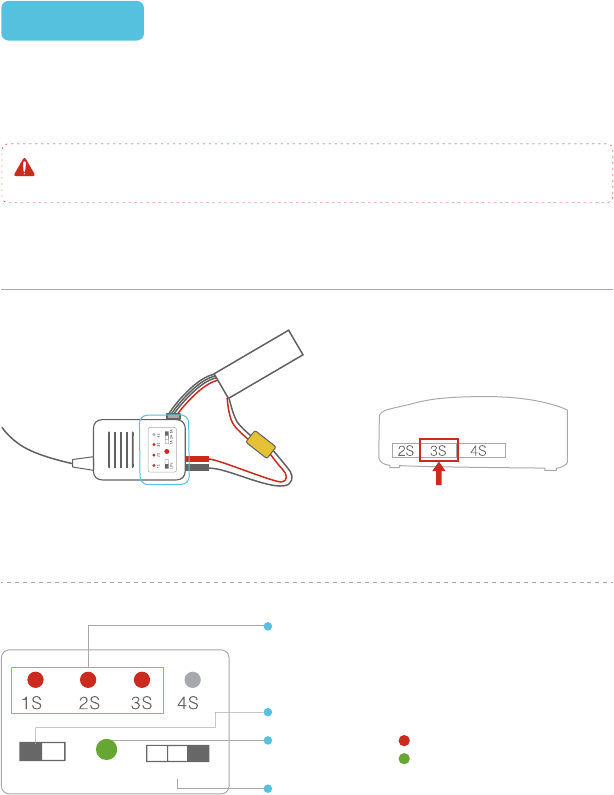
The 1S 2S 3S indicators will be solid red. The 4S does
not illuminate when charging the GHOST Drone battery,
as this is a 3S battery pack.
Battery type: LiPo (Ensure that LiPo is selected)
Charging status: indicates charging;
indicates fully-charged
The capacity of the GHOST Lithium Polymer (LiPo) battery is 5400 mAh, rated at 11.1v.
It uses an XT60 connector. The GHOST battery has a power management function built
in, and it should only be charged using the included GHOST charger.(59.94Wh)
BATTERY
04
ACCESSORIES AND ASSEMBLY
CHARGING THE BATTERY
Front view of the charger
Please note that the battery voltage may rise post-flight. This is normal. Do not fly the
GHOST if the battery shows less than a 30% charge.
Battery charging diagram Side view of the charger
(Make sure the wires are
connected correctly)
(Plug in the 3S balancing socket)
1A 2A 3A
LiPo 1A 2A 3A: Indicates charging amperage
(Battery charges faster with higher amperage.Please
note the suggested charge rate for the included 3S
5400mAh battery is 10 C.)
Use only the included GHOST battery charger.
Do not use the battery if the casing and included balancer is broken, deformed or inflated.
Always set the charge output volts to match battery volts.
Never allow battery temperature to exceed 140°F (60 °C)
Recharge your battery post-flight only after it has returned to room temperature.
Never leave a charging battery unattended, and do not place the battery or charger on anything
flammable. Do not store or charge the battery in direct sunlight.
Never disassemble the battery and do not modify the battery circuit. Never discharge below
3.2V per cell. Never puncture the battery assembly or individual cells.
Store the battery between 11.4V and 11.6V (3.8V – 3.85V per cell).
Do not store the GHOST Drone with the battery connected. This will drain the battery and
possibly damage it.
Keep the battery away from children, animals, water, and fire.
If your battery breaks or becomes unusable, it must be recycled by an authorized electronic
waste facility. Batteries and other electronic waste must be disposed of in a strict manner.
Consult your local waste disposal agency for guidelines on battery disposal.
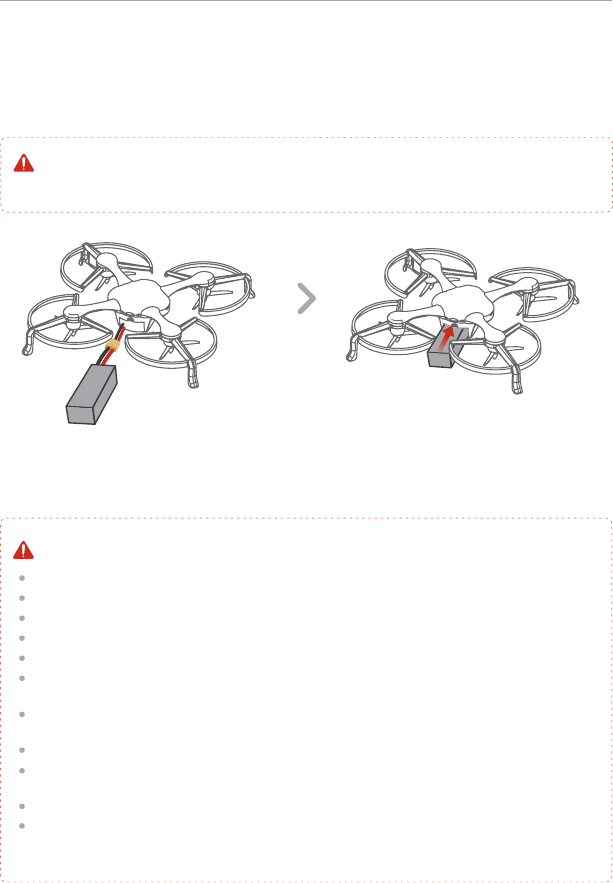
Place the GHOST on a horizontal surface to connect the battery. Push the battery into
the battery compartment (inward as shown in the diagram below). Close the compartment
door, making sure that the battery is correctly seated inside the battery compartment. Do
NOT 'force' the door closed as this could damage the wires or the GHOST Drone itself.
If the door will not close easily, reposition the wires accordingly.
Before flight, ensure that the battery is correctly installed in the GHOST Drone. An
incorrectly installed battery may cause safety issues when flying, and may cause incorrect
voltage readings. An incorrectly installed battery may prevent take-off.
05
BATTERY INSTALLATION
BATTERY WARNINGS & TIPS
Ensure battery wire is correctly connected
(Red to Red, Black to Black)
G-BOX
The G-BOX is a wireless interface unit designed specifically for controlling and interfac-
ing with the GHOST Drone. Each GHOST Drone is paired with one G-BOX. The GHOST
App cannot operate the Ghost without a G-BOX. Please store the G-BOX appropriately.
Should your G-Box become damaged, it will be necessary to replace the G-Box unit.
Keep the G-BOX in your hand or in your pocket during fight. If the G-Box is not near you, you
may lose connection with the GHOST Drone.
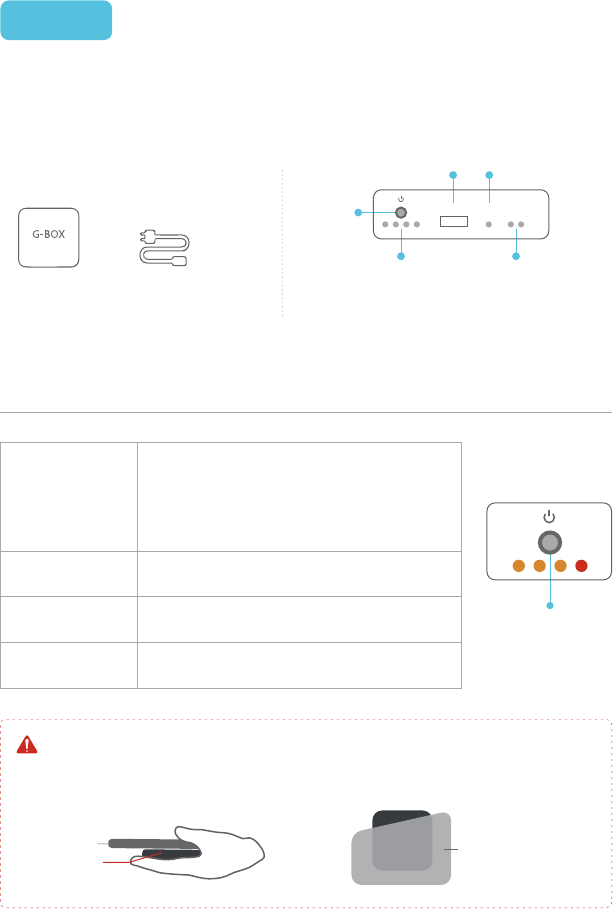
Quickly press the power button once.
Hold the power button until the PWR
indicator turns off.
The four LEDs next to the power button
flash in sequence.
The left side LED flashes while the three
LEDs on the right are solid.
Note: After the G-BOX turns on, the battery
indicator, PWR and DATA indicators will turn on.
After several seconds the battery indicator turns
off to save battery.
G-BOX SidesUSB Power CableG-BOX
06
Switch
Charging Port
Communication
Lights
Charge/Battery
Level Indicator
Power Indicator
ON/OFF
USING THE G-BOX
IMPORTANT TIPS
Phone Pocket
G-BOX
G-BOX
USB PWR DATA
Power On
Power Off
While Charging
Fully Charged
Communication Overview
07
App G-BOX GHOST Drone
Confirm
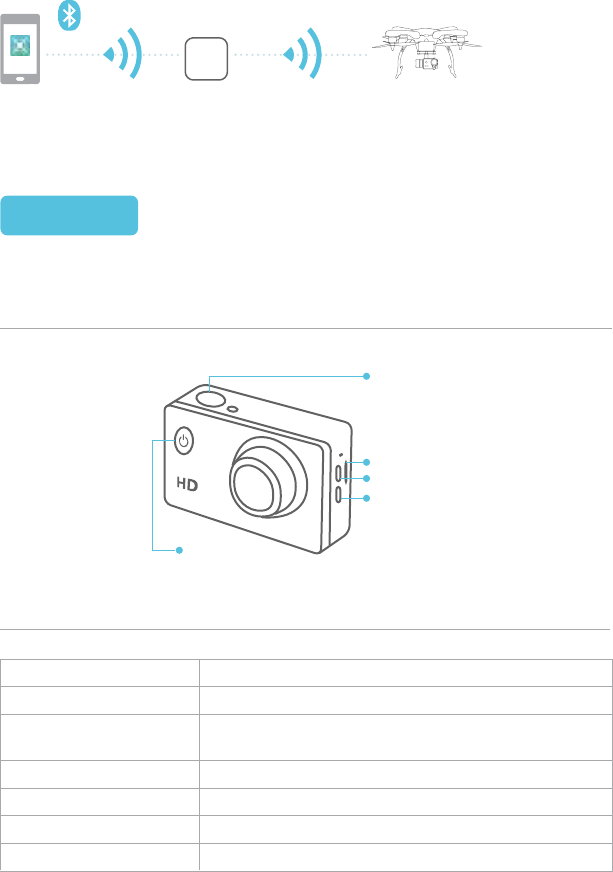
MICRO SD
USB
HDMI
Power/Mode
EHANG’s Sports Camera can shoot up to 1080P HD.
CAMERA
SPECIFICATIONS
CAMERA
Lens
Video Format
Video Compression
Format
Photo Resolution
Battery Capacity
Power Consumption
170-degree high resolution wide angle lens
MOV
H.264
12M/8M/5M
900mAh
400mA@4.2V
Second Beeps 5s/10s/20s
G-BOX

08
The GHOST gimbal is made from lightweight aluminum alloy and is used to carry a
camera.
CAMERA OPERATION
INSTALLATION
GIMBAL
Supports exFAT 32k formatted cards.
70 minutes @ 1080P when fully charged.
Note:Quickly press the power button to change modes.
Press the Confirm button to start and stop recording.
(When charging, do not use a charger that delivers more than 1000mA
or the camera may be damaged.)
Micro SD Card
Recording Time
Power On/Off
Charging
Connect a USB cable to charge the camera.
Press the power button to turn on. To turn off, hold the power
button until “GOODBYE” appears.
SPECIFICATIONS
127g
±0.09°
7 V – 17 V
Roll ±45°/ Pitch -90°to +30°
EHang Sports Camera, GoPro3, GoPro 3+, GoPro4
Weight
Accuracy
Operating Voltage
Angle Restrictions
Supported Cameras
Gimbal (with Clamp)
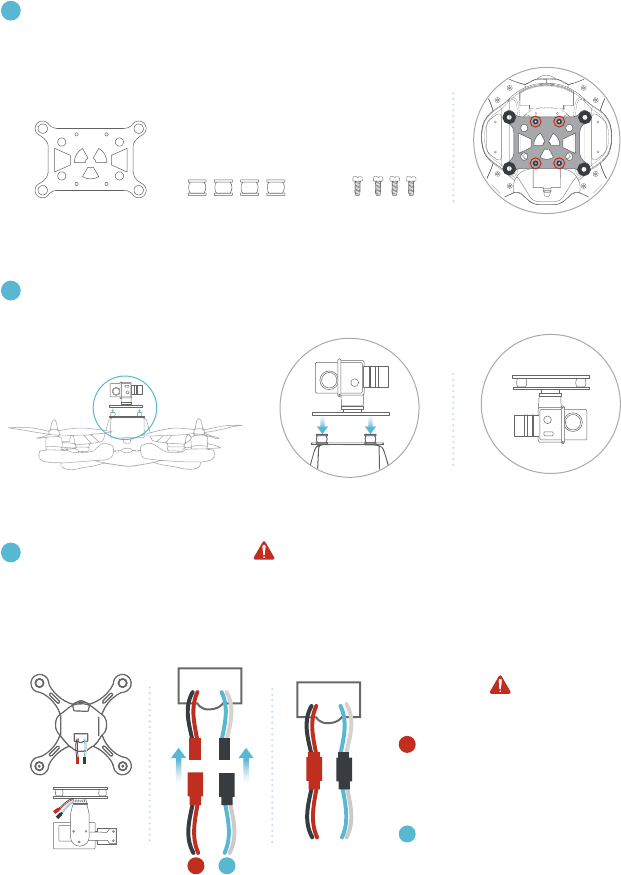
Clamp the camera into the gimbal holder, and then tighten the long screws to hold
the camera in place.
The camera lens should be on the right side of the clamp when installed correctly.
Completion
1Installing the camera.
09
Make sure the camera faces the front of Ghost.
WIRE COLOR
Power Cable:
Black to Black, Red to Red
(Gimbal will be destroyed if
colors are reversed.)
Control Cable:
White to White, Blue to Blue
Install rubber ball dampeners onto the gimbal mount, then tighten the short screw
to hold it together with GHOST.
Completion
Completion
Gimbal GHOST
Mount Short Screws
Rubber Ball
Dampeners
Pop open the cover under GHOST, then pull out the power lead inside of
GHOST. Connect the lead from the GHOST to the female lead on the gimbal.
1
2
2Installing the gimbal
3Connect the gimbal with the gimbal Ghost mount.
4Connecting the power supply
1 2
10
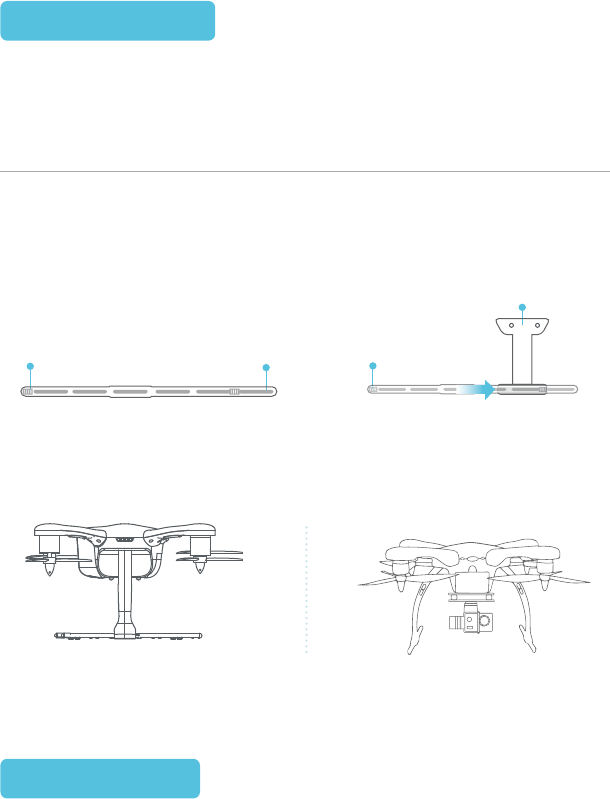
LANDING GEAR
The landing gear must be installed on the GHOST Drone when the gimbal is attached.
Please note the direction of the horizontal bars when assembling the landing gear. The
proper assembly is shown in the diagram below.
Bottom Plate
Horizontal Bar
Head Rear
Head
Front
Head
Assembled Landing Gear
Front View Side View
The landing gear is made from a high-strength composite material. The landing gear is
designed to support the weight of the Ghost Drone with gimbal and camera attached.
INSTALLATION
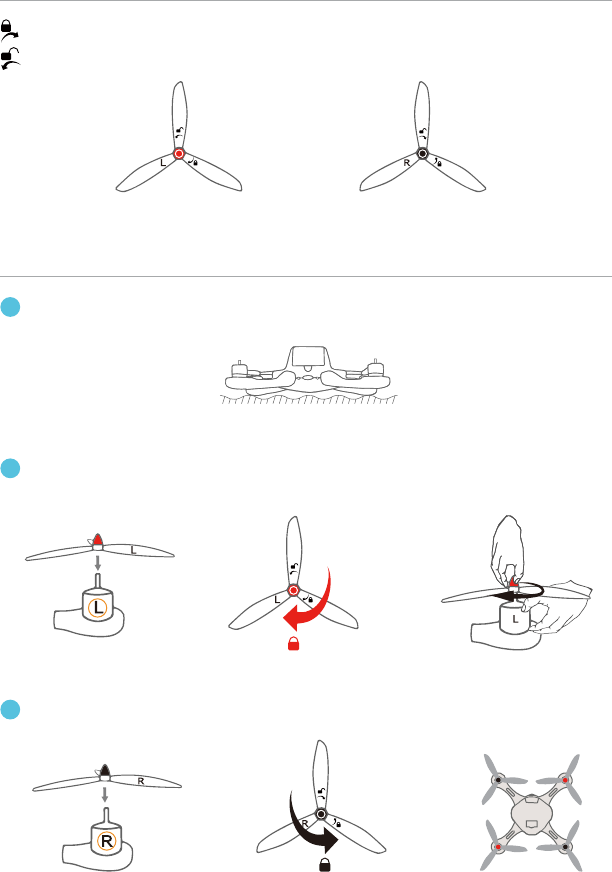
GHOST uses 3-blade 8 inch fast-assemble propellers. Propeller nuts have two colors,
red andblack. Each indicates different rotating directions.
PROPELLERS
11
ICON EXPLANATION
INSTALLATION
3
1
Left
Put the aircraft upside down on soft surface to avoid scratches.
Right
LOCK: Tighten the propeller in this direction.
UNLOCK: Remove the propeller in this direction.
Attach the black nut propellers to the R motors in the same way.
2
Match the red nut propellers with the L motors, and tighten the propellers according
to the fastening instructions.
12
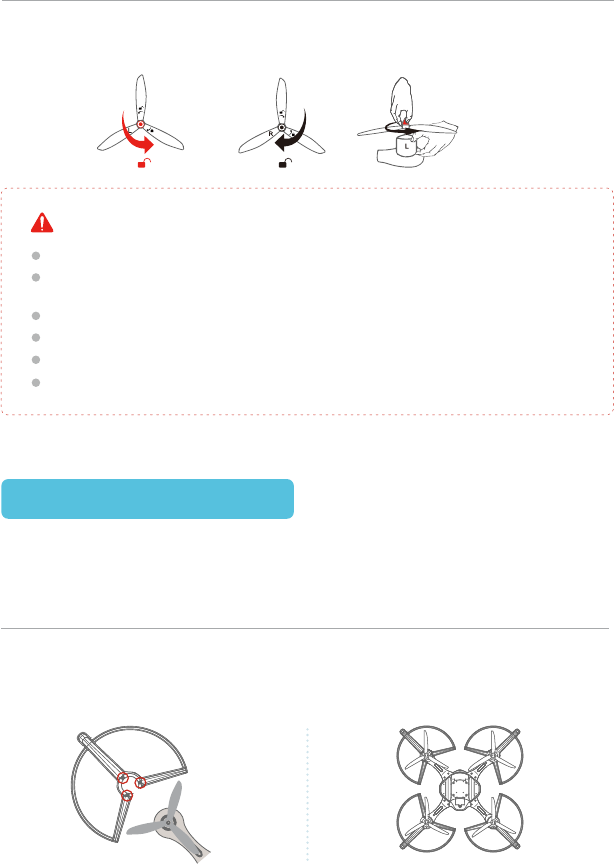
Completed Assembly
Propeller Guard Assembly and Removal
To install the propeller guards, place each guard over the GHOST motor area and align
with the three, pre-drilled holes. Use three screws to secure each guard to the GHOST
Drone body. To remove, unscrew the three holding screws and remove the guard.
PROPELLER GUARDS
The GHOST Drone propeller guards are made from a high-strength composite material.
They are effective in preventing damage to the propellers.
DISASSEMBLING
Keep the motor deadlocked in place with one hand and remove the propeller accord-
ing to the unfastening instructions.
Check that the propellers and motors are installed correctly and firmly before each flight.
It is necessary to check that all propellers are in good condition before take-off. DO NOT
use any aged, deformed or damaged propellers.
To avoid injury, do NOT approach or touch the propellers or motors while they are spinning.
Be careful during propeller assembly and removal.
For a better and safer flight experience, please use original EHang propellers.
If you need to replace your propellers, please go to our website www.ehang.com
WARNING
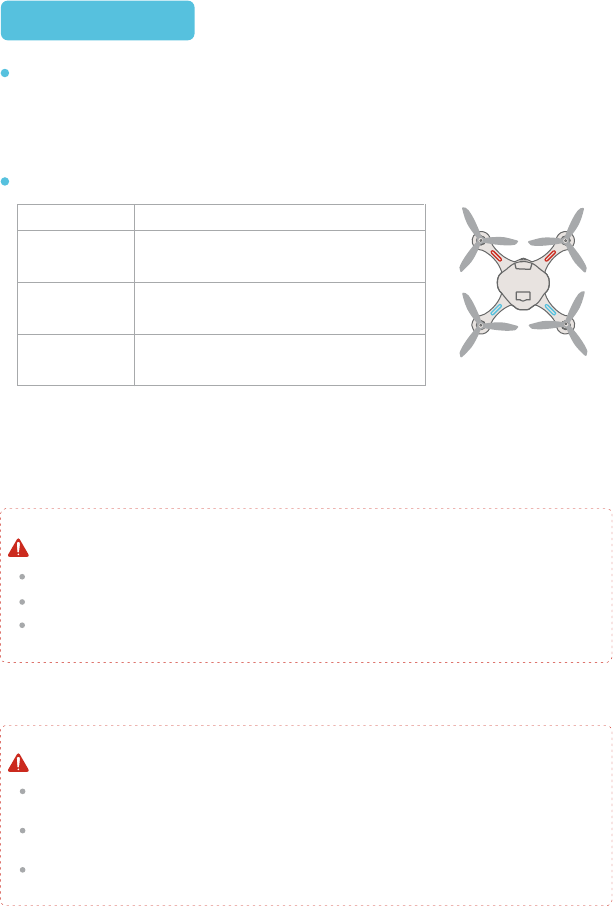
Be advised that the GHOST Drone does not have an on/off switch. To power on the
GHOST Drone, connect the GHOST battery. After connecting the battery, LED lights
will flash, two red and two blue. The red LEDs indicate the front of the GHOST Drone,
the blue indicate the rear. If the LEDs flash rapidly during GPS flight, land the GHOST
immediately.
LED Indicators
G-BOX, aircraft battery level high.
Check that propellers are installed correctly, secure, and damage-free.
Check that the motors turn the props freely and easily.
PRE-FLIGHT CHECKLIST
Keep the G-BOX and mobile device together to ensure the connection does not drop while
using the GHOST Drone.G
Remember to enable the location function on your device, as the GHOST App can cache
local maps to ehance your flying experience (requires network connectivity).
Do not unlock and takeoff until the GPS has acquired at least six satellites.
REMINDER FOR iOS USERS
LED LEGEND
LED legend
13
1.Before takeoff: Initializing
2.During flight: Low battery power
1.The Ghost is unlocked
2.During flight
Searching for GPS satellites.
Found six or more satellites, can unlock
and takeoff.
Blue Flashing
Blue Solid
Red Flashing
Red Solid
Note: After the GHOST is powered on, the red LED light will flash rapidly. Place the GHOST on flat,
even ground. After approximately five seconds, the GHOST can be unlocked and takeoff.
14
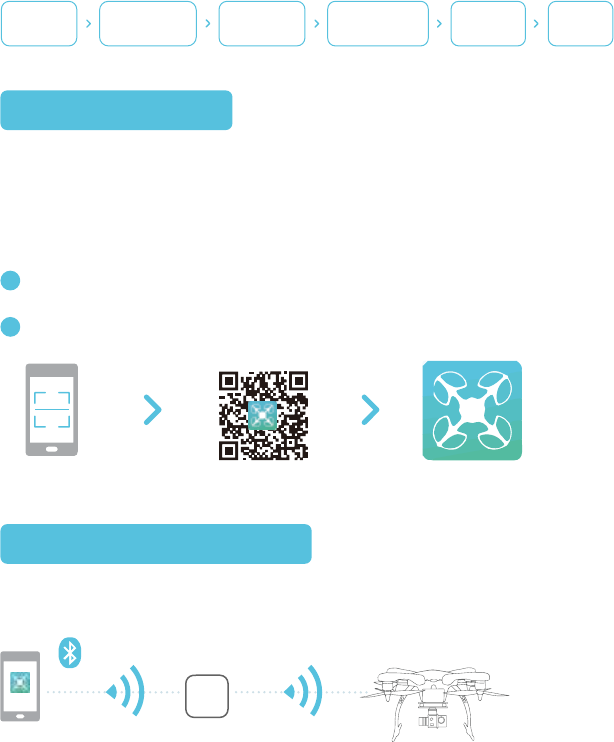
App and G-BOX connection:
The GHOST App connects to the G-BOX through Bluetooth, the G-BOX connects to the
GHOST Drone through a data transmission module.
1.Connect to the G-Box by turning on the Bluetooth settings in your GHOST Drone compatible smartphone
or tablet.
2.Turn on the G-Box as noted on Page 6 of this manual.
3.Turn on the GHOST Drone as noted on Page 5 of this manual.
FLIGHT INSTRUCTIONS
1
2
DOWNLOAD APP
CONNECT WITH DRONE
Android hardware requirement: Arm processors
Android system requirement: android 3.0 or above( including android 3.0)
iOS model requirement: iPhone 5 or above (including iphone5) , iPad3 or above (including iPad3)
iOS system requirement: iOS 7.0 or above
To Download the GHOST App, visit www.ehang.com.
Or scan this QR code to download.
Download
App
Connect with
GHOST Drone
Compass
Calibration
Drone
Configurations
Acquiring
GPS
First
Flight
App G-BOX GHOST
G-BOX
15
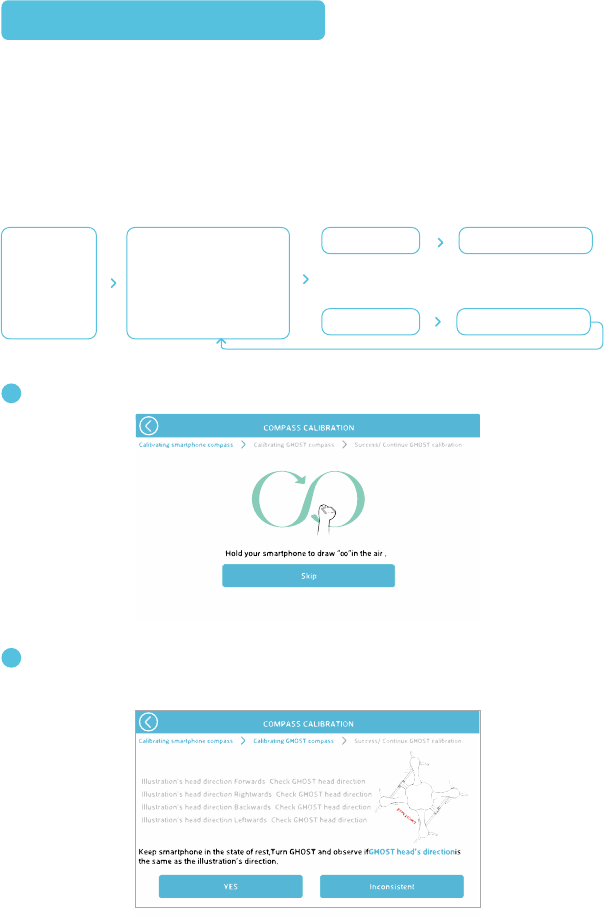
1Mobile device compass calibration.
Calibrate the compass using the GHOST App. The compass calibration will automatically
begin after the Bluetooth has successfully paired. Ensure that the direction of the
GHOST in the GHOST App aligns with the GHOST Drone. Rotate the GHOST until the
text in the GHOST App turns green, then tap the “Yes” button. If it is not the same, click
“Inconsistent” to enter compass calibration.
COMPASS CALIBRATION
2Rotate the GHOST Drone slowly and allow the App to fully determine the heading of the GHOST
Drone before proceeding to the next heading direction. The text for a given heading will turn
green, indicating that the direction has been determined accordingly.
Note: Instructions in the GHOST App may be newer than this manual. The following is included solely
as a reference, please operate according to instructions in the latest GHOST App.
Smart-
phone/tablet
compass
calibration
compass calibration
(Observe the Ghost’s
direction and check
that it matches the
GHOST App) Inconsistent
Yes continue
compass calibration
16
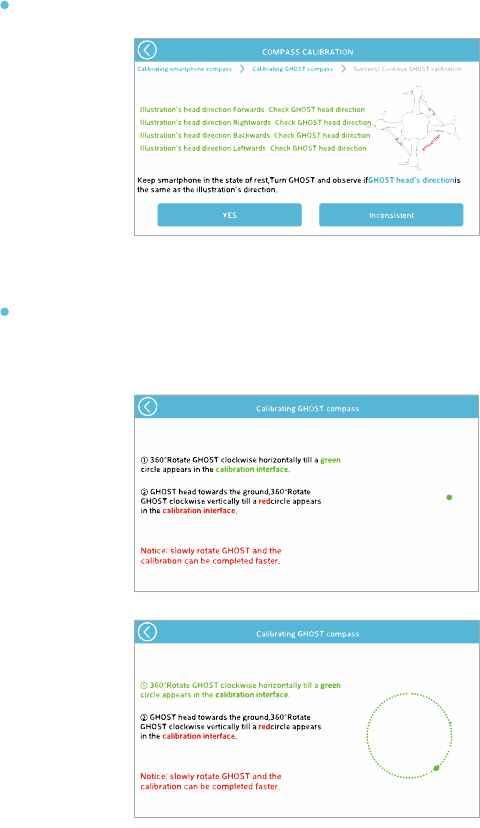
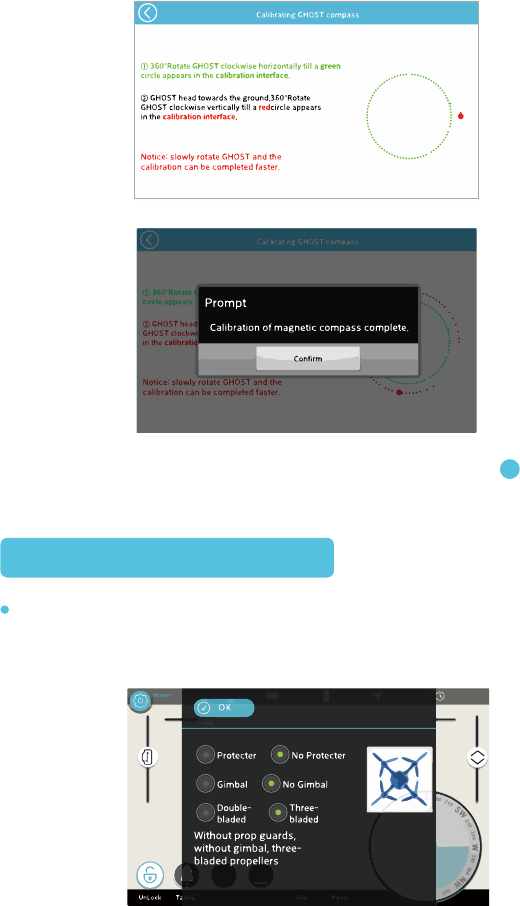
In the “Not Same” page, the green dots show the drone orientation. Rotate the GHOST Drone
slowly clockwise to populate the circle with green dots.
(1)
The red dots show the GHOST Drone trajectory. Tilt the nose down until the GHOST Drone is
perpendicular to the ground, and then slowly rotate clockwise until the red dots fully populate
the circle.
(2)
If it is not the same, click “Inconsistent” to enter compass calibration.
ALL lines of text must be green in order for the Yes button to be functional.
17
Make sure all App settings match that of your current GHOST Drone configuration.
This is critical. Flying with incorrect flight settings may jeopardize your GHOST
Drone.The different settings tell the GHOST which flight mode to use. Using an
incorrect flight mode may result in damage to your GHOST Drone.
DRONE CONFIGURATION
Click “Confirm” to re-enter the previous interface. Then repeat step .
(3)2
The GHOST Drone can fly once at least six GPS satellites have been acquired. If the
GHOST is having trouble acquiring satellites, try moving to a more open area.
The GHOST Drone may not fly normally near high-rise buildings due to GPS interfer-
ence. Please fly in open spaces, away from densely populated urban areas, to
minimize GPS interference and maintain a safe flying environment.
Do not fly near obstacles, people, crowds, power lines, trees, water, or anything else
that may cause interference with your GHOST flights.
Do not fly in restricted air space.
Do not fly in or around congested electromagnetic (EM) environments. The GHOST
Drone must be kept at least 200m (656 ft.) away from strong EM sources to operate
normally. EM interference can cause loss of communication with the GHOST Drone
and result in damage to the GHOST and your surroundings.
Do not operate in bad weather, including extremely high or low temperatures, heavy
snow, high wind, or rain.
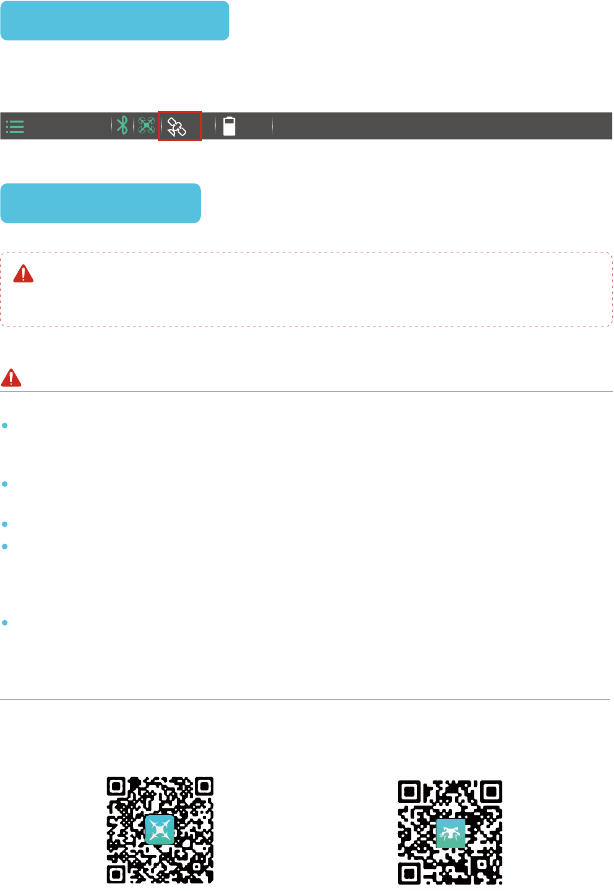
For more in-depth information, watch tutorials on www.ehang.com, or scan the QR
codes below.
18
NOTES FOR FLIGHT ENVIRONMENT
INSTRUCTIONAL VIDEOS
ACQUIRING GPS
FIRST FLIGHT
GHOST YouTube Page GHOST Aerial Installation Video
MODE
DISTANCE HEIGHT SPEED TIME
8
Do not operate the GHOST with the propeller guards and landing gear simultaneously
installed. For users who purchased the GHOST Aerial or Aerial Plus, practice flying with the
basic configuration before you fly with a camera attached.
UNLOCK TAKEOFF RETURN LAND FOLLOW HOVER
MODE
DISTANCE HEIGHT SPEED TIME
Note: Control buttons do not operate when they are grayed out.
Gimbal Roll
GHOST Drone Yaw Control
GHOST Drone Elevation Control
Micro-Control
Gimbal Pitch
GHOST APP
19
2
3
4
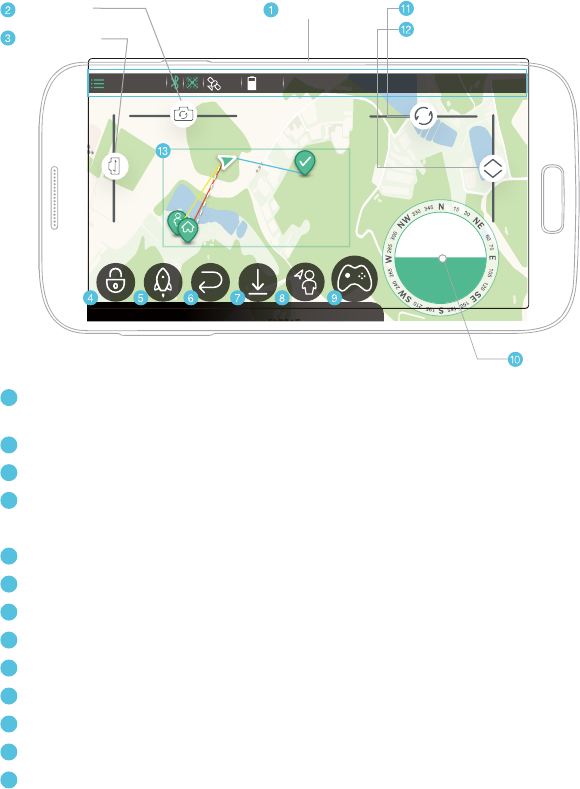
Status Bar: Settings, Flight mode, Bluetooth, “Heartbeat”, Number of Satellites,
Battery Level, Flight Distance, Altitude, Speed, Flight Time.
Gimbal: Control gimbal roll
Gimbal: Control gimbal pitch
Lock: Stop propellers
Unlock: Start propellers
Takeoff: Take off and hover at 10m (33 ft.)
Return: Returns and hovers at 10m (33 ft.) above the takeoff point
Land: Descend and land
Follow: Auto-follow
Hover: Stay in the current position
Micro-Control: Functions similarly to a remote control joystick.
Rotate: Yaw control
Elevation: Adjust altitude
White dotted line: The GHOST Drone flight path
Blue Line: Directional heading
Red Line: The distance between drone and takeoff point
Yellow Line: The distance between GHOST drone and GHOST App
5
6
7
8
9
1
10
11
12
13
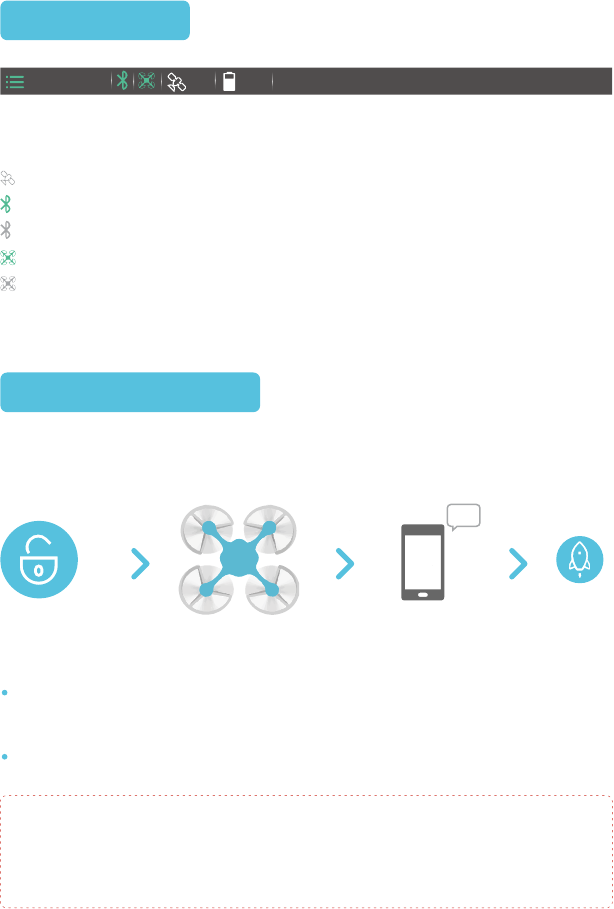
Status Bar
UNLOCK AND LOCK
STATUS BAR
Takeoff
The GHOST Drone will emit a continuous tone if it does not receive any flight instruc-
tions for 3.5 minutes (210 seconds). This is normal. To stop the tone, click the
“Unlock” icon and takeoff or, remove the GHOST battery.
After unlocking, tap the “Takeoff” button. The Ghost will ascend 10m (33ft.) and hover.
After clicking “Unlock,” the button will turn to a lock icon. If you click “Lock,” a confirmation
screen will appear to ensure that you do not accidentally stop your propellers. If you click “Lock”
and then confirm while the GHOST Drone is in flight, the propeller will cease spinning immedi-
ately. Unless it is an emergency situation, do not do this, as it may result in damage to your
GHOST.
Voice Prompt
Propellers IdleUnlock
At least six satellites are required for GPS flight.
If the Bluetooth icon light is steady, the GHOST App and G-BOX have successfully connected.
If the Bluetooth icon turns to gray, the GHOST App and G-BOX are not connected.
Heartbeat icon flashing: The GHOST App and GHOST drone have successfully connected.
Heartbeat icon does not flash: GHOST App and GHOST Drone are not connected.
20
MODE
DISTANCE HEIGHT SPEED TIME
8
From left to right: Settings, Flight mode, Bluetooth, “Heartbeat”, Number of Satellites,
Battery Level, Flight Distance, Altitude, Speed, Flight Time.
Click “Unlock” when the GHOST App and GHOST Drone have successfully connected
to six or more GPS satellites and you are ready to takeoff.

TAKEOFF
HOVER
If the mobile device has network access, a map of your current area will populate,
overlaid with your position and the position of the GHOST Drone.
A is drone position. Drone will go to the position B after setting waypoint. B.
The Ghost will go to D if you set a new destination D during transit to B.
21
D(alternative destination)
B(destination)
Note:Once airborne, the GHOST Drone can receive point-to-point flight instruc-
tions. Waypoint flight requires the GHOST Drone to be 10m (33 ft.) or higher.
Please be aware of any obstructions during flight to avoid a collision.
In case of emergency, use the hover function to stop your GHOST and assess your flight
situation.
Click the “Takeoff” button after “Unlock.” After the takeoff countdown, the GHOST will
rise and hover 10m (33 ft.) above the takeoff point.
You can tap the “Hover” button at any point during flight. If you do so, the GHOST Drone
will begin hovering immediately at its current position.
Tap to Add Waypoint
A
C
D
B
Hover Anytime
10m
Takeoff
Ascending
22
When using Micro-Control, the GHOST Drone’s front is indicated by red LEDs, the rear by
blue.The Micro-Control function can also be used to aid in fine-tuning the landing point of the
GHOST Drone when in Landing mode.
Only use Follow-Me in an open area, as the GHOST Drone does not currently have
obstacle avoidance capabilities. If the user is changing elevation while travelling, the user
must manually adjust the GHOST Drone elevation, as the GHOST cannot dynamically
change elevation while in Follow-Me mode.
To use Follow-Me, GPS on the mobile device running the GHOST App must be enabled.
Only enable Follow-Me when the distance between the operator and the GHOST Drone is
more than 3m (10 ft.). When the user is travelling, it is advised that the user not stop
suddenly, as the GHOST Drone cannot come to a sudden stop. When coming to a stop,
stop slowly. If the user clicks another button in the GHOST App while in Follow-Me mode,
Follow-Me will disengage. Ehang recommends setting the Ghost Drone’s height to be well
above the user so as to avoid any collisions or possible damage while using Follow-Me.
MICRO-CONTROL
FOLLOW-ME
Watch the “Micro-
Control” tutorial
Scan this QR code
Note
The Follow-Me function is enabled when the GHOST is in hover mode.
The “Micro-Control” function
allows the GHOST Drone to be
controlled at its current altitude.
The GHOST Drone must be in
Hover mode to access the
“Micro-Control.”
MICRO
CTRL
MICRO
Hover Anytime
Micro-Control
23
Elevation function can only be used while in Hover mode.
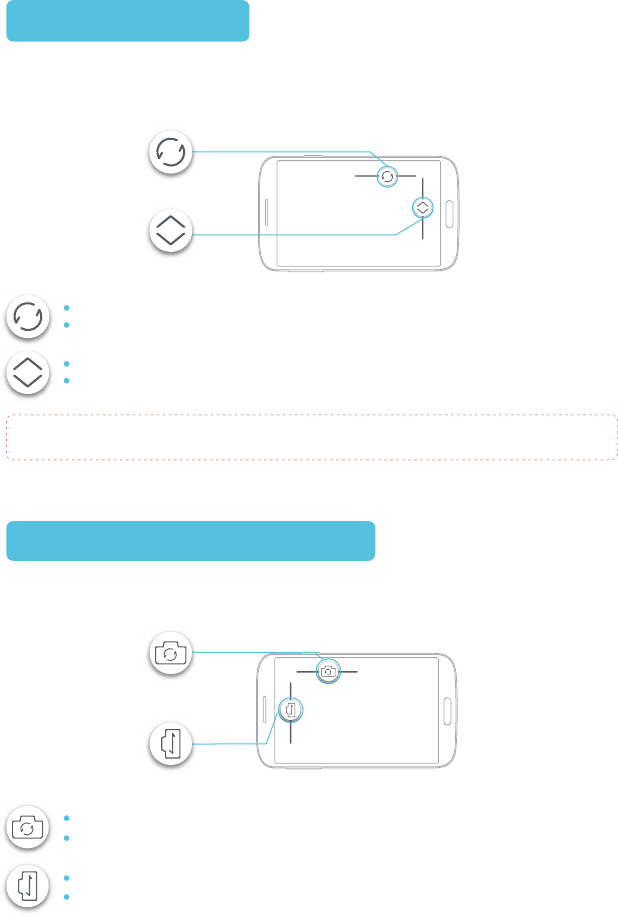
YAW / ELEVATION
CONTROLLING THE GIMBAL
The “Elevation” slider controls the height of the GHOST Drone and the “Yaw” slider
controls the direction the GHOST Drone is pointed. Both functions can only be used
while in Hover mode.
Yaw
Elevation
Drone turns counter-clockwise when the button is dragged left.
Drone turns clockwise when button is dragged to the right.
Drone ascends when the button is dragged upwards.
Drone descends when button is dragged down.
Gimbal Roll
Gimbal Pitch
The GHOST App can control the roll and pitch of the gimbal while in flight. The GHOST
App can be used to fine-tune the position of the attached camera.
The gimbal rolls to the left, or counter-clockwise, when the slider is dragged to the left.
The gimbal rolls to the right, or clockwise, when the slider is dragged to the right.
The gimbal pitches up when the slider is dragged up.
The gimbal pitches down when the slider is dragged down.
24
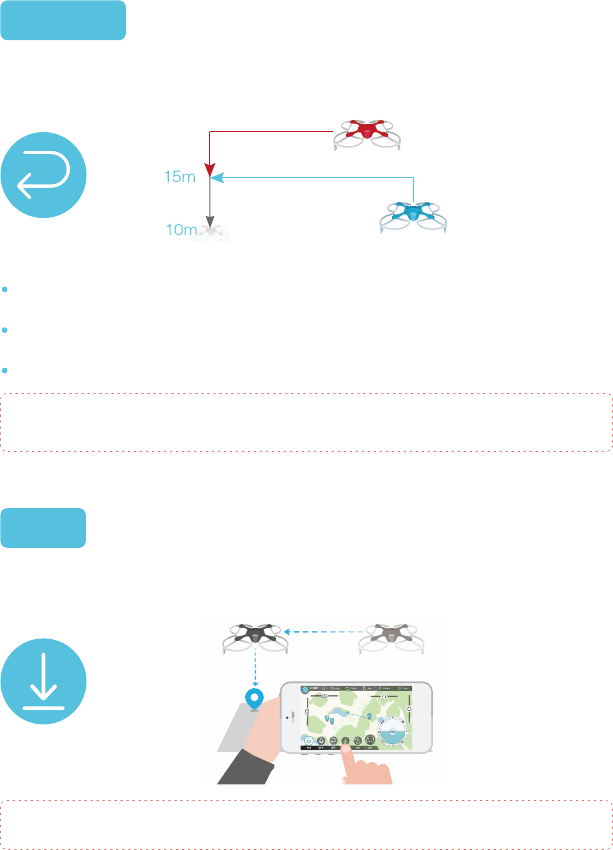
If the GHOST Drone is already above 15m (50 ft.), it will return directly to its original
takeoff point, drop to 10m (33 ft.), and hover in place.
If the Ghost Drone is below 15m (50 ft.), it will ascend to 15m (50 ft.) before descend-
ing to 10m (33 ft.) and hover in place.
The indicated altitude uses the takeoff point as the baseline.
LAND
RETURN
①Height >15m, GHOST directly returns.
②Height≤15m, GHOST ascends to
15m and returns.
When tapping “Return” in the GHOST App, the GHOST Drone will rise to 10m (33 ft.) and
transit to its original takeoff point and hover in place.
When tapping “Land,” the GHOST Drone will descend straight down and land. After five
seconds on the ground, the propellers will lock.
Do not tap “Land” if the GHOST Drone is not in an area that is suitable for landing.
The return flight path is a straight line to the original take off point, make sure there are no
obstructions between the departure point and the GHOST Drone.
Note: Unless you have adjusted and saved parameters in the Other button on the GHOST App,
all heights and speeds are set by default.

25
FAQ
Does GPS or WiFi have to be on to show my location?
The GHOST Drone does not have a standalone GPS capability, the GHOST App shows your
location as well that of the GHOST Drone. No map will be displayed if the GHOST App does not
have network connectivity. GPS must be enabled on your mobile device to operate the GHOST
Drone.
Why am I having trouble binding?
If the GHOST Drone and GHOST App are not pairing, open the App and turn on the G-BOX. Click
Settings—Other Settings—Bind. The binding process should complete in under two seconds. Try
to bind again if binding does not succeed within five seconds.
Why does the GHOST App say “unlock failed”?
Check to make sure that the GHOST Drone has sufficient battery, and that it has acquired at least
six satellites. If all readings are nominal, please disconnect and re-connect the GHOST Drone
battery. Attempt to unlock again. If you are still having problems, contact customer service.
Will the GHOST Drone automatically return when the battery is low?
The GHOST App both speaks and displays the current battery level. When the GHOST Drone is
critically low on battery, it will automatically land. In the event of a signal interruption, the GHOST
will immediately land.
What happens if the GHOST App mobile device turns off while in-flight?
The GHOST Drone will automatically return if it does not receive a signal for five seconds.
What do I do in an emergency?
In the event of an emergency, immediately click “Hover.” If “Hover” fails, ensure everyone’s safety
before attending to the Ghost Drone.
Can the GHOST Drone automatically avoid obstacles?
No. The GHOST Drone does not contain obstacle-avoidance technology. Be aware of your
surroundings and always fly safely.
How do I update the GHOST App?
The GHOST App will prompt you to update when an update becomes available. You may also
download the latest GHOST App from our website.
What do I do when the GHOST App becomes non-responsive?
The GHOST Drone will automatically return if it does not receive a signal for five seconds. If the
GHOST App becomes unresponsive, re-launch the GHOST App, or restart your mobile device.
How far and how high can the GHOST Drone fly?
Under optimal conditions, the GHOST Drone can fly up to 1000m (3,280 ft.) away from the
GHOST App and G-BOX. Remember to observe all local flight regulations and ordinances when
operating your GHOST Drone.

The GHOST Drone comes with a one-year guarantee. If you encounter problems with
your GHOST Drone, please contact support@ehang.com. Keep up-to-date by visiting
us at www.ehang.com.
SERVICE AND SUPPORT
SERVICE AND SUPPORT
Thank you, and enjoy your GHOST Drone!
26

www.ehang.com
EHang, Inc. 2015