Guangzhou Netum Electronic Technology NT-1203 Wireless Barcode Scanner User Manual
Guangzhou Netum Electronic Technology Co., Ltd Wireless Barcode Scanner
User manual

1
Introduction
This Wireless Bar Code Scanner is an ingenious device with unique triggger
design and excellent performance. It is produced under advanced techniques, with
finest chipsets and fully conforms with ergonomics requirements. It is fast and
accurate in all 1D codes reading and programmed to better read incomplete or fuzzy
codes. It can be widely used in domains including commercial POS system,
supermarkets, warehousing and logistics, libraries, banks, transportation, postal
service, industrial and manufacturing process management.
It is represents an optical combination of proven high property scanning
technology and state-of-the-art ergonomics, featuring
-- Long-distant and fast transmission,
-- Data storage,
-- Scan number display,
-- Network construction, and
-- Application of Anti-jamming Frequency Hopping Technology.
This product brings convenience, comfort, high-speed and stability into your bar code
scanning.
Features and Advantages
1. It could be used as a collector, memory 4M can be extended to 8M
2. Never lose data, clear warning.
3. Intelligent uploading; can choose to upload data of last scans and resume uploading
from breakpoints.
4. No-messy-code programmed, data counting, repeated code and out of the base
range warning, ID display.
5. Beeper and light indicates if the scanner is out of the base range and scanning will
automatically switch to storage mode.
6. Support one to one, one to many, many to one operation; and each base can respond
to up to 254 scanners.
7. The terminal communicates with the base at long distance of 150 meters indoor or
300 meters outdoor.
8. 1200MA replaceable lithium battery enables 6-10 hours continuous use after full
charge and avoids trouble of returning to factory for replacing battery. Base supports
data transmission and battery charging.
9. Germany imported quartz scanning window; effective light penetration,
scratch-proof.
10. Supports USB, PS2, RS232 and other designated interface.

2
Unpacking the scanner
Your scanner was thoroughly tested and inspected before it was shipped from the
factory. The shipping box contains:
Wireless Barcode Scanner
1 piece
Base
1 piece
Battery Pack
1 piece
USB cable
1 piece
Antenna
1 piece
Association card
2 pieces
User’s guide
1 copy
If any of these items are missing or damaged, please contact your local representative.
Retain the shipping box in case you need to ship the scanner.

3
Installing the scanner
Connecting the base with USB cable to a computer
1. Connect the base with the cable into the computer’s connector.
2. Windows will automatically install the driver. (If not, you need to install the driver
by manual on the host to communicate with the scanner.)
3. When connection is finished, windows will indicate “The hardware has been
installed and can be used” and the scanner light will be on.
4. If connection fails, unplug the base and repeat the above steps.
Installing the antenna
1. Connect the antenna vertically to the antenna interface on the base.
2. Hold the antenna and tighten it by rotating the nut head clockwise until secure.
Notes: To remove the antenna, please operate by inverse steps.
Starting wireless scanning
Scan the code “start wireless scanning” on the association cards or page 11 of the
guide book.
Understanding the features
Audio and visual indications during data transmission:
Successful communication
Sound (beeper)
Blue light
Yes
One beep
Flash 1 time
No
Three beeps
Flash 3 times (changed into
Storage Mode)
Storage function:
When communication fails (out of base range or signal interference), the reader will
store the scanned barcode information automatically. You can also select storage
mode by manual. 4M inner memory, can store 40-100 thousand barcodes information.
Low power alarm:
In case of instant auto-shutdown after startup, please charge the battery as the power
is low.
Charging:
Please fully charge the battery for first time use. Shut down the scanner before
charging. When the reader/terminal is on charge, both the blue and the red lights on
the base will be on. When charging is finished, only the red one will be on.

4
Performance Parameters
Title
Parameter
Operating Channel
433.79MHz|SM
Communication Distance
150 meters indoor; 300 meters outdoor
Type of illuminant
650nm laser
Operation way
Hand-held or bracket-held
Bit Error Rate(BER)
1/ 800 million
Safety Performance
Meet the Grade ⅠNational Criteria for Laser
Safety
Symbologies
EAN-8,EAN-13,UPC-A,UPC-E,Code 39,
Code 93,Code 128,EAN128,Coda bar,Industrial
2 of 5,Interleave 2 of 5,Matrix 2 of 5,MSI,
China Zip Code etc.
Supported Interface
RS232, PS2 Keyboard, USB
Scanning Method
Automatic/ Manual
Transmission Rate
RS232 Baudrate:2400-38400
Resolution
3mil (0.1mm)
Depth of Field
15-800mm(pos0.9)
Decode Speed
98 times/second
Reading Angle (pitch)
60°
Reading Angle (skew)
45
Operating Temperature
-20℃-45℃
Storage Temperature
-20℃-45℃
Operating Humidity
5%-85%
Storage Humidity
5%-85%
Power Voltage
5V
Working Current
68mA
Static Current
48mA
Light Intensity
Daylight, 4000lux max
Electromagnetic Interference
Comply with en50081,part1 criteria
External Electromagnetic Interference
Resistance
Comply with en50082,part1 criteria
Materials
ABS+PC
Exterior Dimension
Length*Width*Height:
Reader: 183mm*75mm*105mm;
Base (without antenna): 205mm*100mm*40mm;
Weight
Reader: 195g; Base (with antenna): 230g
5
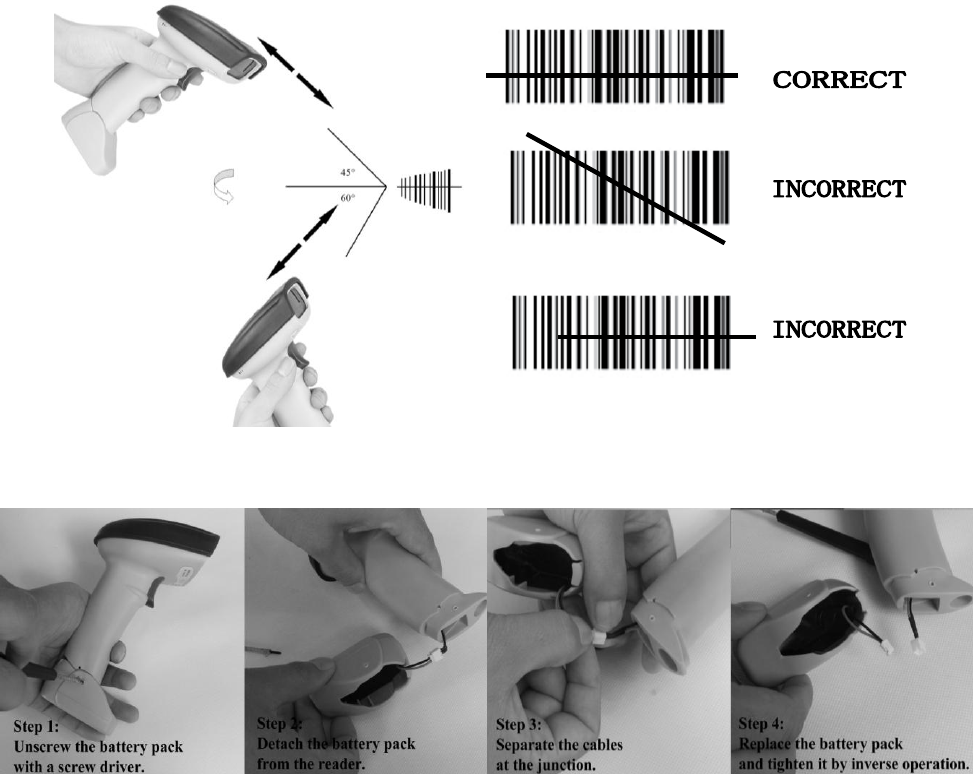
Operating the scanner
Before you start scanning, make sure:
• The terminal has adequate power .
• The scanner, cable and the Host are connected.
• All cable connections from the base station are secure.
To scan bar codes
1. Aim the scanner at a slight angle or pitch to the bar code and press the trigger.
2. If you did not get a good read, adjust the scanner distance from the bar code and
the position of the scan beam to make sure you scan every bar and space. The
optimum reading stance between scanner and barcode is 15-20 cm.
3. On a successful read, there’ll be a beep sound, beam dies out. The scanner then
transmits barcode message to the Host.
4. To instantly upload data, please make sure that the terminal is in range and
associated to the base, or program will automatically turn into storage mode. The
terminal communicates with the base at long distance of 150 meters indoor or 300
meters outdoor.
Replace the battery pack as below:
6
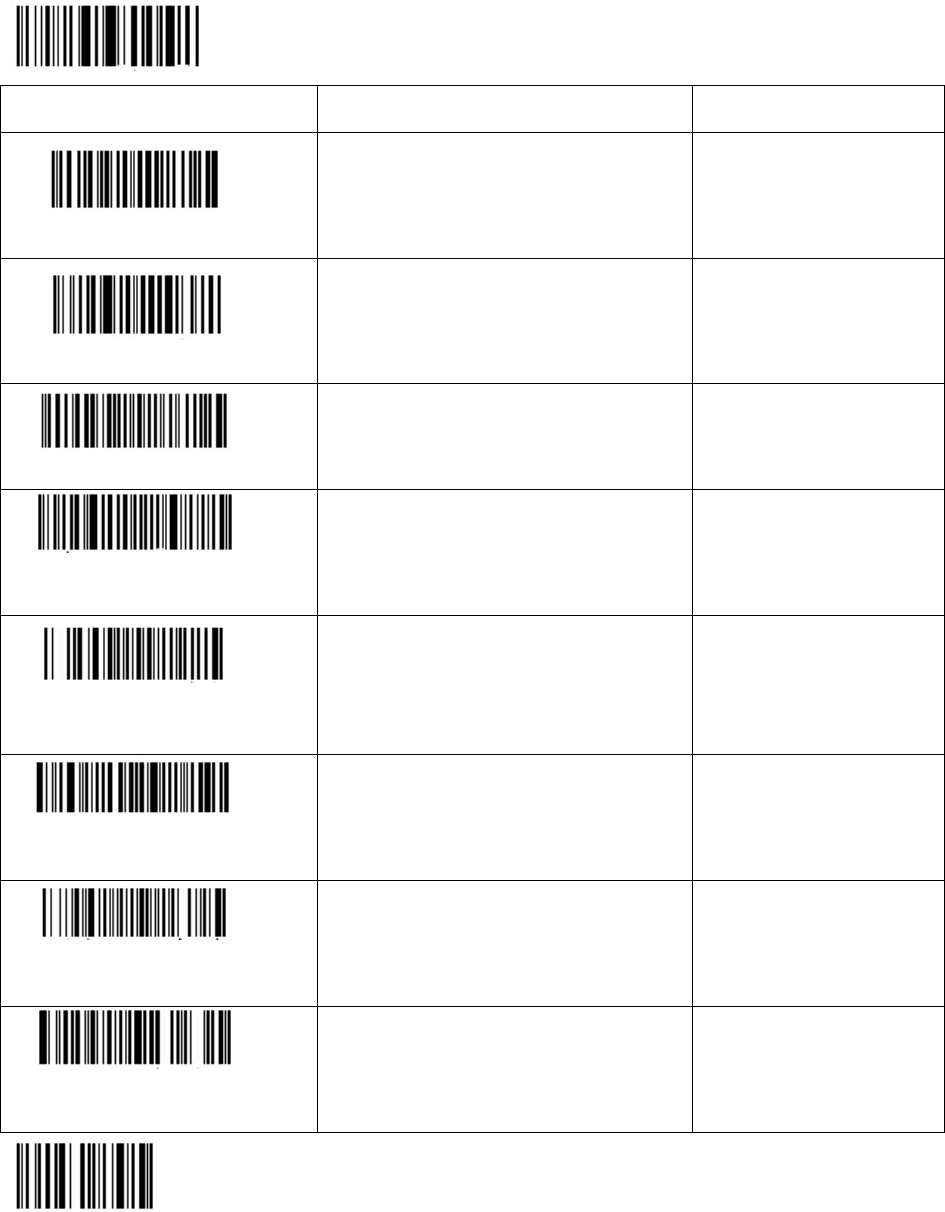
Configuring the scanner
Play around in the settings menu to configure the device to your exact
specifications.
Setting Code
Description
Note
Normal Mode
(instant upload mode)
Scan this code to enter
normal scanning mode.
Under this mode, data will
be transmitted to the base
upon scan.
(defaulted)
The scanner emits 1 beep and the
blue light flashes once when the
base successfully receives
signals.
The scanner emits 3 beep and the
blue indicator flashes 3 times
when the base is not successfully
associated with scanner. The
scan result will be automatically
stored in the scanner.
Storage mode will be activated
to replace normal mode when
the base fails 3 times in a row
receiving a signal.
Storage Mode
Scan this code to enter
Storage mode.
Under this mode, scans will
be stored in the scanner.
Under this mode, the red light is
on. The blue light will flash
when a code is successfully read
and stored.
Upload data
Scan this code to uploading
stored data.
All data in the scanner will
be uploaded to the
corresponding base.
(Note: if the data of previous
operations are not cleared
but still stored in the scanner,
they will also be uploaded.)
You can scan this code to
re-upload all stored data when
uploading is stopped due to
improper base association.
(During uploading, the scanner
responds as under normal mode)
Upload data of last
operation.
Scanner this code to upload
data of the last operation
(from the last startup) to the
base.
7
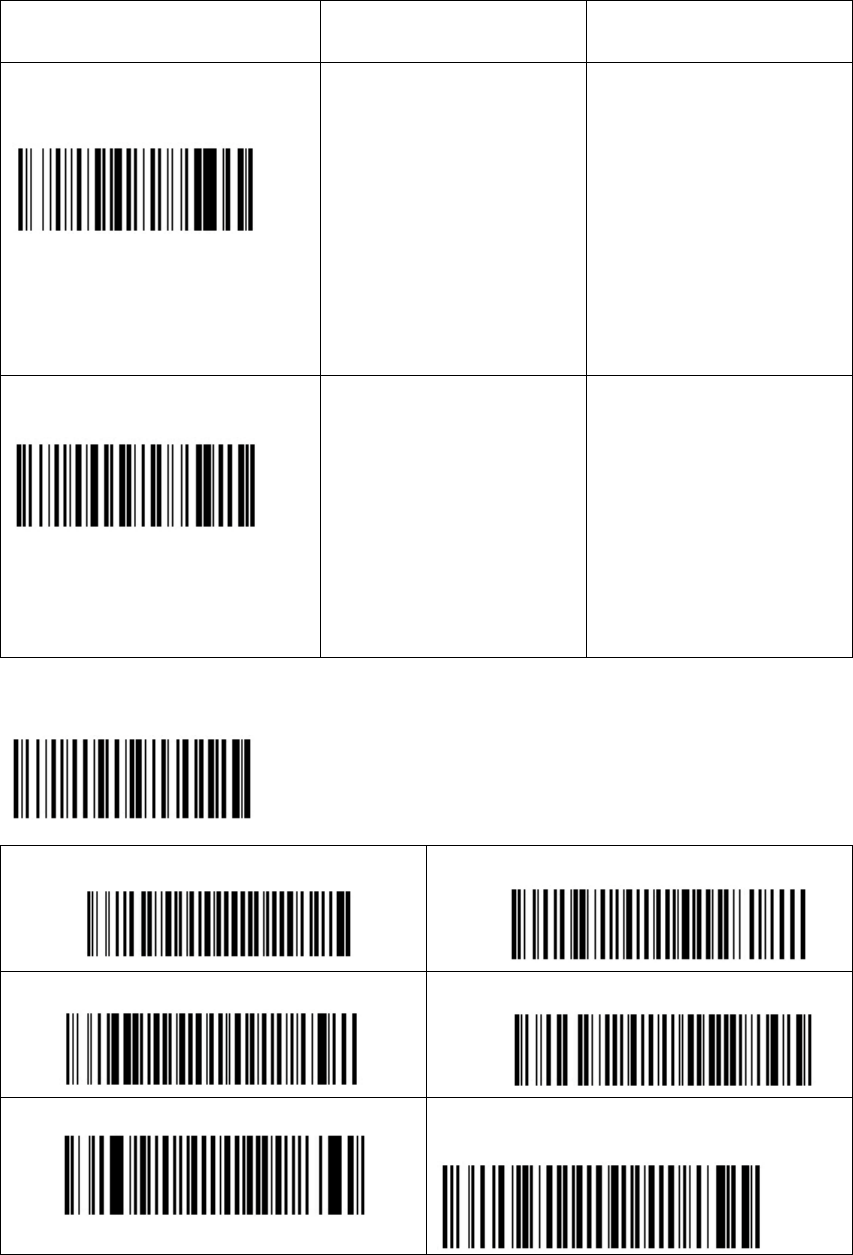
Configuring the scanner (continued)
Resume broken upload
Scan this code to resume
uploading data from the
breakpoint.
You can scan this code to resume
uploading from the breakpoint
when uploading is broken down
(when the base is disconnected
or powered off).
e.g.: if uploading is broken down
at the 6th code of total 10 stored
codes. Scan this code, the
uploading will continue from the
6th code to the last.
During uploading, the beeper
indicates the same as under
normal mode. (please, see
normal mode)
Show total number of
scans
Scan this code to show
total number of stored
scans.
This counts by the number of
carriage return.
Show number of last scans
Scan this code to show
number of last stored
scans.
Note: this counter shows
new scan number after
“uploading data of last
operation”.
Clear storage
(use with caution)
Scan this code to clear
scanner storage.
(To scan this code, please
turn the scanner by 90°)
On a successful clearing, the
blue light flashes once
.
(Available under both normal
mode and storage mode)
8
Scanner Transmitter Setting
Enter setting
Setting Code
Description
Note
Set transmitter channel
Set working channel:
e.g.: NT 111=10#, set working
channel 10. Range: 00-15, end with
#.
0#
1#
…
15#
Set transmitter ID
Set transmitter ID:
e.g.: NT 121=100#,
set transmitter ID 100. Range:
1-254, end with #.
1#, 2#...
…100#, …
254#
Set corresponding receiver
ID
Set transmitter reporting to a named
receiver.
e.g.: NT 122=200#,
set corresponding receiver ID 200.
Range: 1-254, end with #.
1#, 2#...
…100#, …
254#
Set beeper
Activate or deactivate beeper
function to indicate whether or not
the signals are received during
uploading data.
Signals received: 1 beep
Signals not received: 3 consecutive
beeps
Note: this function will affect
scanning speed. Scanning speed is 1
code per second when it is activated
and 3 codes per second when not.
Range: 2#, 3#.
2#
3#
Restore all original
transmitter settings
Restore this module to original
settings.
Save& Exit
9
Scanner receiver setting
Enter setting
Setting Code
Description
Note
Set receiver channel
Set receiver channel: e.g.: NT
211 = 10#, set working channel
10. Range: 00-15, end with #.
0#
1#
…
15#
Set receiver ID
Set receiver ID: e.g.: NT
221=100#, set transmitter ID
200. Range: 1-254, end with #.
1#
2#
… 100#, …
254#
Enable scanner ID report
Display scanner ID at the
receiving end.
Disable scanner ID
report
Do not display scanner ID at
the receiving end.
Set Tab between ID and
barcode
Set the delimiter between ID
and barcode a Tab when ID
report is enabled. (Default
setting)
e.g.: scanner
ID=10, barcode=
12345; display: 10
12345
Set White Space between
ID and barcode
Set the delimiter between ID
and barcode white space when
ID report is enabled.
e.g.: scanner
ID=10, barcode=
12345; display: 10
12345
Set “-” between ID and
barcode
Set the delimiter between ID
and barcode a “-” when ID
report is enabled.
e.g.: scanner
ID=10, barcode=
12345; display:
10- 12345
Restore all original
receiver settings
Restore this module to original
settings.
Save & Exit
Note: After a programming operation, the reader will emit beeps and the light
will flash to indicate association to the base. Put the reader close to the base.
Unplug the base for a few seconds then plug it back. The light and the beeper
will stop on a successful setting. Then the reader will perform on the new setting.
10
Repeated code detection setting
Setting code
Function
Description
Enable repeated code
detection
Enable repeated
code detection.
Note: this setting
will be
automatically saved
and remain
effective after
power failure.
When this function
is activated, the
scanner will give an
error alarm with 5
beeps and
automatically
cancel the last
repeated code if a
repeated code is
scanned.
Disable repeated code
detection
Disable repeated
code detection.
Note: this setting
will be
automatically saved
and remain
effective after
power failure.
The above detecting time can be adjusted by scanning the following codes:
(default: 6 seconds)
Enter setting
Set detecting time 6 seconds
Set detecting time 5 seconds
Set detecting time 4 seconds
Set detecting time 3 seconds
Set detecting time 2 seconds
Set detecting time 1 seconds

11
Save & Exit
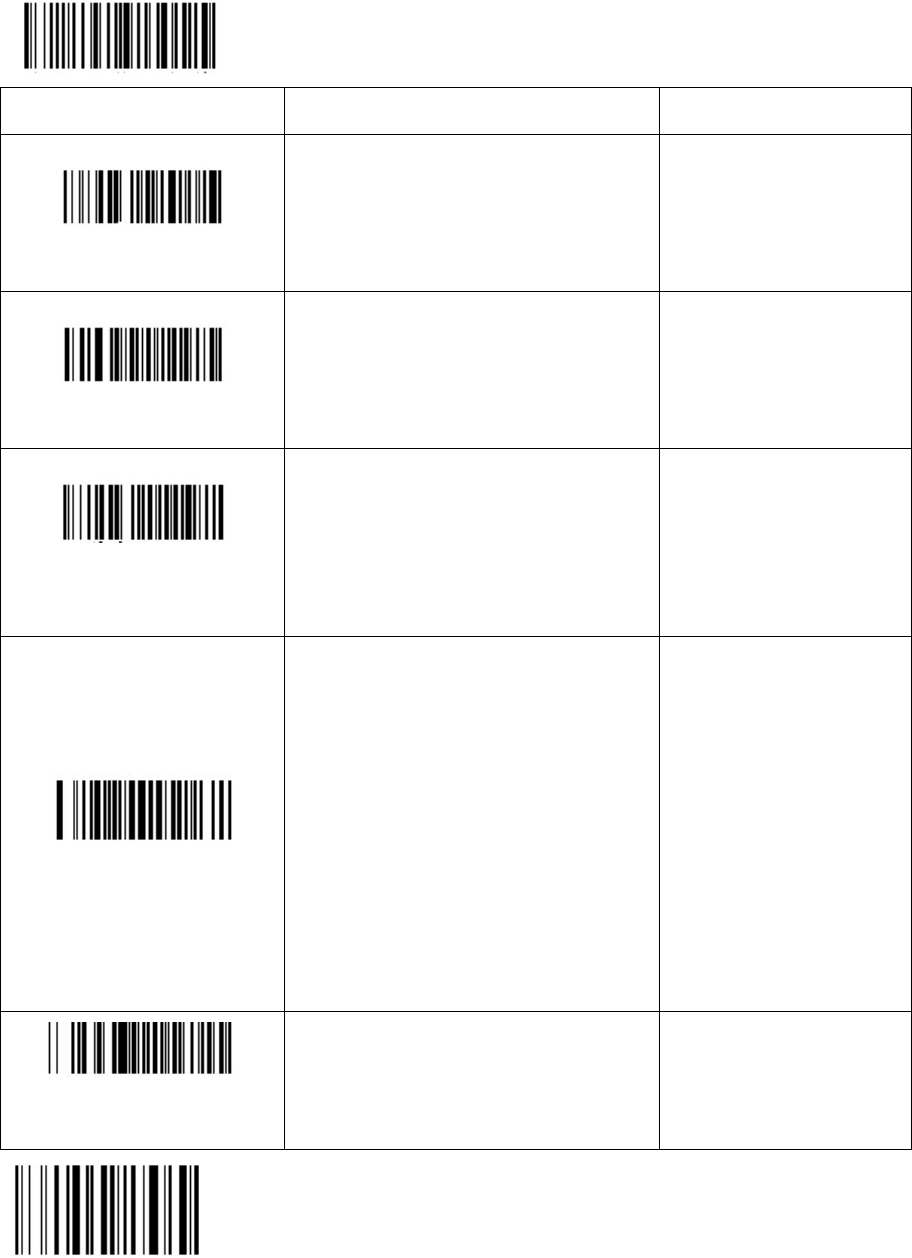
Appendix – 1
0 – 9, #, TEST 1234567890
0 1
2 3
4 5
6 7
8 9
# TEST 1234567890
Restore All Original Scanner Settings Start Wireless Scanning

12
Display version information
Troubleshooting the scanner
This table lists potential problems and their solutions.
Symptom
Cause
Solution
The base does not
upload data.
When the reader is
out of range and not
associated to the base,
storage mode will be
automatically
activated to replace
normal instant upload
mode.
To restore normal mode, scan the normal
mode code on the white association
cards or 6th page of this book. On the
other hand, when instant uploading is
not needed, scan the storage mode code
below it to store scans.
The reader emits
a beam but does
not read bar
codes.
Wireless scanning function
is not activated.
Scan the code “start wireless scanning”
on the association cards or page 11 of
the guide book.
System is jammed.
Scan the code “restore all original
scanner settings” at the right bottom on
page 11 and then scan the code “start
wireless scanning” below it.
The reader could not
associate with the base.
1) scan the first code on page 8 “enter
setting”;
2) scan the last second code on page 8
“restore all original transmitter
settings”;
3) scan the last code on page 8 “save &
exit”;
4) scan the first code on page 9 “enter
setting”;
5) scan the last second code on page 9
“restore all original receiver settings”
(the reader will emit beeps);
6) put the reader close to the base;
remove the base cable and plug it back
after a few seconds; the flashing light
and beeper will stop; setting is
successful; (if the beeper does not stop

13
after you remove the base cable, repeat
the above steps.)
7) scan the last code on page 9 “save &
exit”.
Troubleshooting the scanner (continued)
The reader does not emit
a beam and read bar
codes.
The reader is
not receiving
power.
Make sure the battery pack is fully
charged. Replace the battery pack if
damaged.
Scanner does not read
bar codes quickly and
sometimes requires
multiple scans.
The battery pack
power is lower than
5V.
Charge it. Full charging needs 3-5 hours
until the light turns into red.
The scanning
window is
dirty
Clean the window with a cotton cloth
moistened with an ammonia and water
solution. Dry with a soft cotton cloth or
allow to air dry.
The bar code
is dirty.
Make sure the bar code is free of dirt
and grime. Then scan at a slight angle or
pitch to the bar code (see “Operating the
Scanner” earlier in this guide).
You didn’t
scan in
appropriate
distance.
Try adjusting the scanning
distance.
Scanner cannot read
certain bar codes.
The scanner was
not set up to read
this type of barcode
symbology, or the
bar code is
damaged, covered
up, or of poor
quality.
Scan another bar code on a similar item.
If it scans, clean the bar code giving you
trouble.
If you are still unable to scan, restore the
scanner to original settings. If you still
fail, try using other scanner.
The scanner
does not
recognize the
programming
bar code
Make sure you are scanning the correct
programming bar code and try again.

14
scanned.
Scanner does not read
“shiny” bar codes.
Reflected light
distorts the
scan beam.
Scan at a slight angle or pitch to the bar
code (see “Operating the Scanner”
earlier in this guide).
Further operating the scanner
Aim
Operation
To display the total scan number, to
clear stored data, to upload data.
Scan the related bar codes in “bar code
settings” earlier inn this guide.
To identify codes by displaying the
related reader IDs in a situation that
a base communicates with many
readers simultaneously.
To construct a “many to one” network.
1) scan the code “enter setting” on the top of page
9.
2) scan the code “display transmitter ID” on page
9, the reader will emit beeps.
3) put the reader close to the base and unplug the
base for a few seconds and then plug back. The
flashing light and the beeper will stop.
4) scan the last code on page 9 “save & exit”.
There will be an ID number of this reader “10”
displayed before this reader’s every scanned
code. (Defaulted: 10)
To change the ID to other number, like “200”
(range: 1-254)
1) scan the code “enter setting” on the top of page
8.
2) scan the code “set transmitter ID” on page 8.
3) scan the numbers codes on page 11, “2”, “0”,
“0” and end with “#”.
4) scan the code on page 8 “save & exit”.
To configure different working
channels for scanner sets to
communicate simultaneously
in a network and avoid data
interference on hosts. E.g.:
channel=6. (Defaulted= 10)
Make sure that the base is connected to the host
with antenna.
Set transmitter channel.
1) scan the code “enter setting” on page 8.
2) scan the code “set transmitter channel” on page
8.
3) scan the number code “6” on page 11 and end
with “#”.

15
4) scan the code “save & exit” on page 8 to finish
transmitter channel setting.
Set receiver channel.
5) scan the code “enter setting” on page 9.
6) scan the code “set receiver channel” on page 9.
Further operating the scanner (continued)
7) scan the number code “6” on page 11
and end with “#”. (The number should be
the same as setting transmitter channel.)
The base will emit beeps.
8) unplug the base for a few seconds then
plug back. The flashing light and
sounding beeper will stop. If they do not
stop, the above setting is not successful.
Scan the code “restore all original
scanner settings” then the code “start
wireless scanning” and repeat the above 8
steps until successful.
9) scan the code “save & exit” on page 9
to finish receiver channel setting.
Scan an item code to test data
uploading.
Maintaining the Scanner
Charge the battery at the end of each use and unplug it right when it reaches
full charge; overcharging will shorten the battery's lifespan.
Water or grime on the window of the scanner will distort the scan beam and
impair performance. Moving from one temperature extreme to another causes
condensation to form on the optical surfaces that affects scanner performance.
• Clean the window with a cotton cloth moistened with an ammonia or water
solution. Dry with a soft cotton cloth or allow to air dry.
• Do not use a dry tissue to wipe the window. This causes small scratches on the
window that will gradually affect performance.
• Do not immerse the scanner in water.
• Operate and store the scanner and battery pack in an environment with 5% to

16
85% relative humidity.
• Operate the battery pack in temperatures within -20°C to 45°C (-4°F to 113°F)
and store the battery pack in temperatures within -20°C to 45°C (-4°F to 113°F).
• when powered on, the wireless function will automatically send code data each
11s. for your health, turn it off is recommended when not use.
Warranty
Dear customer;
Thank you for purchasing our products. Please keep this card and present when
applying for warranty work.
User name:
Tel:
Filled/
sealed
by the
Seller
Seller name:
Tel:
Add:
Model:
Series NO.:
Purchase Date:
Warranty Terms:
a. This product is warranted against manufacturing defects in materials for a period
of 1 year and workmanship for a period of 2 years from date of Manufacture,
under normal use.
b. We will repair or replace this unit, at our option and at no charge to the user, with
new or reconditioned parts or products if found to be defective during the first
year of the warranty period. During the 2nd year of the warranty, there shall be no
charge for the workmanship and we will charge for the parts to repair the unit,
should a valid warranty claim arise. After the warranty, we will charge the
prevailing shop rate to repair the unit.
c. All items, within warranty period, shipped to us must be freight prepaid. We will
pay the return freight via a service of our technologies’ choice. Customer is
responsible for payment of any shipping upgrades.
d. Our retailer and we will not assume liability for incidental, consequential, punitive
or other similar damages associated with the operation or malfunction of this
product.
This warranty covers all defects in material and workmanship with the following
specified exceptions:
(1) Damage caused by accident, unreasonable use or neglect (including the lack of
reasonable and necessary maintenance);
(2) Damage occurring during shipment (claims must be presented to the carrier);
(3) Damage to, or deterioration of, any accessory or decorative surface;
17
(4) Damage resulting from failure to follow instructions contained in your owner’s
manual;
(5) Damage resulting from the performance of repairs or alterations by someone other
than an authorized service center;
(6) The product has been subjected to abnormal physical or electrical stress, including
lightning strike, misuse, negligence, or accident;
(7) Applications and uses that this product was not intended.
This device complies with Part 15 of the FCC Rules. Operation is subject to the following two
conditions: (1) this device may not cause harmful interference, and (2) this device must accept any
interference received, including interference that may cause undesired operation.
Changes or modifications not expressly approved by the party responsible for compliance could
void the user's authority to operate the equipment.
NOTE: This equipment has been tested and found to comply with the limits for a Class B digital
device, pursuant to Part 15 of the FCC Rules. These limits are designed to provide reasonable
protection against harmful interference in a residential installation. This equipment generates, uses
instructions, may cause harmful interference to radio communications. However, there is no
guarantee that interference will not occur in a particular installation. If this equipment does cause
harmful interference to radio or television reception, which can be determined by turning the
equipment off and on, the user is encouraged to try to correct the interference by one or more of
the following measures:
-- Reorient or relocate the receiving antenna.
-- Increase the separation between the equipment and receiver.
-- Connect the equipment into an outlet on a circuit different from that to which the receiver is
connected.
-- Consult the dealer or an experienced radio/TV technician for help.