Guangzhou Panyu Juda Car Audio Equipment HSB5810 Wireless Sound Bar Speaker User Manual
Guangzhou Panyu Juda Car Audio Equipment Co.,Ltd. Wireless Sound Bar Speaker
UserManual.wiki
>
Guangzhou Panyu Juda Car Audio Equipment
>
HSB5810 User Manual
User Manual
Navigation menu
Upload a User Manual
Namespaces
Wiki Guide
HTML
PDF
Info
Views
User Manual
Discussion / Help
Navigation


![Connections-9-LINE IN/AUX INThis sound base have two extra groups of audio input terminals. You can input the analogue stereo audio signals from extra devices such as VCD, CD, VCR, DVD player, etc.Use the audio cable to connect the stereo audio output terminals of a VCD, CD, VCR,DVD player to the stereo input terminals LINE IN/AUX IN of this sound base. Its corresponding signal source is LINE IN/AUX IN which can be available by pressing [LINE/AUX] on the remote control.OPTICALOptical InputOptical OutputUse the optical cable to connect the optical input of this sound base to the optical output of VCD, CD, VCR, DVD player.Optical InputLINE Output AUX Input Connections-9-LINE IN/AUX INThis sound base have two extra groups of audio input terminals. You can input the analogue stereo audio signals from extra devices such as VCD, CD, VCR, DVD player, etc.Use the audio cable to connect the stereo audio output terminals of a VCD, CD, VCR,DVD player to the stereo input terminals LINE IN/AUX IN of this sound base. Its corresponding signal source is LINE IN/AUX IN which can be available by pressing [LINE/AUX] on the remote control.OPTICALOptical InputOptical OutputUse the optical cable to connect the optical input of this sound base to the optical output of VCD, CD, VCR, DVD player.Optical InputLINE Output AUX Input Connections-9-LINE IN/AUX INThis sound base have two extra groups of audio input terminals. You can input the analogue stereo audio signals from extra devices such as VCD, CD, VCR, DVD player, etc.Use the audio cable to connect the stereo audio output terminals of a VCD, CD, VCR,DVD player to the stereo input terminals LINE IN/AUX IN of this sound base. Its corresponding signal source is LINE IN/AUX IN which can be available by pressing [LINE/AUX] on the remote control.OPTICALOptical InputOptical OutputUse the optical cable to connect the optical input of this sound base to the optical output of VCD, CD, VCR, DVD player.Optical InputLINE Output AUX Input RL L R Connections-9-LINE IN/AUX INThis sound base have two extra groups of audio input terminals. You can input the analogue stereo audio signals from extra devices such as VCD, CD, VCR, DVD player, etc.Use the audio cable to connect the stereo audio output terminals of a VCD, CD, VCR,DVD player to the stereo input terminals LINE IN/AUX IN of this sound base. Its corresponding signal source is LINE IN/AUX IN which can be available by pressing [LINE/AUX] on the remote control.OPTICALOptical InputOptical OutputUse the optical cable to connect the optical input of this sound base to the optical output of VCD, CD, VCR, DVD player.Optical InputLINE Output AUX Input RL L R AUX OutputLINE INLine Input AUDIO INPUT AUDIO OUTPUT ARC(AUDIO RETURN CHANNEL) ARC is audio return channel function,it is used in digital audio output of liquid-crystal display television in order to get the optimal synchronous sound quality .Use the HDMI cable to connect the HDMI-ARC input port of this sound base to the ARC output port of the liquid-crystal display television.](https://usermanual.wiki/Guangzhou-Panyu-Juda-Car-Audio-Equipment/HSB5810/User-Guide-3588283-Page-10.png)
![Connections-10-Press standby button to power on the sound base, then press source button on the sound base to switch the corresponding bluetooth mode, the bt will be flashing quickly in the display screen , the sound base is in searching bluetooth signal status, byone BS015 Note:Bluetooth connection range in 10 meters.The bluetooth pairing model 1byone BS015 in your device was not deleted.use your smart phone to search the bluetooth signal of the sound base, select 1 on your list, input the password 0000 if need the password prompt, the sound base will synchronize to play songs on your mobile phone while the bt keep solid light in the display screen means to be connected successfully. Disconnected the bluetooth on the smart phone to switched off the bluetooth connection.In bluetooth mode,[PLAY/PAUSE],[NEXT], [PREVIOUS], [VOLUME+/-] etc. are also active.Bluetooth Model:1byone BS015BLUETOOTH](https://usermanual.wiki/Guangzhou-Panyu-Juda-Car-Audio-Equipment/HSB5810/User-Guide-3588283-Page-11.png)
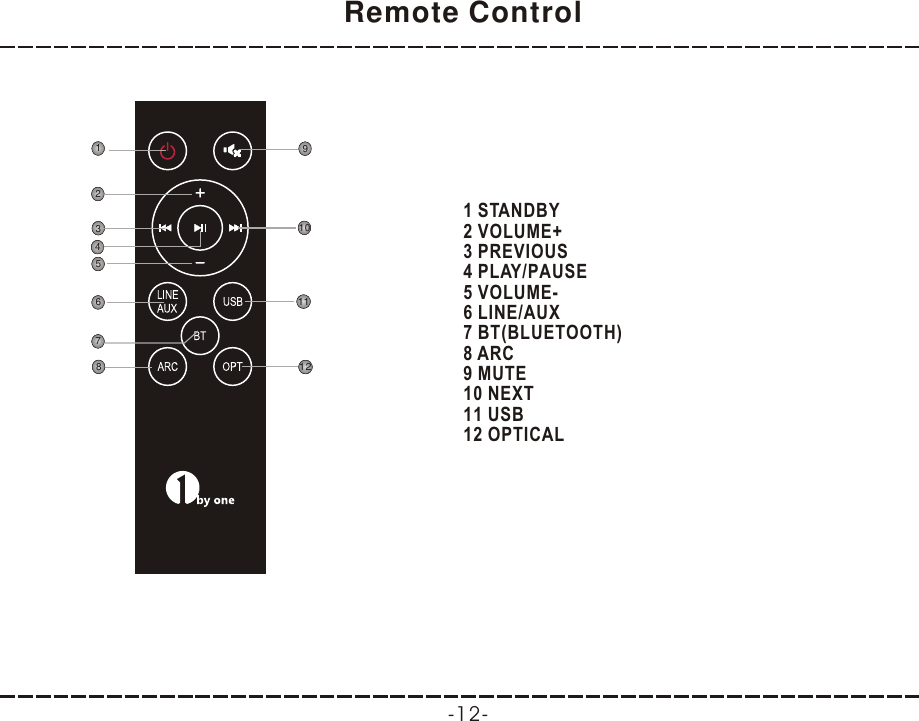
![STANDBY Press to switch on the unit. Press it again to put the unit in standby mode.Press to temporarily pause a playback. Press it again to resume the playback.Hold down this button for 3 seconds to disconnect bluetooth. Basic Playback-13- OperationPress to skip to the next track.Press to return to the previous track.Press to enter to USB mode.Press repeatedly to switch between LINEand AUX IN mode.Press to enter to OPTICAL IN mode.LINE/AUXPress to temporarily switch off the sound . Press it again to switch it on.Press [VOLUME+] to turn up the volume.Press [VOLUME-] to turn down the volume.MUTEUSBOPTPress to enter to ARC mode.ARCPress to enter to BT(BLUETOOTH) mode.BT](https://usermanual.wiki/Guangzhou-Panyu-Juda-Car-Audio-Equipment/HSB5810/User-Guide-3588283-Page-14.png)
![-14-TroubleshootingBefore resorting to maintenance service, please kindly check by yourself with the following chart.SoundThere is no sound or the sound is distorted.The audio cables aren't connected securely.The volume is set to the minimum level.The sound is switched off.Connect the audio cables securely.Turn up the volume.Press [MUTE] on the remote control to switch on the sound.Press [PLAY/PAUSE].The remote control does not function.Symptom Cause(s) RemedyThe buttons on the unit doesn't work. Switch off and unplug the unit. Then connect the plug to the power supply and switch it on again.The unit is being interfered with static electricity etc.The AC power cord is not connected to the power supply or is not connected to a power supply securely.Please check that the AC power cord is connected securely.No PowerThere is no battery in the remote control.The batteries are out of charge. The remote control isn't pointed to the remote sensor.The remote control is out of its operating area.The unit is shut down.Install two AAA/1.5V batteries in it.Replace the batteries with new ones.Make sure that the remote control is pointed to the remote control sensor.Make sure the remote control is within the operating area.Switch off the unit and disconnect it from the AC outlet. Then power on the unit again.](https://usermanual.wiki/Guangzhou-Panyu-Juda-Car-Audio-Equipment/HSB5810/User-Guide-3588283-Page-15.png)