Guangzhou Shiyuan Electronics ANDROIDBOX ANDROID BOX User Manual
Guangzhou Shiyuan Electronics Co., Ltd. ANDROID BOX
UserManual.wiki
>
Guangzhou Shiyuan Electronics
>
ANDROIDBOX User Manual
User Manual
Navigation menu
Upload a User Manual
Namespaces
Wiki Guide
HTML
PDF
Info
Views
User Manual
Discussion / Help
Navigation

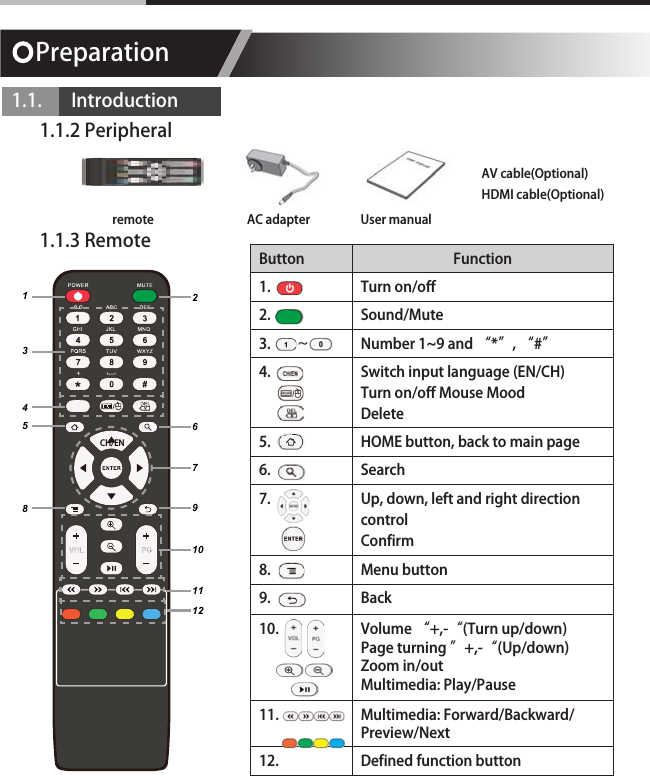
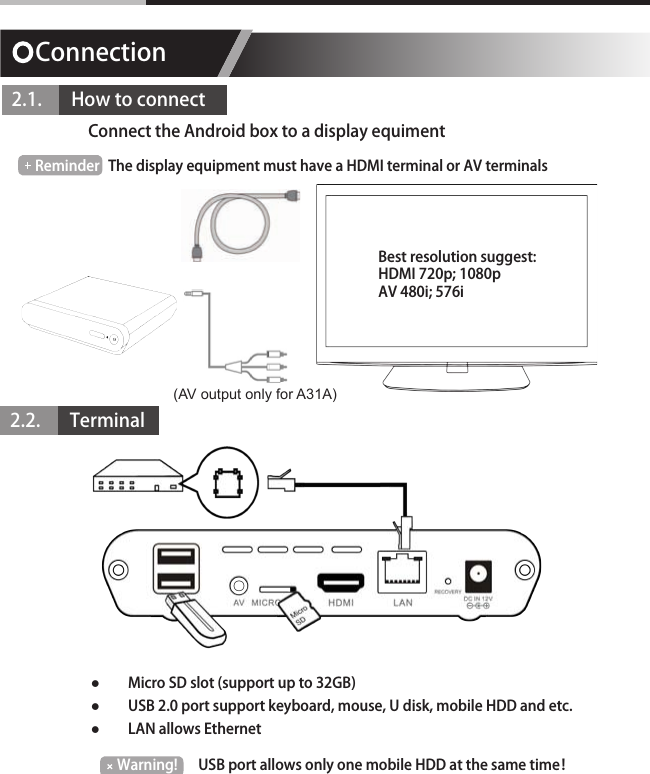
![Front FuctionSignal receiverSignal LED(red--power off, green--power on)Power buttonPreparation1.1. Introduction1.1.1 SketchBack FunctionUSB port x 2AV output (Best resolution experience in 480i or 576i)[Only for A31A]micro SD slot[SD card slot for A31]HDMI output (Best resolution experience in 720p or 1080p)Ethernet inputRecovery buttonDC inA31A31A](https://usermanual.wiki/Guangzhou-Shiyuan-Electronics/ANDROIDBOX/User-Guide-1903369-Page-5.png)

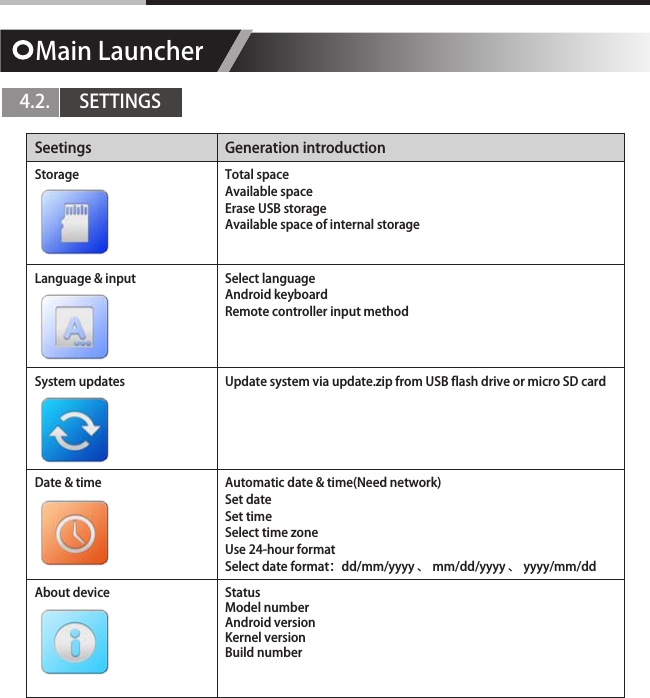
![Main Launcher4.2. SETTINGSSeetings Generation introductionWi-Fi settings Check to turn on Wi-Fi so you can connect to Wi-Fi networksCheck to receive an alert when an open Wi-Fi network becomes availableOpens a dialog where you can add a Wi-Fi network by entering its SSID (the name it broadcasts) and security typeEthernet Turn on/off the EthernetEthernet settings:IP address, Subnet Mask, DNS Server, Default Gateway and etc.Display Output mode:HDMI --- 1080p;720p;AV[only for A31A] --- 480i;576i(only for av output)Set your display overscan ratioFont sizeApplications DownloadedOn SD/Micro SD cardRunningAllFactory data reset Erases all data on the device](https://usermanual.wiki/Guangzhou-Shiyuan-Electronics/ANDROIDBOX/User-Guide-1903369-Page-13.png)
![SpecificationOS Android 4.0CPU ARM Cortex A9Frequency Up to 1GHzRAM 1GB DDR3ROM 4GB NAND FlashI/O USB port x 2Ethernet input RJ45 portMicro SD card slot[SD card slot for A31] AV output[only for A31A]HDMI outputSupport Wireless: Wi-Fi 802.11 b/g/nWired: Ethernet10/100 Base-TLanguage English, Chinese simplified, Chinese traditional and etc.Display Specs Aspect Ratio: 4:3(only for av output); 16:9Resolution: (HDMI)720p; 1080p (AV)480i; 576i[only for A31A]Media Format Video Formats: Full-format 1080P HD video decoding playSupported Video decoding: MPEG 1, MPEG 2,MPEG4, H.264, H.263, VC-1, RV30/40,Supported Audio decoding: PCM, LPCM, MP3, AAC, MPEG Audio, WMSupported subtitle formats: SRT,SSA,ASS,SUBFeature First Time InstallationScreen keyboard or support USB keyboard, wireless keyboard and mouseVideo, music, picture playerFile managerApkInstallerEmail, Gmail and etc.(support POP, IMAP, Exchange)Support kinds of thirdparty softwaresSupport Adobe Flash](https://usermanual.wiki/Guangzhou-Shiyuan-Electronics/ANDROIDBOX/User-Guide-1903369-Page-17.png)