Guangzhou Shiyuan Electronics D311 ANDROID DONGLE User Manual
Guangzhou Shiyuan Electronics Co., Ltd. ANDROID DONGLE Users Manual
User Manual
AndroidTM Dongle
User Manual
D311
2FEATURES
Android Dongle is based on Android OS.
You can use it:
PRODUCT & ACCESSORIES
3 4 5
9876
QUICK INSTALL GUIDE INTERFACE USE WITH MOUSE INSTALLING WIZARD
•WELCOME PAGE
-
the device
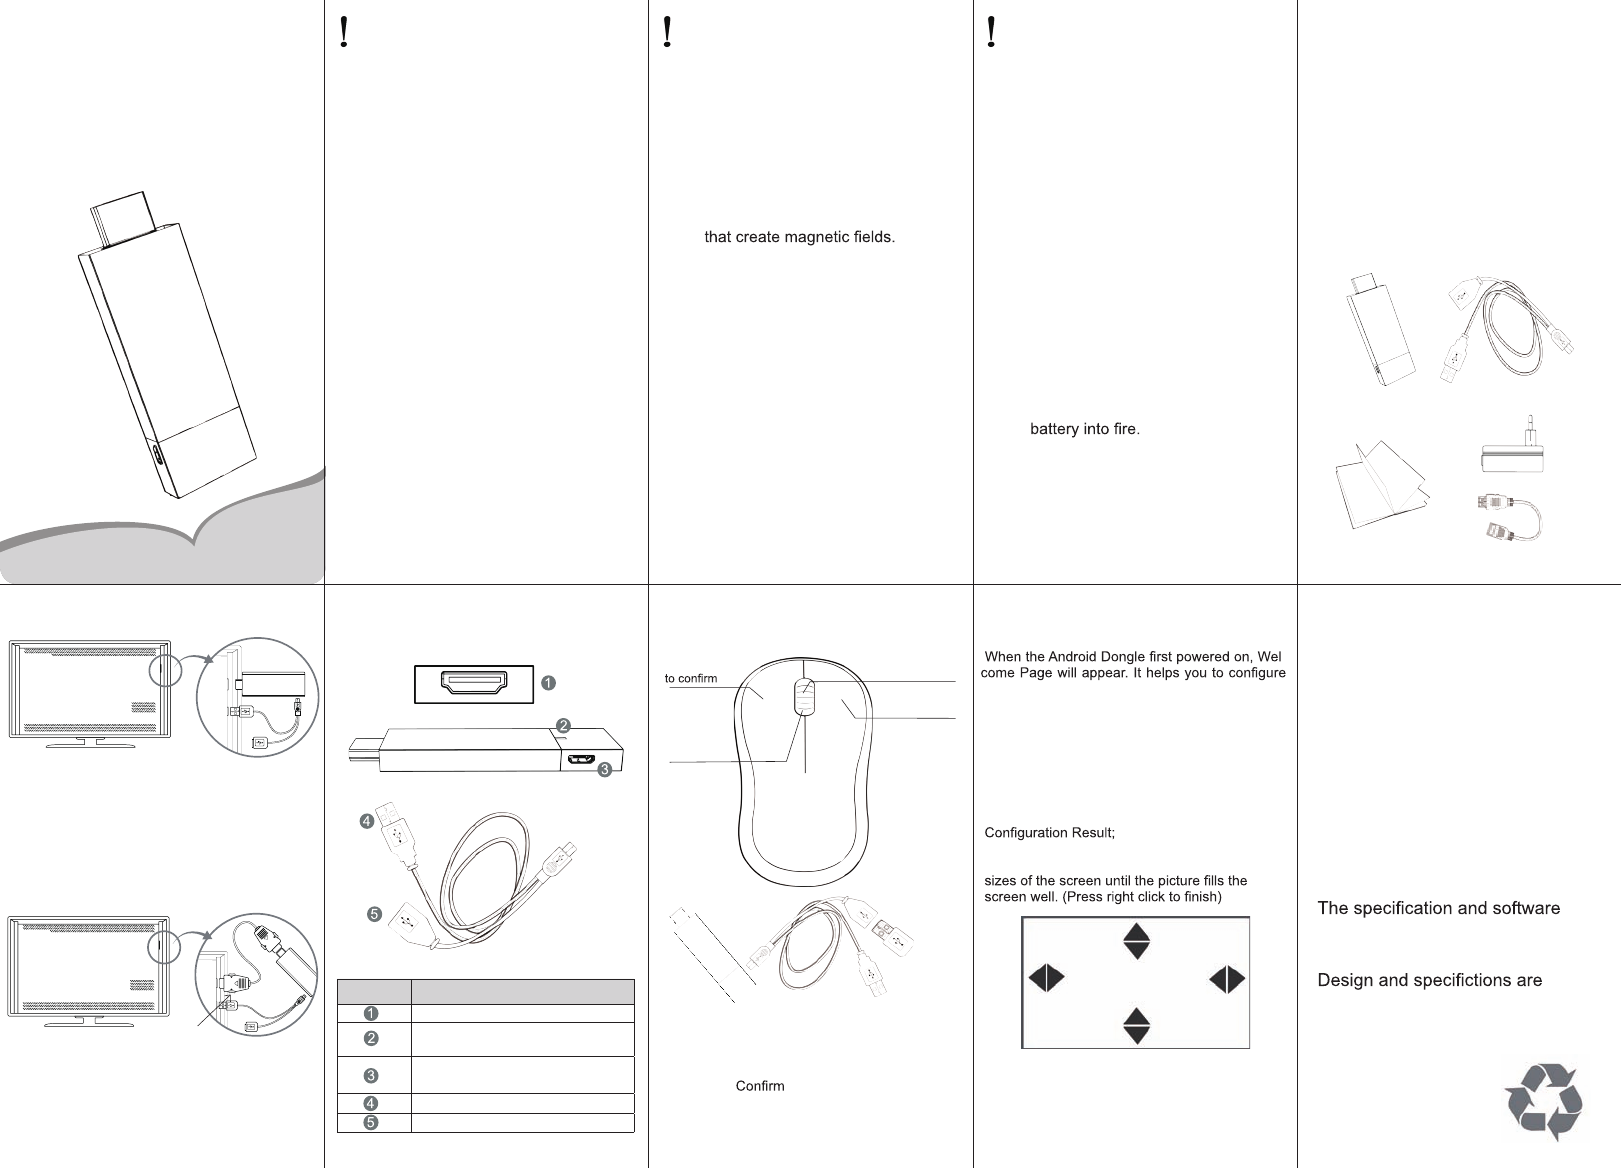
•INSTALLING WIZARD
You can set your Dongle as below:
Choose your language;
Choose your Wi-Fi network access point;
Adjust screen size, click the arrows on the four
HDMI
Usb
HDMI
Usb
Product Y-USB Cable(150cm)
User Manual
•Normal Condition
Insert Dongle into TV's HDMI input interface.
Connect Dongle's micro USB port to TV's USB
port via USB supply line for power supply.
(*ATTENTION:Make sure the USB power supply
can offer 5V/at least 1.5A.If not, please use a
5V/1.5A output AC adapter instead!)
•Connected Condition
(NO ENOUGH SPACE FOR DONGLE AROUND THE
TV'S HDMI INPUT INTERFACE):
Connect Dongle to TV's input interface needs to
add another HDMI extended wire.
HDMI extended cable *sketch map
*Back Cover
SAFETY WARNING
PLACEMENT
●Do not place the unit on an unstable
cart, stand, tripod, bracket, table, or
shelf.
●Do not expose the unit to direct sun-
light and other sources of heat.
●Do not handle liquids near or on the
unit.
●Never spill liquid of any kind into the
unit
●Do not put the unit near appliances
●Do not put heavy objects on top of
the unit.
POWER SUPPLY
●Make sure the USB power supply
can offer 5V/at least 1.5A.If not,
please use a 5V/at least 1.5A output
AC adapter instead.
●Please unplug power supply and
aerial plug when the weather is
thunder-storm or lightning.
●Please unplug power supply, when
there is nobody at home or didn’t
use over a long period of time.
●Please keep power cord from physi-
cal or mechanical damage.
●Please use exclusive power cord,
don’t modify or lengthen it.
●Please check and ensure AC source
is connected with the ground.
SECURITY INFORMATION
Before using the product, please
read this manual throughly.
The manual contains important
security information and tutorials
about the product.
This device complies with Part 15 of the FCC Rules.
Operation is subject to the following two conditions:
(1) this device may not cause harmful interference, and
(2) this device must accept any interference received,
including interference that may cause undesired operation.
THE MANUFACTURER IS NOT RESPONSIBLE FOR
ANY RADIO OR TV INTERFERENCE CAUSED BY
UNAUTHORIZED MODIFICATIONS TO THIS
EQUIPMENT.
SUCH MODIFICATIONS COULD VOID THE USER’S
AUTHORITY TO OPERATE THE EQUIPMENT.
TEMPERATURE
●Do not place the unit near or over a
radiator or a heater register.
●If your unit is suddenly moved from
a cold to a warm place, unplug the
power cord for at least two hours
until moisture removed.
HUMIDITY
●Do not expose machine in rain,
damp or place near water.
●Ensure the indoor is dry and cool.
VENTILATION
●Keep the ventilation openings clear.
●Ensure that the unit has enough
space for ventilation around.
BATTERY
●Please dispose used battery cor-
rectly.
●Please don’t let kid touch battery,
in case of dangerous don’t throw
SOFTWARES
●Some softwares for smart phones
or unique CPU solutions may not
suit for this product.
●Some softwares need unique pe-
ripherals to support, like G-sensor,
may not suit for this product.
SAFETY WARNING
• Surf the Internet via Wi-Fi
• Communicate with your friends via
SNS applications
• Enjoy movie, music and photo via
media player applications
10
version involved in this manual
is for reference only.
subject to change without prior
notice.
HDMI extention
(Optional)
Adaptor(Optional)
You can use a wireless mouse to operate the
Android Dongle easiely:
Plug the USB receiver to the Y-USB cable.
1. Left click:
2. Right click:Back(Set fuction in settings)
3. Middle click:Open menu(Set fuction in settings)
4. MouseWheel:Roll over, Page up&down
Number Features
HDMI output
Signal light(Light on during
running,light off when shut down)
Micro USB port (OTG & Power
supply)
Y-USB Cable Power supply(5V)
Y-USB Cable OTG(USB 2.0)
Left Click
Right Click
to back
Middle Click
to open menu
Rolling to page
up&down
5V Power supply
USB receiver
Input :DC5V 1.5A
FCC ID:OGX-D311
Guangzhou Shiyuan Electronics Co., Ltd
This equipment complies
with the FCC RF radiation
exposure limits set forth
for an uncontrolled
environment. This
equipment should be
installed and operated
with a minimum distance
of 20cm between the
radiator and any part of
your body.
Pointer speed
Mouse Right Button
Mouse Middle Button
1. Open the ApkInstaller
2. Find the icon of the application, and
enter it
3. Press the install button
4. You can nd the application in tab
“Apps” after installation
12
BROWSER
•Middle click: Call out the menu of browser
•Right click: Back to the last page
•Search bar: Call out the search bar to search
or input web address
•Mouse wheel: Roll over to page up/down
APPLICATIONS
11 13 14 15
2019
18
17
16
•Language & input
Select language
Android keyboard
Remote controller input method
•About device
Status
Model number
Android version
Kernel version
Build number
•System updates
Update system via update.zip from USB ash
drive
Menu of Browser
• Set a new window (At most 4)
• Bookmarks
• Refresh the Current Sheet
• Forward
• More:Add bookmark; Find on page; Select
text; Page info; Downloads; Settings; Close
Install from USB Flash Drive
1. Open the“File manager”
2. Choose your USB ash drive or any
other mass storage’s folder
3. Find you application, and press it
4. Press the install button
5. You can nd the application in tab
“Apps” after installation
APPLICATIONS
Download & install from Browser
1. Open the Browser.
2. Press search key and input your website
address
3. Download the APK le which you like if
there is a link for download (If you have
problems with downloading, please
make sure there is enough room in your
internal storage)
4. You will nd the le in your inner storage
folder
Install from ApkInstaller
Remove Applications
1. Enter SETTINGS
2. Enter "Applications--Manage applications"
3. Find the application you want to remove in
tab "All"
4. Enter the icon and press "Uninstall"
5. Press "OK" to conrm uninstall
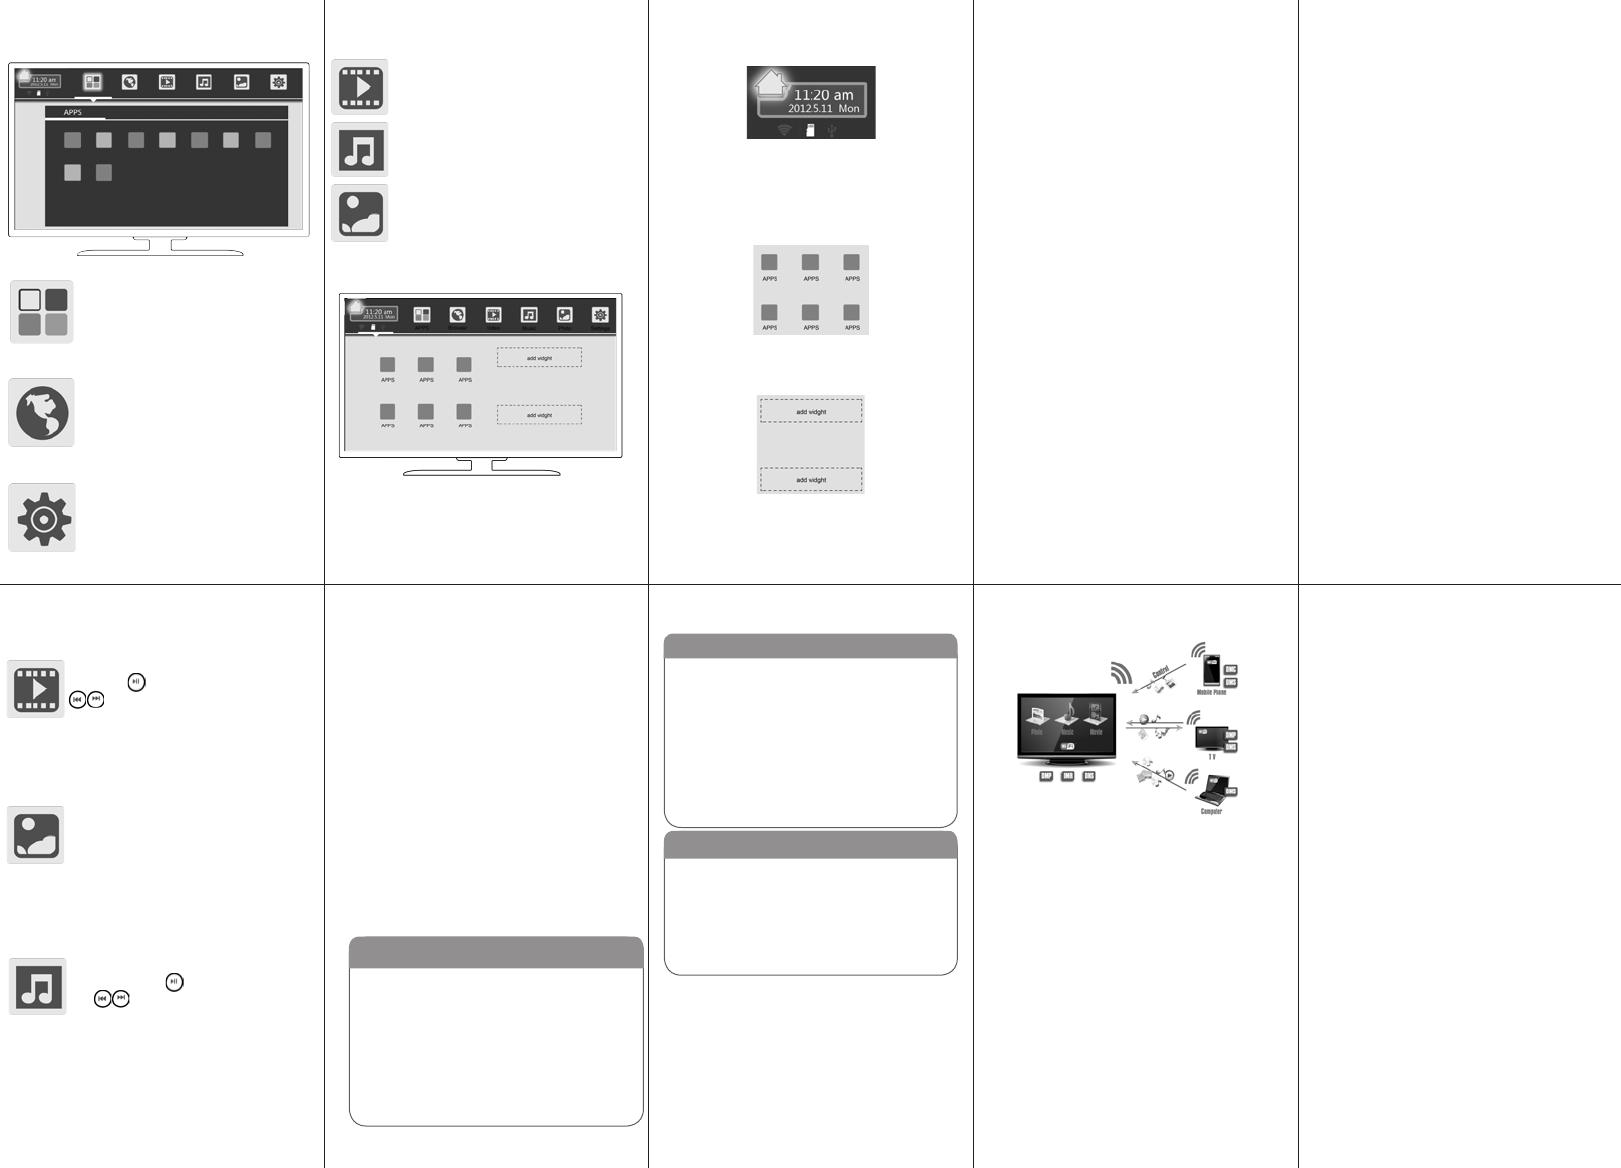
ADVANCED FEATURES
1.Enter the APP MediaSharing. You will see a list of
devices that support DLNA on the left.
2.Choose the device on the left, you will see a list
of media les that the device shared.
3.Choose and press the media le you want to play.
It will take a little longer for video les. Music and
picture play screenshots are as followed:
1) You can drag the progress bar during playing
music or video. You can also have basic functions
like forward/rewind and prev/next
2) Picture player can zoom in/out and rotate the
picture as you like, it also provide lmslide function
4.Menu of MediaSharing.Operating tips:
1) Refresh: Refresh the list of supported devices
2) Settings: Turn on/off the function of sharing, turn
on/off when booting and set TV’s device name
FAQ
UI ELEMENT UI ELEMENT
The Browser tab contains bookmarks
and search bar. It allows you enjoy
your time on surng Internet. You
can search for information and watch
online TV etc.
The Media Player tabs contain:Video/
Music/Pic
Video tab & music tab lists information
as: media type/preview, le name, time.
Pic tab shows a matrix of picture
preview.
The AppManager lets you view and
launch selected application, such as
Weather, Calendar ,News
The Settings screen contains most of
the customizing and conguration op-
tions, such as language, aspect ratio
and network settings
MEDIA PLAYER
•Video
You can play the video on the USB ash
drive.Use to control Play/Pause; Use
to change Next/Prev video.Use
middle click to call the menu.
•Picture
You can play the picture on the USB
ash drive.Use middle click to call the
menu. You can roll the picture, set time
of lmslide and even set the present
picture as wallpaper.
•Music
You can play the music on the USB
ash drive. Use to control Play/Pause;
Use to change Next/Prev music;
Use middle click to call the menu.
*sketch map
SETTINGS
•Wi-Fi settings
Check to turn on Wi-Fi so you can connect to
Wi-Fi networks
Check to receive an alert when an open Wi-Fi
network becomes available
Opens a dialog where you can add a Wi-Fi
network by entering its SSID (the name it
broadcasts) and security type
•Display
Output mode:1080p;720p
Set your display overscan ratio
Font size
•Applications
Downloaded
On SD/TF card
Running
All
•Backup & reset
Back up my data
Erases all data on MediaBox
•Storage
Total space
Available space
Erase USB storage
Available space of internal storage
•DLNA
SETTINGS
MAIN LAUNCHER
Main Laucher tab contains:
Time information
(You can set time information at settings)
Function status contains:
Wi-Fi;USB connection
(White for working, gray for standby)
Often used Apps contains:
6 of the most used app icons in recent time
You can put at most two often used widgets on
the blank space. You can delete the widget by
long press on the edge of the widget.(*Attention:
Not all apps have widgets!)
Main launcher contains:
Time information; Function status;
Often used Apps; Widgets
*Attention: When you need to play media les
from your USB ash drive or mobile HDD, please
make sure that your power supply is over 5V/1.5A.
For more stable experience, 5V/2A is better.
MAIN LAUNCHER
•Date & time
Automatic date & time(Need network)
Set date
Set time
Select time zone
Use 24-hour format
Select date format
*sketch map
•Can not start up:
Please check after connected to power supply.
Please check if the signal light is on.
Please change another 5V power supply to try
again.
•Noise
Please check if the audio le is broken, you can
try some other les.
Please leave the product far from your mobile
phone.
•Messy code
Please check if you have chosen the correct
language.
•Can not download resource
Please check if internal memory or Micro SD card
is full.
Please check if the product is connected to the
Internet.
•Can not connect to the Internet
Please make sure Wi-Fi function is turned on.
Please use a PC or a mobile phone to check
whether the Wi-Fi can connect to Internet.
Please check Wi-Fi signal strength.
•Mouse/trackpad