Guided Therapeutics 13500 RFID User Manual Identifier Title property
Guided Therapeutics, Inc RFID Identifier Title property
User Manual
User’s Manual
LuViva® Advanced Cervical Scan
Model Number 13500
LuViva® Advanced Cervical Scan
Model Number 13500
Manufactured in USA by:
Guided Therapeutics, Inc.
5835 Peachtree Corners East, Suite D
Norcross, GA 30092 USA
www.guidedinc.com
customersupport@guidedinc.com
Skype: guidedinc.customersupport
(1) (770) 242-8723
0473
Emergo Europe
Molenstraat 15
2513 BH, The Hague
The Netherlands
(T) (31) (0) 70 345-8570
Copyright © 2013 Guided Therapeutics, Inc.
LuViva® Advanced Cervical Scan is a registered trademark of Guided Therapeutics, Inc.
November 2013, CNDS-0-635-MAN_3

November 2013, CNDS-0-635-MAN_3
Page 2 of 78
Table of Contents
1. Introduction .................................................................................................................. 6
1.1 About this Manual ................................................................................................................................... 6
1.2 LuViva® Advanced Cervical Scan Description ..................................................................................... 6
2. Device Description ........................................................................................................ 6
2.1 Components of the LuViva Advanced Cervical Scan System................................................................ 6
2.2 Components ............................................................................................................................................ 7
2.2.1 Cart ................................................................................................................................................. 7
2.2.1.1 Wheels .................................................................................................................................. 7
2.2.1.2 Handle.................................................................................................................................. 7
2.2.2 Docking Station ............................................................................................................................ 7
2.2.3 Base Unit ....................................................................................................................................... 7
2.2.4 Main Power Switch on Base Unit................................................................................................. 7
2.2.5 Monitor .......................................................................................................................................... 7
2.2.6 Hand Held Unit ............................................................................................................................ 7
2.2.7 LuViva Stand-by Power Switch on HHU ..................................................................................... 7
2.2.8 Cable .............................................................................................................................................. 7
2.3 Accessory: CG (Cervical Guide) ............................................................................................................. 7
2.4 Side View of LuViva ................................................................................................................................ 8
2.5 Back View of LuViva ............................................................................................................................... 9
2.6 Accessory: CG (Cervical Guide) ........................................................................................................... 10
3. Safety Information-Warnings, Cautions and Symbols ................................................... 11
3.1 Notations ................................................................................................................................................ 11
3.2 Explanation of Safety Symbols found on LuViva ................................................................................. 11
3.3 Explanation of CG Safety Information found on Cervical Guide (CG) Packaging ............................ 13
3.4 Explanation of Indicators ..................................................................................................................... 13
3.5 Warnings, Cautions and Notes ............................................................................................................ 14
3.5.1 LuViva Diagnostic Use Warnings ............................................................................................... 14
3.5.2 Frequency of Use—Number of Tests per Day ........................................................................... 14
3.5.3 Operator Use Cautions ............................................................................................................... 14
3.5.5 Cervical Guide Cautions ............................................................................................................. 15
3.5.6 Lamp Warnings........................................................................................................................... 15
3.5.7 Cleaning and Disinfection .......................................................................................................... 16
3.5.8 Electrical Safety .......................................................................................................................... 16
3.5.4 Mechanical and Ingress ...............................................................................................................17
4. Intended Use and Indications for Use .......................................................................... 18
4.2 Intended Use ......................................................................................................................................... 18
4.3 Indications for Use ............................................................................................................................... 18
5. Start-Up and Configuring LuViva................................................................................. 20
5.1.1 Start up ......................................................................................................................................... 20
5.1.2 Set-up ........................................................................................................................................... 20

November 2013, CNDS-0-635-MAN_3
Page 3 of 78
6. Operating Environment .............................................................................................. 25
6.1 Operating Environment ........................................................................................................................ 25
6.1.1 Room Temperature Requirements ............................................................................................. 25
6.1.2 Visibility Conditions.................................................................................................................... 25
6.1.3 Minimize Noise Level and Distractions during Test ................................................................. 25
7. Performing a Test ........................................................................................................ 25
7.1 Accessories ............................................................................................................................................. 25
7.1.1 Cervical Guides ............................................................................................................................ 25
7.1.2 Specula ......................................................................................................................................... 25
7.1.3 USB Drive .................................................................................................................................... 25
7.2 Patient and Operator Positioning ........................................................................................................ 25
7.3 LuViva Start-Up and Patient ID ........................................................................................................... 26
7.4 Insert Speculum and Attach Cervical Guide ....................................................................................... 28
Patient and Test Preparation: Prepare patient per standard of care for a colposcopic exam. ............... 28
7.5 Calibration ............................................................................................................................................. 29
7.6 Dispose of Calibration Cap ................................................................................................................... 30
7.7 Clean Cervix and Insert CG .................................................................................................................. 30
7.8 LuViva Evaluation ................................................................................................................................ 31
7.9 Evaluate Image...................................................................................................................................... 32
7.9.1 Limitations in Number of Diagnostic Tests ............................................................................... 32
7.10 Remove and Discard of CG ................................................................................................................. 32
7.11 Results Display..................................................................................................................................... 33
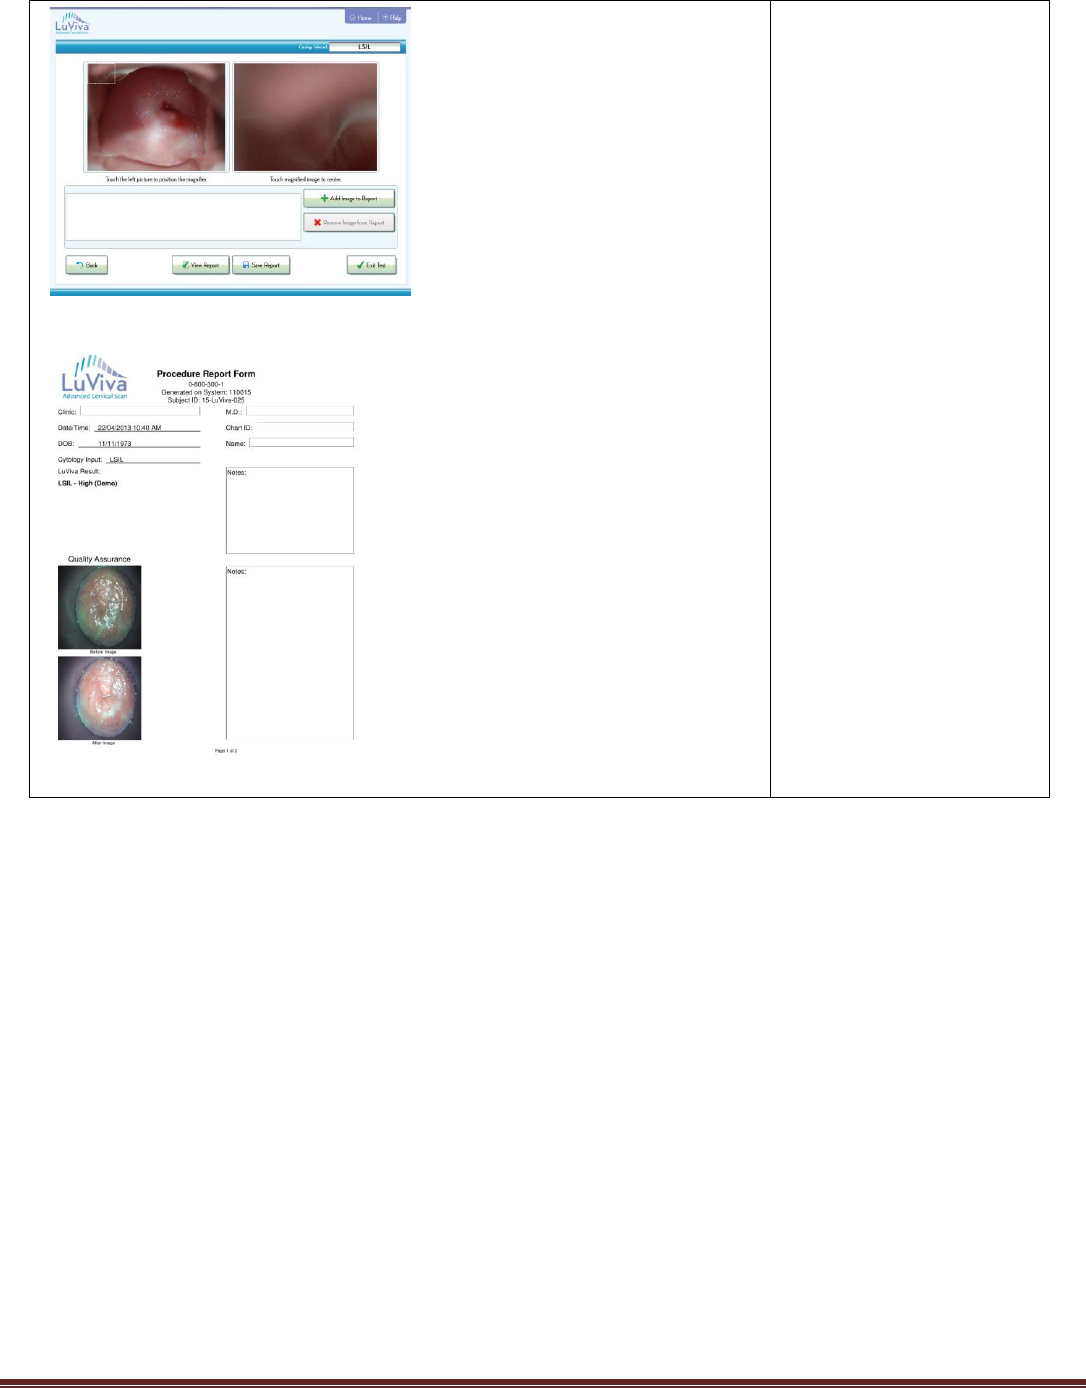
7.12 Report Display ..................................................................................................................................... 34
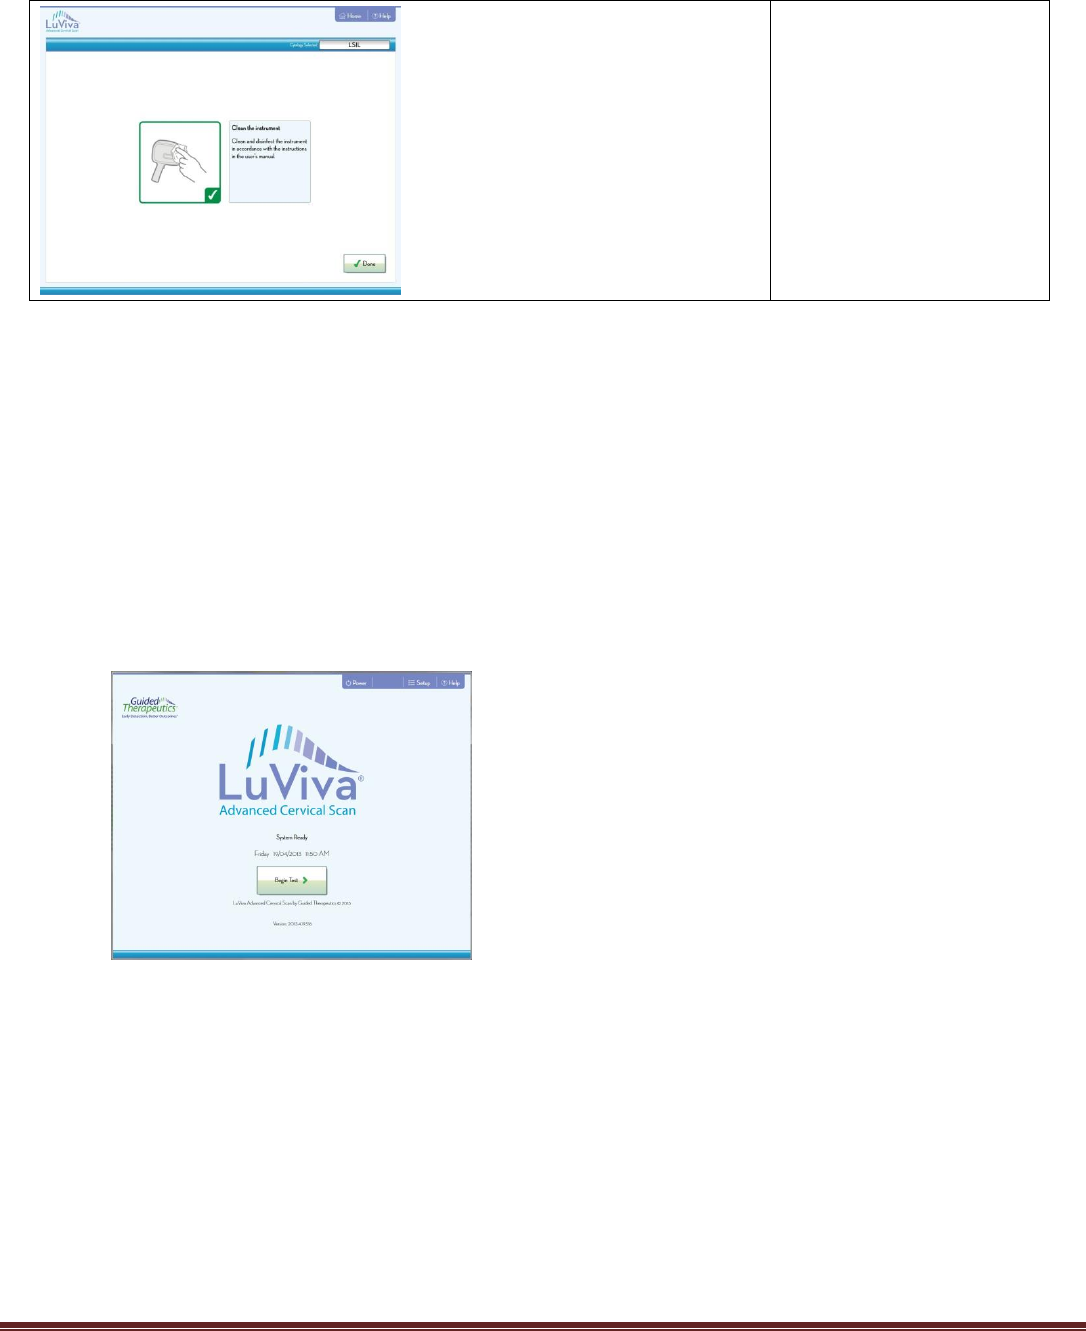
7.13 Clean Unit Prompt .............................................................................................................................. 35
7.14 Help Screen ......................................................................................................................................... 35
7.15 Shut Down Sequence........................................................................................................................... 35
8. Moving and Transporting LuViva ................................................................................ 36
8.1 Moving LuViva ...................................................................................................................................... 36
8.2 Transporting LuViva ............................................................................................................................ 37
8.3 Transporting LuViva for Service .......................................................................................................... 37
9. Troubleshooting Guide................................................................................................ 37
9.1 Common Errors ..................................................................................................................................... 37
9.2 Operating Errors and Warning Messages ........................................................................................... 38
9.3 Other Errors .......................................................................................................................................... 40
9.4 Additional Errors .................................................................................................................................. 40
10. Cleaning and Disinfection Procedures ....................................................................... 40
10.1 Cleaning and Disinfection Cautions ................................................................................................... 40
10.2 Cleaning Procedure............................................................................................................................. 41
10.2.1 Cleaning Solution Compatibility Summary and Frequency ................................................... 41
10.2.2 Equipment and Supplies Needed ............................................................................................. 42
10.2.3 Cleaning Instructions ............................................................................................................... 42
10.3 Intermediate-Level Disinfection (ILD) Procedure ........................................................................... 44

November 2013, CNDS-0-635-MAN_3
Page 4 of 78
10.3.1 ILD Solution Compatibility Summary and Frequency ............................................................ 44
10.3.2 Equipment Needed ................................................................................................................... 44
10.3.3 Disinfection Instructions .......................................................................................................... 45
11. Maintenance Instructions and Schedule ..................................................................... 47
11.1 Required Inspection............................................................................................................................. 47
11.2 Replacement Parts ............................................................................................................................... 47
11.3 Replacing the Lamp and Air Filter ..................................................................................................... 47
11.4 Replacing Power Cord ......................................................................................................................... 48
11.5 Replacing Monitor Assembly .............................................................................................................. 48
11.6 Software Upgrade ................................................................................................................................ 49
12. Service ...................................................................................................................... 49
13. Disassembly and Packing Instructions (for Service) ................................................... 49
14. Specifications ............................................................................................................ 50
14.1 Technical Description.......................................................................................................................... 50
14.2 Environmental Specifications ............................................................................................................ 51
14.3 Physical and System Specifications ................................................................................................... 52
14.4 Standards Compliance ........................................................................................................................ 52
14.4.1 Emitted Radiation Characteristics ........................................................................................... 54
14.5 Human Blood Derivatives .................................................................................................................. 54
14.6 Lifetime Declaration ........................................................................................................................... 54
14.7 Disposal and Return Instructions ...................................................................................................... 54
14.7.1 Disposal of LuViva (excluding monitor)................................................................................... 54
14.7.2 Disposal of LuViva Monitor ...................................................................................................... 55
14.7.3 Disposal of CG ........................................................................................................................... 55
14.7.4 Disposal of Lamp ....................................................................................................................... 55
14.7.5 WEEE/RoHS Recycling Directives .......................................................................................... 55
15. Performance Characteristics...................................................................................... 56
Sensitivity, Specificity and Negative Predictive Value of LuViva at the Low/Moderate (Green/Yellow) Threshold
............................................................................................................................................................... 57
Sensitivity, Specificity and Negative Predictive Value of LuViva at the Moderate/High (Yellow/Red) Threshold
............................................................................................................................................................... 58
16. EMC Information: Guidance and Manufacturer’s Declarations ................................... 59
17. Warranty and Return Policy Information ................................................................... 63
18. Patent Information .................................................................................................... 63
19. References ................................................................................................................ 64
20. Set-Up - Assembly ..................................................................................................... 64
20.1 Visual Overview of Unpacking and Assembly steps: ........................................................................ 64
20.2 Remove LuViva from Shipping Container ........................................................................................ 68
20.3 Base Unit - Air Filter and Lamp Assembly Installation ................................................................... 69
20.3.1 Install Air Filter ......................................................................................................................... 69
20.3.2 Install the Lamp Assembly .......................................................................................................71
20.4 Install the Base Shell .......................................................................................................................... 73

November 2013, CNDS-0-635-MAN_3
Page 5 of 78
20.5 Install the Monitor Arm and Display ................................................................................................ 75
20.6 Place the HHU on the Docking Station ............................................................................................. 76
21. Set-Up—Software Configuration .................................................................................77
21.1 Initial Installation ................................................................................................................................ 77
22. Monitor Arm Instructions for Use ..............................................................................77
23. Touchscreen Monitor Instructions for Use ................................................................ 78

November 2013, CNDS-0-635-MAN_3
Page 6 of 78
1. Introduction
1.1 About this Manual
This instruction manual has been prepared by Guided Therapeutics, Inc. for operators of the LuViva® Advanced
Cervical Scan. This manual provides basic instructions for use and troubleshooting procedures. To ensure safe
operation of this product, the operator must read the entire instruction manual before operating the device. This
manual is available in the help menu. A copy is also available online at www.guidedinc.com.
1.2 LuViva® Advanced Cervical Scan Description
LuViva is a point-of-care device that uses a combination of fluorescence and reflectance spectroscopy to scan the
entire ecto-cervix. LuViva is intended for use prior to colposcopy, or indicated follow-up or recall procedure, by a
trained healthcare professional, (e.g. physician, nurse practitioner, physician’s assistant, nurse, or others who are
trained to place a speculum in a patient) to triage the disease state of women with abnormal Pap results or other risk
factors associated with cervical disease, such as positive HPV results or previous dysplasia to detect moderate to high-
grade dysplasia (i.e. CIN2 or worse). A positive result from LuViva indicates that further evaluation is warranted as
indicated by the current standard of care. A negative result from LuViva indicates that a further evaluation is not
warranted and the woman may return to routine screening as indicated by the current standard of care.
LuViva consists of two major components—a Hand Held Unit (HHU) and a Base Unit (BU). The HHU is attached to
the BU with a cable that contains power, computer data and fiber optic cables. The cable is considered to be a part of
the HHU. During the procedure the HHU is used by the operator in combination with a single-use Cervical Guide
(CG). The CG serves as the patient interface, provides a patient/instrument barrier, sets the optical distance and helps
exclude room light from interfering with the measurement. The CG also includes a removable reference target that is
used to calibrate LuViva before each measurement.
2. Device Description
LuViva consists of two subsystems or units. A Hand Held Unit (HHU) and a Base Unit (BU). The HHU has an
umbilical cable that connects to the BU, provides power, data and fiber optic elements. This umbilical is considered to
be a part of the HHU. The HHU is used by the clinician in combination with a single use Cervical Guide (CG) during a
patient examination. The CG serves as a patient instrument barrier, sets the optical distance and helps exclude room
light from entering the measurement. The CG also includes a removable reference target that is used to normalize the
device output prior to each measurement.
2.1 Components of the LuViva Advanced Cervical Scan System
LuViva Advanced Cervical Scan System (LuViva) arrives in a single container. Some assembly is required prior to use.
The LuViva includes the following components:
1. LuViva Cart with locking wheels
2. Hand-Held Unit ( attached to base unit with cable – enclosed in protective packaging)
3. Monitor Arm (separate box)
4. Monitor (separate box)
5. LuViva® Cervical Guides (separate box)
6. Installation and Product documentation
a. Unpacking and Assembly instructions
b. USB Thumb drive
7. Service Kit (separate box)
8. Power cord (not included, supplied by distributor)

November 2013, CNDS-0-635-MAN_3
Page 7 of 78
2.2 Components
2.2.1 Cart
2.2.1.1 Wheels
The LuViva has four (4) wheels. All wheels are lockable.
2.2.1.2 Handle
The handle that surrounds the Base Unit allows for LuViva to be moved from room to room, or positioned as needed
in the examination room.
2.2.2 Docking Station
The Docking Station is the storage station for the HHU.
2.2.3 Base Unit
The Base Unit is the under the Base Unit Cover. It contains the majority of the electrical equipment. It contains a
computer system with LuViva software, the light source and most of the electronics and the hardware necessary to
conduct a diagnostic test.
2.2.4 Main Power Switch on Base Unit
The Main Power Switch is used to enable the power to be turned on using the Stand-by Power Switch above on
LuViva. LuViva cannot be turned on with the Stand-by Power Switch if the Main Power Switch is not also turned on.
2.2.5 Monitor
The touchscreen allows the operator to progress through a LuViva diagnostic test, to display the result, to access the
Help system, and to turn off LuViva after use.
2.2.6 Hand Held Unit
The Hand Held contains the camera, lenses and hardware needed to capture images of the cervix for the LuViva
diagnostic test. It has a single activation button in the handle that can be used to advance through the test. It has a
touchpad for screen navigation.
2.2.7 LuViva Stand-by Power Switch on HHU
Turn On
The Stand-by Power Switch is used to turn on LuViva. Press and release the Stand-by Power Switch to turn on
LuViva.
Turn Off
Typically, the LuViva software is used to turn off LuViva; however, the main power switch may also be used to turn off
the LuViva in an emergency. Press and hold the main power switch for ten seconds to turn off LuViva.
2.2.8 Cable
The cable connects the Hand Held Unit to the Base Unit, and provides the pathways for light and electrical
communications between the electronics in both the units. It is tethered to the front column of the Cart.
2.3 Accessory: CG (Cervical Guide)
The CG is attached to the front of the Hand Held Unit in order to conduct a diagnostic test. It is a non-sterile Type B
Applied Part accessory to the LuViva device. It is a single-use disposable that is immediately discarded after use. The
Calibration Cap provides an internal target used to provide a reference measurement to LuViva. The Cap is removed
as part of the test sequence.
November 2013, CNDS-0-635-MAN_3
Page 8 of 78
2.4 Side View of LuViva
8. Base Unit
Cover
1. Monitor
2. Docking Station
7. Locking
wheels
5. Cable
3. Hand Held Unit
6. Handle
4. Stand-by Power
Switch
1. Monitor
2. Docking Station
3. Hand Held Unit
4. Stand-by Power Switch
5. Cable
6. Handle
7. Locking Wheels
8. Base Unit Cover
November 2013, CNDS-0-635-MAN_3
Page 9 of 78
2.5 Back View of LuViva
5. Base Unit Cover
(main label
location)
6. Lamp Access
Panel
7. Main Power
Switch
8. Power Inlet for AC
from Wall Outlet
4. Docking Station
1. Monitor
2. Monitor bracket
mount
3. Monitor Arm
1. Monitor
2. Monitor Bracket Mount
3. Monitor Arm
4. Docking Station
5. Base Unit Cover (main label
location)
6. Lamp Access Panel
7. Main Power Switch
8. Power Inlet
November 2013, CNDS-0-635-MAN_3
Page 10 of 78
2.6 Accessory: CG (Cervical Guide)
The CG is attached to the front of the Hand Held Unit in order to conduct a diagnostic test. See below.
Cervical Guide
Select button
Navigation
Arrows
Stand-by Power
Button
Docking Grooves
Select Trigger
Cervical Guide
November 2013, CNDS-0-635-MAN_3
Page 11 of 78
3. Safety Information-Warnings, Cautions and Symbols
This section contains information regarding Warnings, Cautions and Safety Symbols for LuViva. Review these
warnings carefully so that both you and your patients will be safe when using LuViva.
3.1 Notations
Throughout this manual there are texts in differing formats. These texts are warnings, cautions, notes and technique
tips and they are used as follows:
WARNING: A WARNING describes serious adverse reactions and potential safety hazards,
limitations in use imposed by them, and steps that should be taken if they occur.
CAUTION: A CAUTION is information regarding any special care to be exercised by the operator
and/or patient for the safe and effective use of the device. It indicates possibility for damage to the
device.
NOTE: A NOTE provides important general information that will help you make better use of your
LuViva.
TECHNIQUE TIP: A TECHNIQUE TIP indicates important specific information that will help you make better use of
your LuViva.
3.2 Explanation of Safety Symbols found on LuViva
Symbol
Description
Symbol
Description
Caution, Consult Documentation
Type B Applied Part
Dangerous Voltage
Ultraviolet Radiation
Hot Surface
Non-Ionizing Radiation
Catalogue Number
Explosion Hazard
Manufacturer
Protective earth terminal
Filter Changing
Electronic Waste
Consult Accompanying Documents
Do Not Reuse

November 2013, CNDS-0-635-MAN_3
Page 12 of 78
Symbol
Description
Symbol
Description
Stand-by
Lot Number
Date of Manufacture
Use By (Expiration Date)
S/N
Serial Number
Fragile; handle with care
This Way Up
Atmospheric Pressure Limitation
Humidity Limitation
Temperature Limitation
On/Off Power
European Representative
Recycle CB
Always Wear Eye Protection
Keep Dry
LDPE
Recycle LDPE
Do not Stack
Do Not Clamp
SGS Certification Mark
Recycle other
0473
CE Mark
Federal Communications
Commission
November 2013, CNDS-0-635-MAN_3
Page 13 of 78
3.3 Explanation of CG Safety Information found on Cervical Guide (CG) Packaging
Symbol/Caution
Explanation
Investigational device
Limited by Federal (or United States) law to investigational use.
Use with other devices
This device is intended for use with a speculum and LuViva during a gynecological
exam.
CAUTION: Read LuViva User’s Manual and Instructions for Use
Do Not Reuse—Single -use only RISK OF CROSS-CONTAMINATION
Type B Applied Part
Reference Number
Lot Number
Use By Date—CG has a shelf life. Do Not Use if CG is beyond its expiration date.
Date of Manufacture
Manufacturer
Humidity limitation
Temperature limitation
Recycle ABS
Controlled Temperature limitation
Only
For Prescription Only
0473
CE Mark
3.4 Explanation of Indicators
The HHU Stand-by button incorporates light emitting diodes (LEDs).
The LEDs indicate the following:
Green - system ready
Green flashing- on but not ready
Yellow - view display for message
Yellow flashing - system error; restart required or in process

November 2013, CNDS-0-635-MAN_3
Page 14 of 78
3.5 Warnings, Cautions and Notes
3.5.1 LuViva Diagnostic Use Warnings
WARNING: LuViva is not intended to replace primary screening tests such as the Pap smear/test.
WARNING: The LuViva device should not be used in patients with Pap results with high risk for
severe dysplasia/dyskaryosis.
WARNING: LuViva should only be operated by healthcare professionals.
WARNING: LuViva is not intended for use as a colposcope.
WARNING: Do not pinch vaginal or cervical tissue between the edges of the speculum blades and the
cervical guide. Patient injury may occur.
WARNING: Support the HHU in accordance with instructions. Motion during use may cause
misdiagnosis of and injury to the patient.
3.5.2 Frequency of Use—Number of Tests per Day
WARNING: LuViva should not be used on a single patient for more than three LuViva scans per 24
hour period.
3.5.3 Operator Use Cautions
WARNING: LuViva is not intended for use in areas where gaseous anesthesia, oxygen or nitrous
oxide is used. Due to the nature of the light source, an explosion may result.
CAUTION: Lock the wheels after positioning in the exam room, prior to use on a patient.
CAUTION: LuViva results depend upon the os of the cervix remaining in the field of view during the
test. Movement by the patient may cause misdiagnosis. If patient moves, test should be repeated.
CAUTION: Instruct the patient to be as still as possible to minimize potential injury during the test.
CAUTION: Use handle of HHU to place HHU into Docking Station to avoid pinching or crushing
fingers between the HHU and the cradle.
CAUTION: Always wear gloves and use sterile field methods when using LuViva to protect the
operator and patient from potential cross-contamination.
NOTE: Ensure the Calibration Cap is fully seated on Cervical Guide before beginning calibration. Do
not remove or discard the Calibration Cap until calibration has completed.

November 2013, CNDS-0-635-MAN_3
Page 15 of 78
NOTE: The results for the patient are NOT saved on LuViva. To save results, use “Save Report”
feature.
3.5.5 Cervical Guide Cautions
CAUTION: To prevent contamination, handle the CG with gloves to maintain cleanliness. Do not
touch non-disinfected surfaces with CG.
CAUTION: The CG is a single-use disposable. The CG is non-sterile and cannot be sterilized by the
operator. Do not clean and reuse. Reuse carries a high risk of cross-contamination and cross-
infection of patients.
CAUTION: Dispose of the CG as medical waste. Improper disposal could result in exposure of an
unprotected person to bio-contamination.
CAUTION: The CG has an expiration date. Check the CG packaging to ensure the CG has not expired
prior to use.
CAUTION: The CG must not be used if the packaging has been damaged.
NOTE: Confirm the compatibility of specula before using with LuViva Cervical Guides.
3.5.6 Lamp Warnings
WARNING: INTENSE LIGHT HAZARD. Do not operate LuViva without the Base Unit Cover in place.
WARNING: The light source for LuViva is a Xenon Arc Lamp that creates Visible and UV Radiation.
Improper use of LuViva may result in inadvertent exposure to UV light. Always use LuViva with a
LuViva Cervical Guide (CG). Do not look into the CG while operating.
WARNING: Always wear eye protection when handling lamp.
WARNING: The lamp remains at high temperatures during and after operation. Do not let any part
of the heated lamp come in contact with your skin. The heated lamp will cause burns. Allow the lamp
to cool for one hour before replacing it.
WARNING: The maintenance functions of replacing the lamp or replacing the filter should not be
performed while a patient is in the room. The operator shall not touch an accessible part and a
patient simultaneously.
CAUTION: Wear long sleeves, gloves and face shield while installing the lamp in LuViva.
CAUTION: Contents of the lamp are under pressure and may explode if dropped, jarred, scratched
or exposed to excessive force. Injury may result if the lamp is broken.

November 2013, CNDS-0-635-MAN_3
Page 16 of 78
CAUTION: Do not touch the lamp with bare hands. Dust, oils and grime will be transmitted to the
lamp, and during use may cause the lamp to explode.
CAUTION: Lamp must be replaced after 1000 hours of use.
NOTE: See Performance Characteristics Section for description of optical radiation emitted.
3.5.7 Cleaning and Disinfection
CAUTION: LuViva requires cleaning and disinfection between patients, as specified in this manual,
to prevent operator-to-patient, and patient-to-patient contamination and cross-contamination.
CAUTION: During cleaning and disinfection, wear personal protective equipment such as eye wear,
moisture resistant clothing and chemical resistant gloves so that you are not exposed to chemical
disinfectants and potentially infectious patient debris. Wear appropriate personal protective
equipment. Always dispose of contaminated personal protective equipment as medical waste.
CAUTION: Do not spray cleaning and disinfectant solutions directly into the rear and sides of the
monitor, where the vent holes are located.
CAUTION: Use of cleaners other than those specified in Section 11 will void the warranty.
CAUTION: Guided Therapeutics has performed cleaning validation and disinfection validation only
for the class of cleaning agents and disinfectants listed in the procedure.
CAUTION: If the HHU Window is not cleaned thoroughly and completely (with no debris or
streaking), LuViva will not be able to accurately determine the disease state of the patient.
3.5.8 Electrical Safety
WARNING: No modification of this equipment is allowed. Modifications of the unit will void the
warranty and may expose operators and patients to serious injury.
CAUTION: To avoid the risk of electrical shock, this equipment must only be connected to a Supply
Mains with protective earth (grounded wall outlet).Improperly powering LuViva may result in
damage to LuViva and substantial risks of electric shock to the operator or patient.
CAUTION: Risk of Electrical shock. Disconnect main power before replacing the lamp assembly or
air filter.
CAUTION: Risk of Electrical Shock. No user-serviceable parts inside. Only components listed as
“Replacement Parts” are replaceable by operator or service personnel. Refer servicing to qualified
personnel.
CAUTION: Position LuViva so it may be unplugged.
CAUTION: Equipment not suitable for use in the presence of flammable anesthetic mixture with air,
oxygen or nitrous oxide.

November 2013, CNDS-0-635-MAN_3
Page 17 of 78
CAUTION: Do not load non-LuViva software onto the computer as it could interfere with the proper
operation of the system and will void the warranty.
CAUTION: LuViva is not to be used as a personal computer.
CAUTION: Medical Electrical Equipment needs special precautions regarding EMC and needs to be
installed and put into service according to the EMC information provided in this manual. (See
Section 16: EMC Information: Guidance and Manufacturer’s Declarations)
CAUTION: Portable and mobile RF communications equipment can affect Medical Electrical
Equipment.
CAUTION: LuViva must not be used adjacent to or stacked with other equipment. If adjacent or
stacked use is necessary, LuViva should be observed to verify normal operation in the configuration
in which it will be used.
CAUTION: Use of accessories and cables other than those specified, with exception of parts sold by
Guided Therapeutics, Inc. or their approved distributors as replacements for internal components,
may result in increased emissions or decreased immunity of LuViva.
CAUTION: LuViva may be interfered with by other equipment, even if that other equipment
complies with Comité International Spécial des Perturbations Radioélectriques (CISPR) emission
requirements.
CAUTION: Grounding reliability can only be achieved when the equipment is connected to an
equivalent receptacle marked “HOSPITAL ONLY” or “HOSPITAL GRADE.”
3.5.4 Mechanical and Ingress
CAUTION: The LuViva handle is designed to roll and push LuViva. The handle may be used to lift
LuViva out of the shipping container and to move over thresholds.
CAUTION: LuViva has not been sealed against fluid intrusion. LuViva may be permanently
damaged if it is directly sprayed with cleaning solutions. If there is fluid intrusion of any kind, do
not use LuViva; call for service. This includes all components of LuViva. Electrical burns or injuries
may occur to the Operator. Intrusion of water or cleaning solutions is not allowed for any part of
LuViva and will void warranty.
CAUTION: Do not insert fingers or objects into any part of LuViva. Injury may result.
CAUTION: The monitor for LuViva is designed for routine medical use. Damage to the monitor
from excessive force may occur, and will impair the ability of LuViva to perform diagnostic tests
correctly.
CAUTION: Dropping the HHU onto the floor may result in permanent damage to LuViva and void
the warranty. If dropped, discard CG and clean HHU and umbilical cable. Restart LuViva and
check for error messages before reuse.
CAUTION: Dropping or tipping LuViva may result in permanent damage and void the warranty. If
damage occurs, contact Customer Service for further instructions (770) 242-8723.

November 2013, CNDS-0-635-MAN_3
Page 18 of 78
4. Intended Use and Indications for Use
4.1 Intended User
LuViva is to be operated by a qualified healthcare professional, (e.g. physician, nurse practitioner, physician’s
assistant, nurse, or others who are trained to place a speculum in a patient) at the direction of a physician or when
indicated by the current standard of care.
4.2 Intended Use
The intended use population consists of women aged 16 and above who are referred to follow-up because of abnormal
Pap results, positive HPV results or other risk factors associated with cervical cancer, such as previous dysplasia.
4.3 Indications for Use
LuViva is indicated for use as a triage test for women at risk for cervical cancer based on current cervical cancer
screening guidelines, in order to provide the physician with additional information regarding the likelihood of CIN2+
disease. The LuViva device is not indicated for use as a primary screening test for cervical cancer or precancer.
4.3.1 Cytology
For a LuViva result to be valid, a cytology result must be available from cells collected no greater than 120 days prior
to the LuViva scan.
“Test Results Not Available” is utilized when the patients’ referral cytology result is not immediately available or Pap
test is being performed on the same day as the LuViva Advanced Cervical Scan. This selection shown on the Referral
Criteria input screen will provide the healthcare professional with a LuViva Advanced Cervical Scan result for all
available cytology inputs, so that the LuViva Advanced Cervical Scan result may be compared with the same day Pap
test result.
4.4 Contraindications
Contraindications consist of, but are not limited to:
Pregnancy
Menstruating on the day of the LuViva test
Radiation therapy to the patient’s genitourinary system within 1 year
Prior hysterectomy
Congenital anatomical cervical variant (e.g., double cervix)
Friable cervix at the time of the exam (i.e., a cervix that bleeds easily upon minimal contact or trauma)
Post-coital or other significant bleeding at the time of the exam
Excessive cervical mucus or discharge that cannot be removed and is significant enough, in the opinion of
the operator, to interfere with a Pap test or colposcopy, resulting from inflammatory, bacterial or other
sources
History of any photosensitizing disease or other disease affected by ultra-violet radiation, (e.g., porphyria,
Lupus Erythematosus).
Undergoing phototherapy
Recent use of photosensitizing agents, such as fluoroquinolones or retinoids.
Referral test results that indicate risk of severe dysplasia, such as an HSIL cytology result

November 2013, CNDS-0-635-MAN_3
Page 19 of 78
WARNING: If the patient has any of these contraindications do not use LuViva. Use of LuViva
may cause injury to the patient.
4.5 Side Effects
LuViva has no known Side Effects.
November 2013, CNDS-0-635-MAN_3
Page 20 of 78
5. Start-Up and Configuring LuViva
5.1.1 Start up
Plug power cord into LuViva, then into a
grounded wall outlet.
Turn on system using Standby Power Switch.
5.1.2 Set-up
Use touchscreen or HHU Keypad to navigate through set-up screens.
Start Screen.
Select Set-Up to configure the system.
November 2013, CNDS-0-635-MAN_3
Page 21 of 78
Use touchscreen to navigate set-up menu.
Run screen calibration to calibrate touchscreen.
Select screen Calibration button. Follow the
instructions, pressing and holding the corners for
15 seconds. They will turn from red to blue to
indicate progress and increase to 100%. Touch all
4 corners as indicated.
If screen tracking appears slow or uneven,
recalibrate touchscreen. Recalibration may be
needed throughout the year, or between users.
Set Date Format
dd/mm/yyyy
Or
mm/dd/yyyy

November 2013, CNDS-0-635-MAN_3
Page 22 of 78
Set Date
Choose today’s Month, Day and Year
Set Time Format
Choose 12 Hours or 24 Hours format
12 Hours: 8:00AM / 8:00PM
24 Hours: 08:00:00 / 20:00:00
Set Time
Use buttons to increment hours and seconds with
up and down arrows
Set Time Zone
November 2013, CNDS-0-635-MAN_3
Page 23 of 78
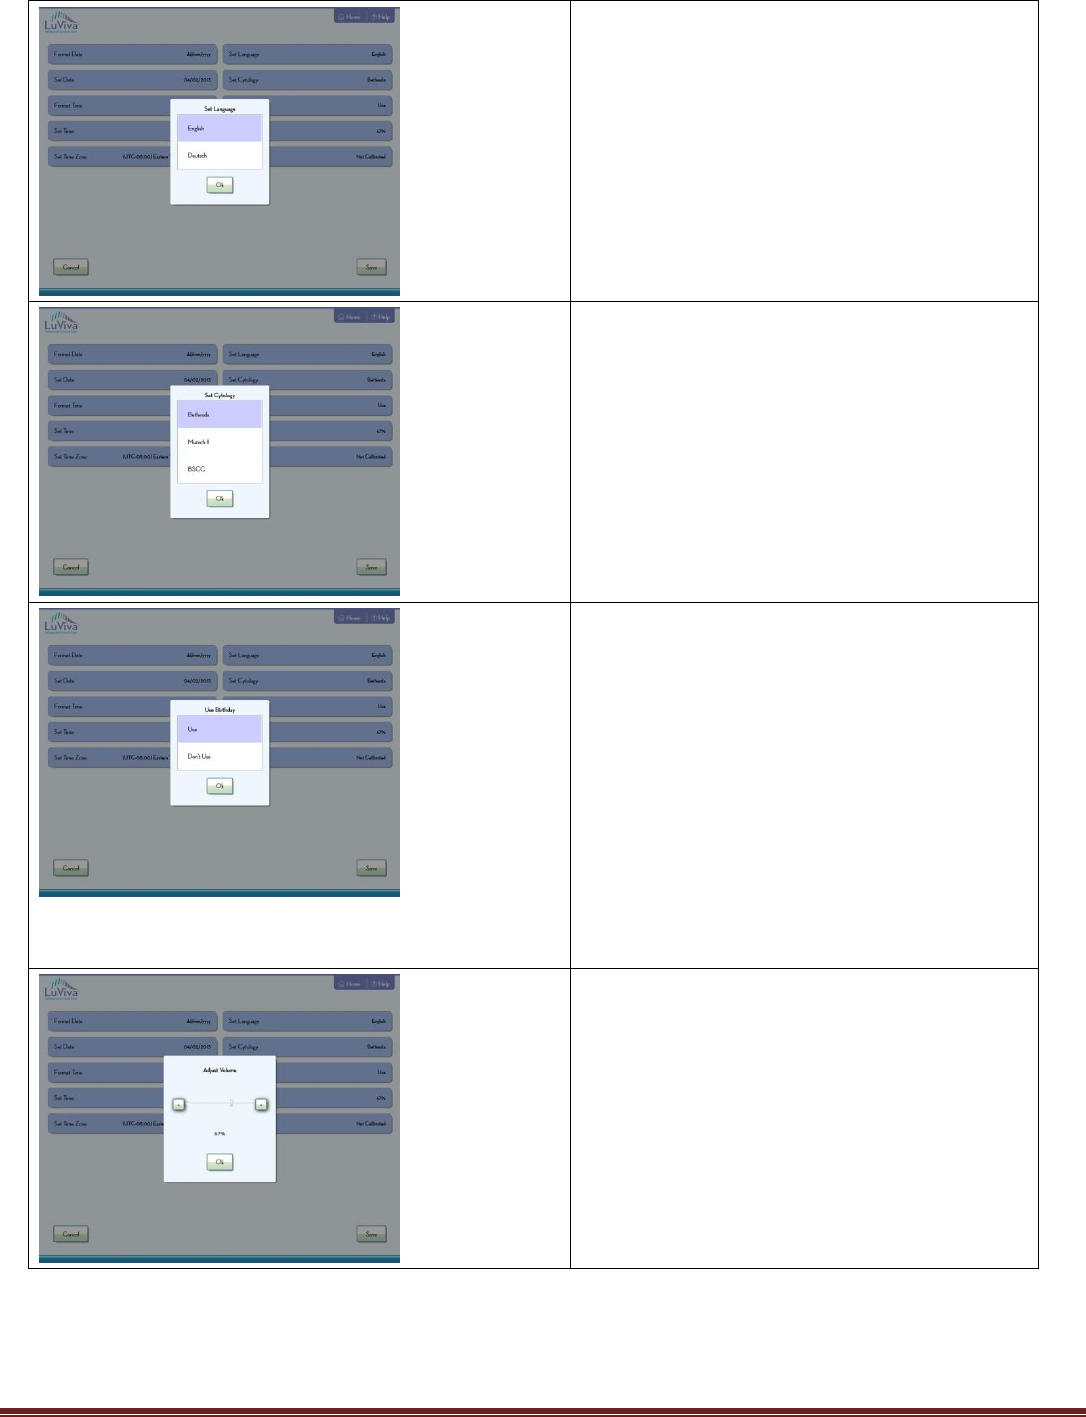
Select Language
Choose preferred language
Select Cytology
Current choices:
Bethesda
Munich II
BSCC
Set Use of Birthday as patient descriptor/ID
You may want to use the patient’s birth date as a
patient ID for the final printed report. Choosing
this mode will require you to enter the patient’s
birth date prior to the diagnostic test.
The birthday will be used in the file name as an
identifier.
If you do not use the Birthday ID, only the date
and time of the diagnostic test will be used as a
pseudo-patient identifier on the final printed
report.
Set System Volume

November 2013, CNDS-0-635-MAN_3
Page 24 of 78
Touch Save to save your Set-Up selections.
Set-Up is complete.
Any of these settings can be changed at a later
date by accessing the Set-up Screen through the
System Ready screen available at Start-Up and at
the beginning of every diagnostic test.

November 2013, CNDS-0-635-MAN_3
Page 25 of 78
6. Operating Environment
6.1 Operating Environment
The best environment for safe and comfortable operation of LuViva is in an air-conditioned, clinical setting with
gynecologic examination equipment present and available and medical waste disposal capabilities.
WARNING: LuViva is not intended for use in areas where gaseous anesthesia, oxygen or nitrous
oxide is used. Due to the nature of the light source, an explosion may result.
6.1.1 Room Temperature Requirements
LuViva operates best in a room with air-conditioning, at or below 77ºF (25ºC). LuViva can be stored in rooms with
less controlled temperatures. Please see Environment Specifications for more information.
6.1.2 Visibility Conditions
LuViva does not require specific lighting conditions; light levels needed for a gynecological exam are sufficient to
operate the device and its accessories.
TECHNIQUE TIP: A lower lighting level may be helpful during the diagnostic test in order to avoid an Ambient
Light Error.
6.1.3 Minimize Noise Level and Distractions during Test
LuViva incorporates both visible and audible cues throughout the test sequence. Maintaining an environment that is
free of loud ambient noise or any activities that may cause distractions is recommended.
7. Performing a Test
To perform a LuViva test, you must use the touchscreen to start and navigate through the screens. Some screens will
include instructions for you to follow in order to proceed to the next step of the test. Please follow all instructions
shown. Additional Warnings, Notes and Technique Tips are given in the next sections of the manual to assist you in
completing each test accurately. Each test should take approximately 5 minutes from start to finish.
7.1 Accessories
7.1.1 Cervical Guides
In order to use LuViva, you will need a cervical guide for every patient. The disposables are provided in cases of 20,
and may be ordered by contacting a Guided Therapeutics, Inc. authorized distributor or customer service at Guided
Therapeutics, Inc. Each case contains instructions for use for the disposable.
LuViva Cervical Guides are non-sterile, single-use devices intended for use with a speculum and LuViva Advanced
Cervical Scan during a gynecological exam.
7.1.2 Specula
NOTE: Confirm the compatibility of specula before using with LuViva.
7.1.3 USB Drive
NOTE: The results for the patient are NOT saved on LuViva. Ending the test closes the program and deletes results.
The operator shall be given an option to save the results output in PDF format on a USB thumb drive. A USB 2.0
thumb drive is supplied by Guided Therapeutics, Inc. See Specifications Section.
7.2 Patient and Operator Positioning
LuViva is accessible by the operator in the standing or seated position. The patient shall be in a position for a
gynecological exam, positioned so that the operator can easily manipulate the HHU into the speculum while accessing
the touchscreen.

November 2013, CNDS-0-635-MAN_3
Page 26 of 78
The umbilical cable is 59” (1.5 meters) from the umbilical support ring on the Cart to the bottom of the HHU. Setting
up LuViva within 36” (0.9 meters) from both the patient and the monitor will provide the most comfortable usage.
Position LuViva at the end of the exam table for best accessibility.
CAUTION: Lock the wheels after positioning in the exam room, prior to use on a patient.
7.3 LuViva Start-Up and Patient ID
If not already on, turn on system using Standby Power Switch.
Start-up Screen.
Select Begin Test
Enter Patient’s Birth Date Use of birthdate is
optional, select configuration under Set-Up.
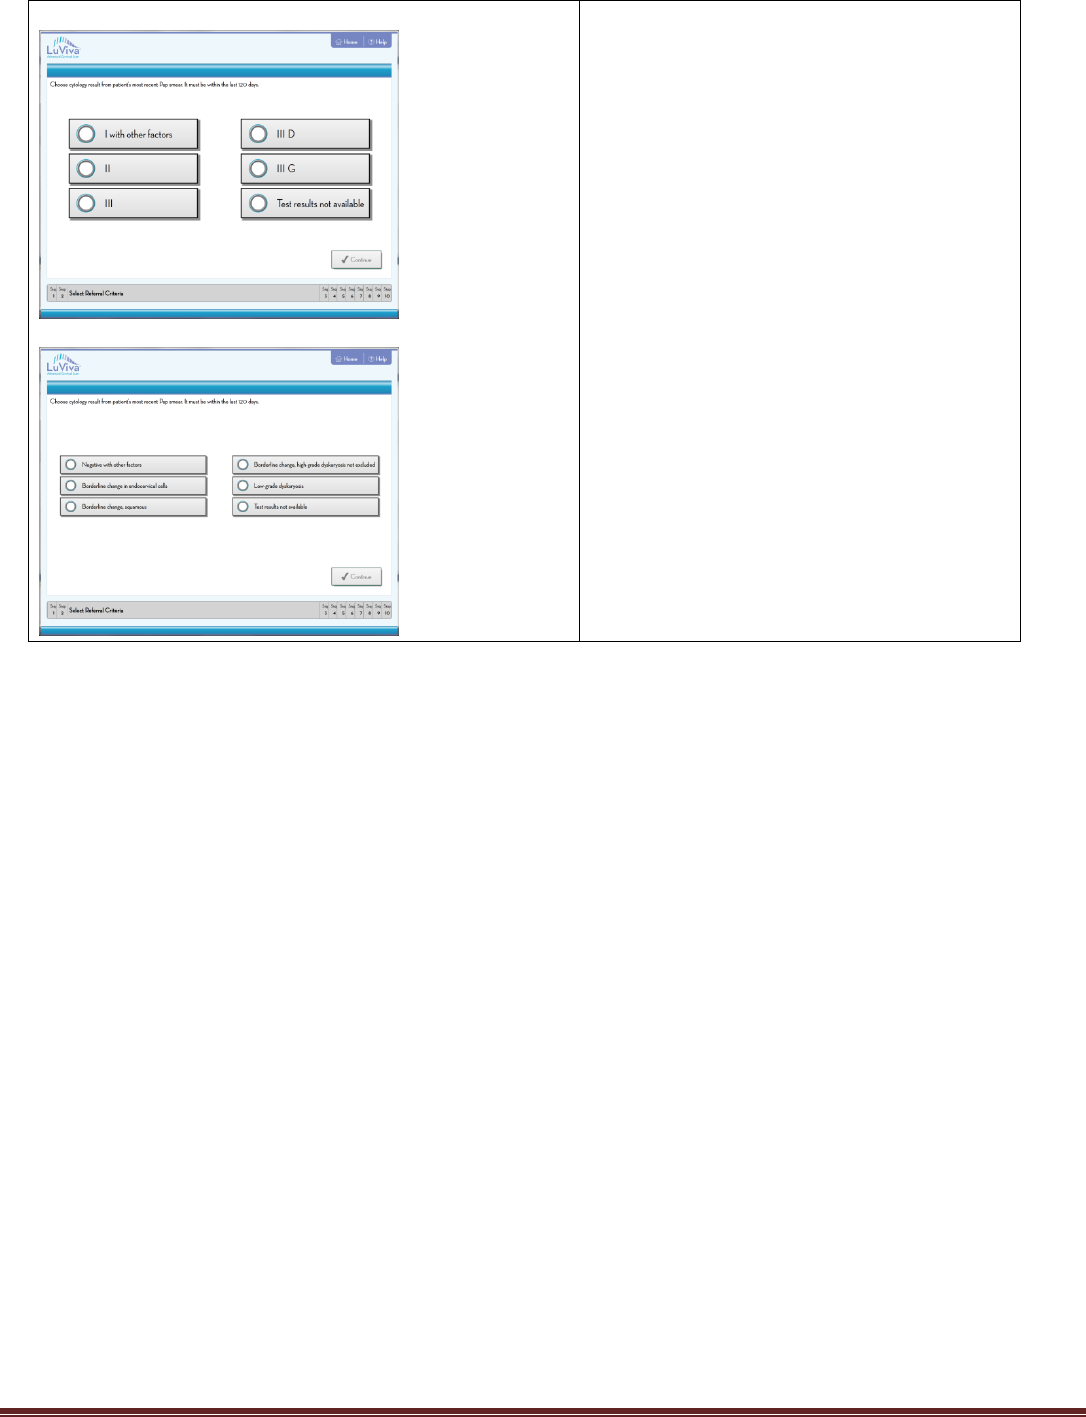
Bethesda
Select Referral Criteria
Note, this screen will display the cytology
system selected during set-up.
“Test Results Not Available” is utilized
when the patients’ referral cytology result
is not immediately available or Pap test is
being performed on the same day as the
LuViva Advanced Cervical Scan. This
selection shown on the Referral Criteria
input screen will provide the healthcare
professional with a LuViva Advanced
Cervical Scan result for all available
cytology inputs, so that the LuViva
Advanced Cervical Scan result may be
compared with the same day Pap test
result.
November 2013, CNDS-0-635-MAN_3
Page 27 of 78
Munich II
BSCC (dyskaryosis)

November 2013, CNDS-0-635-MAN_3
Page 28 of 78
7.4 Insert Speculum and Attach Cervical Guide
Patient and Test Preparation: Prepare patient per standard of care for a colposcopic exam.
Inspect LuViva for damage, cracks,
scratches on the HHU Window, debris on
HHU window.
Visually inspect all components for physical damage. If
damage is noted, please contact your local
dealer/distributor or Guided Therapeutics, Inc.
CAUTION: If the HHU Window is not cleaned thoroughly
and completely (with no debris or streaking), LuViva will
not be able to accurately determine the disease state of
the patient.
Prepare for the exam using good clinical
practices and put on gloves.
CAUTION: Always wear gloves and use sterile field
methods when using LuViva to protect the operator and
patient from potential cross-contamination.
Prepare the patient for the exam (i.e.
have patient move into an exam position,
prepare speculum and insert)
NOTE: Confirm the compatibility of specula before using with
LuViva Cervical Guides.
Open CG package.
CAUTION: The CG must not be used if the packaging has been damaged.
CAUTION: To prevent contamination, handle the CG with gloves to maintain cleanliness. Do not touch
non-disinfected surfaces with CG.
CAUTION: The CG has an expiration date. Please check the packaging to make sure your product has
not expired prior to use.
WARNING: The CG is a single-use disposable. The CG is non-sterile and cannot be sterilized
by the operator. Do not clean and reuse. Reuse carries a high risk of cross-contamination and
cross-infection of patients.
Inspect the HHU for
damage. Inspect the window
for cleanliness. Attach the
CG to the front of the HHU.
Align tab of Cervical Guide
to the tab on the face of the
HHU. Turn clockwise until
tab is pointing to the top of
the HHU (12 o’clock).
NOTE: The CG should
snap securely into
position with a click.
Use the touchscreen buttons in the lower right corner of the screen or press the
button on the HHU handle to proceed.
Start Calibration.
You can use the button on
the touchscreen or the
button on the HHU handle

November 2013, CNDS-0-635-MAN_3
Page 29 of 78
to proceed.
Calibration of LuViva will
begin.
7.5 Calibration
NOTE: Do not remove or
discard the Calibration Cap
until calibration has
completed.

November 2013, CNDS-0-635-MAN_3
Page 30 of 78
7.6 Dispose of Calibration Cap
NOTE: Do not remove or discard the Calibration Cap until calibration has completed.
Once calibration is complete, discard
Cervical Guide Cap. (Recyclable ABS)
7.7 Clean Cervix and Insert CG
Clean the patient’s cervix with a swab to remove any excess mucus or blood.
WARNING: Do not pinch vaginal or cervical tissue between the edges of the speculum blades
and the CG. Patient injury and pain may occur.
CAUTION: Prepare the patient for CG insertion and instruct the patient to be as still as possible to
minimize potential injury during the test. Unintended motion by the patient may cause an error, and
the test will need to be repeated.
CAUTION: LuViva results depend upon the os of the cervix remaining in the center and the cervix
remaining in the same orientation during the test sequence. Movement by the patient may cause an
error and the test will need to be repeated.

November 2013, CNDS-0-635-MAN_3
Page 31 of 78
Gently insert the CG into the
speculum until it touches the
cervix. The screen will show
a live video image to help
guide the CG against the
cervix and to center the os in
the image.
Maintaining os in field of
view; make contact with
cervix.
Once the os is centered, hold
the HHU steady.
LuViva evaluation takes
approximately 2 minutes.
To proceed, use the select
button on the HHU keypad
(or touchscreen button on
the right side of the screen ).
7.8 LuViva Evaluation
A screen will inform the
Operator of the testing
progress. An audible
prompt will occur at the end
of the test.
The test lasts approximately
2 minutes.
November 2013, CNDS-0-635-MAN_3
Page 32 of 78
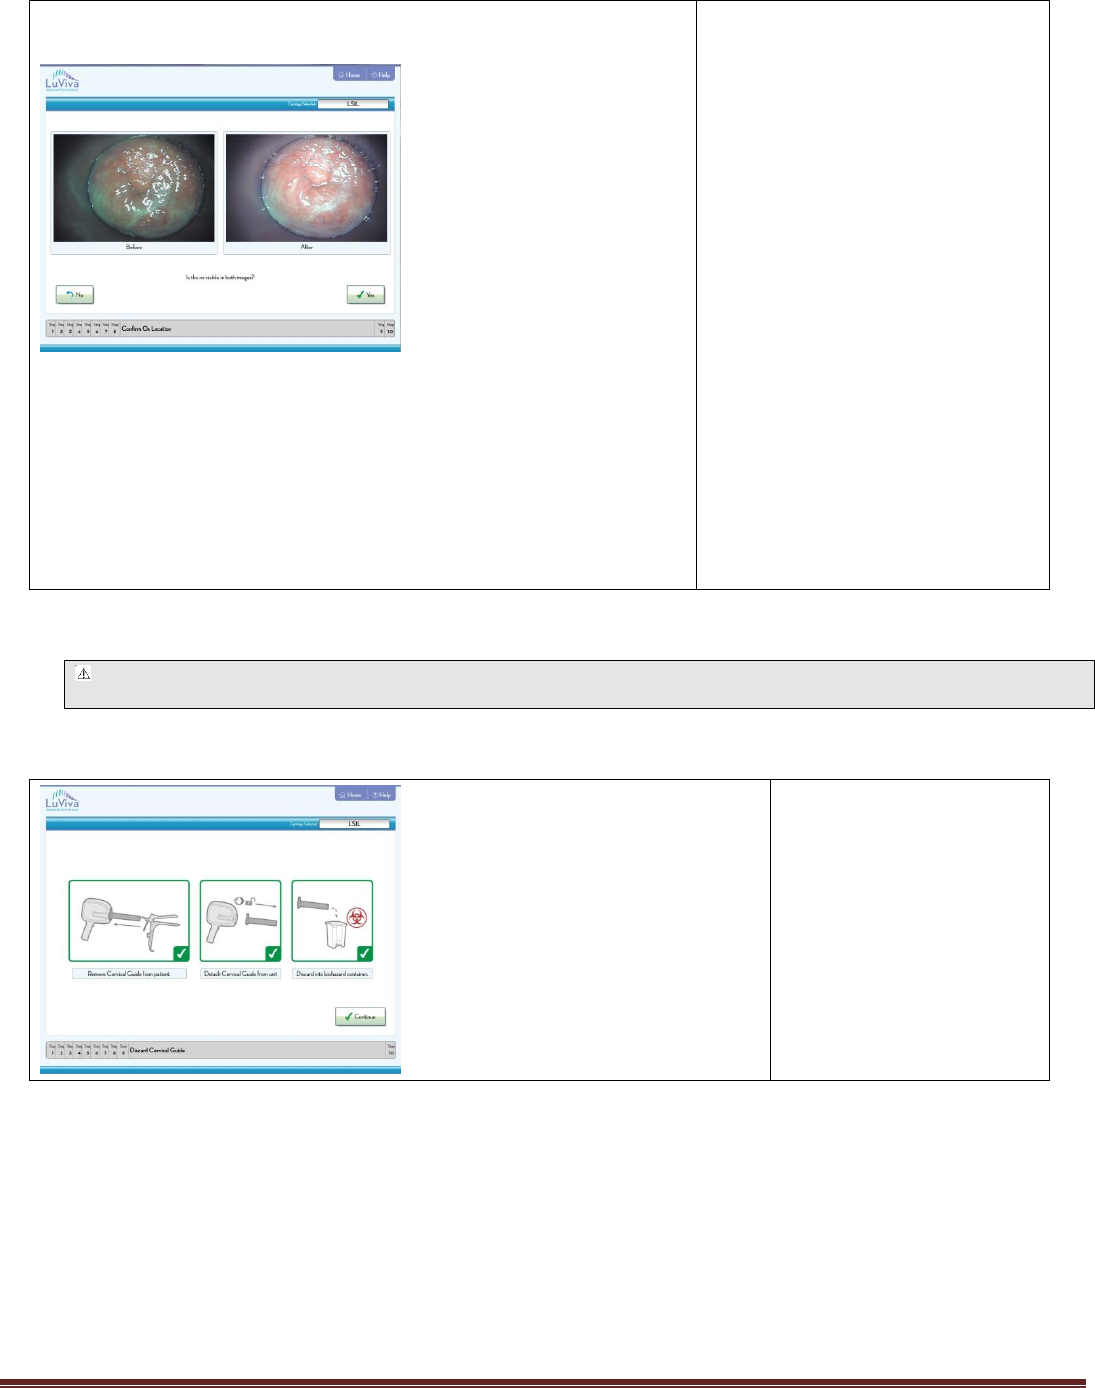
7.9 Evaluate Image
Motion Evaluation
The test includes taking a digital
image of the cervix before and after
the scan. These “before” and “after”
images are compared to minimize
errors in diagnosis due to excessive
movement. The comparison is based
on the presence of the os in each
photo.
If the os is still visible, the test may
continue.
Selecting Yes will allow the test to be
completed.
If the os is no longer visible, then the
test should be repeated.
Selecting No will take the operator
back to the beginning of the
diagnostic test.
Perform test again, and repeat the
Motion Evaluation.
7.9.1 Limitations in Number of Diagnostic Tests
WARNING: LuViva should not be used on a single patient for more than three (3) LuViva
scans per 24-hour period.
7.10 Remove and Discard of CG
Remove the CG from the
patient. Remove the CG
from the HHU and discard
as medical waste. Continue
to the Results Display.
November 2013, CNDS-0-635-MAN_3
Page 33 of 78
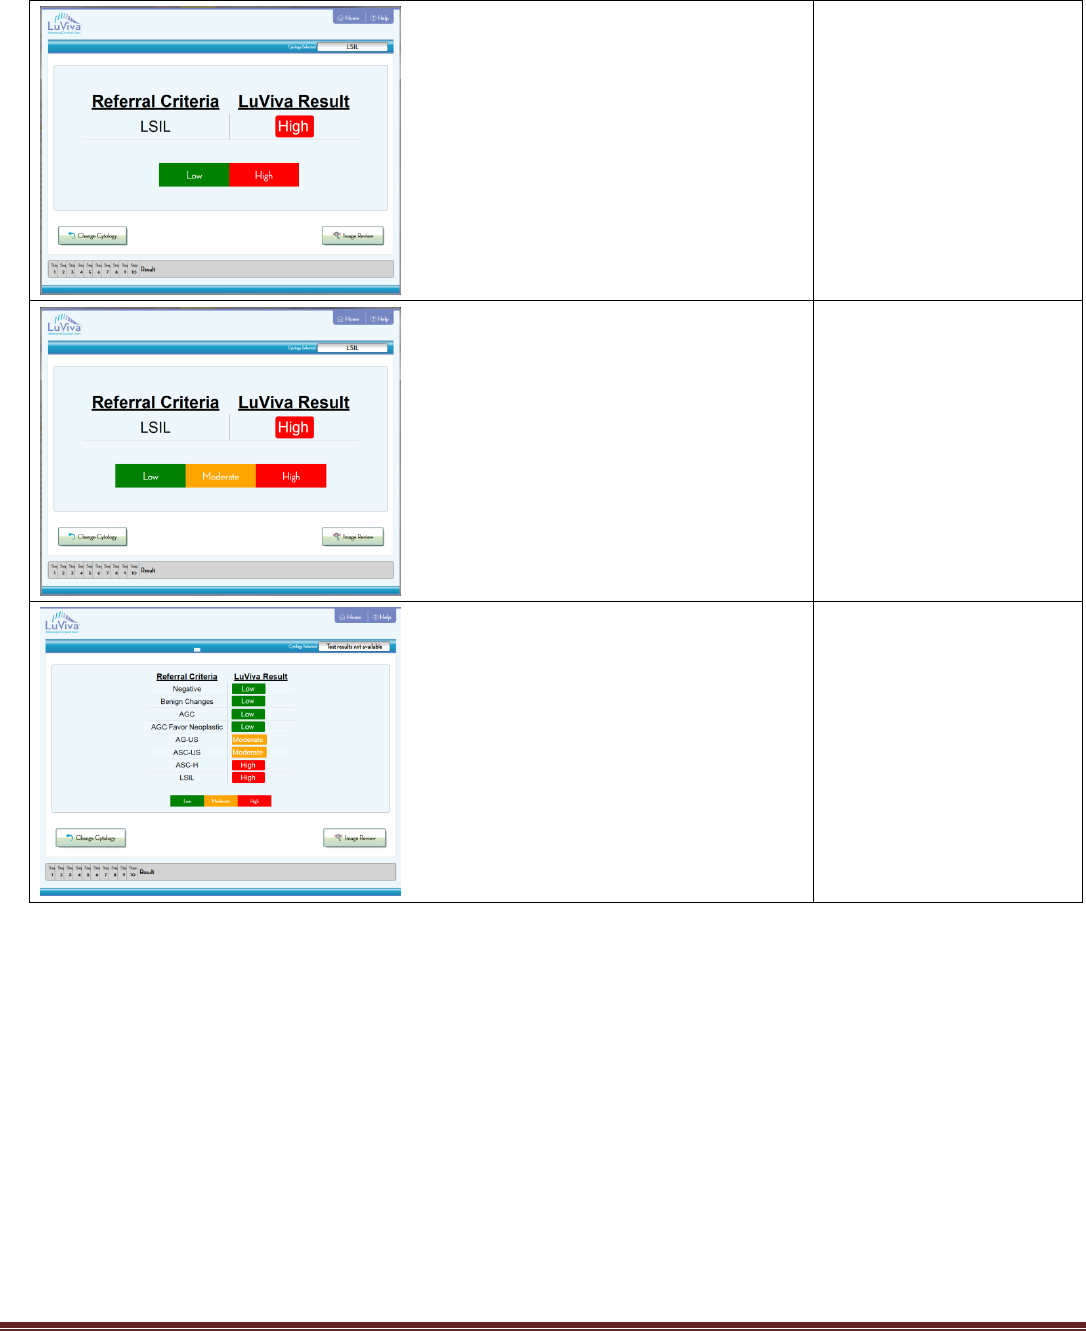
7.11 Results Display
LuViva Result
(LOW/HIGH)
LuViva Result
(LOW/ MODERATE /
HIGH)
LuViva Result for all
available Referral Criteria
November 2013, CNDS-0-635-MAN_3
Page 34 of 78
7.12 Report Display
When prompted, select
images for report.
To save report, insert USB
drive into port on monitor
and save report. Alternately,
manually record data onto
patient chart.
At the conclusion of the
diagnostic test, operator is
reminded to download the
final report, since
proceeding will cause the
current patient’s data to be
deleted, in preparation for
the next patient.
November 2013, CNDS-0-635-MAN_3
Page 35 of 78
7.13 Clean Unit Prompt
Clean and disinfect the unit.
CAUTION: LuViva requires cleaning and disinfection between patients, as specified in this manual,
to prevent operator-to-patient, and patient-to-patient contamination and cross-contamination.
CAUTION: Dispose of the CG as medical waste. Improper disposal could result in exposure of an
unprotected person to bio-contamination.
7.14 Help Screen
This User Manual will load from the help screen.
The software version is shown on the start-up screen.
7.15 Shut Down Sequence
Power off LuViva through the touchscreen power button or HHU on-standby button by pressing and holding for 10
seconds. To completely power down, disable the Main Power Switch on the Base Unit, and unplug LuViva from the
wall.
November 2013, CNDS-0-635-MAN_3
Page 36 of 78
8. Moving and Transporting LuViva
LuViva has wheels to allow for the device to be easily moved within the clinic area, and from room to room within a
facility that has elevators and smooth or carpeted floors.
Transporting LuViva up and down stairs and over rough or uneven surfaces requires disassembly; see further
instructions below.
8.1 Moving LuViva
To move LuViva, use the touchscreen to turn off LuViva, or the Main Power Switch on the HHU. Unplug LuViva from
the wall outlet and secure the power cord. Make sure the HHU is securely docked in the Docking Station and secure
the umbilical cable so that it does not drag on the floor. Unlock the wheels, grasp the handle and roll LuViva into
another room and place into desired position. Lock the wheels before use on patient. Plug LuViva into the properly
grounded wall outlet and turn on LuViva by turning on both the Main Power Switch and the On-Standby Button to
verify operation.
Moving Position (room-to-room)
Dock the HHU and move the monitor
to a low position.
DO NOT roll LuViva with Monitor
Arm in fully extended position.
DO NOT roll LuViva with HHU
undocked. Do not rest HHU on table
top.

November 2013, CNDS-0-635-MAN_3
Page 37 of 78
8.2 Transporting LuViva
LuViva weighs approximately 125 lbs. (57kgs). The preferred method for moving LuViva up or down stairs or over
rough terrain is with it disassembled and in its original packaging.
CAUTION: The LuViva handle is designed to roll and push LuViva. The handle may be used to lift the
LuViva out of the shipping container and to move over thresholds.
Disassembly
Turn off LuViva and unplug LuViva from the wall outlet. Disconnect the cables from the monitor. Remove the
touchscreen from the top of the Base Unit. Remove the monitor arm. Open the Base Unit Cover, open the lamp access
panel and remove the lamp assembly. Close the Back Access Panel. Place the Base Unit, Touchscreen, Lamp Assembly,
and Base Unit Cover back into their original packaging. Move the packages to the new location. Reassemble LuViva in
the new location following the assembly instructions provided in the “Using LuViva for the First Time” section in this
manual.
8.3 Transporting LuViva for Service
If service is required, contact distributor for a reusable service case for product return.
9. Troubleshooting Guide
9.1 Common Errors
Problem/Indication
Possible Causes
Operator Action(s)
LuViva will not turn on.
LuViva is not plugged into
an appropriately rated wall
outlet.
LuViva needs 100-240V/50-60Hz AC
current in order to operate.
Main Power Switch of the
Base Unit is turned off.
Remove Base Unit Cover, flip Bottom
Switch on at the back of LuViva Base
Unit, and replace cover.
Bulb Access door is open.
Remove Base Unit Cover. Close the bulb
access door. If the Access door is opened
during operation, LuViva will turn off.
Power Up Sequence not
performed in designated
order.
Unplug LuViva and turn all switches to
the off position. Follow the Set-Up
Assembly steps to activate LuViva.
If after performing all of the above troubleshooting actions
LuViva will still not turn on, please contact Customer Service
for further instructions.
Touchscreen will not turn on.
Indicated by dark touchscreen.
Touchscreen installed
without attaching Power
Cables
Pivot monitor to examine the rear cable
connections. Check that the USB, video,
audio and power cables from the Base
Unit are plugged into the touchscreen.
Remove Base Unit cover and confirm
cable connections are made at the front
left corner of the base unit.
Touchscreen is on, but LuViva
screen is not displayed
Touchscreen installed
without attaching USB
Cable
Power Up Screen is Windows
desktop.
Software error during
booting.
Contact Customer Service for further
instructions.

November 2013, CNDS-0-635-MAN_3
Page 38 of 78
Power Up Screen is MS DOS
boot-up error message.
Software error during
booting.
Contact Customer Service for further
instructions.
LuViva will not move easily.
Wheels are locked (wheel
locks are flipped down).
Unlock wheels by flipping wheel locks
up. LuViva should move easily.
Error message – low lamp
power, on first test and retries.
Lamp installed incorrectly.
Remove lamp assembly and reinstall
following Assembly Instructions.
If error message continues, contact
Customer Service.
All other error messages
Various software and
hardware causes
See Sections below.
9.2 Operating Errors and Warning Messages
Warning Screen/Error Message
Possible Reasons
Operator Action(s)
Ambient Light Error
If there is too much
ambient light entering
the HHU during
calibration, then an
Error message will
appear. Calibration will
need to be repeated.
Common Causes for the
Ambient Light error:
removal of the Cap
prior to calibration,
extremely bright room
lighting, or a Cap that is
not securely seated on
the end of the CG.
Remove and reinstall Cap on
the CG Disposable. Press
firmly to mount the cap flush
with the end of the tube. Touch
OK to restart calibration.
If you receive the same error
again, remove and reinstall the
CG Disposable onto the HHU.
The CG should ‘click’ into
position on the HHU bracket.
Touch OK to restart
calibration.
If you receive the same error
again, attach a new CG and
repeat test.
If you receive same error
again, contact Customer
Service.
Code 247: Cervical Guide not detected.Check
Cervical Guide attachment or install a new one.
Cervical Guide installed
incorrectly
Check attachment, reinstall.
Code 247: Cervical Guide not detected. Check
Cervical Guide attachment or install a new one.
Used Cervical Guide
installed
Install new Cervical Guide.
Code 224: Cervical Guide not found. Check Cervical
attachment or replace.
Cervical Guide installed
incorrectly
Check attachment, reinstall.
Code 239: There is a problem with the attached
Cervical Guide. Replace with a new one and retry.
Install new Cervical Guide.
Code 78: System severely overheated. Shutting
down. If this problem persists, contact Guided
Therapeutics, Inc.
System Error
Shut down and retest.
Code 209: Test limit will be exceeded in 2 min.
Complete test within time
window.

November 2013, CNDS-0-635-MAN_3
Page 39 of 78
Warning Screen/Error Message
Possible Reasons
Operator Action(s)
Code 210: Test time limit exceeded. Recalibration
required.
Timing Errors will
cause warnings to
appear. Continued use
will cancel the current
test.
Timing errors include
the Calibration Time
being Exceeded, the
Measurement Time
Exceeded, and System
Operating Time
Exceeded.
Test Cancelation was requested. You will lose
acquired data. Do you wish to proceed?
LuViva allows for
ending a test prior to
full test execution.
A confirmation
message will appear
confirming that you
want to end the test.
Touch OK to end the test
Touch Cancel to continue the
test.
Code 203: Patient Exposure limit is reached.
Reschedule a test.
Code 95: Retest limit has been exceeed.
LuViva can only be
used for 3 scans per
patient within one 24-
hour period
Rerun test in 24 hours.
Hand Held Unit Overheated. Wait for system to cool
or shutdown.
System Error
Wait for system to cool or
shutdown.
Code 245: Too many spots were rejected. Retry
tissue imaging.
If there is blood or
mucus covering more
than 25% of the cervix
during the Diagnostic
Test, this error message
will appear. For LuViva
to operate successfully,
the cervix needs to be
swabbed to remove
excess blood and
mucus.
Remove HHU/CG from
patient and keep it from
touching any other surface.
Swab cervix gently to remove
any blood or mucus on the
patient’s cervix. Touch OK and
follow the test procedure
again.
If there is no blood or mucus
on the patient’s cervix, contact
Customer Service.
Code 212
There was a general hardware failure. If this
problem presists, Contact Guided Therapeutics, Inc.
General system error
message.
Code 248, 249, 250, and 252
Storage media error
Error message
associated with
incorrect storage
media.
Use larger capacity USB drive.
Unplug drive, plug in again
and repeat action.

November 2013, CNDS-0-635-MAN_3
Page 40 of 78
9.3 Other Errors
Other software or hardware errors may occur with regular use of LuViva. See the troubleshooting listing below for
information regarding the following errors.
LuViva Action
Operator Action
System Errors
Error Message will appear with
Error Code
Make note of error code, click on OK, and
shut down LuViva.
Restart in 10 minutes.
If error message reappears – contact
Customer Service and inform them of the
error code. Service may be needed.
Maintenance Errors
Error Message will appear with
Error Code – the Lamp
Assembly needs to be replaced.
If this error occurs after installation,the
Lamp Assembly may be installed
incorrectly and needs to be reinstalled.
If this error occurs after the first 6 months
to 1 year after purchase, contact Customer
Service for a Service Kit in order to replace
the bulb.
Temperature Errors
LuViva will cancel the current
test, and an Error Message will
appear with Error Code.
LuViva will go into sleep mode to allow the
system to cool and will monitor internal
temperatures. Place HHU on Docking
Station when directed. When LuViva has
reached recommended operating
temperatures, it will return to the System
Ready screen. It will be ready to resume
testing.
Operation Errors
Error Message will appear with
Error Code – System has
timed out, and will need to
cool.
LuViva will return to the System Ready
screen when it is ready to resume testing.
9.4 Additional Errors
Any errors that are received continually (even with troubleshooting efforts) indicate the need for service. Please
contact Customer Service for further instructions should any error be repeated three or more times.
CAUTION: Do not load non-LuViva software onto the computer as it could interfere with the proper
operation of the system and will void the warranty.
10. Cleaning and Disinfection Procedures
10.1 Cleaning and Disinfection Cautions
LuViva requires regular cleaning with the cleaners and disinfectants specified in this manual to prevent
operator-to -patient, and patient-to-patient contamination and cross-contamination.
The operator is instructed to handle the device in ways to reduce likelihood of contamination; for example,
immediately remove and dispose of soiled CG. Do not place soiled HHU into Table Top Docking Station.

November 2013, CNDS-0-635-MAN_3
Page 41 of 78
Failure to properly clean and disinfect LuViva equipment after each examination can compromise patient
safety. To minimize the risk of transmitting diseases from one patient to another, after each examination the
HHU and HHU dock must undergo thorough manual cleaning followed by intermediate level disinfection.
If the HHU and Dock are not immediately pre-cleaned, residual organic debris will begin to solidify and it
may be difficult to clean.
If the HHU and HHU dock are not cleaned meticulously, effective disinfection may not be possible. Clean the
HHU and dock before disinfection to remove microorganisms or organic material that could reduce the
efficacy of the disinfection.
Patient debris and intermediate level disinfectants are hazardous. Wear personal protective equipment to
guard against dangerous chemicals and potentially infectious material. During cleaning and disinfection, wear
appropriate personal protective equipment, such as eye wear, moisture resistant clothing and chemical
resistant gloves so that your skin is not exposed. Always remove contaminated personal protective equipment
and dispose of as medical waste after cleaning and disinfection.
Thoroughly wipe the surfaces with potable water to remove any cleaning agent residue.
Do not spray cleaning solutions or disinfectant solutions directly into the rear and sides of the monitor where
the vent holes are located.
Follow the cleaning agents and disinfectant manufacturer’s directions.
Do not use cleaners and disinfectants beyond their expiration date.
Components to be disinfected MUST be dry before disinfection. Residual rinse water from the cleaning
process dilutes the disinfectant, which negatively affects the disinfecting power. Disinfectant claims are not
supported when parts are not pre-cleaned and dried thoroughly prior to use.
Guided Therapeutics, Inc. has performed cleaning validation and disinfection validation only for the class of
cleaning agents and disinfectants listed in the procedure.
10.2 Cleaning Procedure
10.2.1 Cleaning Solution Compatibility Summary and Frequency
Component
Cleaning-Detergent
Solution
dual enzymatic
aqueous detergent
Cleaning
Isopropyl Alcohol (IPA)
Frequency
HHU-Window
Yes, do not spray
directly, wipe with
moistened wipe
Yes, wipe with moistened wipe
After each patient
HHU – Casing
Yes, do not spray
directly, wipe with
moistened wipe
No
After each patient
Umbilical Cable
Yes, do not spray
directly, wipe with
moistened wipe
No
After each patient
HHU Dock
Yes, do not spray
directly, wipe with
moistened wipe
No
After each patient
Touchscreen
Yes, do not spray
directly, wipe with
moistened wipe
No
After each patient
Base Unit (bottom of
cart)
Yes
No
Weekly as required

November 2013, CNDS-0-635-MAN_3
Page 42 of 78
10.2.2 Equipment and Supplies Needed
Prepare the following equipment:
Personal protective equipment (eye glasses, face mask, moisture resistant gown and chemical resistant gloves)
Cleaning area with access to clean water, such as a scrub sink and countertop.
Disposable Task Wipes ( such as lint-free wipes, paper towels or heavy-duty task wipes)
o Examples: Kim-Wipes Disposable Task Wipes ( lint free wipes),
o Examples: regular paper towels( such as Bounty, Brawny, etc.) or
o Examples: heavy-duty task wipes, such as dry wipes Wypall L10 Utility Wipes or disposable
washcloths, such as CliniGuard Dry Disposable Washcloths
Cleaning containers or clean disposable task wipes to rest HHU while cleaning it.
Detergent solution: medical grade, low foaming, neutral pH, Subtilisin protease enzymatic aqueous detergent
o Examples: MetriZyme Dual Enzymatic Detergent and MetriSponge
Clean, potable water for diluting the detergent solution
Clean, potable water for rinsing
Disposable Task Wipes for drying
Pre-moistened 70% Isopropyl Alcohol wipes or 70% IPA cotton swab applicator
CAUTION: The HHU and Base Unit are IP20. The units are not designed for submersion or
excessive fluid ingress. Clean, rinse and disinfect via wiping with task wipes moistened with
cleaning solution, rinse water or disinfectant.
10.2.3 Cleaning Instructions
Use a medical grade, low foaming, neutral pH enzymatic detergent and follow the manufacturer’s dilution and
temperature recommendations.
Prepare detergent solution following manufacturer’s directions on the labeling.
Use fresh detergent solution for each cleaning session. Discard solution according to manufacturer’s
recommendations.
Manual cleaning: Add 1oz (4 pumps yields one ounce) of concentrate to one gallon of warm water (68° F -104° F)
/(20° C – 40° C)
HHU
1. Place dirty HHU on a clean disposable task wipe or disinfected cleaning container, such as a metal surgical tray.
2. Keep the HHU handle pointing toward the table to avoid cleaning fluid from penetrating the umbilical-handle
interface
3. Wet a disposable task wipe with the detergent solution. Using disposable task wipes, remove all gross visible soil
from the contaminated device. Discard each wipe as it becomes dirty. It is best to wipe and discard, using a new
disposable task wipe for each removal. Wipe away from the HHU window, towards the handle.
4. Once gross visible soil is removed, thoroughly spray detergent solution onto a disposable task wipe. Apply wipe
directly onto the areas to be cleaned. Allow device to be saturated with solution to dissolve any remaining organic
soil, loosen attachment of bioburden and thoroughly wet the device surface. Wet surface with soaked wipes at least
2 minutes to ensure that soil is hydrated for easier removal. If matter has dried on, continue to soak surface with
new wet wipes until visibly clean. Pay attention to mating surfaces, the HHU-nut interface, and the HHU umbilical
cable interface.
5. Using detergent solution and disposable task wipes or pre-soaked detergent sponge, manually scrub the instrument
until visible soil is removed—at least 2 minutes. Dispose of wipes as needed. Rinse device by wiping with wipes
moistened with warm tap water at (68° F -104° F) /(20° C – 40° C)
6. If the radiator area of the device is heavily soiled, such that soil has dripped below the surface of the radiator cover
onto the radiator, remove the radiator cover using small flathead screwdriver to pop it out. Manually scrub the
radiator cover if needed until visible soil is removed. Using detergent solution and disposable task wipes or pre-
soaked detergent sponge, gently scrub the radiator until visible soil is removed. Rinse radiator and radiator cover by
wiping with wipes moistened with warm tap water at (68° F -104° F) /(20° C – 40° C). Replace radiator cover, by
aligning the cover and pushing into place.
7. Under normal office lighting, visually inspect the device to ensure soil has been removed. If visible soil remains, clean
the device again as directed above.

November 2013, CNDS-0-635-MAN_3
Page 43 of 78
8. After device is visibly clean, dry completely with a clean task wipe.
9. Place cleaned HHU on disposable task wipe.
HHU Window
1. Visually inspect the HHU Window for visible soil or streaks.
2. If the window is streaked, wipe the HHU window with disposable task wipes moistened with detergent solution.
3. Discard wipes as they become contaminated.
4. Visually inspect the HHU Window for soil.
5. Repeat wiping until window is not soiled.
6. Wipe window with pre-moistened 70% IPA wipe or 70% IPA cotton swab applicator.
7. Visually inspect the HHU Window for streaks. Repeat IPA wiping until the window is dry without streaks. Allow to air
dry at ambient temperature (68° F) /(20° C )
Umbilical
1. Place HHU on a clean disposable task wipe or disinfected cleaning container, such as a metal surgical tray.
2. Keep the HHU handle pointing toward the table/floor to avoid cleaning fluid penetrating the umbilical-handle
interface.
3. Wet a disposable task wipe with the detergent solution. Using disposable task wipes, remove all gross visible soil
from the umbilical cable. Discard each wipe as it becomes dirty. It is best to wipe and discard, using a new disposable
task wipe for each removal. Wipe away from the HHU, toward the handle.
4. Once gross visible soil is removed, thoroughly spray detergent solution onto a disposable task wipe. Apply wipe
directly onto the areas to be cleaned. Allow device to be saturated with solution to dissolve any remaining organic
soil, loosen attachment of bioburden and thoroughly wet the device surface. Wet surface with soaked wipes at least
2 minutes to ensure that soil is hydrated for easier removal. If matter has dried on, continue to soak surface with
new wet wipes until visibly clean. Pay attention to the HHU umbilical cable interface.
5. Using detergent solution and disposable task wipes or a pre-saturated detergent sponge, manually scrub the
umbilical cable at least 2 minutes. Dispose of wipe/sponges as needed. Rinse device by wiping with wipes moistened
with tap water at (65° F) /(18° C )Under normal office lighting, visually inspect the cable to ensure soil has been
removed. If visible soil remains, clean the cable again as directed above.
6. After cable is visibly clean, dry completely with a clean, dry disposable task wipe
BU-Dock
1. Wet a disposable task wipe with the detergent solution. Using disposable task wipes, remove all gross visible soil
from the contaminated area (docking station). Discard each wipe as it becomes dirty. It is best to wipe and discard,
using a new disposable task wipe for each removal.
2. Once gross visible soil is removed, thoroughly spray detergent solution onto a disposable task wipe. Apply wipe
directly onto the areas to be cleaned. Allow device to be saturated with solution to dissolve any remaining organic
soil, loosen attachment of bioburden and thoroughly wet the device surface. Wet surface with soaked wipes at least
2 minutes to ensure that soil is hydrated for easier removal. If matter has dried on, continue to soak surface with
new wet wipes until visibly clean.
3. Using detergent solution and disposable task wipes or pre-soaked detergent sponge, manually scrub the device until
visible soil is removed— at least 2 minutes. Dispose of wipes/sponge as needed. Rinse device by wiping with wipes
moistened with warm tap water at (68° F -104° F) /(20° C – 40° C)
4. Under normal office lighting, visually inspect the device to ensure soil has been removed. If visible soil remains, clean
the device again as directed above.
5. After device is visibly clean, dry completely with a clean task wipe.
Touchscreen
1. Caution: DO NOT spray detergent solution directly onto monitor. Rear of monitor is not protected against fluid
intrusion. Monitor should be cleaned by spraying detergent onto wipes, then using moist wipe to clean the surfaces.
2. Wet a disposable task wipe with the detergent solution. Using disposable task wipes, remove all gross visible soil
from the contaminated touchscreen. Discard each wipe as it becomes dirty. It is best to wipe and discard, using a
new disposable task wipe for each removal.
3. Once gross visible soil is removed, thoroughly spray detergent solution onto a disposable task wipe. Apply wipe
directly onto the areas to be cleaned. Allow device to be saturated with solution to dissolve any remaining organic
soil; loosen attachment of bioburden and thoroughly wet the device surface. Wet surface with soaked wipes at least
2 minutes to ensure that soil is hydrated for easier removal. If matter has dried on, continue to soak surface with
new wet wipes until visibly clean. Pay attention to monitor touchscreen–bezel interface.
4. Using detergent solution and disposable task wipes, manually scrub the device until visible soil is removed, at least 2
minutes. Dispose of wipes as needed. Rinse device by wiping with wipes moistened with warm tap water at (68° F -
104° F) /(20° C – 40° C)Under normal office lighting, visually inspect the device to ensure soil has been removed. If
visible soil remains, clean the device again as directed above.
5. After device is visibly clean, dry completely with a clean task wipe.
BU-Touchscreen
bezel
1. Caution: DO NOT spray detergent solution directly onto monitor. Rear of monitor is not protected against fluid
intrusion. Monitor should be cleaned by spraying detergent onto wipes, then using moist wipe to clean the surfaces.
2. Wet a disposable task wipe with the detergent solution. Using disposable task wipes, remove all gross visible soil
from the contaminated monitor bezel. Discard each wipe as it becomes dirty. It is best to wipe and discard, using a

November 2013, CNDS-0-635-MAN_3
Page 44 of 78
new disposable task wipe for each removal.
3. Once gross visible soil is removed, thoroughly spray detergent solution onto a disposable task wipe. Apply wipe
directly onto the areas to be cleaned. Allow device to be saturated with solution to dissolve any remaining organic
soil; loosen attachment of bioburden and thoroughly wet the device surface. Wet surface with soaked wipes at least
2 minutes to ensure that soil is hydrated for easier removal. If matter has dried on, continue to soak surface with
new wet wipes until visibly clean. Pay attention to power button grooves and the monitor–bezel interface.
4. Using detergent solution and disposable task wipes, manually scrub the device until visible soil is removed—at least
2 minutes. Dispose of wipes as needed. Rinse device by wiping with wipes moistened with warm tap water at (68° F -
104° F) /(20° C – 40° C)Under normal office lighting, visually inspect the device to ensure soil has been removed. If
visible soil remains, clean the device again as directed above.
5. After device is visibly clean, dry completely with a clean task wipe.
10.3 Intermediate-Level Disinfection (ILD) Procedure
This Disinfection procedure is to be conducted immediately after the Cleaning procedure outlined in the section
above. If the device is not cleaned meticulously, effective disinfection may not be possible. Clean the device before
disinfection to remove microorganisms or organic material that could reduce the efficacy of the disinfection.
10.3.1 ILD Solution Compatibility Summary and Frequency
Component
ILD
70% isopropyl alcohol wipes
or 70% IPA cotton swab
applicator
ILD
quaternary ammonium
compounds and 10-20 %
isopropyl alcohol in aqueous
solution both in solution and in
pre-moistened wipes
Frequency
HHU—Window
Yes (disinfect by wiping
with IPA pre-moistened
wipe)
Yes, do not spray directly, wipe
with moistened wipe
After each patient
HHU—Casing
No
Yes, do not spray directly, wipe
with moistened wipe
After each patient
Umbilical Cable
No
Yes, do not spray directly, wipe
with moistened wipe
After each patient
HHU Dock
No
Yes, do not spray directly, wipe
with moistened wipe
After each patient
Base Unit—
Touchscreen
No
Yes, do not spray directly, wipe
with moistened wipe
After each patient
Base Unit—Base
No
Yes, do not spray directly, wipe
with moistened wipe
Weekly as required
10.3.2 Equipment Needed
Prepare the following equipment:
Personal protective equipment (eye glasses, face mask, moisture resistant gown and chemical resistant gloves)
Disposable Task Wipes ( such as paper towels or heavy-duty task wipers)
Soft scrubbing implement such as a cotton cervical swab
o Large Round Tip Swab ( cotton swab, cervical swab, or equivalent)
o Soft brush ( nylon instrument brush, disposable toothbrush or equivalent)

November 2013, CNDS-0-635-MAN_3
Page 45 of 78
Intermediate Level Disinfectant (ILD) solution
o Quaternary ammonium compounds and isopropyl alcohol in aqueous solution
o Example: CaviCide
o Nominally 0.25% n-Alkyl dimethyl benzyl ammonium chlorides and 10-20% isopropyl alcohol in
aqueous solution
Intermediate Level Disinfectant Wipes
o Quaternary ammonium compounds and isopropyl alcohol in pre-saturated wipes
o Example: CaviWipes, Sani-Wipes
o Nominally 0.25% n-Alkyl dimethyl benzyl ammonium chlorides and 10-20% isopropyl alcohol in
aqueous solution
Pre-moistened 70% IPA wipes or 70% IPA cotton swab applicator.
10.3.3 Disinfection Instructions
CAUTION: The HHU and Base Unit are IP20. The units are not designed for submersion or
excessive fluid ingress. Clean, rinse and disinfect via wiping with task wipes moistened with
cleaning solution, rinse water or disinfectant.
Base Unit, HHU, Umbilical Cable
and Dock
1. Determine that the HHU and Umbilical Cable are dry. If they have not dried completely, use disposable task
wipes to wipe down the areas until dry.
2. Inspect surface for cleanliness. If not visibly clean, use one pre-saturated disinfectant wipe to completely
preclean the surface of all gross debris. Discard wipe.
3. Spray a new pre-saturated disinfectant wipe with additional disinfectant solution so that it is visibly
saturated. Wipe the surface of the HHU with disinfectant wipe so that the entire HHU surface remains
visibly wet for at least 1 minute.
4. Saturate a large disposable swab, such as a cervical swab, and a soft brush, with disinfectant solution. Use a
cervical swab and brush to lightly scrub the HHU seams, button perimeters, HHU nut-housing interface, and
cable-housing mating surface to ensure disinfectant contacts the crevices. Scrub for at least one minute with
the swab and brush.
5. After scrubbing seams, spray a new pre-saturated disinfectant wipe with additional disinfectant solution so
that it is visibly saturated and use this wipe to vigorously rub the surface to ensure disinfectant contact for
one minute. Discard wipe.
6. Using a new pre-saturated disinfectant wipe, rub the surface of the device so that it remains visibly wet for 3
minutes. Repeated use of pre-saturated disinfectant wipes and disinfectant spray may be required to ensure
the surface remains visibly wet for 3 minutes at room temperature (65F/18C).
7. Discard used wipes.
HHU Window
1. Visually inspect the HHU window for visible soil or streaks.
2. If the window is streaked, wipe the HHU window with pre-saturated disinfectant wipe.
3. Discard wipes as they become contaminated.
4. Visually inspect the HHU window for soil.
5. Repeat wiping until window is not soiled.
6. Disinfect window with pre-saturated disinfectant wipe. Allow the window to remain wet for 3 minutes, and
then air dry at ambient temperature (60-80F).
7. Wipe window with pre-moistened 70% IPA wipe or pre-moistened 70% IPA cotton swab applicator. Allow to
air dry at ambient temperature (68F/20C)
8. Visually inspect the HHU window for streaks. Repeat IPA wiping until the window is dry without streaks.
Allow to air dry at ambient temperature (68F/20C).
Touchscreen and Bezel
1. Caution: DO NOT spray detergent solution directly onto monitor. Rear of monitor is not protected against
fluid intrusion. Monitor should be disinfected with pre-saturated disinfectant wipes.

November 2013, CNDS-0-635-MAN_3
Page 46 of 78
2. Determine that the Touchscreen Monitor is dry. If it has not dried completely, use disposable task wipes to
wipe down the areas until dry. Discard wipe.
3. Inspect surface for cleanliness. Use one pre-saturated disinfectant wipe to completely pre-clean the surface
of all gross debris. Discard wipe.
4. Spray a new pre-saturated disinfectant wipe with additional disinfectant solution so that it is visibly
saturated. Wipe the surface of the monitor and bezel and the monitor-bezel interface with disinfectant wipe
so that the entire surface remains visibly wet for at least 1 minute. Discard wipe.
5. Use a new pre-saturated disinfectant wipes to thoroughly wet the surface. Firmly rub the monitor and bezel,
and monitor-bezel interface with the wipe to ensure disinfectant contact for one minute. Discard wipe.
6. Using a new pre-saturated disinfectant wipe, rub the surface of the device so that it remains visibly wet for 3
minutes. Repeated use of pre-saturated disinfectant wipes and disinfectant spray may be required to ensure
the surface remains visibly wet for 3 minutes at room temperature (65° F) /(18° C )
7. Discard used wipes.

November 2013, CNDS-0-635-MAN_3
Page 47 of 78
11. Maintenance Instructions and Schedule
“Maintenance, inspection, and replacement of parts for LuViva should be performed at specified intervals. Routine
cleaning and disinfection procedures should be followed as described in the Cleaning and Disinfection section of this
manual.
11.1 Required Inspection
LuViva is an electrical medical device and should be treated with care. The safety of patient and operator depend upon
the device maintaining its integrity. The operator should inspect the device for general damage each time the device is
used. If the device becomes damaged, contact Guided Therapeutics, Inc.
11.2 Replacement Parts
LuViva will require replacement of some components throughout its lifetime. Replace the bulb after 1000 hours of
use. Replace the air filter at the same time.
These replacement parts are replaceable by the operator.
All replacement parts may be ordered by calling Customer Service at (770) 242-8723.
Part Cat. No.
Cervical Guides 14100
Service Kit 14250
Monitor Assembly 13900
Power Cord Call Distributor
(Use cable such as: Interpower, 125V, 10A, Hospital Grade, NEMA 5-15 plug, EN60320 connector, 18 AWG, 3m)
Use country –specific equivalent cable, supplied by distributor)
For replacement of any other part, contact distributor or Customer Service at (770) 242-8723.
The Service Kit contains a replacement lamp assembly with tool, air filter and, if needed, USB drive with software
update. The lamp will need replacement after 1000 hours of use. An error message will appear on LuViva when this
limit is reached. LuViva must be turned off for one (1) hour prior to attempting to replace the lamp.
WARNING: The maintenance functions of replacing the lamp or air filter should not be
performed while a patient is in the room. The operator shall not touch an accessible part and a
patient simultaneously.
11.3 Replacing the Lamp and Air Filter
WARNING: The lamp remains at high temperatures during and after operation. Never let any
part of the heated lamp come in contact with your hands or skin. The heated lamp will cause
burns.
CAUTION: Wear long sleeves and face shield while replacing the lamp in LuViva.
Install air filter and new lamp assembly using the tool provided with it in the service kit, following the installation
instructions.
LuViva must be turned off for one (1) hour prior replacing the lamp in order to sufficiently cool.
Unplug LuViva from wall.
Remove Base Unit cover. Remove Lamp Access Panel.
Turn power switch to the off position.

November 2013, CNDS-0-635-MAN_3
Page 48 of 78
Using supplied tool, unscrew the lamp access door screw ¼ turn to reveal the lamp assembly. Using retained
lamp placement tool from initial install, mount the tool on the alignment pins and remove lamp assembly.
Remove the tool with the lamp assembly inside it. Do not touch the bulb or lamp assembly. Either discard
the lamp assembly as required by federal and state regulations in your area for high pressure xenon gas bulbs
or return the lamp assembly to Guided Therapeutics, Inc. for disposal and recycling. The placement tool
should be retained for future use for lamp removal.
NOTE: The lamp assembly can still be removed without the lamp placement tool. However, this increases the
risk of breaking the bulb, which is to be avoided.
To Reactivate LuViva
Once all the Service Kit items have been replaced, enable LuViva by turning on the Main Power Button on the
Base Unit.
Replace the lamp access panel and the base unit cover.
Plug LuViva back in to properly grounded wall outlet.
Turn on the unit with the HHU On/Stand-By button.
Verify operation.
11.4 Replacing Power Cord
Unplug old power cord from wall. Obtain new power cord as specified above. Plug new power cord into Base Unit.
11.5 Replacing Monitor Assembly
Remove the monitor as indicated in the installation instructions, detaching all cables prior to removing from the
Monitor Arm bracket. The existing monitor may need to be returned to Guided Therapeutics, Inc. Please see the
Warranty and Return Information section in this manual for instructions on returning the Touchscreen.
To remove the Monitor, press the monitor clamp and
slide the monitor upwards.
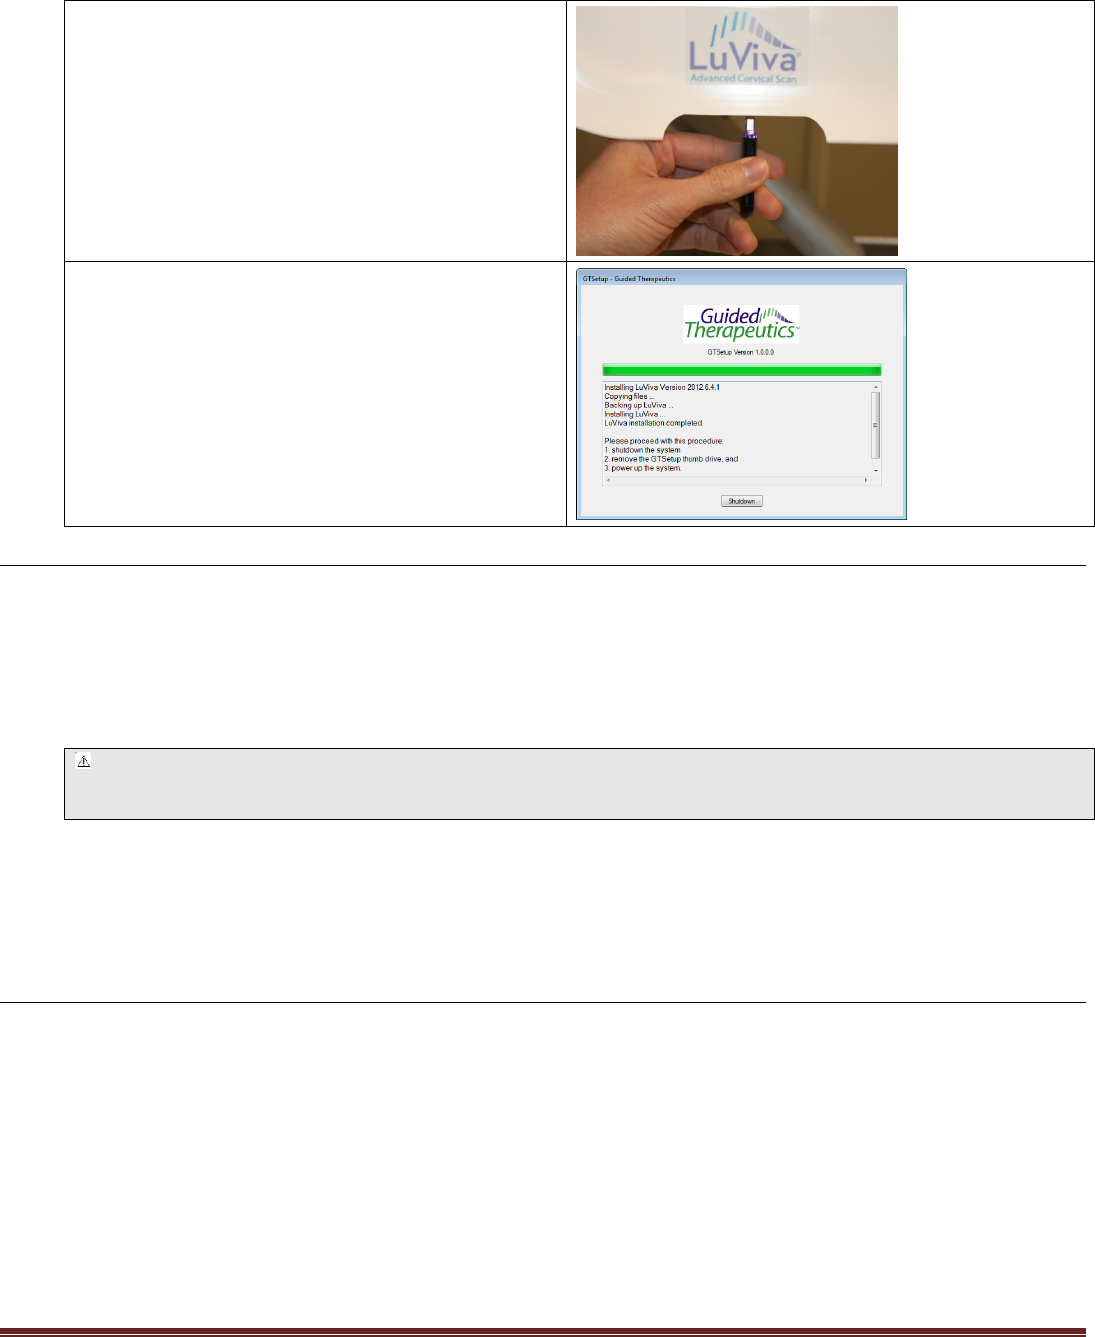
November 2013, CNDS-0-635-MAN_3
Page 49 of 78
11.6 Software Upgrade
If software upgrades are needed, the upgrade software will be made available via USB drive. Install as per set-up
instructions.
1. Obtain the software upgrade USB drive.
2. Insert the software upgrade USB drive into the
USB port of the monitor.
3. Power up the system using Standby button on the
HHU.
4. After system startup, the GT Setup software will
install LuViva software.
5. The GT Setup screen will appear and display
progress.
6. At the end of the installation, shut down the
system.
7. Remove the setup USB.
The system is ready for use.
12. Service
The lamp assembly and air filter are the only operator serviceable components. These can be accessed from the lamp
access door with supplied tool.
There are no other operator serviceable parts. Do not attempt to open any other part of LuViva. Doing so could
damage LuViva, expose the operator to risk of electric shock and invalidate the manufacturer’s warranty.
WARNING: To avoid the risk of electrical shock, this equipment must only be connected to a
supply mains with protective earth (grounded wall outlet). Improperly powering LuViva may
result in damage to LuViva and substantial risks of electric shock to the operator or patient.
CAUTION: Risk of Electrical shock. Disconnect main power before replacing the lamp assembly or air filter.
CAUTION: Risk of Electrical Shock. No user-serviceable parts inside. Only components listed as “Replacement Parts”
are replaceable by operator or service personnel. Refer servicing to qualified personnel.
13. Disassembly and Packing Instructions (for Service)
The Instrumentation package, which includes the Base Unit enclosure, umbilical cable and HHU can be completely
removed from the cart and returned to Guided Therapeutics, Inc. for service and/or repair as needed. A reusable
service case and additional packing instructions will be sent to transport the Instrumentation package.
If new packaging is needed to ship the device locally, please contact distributor and/or Guided Therapeutics, Inc. for
return packaging and packing instructions.

November 2013, CNDS-0-635-MAN_3
Page 50 of 78
14. Specifications
This section provides all the information needed for safe operation of LuViva.
14.1 Technical Description
Technical Description Information
Sections where Information can be found
Safe Operation
Operating Environment, Performing a Test, Safety
Information
Safe Transport
Moving and Transporting LuViva
Safe Storage
Environmental Specifications
Safe Installation and Safe Preparation for Use
Set-Up – Assembly, Set-Up – Software Configuration,
Operating Environment, Performing a Test
Labels & Marking Explanations
Safety Information
Environmental Conditions of Use
Environmental Specifications
Special Installation Requirements
Set-Up – Assembly, Set-Up – Software Configuration
Means of Isolating LuViva from Supply Mains
System Specifications
Unauthorized Modification of LuViva
Safety Information
Power Cord
Replacement Parts
Mechanical Drawings for Maintenance Procedures
Maintenance Instructions and Schedule
Functional Description
Device Description
Displayed Values—Range, Accuracy and Precision
Performance Characteristics

November 2013, CNDS-0-635-MAN_3
Page 51 of 78
14.2 Environmental Specifications
Operating Conditions
LuViva
CG
Temperature
10C - 40C
(50F – 104F)
10C - 40C
(50F – 104F)
Humidity
30% to 75%
non-condensing
30% to 75%
non-condensing
Altitude
700 hPa to 1060 hPa
700 hPa to 1060 hPa
Transport Conditions – Within
Same Facility
LuViva
CG
Temperature
10C - 40C
(50F – 104F)
10C - 40C
(50F – 104F)
Humidity
10% to 95%
non-condensing
10% to 95%
non-condensing
Altitude
700 hPa to 1060 hPa
700 hPa to 1060 hPa
Transport Conditions – Between
Different Facilities
LuViva
CG
Temperature
-20C to 50C
(-4F – 140F)
-20C to 50C
(-4F – 140F)
Do not expose cervical
guides to temperatures
above 50C (122F). Guided
Therapeutics, Inc. cannot
guarantee the performance
of the cervical guide when
stored at temperatures
outside of the recommended
range.
Humidity
10% to 95%
non-condensing
10% to 95%
non-condensing
Special Instruction
Transport in packaged
configuration
CG-20 packaged
configuration
Storage Conditions
LuViva
CG
Temperature
-20C to 50C
(-4F to 140F)
The cervical guides are best
when stored at
-20C to 30C
(-4F to 86F)
Humidity
10% to 95%
non-condensing
10% to 95%
non-condensing

November 2013, CNDS-0-635-MAN_3
Page 52 of 78
14.3 Physical and System Specifications
Physical Specifications
LuViva
CG
Life Span
5 years
Expiration Date
Total Weight
125 lbs. (57kg)
0.2 pounds, 90 grams
HHU Weight
4.5 lbs. (2kg)
Instrumentation package
(Base Unit- HHU)
combined weight
33 lbs. ( 15 kg)
Total Dimensions
23 W x 26D x 60”H
(58 cmW x 66cmD x 152cmH)
5” x 13”
(0.13m x 0.33m) packaged
Display Dimensions
17” diag. (43cm)
Light Source
Replaceable Xenon Arc Lamp
Life Span of Light Source
Replace after 1000 hours
Shelf Life of CG
Expiration Date
Result Format
Discreet Level:
Low /High likelihood of neoplasia
or
Low/Moderate/High likelihood of neoplasia
AC Power Input
100-240V AC, 10.0 Amps 50-60Hz
Means of Separation from Supply Mains
Double insulation and metal (aluminum)
enclosure. Applied parts are not patient
connections
Device Classification
Class I ME Equipment
Mode of Operation
Continuous
Classification-Degree of Protection
Against Electrical Shock
Type B Applied Part
Degree of Protection Against Electrical
Shock
Not suitable for oxygen rich environment.
IP Rating—Degree of Protection Against
Ingress of Water
IP20
14.4 Standards Compliance
The device is designed to conform to the following Standards:

November 2013, CNDS-0-635-MAN_3
Page 53 of 78
ANSI/AAMI ES60601-1:2005: Medical electrical equipment, Part 1: General requirements for basic safety and
essential performance
Medical electrical equipment Part 1: General requirements for safety (IEC 60601-1 1988 A1:1991 +A2: 1995).
ANSI/AAMI/IEC 60601-1-2:2007: Medical electrical equipment — Part 1-2: General requirements for basic
safety and essential performance. - Collateral standard: Electromagnetic compatibility - Requirements and tests.
BS EN 60601-1-2:2007
Medical electrical equipment. General requirements for basic safety and essential performance. Collateral
standard. Electromagnetic compatibility. Requirements and tests.
CAN/CSA C22.2 NO. 60601-1-2-08 Medical electrical equipment - Part 1-2: General requirements for basic safety
and essential performance - Collateral standard: Electromagnetic compatibility - Requirements and tests
(Adopted IEC 60601-1-2:2007, third edition, 2007-03)
01-Dec-2008.
IEC 60601-2-57 Ed. 1.0 b:2011 / CAN/CSA C22.2 NO. 60601-2-57:11
Medical electrical equipment - Part 2-57: Particular requirements for the basic safety and essential performance of
non-laser light source equipment intended for therapeutic, diagnostic, monitoring and cosmetic/aesthetic use.
Medical equipment with respect to electric shock, fire, and mechanical hazards only in accordance with
AAMI/IEC/EN 60601-1.
Intentional emitter
o US/ FCC part 15, Subpart C
o FCC ID: 2AAAW-13500
o Changes or modifications not expressly approved by the party responsible for compliance could void the
user's authority to operate the equipment.
This device complies with Part 15 of the FCC rules. Operation is subject to the following conditions: (1) this device
may not cause harmful interference, and (2) this device must accept any interferences received, including
interference that may cause undesired operation.
Canada/RSS-210 Annex 2 Low-power License-exempt Radiocommunication Devices (All Frequency
Bands): Category I Equipment
o MODEL: 13500
o IC: 11125A-13500
EU/EN 300 330-2 Electromagnetic compatibility and Radio spectrum Matters (ERM); Short Range Devices
(SRD);Radio equipment in the frequency range 9 kHz to 25 MHz and inductive loop systems in the frequency
range 9 kHz to 30 MHz; Part 2: Harmonized EN covering the essential requirements of article 3.2 of the R&TTE
Directive
EU/EN 301 489-1 Electromagnet compatibility and Radio spectrum Matters (ERM); ElectroMagnetic
Compatibility standard for radio equipment

November 2013, CNDS-0-635-MAN_3
Page 54 of 78
14.4.1 Emitted Radiation Characteristics
LuViva emits low levels of UV and visible light. It also emits RF.
UV/visible light from 300 to 800 nm is delivered to the patient. Per analysis to IEC 60601-2-57 ed 1.0 (01-2011)
IEC 60601-2-57 Medical electrical equipment - Part 2-57: Particular requirements for the basic safety and
essential performance of non-laser light source equipment intended for therapeutic, diagnostic, monitoring and
cosmetic/aesthetic use, LuViva is in the category of exempt.
IEC 60601-2-57 Ed. 1.0 b:2011 / CAN/CSA C22.2 NO. 60601-2-57:11
Medical electrical equipment - Part 2-57: Particular requirements for the basic safety and essential performance of
non-laser light source equipment intended for therapeutic, diagnostic, monitoring and cosmetic/aesthetic use.
60601-2-57 RESULTS SUMMARY (ANNEX BB: TABLE BB.1)
Hazard
Wavelength
Range (nm)
Symbol
Measurements Included
(duration in seconds listed
in parenthesis)
Emission Limits
for Exempt
Group (60601-2-
57)
GTI Results
(% of Limits in
parenthesis)
Units
Actinic UV
180-400
Es
F1, Reflectance &
Illumination
30
0.826
(2.75%)
J/m2
Near UV
315-400
EUVA
All
10000
290
(2.90%)
J/m2
Blue Light
300-700
LB
All
106
1.87x10⁴
(1.87%)
J/m2sr1
Retinal Thermal
380-1400
LR
F3 (2)
3.66x10⁵
9.92x10³
(2.36%)
W/ m2sr1
Reflectance (0.5)
5.95x10⁵
1.25x10³
(0.21%)
W/ m2sr1
Illumination (180)
2.81x10⁵
1.70x10³
(0.60%)
W/ m2sr1
Retinal Thermal,
weak visual
stimulus
780-1400
LIR
Reflectance & Illumination
6000/α
N/A
Corneal / Lens
IR
780-3000
EIR
Reflectance (0.5)
3.03x10⁴
2.43
(0.01%)
W/m2
Illumination (180)
3.66x10²
0.729
(0.20%)
W/m2
14.5 Human Blood Derivatives
LuViva Advanced Cervical Scan and Cervical Guides contain no human blood derivatives.
14.6 Lifetime Declaration
LuViva has an expected lifetime of 5 years.
14.7 Disposal and Return Instructions
Dispose of device in accordance with local regulations. See specific guidance below.
14.7.1 Disposal of LuViva (excluding monitor)
Dispose of LuViva as electronic waste following the federal and state laws, regulations and requirements in your area.
The lamp assembly contains a xenon gas lamp at high pressure. It is to be disposed of as industrial waste following
the federal and state laws, regulations and requirements in your area. The air filter can be disposed of through
municipal waste. Contact Guided Therapeutics, Inc. for additional information.

November 2013, CNDS-0-635-MAN_3
Page 55 of 78
14.7.2 Disposal of LuViva Monitor
The monitor contains mercury. Dispose and/or recycle monitor in accordance with mercury-containing waste
following the federal and state laws, regulations and requirements in your area.
14.7.3 Disposal of CG
After use, the CG should be disposed of as medical waste following the federal and state laws, regulations and
requirements in your area.
14.7.4 Disposal of Lamp
Either discard the lamp assembly as required by federal and state regulations in your area for high pressure xenon gas
bulbs or return the lamp assembly to Guided Therapeutics, Inc. for disposal and recycling
14.7.5 WEEE/RoHS Recycling Directives
If you are subject to the WEEE/RoHS recycling directives, call customer service for assistance.
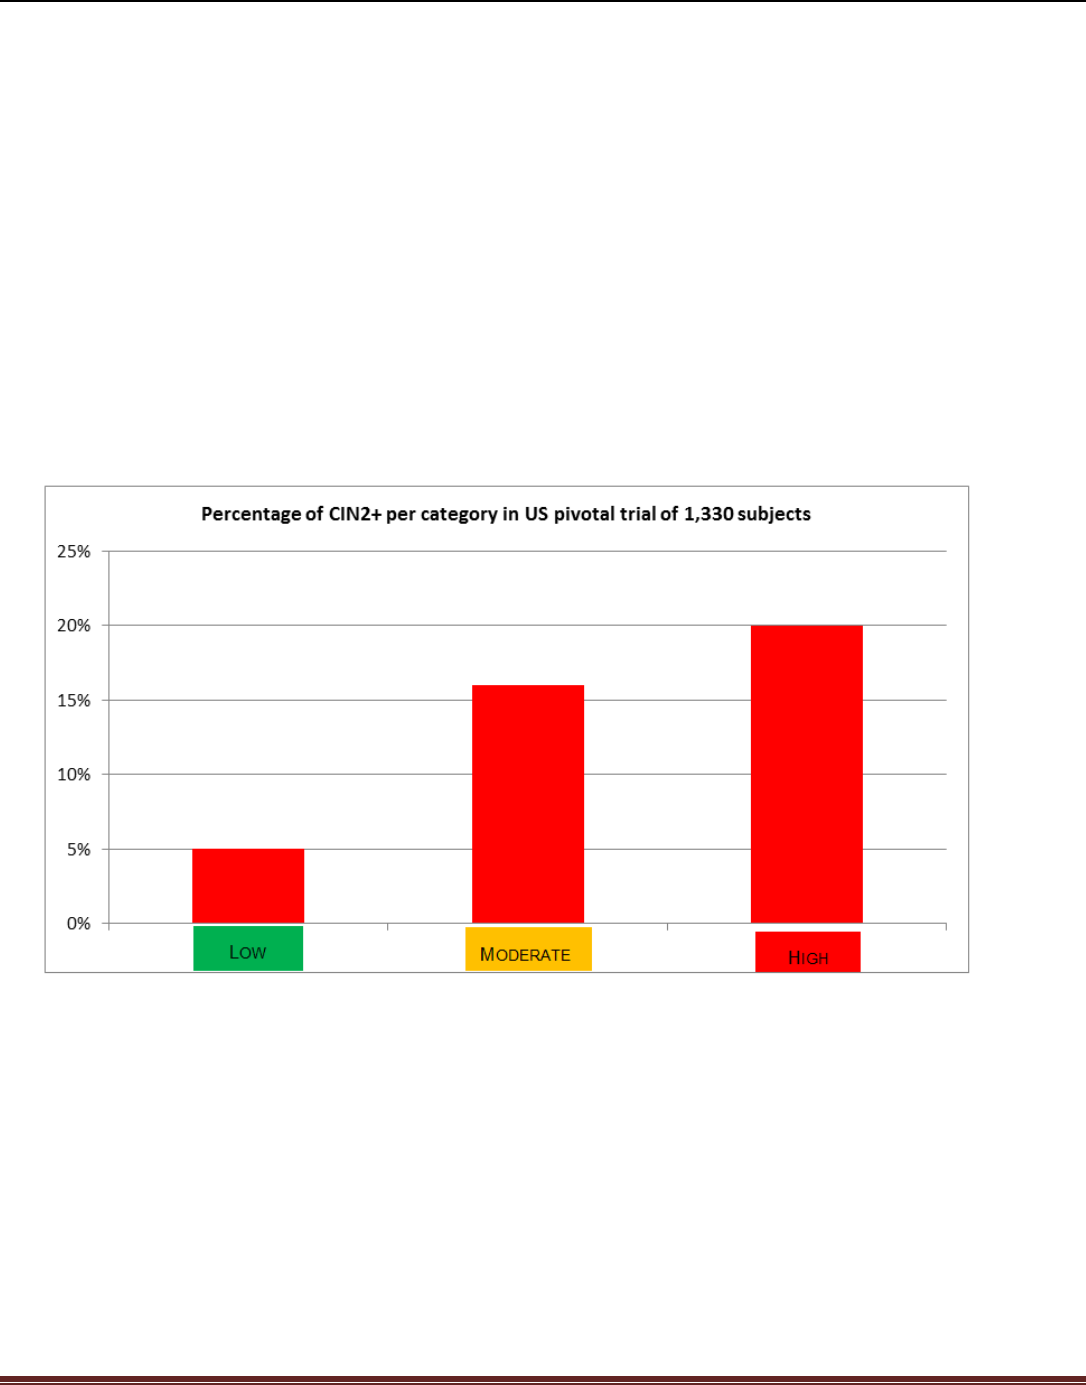
November 2013, CNDS-0-635-MAN_3
Page 56 of 78
15. Performance Characteristics
LuViva® Advanced Cervical Scan indicates the likelihood of Cervical Intraepithelial Neoplasia Grade II and higher
(CIN2+) in a referred population (See Indications for Use) at the time the scan is given to the patient. The likelihood
of CIN2+ is presented on a three-point scale: Low (Green), Moderate (Yellow) and High (Red).
LuViva generates the scale by using proven spectroscopy technology to capture spectral data from multiple points on
the cervix and the distal endocervix. The data are integrated into LuViva’s algorithm to produce the index indicating
the likelihood of CIN2+.
LuViva’s pivotal clinical trial of 1,330 patients, referred for additional testing after screening, prospectively
demonstrated that as the index increased in magnitude, so did the likelihood of CIN2+, as documented by quality-
controlled, multi-reader histopathology results.
According to the pivotal clinical trial results, a patient with CIN2+ is approximately four times more likely to be in the
High (Red) category than the Low (Green) category and a patient with CIN3+ (including cancer) is approximately
seven times more likely to be in the High (Red) category than the Low (Green) category. A patient in either the Low
(Green) or Moderate (Yellow) category is least likely to harbor a CIN2+ lesion. (Chart 1)
The Low (Green) category contains the most normal and CIN1 cases (95%) and fewest CIN2+ (5%). The High (Red)
category contains the most CIN2+ cases (20%) and fewest normal (36%) and CIN1 (44%) cases. The Moderate (Yellow)
category is most likely to contain a mix of normal and CIN1 (84%) cases with some CIN2+ cases. (Table 1)
November 2013, CNDS-0-635-MAN_3
Page 57 of 78
Table 1: LuViva three level scale with percentages of normal, CIN1, CIN2 and CIN3 (n = 1,330)
Note: CIN3+ includes cancer
Alternative or complimentary table
LuViva
Color
Alert Code
Risk of High
Grade
Dysplasia
Number
of
Patients
%Normal/CIN1
%
CIN2+
GREEN
LOW
428
95
5
YELLOW
MODERATE
372
84
16
RED
HIGH
530
80
20
Note: CIN2+ includes cancer
Table 2. Distribution of cervical disease in US pivotal trial (n = 1,330)
Disease State by Histopathology
Number of Patients
No disease (Normal)
562
CIN1
577
CIN2
137
CIN3+
54
Total
1,330
Using the diagnostic performance characteristics of sensitivity, specificity and negative predictive value, results at the
two thresholds of the scale, or cut-off points, are presented.
Sensitivity, Specificity and Negative Predictive Value of LuViva at the Low/Moderate (Green/Yellow)
Threshold
At the threshold where a Low (Green) result transitions to the Moderate (Yellow) result:
Sensitivity or the ability of LuViva to correctly identify CIN2+ patients was 87% (167/191) and for CIN3+ patients
it was 89% (48/54)
Specificity or the ability of LuViva to correctly identify normal or benign patients was 40% (222/562) and for CIN1
patients it was 32% (182/577)
Adding the normal/benign patients with the CIN1 patients resulted in a specificity of 35% (404/1139)
LuViva
Color
Alert Code
Risk of High
Grade
Dysplasia
Number
of
Patients
%Normal
%
CIN1
%
CIN2
%
CIN3+
GREEN
LOW
428
52
43
4
1
YELLOW
MODERATE
372
41
43
13
3
RED
HIGH
530
36
44
13
7
November 2013, CNDS-0-635-MAN_3
Page 58 of 78
Perhaps most importantly, LuViva’s Negative Predictive Value of 99% indicates that a patient with a negative
(Green) LuViva result has only a 1% chance of a CIN3+ lesion.
Table 3: Sensitivity/Specificity and Negative Predictive Values (CIN2 and CIN3+)
Sensitivity
CIN3+
Sensitivity
CIN2+
Specificity
Normal
Specificity
CIN1
Specificity
Normal/CIN1
NPV
CIN2
NPV
CIN3+
Low/Moderate
Threshold
89%
87%
40%
32%
35%
96%
99%
Note: CIN3+ includes cancer
Sensitivity, Specificity and Negative Predictive Value of LuViva at the Moderate/High (Yellow/Red)
Threshold
At the threshold where a Moderate (Yellow) result transitions to the High (Red) result:
Sensitivity or the ability of LuViva to correctly identify CIN2+ patients was 56% (107/191) and for CIN3+ patients
it was 67% (36/54).
Specificity or the ability of LuViva to correctly identify normal or benign patients was 66% (373/562) and for CIN1
patients it was 56% (343/577).
This level of sensitivity and specificity indicates that patients with a LuViva result in the Moderate or (Yellow)
zone are transitional, many with CIN1 and some with CIN2 lesions, but not as many normal patients or patients with
CIN3+ lesions.
Adding the normal/benign patients with the CIN1 patients resulted in a specificity of 63% (716/1139).
Perhaps most importantly, LuViva’s Negative Predictive Value of 98% indicates that a patient with a negative
(Green or Yellow) LuViva result has only a 2% chance of a CIN3+ lesion.
Table 4: Sensitivity/Specificity and Negative Predictive Values (Cin2 and CIN3+)
Sensitivity
CIN3+
Sensitivity
CIN2+
Specificity
Normal
Specificity
CIN1
Specificity
Normal/ CIN1
NPV
CIN2
NPV
CIN3+
Moderate/High
Threshold
67%
56%
66%
59%
63%
92%
98%
Note: CIN3+ includes cancer

November 2013, CNDS-0-635-MAN_3
Page 59 of 78
16. EMC Information: Guidance and Manufacturer’s Declarations
The following tables contain the manufacturer’s declarations for the LuViva Advanced Cervical Scan’s electromagnetic
emissions, electromagnetic immunity and recommended separation distances between LuViva and portable and
mobile RF communications equipment, as well as a list of compliant cables.
CAUTION: Medical Electrical Equipment needs special precautions regarding EMC and needs to be
installed and put into service according to the EMC information provided in this manual.
CAUTION: Portable and mobile RF communications equipment can affect Medical Electrical
Equipment.
CAUTION: LuViva must not be used adjacent to or stacked with other equipment. If adjacent or
stacked use is necessary, LuViva should be observed to verify normal operation in the configuration
in which it will be used.
Guidance and Manufacturer’s Declaration – Electromagnetic Emissions
LuViva Advanced Cervical Scan is intended for use in the electromagnetic environment specified below. The
customer or the user of LuViva Advanced Cervical Scan should assure that it is used in such an environment.
Emissions test
Compliance
Electromagnetic environment - guidance
RF emissions
CISPR 11
Group 1
LuViva Advanced Cervical Scan must emit electromagnetic
energy in order to perform its intended function. Nearby
electronic equipment may be affected.
RF emissions
CISPR 11
Class A
LuViva Advanced Cervical Scan is suitable for use in all
establishments other than domestic, and may be used in
domestic establishments and those directly connected to
the public low voltage power supply network that supplies
buildings used for domestic purposes, provided the
following warning is heeded:
Warning: This equipment /system is intended for use by
healthcare professionals only. The equipment/system may
cause radio interference or may disrupt the operation of
nearby equipment. It may be necessary to take mitigation
measures, such as re-orienting or relocation LuViva
Advanced Cervical Scan or shielding the location.
Harmonic emissions
IEC 61000-3-2
Class A
Voltage
fluctuations/flicker
emissions
IEC 61000-3-3
Complies

November 2013, CNDS-0-635-MAN_3
Page 60 of 78
Guidance and Manufacturer’s Declaration – Electromagnetic Immunity
LuViva Advanced Cervical Scan is intended for use in the electromagnetic environment specified below. The
customer or the user of LuViva Advanced Cervical Scan should assure that it is used in such an environment.
Immunity Test
IEC 60601 test level
Compliance level
Electromagnetic Environment –
Guidance
Electrostatic
discharge (ESD)
IEC 61000-4-2
+/- 6 kV contact
+/- 8 kV air
+/- 6 kV contact
+/- 8 kV air
Floors should be wood, concrete or ceramic tile.
If floors are covered with synthetic material, the
relative humidity should be at least 30%.
Electrical fast
transient/burst
IEC 61000-4-4
+/- 2kV for power
supply lines
+/- 1kV for
input/output lines
+/- 2kV for power
supply lines
+/- 1kV for
input/output lines
Mains power quality should be that of a typical
commercial or hospital environment.
Surge
IEC 61000-4-5
+/- 1kV line(s) to
line(s)
+/- 2kV line(s) to
earth
+/- 1kV line(s) to
line(s)
+/- 2kV line(s) to
earth
Mains power quality should be that of a typical
commercial or hospital environment.
Voltage dips, short
interruptions and
voltage variations
on power supply
input lines
IEC61000-4-11
<5% UT
(>95% dip in UT)
for 0,5 cycle
40% UT
(60% dip in UT)
for 5 cycles
70% UT
(30% dip in UT)
for 25 cycles
<5% UT
(>95% dip in UT)
for 5 s
<5% UT
(>95% dip in UT)
for 0,5 cycle
40% UT
(60% dip in UT)
for 5 cycles
70% UT
(30% dip in UT)
for 25 cycles
<5% UT
(>95% dip in UT)
for 5 s
Mains power quality should be that of a typical
commercial or hospital environment. If the user
of LuViva Advanced Cervical Scan requires
continued operation during power mains
interruptions, it is recommended that LuViva
Advanced Cervical Scan be powered from an
uninterruptible power supply or a battery.
Power frequency
(50/60 Hz)
magnetic field
IEC 61000-4-8
3 A/m
3A/m
Power frequency magnetic fields should be a
levels characteristic of a typical location in a
typical commercial or hospital environment.
Note: UT is the a.c. mains voltage prior to application of the test level.
November 2013, CNDS-0-635-MAN_3
Page 61 of 78
Guidance and manufacturer’s declaration – electromagnetic immunity
LuViva Advanced Cervical Scan is intended for use in the electromagnetic environment specified below. The
customer or the user of LuViva Advanced Cervical Scan should assure that it is used in such an environment.
Immunity Test
IEC 60601 test level
Compliance level
Electromagnetic environment - guidance
Conducted RF
IEC 61000-4-6
Radiated RF
IEC 61000-4-3
3 Vrms
150 kHz to 80 MHz
3 V/m
80 MHz to 2.5 GHz
3 V
3 V/m
Portable and mobile RF communications
equipment should be used no closer to any part
of LuViva Advanced Cervical Scan, including
cables, than the recommended separation
distance calculated from the equation applicable
to the frequency of the transmitter.
Recommended separation distance:
d =1.2√P
d=1.2√P 80 MHz to 800 MHz
d=2.3√P 800 MHz to 2.5 GHz
Where P is the maximum output power rating of
the transmitter in watts (W) according to the
transmitter manufacturer and d is the
recommended separation distance in meters.
Field strengths from fixed RF transmitters, as
determined by an electromagnetic site surveya,
should be less that the compliance level in each
frequency rangeb.
Interference may occur in the vicinity of
equipment marked with the following symbol:
NOTE 1 At 80MHz and 800MHz, the higher frequency range applies
NOTE 2 These guidelines may not apply in all situations. Electromagnetic propagation is affected by
absorption and reflection from structures, objects and people.
a Field strengths from fixed transmitters, such as base stations for radio (cellular/cordless) telephones and
land mobile radios, amateur radio, AM and FM radio broadcast and TV broadcast cannot be predicted theoretically
with accuracy. To assess the electromagnetic environment due to fixed RF transmitters, an electromagnetic site
survey should be considered. If the measured field strength in the location in which LuViva Advanced Cervical Scan
is used exceeds the applicable RF compliance level above, LuViva Advanced Cervical Scan should be observed to
verify normal operation. If abnormal performance is observed, additional measures may be necessary, such as re-
orienting or relocating LuViva Advanced Cervical Scan.
b Over the frequency range 150 kHz to 80 MHz, field strengths should be less than 3 V/m.
November 2013, CNDS-0-635-MAN_3
Page 62 of 78
Recommended separation distances between portable and mobile RF communication equipment
and LuViva Advanced Cervical Scan
LuViva Advanced Cervical Scan is intended for use in the electromagnetic environment in which radiated RF
disturbances are controlled. The customer or the user of LuViva Advanced Cervical Scan can help prevent
electromagnetic interference by maintaining a minimum distance between portable and mobile RF communications
equipment (transmitters) and LuViva Advanced Cervical Scan as recommended below, according to the maximum
output power of the communications equipment.
Rated maximum output power of
transmitter
W
Separation distance according to frequency of transmitter, m
150 kHz to 80 MHz
d=1.2√P
80 MHz to 800 MHz
d=1.2√P
800 MHz to 2.5 GHz
d=2.3√P
0.01
0.12
0.12
0.23
0.1
0.38
0.38
0.73
1
1.2
1.2
2.3
10
3.8
3.8
7.3
100
12
12
23
For transmitters rated at a maximum output power not listed above, the recommended separation distance d in
meters (m) can be estimated using the equation applicable to the frequency of the transmitter, where P is the
maximum output power rating of the transmitter in watts (W) according to the transmitter manufacturer.
NOTE 1 At 80 MHz and 800 MHz, the separation distance for the higher frequency range applies.
NOTE 2 These guidelines may not apply in all situations. Electromagnetic propagation is affected by
absorption and reflection from structures, objects and people.
Compliant Cables
Cable or Accessory
Maximum Length
86610610 or equivalent
For example (Interpower, 125V, 10A,
Hospital Grade, NEMA 5-15 plug,
EN60320 connector, 18 AWG, 3m)
Use equivalent cable compatible with
local mains supply.
3m
CAUTION: Use of accessories and cables other than those specified, with exception of parts sold by
Guided Therapeutics, Inc. as replacements for internal components, may result in increased
emissions or decreased immunity of LuViva Advanced Cervical Scan.
RF Frequency Band
LuViva Advanced Cervical Scan incorporates an RF transmitter and RF receiver that operate within a frequency band
of 13.56 MHz +/- 7 kHz.
CAUTION: LuViva Advanced Cervical Scan may be interfered with by other equipment, even if that
other equipment complies with CISPR emission requirements.

November 2013, CNDS-0-635-MAN_3
Page 63 of 78
17. Warranty and Return Policy Information
Guided Therapeutics, Inc. warrants that LuViva® Advanced Cervical Scan will be free from defect in materials and
workmanship for one (1) year from the date of purchase. If, during this one year period, LuViva does not work
properly because of a defect in materials or workmanship, Guided Therapeutics, Inc. will repair LuViva or replace it
free of charge. The warranty of the repaired or replacement LuViva will expire on the date of the original warranty
expiration.
This warranty applies to the original purchaser of LuViva.
This warranty does not cover damage due to external causes, including accident, abuse, misuse, problems with
electrical power, servicing not authorized by Guided Therapeutics, Inc., usage not in accordance with product
instructions and problems caused by use of parts and components not supplied or recommended by Guided
Therapeutics, Inc.
Guided Therapeutics, Inc. will repair or replace products covered under this limited warranty that are returned to
Guided Therapeutics, Inc.’s facility. To request warranty service, you must contact Guided Therapeutics, Inc. within
the warranty period at (770) 242-8723 or your local distributor. You must ship the products back to Guided
Therapeutics, Inc. in their original or equivalent packaging, prepay shipping charges and insure the shipment or
accept the risk of loss or damage during shipment. Guided Therapeutics, Inc. will ship the repaired or replacement
products to you freight prepaid. Guided Therapeutics, Inc. makes no express warranties beyond those stated in this
warranty statement. Guided Therapeutics, Inc. disclaims all other warranties, express or implied.
18. Patent Information
The Cervical Guide and LuViva Advanced Cervical Scan device shall be labeled to inform the operator and possible
manufacturers with an indication that the Cervical Guide and LuViva Advanced Cervical Scan are manufactured under
patent protection.
The product labeling shall include the statements:
LuViva® Advanced Cervical Scan and LuViva® Cervical Guide are covered by one or more of the following patents
and patents pending in the United States of America and other countries:
5,203,328
5,582,168
5,792,049
5,860,421
5,924,981
6,002,482
6,045,502
6,055,451
6,192,734
6,226,541
6,400,875
6,577,391
6,590,651
6,792,982
6,870,620
6,975,899
7,006,220
7,301,629
For an updated list of applicable patents, go to www.guidedinc.com/patents.htm

November 2013, CNDS-0-635-MAN_3
Page 64 of 78
19. References
Colposcopy and Programme Management, Guidelines for the NHS Cervical Screening Programme, Second Edition.
NHSCSP Publication No. 20 May 2010.
20. Set-Up - Assembly
LuViva has been supplied to you in one box with multiple internal packages. Each package contains a critical
component to the device.
1. LuViva Base Unit Cart with locking wheels
2. Hand-Held Unit (attached to Base Unit with umbilical cable)
3. Monitor Arm (in box)
4. Display Monitor (in box)
5. Base Unit Outer Cover (installed)
6. Installation USB thumb drive in documentation packet
7. Unpacking and Assembly instructions
8. User Manual (also found online)
9. Service Kit with filter and replaceable lamp assembly
10. CG-20 (Box of Cervical Guides (Single Use Disposables))
11. Power cord (supplied by distributor; may be in separate box or attached to main shipper)
20.1 Visual Overview of Unpacking and Assembly steps:
November 2013, CNDS-0-635-MAN_3
Page 65 of 78
November 2013, CNDS-0-635-MAN_3
Page 66 of 78
November 2013, CNDS-0-635-MAN_3
Page 67 of 78
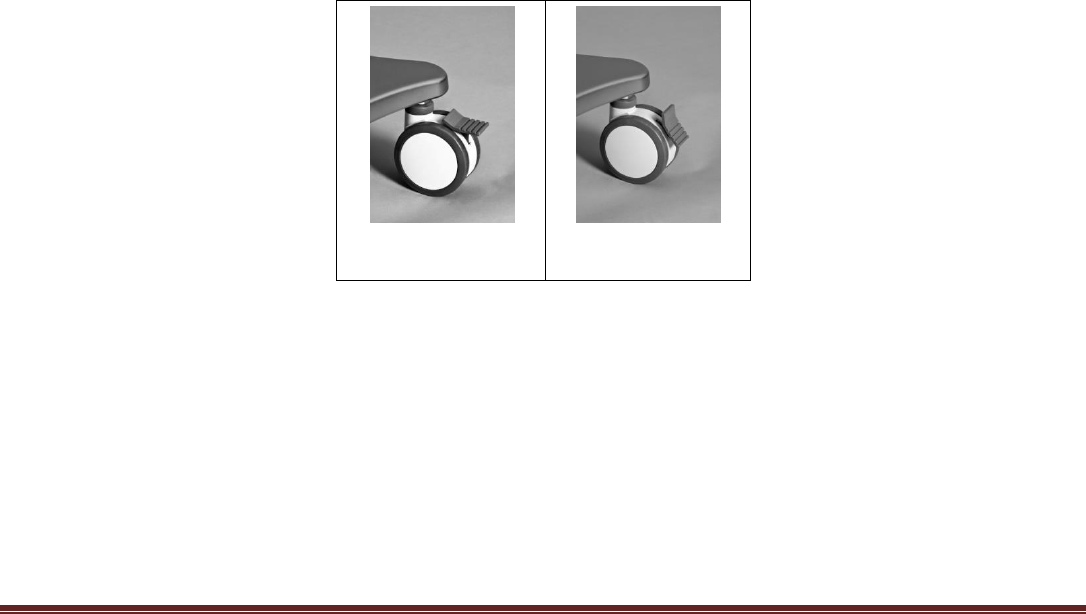
November 2013, CNDS-0-635-MAN_3
Page 68 of 78
20.2 Remove LuViva from Shipping Container
Visually inspect all components for physical damage. If damage is noted, please contact your local
dealer/distributor.
Overview of unpacking steps:
LuViva is supplied in a single crate with packing materials and boxed items contained within.
LuViva is supplied fully assembled with the exceptions of: the monitor arm, monitor, Service Kit contents (air
filter and lamp assembly) and power cord. These items must be installed.
The power cord will be supplied separately by the distributor, and not included in the crate.
Ensure pallet is on flat surface, with a minimum of 10 feet of open space in front of the pallet.
Cut banding straps on pallet.
Open the top of the box and remove Unpacking and Assembly Instructions and review.
Remove documentation packaging (including installation thumb drive), Cervical Guide shipping box, monitor arm
box and service kit.
Remove foam.
Insert ramp under the pallet, wedging foam between pallet and floor.
Remove the monitor box and HHU support section and place the HHU, still in protective foam, on the ground
next to the pallet. Ensure that the HHU is not in front of the ramp.
Dock HHU; use restraint foam to secure HHU in dock.
Remove the rear foam, rocking the unit gently forward to ease removal. Then rock the unit back to remove front
foam.
Orient and unlock wheels.
Without rolling over umbilical cord, roll the instrument out down the ramp.
If needed, move the unassembled LuViva and its accessory items to a location appropriate for assembly.
Lock the front wheels for stability during final assembly. Push the wheel locks down to lock wheels into place.
Unlocked
Locked
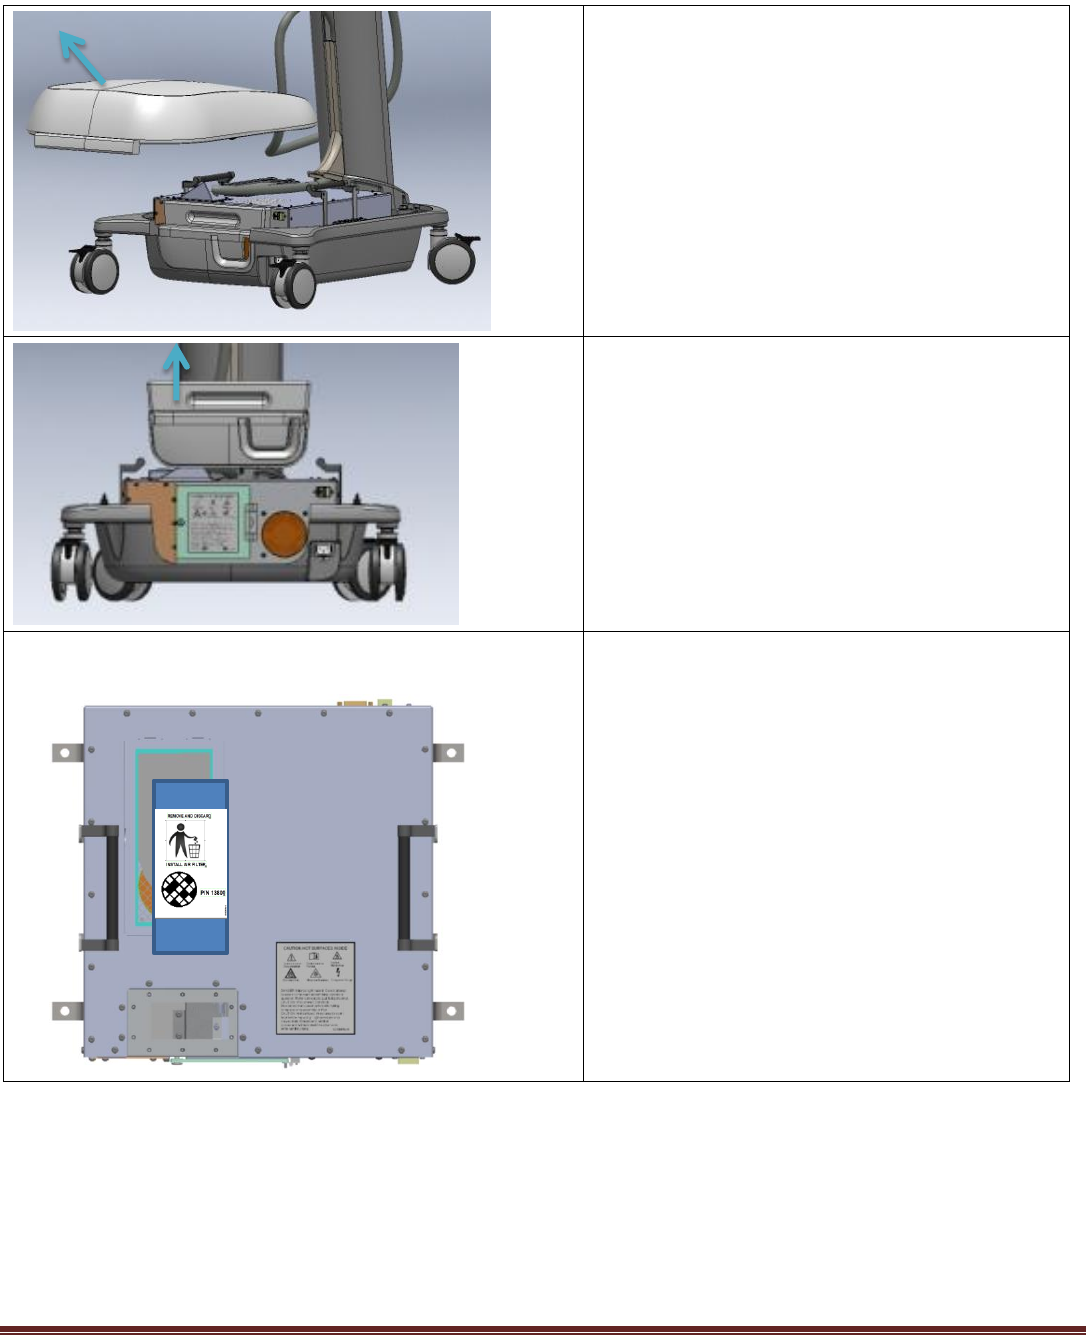
November 2013, CNDS-0-635-MAN_3
Page 69 of 78
20.3 Base Unit - Air Filter and Lamp Assembly Installation
20.3.1 Install Air Filter
Lock wheels for additional stability.
Remove base unit cover to access base unit. Remove
protective plastic coverings.
Remove lamp access panel to access base unit.
Top View of Base Unit
Remove any protective covering from the top of the
base unit.
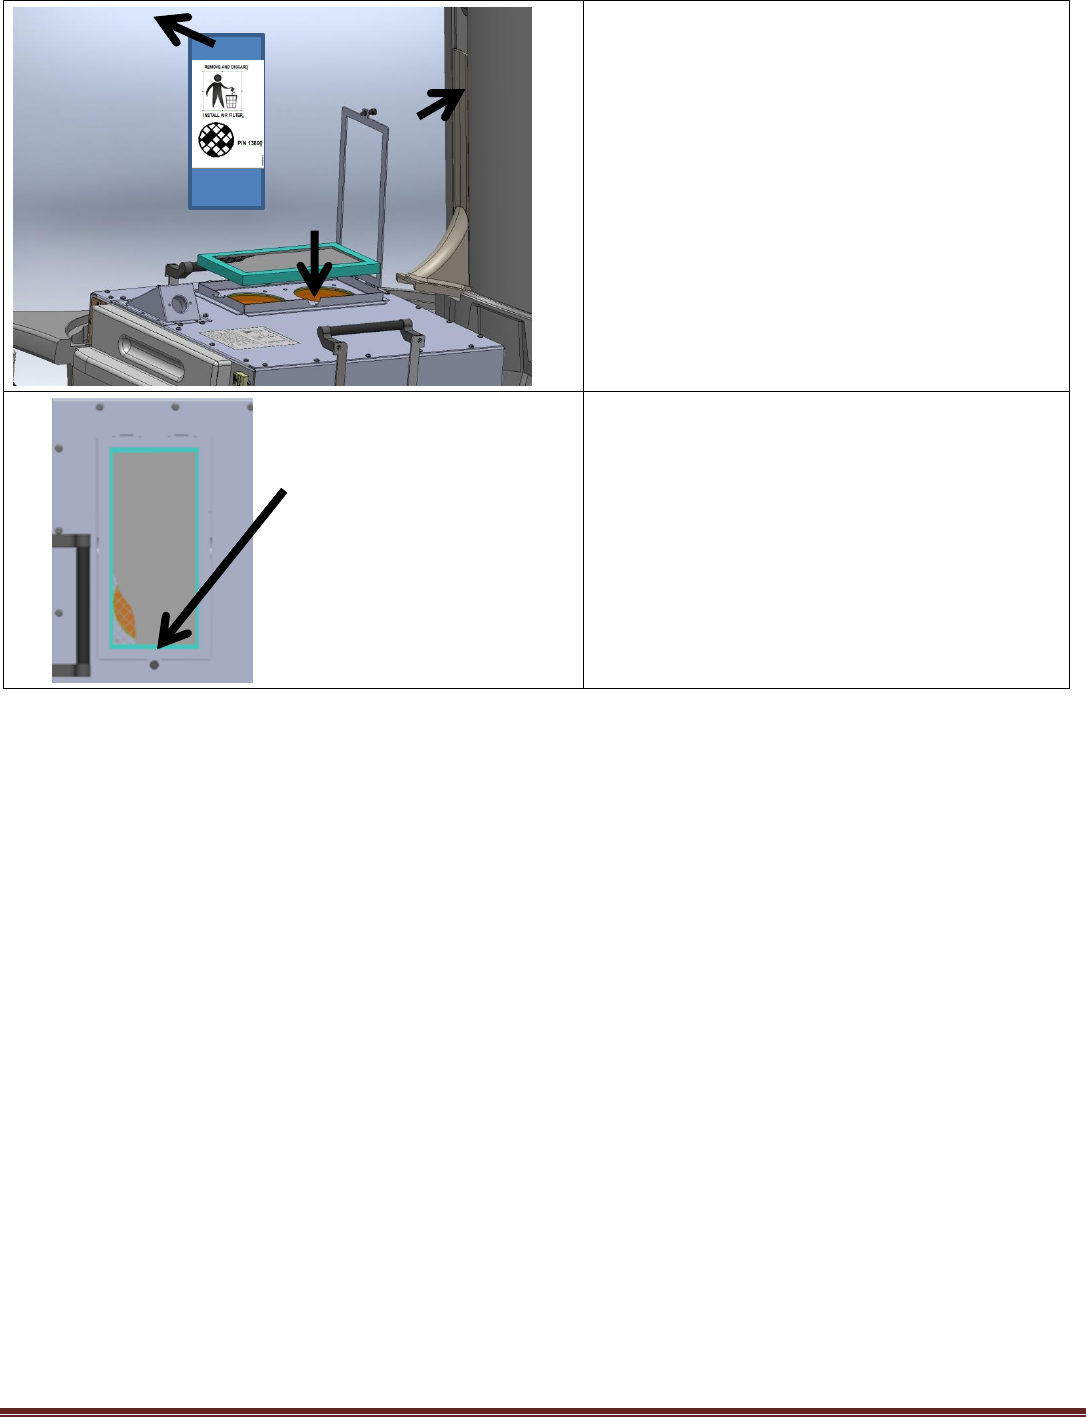
November 2013, CNDS-0-635-MAN_3
Page 70 of 78
An air filter holder is mounted to the top of the base
unit. Open the holder by unscrewing the screw and
lifting the retaining frame.
Remove protective covering from air filter.
Install air filter from the Service Kit.
Close the filter retaining frame and tighten screw by
hand.
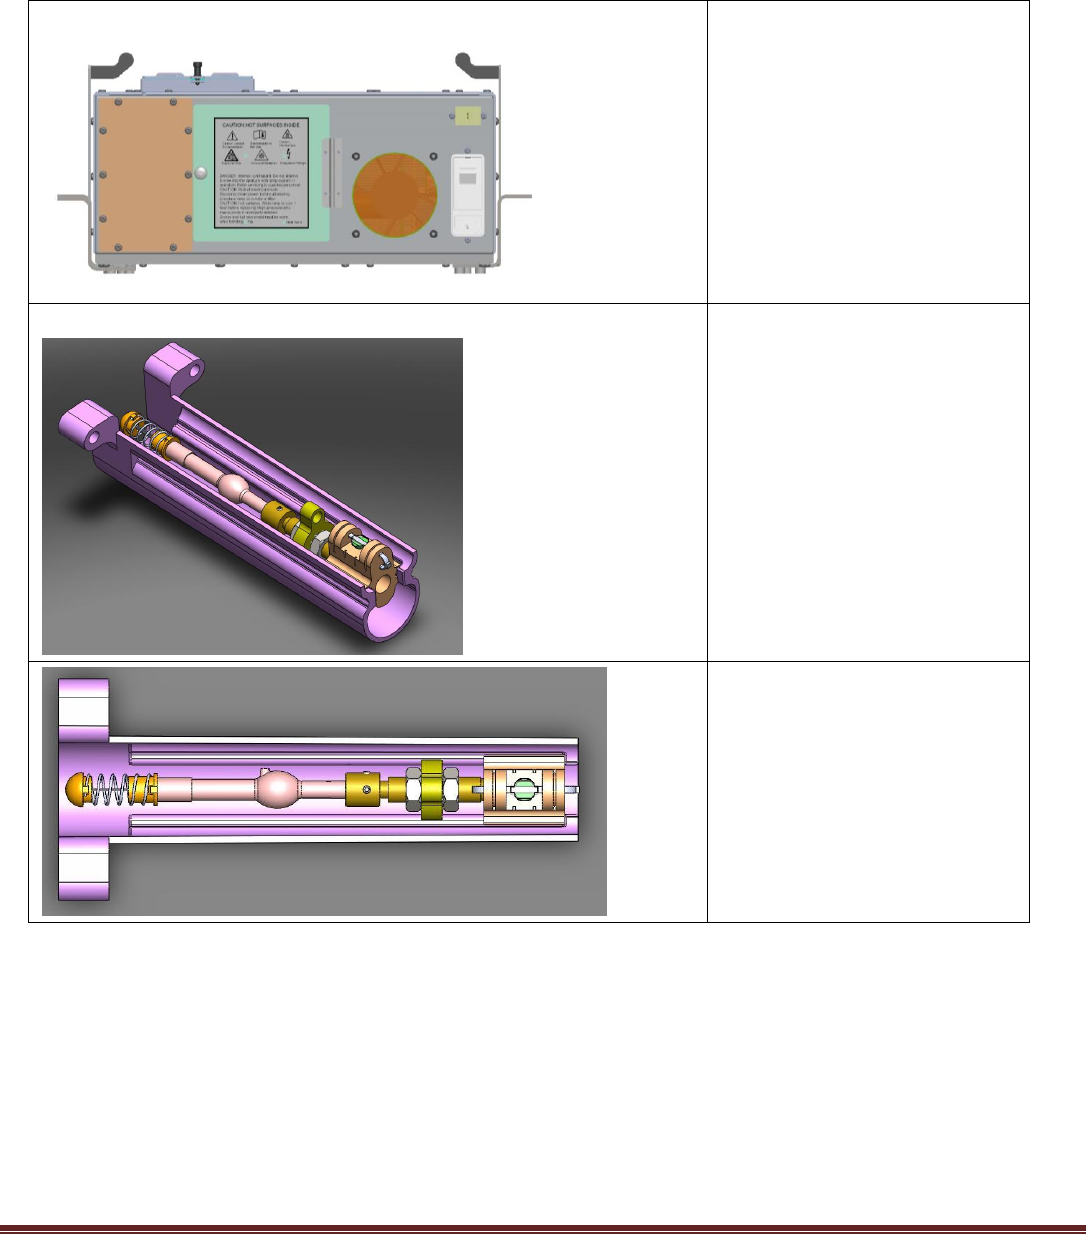
November 2013, CNDS-0-635-MAN_3
Page 71 of 78
20.3.2 Install the Lamp Assembly
CAUTION: Wear long sleeves, gloves and face shield while installing the lamp in LuViva.
CAUTION: Do not drop the lamp, subject it to impacts, apply excessive force or scratch it: the
pressure inside the glass lamp is very high and might cause it to rupture. Injury may result if the
lamp is broken.
CAUTION: Never touch the lamp with bare hands. Dust, oils and grime will be transmitted to the
lamp, and during use may cause the lamp to explode.
Open the Bulb Access Door
of the Base Unit by
unscrewing the locking
screw with supplied 5/32
Allen Key, and opening the
hinged door.
Open the Service kit and
remove the Lamp
Assembly.
Lamp Assembly enclosed
in Placement Tool: Side
View
Lamp Assembly enclosed
in Placement Tool: Top
View
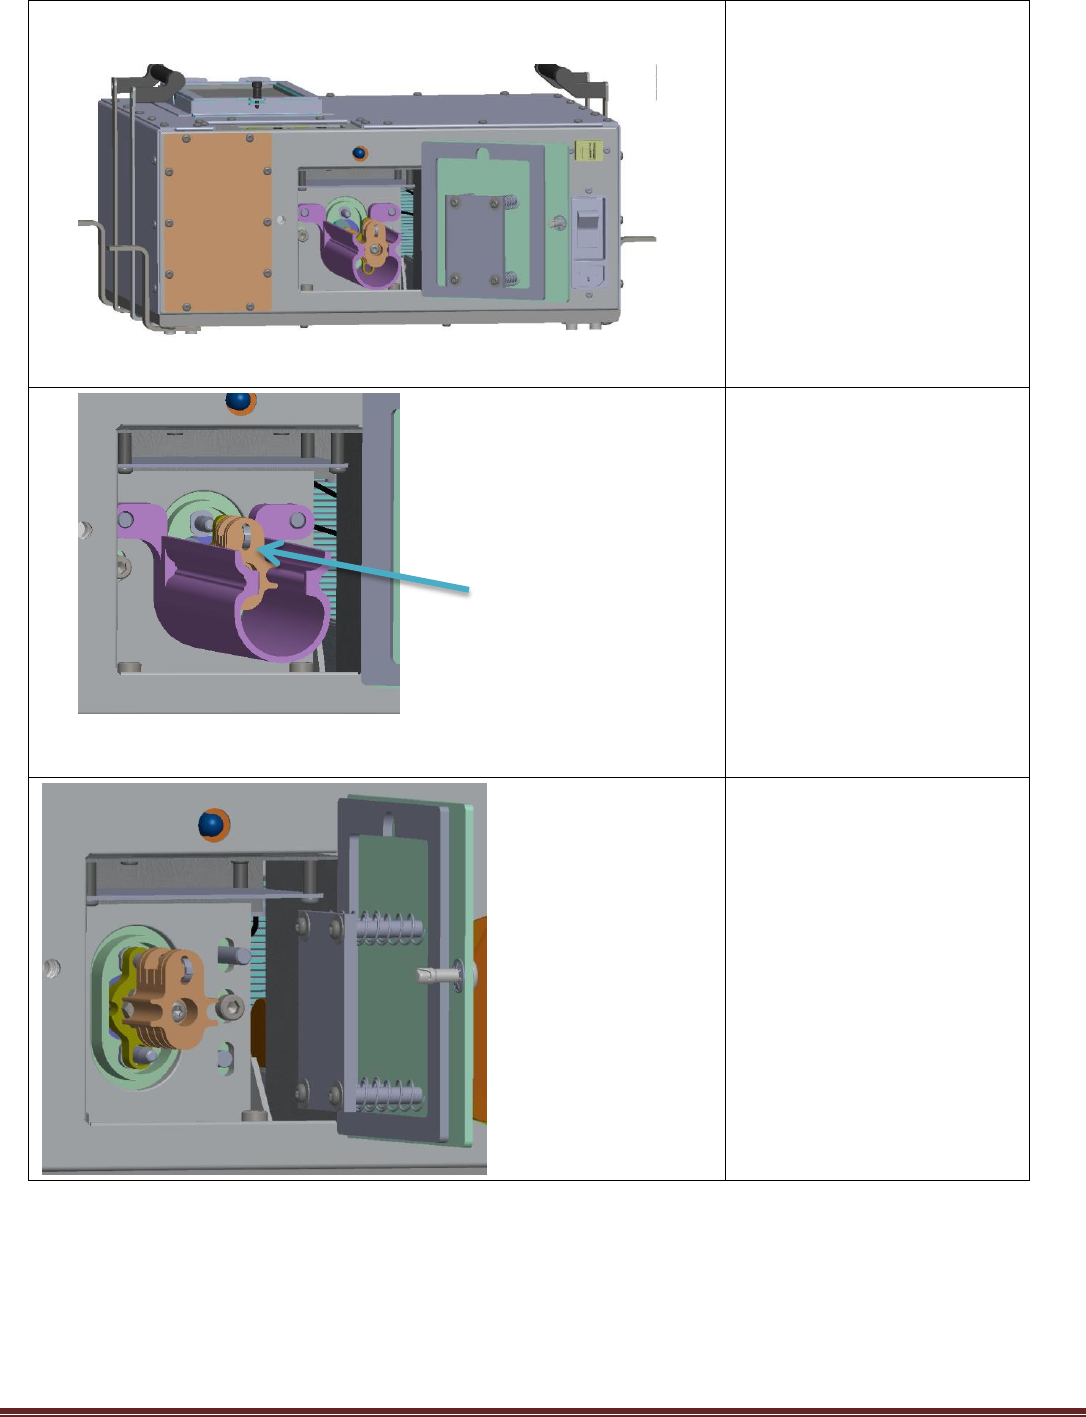
November 2013, CNDS-0-635-MAN_3
Page 72 of 78
Open the Lamp Access
Door. Align the
placement tool onto the
mounting pins.
Pushing on the rear of
the lamp assembly,
gently push the lamp
assembly into position.
Holding lamp in place,
remove placement tool.
Close door. The door will
apply pressure to the
lamp assembly and keep
it in place.
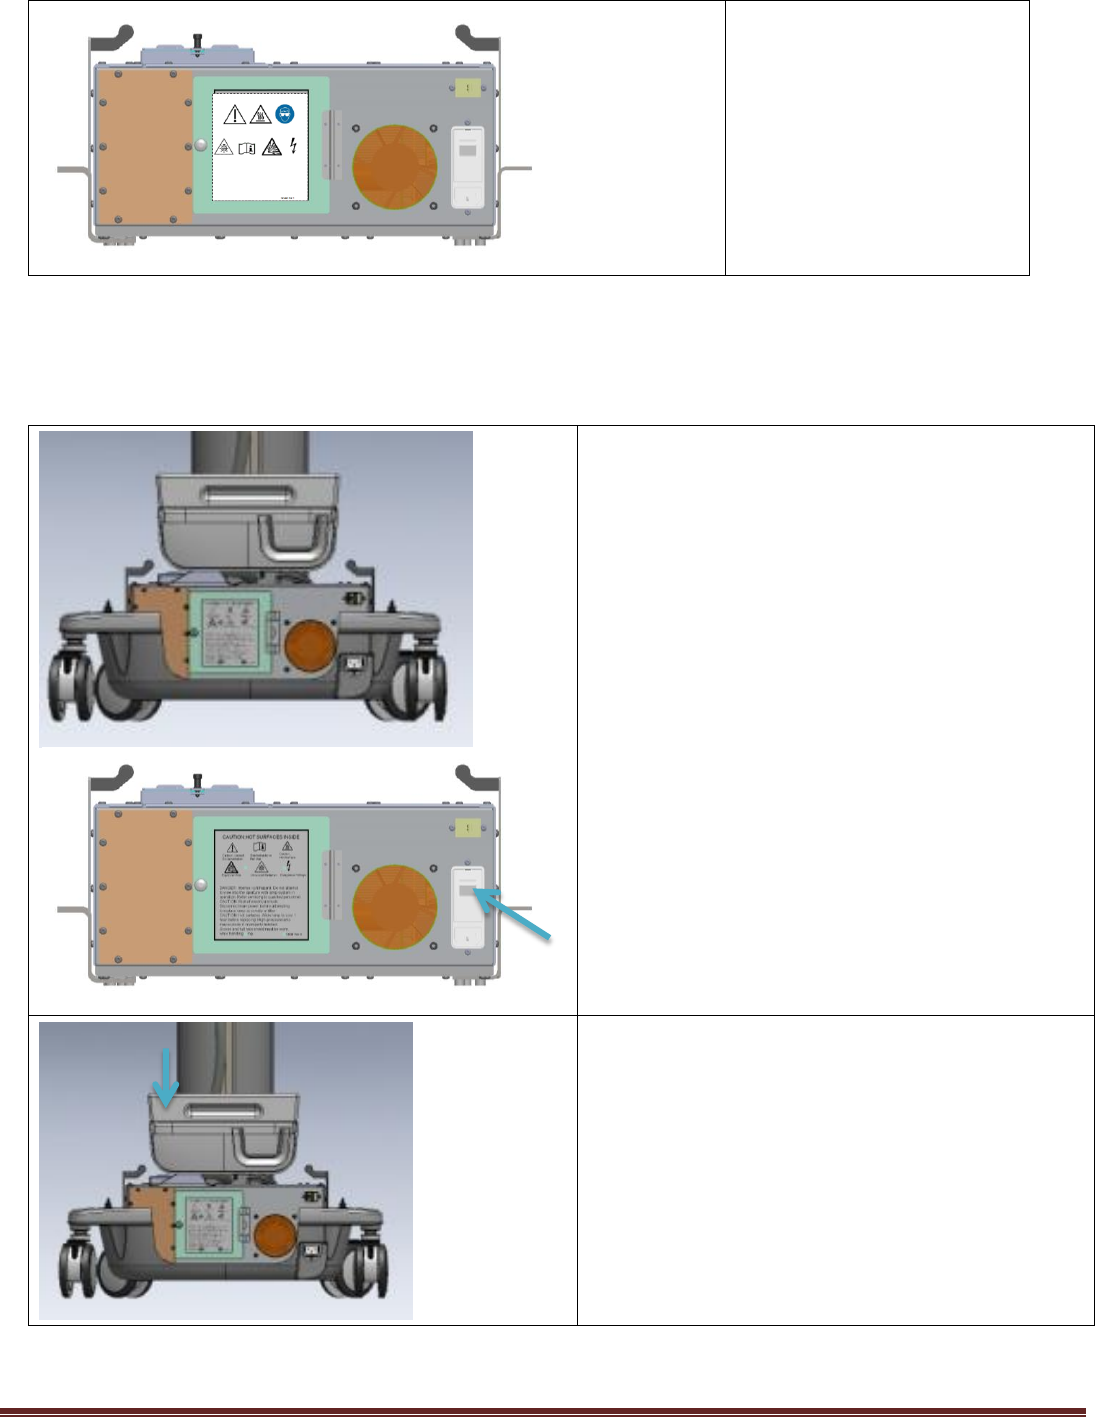
November 2013, CNDS-0-635-MAN_3
Page 73 of 78
Close the Bulb Access
Door and replace screws.
Save packaging; lamp
assemblies require
replacement after 1000
hours of use. Return
used lamp assemblies to
Guided Therapeutics,
Inc. for recycling and
disposal.
20.4 Install the Base Shell
Turn on the Main Power Switch located on the left side
of the Base Unit by moving the power switch to the on
position. This enables the instrument to be powered on.
Install lamp access panel.
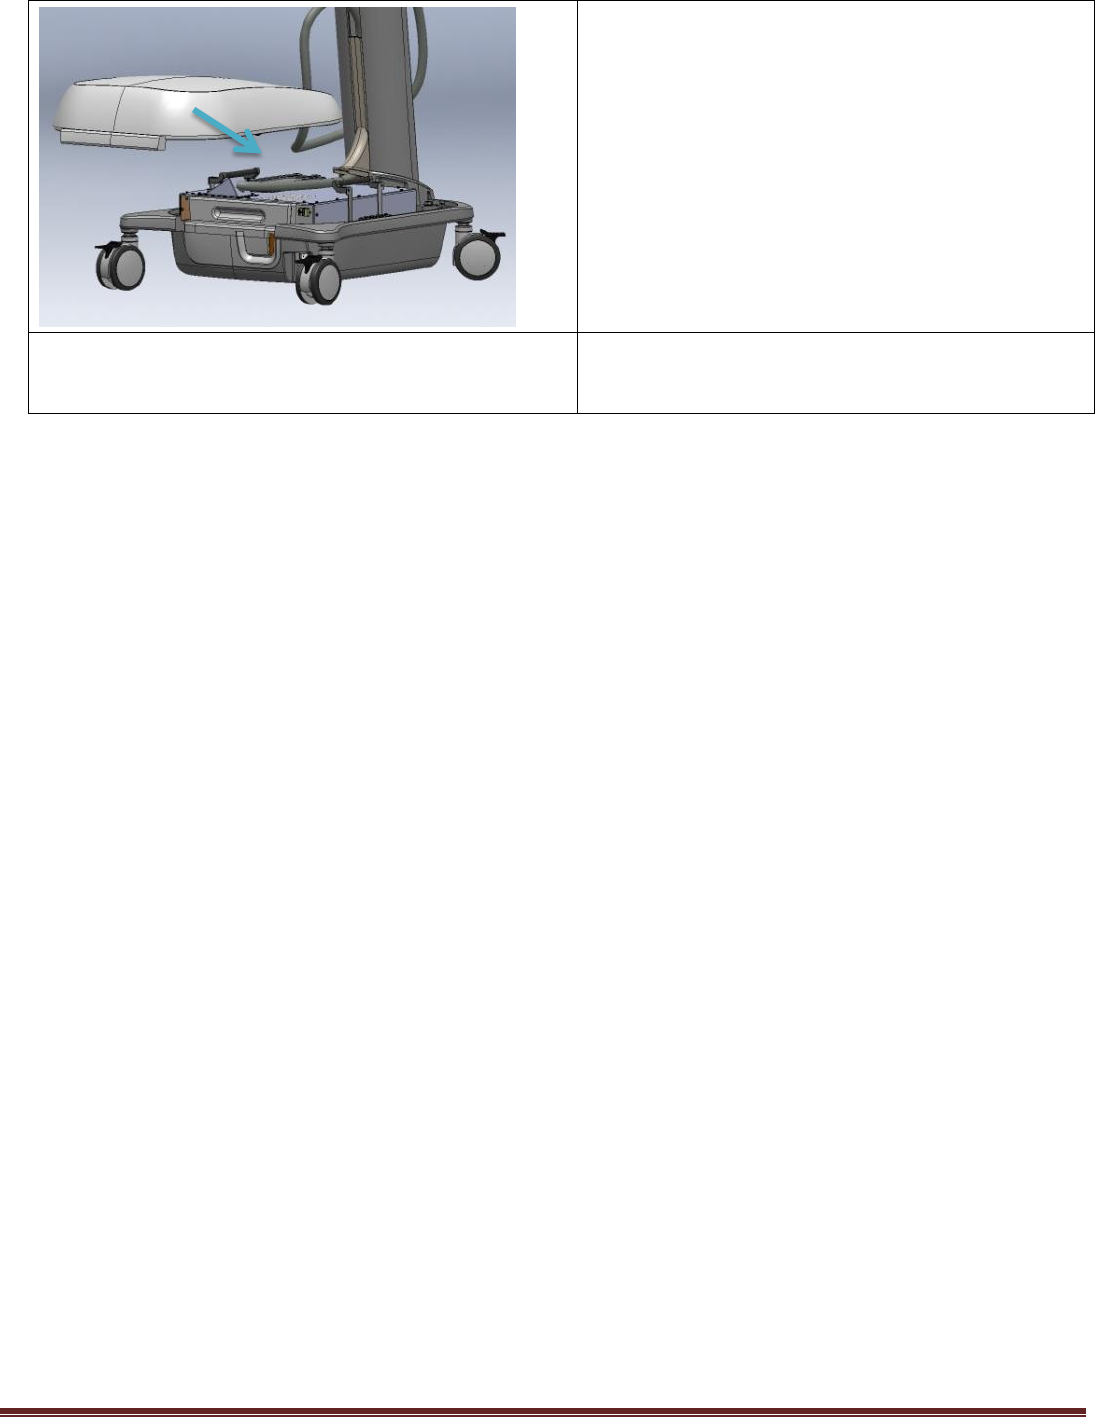
November 2013, CNDS-0-635-MAN_3
Page 74 of 78
Install Base Unit Cart Cover.
PLUG IN POWER CORD
Install country specific power cord, supplied by
distributor. Thread through cart base; plug into Base
Unit power socket.
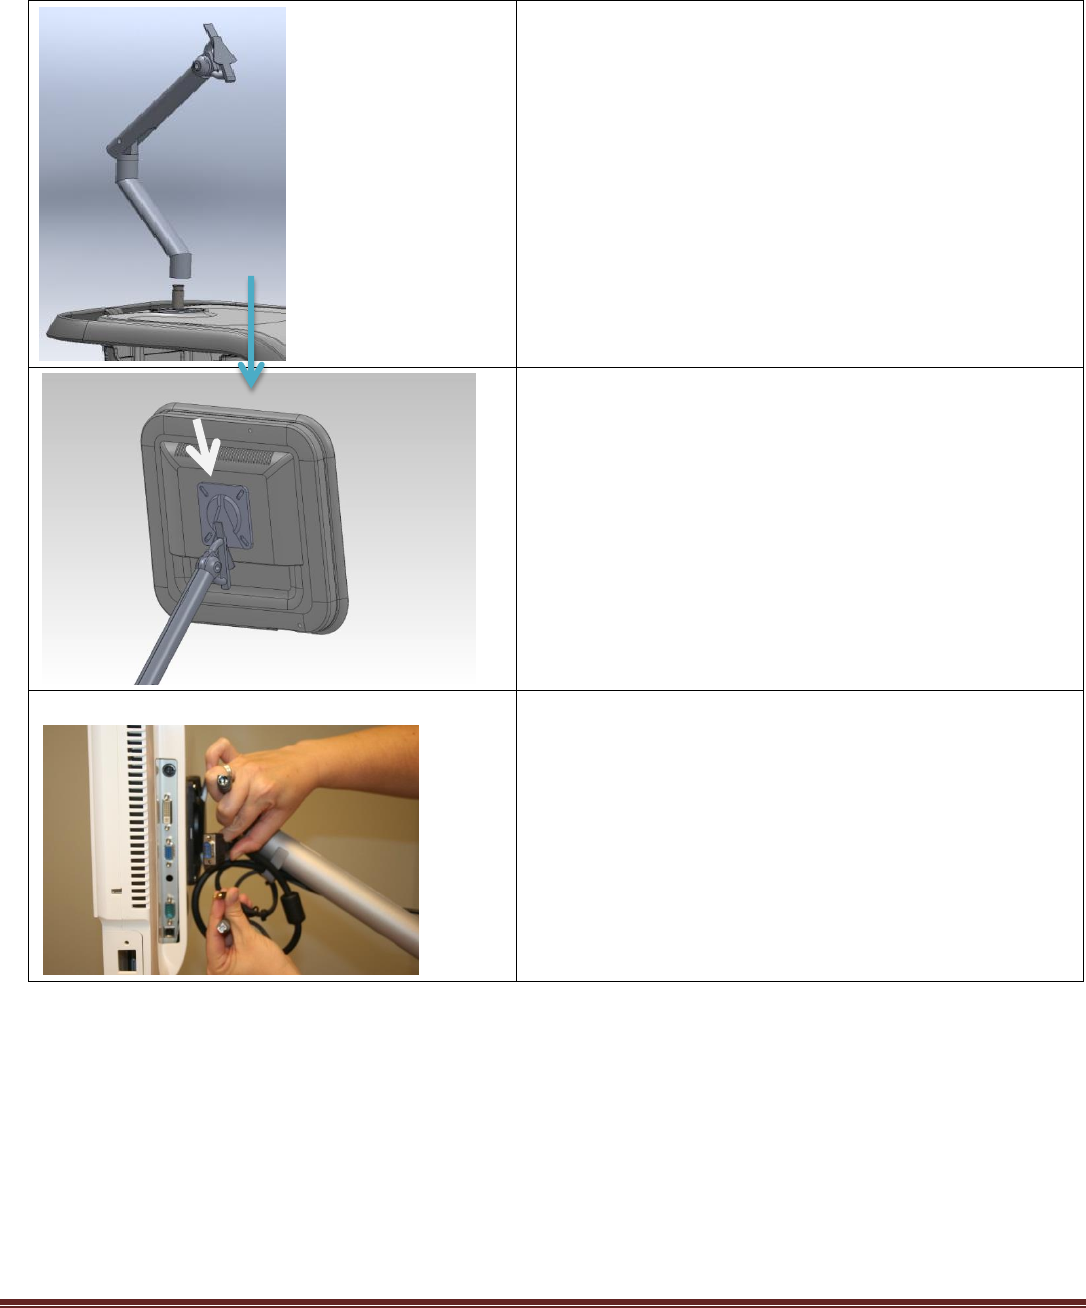
November 2013, CNDS-0-635-MAN_3
Page 75 of 78
20.5 Install the Monitor Arm and Display
The monitor arm and display are supplied in separate packaging. The display is installed on the monitor arm, which is
installed on the table top.
Install the monitor arm into the mounting hole in the table
top.
The touchscreen monitor has a Monitor Mount Retainer
bracket installed on its rear side. Slide the holding clamp of
the Monitor Arm into the matching slot on the bracket to
install the Monitor. It will snap into place when installed
correctly.
Connect USB, Video, audio and power to monitor.
Thread the cables through the cable holders on the monitor
arm. Connect the cables to the inputs marked on the monitor.

November 2013, CNDS-0-635-MAN_3
Page 76 of 78
20.6 Place the HHU on the Docking Station
Remove the protective packaging from the HHU and umbilical cable and place on the Docking Station, as shown
below.
Docked HHU
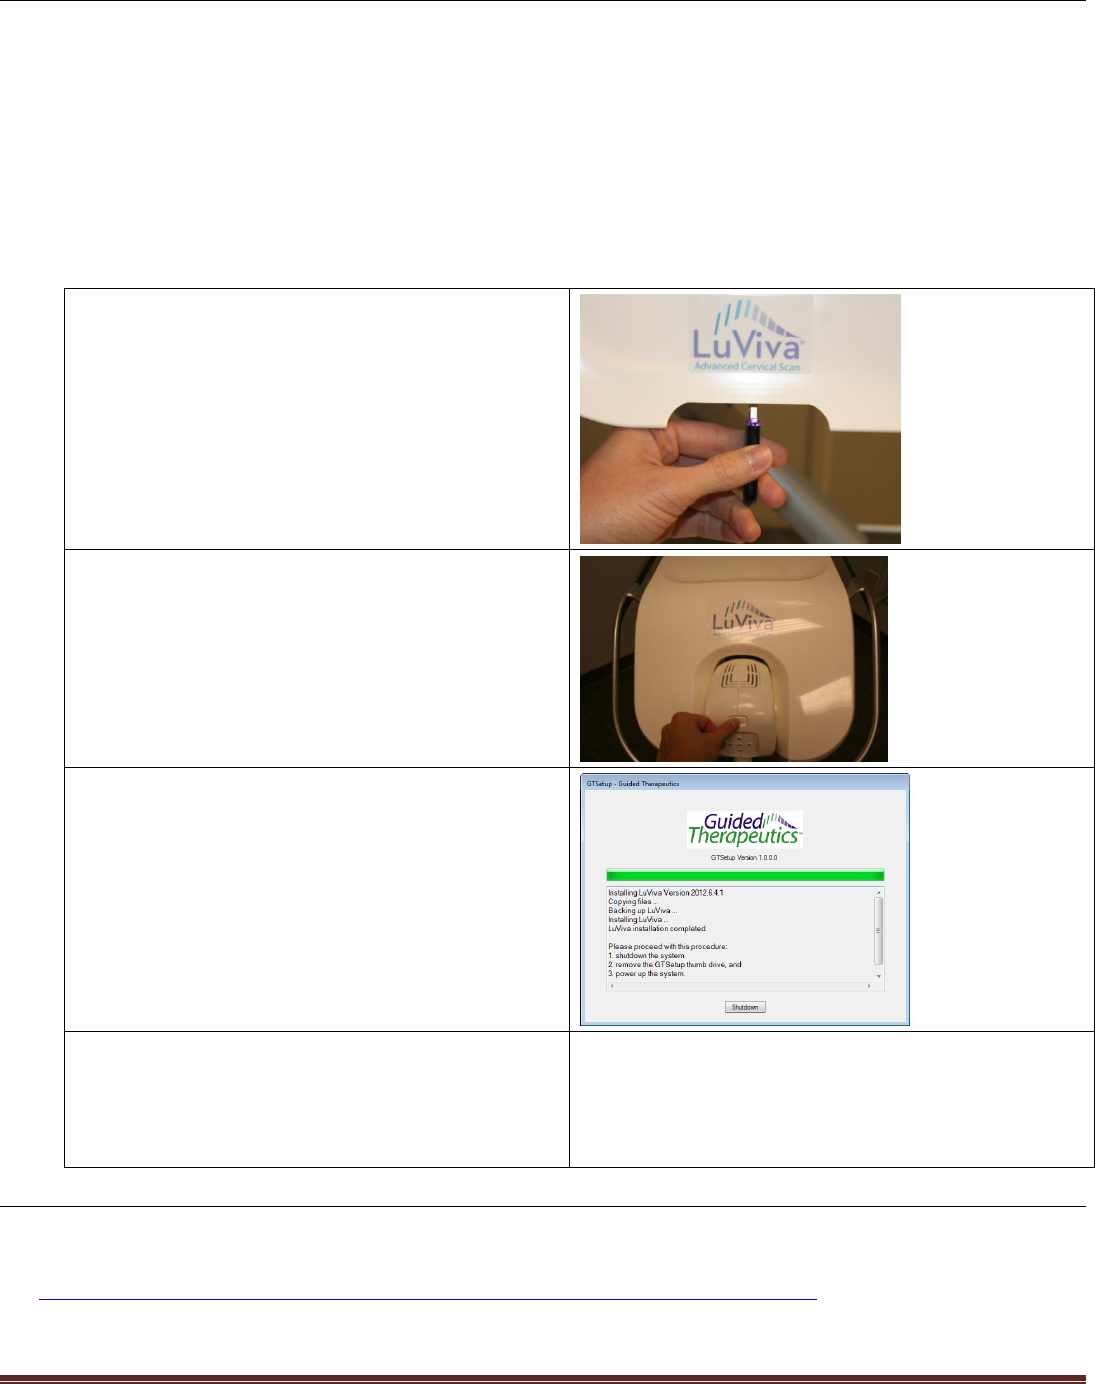
November 2013, CNDS-0-635-MAN_3
Page 77 of 78
21. Set-Up—Software Configuration
21.1 Initial Installation
Once all of the assembly steps are completed, follow the sequence below to activate LuViva:
Plug LuViva into grounded wall outlet.
CAUTION: To avoid the risk of electrical shock, this equipment must only be connected to a
supply mains with protective earth (grounded wall outlet). Improperly powering LuViva
may result in damage to LuViva and substantial risks of electric shock to the operator or
patient.
1. Remove the set-up USB drive from the
documentation package.
2. Insert the setup USB drive into the USB port
of the monitor.
3. Power up the system using Standby button
on the HHU.
4. After system startup, the GTSetup software
will install LuViva software.
5. The GTSetup screen will appear and display
progress.
6. Follow screen prompts until installation is
completed.
7. Remove the set-up USB.
8. The system is ready for use.
22. Monitor Arm Instructions for Use
http://www.hmergonomics.nl/wp-content/uploads/2010/11/DYN-013-001-INST-A.pdf
