Guides Inventorpartingfundamentals Exercises Inv. Part Ing Fundamentals User Manual Inventor
2017-09-11
User Manual: Guides Inventorpartingfundamentals-Exercises InventorPartingFundamentals-Exercises elearn
Open the PDF directly: View PDF ![]() .
.
Page Count: 83

[Type here]
©Copyright 2017 Advanced Solutions, Inc.
All Rights Reserved
Inv. Part Modeling Fundamentals
Confidential

©Copyright 2017 Advanced Solutions, Inc.
All Rights Reserved
1
Confidential

©Copyright 2017 Advanced Solutions, Inc.
All Rights Reserved
2
Inv. Part Modeling Fundamentals
Advanced Solutions, Inc.
Inv. Part Modeling Fundamentals
Prepared and Produced by:
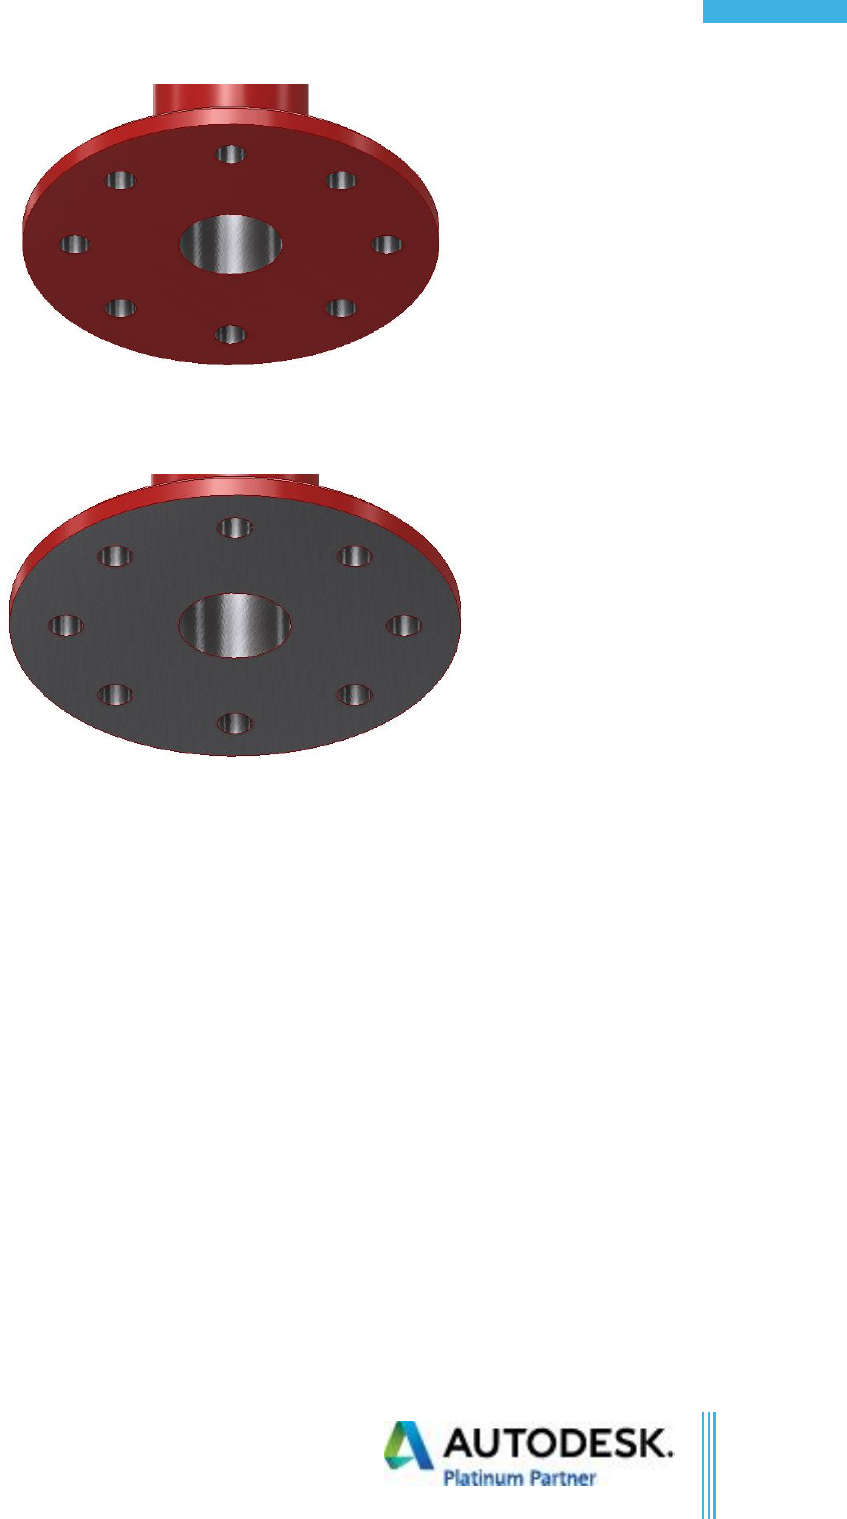
Advanced Solutions, Inc.
1901 Nelson Miller Parkway
Louisville, KY 40223
1-877-GET-ASI1 (438-2741)
www.AdvancedSolutions.com
©Copyright 2017 Advanced Solutions, Inc.
All Rights Reserved
This document may not be reproduced, revised, distributed or used in any manner without the express
written permission of Advanced Solutions Inc.
Dataset files are provided with permission by Advanced Solutions Inc. Dataset files may not be used for
any other purpose other than as training examples for this course. Any other use of this background, as
well as all other datasets, including but limited to any .IPT, .IAM, .ADSK, .RVT and .DWG
files are expressly prohibited.
We trust that these manual and downloadable datasets help you to get the most out of Autodesk Inventor
2015 software investment. So enjoy and happy learning!
We welcome any comments that you may have regarding this training manual. Please forward any
comments to: TrainingRequest@AdvancedSolutions.com.
Autodesk and Inventor are registered trademarks or trademarks of Autodesk, Inc.
General Disclaimer:
NOTWITHSTANDING ANY LANGUAGE TO THE CONTRARY, NOTHING CONTAINED HEREIN CONSTITUTES NOR IS
INTENDED TO CONSTITUTE AN OFFER, INDUCEMENT, PROMISE, OR CONTRACT OF ANY KIND. THE DATA
CONTAINED HEREIN IS FOR INFORMATIONAL PURPOSES ONLY AND IS NOT REPRESENTED TO BE ERROR
FREE. ADVANCED SOLUTIONS, ITS AGENTS AND EMPLOYEES, EXPRESSLY DISCLAIM ANY LIABILITY FOR ANY
DAMAGES, LOSSES OR OTHER EXPENSES ARISING IN CONNECTION WITH THE USE OF ITS MATERIALS OR IN
CONNECTION WITH ANY FAILURE OF PERFORMANCE, ERROR, OMISSION EVEN IF ADVANCED SOLUTIONS, OR
ITS REPRESENTATIVES, ARE ADVISED OF THE POSSIBILITY OF SUCH DAMAGES, LOSSES OR OTHER
EXPENSES. NO CONSEQUENTIAL DAMAGES CAN BE SOUGHT AGAINST ADVANCED SOLUTIONS FOR THE USE
OF THESE MATERIALS BY ANY THIRD PARTIES OR FOR ANY DIRECT OR INDIRECT RESULT OF THAT USE.
THE INFORMATION CONTAINED HEREIN IS PROVIDED “AS IS”, AND IT DOES NOT ADDRESS THE
CIRCUMSTANCES OF ANY PARTICULAR INDIVIDUAL OR ENTITY. NOTHING HEREIN CONSTITUTES
PROFESSIONAL ADVICE, NOR DOES IT CONSTITUTE A COMPREHENSIVE OR COMPLETE STATEMENT OF THE
ISSUES DISCUSSED THERETO. ADVANCED SOLUTIONS DOES NOT WARRANT THAT THE DOCUMENT OR
INFORMATION WILL BE ERROR FREE OR WILL MEET ANY PARTICULAR CRITERIA OR PERFORMANCE OR
QUALITY. IN PARTICULAR, BUT WITHOUT LIMITATION, INFORMATION MAY BE RENDERED INACCURATE BY
CHANGES MADE TO THE SUBJECT OF THE MATERIALS (I.E. APPLICABLE SOFTWARE).
Confidential

©Copyright 2017 Advanced Solutions, Inc.
All Rights Reserved
3
Table of Contents
Table of Contents
Table of Contents .......................................................................................................................................... 3
Chapter 2 Exercise ............................................................................................................................... 5
Chapter 3a Exercise ............................................................................................................................. 8
Chapter 3b Exercise ........................................................................................................................... 10
Chapter 4a Exercise ........................................................................................................................... 13
Chapter 4b Exercise ........................................................................................................................... 18
Chapter 4c Exercise ........................................................................................................................... 19
Chapter 4d Exercise ........................................................................................................................... 21
Chapter 4e Exercise ........................................................................................................................... 23
Chapter 4f Exercise ............................................................................................................................ 27
Chapter 4g Exercise ........................................................................................................................... 28
Chapter 4h Exercise ........................................................................................................................... 29
Chapter 5a Exercise ........................................................................................................................... 31
Chapter 5b Exercise ........................................................................................................................... 33
Chapter 5c Exercise ........................................................................................................................... 36
Chapter 5d Exercise ........................................................................................................................... 38
Chapter 6 Exercise ............................................................................................................................. 40
Chapter 7a Exercise ........................................................................................................................... 43
Chapter 7b Exercise ........................................................................................................................... 45
Chapter 7c Exercise ........................................................................................................................... 47
Chapter 8a Exercise ........................................................................................................................... 49
Chapter 8b Exercise ........................................................................................................................... 52
Chapter 8c Exercise ........................................................................................................................... 54
Chapter 9a Exercise ........................................................................................................................... 55
Chapter 9b Exercise ........................................................................................................................... 58
Chapter 9c Exercise ........................................................................................................................... 60
Chapter 9d Exercise ........................................................................................................................... 64
Chapter 9e Exercise ........................................................................................................................... 67
Chapter 10 Exercise ........................................................................................................................... 69
Chapter 11a Exercise ......................................................................................................................... 72
Chapter 11b Exercise ......................................................................................................................... 76
Chapter 11c Exercise ......................................................................................................................... 79
Chapter 11d Exercise ........................................................................................................................... 1
Chapter 13 Exercise ............................................................................................................................. 2
Confidential

©Copyright 2017 Advanced Solutions, Inc.
All Rights Reserved
4
Inv. Part Modeling Fundamentals
Confidential
©Copyright 2017 Advanced Solutions, Inc.
All Rights Reserved
5
Table of Contents
Chapter 2 Exercise
1. Open Engine Crank Shaft.ipt file.
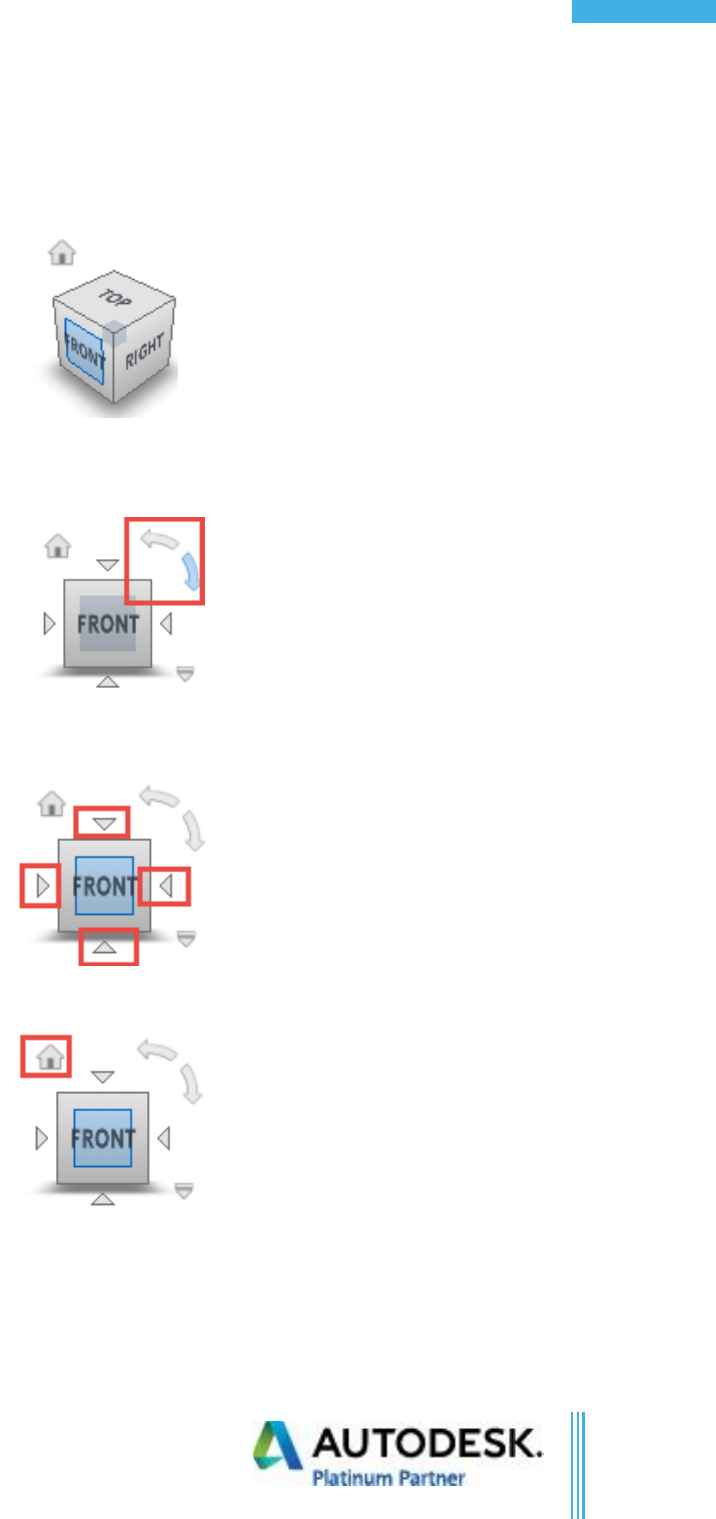
2. Click on the “Front” face of the View Cube.
3. The model will rotate to bring that face normal to the screen.
4. Use the clockwise and counterclockwise arrows to rotate the part in the view.
5. Use the (4) arrows to rotate the part in an upwards, downwards, left, right orientations.
6. Click on the “Home” button to return the part back to the original isometric view.
7. Press and hold the middle mouse button, and pan the model back and forth.
8. Roll the center wheel mouse button to zoom the model in and out.
9. Double click the center wheel to zoom extents to bring the model back into view.
Confidential
©Copyright 2017 Advanced Solutions, Inc.
All Rights Reserved
6
Inv. Part Modeling Fundamentals
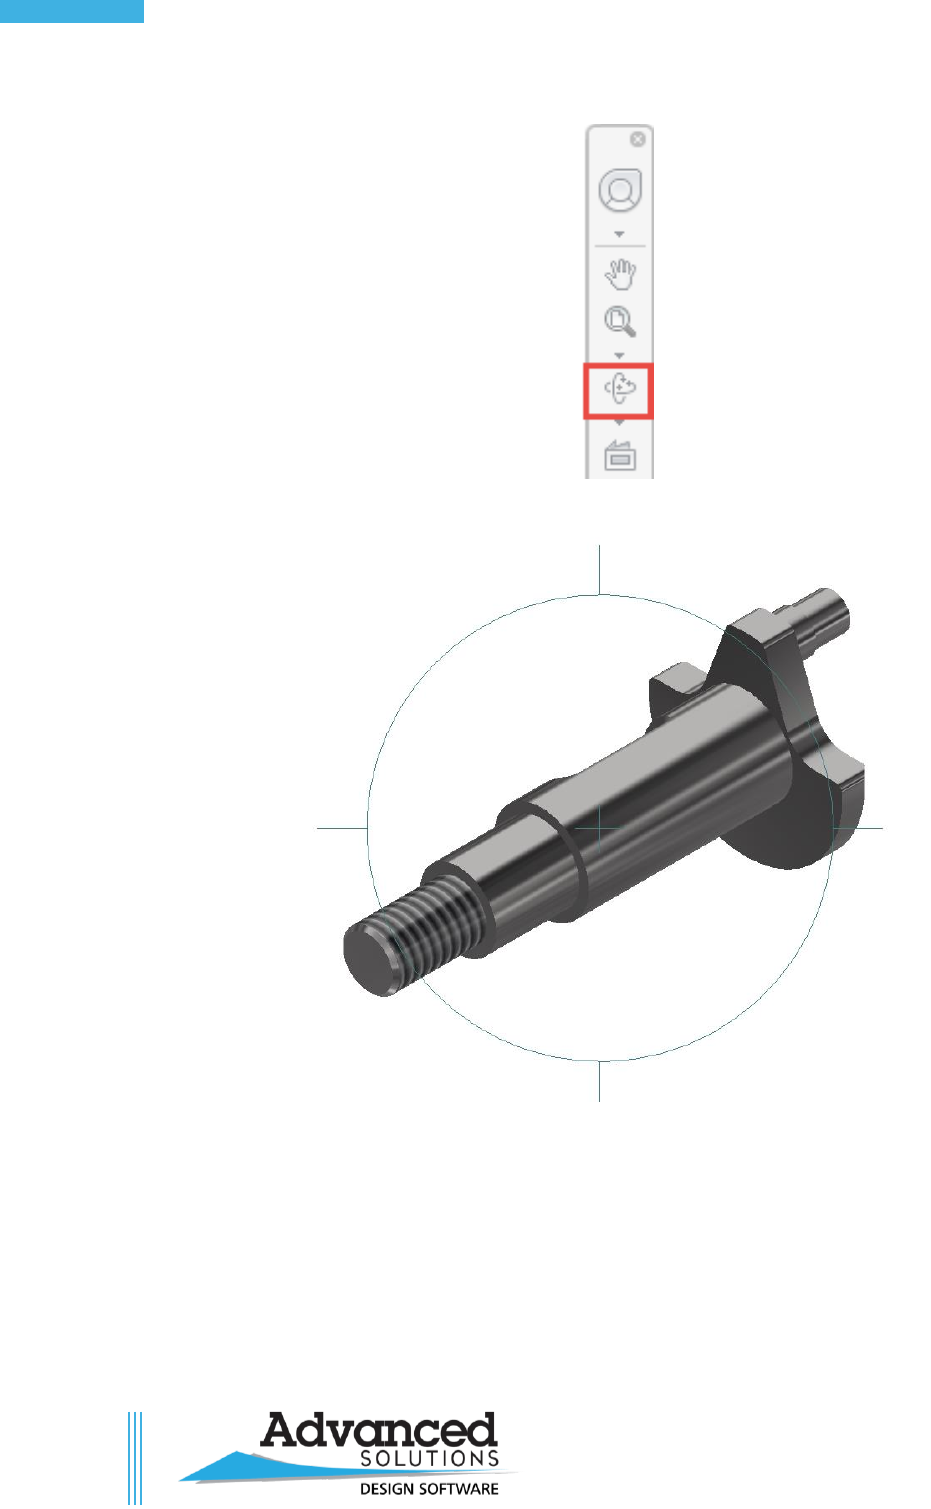
10. Use the orbit button from the navigation tool bar.
11. A circle with poles will appear on the screen as shown.
12. Drag at each pole to watch the rotation.
13. Drag in the 2 o’clock, 4 o’clock, 8 o’clock, and 11 o’clock positions and watch the rotation.
14. Place the cursor in the middle of the circle, left click and drag.
15. Press the ESC button to clear the orbit command.
16. Press and hold the SHIFT key and the middle mouse button and drag.
17. Press and hold F4. When it is released, the orbit command goes away.
Confidential
©Copyright 2017 Advanced Solutions, Inc.
All Rights Reserved
7
Table of Contents
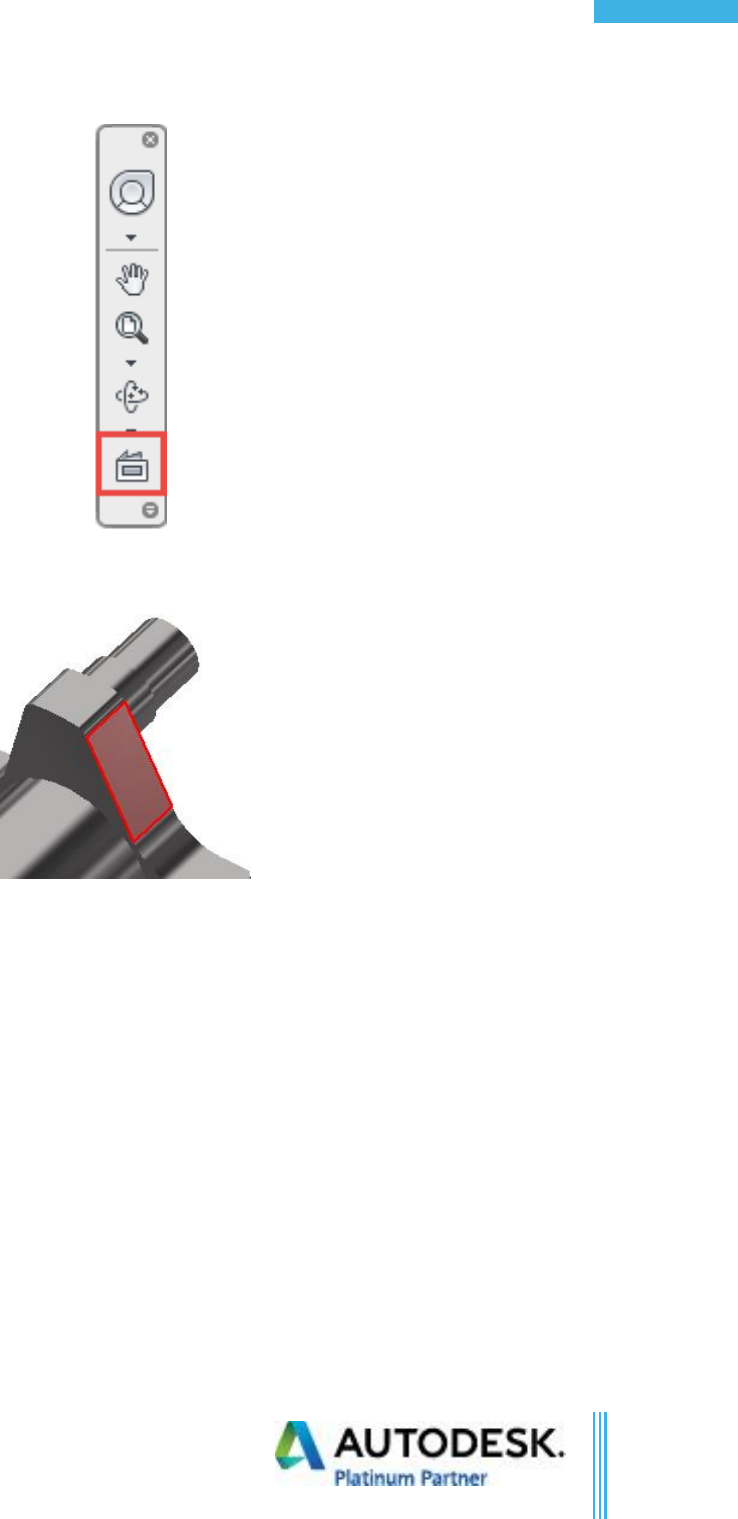
18. Use the Look At command from the navigation toolbar.
19. Select the face shown below.
20. Notice that the face is made normal to the screen.
21. Close the part without saving.
Confidential
©Copyright 2017 Advanced Solutions, Inc.
All Rights Reserved
8
Inv. Part Modeling Fundamentals
Chapter 3a Exercise
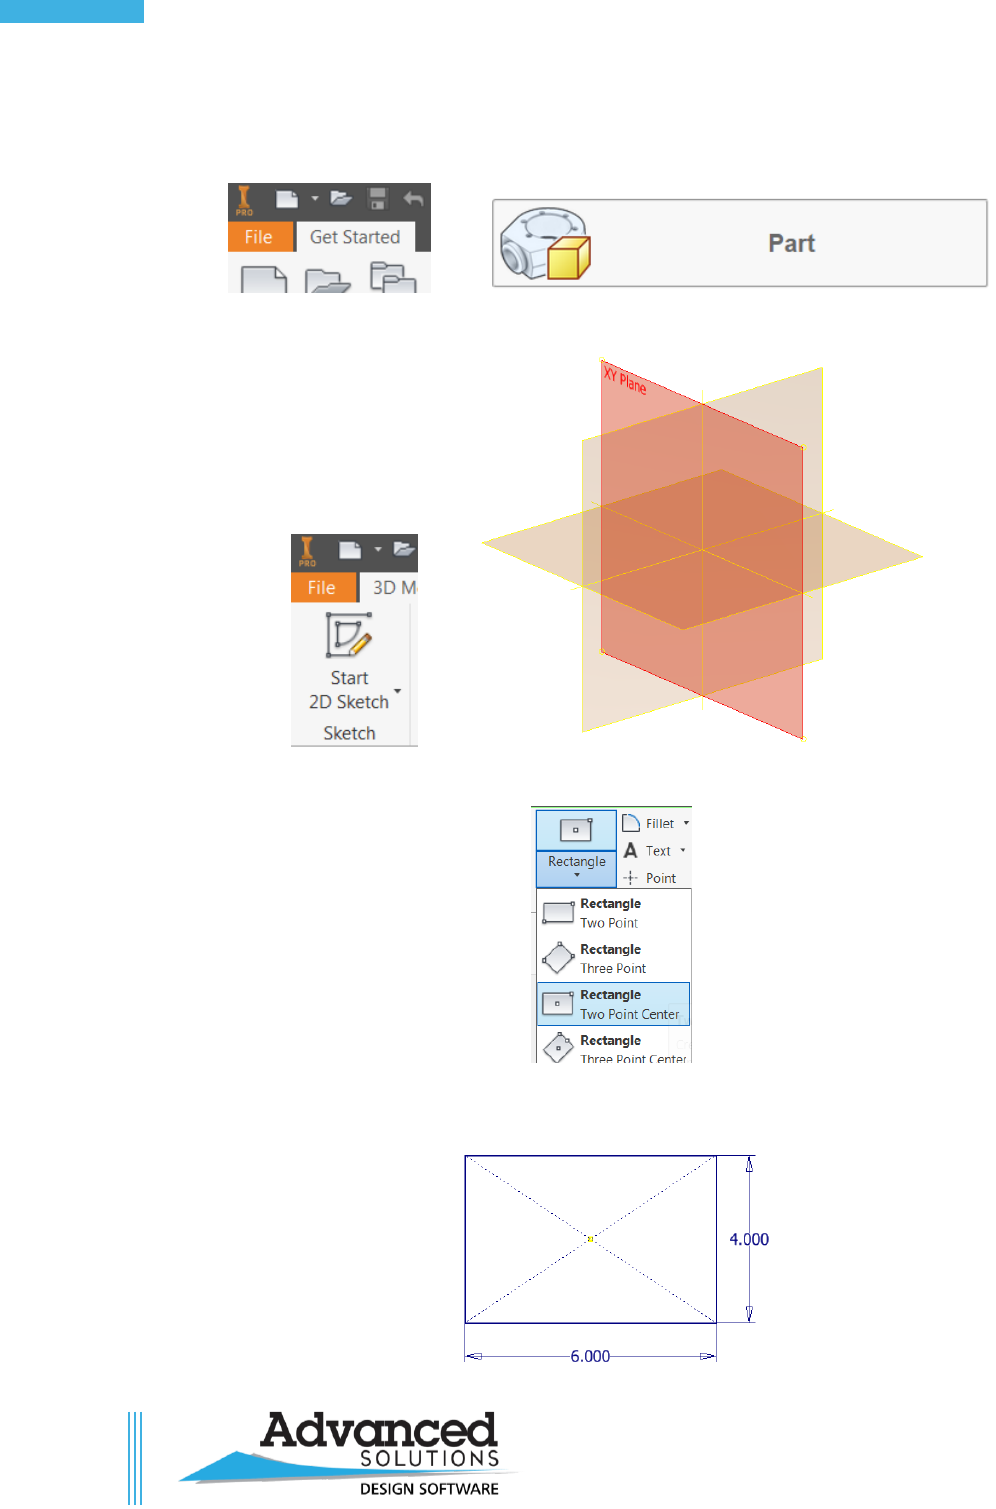
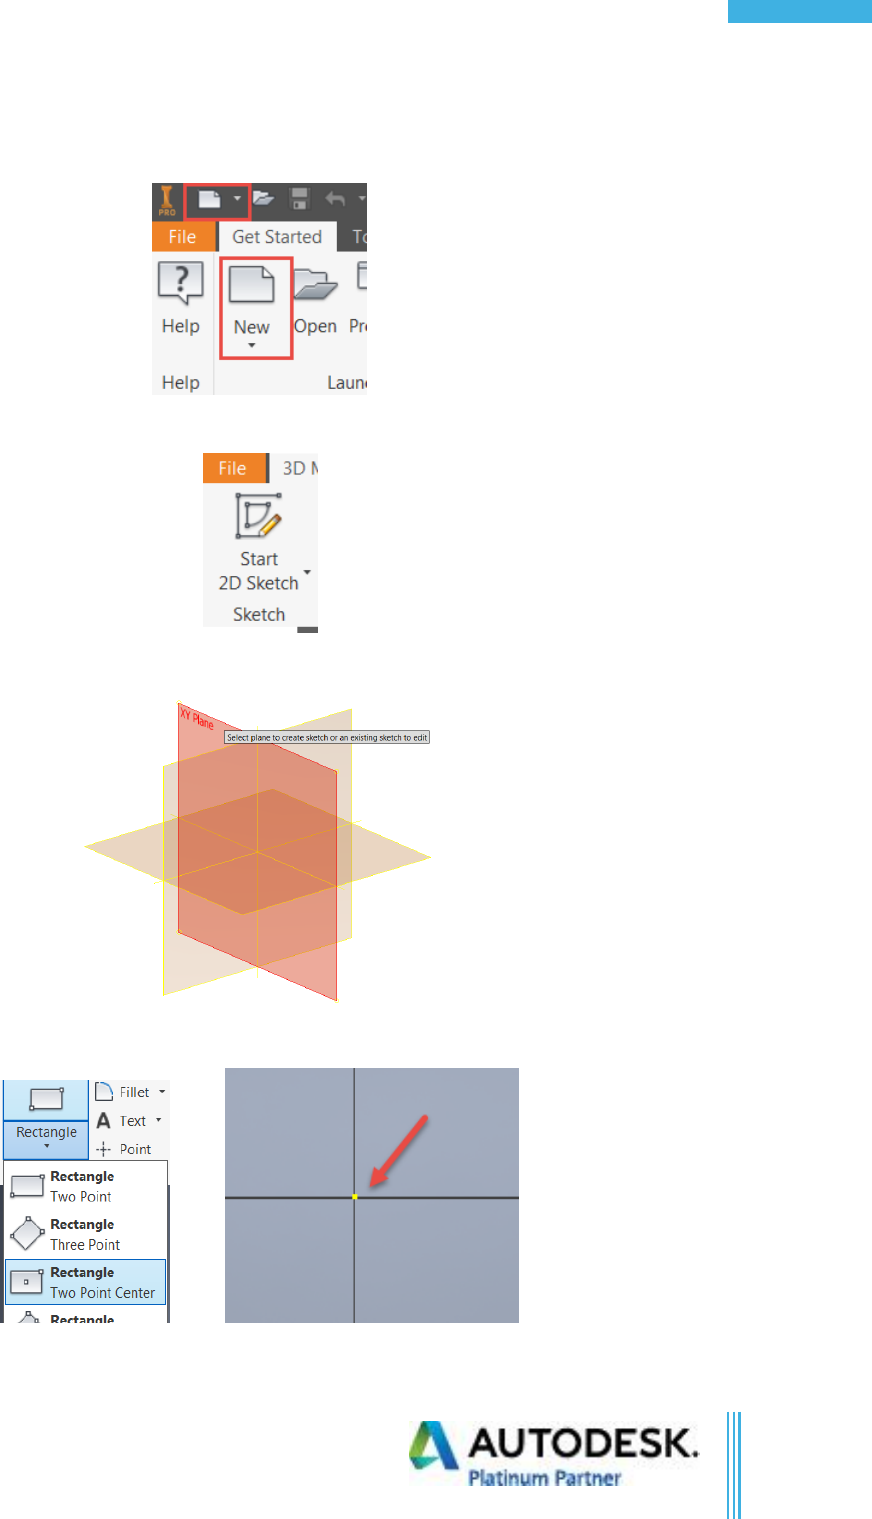
1. In the Getting Started Tab click on the new part icon to create a new part.
2. Start a new sketch on the XY plane.
3. Create a two-point center point rectangle on the projected origin point.
4. Using the Heads up display type in 6 for the horizontal dimension, then hit the TAB key to cycle to
the vertical dimension and type in 4, then hit ENTER.
Confidential
©Copyright 2017 Advanced Solutions, Inc.
All Rights Reserved
9
Table of Contents
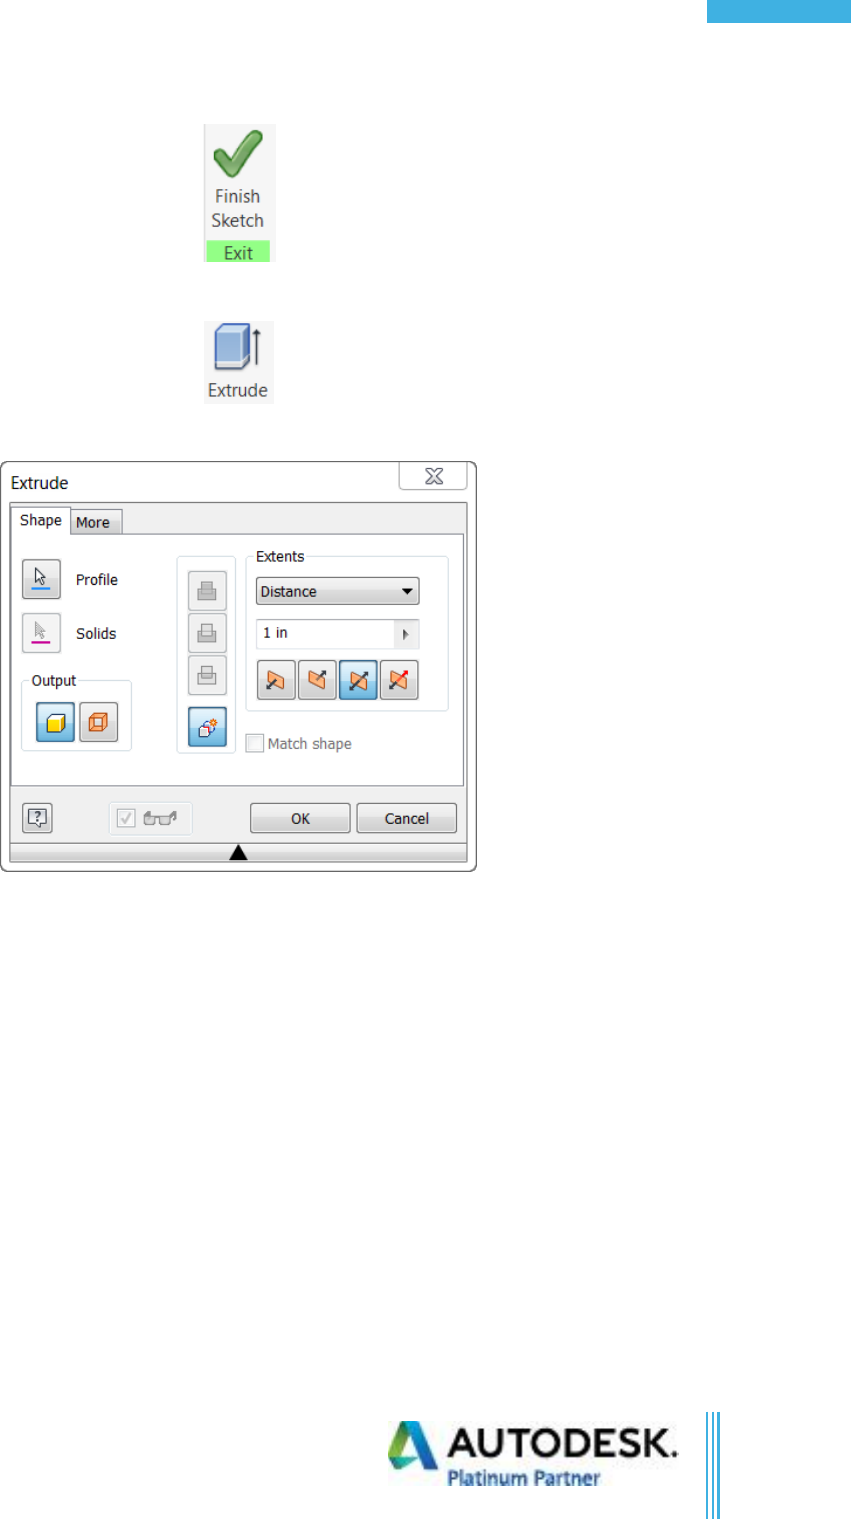
5. In the ribbon click on finish sketch.
6. In the ribbon in create panel click on extrude or “E” on the keyboard for extrude.
7. Select the Symmetric direction, with a distance of 1 in. and click OK to accept the inputs.
8. Save the part as “My Rectangle”
Confidential
©Copyright 2017 Advanced Solutions, Inc.
All Rights Reserved
10
Inv. Part Modeling Fundamentals
Chapter 3b Exercise
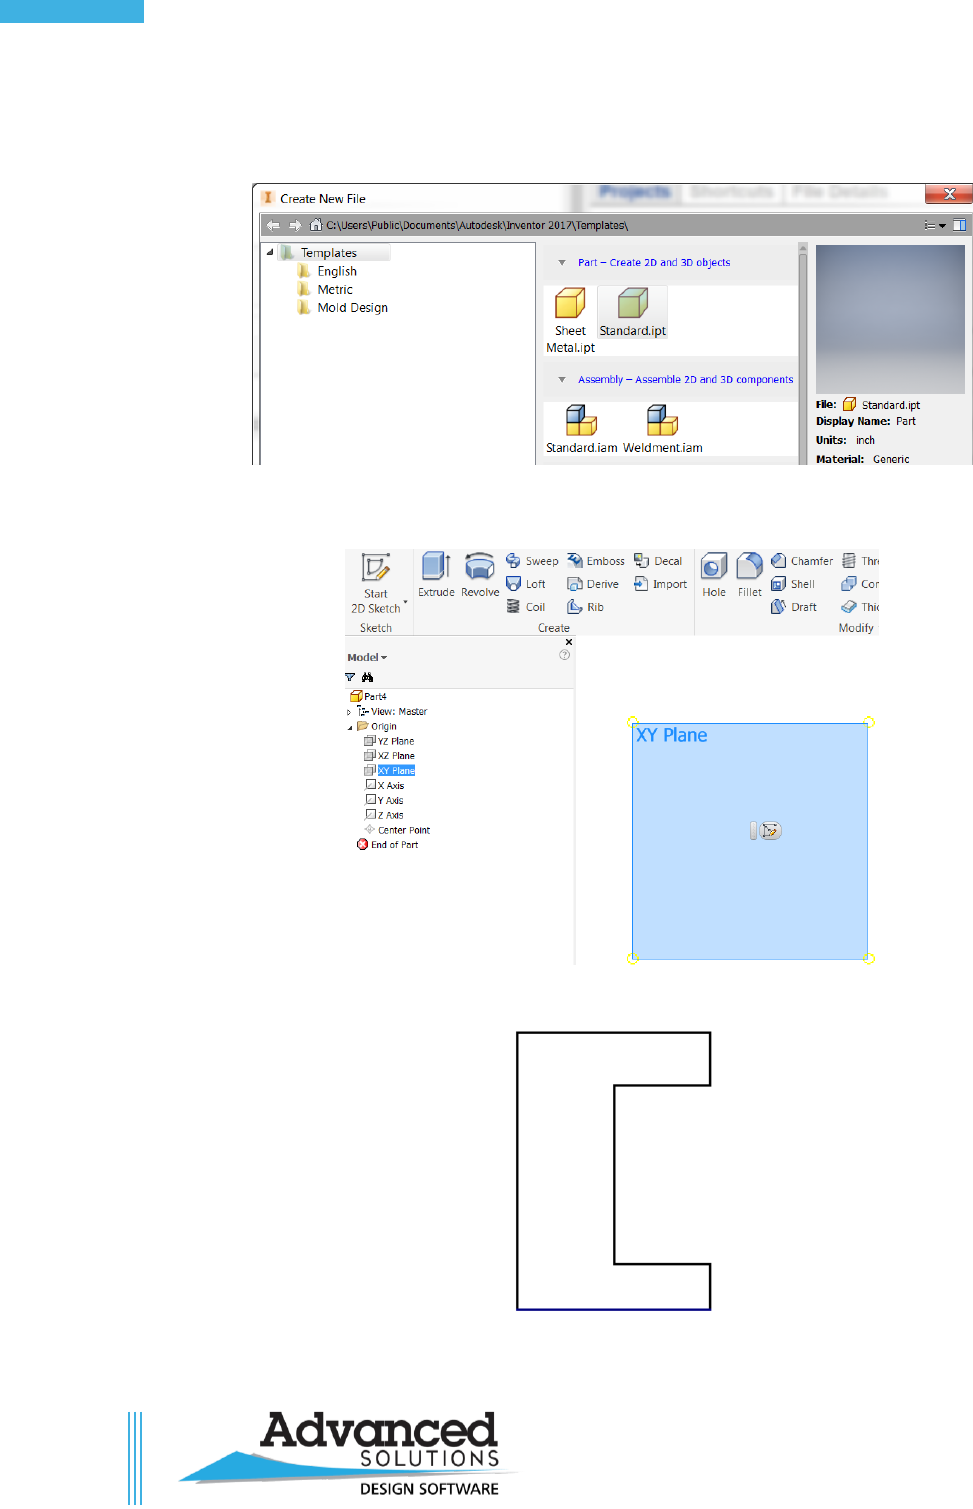
1. Create a new inch part by using the “new” document button in the ribbon.
2. Create a sketch on the XY plane by highlighting the XY plane in the browser, then clicking the new
sketch button.
3. Draw a profile that is like what is shown below starting at the projected origin point.
Confidential
©Copyright 2017 Advanced Solutions, Inc.
All Rights Reserved
11
Table of Contents
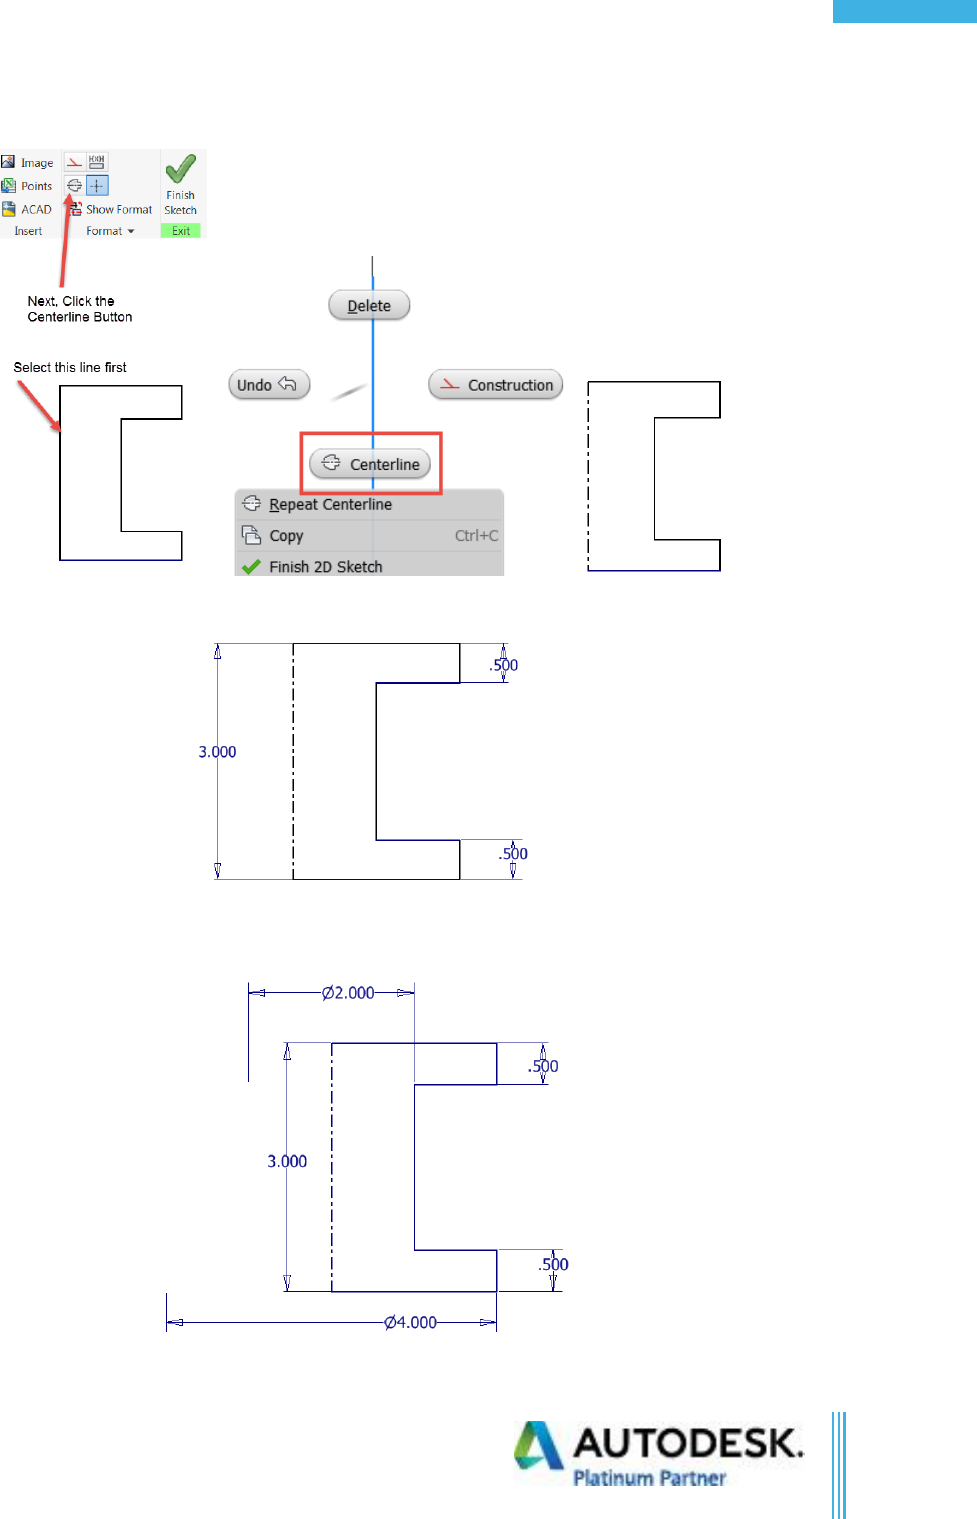
4. Select the vertical line and make it a centerline as shown below, or select the line, then right click
and choose centerline.
5. Use the General Dimension command to create the part.
6. Click the centerline and then a vertical edge or vice-versa to automatically generate a diametric
dimension.
Confidential
©Copyright 2017 Advanced Solutions, Inc.
All Rights Reserved
12
Inv. Part Modeling Fundamentals
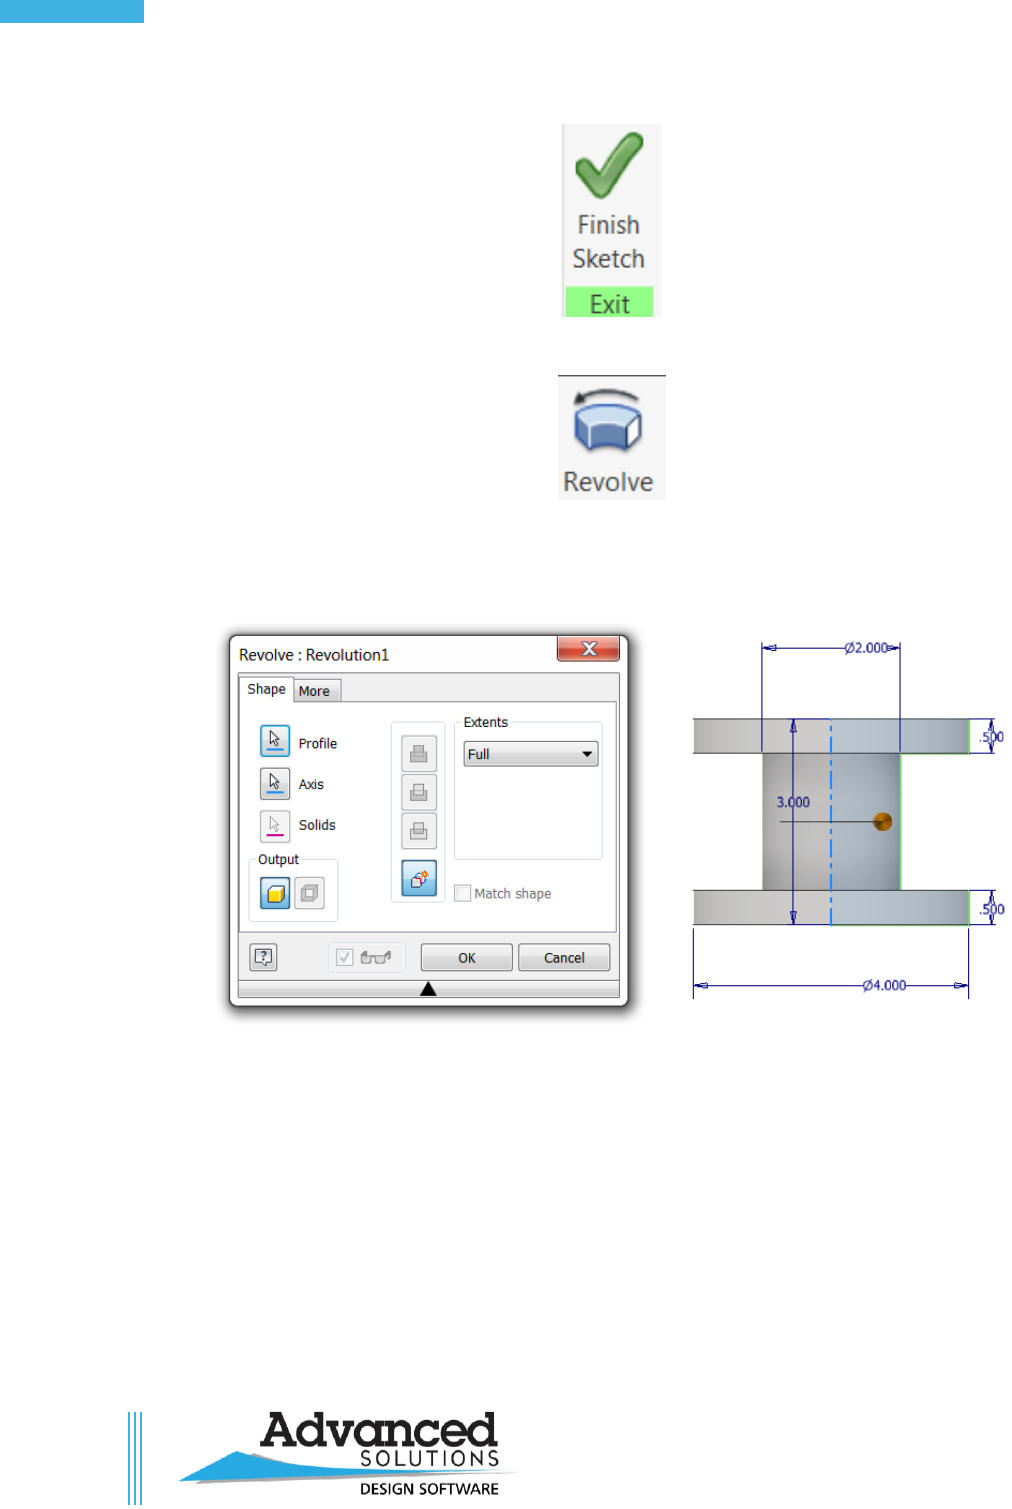
7. Click Finish sketch in the ribbon.
8. Click the Revolve command in the create panel.
9. Notice that the profile is automatically selected and the axis has been automatically selected. This
is because you had specified a line as a centerline. If the centerline had not been set in the sketch,
then you would have to tell the software what the axis should be.
10. Click OK.
11. Close the part without saving.
Confidential
©Copyright 2017 Advanced Solutions, Inc.
All Rights Reserved
13
Table of Contents
Chapter 4a Exercise
1. Start a new Standard.ipt file.
2. Start a new sketch.
3. Select the XY Plane.
4. Start a center point rectangle on the projected center point.
Confidential
©Copyright 2017 Advanced Solutions, Inc.
All Rights Reserved
14
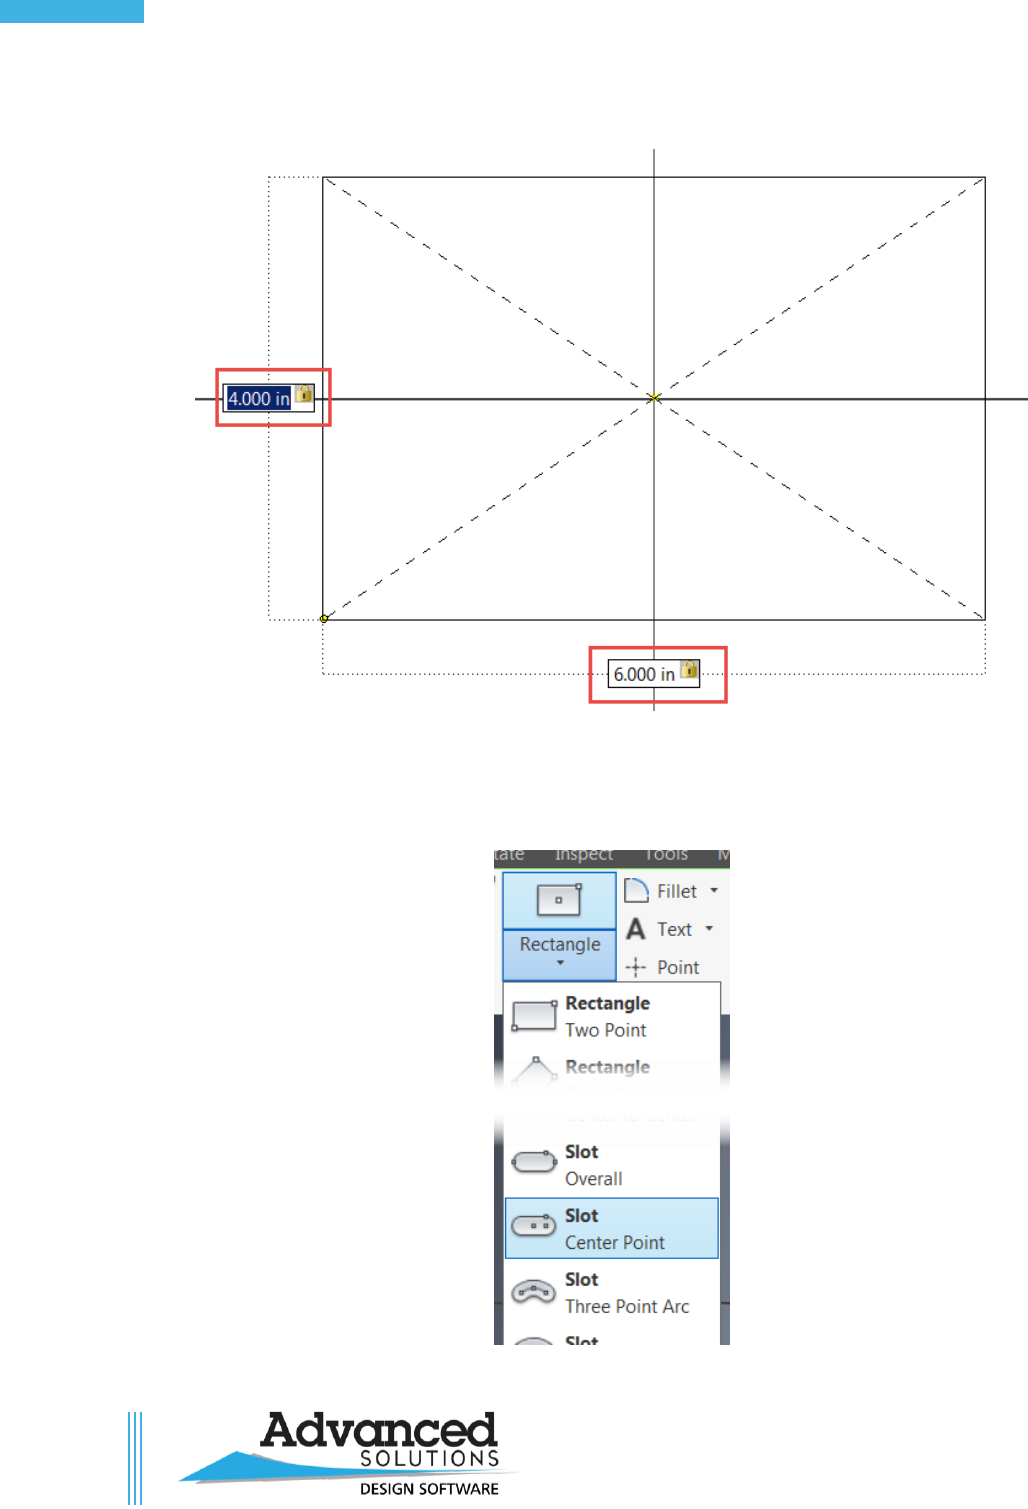
Inv. Part Modeling Fundamentals
5. For the rectangle dimensions use 6.0 in for the Width and 4.0 in for the Height using the TAB key
to cycle between the values.
6. Press ENTER when finished typing in the values.
7. Notice the dimensions were automatically placed for you.
8. Expand the Rectangle drop-down and choose Center Point Slot.
Confidential
©Copyright 2017 Advanced Solutions, Inc.
All Rights Reserved
15
Table of Contents
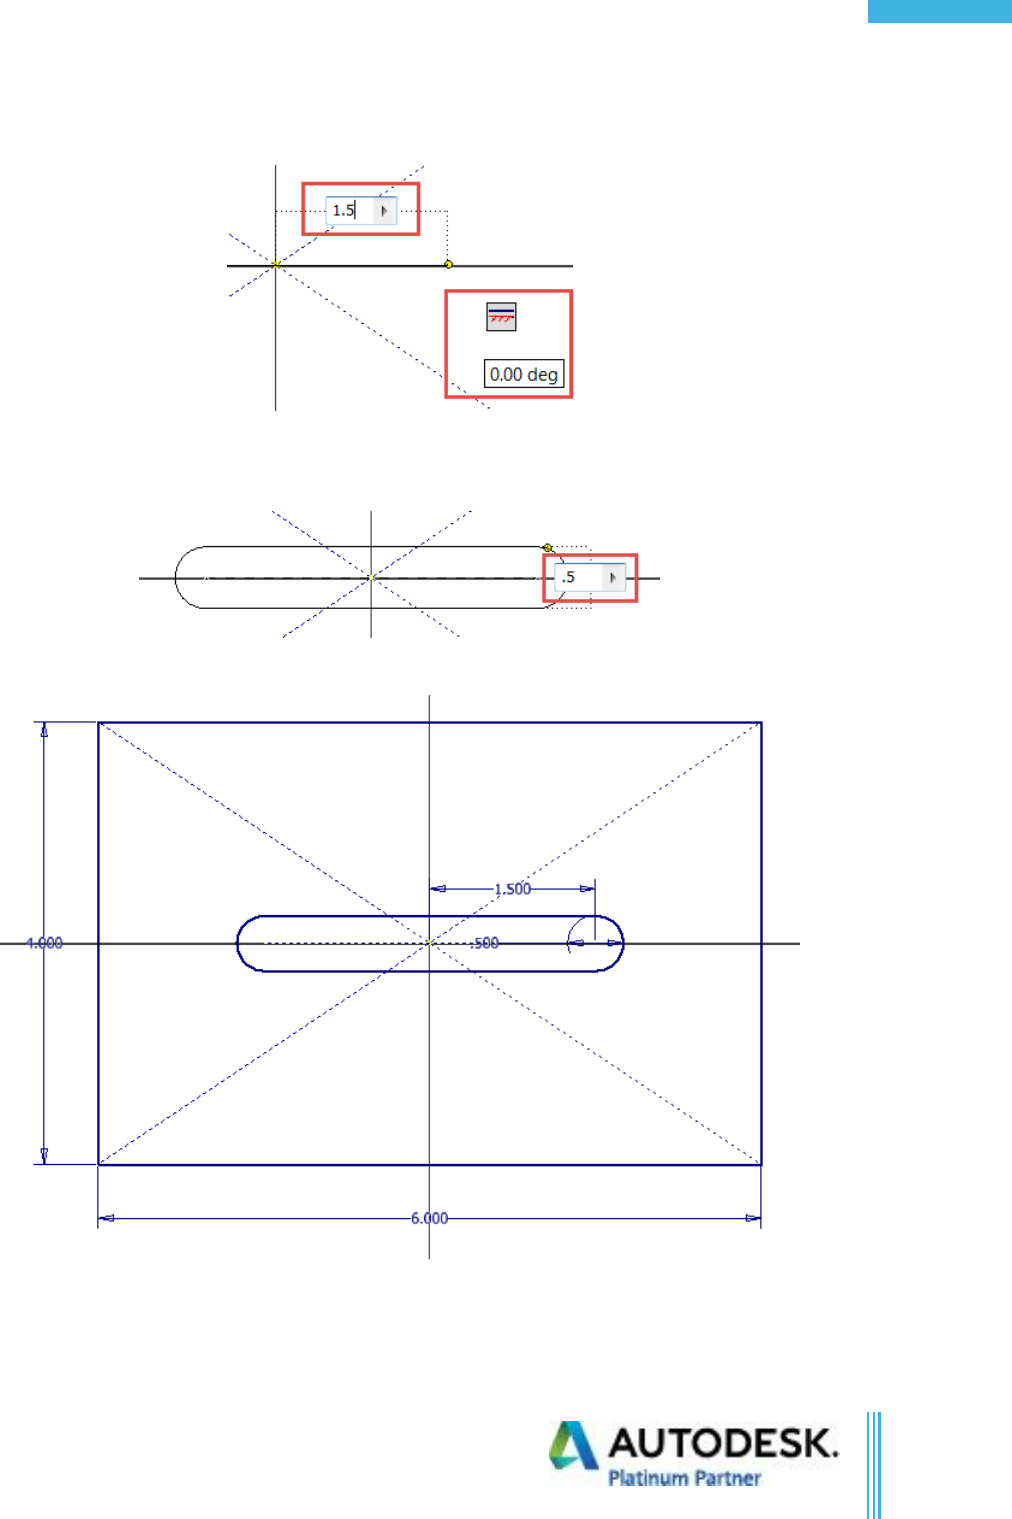
9. Select the projected center point again.
10. Drag the Cursor to the right, type 1.5 in.
11. Press ENTER.
12. Drag the cursor vertically and type 0.5 in.
13. Press ENTER.
14. Notice the dimensions were placed automatically. If you just sketched the geometry without typing
in values, you would have to come back later and place dimensions on the geometry to fully define
it.
Confidential
©Copyright 2017 Advanced Solutions, Inc.
All Rights Reserved
16
Inv. Part Modeling Fundamentals
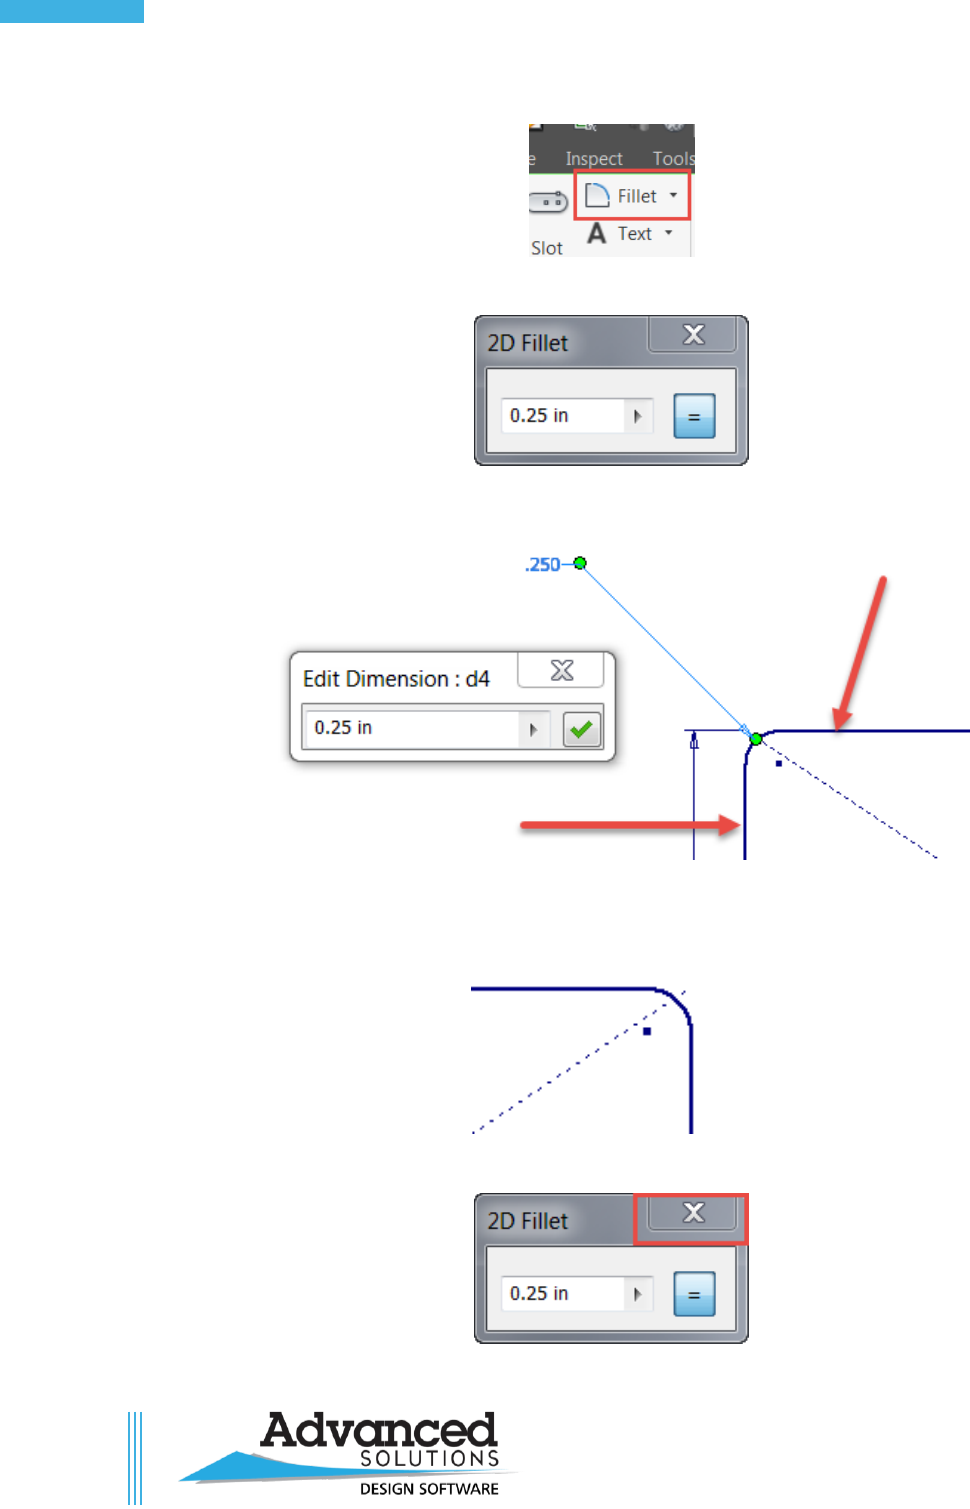
15. Select the Fillet Command.
16. Type in 0.25 in.
17. Select the (2) lines that form the upper left corner.
18. Select the other (2) lines that form the upper right corner.
19. Close the Fillet Command.
Confidential
©Copyright 2017 Advanced Solutions, Inc.
All Rights Reserved
17
Table of Contents
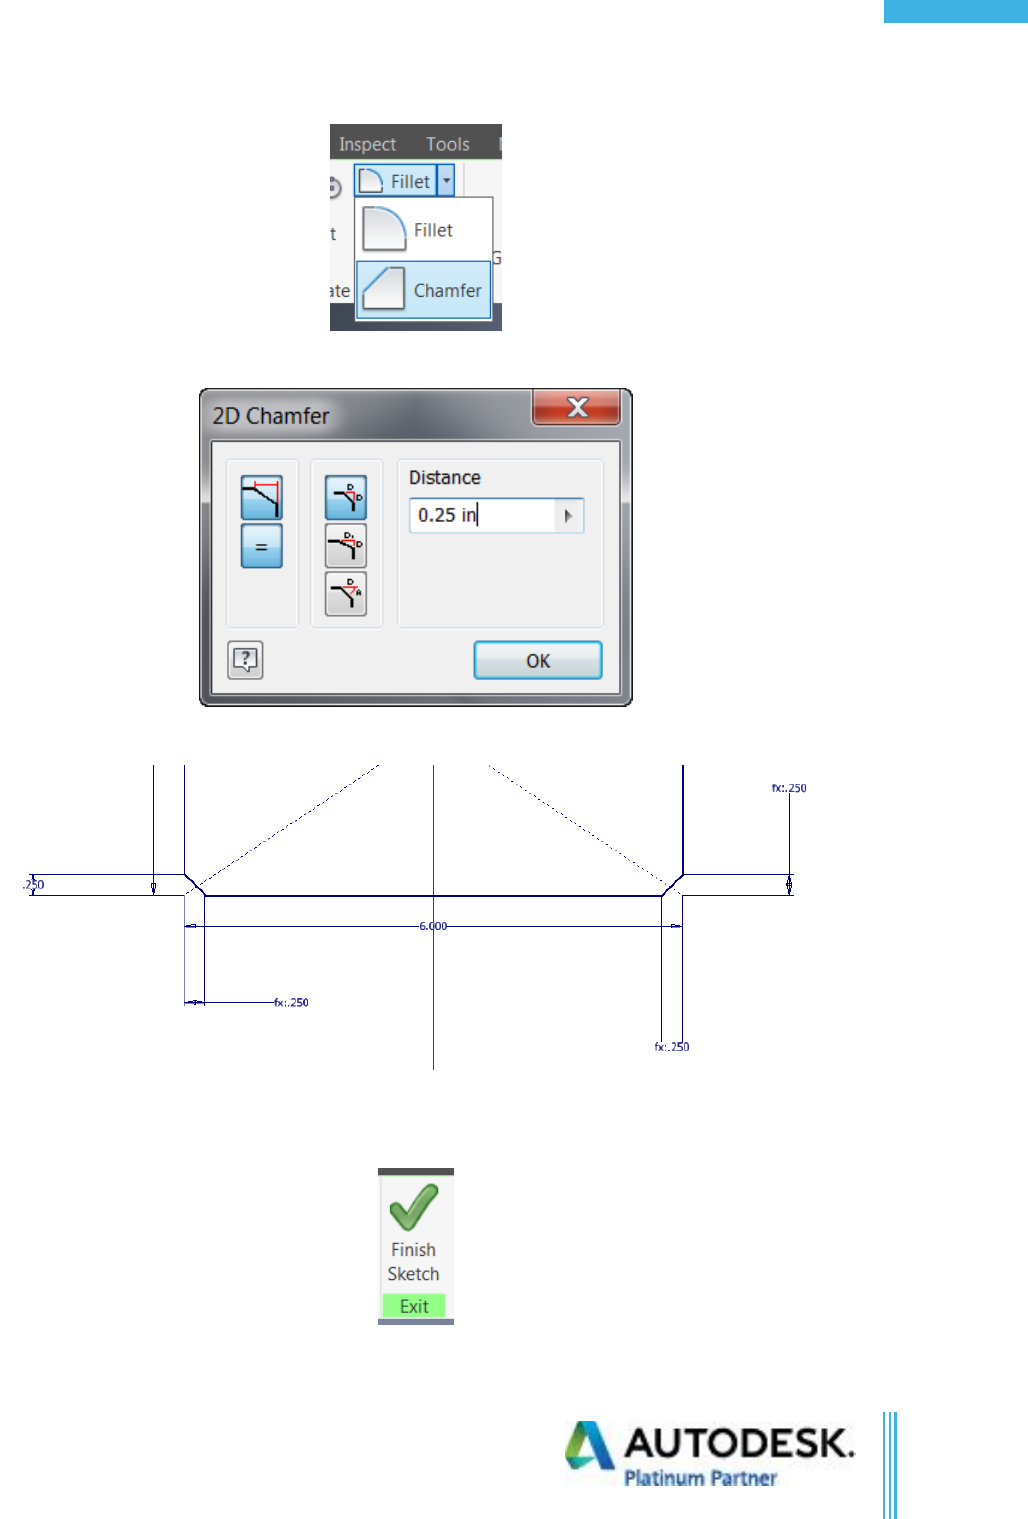
20. Click the drop-down for the Fillet Command and select Chamfer.
21. Type in 0.25 in for the Distance.
22. Select the lines that form the bottom corners to apply the chamfer.
23. Close the Chamfer command.
24. Finish the sketch in the ribbon.
25. Close the file without saving.
Confidential
©Copyright 2017 Advanced Solutions, Inc.
All Rights Reserved
18
Inv. Part Modeling Fundamentals
Chapter 4b Exercise
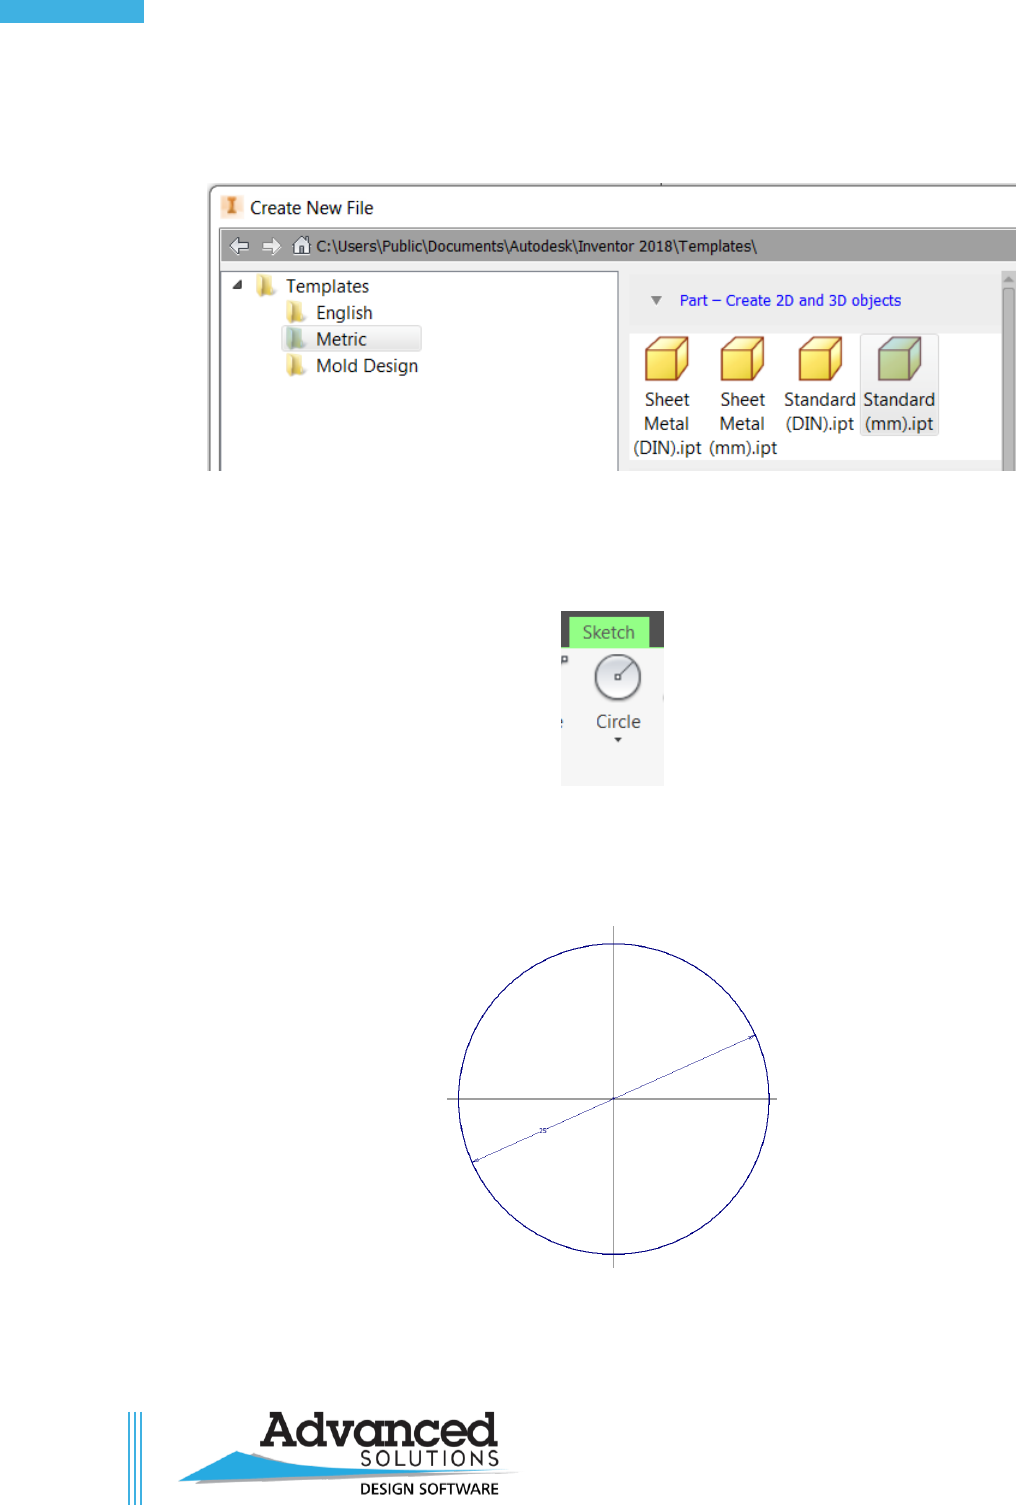
1. Start a new Standard (mm).ipt.
2. Click Create.
3. Create a new sketch on the XY Plane.
4. Start the circle command.
5. Select the projected center point.
6. Drag the cursor and type in 25.
7. Press ENTER.
8. Finish the sketch and close without saving.
Confidential
©Copyright 2017 Advanced Solutions, Inc.
All Rights Reserved
19
Table of Contents
Chapter 4c Exercise
1. Start a new Standard.ipt.
2. Create a new sketch on the XY plane.
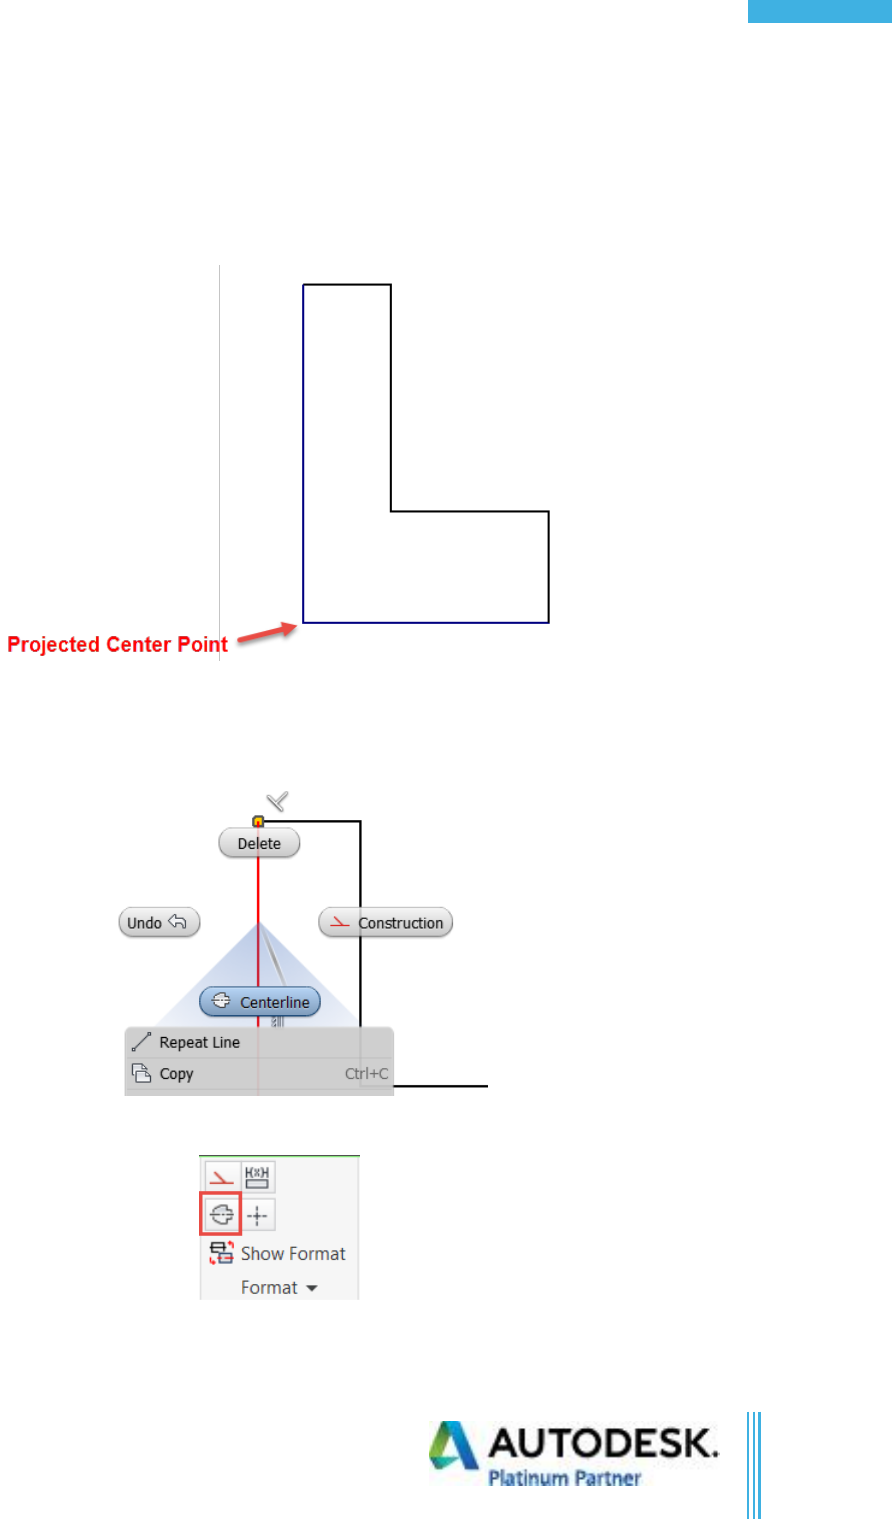
3. Create a sketch like what is shown below.
4. Select the vertical line from the center point.
5. Make it a Centerline by either right clicking on it and selecting centerline.
6. Or, by selecting the line and choose the centerline button from the Format Panel.
Confidential
©Copyright 2017 Advanced Solutions, Inc.
All Rights Reserved
20
Inv. Part Modeling Fundamentals
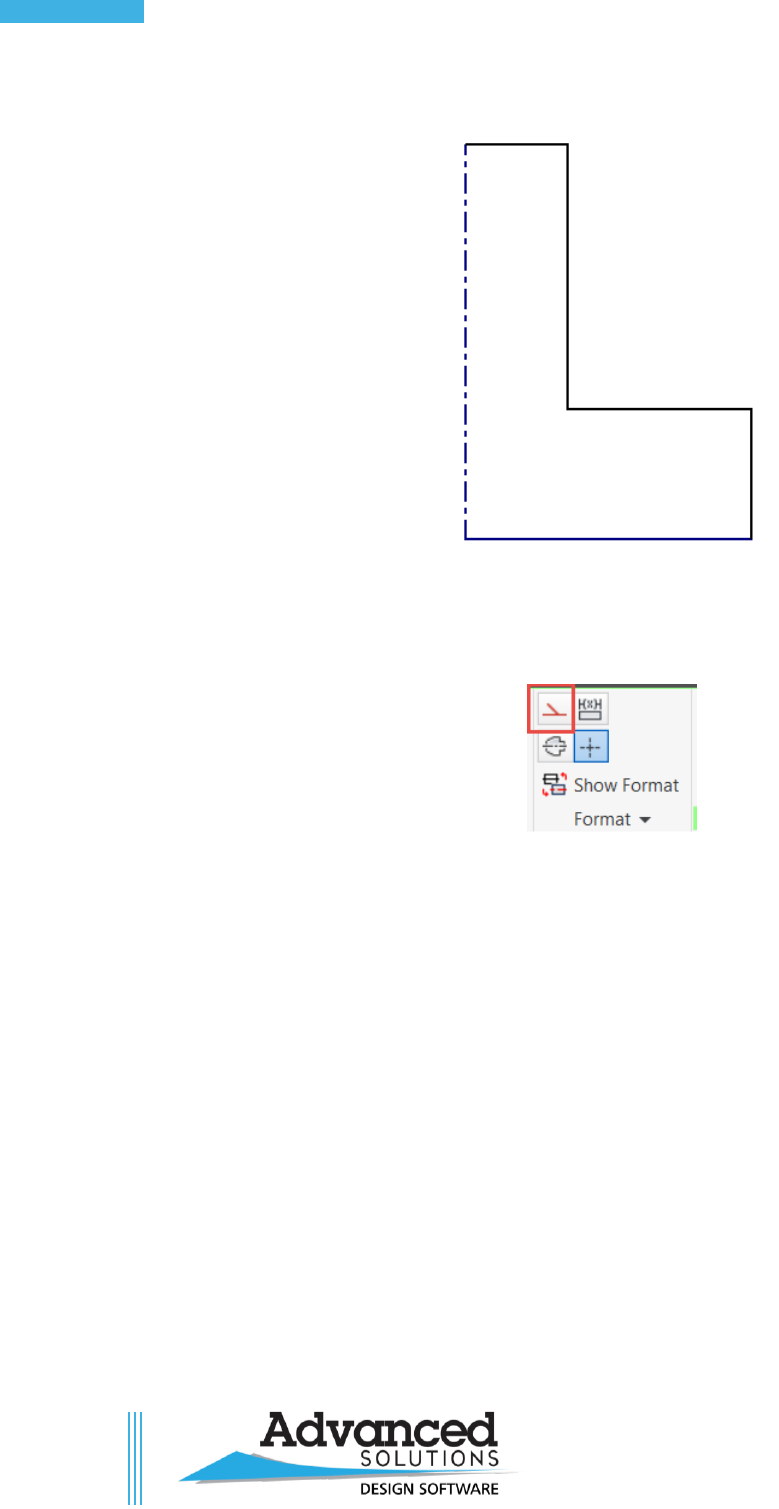
7. The sketch should look like below.
8. If the line would have been selected as a construction line, then when it comes time to revolve the
part, you would not get a solid. Remember that construction lines are considered as reference
geometry even though they create a closed profile. The software will ignore the construction line
type. The construction line button is shown below.
9. Finish the sketch and close it without saving.
Confidential
©Copyright 2017 Advanced Solutions, Inc.
All Rights Reserved
21
Table of Contents
Chapter 4d Exercise
1. Open Sketch Dimensions.ipt file.
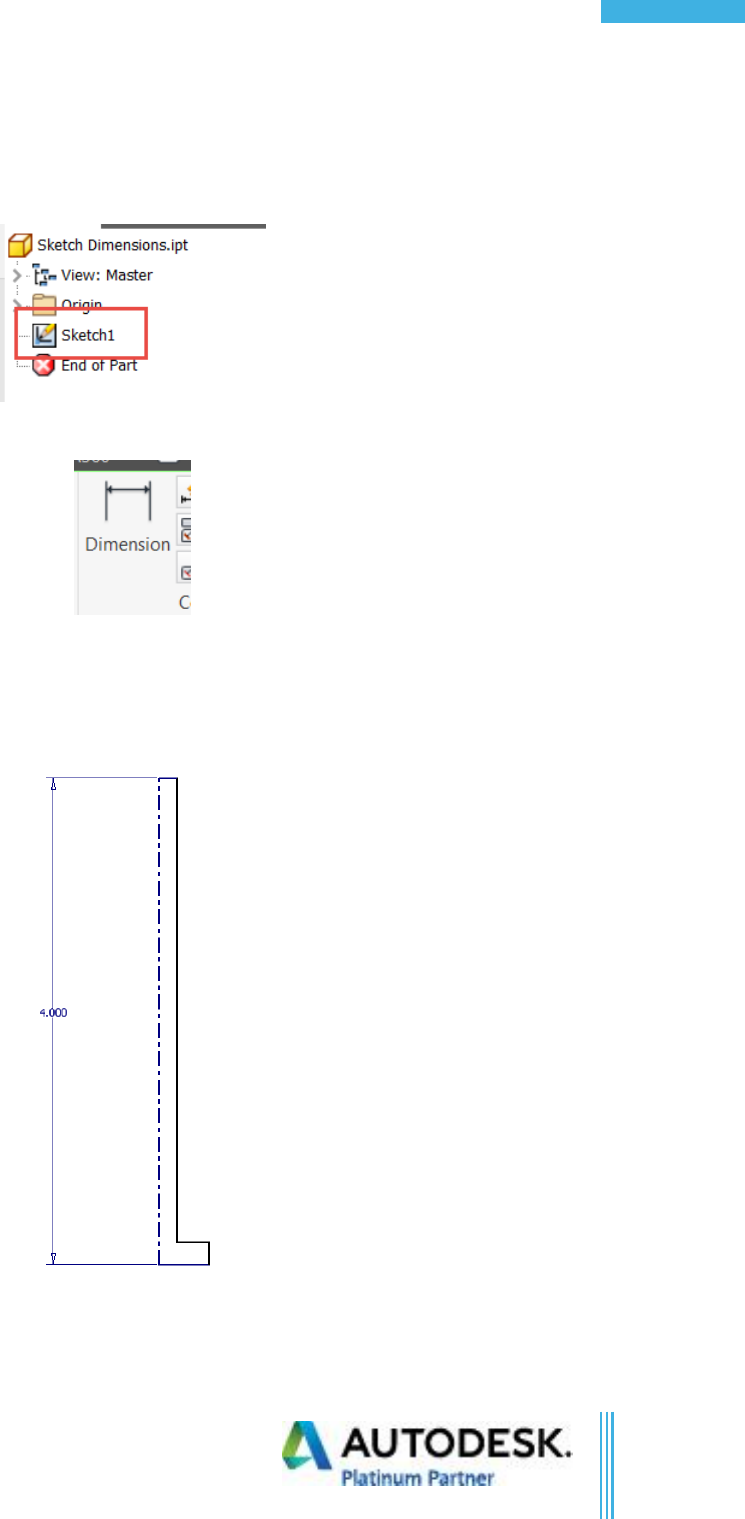
2. Double click on Sketch1 in the browser, or right click on the sketch and choose Edit Sketch.
3. Select the Dimension command in the Constrain Panel or press the “D” key on keyboard.
4. Select the vertical line that is the centerline.
5. Drag and place the dimension to the left.
6. Type in 4 in.
7. The line is driven to the length of the dimension.
Confidential
©Copyright 2017 Advanced Solutions, Inc.
All Rights Reserved
22
Inv. Part Modeling Fundamentals
8. Place a dimension that represents the Flange Height and type in 0.5 in.
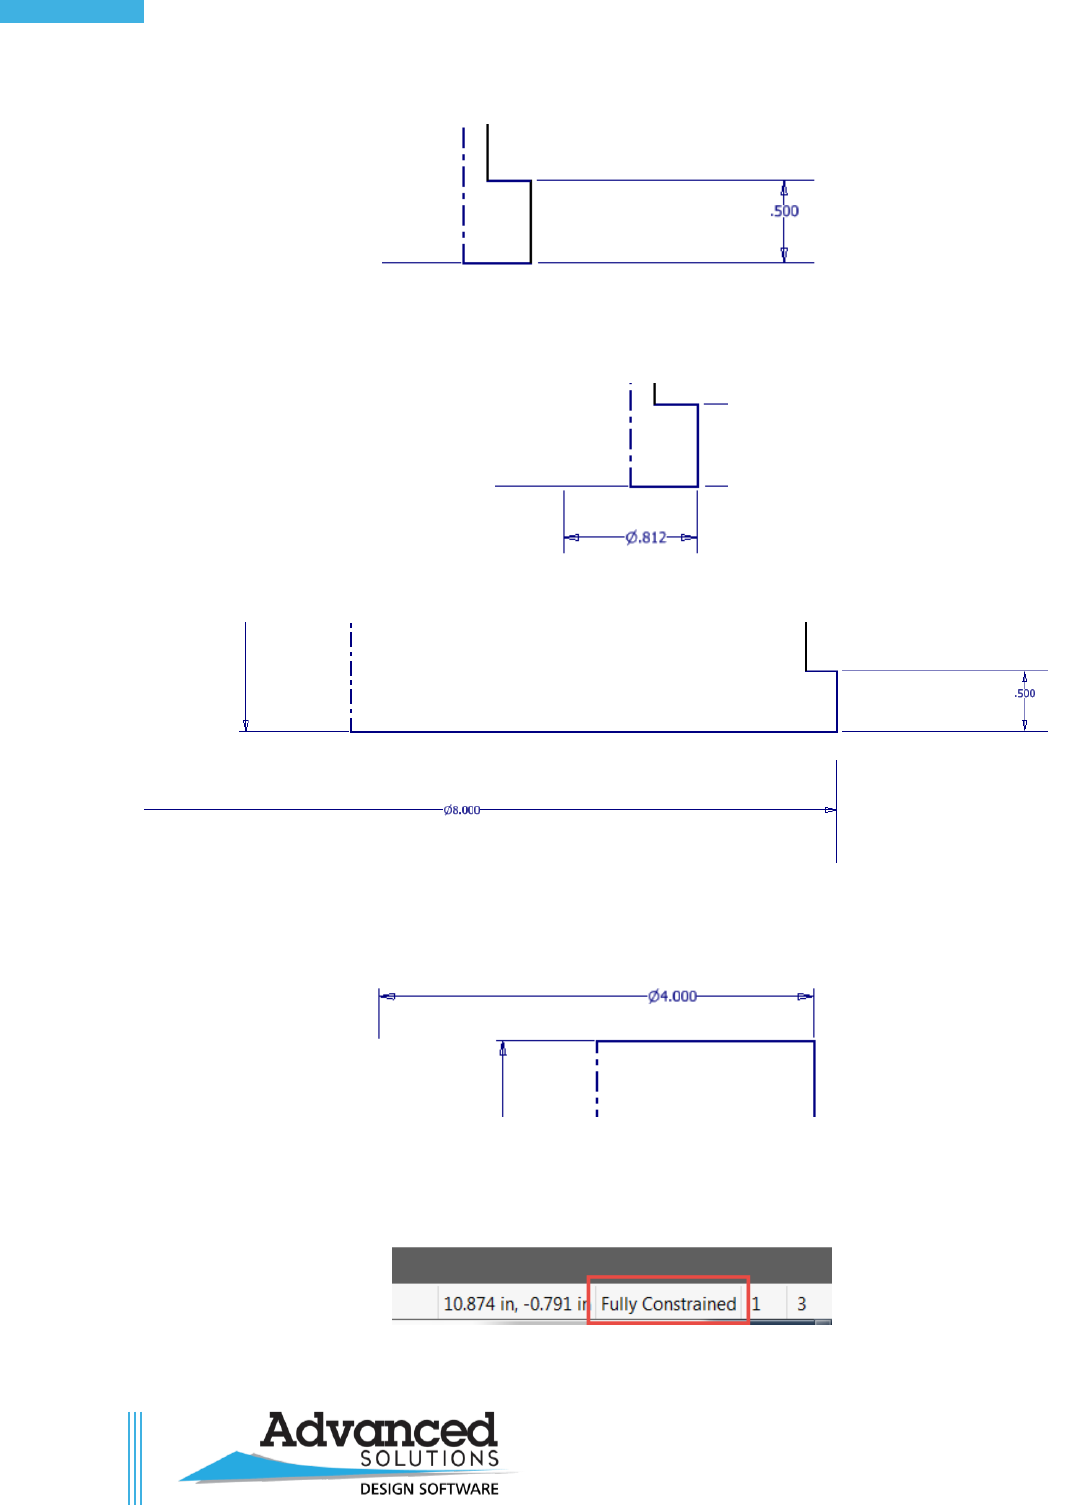
9. Select the centerline and then the vertical line you just placed the 0.5 in dimension on. Place the
dimension to the bottom.
10. Type in 8.0 in when the dimension box appears.
11. Notice that the dimension is automatically a diametric dimension.
12. Create a 4.0 in dimension for the top by using the centerline and other vertical line as shown.
13. Notice the 4” dimension is automatically a diametric dimension.
14. Look in the lower right corner of the graphics window. The sketch is Fully Constrained.
15. Finish the sketch and close without saving.
Confidential
©Copyright 2017 Advanced Solutions, Inc.
All Rights Reserved
23
Table of Contents
Chapter 4e Exercise
1. Open circular dimensions.ipt.
2. Double click on Sketch1 in the browser, or right click on it and choose Edit sketch.
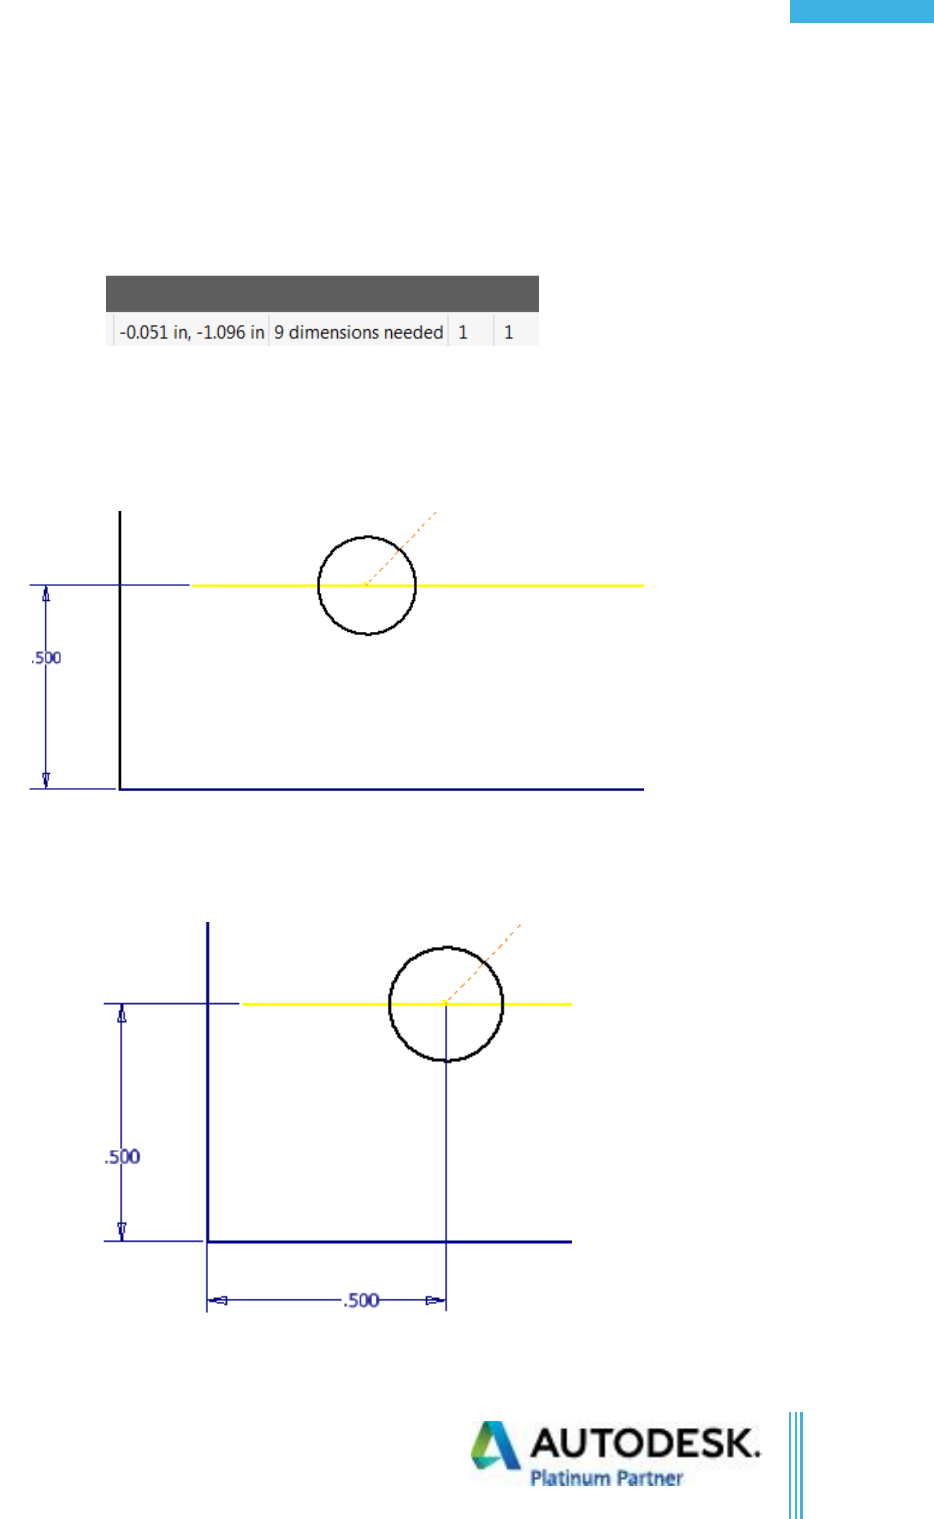
3. Notice the lower right corner of the graphics window, there are (9) dimensions needed.
4. Activate the dimension command by either using “D” on the keyboard or the dimension command
in the ribbon.
5. Add a vertical dimension from the projected X Axis and the bottom horizontal line.
6. Type in 0.5 in.
7. Apply a dimension from the left vertical line to the center of the circle.
8. Type in 0.5 in.
Confidential
©Copyright 2017 Advanced Solutions, Inc.
All Rights Reserved
24
Inv. Part Modeling Fundamentals
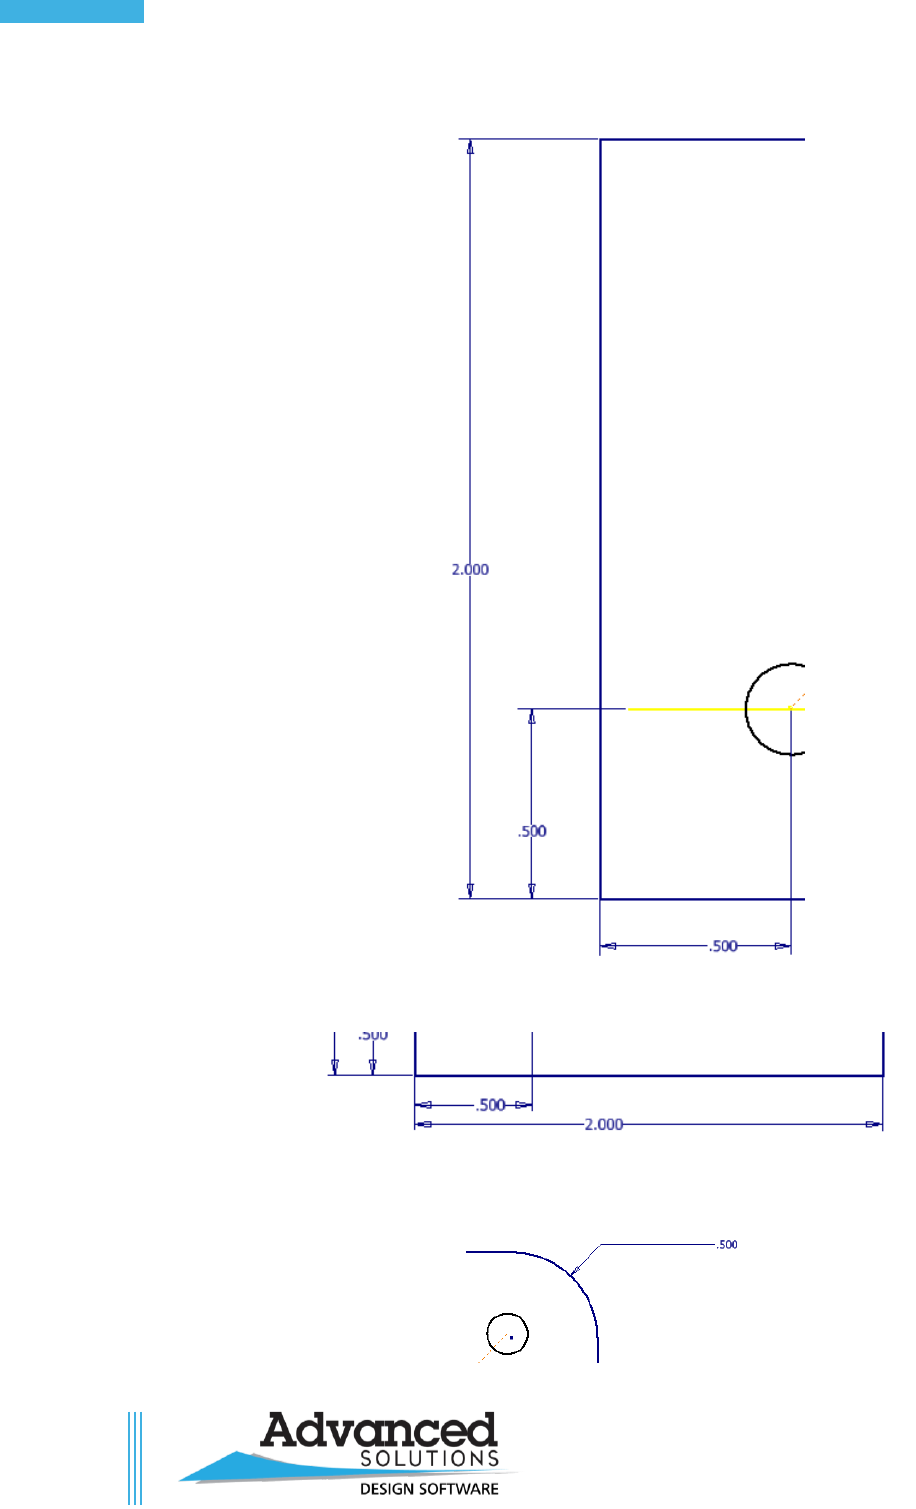
9. Set the height of the box to be 2.0 in.
10. Set the width of the box to be 2.0 in.
11. Make the arc in the upper right corner a radius of 0.5 in.
Confidential
©Copyright 2017 Advanced Solutions, Inc.
All Rights Reserved
25
Table of Contents
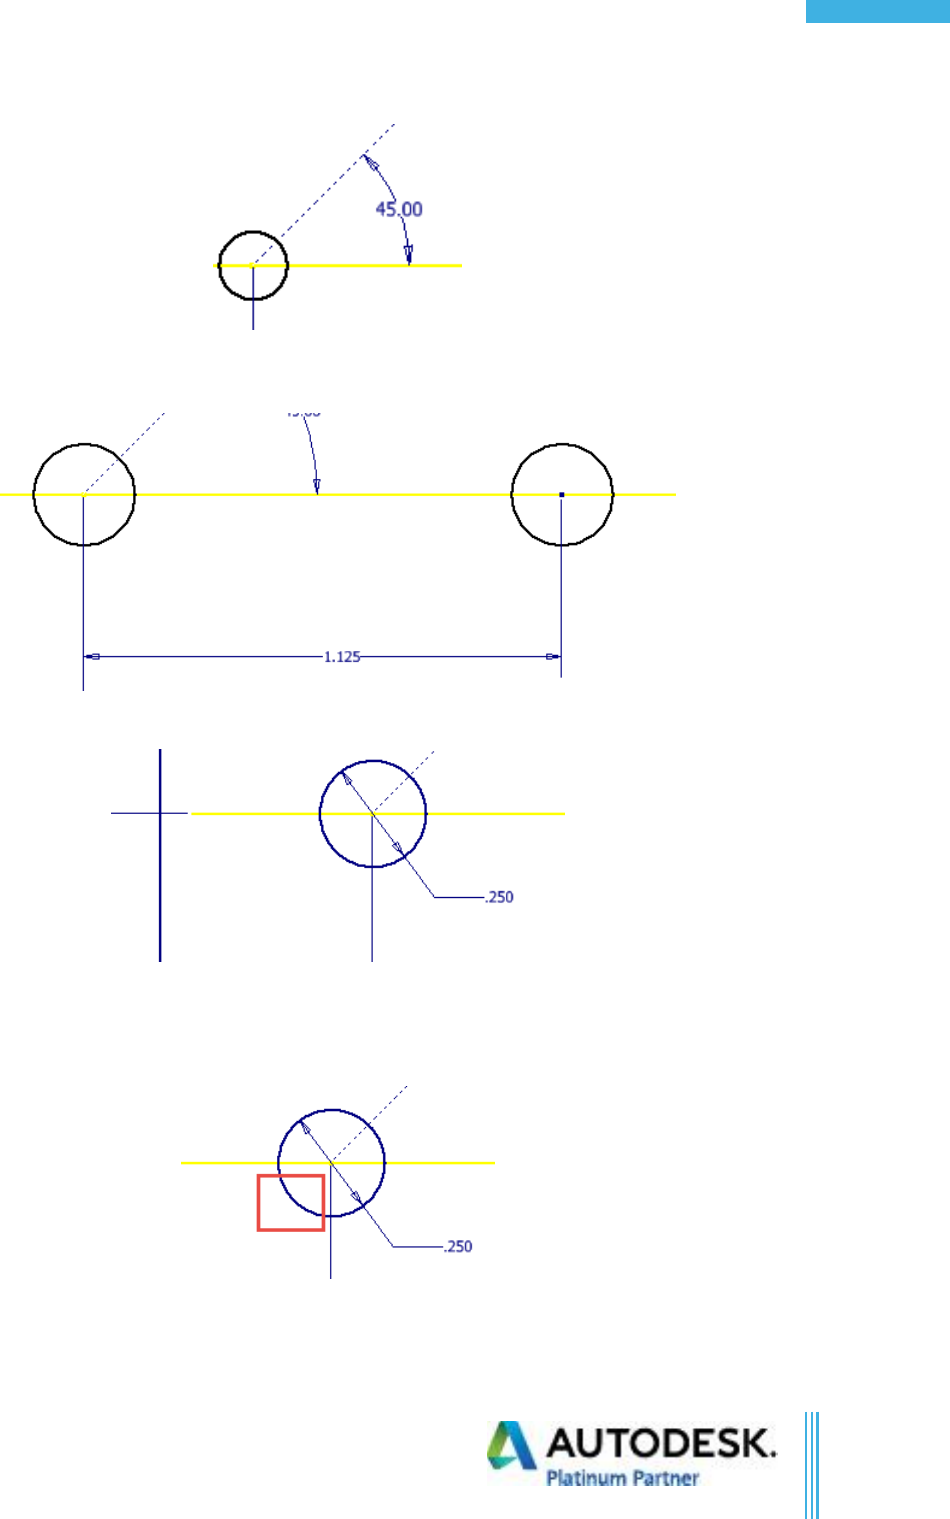
12. Set the angle between the construction line and the projected X axis to be 45 degrees.
13. Set the center to center distance of the horizontal holes to be 1.125 in. You don’t need to pick the
center points, just select the circular segments. The dimension will go to the center automatically.
14. Set the diameter of the lower left circle to be 0.25 in.
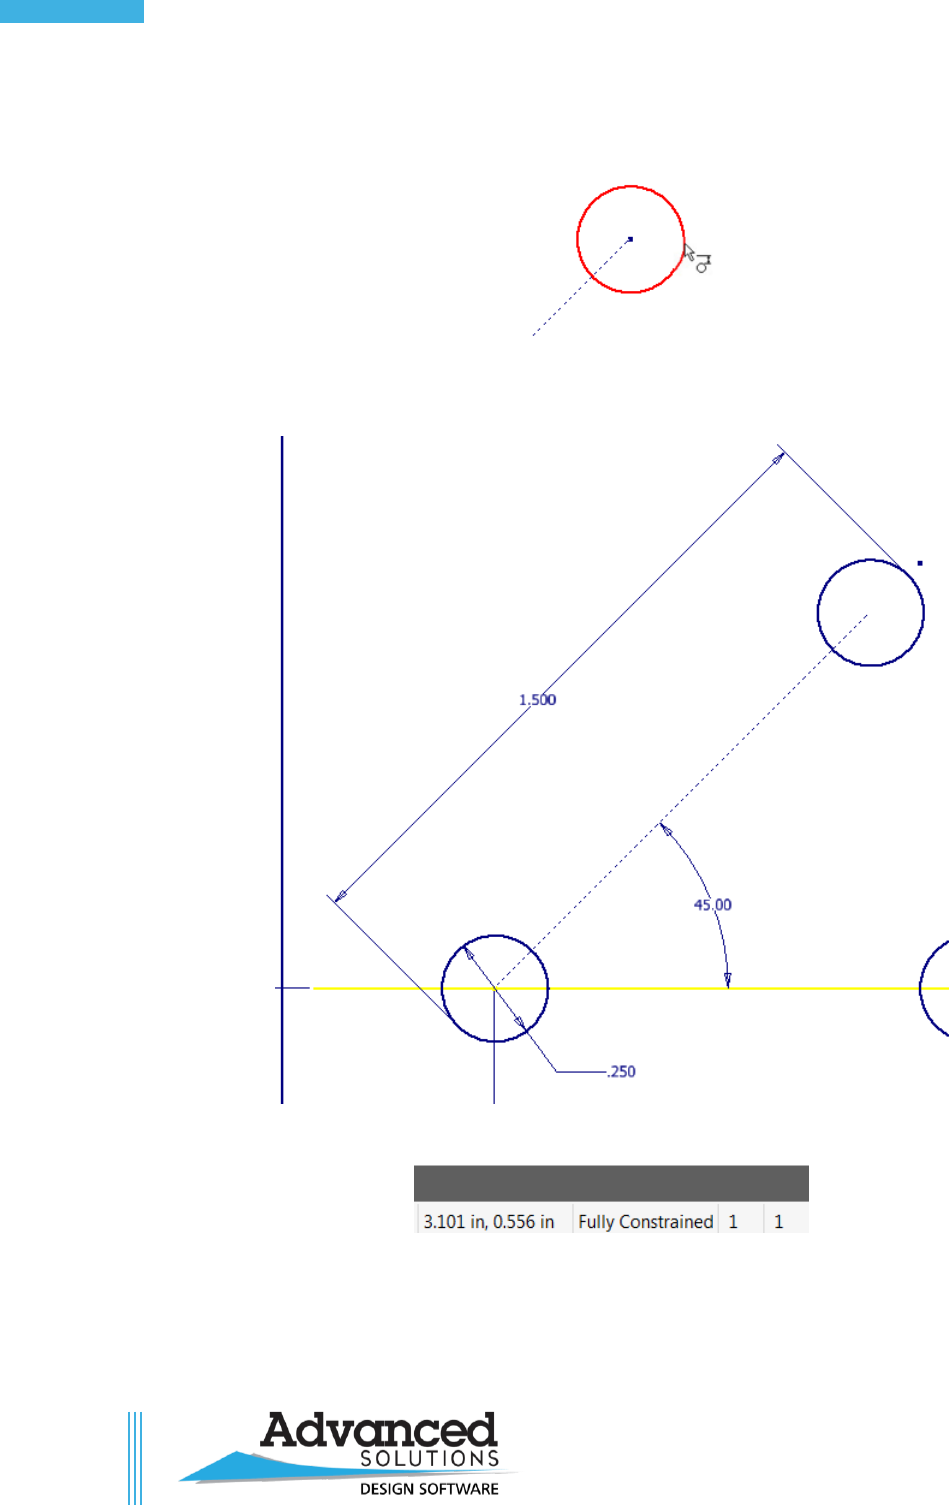
15. Next, set the outside to outside dimensions of the diagonal circles.
16. Activate the dimension command if not already. Select the lower left circle in an area and shown
below:
17. This will make the dimension land on the selected side of the circle.
Confidential
©Copyright 2017 Advanced Solutions, Inc.
All Rights Reserved
26
Inv. Part Modeling Fundamentals
18. Now drag the mouse to the upper right circle while remaining along the centerline of the circles,
and when the cursor changes to the tangent symbol click.
19. When the symbol from above appears, click and drag above the circles.
20. Type in 1.5 in.
21. Notice the lower left corner of the graphics window state that the sketch is Fully Constrained.
22. Finish the sketch and close without saving.
Confidential

©Copyright 2017 Advanced Solutions, Inc.
All Rights Reserved
27
Table of Contents
Chapter 4f Exercise
1. Open Sketch Constraint 1.ipt.
2. Edit the sketch in the browser.
3. Apply all required constraints to each section.
Confidential

©Copyright 2017 Advanced Solutions, Inc.
All Rights Reserved
28
Inv. Part Modeling Fundamentals
Chapter 4g Exercise
1. Open Sketch Constraint 2.ipt.
2. Edit each sketch labeled as “Fix” in the browser to match the “Done” version using constraints.
Confidential
©Copyright 2017 Advanced Solutions, Inc.
All Rights Reserved
29
Table of Contents
Chapter 4h Exercise
1. Open “Relax Mode.ipt”.
2. Double click on “Sketch1” icon in the browser to edit the sketch.
3. Turn on Relax Mode.
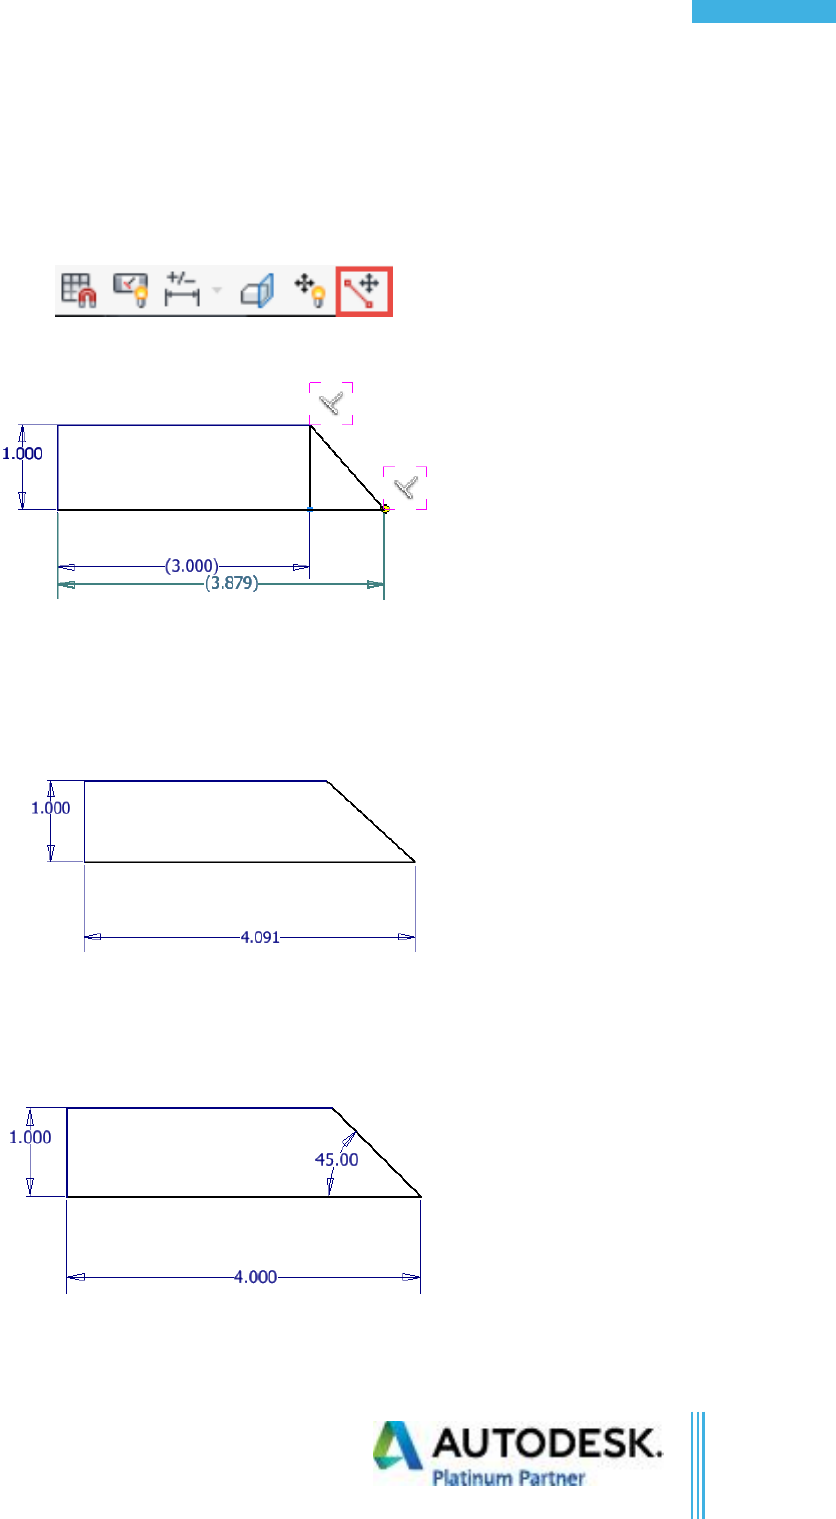
4. Click and drag the lower left corner of the rectangle to the right.
5. Notice how the dimension becomes referenced, and there are purple boxes around (2) constraints.
The boxes show the constraints that will be removed.
6. Drag until the reference dimension reads about “4.00” and release.
7. Notice the dimension becomes a regular dimension again.
8. Notice there are still (2) dimensions needed to fully define the sketch.
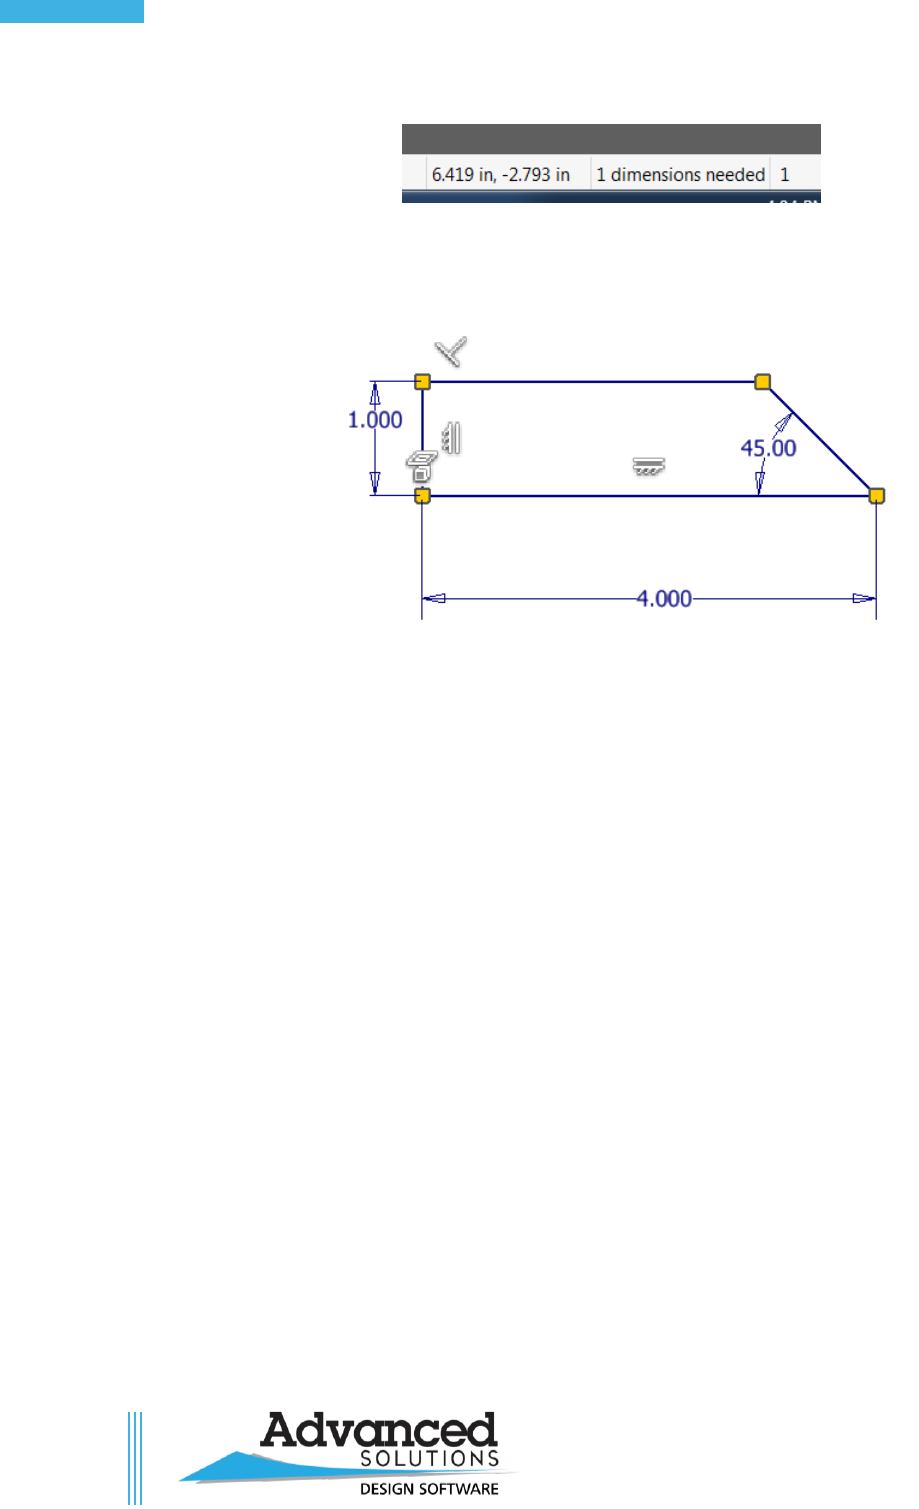
9. Double click on the horizontal dimension and change to be exactly “4 in”.
10. Add an angle dimension of 45 degrees.
Confidential
©Copyright 2017 Advanced Solutions, Inc.
All Rights Reserved
30
Inv. Part Modeling Fundamentals
11. There is still (1) dimension required to fully define the sketch.
12. It was fully defined by perpendicularity constraints, but they were removed when we used the
relaxed mode. Either add a perpendicular constrain on the left vertical and a horizontal line, or add
a horizontal constrain on the bottom line. The sketch will be fully defined.
13. Close the file without saving.
Confidential
©Copyright 2017 Advanced Solutions, Inc.
All Rights Reserved
31
Table of Contents
Chapter 5a Exercise
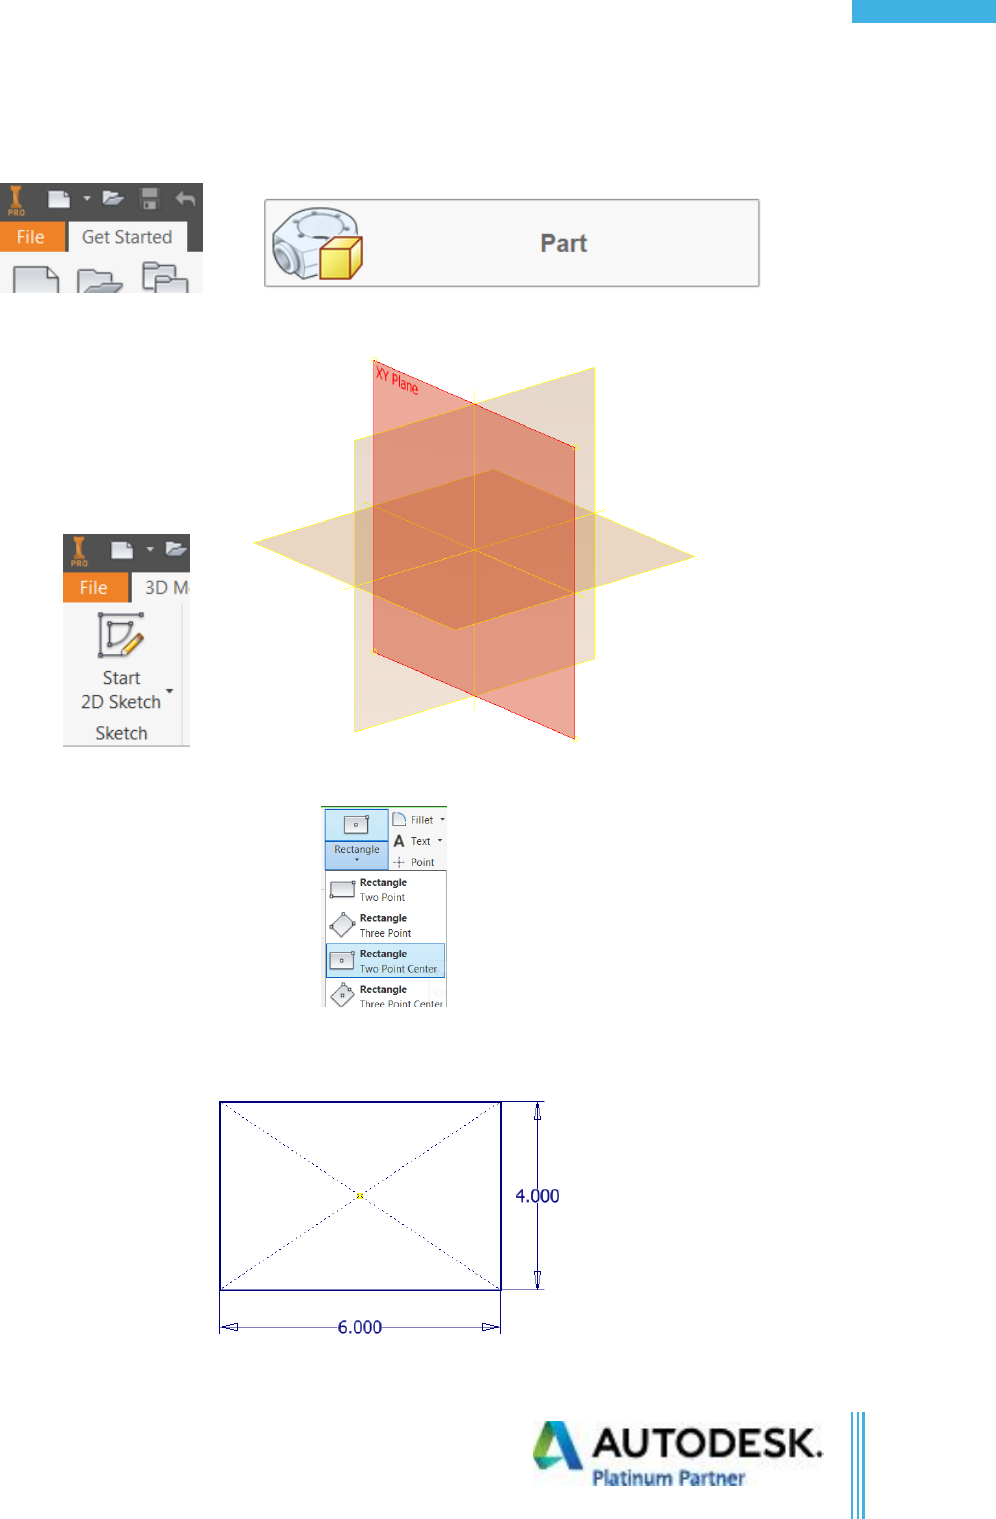
1. In the Getting Started Tab click on the new part icon to create a new part.
2. Start a new sketch on the XY plane.
3. Create a two-point center point rectangle on the projected origin point.
4. Using the Heads up display type in 6 for the horizontal dimension, then hit the TAB key to cycle to
the vertical dimension and type in 4, then hit ENTER.
Confidential
©Copyright 2017 Advanced Solutions, Inc.
All Rights Reserved
32
Inv. Part Modeling Fundamentals
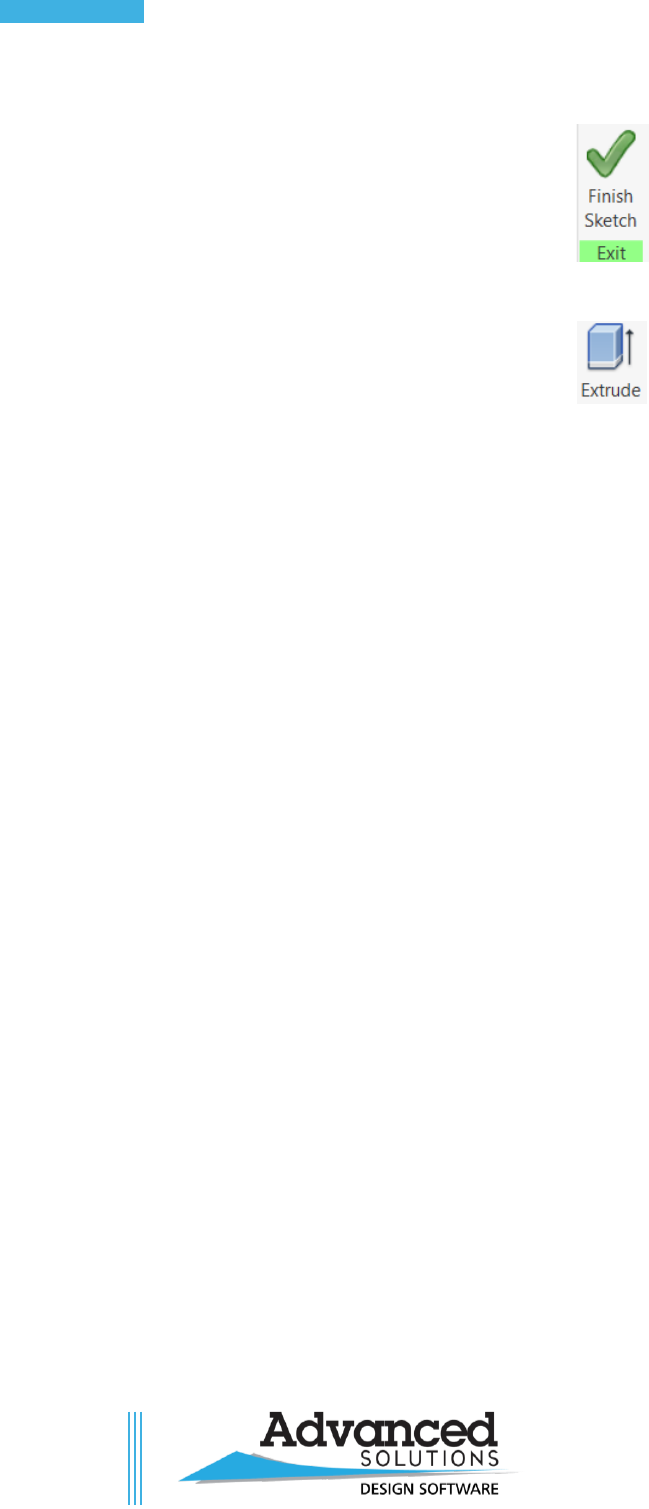
5. In the ribbon click on finish sketch.
6. In the ribbon in create panel click on extrude or “E” on the keyboard for extrude.
7. Select the Symmetric direction, with a distance of 1 in.
8. Click OK.
9. Close the file without saving.
Confidential
©Copyright 2017 Advanced Solutions, Inc.
All Rights Reserved
33
Table of Contents
Chapter 5b Exercise
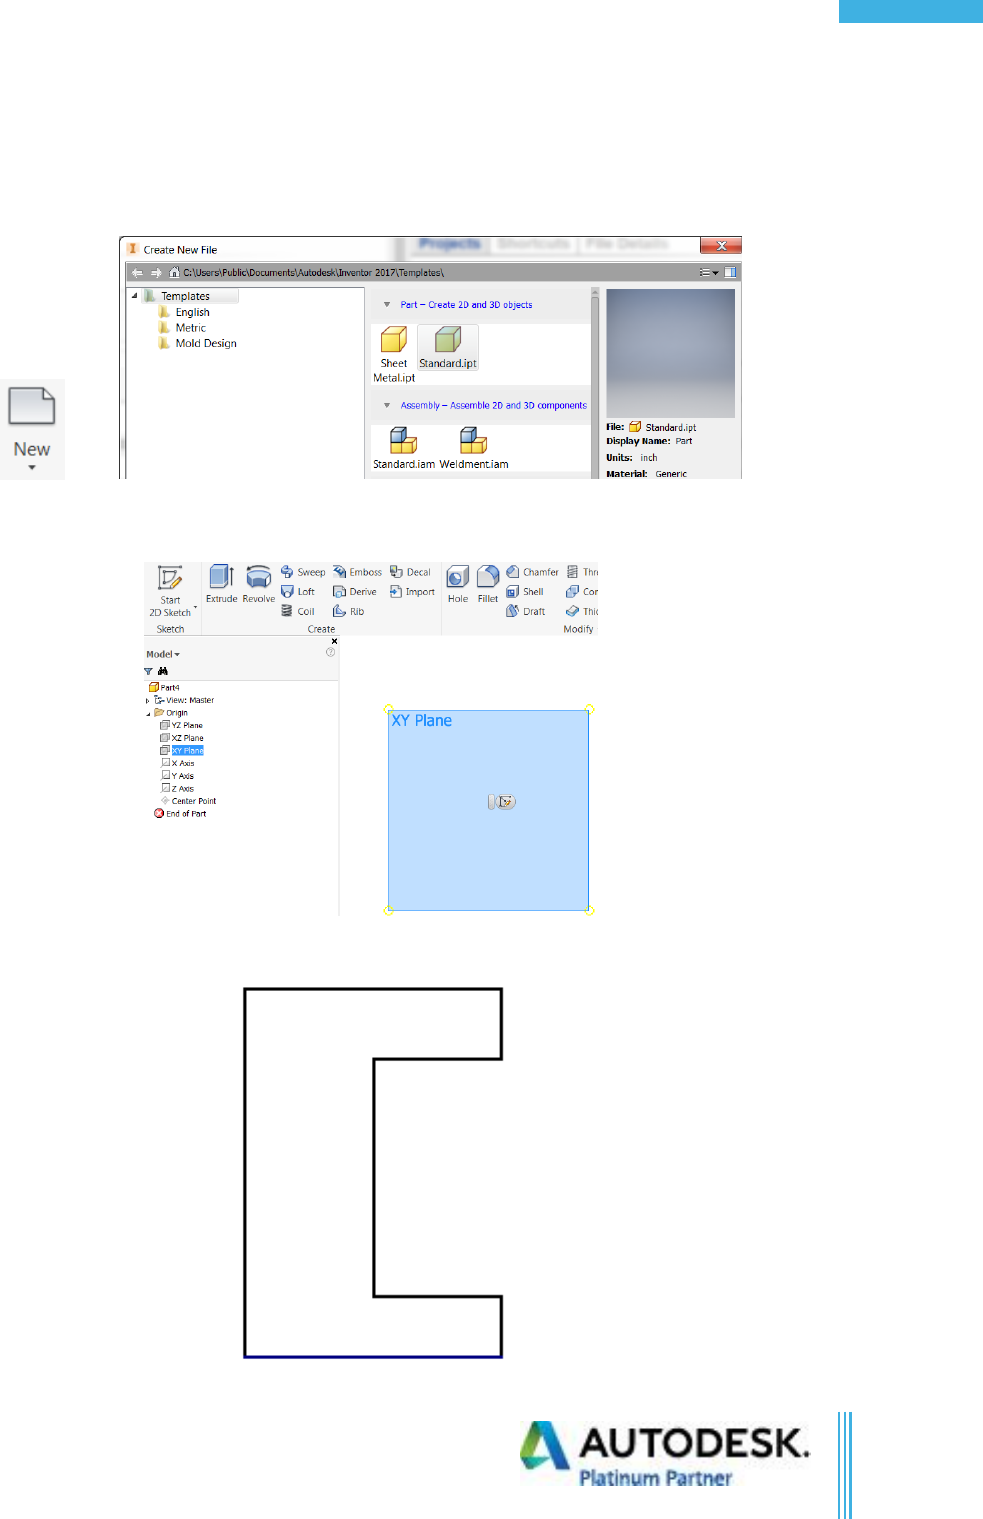
1. Create a new inch part by using the “new” document button in the ribbon.
2. Create a sketch on the XY plane by highlighting the XY plane in the browser, then clicking the new
sketch button.
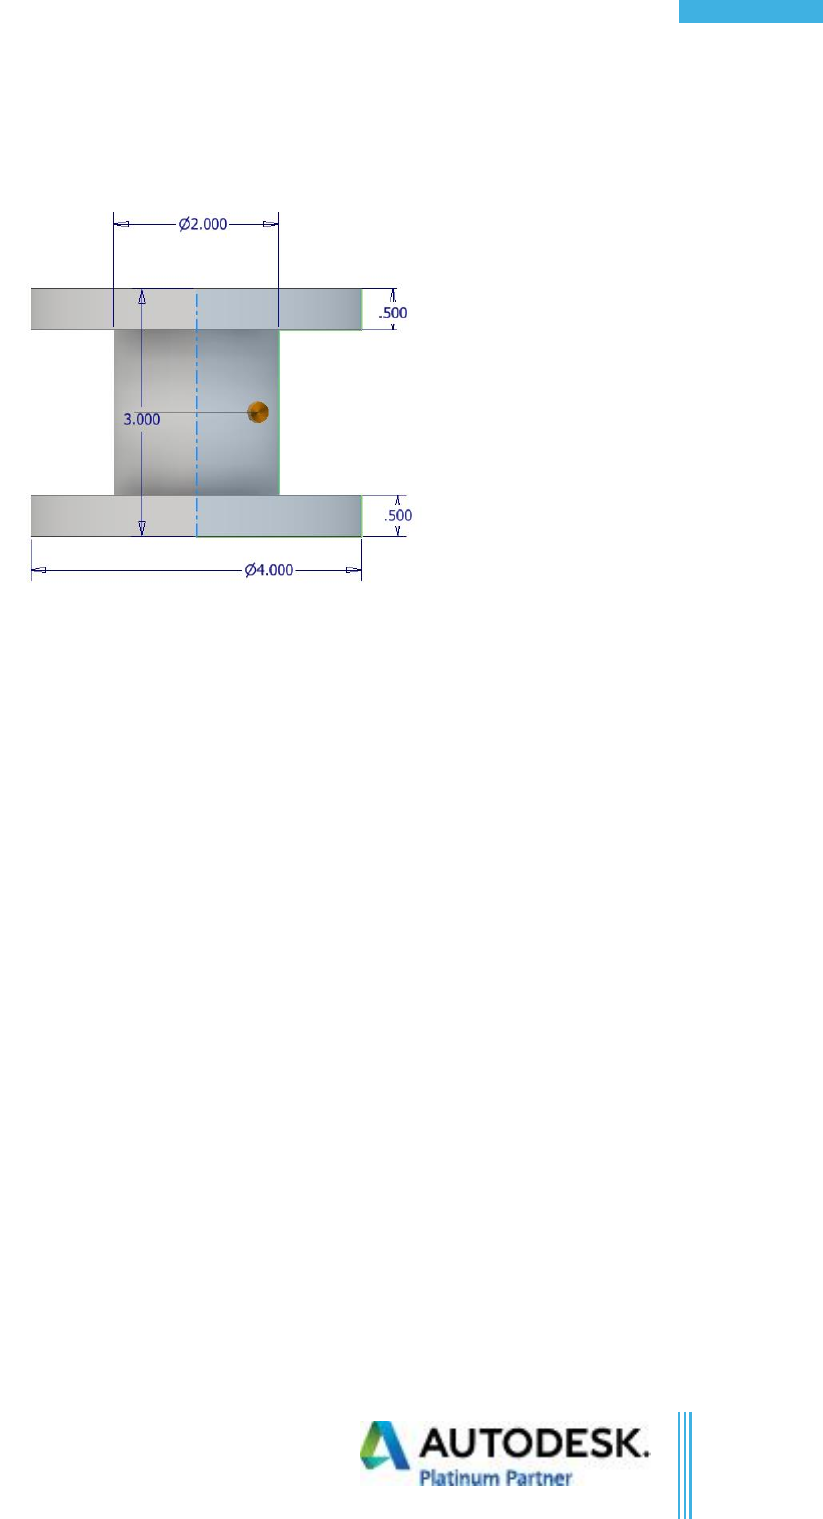
3. Draw a profile that is similar to what is shown below starting at the projected origin point.
Confidential
©Copyright 2017 Advanced Solutions, Inc.
All Rights Reserved
34
Inv. Part Modeling Fundamentals
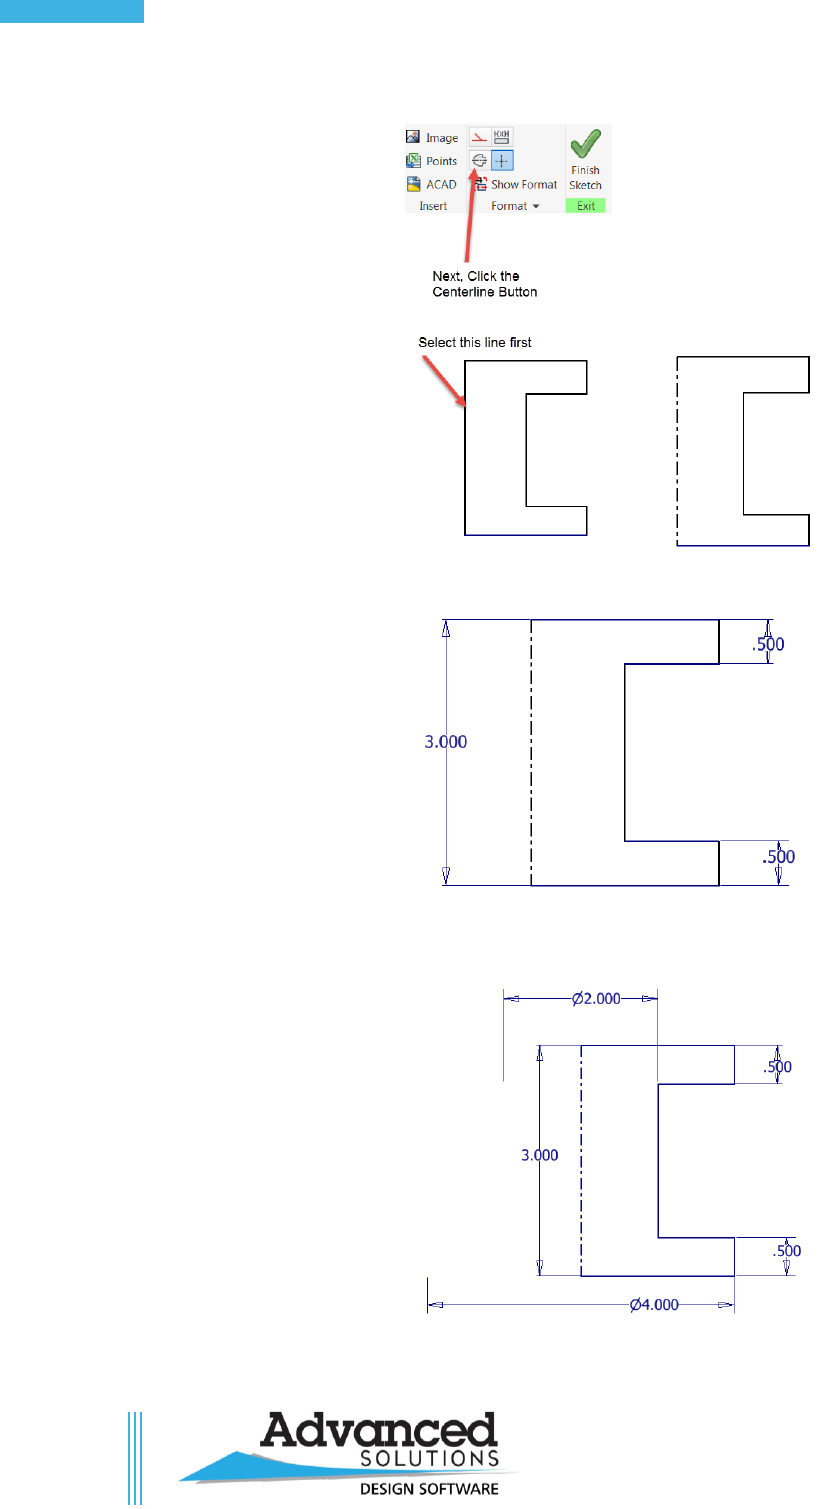
4. Select the vertical line and make it a centerline.
5. Use the General Dimension command to create the part.
6. Click the centerline and then a vertical edge or vice-versa to automatically generate a diametric
dimension.
Confidential
©Copyright 2017 Advanced Solutions, Inc.
All Rights Reserved
35
Table of Contents
7. Next click, finish sketch in the ribbon, and then click the revolve command in the create panel.
Notice that the profile is automatically selected and the axis has been automatically selected. This
is because we had specified a line as a centerline. If the centerline had not been set in the sketch,
then you would have to tell the software what the axis should be.
8. Click OK in the Revolve dialog box.
9. Close the file without saving.
Confidential
©Copyright 2017 Advanced Solutions, Inc.
All Rights Reserved
36
Inv. Part Modeling Fundamentals
Chapter 5c Exercise
1. In the Getting Started Tab click on the new part icon to create a new Standard.ipt.
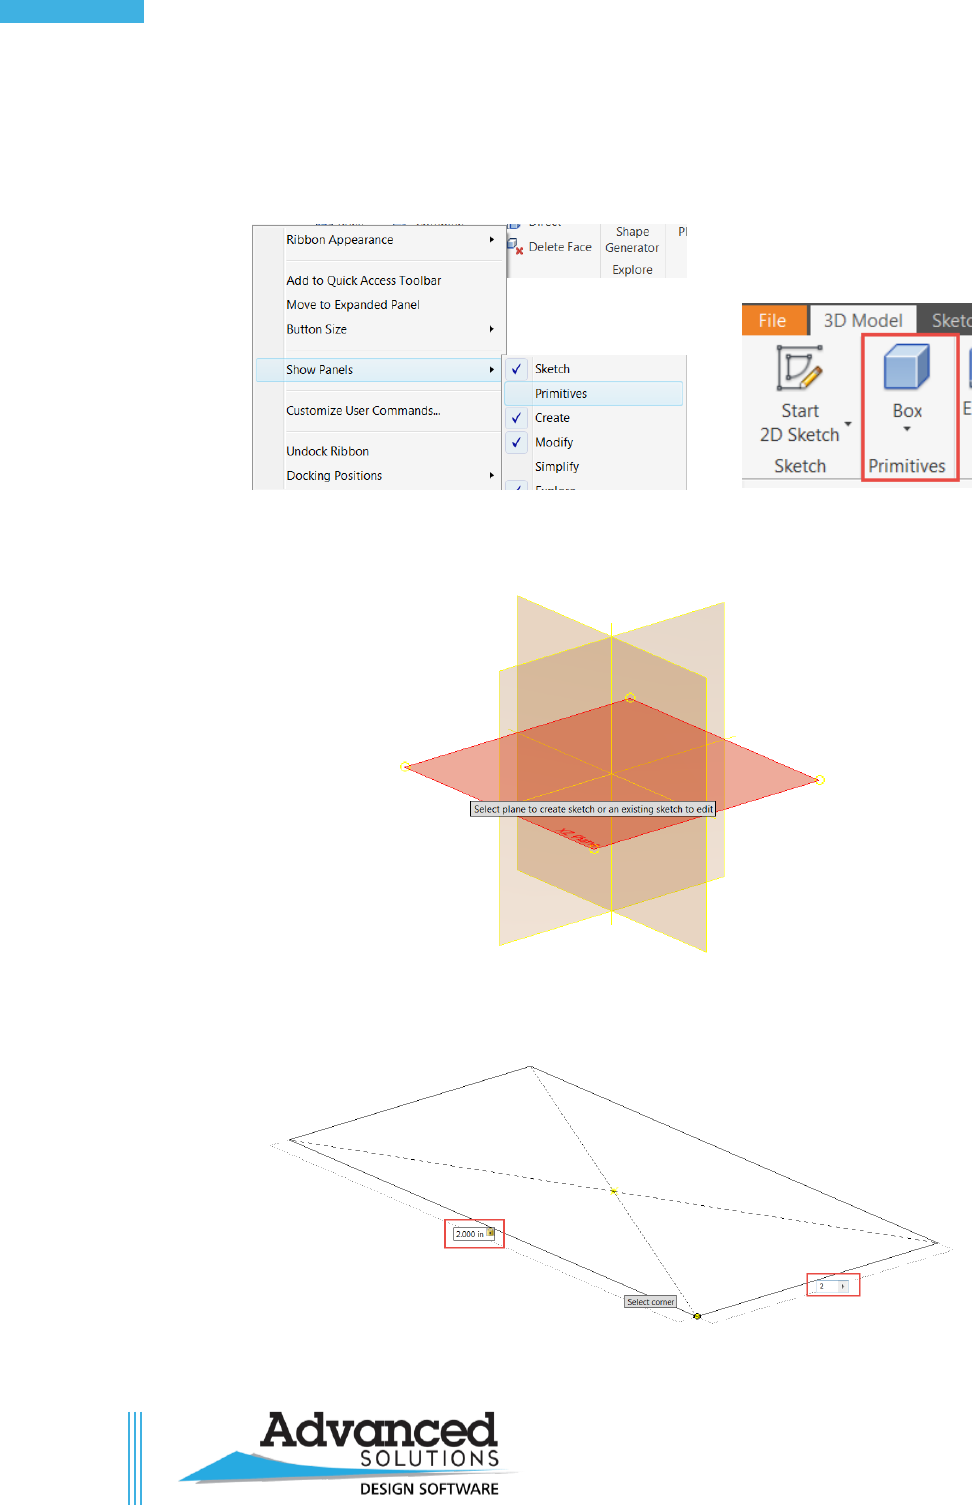
2. Right click on the ribbon > Show Panels > Primitives.
3. Choose the “Box” primitive.
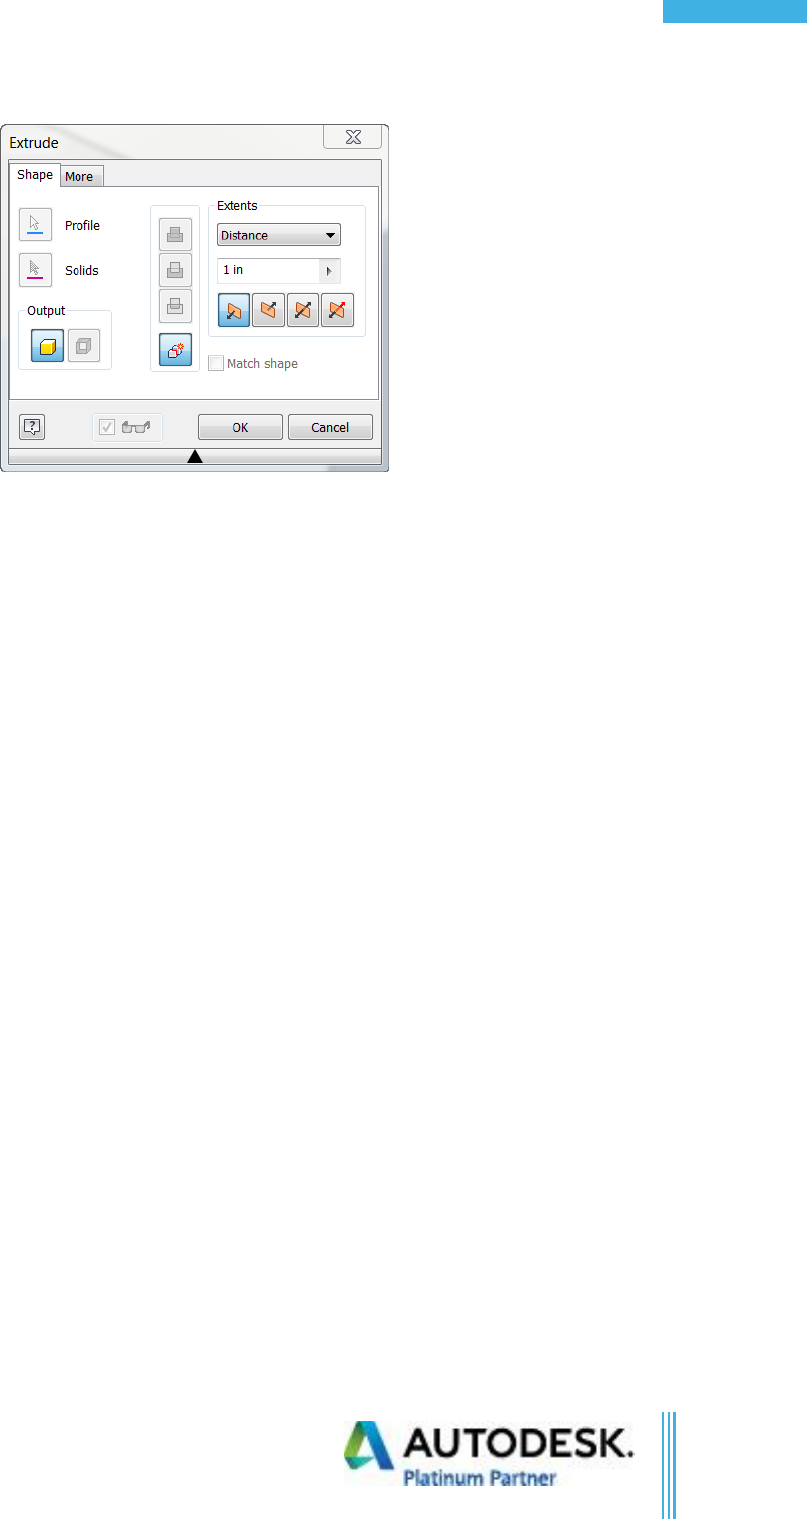
4. Select the XZ Plane.
5. Select the center point on the screen.
6. Make the square 2in x 2 in.
Confidential
©Copyright 2017 Advanced Solutions, Inc.
All Rights Reserved
37
Table of Contents
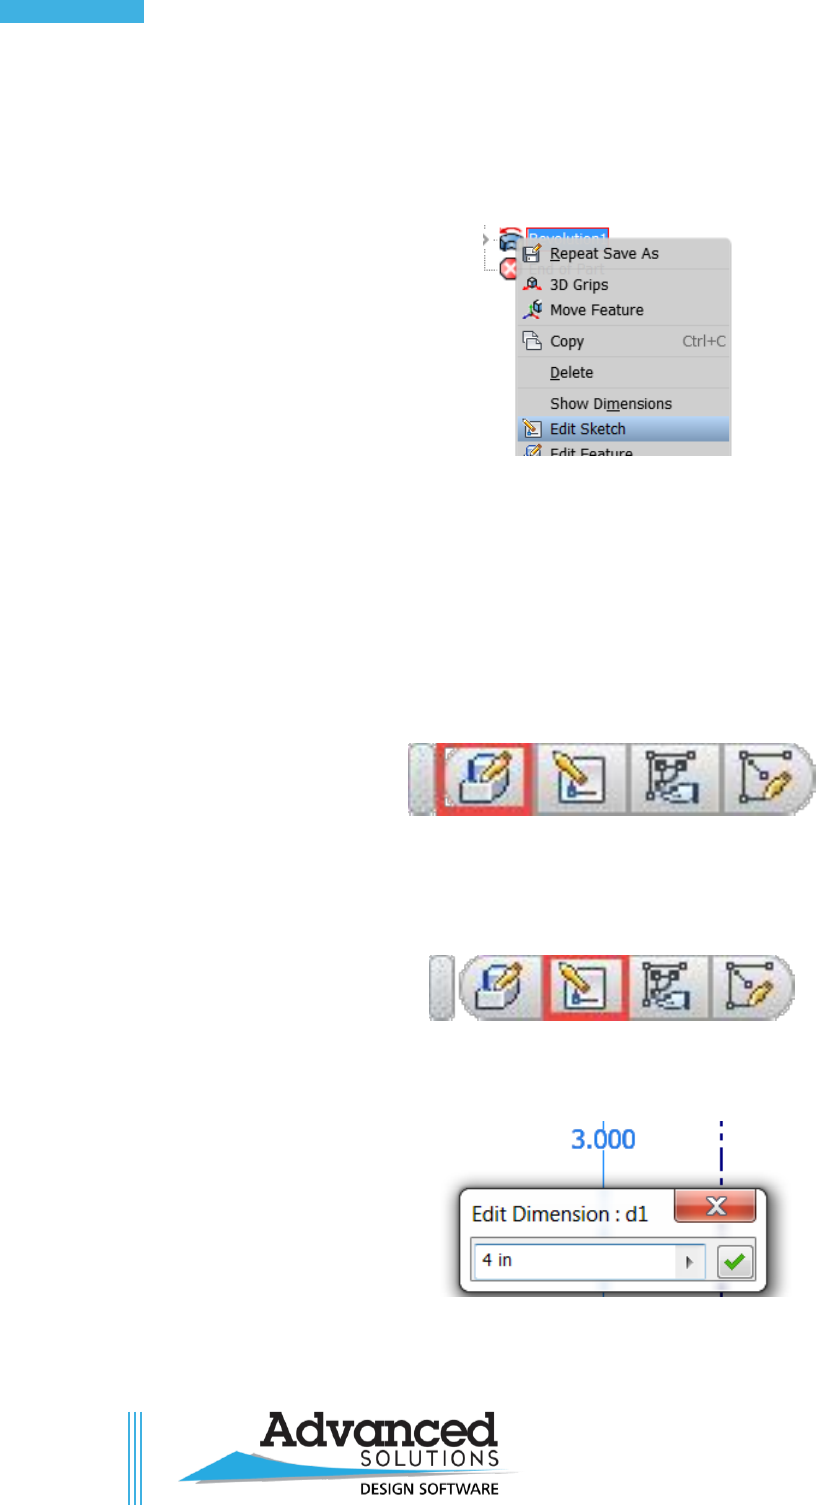
7. Type in an extrusion height of 1.0 in if not already.
8. Click OK in the dialog box.
9. Save the part as “Primitive Box”.
Confidential
©Copyright 2017 Advanced Solutions, Inc.
All Rights Reserved
38
Inv. Part Modeling Fundamentals
Chapter 5d Exercise
1. Open “Edit Feature.ipt”.
2. Right click on “Revolution1” in the browser > Edit Sketch.
3. The sketch environment is activated again.
4. Click Finish Sketch in the Ribbon.
5. Double click on “Revolution1” in the browser.
6. The edit feature dialog box appears.
7. Click Cancel in the dialog box.
8. Select a face on the part in the graphics window and choose the first button in the toolbar that
appears.
9. The edit feature dialog box appears.
10. Cancel the dialog box.
11. Select any face again and choose the second button in the toolbar that appears.
12. The sketch environment shows up again.
13. Change the “3.000” dimension to 4 in by double clicking on it.
14. Finish the sketch.
Confidential
©Copyright 2017 Advanced Solutions, Inc.
All Rights Reserved
39
Table of Contents
15. Notice the part immediately updates.
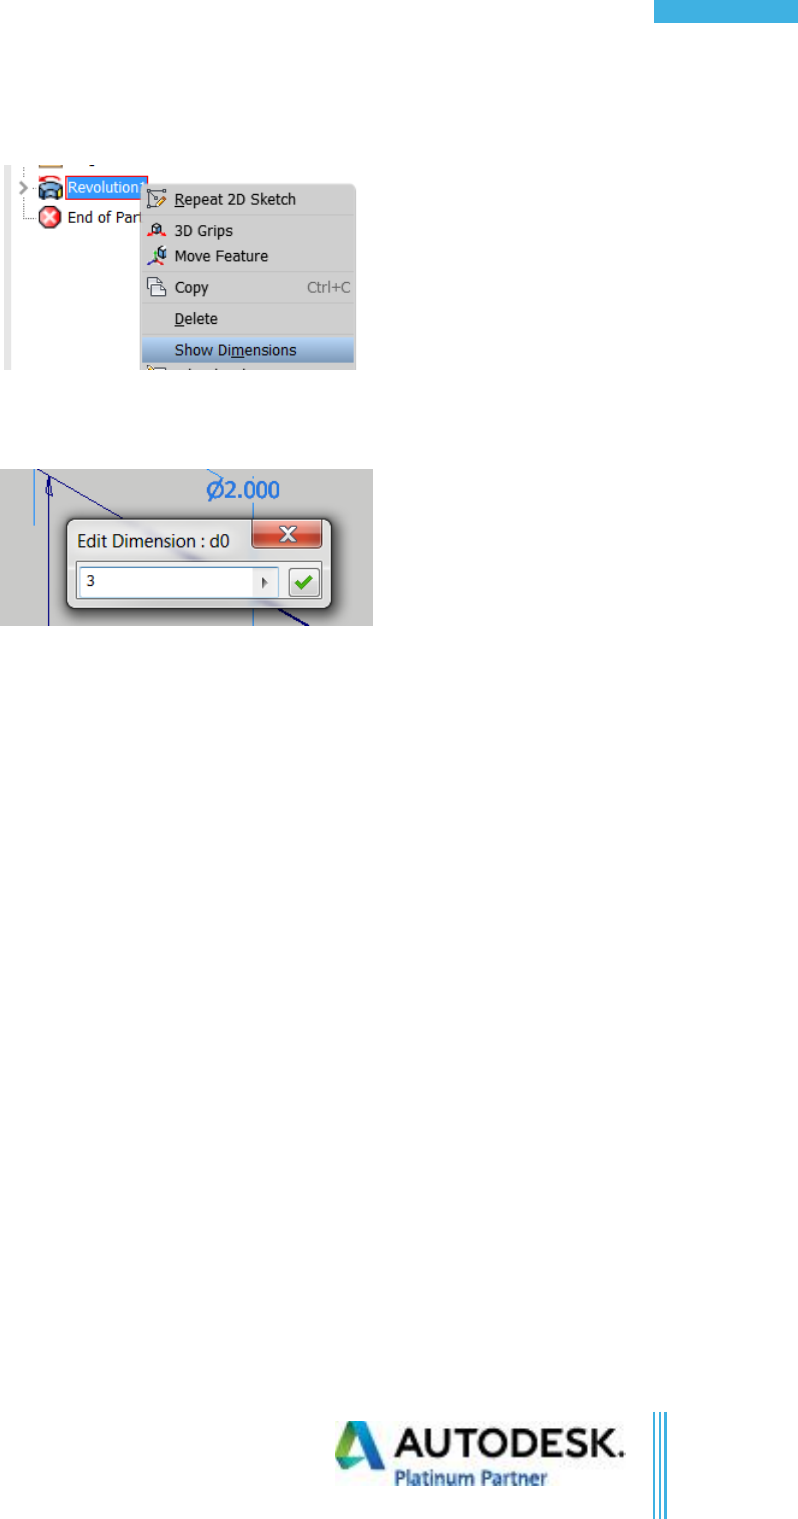
16. Right click on “Revolution1” in the browser > Show Dimensions.
17. All sketch dimensions and revolve dimensions appear.
18. Double click on the “2.000” dimension and change it to “3.000”.
19. The model updates.
20. Close without saving.
Confidential
©Copyright 2017 Advanced Solutions, Inc.
All Rights Reserved
40
Inv. Part Modeling Fundamentals
Chapter 6 Exercise
1. Open “Sketch Editing.ipt”.
2. Double click “Sketch1” icon in the browser to edit the sketch.
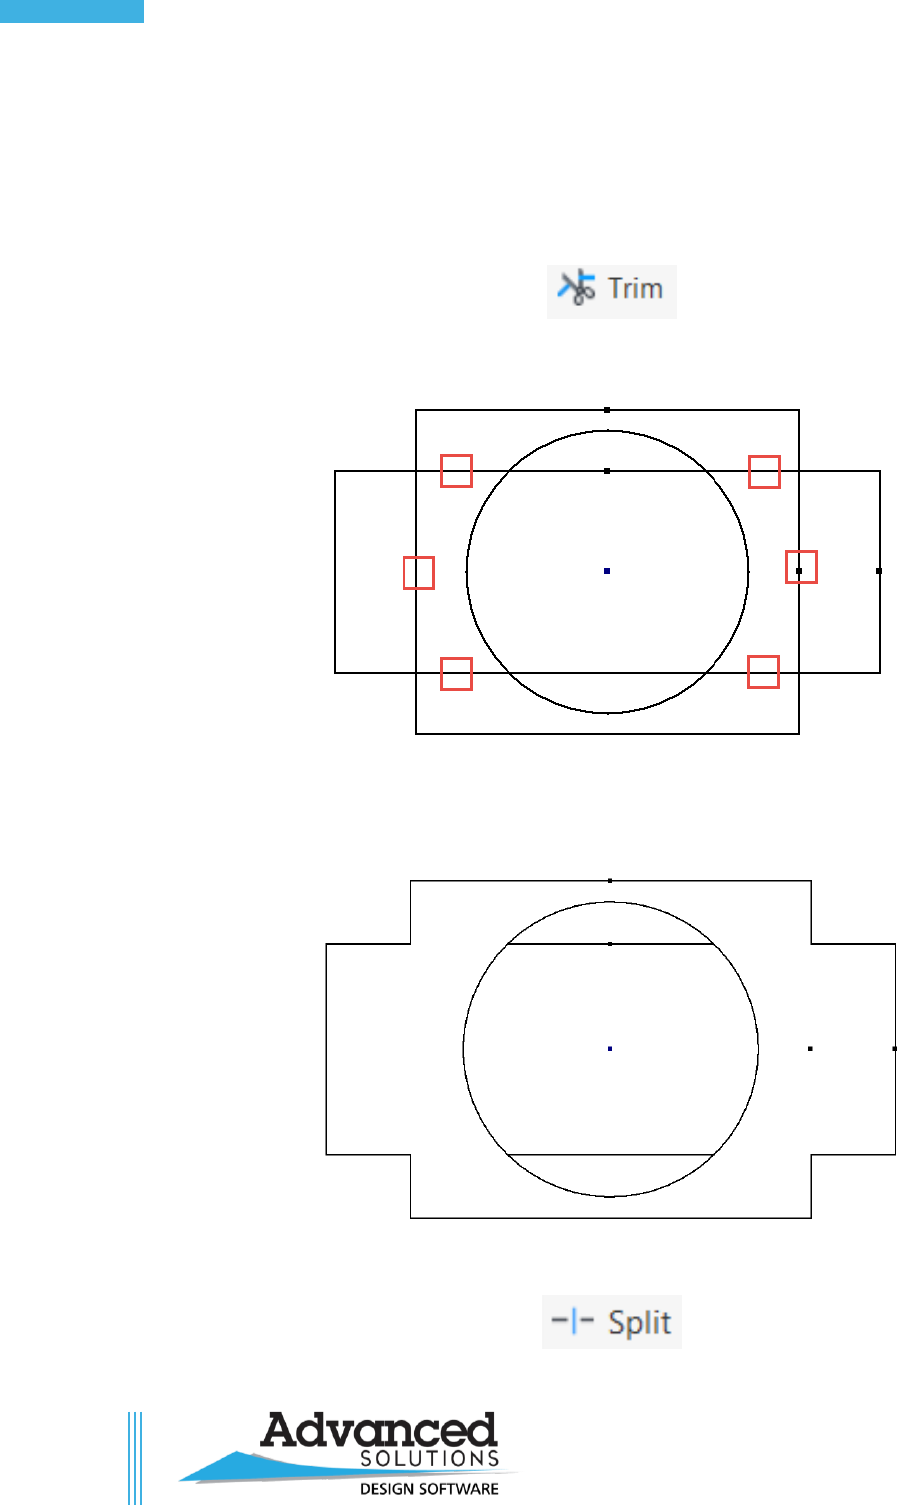
3. Start the Trim command.
4. Press and hold the left mouse button to make a fence line to remove the lines shown.
5. Press Esc to cancel the trim command.
6. The part should now appear like below.
7. Start the “Split” Command.
Confidential
©Copyright 2017 Advanced Solutions, Inc.
All Rights Reserved
41
Table of Contents
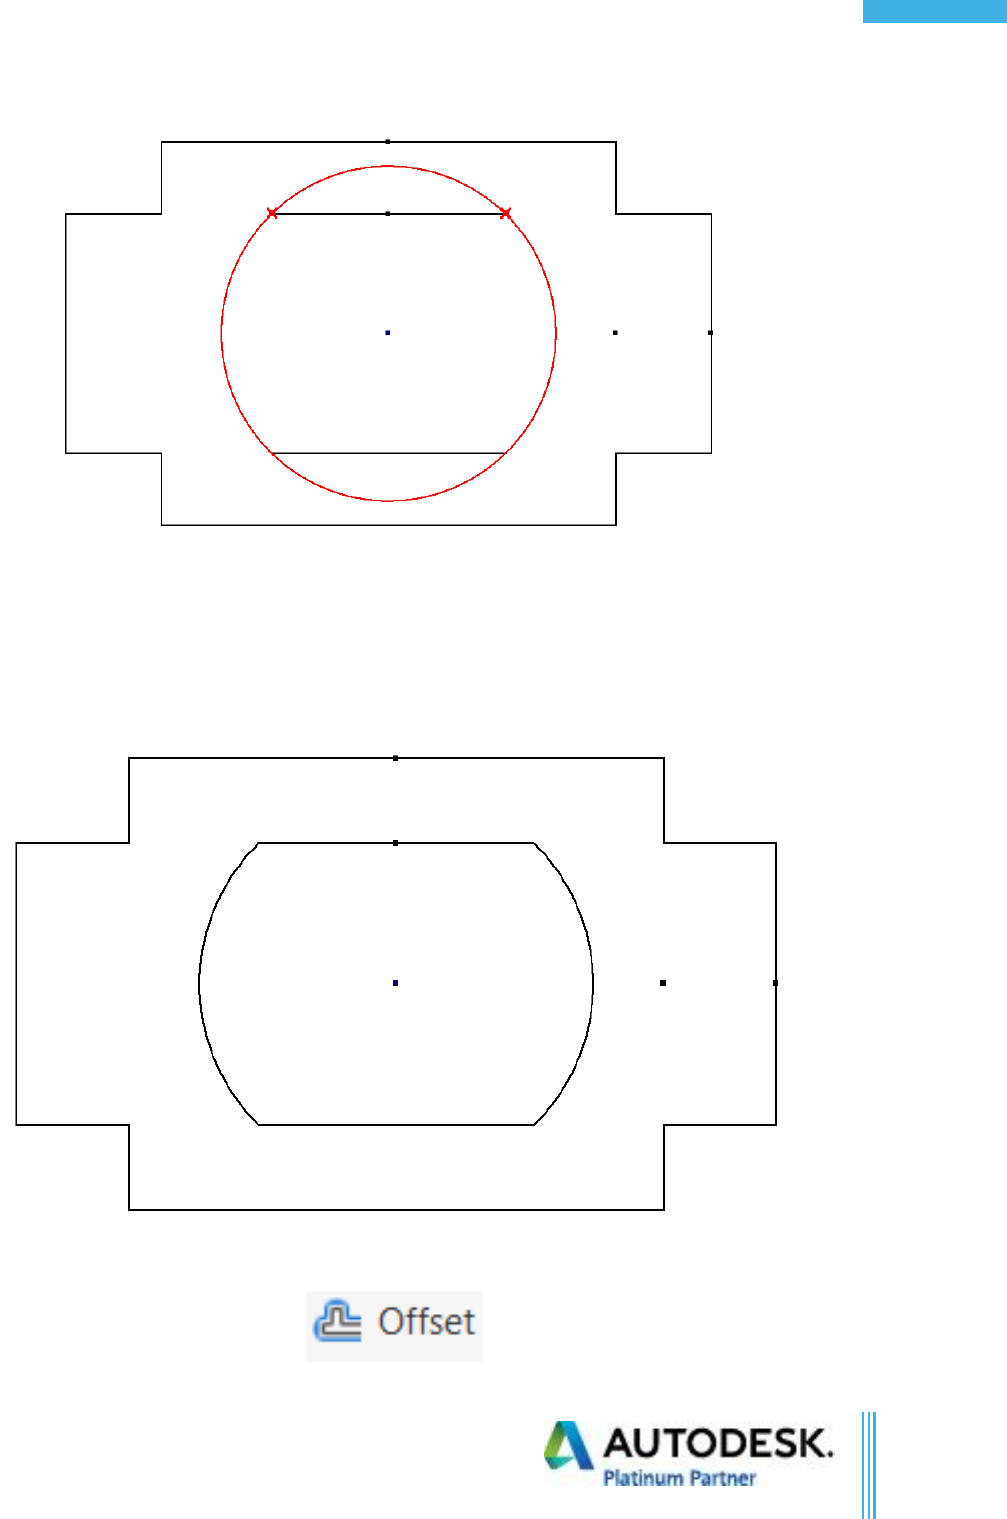
8. Hover the cursor over the top of the circle until you see the (2) X’s and click.
9. Press Esc to cancel the split command.
10. Click on the circle, notice how the circle is split into (2) different segments.
11. Start the Trim command again.
12. Trim off the segment you just created, and trim off the bottom of the arc as shown below.
13. Click the offset button.
Confidential
©Copyright 2017 Advanced Solutions, Inc.
All Rights Reserved
42
Inv. Part Modeling Fundamentals
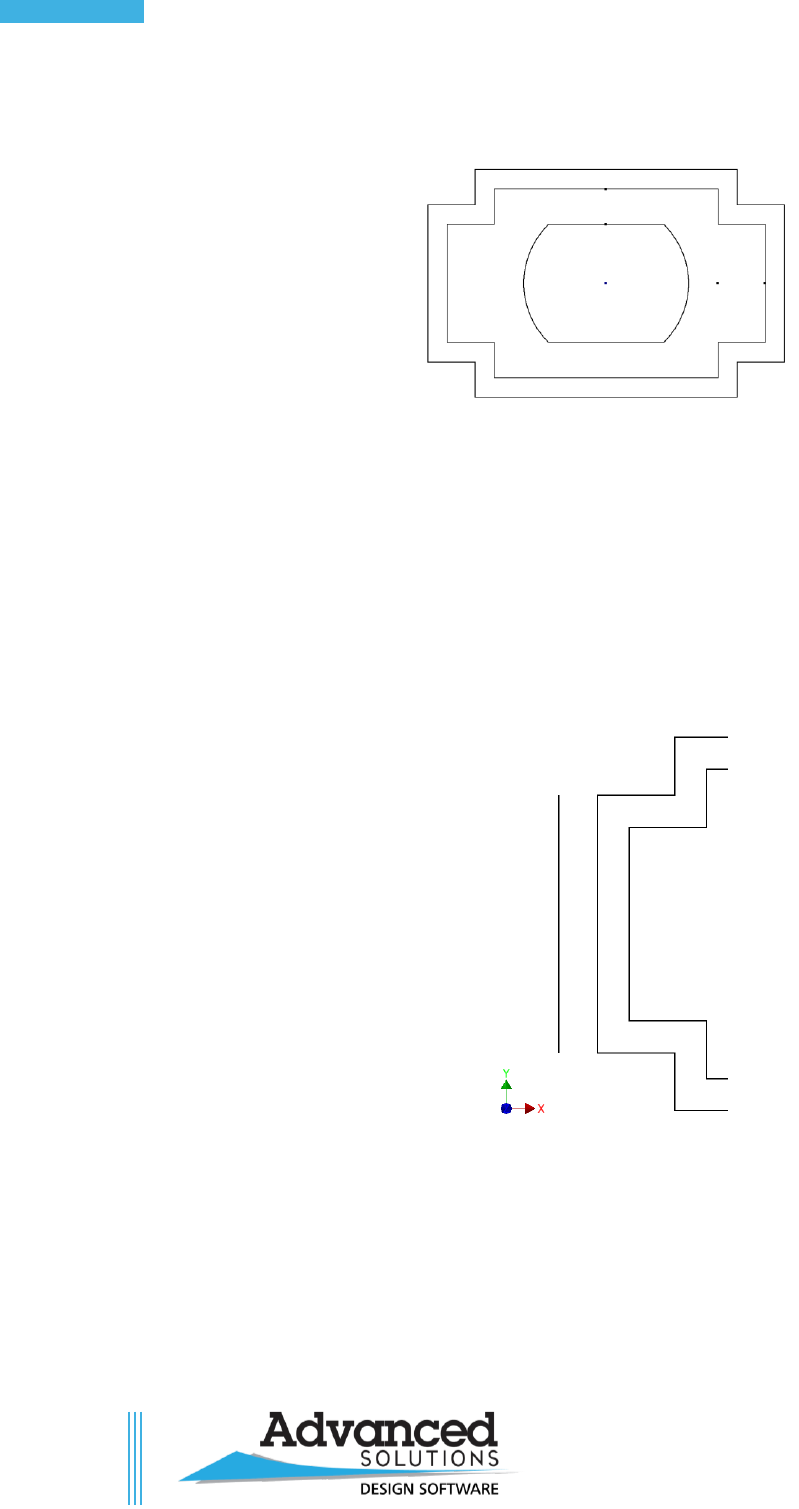
14. Select the outer profile, and drag to where it offsets to the outside, then click to place.
15. Press Esc to cancel the offset.
16. Start the offset command again.
17. Right click in space in the graphics window.
18. Select Loop Select.
19. Select the left most vertical line.
20. Right click > Continue.
21. This will only offset the one single item.
22. Drag to the left and click to place.
23. Click “UNDO” to remove the offset.
24. Close the part without saving.
Confidential
©Copyright 2017 Advanced Solutions, Inc.
All Rights Reserved
43
Table of Contents
Chapter 7a Exercise
1. Open Secondary Feature.ipt.
2. Start a new sketch on the top face of the rectangle.
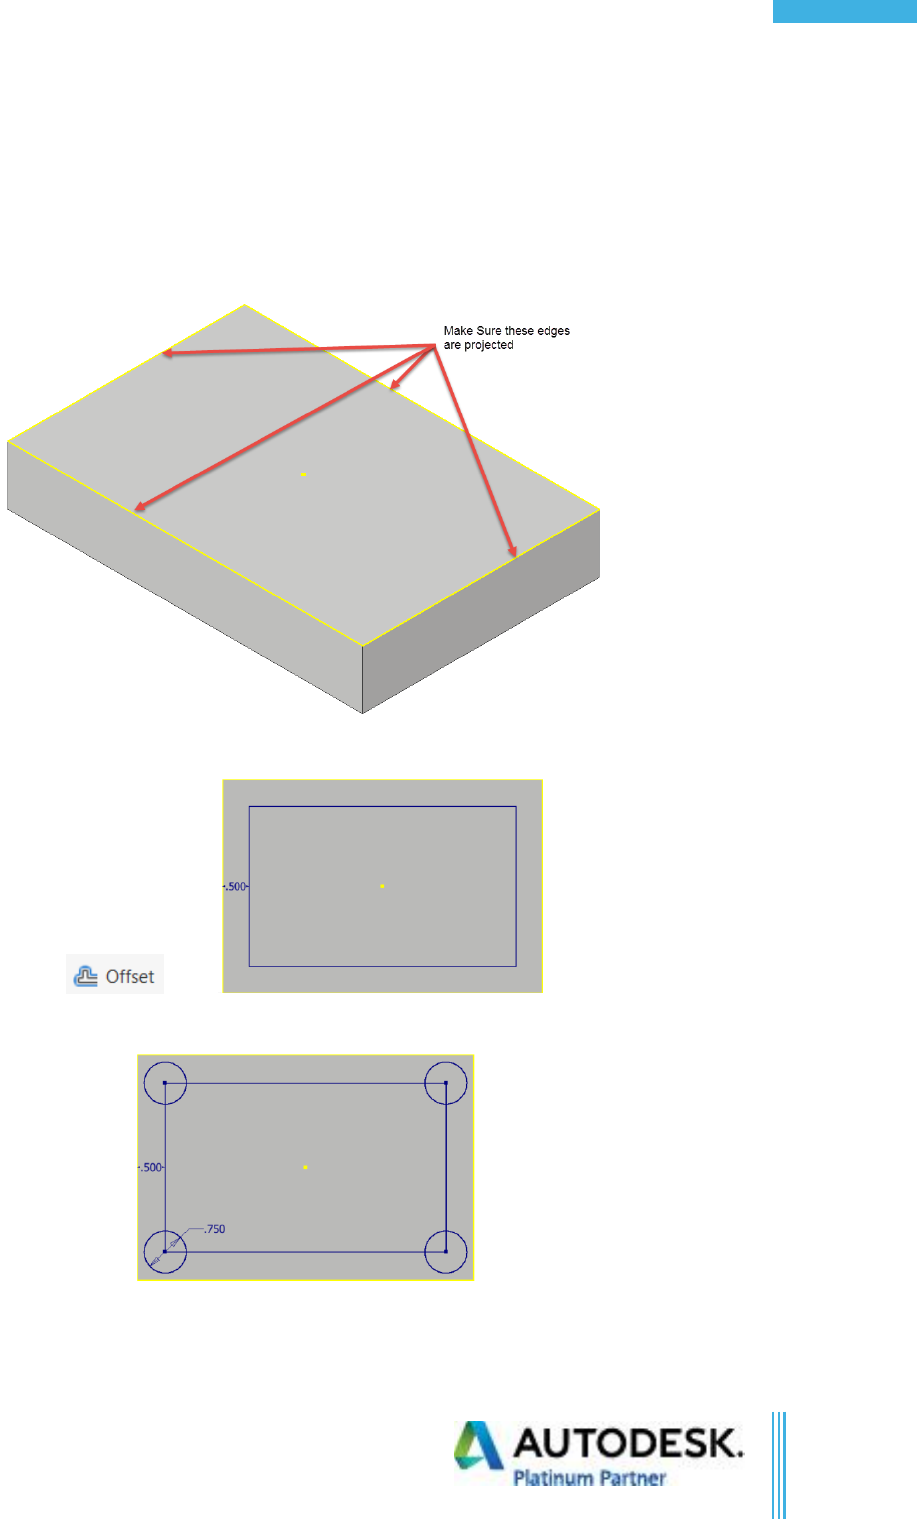
3. If the edges do not automatically project, make sure to project the top edges of the rectangle using
the project geometry command.
4. Use the offset command in the modify panel to offset the outer edges “0.5 in” inwards.
5. Create circles on all four corners of a diameter of “0.75 in”.
6. Make all the circles equal diameters by using the equal command.
Confidential
©Copyright 2017 Advanced Solutions, Inc.
All Rights Reserved
44
Inv. Part Modeling Fundamentals
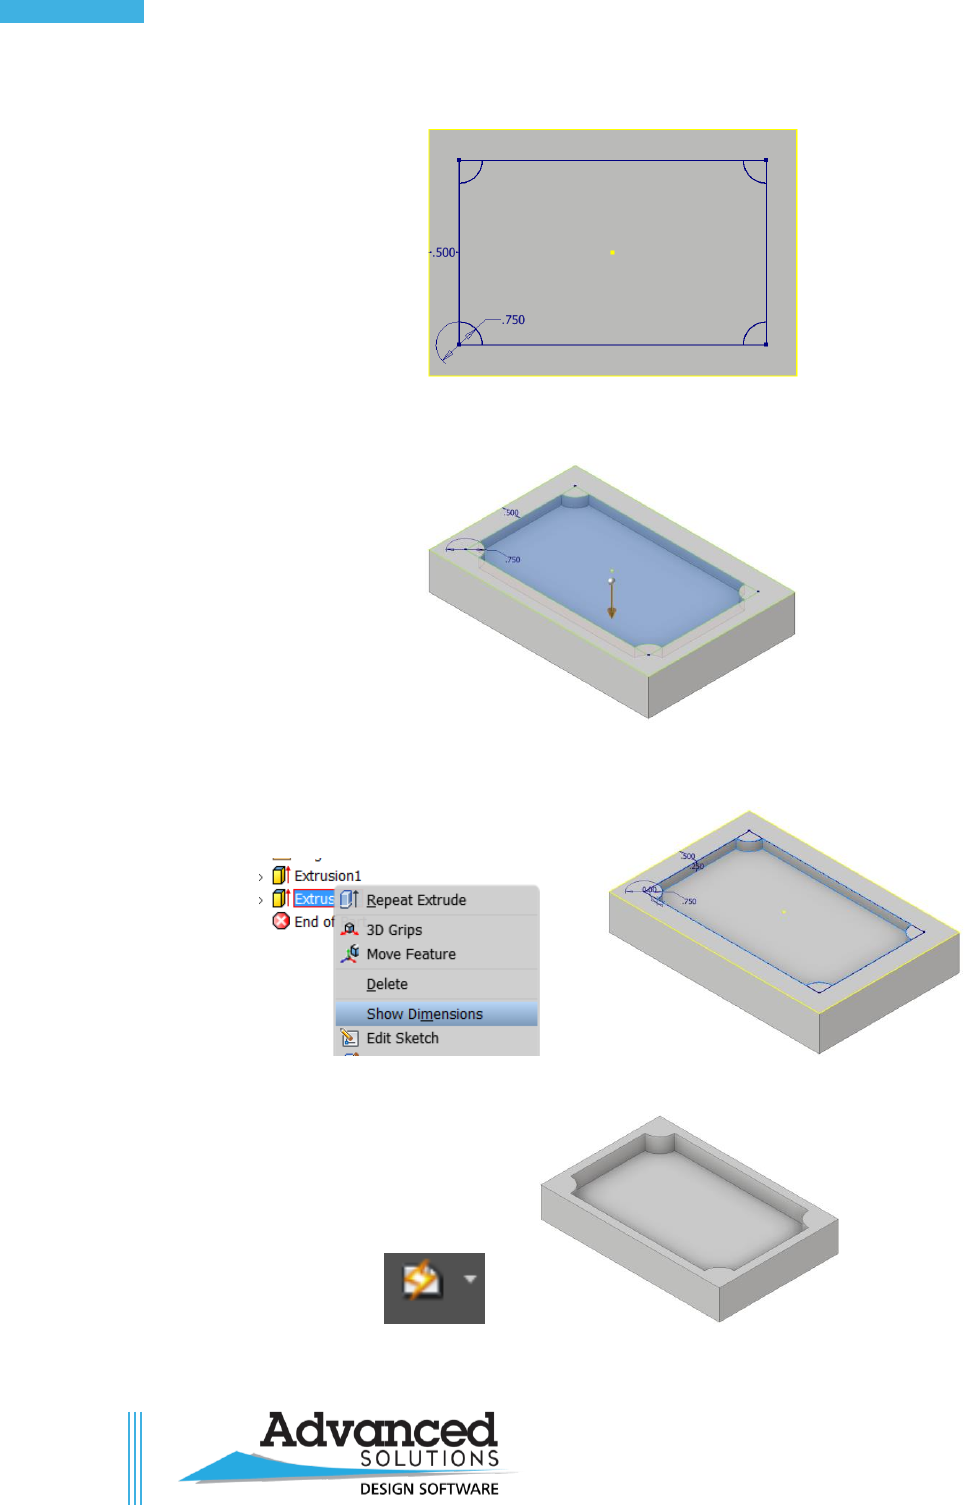
7. Trim the circles to show the image below.
8. Finish the sketch, use the extrude command to select the inside profile, and cut it a depth of “0.25
in”, then click the green check mark to finish the extrusion.
9. Right-click on “Extrusion 2” and select “Show Dimensions” to change the offset distance from “0.5
in” to “0.25”, depth of cut to “0.5 in” and the arc diameter from “0.75 in” to “1.0 in”.
10. Update the model in the Quick Access toolbar.
11. Close the part without saving.
Confidential
©Copyright 2017 Advanced Solutions, Inc.
All Rights Reserved
45
Table of Contents
Chapter 7b Exercise
1. Open revolve.ipt
2. Create a new sketch on the XY plane.
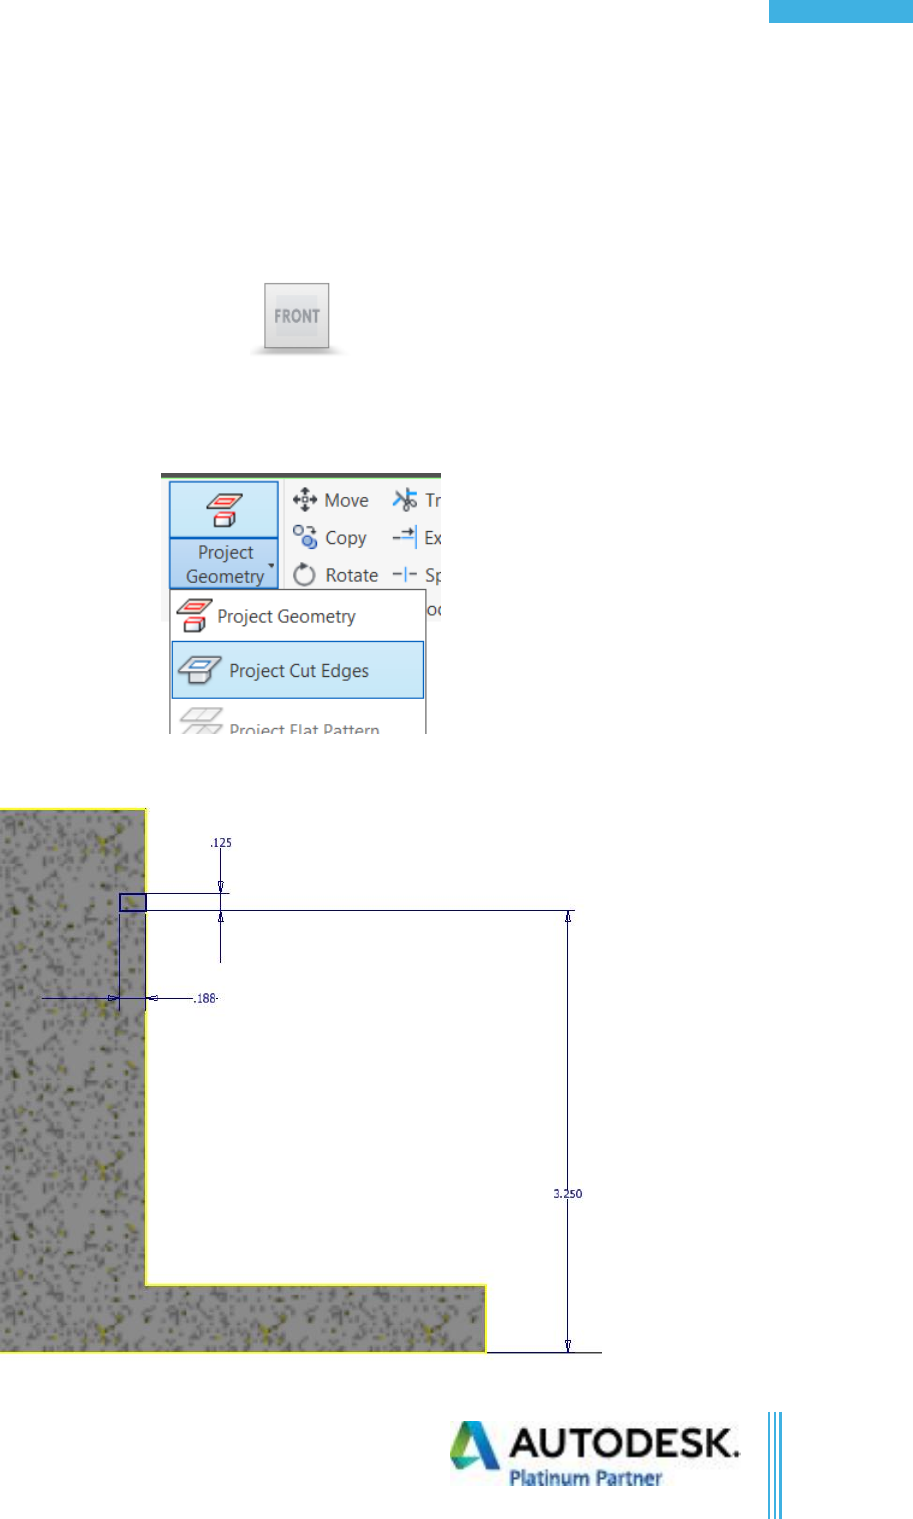
3. Make sure to orient the view to be looking at the Front face of the view cube.
4. Press F7 on the keyboard.
5. Use the Project Cut Edges option from the project geometry drop-down.
6. Create the sketch shown: 0.125 in x 0.1875 in rectangle, 3.250 in up from the base.
Confidential
©Copyright 2017 Advanced Solutions, Inc.
All Rights Reserved
46
Inv. Part Modeling Fundamentals
7. Finish the sketch.
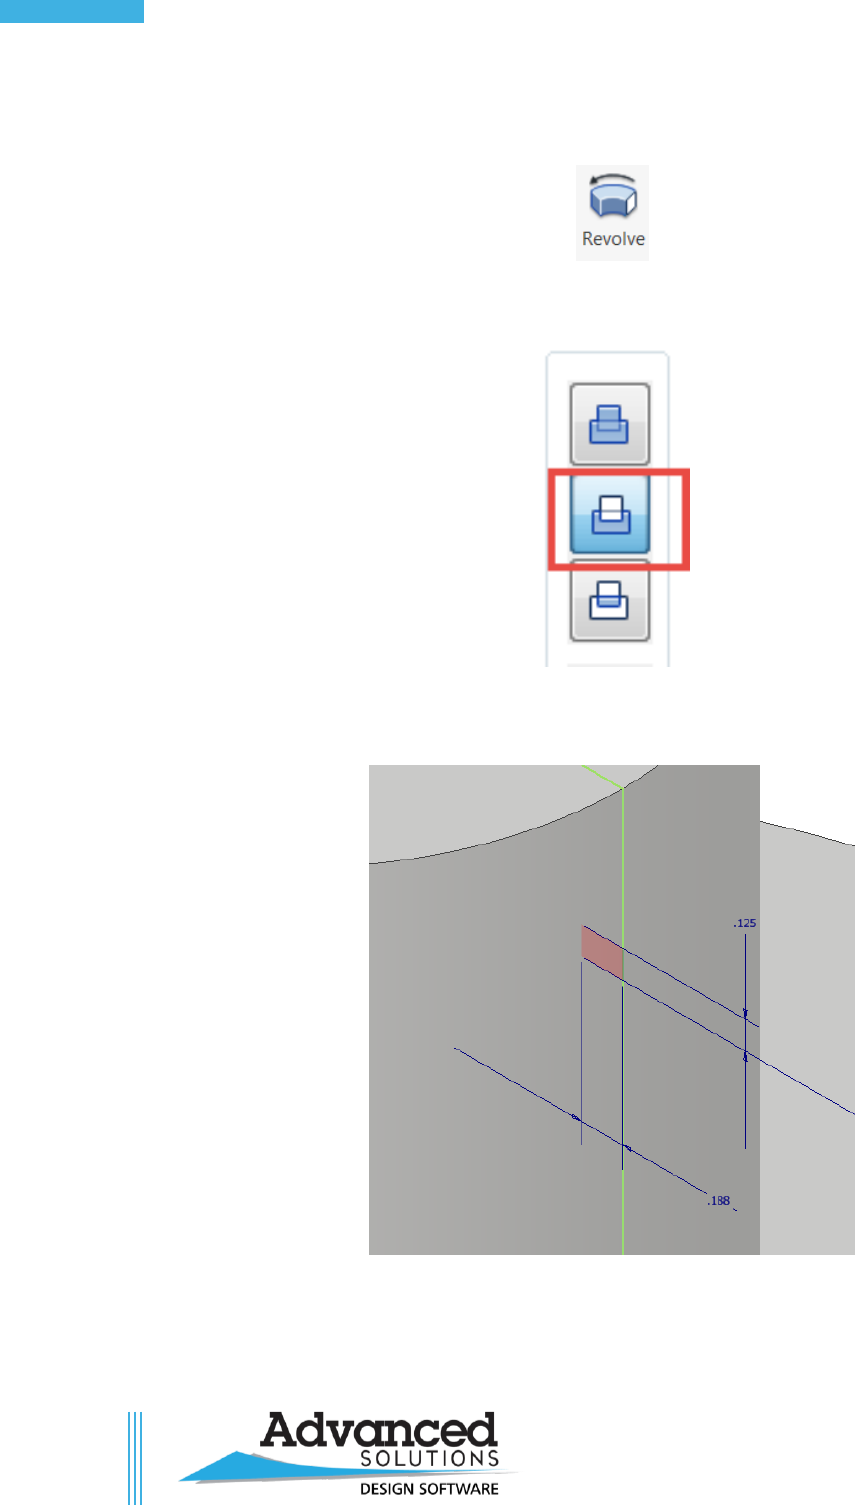
8. Activate the revolve command.
9. Make sure to use the cut option.
10. Use the Y axis for the revolve axis.
11. Select the small rectangle as the profile.
12. Click OK.
13. Close the part without saving.
Confidential
©Copyright 2017 Advanced Solutions, Inc.
All Rights Reserved
47
Table of Contents
Chapter 7c Exercise
1. Open Share Sketch.ipt.
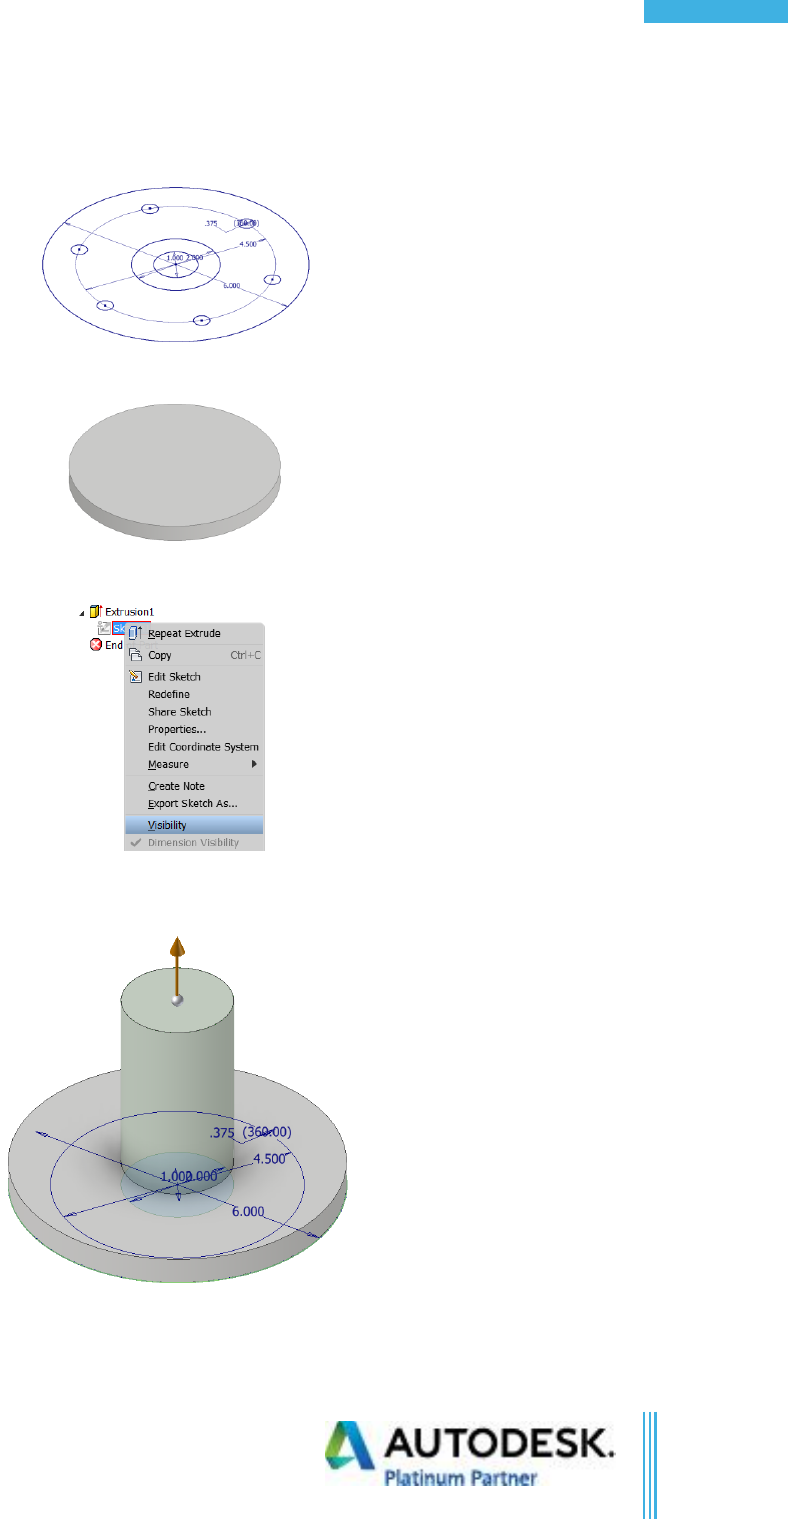
2. Extrude all of the profiles to a distance of “0.5 in” make a solid disc.
3. Expand Extrusion 1 and right-click on sketch 1 to turn on the sketch visibility.
4. Repeat the extrude command, then select the two inner circles. The default is to cut, change the
extrusion to a join, and type a distance of “4.0 in” and click ok.
Confidential
©Copyright 2017 Advanced Solutions, Inc.
All Rights Reserved
48
Inv. Part Modeling Fundamentals
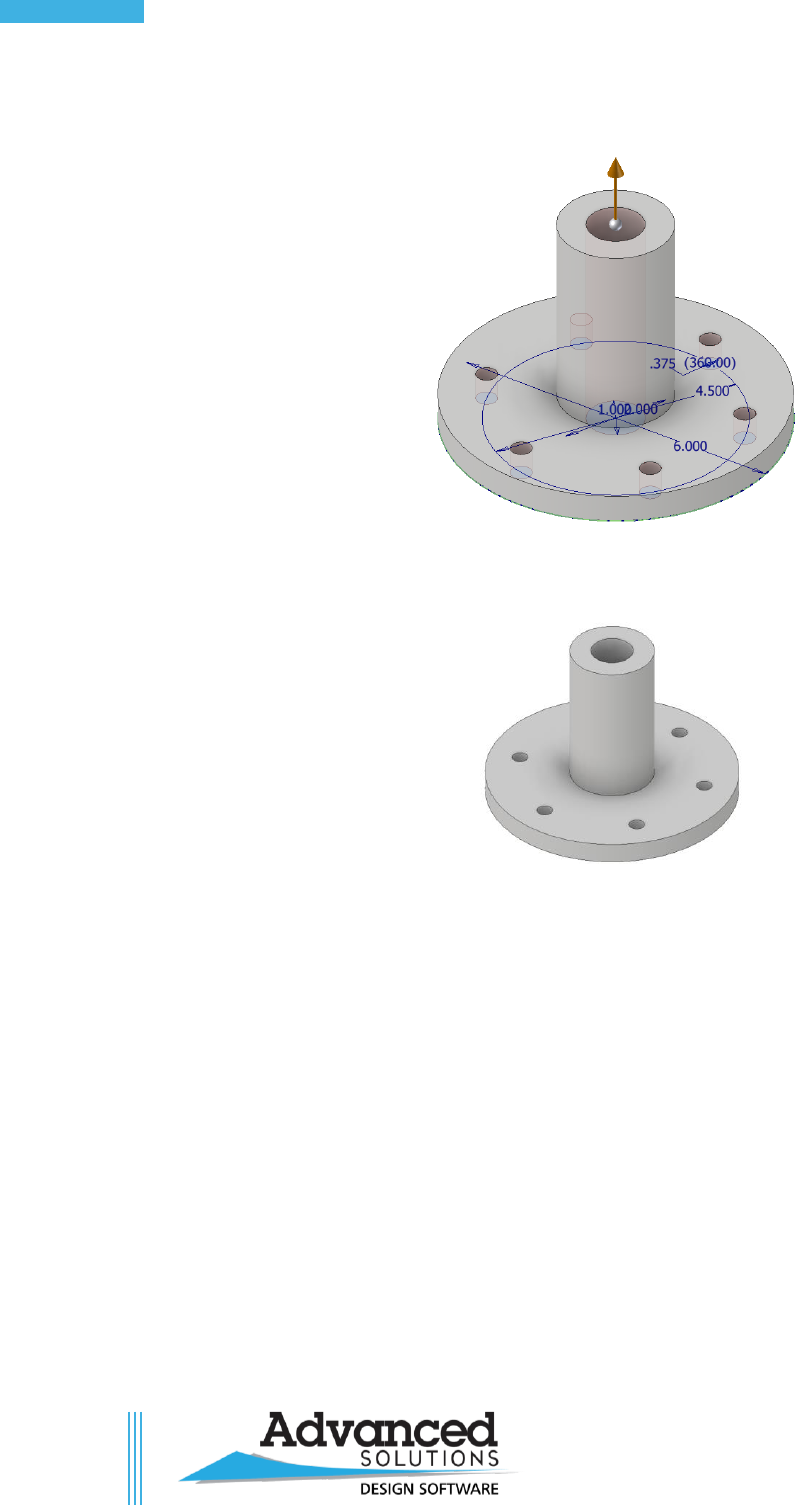
5. Repeat the extrude command and select the inner circle and the outer holes. Change the distance
to “All”.
6. Click OK to complete the extrusion.
7. Right-click on Sketch1 and turn off the sketch visibility.
Confidential
©Copyright 2017 Advanced Solutions, Inc.
All Rights Reserved
49
Table of Contents
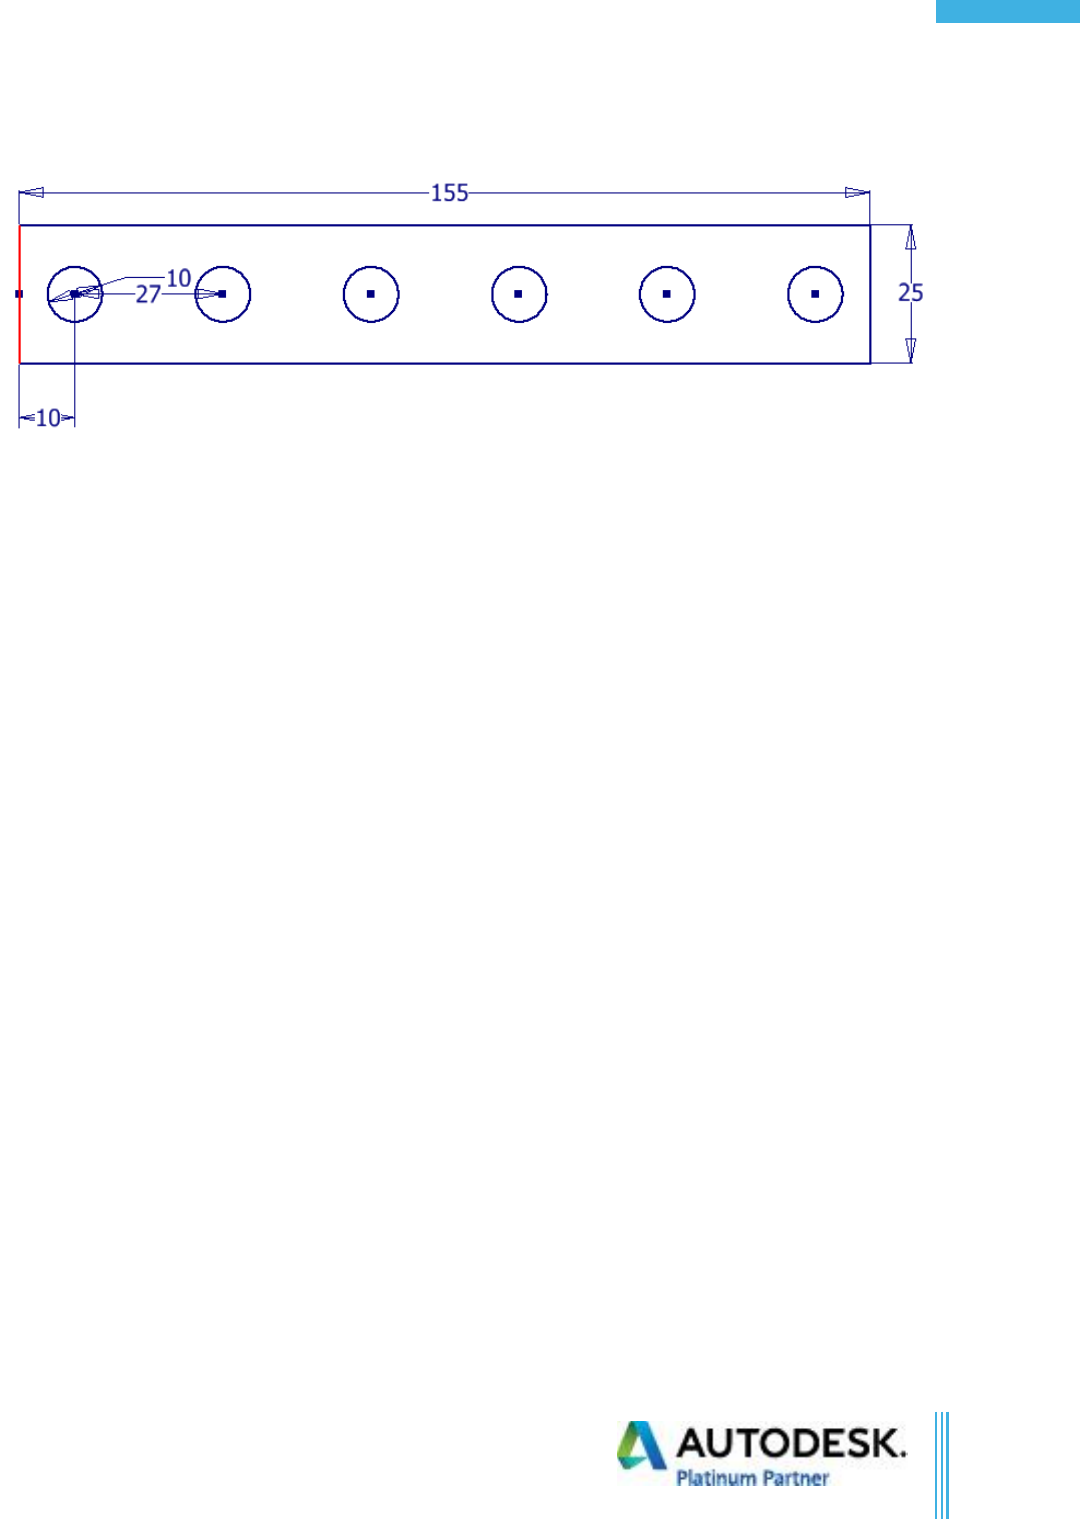
Chapter 8a Exercise
1. Create a new Standard (mm).ipt.
2. Start a new sketch on the XY Plane.
3. Create a Two Point Rectangle starting at the origin dragging to the right for the second point.
4. In the Heads Up Display, type in 150 for the X dim hit tab button and 25 for the Y dim.
5. Sketch a circle with a diameter of 10.
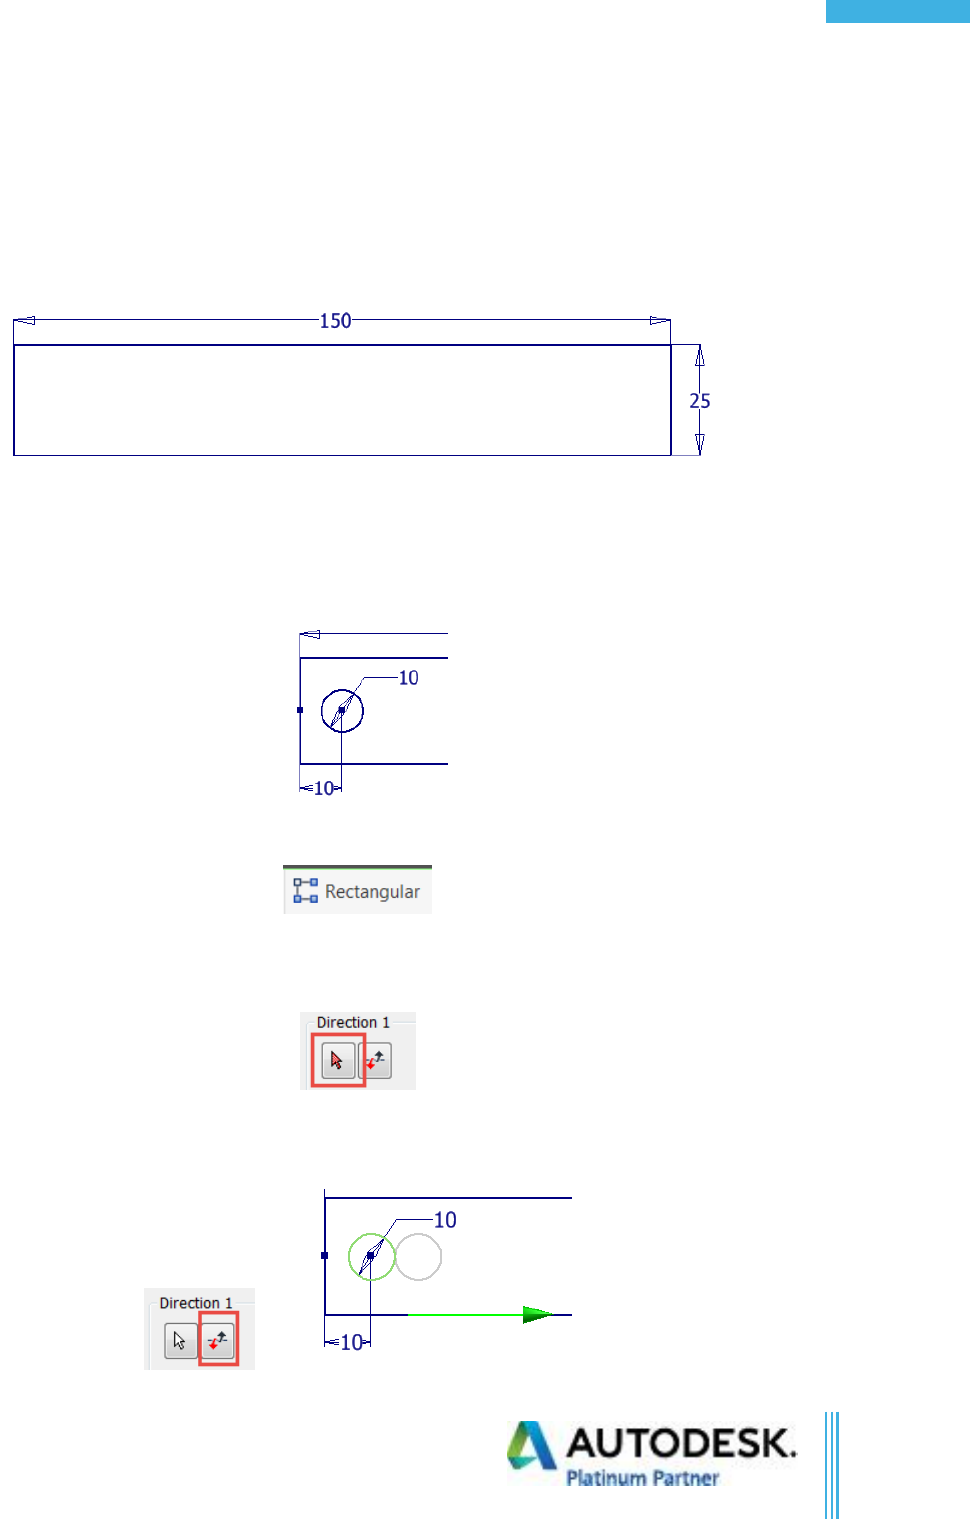
6. Dimension the circle 10 off of the left end of the part.
7. Add a horizontal constraint from the center of the circle to the midpoint of the left vertical line.
8. Click Rectangular Pattern in the ribbon.
9. Select the Circle for the Geometry.
10. Click the arrow under Direction 1.
11. For Direction 1, select the bottom line.
12. If the green arrow points to the left, use the flip button to make it point to the right.
Confidential
©Copyright 2017 Advanced Solutions, Inc.
All Rights Reserved
50
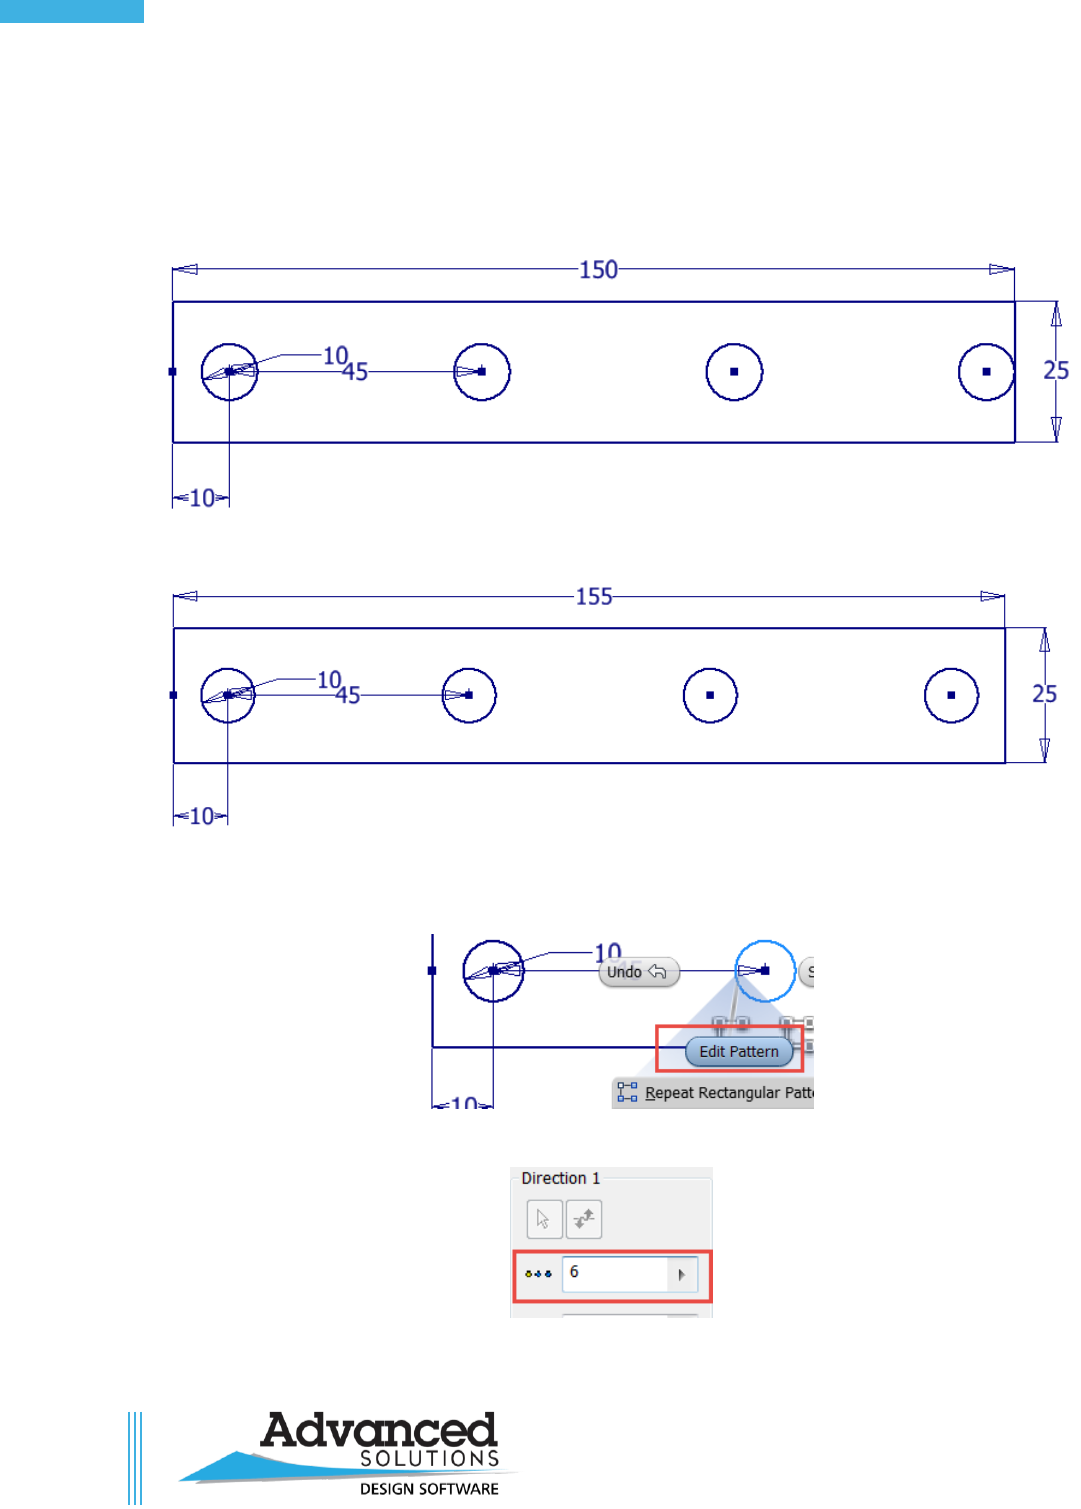
Inv. Part Modeling Fundamentals
13. Set the Count Field to (4).
14. Click in the distance field.
15. Type in 45.
16. Click OK.
17. Change the 150 to 155.
18. Right-click on the second hole.
19. Select Edit Pattern.
20. Change the count field to 6.
21. Change the Distance filed to 27.
Confidential
©Copyright 2017 Advanced Solutions, Inc.
All Rights Reserved
51
Table of Contents
22. Click OK.
23. Notice that the pattern updates.
Confidential
©Copyright 2017 Advanced Solutions, Inc.
All Rights Reserved
52
Inv. Part Modeling Fundamentals
Chapter 8b Exercise
1. Open Circular Sketch.ipt.
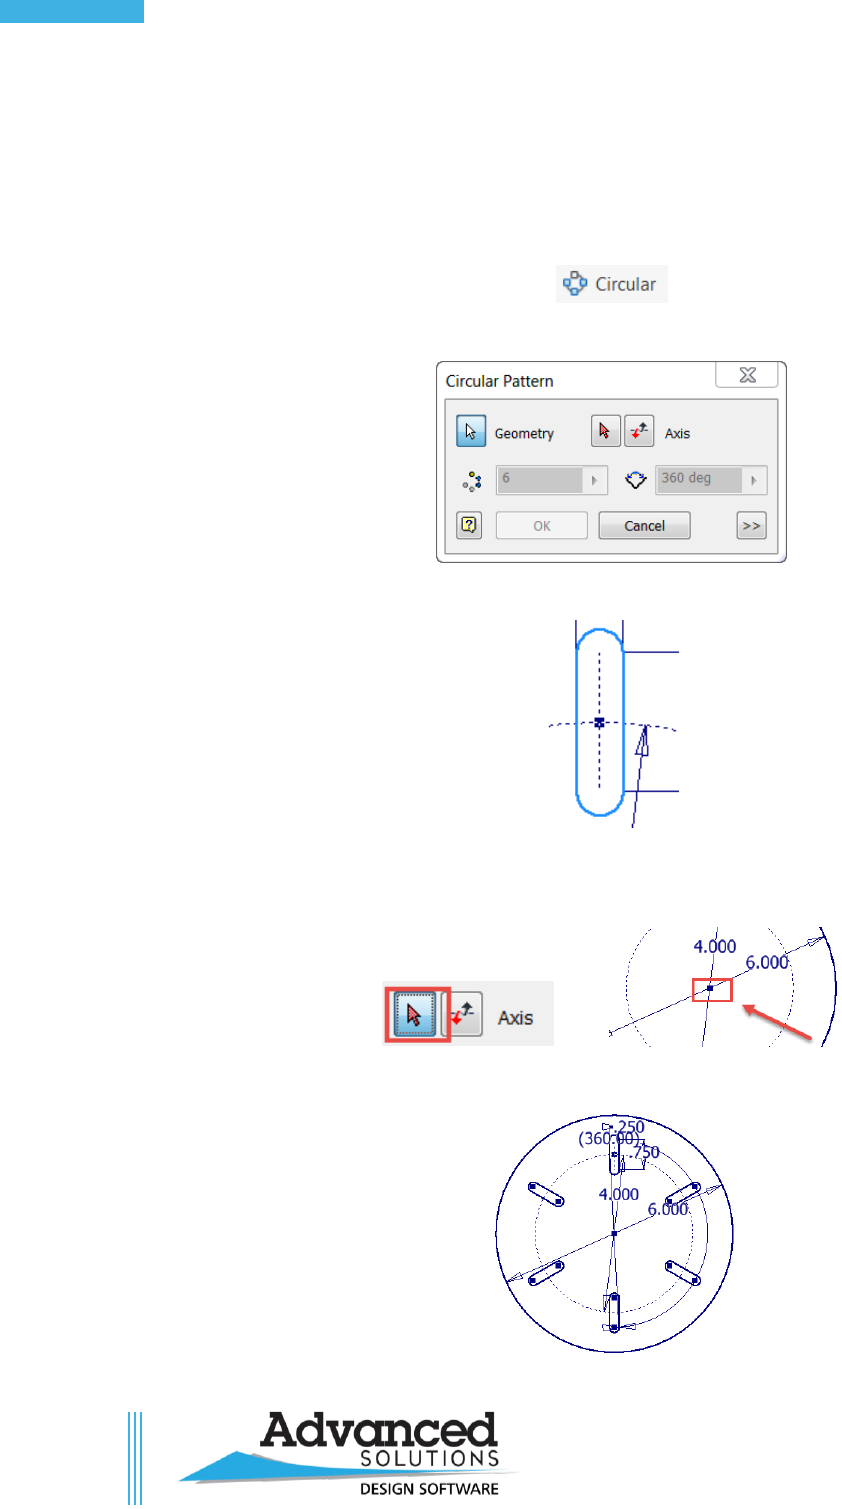
2. Edit the sketch.
3. Click Circular Pattern.
4. The circular Pattern dialog box appears.
5. For the geometry select all the edges of the slot.
6. Click the Arrow for the Axis selection.
7. Choose the center point for the axis.
8. Click OK.
Confidential
©Copyright 2017 Advanced Solutions, Inc.
All Rights Reserved
53
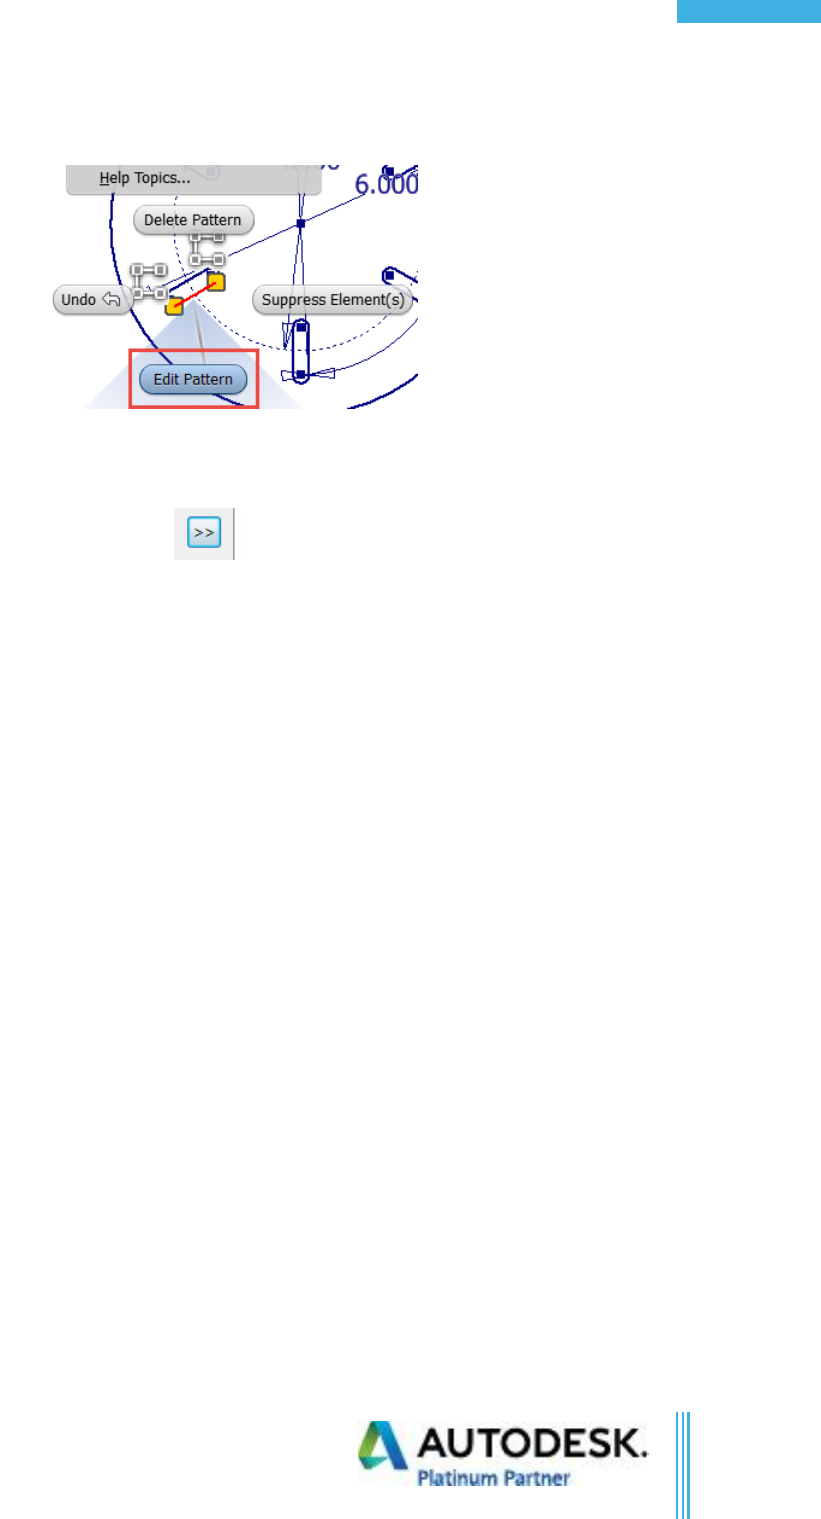
Table of Contents
9. Right-click on one of the instances of the slot.
10. Select Edit Pattern.
11. Change the angle from 360 to 90.
12. Choose the more button.
13. Uncheck the Fitted option.
14. Recheck the Fitted option.
15. Notice how the pattern reacts. Fitted tries to place the (6) instances into a 90-degree angle. When
fitted is unchecked it will place them directly at 90 degrees. That is why you only see (4) is because
(2) of them are placed on top of one another.
16. Click cancel in the dialog box.
Confidential
©Copyright 2017 Advanced Solutions, Inc.
All Rights Reserved
54
Inv. Part Modeling Fundamentals
Chapter 8c Exercise
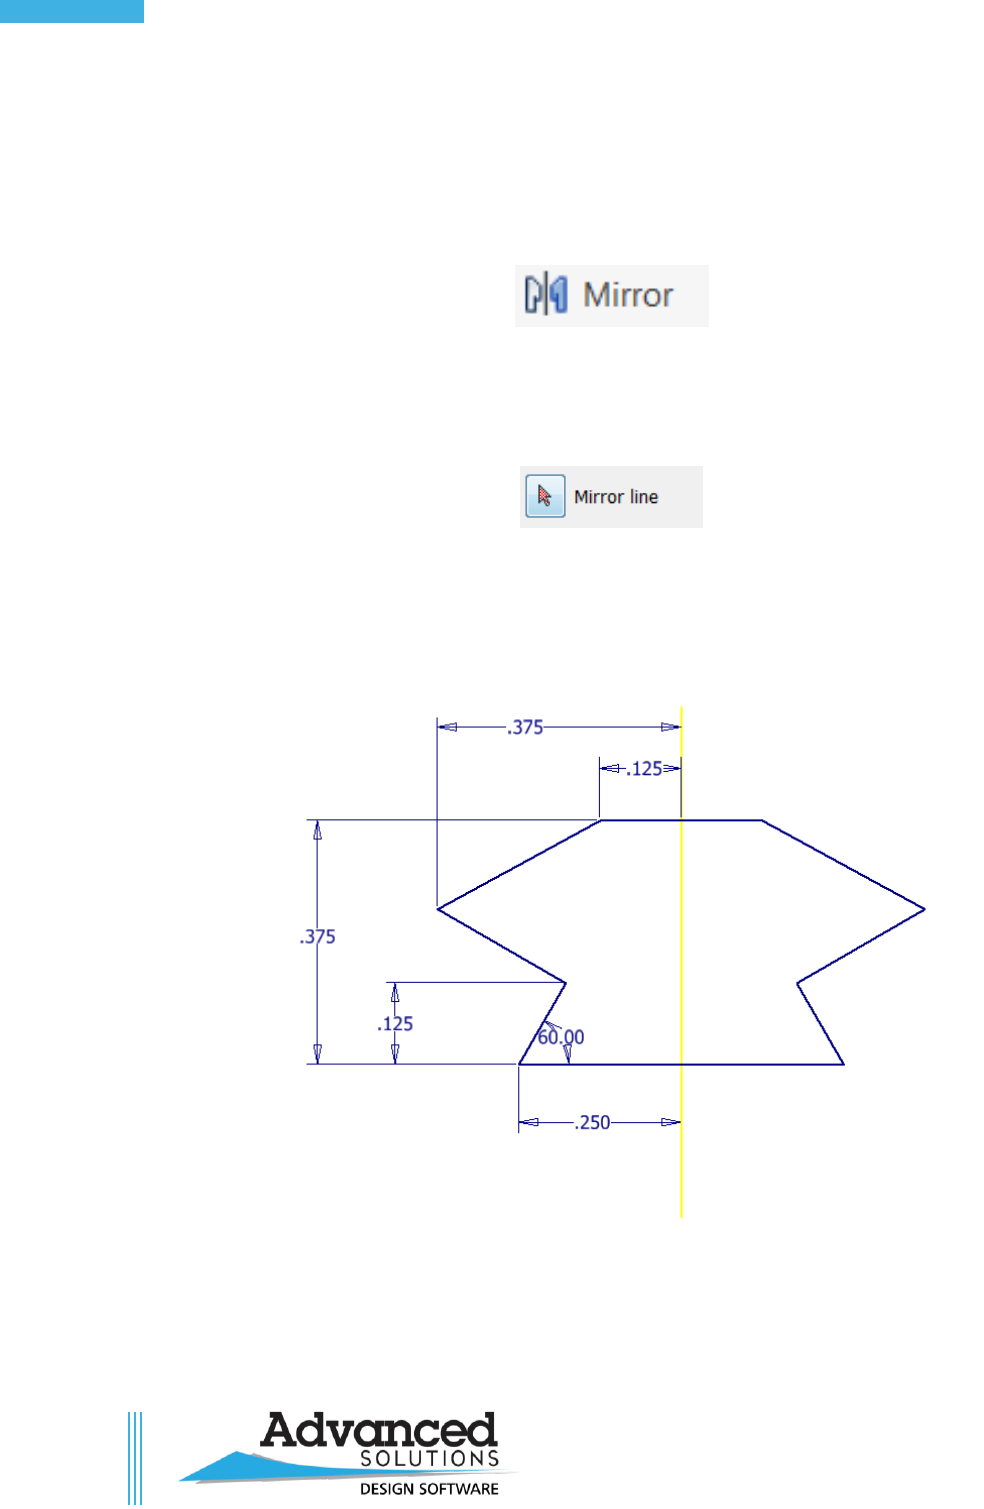
1. Open “mirror.ipt”.
2. Double click on “Sketch1” icon in the browser to edit the sketch.
3. Select the Mirror command.
4. The mirror dialog box appears.
5. Select all the geometry on the left side of the vertical line.
6. Click on the Mirror Line button.
7. Select the Vertical line.
8. Click apply.
9. Click done.
10. Finish the sketch.
11. Close without saving.
Confidential
©Copyright 2017 Advanced Solutions, Inc.
All Rights Reserved
55
Table of Contents
Chapter 9a Exercise
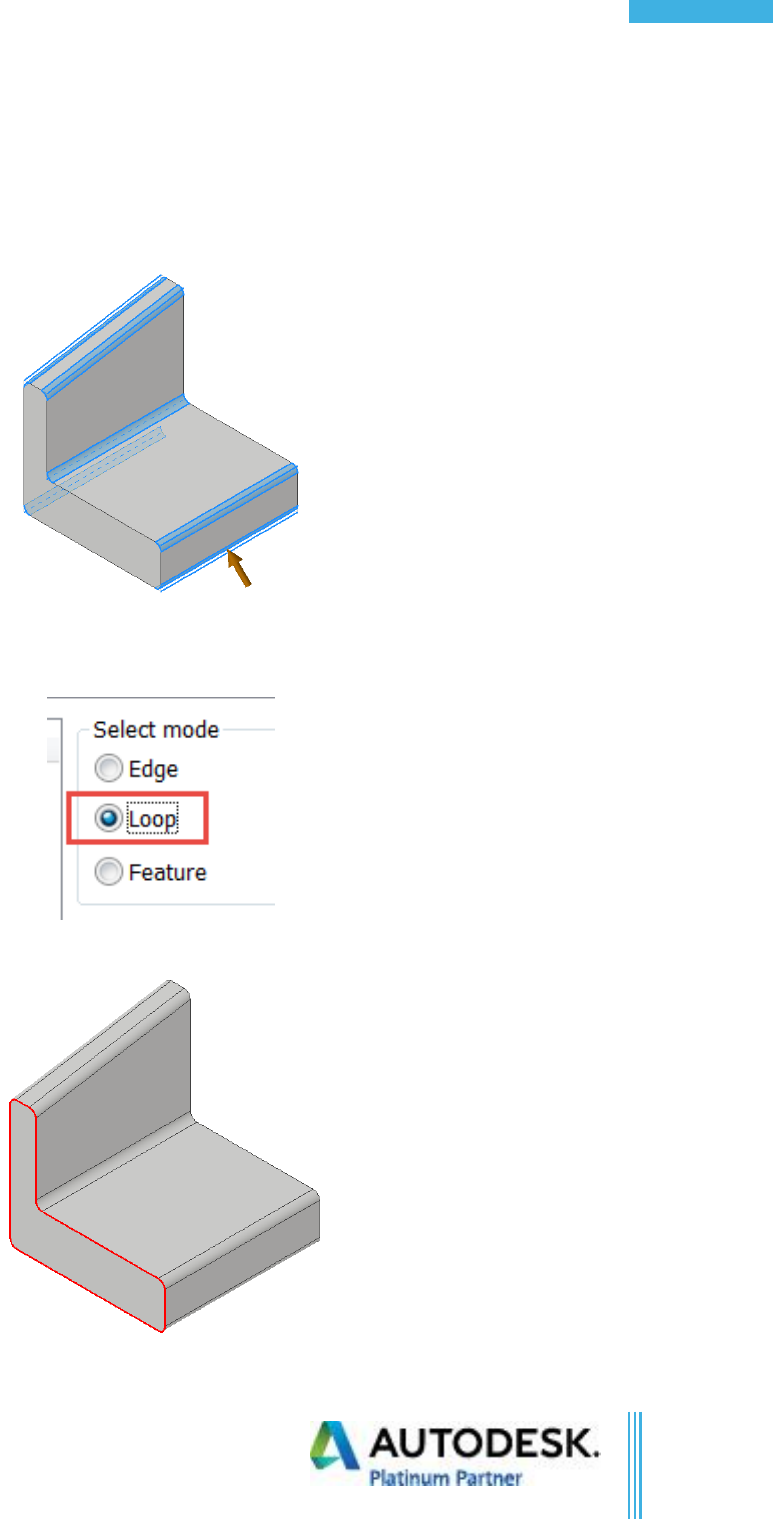
1. Open Fillets.ipt.
2. Activate the fillet command.
3. Click on the (6) edges shown below, set the radius to 0.25 in.
4. Click OK.
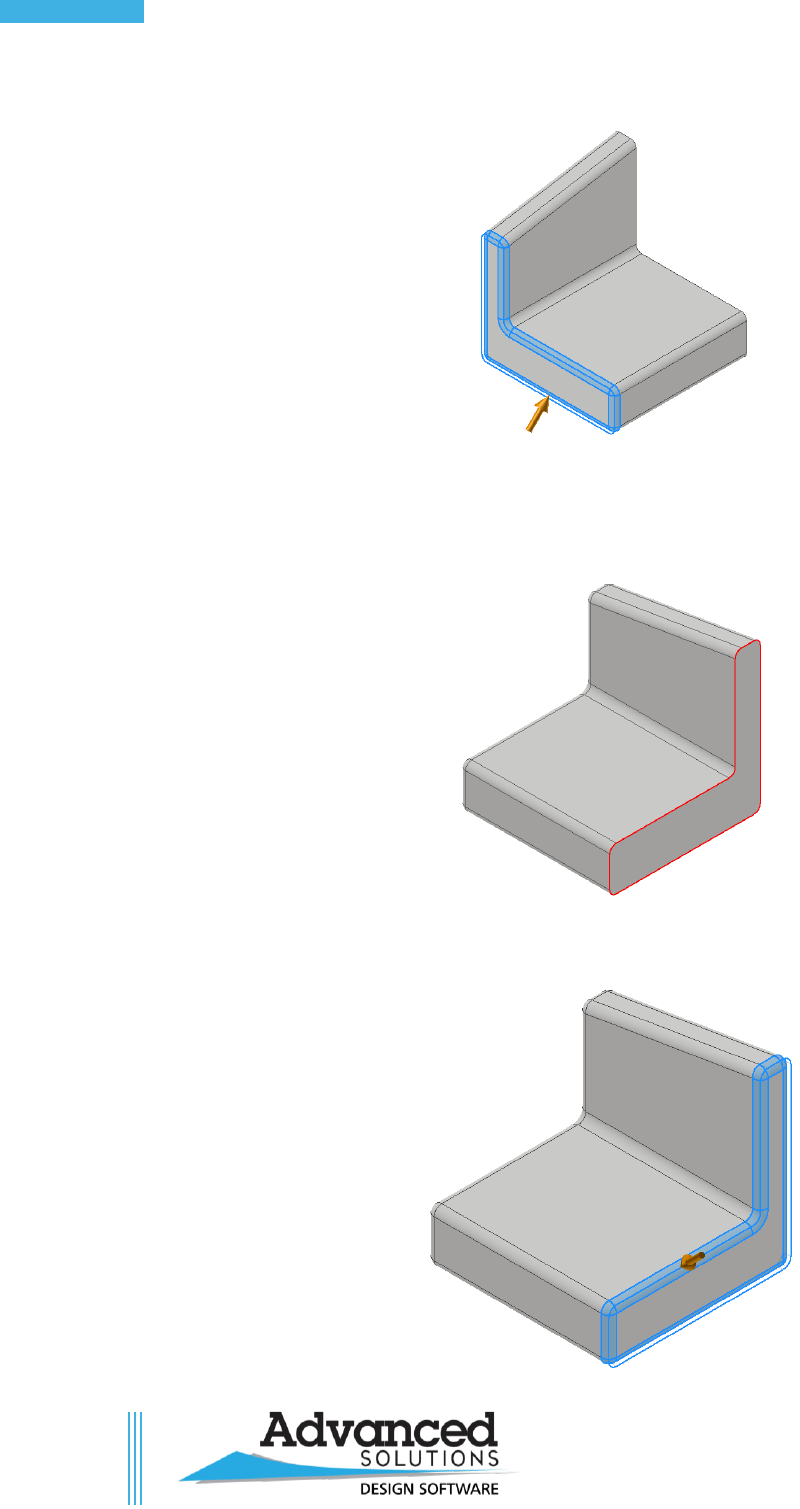
5. Activate the fillet command again, and choose the loop select method and radius of 0.25 in.
6. Select the edges shown below:
Confidential
©Copyright 2017 Advanced Solutions, Inc.
All Rights Reserved
56
Inv. Part Modeling Fundamentals
7. Preview should appear the same as shown below:
8. Click OK.
9. Activate the fillet command again.
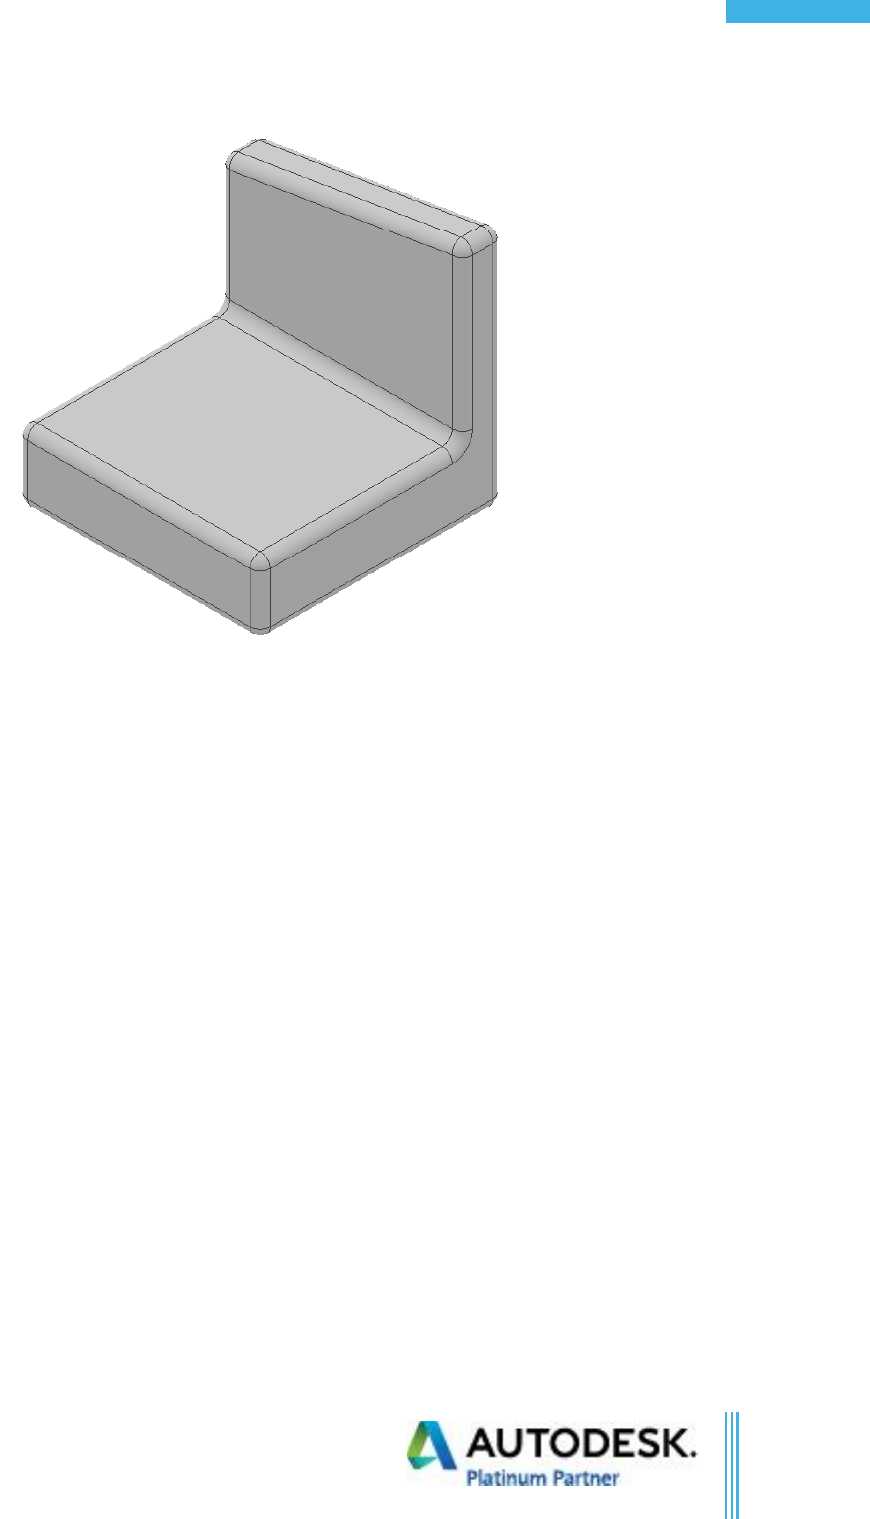
10. Keep the default settings, and select a non-filleted edge shown below:
11. Notice that all the edges are selected even though the loop method was not used. This is because
of the tangentially connected edges. All tangentially connected edges will be selected by default.
Confidential
©Copyright 2017 Advanced Solutions, Inc.
All Rights Reserved
57
Table of Contents
12. Click OK.
13. Close the part without saving.
Confidential
©Copyright 2017 Advanced Solutions, Inc.
All Rights Reserved
58
Inv. Part Modeling Fundamentals
Chapter 9b Exercise
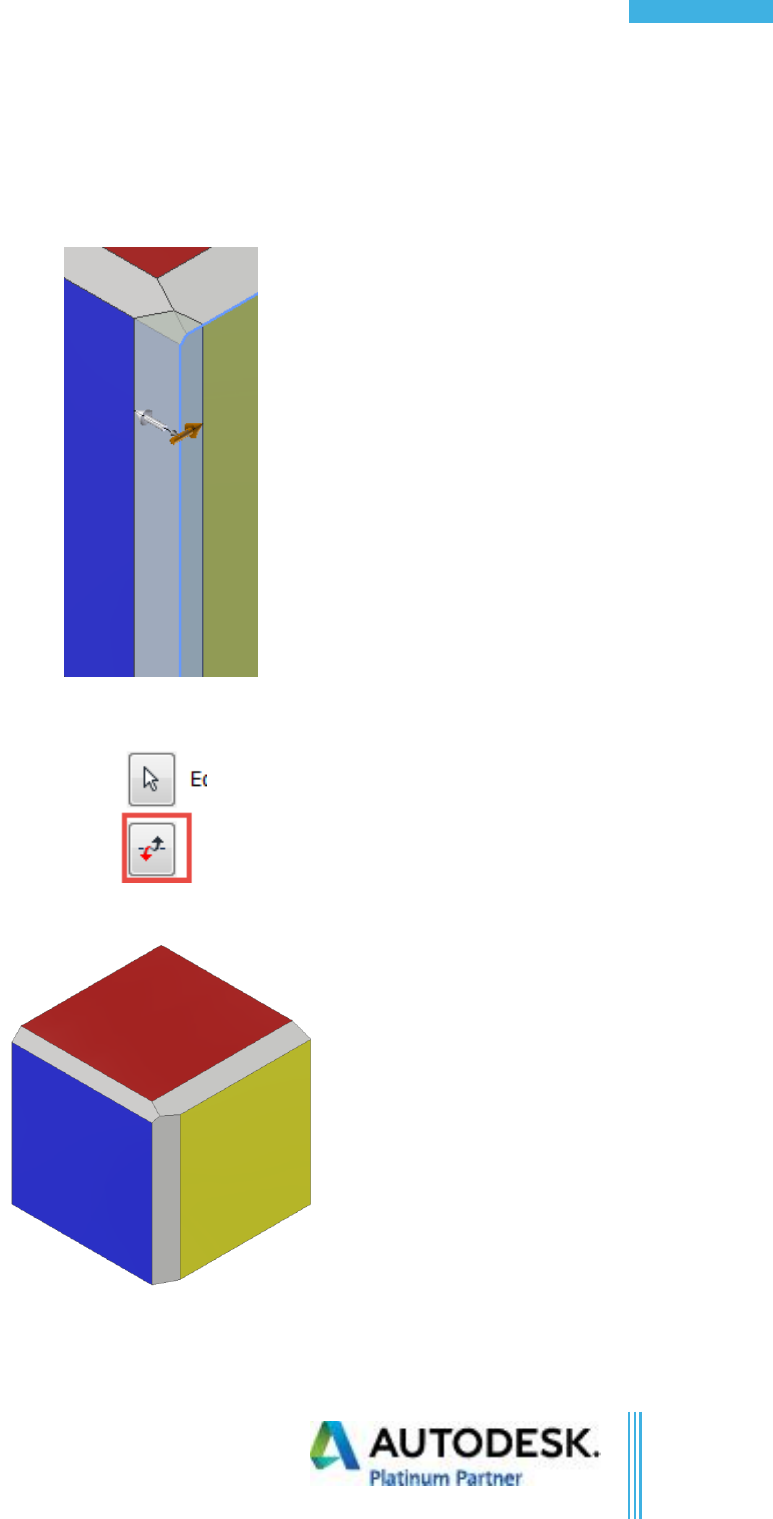
1. Open Chamfer.ipt.
2. Activate the Chamfer command.
3. Make sure the distance option is selected.
4. Set the distance value to 0.125 in.
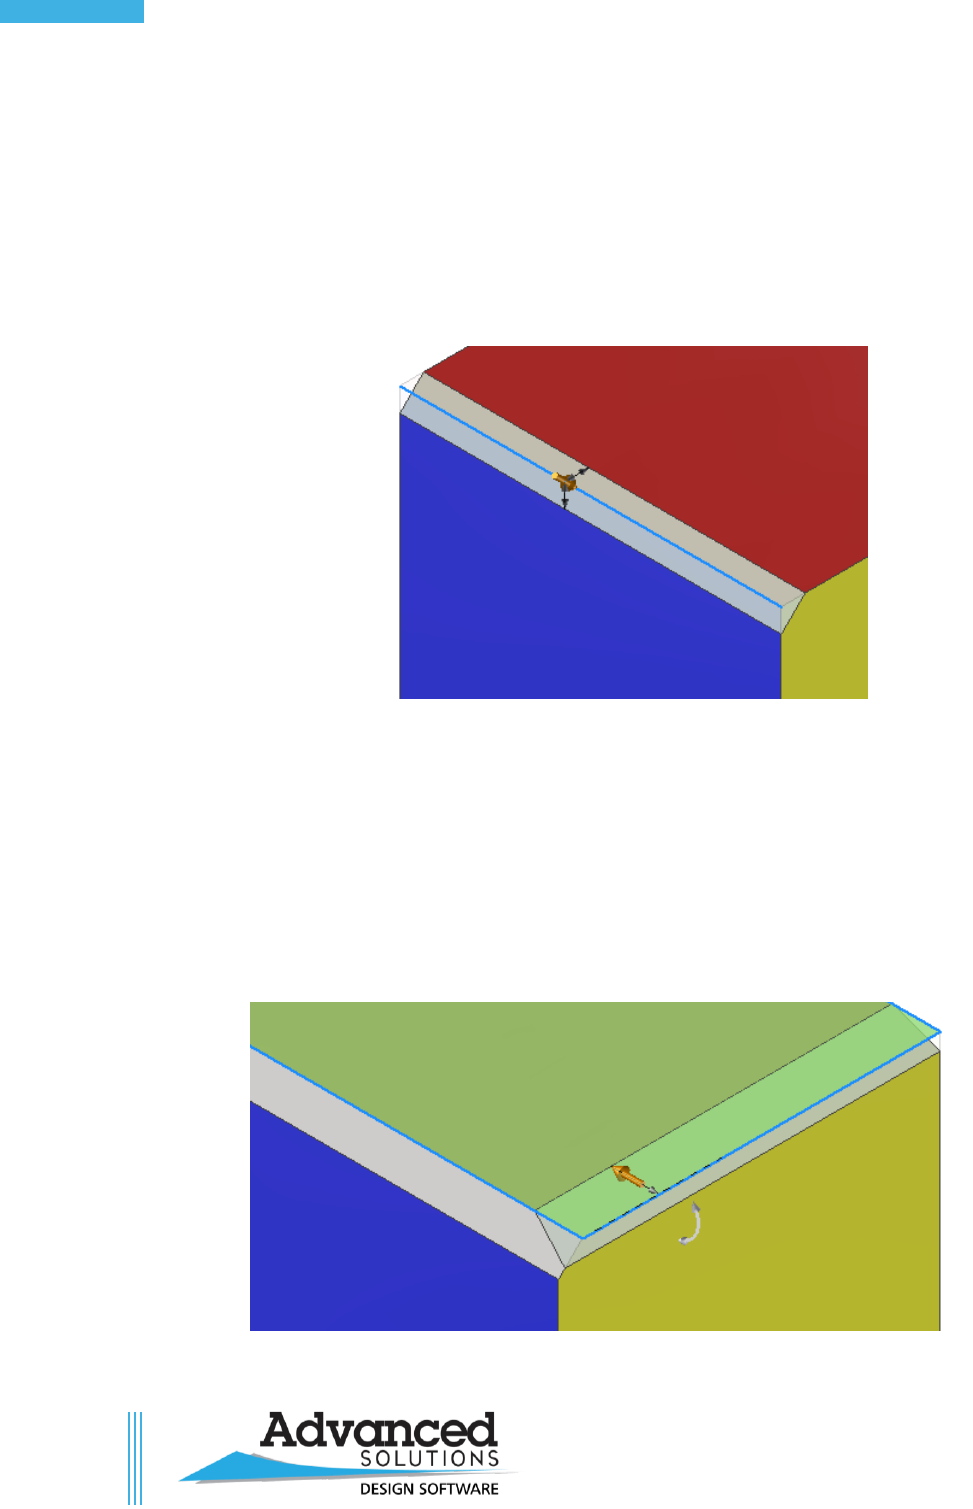
5. Select the edge that forms the edge of the “Red” & “Blue” faces as shown:
6. Click OK.
7. Activate the chamfer command again.
8. Make sure the Distance and Angle option is chosen.
9. Set the Distance as 0.25 in.
10. Set the Angle to be 20.
11. Select the “Red” surface as the face.
12. Select the edge that forms the edge of the “Red” & “Yellow” faces as shown:
13. Click OK.
Confidential
©Copyright 2017 Advanced Solutions, Inc.
All Rights Reserved
59
Table of Contents
14. Start the chamfer command again.
15. Make sure the Two Distances option is selected.
16. Set Distance 1 as 0.125 in, and Distance 2 as 0.25 in.
17. Select the edge that forms the edge of the “Blue” & “Yellow” faces as shown:
18. Use the Flip button to switch the Distance 1 &2 values back and forth.
19. Click OK.
20. Close the part without saving,
Confidential
©Copyright 2017 Advanced Solutions, Inc.
All Rights Reserved
60
Inv. Part Modeling Fundamentals
Chapter 9c Exercise
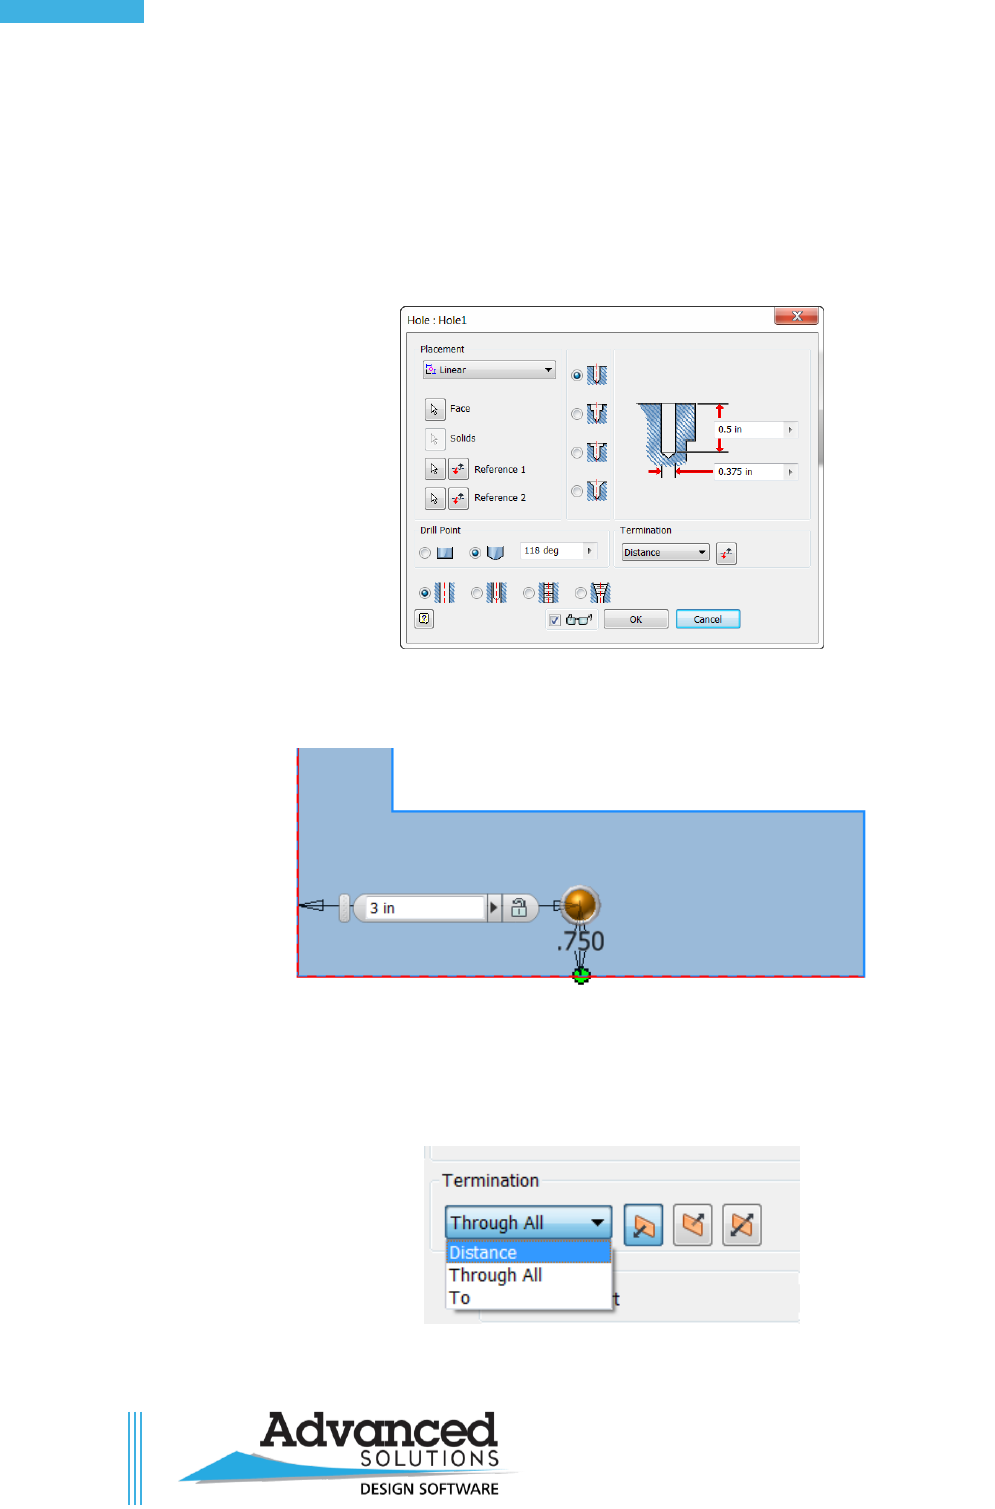
1. Open Place Holes.ipt.
2. Click on the “Front” from the view cube.
3. Activate the Hole command or press “H” on the keyboard.
4. Make sure the “Linear” placement type is selected.
5. Select the front face as the placement face.
6. Select the left edge of the part for reference 1 and make its dimension 2 in.
7. Select the bottom edge of the part for reference 2 and makes its dimension 0.75 in.
8. Select the 2 in dimension again, and change it to 3 in.
9. Set the termination to distance, and type in 0.5 in.
10. Set the hole diameter to 0.375 in.
Confidential
©Copyright 2017 Advanced Solutions, Inc.
All Rights Reserved
61
Table of Contents
11. Click OK.
12. Activate the hole command again, or press “H” on the keyboard.
13. Rotate the part to look at the round boss in the back.
14. Make sure that the placement type in linear.
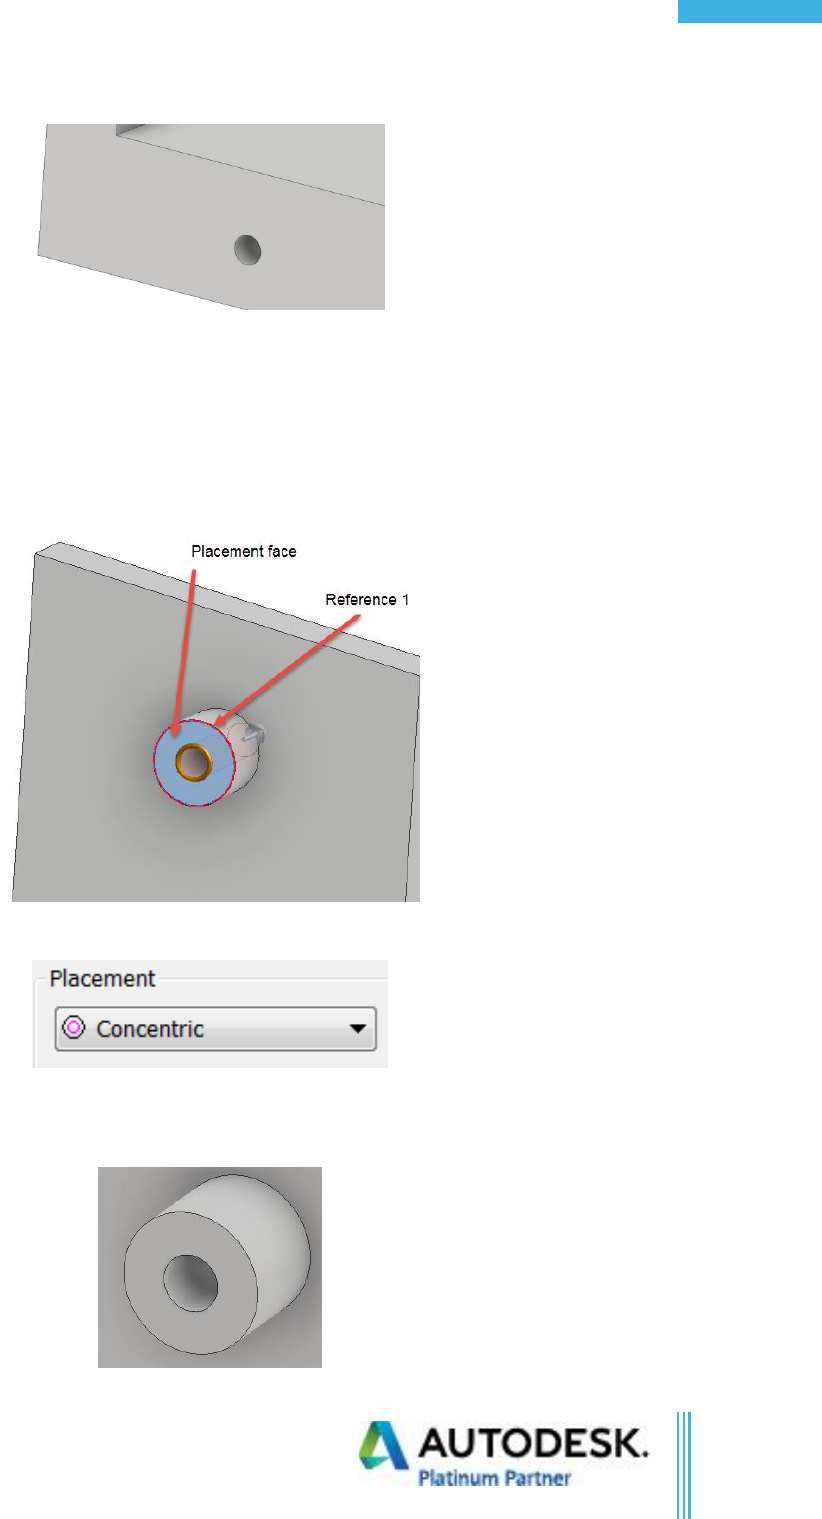
15. Select the end of the boss as the placement face.
16. Select the radial edge as reference 1.
17. Notice how the software automatically switches the placement type to “concentric”.
18. Set the hole diameter to 0.5 in through all.
19. Click OK.
Confidential
©Copyright 2017 Advanced Solutions, Inc.
All Rights Reserved
62
Inv. Part Modeling Fundamentals
20. Switch the view Cube to be on the “right”.
21. Use the lower face of the part and start a new sketch.
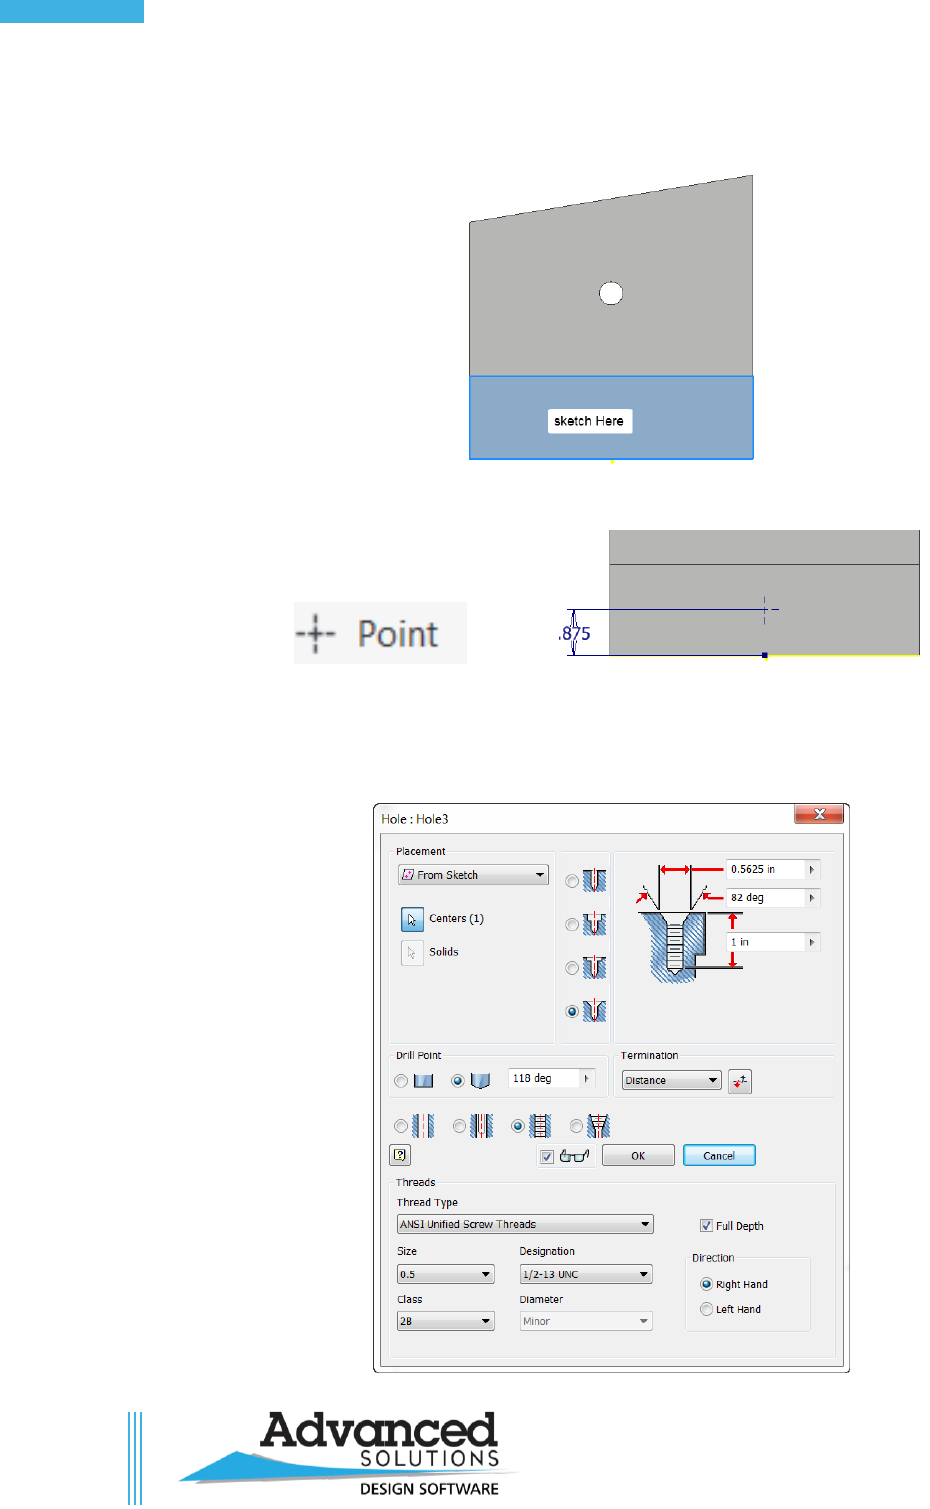
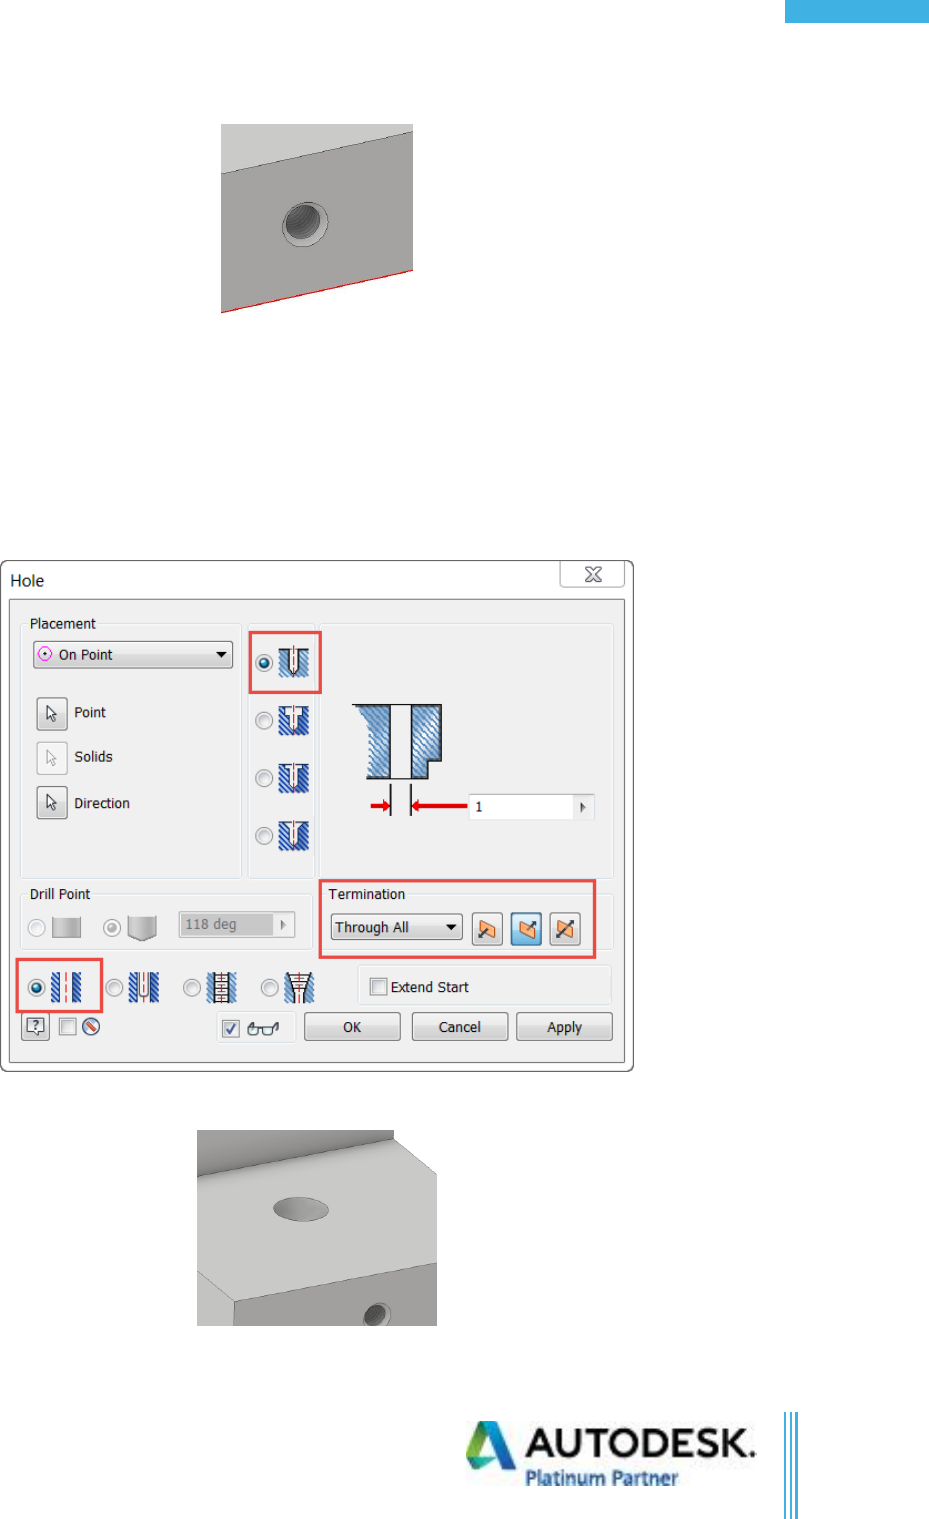
22. Place a point, and dimension it as shown below (use required constraint to define the sketch).
23. Finish the sketch, and start the hole command.
24. Create a tapped countersink hole.
25. Set the values as shown below:
Confidential
©Copyright 2017 Advanced Solutions, Inc.
All Rights Reserved
63
Table of Contents
26. Click OK.
27. Activate the hole command, and select On Point for placement type.
28. For the point, select the Hole WP in the browser.
29. For the Direction use the Y axis.
30. Use a simple drilled through hole of a 1 in diameter set to through all.
31. Flip the direction of the hole using the flip arrow next to the termination type to make the hole go
into the part.
32. Click OK.
33. Close the part without saving.
Confidential
©Copyright 2017 Advanced Solutions, Inc.
All Rights Reserved
64
Inv. Part Modeling Fundamentals
Chapter 9d Exercise
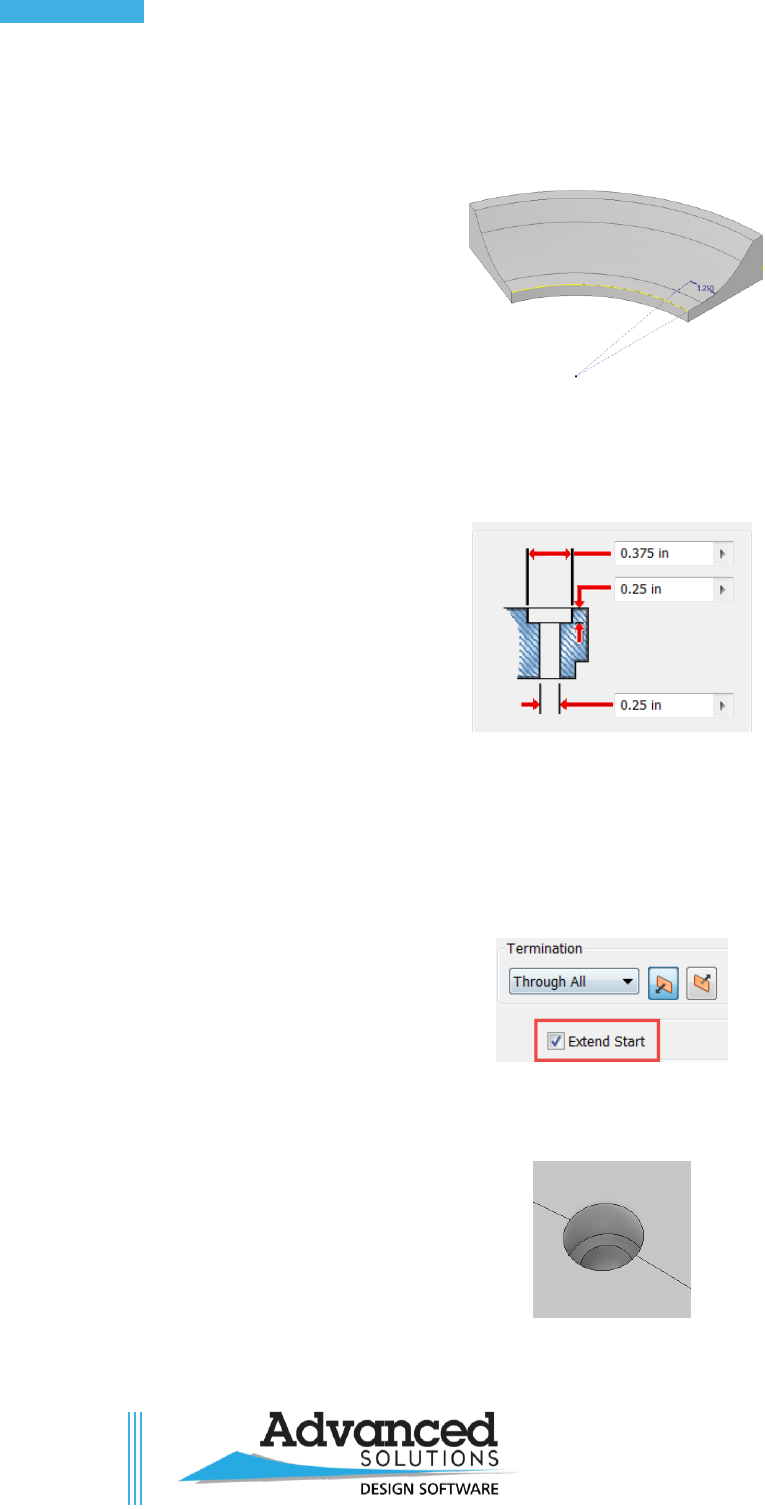
1. Open Hole Features.ipt.
2. Use the Existing sketch to create a hole.
3. Use the Counterbore type.
4. Set the Values as shown.
5. Click OK.
6. Notice there is a Counterbore hole, but the top is not open. In previous releases, an additional
command was required to fix this.
7. Edit the Hole feature.
8. Check the “Extend Start” check box as shown.
9. Click OK.
10. Notice now the hole has been cleaned up.
Confidential
©Copyright 2017 Advanced Solutions, Inc.
All Rights Reserved
65
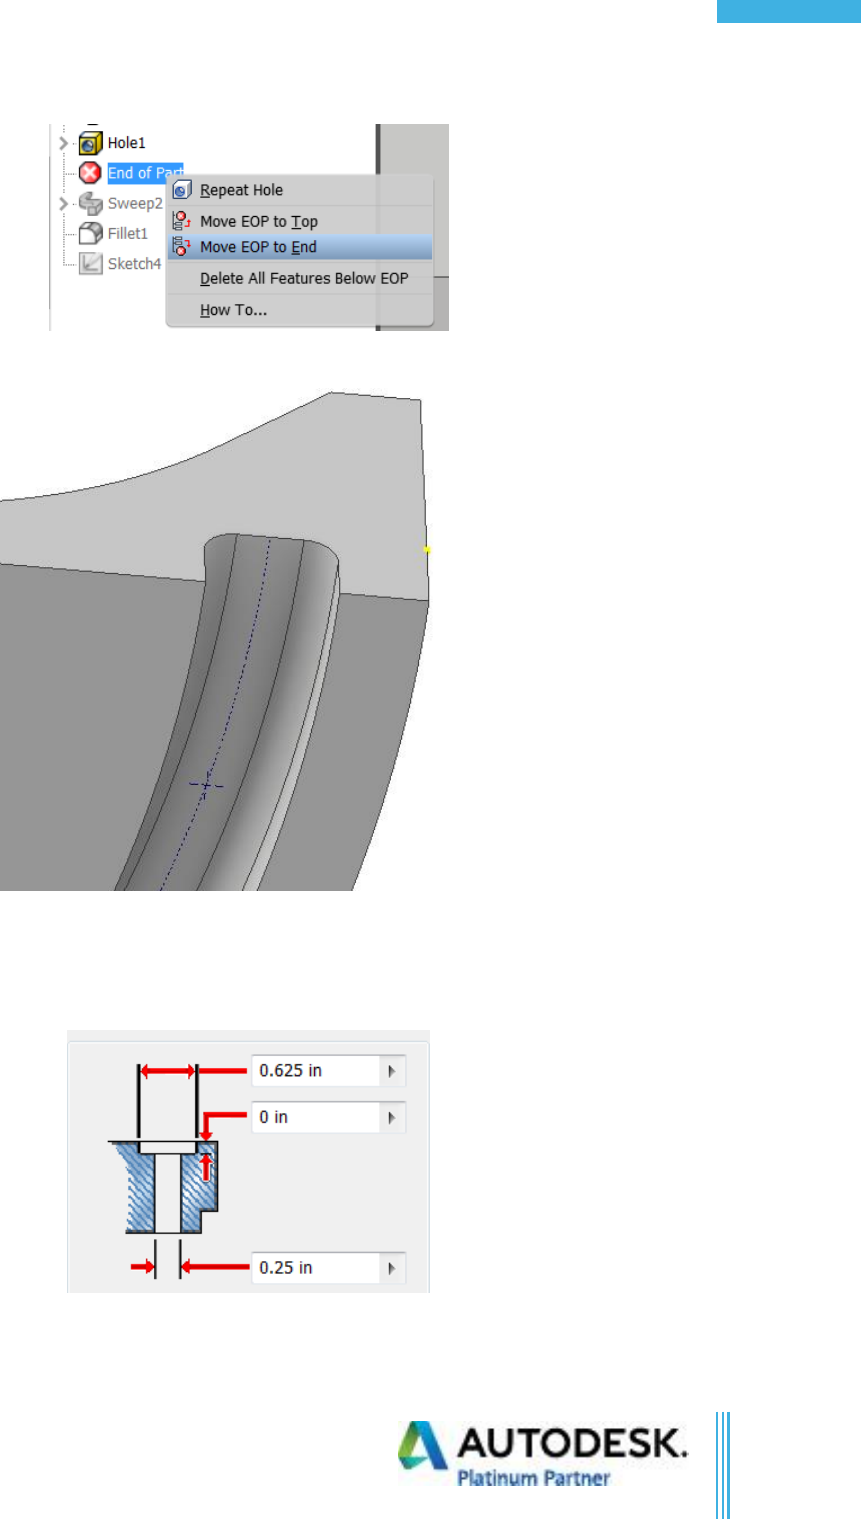
Table of Contents
11. Right click on the End of Part Marker and select “Move EOP to End”.
12. Spin the model over to see the sketch point as shown.
13. Start the hole command again.
14. Select the Spot Face option.
15. Set the values as shown.
16. Remove the check mark from the Extend start.
17. Click OK.
Confidential
©Copyright 2017 Advanced Solutions, Inc.
All Rights Reserved
66
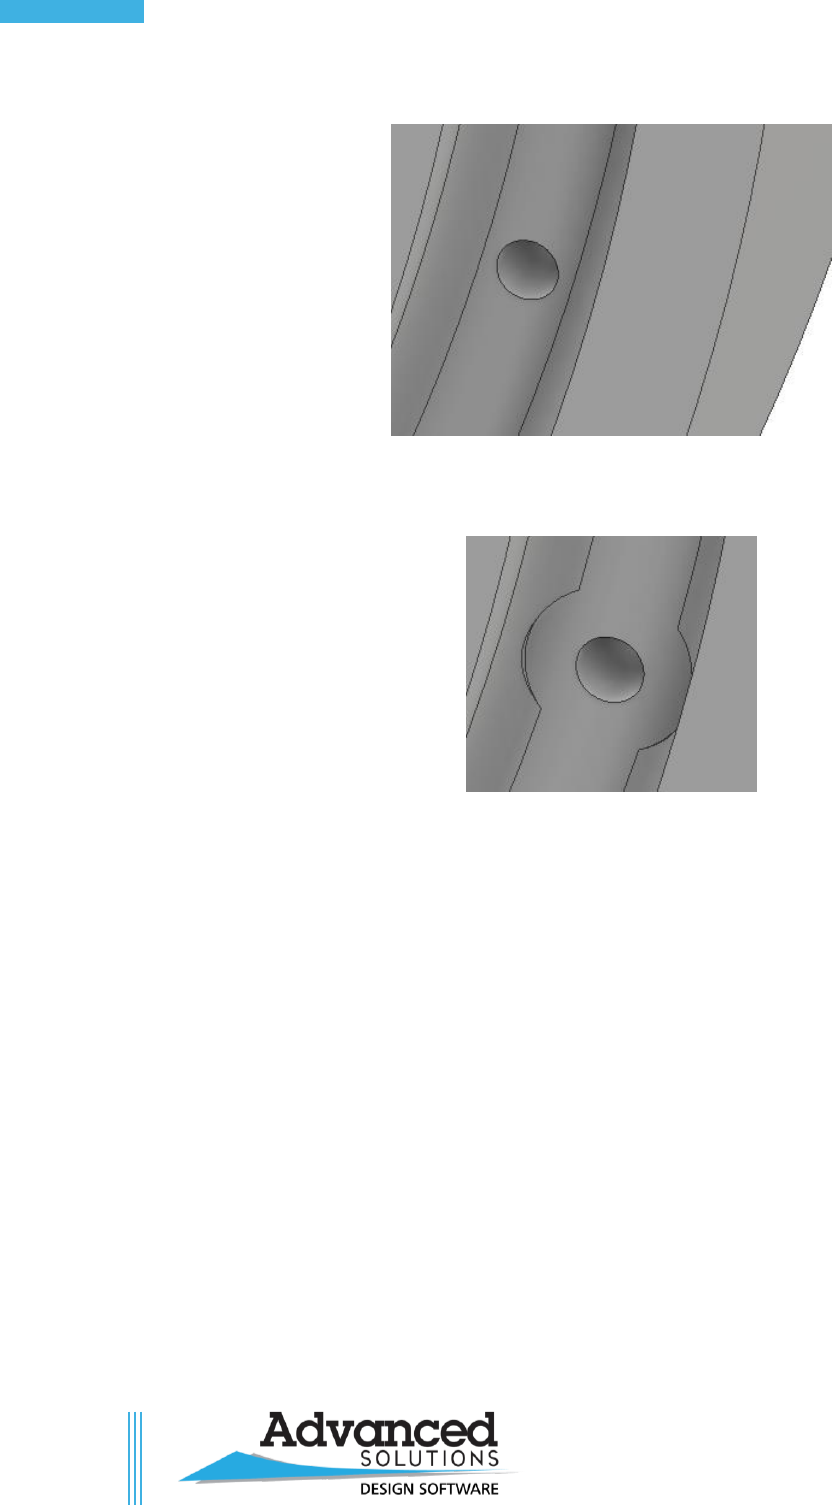
Inv. Part Modeling Fundamentals
18. Notice the hole is just a simple through hole.
19. Edit the hole and place a check in the Extend Start and click OK.
20. Notice that the surface around the hole has been clean up.
21. Close the file without saving.
Confidential
©Copyright 2017 Advanced Solutions, Inc.
All Rights Reserved
67
Table of Contents
Chapter 9e Exercise
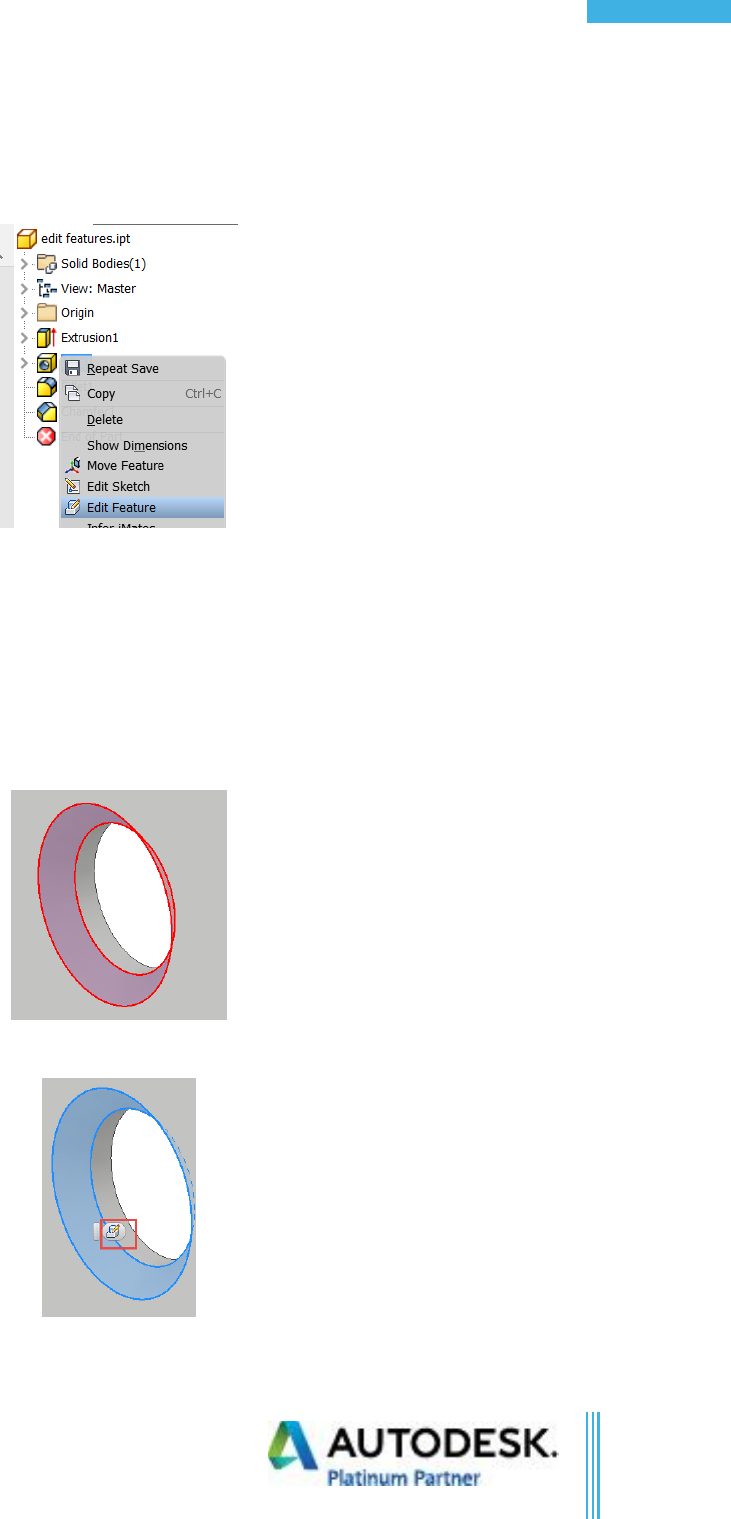
1. Open edit features.ipt.
2. Right click on Hole1 in the browser > Edit Feature.
3. Change the hole diameter to 0.75 in.
4. Click OK.
5. Double click on Fillet1 icon in the browser.
6. Change the radius to 0.25 in.
7. Click OK.
8. Select the face of the chamfer in the model as shown.
9. Click on the icon that appears in the mini tool bar.
10. Change the Distance to 0.1875 in.
Confidential
©Copyright 2017 Advanced Solutions, Inc.
All Rights Reserved
68
Inv. Part Modeling Fundamentals
11. Click OK.
12. Close the part without saving.
Confidential
©Copyright 2017 Advanced Solutions, Inc.
All Rights Reserved
69
Table of Contents
Chapter 10 Exercise
1. Open Engine Case Side.ipt.
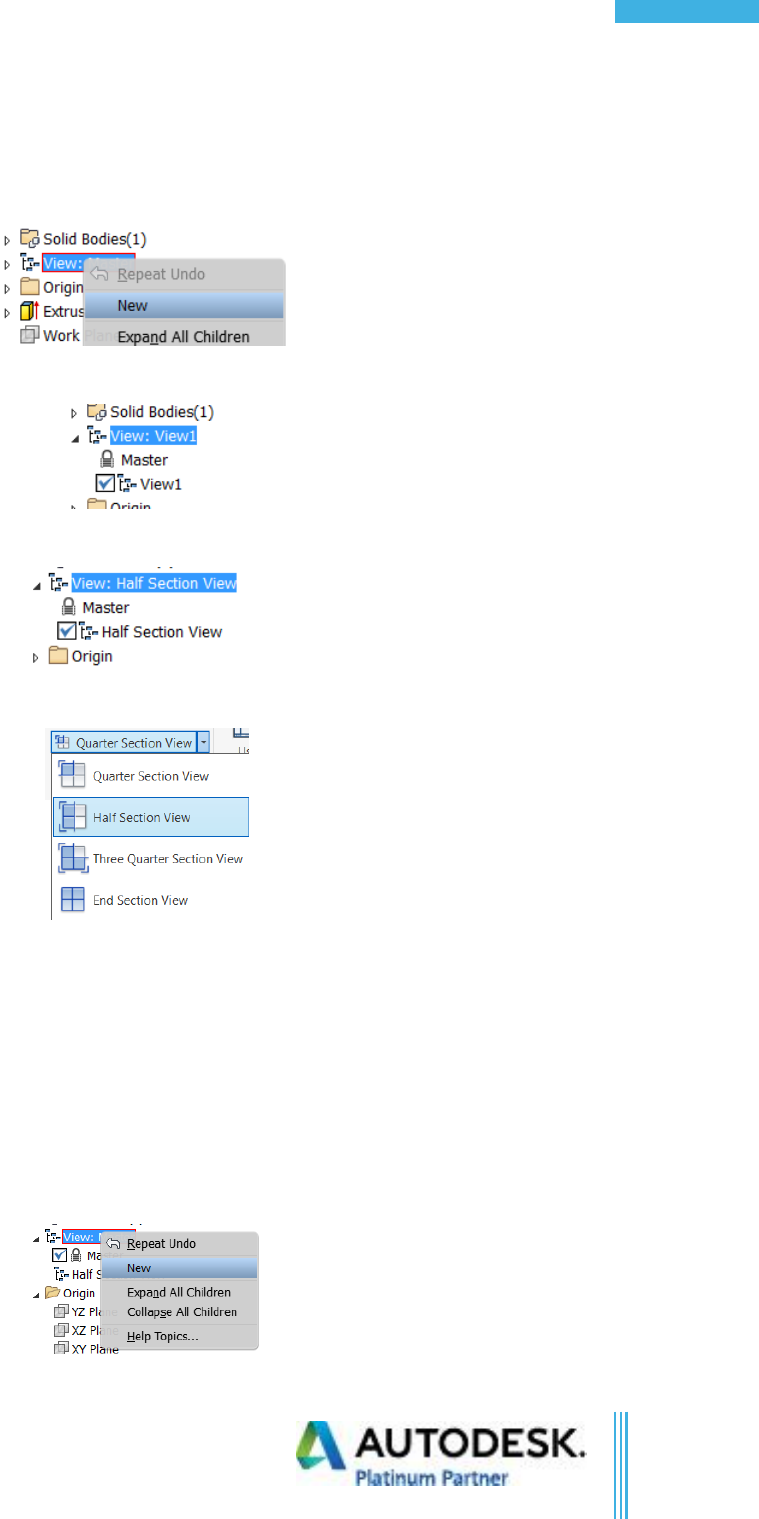
2. In the browser right-click on “View: Master” and click “New”.
3. Expand the View folder and “View1’ is active.
4. Rename View1 to “Half Section View”.
5. In the view tab, click the drop-down next to Quarter Section view.
6. Select Half section view.
7. Expand the origin folder, and select the YZ plane.
8. Type in -8.72 and click OK.
9. Double click back on the Master view in the browser.
10. Double click back on half section view.
11. Switch back to the master view.
12. Right-click on View: Master and choose “New”.
Confidential
©Copyright 2017 Advanced Solutions, Inc.
All Rights Reserved
70
Inv. Part Modeling Fundamentals
13. Rename View1 to Red.
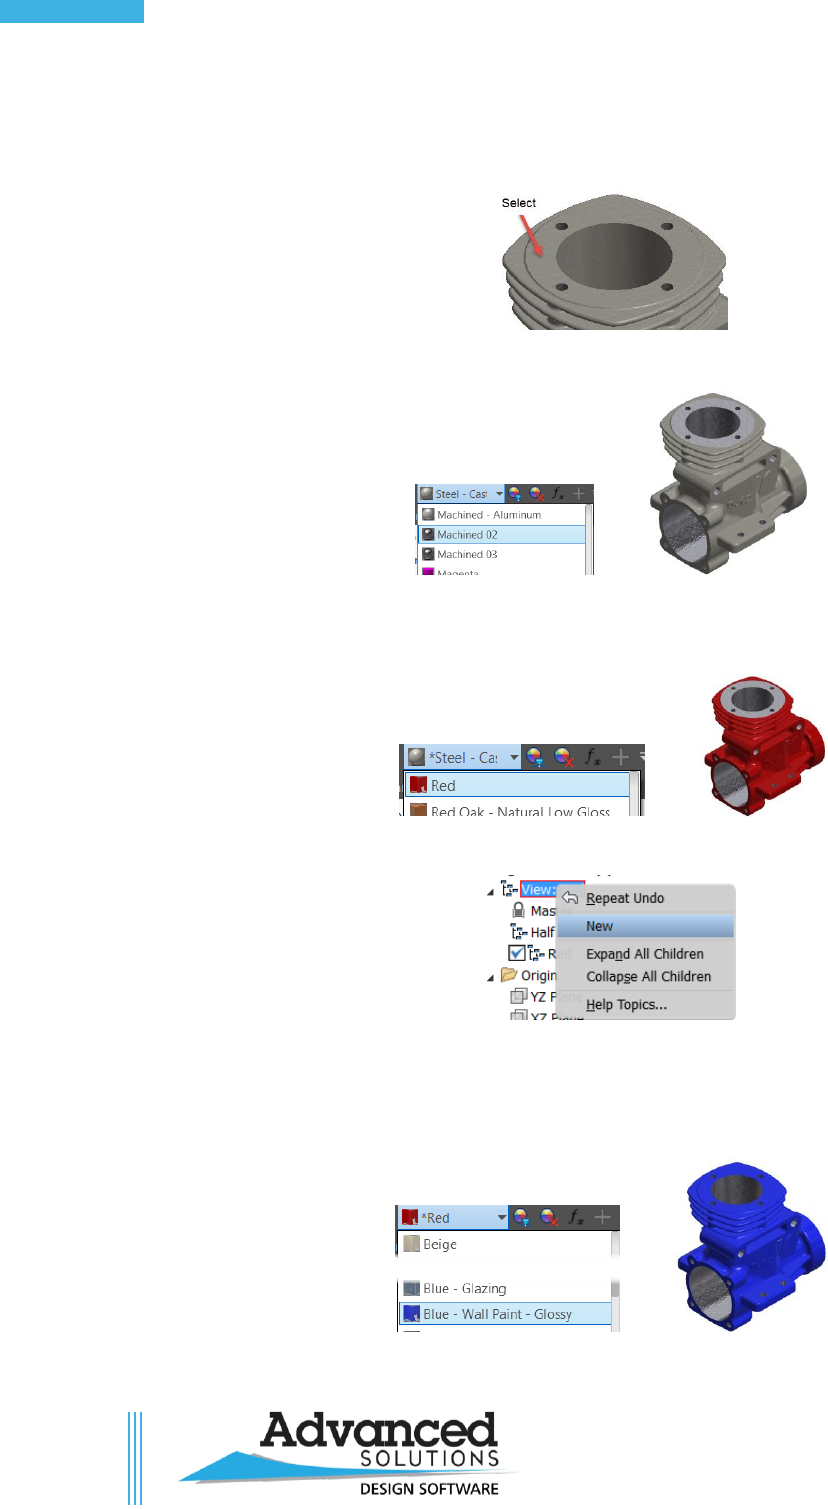
14. In the browser, select: the top face of the engine, Hole1, Hole2, Extrusion24, Hole3, Circular
Pattern3, extrusion27, Extrusion28, Extrusion29, Extrusion35, Extrusion36, Hole4.
15. Set the appearance of the features to Machined 02.
16. Click in the graphics window and make sure nothing is selected.
17. In the appearance drop-down choose “Red”.
18. Right-Click on View: Red and choose “New”.
19. Rename “View1” to “Blue”
20. Click in the graphics window and make sure nothing is selected.
21. In the appearance drop-down, change Red to Blue – Wall Paint – Glossy.
Confidential
©Copyright 2017 Advanced Solutions, Inc.
All Rights Reserved
71
Table of Contents
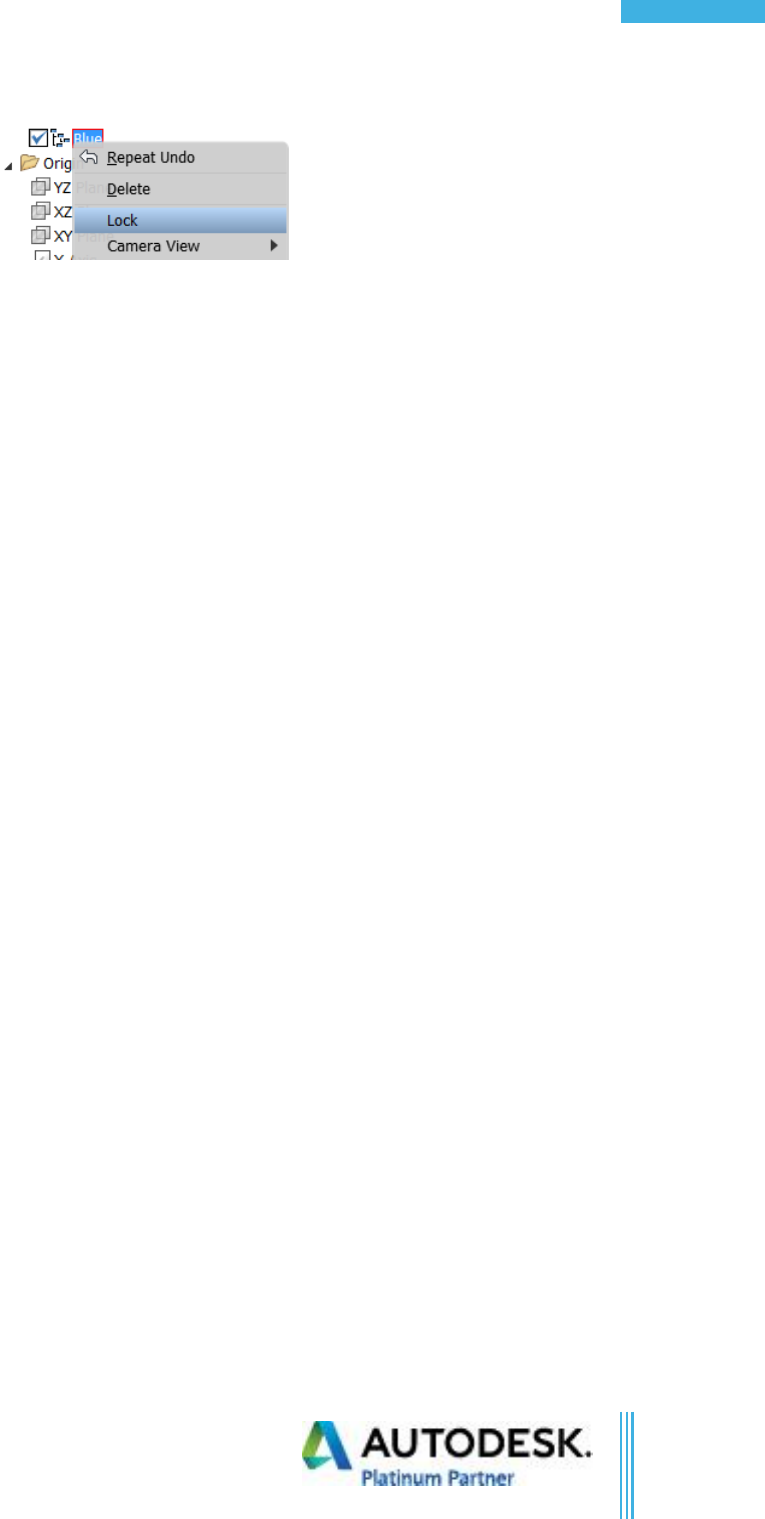
22. Right-Click on View Blue in the browser and select “Lock”.
23. Double-click on Red to activate it.
24. Click on the “Right” face in the view cube to reorient the model.
25. Switch back to “Blue”.
26. Click on the “Right” face in the view cube to reorient the model.
27. Switch back to “Red”.
28. Switch back to “Blue”.
29. Notice that “Red” stayed where the camera was placed, but “Blue” went back to the isometric
view. This is because the view was locked and cannot be altered unless it is unlocked. Try
changing the color. It will change, but when you cycle away from the view and come back it will
be blue again.
Confidential
©Copyright 2017 Advanced Solutions, Inc.
All Rights Reserved
72
Inv. Part Modeling Fundamentals
Chapter 11a Exercise
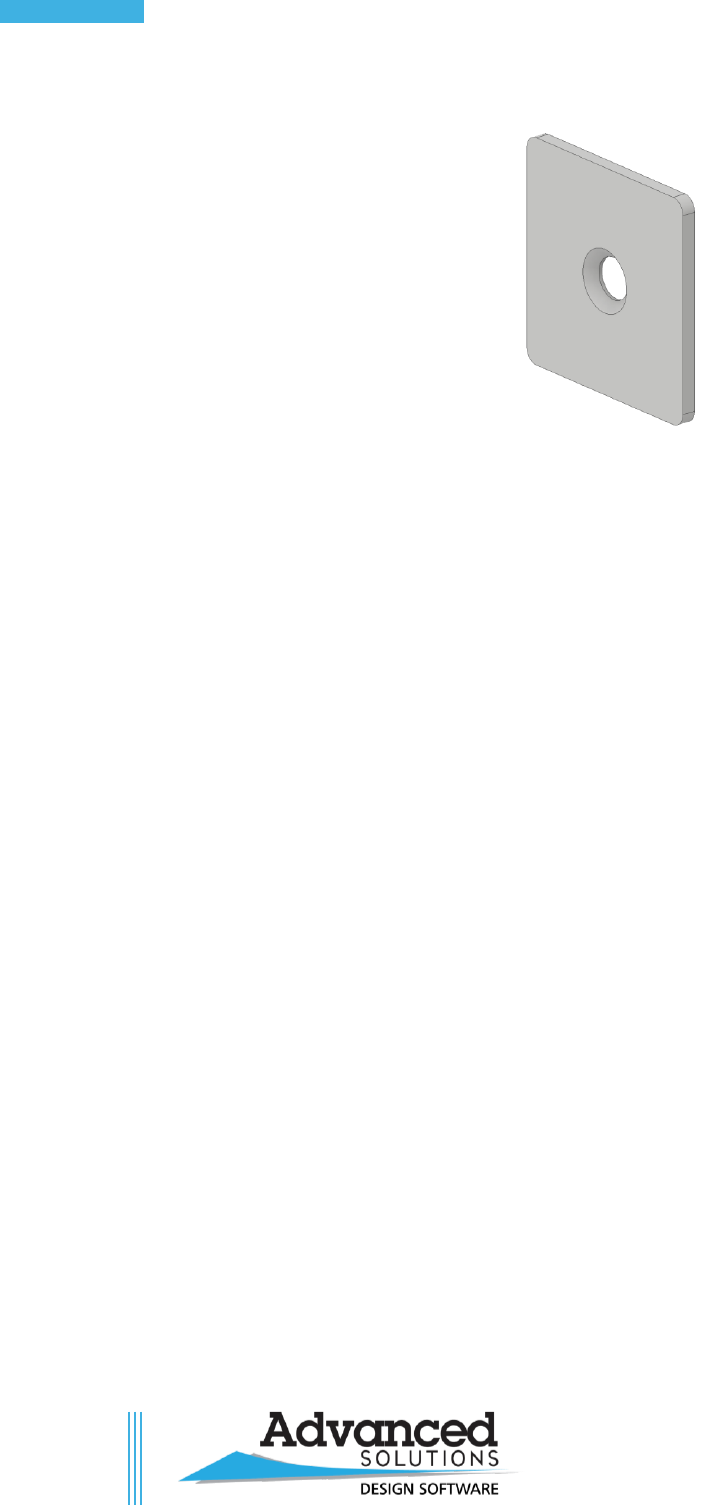
1. Open iproperty and material.ipt
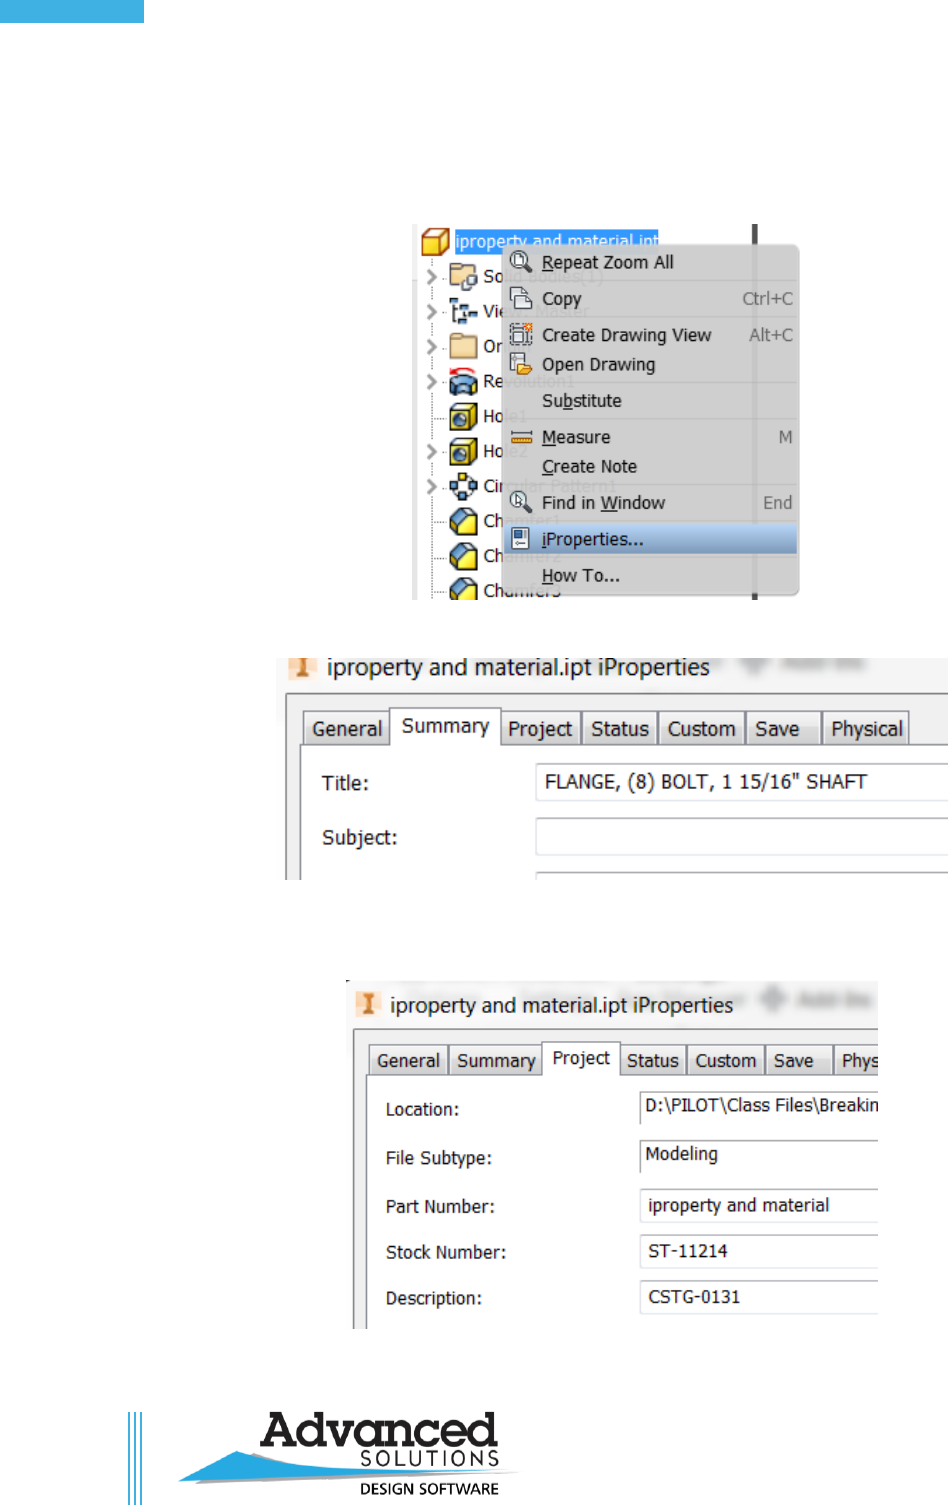
2. In the model browser, right click on the name of the part and choose iProperties.
3. In the Summary Tab > Title Field, type: “FLANGE, (8) BOLT, 1 15/16" SHAFT”.
4. In the Project Tab > Stock Number type: “ST-11214”.
5. In the Project Tab > Description type: “CSTG-0131”.
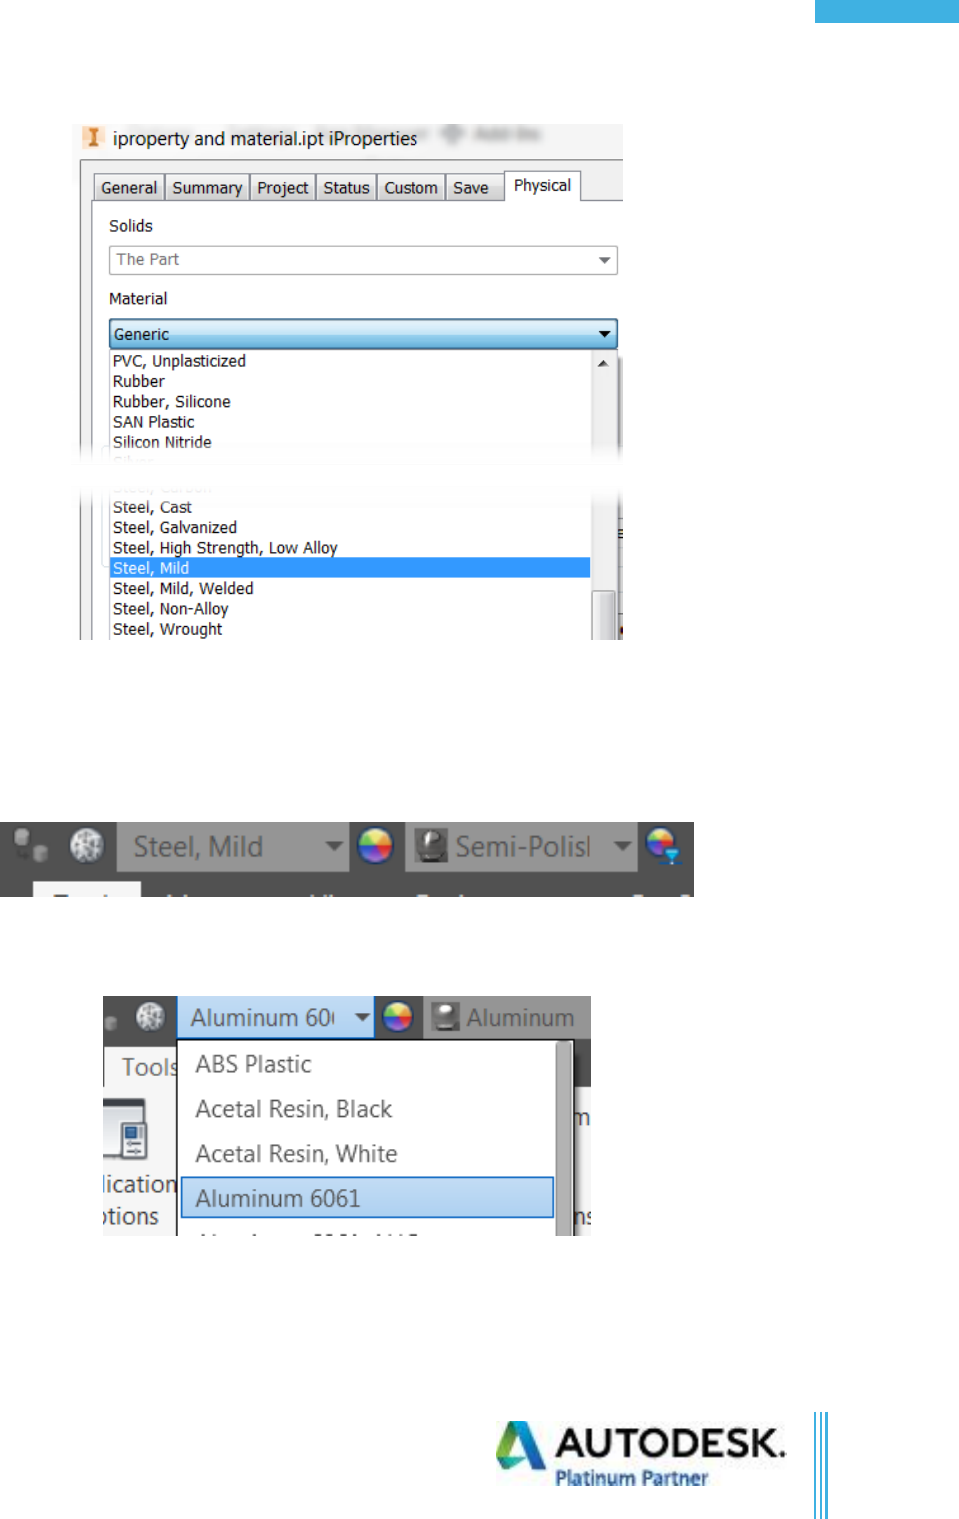
6. Click on the Physical Tab, if required select the “Update” button. Notice the mass.
Confidential
©Copyright 2017 Advanced Solutions, Inc.
All Rights Reserved
73
Table of Contents
7. Select the material drop-down, and choose “Steel, Mild”.
8. Notice, the mass has updated to reflect the material of Mild Steel.
9. Click OK.
10. Notice how the part has changed color.
11. Look in the Quick Access Toolbar, Notice the material and appearance drop-downs.
12. The material has also updated here, and the appearance has been defined as well.
13. Use the material drop-down in the Quick Access Toolbar to choose “Aluminum 6061”.
14. Notice, the part changed color, and the appearance updated as well.
15. Set the Material back to “Steel, Mild”.
Confidential
©Copyright 2017 Advanced Solutions, Inc.
All Rights Reserved
74
Inv. Part Modeling Fundamentals
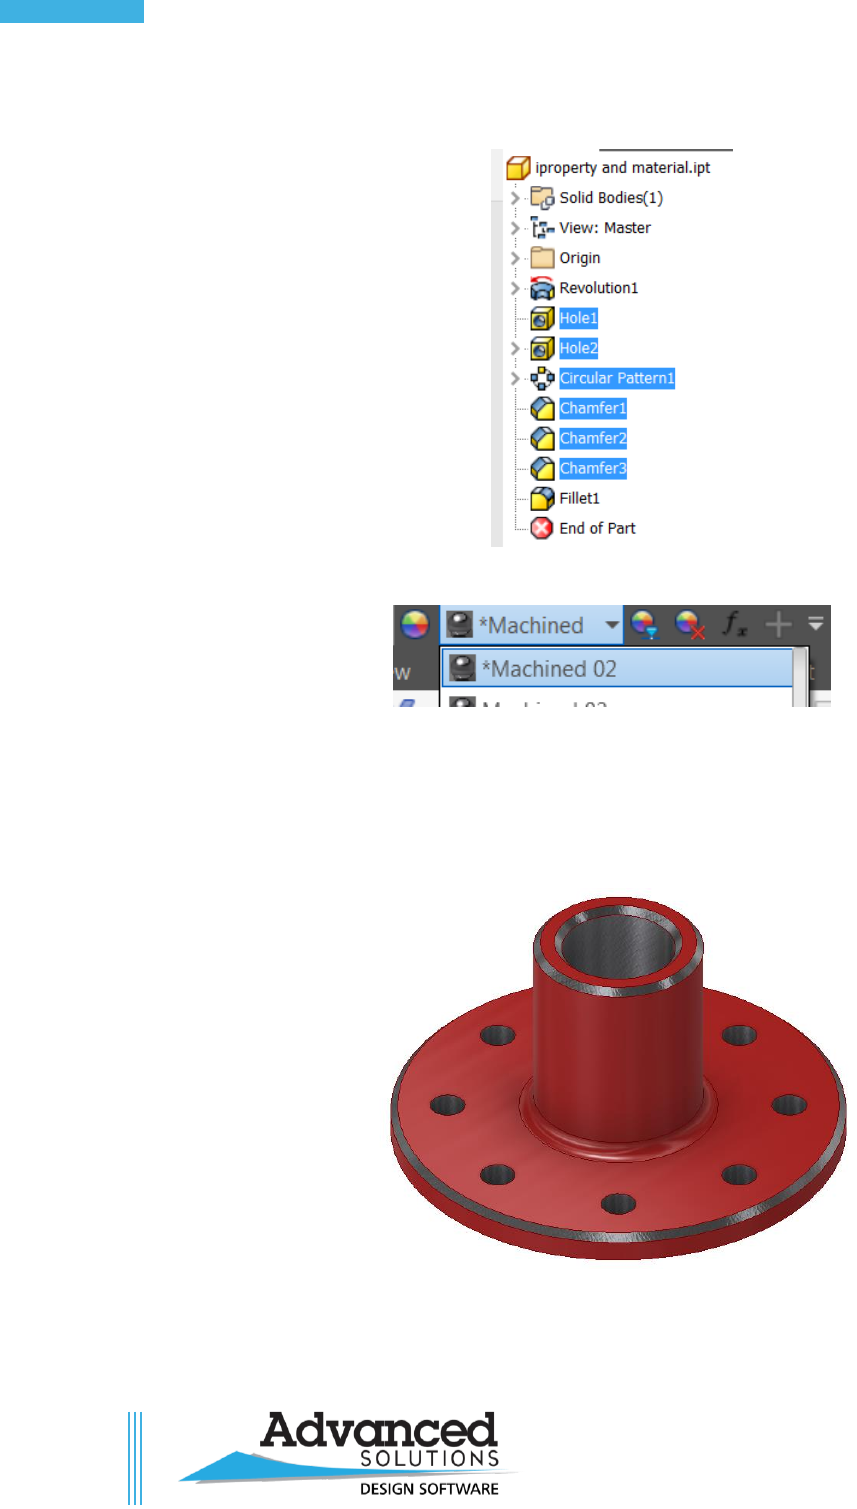
16. In the Browser, Hold the CTRL key and select “Hole1”, “Hole2”, “Circular Pattern1”, “Chamfer1”,
“Chamfer2”, “Chamfer3”.
17. In the Appearance drop-down, choose “Machined 02”.
18. Notice that the features have a different appearance than the default.
19. Click in the graphics window (in space), or press the ESC key and make sure nothing is selected.
20. In the Appearance drop-down, choose “Red”.
21. Notice that the entire part changed to red except for the features you defined earlier.
22. Spin the part to look at the bottom face.
23. Notice that it is red as well.
Confidential
©Copyright 2017 Advanced Solutions, Inc.
All Rights Reserved
75
Table of Contents
24. Select the face, in the Appearance drop-down, choose “Machined 02”.
25. Now, just that face has the appearance applied to it.
Confidential
©Copyright 2017 Advanced Solutions, Inc.
All Rights Reserved
76
Inv. Part Modeling Fundamentals
Chapter 11b Exercise
1. Open Stapler.iam.
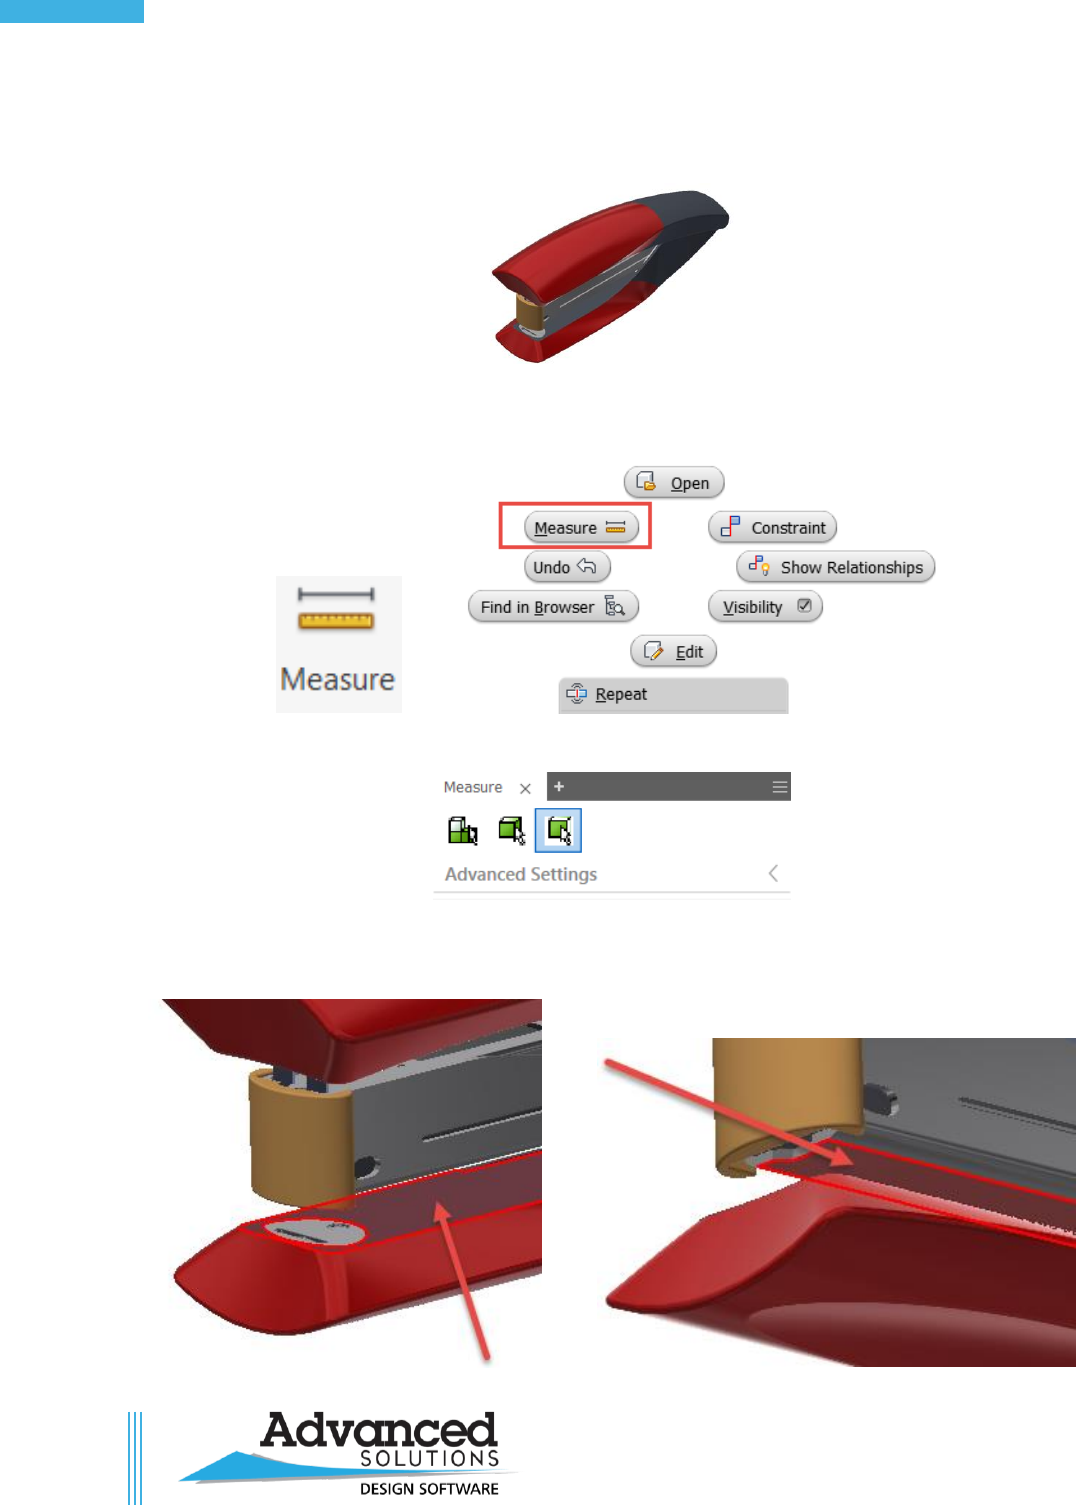
2. Start the measure command, Inspect Tab > Measure Panel > Measure. Or, right click in the
graphics window > Measure.
3. The Measure dialog box appears.
4. Make sure the last button (Faces and Edges) is selected.
5. Measure the clearance distance where the paper will slide into the stapler from the faces shown.
Confidential
©Copyright 2017 Advanced Solutions, Inc.
All Rights Reserved
77
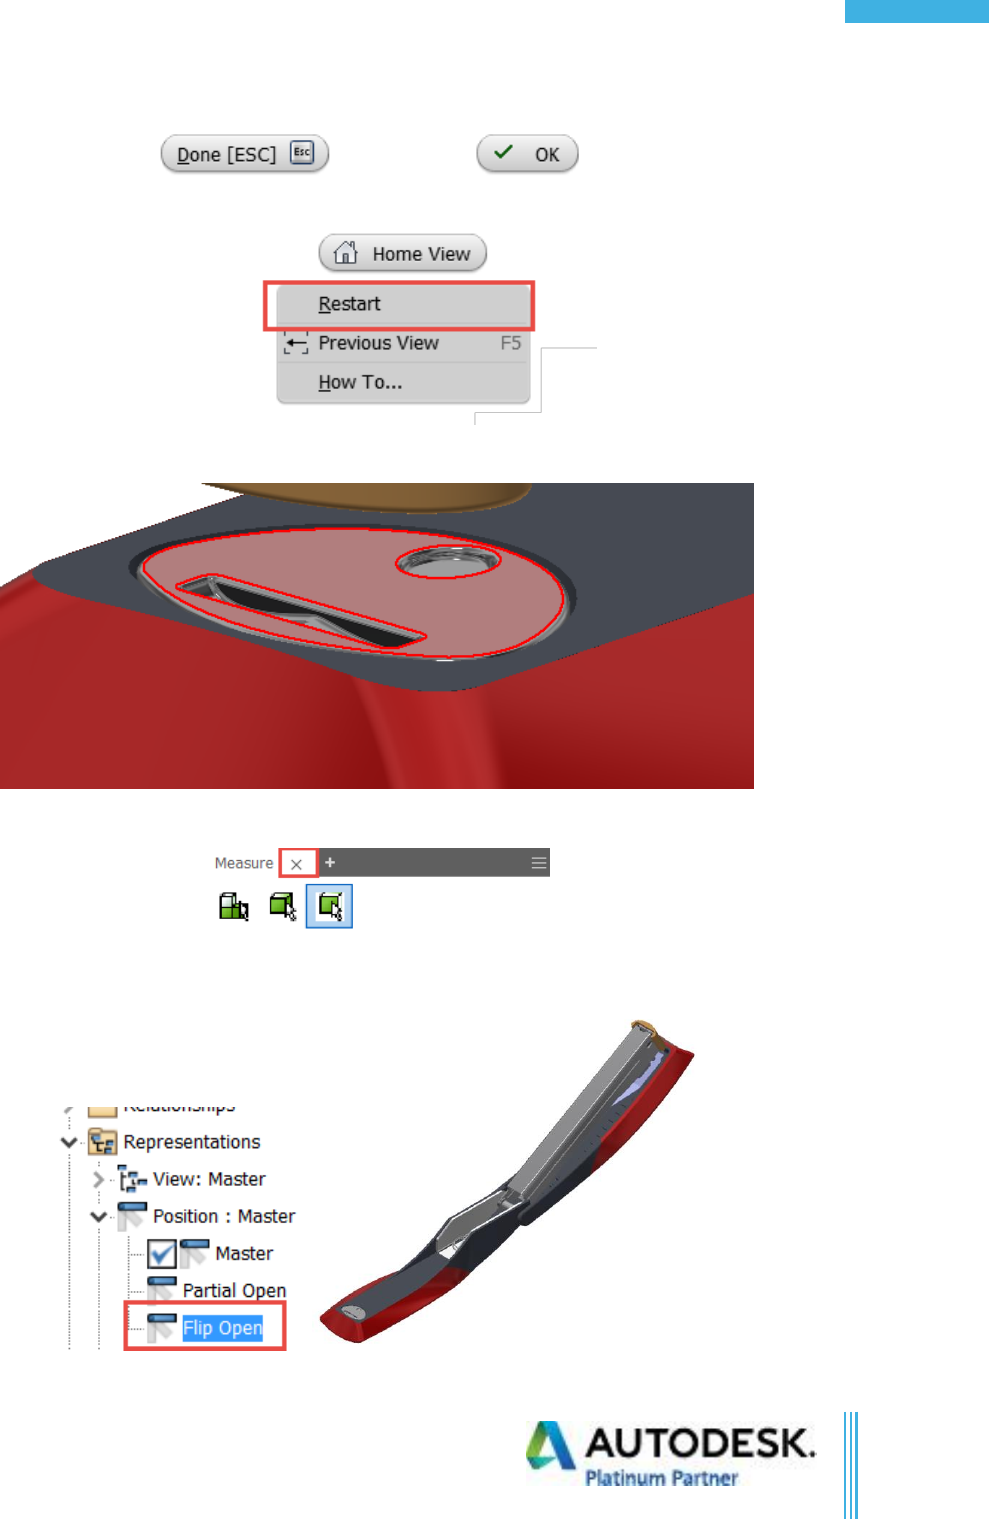
Table of Contents
6. Right click in the graphics window and restart the measure command.
7. Select the top face of the staple crimper as shown. Perimeter, Loop Length, and Area are shown.
8. Choose the “X” button in the measure dialog box to close it.
9. Set the Positional Representation of the Stapler to be “Flip Open” by double clicking it.
Confidential
©Copyright 2017 Advanced Solutions, Inc.
All Rights Reserved
78
Inv. Part Modeling Fundamentals
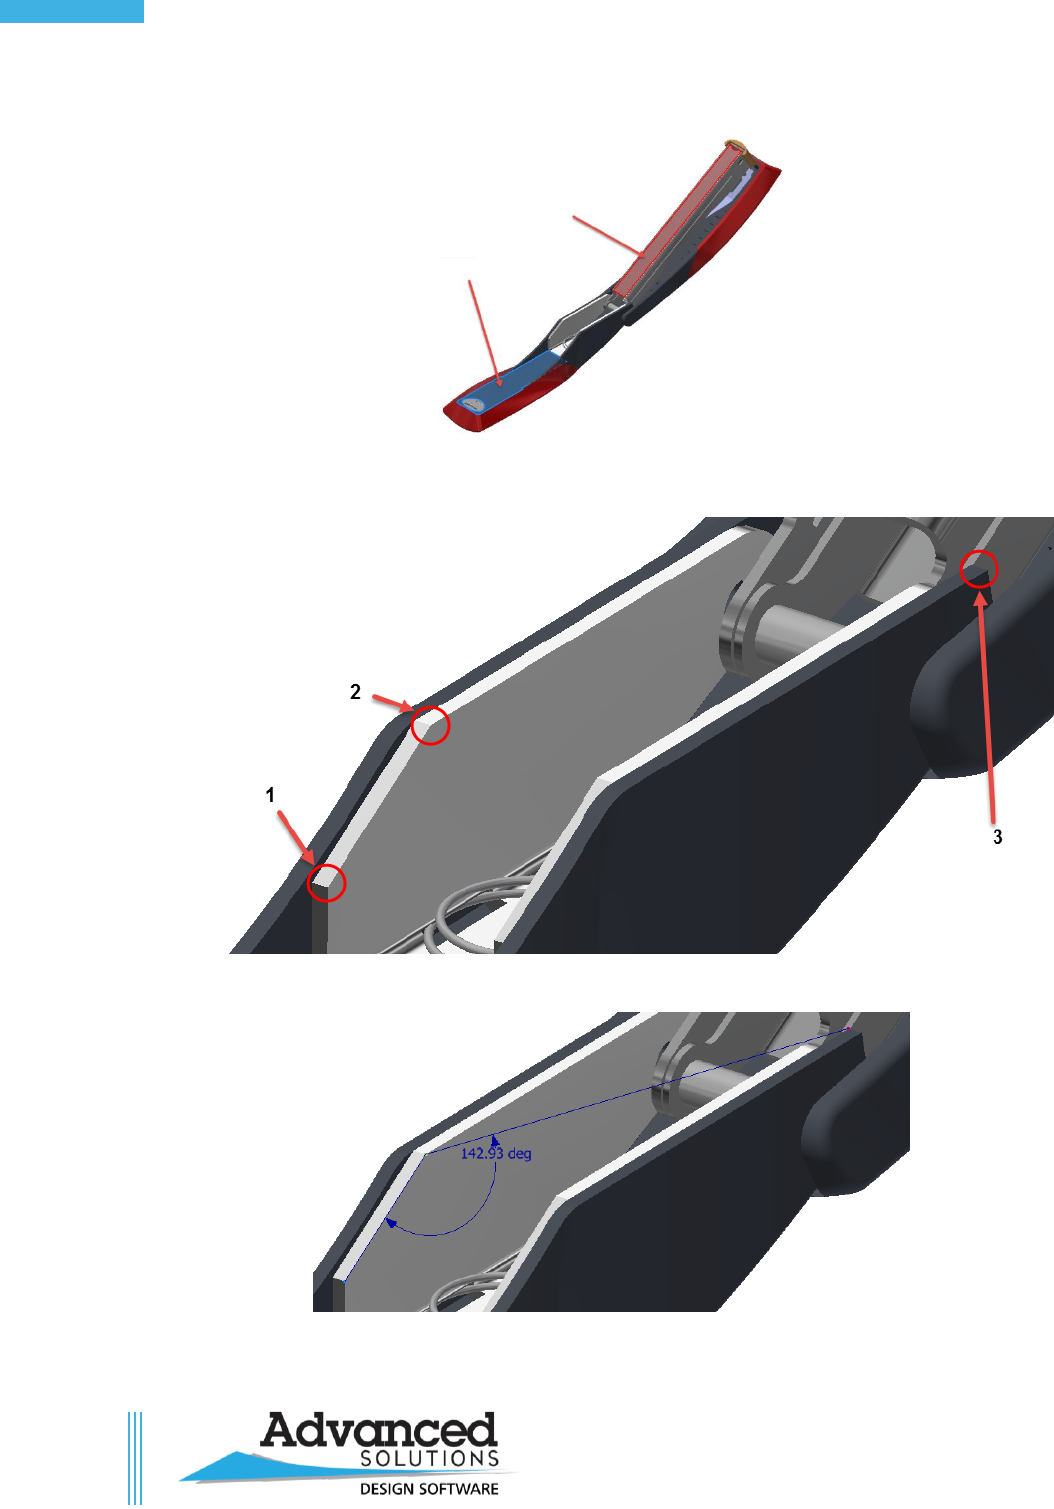
10. Measure the angle between the highlighted faces.
11. Measure the angle between (3) points. Using all inside corners, select #1, #2, then hold the SHIFT
key and choose inside corner of #3.
12. The result is shown below:
13. Close the assembly without saving.
Confidential
©Copyright 2017 Advanced Solutions, Inc.
All Rights Reserved
79
Table of Contents
Chapter 11c Exercise
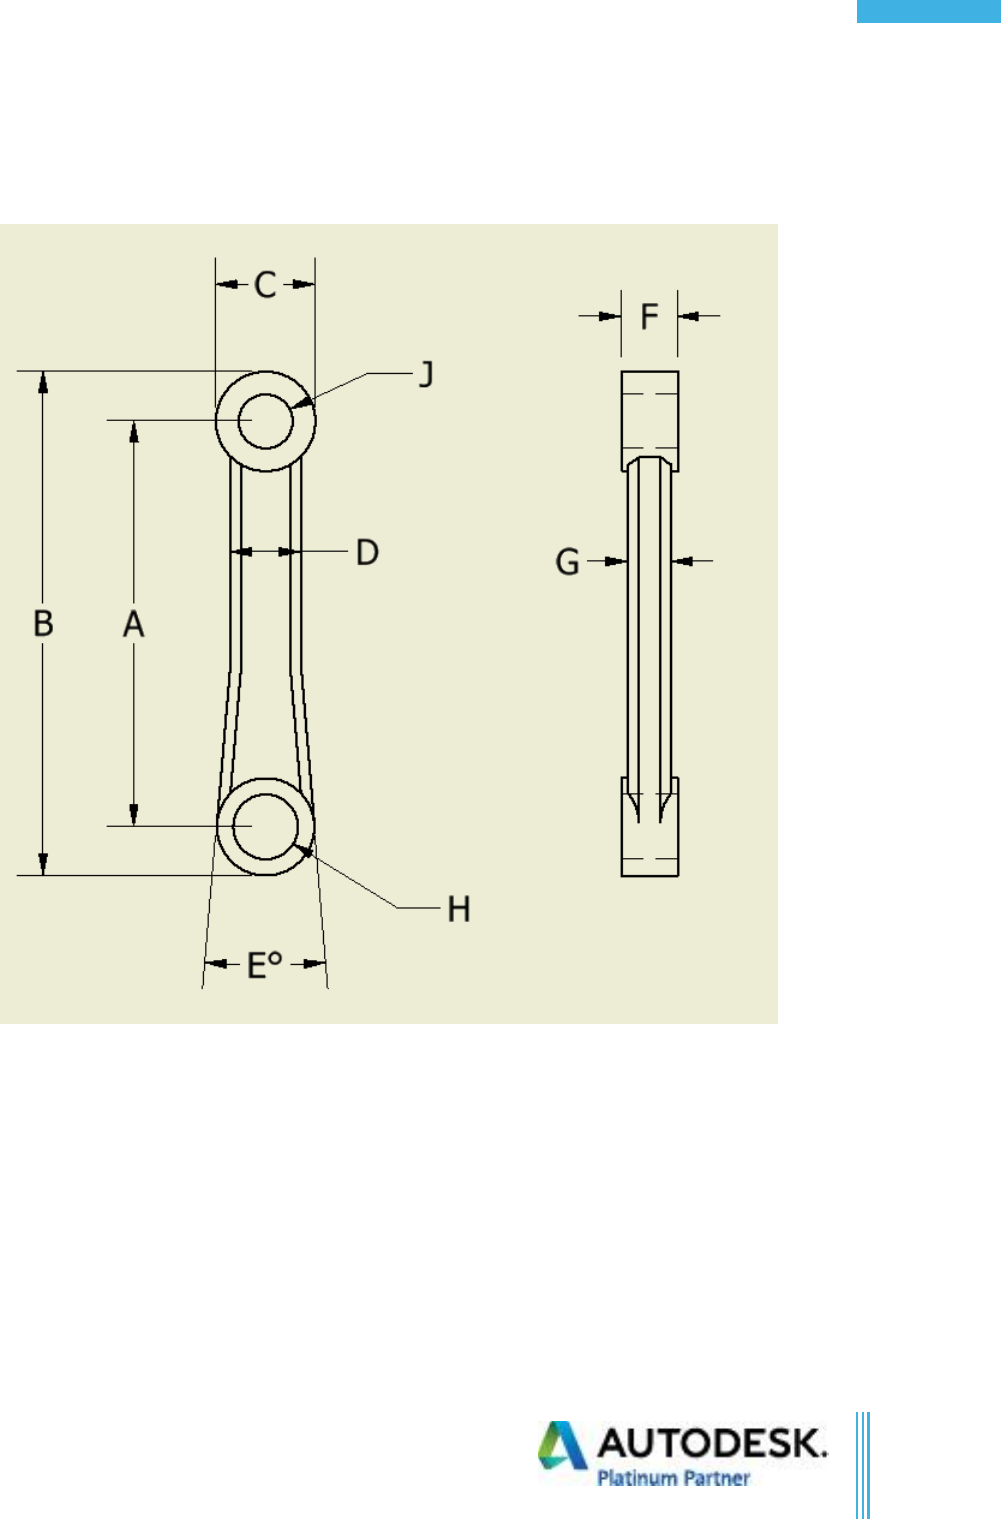
1. Open measurement.ipt
2. Find the values shown below:
3. A) 0.935 in
4. B) 1.163 in
5. C) 0.230 in
6. D) 0.163 in
7. E) 9.65 degrees
8. F) 0.130 in
9. G) 0.100 in
10. H) 0.150 in
11. J) 0.125 in
Confidential
©Copyright 2017 Advanced Solutions, Inc.
All Rights Reserved
1
Table of Contents
Chapter 11d Exercise
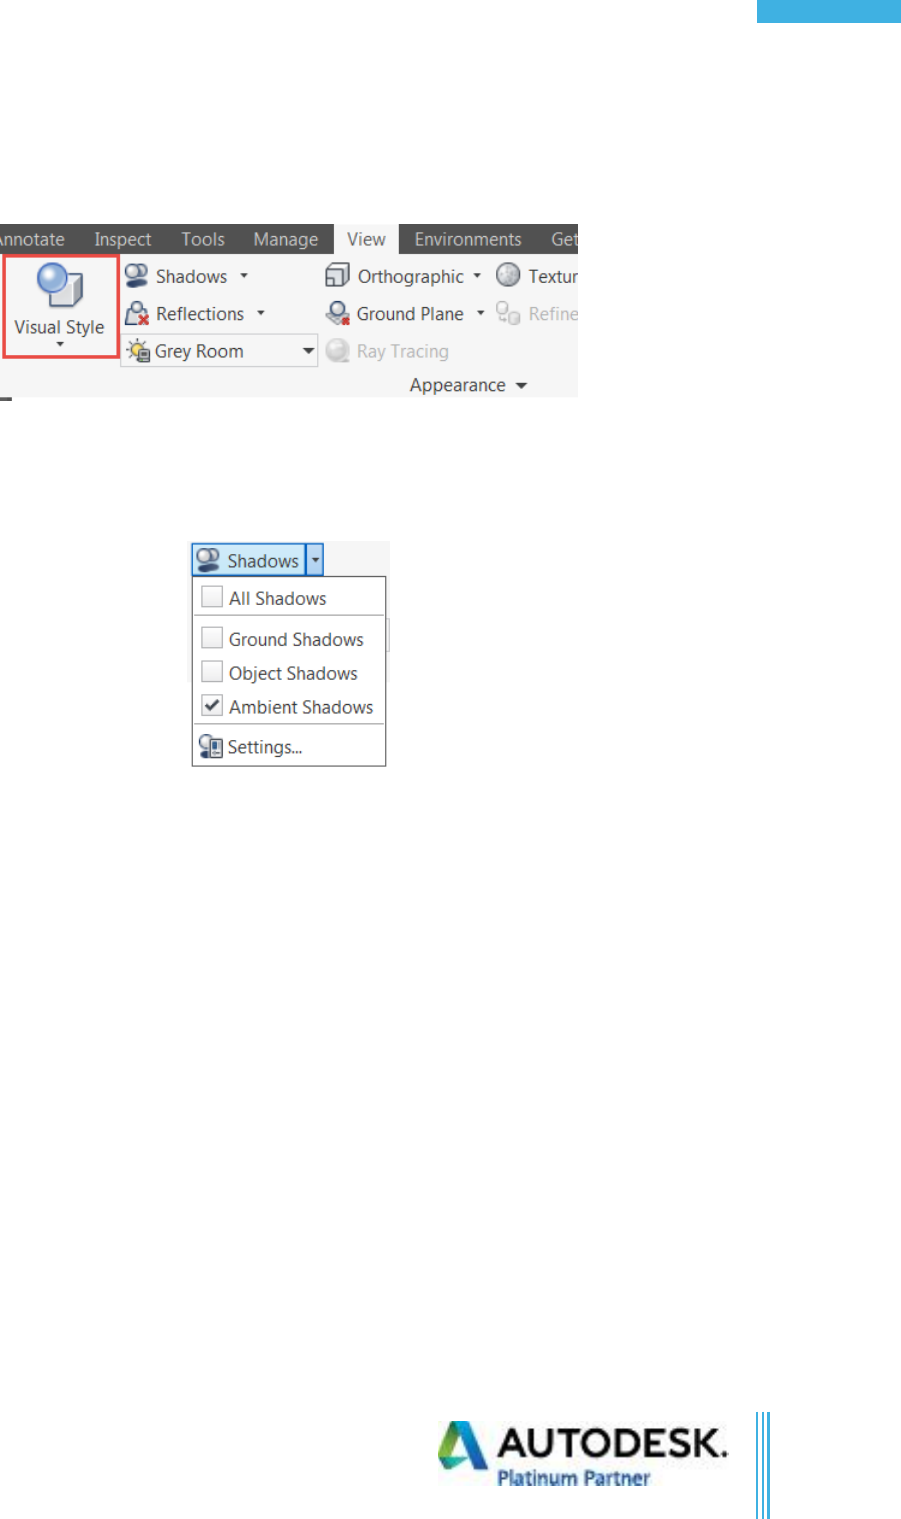
1. Open Visual Style.ipt.
2. Click on the View Tab > Appearance Panel > Visual Style Drop-down.
3. Switch through the different view styles to see the difference.
4. Switch back to Shaded with Edges.
5. Click on the Shadows drop-down > Uncheck Ambient Shadows.
6. Notice the center hole of the model.
7. Turn Ambient Shadows back on.
8. Click on the Reflections drop down and check Reflections.
9. Notice the reflection under the model.
10. Turn off reflections.
11. Use the drop-down to cycle between Orthographic and Perspective views.
Confidential
©Copyright 2017 Advanced Solutions, Inc.
All Rights Reserved
2
Inv. Part Modeling Fundamentals
Chapter 13 Exercise
1. Open Delete Feature.ipt.
2. Investigate the model to see how it was constructed.
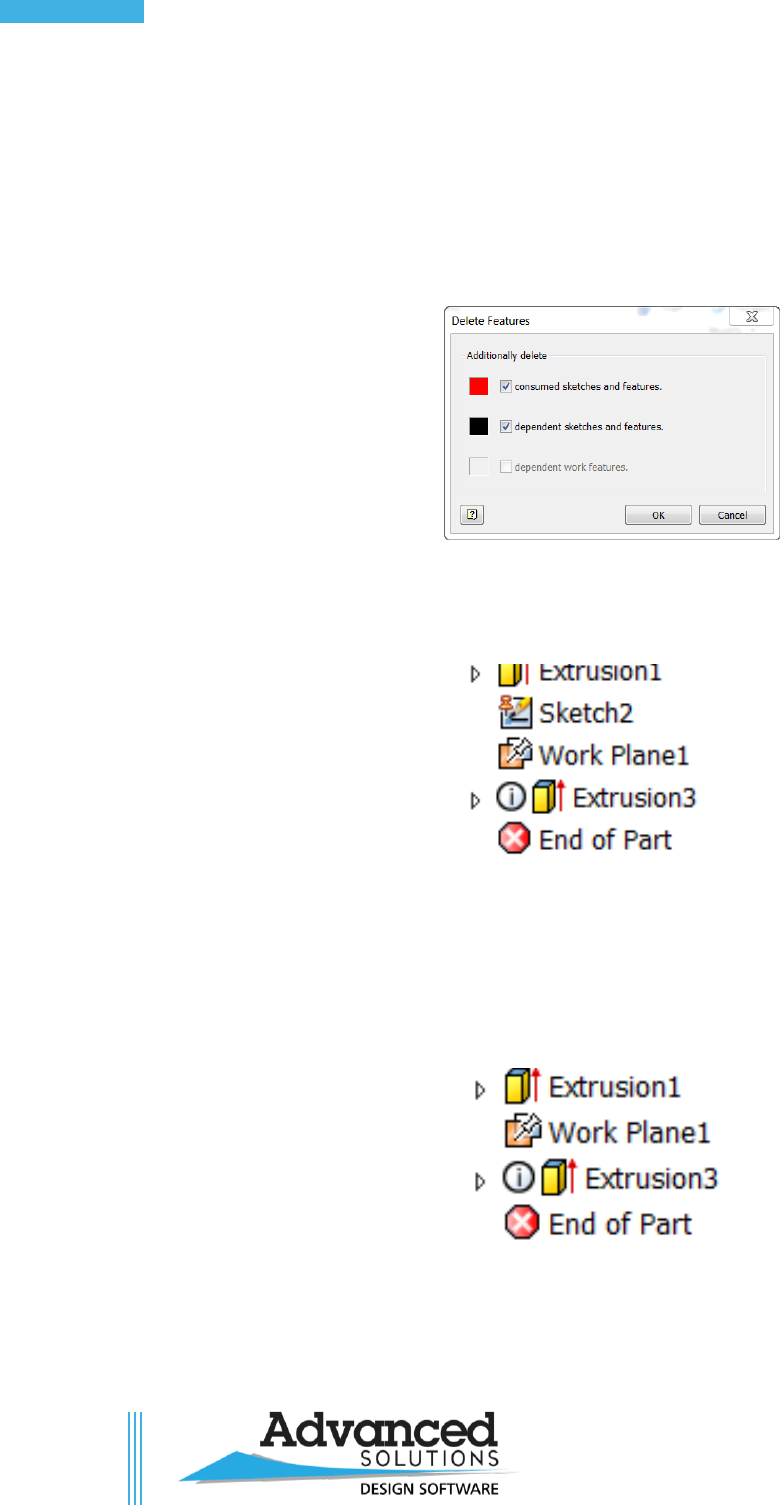
3. Select Extrusion2 and click Delete.
4. The Delete Features dialog box appears.
5. Uncheck both boxes to see what you get.
6. Notice that Sketch2 was left behind from Extrusion2, a grounded Work Plane was created for the
sketch plane that was the top of Extrusion2.
7. Click Undo.
8. Delete Extrusion2 again.
9. Uncheck only Dependent Sketches and Features.
10. Notice that Sketch2 is now gone because you told it to remove consumed sketches.
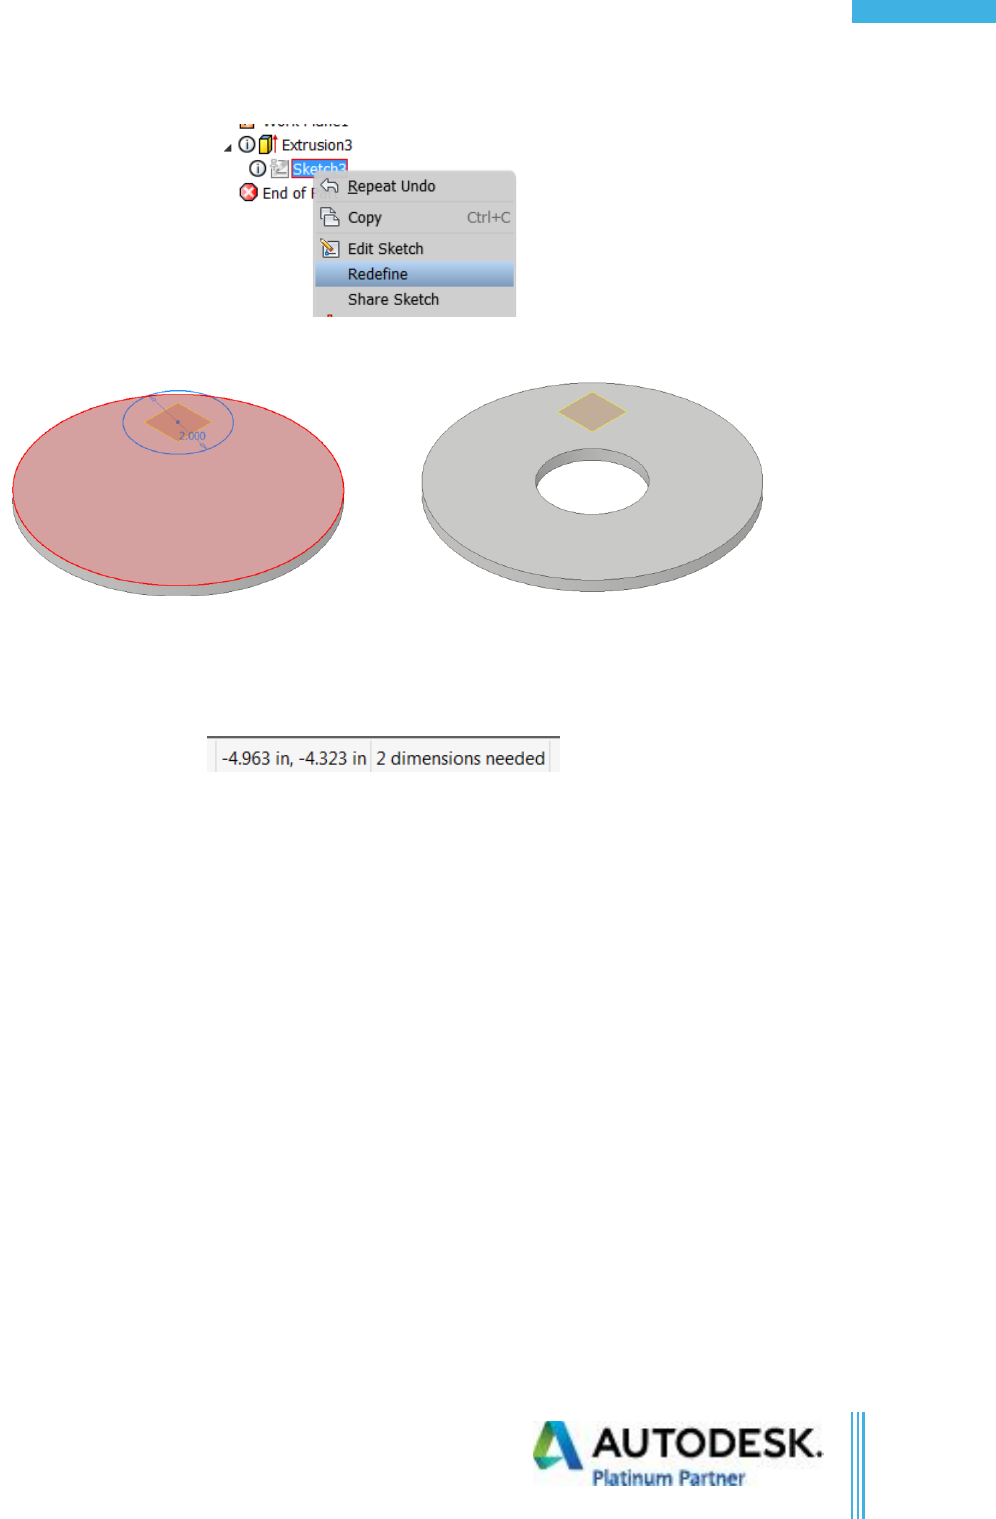
11. Expand Extrusion3
12. Right-click on Sketch3
Confidential
©Copyright 2017 Advanced Solutions, Inc.
All Rights Reserved
3
Table of Contents
13. Click Redefine.
14. Click the top face of Extrusion1.
15. Delete the grounded work plane.
16. Edit Sketch3
17. Notice that 2 dimensions are required to have a fully constrained sketch.
18. Grab the center point of the circle and drag it. It is not constrained to anything.
19. Click on Project Geometry in the ribbon.
20. Project the origin center point into the sketch.
21. Use the coincident constraint on the center point of the circle and the projected point.
22. Finish the sketch.
23. Notice there are no errors.
24. Click on the View Tab > Appearance Panel > Visual Style Drop-down.
Confidential