Guillemot 011018-91XX Pro Victory RF Basestation User Manual Manual
Guillemot Corp S.A. Pro Victory RF Basestation Manual
Manual
QUICK INSTALL
THRUSTMASTER®
12. Connecteur pour
le pédalier
13. Câble du pédalier
14. Pédalier progressif
15. Système de fixation
16. Vis de serrage
17. Partie centrale du
support pour les
genoux
18. Parties latérales
amovibles du support
pour les genoux
FCARACTÉRISTIQUES TECHNIQUES
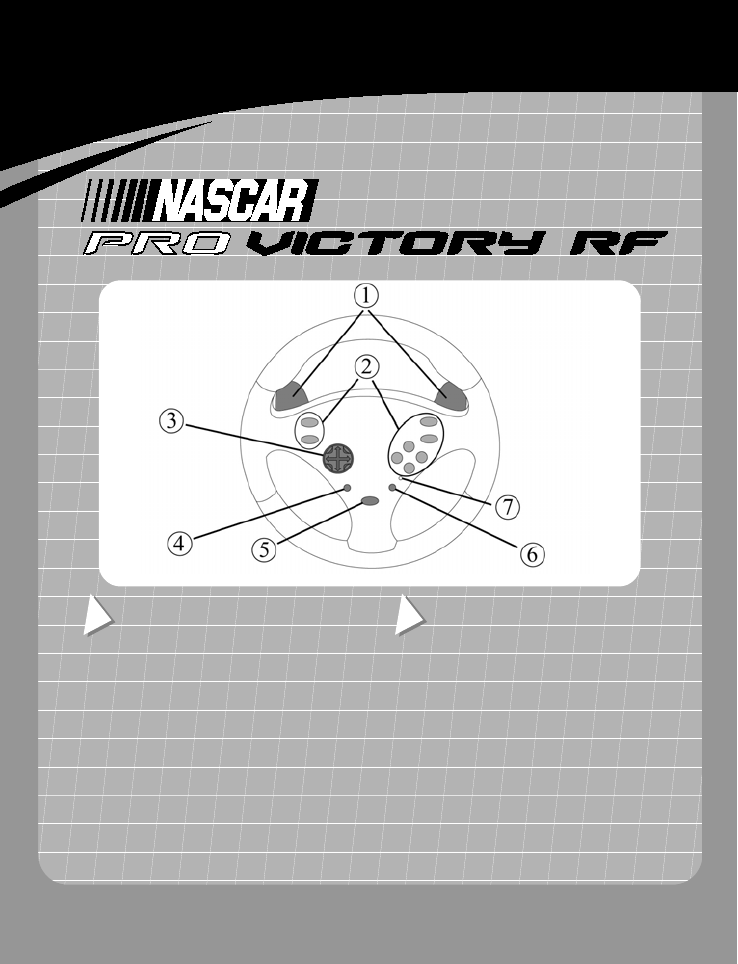
1. Leviers progressifs
2. Boutons d’action
3. Croix multidirectionnelle
4. Bouton Select
5. Bouton Start
6. Bouton Mode
7. Voyant lumineux
8. Bouton d’alimentation /
de sélection du canal
9. Compartiment piles
10. Émetteur-récepteur
radio
11. Cordon de liaison
US TECHNICAL FEATURES
1. Progressive levers
2. Action buttons
3. 8-Way D-Pad
4. Select button
5. Start button
6. Mode button
7. LED
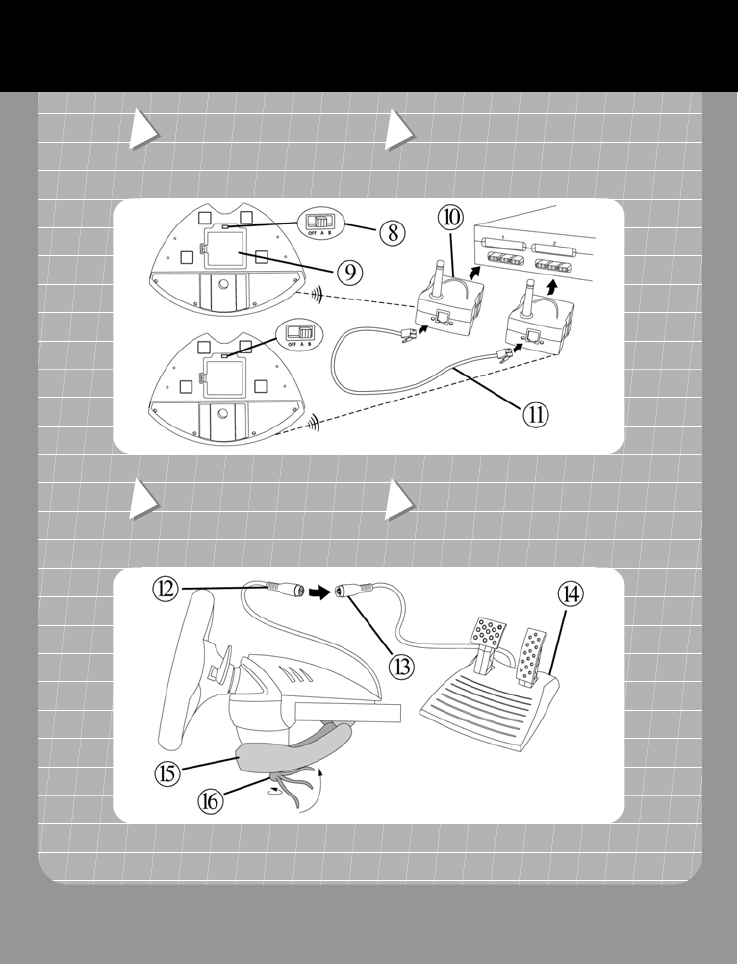
8. Power/Channel selector
switch
9. Battery compartment
10. RF base station
11. 2-headed phone cord
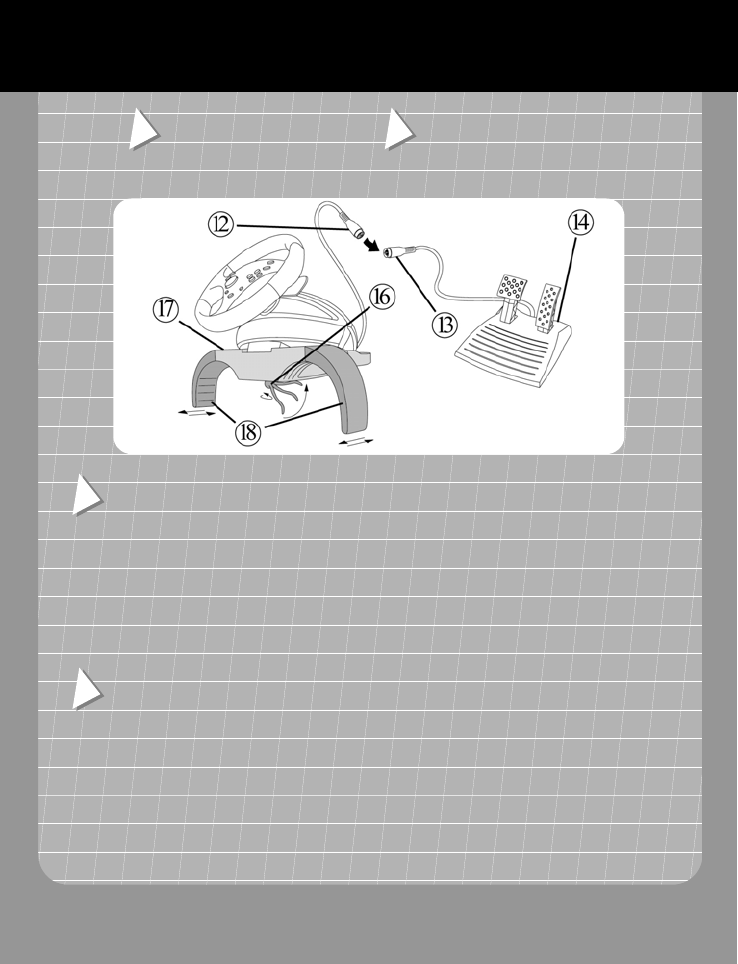
12. Pedal connector
cable
13. Pedal receptor cable
14. Progressive pedals
set
15. Clamp
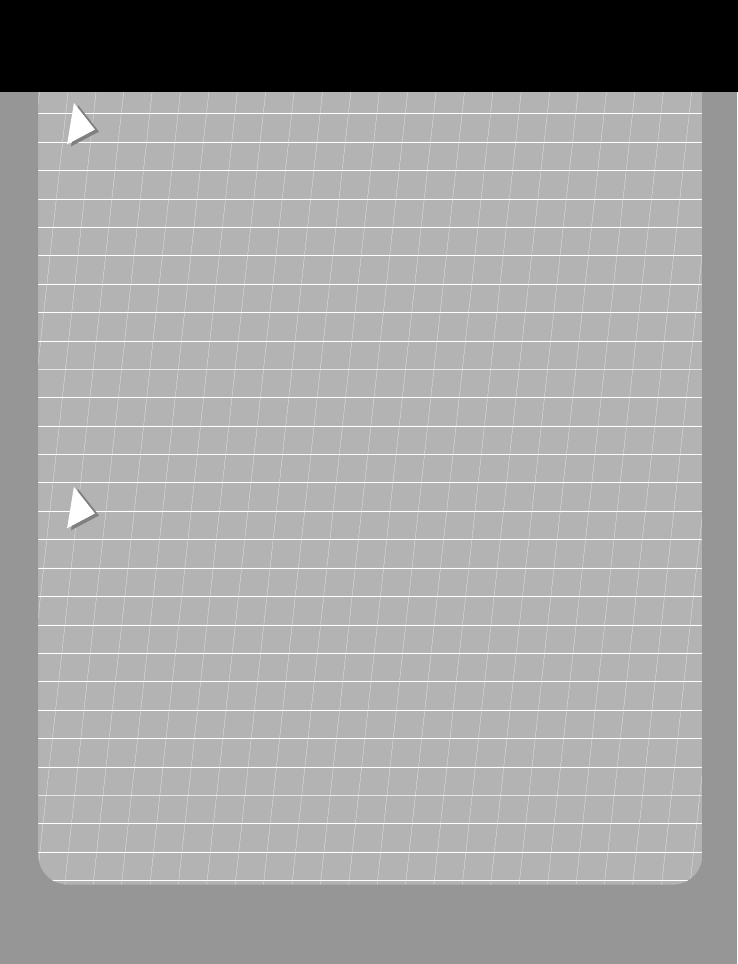
16. Clamp screw
17. Laptop piece
18. Laptop removable
wings
OPERATION IS SUBJECT TO THE FOLLOWING TWO CONDITIONS: (1) THIS DEVICE MAY NOT CAUSE
INTERFERENCE, AND (2) THIS DEVICE MUST ACCEPT ANY INTERFERENCE, INCLUDING INTERFERENCE THAT
MAY CAUSE UNDESIRED OPERATION OF THE DEVICE.
®
TM
US GENERAL SETUP FCONFIGURATION GÉNÉRALE
US TABLE CLAMP SETUP FFIXATION À UNE TABLE
L’UTILISATION DE CE DISPOSITIF EST AUTORISÉE SEULEMENT AUX CONDITIONS SUIVANTES : (1) IL NE DOIT
PAS PRODUIRE DE BROUILLAGE, ET (2) L’UTILISATEUR DU DISPOSITIF DOIT ÊTRE PRÊT À ACCEPTER TOUT
BROUILLAGE RADIOÉLECTRIQUE REÇU, MÊME SI CE BROUILLAGE EST SUSCEPTIBLE DE COMPROMETTRE LE
FONCTIONNEMENT DU DISPOSITIF.
US INFORMATION TO USER
This device complies with Part 15 of the FCC Rules. Operation is subject to the following two conditions: (1) This device may not cause harmful interference, and
(2) This device must accept any interference received, including interference that may cause undesired operation.
This equipment has been tested and found to comply with the limits for Class B Digital Device, pursuant to Part 15 of the FCC Rules. These limits are designed to
provide reasonable protection against harmful interference in a residential installation. This equipment generates and can radiate radio frequency energy and, if
not installed and used in accordance with the instructions, may cause harmful interference to radio communications. However, there is no guarantee that
interference will not occur in a particular installation. If this equipment does cause harmful interference to radio or television reception, which can be determined
by turning the equipment off and on, the user is encouraged to try to correct the interference by one or more of the following measures.
• Reorient or relocate the receiving antenna
• Increase the separation between the equipment and receiver
• Connect the equipment into an outlet on a circuit different from that to which the receiver is connected
• Consult the dealer or an experienced radio/TV technician for help.
Any changes or modifications not expressly approved by the party responsible for compliance could void the user’s authority to operate the equipment.
FDÉCLARATION DE CONFORMITÉ
Ce dispositif est conforme à la section 15 du règlement de la Commission Fédérale des communications américaine. L’utilisation de ce dispositif est autorisée
seulement aux conditions suivantes : (1) il ne doit pas produire de brouillage, et (2) l’utilisateur du dispositif doit être prêt à accepter tout brouillage radioélectrique
reçu, même si ce brouillage est susceptible de compromettre le fonctionnement du dispositif.
Suite aux tests effectués, ce dispositif est déclaré conforme aux standards des appareils numériques de la Classe « B », tels qu’ils sont définis dans la section 15
du règlement de la Commission Fédérale des communications américaine. Ces standards sont établis afin d’éviter toute interférence nuisible dans un
environnement résidentiel. Ce dispositif génère des ondes radio ; s’il n’est pas installé et utilisé conformément aux instructions, il peut perturber les
communications radio. Cependant, même dans le cadre d’une utilisation conforme, des interférences peuvent se produire dans certains cas particuliers. Si ce
dispositif venait à perturber les réceptions radio ou télévisuelles (fait qui peut être vérifié en éteignant puis en rallumant le dispositif), l’utilisateur est invité à suivre
une ou plusieurs des mesures suivantes pour éliminer les interférences :
• Réorienter ou déplacer l’antenne de réception ;
• Éloigner le dispositif du récepteur ;
• Connecter le dispositif à une prise située sur un réseau indépendant de celui auquel est connecté le récepteur ;
• Consulter le revendeur ou un dépanneur radio/TV.
Toute modification non expressément approuvée par la partie garantissant la compatibilité du dispositif peut rendre caduc le droit d’utilisation de ce dispositif.
US LAPTOP SETUP FINSTALLATION SUR LES GENOUX
US GENERAL SETUP
1. Insert 4 “AA” batteries into the battery compartment (9) located on the underside of the wheel base.
2. Plug the RF base station (10) into a PlayStation® port.
3. Set up the wheel in either the table clamp or laptop configuration (instructions are provided on the following
page).
4. Switch on the power by setting the Power/Channel selector switch (8) to the A position.
TO PLAY WITH 2 NASCAR® PRO VICTORY RF WHEELS SIMULTANEOUSLY
1. Follow steps 1 to 3 of General Setup, above, for each of the wheels.
2. Set the Power/Channel selector switch (8) to A on one wheel, and B on the other.
3. Plug the 2-headed phone cord (11) into the jacks located on the front of each RF base station.
Important:
• The radio frequency’s maximum range is 30 feet (9 meters).
• Make sure to set the Power/Channel selector switch (8) to the OFF position when the wheel is not in use. This
will help to conserve power and extend battery life.
• Up to 2 NASCAR® Pro Victory RF wheels may be used simultaneously. Please note that each wheel must be
equipped with its own RF base station.
• This device is only guaranteed to be compatible with other NASCAR® Pro Victory RF wheels.
FCONFIGURATION GÉNÉRALE
1. Insérez 4 piles AA dans le compartiment piles (9) situé sous la base du volant.
2. Branchez l’émetteur-récepteur radio (10) sur un port manette PlayStation®.
3. Installez le volant selon le mode désiré (fixation à une table ou installation sur les genoux, voir page suivante).
4. Mettez le volant sous tension en plaçant le bouton d’alimentation / de sélection du canal (8) sur la position A.
POUR JOUER AVEC 2 VOLANTS NASCAR® PRO VICTORY RF EN MÊME TEMPS
1. Répétez les étapes 1 à 3 de la section Configuration générale pour le deuxième volant.
2. Placez le bouton d’alimentation / de sélection du canal (8) sur la position A pour le premier volant, et sur la
position B pour le deuxième.
3. Branchez le cordon de liaison (11) sur les connecteurs situés en façade de chaque émetteur-récepteur radio.
Important :
• La portée maximale du récepteur radio est de 9 mètres.
• Placez toujours le bouton d’alimentation / de sélection du canal (8) sur la position OFF quand vous n’utilisez pas
le volant afin de ne pas décharger les piles.
• Jusqu’à 2 volants NASCAR® Pro Victory RF peuvent être utilisés simultanément. Chaque volant doit être utilisé
avec son propre émetteur-récepteur radio.
• La compatibilité de ce périphérique n’est garantie qu’avec d’autres volants NASCAR® Pro Victory RF.
FINSTALLATION DU VOLANT
Fixation à une table
1. Placez le volant sur une table ou autre surface plane.
2. Placez la vis de serrage (16) dans le système de fixation (15), puis vissez l’ensemble dans l’emplacement prévu,
sous le volant, jusqu’à ce que ce dernier soit parfaitement stable. Ne serrez pas trop fort la vis car vous risquez
d’endommager le système de fixation ou la table.
3. Reliez le câble du pédalier (12) au connecteur du volant (13).
4. Vous êtes maintenant prêt à jouer.
Installation sur les genoux
1. Retournez le volant.
2. Faites coulisser les parties latérales amovibles (18) dans la partie centrale (17) du support pour les genoux.
3. Placez la vis de serrage (16) dans la partie centrale du support pour les genoux (17), puis vissez l’ensemble dans
l’emplacement prévu, sous le volant, jusqu’à ce que le support soit correctement positionné. Ne serrez pas trop
fort la vis car vous risquez d’endommager le support.
4. Reliez le câble du pédalier (12) au connecteur du volant (13).
5. Vous êtes maintenant prêt à jouer.
Pour un encombrement réduit, retirez les parties latérales amovibles (18) de la partie centrale (17) du support pour
les genoux et rangez le tout dans la boîte du volant.
© Guillemot Corporation 2001. Thrustmaster® et Pro Victory™ sont des marques et/ou des marques déposées de Guillemot Corporation S.A. NASCAR® est une marque déposée
de National Association for Stock Car Auto Racing, Inc. PlayStation® et PS one™ sont des marques et/ou des marques déposées de Sony Computer Entertainment, Inc. Negcon™
est une marque de Namco, Ltd. Tous droits réservés. Toutes les autres marques sont des marques et/ou des marques déposées de leurs propriétaires respectifs. Illustrations non
contractuelles. Le contenu, la conception et les spécifications sont susceptibles de changer sans préavis et de varier selon les pays.
www.nascar.com
US WHEEL SETUP
Table clamp setup
1. Place the wheel on a table or flat surface.
2. Place the clamp screw (16) into the clamp (15) and then screw the clamping unit into the hole on the underside of
the wheel until firmly fixed into place. Be careful not to over-tighten the clamp to avoid damaging either the clamp
or the table.
3. Connect the pedal connector cable (12) to the pedal receptor cable (13).
4. You are now ready to play.
Laptop setup
1. Turn the wheel upside down.
2. Slowly slide the removable wings (18) onto both sides of the laptop piece (17) until firmly fixed into place.
3. Place the clamp screw (16) into the hole in the laptop piece (17) and then screw the unit into the hole on the
underside of the wheel until firmly fixed into place. Be careful not to over-tighten the clamp to avoid damaging the
laptop piece.
4. Connect the pedal connector cable (12) to the pedal receptor cable (13).
5. You are now ready to play.
For easy storage, remove the wings (18) from the laptop piece (17) and place inside the box.
© Guillemot Corporation 2001. Thrustmaster® and Pro Victory™ are trademarks and/or registered trademarks of Guillemot Corporation S.A. NASCAR® is a registered trademark of
the National Association for Stock Car Auto Racing, Inc. PlayStation® and PS one™ are trademarks and/or registered trademarks of Sony Computer Entertainment, Inc. Negcon™
is a trademark of Namco, Ltd. All rights reserved. All other nationally and internationally recognized trademarks and brand names are hereby acknowledged. Illustrations not binding.
Contents, designs and specifications are subject to change without notice and may vary from one country to another.
www.nascar.com
For use with PlayStation®, PlayStation® 2 & PS one™
FFONCTIONS AVANCÉES
Changer de mode de jeu
Pressez le bouton Mode pour commuter entre les 3 modes de jeu proposés : Digital (le voyant lumineux est éteint) ;
Analog (le voyant lumineux devient rouge) ; Negcon™ (le voyant lumineux clignote en rouge).
Ajuster la sensibilité du volant
Cette option permet à l’utilisateur d’ajuster le rapport angle de braquage / influence dans le jeu. Le réglage par
défaut est une plage de réponse étendue qui correspond au réglage minimal de sensibilité (le volant doit être
tourné à fond dans une direction pour effectivement braquer au maximum dans le jeu).
• Pour augmenter la sensibilité :
Maintenez le bouton Select enfoncé et appuyez sur la direction droite de la croix multidirectionnelle. 5 paliers de
sensibilité sont disponibles ; le moteur vibre chaque fois qu’un nouveau palier est sélectionné.
• Pour réduire la sensibilité :
Si la sensibilité est supérieure au réglage par défaut, maintenez le bouton Select enfoncé et appuyez sur la
direction gauche de la croix multidirectionnelle pour réduire la sensibilité du volant. Ici encore, le moteur vibre
chaque fois qu’un des 5 paliers est atteint.
Traction Control System (TCS)
Dans certains jeux, si vous contre-braquez trop brusquement suite à un dérapage, vous risquez de vous retrouver
hors de la piste. Ce système, programmé dans le volant, contrôle et ajuste l’intensité du contre-braquage pour vous
permettre de reprendre le contrôle du véhicule plus facilement.
Émuler l’axe Y2 sur le pédalier
Dans certains jeux, le mini-stick droit (l’axe Y2) sert à contrôler l’accélération et le freinage. Dans ce cas, pressez
simultanément les boutons Select et ∆ pour émuler ces fonctions sur le pédalier.
US ADVANCED FEATURES
Changing modes
Press the Mode button to switch between 3 playing modes: Digital (LED is off); Analog (LED is red); Negcon™
(LED is flickering red).
Adjusting steering sensitivity
This option allows the user to adjust how far the wheel must be turned to the right or left in the game. The default
setting is full range responsiveness, the lowest sensitivity setting (the wheel has to be turned all the way in either
direction to achieve full responsiveness).
• To increase sensitivity:
Hold down the Select button and press the right direction on the D-Pad. There are 5 different settings to choose
from: the motor will vibrate each time the setting is changed.
• To decrease sensitivity:
If sensitivity has been increased from the default (lowest) setting, hold down the Select button and press the left
direction on the D-Pad to decrease the wheel’s sensitivity: as mentioned above, there are a total of 5 different
settings. The motor will vibrate each time the setting is changed.
Traction Control System (TCS)
Checks the speed of the reverse turn after a skid and provides a compensating adjustment in the game. This works
especially well in games where it is generally difficult to keep from thrashing about from side to side: it has the effect
of bringing you back into control more easily. This feature is programmed into the wheel.
Swap Y2 axis to the pedals
In some games, the right mini-stick (Y2) is used to control the gas (up) and brake (down) functions. In this case,
pressing the Select and ∆ buttons simultaneously will swap these two functions to the pedals.
Pour PlayStation®, PlayStation® 2 & PS one™