Guizhou Jinghao Technologies NOCTIS-V1 ACCUFIRE multi-function sighting device User Manual
Guizhou Jinghao Technologies co.,Ltd ACCUFIRE multi-function sighting device Users Manual
User Manual
1
©2018 Accufire
ACCUFIRE
MULTIFUNCTIONAL
SIGHT
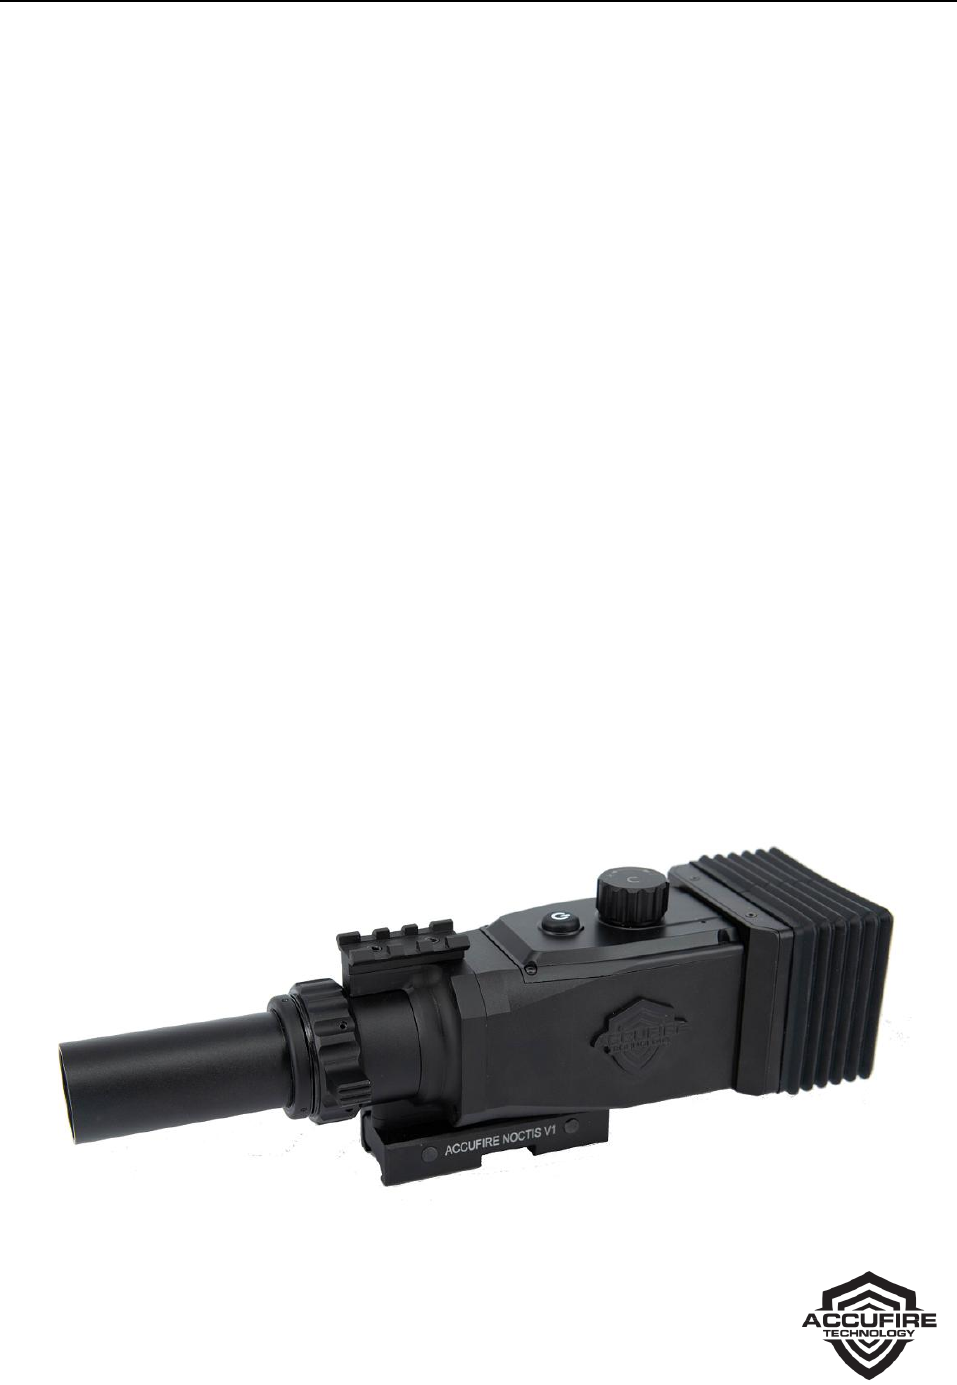
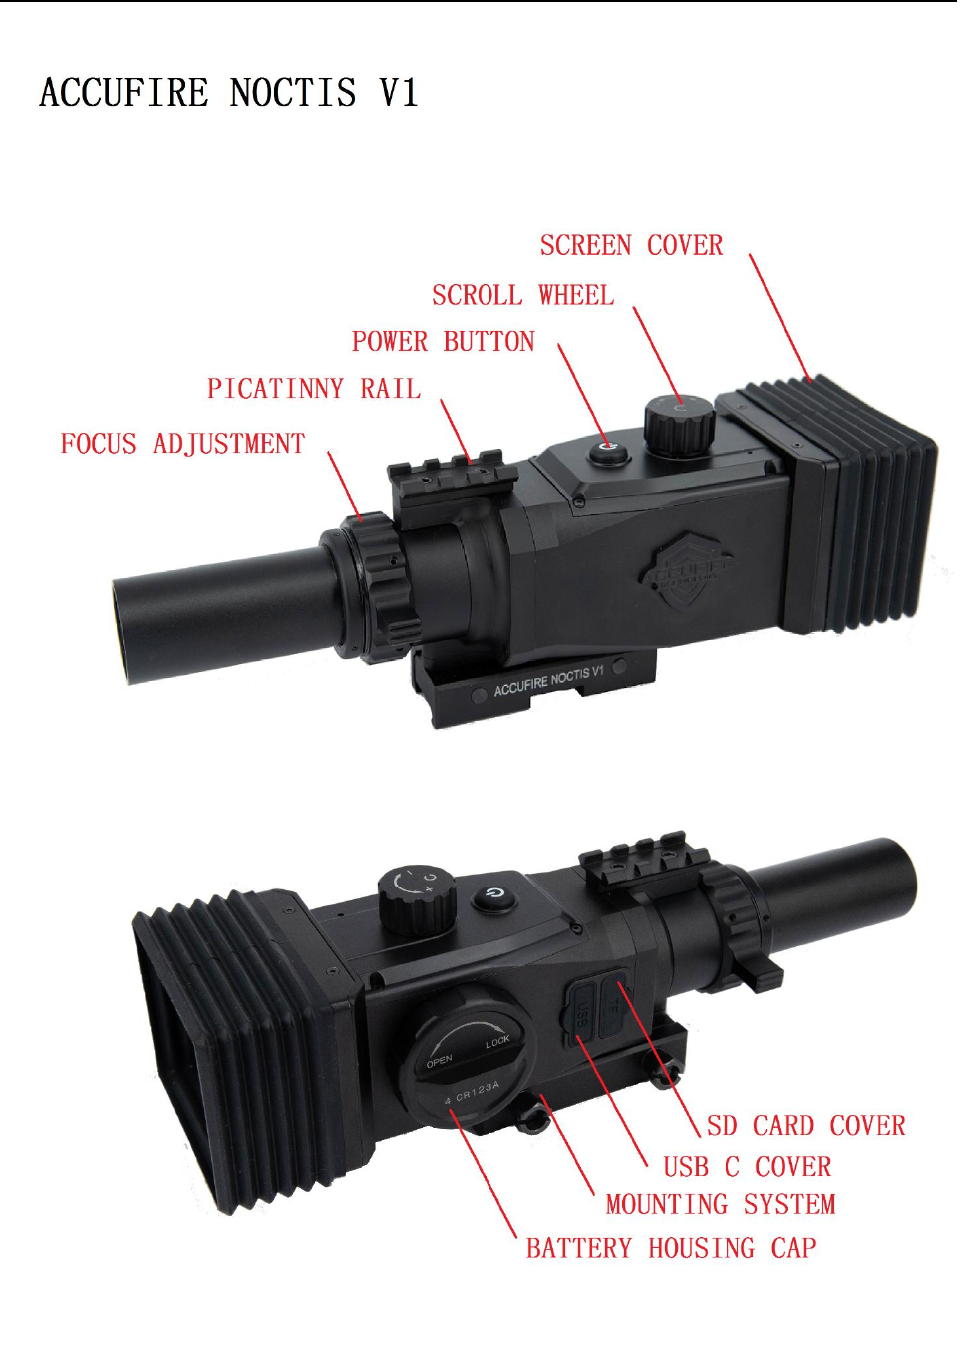
NOCTIS V1
User Manual
2
©2018 Accufire

3
©2018 Accufire
Contents
Product Features ..................................................... 4
Operating Instructions ........................................... 4
Unpacking Inspection ..................................................................................................................... 4
Product Power Supply .................................................................................................................... 4
Micro SD Socket ............................................................................................................................. 5
Startup & Shutdown....................................................................................................................... 5
Power Button and Knob ................................................................................................................. 5
Focus Adjustment .......................................................................................................................... 5
Installation ..................................................................................................................................... 6
Interfaces.................................................................. 6
Home Screen .................................................................................................................................. 6
Menu Item...................................................................................................................................... 7
Functions .................................................................. 8
Primary Magnification.................................................................................................................... 8
Distance .......................................................................................................................................... 8
Sighting Area Magnification ........................................................................................................... 9
Zeroing ........................................................................................................................................... 9
Hunting/Observing Mode ............................................................................................................ 10
Reticle Style .................................................................................................................................. 10
Sleep ............................................................................................................................................. 11
Factory Reset ................................................................................................................................ 11
Software Upgrade ........................................................................................................................ 11
Day and Night Mode Switching .................................................................................................... 12
Bullet Type Input .......................................................................................................................... 12
System settings ............................................................................................................................ 13
WiFi Setting ......................................................................................................................... 13
Sighting Window Opening ................................................................................................... 13
Screen Brightness Setting .................................................................................................... 13
Time Setting ......................................................................................................................... 14
Warning ..................................................................14
4
©2018 Accufire
Product Features
1080P HD Video
High-Precision Trajectory Calculation
Quick Calibration
1-16 Times Smooth Zooming
Three-Axis Gyroscope
Three-Axis Accelerometer
Day and Night Mode Switching
WiFi Video Image Transmission
Retina Screen Display
Product Specification
Microphone
Yes
Micro SD card
2-32Gb
Ports
USB type C、Micro SD
battery type
4 CR123A
Dimensions
196*85*87mm
Weight
31 oz/1.6lb
IP rating
IPX4
Battery Life
5 hours
Mounting
Picatinny
Warranty
2 years
Operating Instructions
Unpacking Inspection
Please follow the steps below before using the sight:
1. Take the sight out from the packing box.
2. Check whether there are accessories: sight, light shield, hood, filter cartridge, TYPE-C data
cable and micro USB data cable.
3. Before use, please ensure that the surface of the lens is smooth.
Product Power Supply
The sight can be powered by a battery or a mobile power source, and when both power sources are
present, powered preferably by the mobile power supply.
Battery Power Supply:
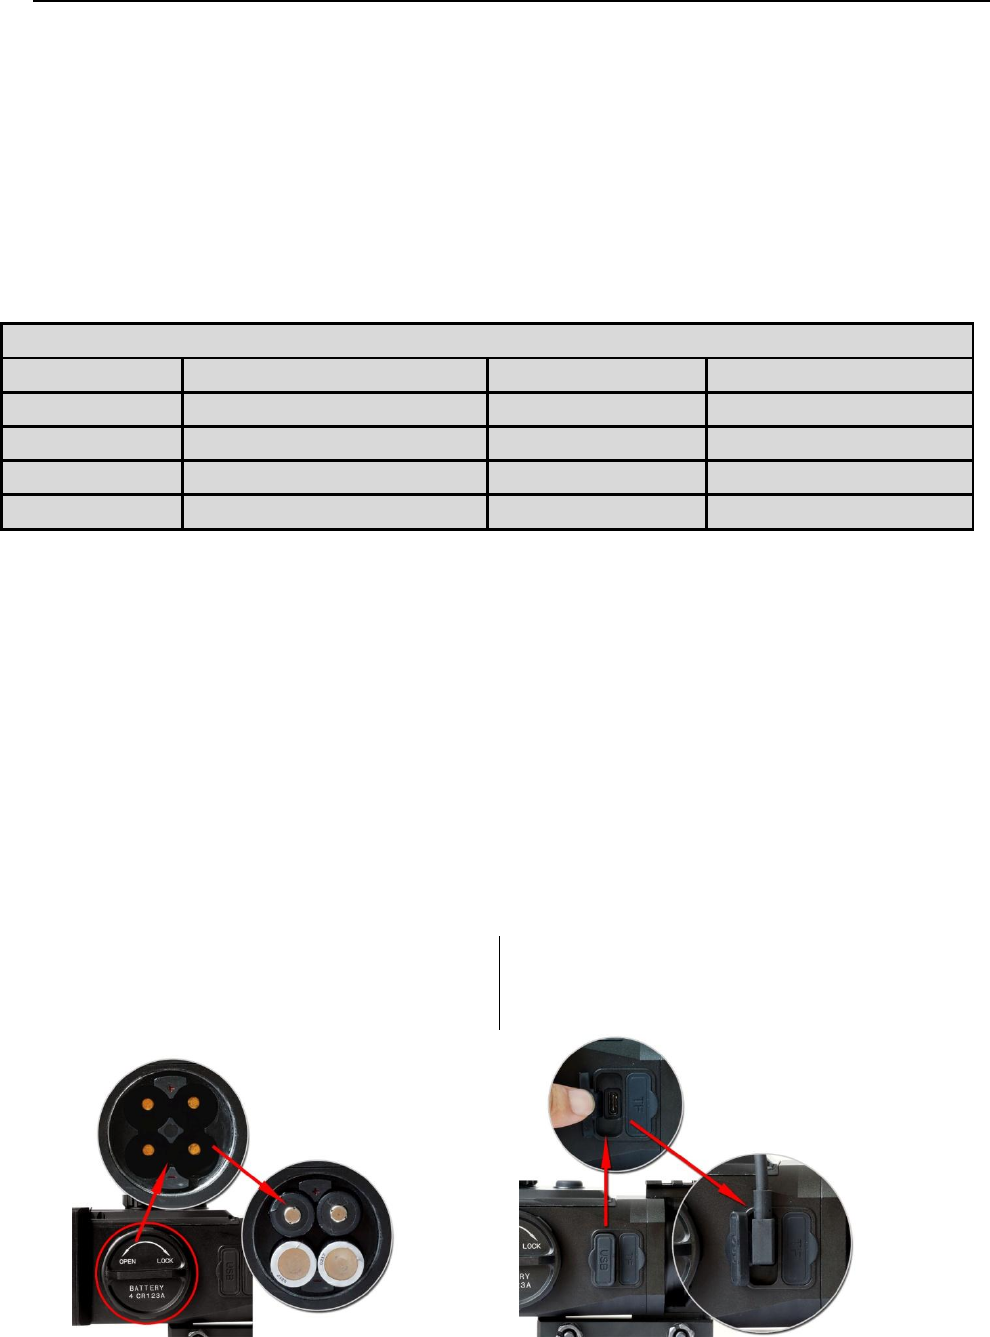
Install 4 CR123A batteries and tighten the
battery cover.
Mobile Power Source Power Supply:
Connect the sight with the mobile power
using the TYPE-C data cable
5
©2018 Accufire
Micro SD Socket
Please be sure to insert the SD card before using the sight
to ensure that the sight functions properly.
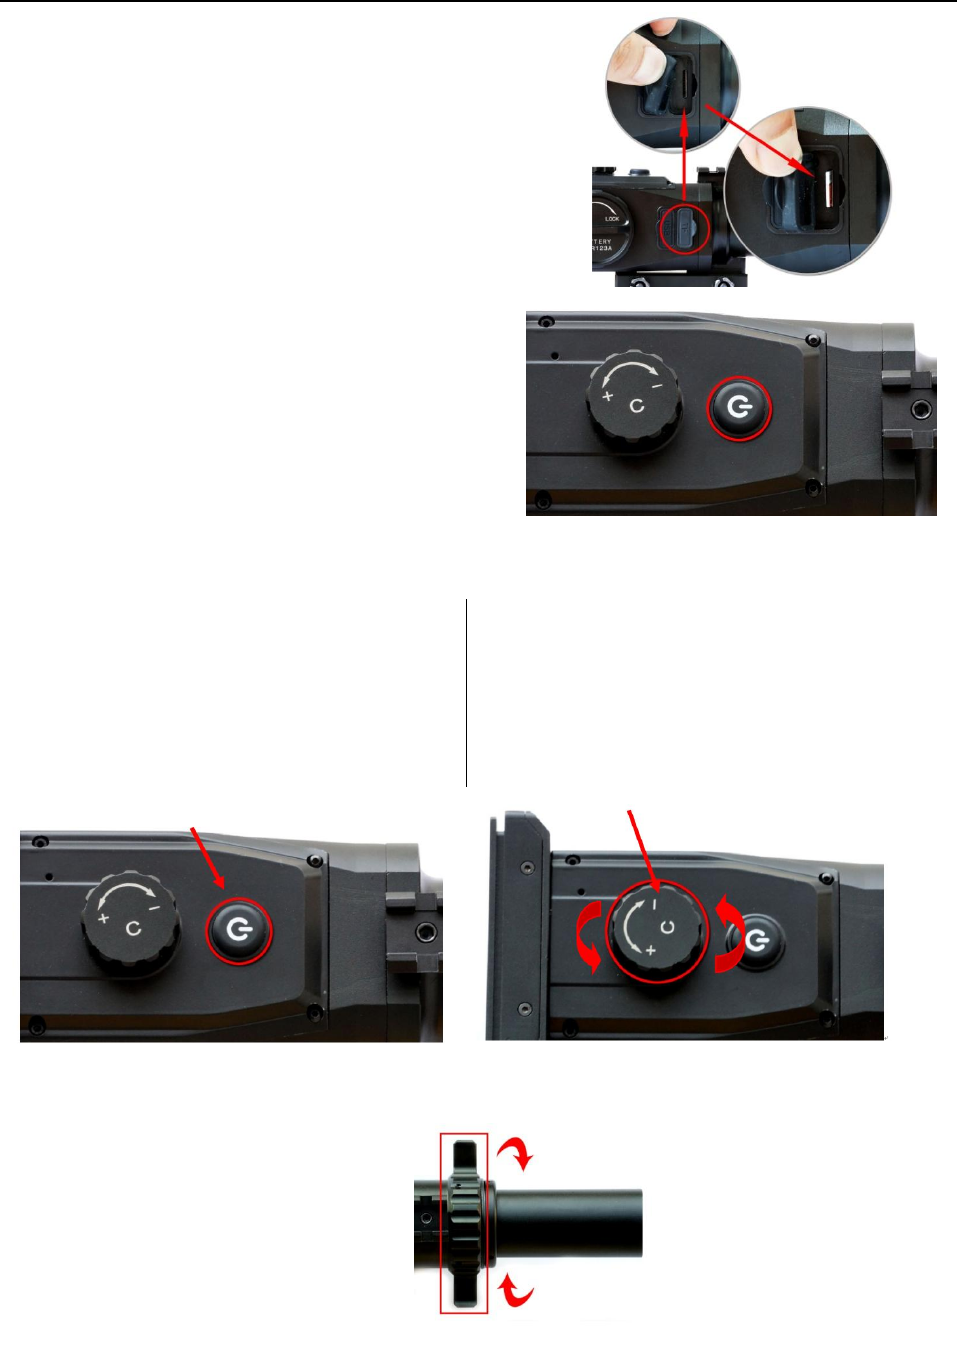
Uncover the rubber plug and insert the micro SD card as
shown.
Startup & Shutdown
Start up the device: press and hold the power button
until the ACCUFIRE icon appears on the screen.
Shut down the device: press and hold the power
button until the screen is turned off.
Power Button and Knob
Three operating modes of power button:
Short-press 1 time: take photo
Short-press 2 times: start video
Long-press: startup & shutdown
Three operating modes of knob:
Rotate: switch option
Short-press: enter option
Long-press: enter or quit main menu
Focus Adjustment
Rotate the focus knob to ensure that a
clear picture may be presented at any
distance.
6
©2018 Accufire
Installation
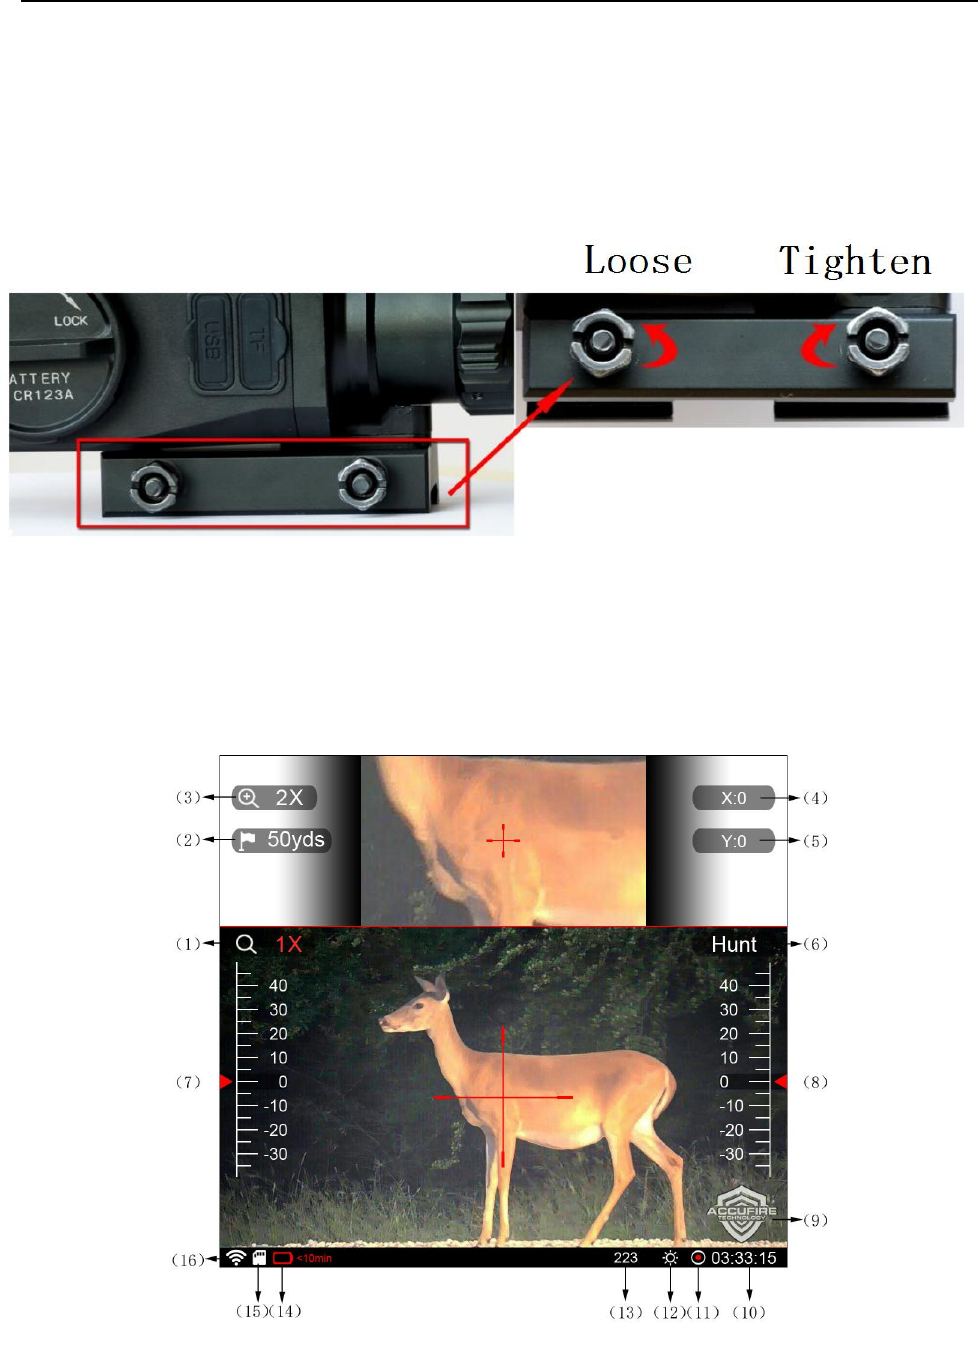
1. Unscrew two nuts on the mount.
2. Place the sight on the appropriate position of the Picatinny rail.
3. Tighten the retaining nut.
Interfaces
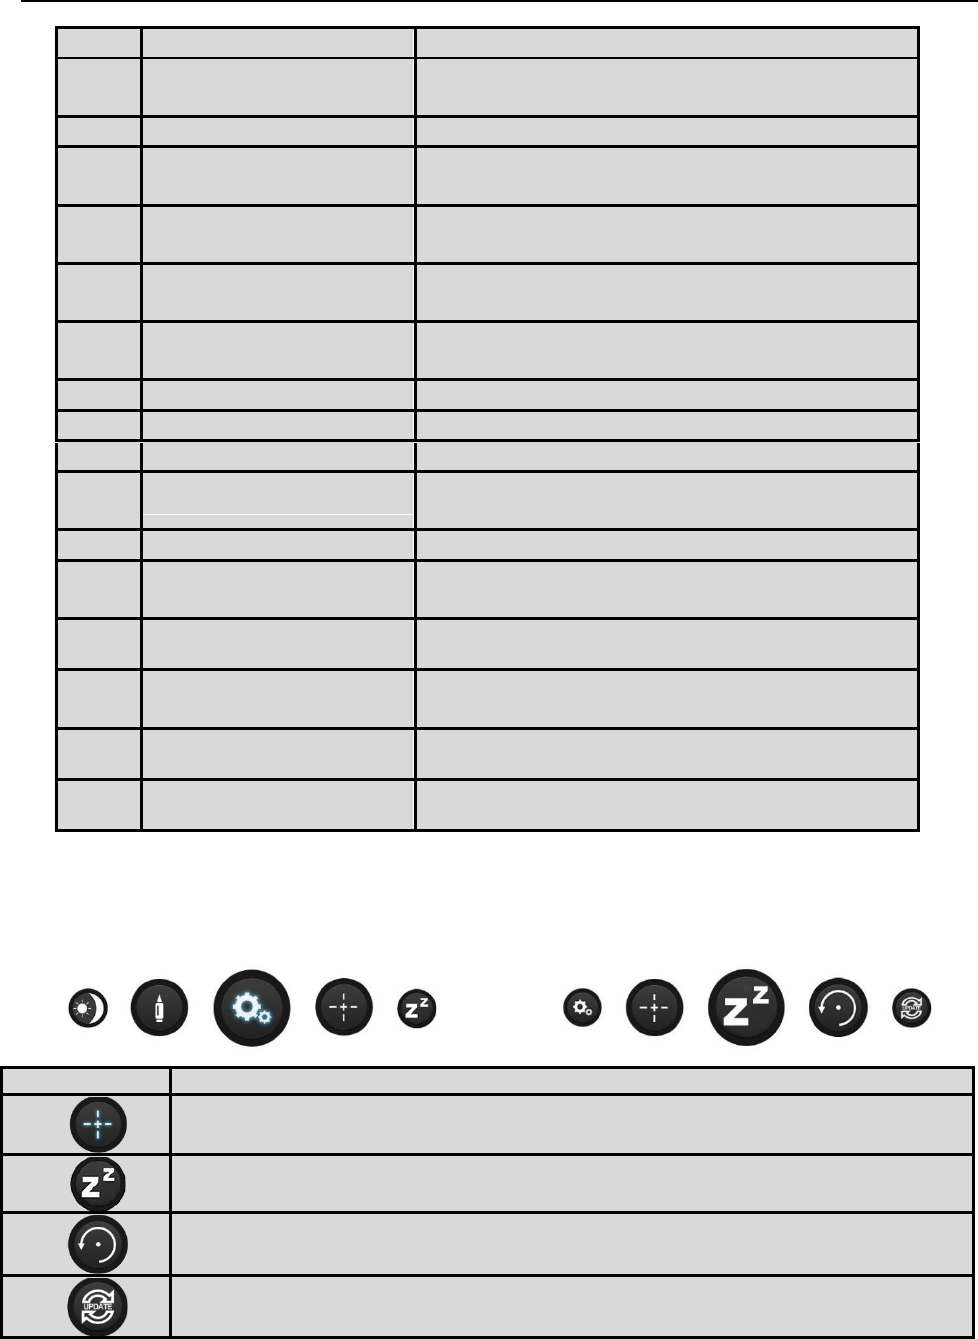
Home Screen
7
©2018 Accufire
No.
Name
Functions
1
Home screen
magnification
Edit and display current magnification of the
sight
2
Distance
Edit and display current distance of the target
3
Sighting area
magnification
Edit and display current magnification of the
sighting area
4
Horizontal trajectory
compensation
Edit and display horizontal trajectory
compensation at the current distance
5
Vertical trajectory
compensation
Edit and display vertical trajectory
compensation at the current distance
6
Hunting/observing
mode
Switch between hunting and observing modes
7
Pitch angle scale
Display attitude pitch angle scale
8
Roll angle scale
Display attitude roll angle scale
9
Logo
Display product logo
10
Time display
Display cumulative time of video during video,
and display the current time during non-video
11
Video indicator
Flicker during video
12
Day and night mode
display
Prompt to use day/night mode currently
1
3
Bullet category
Display the currently used bullet category
1
4
Battery level
Flicker at low battery level and prompt the
remaining time
1
5
SD card identifier
Indicate whether the SD card exists
1
6
Wifi identifier
whether the WiFi is opened
Menu Item
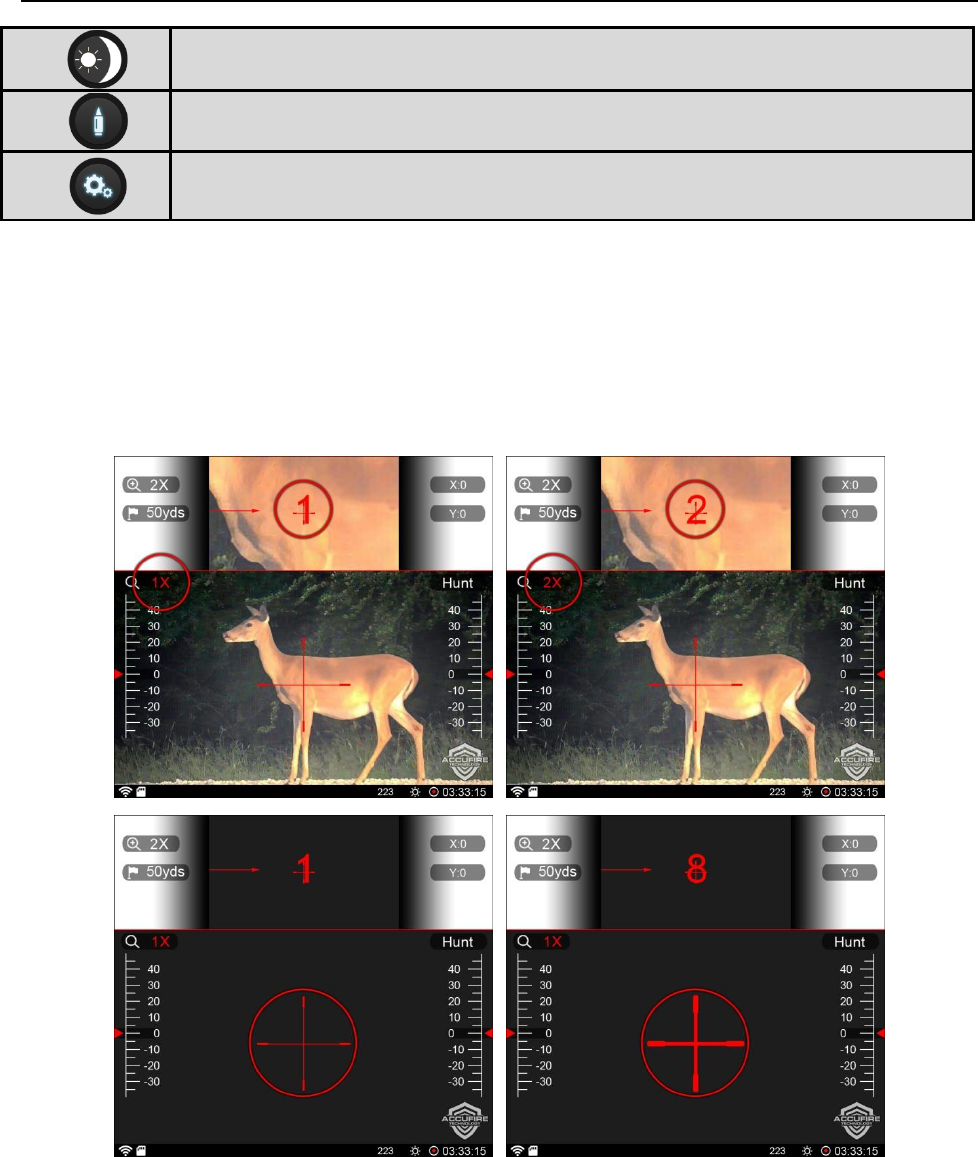
Long-press the knob, and release the knob after the home menu interface appears. There are 7
menu items in total, and various menu items can be cyclically switched by rotating the knob.
Pattern
Description
Reticle Style 10: click the knob to select the cross division line style
Sleep: click the knob to make the sight enter the sleep mode and turn off the
screen
Factory reset: click the knob to enter
Software upgrade: click the knob to make the sight read the upgrade file from
the SD card and perform the software upgrade.
8
©2018 Accufire
Day and night mode switch: click the knob to switch day and night vision
modes
Bullet type: click the knob to set bullet type
System setting: click the knob to set the time, sighting area, wifi and screen
brightness
Functions
Primary Magnification
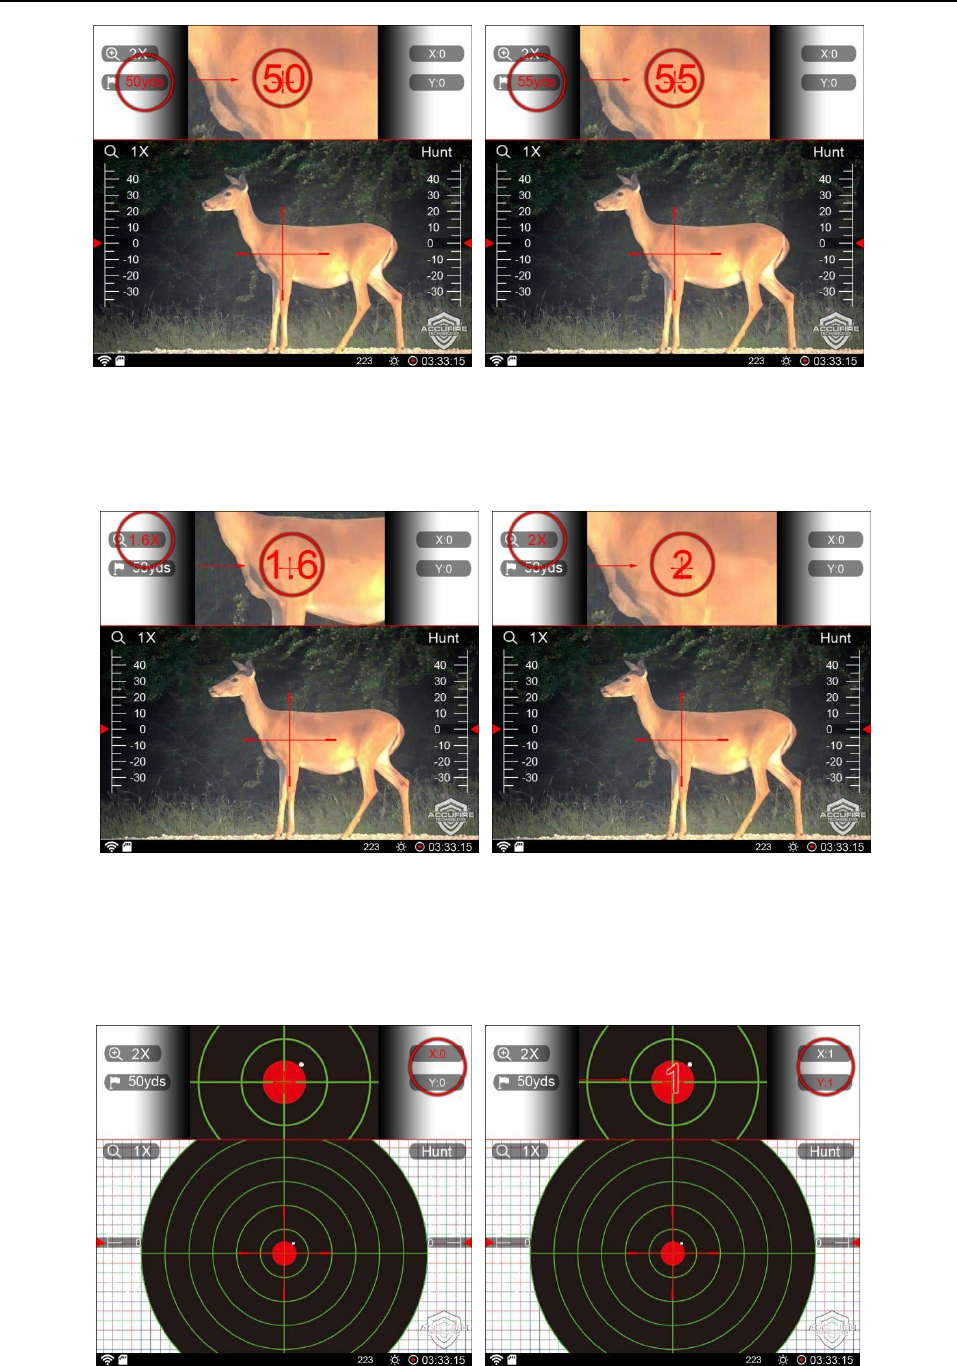
Rotate the knob to select “Primary Magnification”, click to enter the edit mode, rotate the knob to
adjust the primary magnification from 1x to 2x to magnify the image, otherwise reduce the image.
When the magnification reaches 4 times and above, the sighting crossline will be automatically
thickened.
Distance
Rotate the knob to select the distance option, click the knob to set the distance value, and rotate the
knob to increase or decrease the distance value.
9
©2018 Accufire
Sighting Area Magnification
Rotate the knob to select the sighting area magnification option, click the knob to set the sighting
area magnification, and rotate the knob to increase or decrease the sighting area magnification.
Zeroing
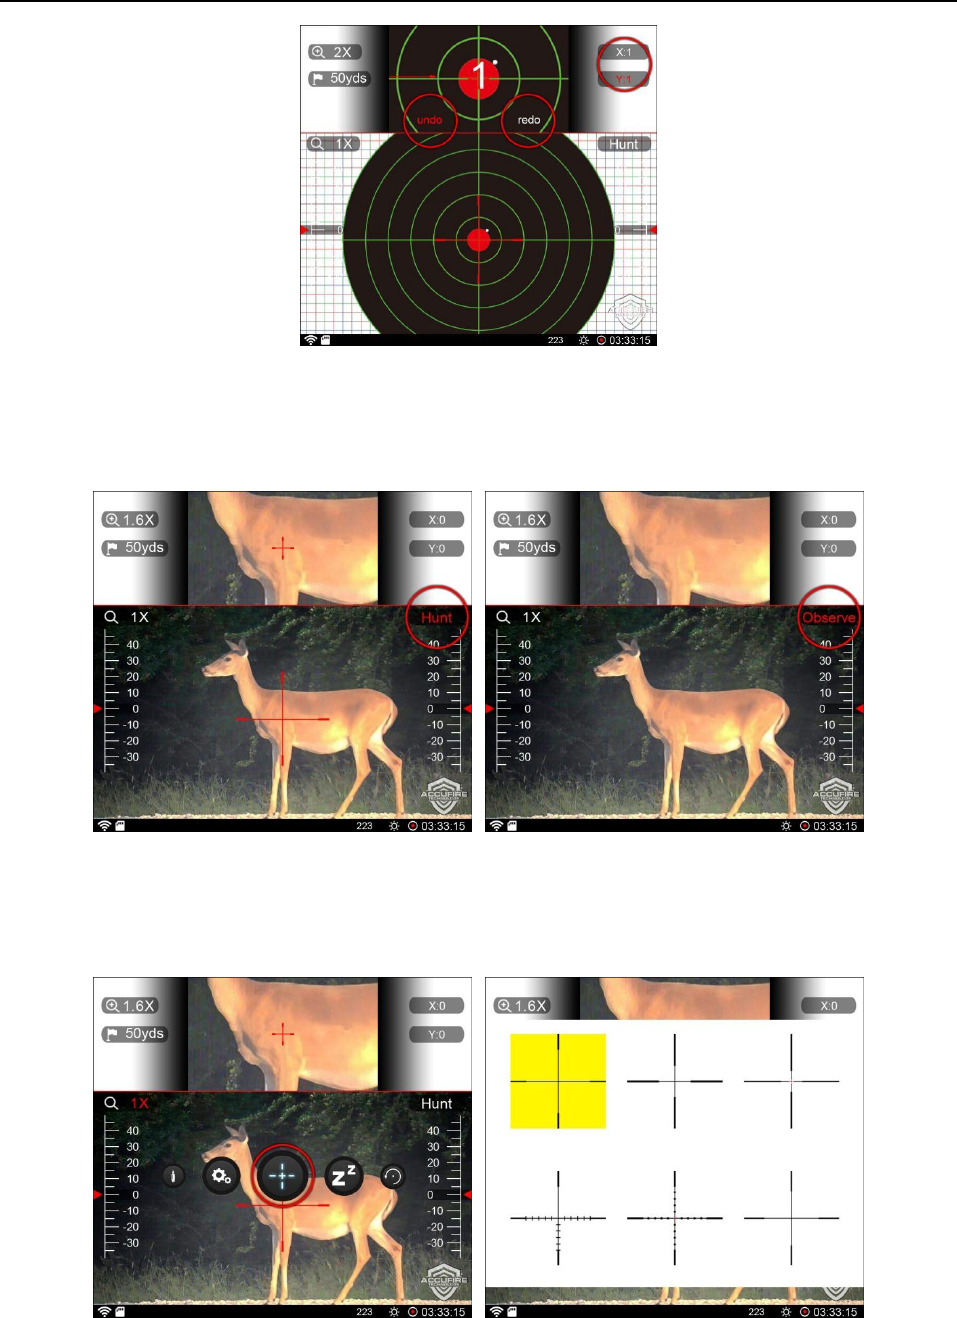
Measure the target distance of the target and input this distance value on the sight. After aiming at
the bull’s eye with the sight, measure deviation values (Inch) of the impact point from X and Y of
the bull's eye, and operate the knob to input the deviation values into the corresponding x and y
areas to complete the zeroing.
During zeroing, if the input is wrong or mishandled, you can undo or redo.
10
©2018 Accufire
Hunting/Observing Mode
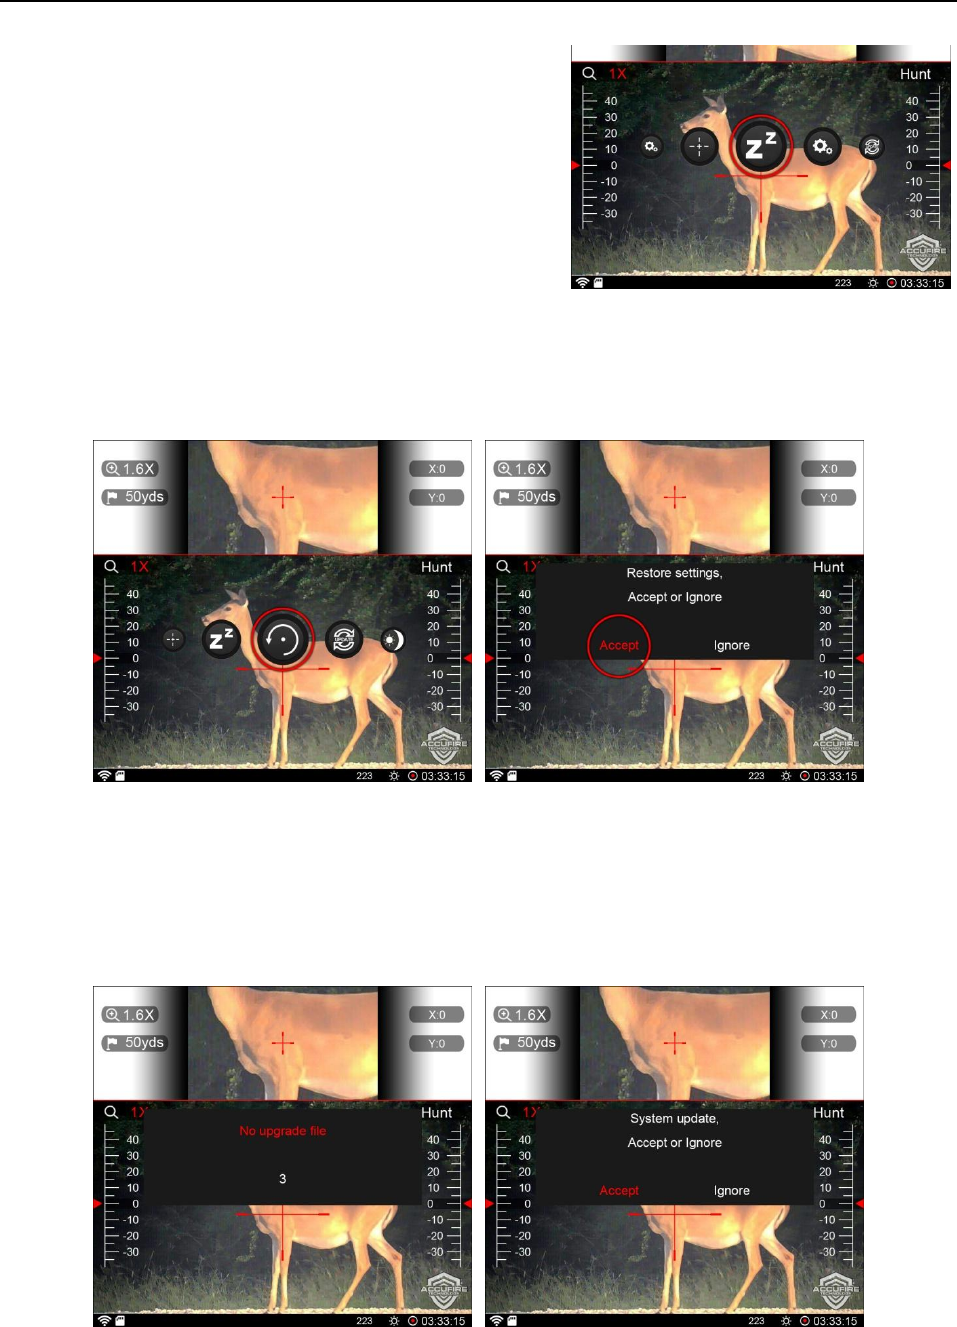
The default is the hunting mode. This option will be selected and the modes will be cyclically
switched by clicking the knob. In the observing mode, the cross division line and bullet types will
not be displayed.
Reticle Style
Enter the home menu item, select the reticle style, click the knob to enter, rotate the knob to select
the reticle style, and click the knob to complete the setting.
11
©2018 Accufire
Sleep
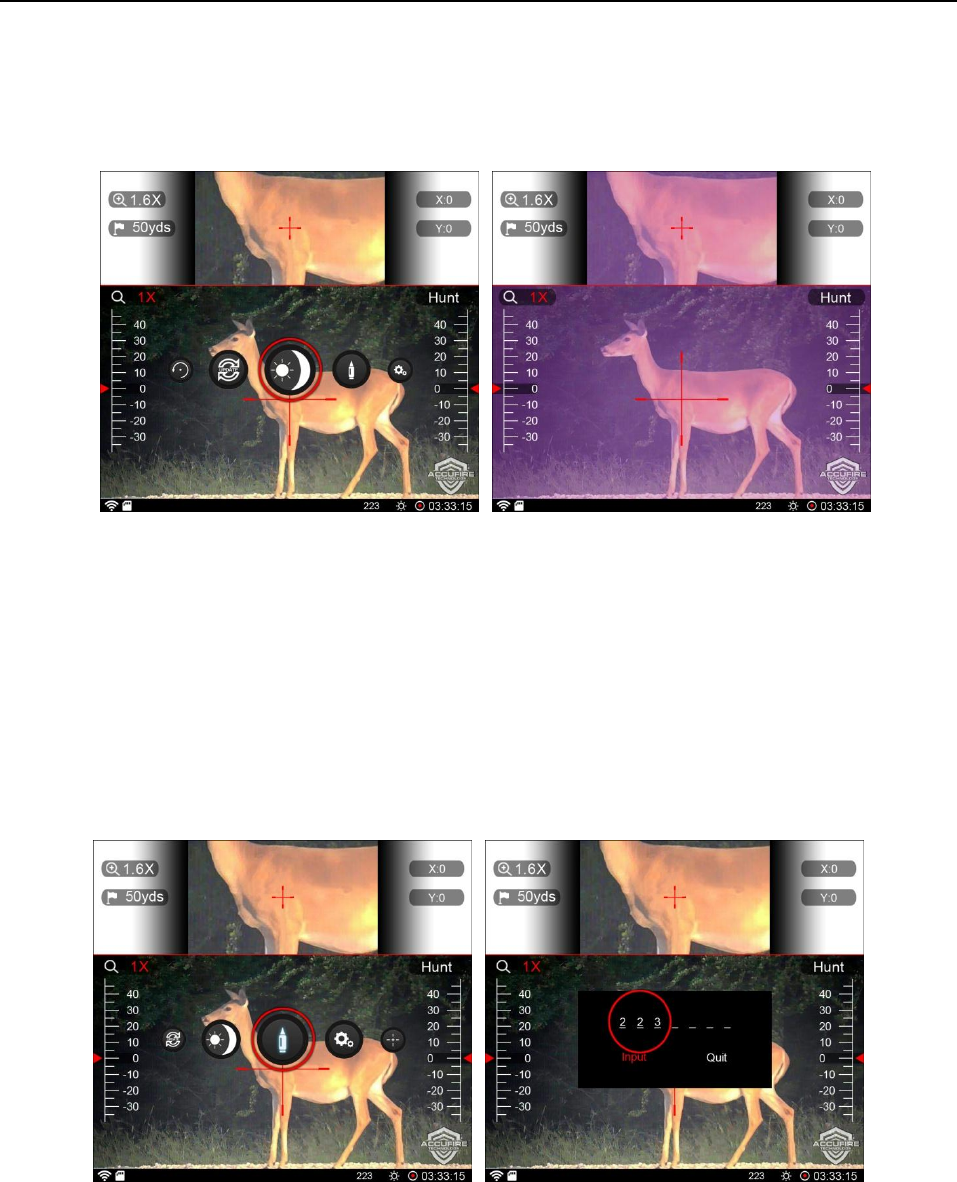
Enter the home menu item, select the sleep icon, and
click the knob, the sight enters the sleep mode, and in the
sleep mode, quits the sleep mode by clicking the power
button.
Factory Reset
Enter the home menu item, select factory reset, click the knob, pop-up the prompt box, select
“accept” to ensure that the sight restores the factory settings, and select “Ignore” to ensure that it
quits the current operation.
Software Upgrade
Enter the home menu item, select the software upgrade icon, and click the knob; after the upgrade
is successful, the sight will restart automatically; and if the SD card is not inserted or the upgrade
file is damaged, the sight prompts “the upgrade file does not exist”.
12
©2018 Accufire
Day and Night Mode Switching
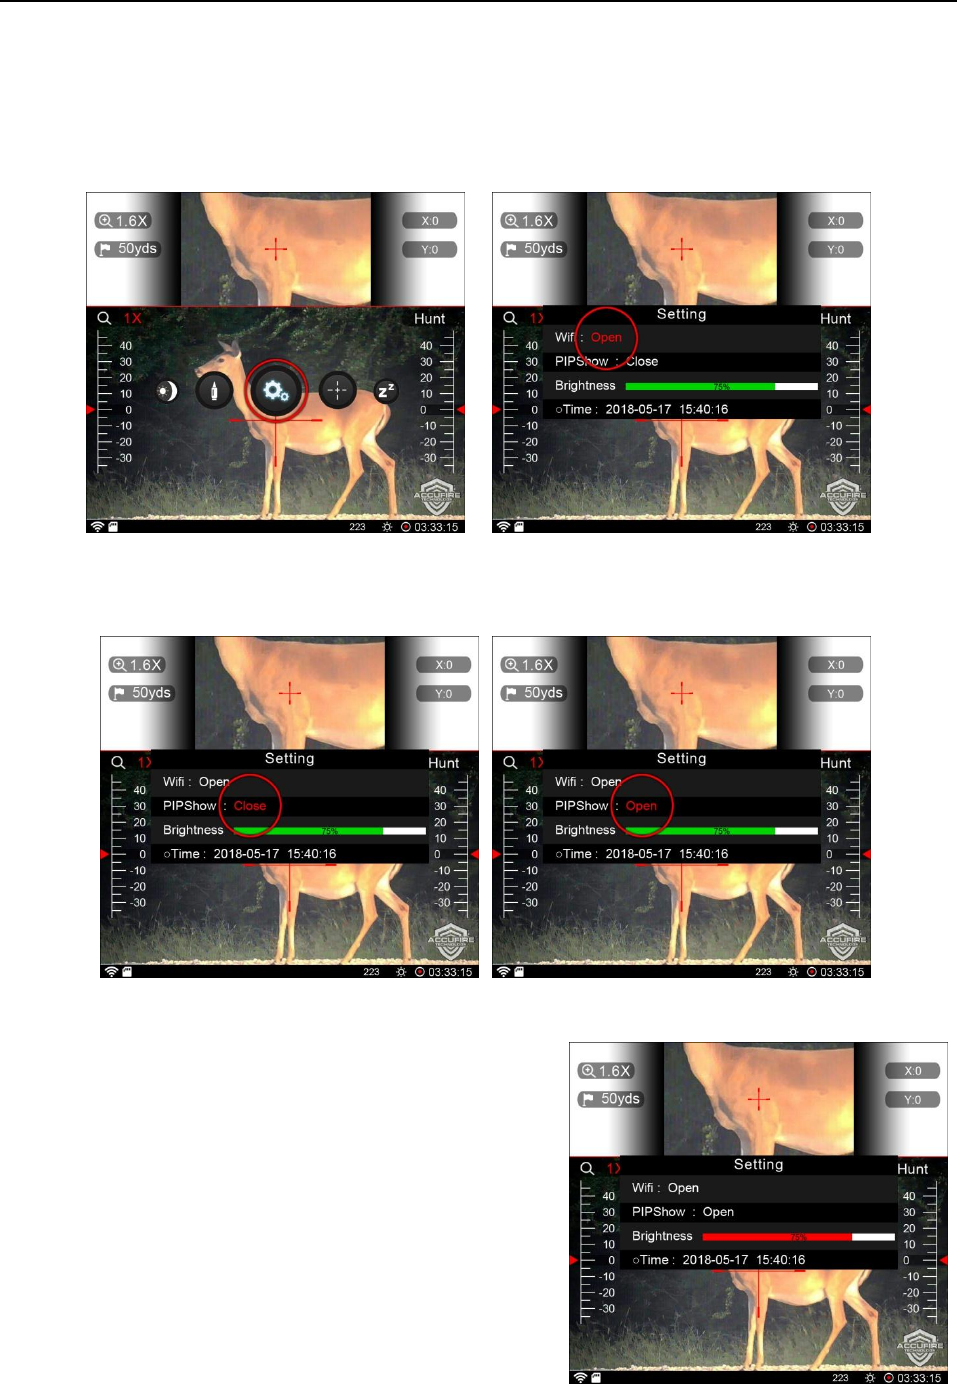
Enter the home menu item, select day and night mode switching, and click the knob to complete
the mode switching.
Bullet Type Input
Enter the home menu item, select the bullet type, and click the knob. The bullet type can contain
numbers or symbols, the numbers are 0-9, the symbols are"- /. x", four symbols in total, the bullet
type can record up to 7-digit symbols. Rotate the knob to select the input position, click the knob,
then rotate the knob to select the corresponding symbol, and click the knob again to complete the
input of one-digital symbol. After the type input is completed, select “Input” to save the type, and
select “Quit” to abandon the input.
13
©2018 Accufire
System settings
WiFi Setting
Open the WiFi or close the WiFi.
Sighting Window Opening
Set opening or closing of the sighting window.
Screen Brightness Setting
In the system setting option, rotate the knob to select
“Brightness”, click the knob to enter the adjustment
status, and rotate the knob to adjust the screen brightness.
Screen brightness levels are 5%, 10%, 15%, 20%, 25%,
50%, 75% and 100%.
Quick Screen Brightness Adjustment
In the home screen, long-press the knob to pop up the
home menu interface, and at this time, long-press and
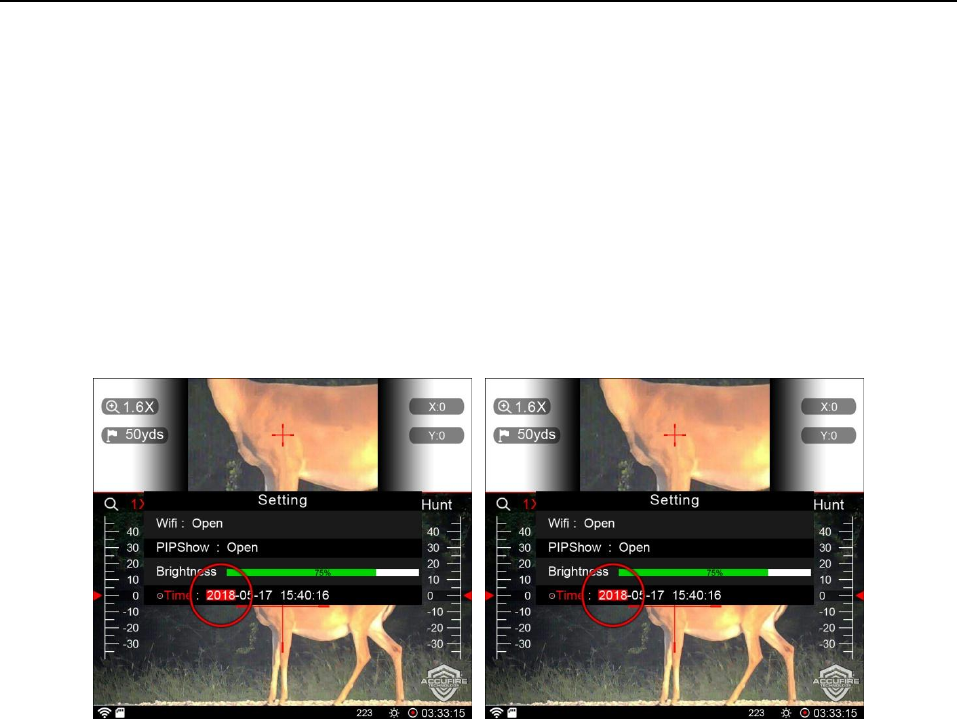
14
©2018 Accufire
hold the knob for 2 seconds to enter the quick screen brightness adjustment mode, and rotate the
knob to adjust the screen brightness. After the screen brightness adjustment is completed,
long-press the knob to quit the quick screen brightness adjustment after about 3 seconds.
Time Setting
In the system setting option, rotate the knob to select the “Time” option, click the knob to enter the
time setting. Rotate the knob to select the position to set the time, click to enter, rotate the knob to
increase or decrease the value, and click again to quit the setting of this time position. As such, set
the year, month, day, hour, minute, and second in this order.
FCC Statement:
This device complies with part 15 of the FCC Rules. Operation is subject to the
following
two conditions: (1) This device may not cause harmful interference, and (2) this
device
must accept any interference received, including interference that may cause
undesired
operation.
This equipment has been tested and found to comply with the limits for a Class B
digital
device, pursuant to part 15 of the FCC Rules. These limits are designed to provide
reasonable protection against harmful interference in a residential installation. This
equipment generates, uses and can radiate radio frequency energy and, if not installed
and used in accordance with the instructions, may cause harmful interference to radio
communications. However, there is no guarantee that interference will not occur in a
particular installation. If this equipment does cause harmful interference to radio or
television reception, which can be determined by turning the equipment off and on,
the
user is encouraged to try to correct the interference by one or more of the following
measures:
—Reorient or relocate the receiving antenna.
—Increase the separation between the equipment and receiver.
—Connect the equipment into an outlet on a circuit different from that to which the
receiver is connected.
—Consult the dealer or an experienced radio/TV technician for help.
Caution: Any changes or modifications not expressly approved by the party
responsible
for compliance could void the user's authority to operate the equipment.