Guo Wei Electronics POWERMAT Colombo Bluetooth DECT Cordless Telephone User Manual
Shenzhen Guo Wei Electronics Co. Ltd. Colombo Bluetooth DECT Cordless Telephone
User Manual
Warning: Charge the handset for 24 hours before use.
Welcome...
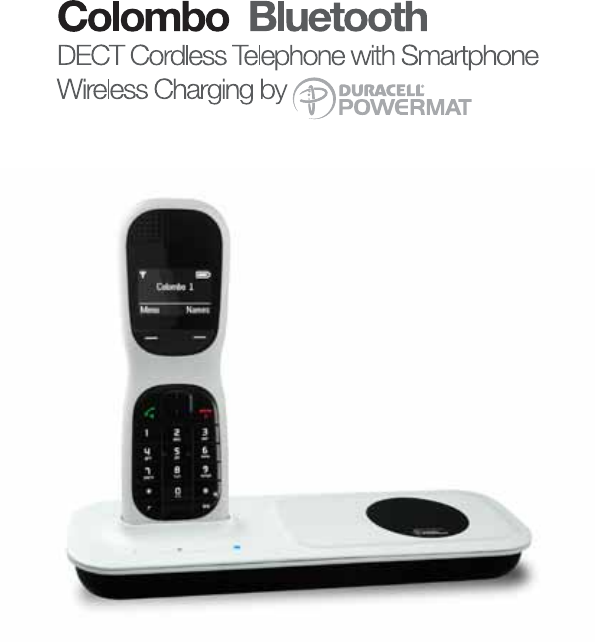
to your new Colombo Bluetooth Digital Cordless Telephone
with Duracell PowermatTM wireless charging!
With Bluetooth wireless functionality you have seamless connectivity between
your home phone and mobile phone.1
Enjoy using the following benets:
• The Colombo base supports Duracell PowermatTM wireless charging,
allowing you to conveniently charge your mobile phone on the Colombo
base. A Duracell PowermatTM jacket must be purchased separately to t your
mobile. This is available from leading retailers or you can buy online at www.
powermat.com. A USB socket is integrated into the Colombo Bluetooth base
as a back-up charging facility.
• Conveniently synchronize up to 1000 name and number contacts from your
mobile phone to your Colombo handset.
• Make calls either over the xed line or mobile network using the Colombo
handset, allowing you to utilise and benet from your individual network calling
packages.1
• Receive mobile calls via your Colombo handset whilst keeping your mobile on
charge.
• With Caller ID, see who is calling your mobile number on the Colombo
handset(s).
• Optimise the range and call quality of your mobile phone around the home, by
positioning your Colombo base unit where you have the strongest signal.2
• Register up to 7 mobile phones to the Colombo base, so you and all your
family can enjoy the benets of Bluetooth.1,3
Need help?
You may nd the answer in the ‘Help’ section at the back of this guide.
1Compatible Bluetooth mobile phone required.
2Mobile phone must be positioned within 10m of the Colombo base.
3Only one mobile at a time can be connected to the Colombo.
This user guide provides you with all the information you need
to get the most from your phone.
To set up your phone, follow the simple instructions in ‘Getting
Started’, on the next few pages.
IMPORTANT
Only use the telephone line cord supplied.
Got everything?
• Cordless handset
• Cordless base
• 2 x rechargeable Ni-MH battery cells
• Power adaptor for the base
• Telephone line cord
If you have purchased a Colombo multiple pack you will also have the
following additional items:
• Cordless handset & charger
• 2 x rechargeable Ni-MH battery cells
• Power adaptor for the charger
Please note that this equipment is not designed for making emergency telephone
calls when the power fails. Alternative arrangements should be made for access to
emergency services.

4
1. Getting started ........................................................ 7
1.1 Location ............................................................................................ 7
1.2 Setting up the base ........................................................................... 7
1.3 Bluetooth wireless technology .......................................................... 8
1.4 Pair your Colombo with your mobile ................................................. 9
1.5 Copy the phonebook from a mobile .................................................. 9
1.6 Duracell PowermatTM Wireless charging ........................................ 10
1.7 Welcome screen ............................................................................. 11
1.8 Date and time ................................................................................. 11
1.9 Battery performance ....................................................................... 11
1.10 Connecting the handset and charger ............................................. 12
2. Getting to know your phone ................................ 13
2.1 Overview of your handset ............................................................... 13
2.2 Handset LCD Display ..................................................................... 15
2.3 Overview of the base ...................................................................... 16
2.4 Navigating the menu ....................................................................... 16
2.5 Menu map ....................................................................................... 17
3. Using the phone ................................................... 19
3.1 Switch the handset on / off ............................................................. 19
3.2 Make a call ...................................................................................... 19
3.3 Preparatory dialling ......................................................................... 19
3.4 Make a call using speed dial (keypad 1 to 9) .................................. 19
3.5 End a call ........................................................................................ 19
3.6 Receive a call from the xed line .................................................... 19
3.7 Receive a mobile call on the cordless handset ............................... 20
3.8 Set the receiver volume .................................................................. 20
3.9 Secrecy ........................................................................................... 21
3.10 Intercom .......................................................................................... 21
3.11 Receive an internal call .................................................................. 21
3.12 Transfer a call ................................................................................. 21
3.13 3 way conference call ..................................................................... 21
3.14 Make a hands-free call ................................................................... 22
3.15 Answer a call hands-free ................................................................ 22
3.16 Switch to hands-free during a call .................................................. 22
3.17 View or dial a redial entry ............................................................... 22
3.18 Copy a Redial list number to the phonebook .................................. 23
3.19 Delete a redial entry ....................................................................... 23
3.20 Lock/unlock the keypad .................................................................. 23
4. Phonebook ............................................................ 24
4.1 To store an entry ............................................................................. 24
4.2 Entering names ............................................................................... 24
4.3 Character map ................................................................................ 24
4.4 To view and dial phonebook entries ............................................... 25

5
4.5 Enter a pause ................................................................................. 25
4.6 To search an entry .......................................................................... 26
4.7 To view details of an entry .............................................................. 26
4.8 To edit an entry ............................................................................... 26
4.9 To copy an entry to another handset .............................................. 26
4.10 To assign a ringtone ....................................................................... 27
4.11 To delete an entry ........................................................................... 27
4.12 To store a quickdial number ........................................................... 27
4.13 To clear a quickdial number ........................................................... 27
4.14 To access the phonebook during a call .......................................... 28
4.15 To copy the phonebook to another handset ................................... 28
4.16 To check memory status ................................................................ 28
4.17 To delete all entries ........................................................................ 28
5. Calls list ................................................................. 29
5.1 New calls alert ................................................................................ 29
5.2 To dial from the Calls list ................................................................ 30
5.3 To view details of the call ................................................................ 30
5.4 To save a number from the Calls list to the phonebook ................. 30
5.5 To delete a Calls list entry .............................................................. 31
5.6 To delete entire Calls list ................................................................ 31
6. Agenda ................................................................... 32
6.1 Add a new event ............................................................................. 32
6.2 Switch off reminder ring .................................................................. 32
6.3 Show event details .......................................................................... 32
6.4 Edit an event ................................................................................... 33
6.5 Delete an event ............................................................................... 33
6.6 Delete all events ............................................................................. 33
7. Clock & Alarm ....................................................... 34
7.1 Set the date and time ...................................................................... 34
7.2 Set the alarm .................................................................................. 34
7.3 Time format ..................................................................................... 35
8. Handset settings ................................................... 36
8.1 Handset ringtone ............................................................................ 36
8.2 Handset ringer volume .................................................................... 36
8.3 Receiver volume ............................................................................. 36
8.4 Handset name ................................................................................ 37
8.5 Display language ............................................................................ 37
8.6 Screensaver .................................................................................... 37
8.7 Light timeout ................................................................................... 37
8.8 Auto talk .......................................................................................... 38
8.9 Key beep ......................................................................................... 38
8.10 PBX access code ........................................................................... 38

6
9. Base settings......................................................... 39
9.1 Dialling mode .................................................................................. 39
9.2 Ring priority ..................................................................................... 39
9.3 Recall mode .................................................................................... 39
9.4 Change the System PIN ................................................................. 40
9.5 Restore default settings .................................................................. 40
9.6 ECO mode ..................................................................................... 41
9.7 Default settings ............................................................................... 42
10. Using additional handsets ................................... 43
10.1 Registering an additional handset .................................................. 43
10.2 Register a different make of handset to your Colombo base ......... 44
10.3 Select a base .................................................................................. 44
10.4 De-register a handset ..................................................................... 44
11. Help ........................................................................ 45
12. General information.............................................. 47

7
1. Getting started
IMPORTANT
Do not place your Colombo in the bathroom or other humid areas.
1.1 Location
You need to place your Colombo base within 2 metres of the mains power socket
and telephone socket so that the cables will reach. Make sure it is at least 1
metre away from other electrical appliances to avoid interference. Your Colombo
works by sending radio signals between the handset and base. The strength of
the signal depends on where you position the base. Putting it as high as possible
ensures the best signal.
Handset range
The Colombo has a range of 300 metres outdoors when there is a clear line of
sight between the base and handset. Any obstruction between the base and
handset will reduce the range signicantly. With the base indoors and handset
either indoors or outdoors, the range will normally be up to 50 metres. Thick stone
walls can severely affect the range.
Bluetooth wireless range
Once your Colombo and mobile phone are paired (see page 9), by positioning the
Colombo base and mobile phone where the mobile signal is strongest you can
optimise the range. The mobile phone must be within 10m of the Colombo base.
If you go out of range when making a call on the Colombo, handset using the
mobile network, you will hear a double beep. If you don’t move back into range the
call will be disconnected and the icon will be replaced by the icon ashing
on the handset display, see below.
Signal strength
The icon on your handset indicates when you are in range. When out of range
of the base, the screen shows SEARCHING, the icon ashes and the handset
gives an out-of-range warning tone every minute. This tone is repeated until you
move back into range.
If you move out of range during a call, the telephone call will be disconnected.
Move back within range before you make any further calls. The handset will
automatically re-connect to the base.
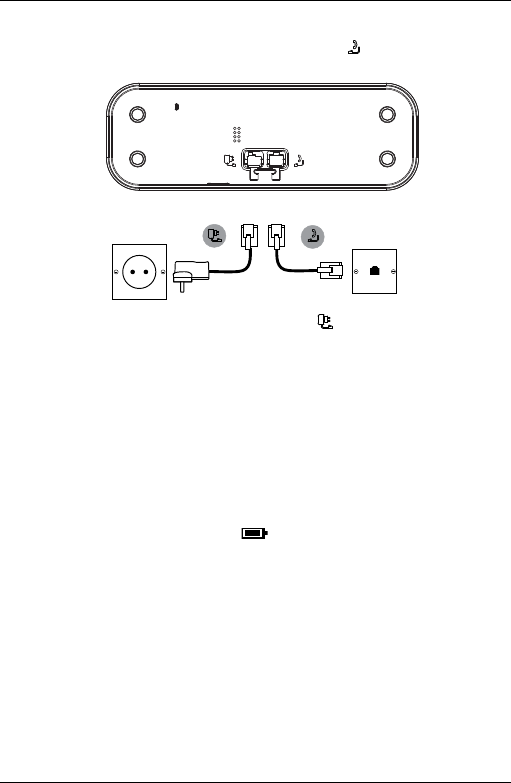
1.2 Setting up the base
IMPORTANT
The base station must be plugged into the mains power at all times. Do not plug
the telephone line cord into the wall socket until the handset is fully charged. Only
use the power and telephone cables supplied with the product.
Getting started
8
Connecting up the base
1. Plug the telephone line cord into the socket marked on the underside of
the base
2. Plug the power adaptor into the socket marked on the underside of the
base and plug the other end into the mains power wall socket. Switch on the
mains power.
Installing and charging the handset
1. Remove the battery cover from the back of the handset and insert the 2 x AAA
NiMH rechargeable batteries supplied. Please note the ‘+’ and ‘-’ markings
inside the battery compartment and insert in the correct direction.
2. Slide the battery cover back into place.
3. If you are charging the batteries for the rst time, place the handset on the
charger to charge for at least 24 hours continuously.
4. When the handset is fully charged, will appear steady on the display.
The display will show
HANDSET
and handset number (e.g. 2) to indicate that it is
registered to the base.
NOTE
If you have bought a multi-pack you will need to set up each handset and charger,
see page 11.
1.3 Bluetooth wireless technology
Your Colombo can be registered with up to 7 mobile phones via Bluetooth wireless
technology1 but can only be connected to one mobile at a time.
A mobile that has been registered cannot be deleted manually, when an eighth
mobile is connected the oldest mobile will be deleted.
Once your mobile and Colombo are paired you can:
Getting started

9
• Make or receive calls over the xed line or mobile network from the cordless
handset.
• When receiving a call the cordless handset will show Caller ID from the mobile
phone.
• Synchronise your mobile phonebook to the cordless handset, see page 9.
1Bluetooth® wireless technology provides a wireless connection of up to 10 metres
between the Colombo and other Bluetooth compatible mobile phones.
1.4 Pair your Colombo with your mobile
You will need to pair your Colombo with your mobile phone before you can take
advantage of the Bluetooth features.
1. Turn on your mobile phone’s Bluetooth function.
2. Press and hold for 4 second to set the Colombo base to discoverable.
3. Place the mobile close to the Colombo base and search for devices.
4. The Colombo will show as
Colombo
on your mobile.
5. Follow your mobile’s instructions to pair and connect to the Colombo.
NOTE
If a connected mobile goes out of range it will reconnect automatically when it is
within range again, unless another mobile has been connected during this period.
If the mobile doesn’t automatically reconnect with the Colombo you will need to
reconnect manually via the Bluetooth on the mobile.
1.5 Copy the phonebook from a mobile
You can copy up to 1000 name and number contacts from your mobile phone to
the Colombo handset in one easy operation.
1. Press
Names
to enter the phonebook menu.
2. Scroll to
Copy Phonebook
and press
Select
.
3. The display shows
To Handset.
4. Scroll to
From Mobile
and press
Select
.
5. Copy is completed when the message “
X Entries Copied”
appears on the display.
6. Press to return to standby.
Getting started
10
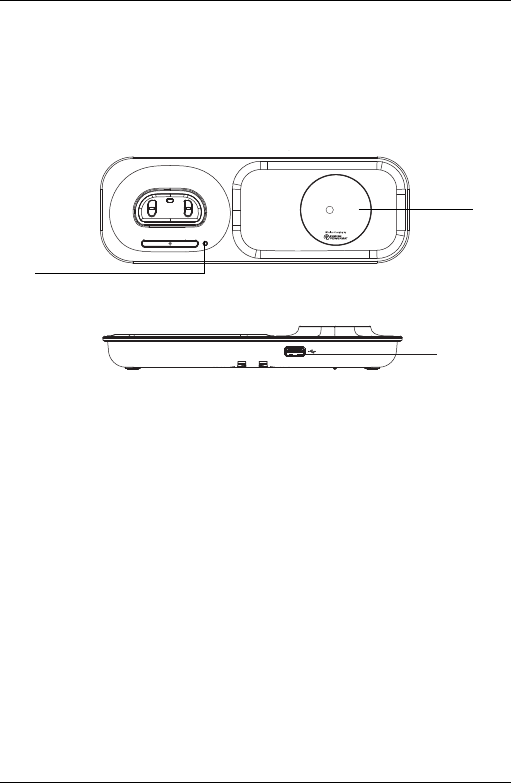
1.6 Duracell PowermatTM Wireless charging
To wirelessly charge your mobile, t it in the Duracell PowermatTM jacket (not
provided). The Duracell PowermatTM jacket can then be placed in any 360 degree
position on the Duracell PowermatTM charging pad. A standard (Type A) USB
receptacle 5V charging port is available on the Colombo DECT base for wired
charging (USB wire not provided). Both the charging pad and charging port can be
used simultaneously.
A
B
C
A Duracell PowermatTM Blue Charging LED
When you mobile is charging on the Duracell PowermatTM charging pad the
LED will light up.
B Duracell PowermatTM Charging pad
If your mobile phone has a compatible Duracell PowermatTM jacket (not
provided), then you can t your mobile in the Duracell PowermatTM jacket and
place it on the Duracell PowermatTM charging pad to charge wirelessly.
C Standard (Type A) USB connector socket for charging
If your mobile doesn’t have a compatible Duracell PowermatTM jacket you can
use the USB connector socket to charge your mobile phone (USB connector
wire not provided).
NOTE
Once paired and charging the Bluetooth connectivity will automatically activate
between the Colombo Bluetooth and your mobile, synchronising all your mobile
calls with your Colombo Bluetooth cordless handset. Now all your calls can be
made and received from the comfort of your cordless handset.
Getting started

11
1.7 Welcome screen
1. The Welcome screen will briey appear, then a list of countries is displayed.
2. Scroll or to your country (operator) and press
Select
. The handset
and base will reset to load the correct settings. The standby screen is then
displayed and your phone is ready to use.
NOTE
You can still make and receive calls without rst selecting your country and
network operator, however the Welcome screen will re-appear until you have
congured your phone country settings.
1.8 Date and time
Providing you have subscribed to your network’s Caller Display service, the date
and time is set automatically for all handsets every time a call is received.
If you do not subscribe to the Caller Display service you can set the date and time
manually.
1. Press
Menu
and scroll to
Clock & Alarm
. Press
Select
. Display shows
Date & Time
,
press
Select
.
2. Enter the date using the format DD-MM-YY e.g. 04-08-12 for 4th August 2012.
3. Press
Save
and enter the time using the 24 hour format HH-MM, e.g. 14-45 for
2.45pm.
4. Press
Save
to conrm.
5. Press to return to standby.
1.9 Battery performance
In ideal conditions, fully charged batteries should give about 10 hours talk time or
100 hours standby time on a single charge1. Note that new batteries do not reach
full capacity until they have been in normal use for several days.
To keep your batteries in the best condition, leave the handset off the base for a
few hours at a time. Running the batteries right down at least once a week will
help them last as long as possible.
The charge capacity of rechargeable batteries will reduce with time as they wear
out, giving the handset less talk / standby time. Eventually they will need to be
replaced. Batteries and handset may become warm during charging. This is
normal.
1All talk and standby times are approximate and depend on features selected and
usage pattern.
Battery low warning
If ashes in the display, you will need to recharge the handset before you can
use it again. During charging, will scroll on the display.
Getting started
12
Intelligent charging
Your Colombo supports Intelligent Charging, this means when the cordless
handset is fully charged, the base will automatically detect this and stop drawing
power from the mains to charge the handset, saving unnecessary
power usage.
IMPORTANT
Warning! Use only the approved rechargeable Ni-MH battery cells (2 x AAA Ni-MH
750mA rechargeable batteries) supplied with your Colombo.
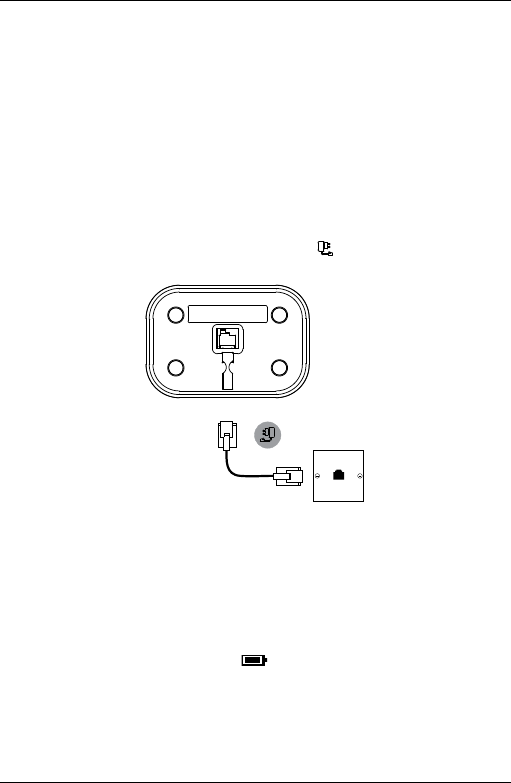
1.10 Connecting the handset and charger
If you have purchased a multiple pack, you will need to carry out this process for
all the additional handsets and chargers.
1. Plug the power adaptor into the socket marked on the underside of the
charger and plug the other end into the mains power wall socket.
2. Remove the battery cover from the back of the handset and insert the 2 x AAA
NiMH rechargeable batteries supplied. Please note the ’+’ and ’-’ markings
inside the battery compartment and insert in the correct direction.
3. Slide the battery cover back into place.
4. If you are charging the batteries for the rst time, place the handset on the
charger to charge for at least 24 hours continuously.
5. When the handset is fully charged, icon will appear steady on the display.
The display will show
HANDSET
and handset number (e.g. 2) to indicate that it is
registered to the base.
Your Colombo is now ready for use.
Getting started
13
2. Getting to know your phone
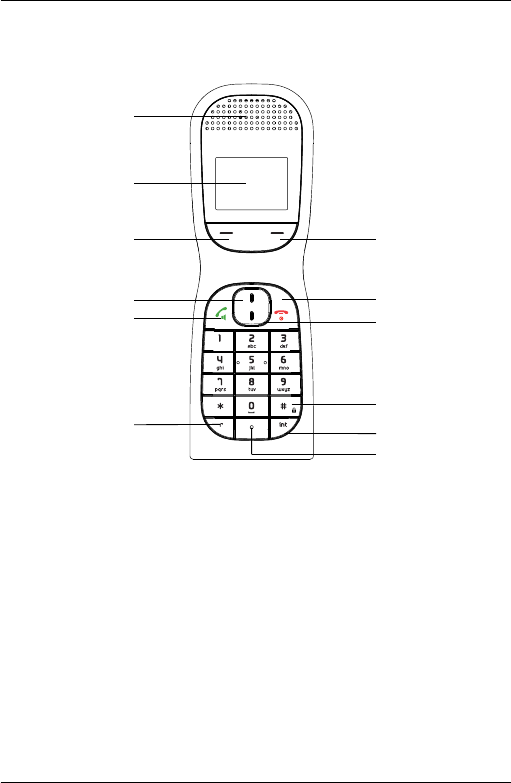
2.1 Overview of your handset
A
B
C
D
E
F
L
H
G
I
J
K
A Earpiece
B Display
See page 14 for an overview of the display icons.
C Menu / OK / Secrecy / Left softkey
In standby mode, press to open the Menu.
Press to select menu options and to conrm a displayed option.
During a call, press to turn secrecy on / off.
D Redial list / Scroll up / Volume up / Pause
In standby mode, press to open the redial list.
Scroll up through lists and menus.
Increase the earpiece and hands-free volume.
When the phone is ringing, press to increase the handset ringer volume.
Press and hold to enter a pause (P) when pre-dialling or storing numbers.
Getting to know your phone

14
E Talk / Hands-free
Make or answer a call.
Activate and deactivate hands-free during a call.
IMPORTANT
Hands-free activation can suddenly increase the volume in the earpiece to a
very high level. Make sure the handset is not too close to your ear.
F Recall
Use recall (R) functions.
G Phonebook menu / Clear / Back / Right softkey
In standby mode, press to open the phonebook menu.
Clear incorrect input during text editing.
Return to previous menu.
H End / Exit / Switch handset on/off
End a call.
When in a menu, go back to standby mode.
Press and hold to switch handset off (when in standby) or on.
I Phonebook / Scroll Down / Volume down
Open the phonebook.
Scroll down through lists and menus.
Decrease the earpiece and hands-free volume.
When the phone is ringing, press to decrease the handset ringer volume.
J Change case / Keypad lock / #
Press to change the case when entering letters / editing.
Press and hold to lock the keypad.
Dial a #
K Intercom
Press to make an internal call.
L Microphone
Getting to know your phone

15
Getting to know your phone
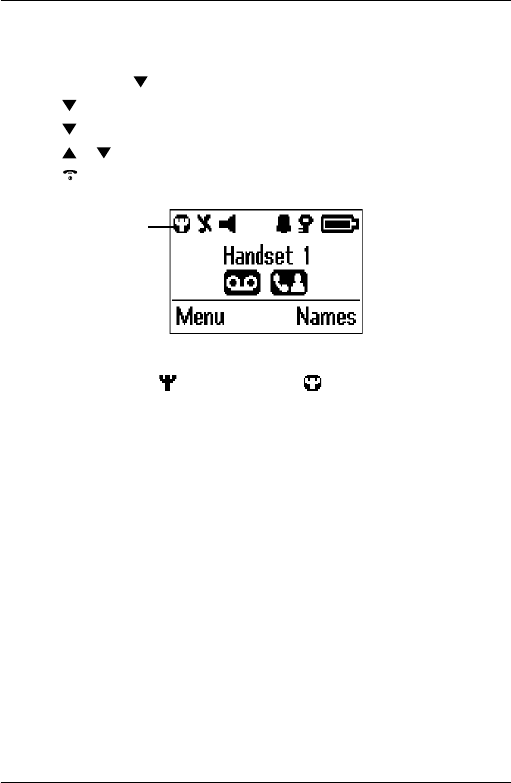
2.2 Handset LCD Display
Steady when the handset is registered and within range of the base.
Flashes when handset is out of range or searching for the base
Displays when ECO mode is on.
Displays when the call is received from your mobile network.
Handset ringer volume is Off.
Displays when in hands-free mode.
The alarm clock has been set.
The keypad is locked.
Displays when you have new voicemails.1
Displays when you have missed calls and new number(s) in the
Calls list.2
1This feature is dependent on your Network Service provider supporting the
service. A subscription fee may be payable.
2For this feature to work, you must subscribe to Caller ID Service from your
network operator. A subscription fee may be payable.
The approximate power levels of your battery are indicated as follows:
Battery is fully charged
Battery is partially charged
Battery is running low

16
Getting to know your phone
2.3 Overview of the base
A
A Page
In standby, press to ring the handset(s).
Press and hold to enter registration mode when registering handsets.
2.4 Navigating the menu
Your Colombo has an easy to use menu system on the handset.
Each menu has a list of options, which you can see on the menu map on the
following page.
When the handset is in standby:
1. Press the left softkey
Menu
. The main menu is opened.
2. Then use or buttons to scroll through the menu (see below).
3. Soft key options
Select
and
Back
are displayed.
Press the left softkey
Select
to open a sub-menu or validate an option.
Press the right softkey option
Back
to go back to the previous menu level,
correct a character or cancel an action.
Moving up and down through the menu
Throughout this guide the and symbols will be used whenever you need to
scroll up or down in the product menu.
Please see the illustration below for where to nd the up and down buttons on the
handset.
Press to scroll up
Press to scroll down
NOTE
If no buttons are pressed for 30 seconds or the handset is placed on the
base / charger, the handset returns to standby.

17
Getting to know your phone
2.5 Menu map
Calls Lists
Missed Calls
Received Calls
Dialled Calls
Delete Calls
Agenda
If there is an event, press
Options
and
the following will be displayed.
Add Event
Show Details
Edit Event
Delete Event
Delete All Events
If the list is empty:
Add Event
Clock & Alarm
Date & Time
Alarm
Time Format
Settings
Set Handset
Ringtone
Ringer Volume
Receiver Volume
Recall Mode
Handset Name
Language
Screensaver
Light Timeout
Auto Talk
Key Beep
PBX Access Code
Set Base
Dialling Mode
Ring Priority
Recall Mode
System PIN
Master Reset
ECO Mode

18
Getting to know your phone
Registration
Register Handset
Select Base
De-register
Names Press Names during a call
From menu in standby:
Search
Add Entry
Copy Phonebook
Memory Status
Delete Phonebook
Press in standby and phonebook
list is displayed, select
Options:
Show Details
Edit Entry
Copy Entry
Ringtone
Delete Entry
Quickdial
Phonebook list is displayed, select
Options
:
Add Entry
Show Details
Edit Entry
Delete Entry

19
3. Using the phone
3.1 Switch the handset on / off
Press and hold to switch the handset on or off.
3.2 Make a call
1. Press .
2. When you hear the dialling tone, dial the telephone number.
3.3 Preparatory dialling
Once you have paired your Colombo with your mobile, you can make calls over
the xed line or mobile network using the Colombo handset, to pair the Colombo
with your mobile, see page 9.
1. Enter the phone number (maximum 24 digits). If you make a mistake press
Clear
.
2. Press ,
PSTN Call
is highlighted.
Either
3. Press
Dial
or to dial over the xed line.
Or
4. Scroll to
Mobile Call
and press
Dial
or to dial over the mobile network.
3.4 Make a call using speed dial (keypad 1 to 9)
1. Press and hold a key from 1 to 9 until the number is displayed and dialled. If
no number is stored, you will hear a beep.
NOTE
To store a quickdial number, see page 27.
3.5 End a call
1. Press , or place the handset back on the base / charger.
After you hang up, the duration of your call is displayed for 5 seconds.
3.6 Receive a call from the xed line
When you receive an external call, the phone rings and
External Call
shows on the
display. If you subscribe to Caller ID the phone number will also display and if
the full phone number is in the cordless handset phonebook the name will be
displayed.
1. If the handset is off the base then press to answer the call, or if the handset
is on the base simply lift the handset to answer the call.
Using the phone

20
3.7 Receive a mobile call on the cordless handset
1. When you receive a call via your mobile phone the cordless handset will also
ring.
2. The cordless handset display shows the callers number or name if the
phonebook has been copied and a will replace the icon.
3. Press to answer the call.
NOTE
If Auto Talk mode is on, simply lift up the handset from its base to answer the call.
The default setting is On. If you have changed Auto Talk mode to Off, you will
need to press to answer a call.
If Auto Talk mode is on, you will not be able to see the Caller’s details before you
answer the call.
NOTE
If you have subscribed to your Network’s Caller Identity service and assigned
a VIP Group to the caller’s number, the caller’s details are displayed before the
phone starts ringing. You can set your phone to give the default ringtone as soon
as the call is received then once the caller’s identity is displayed, the assigned
ringtone will start.
NOTE
An incoming call has priority over other events. Whenever there is an incoming
call, other operations in progress such as phone settings, menu navigation, etc.
will be ended.
3.8 Set the receiver volume
You can set your earpiece or hands-free volume via the handset menu. There are
8 levels to choose from.
1. Press
Menu
, scroll to
Setting
s and press
Select
.
2.
Set Handset
is highlighted. Press
Select
.
3. Scroll to
Receiver Volume
and press
Select
.
4. Scroll or to adjust the receiver volume level and press
Save
.
5. Press to return to standby.
IMPORTANT
When the phone is ringing, avoid holding the earpiece too close to your ear as
it may damage your hearing. Hands-free activation can suddenly increase the
volume in the earpiece to a very high level. Make sure the handset is not too close
to your ear.
NOTE
During a call, you can also press or to adjust the earpiece or hands-free
volume.
Using the phone

21
3.9 Secrecy
You can mute your handset so that you can talk to someone nearby without your
caller hearing.
1. During a call, press
Secrecy
. The display shows
Secrecy On
and your caller cannot
hear you.
2. Press
Off
to resume your call.
3.10 Intercom
If you have more than one handset registered to the base, you can make internal
calls between two handsets.
Internal Call
and
Handset X
displays to indicate an internal call.
Press followed by the number (1-5) of the handset you want to call.
3. Press
OK
.
3.11 Receive an internal call
When you receive an internal call,
Internal Call
and
Handset X
is displayed.
1. If the handset is off the base then press to answer the call, or if the handset
is on the base simply lift the handset to answer the call.
NOTE
If the handset does not belong to the Colombo range, this function may not be
available.
3.12 Transfer a call
You can transfer an external call to another handset registered to the base.
During an external call:
1. Press followed by the handset number (1-5) that you want to transfer to.
2. Press
OK
.
3. When the other handset answers, press to complete the transfer.
NOTE
If there is no answer from the other handset and you wish to return to your
external caller, press .
Your external call resumes automatically after 100 seconds if there is no answer.
3.13 3 way conference call
You can hold a 3-way conference call between 2 internal callers and 1 external
caller.
During a call with an external caller:
1. Press followed by the handset number (1-5) that you want to establish a
conference call.
Using the phone

22
2. Press
OK
.
3. When the other handset answers, press
Join
to connect all three callers to
begin the conference call.
4. If there is no answer from the other handset, press to return to your
external caller.
5. Press to end the call.
3.14 Make a hands-free call
Hands-free lets you talk to your caller without holding the handset. It also enables
other people in the room to listen to the conversation.
Either
1. Dial the number and then press three times to dial over the xed line.
Or
2. Press and scroll down to
Mobile Call
and press twice, to dial over the
mobile network.
is displayed and you will hear the call over the handset loudspeaker.
3. Press to switch the call between the earpiece and hands-free.
4. Press to end the call.
3.15 Answer a call hands-free
If the handset is on the base and auto talk is switched on, lift the handset and
press .
If the handset is off the base or auto talk is switched off, press twice to answer
the call.
3.16 Switch to hands-free during a call
During a call, press to put the call on hands-free.
To switch hands-free off and return the call to the earpiece, press again.
3.17 View or dial a redial entry
1. Press to open the Redial list.
2. The last number dialled is highlighted.
3. Scroll or to the entry you want.
Either
4. Press twice to dial the entry over the xed line.
Or
5. Press and scroll down to
Mobile Call
and press , to dial over the mobile
network.
Using the phone

23
NOTE
If the caller’s number exactly matches an entry stored in the phonebook, the name
is displayed. Press to see the caller’s number.
3.18 Copy a Redial list number to the phonebook
1. Press to open the Redial list.
2. Scroll or to the entry you want.
3. Press
Options
.
Show Details
is highlighted. Scroll to
Save Number
.
4. Press
Select
. The display shows
Enter Name
.
5. Enter the name and press
OK
. The number is displayed.
6. Edit the number if necessary, then press
Save
.
7. Press or to select the ringer melody you want and press
Select
. The
number is stored.
8. Press to return to standby.
NOTE
See “ENTERING NAMES” on page 24.
3.19 Delete a redial entry
1. Press to open the Redial list.
2. Scroll or to the entry you want and press
Options
. The display shows
Show
Details
.
3. Scroll to
Delete Call
4. Press
Select
to conrm or to cancel.
3.20 Lock/unlock the keypad
You can lock the keypad so that it cannot be operated accidentally while carrying
it around.
NOTE
When the keypad is locked, you can still answer incoming calls and operate the
handset as normal. When the call ends, the keypad lock comes on again.
1. Press and hold .
icon is displayed.
2. To unlock the keypad, press the button below
Unlock
. The display shows
Press #
to Unlock Keys
.
3. Press within 3 seconds.
Using the phone
24
4. Phonebook
The Colombo handset phonebook can store up to 1000 names and numbers.
These can be stored manually or you can copy the phone numbers from your
mobile phone.
NOTE
To see how to pair your Colombo with your mobile and copy the mobile
phonebook, see page 9.
NOTE
Numbers can be up to 24 digits long and names up to 12 characters long. Entries
are stored in alphabetical order.
4.1 To store an entry
1. Press
Names
to enter the phonebook menu.
Search
is highlighted.
2. Scroll to
Add Entry
and press
Select
.
3. Enter a name and press
OK
.
4. Enter a number and press
Save
.
5. Scroll or to the melody you want and press
Select
. The entry is stored.
6. Press to return to standby.
NOTE
Cancel storing an entry by pressing at any time during the process.
4.2 Entering names
Use the alphanumeric keypad to enter names in the phonebook.
For instance to enter the name Paul
P Press once
A Press once
U Press twice
L Press three times
To enter a space press
Press or to move between characters / digits.
Press
Clear
to delete a character or press and hold
Clear
to delete all characters.
4.3 Character map
Key Case Assigned characters and symbols
L / U . , - ? ! ¡ ¿ ’ @ : ; / 1
L a b c 2 ä æ å à ç
Phonebook
25
U A B C 2 Ä Æ Å Ç
L d e f 3 è é
U D E F 3 É
L g h i 4 ì
UG H I 4
L j k l 5
U J K L 5
L m n o 6 ö ø ò ñ
UM N O 6 Ö Ø Ñ
L p q r s 7 ß
U P Q R S 7
L t u v 8 ù ü
U T U V 8 Ü
Lw x y z 9
U W X Y Z 9
L / U Space 0
L / U short press to switch between Abc, abc, ABC and
123 mode
4.4 To view and dial phonebook entries
1. In standby, press . The rst entry is highlighted on the display.
Scroll or to the entry you want.
Or
To search alphabetically, press the key with the rst letter of the name, e.g. if
the name begins with N, press twice. The display shows the rst entry
beginning with N. If required, scroll or to the exact entry.
2. Press ,
PSTN Call
is highlighted.
Either
3. Press
Dial
or to dial over the xed line.
Or
4. Scroll to
Mobile Call
and press
Dial
or to dial on the mobile network.
4.5 Enter a pause
If your Colombo is connected to a switchboard, you may need to enter a pause in
a stored number. This gives the switchboard time to nd an outside line. A Pause
is normally stored after the switchboard access code (e.g. 9)
1. When storing a number, press and hold until the display shows P. You can
Phonebook

26
then continue storing the phone number.
4.6 To search an entry
1. Press
Names
to enter the phonebook menu.
2.
Search
is highlighted. Press
Select
. The rst entry is highlighted on the display.
3. Enter the rst letter of the name to search alphabetically then scroll or to
the exact entry.
4. Press to return to standby.
4.7 To view details of an entry
1. In standby, press . The rst entry is highlighted on the display.
2. Enter the rst letter of the name to search alphabetically then scroll or to
the exact entry. Press
Options
.
3.
Show Details
is highlighted. Press
Select
. The name, number and ringtone of the
entry are displayed.
4. Press to return to standby.
4.8 To edit an entry
1. In standby, press . The rst entry is highlighted on the display.
2. Enter the rst letter of the name to search alphabetically then scroll or to
the exact entry. Press
Options
.
3. Scroll to
Edit Entry
and press
Select
.
4. Edit the name and press
OK
to conrm. Press
Clear
to delete a character, or
press and hold
Clear
to delete all characters.
5. Edit the number and press
Save
. Press
Clear
to delete a character, or press and
hold
Clear
to delete all characters.
6. Scroll or to the ringtone you want and press
Select
. The entry is stored.
7. Press to return to standby.
4.9 To copy an entry to another handset
1. In standby, press . The rst entry is highlighted on the display.
2. Enter the rst letter of the name to search alphabetically then scroll or to
the exact entry. Press
Options
.
3. Scroll to
Copy Entry
and press
Select
.
4. The display shows
To Handset
, press
Select
.
5. Scroll or to the number of the handset you want the entry to be copied
to. Press
Select
.
Phonebook

27
6. On the receiving handset the display shows
Copy phonebook?
, press
Yes
.
7. Copy is completed when the message “
<Name> copied
” appears on the display.
8. Press to return to standby.
NOTE
If an entry with the same number is already stored in the receiving handset, it will
not be copied.
4.10 To assign a ringtone
1. In standby, press . The rst entry is highlighted on the display.
2. Enter the rst letter of the name to search alphabetically then scroll or to
the exact entry. Press
Options
.
3. Scroll to
Ringtone
and press
Select
.
4. Scroll or to the ringtone you want and press
Select
. The ringtone is saved.
5. Press to return to standby.
4.11 To delete an entry
1. In standby, press . The rst entry is highlighted on the display.
2. Enter the rst letter of the name to search alphabetically then scroll or to
the exact entry. Press
Options
.
3. Scroll to
Delete Entry
and press
Select
.
4. Display shows
Delete <Name>?
. Press
Yes
to conrm or
No
to cancel.
5. Press to return to standby.
4.12 To store a quickdial number
1. In standby, press . The rst entry is highlighted on the display.
2. Enter the rst letter of the name to search alphabetically then scroll or to
the exact entry, then press
Options
.
3. Scroll or to
Quickdial
, press
Select
to conrm.
4. Scroll or to
Key X
where the entry will be stored, press
Select
.
5.
Assign
is highlighted press
Select
to conrm.
6. Press to return to standby.
4.13 To clear a quickdial number
1. In standby, press . The rst entry is highlighted on the display.
2. Enter the rst letter of the name to search alphabetically then scroll or to
the exact entry, then press
Options
.
3. Scroll or to
Quickdial
, press
Select
.
Phonebook

28
4. Scroll or to
Key X
where the entry is stored, press
Select
.
5. Scroll or to
Clear Entry
, press
Select
to conrm.
6. Press to return to standby.
4.14 To access the phonebook during a call
1. During a call, press
Names
.
2. Press
Options
to select
Add Entry
,
Show Details
,
Edit Entry
or
Delete Entry
.
4.15 To copy the phonebook to another handset
1. Press
Names
to enter the phonebook menu.
2. Scroll to
Copy Phonebook
and press
Select
.
3. The display shows
To Handset
, press
Select
.
4. Scroll or to the number of the handset you want the phonebook to be
copied to. Press
Select
.
5. On the receiving handset the display shows
Copy Phonebook?
, press
Yes
.
6. Copy is completed when the message “
X Entries Copied
” appears on the display.
7. Press to return to standby.
Note
If an entry with the same number is already stored in the receiving handset, it will
not be copied.
4.16 To check memory status
You can check how much phonebook memory you have on your phone.
1. Press
Names
to enter the phonebook menu.
2. Scroll to
Memory Status
and press
Select
. The display shows the number of used
and free phonebook entries.
3. Press to return to standby.
4.17 To delete all entries
1. Press
Names
to enter the phonebook menu.
2. Scroll to
Delete Phonebook
and press
Select
.
3. Display shows
Delete All Entries ?
. Press
Yes
.
4. Press to return to standby.
Phonebook

29
5. Calls list
When your mobile and Colombo are paired, on an incoming call via the mobile
network, the caller’s name will be displayed if the number matches the Colombo
phonebook. If no match is found only the number will
be shown.
If you receive a call on the xed line and have subscribed to Caller ID service,
provided the identity of the caller is not withheld, the number of the caller will be
displayed together with the date and time of the call (if provided by the network).
NOTES
If the caller’s number is stored in your phonebook along with a name, the name
will also be displayed.
If the number is unavailable,
Unavailable
will be displayed.
If the caller has withheld their number,
Withheld
will be displayed.
If the call is from an international number,
International
will be displayed.
If the call is from the operator,
Operator
will be displayed.
If the call is from a payphone,
Payphone
will be displayed.
If the call is from a ringback request,
Ringback
will be displayed.
Information about incoming calls is dependent on the country and network
operator. Some operators may charge a subscription for their Caller ID service.
The Calls list contains details of missed and received call. Details include the date
and time of the call. Entries are displayed in chronological order with the most
recent call at the top of the list.
When the list is full, and a new call is received, the oldest entry will be deleted
automatically.
The received and missed Calls list holds details of up to 50 calls.
If you receive more than one call from the same number, only the most recent call
is kept in the Calls list.
5.1 New calls alert
When you have new missed calls (incoming calls that you haven’t answered), the
display shows
You have X New missed calls
.
1. Press
View
to see details of the call.
If you press
Back
, the screen returns to standby and the
icon is displayed.
Calls list

30
5.2 To dial from the Calls list
1. Press
Menu
, the display shows
Calls Lists
, press
Select
.
2. Scroll or to highlight the Calls list (
Missed Calls
,
Received Calls
,
Dialled Calls
) you
want.
3. Press
Select
to conrm. The most recent number or name if stored in the
phonebook is displayed.
4. Scroll or to the entry you want.
5. Press ,
PSTN Call
is highlighted.
6. Either press
Dial
or to dial over the PSTN line.
7. Or scroll to
Mobile Call
and press
Dial
or to dial over the mobile network.
5.3 To view details of the call
1. Press
Menu
, the display shows
Calls Lists
, press
Select
.
2. Scroll or to highlight the Calls list (
Missed Calls
,
Received Calls
,
Dialled Calls
) you
want.
3. Press
Select
to conrm. The most recent number or name if stored in the
phonebook is displayed.
4. Scroll or to the entry you want and press
Options
.
5. Display shows
Show Details
. Press
Select
. The number (or name if stored in the
phonebook) is displayed.
6. Scroll to see the date and time of the call.
7. Press to return to standby.
5.4 To save a number from the Calls list to the phonebook
1. Press Menu, the display shows
Calls Lists
, press Select.
2. Scroll or to highlight the Calls list (
Missed Calls
,
Received Calls
,
Dialled Calls
) you
want.
3. Press
Select
to conrm. The most recent number or name if stored in the
phonebook is displayed.
4. Scroll or to the entry you want and press
Options
.
5. Scroll to
Save Number
and press
Select
.
6. Enter a name and press
OK
.
7. Display shows the number of the call. Edit the number if necessary and press
Save
. Press
Clear
to delete a character, or press and hold
Clear
to delete
all characters.
8. Scroll or to the melody you want and press
Select
. The entry is stored.
Calls list

31
9. Press to return to standby.
5.5 To delete a Calls list entry
1. Press
Menu
, the display shows
Calls Lists
, press
Select
.
2. Scroll or to highlight the Calls list (
Missed Calls
,
Received Calls
,
Dialled Calls
) you
want.
3. Press
Select
to conrm. The most recent number or name if stored in the
phonebook is displayed.
4. Scroll or to the entry you want and press
Options
.
5. Scroll to
Delete Call
and press
Select
. The call
is deleted.
6. Press to return to standby.
5.6 To delete entire Calls list
1. Press
Menu
, the display shows
Calls Lists
, press
Select
.
2. Scroll to
Delete Calls
and press
Select
.
3. Scroll or to highlight the Calls list (
Missed Calls
,
Received Calls
,
Dialled Calls
or
All
Calls
) you want.
4. Display shows
Delete All Calls ?
. Press
Yes
to conrm or
No
to cancel.
5. Press to return to standby.
Calls list

32
6. Agenda
6.1 Add a new event
Use the Colombo to remind you of details of up to ve events such as birthdays,
anniversaries or appointments.
Up to 24 characters can be entered as the subject.
1. Press
Menu
, scroll to
Agenda
and press
Select
.
2. If no previous event is stored,
Add Event
is highlighted. Press
Select
.
Or
If events are already stored, they are listed. Press
Options
.
Add Event
is
highlighted. Press
Select
.
3. Enter the subject and press
Save
.
4. Enter the date (DD/MM) and press
Save
. Enter the time (HH:MM) and press
Save
. If the current time format setting is 12 hour, select
am
or
pm
.
5. Scroll or to
Silent
or
Alarm
then press
Select
.
If you press
Alarm
:
Scroll or to
Once
or
Annually
then press
Select
.
• If
Once
is selected, scroll or to select when you
want to receive the reminder
At event time
or
30 min before
. Press
Select
to save.
• If
Annually
is selected, then the alarm will sound at the event’s time.
6. Press to return to standby.
NOTES
If you select a silent reminder, the event subject is displayed on screen but no
alarm will sound.
When the event memory is full, the display shows
Memory Full
. You must delete an
event before you can add a new one.
6.2 Switch off reminder ring
When the event is due, the event subject is displayed. If the reminder is not set to
Silent, the alarm will ring and is displayed.
1. Press
View
to stop the alarm and see the details of the event.
Or
Press
Back
to stop the alarm and return to standby.
NOTE
If no button is pressed, the alarm stops after one minute.
6.3 Show event details
1. Press
Menu
, scroll to
Agenda
and press
Select
.
2. Stored events are displayed. The rst event is highlighted on the display. If
Agenda

33
required, scroll to the event you want and press
Options
.
3. Scroll to
Show Details
and press
Select
. The description, date and time of the
event are displayed.
4. Press to return to standby.
6.4 Edit an event
1. Press
Menu
, scroll to
Agenda
and press
Select
.
2. Stored events are displayed. The rst event is highlighted on the display. If
required, scroll to the event you want and press
Options
.
3. Scroll to
Edit Event
and press
Select
.
4. Edit the subject and press
Save
. Press
Clear
to delete a character, or press and
hold
Clear
to delete all characters.
5. Edit the date (DD/MM) and press
Save
. Edit the time (HH:MM) and press
Save
. If
the current time format setting is 12 hour, select
am
or
pm
.
6. Scroll or to
Silent
or
Alarm
then press
Select
.
If you press
Alarm
:
Scroll or to
Once
or
Annually
then press
Select
.
• If
Once
is selected, scroll or to select when you want to receive the
reminder
At event time
or
30 min before
. Press
Select
to save.
• If
Annually
is selected, then the alarm will sound at the event’s time.
7. Press to return to standby.
6.5 Delete an event
1. Press
Menu
, scroll to
Agenda
and press
Select
.
2. Stored events are displayed. The rst event is highlighted on the display. If
required, scroll to the event you want and press
Options
.
3. Scroll to
Delete Event
and press
Select
.
4. Display shows
Delete Event ?
. Press
Yes
to conrm or
No
to cancel.
5. Press to return to standby.
6.6 Delete all events
1. Press
Menu
, scroll to
Agenda
and press
Select
.
2. Stored events are displayed. The rst event is highlighted on the display.
Press
Options
.
3. Scroll to
Delete All Events
and press
Select
.
4. Display shows
Delete All Events ?
. Press
Yes
to conrm or
No
to cancel.
5. Press to return to standby.
Agenda

34
7. Clock & Alarm
If you have subscribed to your network’s Caller ID service, the base automatically
sets the date and time of all handsets when you receive the rst call. You can also
manually set the time on the individual handsets.
7.1 Set the date and time
1. Press
Menu
, scroll to
Clock & Alarm
and press
Select
.
2.
Date & Time
is highlighted. Press
Select
.
3. Enter the date using the format DD/MM/YY e.g. 04/08/12 for 4 August 2012
and press
Save
.
4. Enter the time (HH:MM) and press
Save
.
If the current time format setting is 12 hour, select
am
or
pm
.
5. Press to return to standby.
NOTE
The date and time is retained during a power failure or when the batteries are
discharged.
7.2 Set the alarm
When the alarm is set, the display shows . Each handset can have a different
alarm setting.
1. Press
Menu
, scroll to
Clock & Alarm
and press
Select
.
2. Scroll to
Alarm
and press
Select
.
3. Scroll or to
Off
or
On
and press
Select
.
If Alarm is set to
On
:
Scroll or to
Once
,
Mon - Fri
or
On Daily
then press
Select
.
Enter the time (HH:MM) and press
Save
.
If the current time format setting is 12 hour, scroll or to select
am
or
pm
.
4. Press to return to standby.
NOTES
If the alarm is set to
Once
, will disappear from the screen after the alarm has
sounded once.
If the alarm is set to
On Daily
or
Mon - Fri
, will remain on the screen after the alarm
has sounded.
When the alarm goes off, press any key to stop the ring.
Clock & Alarm

35
7.3 Time format
1. Press
Menu
, scroll to
Clock & Alarm
and press
Select
.
2. Scroll to
Time Format
and press
Select
.
3. Scroll or to
12 Hour
or
24 Hour
and press
Select
.
4. Press to return to standby.
Clock & Alarm

36
8. Handset settings
8.1 Handset ringtone
You can set different ringtones for external calls and internal calls.
Select from 40 handset ringtones.
You will hear a sample ring as you scroll to each ringtone.
1. Press
Menu
, scroll to
Settings
and press
Select
.
2.
Set Handset
is highlighted. Press
Select
.
3.
Ringtone
is highlighted. Press
Select
.
4. Scroll or to
External Call
or
Internal Call
and press
Select
.
5. Scroll or to the ringtone that you want and press
Select
.
6. Press to return to standby.
8.2 Handset ringer volume
The handset has 5 ringer volume settings plus Off.
If the volume is set to Off, is displayed.
1. Press
Menu
, scroll to
Settings
and press
Select
.
2.
Set Handset
is highlighted. Press
Select
.
3. Scroll to
Ringer Volume
and press
Select
.
4. Scroll or to adjust the ringer volume level and press
Save
.
5. Press to return to standby.
NOTE
When the phone is ringing, you may press
Silence
to silent the ringer for
that call.
8.3 Receiver volume
This sets the standard volume level for the handset, earpiece. There are 8 levels
to choose from.
1. Press
Menu
, scroll to
Settings
and press
Select
.
2.
Set Handset
is highlighted. Press
Select
.
3. Scroll to
Receiver Volume
and press
Select
.
4. Scroll or to adjust the receiver volume level and press
Save
.
5. Press to return to standby.
Handset settings

37
8.4 Handset name
If you are using more than one handset with the Colombo base, you can give each
handset a personalised name to easily distinguish between the handsets.
A name can be up to 10 characters long.
1. Press
Menu
, scroll to
Settings
and press
Select
.
2.
Set Handset
is highlighted. Press
Select
.
3. Scroll to
Handset Name
and press
Select
.
4. Enter the name and press
Save
. Press
Clear
to delete a character, or press and
hold
Clear
to delete all characters.
5. Press to return to standby.
8.5 Display language
The available languages include:
English, Deutsch, Français, Italiano, Nederlands, Español, Türkçe, Ελληνικά and
Português.
1. Press
Menu
, scroll to
Settings
and press
Select
.
2.
Set Handset
is highlighted. Press
Select
.
3. Scroll to
Language
and press
Select
.
4. Scroll or to the language you want and press
Select
.
5. Press to return to standby.
8.6 Screensaver
When the screensaver is set to Clock, an analogue clock is displayed.
The screensaver comes on when the screen backlight switches off in standby. To
change the backlight timeout setting, see Light timeout in the next section.
1. Press
Menu
, scroll to
Settings
and press
Select
.
2.
Set Handset
is highlighted. Press
Select
.
3. Scroll to
Screensaver
and press
Select
.
4. Scroll or to
Clock
or
Off
then press
Select
.
5. Press to return to standby.
8.7 Light timeout
Set the duration of the backlight after the handset returns to standby screen.
1. Press
Menu
, scroll to
Settings
and press
Select
.
2.
Set Handset
is highlighted. Press
Select
.
3. Scroll to
Light Timeout
and press
Select
.
Handset settings

38
4. Scroll or to set the timeout period you want, choose from either
15
,
30
or
45
Seconds
and press
Select
.
5. Press to return to standby.
8.8 Auto talk
With Auto Talk switched on, you can answer a call just by lifting the handset off the
base or charger. If switched off, you will have to press to answer
a call.
1. Press
Menu
, scroll to
Settings
and press
Select
.
2.
Set Handset
is highlighted. Press
Select
.
3. Scroll to
Auto Talk
and press
Select
.
4. Scroll or to
Off
or
On
then press
Select
.
5. Press to return to standby.
8.9 Key beep
When you press a button on the Colombo handset, you will hear a beep. You can
switch it on or off.
1. Press
Menu
, scroll to
Settings
and press
Select
.
2.
Set Handset
is highlighted. Press
Select
.
3. Scroll to
Key Beep
and press
Select
.
4. Scroll or to
Off
or
On
then press
Select
.
5. Press to return to standby.
8.10 PBX access code
If the Colombo is connected to a switchboard, you may need to enter a one-digit
access code in the dialling sequence to be able to connect to the outside line. The
access code will be displayed at the beginning of a number on the screen. The
code can be up to 4 digits long. The access code will not be used when you dial
the number manually (such as when you are not dialling from the phonebook).
This allows you to make calls to other switchboard extensions.
1. Press
Menu
, scroll to
Settings
and press
Select
.
2.
Set Handset
is highlighted. Press
Select
.
3. Scroll to
PBX Access Code
and press
Select
.
4. Scroll or to
Off
,
On
or
Set Code
then press
Select
.
If you select
Set Code
, enter the switchboard access code e.g. 9 then
press
Save
.
5. Press to return to standby.
Handset settings

39
9. Base settings
9.1 Dialling mode
The Colombo is preset to Tone dialling. It is unlikely that you need to change this
setting.
1. Press
Menu
, scroll to
Settings
and press
Select
.
2. Scroll to
Set Base
and press
Select
.
3. Scroll to
Dialling Mode
and press
Select
.
4. Scroll or to
Pulse
or
Tone
and press
Select
.
5. Press to return to standby.
9.2 Ring priority
When you have more than one handset registered to your base, you can set one
handset to ring before the other handsets. This allows one handset user to answer
all incoming calls rst, for example, the receptionist.
Choose
All Handsets
if you want all handsets to ring at the same time or
Select Handset
to nominate a handset to ring before the other handsets ring.
1. Press
Menu
, scroll to
Settings
and press
Select
.
2. Scroll to
Set Base
and press
Select
.
3. Scroll to
Ring Priority
and press
Select
.
4. Scroll or to
All Handsets
or
Select Handset
then press
Select
.
If you choose
Select Handset
, all available handsets are displayed.
• Scroll or to the handset you want then press
Select
.
• Scroll or to the number of rings that you want to set:
2
,
4
or
6 Rings
and
press
Select
.
5. Press to return to standby.
9.3 Recall mode
Recall is useful to access certain network services and PBX /
switchboard services.
The default recall mode preset in the Colombo is suitable for your country network
and therefore you should not need to change it.
NOTE
The use of the Colombo cannot be guaranteed on all PABX.
1. Press
Menu
, scroll to
Settings
and press
Select
.
2. Scroll to
Set Base
and press
Select
.
3. Scroll to
Recall Mode
and press
Select
.
Base settings

40
4. Scroll or to
Recall 1
or
Recall 2
and press
Select
.
5. Press to return to standby.
9.4 Change the System PIN
The System PIN is required when changing certain settings and for registration
/ de-registration. The default setting is 0000. You can change this to your own
preferred number (up to 8 digits).
When you enter a PIN, the digits are shown as
****
.
1. Press
Menu
, scroll to
Settings
and press
Select
.
2. Scroll to
Set Base
and press
Select
.
3. Scroll to
System PIN
and press
Select
.
4. Enter the old PIN (Default setting = 0000) and press
OK
.
5. Enter the new PIN and press
OK
.
6. Re-enter the new PIN and press
OK
.
7. Press to return to standby.
NOTE
It is advisable to make a note of your new PIN code and keep it
somewhere safe.
9.5 Restore default settings
You can restore the Colombo to its default (original) settings. Resetting the
Colombo will not affect the phonebook or Calls list, and all handsets registered to
the base will be retained. Only the handset and base settings will be reset.
1. Press
Menu
, scroll to
Setting
s and press
Select
.
2. Scroll to
Set Base
and press
Select
.
3. Scroll to
Master Reset
and press
Select
.
4. Select
Yes
to conrm or
No
to cancel.
5. Enter the System PIN (Default setting = 0000) then press
OK
. The display will
show
Reset Complete
and the unit will restart automatically.
Base settings
41
9.6 ECO mode
Your Colombo offers an ECO mode function which reduces the transmitted power
and energy consumption when switched on. This feature is set to
Off
by default.
1. Press
Menu
, scroll to
Settings
and press
Select
.
2. Scroll to
Set Base
and press
Select
.
3. Scroll to
ECO Mode
and press
Select
.
4. Scroll or to
Off
or
Eco Mode
and press
Select
.
5. Press to return to standby.
Signal icon in
Eco Mode
NOTE
When
ECO
is set to
On
, the is replaced with the and the handset range will be
reduced.
Base settings

42
9.7 Default settings
Handset name HANDSET
Key tone On
Auto pick up On
Ringer melody (EXT) Melody 3
Ringer melody (INT) Melody 1
Ringer volume 3
Earpiece volume 4
Phonebook Unchanged
Call list Unchanged
Redial list Unchanged
Master PIN 0000
Keypad lock Off
Clock 12:00
Alarm Off
Dial mode Tone
Base settings

43
10. Using additional handsets
Up to 5 handsets can be registered to one base station. Additional handsets must
be registered to the base before you can use them.
• The instructions described below apply specically to the Colombo handset. If
you wish to register another manufacturer’s handset, the instructions may vary.
In this case, please refer to the instruction manual of the additional handset.
• The System PIN is required to register or de-register handsets. The default
PIN is 0000.
10.1 Registering an additional handset
NOTE
Handset batteries must be fully charged before you start to register. Hold your
handset close to the base during the registration process. Handsets that were
supplied with your Colombo base are already preregistered.
On the base:
1. Press and hold for at least 4 seconds and the base will be ready
accept additional handsets. The base will remain in registration mode for 90
seconds.
On the handset:
1. Press
Menu
, scroll to
Registration
and press
Select
.
2.
Register Handset
is highlighted. Press
Select
.
3. Bases are displayed. If necessary, scroll or to a new base you wish to
register the Colombo handset to and press
Select
.
4. If you are replacing a base that is already indicating
In Use,
when you press
Select
the display shows
Replace Base X?
Press
Yes.
5. Enter the system PIN and press
OK
.
6. The display shows
Searching Base X
.
7. When registration is successful the display shows
Handset Registered
and you hear
a conrmation beep.
NOTE
If registration is not successful the rst time, please repeat the process again in
case the base registration period ran out of time. If the base is not found after a
few seconds, the handset returns to standby. Try registering again.
If there are already 5 handsets registered to the base, registration will fail. You
must de-register a handset before you can register a new one.
Using additional handsets

44
10.2 Register a different make of handset to your Colombo base
IMPORTANT
DECT GAP Prole only guarantees that basic calling functions will work correctly
between different makes / types of handset and base. There is a possibility that
certain devices such as Caller ID will not work correctly.
On the base:
1. Press and hold for at least 4 seconds and the base will be ready
accept additional handsets. The base will remain in registration mode for 90
seconds.
On the handset:
Follow the registration instructions given in your handset’s user guide.
10.3 Select a base
You can register the Colombo handset with up to 4 bases. Once registered, you
can switch between bases, for example, bases at home and at work.
1. Press
Menu
, scroll to
Registration
and press
Select
.
2. Scroll to
Select Base
and press
Select
.
3. All the base numbers are displayed.
(In use)
is shown beside the base number where the handset was previously
registered to. Scroll or to the base you want and press
Select
.
4. The display shows
Searching Base X
. When registration is complete, the handset
returns to standby.
10.4 De-register a handset
Use one handset to de-register another. You cannot de-register the handset that
you are using.
1. Press
Menu
, scroll to Registration and press
Select
.
2. Scroll to
De-register
and press
Select
.
3. Enter the System PIN and press
OK
. (default setting = 0000)
4. Scroll or to the handset you want to de-register and press
Select
.
5. Press
Yes
to conrm or
No
to cancel.
6. Press to return to standby.
Using additional handsets

45
11. Help
No dial tone
• Use only the telephone line cord supplied.
• Check that the telephone line cord is connected properly.
• Check that the mains power is connected properly and switched on.
No display
• Check that the batteries are inserted correctly and fully charged. Use only
approved rechargeable batteries supplied.
• Check that the handset is switched on. Press and hold .
• Reset the base by removing the batteries and disconnecting the mains power.
Wait for around 15 seconds before connecting it again. Allow up to one minute
for the handset and base to synchronise.
icon ashes
• Handset is out of range. Move closer to the base.
• Make sure that the handset is registered to the base, see page 43.
• Check that the mains power is connected properly and switched on.
My phonebook will not copy from my mobile phone
• Make sure the Colombo and your mobile are paired see page 8.
• Not all mobiles will allow you to copy the phonebook via Bluetooth wireless
technology. For advise on compatible mobiles please contact customer
services on xxxxxxxxxxxx.
The Colombo does not show in my mobile’s device list
• Unplug the Colombo base from the power and plug back in again.
• Turn the Bluetooth function on the mobile off and on and try again.
• If the problem persists reset the Colombo to its default settings, see page 40.
I cannot make / receive calls on the Colombo via the mobile
network
• Make sure your mobile is paired and says “Connected”.
• Turn the Bluetooth function on the mobile off and on and try again.
My mobile will not charge on the Colombo base using the
Duracell PowermatTM jacket
• Remove the mobile from the charging pad and remove the jacket, put the
mobile back in the jacket and replace onto the charging pad.
Keypad does not seem to work
• Check that the keypad lock is not on, see page 23.
icon is not scrolling during charge
• Adjust the handset slightly on the base.
• Clean the charging contacts with a cloth moistened with alcohol.
Help

46
• Check that the mains power is connected properly and switched on.
• The battery is full. When the handset is fully charged, icon will appear
steady on the display.
No Caller ID
• Check your subscription with your network operator, see page 29.
• The caller may have withheld their number.
• The record cannot be found in your phonebook. Check that you have the
correct name / number stored in your phonebook, with the full area code.
I have forgotten my PIN!
• Remove one battery, press and hold the star button on the handset and
replace the battery. The display shows
Master Reset
, press
OK
. The handset will
automatically reset and the PIN will default back
to 0000.
Cannot register a handset to the base
• You can register up to a maximum of 5 handsets to a Colombo base. You must
de-register a handset in order to register a new one, see page 44.
• Check that you have entered the correct PIN code (default = 0000).
• Check that you are at least one metre away from other electrical equipment to
avoid interference when registering.
Handset does not ring
• The handset ringer volume may be set to Off, see page 36.
Noise interference on my phone or on other electrical
equipment nearby
• Place your Colombo at least one metre away from electrical appliances or any
metal obstructions to avoid any risk of interference.
Help

47
12. General information
IMPORTANT
This equipment is not designed for making emergency telephone call when
the power fails. Alternative arrangements should be made for access to the
emergency services.
This product is intended for connection to analogue public switched telephone
networks and private switchboards in US.
IMPORTANT SAFETY INSTRUCTIONS
When using your telephone equipment, basic safety precautions should always be
followed to reduce the risk of re, electric shock and injury to persons, including
the following:
• Do not use this product near water for example, near a bathtub, washbowl,
kitchen sink or laundry tub, in a wet basement or near a swimming pool.
• Do not use the telephone to report a gas leak in the vicinity of the leak.
• Use only the power cord and batteries indicated in this manual. Do not dispose
of batteries in a re. They may explode. Check with local codes for possible
special disposal instructions.
Cleaning
• Clean the handset and base (or charger) with a damp (not wet) cloth, or an
anti-static wipe.
• Never use household polish as this will damage the product. Never use a dry
cloth as this may cause a static shock.
Environmental
• Do not expose to direct sunlight.
• The handset may become warm when the batteries are being charged or
during prolonged periods of use. This is normal. However, we recommend that
to avoid damage you do not place the product on antique/veneered wood.
• Do not stand your product on carpets or other surfaces which generate bres,
or place it in locations preventing the free ow of air over its surfaces.
• Do not submerge any part of your product in water and do not use it in damp
or humid conditions, such as bathrooms.
• Do not expose your product to re, explosive or other hazardous conditions.
• There is a slight chance your phone could be damaged by an electrical storm.
We recommend that you unplug the power and telephone line cord during an
electrical storm.
Product disposal instructions
• The symbol shown here and on the product means that the product is classed
as Electrical or Electronic Equipment and should not be disposed with other
household or commercial waste at the end of its working life.
• The Waste of Electrical and Electronic Equipment (WEEE) Directive (2002/96/
EC) has been put in place to recycle products using best available recovery
and recycling techniques to minimize the impact on the environment, treat any
General information

48
hazardous substances and avoid increasing landll.
Product disposal instructions for residential users
• When you have no further use for it, please remove any batteries and dispose
of them and the product per your local authority’s recycling processes. For
more information please contact your local authority or the retailer where the
product was purchased.
Warranty Information
• This product has a warranty of 12 months and is therefore guaranteed to
be free from defects in materials and workmanship during that period. If you
experience a problem within that time, simply call the helpdesk on xxxxxxxxxxx
(local call rate applies).
• If your problem cannot be solved by our helpdesk, you will need to return your
product to the place it was purchased. Remember to take your receipt as proof
of purchase as it must be produced before the warranty can be honoured.
• This product must have been used only for the intended purpose and not been
subjected to wilful or accidental damage.
• This warranty does not cover damage caused by excessive voltage or
lightning.
• If this product has been tampered with in any way, the warranty shall be
considered null and void.
• This guarantee does not affect your statuatory rights.
FCC / ACTA Information
Warning: changes or modications not expressly approved by the party
responsible for compliance could void the user’s authority to operate the
equipment. Privacy of communications may not be ensured when using this
telephone!
This equipment complies with Part 68 of the FCC rules and the requirements
adopted by the ACTA. On the bottom of this equipment is a label that contains,
among other information, a product identier in the format US:AAAEQ##TXXXX. If
requested, this number must be provided to the telephone company.
A plug and jack used to connect this equipment to the premises wiring and
telephone network must comply with the applicable FCC Part 68 rules and
requirements adopted by the ACTA. A compliant telephone cord and modular
plug is provided with this product. It is designed to be connected to a compatible
modular jack that is also compliant. See installation instructions for details.
If this equipment [US: SGWW401BPOWERMAT] causes harm to the telephone
network, the telephone company will notify you in advance that temporary
discontinuance of service may be required. But if advance notice isn’t practical,
the telephone company will notify the customer as soon as possible. Also, you
will be advised of your right to le a complaint with the FCC if you believe it is
necessary.
The telephone company may make changes in its facilities, equipment, operations
or procedures that could affect the operation of the equipment. If this happens
General information

49
the telephone company will provide advance notice in order for you to make
necessary modications to maintain uninterrupted service.
If trouble is experienced with this equipment [US: SGWW401BPOWERMAT], for
repair or warranty information, Service can be facilitated through our ofce at:
U.S. Agent Company Name: Future Call LLC
Address: 13425 S 37th Place Phoenix AZ 85044
Tel: 480-759-2255
Fax: 480-706-1184
If the equipment is causing harm to the telephone network, the telephone
company may request that you disconnect the equipment until the problem is
resolved.
Please follow instructions for repairing if any (e.g. battery replacement section);
otherwise do not alternate or repair any parts of device except specied. For
repair procedures, follow the instructions outlined under the limited warranty.
Connection to party line service is subject to state tariffs. Contact the state public
utility commission, public service commission or corporation commission for
information.
If your home has specially wired alarm equipment connected to the telephone
line, ensure the installation of this [POWERMAT] does not disable your alarm
equipment. If you have questions about what will disable alarm equipment, consult
your telephone company or a qualied installer.
If the telephone company requests information on what equipment is connected to
their lines, inform them of:
a) The ringer equivalence number [0.1B]
b) The USOC jack required [RJ11C]
c) Facility Interface Codes (“FIC”) [02LS2]
d) Service Order Codes (“SOC”) [9.0Y]
e) The FCC Registration Number [US: SGWW401BPOWERMAT]
The REN is used to determine the number of devices that may be connected to
a telephone line. Excessive RENs on a telephone line may result in the devices
not ringing in response to an incoming call. In most but not all areas, the sum of
RENs should not exceed ve (5.0). To be certain of the number of devices that
may be connected to a line, as determined by the total RENs, contact the local
telephone company. The REN for this product is part of the product identier that
has the format US: AAAEQ##TXXXX. The digits represented by ## are the REN
without a decimal point. For this product the FCC Registration number is [US:
SGWW401BPOWERMAT] indicates the REN would be 0.1B.
This product is hearing aid compatible.
This device complies with part 15 of the FCC Rules. Operation is subject to the
following two conditions: (1) This device may not cause harmful interference, and
General information

50
(2) this device must accept any interference received, including interference that
may cause undesired operation.
Note: This equipment has been tested and found to comply with the limits for
a Class B digital device, pursuant to part 15 of the FCC Rules. These limits
are designed to provide reasonable protection against harmful interference
in a residential installation. This equipment generates, uses and can radiate
radio frequency energy and, if not installed and used in accordance with the
instructions, may cause harmful interference to radio communications. However,
there is no guarantee that interference will not occur in a particular installation. If
this equipment does cause harmful interference to radio or television reception,
which can be determined by turning the equipment off and on, the user is
encouraged to try to correct the interference by one or more of the following
measures:
—Reorient or relocate the receiving antenna.
—Increase the separation between the equipment and receiver.
—Connect the equipment into an outlet on a circuit different from that to which the
receiver is connected.
—Consult the dealer or an experienced radio/TV technician for help.
Specic Absorption Rate (SAR) information
SAR tests are conducted using standard operating positions accepted by the
FCC with the phone transmitting at its highest certied power level in all tested
frequency bands, although the SAR is determined at the highest certied power
level, the actual SAR level of the phone while operating can be well below the
maximum value, in general, the closer you are to a wireless base station antenna,
the lower the power output. Before a new model phone is a available for sale to
the public, it must be tested and certied to the FCC that it does not exceed the
exposure limit established by the FCC, Tests for each phone are performed in
positions and locations (e.g. at the ear )as required by the
FCC. This handset has also been tested and meets the
FCC RF exposure guidelines.Use of otheraccessories may Non-compliance with
the above restrictions may result in violation of RF exposure guidelines.
IMPORTANT NOTE
FCC Radiation Exposure Statement: This equipment complies with FCC
radiation exposure limits set forth for an uncontrolled environment .This equipment
should be installed and operated with minimum distance 20cm between the base&
your body. This transmitter must not be co-located or operating in conjunction
with any other antenna or transmitter.
Connecting to a switchboard
This product is intended for use within US for connection to the public telephone
network and compatible switchboards, which support tone dialling and timed break
recall. If in doubt please consult your service provider.
Inserting a pause
With some switchboards, after dialling the access code you may have to wait for a
moment while the switchboard picks up an outside line so you will need to enter a
pause in the dialing sequence.
• Press and hold # to insert a pause (P) before entering the telephone number.
You may also need to enter a pause when storing international numbers or charge
card numbers.
Recall
You may need to use the recall function if you are connected to a switchboard/
PBX (Private Branch Exchange), contact your PBX supplier for further information.
US v3 26-11-2013