HAIER Coolers Manual L0501620
User Manual: HAIER HAIER Coolers Manual HAIER Coolers Owner's Manual, HAIER Coolers installation guides
Open the PDF directly: View PDF ![]() .
.
Page Count: 60
• @ @
Whaf The World Comes Home To _'
W_te_Dis?e_
Model#
F@ @
_s_yuc_s J _s_o_ o
ModUle#
_s_yuc_s _ _s_c_ o
Modelo#
ReadcIH of the instructions before using this appJiclnceo
When using this appliance, always exercise basic safety
precautiens, indudin9 the following:
"1. Use this appliance only for its intended purpose as described in this use and
care guide.
2. This water dispenser must be properly installed in accordance with the
installation instructions before it is used. See the grounding instructions in the
installation section.
3.
4_
5.
6.
7_
Never unplugyour water dispenserby pulling on the power cor& Always
grasp the plug firmly and pull straightout from the outlet.
Repair or replace immediately, al! electric service cords that have become
frayed or otherwise damaged. Do not use a cord that shows cracks or abrasion
damage along its length, on the plug or at the connector end_
Unplug your water dispenser before cleaning and making any repairs.
Note: If for any reason this product requires service, we strongly recommend
that a certified technician perform the service.
This water dispenser should not be recessed or built into an enclosed cabinet. It
is designed for freestanding installation only.
Thisappliance is designedfor INDOOR USEONLYand should not be used
outdoors.
8. Do not operate ),'our water dispenser in the presence of explosive fumes.
9. Close supervision is necessary when any appliance is used by or near children.
10. To protect against electric shock, do not immerse the cord, plug, or any other
part of the water dispenser in water or other liquids.
SAVEI'HESEINSl'RU(I'IONS
ForFutureUse
Thank you for purchasing our Haier
producL This easy-to-use manual will
guide you in getting the best use of
your water dispensen
Remember to record the model and
serial numben They are on a label in
back of the uniL
Model number
Serial number
Date of purchase
Staple your receipt to your manual° You wiJJ need it to obtain
warranty service.
PAGE
SAFEYYPRECAUTIONS ............................................................................ 1
PARTS AND FEATURES...................................................................... 4-10
PROPER LOCATION .............................................................................. 11
ELECTRICAL CONNECYION$ 12
Grounding Instructions 12
Wiring Requirements 12
Extension Cords 12
Power Interruptions .................................................................................... ] 2
OPm:RATING YOUR WA'[_:R DISP_:N$_:R ....................................... 13" 15
Cold/Hot \,,VaterFaucets 13
Cold/Hot Water Switches 13
Cold/Hot Water Indicator Lights.................................................................. 13
Using the Refrigerator Compartment ............................................................ 'J4
Using the Storage Compartment .................................................................. ] 4
Replacing the Fuse...................................................................................... 14
Removable Drip Tra';!.................................................................................. 15
PROPER ¢ARm:AND CLEANING ...................................... 15-16
General ] 5
Cleaning the Condenser Coils ............................................................. 16
For"Long Vacations or Absences /Moving .................................................. 16
]rRouBP.ESHOOTmNG GUID_: .......................................................... 17-18
WARRANTY ............................................................................................ 19
iiiiiiiiiiiiiiiiiiiiiiiiiiiiiiiiiiiiiiiiiiiiiiiiiiiiii @ i i i i i i i i i i i i i i i i i i i i i i i i i i i!
1_RemoveaJJpacking materials. Thisincludesthe foam base and aJJadhesivetape
homing the accessoriesinside and outside.
2. Inspectand removeany remaining packaging,tape and printed materiaJsbefore
turning on the water dispensen
Note: AJJowthewater dispenserto standin an upright positionfor at Jeast
8hours b÷for÷ turning on tB÷ power.
Features
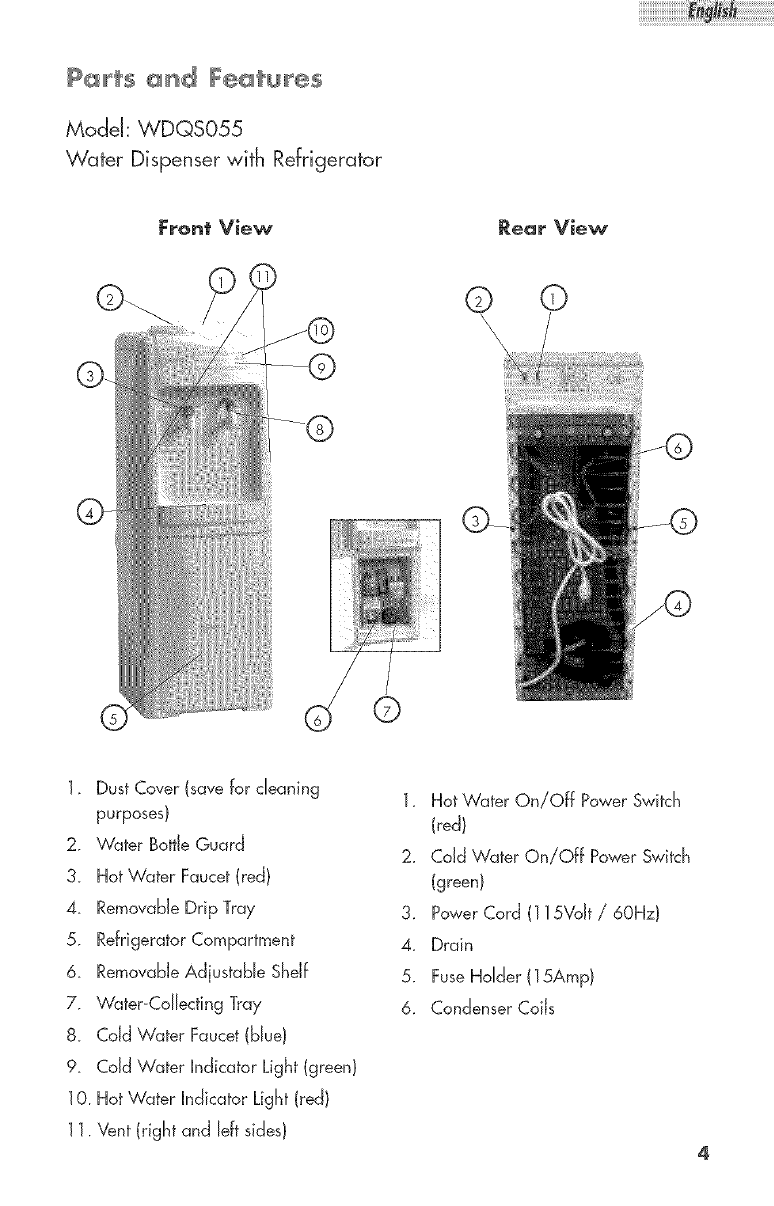
Model: WDQS055
Water Dispenser with Refrigerator
Front View Rear View
© ©
©
1. DustCover(savefor cleaning
purposes)
2. Water BottleGuard
3_ Hot Water Faucet(red)
4. RemovableDrip Tray
5. RefrigeratorCompartment
& RemovableAdjustableShelf
7. \'Vater-CoJJectingTray
8_ Cold Water Faucet(blue)
9. Cold Water hdicator Light (green)
10_Hot Water Ndicator Light(red)
11. Vent (right and Jeffsides)
1. Hot Water On/Off Power Switch
(red)
2. Cold Water On/Off Power Switch
(green)
3. Power Cord (115Volt /60Hz)
4. Drain
5. Fuse Holder (15Amp)
6. Condenser Coils
_H_s _d Fe_tuHes
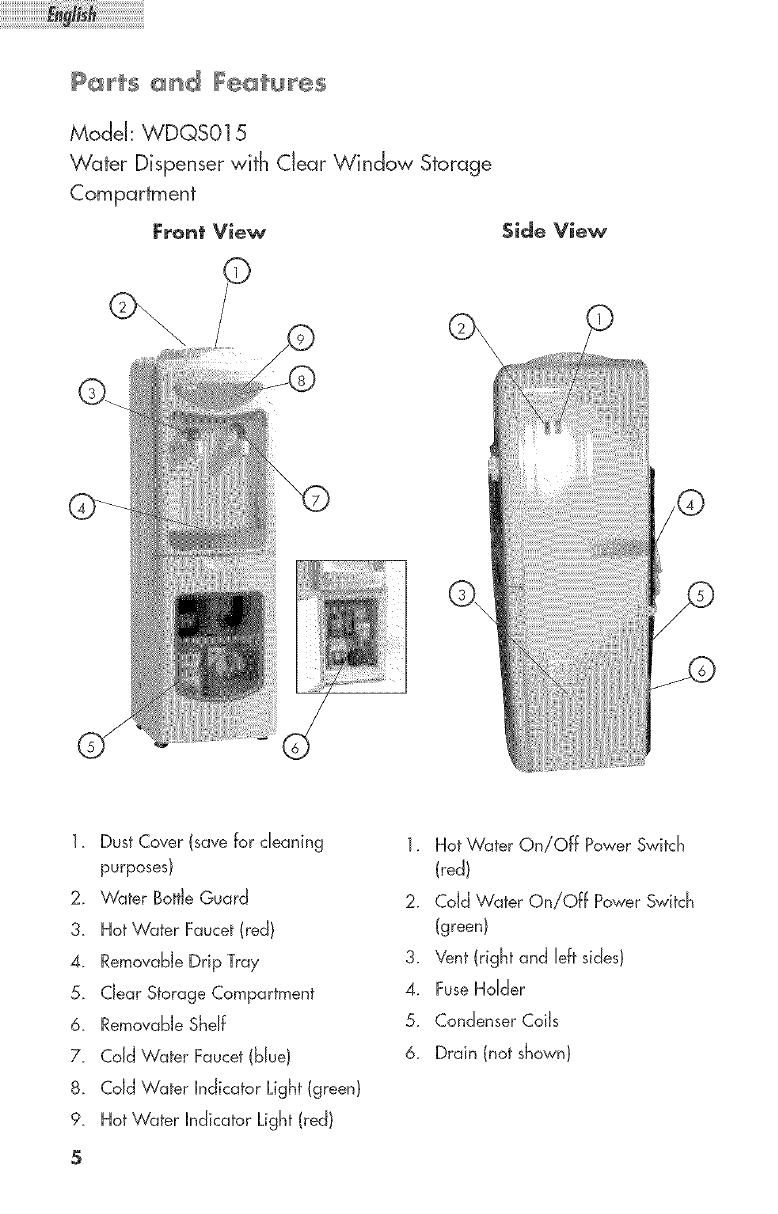
Model: WDQS015
Water Dispenser with Clear Window Storage
Compartment
Front View $i4e View
\\
/®
1. Dust Cover (save for cleaning
purposes)
2. Water Bottle Guard
3_ Hot Water Faucet (red)
4. Removable Drip Tray
5. Clear Storage Compartment
6. RemovableShdf
7_ Cold \'VaterFaucet(Mud
8. Cold Water hdicator Light(green}
9_ Hot Water nndicatorLight (red}
5
1. Hot Water On/Off PowerSwitch
(red)
2. Cold \dater On/Off PowerSwitch
(green}
3. Vent(right and Jeffsides}
4. FuseHdder
5. CondenserCoils
6. Drain (not shown}
_rts _d Features
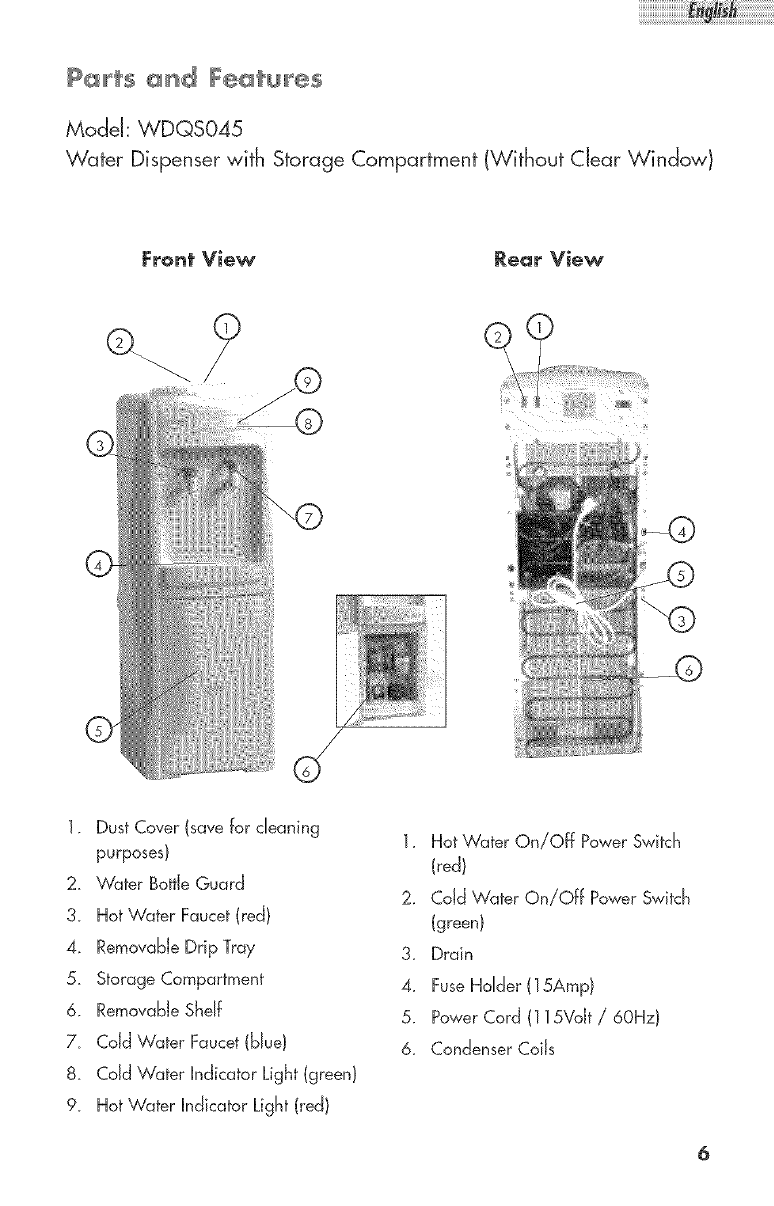
Model: WDQS045
Water Dispenser with Storage Compartment (Without dear Window)
Front View Rear View
©
1. DustCover(savefor cleaning 1. Hot Water On/Off PowerSwitch
purposes) (red)
2. Water BottJeGuard 2. CoJdWater On/Off PowerSwitch
3_ Hot Water Faucet(red} (green)
4. RernovabJeDrip Tray 3. Drain
5. StorageCornpartrnent 4. FuseHoJder(15Amp}
6. RernovabJeShdf 5. PowerCord (115Volt/ 60Hz)
7_ CoJdWater Faucet(bJue) 6. CondenserCoiJs
8. CoJdWater hdicator Light (green)
9_ Hot Water hdicator Light(red)

iiiiiiiiiiiiiiiiiiiiiiiiiiiiiiiiiiiiiiiiiiiiiiiiiiiiii @ i i i i i i i i i i i i i i i i i i i i i i i i i i i!
_ts _d Features
Model: WDQSO05
Water Dispenser
Front View Rear View
©
1_ DustCover(save for cleaning
purposes}
2. Water BottleGuard
3. Hot Water Faucet(red}
4_ RemovableDrip Tray
5. Cold Water Faucet(blue}
& Cold Water Indicator Light (green}
7. Hot Water Indicator Light(red}
1. Power Cord (115Vdt /60Hz}
2_ Fuse HoMer (15Amp)
3. Drain
4. Pressure ReleaseVent
5. Coding Fan
6. Hot Water Switch (red)
7. Cold Water Switch (green}
P_Hts _d _÷_uHes
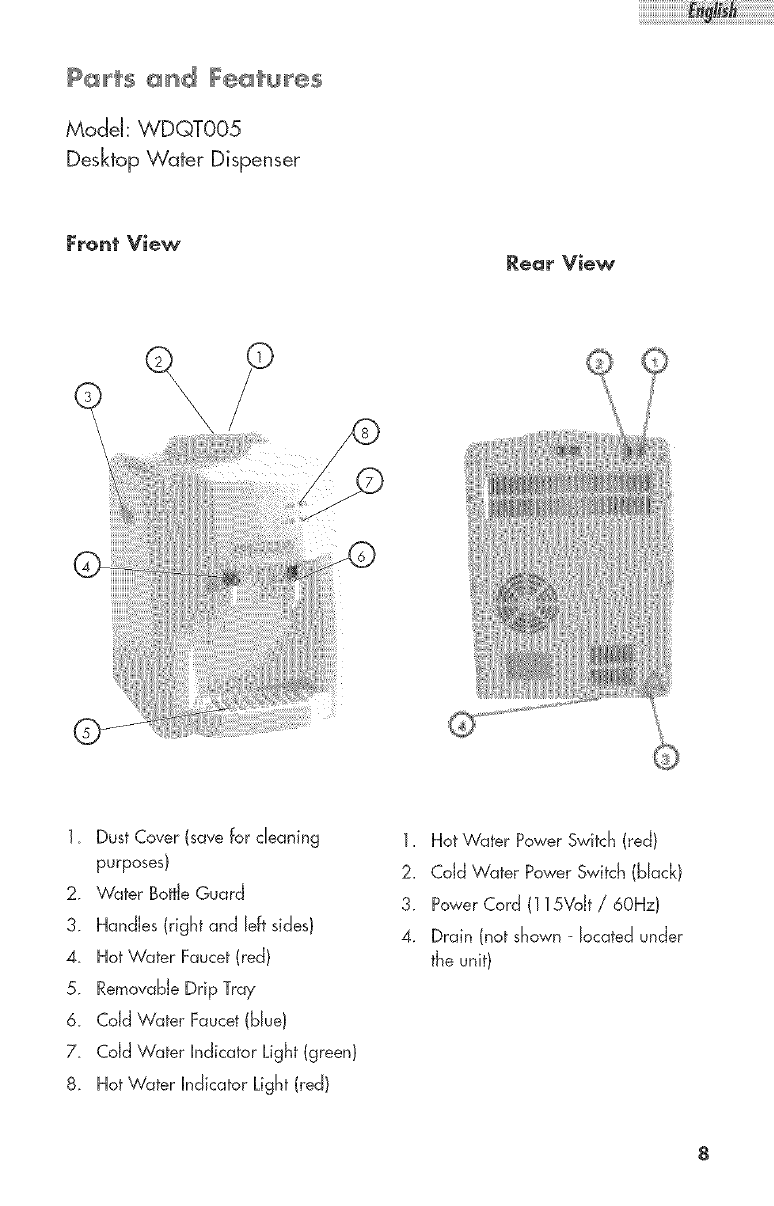
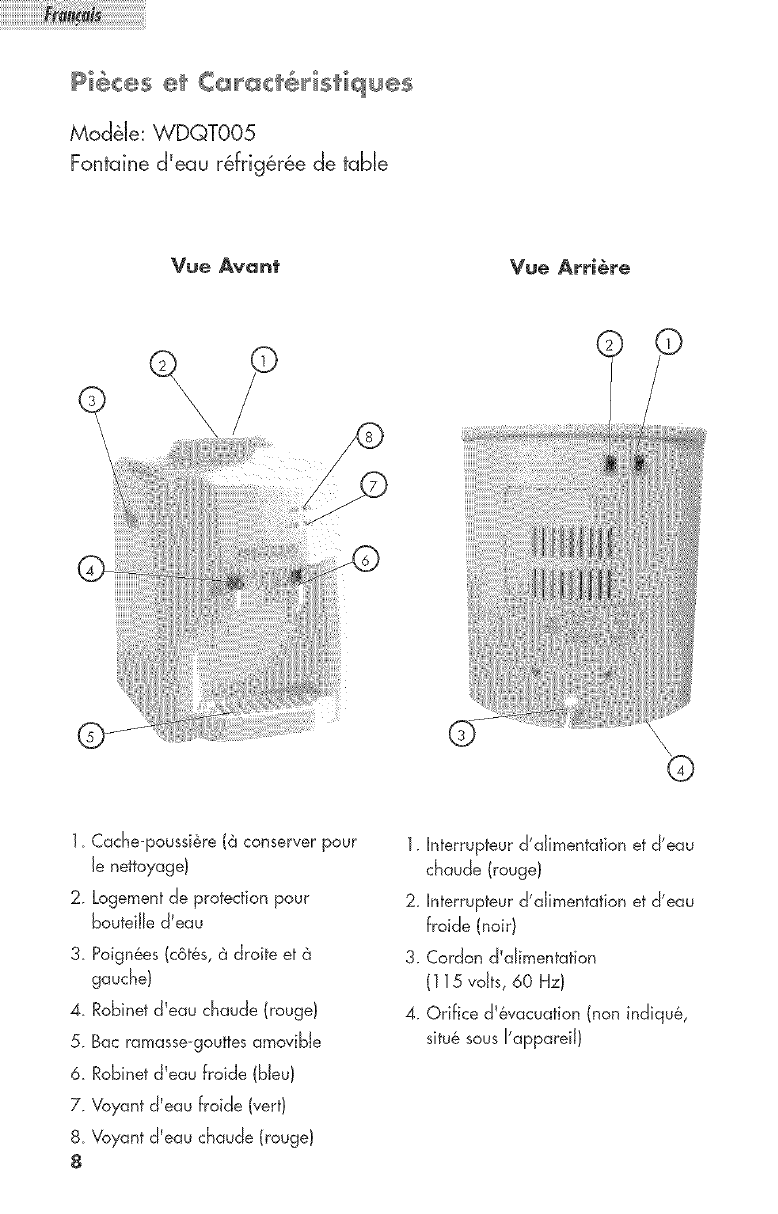
ModeJ: WDQTO05
Desktop Water Dispenser
Front Vi÷_ Rear Vie_
1_ Dust Cover (save for cleaning
purposes)
2. Water BottJeGuard
3. Handles (right and Jeff sides}
4_ Hot Water Faucet (red/
5. RemovabJe Drip Tray
& CoJd Water Faucet (bJue)
7. Cold Water _ndicator Light (green/
8. Hot Water hclicator Light (red}
1_ Hot Water Power Switch (red)
2_ CoJd \'Vater Power Switch (black)
3. Pawer Cord (115VoJt /60Hz/
4. Drain (not shown - Jocated under
the unit)
8

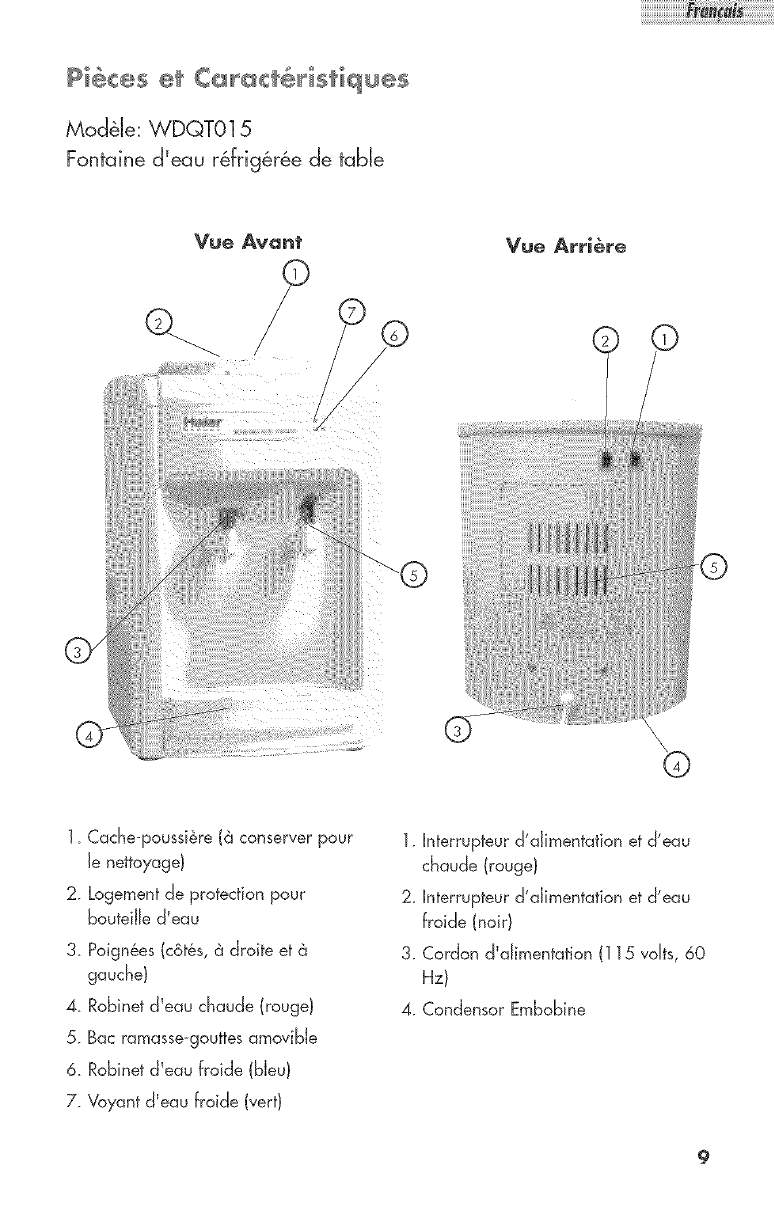
ModeJ: WD©T015
Desktop Water Dispenser
Front View
/
©©
©
Rear View
........
1_ Dust Cover (save for cleaning
purposes)
2. Water Bottle Guard
3. Hot Water Faucet (red)
4_ RemovabJe Drip Tray
5. CoJd Water Faucet (bJue}
6_ Cold Water Indicator Light (green)
7. Hot Water Hndicator Light (red)
1_ Hot Water Power Switch (red}
2_ CoJd Water Power Switch (green)
3. Drain
4. Power Cord (115VoJt /60Hz)
5. Condensor CoiJs
9
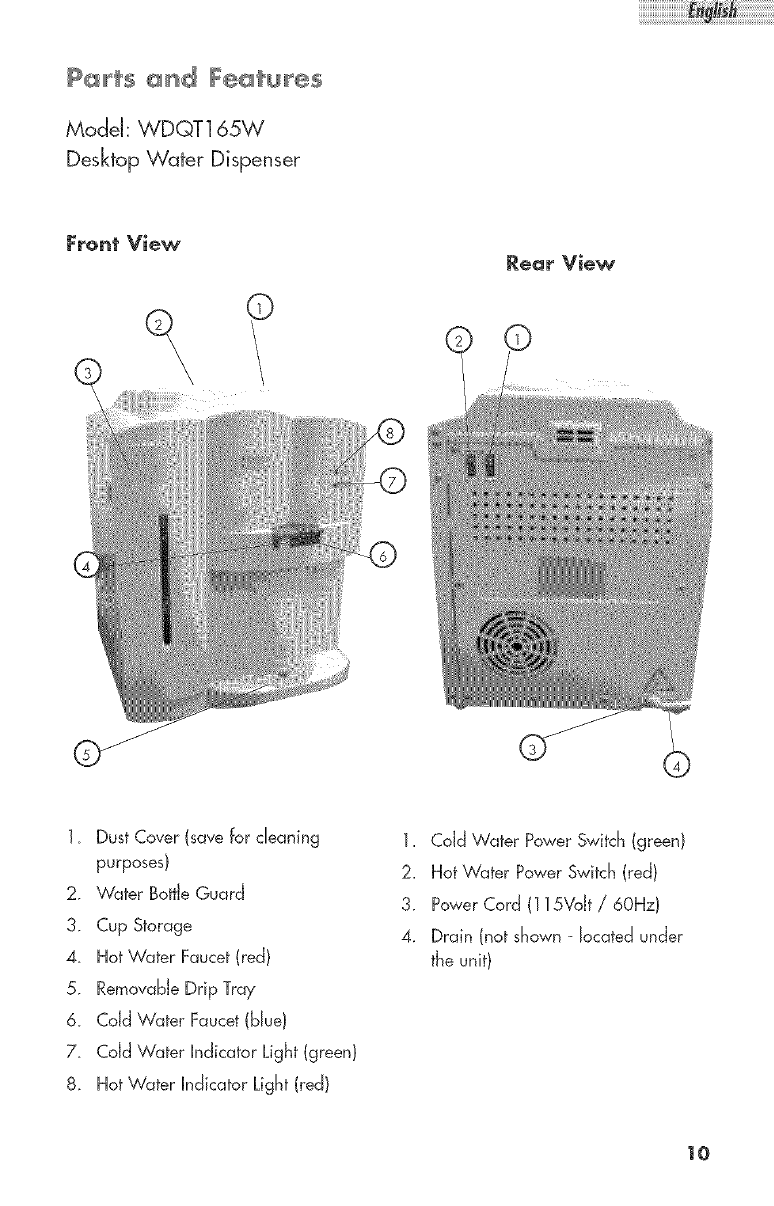
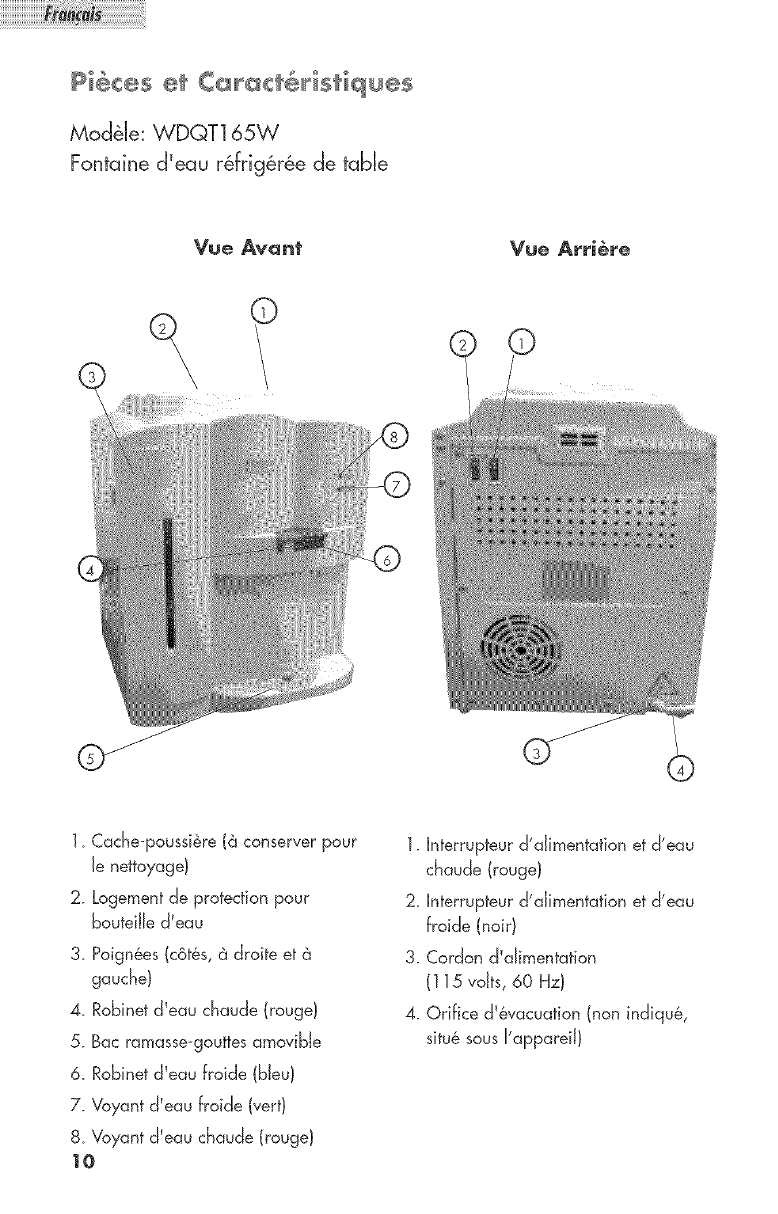
Mode[: WDQT165W
Desktop Water Dispenser
Front View
©
Eear View
1_ DustCover{savefor cleaning
purposes}
2. Water BaffleGuard
3. Cup Storage
4_ HotWater Faucet(red}
5. RernovabJeDrip Tray
& CoJdWater Faucet(Mud
7. Cold Water hdicator Light(green}
8. HotWater hdicator Light (red}
1_ Cold Vv'ater Power Switch (green}
2_ Hot Water Power Switch (red)
3. Power Cord (115VoJt /60Hz)
4. Drain (not shown - Jocated under
the unit}
10
r@per L@ tioH
®Toensurethat your water dispenserworks at the maximumefficiencyit was
designedfor. you shouldinstall it in a locationwhere there is proper air
circulationand electricalconnections.
®Thefollowing are the recommendedclearancesaround thewater dispensen
Sides..........3/4" (19ram}
Back..............2" (50ram)
® Do not instaJJyour water dispenser in any location that is not properly insulated
or heated because the unit is not designed to operate in temperature settings
below 55°F/13°C_
Note: Thebuilt-in thermostatmaintains the hot and cold temperatures
automatically.The hot water temperaturewiJJbe between
176-203°F /80-95°C and the cold water temperaturewiJJbe between
36-50°F /2-10"C during thisoperation.
®Selecta suitablelocation for the unit on a hard evensurfaceaway from direct
sunlightand heat sources(e.g, radiators, baseboardheaters,cooking
appliances,etc.}.
Note: Hot and cold water wiJJnot be instantlyavailable as the unit wiJJneed
time to heat up and cool down the water.
CAUTION: DO NOY plug in the water dispenser until water
flows through both Hot ond Cold woter IFoucets.
Assembly _HStrUCtieH5
Read carefuJly and understand all installation instructions
before installing the water dispenser',
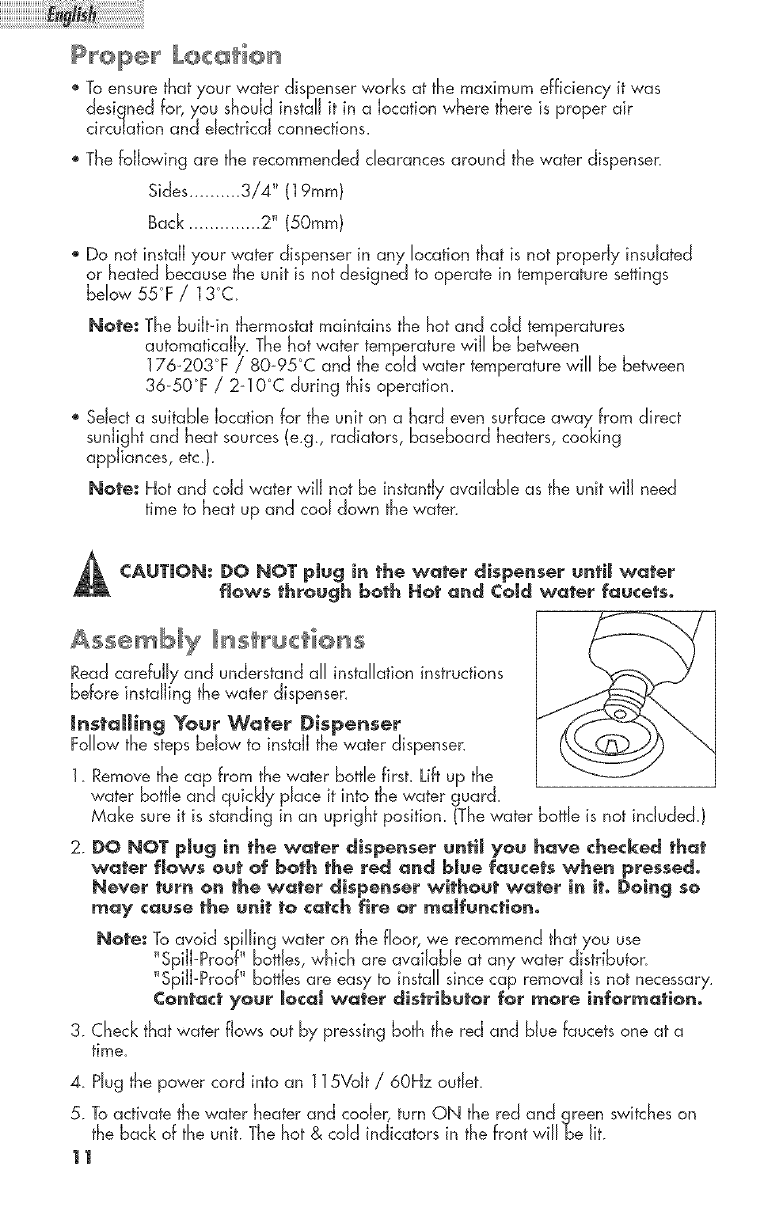
Installing Your Water Dispenser
Followthe stepsbelow to install thewater dispensen
1. Removethe cap from the water bottlefirst. Liftup the
water bottleand quickly place it into the water guard.
Make sureit is standingin an upright position. (Thewater bottle is not included.}
2. DO NOT plug in the woter dispenser untJJ you hove checked thor
woter flaws out of both the red ond blue foucets when pressed.
Never turn on the woter dispenser without woter in it. Doing so
moy ¢ouse the unit to ¢otch fire or too[function°
Note: To avoid spilling water on the floor, we recommend that you use
"Spill-Proof"bottles,which are available at any water distributor.
"Spill-Proof"bottlesare easyto installsincecap removalis not necessary.
¢ontoct yaur [oco[ woter distributor for more informotian.
3. Checkthatwater flows out by pressingboth the red and blue faucetsone at a
time.
4_ Plug the power cord into an 115Vdt / 60Hz outlet.
5. To activate the water heater and coder, turn ON the red and green switches on
the back of the unit. The hot & cdd indicators in the front wiHBe lit.
11
Grounding Instructions
Thisappliancemustbegrounded_Hntheeventofanelectricalshortcircuit,
groundingreducestheriskofelectricshockbyprovidinganescapewireforthe
electriccurrent.Thisapplianceisequippedwithacordcontainingagroundingwire
andagroundedpJug_Theplugmustbeinsertedintoanoutletthatisproperly
installedandgroundd.
®Hmproperuseoftheplugmayresultintheriskofelectricshock_
®Consultaqualifiedelectricianorservicetechnicianifthegrounding
instructionsarenotcompJetdyunderstoodorifindoubtastowhether
theappliancehasbeenproperlygrounded.
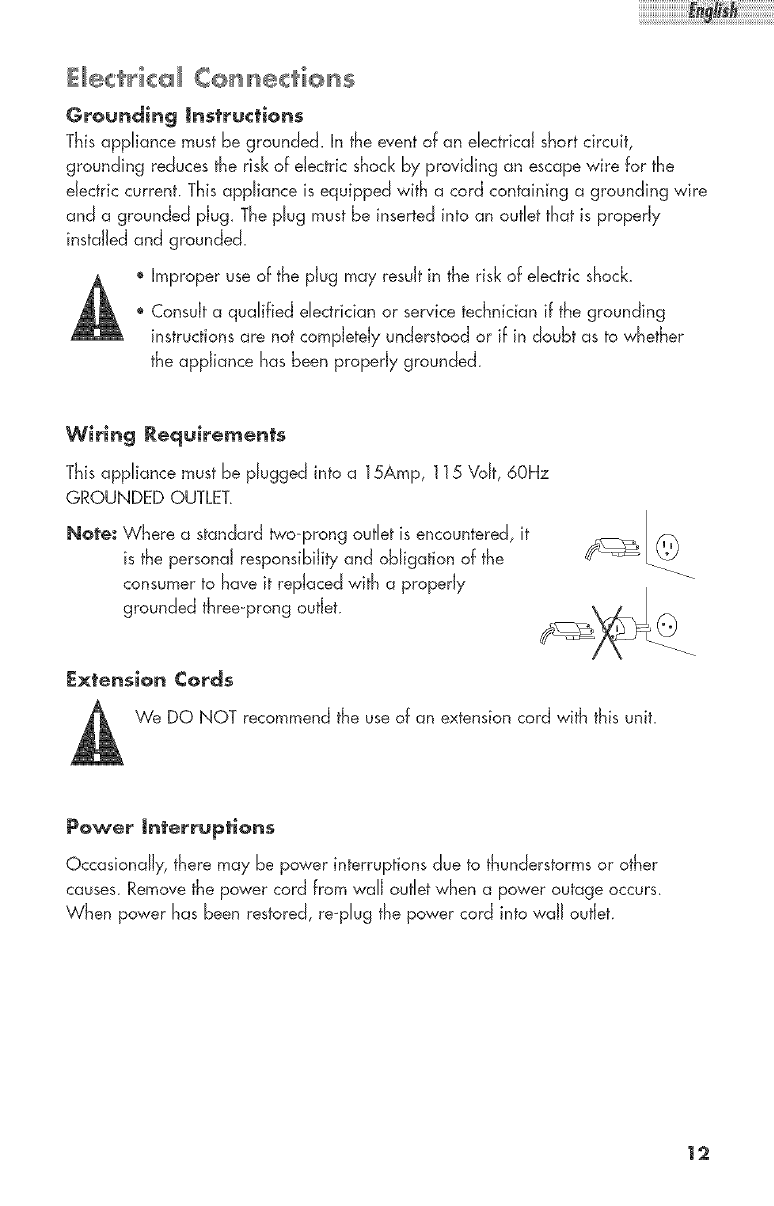
Wiring Requirements
Thisappliance mustbe plugged into a 15Amp, 115 Volt,60Hz
GROUNDEDOUTLET.
Note: Where a standardtwo-prong outletis encountered,it
is the personal responsibilityand obligation of the
consumerto have it repJacd with a properly
grounded three-prongoutlet.
E×tensien Cords
We DO NOT recommend the use of an extension cord with this unit.
Power Jnterrupti@n5
Occasionally, there may be power interruptions due to thunderstorms or other
causes. Remove the power cord from wall outlet when a power outage occurs.
When power has been restored, re-plug the power cord into waJJoutlet.
12
iiiiiiiiiiiiiiiiiiiiiiiiiiiiiiiiiiiiiiiiiiiiiiiiiiUi_i__i__i__i__i__i__i__i__i__i__i__i__i__i__i__i__i__i__i__i__i__i__i__!__!__i__!_
@oereting Your W ter Disoenser
Thiswater dispensermaintains instanthot and cold water for your cookingand
drinking needs.Itaccepts2, 3 or 5-gallon water bottles.
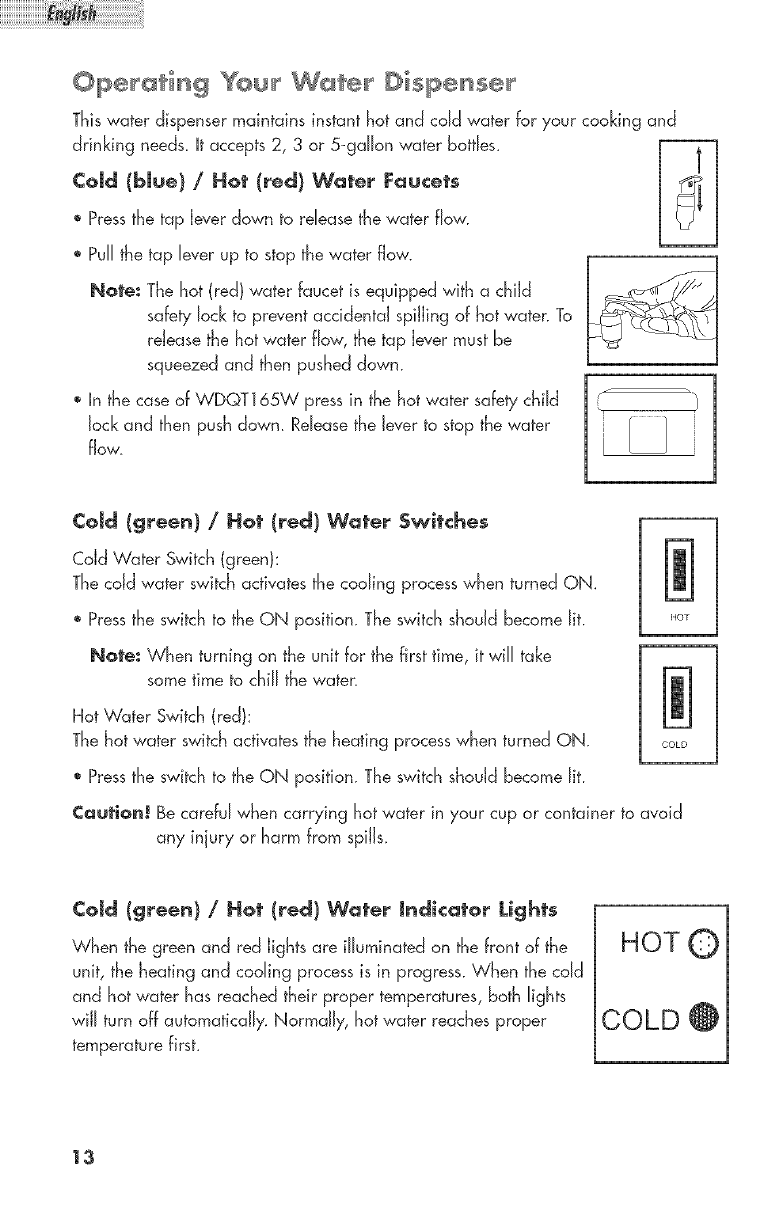
Cold (blue) /Hot (red) Water Faucets
® Pressthe tap leverdown to releasethe water flow.
® PuJJthe tap lever up to stopthe water flow.
Note: The hot (red)water faucetis equippedwith a child
safetylock to preventaccidental spilling of hot waten To
releasethe hot water flow, the tap levermust be
squeezedand then pusheddown_
In the caseof WDQT165W pressin the hotwater safetychild
lockand then pushdown. Releasethe leverto stopthe water
flow.
S _ _._
1
Cold (green) /Hot (red) Water Switches
Cold Water Switch(green}:
Thecold water switchactivatesthe cooling processwhen turnedON.
® Pressthe switchto theON position. Theswitchshould becomelit. HoT
Note: When turning on the unit for the first time, it will take
some time to chill the waten
HotWater Switch(red}:
Thehot water switchactivatesthe heating processwhen turned ON.
Pressthe switchto theQN position. Theswitchshould becomeJiL
¢autienJ Becarefulwhen carrying hot water in ),'ourcup or containerto avoid
any injury or harm from spills.
m
COLD
Cold (green) /Hot (red) Water Indkator Lights
When the greenand red lights are illuminatedon the front of the
unit, the heating and cooling processis in progress.When the cold
and hotwater has reachedtheir proper temperatures,both lights
wiJJturn off automatically.Normally, hot water reachesproper
temperaturefirst.
HOT(
COLD @
13
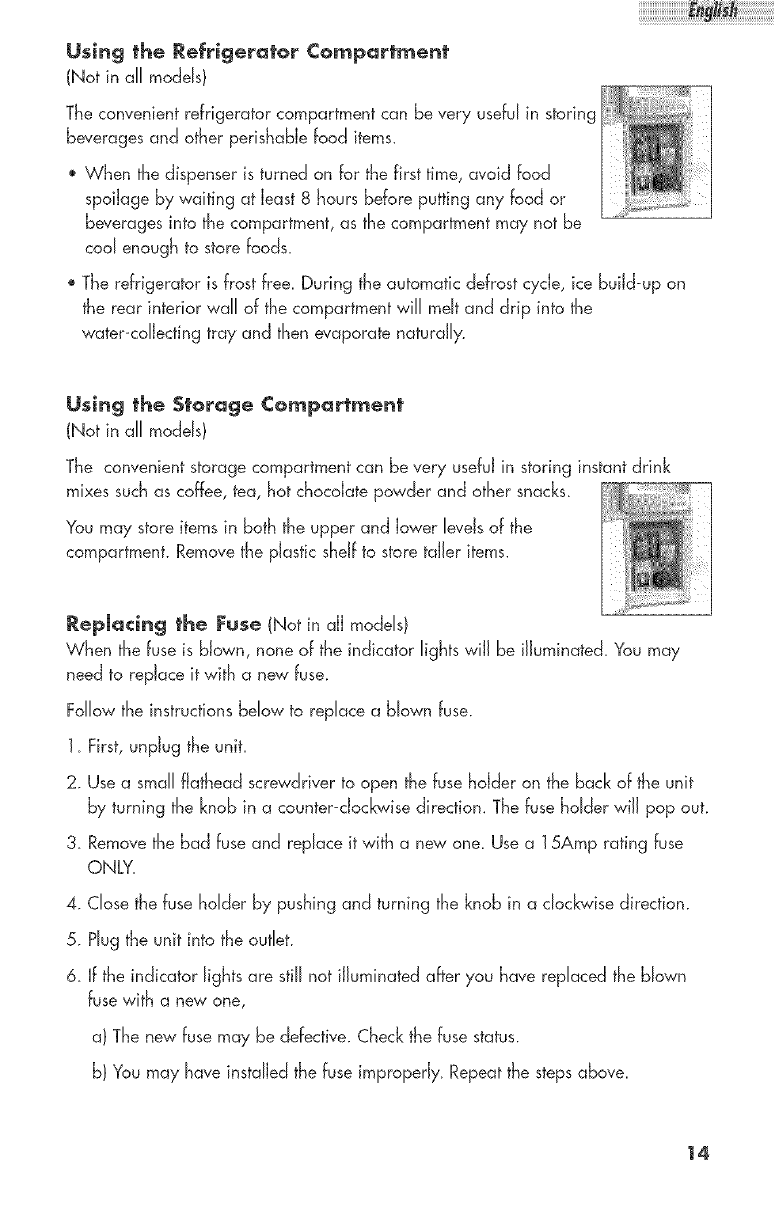
Using the Refrigerator Compartment
(Not in all models)
Theconvenientrefrigerator compartmentcan be very usefulin storing
beveragesand other perishablefood items_
When the dispenseris turnedon for the first time, avoid food
spoiJageby waiting at Jeast8 hours before puttingany food or
beveragesinto the compartment,as the compartmentmay not be
cool enoughto storefoods.
® Therefrigerator is frost free_During the automaticdefrostcycle,ice buiJd-upon
the rear interior wall of the compartmentwiJJmeltand drip into the
water-colJectingtray and then evaporatenaturaJly.
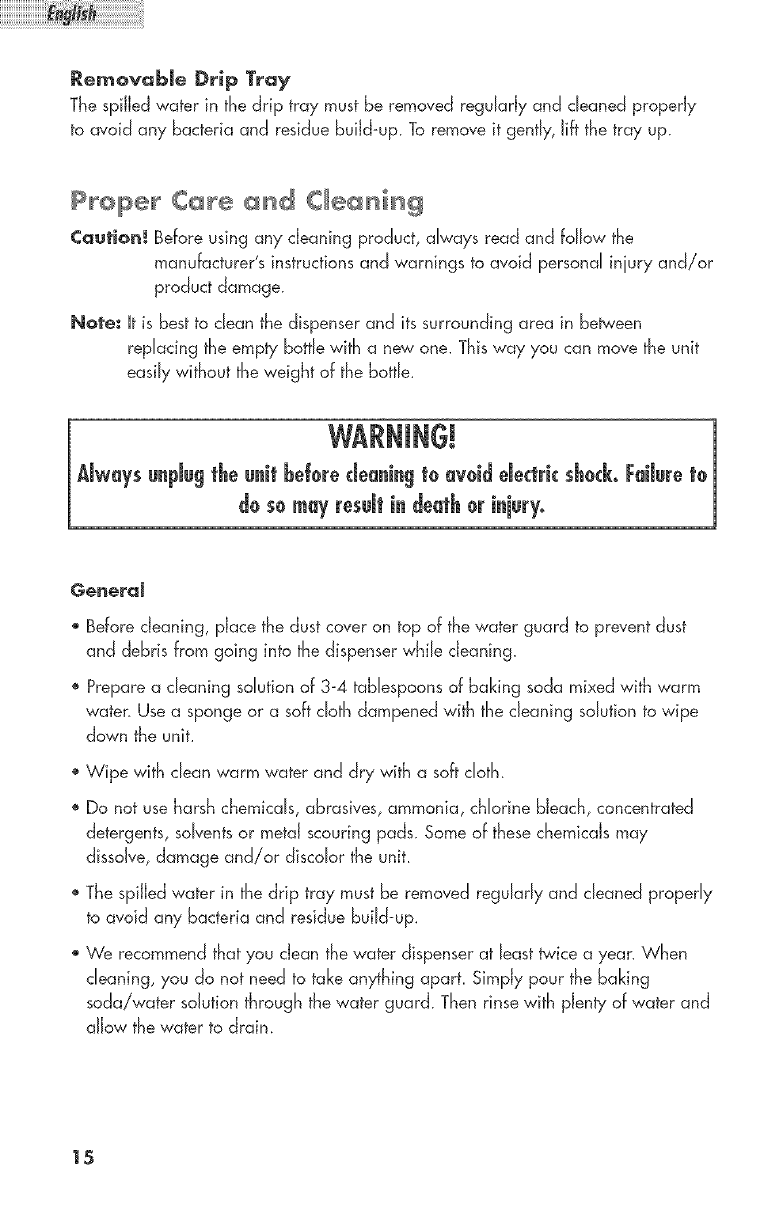
Using the St@rage ¢@mpart_ent
(Not in all models)
The convenientstoragecompartmentcan be very usefuJin storing instantdrink
mixessuchas coffee,tea, hot chocoJatepowder and other snacks.
Youmay storeitemsin both the upper and lower JeveJsof the
compartment.Removethe pJasticsheJfto storetaJJeritems.
RepJadng the Fuse (Not in aJJmodds)
When the fuseis bJown,noneof the indicator JightswiJJbe iJJuminated.Youmay
needto repJaceit with a new fuse.
FoJJowthe instructionsbeJowto repJacea bJownfuse.
1_First,unpJugthe unit_
2. Usea smallfJatheadscrewdriverto open the fusehomer on the backof the unit
by turning the knob in a counter-clockwisedirection. Thefuseholder wiJJpop out.
3_Removethe bad fuseand replaceit with a new one. Usea 15Amp rating fuse
ONLY.
4. Closethe fuseholder by pushing and turning the knob in a clockwisedirection.
5. Hug the unit into the ouflet_
6. If the indicator lights are stiJJnot iJJuminatedafteryou have replacedthe blown
fusewith a new one,
a) Thenew fusemay be defective.Checkthe fuse status.
b) Youmay have instdJedthefuseimproperJy_Repeatthe stepsabove_
14
iiiiiiiiiiiiiiiiiiiiiiiiiiiiiiiiiiiiiiiiiiiiiiiiiiUi_i__i__i__i__i__i__i__i__i__i__i__i__i__i__i__i__i__i__i__i__i__i__i__!__!__i__!_
RemovabJe Drip Tray
ThespiJJedwater in the drip tray mustbe removedregularJyand cleaned properly
to avoid any bacteriaand residuebuiJd-up_Toremoveit gently_Jiflthe tray up.
_roper C_r÷ _d C_÷_iHg
Cautian_ Before using any cleaning product, always read and follow the
manufacturer's instructions and warnings to avoid personal iniury and/or
product damage.
Not÷: It is best to dean the dispenser and its surrounding area in between
repladng the empty bottle with a new one. This way you can move the unit
easily without the weight of the bottle.
WARNING! 1
AJways unpJugthe unit beJeredeaningto avoid dectrk shOCkoFaiJureto
de se may res@ in deat_er i_j_ryo
BeforecJeaning,pJacethedust coveron top of thewater guard to preventdust
and debris from going into the dispenserwhiJecJeaning_
®Preparea cleaning sdution of 3-4 tabJespoonsof baking soda mixedwith warm
waten Usea spongeor a soft clothdampenedwith the cJeaningsoJutionto wipe
down the unik
®Wipe with dean warm water and dry with a soft cJoth_
®Do not useharsh chemicals,abrasives,ammonia, chJorinebJeach,concentrated
detergents,soJventsor metaJscouringpads. Someof thesechemicalsmay
dissoJve,damage and/or discdor the unit.
®ThespiJJedwater in the drip tray mustbe removedreguJarJyand cleanedproperJy
to avoid any bacteriaand residuebuiJd-up.
We recommendthatyou cJeanthewater dispenserat Jeasttwice a yean When
cleaning,you do not need to takeanything apart. SimpJypour the baking
soda/water soJutionthrough the water guard_Thenrinse with pJentyof water and
aJJowthe water to drain.
15
CJeaning [_he Condense_ CoiJs (Not in all modeJs)
® \'Ve recommend that you move the dispenser away from the waJ[ and vacuum or
brush the cdJs on the rear of the unit at least 4 times a yean Some operating
environments may require more frequent cleaning.
Turn OFF the cold and hot water switches.
®UnpJug the unit.
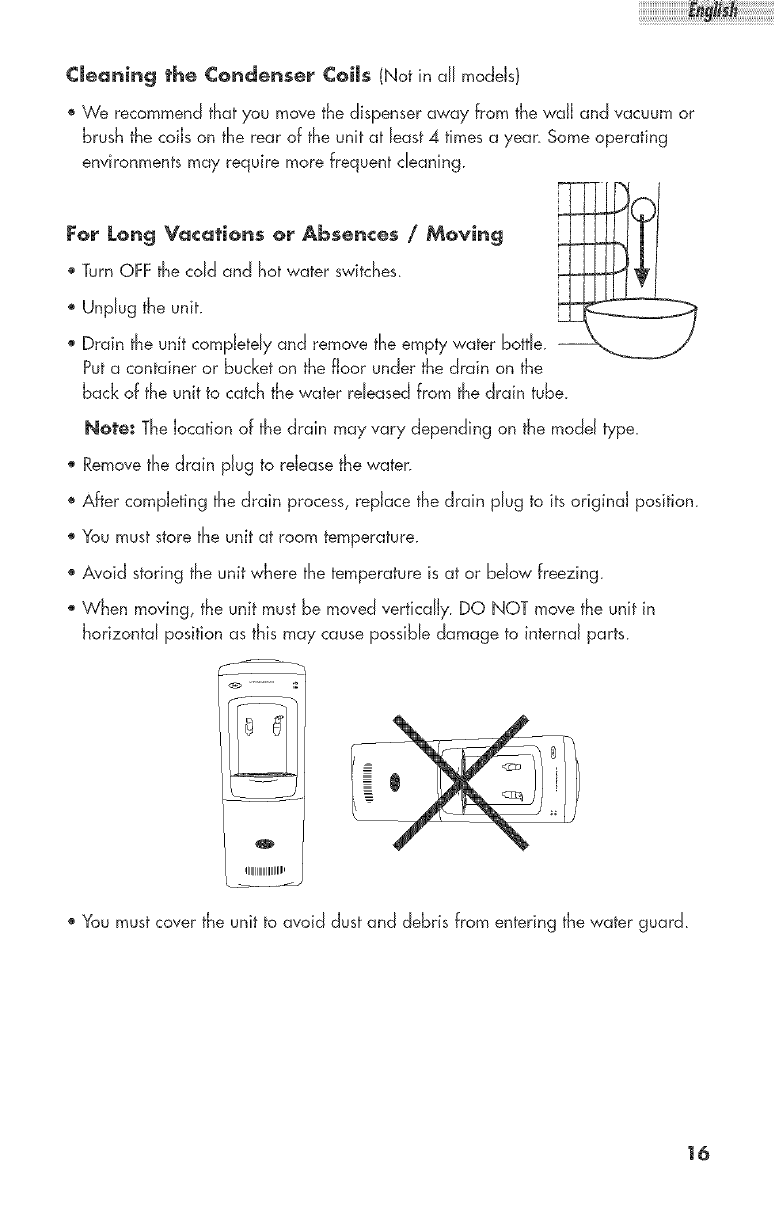
" Drain the unit compJetdy and remove the empty water bottle. --
Put a container or bucket on the floor under the drain on the
back of the unit to catch the water rdeased from the drain tube_
Note: The Jocation of the drain may vary depending on the modeJ type_
Remove the drain pJug to rdease the water.
®After compJeting the drain process, repJace the drain pJug to its original position.
®You must store the unit at room temperature.
Avoid storing the unit where the temperature is at or beJow freezing.
When moving, the unit must be moved verticdJy_ DO NOT move the unit in
horizontal position as this may cause possibJe damage to internaJ parts_
0
'1111111111111111111111111'
You must cover the unit to avoid dust and debris from entering the water guard.
16
iiiiiiiiiiiiiiiiiiiiiiiiiiiiiiiiiiiiiiiiiiiiiiiiiiUi_i__i__i__i__i__i__i__i__i__i__i__i__i__i__i__i__i__i__i__i__i__i__i__!__!__i__!_
Tr@ub es @@ti g @uid÷
The unit does not operate.
*Checkif your"water dispenser"is pJuggd in.
®Checkthe circuit breaker and the fuseto makesure thereis power at the outlet.
The uriJt is plugged iri But the iridicator Jlghts are riot iJtumiriate4,
®Readthe _RepJacingthe Fuse'_sectionon page 14.
There is rio water from the faucet,
Thisis due to an improper settingof the water bottle or from blockedairflow.
®Adiustthe positionof the bottleproperly on the water bottle guard so the air
opening is not bJockd.
There is rio hot water comirig from the faucet,
®Toomuchhot water was usedin too shorta period of time.
Youmay needto wait awhile for morewater to be heated.
Checkif the hot water switchis in the ON position.
The water is riat cool,
Thisis due to either a compressormalfunction(for unitswith compressor)or the cold
water switchmay be in the OFFposition.
®Checkif the cold water button is in the ON position.
17
¢ompr÷ssor runs too frequentiyo
Thismay be necessaryto maintaina constanttemperatureduring hot and humid
days.
® CJeanthe condensercoiJson the back of the uniL
The water is leaking fro_ the drip tray.
Thisis due to over-spiJJingof thewater in the drip tray.
Youmustremovethe drip tray from the dispenserand empty out thewaten
RepJaceit once you have emptiedthe waten
What happens if the water dispenser is running dry
(without the war÷r)?
®You must never Jet the water dispenser run dry as this may cause damage to the
unit and createa fire_DO NOT Jetthe dispenserrunwithout waten
YoumustrepJacethe empty bottleimmediateJy.
What size of water batt_e can J use with this water dispenser?
*Youcan use2, 3 or 5-gaJJonbottJeswithour waterdispensen
18
What is covered and for how
long?
Thiswarrant)'-coversaJidefectsin work-
manshipor materialsfor a period of:
12 months Jabot (carry-in only)
12 months ports
Thewarranty commenceson the date
the itemwas purchasedand the original
purchasereceiptmustbe presentedto
the authorized servicecenterbefore
warranty repairs are rendered.
EXCEPTIONS: Commercial or
Rental Use warranty
90 days labor (carry-in only)
90 days ports
No other warranty applies
What is covered.
1. The mechanicaland electricalparts,
which serveas a functional purpose
of thisappliance, for a period of 12
months.ThisincludesaJ/parts except
finish, and trim_
Whot wiJJ be done?
1. We wiJJrepair or replace,at our
discretion,any mechanicalor
electrical part which provesto be
defectivein normal usageduring the
warrant),-period so specified.
2. TherewiJJbe no charge to the
purchaserfor parts and labor on any
covereditemsduring the initial 12
monthperiod. Beyondthis period,
only parts are coveredin tJ_e
remainingwarrant}< Laboris not
provided and mustbe paid by the
customer,
3. Contactyour nearestauthorized
servicecentenFor the name of the
nearestservicecenterpleasevisit our
websiteat wwwHaierAmerica.com or
caJJ1-877-337-3639 for more
information.
]9
THIS WARRANTY COVERS
APPLIANCES WITHIN THE
CONTINENTAL UNITED STATES,
PUERTO RICO AND CANADA.
IT DOES NOT COVER
THE FOLLOWING:
Damages from improper installation.
Damages in shipping.
Defects other than manufacturing.
Damage from misuse, abuse, accident,
alteration, lack of proper care and
maintenance or incorrect current or
voJtage_
Damage from other than household use_
Damage from service by other than an
authorized dealer or service centen
Decorative trims or replaceable light
bulbs_
Transportation and shipping_
Labor (after the initial 12 months)_
THIS LIMITED WARRANTY IS GIVEN IN
LIEUOF ALL OTHER WARRANTIES,
EXPRESSEDOR, INCLUDING THE
WARRANTIES OF MERCHANTABILITY
AND FITNESSFOR A PARTICULAR
PURPOSE.
The remedy provided in this warranty is
exclusive and is granted in lieu of aJJ
other remedies.
This warrant),- does not cover incidental
or consequential damages, so the above
limitations may not apply to you_ Some
States do not allow limitations on how
long an implied warranty lasts, so the
above limitations may not apply to you.
This warrant),, gives you specific Je_aJ
rights, and you may have other ri@ts,
which vary, from state to state.
Haier America
New York, NY 10018
MsezroutesJesinstructions avant d'utiJiser ¢et appareH°
Borsque vous utHisez ¢et appareiJ, veiHez a touiours respecter
(÷s consignes de s_curit_ (es pJus _(_÷ntaires, (÷s suivantes:
"_. Ufi)isez cet appareiJ uniquement pour )'usage auque) i( est desfin& comme
indiqu& dons ce manuek
2. Ceffe fontaine d'eau r6frig&r&e doit @re mont&e conform6ment aux instructions
d'instdJafion avant de J'ufiJiser.Voir Jesinstructions de la section d'instdlafion.
3. Ne d_branchez iamais votre fontaine d'eau r6frig6r_e en tirant sur becane d'ah
imentation. Saisissez fermement Ja fiche et firez tout droit sur cette derni_re.
4. Remp[acez imm&diatement tout cordon ou cabJe &)ectrique effiJoch& ou endom-
mag&. Vei))ez a ne pas ufiJiser un cab)e pr&sentant des craqueJures ou des abra-
sions au niveau du cordon, de Ja fiche ou de )'extr&mit& du connecteur.
5. D&branchez Jo fontaine d'eau r6frig&r&e avant de )a nettoyer ou de )a r&paren
Remarque: Si pour une raison ou pour une autre, cet apparei) ddt &tre
r6par&, i) est fortement agr&_ effectue )a r@aration.
6. Cette fontaine d'eau r&frig_r&e ne doit pas @re p)ac&e en retrait ou encastr& a
J_int@'ieurd_une cavit@armoire. Cet appareiJ atre pJac6 tout seuJet sans support.
7. Cet appareiJ doit &tre utiJis_ A, L'INTERIEURUNIQUEMENT et ne doit en aucun
cos &tre utiJis&a J'ext@ieun
8. N'uti)isez pas )a fontaine d'eau r&frig@&e en pr&sence de vapeurs expJosives.
9. IJest n&cessaire de survei))er attentivement Jesenfants )orsque vous utiJisez cet
apparei) a proximit_ des enfants.
10. Pour &viter tout risque d'a)ectrocution, ne pas immerger Jecame 6Jectrique, )a
fiche ou toutes autres pi&ces de )o fontaine r&frig&r&e )'eau ou tout autre )iquide.
(ONSFRVFZ(FSIN TRU(TIO S
Afi de Jes e s Jter Jt rie rer e t
Nous vous remercions d'avoir fair
I'achat cJe cet appardl Haien Cette
notice facile a consulter vous aidera
a ufiliser au mieux votre fontaine
d'eau r_,frig@6e.
N%uNiez pas de noter le md@le et
num@o de s@ie. Ces derniers se
trouvent sur une @iquette au dos de
I'appareil.
Agra_ez Je re c_ de vente s_r votre _etice. Vows en _res
_esein _in de _n_ficier de J_ ¢e_vert_re e_erte par J_
g_r_ntieo
Num6ro du modde
Num_ro de s@'ie
Date d' achat

¢HOJSmRUEMPBACEMENT DE BA FONTAJNE .................................... 11
JNSYRUCTJONS D'JNSTALBATmON ............................................. 1 1
Montage de la fontaine d'eau r_frig@_e ...................................................... 11
RACCORDEMENTS _:U:¢TRIQUES ........................................................ J 2
Instructions de raise 6 Ja masse............................................................. 12
RaccorcJements_lectriques 12
RdJonges _Jectriques 12
Coupures de courant .................................................................................. 12
UYJLJSATJON J)E BA FONTAJNE J)'EAU R_:FRiGERI:E .................. 13-15
Robinets FroicJiChaud .......................................................................... 13
Interrupteurs FroidiChaucJ .......................................................................... 13
Voyants FroidiChaud ................................................................................ J3
UtiJisation du compartiment r&frig_rateur .................................................... 'l 4
RempJacer JefusibJe.................................................................................... 14
Retirer Je bac ramasse-gouttes .................................................................... J5
Remplacer le fusible .................................................................................... 15
ENYR_:YJEN ET NETTOYAGE ............................................................ 15-16
Nettoyage g_n_raI et maintenance 15
Nettoyage cJes serpentins condenseurs ................................................ 'J6
Vacances /Absences cJe Jengue cJur_e /D@n_nagement .............................. 'J6
GUIDE DE DEPANNAGE .................................................................. 17-18
GARANTJE .............................................................................................. 19
1.Retireztoutlemat_riaud'embdlage,ycompris le socJeen mousse et le ruban
aclh6sif retenant les accessoires de la fontaine 6 i'int_rieur et 6 I'ext@ieur.
2. V6rifiez Jafontaine et retirez rout mat&riau d'embaJJage restant, ruban et cJocu-
mentaion avant de mettre en marche Ja fontaine r6frig6r&e.
Note: Laissez Jafontaine r6frig&r_e cJemeurercJebout pendant au moins 8 heures
avant de Jamettre en marche.
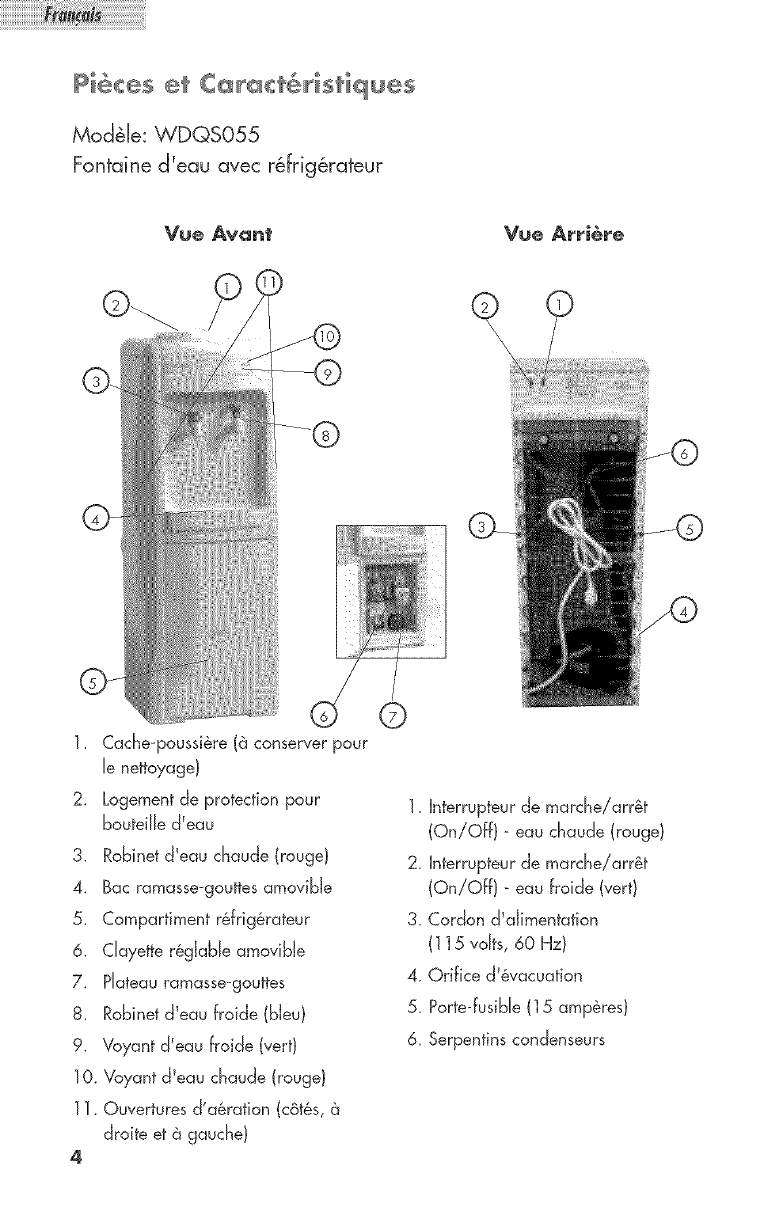
Mod_Je: WDQS055
Fontaine d_eau avec r@frig@ateur
2.
3.
4.
5.
6.
7.
8.
9.
10.
11.
Vue Avant
Cache-poussi@e (8 conserver pour
Jenettoyage}
Logernent de protection pour
BouteiHecJ'eau
Robinet d_eau chaude (rouge}
Bac ramasse-gouttes amoviNe
Compartiment r_frig_rateur
CJayette r@gJabJeamovibJe
PJateau ramasse-gouttes
Robinet d_eau frdde (bJeu)
Voyant d'eau froicJe (vert)
Voyant d_eau chaude (rouge}
Ouvertures d'a_ration (c6t_s,
droite et _ gauche}
©
Vue Arri_re
© ©
1. Interrupteur de marcheiarr@
(On/Off) - eau chaucJe(rouge}
2. Interrupteur de marcheiarr_t
(On/Off} - eau froicJe (vert)
3. Cordon cJ_dimentation
( 115 vdts, 60 Hz)
4. Orifice d_vacuation
5. Porte-fusibJe (15 amp@es)
&Serpentins concJenseurs
Pig_es e_ C_re_t6ristiq_es
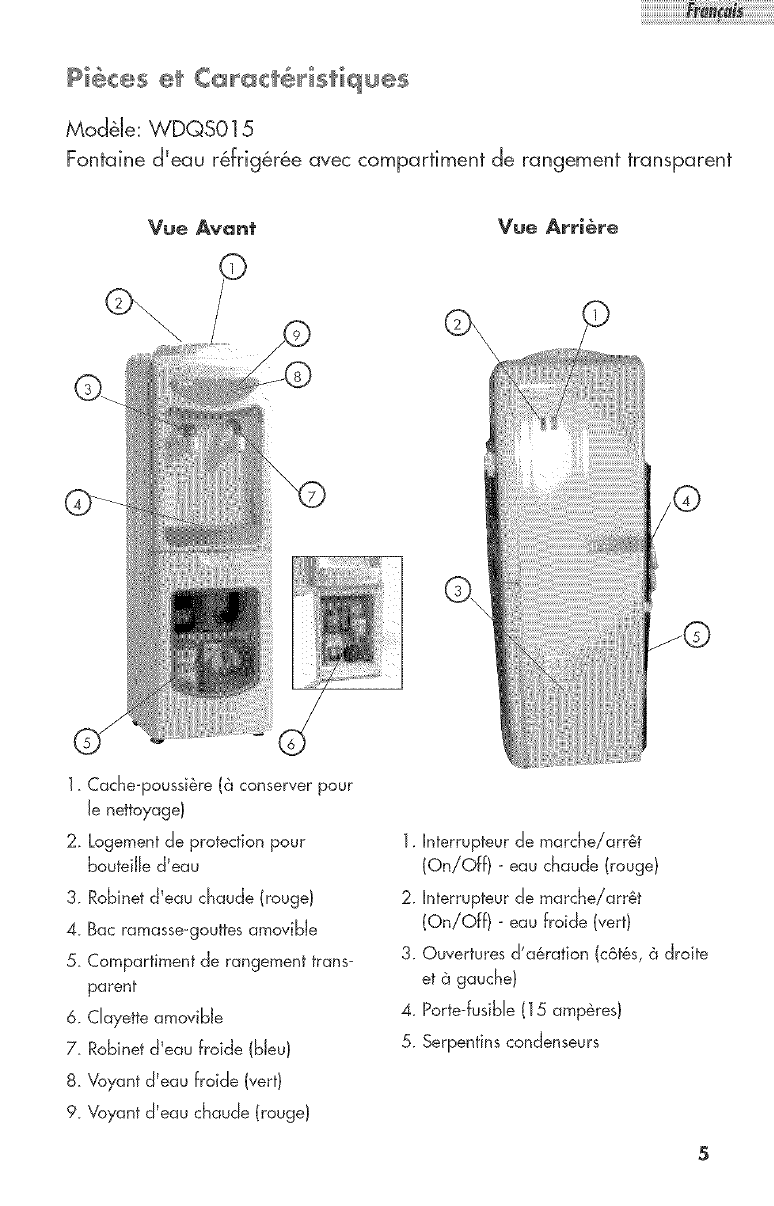
Modde: WDQS015
Fontaine d'eau r6frig6r6e avec compartiment de rangement transparent
Vue Avant Vue ArtiSte
\
/®
J©
1. Cache-poussi&re (a conserver pour
Jenettoyage}
2. Logement de protection pour
bouteiJle d'eau
3. Robinet d'eau chaude (rouge}
4_ Bac ramasse-gouttes amovibJe
5. Compartiment de rangement trans-
parent
6. Clayette amovibJe
7_ Robinet d'eau froide (bJeu}
8. Voyant cJ'eau froide (vert}
9_Voyant cJ'eau chaucJe(rouge}
1. Interrupteur de marche/arr6t
(On/Off) - eau chaude (rouge}
2. Interrupteur de marche/arr@t
(On/Off} - eau froide (vert)
3. Ouvertures d'a_ration (c6t6s, _ droite
et @gauche}
4. Porte-fusiNe (15 amperes)
5. Serpentins condenseurs
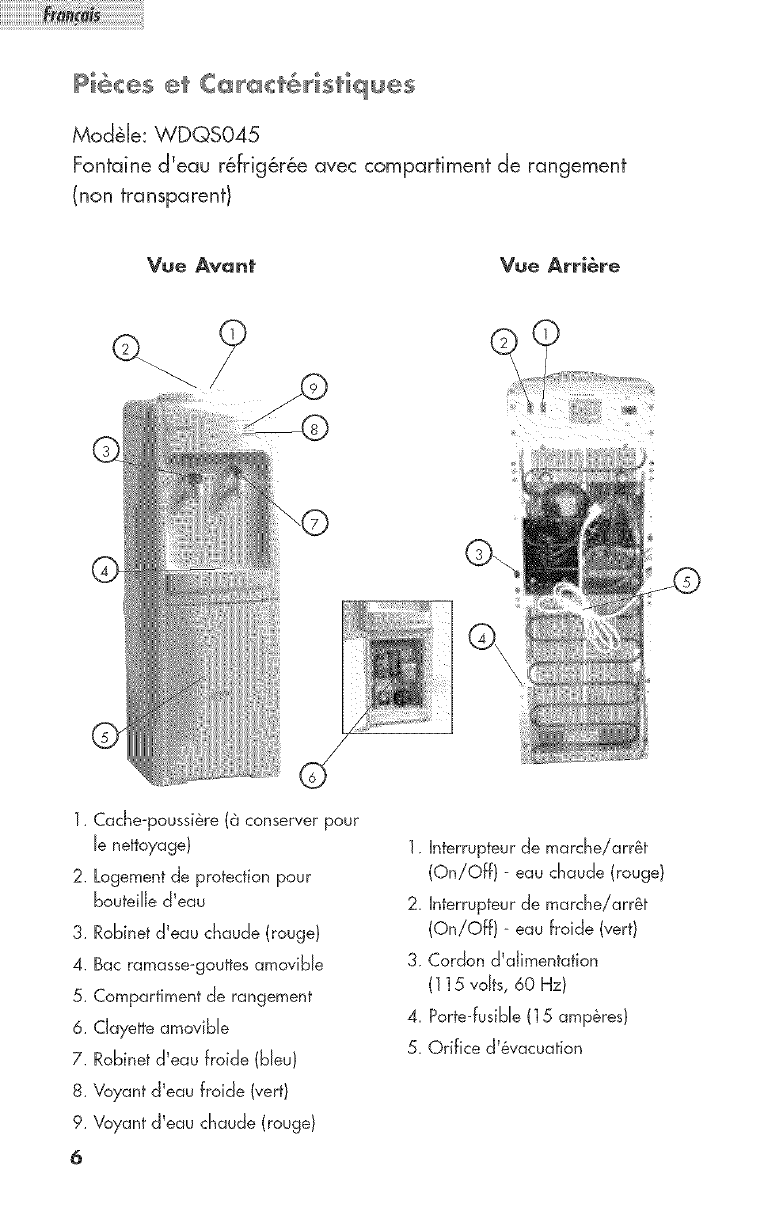
Mod_Je: WDQS045
Fontaine d_eau r@frig@@eavec compartiment de rangement
(non transparent)
Vue Avant Vue ArtiSte
©
1. Cache-poussi&re (_ conserver pour
le nettoyage)
2. Logement de protection pour
bouteiJJecJ'eau
3. Robinet d_eau chaude (rouge}
4. Bac ramasse-gouttes amoviNe
5. Compartiment de rangement
6. CJayette amovibJe
7. Robinet d_eau froide (bJeu/
8. Voyant d_eau froide (vert}
9. Voyant d_eau chaude (rouge}
6
1. Interrupteur de marcheiarr_t
(On/Off} - eau chaucJe (rouge}
2. Interrupteur de marche/arr@
(On/Off} - eau froide (vert)
3. Cordon d_aJimentation
( 115 vdts, 60 Hz)
4. Porte-fusibJe (15 amperes}
5. Orifice d_vacuation
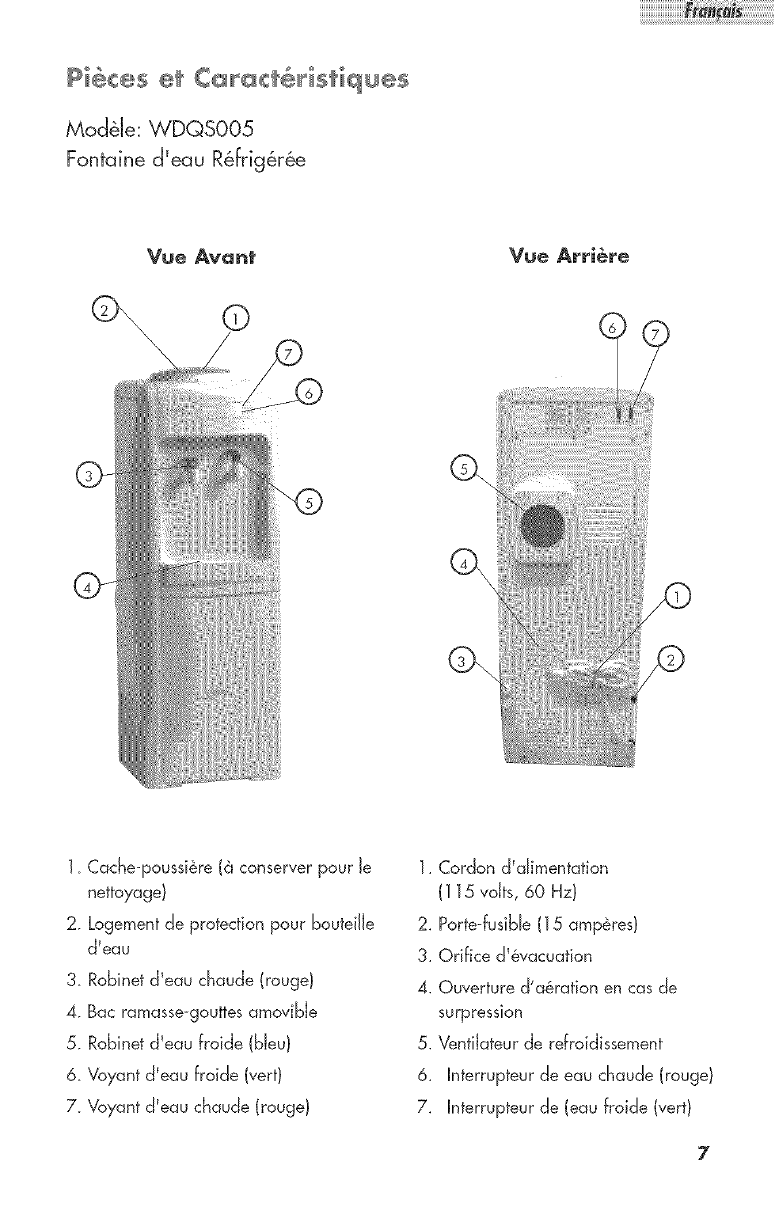
Mod@[e: WDQSO05
Fontaine d_eau R6frig@_e
Vue ArtiSte
Q
\
1_Cache-poussi_re (6 conserver pour Je
nettoyage}
2. Logement de protection pour bouteiJJe
d_ec_u
3_ Robinet d'eau chaude (rouge}
4. Bac ramasse-gouttes amovibJe
5. Robinet d%au froide (Bleu}
6. Voyant d_eau froide (vert)
7_Voyant d_eau chaude (rouge}
1. Cordon d'dimentation
{115 vdts, 60 Hz)
2. Porte-fusibb (15 amp@es}
3. Orifice d'6vacuation
4. Ouverture d'a&ration en cas de
surpression
5. VentiJateur de refroidissement
6. Bterrupteur de eau chaude (rouge}
7. Interrupteur de (eau frdde (vert}
Pig_es e_ C_re_t6ristiq_es
Modde: WDQTO05
Fontaine d'eau r6frig6r6e de tabJe
Vue Avant Vue Arri_re
\
®
1_Cache-poussi&re (6 conserver pour
Jenettoyage}
2. Logement de protection pour
bouteiJle d'eau
3_ Poign&es (c6t6s, _ droite et
gauche}
4. Robinet d'eau chaude (rouge}
5. Bac ramasse-gouttes amovibJe
6_ Robinet d'eau froide (bJeu}
7. Voyant d'eau froide (vert}
8_Voyant d'eau chaude (rouge}
8
1. Interrupteurd'dimentation et d'eau
chaude (rouge}
2. Interrupteurd'dimentation et d'eau
froide (noir}
3. Cordon d'dimentation
(115 voJts,60 Hz!
4. Orifice d_@vacuation(non indiqu6,
situ6sousJ'appareiJ}
Pig_es e_ C_r_c_6ristiq_es
Modde: WDQT015
Fontdne d'eau r6frig6r6e de tabJe
Vue Avant
©©
Vue Arri6re
1_Cache-poussi6re (6 conserver pour
Jenettoyage}
2. Logement de protection pour
bouteiJle d'eau
3_ Poign&es (c6t6s, _ droite et
gauche}
4. Robinet d'eau chaude (rouge}
5. Bac ramasse-gouttes amovibJe
6_ Robinet d'eau froide (bJeu}
7. Voyant d'eau froide (vert}
1. Interrupteur d'dimentation et d'eau
chaude (rouge}
2. Interrupteur d'dimentation et d'eau
froide (noir)
3. Cordon d'aJimentation (115 vdts, 60
Hz}
4. Condensor Embobine
Pig_es e_ C_r_c_6ristiq_es
Modde: WDQT165W
Fontaine d'eau r6frig6r6e de tabJe
Vue Avant Vue Arri_re
1_Cache-poussi&re (6 conserver pour
Jenettoyage}
2. Logement de protection pour
bouteiJle d'eau
3_ Poign&es (c6t6s, _ droite et
gauche}
4. Robinet d'eau chaude (rouge}
5. Bac ramasse-gouttes amovibJe
6_ Robinet d'eau froide (bJeu}
7. Voyant d'eau froide (vert}
8_Voyant d'eau chaude (rouge}
]0
1. Interrupteurd'dimentation et d'eau
chaude (rouge}
2. Interrupteurd'dimentation et d'eau
froide (noir}
3. Cordon d'dimentation
(115 voJts,60 Hz!
4. Orifice d'@vacuation(non indiqu6,
situ6sousJ'appareiJ}
iiiiiiiiiiiiiiiiiiiiiiiiii Fran !iliilillillilliililfilliiliilillillilliililfilliiliilillilliiliii
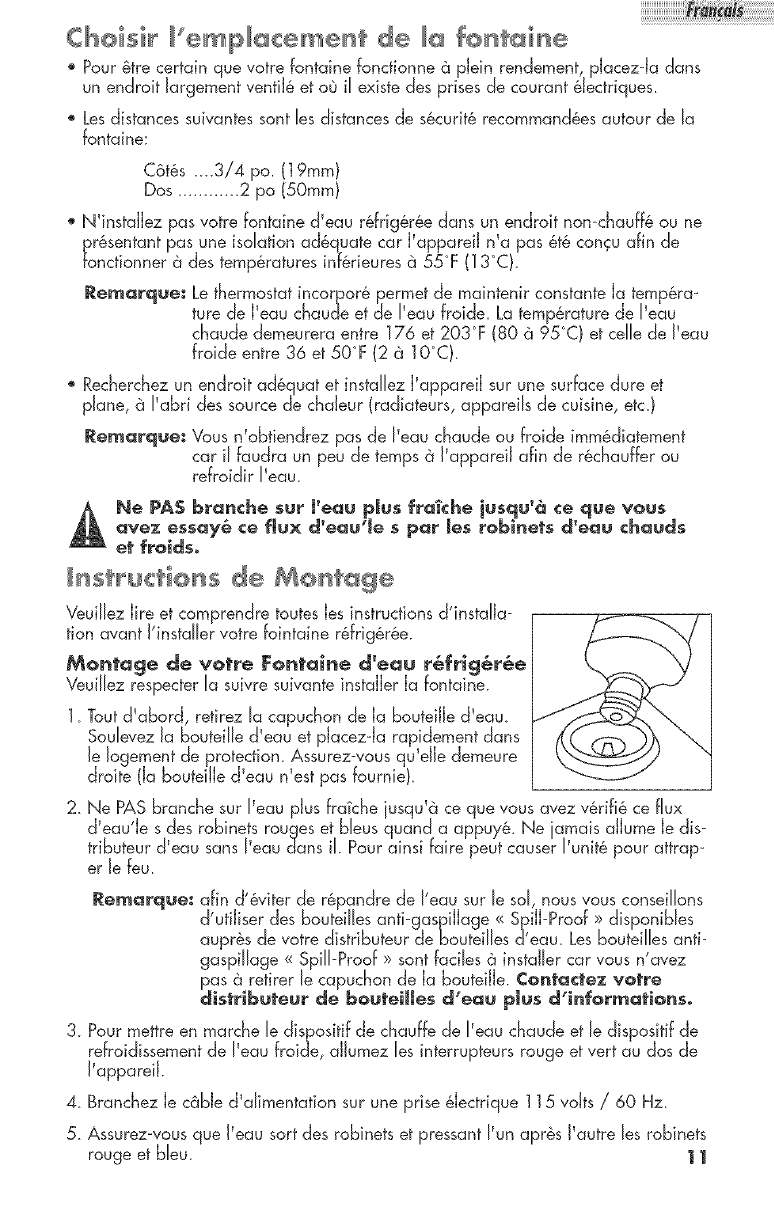
Pour _tre certain que votre fontaine foncfionne _ pJdn rendement, pJacez-Jadans
un encJroitJargement ventiJ&et o0 il existe des prises de courant &Jectriques.
® Lesdistances suivantes sont les distances de s&curit& recommancJ&esautour de la
fontaine:
C6t&s ....3/4 po. (] 9mm}
Dos ............ 2 po (50ram}
N'instdJez pas votre fontaine d'eau r6frig&r6e dans un endroit non-chauff& ou ne
F&sentant pas une isolation acJ_quatecar J'appareiJ n'a pas &t6 concu afin cJe
tonctionner _ des temp&ratures in_6rieures @55°F (] 3°C},
Remarcjue: Le thermostat incorpor& permet de rnaintenir constante Ia femp&ra-
ture cJeJ'eau chaude et c_eI'eau froide, La temp&rature de I'eau
chaude demeurera entre 176 et 203°F (80 e 95°C} et cdle cJeJ'eau
froide entre 36 et 50°F (2 @]0°C}.
® Recherchez un endroit ad&guat et installez J'appareiJ sur une surface dure et
pJane, e I'abri des source de chdeur (radiateurs, appareils de cuisine, etc.}
Rel_c_rque: Vous n'obtiencJrez pas de I'eau chaude ou froide imm&diatement
car iJ faudra un peu de temps 6 J'appareiJ afin de r6chauffer ou
refroidir I'eau.
Ne PA$ branche sur J'eau p_us frakhe jusqu'a ce ¢jee vous
ave7 essay_ ce fJux ¢J'eau'Je s par _es robinets d'eau chaucJs
et froldso
structioHs de MoHt g÷
VeuiJJezJireet comprencJre routes Jesinstructions d'instdJa-
tion avant J'instaJJervotre fointdne r&frig_r6e.
M@ntag÷ de vetre Fontaine d'eau r_frig_r_e
Veuillez respecter la suivre suivante instaJJerJa fontaine.
1. Tout cJ'abord, refirez la capuchon cJeJa bouteiJJed'eau.
Soulevez Ja bouteille cJ'eauet pJacez-Ja rapicJement cJans
JeJogement de protection. Assurez-vous qu'eJJedemeure
droite (Ja bouteiJJed'eau n'est pas fournie}.
2. Ne PAS branche sur I'eau pJusfratche iusqu'_ ce que vous avez v&rifi& ce flux
d'eau Je sdes robinets rouges et bleus quancJ a appuy6. Ne iamais aJJumeJedis-
tributeur cJ'eausans I'eau dans il. Pour ainsi faire peut causer I'unit& pour attrap-
er Jefeu.
Renlarq_÷: afin d%viter cJer&pancJre de I'eau sur le sol, nous vous conseillons
cJutlJlser des boutetJles antl-gasp_Hage <<Sp*H-Proof >d_sponibJes
aupr&s de votre cJistributeur de bouteilles d'eau. Les boutei!les anti-
gaspillage <<SpilJ-Proof >>sont faciles 6 instaJler car vous n avez
pas e refirer le capuchon de Ja bouteiJJe.¢ontactez votre
dJistrlbute_r de bouteiHes d'e_u pJ_s d'inform_tJons°
3. Pour mettre en marche JecJispositif de chauffe de J'eau chaude et JecJispositif de
refroidissement de J'eau froicJe, dJumez Jesinterrupteurs rouge et vert au dos de
J'appardJ.
4. Branchez Jecane d'dimentafion sur une prise &Jectrique 115 voJts / 60 Hz.
5. Assurez-vous que J'eau sort des robinets et pressant J'un apr&s J'autre Jesrobinets
rouge et bJeu. ] ]
Instructionsde _ise a Ja _asse
Cet appareiJ doit @re.mis 6 la masse! En cas de court-circuit _lectrique, la raise 6 Ja
terre de I%ppareil r_cluit le risque d%bdrocution en offrant un fiJpar lequeJ
s%chappe le courant _lectrique. Cet appareil est _quip_ d%n cordon avec fiJ de
masse et d%ne fiche c_emasse. La fiche c!oit @re introduite dans une prise correcte-
ment instatJ_eavec un contact de raise 6 Ja terre.
®Toute utilisation incorrecte c_e la fiche risque c!'entra_ner &lecfrocufion.
"_ConsuJtez un &Jectricienou r¶teur qualifi& si vous ne comprenez pas
compl@ement les instructions c_eraise 6 la masse ou si un c!oute persiste
en ce qui concerne Ja raise 6 la masse c_eJ'appareiJ.
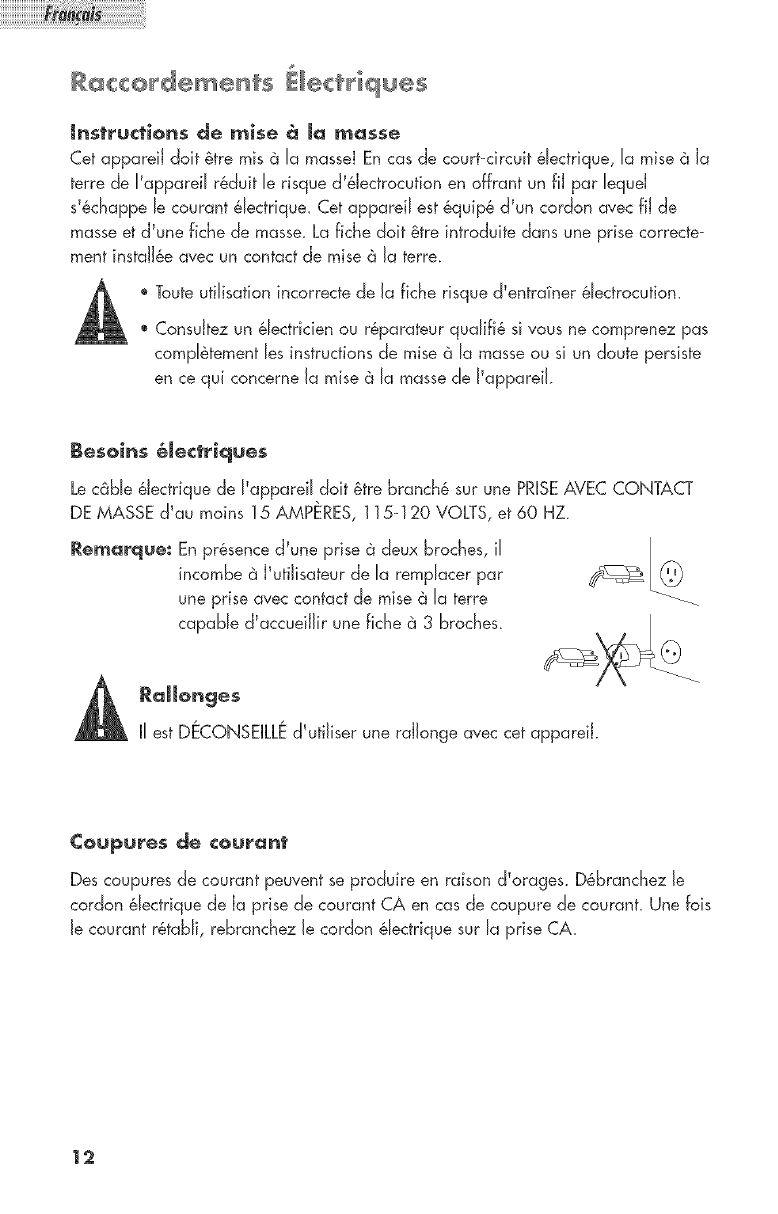
Besoins _Jectriques
Lecane _Jectrique de I%ppareil c!oit _tre branch6 sur une PRISEAVEC CONTACT
DE MASSE c_'au moins 15 AMPERES, 115-120 VOLTS, et 60 HZ.
Re_arqu÷: En pr6sence d%ne prise a deux broches, il
incombe a J%fiJisateurde la remplacer par
une prise avec contact c_eraise 6 la terre
capable d%ccue@ir une fiche a 3 broches.
II est DECONSEILLEchJtiliser une rdJonge avec cet appareiJ.
Coupures de ¢@ur_nt
Des coupures de courant peuvent se prduire en raison 8%rages. D_branchez Je
cordon _Jectrique de Ja prise cJecourant CA en cas de coupure de courant Une fds
Jecourant r@abJi, rebranchez Jecordon _Jectrique sur Ja prise CA
Cettefontained'eaur6frig_r_econfientdeJ'eaugJac_eetdeJ'eauchaude
disponibJesinstantan_mentpourJacuissonoupourboire.Cettefontaine
peutbouteiJJesd'eaude2,3ou5gaJJons(7,5, 11,3et18,9Jitres}.
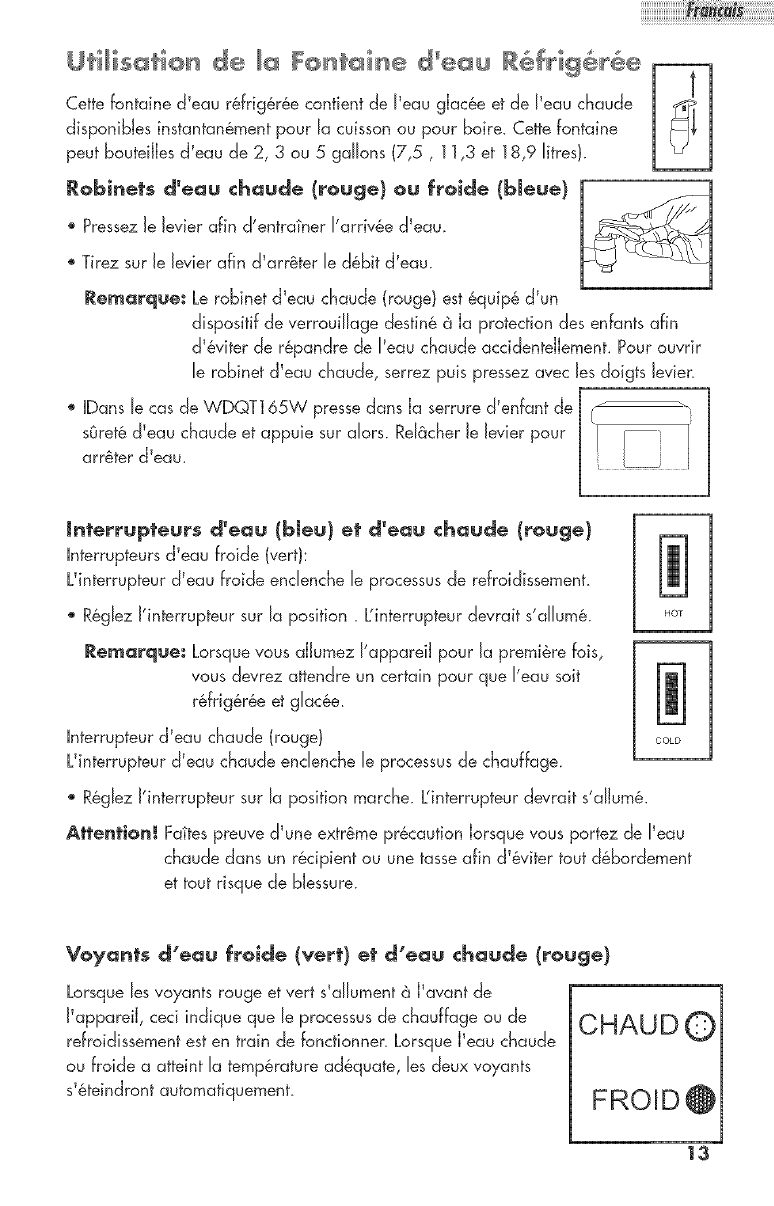
tobinets d'eau chaud÷ (rouge) ou froide (bJeue) j
Pressez JeJevier afin cl'entratner J'arrivae cJ'eau, l _
® Tirez sur JeJevier afin cJ'arr@er JecJabitd'eau. __
l
Rel_arque: Le robinet d'eau chaude (rouge} est @quipad'un
clispositif de verroui/age 8estin@a Ja protection des enfants afin
cl'@iter de r@ancJre de J'eau chaude accicJenteJlement.Pour ouvrir
Jerobinet d'eau chaude, serrez puis pressez avec Jesdoigts Jevien
® IDans Jecas de WDQT165W presse dans la serrure cPenfant de j
sOret_cPeau chaucJeet appuie sur dors. ReJacherJeJevier pour j
arrSter d'eau. [
Jnterrupteurs d'eau (bJeu) et t'eau clau£e (rouge)
Interrupteurs d'eau froide (vert}:
Uinterrupteur d'eau froiSe endenche Jeprocessus de refroidissement.
R_gJezJ'interrupteur sur Ja position ,L'interrupteur devrait s'dbm6. Ho_
Rel_arque: Lorsque vous aJJumezJ'appardJ pour Ja premi@re fois,
vous cJevrezattencJreun certain pour que J'eau sot
r6frig&r_e et gJac6e.
Interrupteur d'eau chaucJe (rouge} ....
L'interrupteur cJ'eau chaucJeenclenche Is processus de chauffage.
R_glez J'interrupteur sur la position marche. L'interrupteur devrait s'alJum&.
AttentionJ Fates preuve cJ'uneextreme precaution Jorsquevous portez de I'eau
chaucJedans un r6cipient ou une tasse afin d'@iter rout cJ_borcJement
et rout risque de bJessure.
Voyants d=eau froid÷ (v÷rt) ÷t d'eau ¢haud÷ (rouge)
Lorsque les voyants rouge et vert s'aJJurnenta l'avant de
J'appareiJ, ced indique que Je processus de chauffage ou de
refroicJissement est en train de foncfionnen Lorsque l'eau chaucJe
ou froide a atteint Ja temp@rature ad@quate, JescJeuxvoyants
s'_teindront automatiquement.
CHAUD( D
FROID@
13
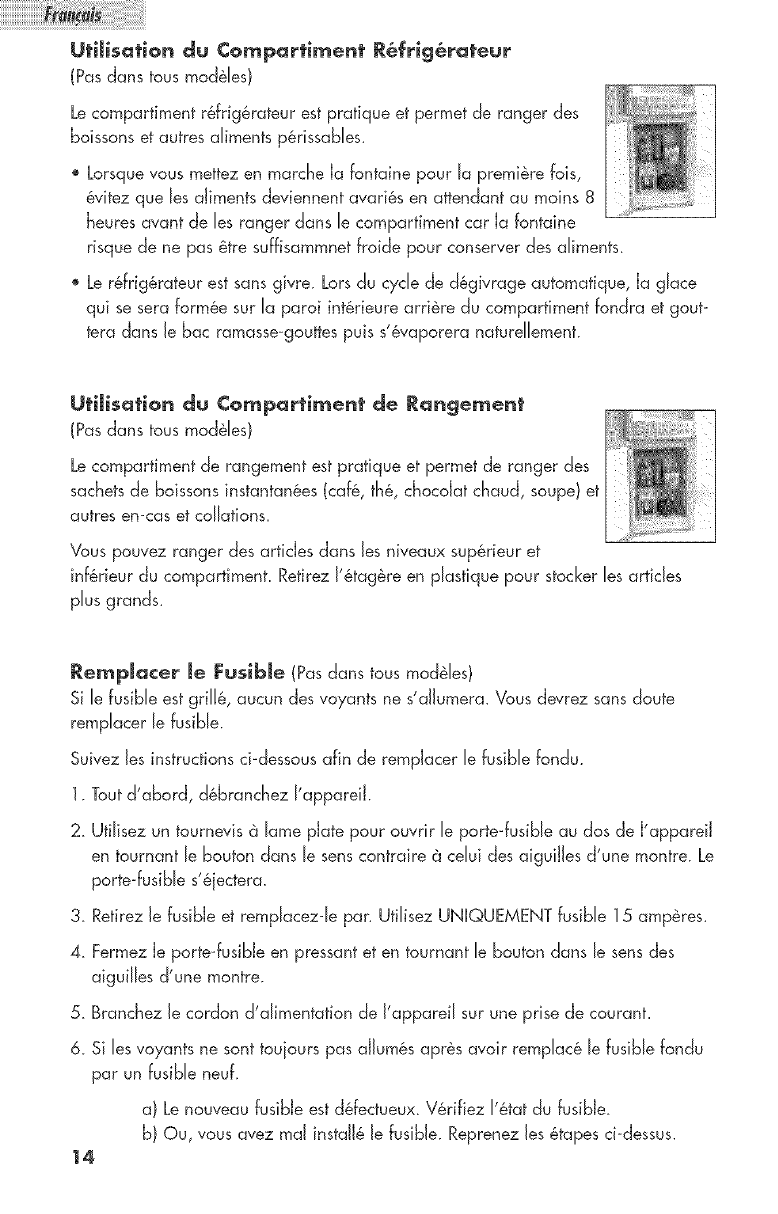
U_i[isation du Compar_imen_ R&frig&rateur
(Pas dans tous mod&les)
Lecompartiment r&frig_rateur est pratique et permet de ranger des
boissons et autres aliments p&rissables_
®Lorsque vous mettez en marche Ja fontaine pour ra premi&re lois,
&vitez que les aJiments deviennent avari&s en attendant au moins 8
heures avant de les ranger dans le comparfiment car Ja fontaine
risque de ne pas _tre suffisammnet froide pour conserver des aliments_
®Le r&frig&rateur est sans givre_ Lors du cycle de d_givrage automafique, Ja glace
qui se sera form&e sur la paroi int&rieure arri&re du comparfiment fondra et gout-
tera dans Jebac ramasse-gouttes puis s%vaporera naturellement.
Utimisation du ¢omparti_÷nt de Rang÷_en_
(Pas dans tous mod&les)
Lecompartiment de rangement est pratique et permet de ranger des
sachets de boissons instantan&es (caf&_th&_chocoJat chaud_ soupe) et
autres en-cas et collations_
Vous pouvez ranger des articles dans les niveaux sup&rieur et
inf&rieur du compartiment. Retirez I'&tag&re en plastique pour stocker les articles
plus grands.
Re_pmacer me !:usibme (Pas dans tous mod&les}
Si le fusible est gril!&, aucun des voyants ne s'allumera. Vous devrez sans doute
remplacer le Fusible.
Suivez les instructions ci-dessous afin de rempJacer le fusible fondu.
1. Tout d'abord, d&branchez I'appareiJ.
2. Utilisez un tournevis _ lame pJate pour ouvrir le porte-fusible au dos de i'appareiJ
en tournant le bouton dans le sens contraire _ celui des aiguiJles d'une montre. Le
porte-fusible s'&iectera.
3_ Retirez le fusibJe et remplacez-le par. Utilisez UNIQUEMENT fusible ] 5amp&res.
4_ Fermez Jeporte-f:usibJe en pressant et en tournant le bouton dans le sensdes
aiguilles d'une montre.
5. Branchez le cordon d'alimentafion de I'appareil sur une prise de courant.
6_ Si les voyants ne sont touiours pas allum&s apr&s avoir remplac& le fusible fondu
par un Fusible neut.
a} Lenouveau fusibJe est d6fectueux. V&rifiez I'&tat du f:usibJe.
b} Ou, vous avez real install& le fusibie. Reprenez les &tapes ci-dessus.
]4
Ba¢ramasse-gouttesamo,tibme
L%aur_panduedansIeBacramasse-gouttesamoviBlecJoit_%tre_tirber6guli&re-
mentetleBacamoviBledoit&trenettoy_afincJ%viterrouteaccumuJafionder_skJus
etlaproJif_rafionc_eBactbries.PourrefirerleBacramasse-gouttesamoviBle,
souJevez-Je.
E_tretieH et Me_ey_ge
Attention_ Avant c_%fiJiser des produits c_e neffoyage, veuillez Jire et respecter les
instructions du faBricant afin c]%viter cl%ncJommager I'appareil ef cJe ne
pas vous BJesser
Renlarque: II est recommand@ de nettoyer la fontaine r&frig@r&e et le p&rim&tre
immbcliaf _ chaque lois que la bouteiJie d'eau est vide afin que vous
p@ssiez c!_placer I'appareiJ snas le po@s de la Bouteille.
Nettoyage G_n&ral
® Avant de netto2"erla fontaine rbfrig&r&e, pJacez le cache-poussi&re sur Je Jogement
cJeprotection c_eJa Boute@ec_'eauafin cJ'&viterroute formation de poussi&re et
accumulation c_ecJ&BriscJansla fontaine Iors ciu neffo)/age.
® Pr&parez une soJufionc_enettoyage en ajoutant 3 6 4cu@_rescJeBicarbonate cJe
soude avec cLei'eau chauc_e.Utilisez une 6ponge ou un chiffon cJoux, tremp&
clans la sohJfionafin c_%ssu'yerI'appareil.
Rincez avec c_eI'eau fi_cJepropre ef s&chez avec un chiffon c_oux.
® N'utilisez pas de prock@s chimiques puissants, aBrasi_s, ammoniaque, ou eau c_e
iave!, dbtergents concentrbs, solvants ou tampons 6 r&curer en fibres mbtatliques.
Certains c_eces proc]uits chimiques risquent c_ecJissoucJre,c]'enc!ommager et ou cJe
c]&colorer votre appareik
® L'eau r&panc_uedans JeBac ramasse-gouttes clair &tre retiree r6guJi_rement et Je
Bac doit &tre netto>'&afin c_'bviter route accumulation de r&sicJuset la prolifbrafion
de Bact6ries.
® Nous vous recommanc!ons tie neffoyer la fontaine c_'eau r&_rig&r&eau moins cJeux
lois par an. Lots cJunettoyage, iJ est inufile de d&monter I'appareil. Versez tout
simpJement la solution de Bicarbonate c_esouc]e et d'eau chaucle c_ansle Iogement
de protection clesfin&a la Bouteille. Ensuite, rincez avec Beaucoup c]'eau
et laissez I'eau s%vacuer. ] 5
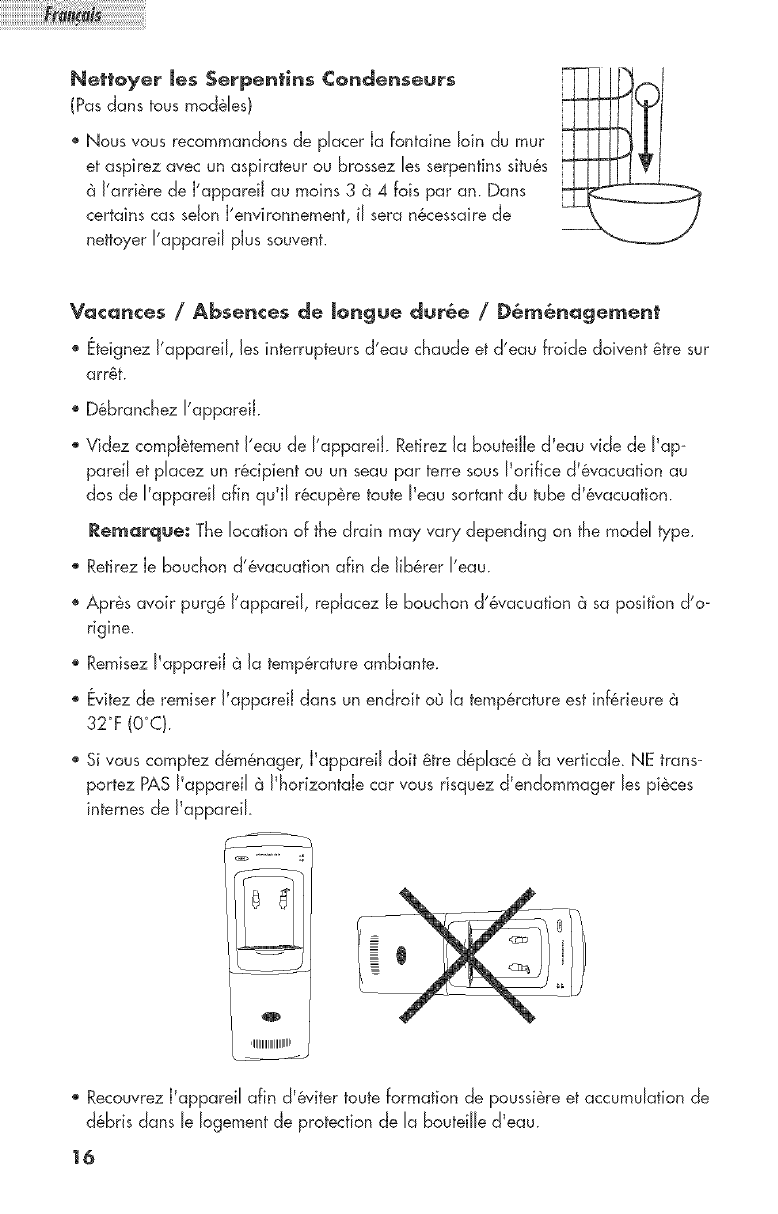
Nettoyer Jes $erpemtims Condenseurs
(Pasdans tousmod_les)
® Nous vous recommandons de placerIafontaineloindu tour
et aspirez avec un aspirateur ou brossez les serpenfins sifu_s
J'arri&re de J'appareiJ au moins 3 _ 4 fois par an. Dans
certains cas seJonJ'environnement, il sera n&cessdre de
nettoyer I'appareil pJus souvent.
Vc_cc_nces /Absences de Jongue dur_÷ /D_@_age_ent
'PEteignez I'appareil, les interrupteurs d'eau chaude et c_'eaufroide doivent &tre sur
arr&t.
®D6branchez I'appareiL
Videz compJ_tement I'eau de I'appareiL Retirez la bouteiJJed'eau vide de I'ap-
pardi et placez un r6cipient ou un seau par terre sous I'orifice c_'6vacuation au
dos de I'appareil afin qu'il r6cup&re toute I'eau sortant du tube d'&vacuation.
Rem_rque: The location of the c_rain may vary depending on the model type.
Retirez Jebouchon d%vacuation afin c_elib&rer I'eau.
®Apr&s avoir purg& I'appardl, repJacez le bouchon d'&vacuation 6 sa position d'o-
rigine.
Remisez I'appareiJ _ la temperature ambiante.
®Evitez de remiser I'appareiJ dans un endroit oO la temperature est inf&rieure 6
32°F (O°C}.
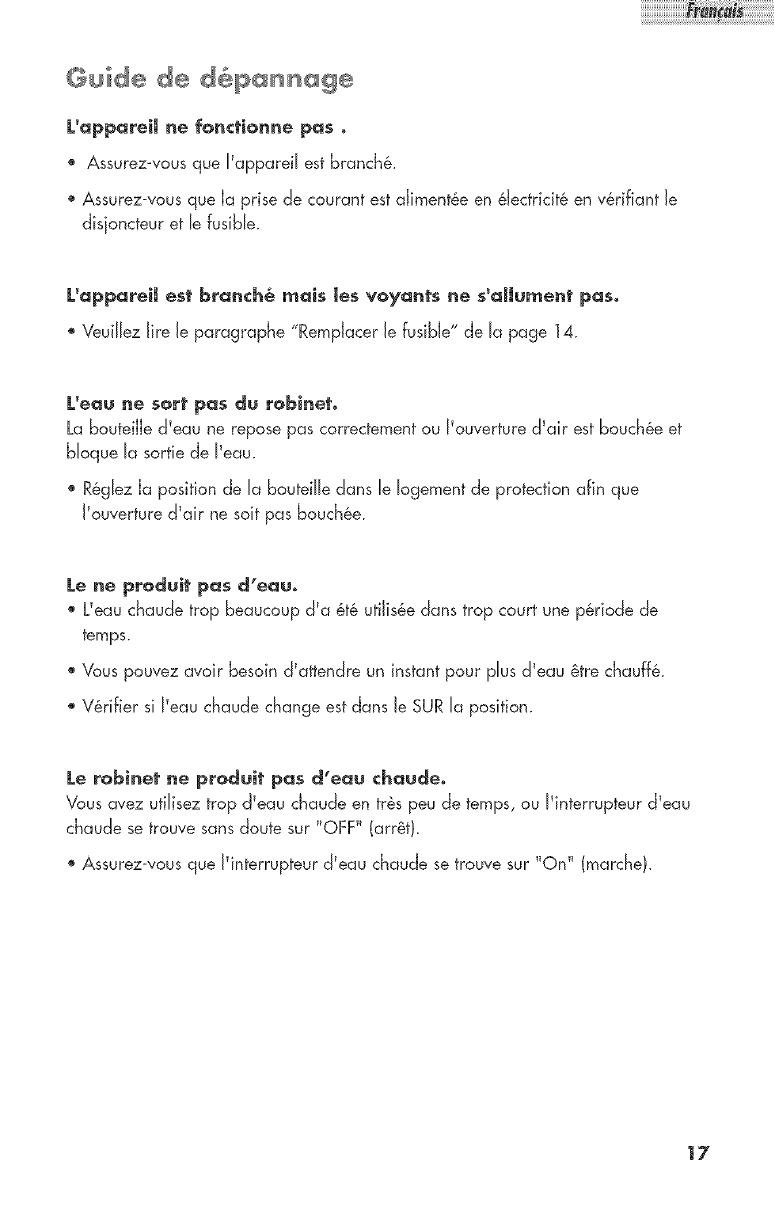
Si vous comptez d6m_nager, J_appareiJdolt @trecJ@pJac@@JaverficaJe. NE trans-
portez PAS J_appareiJ_ J%orizontde car vous risquez d_encJommager Jespi_ces
internes cJeJ_appareiL
o
RecouvrezJ'appareiJafin cJ_6viterrouteformation de poussi@eet accumuJationcJe
d@briscJansJeJogementde protectionde Jaboutei% cJ'eau.
16
@ ide @
L'apporeiJ ne {orlctionne pos ,
Assurez-vous que I%ppardl est branch&.
® Assurez-vous que Ja prise 6 courant est aliment&e en &lectricit6 en v&rifiant Je
disioncteur et le fusiNe.
L'opporeiJ e4 broach_ mois Jesvoyoats ae s'dmument pos.
®Veu@ezJireJeparagraphe "RempJacerJefusibJe"de Japage 14.
L'eou ne sort j:_os du robinet,
La bouteiJJecJ'eaune repose pas correctement ou J'ouverture cJ'air est bouch&e et
bJoque Ja sortie de J'eau.
R@gJezJa position de JabouteiJJedes JeJogement de protection afin que
J'ouverture ?air ne salt pas bouch6e.
Le n÷ produit pos ¢i'eouo
L%au chau6 trop beaucoup ?a 6t6 utiJis6ecJanstrop court une p6riode 6
temps,
Vous pouvez avdr besdn ?attencJre un instant pour pJus?eau 6tre chauff6.
V6rifier si J%auchaude change est dans JeSUR Ja position.
Le robinet ne produit pos d'eou choude,
VousavezutiJiseztrop d'eau chaude en tr&speude temps,ou J'interrupteurd'eau
chaucJese trouvesansdoute sur "OFF" (art&t).
® Assurez-vousque J'interrupteurcJ'eauchaude setrouvesur "On" (marche),
17
Le ¢ompFesseur fonctionne trop fr_quem_ent_
Ceci es_probablemen_ normal afin c_emaintenir constante la temp6rature de I'eau
Iors c_esiours _r_schauds et humides.
®Nettoyez les serpentins du conc_enseur situ_es au c_osde I'appareil.
L'eau fuit du ba¢ rarncssseogouttes.
Le bac c_borc_e d'eau.
®Refirez le bac e_ vic_ez4e.
Replacez4e apr_s I'avoir vid6e.
Qu÷ s÷ passeotoiJsl _a fontc_in÷ _anqu÷ d'eau ou fonctionne sans
Ne laissez iamais la _:on_ainemanquer c_'eauou foncfionner _ sec car vous
risquez c_'endommager I'appareil. NE PAS laisser la fon_aine foncfionner eau.
®Remplacez imm_cliatement tou_ebou_eille vic_e,
QueHe tc_it_ede gourde que pe_xoi'u_i_iser ¢_v÷¢¢e _istribu_e_r
_eo_?
Vous pouvez utiliser 2, 3 ou bouteiJles de 5 gallons avec notre clistributeur d'eau.
18

Qu÷ recouvre _a garantie et
pour ¢ombien de temps?
Cette garantie recouvre tous Jesd6fauts
de fabrication ou de mat_riaux pour une
p_riode de:
] 2 mois pour Ja main d'oeuvre
12 mois pour Jes pi@ces
La garantie prend effet 6 co,mpter de Ja
date d achat de Jarticle etJ originaJ de
Ja facture dolt _tre pr@,sent6au centre de
services agr@_avant d effectuer route
r@aration_
E×CEPTJONS : garantl÷ p@ur un÷
uti_isation ¢ommer¢ia_e ou en
cas 4÷ Jocation
90 jours p@ur Ja main d'_uvr÷
(au servic÷ apr_s-vente unique-
merit)
90 jours pour Jes pi_ces
Aucune autre garantie ne s'ap-
pJicJu÷
Qu%st°¢e qui est ¢ouvert?
1. Lespi_ces m&caniques et _Jectriques
essentieJJesau bon fonctionnement de
cet appareiJ sont garanties pendant
12 mois. CeJa comprend,toutes Jes
pi@cessauf Ja finition etJ habiJJage.
QueJJes seront mesures prises ?
1. Nous nous r@servonsJedroit de
r6parer et de rempJacer toute piece
m6canique ou _Jectrique d_fectueuse
Jorsdune utiJisation normde pendant
Ja p_riode de garantie sp_cifi_e_
2. Lespi_ces et Jamain d'aeuvre ne
seront factur6es 6 J'acheteur pour
aucun articJe couvert par Jagarantie
pendant Ja p6riode initiaJe de 12
mois. Au-deJ6 de cette p6riode, seuJes
Jespi_ces sont couvertes par Ja
garantie_ La main d aeuvre est au
frais du cJient.
3. VeuiJJezcontacter votre centre de ser-
vices a_r_@Je pJusproche. Pour
obtenir Jenora de votre centre de ser-
vices Je pJusproche, veuiJJezappeJer
Je 1-877-337-3639.
CI:ITE GARANTJI: COUVRE BEg
APPAREmJ.$$UR J.ECONTINENT
NONJ)oAMENICAJN (ETAYS-UNmS
ET CANADA) ETA PUERTO RICO.
ELJ.ENE CO_VRE PA$ CE QOJ
S_JT :
Lesdommages dus 6une mauvaise
installation.
Lesdommages survenus pendant Je
transport_
Lesvices autres que de fabrication.
Lesdommages dus 6 une mauvaise utiJi-
sation, 6 une utiJisation excessive, _ une
dt@ation, au manque d'entretien et
une tension ou un voJtage incorrects.
Lesdommages imputabJes 6 une utiJisa-
tion autre que domestique_
Lesdommages dus 6 une r6paration
effectu_e par un service autre que Je
revendeur agr@@ou Jecentre de ser-
vices.
L'habiJJageet JesampouJes_
Le transport et Jexpedition.
La main d ceuvre (apr_s Jes 12 mois ini-
tiaux).
IL N%XlSTE AUCUNE AUTRE
GARANTIE QUE CETTEGARANTIE
LIMITEE, EXPRIMEEOU IMPLICITE,
INCLUANT LESGARANTIES DE
QUALITE MARCHANDE OU D_APTI-
TUDE DANS UN BUT PARTICULIER.
Lesr@arations fournies par Ja pr6sente
garantie sont excJusiveset rempJacent
route autre r@aration.
Cette garantie ne couvre pas Jesdom-
mages indirects ou secondaires. Dans ce
cas, Jeslimitations ci-dessus peuvent ne
pas @re apRJicabJes.Certains _tats n'au-
torisent pas JesJimitations sur Ja dur@e
d'une garantie impJicite. Dans ce cas,
Jeslimitations ci-dessus peuvent ne pas
_tre appJicabJes_
Cette garantie vous reconnalt certains
droits iuridiques, IJest possibJe que
vous disposiez d a,utres droits, pouvant
varier d un _tat 6 Jautre.
Haier America
New York,NY 10018
19
Lea todas Jas instrucciones antes de utiJizcir esta unidcld°
$ie_pre que opere esta unidcid tenga en ¢uentas Jcis normas
ba$icas de $eguridad incJuyendo Ja$ $iguiente$:
1_ UtiJiceesta unidad s6Jopara su usoentendido,como se describeen esteman-
ud yguia de cuidados.
2. EsteDispenser de agua debe instdarse adecuadamente de acuerdo a Jas
instrucciones provistas en este manual antes de utiJizarse_ Vea Jas instrucciones
de conexi6n a tierra.
3_
4.
Nunca desenchufe esta unidad tirando deJcabJe_ Siempre sostenga firme_
mente d enchufe ytire hacia atras_
Repare o reempJace inmediatamente Joscanes de corriente que est_n darlados
o presenten abrasiones. No utiJice canes que muestren rajaduras a Jo Jargo
dd mismo ni enchufes o conectores daBados.
5_
6_
Desenchufe Ja unidad antes de limpiar o antes de hacer alguna reparaci6n.
Nora: Si por dguna raz6n este producto necesita ser reparado nosotros
recomendamos que Ja reparaci6n sea redizada por un service cdificado.
Estedispenser no debe ubicarse en un gabinete cerrado_ Esta diseBado para
Ja instaJad6n Jibre Onicamente.
7. No opere eJdispenser en presencia de gases expJosivos.
8_ Se necesita una supervisi6n cercana cuando es operado pot chicos.
9. Para protegerse de shocks d@scricos no sumeria eJcane, enchufe o dguna
otra parte deJ dispenser en agua u otros Jlquidos.
10_ Para proteger contra eJgripe eJ_ctrico, no sumerge Ja cuerda, eJ tap6n, ni
cudquier otra parte deJabastecedor de agua en eJagua ni otros Jiquidos.
GUARJ)EESI'ASINS]"RLI((IONB
pH futurareferenda
Gracias por utilizar nuestro prducto
Haien Este manual de f6d uso Io NF_merode modelo
Recuerde de tomar nota del modelo
ynOmero de serie. Dos se encuen-
tran en la etiqueta en la parte
trasera de la unidad_
NF;mero de serie
Fecha de compra
Adjurlte Ja factura de co_prci aeste _anud° La _is_cl sera
n÷cesaria pclra hater use de J@sservid@s de garanticl°
]
PAGJNA
PRECAUCJONE$ DE $EGUIRJDAD .......................................................... 1
DESEMPACANDO .................................................................................... 3
PARTE$ Y CARACTERJSTJCA$.......................................................... 4-10
UBJCACtON ADECUADA ...................................................................... 11
JNSTRU¢CJONE$ D_: JNSTALKACJON 1 1
hstdando d dispenser .............................................................................. 11
¢ONEXJON ELECTRICA ...................................................... 12
Insfrucciones de conexi6n a fierra ................................................................ 12
Requerimientos el@ctricos ..........................................................................11_
AJargues.................................................................................................... 'J2
Interrupdones de energia ............................................................................ J2
OPERANDO EL DISPENSER DE AGUA ..........................................13-15
CanilJa cJeagua Friaicaliente .................................................................... 13
Teda de agua Fdai caJiente ...................................................................... 13
Luz incJicdora de agua Fdaicdiente .......................................................... 13
UtiJizando eJ comparfimento de refrigeraci6n .............................................. J 4
ReempJazo del fusibJe ................................................................................ ] 4
Banc_eia de goteo removible ........................................................................ 14
La Bandeja movible c_ela Gota .................................................................. 15
CUIDADO Y MANTENIMIENTO ADECUADO .............................. 15- J6
Limpieza general ........................................................................................ 15
Limpiando el concJensacJor.......................................................................... 'J6
Cuiddos en eJtrasJado, ausendas Jargas yvacadones ................................ 16
PROBLEMAS GJ_NERALES .............................................................. 17-18
GARANTJA ............................................................................................ :20
1_Retire todos los elementos cJe[packaging. Esto incluye [a base de teJgopor y
todas Jascintas adhesivas que sosfienen [as accesorios dentro yfuera de Ja
unidad.
2. [nspecclone yasegOrese de retirar todos Josmaterides deJ embaJaie como cintas
o materiaJes impresos antes de poner en funcionamiento Ja unidad.
Nota: Aseg0erese que eJ dispenser haya estdo por Jomenos Jas 0[timas8 horas
en posici6nvertical antesde encencJer.
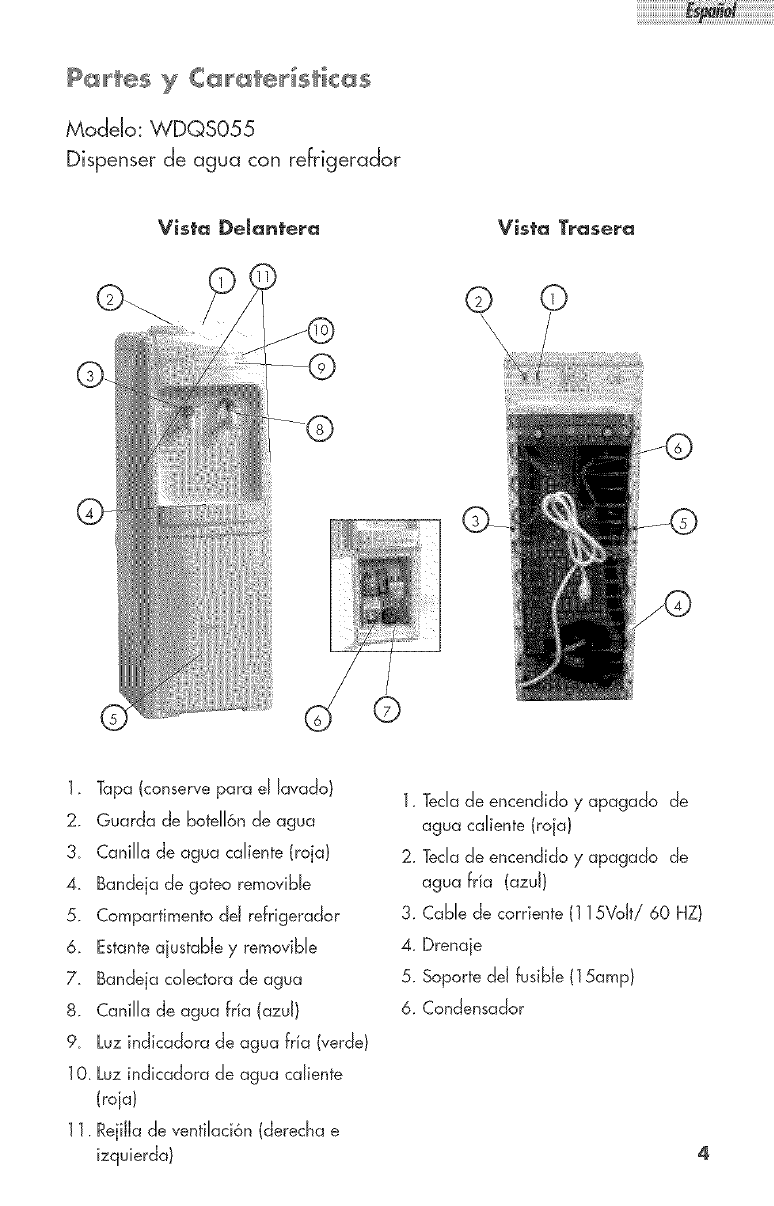
_tes yC_r_ter_sti¢_s
Modelo: WDQS055
Dispenser de agua con refrigerador
Vista DeJantera Vista Trasera
©
© ©
1. Tapa (conserve pora e[ lavado}
2. Guarda de bote[[6n c_e agua
3_ CaniJJade agua cdiente (roja)
4. Bandeja de goteo removibJe
5. Compartimento deJ refrigeracJor
6. Estante aiustabJe yremovibJe
7_ Bandeja coJectora de agua
8. CaniJJa de agua frla (azuJ}
9_ Luz indicadora de agua frla (verde)
10. Luz indicadora de agua caJiente
(roid
11. RejiJla de ventiJaci6n (derecha e
izquierda}
1. Tec[ade encendido yapagdo cJe
agua cdiente (roja)
2. TecJacJeencendido yapagado cJe
agua frla (azuJ}
3. CaNe de corriente (115VoJti 60 HZ}
4. Drenaje
5. Soporte de[ fusiNe (15amp)
6. CondensacJor
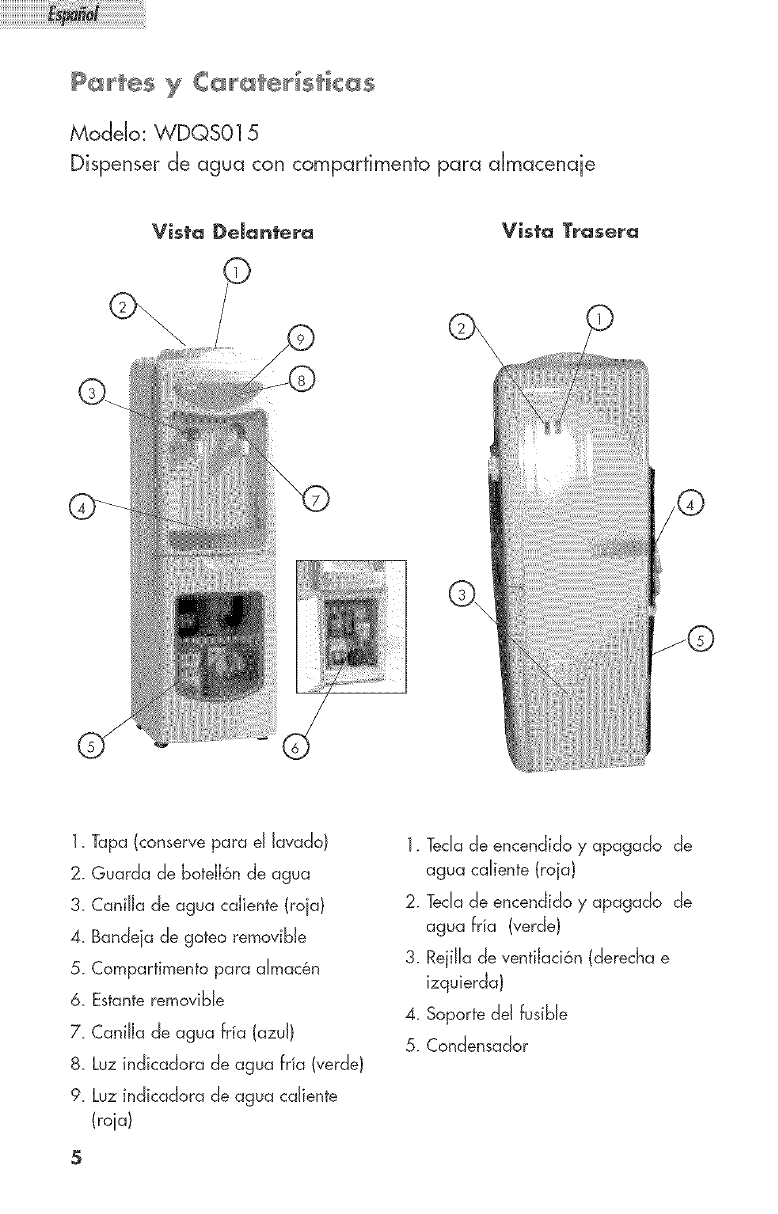
_tes y C_r_ter_sti¢_s
Modelo: WDQS01 5
Dispenser de agua con comparfimento par° aJmacenaie
Vista DeJantera Vista Trasera
\\
Q
1. Tap° (conserve par° eJ Jay°do)
2. Guard° de bote[I6n de agua
3. CaniJJa de agua caJiente (roia)
4_ Bandeia de goteo removibJe
5. Compartimento para dmac6n
& Estante removibJe
7_CaniJJade agua fria (azuJ)
8. Luz indic°dora de agua frla (verde)
9_ Luz indic°dora de agua caJiente
(roid
5
1. TecJade encendido yapagado de
agua cdiente (roja)
2. TecJade encendido yapagado de
agua frla (verde)
3. RejiJJade ventiJaci6n (derecha e
izquierda)
4. Soporte deJ fusible
5. Condensador
_tes yC_r_ter_stic_s
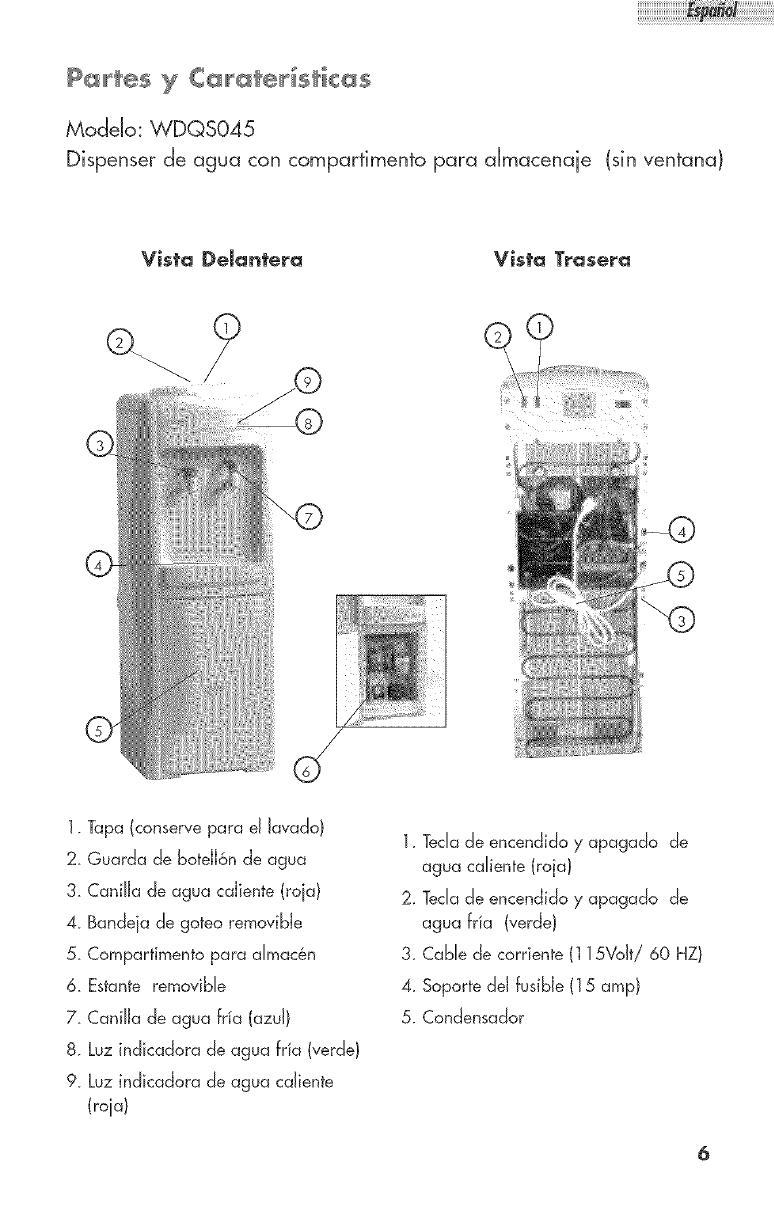
Modelo: WDQS045
Dispenser de agua con comparfimento para aJmacenaie (sin ventana)
Vista DeJantera Vista Trasera
©
1. Tapa (conserve para eJ Javado)
2. Guarda de botdJ6n de agua
3. CaniJJa de agua caJiente (roia)
4_ Bandeia de goteo removibJe
5. Compartimento para dmac6n
& Estante removibJe
7_CaniJJade agua fria (azuJ}
8. Luz indicadora de agua frla (verde)
9_ Luz indicadora de agua caJiente
(roid
1. TecJade encendido yapagado de
agua cdiente (roja}
2. TecJade encendido yapagado de
agua frla (verde)
3. CaNe de corriente (115VoJti 60 HZ}
4. Soporte deJ fusibJe (15 amp}
5. Condensador
_tes y C_r_er_sti¢_s
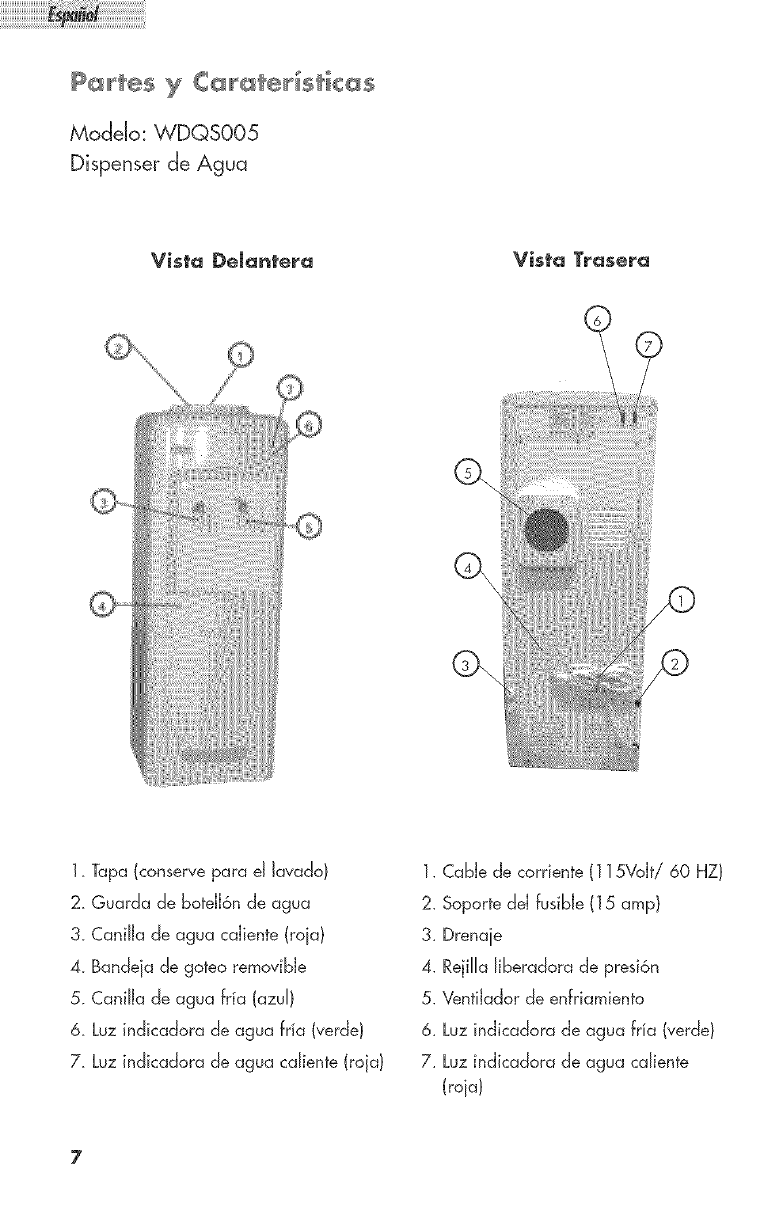
Modelo: WDQS005
Dispenser de Agua
Vista DeJantera Vista Trasera
i!_!i!ii_ii:i_i!il
G
Ck
1_Tapa (conserve para eJJavado)
2. Guarda de boteJI6n de agua
3_CaniJJade agua caJiente (roia)
4_ Bandeia de goteo removibJe
5. Cani[Ja de agua fria (azu[}
& Luz indicadora de agua fria (verde)
7. Luz indicadora de agua cdiente (roja)
1. CaNe de corriente ( 115Volt/60 HZ}
2_Soporte ctei fusibJe (15 amp)
3. Drenaie
4. RejiJJaJiberadora de presi6n
5. VentiJador de enfriamiento
6. Luz indicadora de agua frla (verde)
7. Luz indicadora de agua caJiente
iroio)
_tes y C_r_ter_sti¢_s
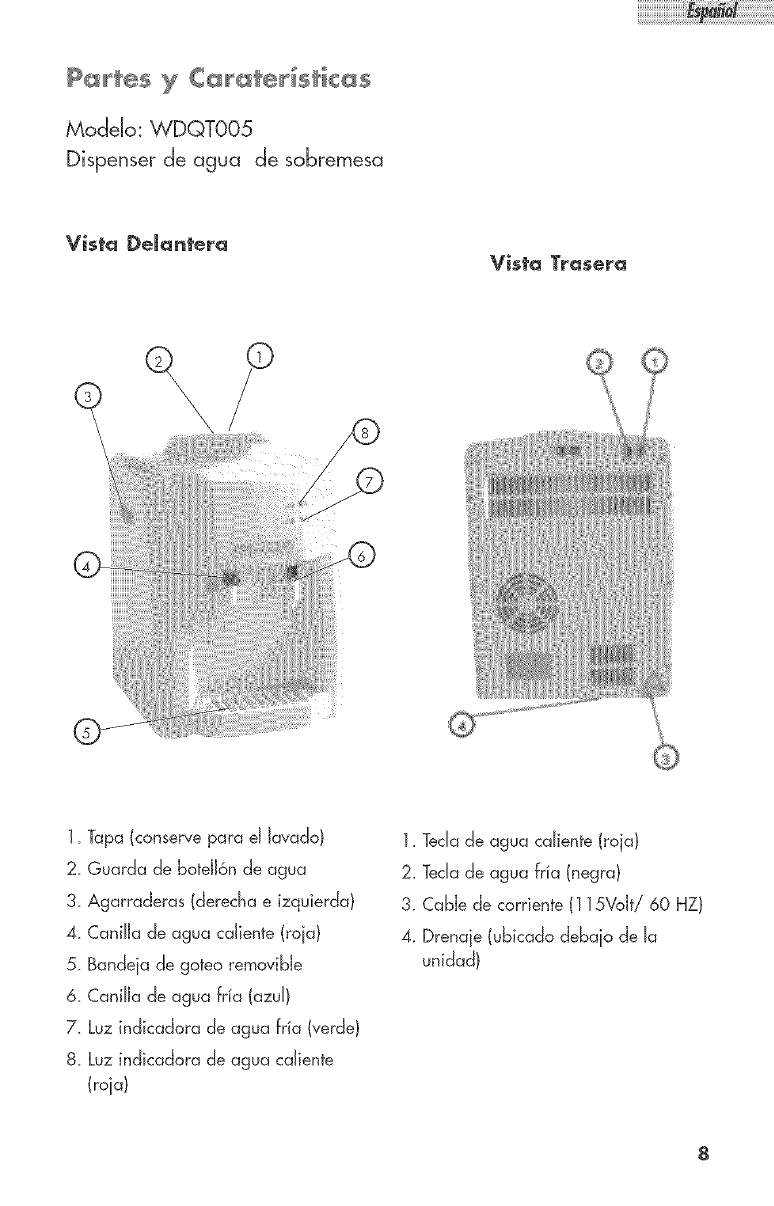
Modelo: WDQT005
Dispenser de agua de sobremesa
Vista DeJantera Vista Trasera
1_Tapa (conserve para el lavado}
2. Guarda de botdJ6n de agua
3. Agarraderas (derecha e izquierda)
4_CaniJJade agua cdiente (roia}
5. Bandeia de goteo removibJe
6. CaniJJa de agua fria (azuJ}
7. Luz indicadora de agua fria (verde}
8. Luz indicadora de agua caJiente
(roid
1_Tecla de agua caliente (roia}
2_Tecla de agua frla (negra)
3. CaNe de corriente ( 115VoJti 60 HZ)
4. Drenaie (ubicado debaio de la
unidad}
P_rte5 y C_r_ter_stic_s
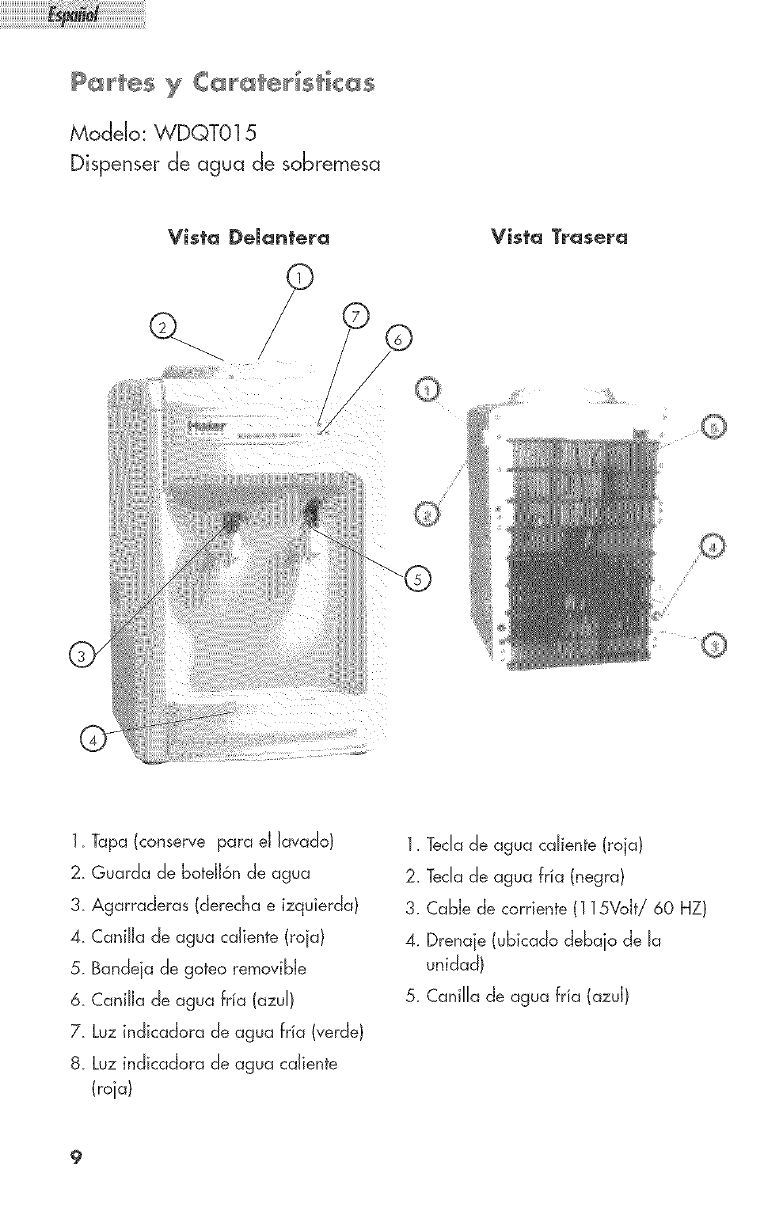
Modelo: WDQT015
Dispenser de agua de sobremesa
Vista DeJantera Vista Tra_era
1_Tapa (conserve para el Javdo)
2. GuarcJa cJebotdJ6n de agua
3. Agarraderas (derecha e izquiercla)
4_ CaniJJade agua cdiente (roia)
5. BanSeia cle cgoteoremovibJe
& CaniJJacJeagua fria (azuJ)
7. Luz indicadora cJeagua fria (verde}
8. Luz indicadora cJeagua caJiente
(roia/
1_TecJade agua cdiente (roia)
2_Teda de agua frla (negra)
3. Cable de corriente (115Volt/60 HZ)
4. Drenaie (ubicdo debaio de la
unidad)
5. Canilla de agua frla (azuJ)
9
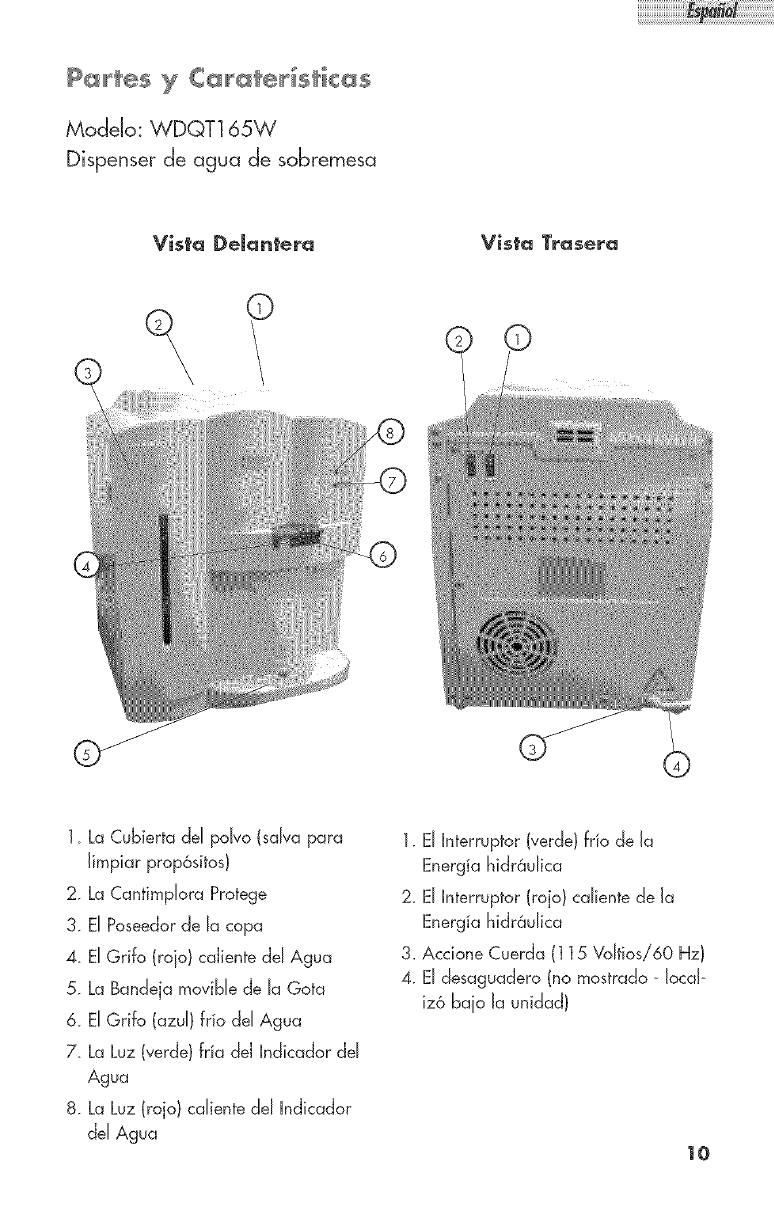
_tes VC_r_ter_sti¢_s
Modelo: WDQT165W
Dispenser de agua de sobremesa
Vista DeJantera Vista Trasera
1, La Cubierta deJ po[vo (saJva para
Jimpiar prop6sitos}
2. La CantimpJora Protege
3. EJPoseedor de Jacopa
4, EJGrifo (roio} caJiente dd Agua
5. La Bandeja movibJe de JaGota
6, EJGrifo (azuJ} frio dd Agua
7. La Luz (verde) frla deJ hdicador dd
Agua
8. La Luz (rojo} cdiente deJ Indicador
deJAgua
1. EJInterruptor (verde) frlo de Ja
Energia hidrauJica
2. EJhterruptor (rojo) cdiente de Ja
Energia hidr_uJica
3_Accione Cuerda (115 VoJtiosi60 Hz)
4. EJdesaguadero (no mostrado - Jocd-
iz6 baio Ja unidad}
10
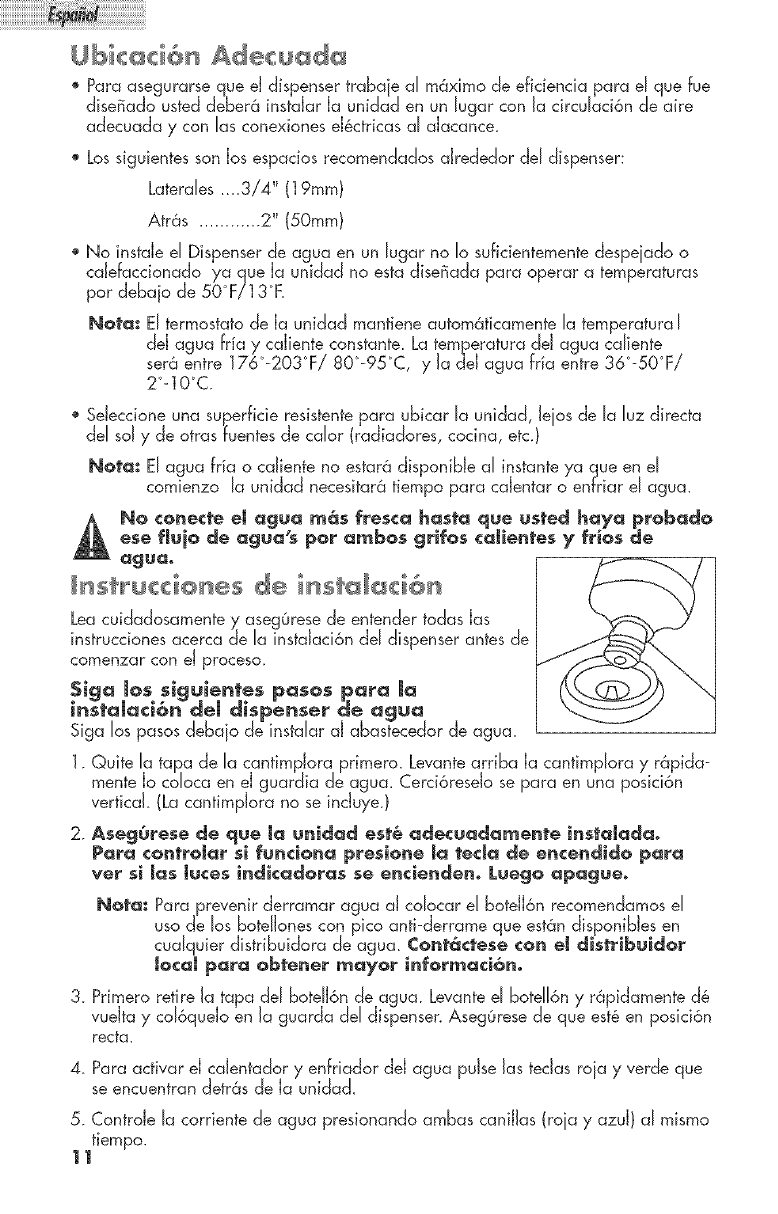
bi¢@d6H Adecu d
®Para asegurarse que e[ dispenser traba[e a[ maximo de eficiencia para e[ que fue
diseffado usted deber6 instdar [a unidad en un [ugar con Jacircdad6n de aire
adecuada ycon las conexiones eJ_ctricas al aJacance.
Los siguientes son [os espacios recomendados aJrededor del dispenser:
LateraIes _3/4 _ (19ram)
Atr6s ............ 2 _ (50ram)
No instde e[ Dispenser de agua en un lugar no [o suficientemente despeiado o
cdefaccionado ya que [a unidad no esta diseBada para operar a temperaturas
por deBajo de 50'F/13°F_
Nata: E[ termostato de [a unidad mantiene autom_ticamente la temperatura I
dd agua fria ycdiente constante. La temperatura dd agua caIiente
ser6 entre 176'-203°F/80°-95°C, yJa c]e[ agua fr_a entre 36°-50'F/
2'-10°C.
®Selecdone una superficie resistente para ubicar [a unidad, [eios de [a [uz directa
del soJyde otras fuentes de cdor (radiadores, cocina, etc.)
Nata: El agua fria o caJiente no estar_ disponibJe al instante ya queen el
comienzo la unidad necesitar6 tiempo para cdentar o enfriar el agua_
Na canect÷ e[ agua _s fr÷sca basra que usted haya prabada
÷se f[uia de agua's par ambas grifas ¢a[ientes yfrias de
agua. --
de iHst d6H
Lea cuidadosamente yaseg0rese de entender todas [as
instrucciones acerca de [a instaJad6n dd dispenser antes de
comenzar con e[ proceso. J
$iga Jos siguientes pasos para Ja
instaJaci6n deJ dispenser de agua
Siga Jospasos debajo de instdar aJ abastecedor de agua_
1. Quite Ja tara de JacantimpJora primero_ Levante arriba [a cantimpJora yr6pida-
mente [o coJoca en e[ guardia de agua. Cerci6reseJo se para en una posid6n
vertical (La cantimpJora no se incJuye.)
2. Aseg@res÷ de que [a unidad est@ adecuadament÷ instaJadao
Para cantraJar si fundana presiane [a teda de encendida para
vet si [as Jutes indkadaras se enciende_ L_ega apag_eo
Nata: Para prevenir derramar agua aJ cobcar e[ boteJJ6nrecomendamos eJ
uso de JosboteHones con pico anti-derrame que est@ndisponibJes en
cudquier distribuidora de agua. Cantactes÷ can ÷[ distrib_idar
Java[ para abtener _ayar i_far_aci6_o
3_ Prirnero retire Ja tapa deJboteJJ6nde agua_ Levante eJ boteH6n yr6pidamente d6
vueJta ycd6qudo en Ja guarda deJ dispenser. Aseg0rese de que est@en posici6n
recta_
4_ Para activar el cdentador yenfriador dd agua puke JastecJasroia yverde que
se encuentran detr@sde la unidad_
5. ControJe Jacorriente de agua presionando ambas caniJJas(roia yazuJ) aJ mismo
fiempo.
]]
{iiiiiiiiiiiiiiiiiiiiiiiiiiiiiiiiiiiiiiiiiiiiiiiiiiii{i
¢onexi6n a tierra
Esta unic_addebe ser conectda a fierra! En e[ caso de un cortocircuito Ja conex[6n
a tierra rec_uceeJ riesgo de un shockeI_ctrico a tra%s c_e[uso de un cane de
escape de [a corriente eI_ctrica. Esta unidac_est6 equipac]a con un cane Y enchufe
con conexi6n a fierra_ EJenchufe c_ebeser insertaclo en una toma c_ecorriente
aclecuada yconedac_a a tierra_
® E[ uso impropio o [nadecuac!o c_e[enchufe puede resuJtar en un shock
el_ctrico.
• ConsuJte un t_cnico espeda[[zado o un e[ectridsta en caso de que [as
instrucciones no hayan sido comprenc!idas en su totaJidad, o en caso de
cludar si eJc!ispenser fue conedac_o correctamente.
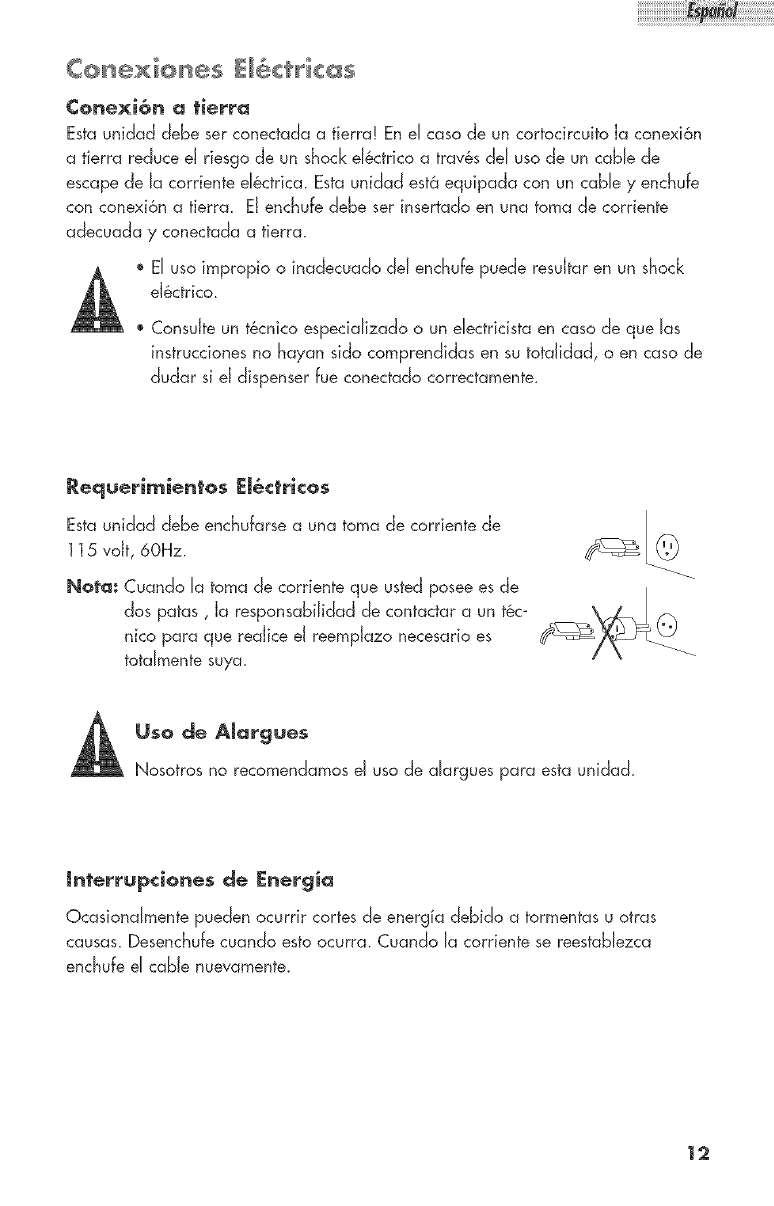
Requerimientos EJ_ctricos
Esta unidad debe enchufarse a una toma de corriente de
115 vdt, 60Hz. _
BJeta: CuancJo [a toma cJecorriente que usted posee es de /
dos patas, Ja responsabiJidad de contactar a un t6c- _'J_ __il_
nico para que reaJice eJ reempJazo necesario es
totdmente suya_
Us@ de AJargues
Nosotros no recomendamos eJuso de dargues para esta unidack
|nterrupciones de J]nergla
Qcasiondmentepuedenocurrir cortesde energla debido a tormentasu otras
causas_DesenchufecuancJoestoocurra. Cuando [a corriente se reestabJezca
enchufee[ cabJenuevamente.
12
©per_d@ d ©ispe_se_ ° de Ague
EsteDispenser de agua brinda aJ instante agua fria y/o cdiente para
safisfacer sus necesidades para cocinar ybeben Se pueden utiJizar boteJ-
Jones de agua de 2, 3 o 5 gaJones.
CaniJJasde agua :Fria (azuJ)/CaJiente (rojo)
Presione hada abajo Jatapa de JacaniJJahacer correr el agua
VueJva a su Jugar Ja tapa de JacaniJJapara cerrar eJpaso.
Nota: La caniJJade agua cdiente (roja} posee un traba de
seguddad para nifios con eJfin de prevenir el derrame
accidental del agua, Para hacer correr eJagua cdiente
prirnero de empujar Ja tapa de la caniJJayJuego pre-
sionar hacia abajo,
En el caso de Ja prensa WDQT165W en Jacerradura caliente
de niBo de seguridad de agua yentonces empui6n hacia abaio. Libere la
palanca para parar el fJuio de agua,
"-z::zzzzzzz:::_
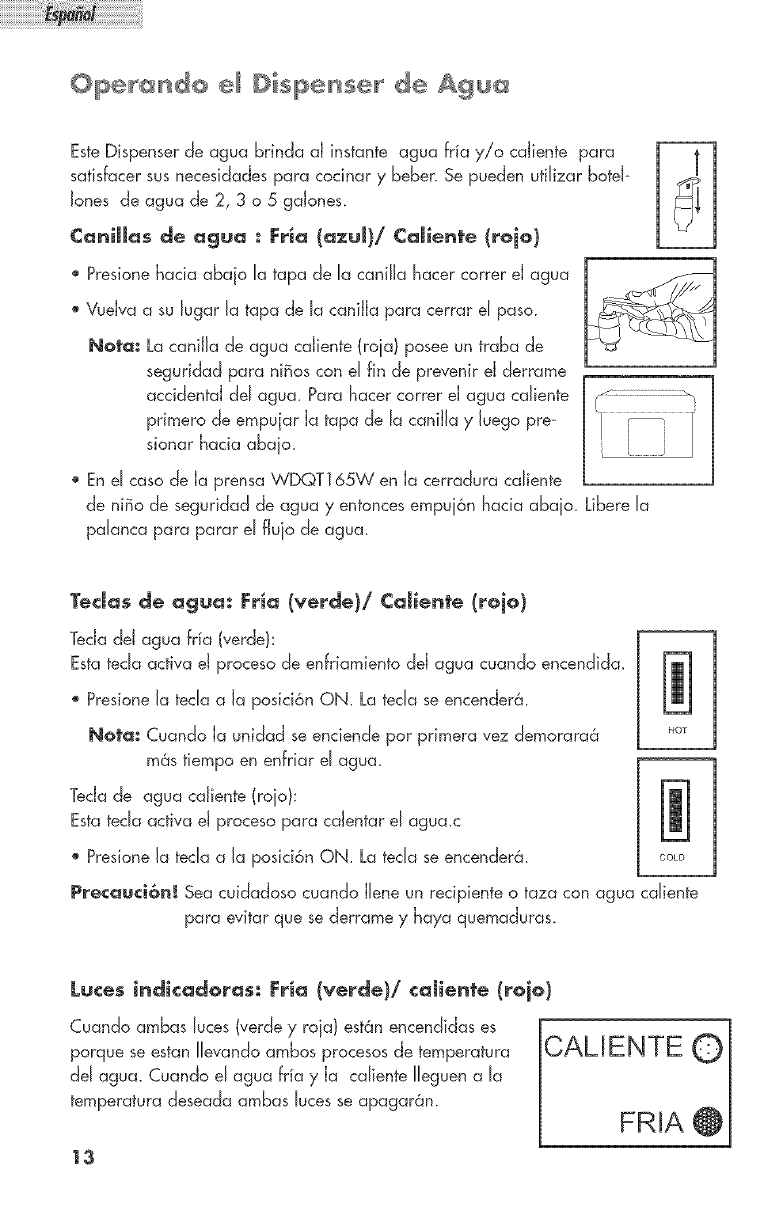
l"edas de agua: Frla (verde|l CaJiente (rojo|
TecJadeJ agua fda (verde}:
Esta tecJaacfiva eJproceso de enfriamiento deJ agua cuando encendida. ill
®Presione JatecJaa Ja posici6n ON La tecJase encenderB_
Nota: Cuando ia unidad se enciende por primera vez demorara4_ _o_
mas fiempo en enfriar el agua.
TecJade agua caJiente (roio}:
Esta tecla acfiva eJproceso para caJentar el agua,c
Presione Jatecla a Ja posici6n ON. La tecla se encender6, coL°
Pre¢ctu¢i6n _.Sea cuidadoso cuando JJeneun redpiente o taza con agua cdiente
para evitar que se derrame yhaya quemaduras.
l.uces indicadoras: Fria (verde)l caJiente (rojo|
Cuando ambas Juces (verde yroia } est@nencendidas es
porque se estan %vando ambos procesos de temperatura
deJagua. Cuando eJagua fria yJa cdiente JJeguena Ja
temperatura deseada ambas Jucesse apagar@n.
CALJENTE C)
FRJA @
13
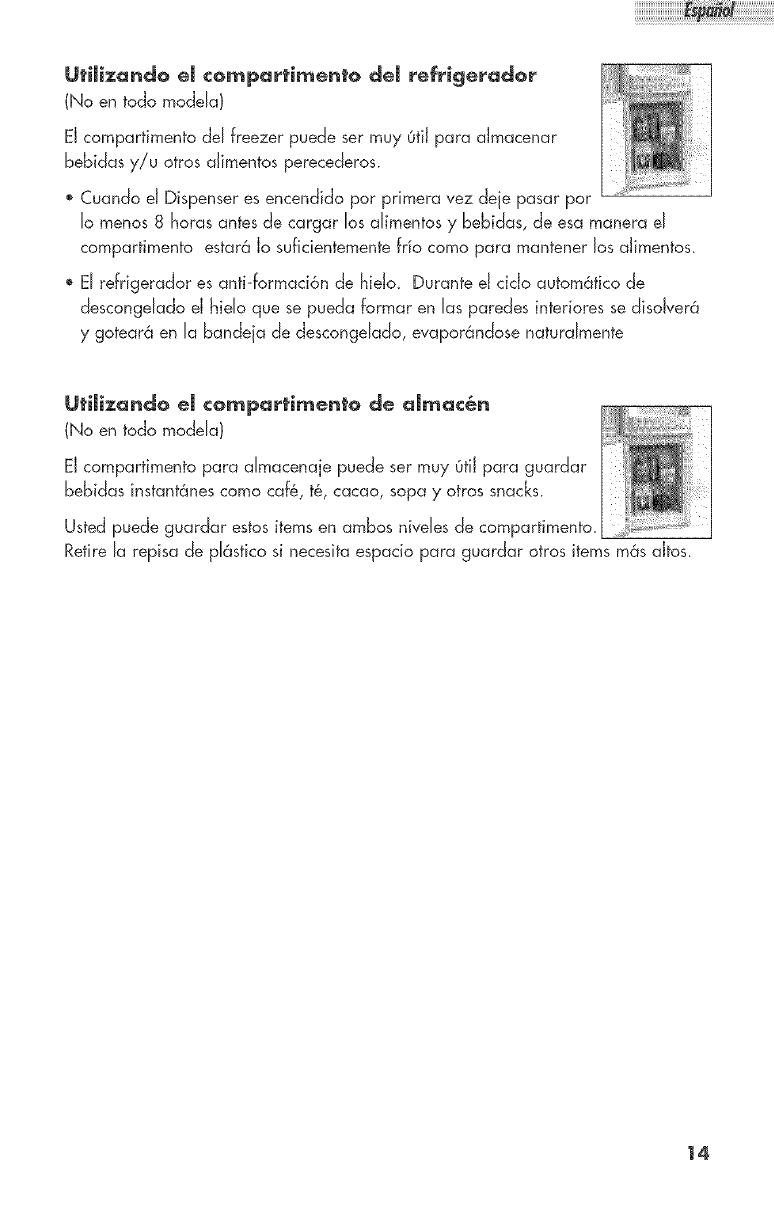
UtiJizando eJ ¢o_parti_ento deJ refrigerador
(No en todo modela)
EJcompartimento deJfreezer pude ser muy otiJ para dmacenar
bebidas y/u otros dimentos perecederos.
,, CuancJo eJDispenser es encendido por primera vez deje pasar por
Jo menos 8 horas antes de cargar Josdimentos ybebidas, de esa manera eJ
compartimento estar_ Jo suficientemente frlo como para mantener JosaJimentos.
® EJrefrigerador es anti-formaci6n de hieJo_ Durante eJcido automd_tico de
descongeJado eJ hieJo que se puecJaformar en Jasparedes interiores se cJisoJver@
ygotear_ en Jabandeja cJedescongeJdo, evapor_ndose naturdmente
UtiJizando d compartimento de aJmac_n
Retire Ja repisa de pJastico si necesita espado para guardar otros items rues aJtos.
14
ReempJaz@ deJ Fusible (No en trio mdela)
CuancJo el fusible est&quemdo ninguna cJeJas Jucesse encender6n. Usted deber6
reempJazarlo por uno nuevo.
Siga Jasinstrucciones siguientes para cambiar eJfusible.
1_Primero desenchufe Ja unidacJ
2. UtiJice un destorniJlacJorde cabeza chata para abrir eJ soporte cJeJfusible en Ja
parte trasera de Ja unidacJ, giranSo eJ torniJJoen cJirecci6n contraria a Jasagujas
deJ reJoj,
3. Retire eJ fusible roto yreempJaze por uno nuevo. Utilice uno de 15 amp sola-
mente.
4. Cierre eJsoporte cJeJfusible ygire Ja _eriJJao torniHo en sentido de Jasagujas
del rdoj.
5. Enchufe Ja unidack
6.8i JasJucesindicacJoras tocJavla no enciencJen:
a} EJfusible nuevo debe estar daBacJo. ControJe eJfusible.
b} Debe haber sido instdacJo inacJecuacJamente.Repita los pasos anteriores.
15
Band÷ia de got÷o re_ovibJe
El agua que se acumuJa en la bandeja debe set desechada regularmente_ Se debe
Jimpiar la bandeja para evitar que se acumuJen residuos yotras bacterias. Para
refirar Ja bandeia Jevantela un poco yretire.
¢uidado_ Antes de utiJizar cuaJquier producto de Jimpieza siempre Jeaysiga Jas
instrucciones de uso dada pot eJfabricante para evitar daBos aJ pro-
ducto o Jesionesfisicas.
Nota: Es recomendabJe Jimpiar eJdispenser yJosdrededores mientras usted red-
iza eJ cambio dd boteJJ6n,asi podr6 mover eJdispenser m6s faciJmente.
SiempredesenchuJeJaunidadantes de JaJimpiezaparaevitar un shock
eJ_ctrk0.
G÷n÷ra_
Antes de Jimpiar cdoque Ja tapa sobre eJ dispenser de modo de prevenir que
pdusas yotros residuos entrenen Ja unidad mientras se Jimpia_
® Prepare una soJuci6n de aproximadamente 3 o 4 cucharadas de bicarbonato de
sosa mezcJadas con agua tibia_ UtiJice una esponia o un paBo suave para
repasar eJinterior yJa parte externa dd gabinete.
® Repase con agua Jimpia ytibia yseque con un paho suave_
® No utiJice quimicos, abrasivos, amoniaco, detergentes concentrados, doro, soJ-
ventes o esponjas de metak AJgunos de estos productos pueden dar'_ar o decoJ-
orar eJacabado de Ja unidad_
®El agua que se acumda en Jabandeia debe ser desechada reguJarmente yse
debe Jimpiar Ja bandeja para evitar que se acumuJen residuos yotras bacterias_
Recomendamos que usted Jimpie el dispenser por Jo menos dos veces aJ aBo_
Cuando Jimpie no es necesario que saque dguna parte deJdispenser; simpJe-
mente vierta JasoJud6n de bicarbonato de sosa por Jaguarda ydeje correr
mucho agua Jimpia antes de usan
16
Limpiando d Condensador (Noen todomodda)
Recomendamos que mueva el dispenser de ia pared para Jimpiar ycepillar d
pdviJJo deJcondensandor yde Ja parte trasera de Ja unidad, par Jo menos hdgaJo
3 o 4 veces aJaBo. AJgunos ambientes requieren una Jimpieza rods frecuente.
IM_I
En CaSO de trasJados, Jargas ausen¢ias y_ _?I
vaca¢Jenes
Leve las tecJasde agua fria ycdiente a OFF
Desenchufe Ja unidad.
®Descargue compJetamente eJ boteJJ6nde agua yretlreJo.
Cdoque un recipiente o baJde en eJpiso debajo dd drenaie en Ja parte trasera
de Ja unidad para iuntar el agua dd tuba de drenaie.
Nora: Depende dd modeJo de unidad Ja ubicaci6n dd drenaie.
®Retire Ja conexi6n deJtuba de drenaje para poder Jiberar d agua restante.
Una vez Jistoredice Ja conexi6n del tuba nuevamente.
Usted debe guardar Ja unidad en un Jugar a temperatura ambiente.
®Evite guardar d dispenser en Jugares donde Ja temperatura es muy fria_
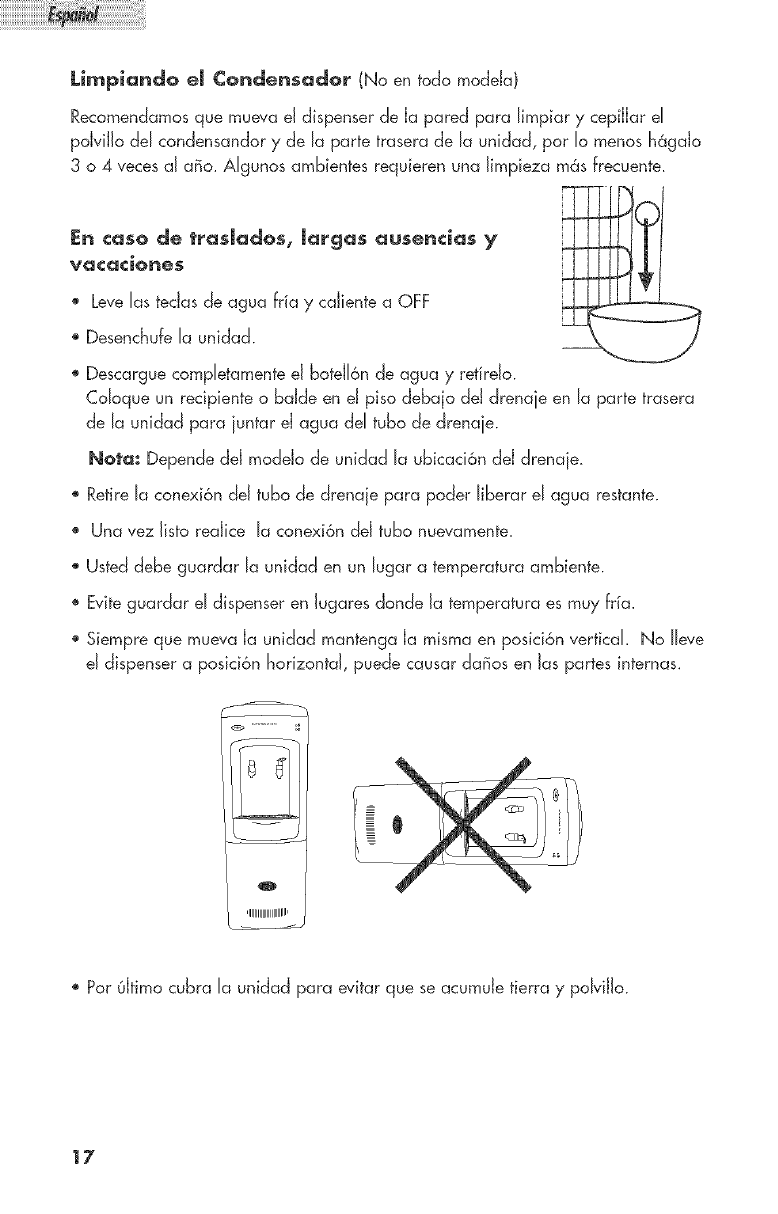
Siempre que mueva Ja unidad mantenga Ja rnisma en posici6n verticak No JJeve
eJdispenser a posici6n horizontaJ, puede causar daBos en Jaspartes internas.
o
®Par OJtimocubra la unidad para evitar que se acumuJe tierra ypolviJJo_
17
EJ r÷irigerador no fundona_
ControJe que Ja unidad est_ enchufada
® ControJe que haya corriente en Jatoma_
La unidad esta enchufada pero Jas lutes indicadoras no endendeno
®LeaJasecci6n"reernpJazodeJfusiNe."
No saJe agua de Jas caniJJaso
Esto es causa de una cdocaci6n inacJecuada deJ boteJJ6nopor JaJobstrucci6n de Ja
corriente cJeaire
® Ajuste Ja posici6n cJeJboteJJ6nde mocJoque Ja abertura cJeaire no bJoqueda_
No soJe oguo ¢oJiente de Jo coniJJo_
® Agua cJemasiado cdiente se utiJiz6 en tambi6n brevemente un espacio de tiempo.
Uste8 pude necesitar esperar un rato para mas agua para ser cdentaSo.
Cheque si eJ interruptor cdiente de agua est@en eJ EN Japosid6n.
No soJe ogua calierlte de Ja canJJJao
Se utiJizo mucho agua cdiente en un perlodo corto de tiempo, o Ja tecJa8e agua
caJiente esta en OFF.
® ControJe que Ja tecJade agua cdiente est6 en posici6n ON
18

EI_otor del co_presortrabaja_uy seguidoo
Esnecesariopara manteneruna temperaturaconstanteen dias c6Iidosyde
humdd,
®Limpie eJconcJensacJoren Japarte trasera de Jaunidd_
Gotea agua de Ja bandeja de goteo_
Se debe a que Ja misma esta JJenade agua yrebdsa_
Retire Ja bandeja yvadeJa,
CoJoquda nuevamente en su Jugan
Qu÷ ocurr÷ si ÷J dispenser s÷ ÷sta quedandto sin aguci?
Nunca deie funcionar el dispensercuando sehaya acabado el agua, puede
causardaBosa Jaunidd_
®Debe reempJazareJboteJJ6ncJeagua inmdiatamente.
Que tama_os de boteJJ6n puedo utiJizar en este dispenser?
UstecJpude usar boteJJonescJe2, 3 o 5 gdones.
19
Qu_ ¢ubre y pot cu6nto tie_po?
Esta garantia cubre trios los defectos
en los materides o los causados pot eJ
trasldo durante un periodo de:
] 2 _eses labor
] 2 _÷ses partes
La garantia comienza eJdia en que d
producto fue comprado_ La factura orig-
inal de compra debe ser presentada
antes de hacer uso del servicio.
Excepciones: Garantla de uso
cornerdaJ
90 dias (tabor)
90 dias (partes)
no apJica ninguna otra garantla°
Qu÷ ÷s _o qu÷ cubr÷?
1. Laspartes mec6nicas yd_ctricas que
se utiJizan para eJ fundonamiento,
por un periodo de 12 meses_Incluye
todas las partes menos el acabado
final.
Que s÷ har_?
1. Repararemos o reempJazaremos
cualquier parte mec6nica o el_ctrica
que se compruebe como defectuosa
en eJ funcionamiento normal y
durante el perlodo de garanfia_
2. No habr6 cargos para el comprdor
pot las partes ylaJoor de acuerdo a
los items anteriores yrespetando el
perldo de "J2 meses_Luego de ese
perldo s6Jolos componentes estan
cubiertos por la garanfia_ La labor
deber6 ser abonada por el diente.
3. Contacte su service autorizado m6s
cercano_ Para averiguar eJnombre
deJ service mas cercano Ilame al
1-877-337-3639
ESTA GARANYJ A ¢UBRE EN LOS
EEUU, PUERTO RiCO YCANADA°
NO ¢UBR_: LO $JGUJENTE:
DaBos por instdaci6n irr_propia
DaBos en eJembarque ytransJdo
Qtros defectos que no sean de manufac-
tura
DaBos por desuso, abuso, accidente,
dteraci6n o faJta de cuiddo ymanten-
imiento adecudo.
DaBos por otro uso que no sea el
dom&stico.
DaBos ocasiondos por reparaciones de
personal no perteneciente a dgOn ser-
vice autorizdo.
Decoraciones o reempJazo cJeJa bombi-
ta de Juz.
Transporte yembarque
Labor (Juegode los primeros 12 meses}
ESTAGARANTIA LIMITADA ESTA
DADA EN LUGAR DE CUALQUIER
OTRA GARANTIA.
Las soJucionesdadas por esta garantia
son exdusivas yotorgdas en Jugar de
cudquier otra soJud6n. Estagaranfia no
cubre daBos incidentdes o secundarios,
de redo que JasJimitaciones precen-
dentes nolo dcanzan a ustd. AJgunos
Estados no permiten JasJimitaciones de
tiempo de una garanfia impJicita, de
modo que JasJimitaciones anteriores
puden no apJicarse en su caso.
Esta garanfia Je da derechos Jegdes
especificos, yustd pude contar con
otros derechos de acuerdo aJ Estado
donde se encuentre.
Haier America
New York,NY 10018
:2O
No regrese este proclucto a kl tienckl
Si tlen÷ ¢llg_n probmema con este prodgcto, par fervor ¢ontacte eI "Centro _e Servklo _
Co_snm_dor _e H_er" _ ]=_77=337=3639 (Vat,do soJo e_ E°UoA)_
NECESITAU_A PRUEBA DE COMP_ FEC_ADA PAP_ ELSERVICIO DE LA GAPJ_hmA
_15_ 60Hz
F_br_qn_ e_ Charge
Hecho e_ ¢h_
• @ 0
What The Wortd Comes Home 'To '_'
part # WC1202-2
Hoier A_erico
Hew York, HY ]0018
