HANA Micron HFDS-00A USB Flash Drive User Manual User s Guide e
HANA Micron Inc. USB Flash Drive User s Guide e
User Manual

Page 1
Mobile Disk
User’s Guide
Please refer to our website at www.mobile-disk.com for the latest updates on Mobile Disk.
Copyright 2002 HANA Micron Inc.
HANA Micron Inc. owns the copyright of both this User’s Manual as well as the contents of the provided installation
CD. Copying or changing part or all of the contents of the User’s Manual is prohibited unless granted prior permission
from HANA Micron. The product is subject to change for improvement without advance notification, and the contents
of the actual installation and use of the product can be somewhat different from those outlined in the User’s Manual.
Registered Trademark
HANA Mobile Disk/AXIS Mobile Disk is a registered trademark of HANA Micron Inc. Microsoft, Windows 98, 98SE,
ME, 2000, and XP are official registered trademarks of Microsoft Corporation. Company names and product names
other than the registered trademarks are the trademarks of their corresponding owners.

Page 2
Table of Contents
1. Features ___________________________________________________________3
2. Operating Instructions ________________________________________________6
2.1 Driver Installation for Windows 98 Second Edition _____________________6
2.2 Operating in Boot Mode __________________________________________9
2.3 Instructions for Linux ___________________________________________10
3. Manager Program __________________________________________________11
3.1 General Format ________________________________________________12
3.2 Apply Password________________________________________________13
3.3 Partition ______________________________________________________16
3.4 Mode Change File Copy _________________________________________17
4. Troubleshooting____________________________________________________18
5. Technical Specifications _____________________________________________19
6. Warranty _________________________________________________________20
7. FCC Labeling Requirement___________________________________________21

Page 3
1. Features
Mobile Disk is a portable device for saving data using a technology known as flash
memory. Mobile Disk’s small size and large capacity make it convenient for a variety of
individuals, including corporate road-warriors who deal with multiple, large presentation
files, designers who need to back-up files for graphic work, and students who need to
submit data intensive reports and also enjoy media (video, audio) files. With Plug & Play
function, using Mobile Disk is easy – just plug it into the PC or the notebook and use it
anywhere, anytime. In addition, with its security and locking functions, Mobile Disk
allows you to prevent both unauthorized access to your files as well as mistaken erasing
of important files.
Plug & Play via USB port
You can use the Mobile Disk simply by plugging it into the USB® port of your PC or
notebook. USB stands for Universal Serial Bus and is recognized as the world standard
computer peripheral connections.
Operating Systems
The device supports all series of Windows as well as Macintosh and Linux (Windows
2000, XP, ME, Macintosh 8.6 or higher, Linux 2.4 or higher).
Power Source
Mobile Disk dose not require any power supplies. It receives its required power from
your computer through the USB port.
Security
You can designate a "Public area" on the Mobile Disk, in which files can be freely
accessed, and an additional password-protected "Secure area". You can set up the
"Public area” and “Secure area” to the ideal size for your needs.
LED Indicator
The Mobile Disk’s LED briefly turns on when you plug the disk into the USB port. LED
steadily blinks during read and write. This allows users to recognize ongoing procedures
accurately and promptly.

Page 4
Speed
1,000 Kilobytes per second for reading and 600 Kilobytes per second for writing.
Capacity Partition
You can more easily use the Mobile Disk by partitioning it into multiple drives, just like
you would in a normal hard disk. For additional security, and to maximize the storage
area for confidential files, you can also set up the "Secure area" to the ideal size for your
needs, with the rest of the available space automatically designated as the "Public area".
The partitioning function is used in the same way as the password function- simply enter
your password and click the "Secure area" button to obtain access.
Mode Change File Restore
When you, by mistake, deleted the ModeChange.exe, which is the partitioning program
in the partitioned Mobile Disk, you cannot change mode of Public/Secure. In this case,
you can copy ModeChange.exe by using the Manager Program (see page 11).
Page 5
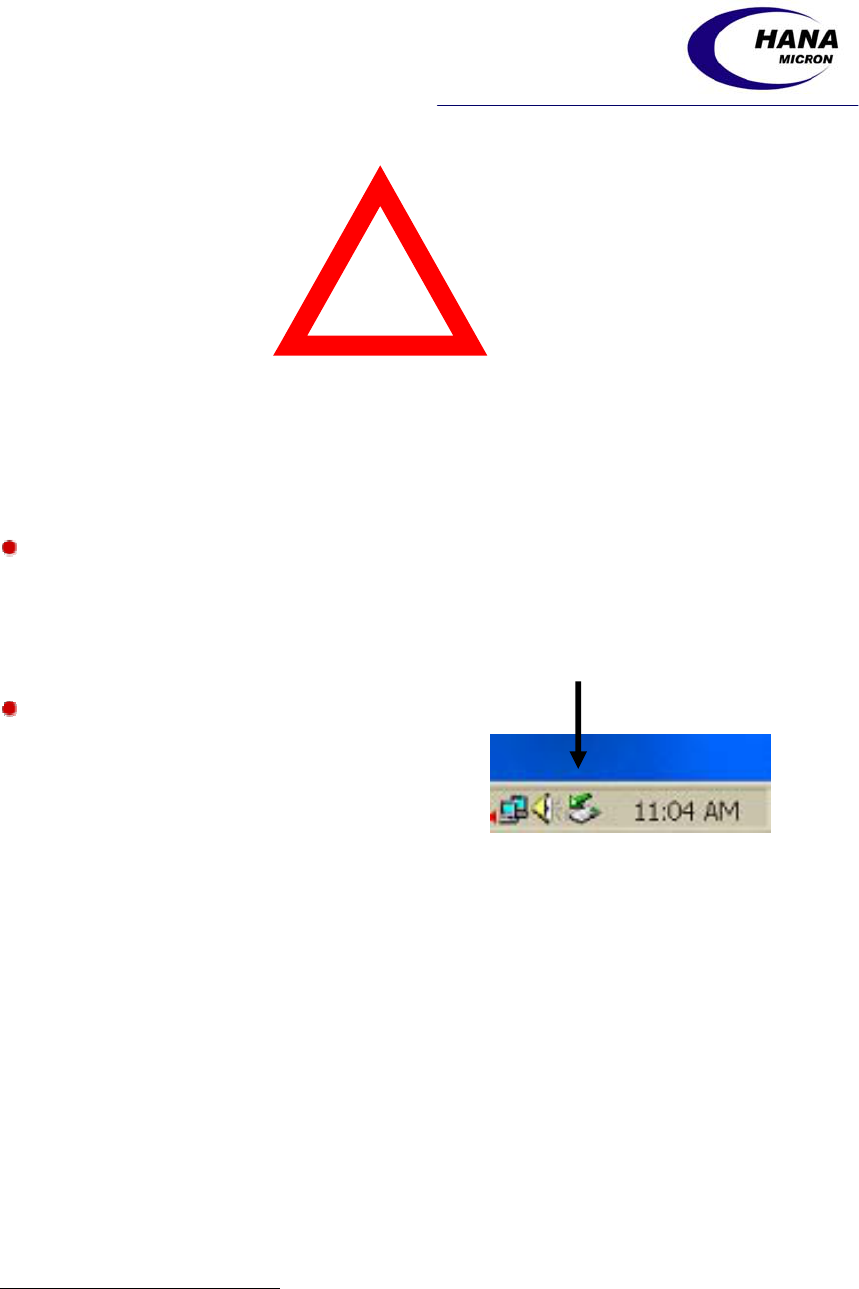
Remove the drive only when the LED light is not blinking. Otherwise, data may
become corrupted.*
In order to remove the drive safely,
click on the Unplug or Eject
Hardware icon in the Tray and then
choose Stop USB Mass Storage
Device.
* Hana Micron, Inc. dose not assume any responsibility for corrupted data due to customer negligence.
Ca u t i on
Page 6
2. Operating Instructions
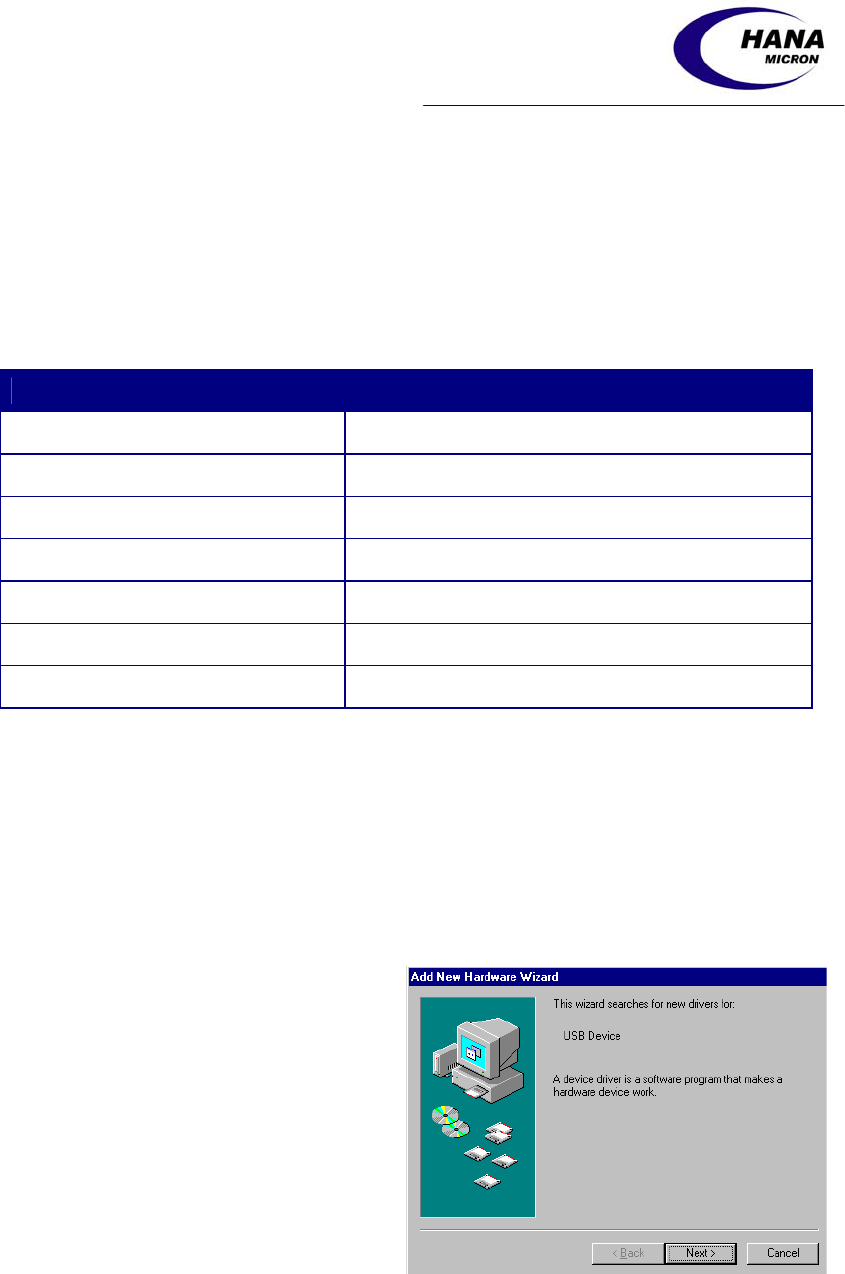
You can connect the drive to the USB port by directly plugging it in to the USB socket or
through an extension cables. With most operating systems, you can input/output and
edit/delete data right away by simply connecting the Mobile Disk to the port.
Supported Operating Systems Driver
Windows XP No driver required
Windows 2000 No driver required
Windows Me No driver required
Windows CE 3.0 or higher No driver required
Macintosh 8.6 or higher No driver required
Windows 98 Second Edition See below for driver installation instructions
Linux 2.4 or higher See page 10 for mounting instructions
2.1 Driver Installation for Windows 98 Second Edition
Since Windows 98(SE) does not support mass storage devices, a one-time installation of
the device driver is required.
Plug the Mobile Disk into the
computer’s USB port. The Add
New Hardware Wizard will start
automatically. Click Next.
Page 7
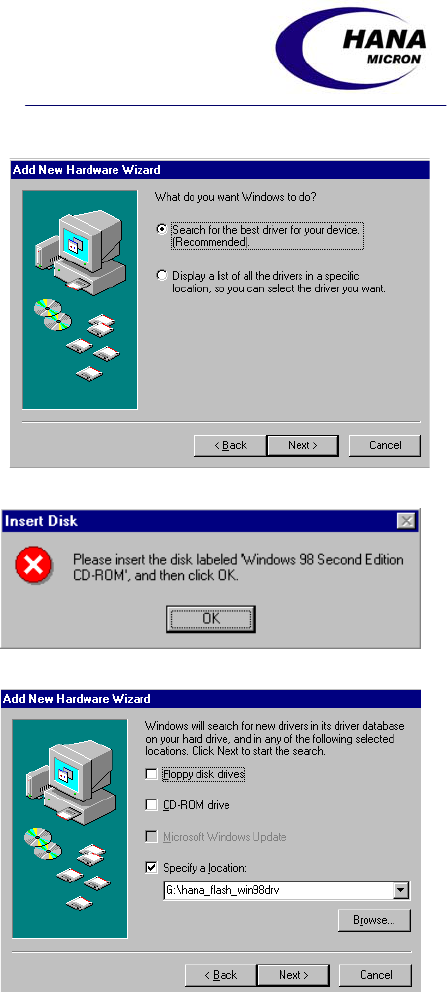
Select Search for the best driver
for your device and then click Next.
Insert Disk appears. Insert the
included CD. Click OK.
Check the Specify a location box.
Click on Browse… and navigate to
the hana_flash_win98drv directory
on the CD.
Click Next.
Page 8
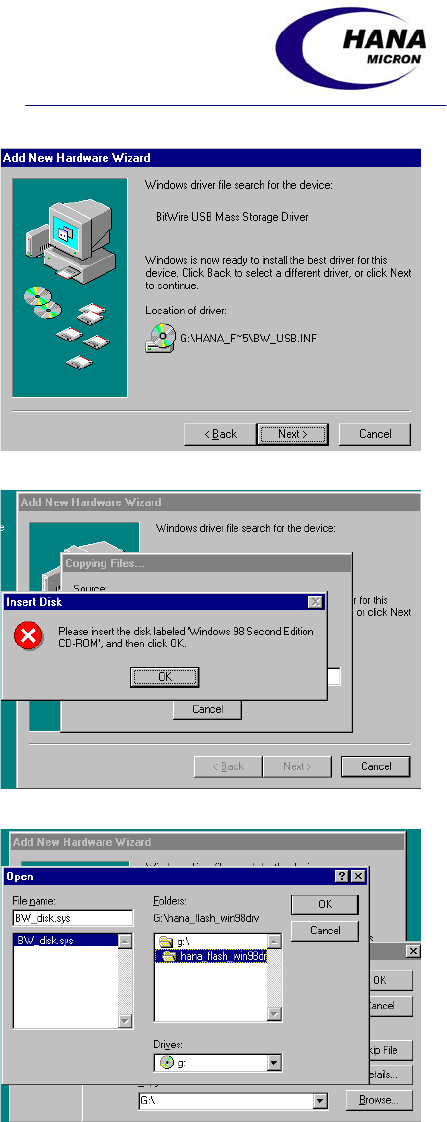
Locate the file BW_USB.INF and
click Next.
Insert Disk appears once again. Just
click OK.
Locate the file BW_DISK.SYS (it is
in the same directory as
BW_USB.INF).
Click OK.
Page 9
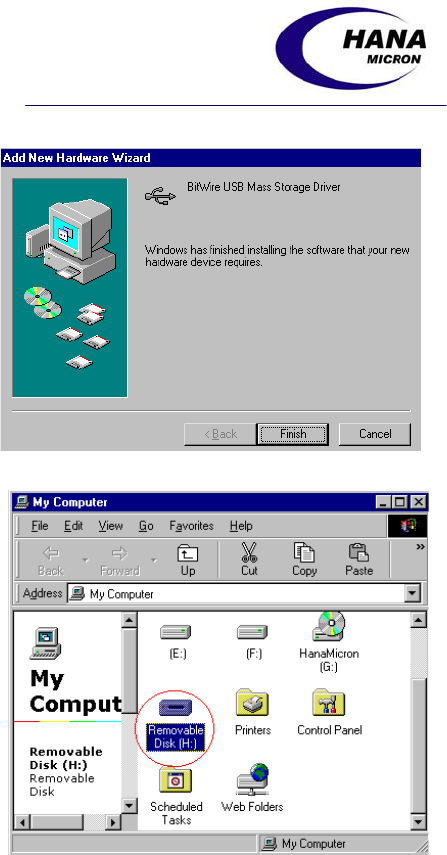
Installation is completed. Click
Finish.
Once the installation process is
complete, a drive icon for the
Removable Disk appears in the My
Computer.
2.2 Operating in Boot Mode
Perform system format (making a MS-DOS boot disk) for windows 98, and make a
boot drive.
Select USB ZIP (Award Bios) or FDD-Emulation (AMI Bios 8.0) from 1st BOOT
DEVICE in the CMOS setup menu of your PC
Restart the system. Booting will be done with the MOBILE DISK.
Once a booting function is installed, this function can be run for any kind of Windows
version.

Page 10
2.3 Instructions for Linux
Operating in Linux (Using Linux Kernel 2.4.X Mount Command):
Log in to root
Connect the product into the USB port.
Pop up the terminal (xterm, hanterm).
With the command mkdir /mnt/disk, generate a folder disk. (Just once initially)
Mount the device with the command mount /dev/sda1 /mnt/disk.
With the command df, command that the following mount was done.
/dev/sda1 127684 8 127684 1%/mnt/disk
With the command cd/mnt/disk, move to disk folder.
Now you can use the mounted folder.
After completing read and write, dismount with the command unmout/dev/sda1 and
remove the product from the USB port.

Page 11
3. Manager Program
The Manager program is a convenient way for you to format the entire disk in case of
data corruption, to password-protect your entire Mobile Disk, or to designate only a
portion of the Disk as your password-protected Secure area and leave the rest of the disk
as a Public area for sharing with other users.
To launch the Manager Program insert the CD in your computer’s CD Drive and then go
to Window’s Start menu, click on Run…, and then browse to locate
diskmanager_v12e.exe on your CD. Then click OK to run the program.
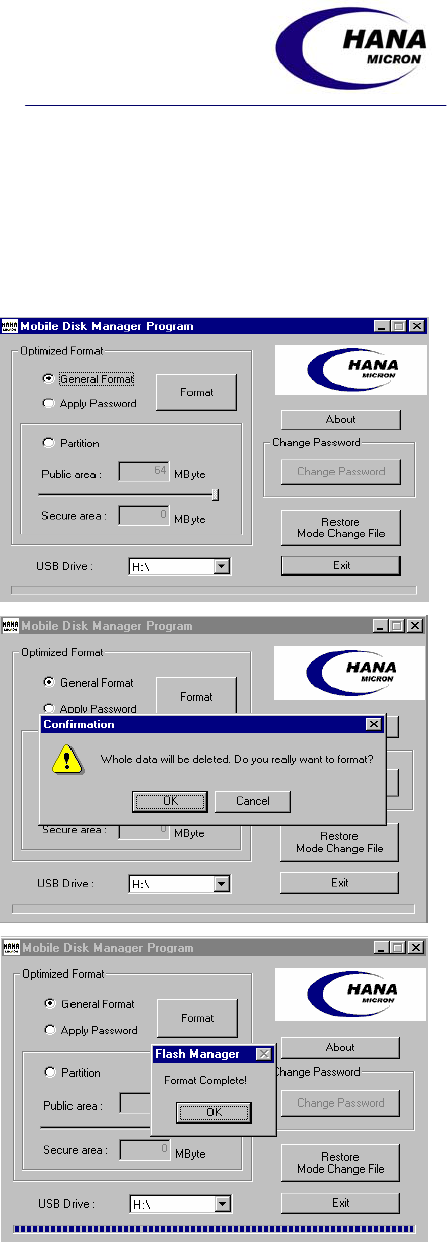
The Manager program offers three main functions:
• Format by clicking the General Format button will format the whole storage area
without partition.
• Format by clicking the Apply Password button will designate the whole storage area
as a Secure area (except a capacity of approximately 430KB) requiring a password to
access the disk.
• Format by clicking the Partition button will divide the storage area into Secure and
Public areas. A program called ModeChange.exe will be automatically copied onto
the disk for switching between Secure and Public areas.
Following are detailed descriptions for each of the above functions:
Page 12
3.1 General Format
Although Mobile Disk is optimized in its initial state, low-level formatting may be
required to eliminate bad blocks caused by an improper shut-down or repetitious read and
write.
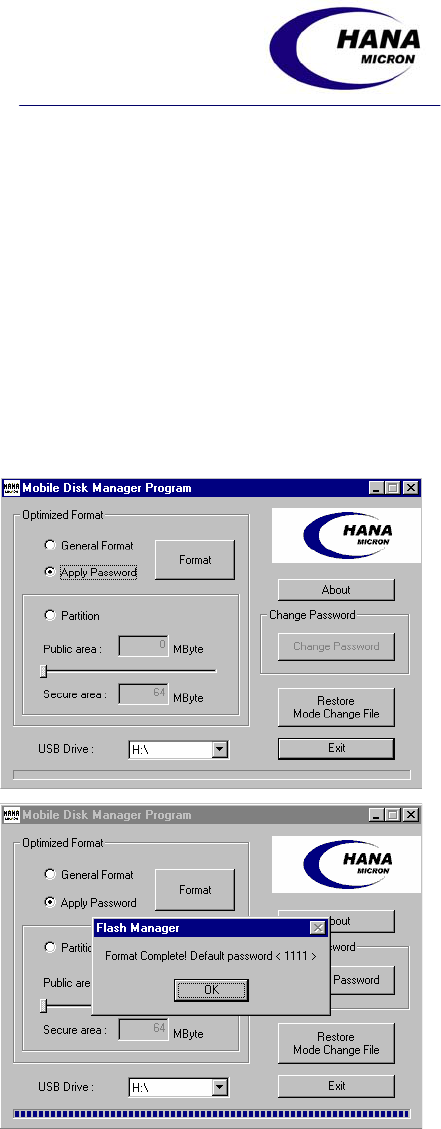
The following window indicates the
stage of general formatting. Select
General Format and click the
Format button.
A warning message about loss of
data will appear. Formatting will
start after clicking OK.
Once the format is complete, a
window with confirmation message
appears. Click OK.
Page 13
3.2 Apply Password
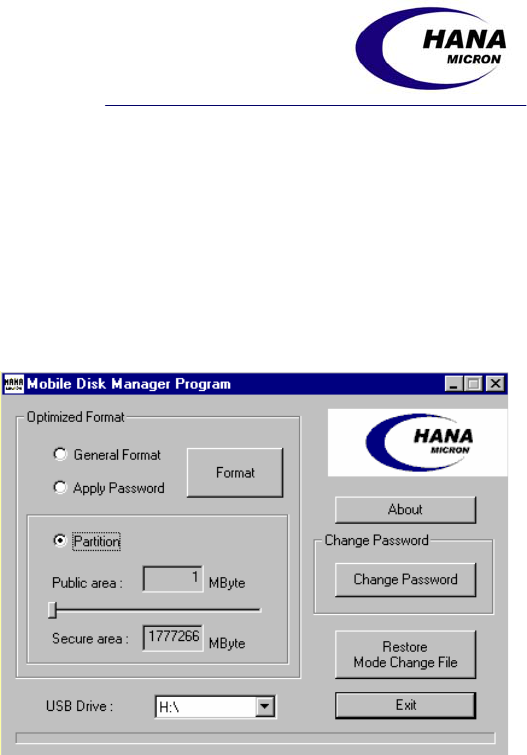
When you password-protect your Mobile Disk, the Manager program puts an executable
file (Password.exe) on your Disk, which can be launched at any time to allow you access
to the secured files. Unlike many other similar products, this convenient program
eliminates the need to carry around a media or make additional installations on every
computer that you need to plug the Disk into.
Apply Password will password-protect your entire Disk (with the exception of
approximately 430KB).
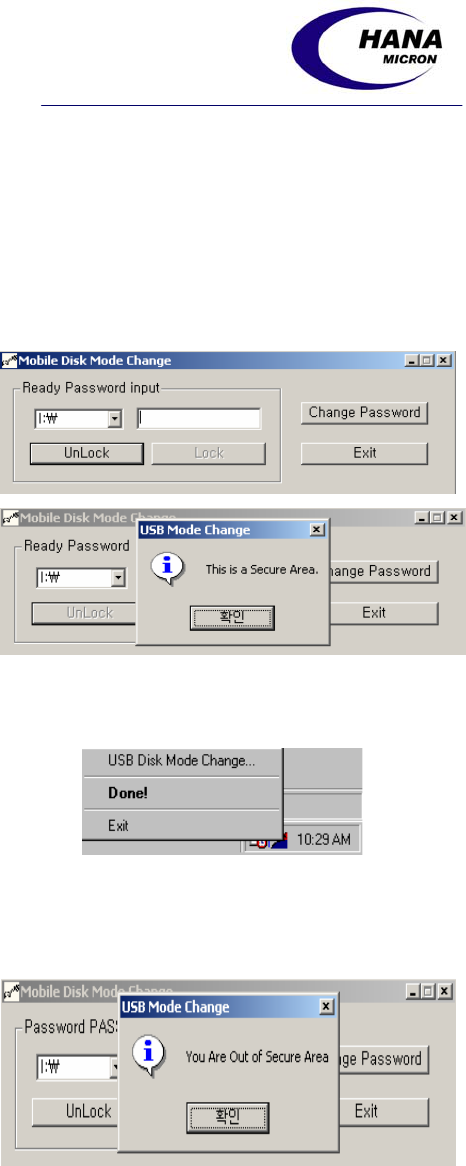
Select the Apply Password button
and then click Format.
Click OK in the warning message
about the loss of data.
The disk will be formatted with a
default password of 1111 (see below
for instructions on how to change
the password).
Page 14
The following steps explain how you can access the password-protected area of your
disk:
Find the Removable Disk from Windows Explorer or My Computer and click on it.
You will see the Paasword.exe executable file. Run this program by opening it.
Enter the password and click on
the Unlock button.
Click OK. The password-
protected area of the disk
(excluding 430 KB) is now
available to use.
As the program is launched, an
icon also appears on the Tray.
Password.exe can be launched
again at any time either by double
clicking this icon or by
positioning the cursor on the icon
and clicking your right mouse
button to select USB Disk Mode
Change…
To exit the Secure area, simply
launch the USB Disk Mode
Change program from the Tray,
and then click on Lock.
Click OK.
Page 15
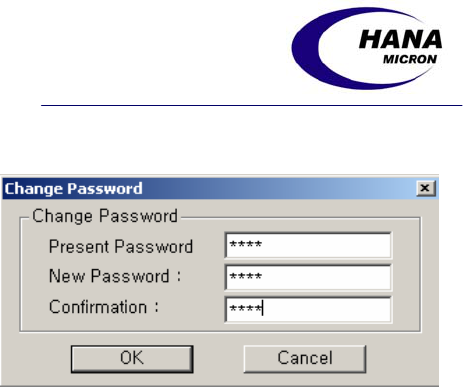
To change a password, click the
Change Password button on the
password function window. If it
is the first time you change the
password, the default password
needs to be entered. Then enter
new password, new password
once again and click OK to
complete password change.
Unlike many other password programs that stay in the computer’s RAM (which may
cause memory overflows and collisions) the password window, as well as the password
function icon, disappear when the disk is removed from the PC.
Once created, Password.exe cannot be deleted unless the Disk is reformatted. If you
accidentally attempt to delete Password.exe off your Mobile Disk, you might see the file
disappear from Windows Explorer. However, by properly ejecting the Disk and then
plugging it back into your computer, the file will appear again in Windows Explorer.
Page 16
3.3 Partition
Your Mobile Disk can be formatted so that only a certain portion of the Disk is password-
protected.
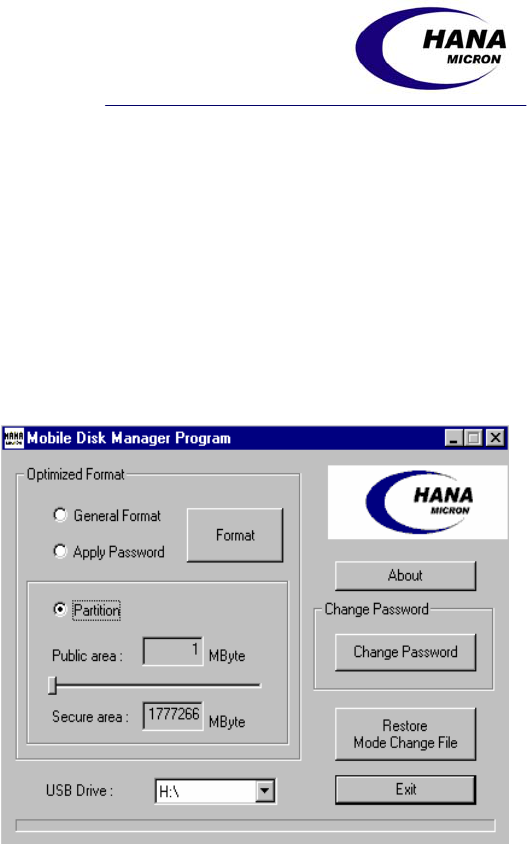
Select the Partition button.
Scroll the horizontal dial to
adjust the desired
allocation between Public
and Secure portions. For
example, in this picture,
the position of the dial
corresponds to 8 Mbytes of
Public area versus 24
Mbytes of Secure area (on
a 32 Mbytes Mobile Disk).
Click Format
Click OK in the warning
message.
Click OK in the message
indicating that the default
password is 1111.
The Manager Program copies a file called ModeChange.exe onto your Mobile Disk.
You will need to launch this program to switch between the Secure and Public areas of
the Disk.
Page 17
3.4 Mode Change File Restore
If the partition program, i.e. ModeChange.exe, is deleted from your Mobile Disk, mode
conversion between Public and Secure areas will not be possible. In this case,
ModeChange.exe can be copied again onto your Mobile Disk by using the Manager
Program.
Click the Mode Change
File Restore button.
Click OK.

Page 18
4. Troubleshooting
• My computer doesn't recognize the Mobile Disk!
First, check whether you are using an operating system that automatically
supports the Mobile Disk – auto-supported operating systems include Microsoft®
Windows® ME, 2000 and XP; Mac® OS 9 and OS X and Linux® versions 2.4.X
and higher. If the drive is being used on one of these systems and is still not
functioning, try it on a different system using one of these operating systems. If
the drive fails to be recognized on a second system, then it is possible the drive
may be defective. Please contact a customer service center and we will arrange
for an immediate, free replacement drive to be shipped to you (assuming the drive
is still under its 1 year warranty period).
• When I connect the Mobile Disk to a Macintosh computer, it recognizes it
but asks if I want to format it.
This means your Macintosh computer cannot read any Windows-formatted files
currently on the drive. Please refer to your computer user’s manual and enable the
Windows file read functionality for your Mac. Note that if you follow the
message and format the Mobile Disk on a Macintosh, it will NOT read or write on
Windows PCs, so it is strongly recommended NOT to do this.
• The Windows ME/2000/XP Operating System recognizes the Mobile Disk,
but will not install the device driver.
It is possible you may have deleted a portion of the standard driver for the
operating system. Please try and download the necessary device driver from the
Microsoft Website.
• The indicated capacity of the Mobile Disk is less than the maximum capacity
of 16MB, 32MB, 64MB or 128MB.
Mobile Disk calculates its storage amount as 1KB=1000 Bytes and
1MB=1,000,000 Bytes. As a result, the actual capacity may be indicated as
15.3MB, 30.8MB, 62.1MB and 124MB respectively. The drive may also only be
showing the available disk space in the ‘public’ part of the drive (if drive security
is being used).
Page 19
5. Technical Specifications
Interface USB Specification 1.1/2.0
Operating System
Windows 98(SE) – driver required (included in CD)
Windows ME, 2000, NT, XP, CE 3.0 or higher, Macintosh OS
8.6 or higher, LINUX 2.4.0 or higher – no driver required
Capacity 16MB, 32MB, 64MB, 128MB, 256MB, 512MB, 1GB, 2GB
Data Retention 10 Years
Speed Read 1,000KB/sec, Write 600KB/sec
Source USB Bus-powered (No other power sources needed)
Contents Mobile Disk, CD, USB Cable, Warranty
Manufacturer HANA Micron Inc., +82-2-2057-4787
Additional Function Password, Capacity Partition
Page 20
6. Warranty
Mobile Disk has been manufactured through strict quality management and inspection. If
any faults or natural breakdown occurs within the warranty term, HANA Micron will
remedy the malfunction according to the guarantees outlined in the warranty statement.
Please record the following information for future reference:
Product Name
Model Number
Date of Purchase Warranty: 1 Year
Purchase Price
Name
Location
Store
Phone
Free Services
Free services are available from the customer service center for 1 year after the Date of
Purchase.
Fee-Based Services
Service charge is incurred when:
− Problem occurs due to improper use (damaged by impact or inserting improper
materials).
− Problem occurs after any repairs or handling not performed by HANA Micron’s
customer service center.
Many products brought to the service center do not have any problems. So please see the
Troubleshooting section of this manual before returning the product.
Customer Service Center
HANA Micron Inc.
6th Floor, Myeong-Seong B/D
Dogok-Dong, Kang Nam-Gu
Seoul, Korea 135-271
Tel : 0502-111-7272
Fax : 02-2057-4635
E-Mail : support@hanausb.com

Page 21
7. FCC Information
This device complies with Part 15 of the FCC Results. Operation is subject to the
following two conditions:
(1) This Device may not cause harmful interface, and
(2) This device must accept any interference received, including interference that
may cause undesired operation.
Note: This equipment has been tested and found to comply with the limits
for CLASS B digital device, pursuant to Part 15 of FCC Rules. These
limits are designed to provide reasonable protection against harmful
interference when the equipment is operated in a commercial environment.
This equipment generates, uses and can radiate radio frequency energy
and, if not installed and used in accordance with the instructions, may
cause harmful interference to radio communications. However, there is no
guarantee that interference will not occur in a particular installation. If this
equipment does cause harmful interference to radio or television reception,
which can be determined by turning the equipment off and on, the user is
encouraged to try correct the interference by one or more of the following
measures:
1.1. Reorient or relocate the receiving antenna.
1.2. Increase the separation between the equipment and receiver.
1.3. Connect the equipment into an outlet on a circuit different from
that to which receiver is connected.
1.4. Consult the dealer or experienced radio/TV technician for help.
WARNING
Changes or modifications not expressly approved by the manufacturer could void the user’s authority to
operate the equipment.