HAOLIYUAN U0631 Mini 802.11ac Wireless USB Adapter User Manual
HAOLIYUAN (SHENZHEN) ELECTRONIC CO., LTD Mini 802.11ac Wireless USB Adapter
User manual
1/36
Wireless 802.11b/g/n/a/ac USB Adapter
User Manual
2/36
Chapter 1: Introduction…………………………………….………….3
1.1 Product Features……………………………………………………….……………….3
1.2 Package Contents……………………………………………………………………….3
1.3 Indicator Description………………………………………………………………….3
CHAPTER 2: Quick Installation Guide……………………………….4
2.1 Driver Installation……………………………………………………………………….4
2.2 Connect to Wireless Access Point……………………………………………….7
2.2.1 Using Client Utility……………………………………………………………………7
2.2.2 Using Windows Zero Configuration………………………………………….12
CHAPTER 3: Client Utility………………………………………………..16
3.1 Connection Profile Management………………………………………………….16
3.1.1 Add a new profile……………………………………………………………………..17
3.1.2 Remove an existing profile……………………………………………………….19
3.1.3 Edit an existing profile………………………………………………………………20
3.1.4 Make a copy of existing profile………………………………………………..21
3.1.5 Set as default profile………………………………………………………………..21
3.2 View Network Statistics, General Information, and Status……….22
3.2.1 General Information………………………………………………………………….22
3.2.2 Status………………………………………………………………………………………..23
3.2.3 View Network Statistics…………………………………………………………….23
3.3 Miscellaneous Settings………………………………………………………………….24
3.4 Establish secure connection with AP by WPS……………………………….25
3.4.1 PIN Code…………………………………………………………………………………….27
3.4.2 Push Button………………………………………………………………………………..28
CHAPTER 4 Soft AP Function…………………………………………….29
4.1 Switch to AP Mode and Station Mode…………………………………………..29
4.1.1 Configure SSID and Channel…………………………………………………….31
4.1.2 Setup Soft-AP Security……………………………………………………………..32
4.2 Advanced Settings………………………………………………………………………..33
4.3 Wireless Statistics………………………………………………………………………….34
4.4 Internet Connection Sharing (ICS)……………………………………………….35
CHAPTER 5: Troubleshooting……………………………….………….35
3/36
Chapter 1. Introduction
Thank you for purchasing the wireless 802.11b/g/n/a/ac USB
adapter! This adapter is mini size design and you are able to plug it
into the USB port. Excepting common wireless standards
802.11b/g/n, this wireless adapter is also 802.11ac compatible -
data transfer rate is 150/433Mbps, and that’s three times faster
than 802.11g wireless network!
1.1 Product Features
◆ Complies with IEEE 802.11ac , IEEE 802.11a,IEEE 802.11n, IEEE
802.11g and IEEE 802.11b standards
◆ Provides USB2.0 port
◆ Provides 150/433Mbps receiving rate and 150/433Mbps sending
rate
◆ Supports 20MHz/40MHz/80MHz frequency width
◆ Auto-detects and changes the network transmission rate
◆ Provides two work modes: Infrastructure and Ad-Hoc
◆ Supports Soft AP to establish your wireless LAN networking
◆ Supports 64/128-bit WEP, WPA, WPA2 encryption methods and
802.1x security authentication standard
◆ Supports WPS (Wi-Fi Protected Setup) encryption method to free
you from remembering long passwords
◆ Easy-to-install, plug and play
◆ Supports Windows XP/VISTA/Win7/ Win8/Linux/Macintosh
1.2 Package contents
The following contents should be found in your box:
◆ One Wireless 802.11b/g/n/a/ac USB adapter
◆ One CD (include driver/utility/user manual)
Note: If any of the listed contents are damaged or missing, please
contact the retailer from whom you purchased the product for
assistance.
1.3 Indicator Description
There is a LED indicator blinking when data communication is
going on.
CHAPTER 2: Quick Installation Guide
4/36
This chapter is to assist you how to use the included CD-ROM
which comprises the Driver and the Client Utility Interface.
2.1 Driver Installation
Please follow the following instructions to install your new
wireless USB Adapter:
2.1.1
Insert the USB wireless network card into an empty USB 2.0 port
of your computer when computer is switched on. Never use force
to insert the card, if you feel it’s stuck, flip the card over and try
again.
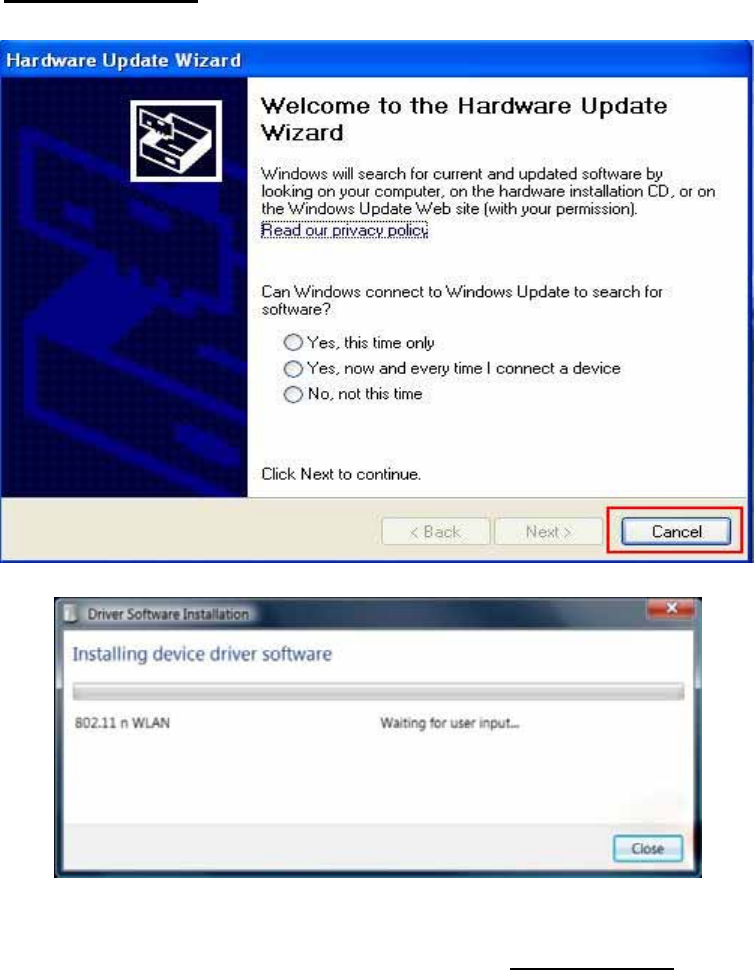
2.1.2
The following message will appear on your computer, click
‘Cancel / Close’. Under Windows XP
Under Windows Vista and Windows 7
2.1.3
Insert the driver CD into your CD-ROM. You can see autorun
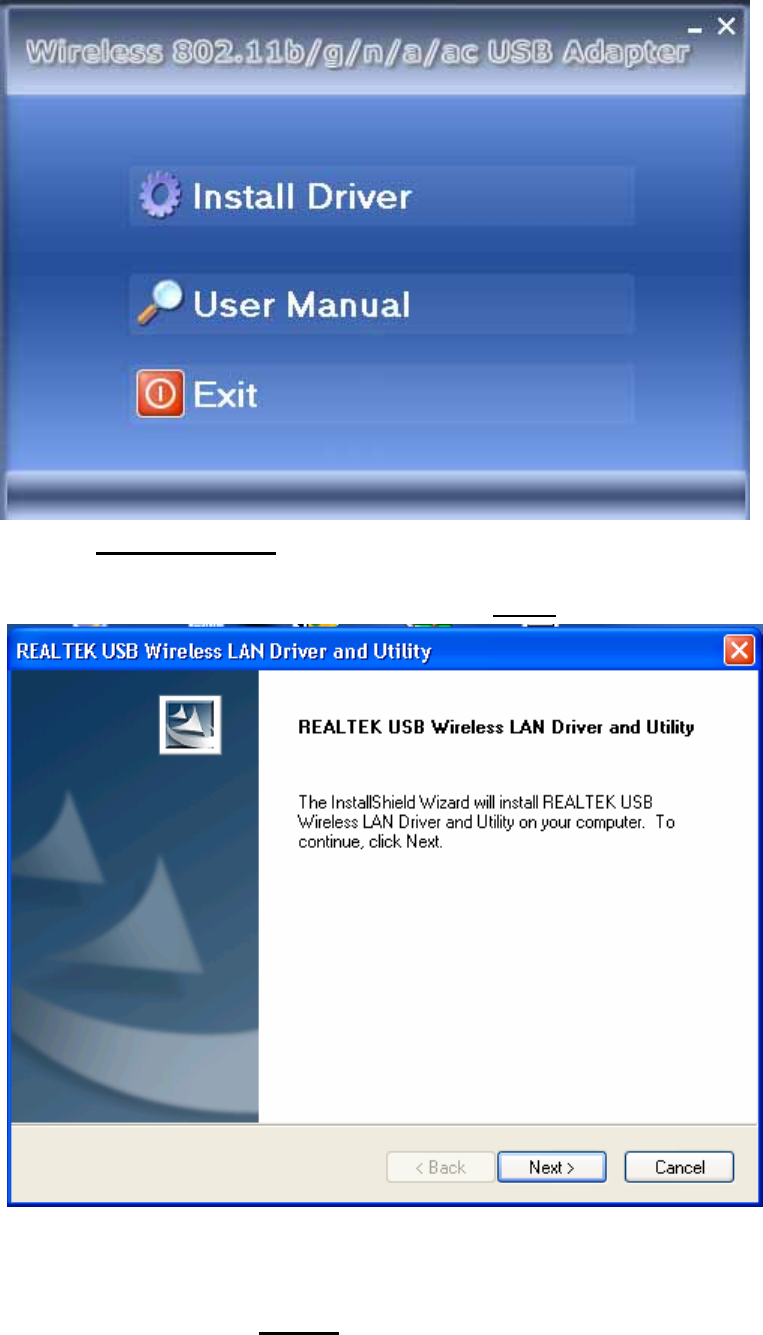
screen below. if not, you can double click ‘autorun.exe’ on CD.
5/36
Click ‘Install Driver’ to start the installation procedure
2.1.4
Installation descriptions shown. Click ‘Next’ to continue
2.1.5
Once the installation is finished the computer will be asked to
reboot. you can click ‘Finish’ and reboot the computer to finish the
installation of driver files.

6/36
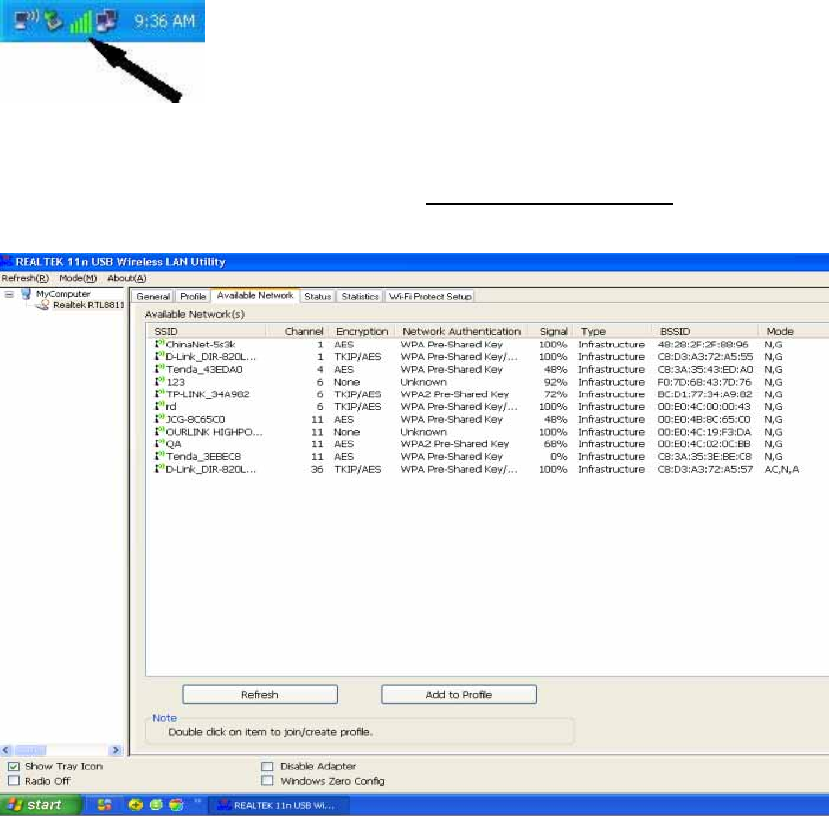
2.1.6
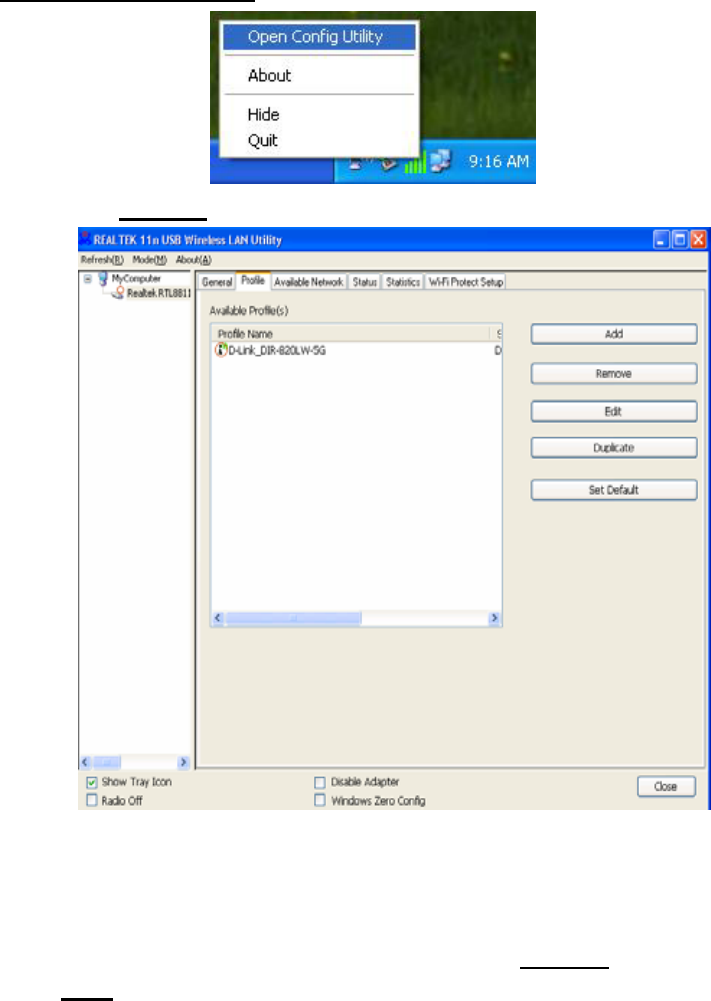
A new icon will appear near the clock of system tray:
Left-click the icon will launch wireless network configuration
utility, and you can right-click the icon to show the quick menu of
configuration utility. This icon also uses different color to show the
status of wireless connection:
Wireless connection is established, good signal reception.
Wireless connection is established, weak signal reception.
Connection is not established yet.
Wireless network card is not detected.
For detailed instructions of wireless network configuration utility,
please see next chapter.
7/36
2.2 Connect to Wireless Access Point
To use wireless network, you have to connect to a wireless
access point first. You can either use Client utility (comes with
network card driver), or Windows Zero Config utility (comes with
Windows operating system).
2.2.1 Using Client Utility
Please follow the following instructions to use Client
configuration utility to connect to wireless access point.
1. Left-click the Client configuration utility icon located at
lower-right corner of computer desktop, and configuration menu
will appear:
HERE!
2. Wireless utility will appear. Click ‘Available Network’ menu to
search for wireless access points nearby.
3. Please wait for a while, and all wireless access points which can
be reached by this wireless network card will be displayed here.
8/36
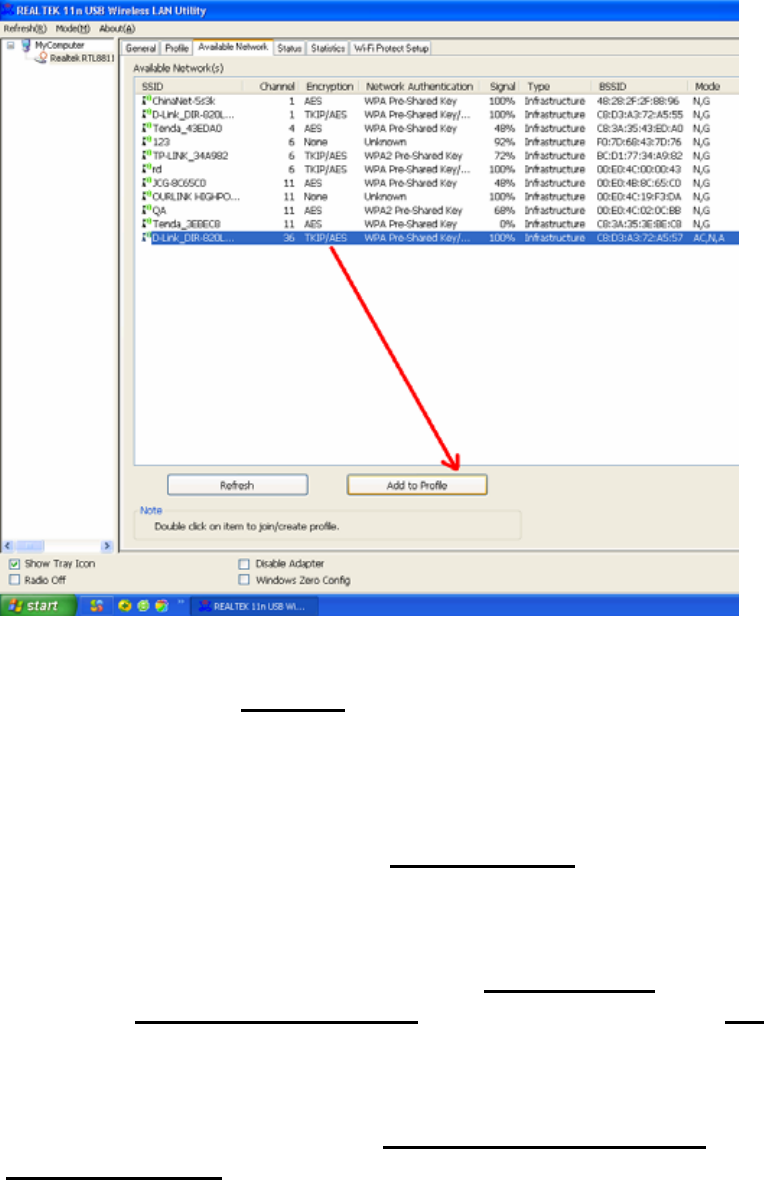
If the wireless access point you wish to connect does not appear
here, you can click ‘Refresh’ button to scan for wireless access
points again; if the wireless access point you’re looking for still not
appear, try to move the computer closer.
When the access point you’re looking for is on the list, left-click it
and then double click it or click ‘Add to Profile’.
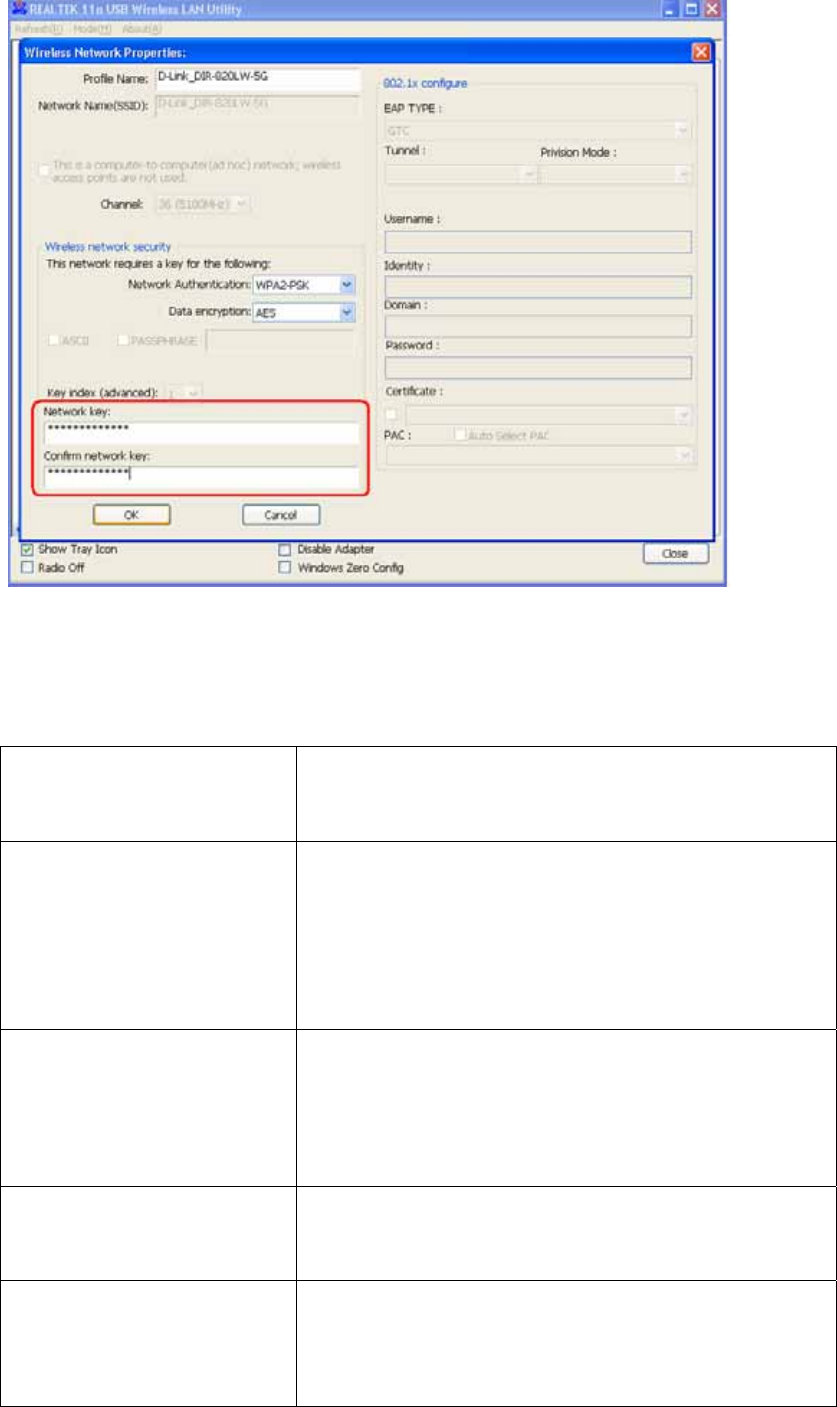
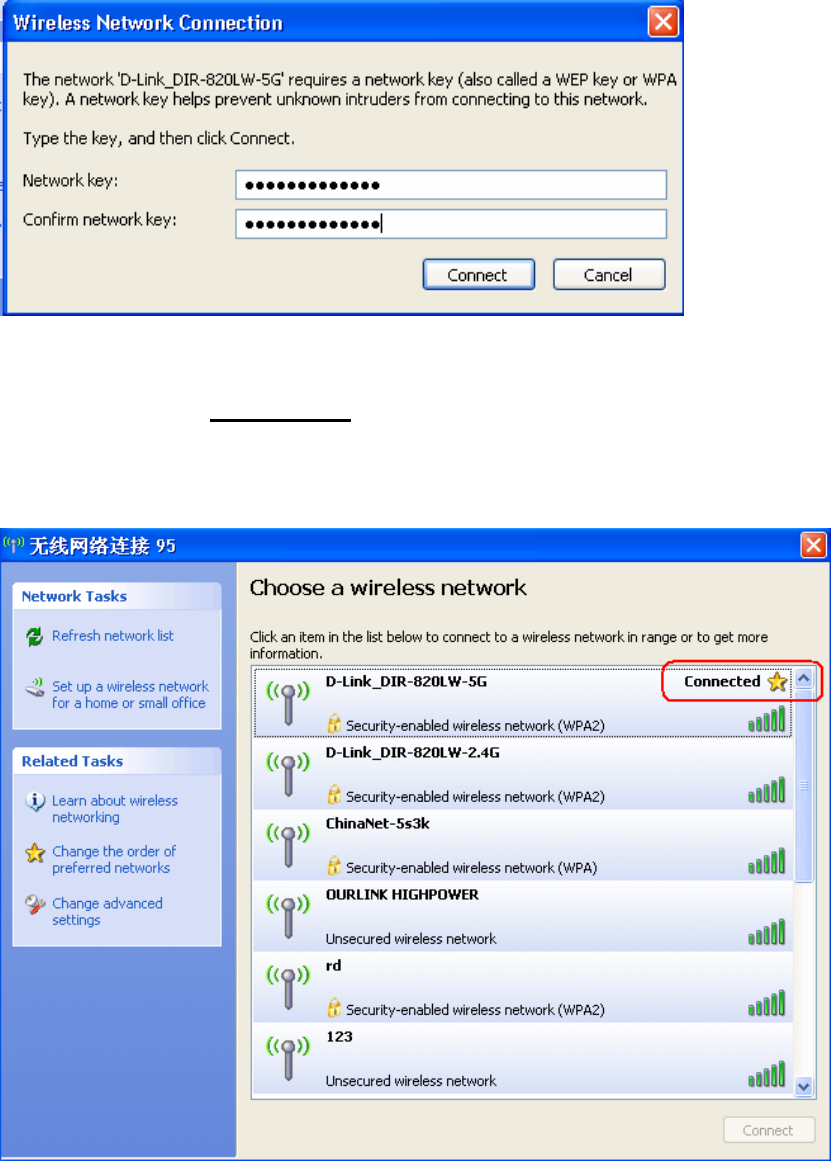
4. If a password (a.k.a. ‘Network Key’) is required to access the
wireless access point, please input it in ‘Network key’ (and input
it again in ‘Confirm network key’ for confirmation). Click ‘OK’
when password is properly inputted.
NOTE: Network security type (‘Network Authentication’ and
‘Data encryption’) will be selected automatically based on
wireless access point’s security setting. It’s not required to change
these settings by yourself.
9/36
All options in this page will be filled automatically according to
the access point you wish to add to profile. However, you can still
modify any of them to meet your requirement.
Profile name
You can give a name to this profile, so you
can remember its purpose easily. It can be
any phrase to help you remember.
Network Name (SSID)
The SSID (Service Set IDentifier, i.e. access
point’s name). This field will be filled as the
access point you selected when SSID is not
hidden and grayed out. If SSID is hidden,
you have to input correct SSID you
yourself.
This is a
computer-to-computer
(ad hoc) network
Check this box if you wish to connect to
another computer / network device by ad
hoc method. When not accessing to
wireless access point, you have to check
this box.
Channel
Select wireless channel for ad hoc
connection. This option only appears when
you’re using ad hoc connection.
Network
Authentication
Select the network authentication type
from drop-down menu. This setting must
be identical with the setting of wireless
access point you with to connect.

10/36
Data encryption
Select the data encryption type from
drop-down menu. This setting must be
identical with the setting of wireless access
point you with to connect.
ASCII / PASSPHRASE
When the encryption type is ‘WEP’, it’s
required to input a set of ‘passphrase’ to
connect to wireless access point. Check
‘ASCII’ or ‘PASSPHRASE’ depends on the
security setting of access point, and input it
in the box; if you select ‘PASSPHRASE’ you
also need to select the length of the key.
The passphrase must be identical with the
setting of wireless access point you with to
connect.
Key index
Select WEP key index. For most of access
points you can select ‘1’, but please refer to
the setting of the access point.
Network key / Confirm
network key
When the encryption type is ‘WPA’ or
‘WPA2-PSK’, it’s required to input a set of
‘passphrase’ to connect to wireless access
point. Please input the same passphrase in
two boxes for confirmation.
EAP TYPE / Tunnel /
Provision Mode
When authentication type is any of 802.1X,
you have to select EAP type, tunnel, and
provision mode from dropdown menu. This
setting must be identical with your 802.1x
authentication server.
Username / Identity /
Domain / Password Please input 802.1x related authentication
information here.
Certificate
If certification is required to authenticate
with 802.1x authentication server, please
select a local certificate from dropdown list.
PAC
Check this box and PAC (Privilege Access
Certificate) will be automatically selected.
Please click ‘OK’ when ready.
5. Network card will attempt to connect to access point now, this
may require few seconds to minutes, please be patient. When the
‘Status’ become ‘Associated’ , your computer is connected to
access point you selected. Click ‘Close’ to close configuration
menu.

11/36
NOTE: If you connected to an access point but the connection has
been dropped soon, please check security settings and re-check
password spelling.
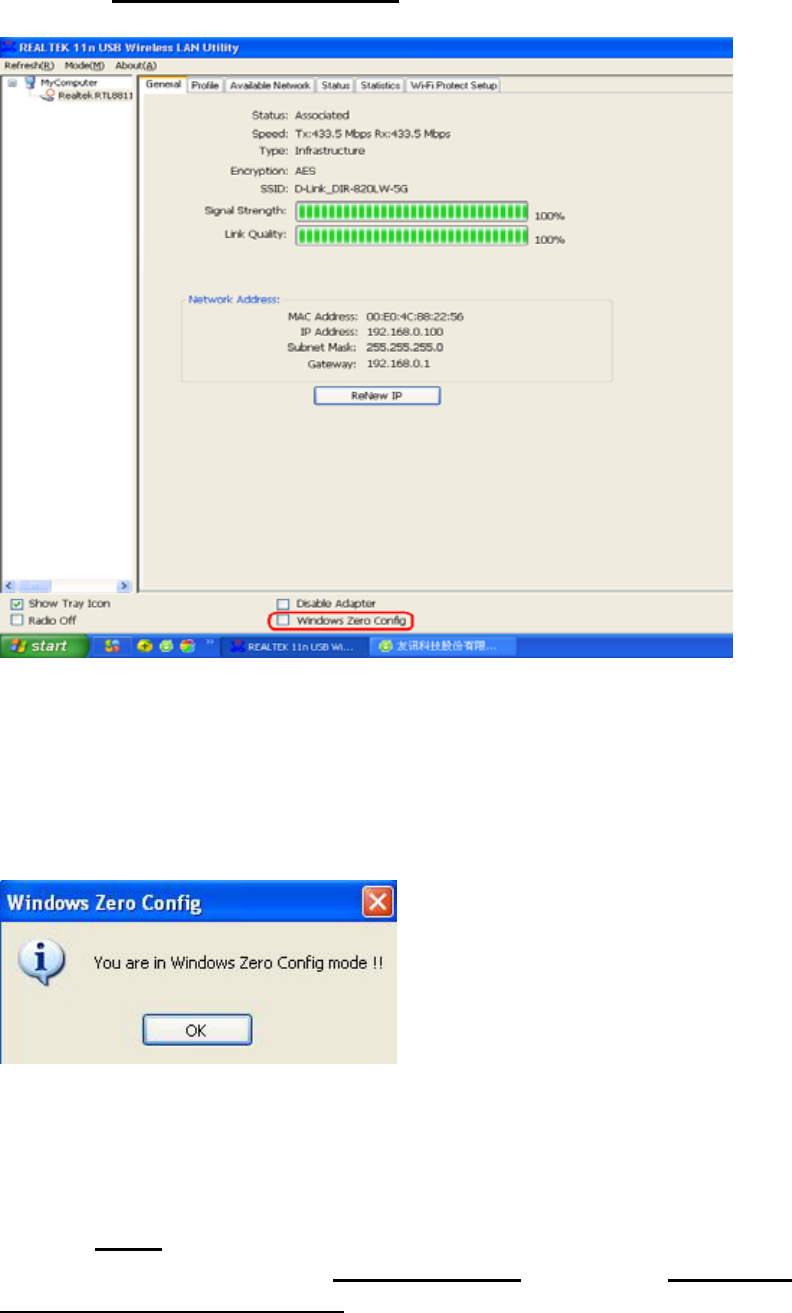
2.2.2 Using Windows Zero Configuration
Windows XP and Vista has a built-in wireless network
configuration utility, called as ‘Windows Zero Configuration’
(WZC). You can also use WZC to configure your wireless network
parameter:
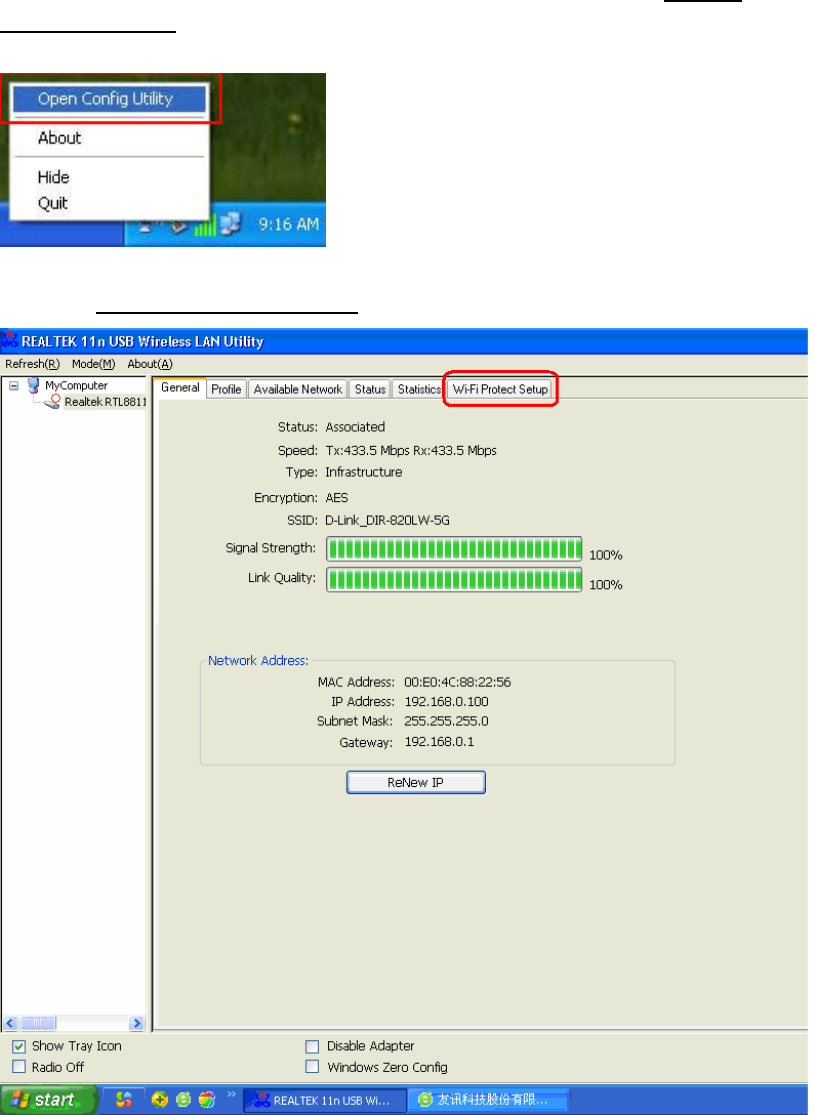
1. Right-click Client configuration utility icon, and click ‘Open
Config Utility’.
12/36
2. Check ‘Windows Zero Config’ box.
3. A message indicating that you’ve been switched to Windows
Zero.
NOTE: To return to use Client utility, uncheck ‘Windows Zero
Config’ box.
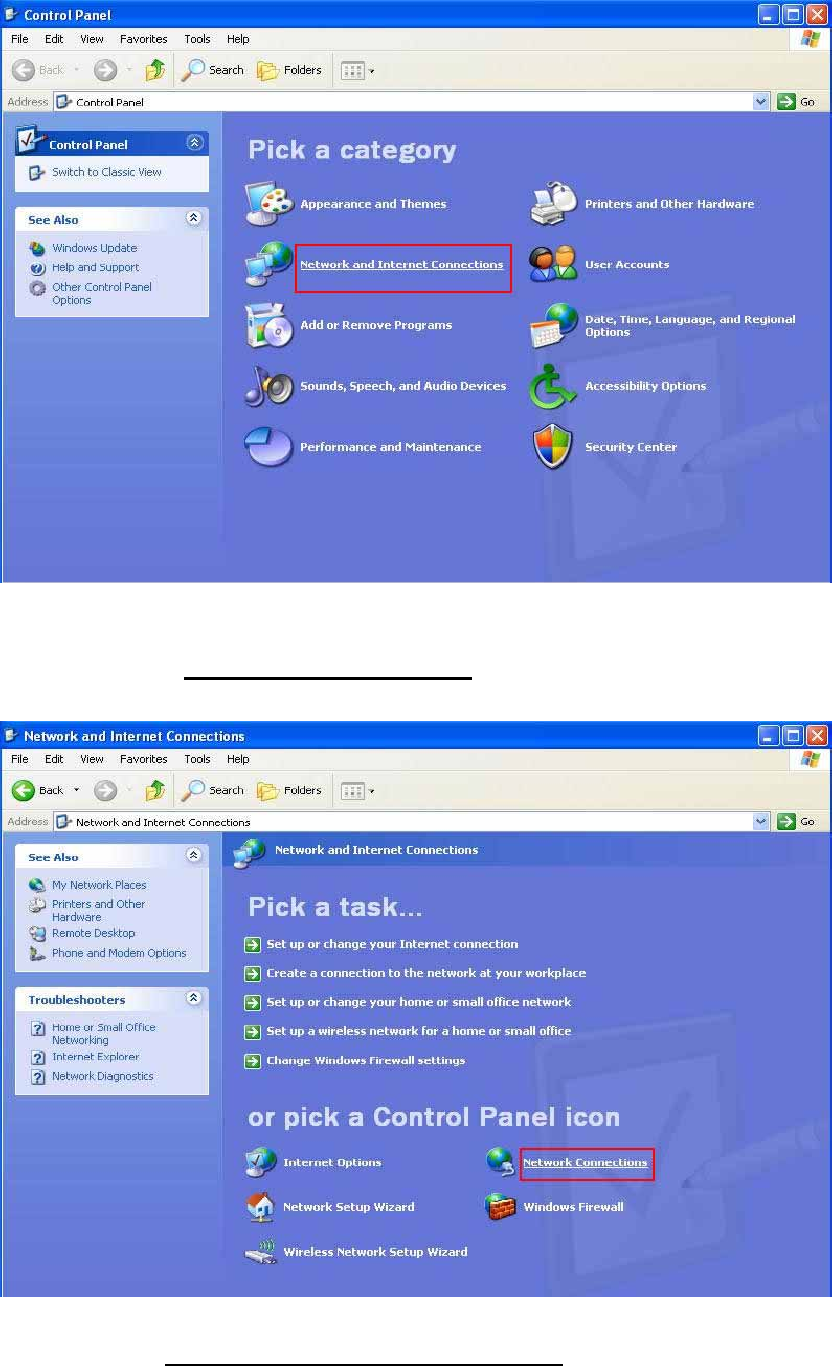
4. Click ‘Start’ button (should be located at the bottom-left corner
of windows desktop), click ‘Control Panel’, then click ‘Network
and Internet Connections’ in Control Panel.
13/36
5. Double click ‘Network Connections’.
6. Right-click ‘Wireless Network Connection’ (it may have a
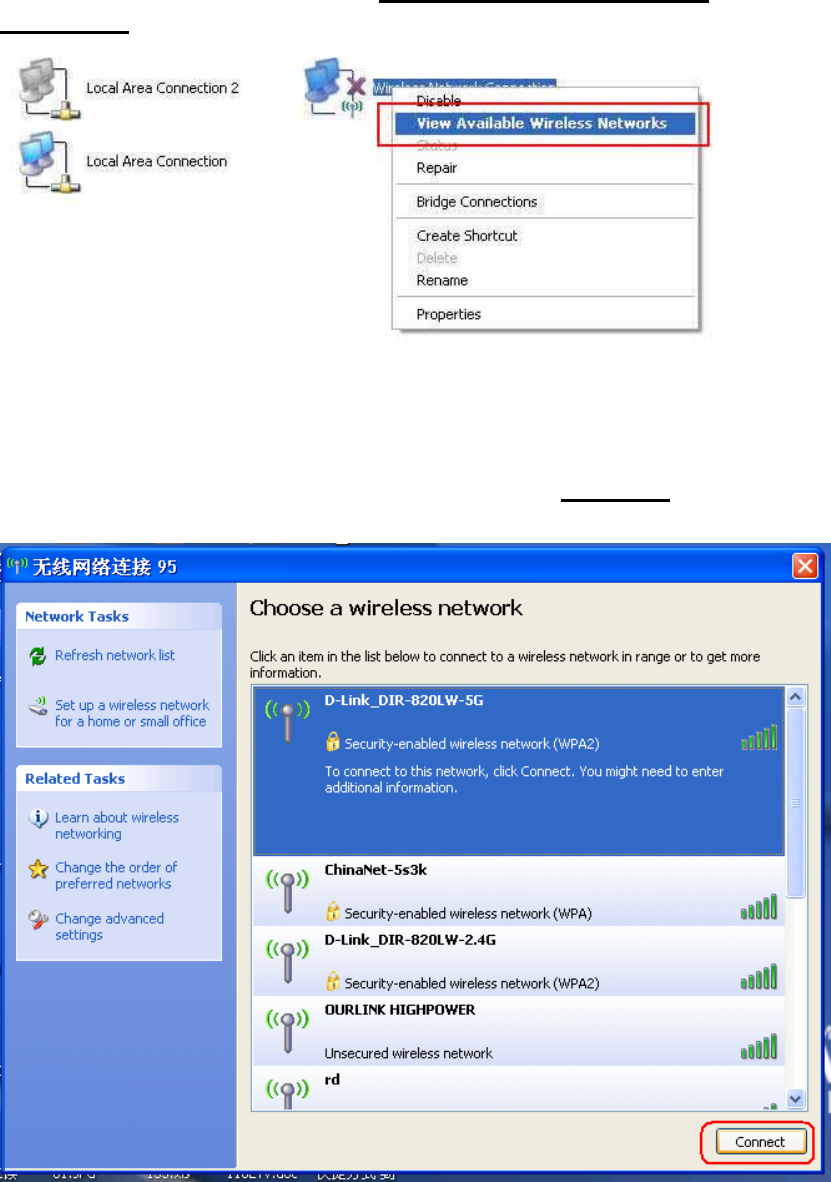
14/36
number as suffix if you have more than one wireless network card,
please make sure you right-click the Wireless LAN 802.11ac USB
Network Adapter), then select ‘View Available Wireless
Networks’.
7. All wireless access points in proximity will be displayed here. If
the access point you want to use is not displayed here, please try to
move your computer closer to the access point, or you can click
‘Refresh network list’ to rescan access points. Click the access
point you want to use if it’s shown, then click ‘Connect’.
8. If the access point is protected by encryption, you have to input
its security key or passphrase here. It must match the encryption
15/36
setting on the access point. If the access point you selected does
not use encryption, you’ll not be prompted for security key or
passphrase.
9. If you can see ‘Connected’ message, the connection between
your computer and wireless access point is successfully
established.
CHAPTER 3: Client Utility
3.1 Connection Profile Management
16/36
If you need to connect to different wireless access points at
different time, like of access point of your home, office, cybercafe,
or public wireless service, you can store the connection parameters
(encryption, passphrase, security etc, etc.) as a profile for every
access point, so you don’t have to input these parameters every
time when you want to connect to a specific wireless access point.
To manage profiles, right-click the Client configuration utility icon
located at lower-right corner of computer desktop, then click
‘Open Config Utility’.
Click the ‘Profile’ menu.
3.1.1 Add a new profile
By this function you can setup the connection parameters for a
specific wireless access point in advance, without contacting it
first.
If you want to create a new profile, click ‘Profile’ menu, then
click ‘Add’ button.
17/36
You’ll be prompted to input connection parameters for the
wireless access point you wish to connect:
Required parameters are:

18/36
Profile name
You can give a name to this profile, so you
can remember its purpose easily. It can be
any phrase to help you remember.
Network Name (SSID)
The SSID (Service Set IDentifier, i.e. access
point’s name). This must be identical with
the SSID of the access point you wish to
connect.
This is a
computer-to-computer
(ad hoc) network
Check this box if you wish to connect to
another computer / network device by ad
hoc method. When not accessing to
wireless access point, you have to check
this box.
Channel
Select wireless channel for ad hoc
connection. This option only appears when
you’re using ad hoc connection.
Network
Authentication
Select the network authentication type
from drop-down menu. This setting must
be identical with the setting of wireless
access point you with to connect.
Data encryption
Select the data encryption type from
drop-down menu. This setting must be
identical with the setting of wireless access
point you with to connect.
ASCII / PASSPHRASE
When the encryption type is ‘WEP’, it’s
required to input a set of ‘passphrase’ to
connect to wireless access point. Check
‘ASCII’ or ‘PASSPHRASE’ depends on the
security setting of access point, and input it
in the box; if you select ‘PASSPHRASE’ you
also need to select the length of the key.
The passphrase must be identical with the
setting of wireless access point you with to
connect.
Key index
Select WEP key index. For most of access
points you can select ‘1’, but please refer to
the setting of the access point.
Network key / Confirm
network key
When the encryption type is ‘WPA’ or
‘WPA2-PSK’, it’s required to input a set of
‘passphrase’ to connect to wireless access
point. Please input the same passphrase in
two boxes for confirmation.
EAP TYPE / Tunnel /
Provision Mode
When authentication type is any of 802.1X,
you have to select EAP type, tunnel, and
provision mode from dropdown menu. This
19/36
setting must be identical with your 802.1x
authentication server.
Username / Identity /
Domain / Password Please input 802.1x related authentication
information here.
Certificate
If certification is required to authenticate
with 802.1x authentication server, please
select a local certificate from dropdown list.
PAC
Check this box and PAC (Privilege Access
Certificate) will be automatically selected.
When all required parameters are set, click ‘OK’ to create and
save a new profile.
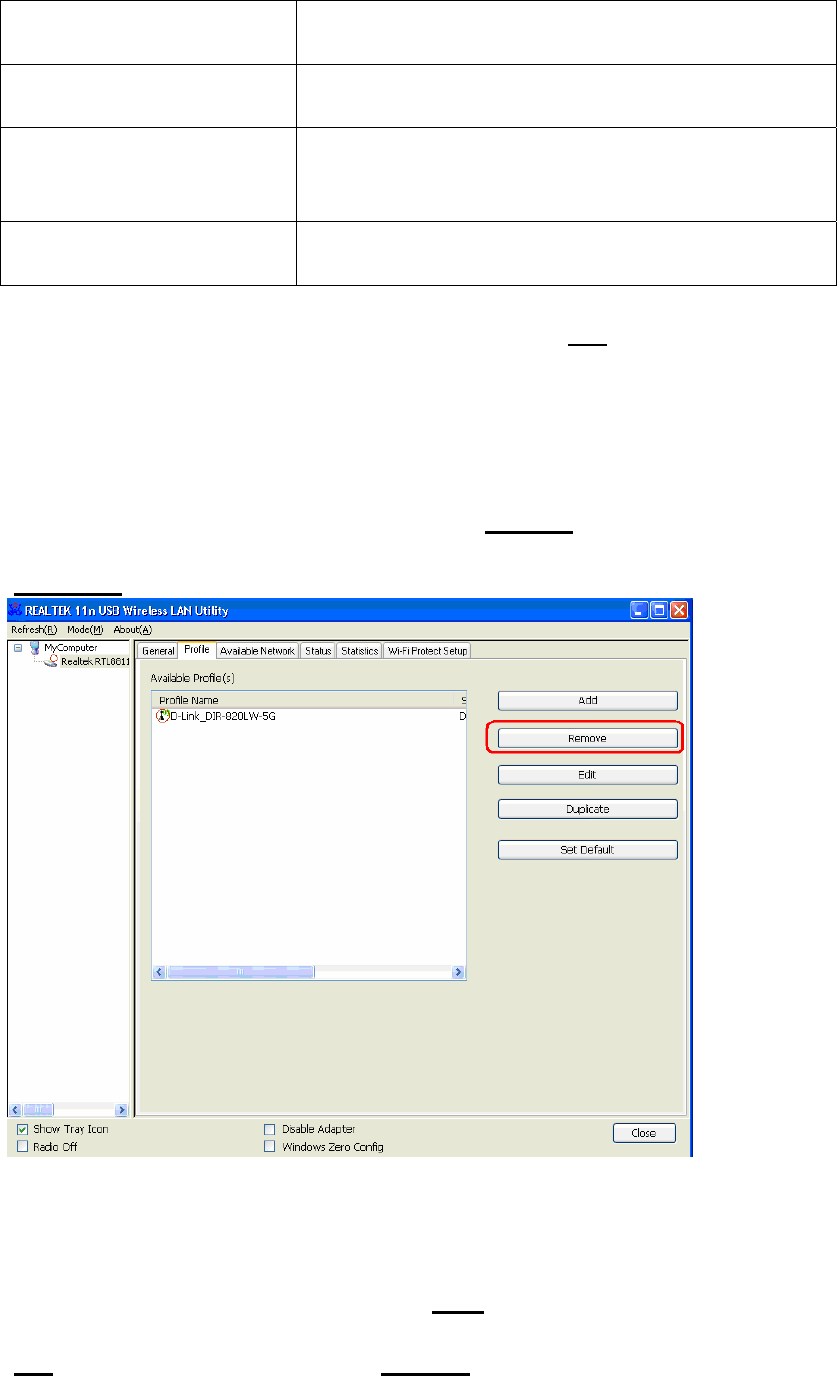
3.1.2 Remove an existing profile
When you no longer need an existing profile, you can remove it.
If you want to remove a profile, click ‘Profile’ menu, then select
an existing profile which you wish to remove, and then click
‘Remove’ button.
3.1.3 Edit an existing profile
If you have added a profile before, and you wish to change the
content of the profile, you can use this function. Please select a
profile from the list first, then click ‘Edit’ button. You’ll be provided
with the contents of selected profile, and you can edit them. Click
‘OK’ to save changes, or click ‘Cancel’ to discard changes.

20/36
3.1.4 Make a copy of existing profile
If you need to make a copy of a specific profile, you can use this
function. This function is very convenient when you need to build a
new profile which parameters are similar to any existing profile.
To do this, select an existing profile, then click ‘Duplicate’
button.
21/36
You’ll be prompted to input a profile name, please use an
identical name that does not exist in profile list.
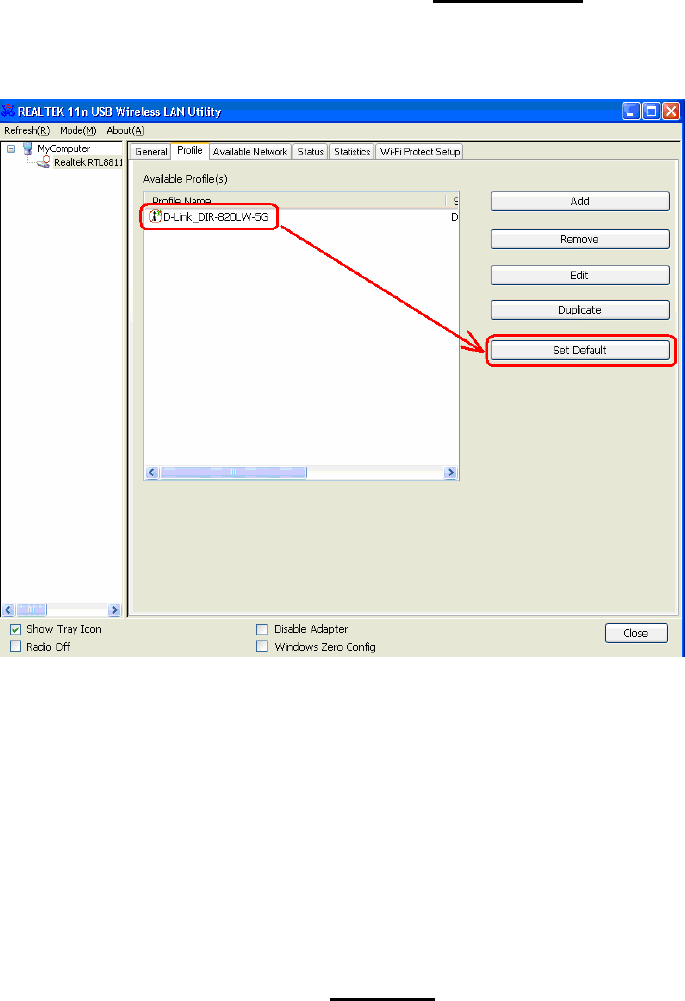
3.1.5 Set as default profile
If you wish to use a specific profile as default connection, you can
select a profile in the list, and click ‘Set Default’. Selected profile
will become default selection and Client configuration utility will
attempt to connect to selected access point.
3.2 View Network Statistics, General Information,
and Status
The configuration utility provides information about network
statistics and link status. If you want to know how your wireless
network card works, you can use these functions to get detailed
information about the wireless connection you’re using.
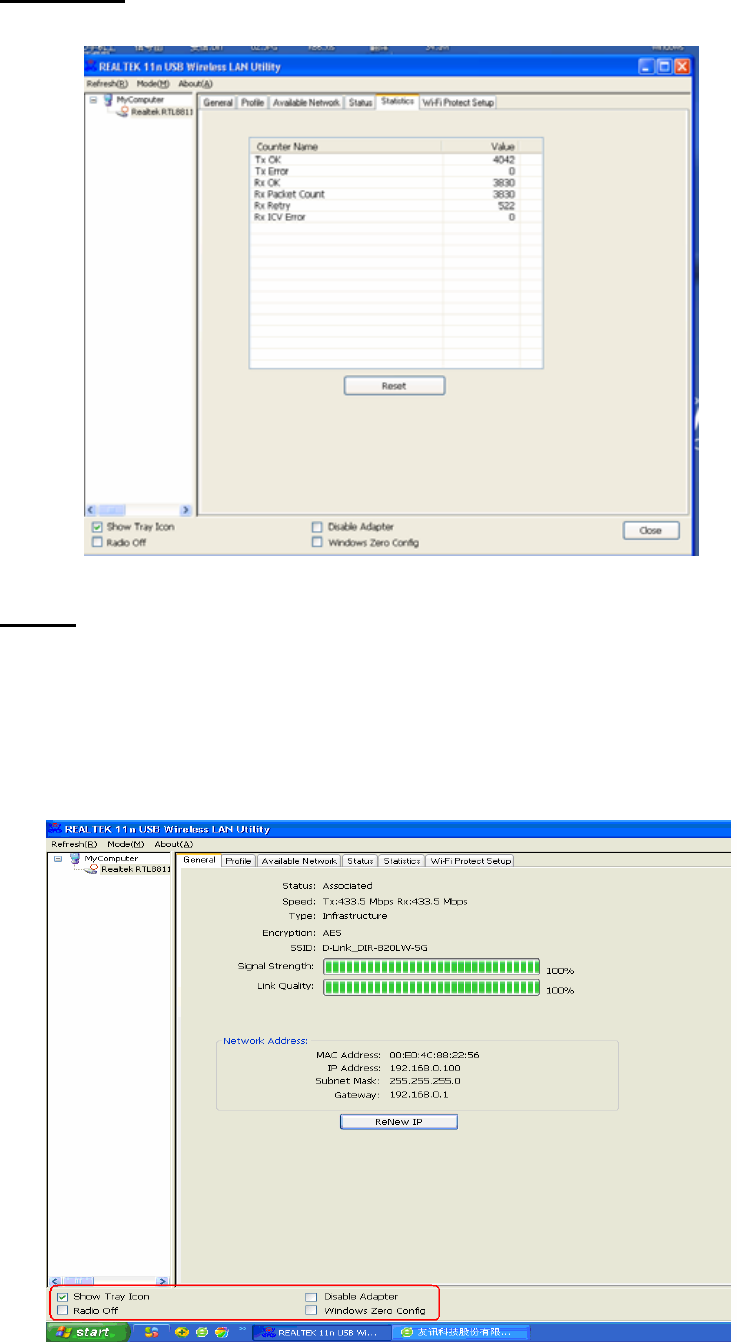
3.2.1 General Information
If you want to know the general information of the access point
you’re connecting to, click ‘General’ menu:

22/36
All general information like signal strength and link quality will be
displayed here. These information are very useful when you
encounter some problem on connecting to access point.
If you wish to get a new IP address from DHCP server, you can
click ‘ReNew IP’ button.
3.2.2 Status
If you want to know the status of your wireless network card,
click ‘Status’ menu:
23/36
3.2.3 View Network Statistics
To view the statistical data of wireless network card, click
‘Statistics’ menu, and the statistics of wireless connection will be
displayed:
All connection-related statistics is displayed here. You can click
‘Reset’ button, to reset the statistics of all items back to 0.
3.3 Miscellaneous Settings
There are few functions provided by Client configuration utility,
you can access these functions from the bottom of configuration
menu:

24/36
The descriptions of these function are listed as follow:
Show Tray Icon
Check this box to show an icon on system tray.
Uncheck this box to hide it.
Radio Off
Switch wireless radio off. Wireless network
functionalities are disabled.
Disable Adapter
Disable wireless network adapter. All
functionalities of configration menu will disappear.
To resume, unckeck ‘Disable Adapter’.
Windows Zero
Config Use Windows Zero Configuration to manage
wireless connections.See section 2.2.2.
3.4 Establish secure connection with AP by WPS
Wi-Fi Protected Setup (WPS) is the latest wireless network
technology which makes wireless network setup become very
simple. If you have WPS-enabled wireless access point, and you
want to establish a secure connection to it, you don’t have to
configure the wireless access point and setup data encryption by
yourself. All you have to do is to go to the WPS setup page of this
wireless card, click a button, and then press a specific button or
enter a set of 8-digit code on the wireless access point you wish to
establish a secure connection - just three simple steps!
For older wireless access points, it’s possible to perform a
firmware upgrade to become a WPS-enabled access point. Since
they may not have a hardware button to press for WPS setup, you
can use an alternative WPS setup method - input the pin code.
Every WPS-compatible wireless network card support pin code
configuration method; you can just input the code to wireless
access point, and the wireless access point and wireless network
card will do the rest for you.
This wireless network card is compatible with WPS. To use this
function, the wireless access point you wish to connect to must
support WPS function too. Now, please follow the following
instructions to establish secure connection between WPS-enabled
wireless access point and your wireless network card.
This wireless network card supports 2 kinds of WPS: PIN code
25/36
and Push-Button.
Please follow the following instructions to setup WPS:
1. Right-click Client configuration utility icon, and click ‘Open
Config Utility’.
2. Click ‘Wi-Fi Protect Setup’ menu.
3. You can use PIN code or Push-Button configuration, and
WPS-compatible wireless access point must use the same type of
WPS. For instructions on setup each type of WPS, see next 2
chapters for detailed instructions.
26/36
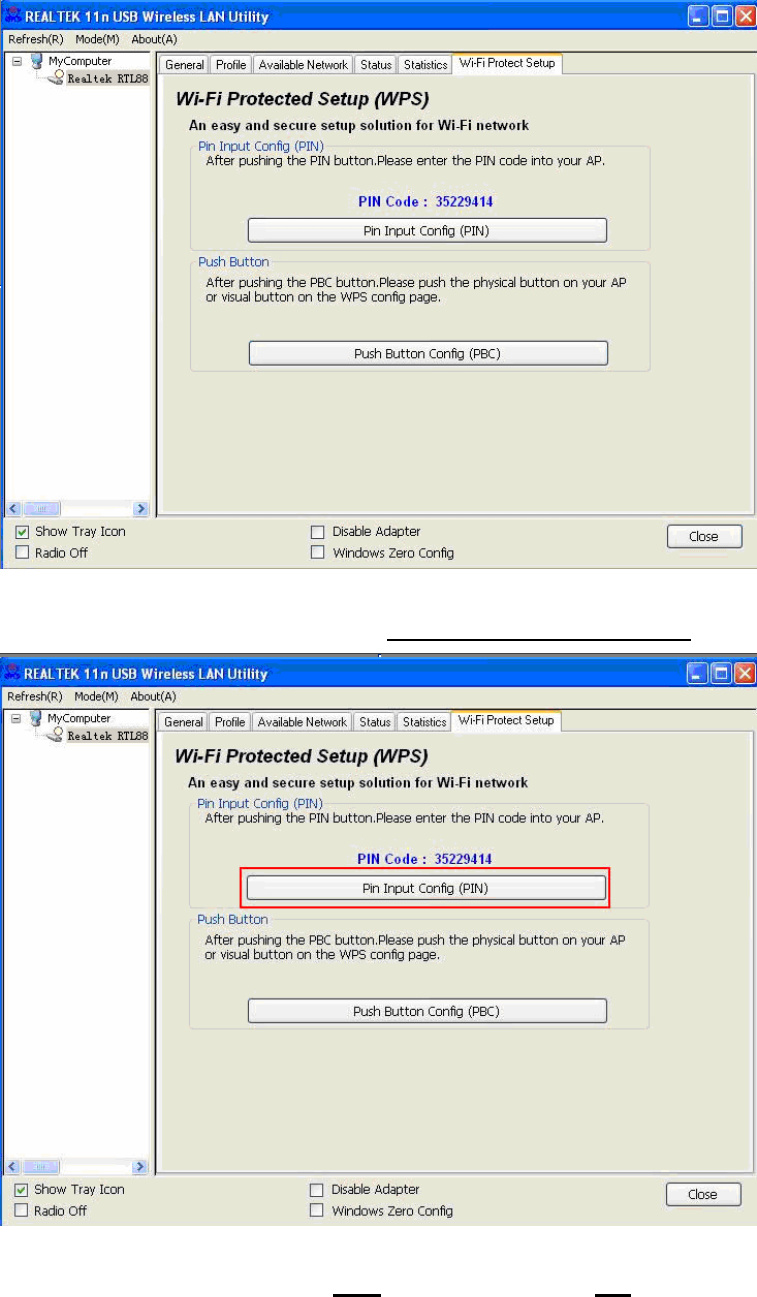
3.4.1 PIN Code
To use PIN Code, please click ‘Pin Input Config (PIN)’ button:
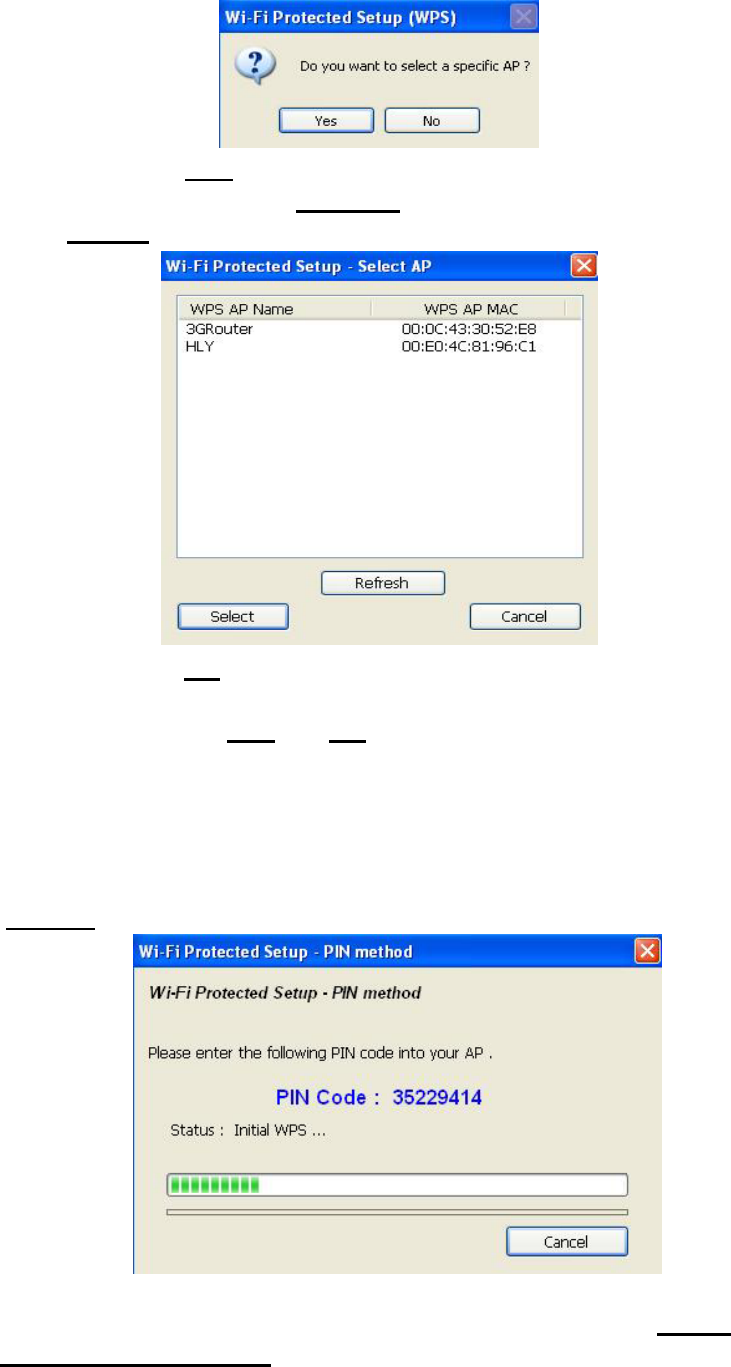
You’ll be prompted to select an access point you wish to connect.
If you know its SSID, click ‘Yes’, otherwise click ‘No’.
27/36
If you select ‘Yes’, a list of all WPS-compatible AP nearby will be
displayed; you can click ‘Refresh’ to rescan, then select an AP and
click ‘Select’ button.
If you select ‘No’, wireless network card will prompt you to enter
8-digit PIN code into your AP, without selecting an AP in advance.
After you select ‘Yes’ or ‘No’ in previous step, network card will
attempt to connect to WPS-compatible AP, and an 8-digit number
will appear. Please input this number to AP’s configuration menu
within 2 minutes, and network card will establish secure
connection with AP automatically.
To stop this procedure before connection is established, click
‘Cancel’.
3.4.2 Push Button
To use Push-Button WPS configuration, please click ‘Push
Button Config (PBC)’ button. This is the easiest way to establish
secure connection by WPS, but if there’re more than one
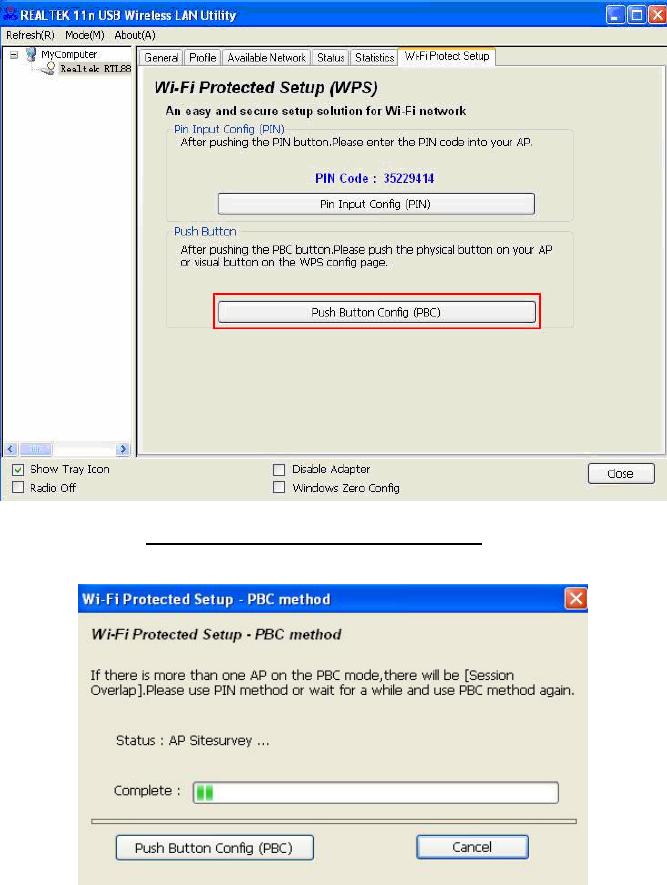
28/36
WPS-compatible AP using Push-Button config, please use PIN Code
instead.
After you click “Push Button Config(PBC)”, a message box will
appear:
Please activate Push-Button function on wireless access point
now, and wireless network card will establish secure connection
with access point within one minute.
CHAPTER 4 Soft-AP Function
Excepting become a wireless client of other wireless access
points, this wireless adapter can act as a wireless service provider
also! You can switch this wireless adapter’s operating mode to ‘AP’
mode to simulate the function of a real wireless access point by
software, and all other computers and wireless devices can
connect to your computer wirelessly, even share the internet
connection you have!
Please follow the instructions in following chapters to use the AP
function of your wireless card.
29/36
4.1 Switch to AP Mode and Station Mode
The operating mode of the wireless card is ‘Station Mode’
(becoming a client of other wireless access points) by default.
Please follow the following instructions to switch to AP mode:
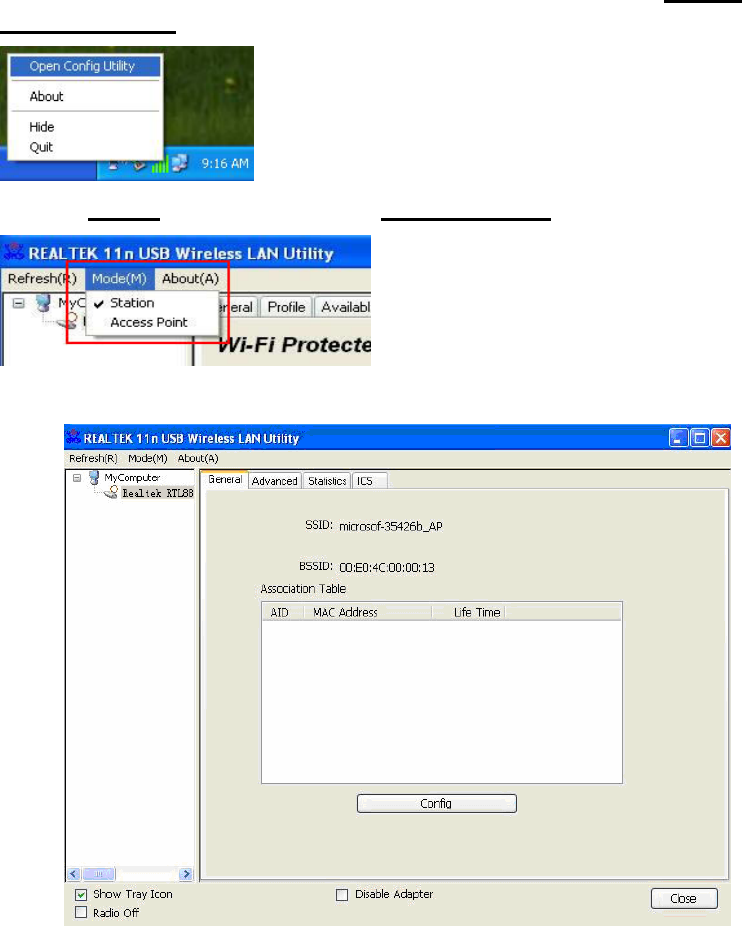
1. Right-click Client configuration utility icon, and click ‘Open
Config Utility’.
2. Select ‘Mode’, and then select ‘Access Point’.
It requires few seconds to switch to AP mode, please be patient.
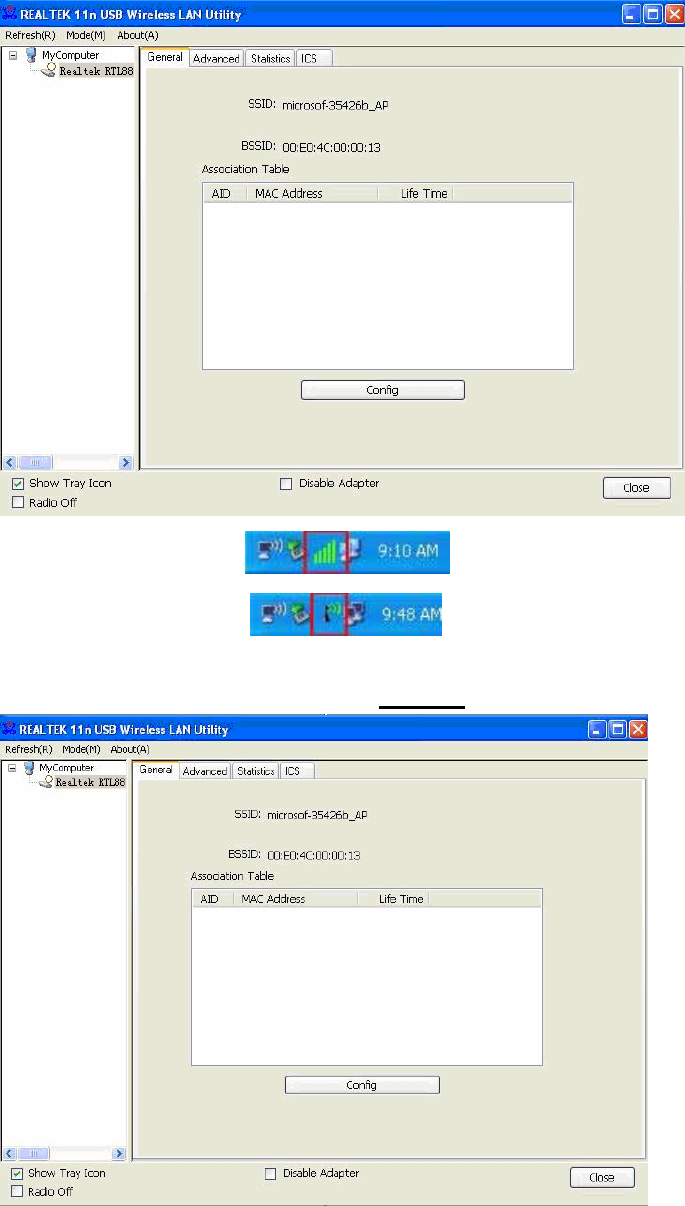
After mode switch is complete, you’ll see general information of
software AP, which shows AP’s SSID and connected wireless
clients.
30/36
Client mode icon :
Software AP icon:
4.1.1 Configure SSID and Channel
To configure software AP, click ‘Config’ button:
The ‘Wireless Network Properties’ is displayed.
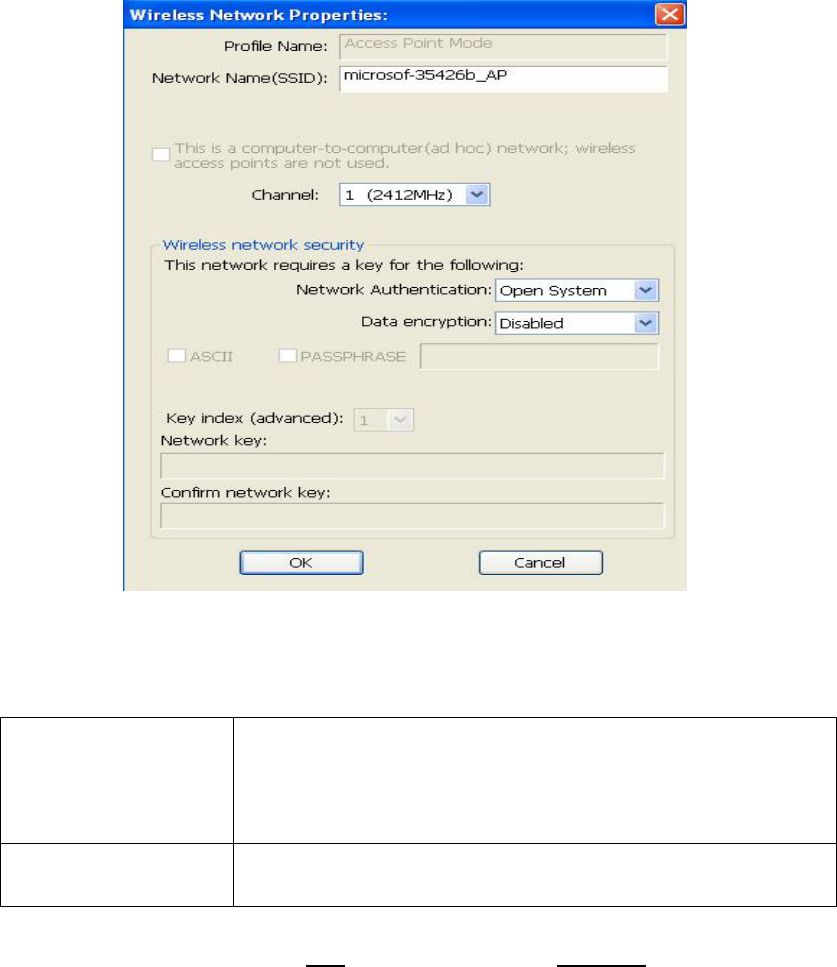
31/36
Please note that Ad-Hoc mode is not available when network
card is in AP mode. The description of major setup items are listed
below:
Network Name
(SSID)
Please input the SSID (the name used to identify
this wireless access point) here. Up to 32
numerical characters can be accepted here,
excepting space.
Channel
Please select the wireless channel you wish to
use, from 1 to 13.
To save changes, click ‘OK’; otherwise click ‘Cancel’ to leave this
menu and keep settings untouched.
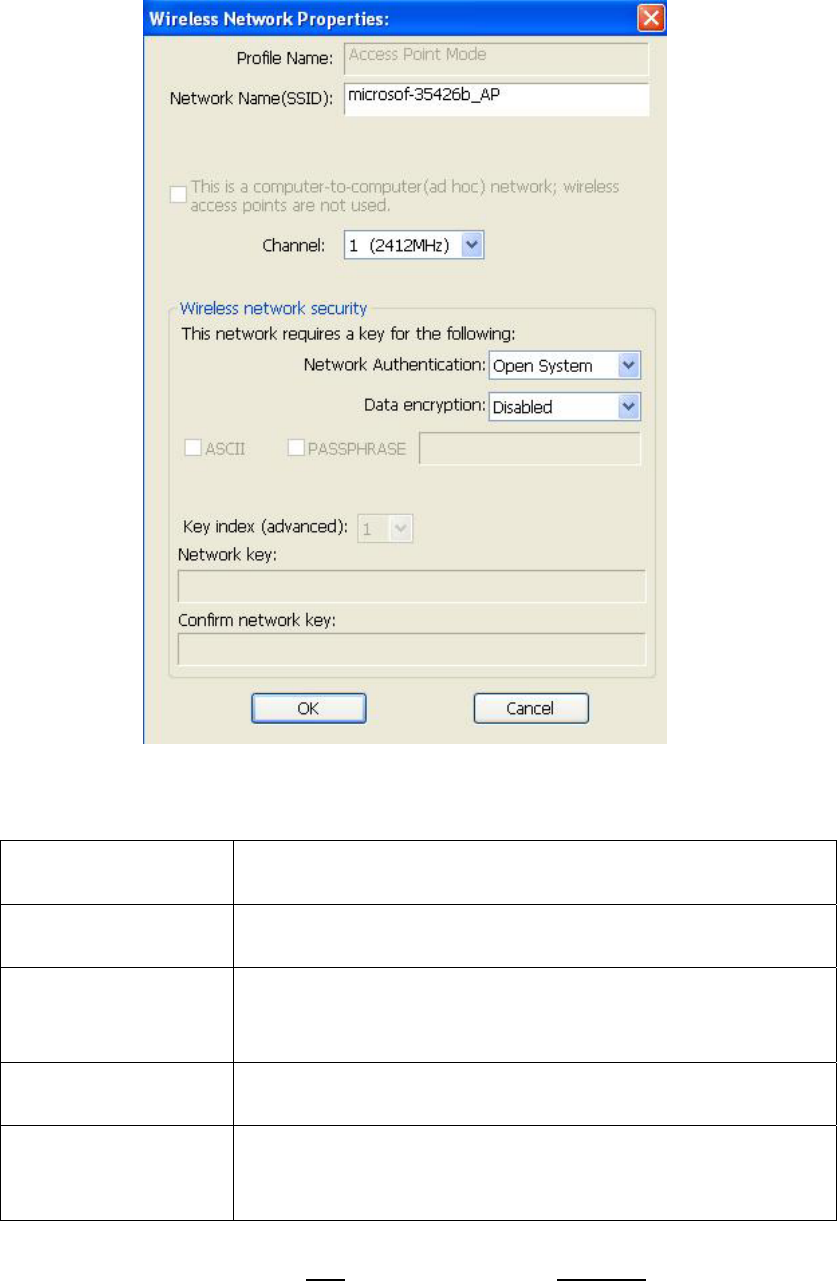
4.1.2 Setup Soft‐AP Security
To setup security options for Soft-AP, configure ‘Wireless
Network Security’ section as follow:
32/36
The description of setup items about wireless security are listed
below:
Network
Authentication Select network authentication mode from
dropdown menu.
Data Encryption
Select data encryption method from dropdown
menu.
ASCII /
PASSPHRASE
If the encryption method is WEP, check either
‘ASCII’ or ‘PASSPHRASE’ box and input it in the
box as WEP passphrase.
Key Index
Select WEP key index (1-4). If you don’t know
which one you should use, select 1.
Network key /
Confirm network
key
IF network authentication mode is WPA, please
input WPA passphrase in both box.
To save changes, click ‘OK’; otherwise click ‘Cancel’ to leave this
menu and keep settings untouched.
4.2 Advanced Settings
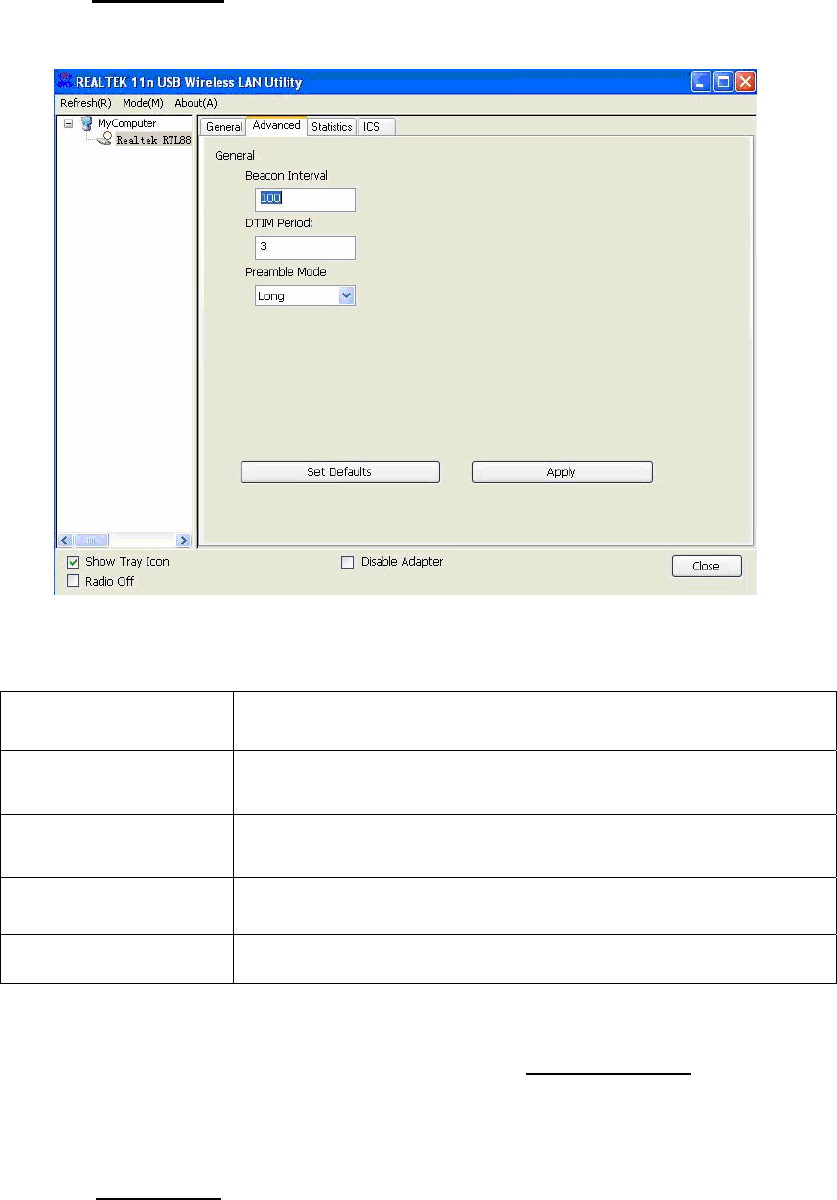
33/36
If you want to setup advanced settings of software access point,
select ‘Advanced’ menu. If you don’t know the meaning and
affects of these settings, keep them untouched.
The description of all setup items are listed below:
Beacon Interval Please input wireless beacon time interval here.
DTIM Period
Please input DTIM (Delivery Traffic Indication
Message) here.
Preamble Mode
Select wireless frame preamble mode (long or
short) from dropdown menu.
Set Defaults Reset all settings back to factory default value.
Apply Save changes.
If you changed any setting here and cause problem on
communicating with wireless clients, click ‘Set Defaults’ to reset
all settings back to default setting.
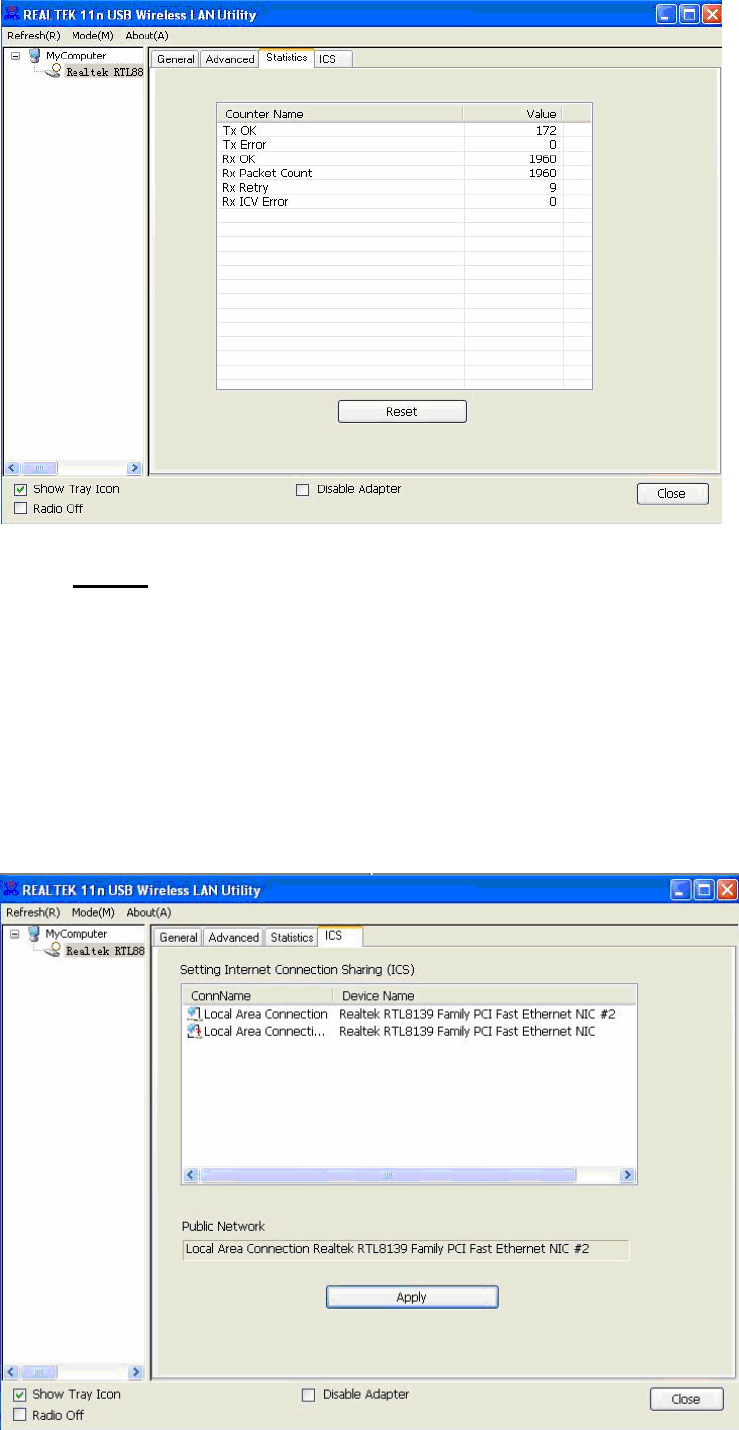
4.3 Wireless Statistics
Select ‘Statistics’ menu and the data statistics about software
access point will be displayed.
34/36
Click ‘Reset’ to reset the value of every item back to ‘0’.
4.4 Internet Connection Sharing (ICS)
In this page, you can assign a network card on your computer as
the path for all wireless clients to get connected to Internet.
If you have only one network card (except this software access
point), you don’t have to select network card here; if you have
more than one network card, select the one you wish to be used as
Internet gateway.

35/36
Click ‘Apply’ to save changes (‘Apply’ is grayed out when no
changes are made in this page).
CHAPTER 5: Troubleshooting
If you encounter any problem when you’re using this wireless
network card, don’t panic! Before you call your dealer of purchase
for help, please check this troubleshooting table, the solution of
your problem could be very simple, and you can solve the problem
by yourself !
Scenario Solution
I can’t find any
wireless access
point / wireless
device in ‘Site
Survey’ function.
1. Click ‘Rescan’ for few more times and see if
you can find any wireless access point or
wireless device.
2. Please move closer to any known wireless
access point.
3. Ad hoc’ function must be enabled for the
wireless device you wish to establish a direct
wireless link.
4. Please adjust the position of network card
(you may have to move your computer if
you’re using a notebook computer) and click
‘Rescan’ button for few more times. If you
can find the wireless access point or wireless
device you want to connect by doing this, try
to move closer to the place where the wireless
access point or wireless device is located.
Nothing happens
when I click
‘Open Config
Utility’
1. Please make sure the wireless network card is
inserted into your computer’s USB port.
2. Reboot the computer and try again.
3. Remove the card and insert it into another
USB port.
4. Remove the driver and re-install.
5. Contact the dealer of purchase for help.
I can not establish
connection with a
certain wireless
access point
1. Click ‘Add to Profile’ for few more times.
2. If the SSID of access point you wish to
connect is hidden (nothing displayed in ‘SSID’
field in ‘Site Survey’ function), you have to
input correct SSID of the access point you
wish to connect. Please contact the owner of
access point to ask for correct SSID.
3. You have to input correct passphrase /
security key to connect an access point with
encryption. Please contact the owner of
access point to ask for correct passphrase /
security key.

36/36
4. The access point you wish to connect only
allows network cards with specific MAC
address to establish connection. Please go to
‘Status’ menu and write the value of ‘MAC
Address’ down, then present this value to
the owner of access point so he / she can add
the MAC address of your network card to his /
her access point’s list.
The network is
slow / having
problem when
transferring large
files
1. Move closer to the place where access point is
located.
2. There could be too much people using the
same radio channel. Ask the owner of the
access point to change the channel number.
Please try one or more solutions listed above.
This device complies with Part 15 of the FCC Rules. Operation is subject to the following two
conditions: (1) this device may not cause harmful interference, and (2) this device must accept any
interference received, including interference that may cause undesired operation.
Changes or modifications not expressly approved by the party responsible for compliance could
void the user's authority to operate the equipment.
NOTE: This equipment has been tested and found to comply with the limits for a Class B digital
device, pursuant to Part 15 of the FCC Rules. These limits are designed to provide reasonable
protection against harmful interference in a residential installation. This equipment generates, uses
instructions, may cause harmful interference to radio communications. However, there is no
guarantee that interference will not occur in a particular installation. If this equipment does cause
harmful interference to radio or television reception, which can be determined by turning the
equipment off and on, the user is encouraged to try to correct the interference by one or more of
the following measures:
-- Reorient or relocate the receiving antenna.
-- Increase the separation between the equipment and receiver.
-- Connect the equipment into an outlet on a circuit different from that to which the receiver is
connected.
-- Consult the dealer or an experienced radio/TV technician for help.
The device is indoor use only
Warnings:
This device complies with Industry Canada’s licence-exempt RSSs
Operation is subject to the following two conditions:
(1) This device may not cause interference and (2) this device must accept any interference,
including interference that may cause undesired operation of the device.
Le présent appareil est conforme aux CNR d'Industrie Canada applicables aux appareils
radio exempts de licence.L'exploitation est autorisée aux deux conditions suivantes :
(1) l'appareil ne doit pas produire de brouillage, et
(2) l'utilisateur de l'appareil doit accepter tout brouillage radioélectrique subi, même si le
brouillage est susceptible d'en compromettre le fonctionnement.
Under Industry Canada regulations, this radio transmitter may only operate using an antenna
of a type and maximum (or lesser) gain approved for the transmitter by Industry Canada. To
reduce potential radio interference to other users, the antenna type and its gain should be so
chosen that the equivalent isotropically radiated power (e.i.r.p.) is not more than that
necessary for successful communication.
Conformément à la réglementation d'Industrie Canada, le présent émetteur radio peut
fonctionner avec une antenne d'un type et d'un gain maximal (ou inférieur) approuvé pour
l'émetteur par Industrie Canada. Dans le but de réduire les risques de brouillage
radioélectrique
à l'intention des autres utilisateurs, il faut choisir le type d'antenne et son gain de sorte que la
puissance isotrope rayonnée équivalente (p.i.r.e.) ne dépasse pas l'intensité nécessaire à
l'établissement d'une communication satisfaisante.
This radio transmitter (identify the device by certification number, or model number if
Category II) has been approved by Industry Canada to operate with the antenna types listed
below with the maximum permissible gain and required antenna impedance for each antenna
type indicated. Antenna types not included in this list, having a gain greater than the
maximum gain indicated for that type, are strictly prohibited for use with this device.
Le présent émetteur radio (identifier le dispositif par son numéro de certification ou son
numéro de modèle s'il fait partie du matériel de catégorie I) a été approuvé par Industrie
Canada pour
fonctionner avec les types d'antenne énumérés ci-dessous et ayant un gain admissible
maximal et l'impédance requise pour chaque type d'antenne. Les types d'antenne non inclus
dans cette liste,
ou dont le gain est supérieur au gain maximal indiqué, sont strictement interdits pour
l'exploitation de l'émetteur
The device is indoor use only