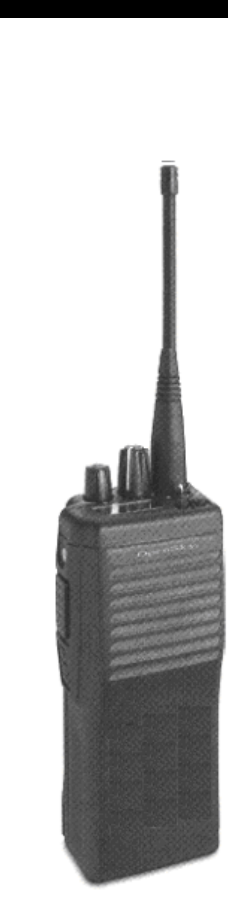
HARRIS P800 Portable Radio Model P800 User Manual users manual cover
Harris Corporation Portable Radio Model P800 users manual cover
HARRIS >
Contents
- 1. Users Manual
- 2. question A
Users Manual
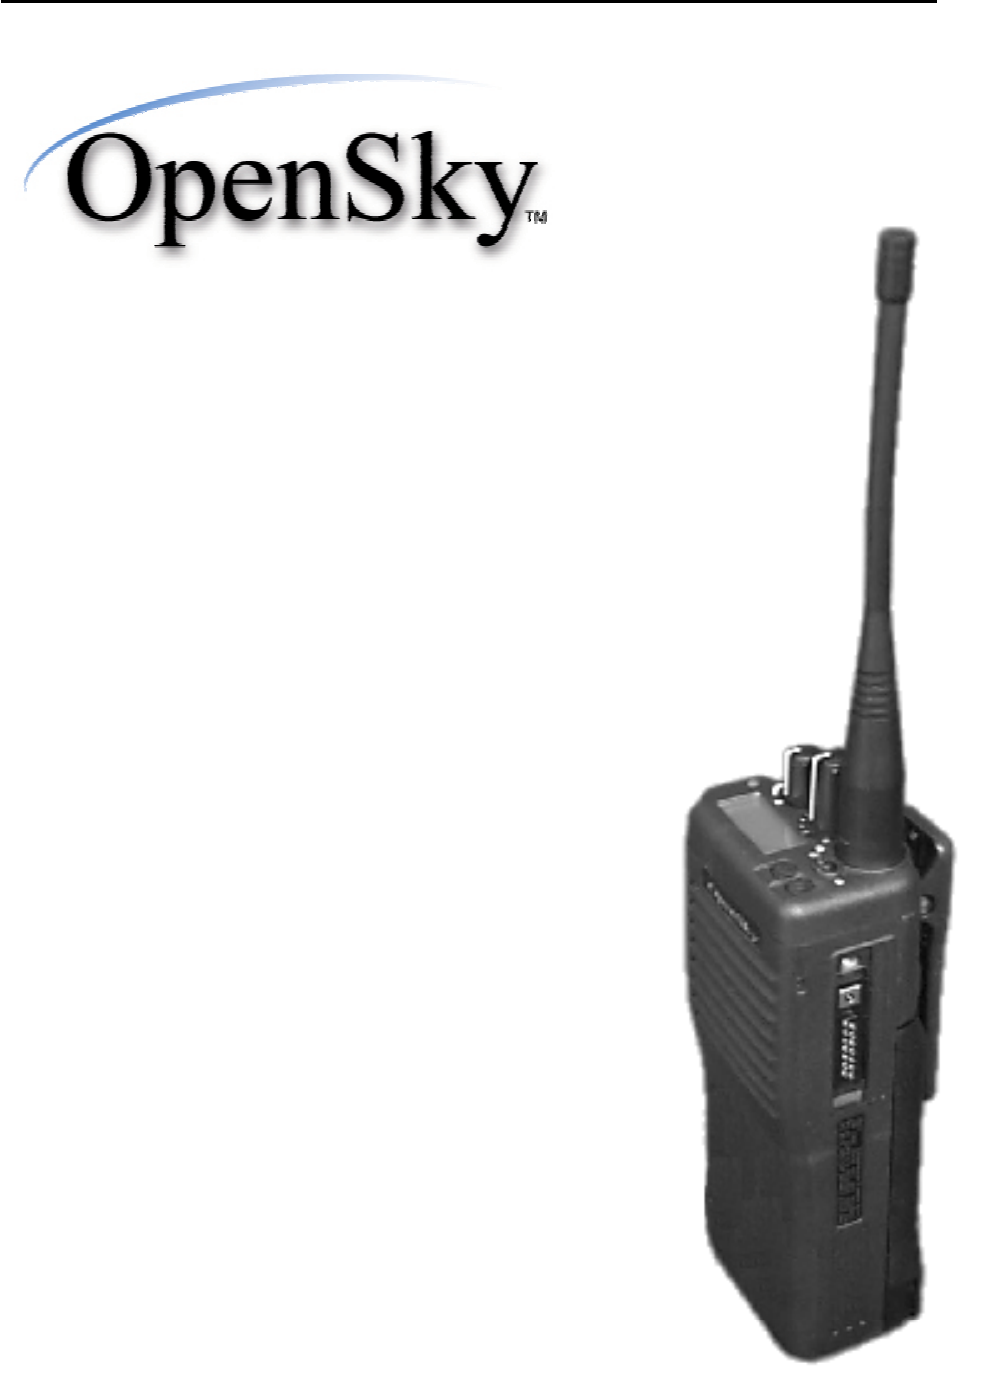
OpenSky Digital Radio
Portable
Radio
Model P800
Users Manual

P800 User’s Manual 1
CHAPTER 1
Welcome to the OpenSky Network
Chapter 1
Safety Notices 3
Notices to the User and Safety Training Information 3
Occupational Safety Guidelines and Safety Training
Information 5
OpenSky Overview 7
Internet Protocol (IP) Network 7
Integrated Voice and Data 8
Digitized Voice, Text and Graphics 8
Multi-Agency Coverage 10
Promotes Interagency Cooperation 10
Connectivity with Legacy Equipment 11
Improved Coverage and Signal Strength 11
Better Peak-Time Performance 12
Software-Configured Device 12
Software Upgradeable 13

Welcome to the OpenSky Network—CHAPTER 1
P800 User’s Manual 3
Safety Notices
IMPORTANT INFORMATION ON SAFE AND
OPTIMAL OPERATION. READ THIS BEFORE
USING YOUR P800 PORTABLE RADIO.
Notices to the User and
Safety Training Information
WARNING Your P800 radio generates RF
electromagnetic energy during transmit mode. This
radio is designed for and classified as “Occupational
Use Only” meaning it must be used only during the
course of employment by individuals aware of the
hazards and the ways to minimize such hazards.
This radio is NOT intended for use by the “General
Population” in an uncontrolled environment.
The OpenSky P800 portable radio has been tested and
complies with the FCC RF exposure limits for
“Occupational Use Only.” In addition, your P-800
radio complies with the following Standards and
Guidelines with regard to RF energy and
electromagnetic energy levels and evaluation of such
levels for exposure to humans:
• FCC OET Bulletin 65 Edition 97-01 Supplement
C, Evaluating Compliance with FCC Guidelines
for Human Exposure to Radio Frequency
Electromagnetic Fields.
• American National Standards Institute (C95.1–
1992), IEEE Standard for Safety Levels with
Respect to Human Exposure to Radio Frequency
Electromagnetic Fields, 3kHz to 300 GHz.
This equipment generates or uses radio frequency
energy. Changes or modifications to this equipment
may cause harmful interference unless the
modifications are expressly approved in the instruction
manual. The user could lose the authority to operate this
equipment if an unauthorized change or modification is
made.
CHAPTER 1—Advanced Radio Operations
4 P800 User’s Manual
This equipment has been tested and found to comply
with the limits for a Class B digital device pursuant to
Part 15 of the FCC Rules. These limits are designed to
provide reasonable protection against harmful
interference in a residential installation.
Government law prohibits the operation of unlicensed
transmitters within the territories under government
control. Illegal operation is punishable by fine or
imprisonment or both. Refer service to qualified
technicians only. Do not operate your transceiver in
explosive atmospheres (gases, dust, fumes, etc.).
This equipment generates and uses radio frequency
energy and may cause harmful interference to radio
communications if not installed and used in accordance
with the instructions. However, there is no guarantee
that the interference will not occur in a particular
installation. If this equipment does cause harmful
interference to radio or television reception, the user is
encouraged to try to correct the interference by one or
more of the following measures:
• Re-orient or relocate the receiving antenna.
• Increase the separation between the equipment and
the receiver.
• Consult a service center for technical assistance.

Welcome to the OpenSky Network—CHAPTER 1
P800 User’s Manual 5
Occupational Safety Guidelines and
Safety Training Information
CAUTION. To ensure that your exposure to RF
electromagnetic energy is within the FCC allowable
limits for occupational use, always adhere to the
guidelines below.
Your P800 portable radio may transmits using the
integral antenna. When the radio is ON, it receives and
also sends out radio frequency (RF) signals.
In 1996, the Federal Communications Commission (FCC)
adopted RF exposure guidelines with safety limits for portable
devices, based on the recommended limits of the National
Council on Radiation Protection and Measurements (NCRP)
and the American National Safety Institute (ANSI).
The design of the P800 Portable Radio complies with the FCC
guidelines for Occupational / Controlled exposure to RF
electromagnetic fields, as measured by the specific absorption
rate (SAR). To assure optimal performance and make sure
human exposure to RF electromagnetic energy is within the
FCC guidelines, always adhere to the following:
1. Do not hold the radio less than 1 inch from your
body, especially your face, ears, or eyes, while
transmitting.
2. When using the radio, angle the antenna away
from your body and do not allow the antenna to
touch your body during transmission.
3. The push-to-talk button should only be depressed
when intending to send a voice message.
4. The radio should only be used for necessary work
related communications.
5. The radio should only be used by authorized and
trained personnel and should not be operated by
children.
6. Do not operate your radio or replace/charge
batteries in explosive atmospheres (gases, dust,
fumes, etc.) or near explosive basking caps. Your
radio should be turned off when installing and
removing batteries.
CHAPTER 1—Advanced Radio Operations
6 P800 User’s Manual
7. Do not attempt any unauthorized modification to
the radio. Changes or modifications to the radio
may cause harmful interference. Service of the
radio should only be performed by qualified
personnel.
8. Always use M/A-COM authorized accessories
(antennas, batteries, belt clips, speakers/mic, etc.).
Use of unauthorized accessories can cause the FCC
RF exposure compliance requirements to be
exceeded.
The information listed above provides the user with the
information needed to make him or her aware of a RF
exposure, and what to do to assure that this radio
operates within the FCC exposure limits of this radio.
Welcome to the OpenSky Network—CHAPTER 1
P800 User’s Manual 7
OpenSky Overview
M/A-COM’s OpenSky is a suite of products
implementing an integrated digital voice and data
system based on the Internet Protocol.
The OpenSky network is digital, but provides
interoperability with analog radios, making it possible
to integrate existing (legacy) equipment alongside the
most sophisticated digital equipment available today.
• If you’ve been issued a P800 to replace a
conventional analog voice-only radio, you’ll
particularly appreciate the integrated voice and
data capabilities of the all-digital OpenSky
Portable equipment.
Internet Protocol (IP) Network
OpenSky’s Wireless Private Network is changing the
nature of real-time communications for large fleet
mobile businesses and public safety organizations
alike.
IP Backbone
Using Internet Protocol (IP) as a network backbone for
end-to-end user applications, OpenSky integrates
digital voice and packet data into a single network that
provides significant performance advantages over
yesterday’s uneasy alliances of independently-built
radio networks trying unsuccessfully to interact.
Like tuning into a channel in a conventional FM
radio system, logging onto the OpenSky network with
your pre-configured user profile will place you in
contact with the members of a software-defined talk
group consisting of the set of users you customarily
have to contact.
CHAPTER 1—Advanced Radio Operations
8 P800 User’s Manual
• Unlike your conventional FM radio, your P800
is a node on an Internet-Protocol (IP) network with
its own unique IP address.
Addressable Headers
Messages intended for you (whether voice or data) are
broken into packets with identifying headers, just like
World Wide Web internet communications, and
targeted to your specific IP address.
• You can travel anywhere within your network
and messages intended for your IP address will
find their way across the network to your personal
receiving set.
This doesn’t mean your communications are traveling
across the World Wide Web. Far from it. OpenSky is a
private wireless Intranet that adopts the best features of
IP protocol for increased communications efficiency
and capacity.
Integrated Voice and Data
Your P800 Portable Radio is a hardware component of
the OpenSky network, an integrated voice and data
communications system that delivers end-to-end digital
voice and data transmissions over the same wireless
network to a single handheld device.
Digitized Voice, Text and Graphics
By converting analog voice waves to digital
information before transmitting them over the network,
OpenSky technology makes it possible for portable
radio users to send and receive voice transmissions at
the same time they receive and view data on the radio’s
display screen.

Welcome to the OpenSky Network—CHAPTER 1
P800 User’s Manual 9
For complex graphics,
interface a PC through
your radio’s RS-232 serial
port.
With a P800 in your vehicle, or by your side, you’ll
be able to scroll through complex instructions and
driving directions displayed on an external terminal
device, or view on-screen emergency warnings while at
the same time carrying on conversations with
dispatchers or other mobile operators in your coverage
area.
• With OpenSky and the P800 you’ll not only use
the same device to receive data and carry on
conversations, you won’t even have to switch
between radio modes to do both simultaneously.
RS-232 Interface
For heavy data transfers or displaying graphics, your
P800 is equipped with an industry-standard RS-232
interface serial port for connecting a portable PC or any
of an increasing array of third-party display and key-
entry devices.
A data programming cable is required in order to use
this feature.

CHAPTER 1—Advanced Radio Operations
10 P800 User’s Manual
Multi-Agency Coverage
OpenSky is scalable, and designed to accommodate a
virtually unlimited number of portable devices from a
single fleet, or even a complex network made up of
several cooperating agencies.
Examples of how OpenSky improves cooperation:
• Every truck in a Carrier Company’s fleet can share
one large national network.
• Every cruiser in a state-wide police agency can
communicate with any other cruiser, from one end
of the state to the other.
• Patrolmen with older analog equipment can
connect seamlessly with newer digital devices over
the same network.
• Emergency response agencies share the same
network for improved communications during a
massive crisis.
Promotes Interagency Cooperation
See full discussions of Talk
Group, User Group and
User Profile elsewhere in
this manual
In fact, the system is best suited to multi-agency public
safety networks over areas as large as an entire state:
every cruiser, ambulance and fire truck and all their
dispatchers and support personnel sharing voice, data,
even graphics over the same network.
Talk to Anyone on your Network
Your personal voice profile defines who you
commonly communicate with. Each user needs only
one authorized radio to connect seamlessly to many
independent agencies or cooperating dispatch
networks.
Welcome to the OpenSky Network—CHAPTER 1
P800 User’s Manual 11
• There’s no need to monitor multiple frequencies on
several pieces of equipment to maintain contact.
• User talk groups connect you at all times with
precisely the users you need to reach, no matter
who they work for, or where they’re located within
the network.
Connectivity with Legacy Equipment
The all-digital, end-to-end IP OpenSky Intranet even
provides support for legacy equipment and protocols
both digital and analog.
Along with supplying voice and data to your P800
portable radio, the network will also support existing
(or “legacy”) radio equipment you may still need to use
during a hardware rollover.
This also means you’ll be able to make radio contact
with cooperating agencies on the same network,
whether or not they have made the conversion to
OpenSky equipment.
Improved Coverage and Signal Strength
Part of OpenSky’s scalability is its ability to
accommodate as many base stations as your coverage
area requires to provide robust voice and data
transmissions wherever your route may extend within
the network.
Cell Sites
OpenSky cell sites automatically extend coverage into
otherwise hard-to-reach areas and connect back into the
network.
Background Roaming and Switching
Automated switching takes place in the background
with OpenSky, so you’ll no longer be required to scan
for an open channel, or wait for an available channel,
when you move through your coverage area.

CHAPTER 1—Advanced Radio Operations
12 P800 User’s Manual
Instead of depending on choices from a central
switching station, your radio itself constantly monitors
signal strength and makes its own decision to roam to
another base site for a more robust connection.
Better Peak-Time Performance
OpenSky’s digital trunking architecture provides
enormous advantages over conventional FM operation.
Conversation capacity is effectively doubled by the
system’s ability to carry two voice-to-voice
conversations over the same channel that was
previously dedicated to just one.
Software-Configured Device
Your P800 is a “soft” radio. Its functions are
determined by OpenSky software applications, in much
the same way computer hardware can be used for
different applications.
Unlike older analog radios you may have used, with
their hardware-based proprietary functions, your P800
converts voice waves into digital information before it
transmits to the network, providing noise-free audio
transmission and reception.
Make any radio in the
system “your radio” by
logging on with your
identity code.
What’s more, because each user in the network has a
unique identity code, you can activate your identity
from any radio connected to the network. Any radio
from your agency’s stockpile of radio hardware can
become “your” radio and log on as part of your talk
group and profile.
Welcome to the OpenSky Network—CHAPTER 1
P800 User’s Manual 13
Software Upgradeable
As with computer hardware, your portable radio
equipment is upgradeable each time the OpenSky
software enables a new feature or operational
enhancement.
Communications protocols, radio features, and user
profiles can be changed easily and transparently to the
user, during a shift or during “sign-on” at the beginning
of a new shift.
CHAPTER 1—Advanced Radio Operations
14 P800 User’s Manual
Enhanced Digital Features
The all-digital network and OpenSky’s digital trunking
features also enable a rich array of network
enhancements unthinkable over historical FM
broadcast systems.
Voice grouping (into talk groups, user groups, and
profiles) is probably the most obvious advantage to
individual users. Other essential and enhanced feature
sets include:
• Priority scanning
• Multiple priority levels
• Pre-emptive emergency calls
• Late-entry calls
• Autonomous roaming for wide area applications.
You’ll benefit from high-quality, noise-free voice
communications with enhanced speech clarity
compared to analog, especially in noisy environments.
P800 User’s Manual 15
CHAPTER 2
Network Organization
Chapter 2
Network Organization 15
Your Voice Feature Personality 17
User Groups 18
Profiles 19
Radio Personality 21
Terminology 23
P800 User’s Manual 16

Network Organization — CHAPTER 2
P800 User’s Manual 17
Your Voice Feature Personality
When you activate your radio at the beginning of a
shift your unique identity code is used to sign on, your
radio is assigned its IP address and “provisioned” with
a radio personality that identifies other users on the
network with whom you are most likely to need to
communicate by voice. If you need to modify your
identity code bring your P800 to your network
administrator.
Some users you’ll only monitor, others you’ll want to
talk with during the course of your shift, just as with
older analog equipment you talked over one frequency
and monitored others to keep informed about the
activities of users in your agency, workgroup, task
force, fleet or geographic area.
Profiles are assigned by
your network administrator
to match your
communication needs.
You’ll have access only to
those users who fall within
your profile.
Your overall radio personality is organized into User
Groups (talk groups and listen groups), similar to a
channel in a conventional FM radio system. These user
groups are then organized into Profiles (collections of
up to 16 user groups), similar to banks of channels.
Finally, as many as 16 profiles make up your
personality.
Global Voice Profile
Profile 1 is known as the Global Voice Group. It is
always active scanning for inbound calls. It is usually
allocated to a “Fleet” operation allowing users to
receive broadcast calls independently of the active
profile.
There can be only one active user profile at any time.
Within that profile, only one user group is your talk
group; the others are listen groups. So, while you have
tremendous capability to establish contact with a very
large number of users, you’ll need to select the profile
that puts you into voice contact with the talk group you
need at any time.
Network Organization — CHAPTER 2
P800 User’s Manual 18
User Groups
A user group is a set of users who regularly need to
communicate (all the officers in a state police barracks,
for instance, or all the drivers who work a particular
shift).
• In conventional FM radio broadcast systems,
these users work together by tuning to the same
channel.
• In the IP-backbone OpenSky digital network,
subscribers in a user group are connected by a bit
of data in the header of every voice or data packet
addressed to the members of the group.
With OpenSky, members of the same user group can
stay in contact regardless of where they roam within
the network, whether the network incorporates a single
county, a state, even the entire nation.
Network capacity is the
only limitation on the
number of users that can
make up a group.
Dispatchers maintain contact with all members of the
group, and each user can stay in “push-to-talk” contact
with the dispatcher and all the users in their talk group,
even if those users are from different, inter-networked
agencies.
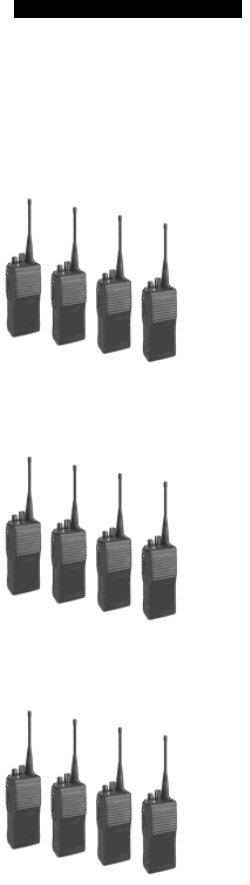
The Figure below illustrates a small user group of four
P800 portable radios.
Figure 1
User Group
Nothing about this user group so far defines it as a talk
group or a listen group. That determination is made
when user groups are gathered together by the network
administrator into the larger groups called profiles.
Each radio assigned
to an individual user

Network Organization — CHAPTER 2
P800 User’s Manual 19
Profiles
A profile is a set of up to 16 user groups. All sorts of
configurations are possible within this simple
architecture. Police officers on the same shift might
make up a profile, for instance. Within this profile,
each police station within the network might be
assigned a user group. So the profile would connect all
the cruisers from 16 stations for an entire shift.
Officers from each station would most likely be in
“push-to-talk” contact with one another; all other
officers on the same shift would most likely monitor
the other groups for “listen-only” access to all other
calls within the profile. But this is only one possible
configuration.
Members of a talk group
are not necessarily
scanning the calls of the
same listen groups.
A user group might just as easily include officers from
several stations: a SWAT team, for example, or a
special emergency task force might require the
collaboration of special personnel or equipment from
different police stations, or even other agencies.
• In conventional FM radio broadcast systems,
users with this sort of relationship would create an
“ad hoc” profile by tuning to one channel for talk-
group privileges and scanning an entire bank of
channels to monitor the conversations of other
groups.
• In the IP-backbone OpenSky digital network,
members of the same talk group automatically
receive every voice message addressed to the
group, and monitor the voice messages of every
other user group in the profile.
Each user in the OpenSky network can be assigned as
many as 16 profiles by the network administrator. At
any time during a network session, users can select the
profile that suits their needs with a simple twist of the
Profile Selector knob. The Active Profile Number is
displayed in the radio’s menu Display and Control
Area.
Network Organization — CHAPTER 2
P800 User’s Manual 20
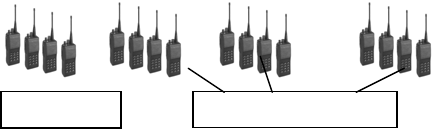
Figure 2
___________________________________________
User Profile
User Group 1 User Group 2 User Group 3 User Group 16
. . .
Talk Groups
While your active profile can contain up to 16 user
groups, only the primary group in any profile is your
talk group. All the other user groups in your profile are
listen-only groups. You’ll hear the calls from these
groups but they will not hear your voice unless your
user group is part of their profile.
To establish voice-to-voice contact with a particular
user, you’ll have to select the profile that makes that
user part of your talk group. This is only possible if
your network administrator has configured a talk group
that contains both you and the other user.
If each of you has a profile that includes the other in a
talk group, you can each select the profile that puts you
into “push-to-talk” contact with the other.
Listen Groups
All the other user groups in each of your up to 16
profiles are listen groups. See the User Profile Figure
above for an illustration of how user groups are related
in a profile.
By adding different listen groups to your several
profiles, your network administrator can change the
configuration of the user groups you can monitor at any
time by clicking your profile selector knob to the
appropriate profile.
You may only have one talk group, but that doesn’t
keep you from tuning in different profiles to monitor a
different “bank of channels.”
Talk Group U
p
to 15 Listen Grou
p
s
Network Organization — CHAPTER 2
P800 User’s Manual 21
Scan Modes
There are three scanning options that include:
Scan none: Scanning is disabled.
Scan normal: Scan all listen groups in your profile.
PTT results in a response in your default
talk group.
Scan talk back: Scan all listen groups in your profile
within a time out period. PTT results
in a response in the active listen group.
Radio Personality
Your radio personality is a collection of up to 16
profiles. The entire personality is organized by your
network administrator and is unique to your
communication needs.
When you activate your radio at the beginning of a
shift and sign on with your unique identity code, your
radio is assigned its IP address and “provisioned” with
a radio personality that identifies other users on the
network with whom you are most likely to need to
communicate by voice.
Your overall radio personality is organized into User
Groups (talk groups and listen groups), similar to a
channel in a conventional FM radio system. These user
groups are then organized into Profiles (collections of
up to 16 user groups), similar to banks of channels.
Finally, as many as 16 profiles make up your
personality.
Network Organization — CHAPTER 2
P800 User’s Manual 22
Figure 3
____________________________________
___
Radio Personality
Profile 1 (1 Talk Group and up to 15 Listen Groups)
. . .
Profile 2 (1 Talk Group and up to 15 Listen Groups)
. . .
...Profile 16 (1 Talk Group and up to 15 Listen Groups)
. . .
Radio personality architecture gives you tremendous
flexibility to organize your communications needs,
even as conditions change.
With 16 profiles you can participate in as many as 16
talk groups. Or, if you only need one talk group, you
can still have up to 16 different profiles that can add
more than 200 other user groups to your listen group
pool, each with an almost unlimited number of
subscribers.
Of course, with potentially hundreds of voice calls in
your profile at any time, your personality also
establishes strict pre-determined priority sequences to
suppress the calls that would distract you from the calls
you’re more likely to need.
Network Organization — CHAPTER 2
P800 User’s Manual 23
Terminology
Most of the terms and concepts you’ll need to
communicate with your dispatcher, network
administrator and other users have parallels in legacy
analog networks.
Digital Compare to Analog
User Group ........ FM radio channel
Profile ................. Bank of FM radio channels
Talk Group ........ “Push-to-talk” connection with
users tuned to the same channel
Listen Group...... “Listen-only” connection to a bank
of radio channels
Profile ................. Talk privileges on one channel
while monitoring an entire bank of
channels
Network Organization — CHAPTER 2
P800 User’s Manual 24
P800 User’s Manual 25
CHAPTER 3
Getting Started
Chapter 3
Before Your First Shift 27
Radio Controls 27
Front Panel Components 28
Left Panel Components 28
Top Panel Components 29
Right Panel Components 32
Menu and Status Choices 35
Primary Display 36
Getting Started — CHAPTER 3
P800 User’s Manual 26
Getting Started — CHAPTER 3
P800 User’s Manual 27
Before Your First Shift
If you’re already familiar with portable radio functions
and the “profile and personality” architecture of an all-
digital network, you’ll find the features and controls of
your new P800 to be logically arranged and easy to
understand.
But if you’re new to digital radio service, and
especially if you’re migrating to OpenSky from an FM
analog radio environment, take some time to review the
Network Organization chapter of this manual before
operating your radio.
In either situation you’ll want to completely familiarize
yourself with the controls and indicators of your new
radio before you start trying to use it on the job. In
particular, you’ll want to be able to scroll your way
through menu display choices and quickly select the
appropriate radio profile for the changing conditions of
your work day.
Radio Controls
Examine your radio thoroughly and familiarize
yourself with the location and operation of its controls
and indicators before studying their functions. The
following diagrams will identify the components of
your equipment one panel at a time.
Getting Started — CHAPTER 3
P800 User’s Manual 28
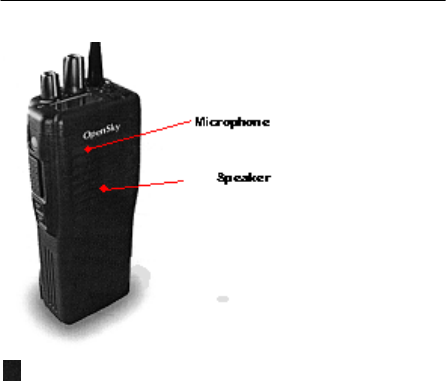
Front Panel Components
The front panel of your P-801T includes the Speaker
element and the Microphone. The microphone is a tiny
rectangle in the upper left-hand corner of the speaker
element. Be careful not to obstruct the microphone
while talking.
Figure 1
Front Panel Components
Component Function
Microphone.............. Picks up your voice for
dispatcher and other users on
the network to hear
Speaker Element...... Allows you to hear voice calls
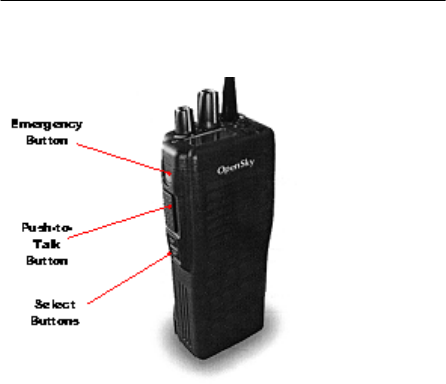
Left Panel Components
The left-side panel of your P800 houses the Emergency
button, the Push-to-Talk button, and two Select buttons
for choosing among performance menu items when
those items are displayed in the LCD Display on the
radio’s top panel.
Getting Started — CHAPTER 3
P800 User’s Manual 29
Figure 2
Left Panel Components
Component Function
Emergency Button..... Sends an emergency alert over
the network and initiates an
emergency call. Also used to
cancel an emergency alert.
Push-to-Talk ..............
Button
Turns the radio microphone on
to transmit a voice call.
Select Buttons ............ Used with the Menu buttons
on the radio’s top panel. When
the menu heading you want
appears in the display panel,
use the Select buttons to scroll
“up and down” through the
choices available.
Top Panel Components
The top panel of your P800 houses the LED display
panel, indicator light and antenna connector, plus four
control components: the Power/Volume switch, the
Profile Selector, Menu buttons and the Toggle switch.
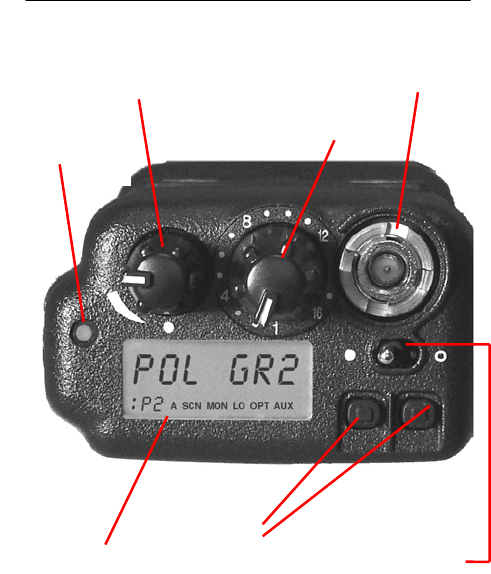
Getting Started — CHAPTER 3
P800 User’s Manual 30
Figure 3
Top Panel Components
Component Function
Power/Volume .........
Switch
Turns the radio on and off.
Controls the volume of calls
coming into the speaker.
Antenna ....................
Connector
Mounting location for your
removable antenna
Indicator Light ........ Turns red and blinks when you
are in transmit mode. Turns
green and blinks when you
receive a call.
Profile Selector ........
Dial
Sets one of 16 profiles as the
active profile.
Antenna Connector
Profile Selecto
r
To
gg
le
Power/Volume
Dis
p
la
y
Menu
Buttons
Indicator
Light
Getting Started — CHAPTER 3
P800 User’s Manual 31
Display Panel ........... Provides profile and user
group information. When the
menu or select buttons are
pressed, the menu display
temporarily changes to show
the selected menu screen. If no
buttons are pressed, the
display returns to the primary
menu.
Menu Buttons .......... These allow the user to cycle
“left and right” through the
menu of radio functions.
Responding to the buttons,
menu headings will appear in
the display panel. Once you
find the menu you want, use
the Select buttons on the
radio’s left panel to scroll “up
and down” through the
choices available in that menu.
Toggle Switch........... Turns display, indicator light,
and side tones on or off.
Getting Started — CHAPTER 3
P800 User’s Manual 32
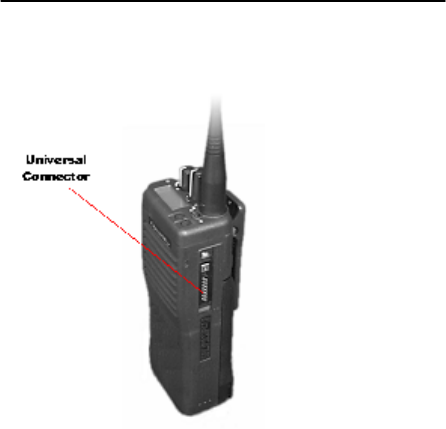
Right Panel Components
The right-side panel of your P-801T houses the
Universal connector you’ll use to attach an external
microphone or speaker. Use this to connect to an
external data terminal using an RS-232 adapter cable.
Figure 4
Right Panel Components
Getting Started — CHAPTER 3
P800 User’s Manual 33
The Display Panel Overview
The radio display shows your active user group and
profile, menu selections and status information. The
display is divided into two major elements:
• Menu Display and Control Area (the top 2/3 of the
panel) and,
• Status Area (the bottom 1/3 of the panel)
The figure below reflects a composite condition you’ll
never see on your display panel. It displays all the
components of the default display, plus all the Status
Area indicators at once, not a natural condition. In
ordinary use, you’ll see just one mode indicator in the
Status Area at any time, and only for 10 seconds after
you make menu selections, before the display reverts to
the default screen.
Figure 5
Display Panel Elements
Menu Display
and Control
Status
Area
Scanning Menu
Active Connection
Channel Chan
g
e
Lockout Indicato
r
Active Profile Indicato
r
Getting Started — CHAPTER 3
P800 User’s Manual 34
Component Function
Menu Display...........
Default Condition
Provides profile and user
group information under
ordinary operating conditions
Menu Display...........
Menu Selection
When Menu or Select buttons
are pressed, this area changes
to show selections from the
menus. These displays, and
any related Status Area
indicators, stay onscreen for
10 seconds before the entire
display reverts to the default
condition.
Status Area............... Arranged across the bottom of
the display panel are five
fields for displaying hints to
remind you what menu you’re
accessing. Unless you’re using
your menus, many of these
fields will be empty.
Status Area...............
Activity Indicator
When your radio is on and
connected to the OpenSky
network, the : appears in the
status area. The number of
your active profile, if any, will
appear after this symbol. Or, if
you have engaged Priority
Scan, a P will display while
the radio scrolls through the
user groups.
Status Area...............
Profile Number
The 01 in the figure above
indicates the active profile for
this user is Profile 01.

Getting Started — CHAPTER 3
P800 User’s Manual 35
Component Function
Status Area...............
Scanning Mode
When you activate the
Scanning Mode menu, SCN
will appear in the Status Area.
In this condition, you can
scroll through your scanning
mode choices in the display
area above.
Status Area...............
Channel Change
When you activate the Active
Radio Channel menu, MON
will appear in the status area.
In this condition, pressing the
Select buttons will display
available channels in the
display area above.
Status Area...............
Lockout Indicator
When you select the Lockout
Menu, LO will appear in the
Status Area. In this condition,
you’ll be able to scroll through
profile names and select those
you want to lock out.
Menu and Status Choices
You’ll use your top panel Menu Buttons to scroll
through the menu choices for changing your radio’s
status, then fine-tune your selections by using the left
panel Selector Buttons to choose from the available
options within each menu.
The Profile Selector, not
the Menu Buttons, is the
component for changing
your active profile
The column headings in the figure below are the
primary menus accessible directly from your Menu
buttons. Entries in the columns below represent the sort
of menu items you might find when using the Selector
buttons to scroll through the primary menus.
Your network administrator will organize the Priority
Scan, Channels, and Lock Out menus to match your
particular needs, so you won’t be distracted by
irrelevant options.

Getting Started — CHAPTER 3
P800 User’s Manual 36
Figure 6
Primary/Secondary Menu Loop
Priority
Scan
Scan
Mode
Channel Side
Tone
Bright
-ness
Mode
Display
Change
Mode
Lock Out
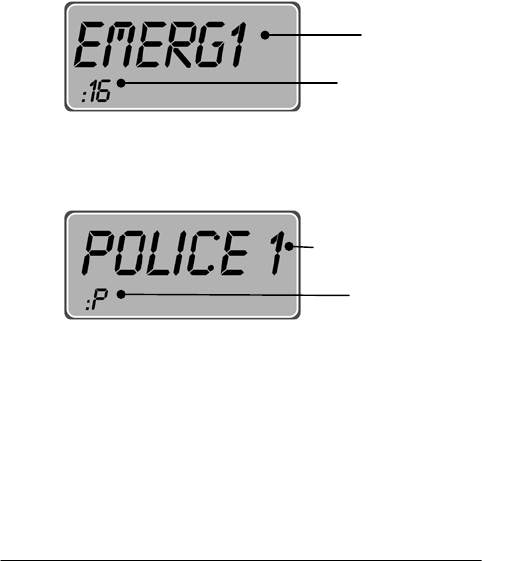
POLICE 1
POLICE 2
FIRE 1
. . .
EMS 5
SC NORM
SC NONE
TLKBK
OT 460
OT 470
OT 480
. . .
OT 990
SIDE ON
SIDEOFF
BRGHT 1
BRGHT 2
BRGHT 3
OTP 418
OTP 313
. . .
SEL2CNG POLICE 1
POLICE 2
FIRE 1
. . .
EMS 5
When you’ve navigated to the secondary menu item
you want to activate, do nothing. The radio will take
your inactivity as a confirmation that you have made
your choice and act accordingly. After a 10-second
delay, your choice is confirmed and your screen will
return to the default display.
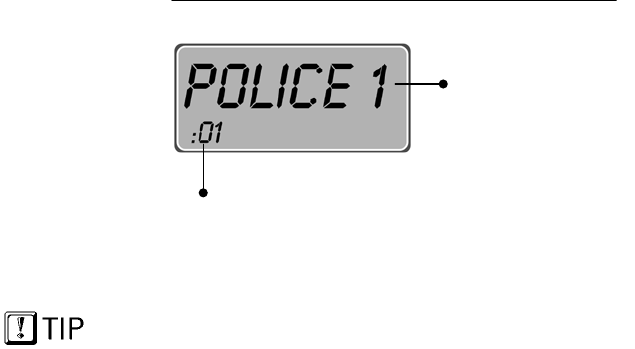
Primary Display
After you turn on the radio and the startup sequence
finishes, the radio will try to register with the network
using its last user ID. If successful, the display shows
the active profile, talk group and menu selections.
Unless you need to change any of the active settings,
you can go right to work when you see this display.
This primary display is the default screen your radio
will return to after you use the menu and selector
buttons to change or review your active settings.
Default is automatic. After your last button-push, and a
10-second delay, the radio will clear your final
selection and return to the Primary display.
Getting Started — CHAPTER 3
P800 User’s Manual 37
Figure 7
Primary Display (Default Screen)
Component Explanation
To see the other user
groups in your active
profile, you’ll use the
menu and selector buttons
to scroll through the
Priority Scan menu.
Talk Group...............
Your profile (identified above
as 01) may contain as many as
16 user groups. For each
profile, only one user group is
configured as your talk group.
The default screen shows the
active talk group in the menu
display and control area.
Profile Number ........ Your network administrator
can configure your radio
personality with up to 16
distinct profiles. The default
screen shows the active
profile number in the status
area.
Talk Group
Profile Numbe
r
Getting Started — CHAPTER 3
P800 User’s Manual 38
P800 User’s Manual 39
CHAPTER 4
Display Panel Functions
Chapter 4
Menu and Selector Buttons 41
Priority Scan 42
Scan Mode 43
Channel Change 44
Side Tone 45
Brightness Control 46
Mode Display 47
Change Mode 48
Lock Out 49
Display Panel Functions – Chapter 4
P800 User’s Manual 40
Display Panel Functions – Chapter 4
P800 User’s Manual 41
Menu and Selector Buttons
Most Display Panel functions are launched from the
Menu and Selector buttons. You’ll use your top panel
Menu Buttons to scroll through the menu choices for
changing your radio’s status, then fine-tune your
selections by using the left panel Selector Buttons to
choose from the available options within each menu.
See the Figure: Primary/Secondary Menu Loop for a
map of the menu choices.
Selecting a new menu setting is a 3-step process:
1.) Press either top panel menu button to enter the
Primary Menu loop. Use the left or right menu
buttons to scroll through the selections.
2.) When you find the appropriate menu, press either
left-panel selector button to enter the menu. Use
the top or bottom buttons to scroll through the
selections.
3.) When you find the appropriate selection, do
nothing. After a 10-second delay, your P800 will
accept your entry as your final selection, clear the
screen, and return to the default screen.

Display Panel Functions – Chapter 4
P800 User’s Manual 42
Priority Scan
When you use the menu buttons to choose Priority
Scan, the P800 scrolls through the available user
groups in your currently selected profile and allows
user selection of the appropriate group as your priority
scan user group.
NOTE: Use of Talk-Back Scan will allow the radio to return
a call on the same talk-group as an in-bound call was just
received on. See SCAN MODE overleaf.
Figure 1
Priority Scan Menu
Component Explanation
Priority Scan ............
User Group
The priority scan user group
will display for 10 seconds,
then the menu display will
revert to the default screen.
Priority Scan ............
Indicator
The priority scan indicator P
will appear in the status area
while the radio scans the
available user groups.
Priority Scan
User Group
Priorit
y
Scan Indicato
r
Display Panel Functions – Chapter 4
P800 User’s Manual 43
Scan Mode
When you use the menu buttons to choose Scan Mode,
the display area adjusts to show you the first of three
available scan modes: None, Normal, or Talkback.
Use the left-panel Selector buttons to scroll through the
choices, then wait for the radio to accept your choice.
When the default screen appears in your display, your
choice has been activated.
Figure 2
Scan Mode Menu
Component Explanation
Chosen ......................
Scan Mode
The scan mode you select
(None, Normal, or Talkback)
will appear in the display area
for 10 seconds, then the menu
display will revert to the
default screen.
Scan Menu................
Indicator
The scan menu indicator SCN
will appear in the status area
while you scroll through and
select your scanning mode.
Chosen
Scan Mode
Scan Menu

Display Panel Functions – Chapter 4
P800 User’s Manual 44
Channel Change
When you use the menu buttons to choose Channel, the
P800 adjusts to show you the first of the available
channels from which you may choose.
Use the left-panel Selector buttons to scroll through the
choices, then wait for the radio to accept your choice.
When the default screen appears in your display, your
choice has been activated.
Figure 3
Channel Change Menu
Component
Explanation
Site Name .................
Your selected channel will
appear in the display area for
10 seconds, then revert to the
default display.
Site Name
(This is an arbitrary
5-character name
for a radio site)

Display Panel Functions – Chapter 4
P800 User’s Manual 45
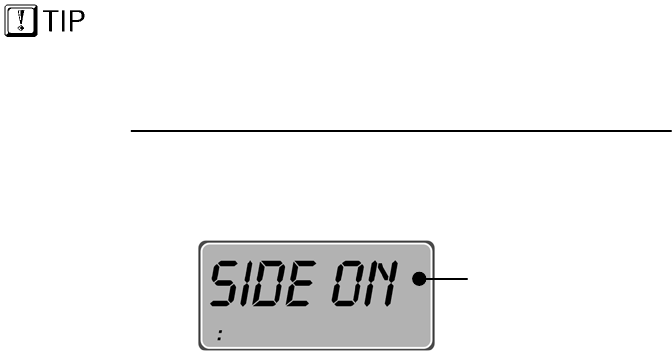
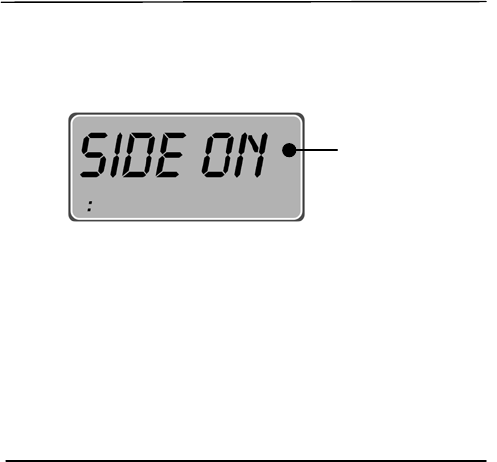
Side Tone
There are only two choices in the Side Tone Menu
(Side Tone ON, Side Tone OFF). Use this function to
activate or de-activate the audible beeps that occur
when you press a Menu or Selector button.
First use the top panel menu buttons to scroll to the
Side Tone menu, then press either left-panel selector
button to toggle between SIDE ON and SIDEOFF, then
wait for the radio to accept your choice. When the
default screen appears in your display, your choice has
been activated.
Figure 4
Side Tone Menu
Component Explanation
Side Tone..................
Your choice of Side Tones ON
or OFF will appear in the
display area for 10 seconds,
then revert to the default
display.
Side Tones ON
or OFF,
depending on
y
our selection

Display Panel Functions – Chapter 4
P800 User’s Manual 46
Brightness Control
There are only three choices in the Brightness Menu.
You’ll use the menu in high- or low-light situations to
change the brightness of back-lighting for your display
panel and key-pad.
First use the top panel menu buttons to scroll to the
Brightness menu, then press either left-panel selector
button to scroll through the choices BRGHT 1,
BRGHT 2 and BRGHT 3, then wait for the radio to
accept your choice. When the default screen appears in
your display, your choice has been activated.
Figure 5
Brightness Menu
Component Explanation
Brightness Level ......
The Brightness level you
select for your display panel
(3 is the brightest; 1 the
dimmest) will appear in the
display area for 10 seconds,
then the menu display will
revert to the default screen.
Brightness Level
of Dis
p
la
y
Panel

Display Panel Functions – Chapter 4
P800 User’s Manual 47
Mode Display
The Mode Menu is a “view-only” menu with only one
active entry at a time. Its function is to display the
name and revision number of the software your radio is
running. As a safeguard against accidentally choosing
the wrong software, you’ll need to deliberately choose
the Change Mode menu and scroll through the options
available in that menu to make a software change.
You’ll need only the top-panel Menu buttons to display
your active software. Just scroll through the menu until
your current mode is displayed in the panel.
Figure 6
Mode Menu (Current Software)
Component Explanation
Active Software........
This “view-only” information
will appear in the display area
for 10 seconds, then the menu
display will revert to the
default screen.
Active
Software
Name and
Version

Display Panel Functions – Chapter 4
P800 User’s Manual 48
Change Mode
You’ll use this mode to change the type or revision
number of the software it runs. The most appropriate
software for your use is automatically loaded with your
other configuration specs whenever you turn on your
radio. To see what software you’re running currently,
use the Menu buttons to scroll to the “view-only”
Mode menu display.
If you need to run software other than what the Mode
menu shows, continue to scroll to the Change Mode
menu (screen display: SEL2CNG). Once you’re in the
Change Mode, use the left-panel Selector buttons to
scroll through the list of available alternative software
versions.
A detailed procedure for changing the mode of your
radio can be found in Chapter 6.
Figure 7
Change Mode Menu
Component Explanation
“Select to .................
Change” Mode
This is the menu heading
you’ll select to launch your
radio into the Mode Change
menu sequence.
From here, you’ll use the left-
panel Selector buttons to
choose another software
mode.
“Select to
Change”
Mode

Display Panel Functions – Chapter 4
P800 User’s Manual 49
Lock Out
You’ll use the Lock Out menu to prevent you from
hearing non-emergency voice calls from user groups
you select. Supervisory and emergency calls will cut
through your lock-out command, but you won’t be
distracted by the other voice call activity from user
groups you’ve locked out, until you elect to run the
menu again and remove the lock.
Use the top-panel Menu buttons to display the Lock
Out menu, then use the left-panel Selector buttons to
scroll through the list of available user groups in your
active profile.
Lockout is a “toggle-type”
condition. Re-select a
locked out group to remove
the lock.
Already locked-out user groups are marked by the
lockout indicator LO in the display panel (see figure
below). To lock out a user group not so marked, display
that group in the display panel and wait until the radio
accepts your selection and returns to the default
display. To lock out another group, return to the Lock
Out menu and make a new selection.
Display Panel Functions – Chapter 4
P800 User’s Manual 50
Figure 8
Lock Out Menu
Component Explanation
Locked Out ..............
User Group
As you scroll through the user
groups in your active profile,
locked out groups are marked by
the indicator LO.
Lock Out ..................
Indicator
Unlike other Status area indicators
that stay lit while the menu is active,
the Lock Out indicator is only
visible when the user group in the
display is currently locked out, not
visible when the selected group is
not locked out.
Locked Out
User Group
Lock Out

P800 User’s Manual 51
CHAPTER 5
Basic Radio Operation
Chapter 5
Power Switch and Volume 53
Disabling Lights and Side Tones 54
Voice Calls 56
Enable and Disable Side Tones 60
Adjusting Display Brightness 62
Changing Your Active Profile 63
Emergency Communications 65
Basic Radio Operation – Chapter 5
P800 User’s Manual 52
Basic Radio Operation – Chapter 5
P800 User’s Manual 53
Power Switch and Volume
Power ON, Power OFF, and VOLUME functions are all handled
from the Power/Volume Switch, a top panel component.
How to Turn Your Radio On
1.) Rotate the Power/Volume switch clockwise until it clicks.
2.) Wait through the Startup Sequence, which lasts
approximately 5 seconds. During this time your radio is
provisioned with your radio personality and current user
specifications.
3.) The
: in the display panel indicates the end of the startup
sequence and your live connection to the OpenSky network.
4.) Turn the Power/Volume switch clockwise to increase the
volume; counterclockwise to decrease the volume.
How to Turn Your Radio Off
1.) Rotate the Power/Volume switch counter-clockwise until it
clicks.
2.) Your Display Panel displays SHUTDWN while the radio
runs through its shutdown sequence. The operating mode of
your radio is saved into network memory and recalled on
the next start-up.
Power/Volume
Basic Radio Operation – Chapter 5
P800 User’s Manual 54
Disabling Lights and Side Tones
For covert operations, it is important to be able to turn off
the radio’s display lights and side tones. For safety’s sake,
though, you probably won’t want to shut your radio down
for the time you’re planning to go covert.
Turning off your radio does
not affect your Toggle
Switch setting, which will
be saved for your next use.
To temporarily disable the lights and sounds that could
inadvertently expose your presence and position, flip
the Toggle Switch, a top panel component. Another flip
of the same switch will bring your display and tones
back into operation.
How to Go Covert
• Push the Toggle Switch to the right until it snaps into
position.
• The Display Panel will go dark, the Indicator light will
turn off, and the Side Tones (the audible beeps you
hear when you use the menu buttons) will be disabled.
Indicator Light Disabled
Toggle
Switch
Display Panel and
Keyboard back-lighting is
disabled
Basic Radio Operation – Chapter 5
P800 User’s Manual 55
If you’ve been conducting covert operations and are ready
to re-enable your radio’s lights, display screen and side
tones for ordinary use, a simple flip of the Toggle Switch
will return the P800 to full function. A “covert” radio looks
like a “powered-off” radio. But re-enabling your functions
has immediate results. You won’t have to wait through the
startup sequence and your radio will not be re-provisioned
when you flip the toggle to re-enable your lights and tones.
How to Enable Lights and Tones
• Push the Toggle Switch to the left until it snaps into
position.
• The Display Panel will brighten, the Indicator light
will turn on, and the Side Tones (the audible beeps
you hear when you use the menu buttons) will be re-
enabled.
• To test your side tones, press a Menu button and
listen for the confirming tone.
Basic Radio Operation – Chapter 5
P800 User’s Manual 56
Voice Calls
As soon as your radio completes the startup sequence and
is live on the OpenSky network, you’ll begin to hear voice
calls from the talk and listen groups in your active profile.
No action is required on your part, but the following list
details how your radio responds to incoming voice
messages.
Initial Network Registration
1.) If the radio has never been registered on your
network, it will attempt to use a default User ID, if
one is available.
2.) If the radio has been previously registered on the
network, it will automatically attempt to re-register
with the same User ID and Password as previously
used. Once registered, the Default Profile Name will
be shown on the display panel.
3.) If registration fails, the message NOT REG will flash
on the display.
Basic Radio Operation – Chapter 5
P800 User’s Manual 57
4.) If registration fails, does not have a default, a
previously used ID, or if you want to enter a new user
ID bring your P800 to your network administrator to
be updated.

Basic Radio Operation – Chapter 5
P800 User’s Manual 58
How to Take a Voice Call
1.) First, if you haven’t already, power up your radio by
rotating the Power/Volume switch clockwise until it
clicks. (See How to Turn Your Radio On.)
2.) Your radio Display Panel flashes a user group to
identify the incoming caller.
3.) The Indicator Light turns green and blinks
throughout the call.
4.) At the end of the call, you will hear a single End of
Message tone.
The steps for making a voice call with your P800 are
similar to those for a conventional portable radio.
How to Make a Voice Call
1.) First, if you haven’t already, power up your radio by
rotating the Power/Volume switch clockwise until it
clicks. (See How to Turn Your Radio On.)
2.) Check the Indicator Light for clearance. If the light is
dark, you are clear to talk. If the light is blinking
green, you are receiving a call.
Indicator
Blinks Green while you are receiving a call.

Basic Radio Operation – Chapter 5
P800 User’s Manual 59
3.) Wait for clearance if necessary. A single End of
Message tone will indicate the end of your incoming
call.
4.) Depress and hold the Push-to-Talk button and speak
normally. For maximum clarity, hold the transceiver
such that the microphone is approximately 1½ inches
from your mouth.
5.) Release the Push-to-Talk button to terminate your
outgoing voice call.
What the Beeping Means
1.) If the network is clear, you won’t hear anything when
you depress the Push-to-Talk button. Just hold the
button down and talk, then release the button.
2.) If you hear 3 rapid beeps, the network is too busy to
transmit or even queue your call. You cannot place a
call in this situation. Wait a few seconds and try your
call again.
3.) If you hear a 3-beep sequence (Medium tone /
Medium tone / High tone), the network has
acknowledged your request for clearance and placed
your call in the queue.
When the network becomes available, the radio will
automatically transmit for 10 seconds and the
Indicator light will blink red.
The network can now accept your call. Depress and
hold the Push-to-Talk button and speak.
Basic Radio Operation – Chapter 5
P800 User’s Manual 60
Enable and Disable Side Tones
Your radio sounds confirming tones when you press the
Menu or Selector buttons. Most users find this audible
confirmation helpful in navigating the menus in the
Display Panel.
Turning off your radio does
not affect your Side Tone
setting, which will be saved
for your next use.
You can disable the side tones, if you wish, by
navigating to the Side Tone menu, and selecting
SIDEOFF. To re-enable the tones, you’ll need to
navigate back to the same menu (without the benefit of
side tones) and this time select SIDE ON.
How to Disable Side Tones
1.) Press either Menu button and continue to press until
the Side Tone menu appears.
2.) The Current Condition will appear in the Display
Panel. The figure above indicates that your side tones
are ON.
3.) Press either Select button until the Display Panel
shows SIDEOFF.
4.) No further action is required. Your radio accepts your
choice and, after a short delay, reverts to the default
screen.
If your radio is operating as normal, but you don’t hear
confirming tones when you navigate the menus, most
likely your Side Tones are disabled.
Shows current
status of Side
Tones
Basic Radio Operation – Chapter 5
P800 User’s Manual 61
How to Enable Side Tones
1.) Press either Menu button and continue to press until
the Side Tone menu appears.
2.) The Current Condition will appear in the Display
Panel. The figure above indicates that your side tones
are ON.
3.) Press either Select button until the Display Panel
shows SIDE OFF.
4.) No further action is required. Your radio accepts your
choice and, after a short delay, reverts to the default
screen.
How to Undo your selection
If you’ve made a selection in error, or immediately change
your mind, you have a few seconds to undo your selection
before it takes effect.
1.) Immediately press either Menu button.
2.) Your Display panel confirms that you are back in the
Side Tone menu.
3.) Use either Select button to change your selection.
If pressing the Menu button does not launch you back into
the Side Tone menu, you haven’t acted quickly enough to
Undo your choice. Wait approximately 10 seconds for the
selection process to clear the radio, then scroll through the
menu until SIDE ON or SIDEOFF appears in the screen.
Shows
current
status of
Side Tones

Basic Radio Operation – Chapter 5
P800 User’s Manual 62
Adjusting Display Brightness
The brightness of your backlighting for the LCD panel and
keypad can be adjusted to any of three levels as the
ambient brightness of your environment changes.
Brightness is a menu item, accessible from the Menu
buttons.
How To Adjust Brightness
1.) Press a Menu button until the brightness menu shows
in the Display panel.
2.) The Current Condition will appear in the Display
Panel. The figure above indicates that your radio is
operating at the lowest level of brightness. To make
the display brighter, choose BRGHT 2 or BRGHT 3.
3.) Press the upper Select button to increase brightness.
Press the lower Select button to decrease brightness.
4.) No further action is required. Your radio accepts your
choice and, after a short delay, reverts to the default
screen.
How to Undo your Brightness Choice
If you’ve made a selection in error, or immediately change
your mind, you have a few seconds to undo your selection
before it takes effect.
5.) Immediately press either Menu button.
6.) Your Display panel confirms that you are back in the
Brightness menu.
7.) Use either Select button to change your selection.
If pressing the Menu button does not launch you back into
the Brightness menu, you haven’t acted quickly enough to
Undo your choice. Wait approximately 10 seconds for the
Shows
current
Brightness
Turning off your radio
does not affect you
r
Brightness setting,
which will be saved fo
r
your next use.

Basic Radio Operation – Chapter 5
P800 User’s Manual 63
selection process to clear the radio, then scroll through the
menu until the Brightness menu appears.
Changing Your Active Profile
During the Startup sequence, your radio is configured with
an entire radio personality, including as many as 16
Profiles, one of which your network administrator has
designated as your Active Profile by default.
Your default profile will contain your most common talk
group and as many as 16 other user groups the radio treats
as “listen groups.”
PERSONALITY
OVERRIDE.
The position of your Profile
Selector dial will override
the default profile selection
your radio makes on
startup.
If at any time you need access to groups not loaded into
your active profile, you can switch to any other profile
in your radio personality. Profile selection is not a
menu item. Instead, the 16-position Profile Selector
dial, a top panel component, gives you much faster
access to your bank of profiles.
How to Choose Another Profile
You’ll have to be familiar enough with your profiles to
recognize them by number, or by the active “talk group”
for each profile.
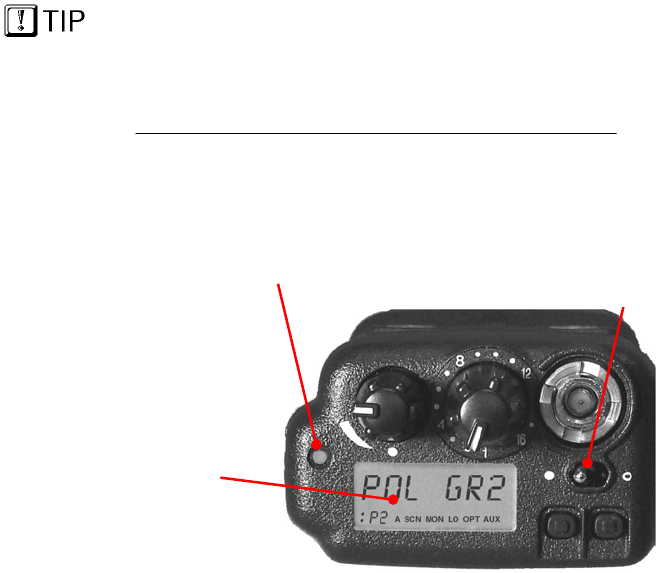
1.) Turn the Profile selector directly to the profile number
of your choice, or browse through the choices until the
talk group you need appears in the Display panel.
Basic Radio Operation – Chapter 5
P800 User’s Manual 64
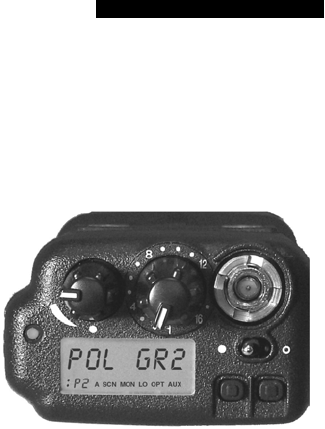
16-Position Profile Selector
Default Talk Grou
p
Active Profile
2.) Your new Active Profile appears in the Status area of
the Display panel. The number following the : symbol
identifies the profile you’ve selected.
3.) The default Talk group for the active profile is
indicated in the Menu display and control area.
4.) Once you’ve dialed a profile, it remains your active
profile selection until you dial another, even if you
turn off your radio. The position of the dial when you
Power On will override the profile selected for you
during the startup sequence.
Basic Radio Operation – Chapter 5
P800 User’s Manual 65
Emergency Communications
Your radio can send out an Alert or place Voice Calls over
the entire network in an emergency. OpenSky handles
Emergency Calls and Alerts with the very highest priority,
giving you and the people you serve access to the help you
need no matter how much traffic the network is handling.
How to Place an Emergency Call
1.) Press the orange Emergency Button on your radio to
send an emergency alert. You’ll find the button just
above the Push-to-Talk button on the left panel (see
the Figure: Left Panel Components).
2.) You’ll hear nothing, but other users will hear the
Emergency Alert signal, a distinctive 3-tone burst of
sound.
3.) At the same time, the network enables an Emergency
Talk Group.
4.) Press the Push-to-Talk button to send your voice out
over the emergency talk group.
5.) All the radios in the Emergency Talk Group will
hear your call and see the emergency talk group
displayed on their radio, overriding any other displays
that may have been active there.
6.) When your emergency ends, your dispatcher must
clear the emergency call.
Basic Radio Operation – Chapter 5
P800 User’s Manual 66

P800 User’s Manual 67
CHAPTER 6
Advanced Radio Operations
Chapter 6
Advanced Radio Operations 67
Fine-Tuning Your Personality 69
Prioritizing a User Group 69
Changing the Scanning Mode 71
Changing the Active Channel 74
Network Operating Mode 75
Locking Out User Groups 75
Troubleshooting 78
Advanced Radio Operations – Chapter 6
P800 User’s Manual 68

Advanced Radio Operations – Chapter 6
P800 User’s Manual 69
Fine-Tuning Your Personality
Access to as many as 16 profiles within your pre-
determined radio personality gives you tremendous
responsiveness to the changing needs of your workday.
What’s more, within each profile, the flexibility of the
IP-protocol OpenSky network makes it possible to
fine-tune your radio’s sensitivity to incoming voice
calls by changing the scanning priority of specific user
groups, changing radio scanning modes and channels,
even locking out the incoming voice calls of entire user
groups.
Prioritizing a User Group
At different times during your shift you may want to
change the Priority Scan Group on your radio. This
determines which talk group will take precedence in
the event that multiple talk groups from your scan list
are simultaneously active.
In the event that the Priority Scan Group is not one of
multiple active talk-groups, the first active is the one
that will be heard.
You may use the procedure below to establish one new
priority scanning group for every profile in your radio
personality. There’s no ranking order in scanning
priority: one group per profile is the priority group; all
other groups in the same profile are “non-priority.”
Priority Scan is
different from Tal
k
Group status. Even i
f
you give a Listen
Group priority scan
status, your Tal
k
Group is still your Tal
k
Group.
Advanced Radio Operations – Chapter 6
P800 User’s Manual 70
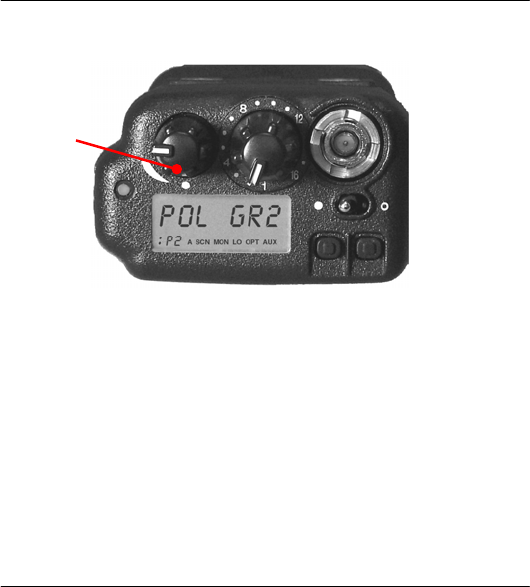
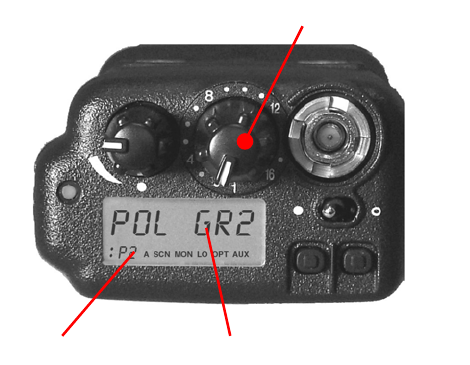
How to Assign Scan Priority to a Group
1.) Turn the Profile selector dial to the profile
containing the user group you wish to prioritize.
When it comes to the screen, each profile is
identified by its profile number and talk group,
which is also the default priority scan group.
2.) Press the right Menu button one time to access
the Priority Scan menu. When you arrive, you’ll
see the Priority indicator P in the Status area.
3.) Use the Selector buttons to scroll through the user
groups in your active profile until you find the
group you want to assign scanning priority.
4.) Stop when your new priority group appears in the
display panel with the Priority Scan indicator.
5.) No further action is required. Your radio assigns
priority status to the group you’ve selected and,
after a short delay, returns to the default screen.
How to Undo your Priority Assignment
If you’ve made a scanning priority assignment in error,
or immediately change your mind, you have a few
seconds to undo your selection before it takes effect.
2.) Immediately press either Menu button.
3.) Your Display panel confirms that you are back in
the Priority Scan menu.
4.) Use either Select button to change your selection.
Talk Grou
p
Profile
Priorit
y
Scan
Priority Scan
Indicato
r
Advanced Radio Operations – Chapter 6
P800 User’s Manual 71
If pressing the Menu button does not launch you back
into the Priority Scan menu, you haven’t acted quickly
enough to Undo your choice. Wait approximately 10
seconds for the selection process to clear the radio,
then press the right Menu button to re-enter the Priority
Scan menu.
Duration of Priority Assignments
If you make no priority assignments during your shift,
each profile selects the talk group as the priority scan
group. When you use the Priority Scan menu to assign
scanning priority to a new group, your assignment
stays in effect until you change it or turn your radio off.
Powering Off erases all scanning priority assignments
and resets your radio to the defaults.
Changing the Scanning Mode
Three scanning modes are available for the P800, but
only one can be active at any time. Changing your
scanning mode changes the way your radio scans voice
calls for all of the profiles in your radio personality.
Your choice of scanning mode will broaden or narrow
the span of your communications with all the listen
groups in your profiles, but does not affect your
interaction with your talk groups.
Your scanning mode choice will stay in effect until you
change it again; even if you turn off your radio, your
current selection will be saved until your next use.
Scan Mode Explanation
No Scanning ......
Full communications (listen and
talk) with your talk group.
No calls from listen groups.
Eliminates distractions.

Advanced Radio Operations – Chapter 6
P800 User’s Manual 72
Scan Mode Explanation
Normal ..............
Scanning
Full communications (listen and
talk) with your talk group.
Receive calls from the listen groups.
This is the default setting. Network
administrator has established this as
the most effective configuration for
everyday use.
Talkback............
Scanning
Full communications (listen and
talk) with your talk group.
Receive calls from the listen groups.
Place voice calls to the most recent
listen group by pressing the Push-
to-talk button before the Talkback
timer expires.
How to Place a Talkback Call
With your radio in Talkback Scanning mode, you can
respond to voice calls from listen groups in your active
profile.
You can’t initiate outgoing voice calls to just any listen
group, but you can immediately respond to any
incoming call by pressing your Press-to-Talk button
before the Talkback timer expires. Your call will go
out only to the most recent listen group you heard.
1.) Set your radio to Talkback Scanning mode.
2.) When you hear an incoming listen group call you
want to respond to, press the Push-to-Talk button.
3.) . . . If you respond before the expiration of the
talkback timer, your call will transmit as a voice
call to the most recent listen group you heard.
4.) . . . If you fail to beat the timer, your call will
transmit to the talk group for your active profile.
5.) . . . If you repeatedly exceed the talkback time
limit, consider asking the network administrator to
extend the time allowed.
Advanced Radio Operations – Chapter 6
P800 User’s Manual 73
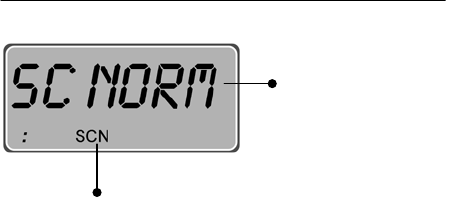
How to Change your Scanning Mode
1.) Press either Menu button until the Scan Menu
appears. The Scan Menu indicator SCN lets you
know you’re in the menu. The Display panel
shows the currently selected Scan mode.
2.) To narrow your scanning list to just the talk group
in your active profile, press either Select button
until SC NONE is displayed.
3.) To select the default scanning mode which scans
all the listen groups in your active profile, press
either Select button until SC NORM is
displayed.
4.) To broaden your communications range by
enabling talkback voice calls to your active listen
groups, press either Select button until SC
TLKB is displayed.
5.) No further action is required. Your radio adjusts to
the new scanning mode and, after a brief delay,
reverts to the default screen.
How to Undo your Scan Mode Selection
If you’ve made a Scanning Mode selection in error, or
immediately change your mind, you have a few
seconds to undo your selection before it takes effect.
1.) Immediately press either Menu button.
2.) Your Display panel confirms that you are back in
the Scan Mode menu.
3.) Use either Select button to change your selection.
Current Scan
Mode Status
Scan Menu
Indicato
r

Advanced Radio Operations – Chapter 6
P800 User’s Manual 74
If the Menu button does not launch you back into the
Scanning Mode menu, you’ve missed the Undo
deadline. Wait approximately 10 seconds for the
selection process to clear the radio, then use the Menu
buttons to re-enter the Priority Scan menu.
Duration of Scanning Mode Selections
Scanning Mode selections survive Power Off. At
startup, your radio will default to the scanning mode of
your last use. Any selection you make during your shift
will remain in effect until you make a new selection
from the Scan Mode menu.
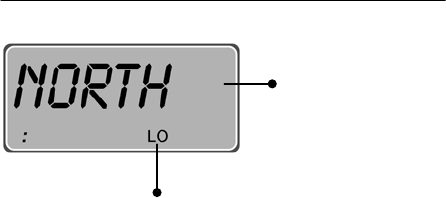
Changing the Active Channel
If your reception is poor or you are repeatedly denied
channel access, you can manually change the radio to a
different channel.
How to Change the Active Channel
1.) Press either Menu button until the Channel
Change Menu appears. The indicator MON lets
you know you’re in the menu. The Display panel
shows the currently selected active Channel.
2.) Press either Select button once or repeatedly to
display alternate channel choices. Stop when you
see a channel you like.
3.) No further action required. Wait while the radio
synchronizes with the new channel.
4.) When synchronization is complete, the display
panel reveals the familiar Active Connection
indicator : in the bottom left corner.
Active
Channel
Channel Menu
Indicato
r
Advanced Radio Operations – Chapter 6
P800 User’s Manual 75
Network Operating Mode
Your P800 operates with the OpenSky Trunked
Protocol (OTP) to provide the full range of features
available on your digital voice and data network.
At the same time, if your agency cooperates with
several others in a multi-agency network supported by
OpenSky’s IP backbone, all agencies benefit from the
advantages of the network architecture whether or not
they’ve migrated from older analog equipment to
digital OpenSky radios.
Locking Out User Groups
There are at least two ways to focus your voice
communications by suppressing calls from listen
groups in your active profile.
By changing your Scanning Mode to No Scan you can
block all non-emergency voice calls from the listen
groups in your profile, concentrating your attention
entirely on your talk group.
Or, by Locking Out selected groups, you can eliminate
just the non-essential communications from being
heard on your radio. This allows you to focus on
scanning resources on just the groups whose calls you
wish to track. Lock Out will block only non-emergency
calls. Emergency Alerts and the voice calls that follow
the alerts will break through your Lock Out command.
Groups You Can Lock Out
It stands to reason that only groups in your active
profile can be locked out, since they’re the only groups
whose voice calls you’ll hear. The Lockout menu
responds to your incoming voice call activity, loading
the names of calling groups into the menu as the calls
are received.
If you don’t find a name you’re looking for in the
Lockout menu, either it’s not in your active profile, or
you haven’t received a call from that group yet in this

Advanced Radio Operations – Chapter 6
P800 User’s Manual 76
radio session. Until you do take a call from that group,
you can’t lock them out.
How to Lock Out a Listen Group
1.) Press either Menu button until the Lockout Menu
appears. The indicator LO lets you know you’re in
the menu. The Display panel shows one of the user
groups from which you’ve received voice calls.
2.) If the message NONE appears in the panel, you
haven’t received any voice messages yet from the
user groups in your active profile. Until you do,
you won’t be able to lock them out.
User Group from
Active Profile
Lockout Menu
Indicator
Advanced Radio Operations – Chapter 6
P800 User’s Manual 77
3.) If the name of a User Group appears in the panel,
use the Upper Select Button to scroll through the
menu of user groups you can lockout. (The lower
Select button is reserved for another use in this
procedure).
4.) Press the Lower Select Button to Lockout calls
from a user group displayed in the panel.
5.) To return to the Menu for more Lockouts, press
either Menu button immediately, then repeat Steps
3 and 4.
6.) If pressing the Menu button doesn’t bring back the
Lockout display, your radio is busy with the
Lockout procedure. Wait about 10 seconds for the
Menu to return to the screen.

Advanced Radio Operations – Chapter 6
P800 User’s Manual 78
Troubleshooting
If your radio does not operate properly, check the chart
below for likely causes. For additional assistance,
contact a qualified service technician.
Symptom Cause Solution
Radio will not
turn on
Low battery. Install a fully charged
battery pack.
No audio Speaker volume is muted. Increase the volume level.
Poor audio You are in a poor coverage
area or not on the network
Move to a better coverage
area.
Poor audio Antenna connection is
loose.
Reseat the antenna in the
top panel connector
Failed
Registration
Wrong User ID/ password
or ID not approved
Send to Network
Administrator for new
User ID and/or password.
Missed Call Scanning not enabled Enable scan mode
Unable to
Respond to a
Call
Talkback scanning not
enabled
Enable talkback scan
Advanced Radio Operations – Chapter 6
P800 User’s Manual 79