HARRIS TR-378-A2 Cellular/PCS Portable Terminal User Manual exhibit 8
HARRIS CORPORATION Cellular/PCS Portable Terminal exhibit 8
HARRIS >
exhibit 8
0RELOH3KRQH
5G
4XDGPRGH
%URZVHUIRU&'3'1HWZRUNVDQG
'XDOEDQG7ULPRGH
IRU7'0$6\VWHPV
8VHU·V*XLGH
$

5HJLVWHU\RXUQHZSKRQHSXUFKDVH(ULFVVRQRULJLQDODFFHVVRULHV
DQGVHHWKHODWHVWLQSURGXFWVE\YLVLWLQJXVDWKWWSZZZHULFVVRQFRPXVFRQVXPHU

Document Conventions . . . . . . . . . . . . . . . . . 1
Guidelines for Safe and Efficient Use . . . . . . 2
Safety . . . . . . . . . . . . . . . . . . . . . . . . . . . . . . . . . . . . . . . . . .2
Exposure to Radio Frequency Signals . . . . . . . . . . . . . . .2
Antenna Care . . . . . . . . . . . . . . . . . . . . . . . . . . . . . . . . .2
Phone Operation . . . . . . . . . . . . . . . . . . . . . . . . . . . . . .2
Driving . . . . . . . . . . . . . . . . . . . . . . . . . . . . . . . . . . . . .3
Electronic Devices . . . . . . . . . . . . . . . . . . . . . . . . . . . . .3
Aircraft . . . . . . . . . . . . . . . . . . . . . . . . . . . . . . . . . . . . .4
Blasting Areas . . . . . . . . . . . . . . . . . . . . . . . . . . . . . . . .4
Potentially Explosive Atmospheres . . . . . . . . . . . . . . . . .4
For Vehicles Equipped with an Air Bag . . . . . . . . . . . . .4
Product Care and Operation . . . . . . . . . . . . . . . . . . . . . . . .5
Battery Information . . . . . . . . . . . . . . . . . . . . . . . . . . . . . . .5
Getting Started. . . . . . . . . . . . . . . . . . . . . . . . . 7
Connecting and Removing Your Battery . . . . . . . . . . . . . . .7
Charging Your Battery . . . . . . . . . . . . . . . . . . . . . . . . . . . . .7
Your Charger . . . . . . . . . . . . . . . . . . . . . . . . . . . . . . . . .7
Learning About Your Mobile Phone. . . . . . . 10
Highlights of Your Phone . . . . . . . . . . . . . . . . . . . . . . . . .10
Data Operation . . . . . . . . . . . . . . . . . . . . . . . . . . . . . .10
Voice Operation . . . . . . . . . . . . . . . . . . . . . . . . . . . . . .10
The Parts of Your Phone . . . . . . . . . . . . . . . . . . . . . . . . . .11
Turning Your Phone On and Off . . . . . . . . . . . . . . . . . . .11
Operating Your Phone . . . . . . . . . . . . . . . . . . . . . . . . . . . .11
Voice . . . . . . . . . . . . . . . . . . . . . . . . . . . . . . . . . . . . . .11
Wireless/IP . . . . . . . . . . . . . . . . . . . . . . . . . . . . . . . . . .12
Browser . . . . . . . . . . . . . . . . . . . . . . . . . . . . . . . . . . . .12
Changing from Voice to Browser Operation . . . . . . . . . . .12
Voice Operation. . . . . . . . . . . . . . . . . . . . . . . 14
Your Display in Voice Operation . . . . . . . . . . . . . . . . . . . .14
Accessing Menus . . . . . . . . . . . . . . . . . . . . . . . . . . . . . . . .15
Voice Operation Display Messages . . . . . . . . . . . . . . . . . .15
Making Calls . . . . . . . . . . . . . . . . . . . . . . . . . . . . . . . .16
Using Your Phonebook . . . . . . . . . . . . . . . . . . . . . . . .17
Answering Calls . . . . . . . . . . . . . . . . . . . . . . . . . . . . . .18
Phone Groups . . . . . . . . . . . . . . . . . . . . . . . . . . . . . . .19
Low Battery Power Alert . . . . . . . . . . . . . . . . . . . . . . .19
International Calls . . . . . . . . . . . . . . . . . . . . . . . . . . . .19
Voice Operation Key Functions . . . . . . . . . . . . . . . . . . . . .20
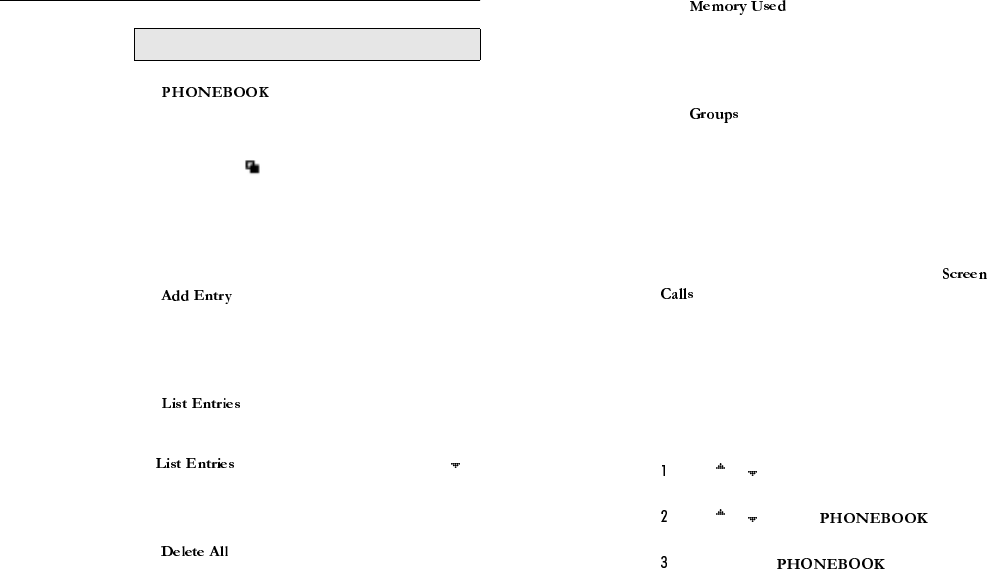
Phonebook Menu . . . . . . . . . . . . . . . . . . . . . . . . . . . . . . .21
Add Entry . . . . . . . . . . . . . . . . . . . . . . . . . . . . . . . . . .21
Table of Contents
List Entries . . . . . . . . . . . . . . . . . . . . . . . . . . . . . . . . . 21
Delete All Entries . . . . . . . . . . . . . . . . . . . . . . . . . . . . 21
Entries Used . . . . . . . . . . . . . . . . . . . . . . . . . . . . . . . . 21
Groups . . . . . . . . . . . . . . . . . . . . . . . . . . . . . . . . . . . . 21
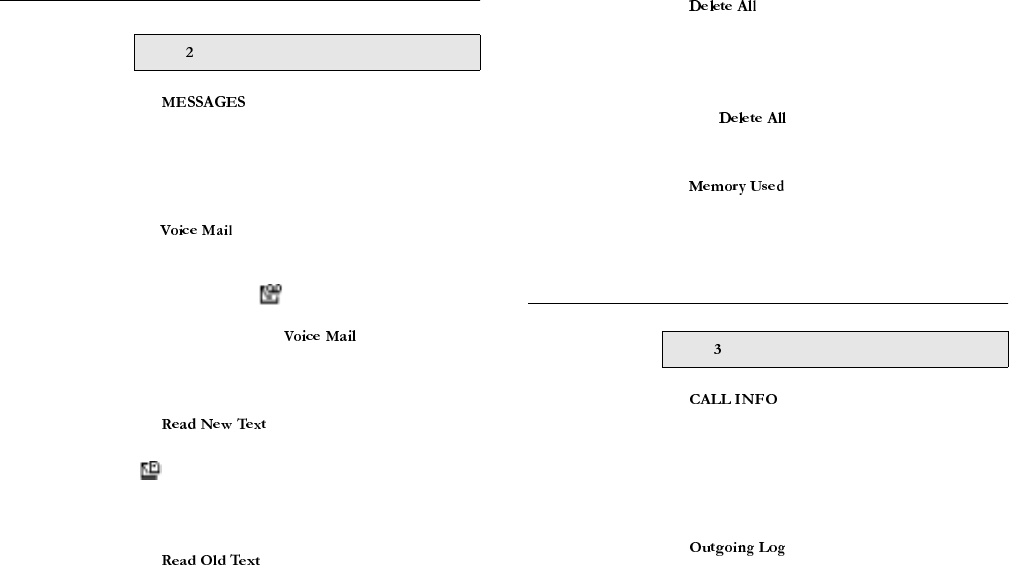
Messages Menu . . . . . . . . . . . . . . . . . . . . . . . . . . . . . . . . . 23
Voice Mail . . . . . . . . . . . . . . . . . . . . . . . . . . . . . . . . . 23
Read New Text . . . . . . . . . . . . . . . . . . . . . . . . . . . . . . 23
Read Old Text . . . . . . . . . . . . . . . . . . . . . . . . . . . . . . 23
Delete All . . . . . . . . . . . . . . . . . . . . . . . . . . . . . . . . . . 23
Memory Used . . . . . . . . . . . . . . . . . . . . . . . . . . . . . . . 23
Call Info Menu . . . . . . . . . . . . . . . . . . . . . . . . . . . . . . . . . 23
Outgoing Calls . . . . . . . . . . . . . . . . . . . . . . . . . . . . . . 23
Incoming Calls . . . . . . . . . . . . . . . . . . . . . . . . . . . . . . 24
Clear Lists . . . . . . . . . . . . . . . . . . . . . . . . . . . . . . . . . . 24
Call Timer . . . . . . . . . . . . . . . . . . . . . . . . . . . . . . . . . 24
Total Calls . . . . . . . . . . . . . . . . . . . . . . . . . . . . . . . . . 24
Settings Menu . . . . . . . . . . . . . . . . . . . . . . . . . . . . . . . . . . 24
Sounds . . . . . . . . . . . . . . . . . . . . . . . . . . . . . . . . . . . . 24
Screened Calls . . . . . . . . . . . . . . . . . . . . . . . . . . . . . . . 25
Restricted Calls . . . . . . . . . . . . . . . . . . . . . . . . . . . . . . 25
Security . . . . . . . . . . . . . . . . . . . . . . . . . . . . . . . . . . . . 25
Call Options . . . . . . . . . . . . . . . . . . . . . . . . . . . . . . . . 26
My Number . . . . . . . . . . . . . . . . . . . . . . . . . . . . . . . . 28
Networks . . . . . . . . . . . . . . . . . . . . . . . . . . . . . . . . . . 28
Backlight . . . . . . . . . . . . . . . . . . . . . . . . . . . . . . . . . . . 30
Clock . . . . . . . . . . . . . . . . . . . . . . . . . . . . . . . . . . . . . 30
Language . . . . . . . . . . . . . . . . . . . . . . . . . . . . . . . . . . . 31
Profiles Menu . . . . . . . . . . . . . . . . . . . . . . . . . . . . . . . . . . 31
Activate . . . . . . . . . . . . . . . . . . . . . . . . . . . . . . . . . . . . 31
Setup . . . . . . . . . . . . . . . . . . . . . . . . . . . . . . . . . . . . . . 31
Auto Activate . . . . . . . . . . . . . . . . . . . . . . . . . . . . . . . 31
Reset Profile . . . . . . . . . . . . . . . . . . . . . . . . . . . . . . . . 31
Browser Operation . . . . . . . . . . . . . . . . . . . . 34
Features . . . . . . . . . . . . . . . . . . . . . . . . . . . . . . . . . . . . . . . 34
Browser . . . . . . . . . . . . . . . . . . . . . . . . . . . . . . . . . . . . 34
Net User’s Guide . . . . . . . . . . . . . . . . . . . . . . . . . . . . . 34
Soft keys . . . . . . . . . . . . . . . . . . . . . . . . . . . . . . . . . . . 34
Scrolling . . . . . . . . . . . . . . . . . . . . . . . . . . . . . . . . . . . 34
Time/Date . . . . . . . . . . . . . . . . . . . . . . . . . . . . . . . . . 34
TEGIC T9® Text Entry . . . . . . . . . . . . . . . . . . . . . . . 34
Configuring Your Browser . . . . . . . . . . . . . . . . . . . . . . . . 35
Entering the Network Settings Submenu . . . . . . . . . . 35
Configuring the NEI . . . . . . . . . . . . . . . . . . . . . . . . . . 35
Configuring the Browser Gateway . . . . . . . . . . . . . . . . 36
Launching Your Browser . . . . . . . . . . . . . . . . . . . . . . . . . . 36
Making Phone Calls in Browser Operation . . . . . . . . . . . . 37
Web Content/Abilities . . . . . . . . . . . . . . . . . . . . . . . . . . . 37
Email . . . . . . . . . . . . . . . . . . . . . . . . . . . . . . . . . . . . . . 37
Calendar . . . . . . . . . . . . . . . . . . . . . . . . . . . . . . . . . . . 37
Contact List . . . . . . . . . . . . . . . . . . . . . . . . . . . . . . . . 37
The World . . . . . . . . . . . . . . . . . . . . . . . . . . . . . . . . . 37
Browser Menu . . . . . . . . . . . . . . . . . . . . . . . . . . . . . . . . . . 37
Home Page . . . . . . . . . . . . . . . . . . . . . . . . . . . . . . . . . 37
Voice Operation . . . . . . . . . . . . . . . . . . . . . . . . . . . . .38
Set Bookmark . . . . . . . . . . . . . . . . . . . . . . . . . . . . . . .38
Large Text/Small Text . . . . . . . . . . . . . . . . . . . . . . . . .38
Show URL . . . . . . . . . . . . . . . . . . . . . . . . . . . . . . . . . .38
Page Help . . . . . . . . . . . . . . . . . . . . . . . . . . . . . . . . . .38
Clear History . . . . . . . . . . . . . . . . . . . . . . . . . . . . . . . .38
Local Settings . . . . . . . . . . . . . . . . . . . . . . . . . . . . . . . .38
Browser Operation Key Functions . . . . . . . . . . . . . . . .39
Wireless/IP Operation . . . . . . . . . . . . . . . . . . 40
Your Display in Wireless/IP Operation . . . . . . . . . . . . . . .40
Computer Setup in Wireless/IP Operation . . . . . . . . . . . .40
Wireless/IP Operation Key Functions . . . . . . . . . . . . . . . .41
Problem Solving . . . . . . . . . . . . . . . . . . . . . . 43

Document Conventions 1
Menu names are shown in the following
typeface: .
Submenu names are shown in the following type-
face:
Keys names are shown in the following typeface:
BACK.
Text that is seen in the phone’s display is shown in
the following typeface: displays.
When this guide instructs you to press a key, press
and release the key.
When this guide instructs you to press and hold a
key, press and hold the key for one to two seconds.
Press the down arrow when you see this symbol ( ).
Press the up arrow when you see this symbol ( ).
Document Conventions
The quick access shortcuts to your phone’s menu
and settings are identified with this shaded box.

2Guidelines for Safe and Efficient Use
Since its introduction in the mid 1980s the mobile
phone is one of the most exciting and innovative
products ever developed. Your phone can help you to
stay in touch with your office, your home, emergency
services and others.
Safety
Exposure to Radio Frequency Signals
Your wireless handheld portable telephone is a low
power radio transmitter and receiver. When it is ON, it
receives and also sends out radio frequency (RF) signals.
In August, 1996, the Federal Communications Com-
mission (FCC) adopted RF exposure guidelines with
safety levels for handheld wireless phones. Those guide-
lines are consistent with the safety standards previously
set by both US and international standards bodies:
ANSI C95.1 (1992)*
NCRP Report 86 (1986)*
ICNIRP (1996)*
Those standards were based on comprehensive and peri-
odic evaluations of the relevant scientific literature. For
example, over 120 scientists, engineers, and physicians
from universities, government health agencies, and
industry reviewed the available body of research to
develop the ANSI Standard (C95.1).
The design of your phone complies with the FCC guide-
lines (and those standards).
* American National Standards Institute: National Coun-
cil on Radiation Protection and Measurements; Interna-
tional Commission on Non-Ionizing Radiation Protection.
Antenna Care Use only the supplied or an approved replacement
antenna. Unauthorized antennas, modifications, or
attachments could damage the phone and may violate
FCC regulations.
Phone Operation
NORMAL POSITION: Hold the phone as you would
any other telephone with the antenna pointed up and
over your shoulder.
TIPS ON EFFICIENT OPERATION: For your phone
to operate most efficiently:
Extend your antenna fully (where applicable).
Do not touch the antenna unnecessarily when the
phone is in use. Contact with the antenna affects
call quality and may cause the phone to operate at a
higher power level than otherwise needed.
Guidelines for Safe and Efficient Use

Guidelines for Safe and Efficient Use 3
Driving Check the laws and regulations on the use of wireless
telephones in the areas where you drive. Always obey
them. Also, if using your phone while driving, please:
Give full attention to driving - driving safely is your
first responsibility.
Use handsfree operation, if available.
Pull off the road and park before making or answer-
ing a call if driving conditions so require.
In addition, Ericsson suggests the following safe driving
tips if you are using your phone while driving:
Get to know your wireless phone and its features
such as speed dial and redial.
Position your wireless phone
within easy reach.
Suspend conversations during
hazardous driving conditions or
situations.
Do not take notes or look up
phone numbers while driving.
Dial sensibly and assess the traffic; if possible, place
calls when you are not moving or before pulling
into traffic.
Do not engage in stressful or emotional conversa-
tions that may be distracting.
Use your wireless phone to call for help.
Use your wireless phone to help others in emergen-
cies.
Call roadside assistance or a special wireless non-
emergency assistance number when necessary.
Electronic Devices
Most modern electronic equipment is shielded from RF
signals. However, certain electronic equipment may not
be shielded against RF signals from your wireless phone.
Pacemakers
The Health Industry Manufacturers Association recom-
mends that a minimum separation of six (6”) inches be
maintained between a handheld wireless phone and a
pacemaker to avoid potential interference with the pace-
maker. These recommendations are consistent with the
independent research by and recommendations of Wire-
less Technology Research.
Persons with pacemakers:
Should ALWAYS keep the phone more than six
inches from their pacemaker when the phone is
turned ON.
Should not carry the phone in a breast pocket.
Should use the ear opposite the pacemaker to mini-
mize the potential for interference.
If you have any reason to suspect that interference is
taking place, turn your phone OFF immediately.
Hearing Aids
Some digital wireless phones may interfere with some
hearing aids. In the event of such interference, you may
4Guidelines for Safe and Efficient Use
want to consult your service provider (or call the cus-
tomer service line to discuss alternatives).
Other Medical Devices
If you use any other personal medical device, consult the
manufacturer of your device to determine if it is ade-
quately shielded from external RF energy. Your physi-
cian may be able to assist you in obtaining this
information.
Turn your phone OFF in health care facilities when any
regulations posted in these areas instruct you to do so.
Hospitals or health care facilities may be using equip-
ment that could be sensitive to external RF energy.
Vehicles
RF signals may affect improperly installed or inade-
quately shielded electronic systems in motor vehicles.
Check with the manufacturer or its representative
regarding your vehicle. You should also consult the man-
ufacturer of any equipment that has been added to your
vehicle.
Posted Facilities
Turn your phone OFF in any facility where posted
notices so require.
Aircraft FCC regulations prohibit using your phone while in the
air. Switch OFF your phone before boarding an aircraft.
Blasting Areas To avoid interfering with blasting operations, turn your
phone OFF when in a “blasting area” or in areas posted:
“Turn off two-way radio.” Obey all signs and instruc-
tions.
Potentially Explosive Atmospheres
Turn your phone OFF when in any area with a poten-
tially explosive atmosphere and obey all signs and
instructions. Sparks in such areas could cause an explo-
sion or fire resulting in bodily injury or even death.
Areas with a potentially explosive atmosphere are often
but not always clearly marked. They include fueling
areas such as gasoline stations; below deck on boats; fuel
or chemical transfer or storage facilities; vehicles using
liquefied petroleum gas (such as propane or butane);
areas where the air contains chemicals or particles, such
as grain, dust, or metal powders; and any other area
where you would normally be advised to turn off your
vehicle engine.
For Vehicles Equipped with an Air Bag
An air bag inflates with great force. DO NOT place
objects, including both installed or portable wireless
equipment, in the area over the air bag or in the air bag
deployment area. If in-vehicle wireless equipment is
improperly installed and the air bag inflates, serious
bodily injury could result.

Guidelines for Safe and Efficient Use 5
Product Care and Operation
Ericsson suggests you read and observe the following for
safe care and operation of your phone:
Do not allow children to play with your phone.
They could hurt themselves or others, or could acci-
dentally damage the phone. Your phone may con-
tain small parts that could be detached and create a
choking hazard.
Do not expose your mobile phone to moisture or
extreme temperatures.
Only Ericsson original accessories are recom-
mended. Failure to use them may result in loss of
performance or product damage, and will void the
warranty.
Do not attempt to disassemble the product. Doing
so will void warranty. This product does not con-
tain consumer serviceable components. Service
should only be performed by Authorized Service
Centers.
Do not allow objects to fall on, or liquids to spill on
products.
Connect AC (power supply) only to designated
power sources as marked on the product.
To reduce risk of damage, remove the electrical cord
from the outlet by pulling the AC adapter at the
outlet rather than the cord.
Make sure the electric cord is located so that it will
not be stepped on, tripped over, or otherwise sub-
jected to damage or stress.
To reduce risk of electric shock, unplug the unit
from the power source before attempting any clean-
ing. Once unplugged, use a soft cloth lightly damp-
ened with water for cleaning.
DANGER - Never alter the AC cord or plug. If the
plug will not fit into the outlet, have a proper outlet
installed by a qualified electrician. Improper con-
nection can result in risk of electric shock.
Don’t twist the antenna. Excess twisting will dam-
age the antenna.
Battery Information
New Batteries
The battery packaged with your phone is not fully
charged. For maximum battery capacity, use your
charger to condition the battery.
Recycling Your Battery
Your phone manufacturer is a member of the Recharge-
able Battery Recycling Corporation (RBRC), a non-
profit service organization designed to assist in the recy-
cling of rechargeable batteries. Many areas require the
recycling of rechargeable batteries. In the U.S., call 1-
800-822-8837 to find out how to recycle your battery.

6Guidelines for Safe and Efficient Use
Outside the U.S., contact your local retailer for recycling
instructions.
Battery Use and Care
A rechargeable battery has a long service life if treated
properly. A new battery, or one that has not been used
for a long period of time, should be conditioned before
using your phone. Avoid recharging a fully-charged or
almost fully-charged battery. If your phone shuts off due
to low battery power, you should charge the battery
within 24 hours for the battery to reach full capacity.
Do not leave your battery where it may be sub-
jected to extremely hot or cold temperatures. This
could reduce the battery’s capacity.
Do not let the metal contacts on the battery touch
another metal object such as keys in your pocket.
This could short-circuit and damage the battery.
Do not attempt to take a battery apart.
Do not expose a battery to open flame. This could
cause the battery to explode.
Turn your phone OFF before removing the battery.
Use only the AC/DC adapter supplied with your
battery charger. Using a different adapter could be
dangerous and will void your phone warranty.
Never charge a battery when the ambient room
temperature is below 50° F (10°C) or above 105°F
(40°C).
Do not allow the battery to be placed into the
mouth. Battery electrolytes may be toxic if swal-
lowed.
Getting Started 7
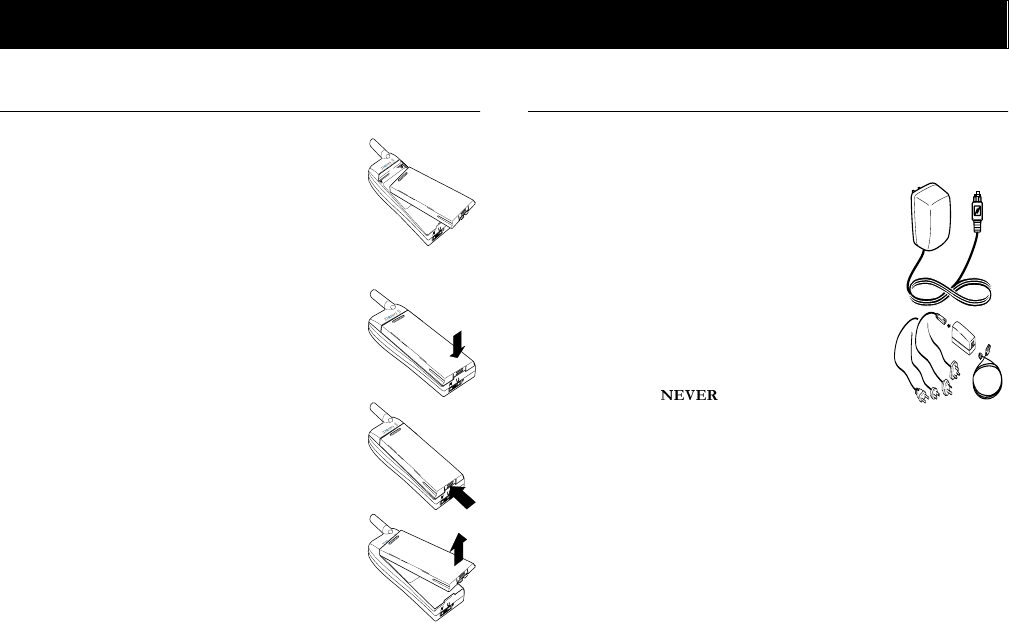
Connecting and Removing Your Battery
1 Place the battery over the back of
the phone. The label on the battery
should face down. Insert the top
portion of the battery into the
phone. The tab on the bottom of
the battery should be pointing
toward the bottom of the phone.
2 Press down until you hear a click.
The battery is now connected.
3 Remove the battery by pushing in
on the tab of the battery with your
thumb.
4 Then, lift the battery up and out of
the battery cavity.
Charging Your Battery
Your Charger Your phone was packaged with
either a rapid or travel charger. It is
important that you fully charge
your battery before you use your
phone. Both chargers supply
power to charge your battery while
the battery is attached to your
phone. If your phone is On, it can
receive calls while using either
charger.
Note! attach the charger to a
phone that does not have a battery
installed.
1 If you have a rapid charger, plug the charger into a
standard wall electrical outlet. If you have a travel
charger, connect the appropriate AC power cord and
phone charging cord to the travel charger.
2 Hold the phone with the display and keypad facing
up.
Getting Started
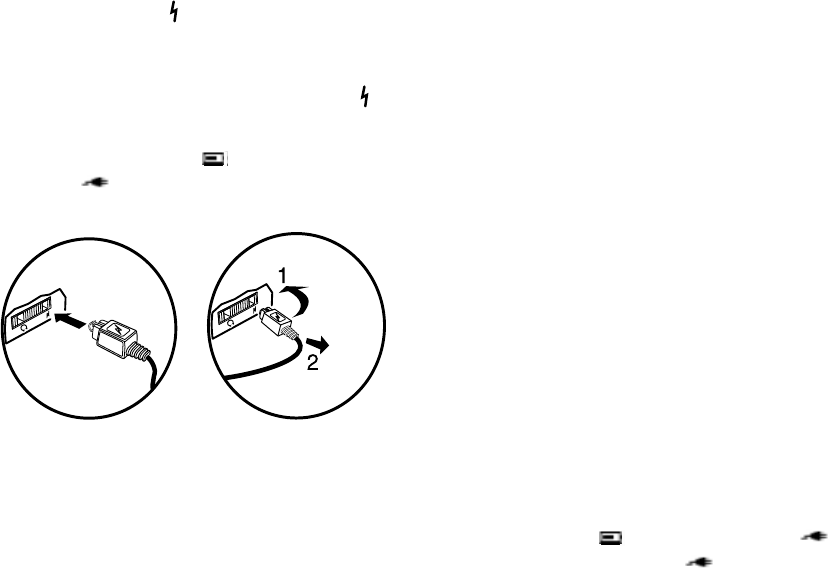
8Getting Started
3 Hold the small plug on the charger cord so the light-
ning bolt symbol ( ) is up.
4 Align the small plug on the charger cord with the con-
nector on the bottom of your phone. The connector
on the phone is above the lightning bolt symbol ( ).
5 Press the plug into the connector until the plug
“snaps” into place. The icon is alternated with
the icon.
Note! Do not twist while inserting or removing the small plug
on the charger cord!
6 Continue charging the phone until the battery is fully
charged.
7 To disconnect the charger, lift the plug connected to
the phone upwards and pull it out.
Charge-Only Mode
If your phone is off, attaching the charger will cause the
phone to activate in charge-only mode. When this mode
is activated the message Charging Only appears in
the display. Your phone is now fast (rapid) charging the
battery. When your phone is fully charged, Battery
Charged appears in the display.
Note! You cannot make or receive calls when your phone is in
charge-only mode.
Slow (Trickle) Charging a Deeply
Discharged Battery
The battery may become deeply discharged (for exam-
ple, when the battery is stored for a long period). As a
result, the phone may not immediately activate charge-
only mode when the charger is connected.
1 Attach the charger to the phone for several hours to
slowly charge (trickle charge) the battery.
2 After trickle charging the battery for several hours the
phone should activate the charge-only mode automati-
cally.
3 Continue charging the phone until the battery is fully
charged.
Note! If the phone is powered On and the phone is charging,
the icon is alternated with the icon. When
fully charged, the icon remains constant.
Getting Started 9
Note! If the phone is in charge-only mode, Battery
Charged appears in the display when the battery is
fully charged.

Learning About Your Mobile Phone 10
Your Ericsson mobile phone features quad-mode tech-
nology. For voice operation, it operates in three modes -
two Digital ( ) modes (800 and 1900 MHz frequency
bands) and one Analog ( ) mode (800 MHz range).
The fourth mode of operation is built-in Cellular Digital
Packet Data (CDPD). The built-in UP.browser allows
you to access a world of information on the Internet.
Highlights of Your Phone
Data Operation UP.Browser version 3.1 for sending/receiving email
and for Internet access
Wireless/IP Connection
Email creation with Tegic T9®
Email response with EZReply®
Server based Contact, Calendar, and To Do Lists
Secure HDML page capability
Application support for Phonebook and Ring Mel-
ody download
Bookmark creation
Voice Operation 25 Ring types (with musical melody ring options)
Caller number ID (last 40 numbers)
Quick call-back feature to respond to text messages
Storage for 400 numbers in the phonebook
Speed dial for 99 numbers including voice mail
Super dial for 9 numbers including voice mail
Dialing for 2 different calling cards
Quick access to the last 40 numbers dialed
Receives SMS messages with 2KB of storage
Quick access to voice mail service
Digital voice encryption
Clock functions
Call duration reminder
Time and date
Stopwatch
Alarm
Profiles
Groups
Call Screening
Call Restrictions
User-customizable greeting
Learning About Your Mobile Phone
11 Learning About Your Mobile Phone
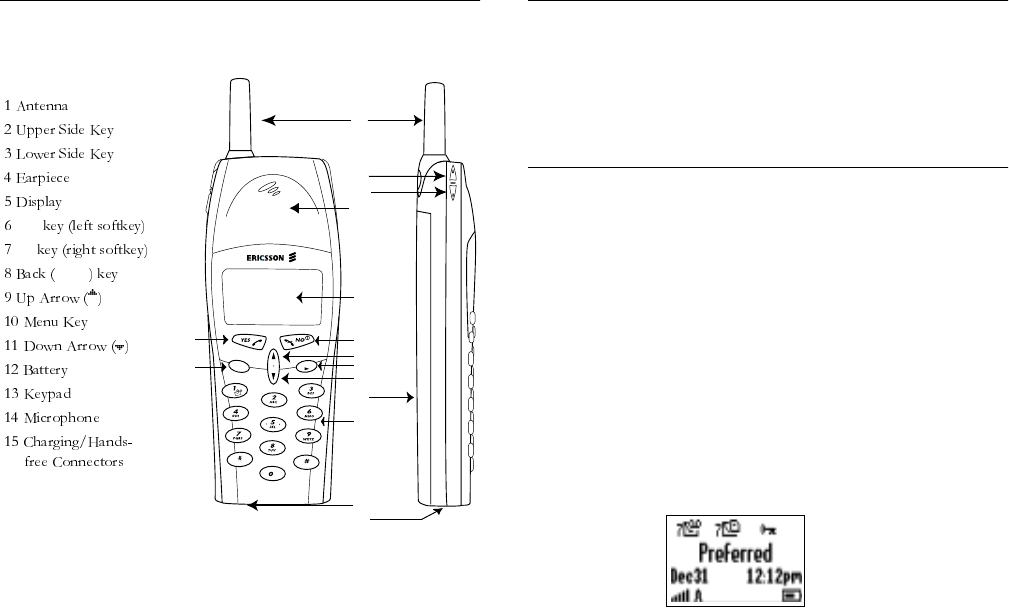
The Parts of Your Phone
The following is a list of the terms used in this user’s
guide to describe your Ericsson mobile phone:
Turning Your Phone On and Off
Turn your phone Off by pressing and holding NO until
your phone sounds a beep and turns off. Turn your
phone On by pressing and holding NO until your phone
sounds a beep and turns on.
Operating Your Phone
Your phone has three distinct forms of operation. In
Voice Operation, you can make or receive calls, and
work with your messages. Voice Operation offers you all
of the options of a traditional cellular telephone. In
Wireless/IP Operation, you can use your phone with
your laptop or desktop computer to browse the Internet,
displaying web content on your computer screen, much
like browsing on a LAN. Browser Operation allows you
to browse the Internet via the CDPD network. You are
able to view web content on your Ericsson mobile
phone.
Voice When you see the following screen, your phone is ready
to make and receive voice calls.
YES
NO
BACK
MENU
1
2
3
4
5
67
11
13
14
15
810
9
12
BACK
a|A ,?!

Learning About Your Mobile Phone 12
For more information about Voice operation, see the
chapter titled "Voice Operation."
Wireless/IP You can use your phone in Wireless/IP Operation when
it is powered on with the cable attached from your
phone to your computer. You can operate your phone as
a Wireless/IP device when you see the following standby
screen.
For more information about Wireless/IP Operation, see
the chapter titled "Wireless/IP Operation."
Browser Your can use your phone as an Internet Browser. Your
home page typically includes Email, Calendar, and Con-
tacts. An example Home Page is shown below.
For more information on Browser Operation, see the
chapter titled "Browser Operation."
Changing from Voice to Browser Operation
There are two easy ways to switch between Voice and
Browser:
1 Press and hold the MENU key.
2 Select the menu tab:
Press MENU.
Press or until is selected.
Press YES.
Note! The factory default setting for your phone’s power-on
option is Voice operation.
To change from Voice Operation to Wireless/IP Opera-
tion, see the chapter titles "Wireless/IP Operation."
13 Learning About Your Mobile Phone
Voice Operation 14
In voice operation, you are able to make and receive tele-
phone calls; work with your voice mail and voice mail
messages; change your phone’s voice settings; add, edit,
or delete entries from your phonebook; and make credit
card calls.
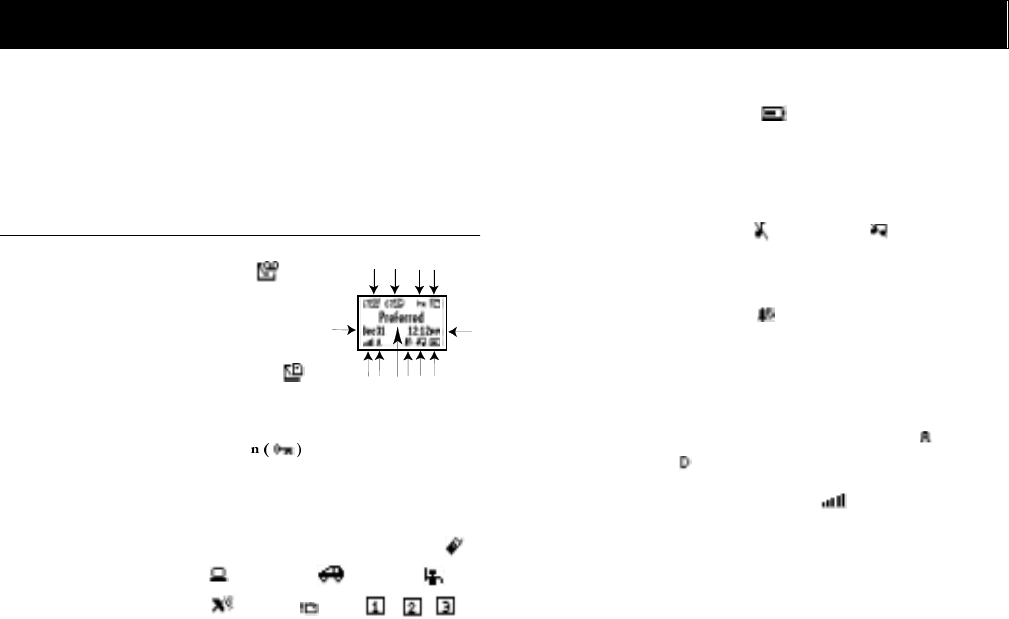
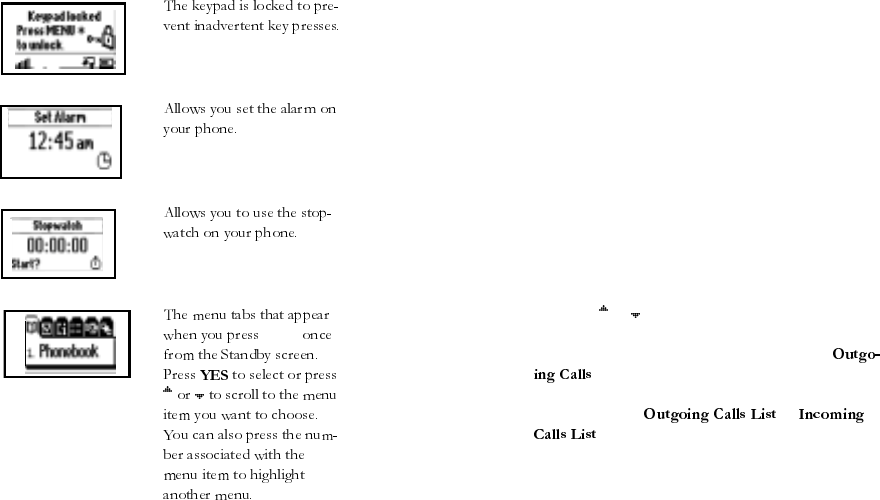
Your Display in Voice Operation
1 Voice Mail Icon ( )
indicates the number of
voice mail messages that
have not been read.
2 New Text Mail Icon ( )
indicates the number of text messages that have not
been read.
3 Keypad Lock Ico indicates that pressing the
keys on the keypad has no effect. This eliminates the
possibility of accidentally pressing keys.
4 Active Profile Icon indicates the currently-selected
profile. The other profile icons include Normal ( ),
Data/Fax ( ), Handsfree ( ), Meeting ( ),
Weekend ( ), Travel ( ), and , , .
5 Current Time is displayed.
6 Battery Icon ( ) shows the relative strength of your
battery. A full icon indicates a fully-charged battery. If
the phone is connected to external power and the bat-
tery is charging, the display will alternate between cur-
rent battery capacity level and the external power.
7 Ringer Off ( )/Silent Mode ( ) Icon indicates
that your phone will not make any keypad or ringing
sounds.
8 Alarm Icon ( ) appears if the alarm is set.
9 Standby Screen indicates that the phone is in standby
mode and is ready for use. The text lable for your cur-
rent network is displayed.
10 Analog/Digital Channel Indicator shows that the
phone is currently operating in analog ( ) or digital
() mode.
11 Signal Strength Icon ( ) shows the relative signal
strength from the wireless system. More bars indicate a
stronger signal.
12 Current Date is displayed.
Voice Operation
1234
5
6
7
8
9
10
11
12
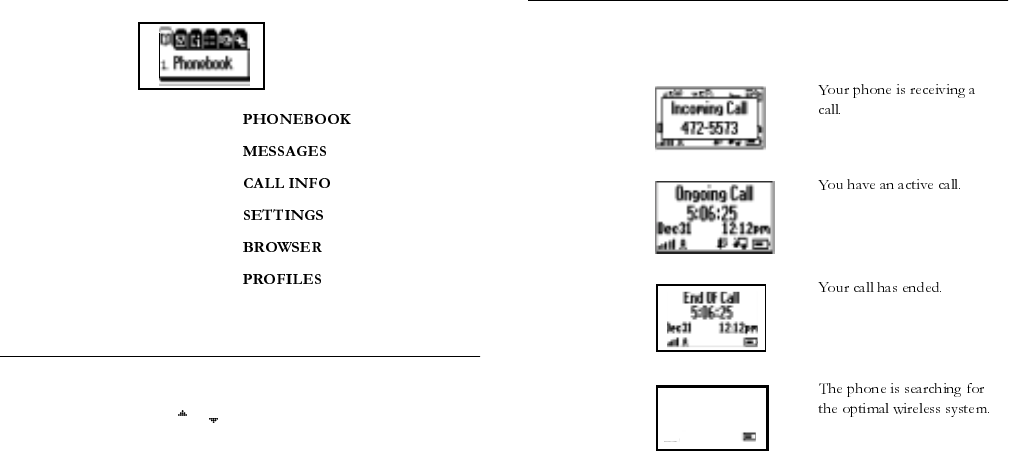
15 Voice Operation
The main menu has six icons that display the top-level
menu options. The corresponding option title of the
selected option is displayed below the menu tabs when
highlighted. Each menu is represented by an icon.
Option 1 is the menu.
Option 2 is the menu.
Option 3 is the menu.
Option 4 is the menu.
Option 5 is the menu.
Option 6 is the menu.
Accessing Menus
Press MENU to access the menus:
1 Press or to scroll through menus, functions in
menus, and settings in a function.
2 Press YES to choose the menu, function, or setting that
is selected.
3 Press NO to go back one level in the menu structure.
4 Press BACK to exit the menus completely.
Voice Operation Display Messages
The following are common display messages on your
mobile phone:
Voice Operation 16
Making Calls 1 Enter the phone number you want to call by pressing
the numeric keys. The number is shown in the display.
Note! You can press BACK to erase one or more digits in the
display, or press and hold BACK to erase all digits.
2 Press YES. Calling is shown in the display while
your phone accesses the wireless network.
3 When the call is connected, Ongoing Call will dis-
play on your screen. The phone number that you
dialed will remain on your screen.
4 When you finish your conversation, press NO.
Redialing the Last Number You Called
Your telephone temporarily stores numbers you have
previously called. To view these numbers, press YES
from the Standby screen when no other digits are int he
display. The last number you called is shown in the dis-
play. Press or to scroll through the other numbers.
You can place a call to a number shown in the display by
pressing YES. You can delete a number from the
by pressing BACK and by pressing YES to con-
firm deletion of the number. You can save a phone
number from the or
by pressing and holding YES while the num-
ber is shown in the display.
Stop and Pause Dialing
Stop and pause dialing lets you enter groups of numbers
with stops and pauses between each group of numbers.
This feature is useful when you need to dial a phone
number and then another number, such as an access
number for an answering machine or voice mail system.
MENU
17 Voice Operation
A stop causes the phone to stop transmitting numbers
until you press YES. You can enter a stop in a series of
digits by pressing and holding # until is shown in the
display. A pause temporarily suspends transmitting
numbers for approximately two seconds before sending
the next series. You can enter a pause in a series of digits
by pressing and holding * until is shown in the dis-
play. For example, if your office has a voice mail system
that requires you to dial a phone number, followed by
your extension, followed by an access code, you could
enter the following: 555-1111 2222 33333.
When you press YES, your phone dials the number and
then stops transmitting tones. When your voice mail
system asks for your extension you would press YES to
transmit your extension. The access code is sent after the
pause. If the timing in your voice mail system does not
allow for pauses, you can enter a stop instead of the
pause, or use multiple pauses.
You can also store groups of numbers which can include
stops and pauses in a phonebook location. You can then
dial the numbers by entering the phonebook location
and pressing YES.
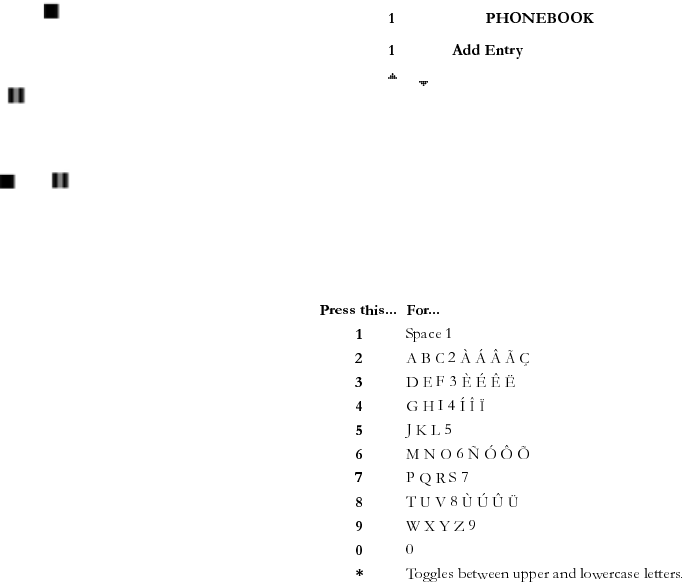
Using Your Phonebook
Creating Phonebook Entries
You can add entries to your phonebook by doing the fol-
lowing:
1 Press MENU from the Standby screen to access the main
menu.
2 Press to display the menu
3 Press to select .
4 Press or to scroll to the name and number line.
See the next section to learn how to enter names in
your phonebook.
5 Press YES to store the new entry.
Entering Letters and Symbols
Press the appropriate key, 0-9, #, or * repeatedly until
the desired letter, character, or digit appears in the dis-
play. For example, to enter an A, press the numeric key 2
once. To enter a B, press the numeric key 2 twice.

Voice Operation 18
Answering Calls
When your phone receives a call, the ring tone sounds,
Incoming Call appears in the display, and the dis-
play and keypad backlight are illuminated (you can dis-
able the ring tone through the menu). If
you have Caller Number Identification (Caller ID) ser-
vice from your service provider, the caller’s phone num-
ber is shown in the display.
Answer the phone by pressing YES. Incoming Call is
replaced by the call timer display. End the call by press-
ing NO.
Call Waiting
If you have call waiting service from your service pro-
vider, press YES to answer a call when you receive the call
waiting signal. You can switch between the two calls by
pressing YES. Do not press NO until you are ready to end
both calls.
Unanswered Calls
Your phone’s display shows the number of calls you have
received but did not answer. You can clear the number of
missed calls from the display by pressing any key except
YES. If Caller Number Identification is available from
your carrier, unanswered calls will be stored in the
of the menu. Press YES
from the Missed Calls Indicator screen to access the
Incoming Call Log.
Temporarily Muting the Ring Tone
To temporarily mute the ring tone without answering
the call, press NO, BACK, the UPPER SIDE VOLUME KEY,
or the LOWER SIDE VOLUME KEY. Incoming Call is
still shown in the display, and you can still answer the
call by pressing YES.
Caller Number Identification
If your service provider has Caller Number Identifica-
tion (Caller ID) service, your phone shows the phone
number of an incoming call in the display. If the number
is one that you have stored in your phonebook with a
name, the name is shown when your phone rings. If the
Caller ID information is not available, the message NO
ID is shown in the display. The word Private may be
shown if the Caller ID is restricted by the service pro-
vider or by the caller.
Muting the Microphone During a Call
To mute the microphone during a call, press and hold
the BACK key. Mic Muted appears in the display when
the call is muted. Repeat this procedure to return to your
call.
Note! Character sets vary according to lan-
guage selection.
19 Voice Operation
Phone Groups The submenu allows you to organize
the members of your phonebook into categories. Each
category can then have a distinctive ring sound associ-
ated with it and can be used for call screening if your
network supports Caller ID. Refer to the Screen Calls
section later in this chapter for more information about
call screening. The 10 options for are
Personal, Family, Friends, Business, Work, Team,
School, Group A, Group B, and Group C.
Increasing or Decreasing Ear Volume
During a Call To increase the ear volume during
a call, press the upper key on the
side of your phone.
To decrease the ear volume during
a call, press the lower key on the
side of your phone.
Low Battery Power Alert
The low battery alert sounds when your battery is reach-
ing its lowest operational power level. The words Low
Battery! will appear in the display. When this hap-
pens, leave your phone turned on. The phone discharges
the battery and then automatically turns off. Charge the
battery within 24 hours after a complete discharge so
that the battery can charge to full capacity.
International Calls
If allowed by your service provider, you can place inter-
national calls with your phone just as you would from
any other phone. If you have difficulty completing inter-
national calls, check with your service provider for infor-
mation.

Voice Operation 20
Voice Operation Key Functions
MENU
BACK
a|A ,?!
, ? !
#
a|A
#
BACK
MENU
21 Voice Operation
Phonebook Menu
The menu contains the following
choices for storing, organizing, and recalling phone lists
and call information.
Note! The profile icon ( ) refers to menu items that are pro-
file-dependent. Profile-dependent menu items indicate
settings that may be customized for every profile to suit a
particular environment.
Add Entry The submenu allows you to store a phone
number and an accompanying name in your phone-
book.
List Entries The submenu allows you to recall a phone
number by the name stored with the phone number or
by the phonebook position number. You can also access
the submenu by pressing and holding
from the Standby screen.
Delete All Entries
The submenu allows you to erase all of your
phonebook entries. You will be prompted to confirm
that you want to delete every entry before the deletion is
complete.
Entries Used The submenu is used to display the
number of phonebook positions that are occupied and
the number of phonebook positions that are available.
Groups The submenu allows you to organize your
phonebook into groups by assigning individual phone
numbers to 1 of 10 Phone Groups. These phone groups
include Personal, Family, Friends, Business, Work,
Team, School, Group A, Group B, and Group C. For
each Phone Group, you may define the group Members
and the group Ring Sound. If you receive a call from a
particular group Member, the group Ring will sound.
Groups are also used in conjunction with the
submenu to allow you to select a group or groups
whose incoming calls will be screened so that the ringer
does not sound.
Assigning Group Rings to Your Phone
Groups
You can assign a specific group ring to each of your
phone groups by doing the following:
Press or from the Standby screen to access the
main menu.
Press or until the menu is
highlighted.
Press YES. The menu is shown in
the display.
MENU 1

Voice Operation 22
Press or until the submenu is
highlighted.
Press YES to select the submenu.
The list of Phone Groups appears in the display.
Press or until the that you want
to select is highlighted.
Press YES to select the to which you
want to assign group options.
Press or until Group Ring is highlighted.
Press YES to select Group Ring.
Press or to scroll through the 25 user-selectable
ring types (including your custom downloaded ring
melody). The active ring type will be indicated by a
filled radio button ( ).
Press YES to select the Group Ring that you want to
assign to your Phone Group. The selected ring type
will ring only when you receive a call from one of the
group members.
Note! Your service provider must support Caller ID for this
feature to work properly.
Press NO to return to the previous screen.
Press CLR to return to the Standby screen.
Editing Your Phone Groups
You can edit phone groups that you have already created
by doing the following:
Press or from the Standby screen to access the
main menu.
Press or until the menu is
highlighted.
Press YES. The menu is shown in
the display.
Press or until the submenu is
highlighted.
Press YES to select the submenu.
The list of Phone Groups appears in the display.
Press or until the that you want
to select is highlighted.
Press YES to select the to which you
want to assign group options.
Press or until Members is highlighted.
Press YES to select Members.
Press or to scroll through your list of phonebook
entries. Select a new member by highlighting the
desired member and pressing the * or # key. The
selected entry will be indicated by a filled checkbox
().
Press YES to save your changes.
Press NO to return to the previous screen.
Press CLR to return to the Standby screen.
The Add Group submenu allows you to create groups of
phonebook members and then name them. Examples of
phone groups include family, friends, and coworkers.
23 Voice Operation
Messages Menu
The menu contains choices for specifying
and accessing message services that may be available
from your service provider (for example, text messages
and voice mail).
Voice Mail The submenu allows you to enter and access
your voice mail access number, if you have voice mail
service from your service provider. A number and the
voice message icon ( ) appear in the Standby screen
to indicate the number of new unread voice messages.
The two options for the submenu are Call
and Store.
Read New Text The submenu allows you to read your
new text messages. A number and the text message icon
( ) appear in the Standby Screen to indicate the
number of new unread text messages.
Read Old Text The submenu allows you to read your
old (already read) text messages.
Delete All The submenu allows you to erase all of your
previously-read unsaved text messages. You can use this
submenu if you have text message service from your ser-
vice provider.
Note! You will be prompted to enter your security code to
enter the submenu.
Memory Used The submenu displays the percentage of
the phone’s memory that is occupied and the percentage
of the phone’s memory that is available.
Call Info Menu
The menu allows you to view informa-
tion and establish dialing and answering preferences for
your phone (some selections available in this menu are
dependent on your service provider). It also enables you
to view and edit system options and call statistics.
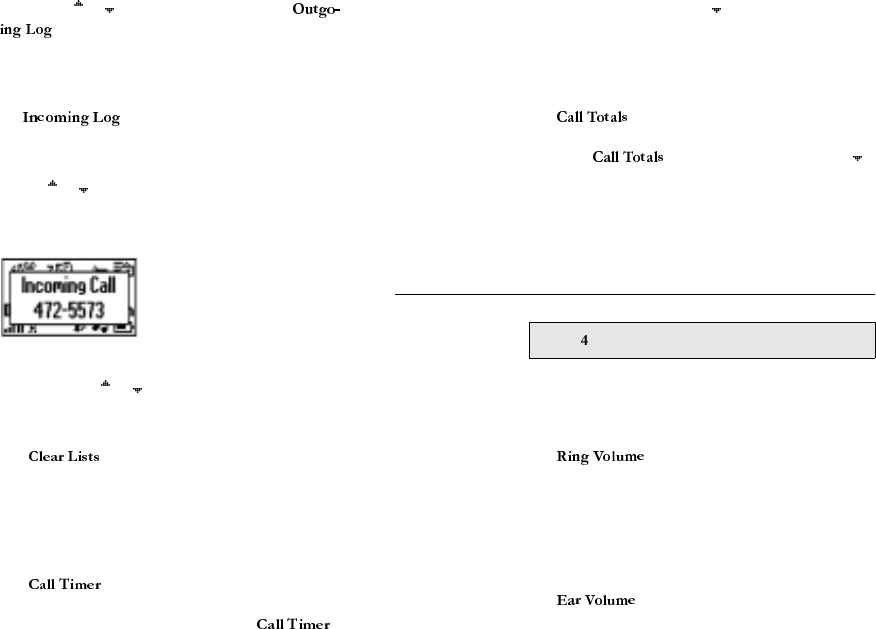
Outgoing Calls The submenu allows you to view and
edit the last 40 phone numbers that you have called. The
cursor is at the left and can be moved by pressing and
MENU
MENU
Voice Operation 24
holding the or key. You can also access the
by pressing YES from the Standby screen.
Incoming Calls If you have Caller ID service from your service provider,
the submenu lists the last 40 calls
received with caller ID (the latest call appears first). To
dial the phone number shown in the display, press YES.
Use the or keys to scroll through the last 40 received
calls. If the received number is stored in the phonebook
with a name, the name is also shown in the display.
The cursor is at the left and can be moved by pressing
and holding the or key.
Clear Lists The submenu allows you to erase all of your
phone lists. You will be prompted to confirm that you
want to delete every entry before the deletion is com-
plete.
Call Timer The submenu shows you the total number
of calls and the total hours and minutes that you have
used since you last reset your phone. The
timer can be reset by pressing until Reset? appears
in the display. When prompted by Reset? press YES.
Counter has been reset! appears in the display.
Total Calls The submenu shows you the total number
of calls and the total hours and minutes that have been
used. The timer can be reset by pressing
until Reset? appears in the display. When prompted
by Reset? press YES. Counter has been reset!
appears in the display.
Settings Menu
Sounds
Ring Volume
The submenu allows you to set the level
of the ring volume from Extra-Low, Low, Medium,
High, Increasing, or Off. The Increasing volume setting
rises in steps from the lowest to the highest level as the
phone continues to ring.
Ear Volume
The submenu allows you to adjust the vol-
ume of the earpiece using the menu setting. You can also
MENU

25 Voice Operation
adjust the volume during a call by using the side volume
keys. There are six volume levels.
Edit Melody 1
The submenu allows you to create a ring
melody using each key on your keypad as a note in your
melody.
Edit Melody 2
The submenu allows you to create a sec-
ond ring melody using each key on your keypad as a
note in your melody.
Key Sound
The submenu allows you to choose the
sound made when you press keys. The four options for
Key Sound are Click, Continuous Burst, or Silent.
Ring Sound
The submenu allows you to choose the
type of sound or melody for the ringer. Each sound or
melody is demonstrated as you scroll through the selec-
tions. There are 25 ring sounds.
Screened Calls Use the submenu to specify groups of call-
ers that will be restricted from ringing through on the
phone. In the submenu, you will see a list
of your phonebook groups and you can choose to silence
the ringer for a particular group or groups of callers.
Press * or # to put a checkmark into the box next to the
desired group ( ). Once you have selected all the
groups to be screened, press YES to exit.
Restricted Calls
Outgoing Calls
The Outgoing Calls submenu allows you to set specific
outgoing call restrictions. Press * or # to put a check-
mark into the box next to the desired group ( ) to set
the call restriction for that particular item. Once you
have selected all the groups of outgoing calls to be
restricted, press YES to exit.
Incoming Calls
The Incoming Calls submenu allows you to set specific
incoming call restrictions. Press * or # to put a check-
mark into the box next to the desired group ( ) to set
the call restriction for that particular item. Once you
have selected all the groups of incoming calls to be
restricted, press YES to exit.
Security
Security Code
Your phone has a that you must enter to
gain access to certain functions, such as call restrictions
and calling card numbers. The factory-programmed
code is 0000. You can change this code to provide maxi-
mum security for your phone. If you forget your
, contact your service provider for assistance.

Voice Operation 26
Power On Lock
The Power On Lock restricts you from making calls each
time you turn the phone on. To unlock the phone, enter
your security code.
Note! You will be prompted to enter your security code to
enter the Power On Lock submenu.
Note! The Keypad Lock feature allows emergency number
access (911).
Auto Key Lock
The submenu restricts you from using
the keypad. The keypad remains locked until you do one
of the following:
Remove and replace the battery.
Press or .
Receive a call (after the call is completed, the key-
pad is returned to the locked state).
Press MENU then * to unlock the keypad.
Note! The Keypad Lock feature allows emergency number
access (911).
Call Options
Answer Option
The submenu allows you to select one
of the following methods for answering calls:
YES key - Press YES to answer calls.
Any key - Press any key to answer calls.
Auto Answer - Call will be answered automatically.
Super Dial
The submenu allows you to dial a phone
number stored in phonebook positions 1 through 9 by
pressing and holding the numeric key corresponding to
the phonebook position. The two options for
are On and Off.
Speed Dial
The submenu allows you to dial a phone
number stored in a phonebook position by entering the
1- or 2-digit position and pressing YES. The two options
for are On and Off.
Auto Area Code
The submenu allows you to store an
area code that will be automatically added to the 7-digit
phone number you are dialing. Enter the area code, then
select On to activate the feature.
The two settings for this function are On and Off. The
area code is automatically added to the phone number
you are calling when is set to On.
does not add the area code to phone
numbers shown in the display by Caller ID, but you
may edit those phone numbers.
27 Voice Operation
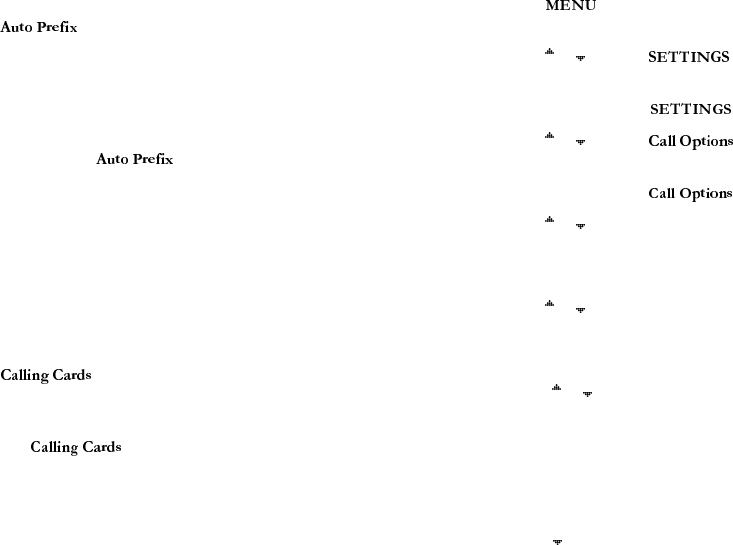
Auto Prefix
The submenu allows you to store a 1- to
12-digit prefix which is automatically added to the
dialed phone number. When you dial a 4- or 5-digit
phone number, the prefix is automatically added to the
phone number.
In order to send a number to office extensions, store the
3-digit prefix in the submenu. You only
need to dial the last 4 or 5 digits of the phone number.
For example, if you save 123 as the auto prefix and the
function is On, you can call 123-7654 by simply dialing
7654. The prefix 123 is automatically added to the
phone number after you press YES to dial the phone
number. The auto prefix is not added for phone num-
bers longer than 5 digits.
Calling Cards
The submenu allows you to store calling
card numbers to use for making long distance calls.
Note! You will be prompted to enter your security code to
enter the submenu.
Setting Up Your Calling Cards
To set up your calling cards, make sure you have the
Calling Card Access Numbers (numbers provided by
your long distance carrier) and the Verification Numbers
(numbers you must enter to allow the calling card call to
be completed)
To set up your calling cards, complete the following
steps.
1 Press from the Standby screen to access the
main menu.
2 Press or until the menu is high-
lighted.
3 Press YES to select the menu.
4 Press or until the submenu is high-
lighted.
5 Press YES to open the submenu.
6 Press or until Calling Cards is highlighted
7 Press YES to open the Calling Cards submenu.
You are prompted to enter your security code.
8 Press or until Default Card, Card 1 Setup, or
Card 2 Setup is highlighted.
9 Press YES to choose the highlighted selection.
10 Press or until Verification Number is high-
lighted.
11 Press YES to select Verification Number.
12 Enter the calling card access number.
13 Press YES to store the number.
14 Press to highlight Access Number.
15 Enter the access number.
16 Press YES to store the number.

Voice Operation 28
Changing the Domestic or International Calling
Pattern
If your long distance carrier requires a unique dialing
sequence, you may need to change the calling pattern.
The calling pattern determines when the numbers are
transmitted by your phone. The default calling pattern
is:
Access number
Stop
Phone number you are calling
Stop
Verification number
To change the calling pattern:
1 After Step 11 under Setting Up Your Calling Cards,
press until Domestic or International is high-
lighted.
2 Press YES to select the highlighted option.
3 Press to scroll through the calling pattern order.
4 To change the calling pattern order, press until the
the setting you want to change is highlighted.
5 Press 1 to scroll through the options for that setting.
6 When you have the calling pattern order you want,
press YES to store the selection.
Placing a Calling Card Call
1 Enter or recall the phone number you want to call.
2 Press and hold YES. The calling card number and the
active calling card are shown in the display.
3 Release the key after the number has been displayed.
4 If you are using stops between numbers, you must
press YES or any number key to send the next sequence
of numbers. If you use pauses, the numbers are sent
automatically after the specified length of time chosen
in the Domestic or International calling pattern.
My Number The submenu is used to display the wire-
less phone numbers that correspond to the subscriptions
that are programmed into your phone.
Note! The ability to have multiple phone numbers is operator
dependent.
Networks The submenu allows you to prioritize and
manually select the systems from which you can obtain
service. This can include your public home system as
well as private and residential systems. This function is
particularly useful if you have access to more than one
mobile system. Only systems that are currently available
can be selected. This varies depending on your geo-
graphic location. The following submenus are used to
customize your options:
29 Voice Operation
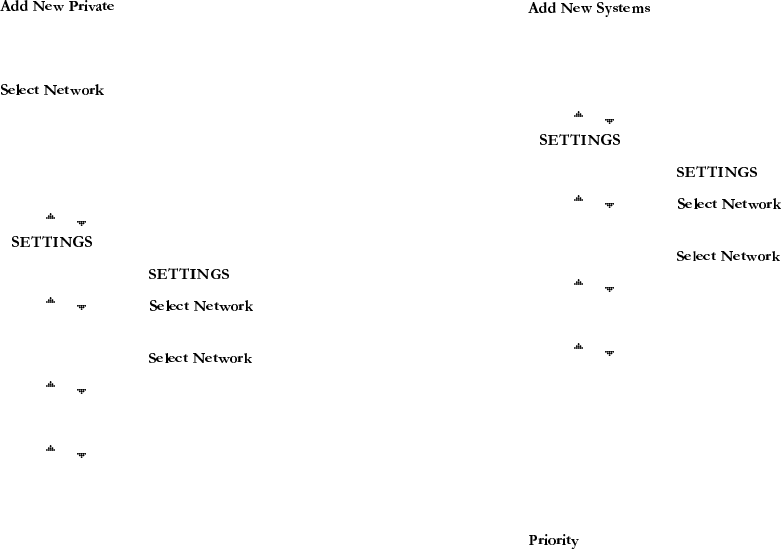
Add New Private
allows you to manual select a private
network.
Select Network
allows you to manually switch to
another system. Your phone will begin to search for all
systems that have been programmed into your phone.
Once the search is complete, you will be provided with a
list of available and unavailable systems. If you want to
switch to another system, do the following:
1 Press or from the Standby screen to highlight the
menu.
2 Press YES to open the menu.
3 Press or until the submenu is
highlighted.
4 Press YES to open the submenu.
5 Press or until Search is highlighted.
6 Press YES to select Search.
7 Press or until a specific system is highlighted.
Options that are grayed out are not selectable.
8 Press YES to select the highlighted system.
Note! You can press NO at any time to stop the Search and
return to the Standby screen.
Add New Systems
allows you to add new systems to
the programmed list of systems. When this feature is
selected, the phone will begin searching for all systems
that are available. To add one of the systems to your
phone’s memory, do the following:
1 Press or from the Standby screen to highlight the
menu.
2 Press YES to open the menu.
3 Press or until the submenu is
highlighted.
4 Press YES to open the submenu.
5 Press or until Add New Systems is highlighted.
6 Press YES to select Add New Systems.
7 Press or until the system that you want to add to
your phone’s memory is highlighted.
8 Press YES to add the highlighted system to your
phone’s memory.
Note! You can press NO at any time to stop the Search and
return to the Standby screen.
Priority
allows you to change the priority of the system
types for which your phone searches. Your default prior-
ity is (1) Public, (2) Private, and (3) Residential. This
means that your phone will look for service on a public

Voice Operation 30
system first, followed by a private system, followed by a
residential system.
To reset your Priority options, do the following:
1 Press or from the Standby screen to highlight the
menu.
2 Press YES to open the menu.
3 Press or until the submenu is
highlighted.
4 Press YES to open the submenu.
5 Press or until Priority is highlighted.
6 Press YES to select Priority.
7 Press or to highlight a specific service.
8 Press 1 to set the priority of the highlighted item to
first. Press 2 to set the priority of the highlighted item
to second. Press 3 to set the priority of the highlighted
item to third.
Network Search
Your phone should be configured by your service pro-
vider for optimal network selection during roaming. If
you want and your service provider allows, you can over-
ride the preconfigured selection by doing the following:
1 Press MENU from the Standby screen to access the main
menu.
2 Press to display the Menu.
3 Press 7 to display the submenu.
4 Press to select the option.
5 Press the or repeatedly until the appropriate sys-
tem selection is highlighted.
6 When the appropriate system selection is highlighted,
press YES.
7 Press NO to return to the previous screen or press BACK
to return to the Standby screen.
Home Only
The availability of the menu item is depen-
dent on your service provider’s phone setup.
allows your phone to look only for your home sys-
tem when you turn on the phone. The phone does not
search for other systems if your home system is not avail-
able.
Backlight Use the submenu to set the display and key-
pad backlighting to stay Off or to automatically turn On
for 20 seconds when a call is received or a key is pressed.
The two settings for are Auto and Off.
Clock The submenu allows you to set the time, time
format, stopwatch, and alarm on your phone. The clock
will then appear on you Standby screen.
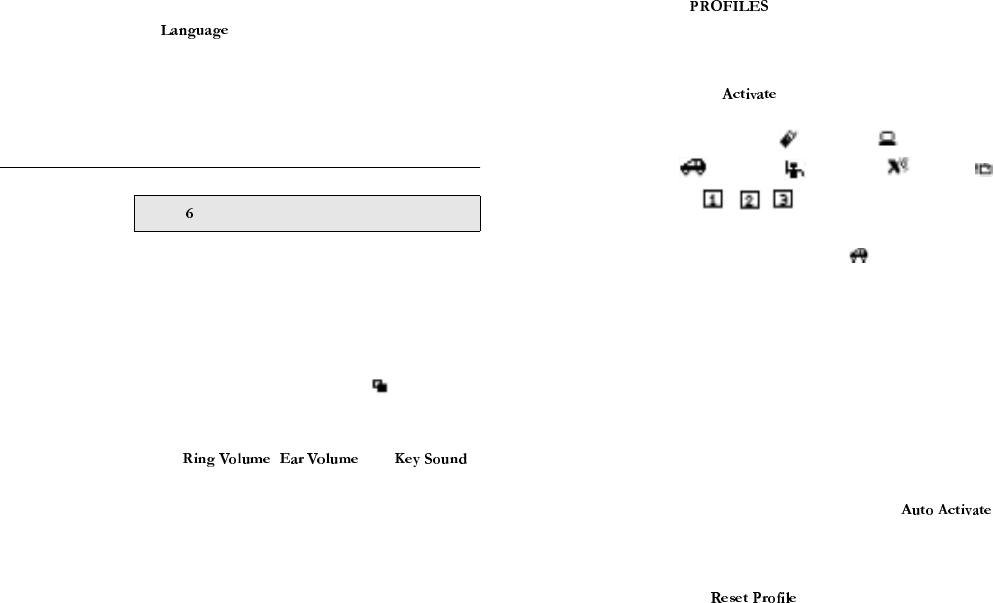
31 Voice Operation
Language The submenu allows you to select the display
language used in the phone display. The languages vary
between markets. Your mobile phone supports English,
French, Spanish, Portuguese, Russian, and Hebrew.
Profiles Menu
Your Ericsson mobile phone has nine user-customizable
profiles which allow you to adapt to several different
operating environments throughout the entire day. Your
phone has been designed to allow you to easily switch
into and out of each profile. Many features located
throughout your menu are profile settings. These set-
tings are indicated by the profile icon ( ). Each profile
feature can be set to a different value for every profile.
In Normal profile, for example, you can program your
phone’s , , and
volume to a moderate level. In Meeting profile, however,
you can change these settings to lower values or even
turn them off completely. When you attend a meeting,
you can quickly change from Normal profile to Meeting
profile.
Note! Your current profile is indicated by the icon in the upper
right corner of the Standby screen except the normal
(default) profile.
The menu contains the following sub-
menus:
Activate 1 Use the submenu to select an operating pro-
file for your mobile phone. The other profile icons
include Normal ( ), Data/Fax ( ), Handsfree
( ), Meeting ( ), Weekend ( ), Travel ( ),
and , , .
Note! When you use your Ericsson vehicle or portable hands-
free kit, the handsfree profile ( ) is automatically acti-
vated.
Setup The Setup Wizard submenu allows you to quickly set up
your profile options according to preset specifications
including Ring Volume, Ring Sounds, Key Sound,
Screen Calls, Answer Option, Auto Area Code, Auto
Prefix, Backlight, and Auto Activate.
Auto Activate The Auto Activate submenu allows you to enable a pro-
file automatically. The two settings for
are On and Off.
Reset Profile Use the submenu to quickly return the
currently active profile to its original factory settings for
every profile feature throughout the menus. Press YES to
MENU

Voice Operation 32
return the phone to its factory settings. Your security
code is not reset.
Note! You will be prompted to enter your security code to
enter the submenu.
33 Voice Operation

Browser Operation 34
s
When your phone is in Browser Operation, you are con-
nected to the Internet via the Cellular Digital Packet
Data (CDPD) Network. Using the built-in browser, you
will be able to view web content and Internet informa-
tion on your Ericsson mobile phone. Your service pro-
vider controls which web pages are accessible by your
subscription. Surfing the web with your Ericsson mobile
phone is quick because the information is specifically
formatted for quick viewing while on the go.
Features
Browser Your Ericsson mobile phone is already loaded with
Phone.com’s UP.Browser v 3.1.
Net User’s Guide
Your service provider may provide you with a Net User’s
Guide in addition to your Ericsson User’s Guide to
explain the fantastic services within your reach from
your browser.
Soft keys Soft keys are your choices for action on the current web
page. To use the soft key function, press the left or right
soft key that is under the text label on the screen.
Scrolling Your Ericsson mobile phone offers you the ability to
scroll through each web page with a single key press. The
scroll bar on the side of your screen indicates how much
viewable information you have seen. Press to scroll up
to the next line or press . Press and hold to scroll to
the next page.
Time/Date Your phone is equipped with an internal clock to pro-
vide time, date, alarm, and stopwatch functions.
TEGIC T9® Text Entry
T9® Text Input enables you to use advanced wireless
communication services such as email, two-way messag-
ing and Web access. With the T9 software embedded on
your Ericsson mobile phone, you can quickly and easily
enter words or entire sentences with just one key press
per letter.
T9 employs an intelligent software protocol enabling
you to enter text as you would on a computer keyboard.
Browser Operation
35 Browser Operation
T9 Text Input technology literally lets nine keys do the
work of 26. Although each key can be interpreted in
multiple ways - a single press on the "5" key, for exam-
ple, could be a "J", "K" or "L" - the T9 algorithm uses
an internal linguistic database to automatically scan pos-
sible variations to determine the correct word instanta-
neously.
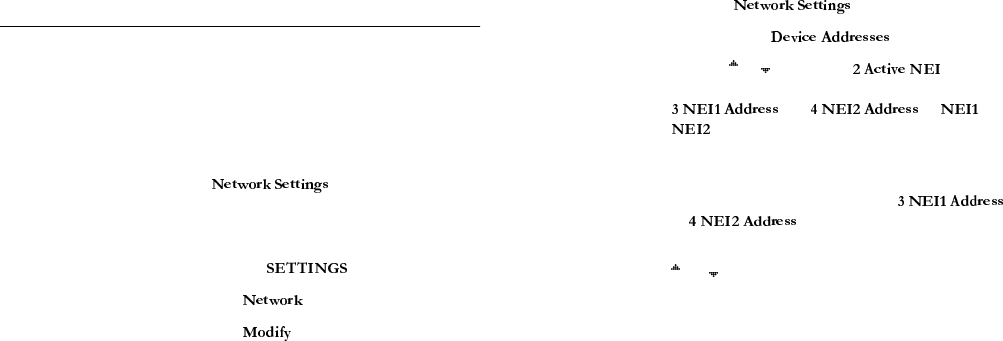
Configuring Your Browser
In order to run your Ericsson mobile phone’s browser,
configure the Network Equipment Identifier (NEI) and
the Browser Gateway under the Network Settings sub-
menu.
Entering the Network Settings Submenu
To enter the submenu, do the fol-
lowing:
1 Press MENU to enter Browser Operation.
2 Press 4 to select the Menu.
3 Press 5 to select .
4 Press 2 to select .
5 Enter your password.
6 Press YES.
Note! The factory-programmed code is 00000.
Configuring the NEI
The NEI is an IP address that uniquely identifies the
phone to the CDPD network. This number is pre-
scribed by the CDPD service provider. Each phone has
its own NEI. The phone can store two independent
NEIs, allowing the user to easily switch between two
separate CDPD service accounts. Configure your NEI
by doing the following:
1 Enter the submenu
2 Press 1 to select .
3 Press the or to scroll to . Remem-
ber to note which NEI is active and the values next to
and . If or
is already configured to a valid IP address, con-
figure the other NEI address and then select it as the
active NEI.
4 Select the NEI address to configure (
or ) and press YES.
5 Enter or modify the NEI using the number keys. Use
or to move the cursor as necessary.
Note! The "dots" are automatically added. Leading zeroes are
necessary where appropriate.
Note! When you change an NEI value, your phone automati-
cally resets the "credentials" for that NEI. Credentials
are basically a counter negotiatied between the CDPD
base station and the phone. If the phone’s credentials do
not match the base station’s credentials for the NEI, the
phone will not register with the base station. If this hap-
Browser Operation 36
pens, call your service provider to request a credential
reset for your NEI.
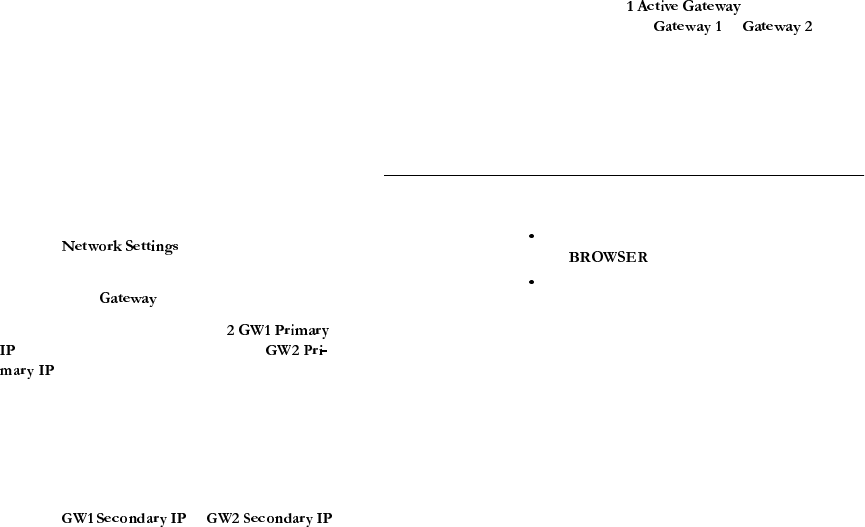
Configuring the Browser Gateway
The Browser Gateway is the IP address of a UP.Link
server to which your phone will connect. The UP.Link
server stores the HDML content for the phone to access.
The phone can store two independent Browser Gate-
ways, allowing the user to easily switch between gate-
ways. To configure the Browser Gateway, do the
following:
1 Enter the submenu as described
above.
2 Press 4 to select .
3 To configure the first gateway, select
. To configure the second gateway, select
.
4 Enter or modify the primary gateway IP address.
Note! The "dots" are automatically added. Leading zeroes are
necessary where appropriate.
5 After entering the IP address, press YES to accept.
6 Select the or
and enter/modify the secondary IP address for the
gateway.
7 After entering the IP address, press YES to accept.
8 Press 1 to select and select the gate-
way to make active ( or ). If the
Active Gateway IP address changes, then the browser
will restart automatically.
Launching Your Browser
To launch the browser, do one of the following:
Press MENU to access the menus and press 5 to open
the Menu
Press and hold the MENU key to switch from Voice
Operation to Browser Operation and launch the
browser.
When the browser is being launched, your phone will
display a screen that will include status messages (like
Connecting, Sending, and Receiving) on the
bottom line of the display. If your phone is not properly
configured, you will get a message with that informa-
tion.
The Home Page (designated by your service provider)
will display after you have successfully launched your
browser. You are now connected to the Net!
You can use the navigation and soft keys to choose any
of the selections provided including returning to your
Home Page, switching to Voice Operation, setting book-
marks, configuring the user interface, or changing your
CDPD network settings from Browser Operation.

37 Browser Operation
Making Phone Calls in Browser Operation
While you are browsing, you can place a phone call or
return to Voice Operation to check voice mail or to
receive phone calls. You cannot receive voice calls while
you are browsing. To return to Voice Operation, do one
of the following:
Press MENU to access the submenu.
Then press 2 to select .
OR
Press and hold the MENU key to switch from
Browser Operation to Voice Operation.
Note! You can set up your phone to power up into Browser
Operation or Voice Operation. The default setting is
Voice Operation.
Web Content/Abilities
Email Your service provider can enable email as an application
for use with your browser. If this feature is enabled, you
can send and receive text messages to anyone with an
email address.
If this feature is enabled, you would be notified of new
email by use of Alerts. The symbol (!) would display on
your screen between your soft key choices and a beep
would sound.
Calendar Your service provider can enable the calendar application
for use with your browser. If this feature is enabled, you
can set meeting minders as alerts and also set future
appointments.
Contact List Your service provider can enable the contact list for use
with your browser. If this feature is enabled, you can
look up addresses to call, view or email.
The World You have access to the world from your Ericsson mobile
phone in Browser Operation. This includes maps,
games, stock quotes, weather, and anything else on the
web.
Browser Menu
When you enter Browser Operation, you will go imme-
diately to the home page. Press MENU to access the
menu.
The menu contains the following choices
for setting the browsing options (the menu items in the
Browser menu are operator dependent):
Home Page The Home Page submenu takes you directly to the
Internet address that your service provider has specified.

Browser Operation 38
This is the web address from which you will start your
browsing.
Voice Operation
The Voice Operation submenu allows you to return to
Voice Operation from Browser Operation to make or
receive a voice call.
Set Bookmark The Set Bookmark submenu allows you to save com-
monly visited Internet addresses. You are then able to
return to the Internet locations by simply browsing your
list of bookmarks and selecting the one you want to visit.
To set a bookmark, simply go the the page that you want
to mark, and press MENU then 3. It will then appear in
your list of bookmarks. To quickly return to a bookmark
location, simply press and hold the number correspond-
ing to the bookmark number once you have launched
the browser.
Note! You can quickly set a bookmark by pressing and holding
the YES key when you are on the page that you want to
mark.
Note! Some pages are not able to be marked because the web
designer has prevented it.
Large Text/Small Text
The submenu allows you to set
the size of the display font on your phone.
Show URL The submenu allows you to display the cur-
rently-selected URL address.
Page Help The submenu allow you to obtain assistance
while using your browser.
Clear History The submenu allows you to erase the
previously displayed Help screens.
Local Settings The Local Settings submenu allows you to customize
your default browser settings.
39 Browser Operation
Browser Operation Key Functions
MENU
BACK
a|A ,?!
a|A
BACK
MENU
,?!

Wireless/IP Operation 40
s
When your phone is in Wireless/IP Operation, you are
online all the time. When you use youe phone with your
computer, you are in Wireless/IP Operation and you are
on the Internet just like when you are connected to the
Internet via a Local Area Network (LAN) or Internet
Service Provider (ISP).
Note! When you are online, all status and error messages will
appear on your computer screen, not on the display of
your mobile phone.
Other Ericsson products can be used in conjunction
with your Ericsson Mobile Phone in Wireless/IP Opera-
tion including the Ericsson Virtual Office (EVO).
Check with your Office/System Administrator and/or
your service provider to learn more about remote access
enhancements.
Your Display in Wireless/IP Operation
When your phone is in Wireless/IP Operation, your dis-
play will look similar to this:
When your phone is connected by data cable, an online
session is begun automatically by the program on your
computer. The session can be ended via your computer
controls or manually by pressing the NO key only. Manu-
ally ending the session will cancel any file transfers and
may result in loss of data.
Computer Setup in Wireless/IP Operation
Your computer must be properly set up in order to suc-
cessfully make Wireless IP calls from your computer
through your phone.
You must have an Ericsson data cable to connect your
computer and your mobile phone. You must also install
the configuration files included with your phone or the
cable accessory kit.
Note! In order to connect to a server, for example your server
at work, you must know your gateway address and server
number and enter it when prompted to do so.
Wireless/IP Operation

41 Wireless/IP Operation
When you are properly set up, you will be able to per-
form all activities on your laptop through the use of your
Ericsson mobile phone. These functions include email,
contact information, electronic calendars. You are able
to browse all of these functions using your Ericsson
mobile phone as your telephone connection.
Wireless/IP Operation Key Functions
The only key on your phone’s keypad that has a function
during Wireless/IP Operation is the NO key. Pressing the
NO key will disconnect your modem call.
Wireless/IP Operation 42
43 Problem Solving
in North America, call
Problem Solving
Problem Solving 44
1-800-ERICSSON (374-2776). In Latin America, call 1-305-755-6789.
All other countries, call 1-919-472-7908.
45 Problem Solving
.
MENU
NO
YES
NO
YES
MENU
MENU
MENU
YES
BACK
BACK
NO
BACK
MENU
YES
MENU
MENU
MENU
MENU
MENU
MENU
MENU
MENU
MENU
MENU
MENU
MENU
MENU
MENU
MENU
MENU
MENU
AE/LZT 123 5093 R1
R280d Shortcuts
MENU
MENU
MENU
MENU
MENU
MENU
MENU
MENU
MENU
MENU
MENU
MENU
MENU
MENU
MENU
MENU
MENU
MENU
MENU
MENU
MENU
YES
MENU
MENU
MENU
MENU
MENU
MENU
9LVLWXVRQWKHZHEDWKWWS
PRELOHHULFVVRQFRP