Exhibit 8


Contents
General Information 2
Operators & Subscription 2, GSM 900/1900 Dual Band 2, SIM & PIN 2
Preparing Your Phone for Use 3
The SIM Card 3, The Battery 4
Turning On the Phone 7
When No Network Name Is Displayed 7, To Turn Off the Phone 7, Initial Set-
tings 7
Making and Receiving Calls 9
Emergency Calls 9, Making Calls 9, Receiving a Call 10, Redialling a Num-
ber 10, Calling Someone Who Has Called You 11, Unanswered Calls 11, Hid-
ing or Showing Your Number 12
During a Call 13
To Change the Earpiece Volume 13, To Mute the Microphone 13, To Use the
Display as a Scratch Pad 13, To Send Tone Signals 13
The Menu System 14
Moving through the Menu System 14, Display Text and Symbols 14
The Phone Book 15
Before You Start 15, Entering Characters 16, Creating Your Personal Phone
Book 16, Recalling a Phone Number 17, Keeping Your Phone Book Up to
Date 19, Copying Phone Numbers between Positions and Memories 20
Sending and Receiving Text Messages 21
Two Memories 21, Setting the Phone for Text Messaging 22, Composing
and Sending Messages 22, Reading a Message 23, Replying to a Message
24, Erasing a Message 24, Storing a Received Message 24, Reading Stored
Messages 25, Calling a Phone Number in a Message 25, Frequently Used
Messages 25
Communicating via the Modem 26
Before you Start 26, The Data Menus 26, Installing the Infrared Modem 27,
To Connect Using the IR Link 30, To Connect Using the RS232 Cable 30,
Making Fax and Data Calls 30, Receiving Fax and Data Calls 31
The Mobile Office Suite 32
Installing the Mobile Office Suite 32, Uninstalling the Mobile Office Suite 33
SIM Application Toolkit 34
What is SIM Application Toolkit? 34, Initialisation 34, Proactive SIM 34,
Data Download to the SIM over the Air 35, New Menu 35, SIM Card Initiated
Features 35, Details on Services Offered 36
Networks 37
Search Mode 37, Selecting a Network 37, List of Preferred Networks 38
Security 40
The Card Lock 40, The Phone Lock 41, Call Barring/Restrict Calls 41, The
Keypad Lock 42, Fixed Dialling 43
Diverting Incoming Calls 44
Activating a Call Divert 44, Diverting when the Data Menus are On 44,
Checking the Divert Status 45, Cancelling Call Diverts 45
Handling More than One Call 46
The Call Waiting Service 46, Receiving a Second Call 46, Receiving a Third
Call 47, To Make a Second Call 47, Connecting Two Calls – Explicit Call
Transfer 47, Conference Calls 47
Handsfree Calling 49
Selecting Answering Mode 49, Other Handsfree-Related Settings 49
Personalizing Your Phone 50
Personal Settings 50, The Ring Signal Level 52, Time and Date 52
Other Useful Features 54
The Answering Service 54, The Call Time/Call Cost 55, The Two Line Serv-
ice 56, Calling Card or Credit Card Calls 57, Area Information 58, The Alarm
60, The Calculator 60
Guidelines for Safe and Efficient Use 61
Warranty Conditions 64
PTO for The Menu System è
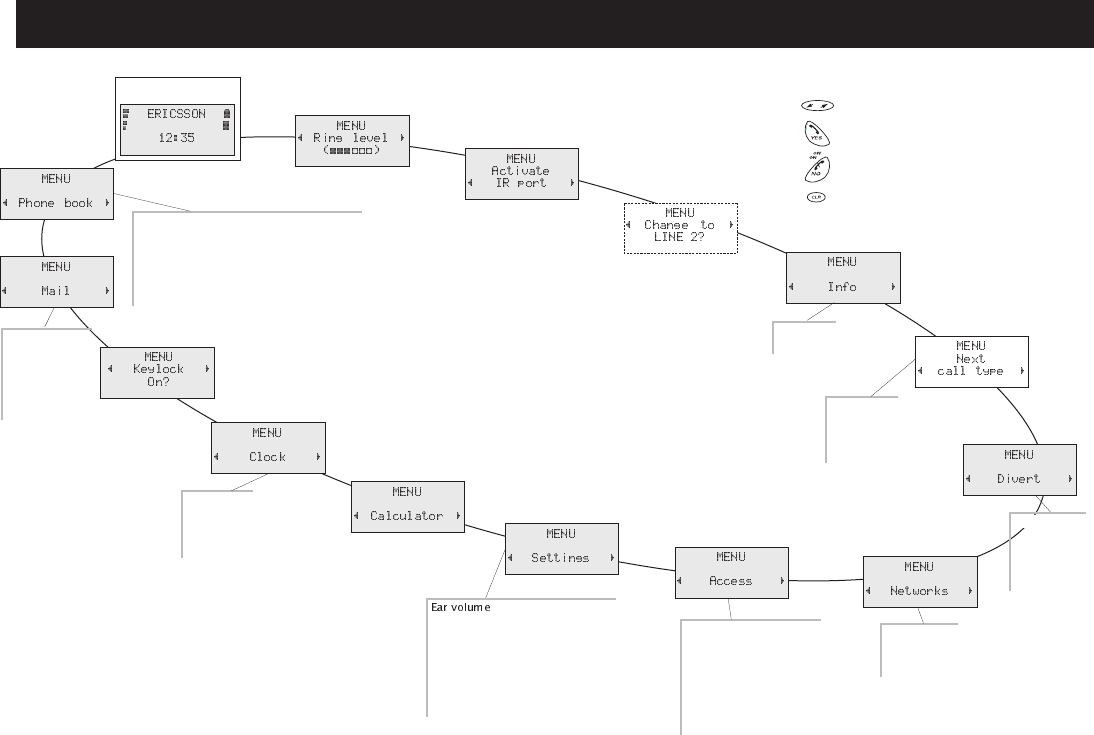
The Menu SystemThe Menu System
Start here
Ring type
Edit melody
Mail alert
Keylock
Key sound
Light
Min minder
Call info
Answering mode
Greeting
Phone no
Language
Data menus
Line1 tag
Master reset
Name recall
Position recall
Store
Edit
Erase
Erase all from phone
Copy all
Copy
Call card numbers
Fixed numbers
Answered calls
Dialled numbers
Voice mail
Read messages
Send messages
Area info
Area messages
Set Voice Mail
Missed calls
All calls
On busy
No reply
Unreachable
Cancel all
Check all
Barring
Call Waiting
Unlock card
Change PIN code
Change PIN2 code
Phone lock
Phone lock Change code
Call cards security
Fixed dial
Set alarm
Set clock
Set date
Clock mode
Date mode
Select net
Search mode
Edit list
New search
Last call
Tot calls
Speech
FAX
Data
move clockwise or anticlockwise
select a menu or function
go back one level in the menu system
go back to the standby menu
* This menu appear only when you have turned on the ‘Data menus’ (see
chapter ‘Communicating via the Modem’).
** This menu appears only if your network operator offers the Two Line
service (also called Alternate Line Service) and you have subscribed to it
(see chapter ‘The Two Line Service’).
*** These menu functions are slightly different if you have selected a ‘Next
call type’ other than speech.
*
**
***
Press… to…
Note! The default display language is
English. The English display texts may
differ from the US Englsih texts.
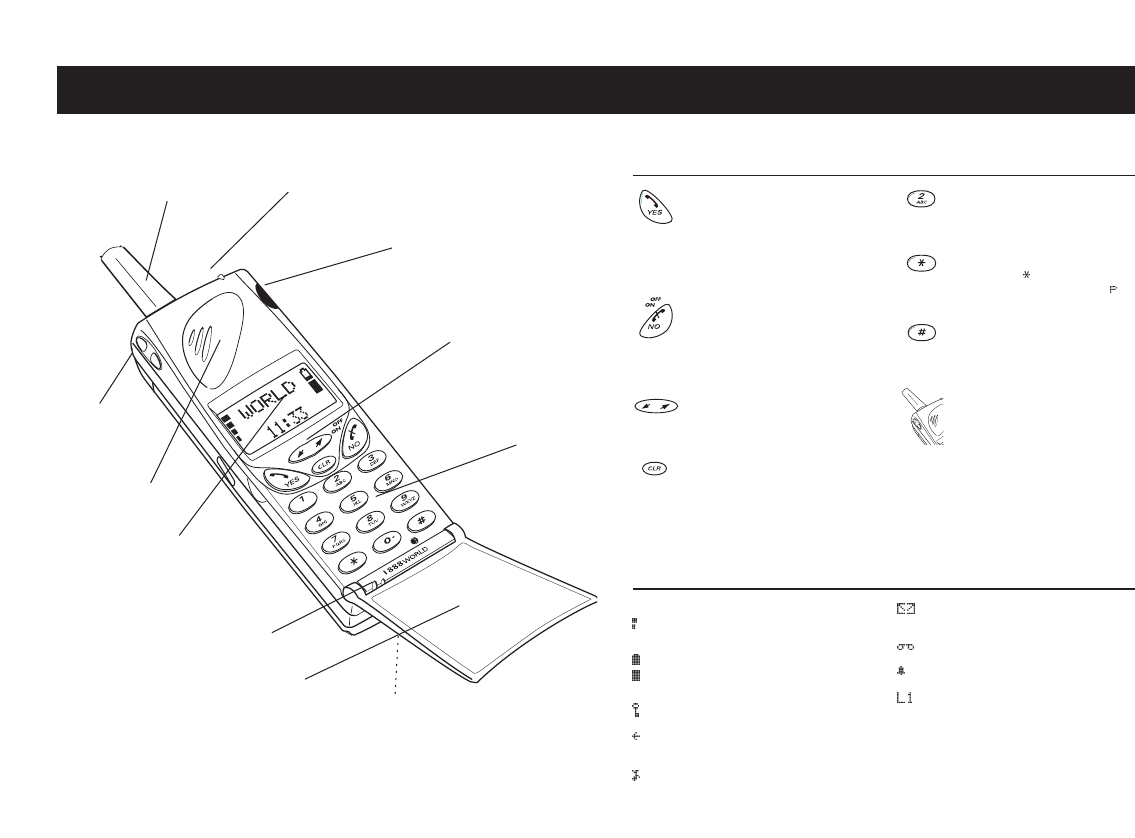
The Phone, Keypad and Display
Key Functions
YES, used to:
• make calls, answer incoming
calls, put calls on hold and
switch between calls.
• confirm selections and in-
puts.
• enter a selected menu.
ON/OFF and NO, used to:
• turn the phone on or off.
• end calls, reject incoming
calls and cancel selections.
• back up one level in the
menu system.
NAVIGATION KEY, press LEFT or
RIGHT (or press and hold) to
access and move through the
menu system.
CLR (Clear), used to
• erase digits from the display.
• mute the telephone.
• return to standby from the
menu system.
NUMERIC KEYS, used to enter
the digits 0–9 and to enter text.
The 0 key also enters the inter-
national prefix (+) if held down.
STAR, used to:
• enter the character.
• enter a pause character ( )if
held down.
HASH, used to:
• enter the characters # or ¤.
• recall a phone number from
the Phone Book.
VOLUME KEYS on the side of the
phone, used to:
• change the earpiece volume
during a call.
• reject an incoming call, if
pressed twice.
• temporarily disable the ac-
tive flip
FLIP, used to answer and end
calls.
Indicators in the Display
Signal strength.
The more bars that are shown,
the higher the signal strength.
Battery meter.
The fuller the icon, the more
power there is.
The keypad is locked.
All incoming calls are diverted
to another number.
The ring signal is turned off.
You have received a text mes-
sage.
You have received a voice mail.
The alarm is set.
The line currently selected. (Re-
quires that you have the Two
Line Service.)
4
Antenna Indicator
light
Earpiece
Keypad
Microphone
Connector
(for charger and
other accessories)
Display
Volume
keys
Infrared (IR)
port
Navigation key
Active Flip

Congratulations…
…and thank you for choosing the I 888 WORLD, a mo-
bile phone specially suited for the demanding user of
communication tools. Retaining the slim, streamlined
size that has become associated with the Ericsson fam-
ily of phones, the I 888 WORLD sets a new standard for
others to follow.
Apart from its unique toughness and extraordinary
sound quality, the I 888 WORLD comes packed with fea-
tures that will help you stay ahead. These are just some
of the highlights:
• With the in-built modem, you can forget all about
PC Cards. It is already inside your phone, guaran-
teeing you instant access to your PC, laptop or
handheld communicator. Wireless if you prefer,
thanks to its infrared capabilities.
• Dual band operation allows you to use your phone
on the European continent as well as in Africa, the
Asia/Pacific region and in the Americas.
Like the other phones from Ericsson, the I 888 WORLD
is produced to meet the highest quality standards.
This guide introduces you to your I 888 WORLD and
shows you how to get the most out of it. Before you
start, please read the ‘Guidelines for Safe and Efficient
Use’.
Please note that some of the functions and services de-
scribed in this user’s guide are depending on your
choice of network operator. Should you need additional
information on how to use them, contact your operator.
Mobile Internet
When you are on the move and in need of communica-
tion and information, Mobile Internet is the answer.
Mobile Internet is a service supplied by Ericsson to fa-
cilitate easy communications and rapid information re-
trieval, wherever you are. It gives you access to on-line
customer services, on-line user manuals, and useful in-
formation when you are out travelling. It allows you to
down load various communication software which will
ensure you achieve optimum results from your Ericsson
products.
If you run into any problems, there are help texts con-
nected to the different Mobile Internet pages.
The Internet address to Mobile Internet is
http://mobile.ericsson.com/mobileinternet
To get access to the service you also need a user id and
a password. The first time you log on, please use the
following:
User Id: mobile
Password: internet
Note that you must change user id and password the
first time you log on to Mobile Internet.
Press to enter the menu system. See inside the cover. 1
General Information
Operators & Subscription
To be able to use your phone, you need to have a sub-
scription to a network. This is obtained from the net-
work operator.
The services included in your subscription depend on
your choice of operator and/or subscription. Therefore,
some of the services and functions described in this
manual may not be accessible to you. If you want a
complete list of the services included in your subscrip-
tion, please contact your network operator.
GSM 900/1900 Dual Band
The Ericsson I 888 WORLD is a dual band phone, which
means that you can use your phone in two different
kinds of networks – the GSM 900 and the GSM 1900
systems.
The GSM 1900 system is used in the US and other parts
of the Americas, and the GSM 900 system is used in
Europe, the Asia/Pacific region and in some parts of
Africa. This means that you can use your I 888 WORLD
on six continents.
Consequently, the I 888 WORLD offers you enhanced
international roaming, thanks to the additional net-
works now available when you are out travelling.
The switching between the two systems is done auto-
matically, which means that you can use your phone
without ever having to consider which system is being
used. This is taken care of by the networks. However,
you should note that the functions offered and the net-
work coverage differ depending on your choice of op-
erator and/or subscription.
SIM & PIN
You will obtain a SIM (Subscriber Identity Module) card
with your subscription. The SIM card contains a com-
puter chip that keeps track of your phone number, the
services you have ordered from your network operator
and your Phone Book information, among other things.
Your SIM card is supplied with a security code or PIN
(Personal Identity Number), which you need in order to
gain access to the network. Your PIN may also be re-
quired when you want to change settings in your
phone. Furthermore, some operators may have
ser-vices that require a second PIN, your PIN2. You will
find your PIN (and PIN2) in the information from your
operator.
Every time you turn on your phone, it prompts you to
enter your PIN. If the PIN is entered incorrectly three
times in a row, the SIM card will be blocked. If this hap-
pens you can unlock it by using your PUK (Personal Un-
blocking Key code), which you also get from your op-
erator.
You should be careful with your PIN, since it is your pro-
tection against unauthorized use of your phone and
subscription.
2Press to enter the menu system. See inside the cover.
Preparing Your Phone for Use
The SIM Card
When you register as a subscriber with a network
operator, you obtain a SIM card.
SIM cards come in two sizes. One is the size of a credit
card, and the other is considerably smaller (about the
size of a regular stamp). The I 888 WORLD uses the
smaller card. Many operators deliver credit card sized
SIM cards which have a perforated smaller card that you
can take out easily.
Before you can use your phone, you must insert the SIM
card into the phone.
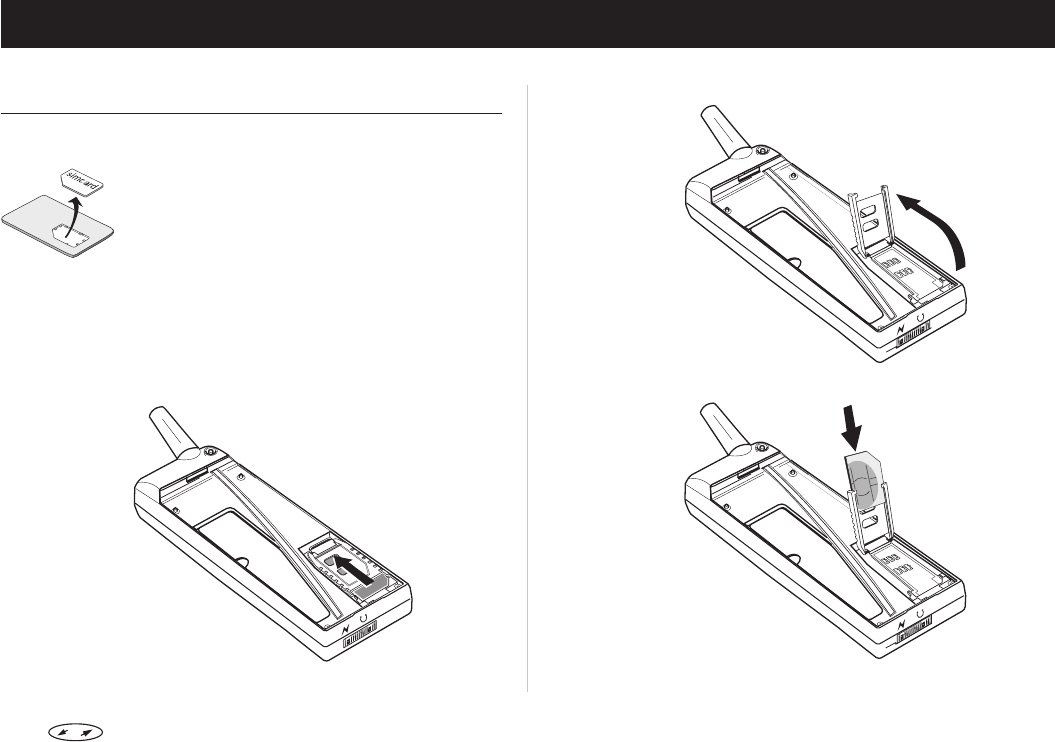
To Insert the SIM Card
To insert the SIM card, remove the battery (if attached)
and follow these steps:
Release the SIM card
holder by sliding it
in the direction of
the arrow.
Open the holder.
Slide the SIM card
into the holder.
Make certain that the
cut corner is top
right.
Press to enter the menu system. See inside the cover. 3
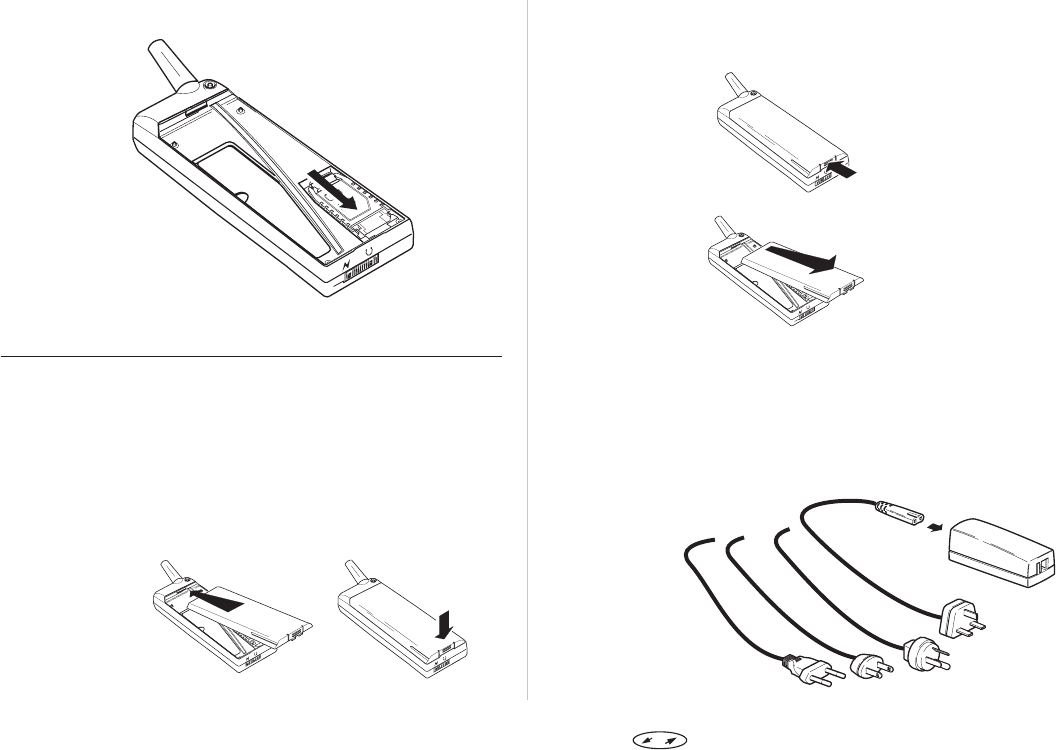
Close the holder.
Lock the holder by
pressing it down and
sliding it in the di-
rection of the arrow
in the picture.
The Battery
Your mobile phone comes with a nickel metal hydride
(NiMH) battery. The battery is not charged when you
buy your phone, but there may be enough power to
turn on the phone. We recommend that you charge the
battery before you use the phone.
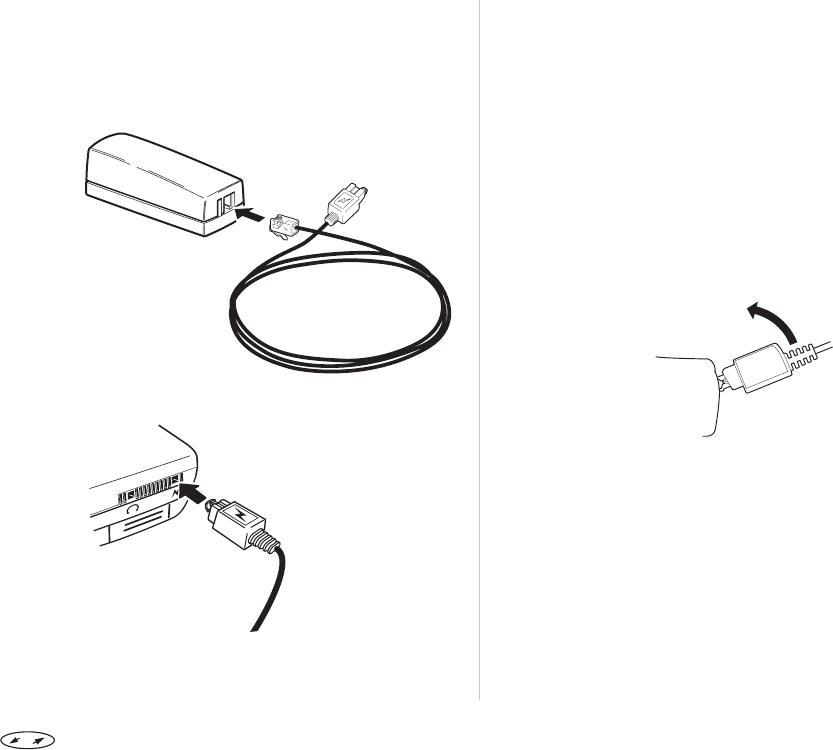
To Attach the Battery to the Phone:
Place the battery on the back of the phone.
Press the battery upwards and against the
phone until it snaps into place.
To Remove the Battery
Make sure that the phone is turned off before removing
the battery (see next chapter). Then:
Press the catch on
the bottom of the
battery.
Lift the battery up
and away from the
phone.
To Charge the Battery
Make sure that the battery is attached to the phone.
Then:
Connect the charger to the mains. (The box
contains several plugs. Use the one that fits the
wall socket.)
4Press to enter the menu system. See inside the cover.
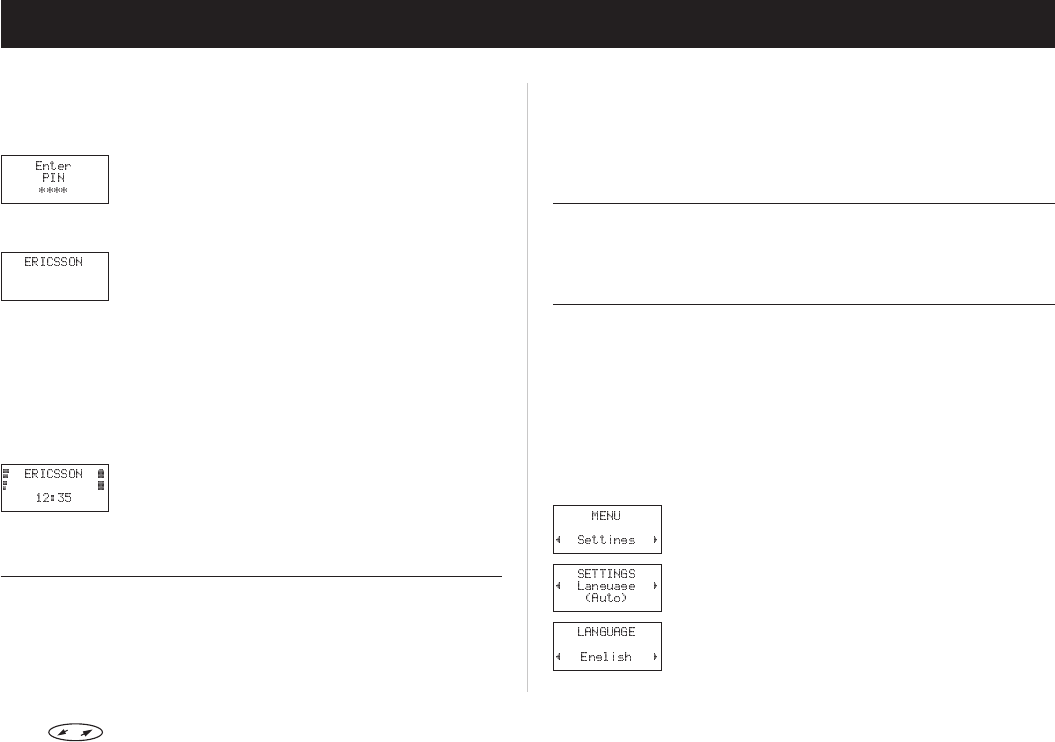
A green indicator on the charger lights up. If
not, make sure you have put the plug into the
charger correctly. (You may have to press hard.)
Connect the clear plastic plug on the charger
cable to the charger. It is correctly inserted
when it snaps into place.
Connect the other
end of the cable to
the phone according
to the picture. The
flash symbol on the
plug must face up-
wards. Note that you
may have to press
hard.
The phone will automatically start charging the battery
when you attach the charger. To indicate charging:
• the battery meter in the display is continuously
filled and emptied.
• the indicator on top of the phone shows a steady
red light (green, if the phone is turned on).
When the battery is fully charged, the battery meter in
the display will show full and the indicator on top of the
phone will show a steady green light.
Note! It is possible to use the phone while the battery is being
charged. This will, however, increase the charging
time.
To Disconnect the Charger
lTwist the plug con-
nected to the phone
upwards and pull it
out.
When to Charge the Battery
The nickel metal hydride battery that comes with your
phone can be charged whenever you wish without
losing performance. This is not the case with the
cheaper nickel cadmium type batteries, often sold as
accessories from other suppliers. For optimal talk and
standby time in the long run, we recommend that you
only use Ericsson original batteries with your I 888
WORLD.
To remind you that the battery will soon need to be
charged or replaced with a charged one:
Press to enter the menu system. See inside the cover. 5

• an alarm signal (a long beep) sounds and the mes-
sage ‘Battery low’ appears for ten seconds in the
display.
• the indicator light on top of the phone starts blink-
ing red.
Note! If the phone is left turned on, the low battery alarm will
be repeated several times and, finally, the phone will
turn itself off when the battery is no longer able to
power it satisfactorily. It might be possible to turn the
phone on again, but you will not be able to make or re-
ceive any calls. You should charge the battery or re-
place it with a charged one.
6Press to enter the menu system. See inside the cover.
Turning On the Phone
To turn on the phone:
Press and hold down the NO (ON/OFF) key until
you hear a click. The display prompts you to
enter your PIN.
Enter your PIN. The digits appear as stars in the
display. If you make a mistake while entering
your PIN, erase the wrong digit by pressing the
CLR key.
Press YES.
If you enter your PIN correctly, ‘ERICSSON’ will appear in
the display. The phone will then search for a network.
Note! If your PIN is entered incorrectly three times in a row,
the SIM card will be blocked and you will have to un-
block it using your PUK code. See chapter ‘Security’.
When a network is found, the phone beeps three times.
The indicator light on top of the phone flashes green
once every second and your network operator’s name
(in most cases abbreviated) is shown in the display. If
you have the charger connected, the indicator will
show a steady green light instead of a flashing one.
You can now make and receive calls. This is called
standby mode.
When No Network Name Is Displayed
If the message ‘Emergency calls only’ is displayed, you
are within range of a network but you are not allowed
to use it. However, in an emergency, you can call the
international emergency number 112 (or 911). See
chapter ‘Making and Receiving Calls’.
If the message ‘No network’ is displayed, there is no
network within range or the received signal is too
weak. You have to move to obtain a sufficiently strong
signal.
To Turn Off the Phone
lIn standby mode, press and hold the NO
(ON/OFF) key until the display is turned off.
Initial Settings
The first time you turn on your I 888 WORLD, you may
want to change the default language and ring level
settings, and set the clock.
Display Language
Most modern SIM cards automatically set the display
language to the language of the country where you
bought your SIM card. If this is not the case, the default
language is English.
To change the display language:
Press the navigation key LEFT or RIGHT until the
‘Settings’ menu appears.
Press YES to enter the ‘Settings’ menu.
Press the navigation key to the LEFT until the
‘Language’ menu appears.
Press YES to enter the ‘Language’ menu.
Press the navigation key until you find the
desired language.
Press YES to select the language.
Press to enter the menu system. See inside the cover. 7
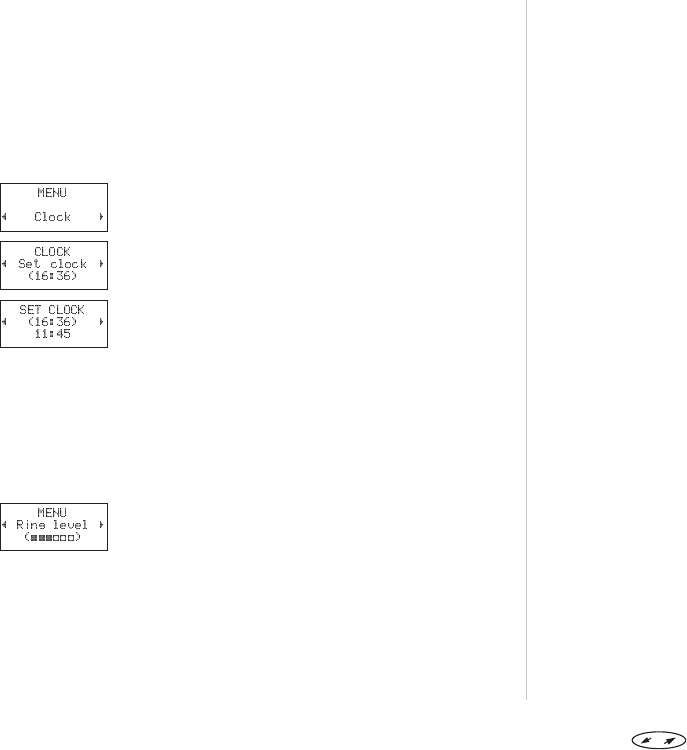
Press CLR to return to standby mode.
Note! If by accident you end up with your phone displaying a
language you do not understand, you can return to Eng-
lish by pressing LEFT 0000 RIGHT at any time.
Setting the Time
The time is shown at the bottom of the display. When
you buy your phone, the time is normally not set.
If you want to set the time:
Press the navigation key LEFT until the ‘Clock’
menu appears.
Press YES to enter the ‘Clock’ menu.
Press the navigation key RIGHT until the ‘Set
clock’ menu appears.
Press YES to enter the ‘Set clock’ function.
Enter the correct time in hours and minutes and
press YES.
Press CLR to return to standby mode.
Note! The time is by default presented in the 24-hour format.
If you prefer the 12-hour format, you can change the
default setting.
For more information, see ‘Personalizing Your Phone’.
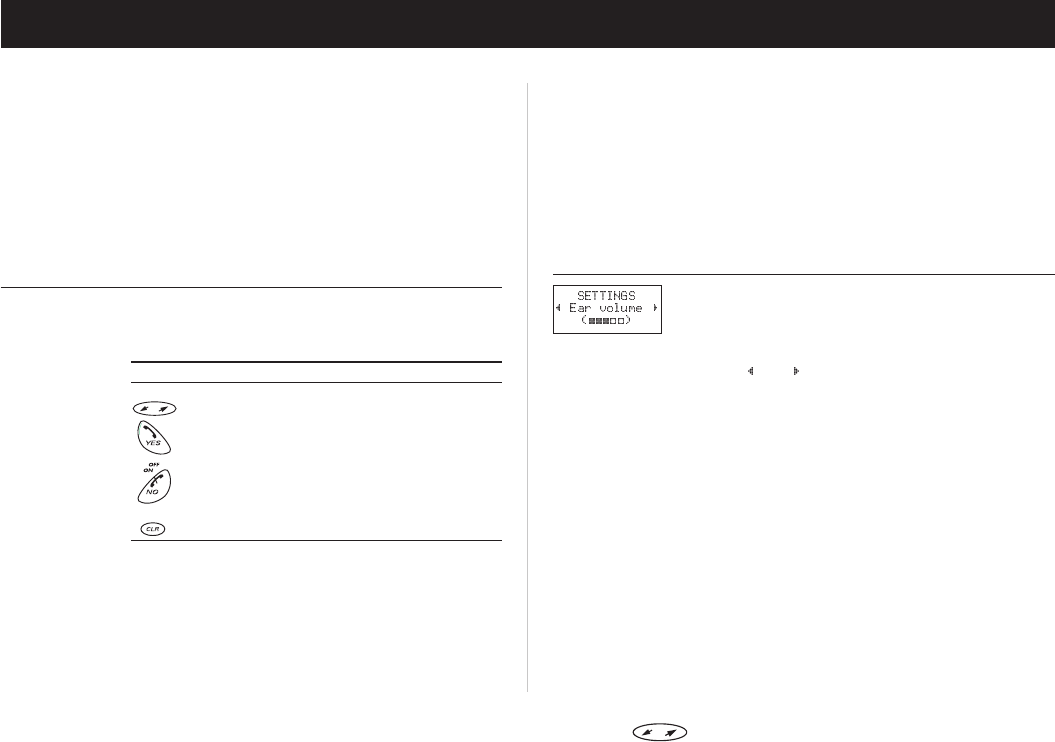
To Set the Ring Signal Level
Press the navigation key RIGHT.
The text ‘Ring level’ and a bar representing the
ring signal level appears in the display.
Press YES to enter the ‘Ring level’ menu.
Use the navigation key to set the ring signal
level.
• Pressing RIGHT increases the volume.
• Pressing LEFT decreases the volume.
The phone rings once with the actual setting as
you press the navigation key, except for the
‘Off’ and ‘Step’ settings.
Press YES to save the setting.
Press CLR to return to standby mode.
Tip! Use the volume keys on the side of the phone to change
the ring level silently.
Note! If you have your I 888 WORLD connected to external
equipment (for example handsfree equipment or a vi-
brating call alert device), the ring signal level will be set
for this situation separately. See ‘Personalizing Your
Phone’ for more information.
8Press to enter the menu system. See inside the cover.
Making and Receiving Calls
The instructions in this chapter assume that you have
turned on your phone and that you are within range of a
network.
Emergency Calls
To make an emergency call:
If the phone is not on, turn it on by pressing the
NO key until you hear a click.
Enter the international emergency number 112,
(or 911 if you are in the Americas).
Note! 911 can also be used in areas that use 112 as the inter-
national emergency number, and vice versa.
Press YES. The display shows ‘Emergency’.
Note! Some operators may require that a SIM card has been
inserted into the phone and, in some cases, that the PIN
has been entered as well.
Making Calls
Domestic Calls
Enter the area code and phone number. The
digits are shown in the display.
• If you need to erase a digit, press CLR.
• To erase all digits, press and hold the CLR key
until all digits have been erased.
Press YES to make the call. The display shows
‘Calling’, followed by ‘Connecting’.
• When the call is answered, a call time meter
in the display shows how long you have been
on the phone in minutes and seconds.
• If nobody answers your call or you cannot get
through, press NO. The number is stored in a
memory which makes it easy to repeat the
call. (See ‘Redialling a Number’ below.)
• If the number is busy, you can redial it auto-
matically. (See ‘Redialling a Number” below.)
When you want to end the call, press NO. The
Call Time meter shows the duration of the call
for three seconds.
Tip! It is possible to check the duration of the call later on.
See ‘Other Useful Features’.
International calls
Press and hold the 0 key until ‘+’ is displayed.
The (+) will automatically be replaced by the
international dialling prefix for the country you
are calling from.
Enter the country code, the area code (without
any leading zero) and the phone number.
Press YES to make the call.
Note! When you are abroad, your phone will automatically
search for a network that you are allowed to use. Which
networks you can use depends on the agreements your
operator has signed with the operators in the country
you are visiting. See chapter ‘Networks’.
Press to enter the menu system. See inside the cover. 9
Checking the first characters
If you have entered more characters than can be seen in
the display, the first characters will be replaced by the
symbol. To check the first characters:
press the navigation key RIGHT.
Receiving a Call
When you receive a call, the phone rings and the indica-
tor light on top of the phone blinks green rapidly. The
display shows ‘Answer?’.
If your subscription includes the Calling Line Identifica-
tion service and the caller’s network sends the number,
you will see the caller’s number at the bottom of the
display. If the number is stored with a name in the
phone book, the name will be shown in the display.
Note! The phone must be turned on and within coverage of a
network before a call can be received.
To Answer the Call
Open the flip.
If the flip is already open; press YES.
When the call is finished, press NO;
or close the flip.
Tip! To mute the ring signal when you receive a call, press
CLR.
To Reject the Call
There are two ways of rejecting the call:
• Press the NO key.
• Press the volume key on the side of the phone
twice.
The caller will hear a busy tone if the caller’s network
supports this function. If ‘Divert on busy’ is activated,
the incoming call is diverted to the number you have
specified (see ‘Diverting Incoming Calls’).
Redialling a Number
Your I 888 WORLD conveniently lets you redial the last
phone numbers you have called (15 or more, depend-
ing on your SIM card). It can also redial a number auto-
matically if the connection failed when you first called.
To Redial Previously Called Numbers
Press YES. The display now shows the last di-
alled number.
Press the navigation key RIGHT or LEFT until the
number you want to call is shown on the
bottom row of the display.
Press YES to make the call.
Note! If you want to clear the last dialled numbers memory,
do the following:
Press the navigation key LEFT. The ‘Phone book’
menu appears.
Press YES to enter the ‘Phone book’ menu.
Press the navigation key LEFT until the ‘Dialled
numbers’ function appears.
Press YES to select the ‘Dialled numbers’ func-
tion.
Press and hold the CLR key. The question ‘Erase
all?’ appears.
Press YES to erase the last dialled numbers from
the memory.
Press CLR to return to standby mode.
The Automatic Redialling Function
If the connection fails and the receiver’s network
supports it, the display shows ‘Retry?’ on the top row
and the reason for the failure on the second row.
10 Press to enter the menu system. See inside the cover.
Checking the first characters
If you have entered more characters than can be seen in
the display, the first characters will be replaced by the
symbol. To check the first characters:
press the navigation key RIGHT.
Receiving a Call
When you receive a call, the phone rings and the indica-
tor light on top of the phone blinks green rapidly. The
display shows ‘Answer?’.
If your subscription includes the Calling Line Identifica-
tion service and the caller’s network sends the number,
you will see the caller’s number at the bottom of the
display. If the number is stored with a name in the
phone book, the name will be shown in the display.
Note! The phone must be turned on and within coverage of a
network before a call can be received.
To Answer the Call
Open the flip.
If the flip is already open; press YES.
When the call is finished, press NO;
or close the flip.
Tip! To mute the ring signal when you receive a call, press
CLR.
To Reject the Call
There are two ways of rejecting the call:
• Press the NO key.
• Press the volume key on the side of the phone
twice.
The caller will hear a busy tone if the caller’s network
supports this function. If ‘Divert on busy’ is activated,
the incoming call is diverted to the number you have
specified (see ‘Diverting Incoming Calls’).
Redialling a Number
Your I 888 WORLD conveniently lets you redial the last
phone numbers you have called (15 or more, depend-
ing on your SIM card). It can also redial a number auto-
matically if the connection failed when you first called.
To Redial Previously Called Numbers
Press YES. The display now shows the last di-
alled number.
Press the navigation key RIGHT or LEFT until the
number you want to call is shown on the
bottom row of the display.
Press YES to make the call.
Note! If you want to clear the last dialled numbers memory,
do the following:
Press the navigation key LEFT. The ‘Phone book’
menu appears.
Press YES to enter the ‘Phone book’ menu.
Press the navigation key LEFT until the ‘Dialled
numbers’ function appears.
Press YES to select the ‘Dialled numbers’ func-
tion.
Press and hold the CLR key. The question ‘Erase
all?’ appears.
Press YES to erase the last dialled numbers from
the memory.
Press CLR to return to standby mode.
The Automatic Redialling Function
If the connection fails and the receiver’s network
supports it, the display shows ‘Retry?’ on the top row
and the reason for the failure on the second row.
To redial the number automatically:
lPress YES.
• The number will automatically be redialled
until the call is answered, up to 10 times.
• If you press any key or receive a call, the re-
dialling will be interrupted.
• If the redialling is successful, the phone will
beep and then you will hear a ring signal.
If you do not want to retry, press NO.
Calling Someone Who Has Called You
If you subscribe to the Calling Line Identification
service, and the caller’s network sends the number, the
numbers of the last ten answered calls are stored in the
phone.
To recall one of the last ten answered numbers:
Press the navigation key to the LEFT. The ‘Phone
book’ menu appears.
Press YES to enter the ‘Phone book’ menu.
Press the navigation key LEFT repeatedly until
the ‘Answered calls’ function appears.
Press YES to select the ‘Answered calls’ function.
Press the navigation key until you find the
number you want.
Press YES to make the call.
To clear the answered calls memory:
Press the navigation key to the LEFT. The ‘Phone
book’ menu appears.
Press YES to enter the ‘Phone book’ menu.
Press the navigation key LEFT repeatedly until
the ‘Answered calls’ function appears.
Press YES to select the ‘Answered calls’ function.
Press CLR. The question ‘Erase all?’ appears.
Press YES.
Unanswered Calls
If you have received calls but have been unable to
answer, the number of unanswered calls will be shown
in the display until you press CLR.
Information about the ten last missed calls is saved in
your phone’s memory, which makes it possible for you
to check when the calls were received. If your subscrip-
tion includes the Calling Line Identification service and
the caller’s network sends the number, you can also
find out who called.
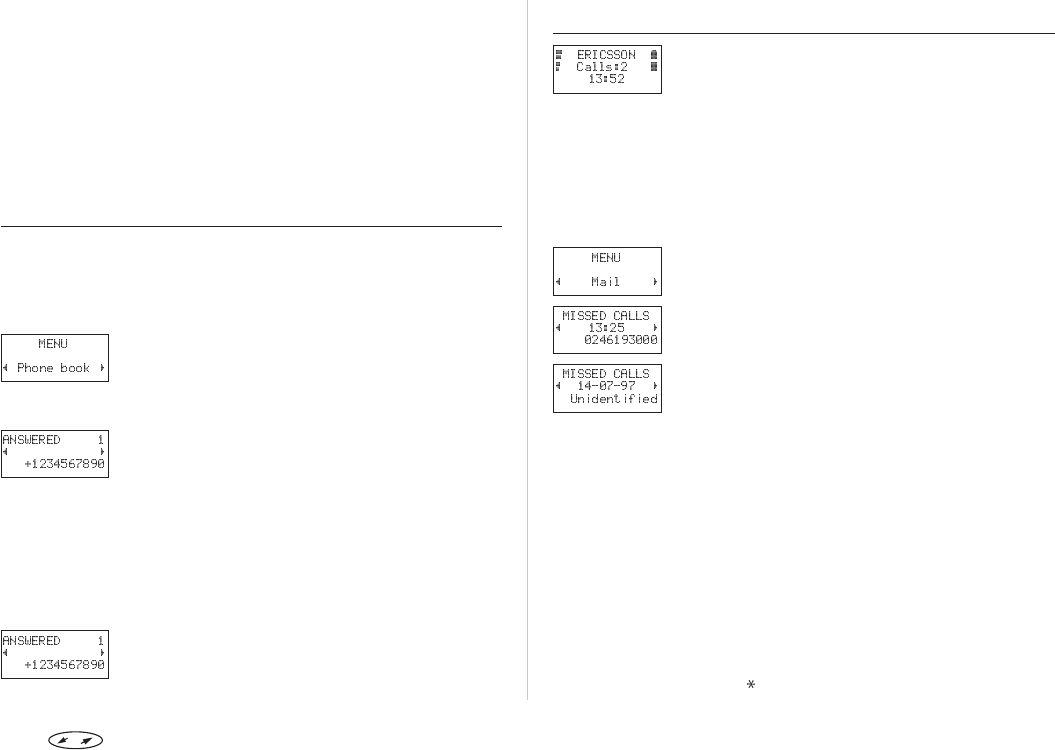
To Find Out Who Called and When
Press the navigation key to the LEFT repeatedly
until the ‘Mail’ menu appears.
Press YES to enter the ‘Mail’ menu.
Press the navigation key repeatedly until the
‘Missed calls’ function appears.
Press YES to enter the ‘Missed calls’ function.
The last caller’s number (if your subscription in-
cludes the Calling Line Identification service) is
now shown in the display together with the
time (or date) when the call was received. If no
information about the caller’s number was re-
ceived, the display will show one of the follow-
ing:
• ‘Unidentified’, which means that no informa-
tion was available.
• ‘Restricted’, which means that the caller
wanted to withhold the number.
To see your other unanswered calls, press the
navigation key repeatedly.
Press CLR to return to standby mode.
Note! If you check a missed call within 24 hours, the time of
the call is displayed. Otherwise, the time is replaced by
the date. You can toggle between date and time by
pressing .
Press to enter the menu system. See inside the cover. 11
To Erase a Number from the Missed
Calls Memory
When the information about the call is shown,
press CLR.
Press YES.
Hiding or Showing Your Number
With most common subscriptions, the caller’s number
is sent when a call is made. This means that the receiver
can see your phone number when you make a call.
However, some operators offer subscriptions where
your phone number is normally hidden.
If you want to change the setting for a particular call,
this is possible provided the network you use supports
it.
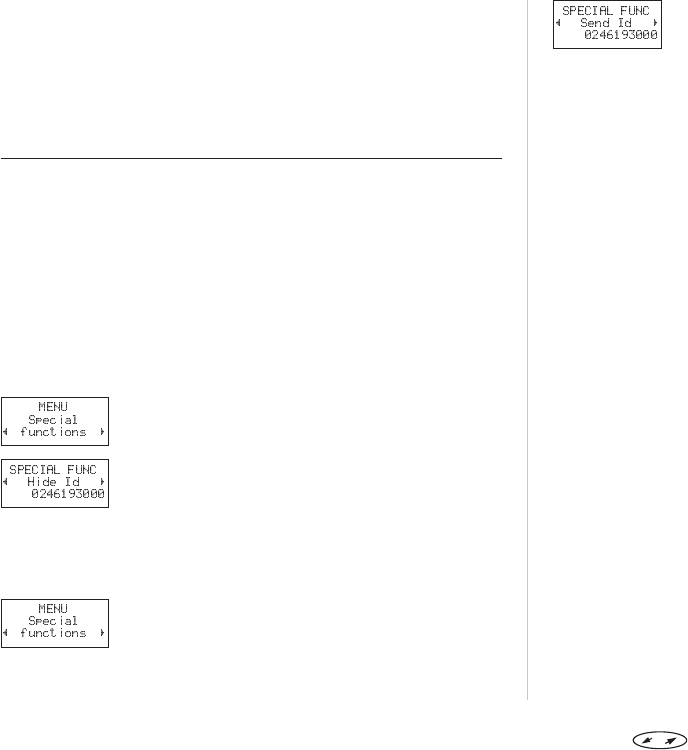
To Hide Your Phone Number for a Par-
ticular Call
Enter the phone number you wish to call.
Press the navigation key RIGHT.
The ‘Special functions’ menu now appears.
Press YES to enter the ‘Special functions’ menu.
Press the navigation key repeatedly until ‘Hide
Id’ appears.
Press YES to make the call.
To Show Your Number for a Particular
Call
Enter the phone number you wish to call.
Press the navigation key RIGHT.
The ‘Special functions’ menu now appears.
Press YES to enter the ‘Special functions’ menu.
Press the navigation key until ‘Send Id’ appears.
Press YES to make the call.
12 Press to enter the menu system. See inside the cover.
During a Call
Your I 888 WORLD has several functions which you
might find helpful while you are on the phone.
To Change the Earpiece Volume
If you want to change the earpiece volume during a call:
lPress the volume keys on the side of the phone
up or down.
• Pressing UP increases the volume.
• Pressing DOWN decreases the volume.
See also ‘Personalizing Your Phone’.
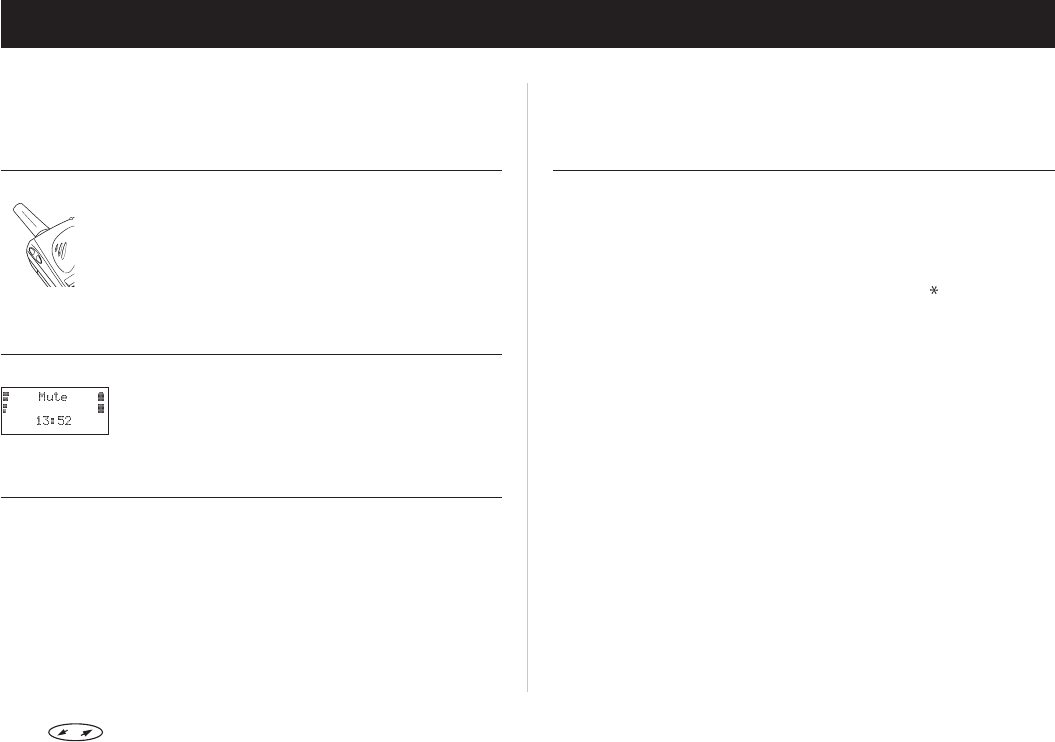
To Mute the Microphone
To mute the microphone temporarily during a call:
Press and hold the CLR key. ‘Mute’ is shown in
the display.
To resume conversation, release the CLR key.
To Use the Display as a Scratch Pad
If you need to write down a phone number during a call,
you can use the Scratch Pad function in the I 888
WORLD. To do this:
lEnter the number using the numeric keys.
When you end the call, the number remains in the dis-
play. You can now call the number by pressing YES or
save it in the Phone Book (see chapter ‘The Phone
Book’).
Note! If you press any numeric key while on the phone, the
person on the other end of the line will hear a tone.
To Send Tone Signals
To use telephone banking services or control a phone
answering machine, you need to use codes. These
codes are sent as tone signals (also known as DTMF
tones or touch tones).
To send tone signals/codes during a call:
lPress the appropriate keys (0–9, and #).
Tip! You can also save the code together with a number in
the Phone Book. See ‘Creating Your Personal Phone
Book’ in the ‘Phone Book’ chapter on how to do this.
Note! If you send tone signals while on the phone, the person
on the other end of the line will hear the tones.
Press to enter the menu system. See inside the cover. 13
The Menu System
The menu system of your I 888 WORLD allows you to
control the phone’s functions and to customize it to suit
your personal preferences.
Each menu contains a list of options; some of these
have submenus with additional options.
To help you find your way around the menus, we
recommend that you use the fold-out on the inside of
the cover.
Moving through the Menu System
The menus are arranged in a continuous loop (see the
fold-out), which you move through with the
NAVIGATION,YES,NO and CLR keys.
Press… to…
move clockwise or anticlockwise.
select a menu or a function.
go back one level in the menu system
and/or leave a setting unchanged.
go back to the standby menu.
To select a menu or make a setting:
Press the navigation key LEFT or RIGHT until you
reach the desired menu or function.
Press YES to enter the menu or to select the
function.
Press the navigation key to find the desired sub-
menu or to select a setting alternative.
Press YES to enter the submenu or to confirm
the setting.
Note! If you enter the menu system, but do not press any keys
in 60 seconds, the phone will return to standby mode.
Tip! Instead of pressing the navigation key repeatedly, you
can press and hold it down until you reach the desired
menu or submenu.
Display Text and Symbols
When you move through the menu system, the follow-
ing hints can help you:
• Capital letters are used to indicate the menu or
function selected.
• When and are displayed, there are more op-
tions you can scroll through with the navigation
key.
• Text in brackets indicates the current setting of
the function that is shown in the display.
14 Press to enter the menu system. See inside the cover.
The Phone Book
The Phone Book in your I 888 WORLD lets you store and
recall phone numbers. This means that the phone can
store all your important numbers. You do not have to
remember them or carry your address book around.
The Phone Book also keeps track of your last dialled
numbers and, if you subscribe to the Calling Line Identi-
fication service, the last answered numbers. Con-
venient if you have to call someone back.
When you receive a call and the caller’s number is in the
Phone Book, you will see the name in the display.
Tip! Your I 888 WORLD comes with the Ericsson Mobile Of-
fice Suite software. When installed on your computer,
the Mobile Office Suite lets you manage your Phone
Book from your computer in a simple way.
You can find more information about the Mobile Office
Suite in the chapter ‘The Mobile Office Suite’.
Before You Start
Before you start creating your personal Phone Book,
there are a few things you need to know. In this section,
you will learn about the two different memories and
how to store the numbers with the international prefix.
We also recommend that you at this stage read the
section about entering characters, even though you
might need to go back to this when you follow the in-
structions later on.
Phone Book Memories
You can store your phone numbers in two different
memories:
• the card memory on the SIM card,
• the phone memory.
Storing your numbers in the card memory allows you to
use the numbers stored on the SIM card even when you
change phones, i.e. when you insert your SIM card into
another phone.
On the other hand, by storing your numbers in the
phone memory, they are always available to you on
your phone, even if you change SIM cards.
The memory positions in the card memory are
numbered from 1 onwards. The actual number of
memory positions available depends on your SIM card.
The phone memory can hold up to 99 phone numbers.
The memory positions are labelled ¤1–¤99.
Note! In the ‘Phone book’ menu, press # to enter the ¤ charac-
ter. Outside the ‘Phone book’ menu, you must press
and hold down # to enter the ¤ character.
International Numbers
If you intend to use your phone both at home and
abroad, you should store all phone numbers as interna-
tional phone numbers, that is with the ‘+’ sign – which
automatically will be replaced by the international dial-
ling prefix for the country you are calling from – fol-
lowed by the country code, then the area code and the
phone number.
• To enter the (+) sign, press and hold 0.
• Omit any leading zero in the area code.
Press to enter the menu system. See inside the cover. 15
Entering Characters
In the phone book you can accompany any number you
store with a name. To enter the characters in the name,
follow the instructions below.
Press the appropriate key, 1–9, 0 or #,
repeatedly until the desired character appears in
the display.
Press… to get…
1 Space-?!,.:;"'<=>( )1
2 ABCÅÄÆàÇ2
3 DEFèÉ3
4 GHIì4
5 JKL5
6 MNOÑÖØò6
7 PQRSß7
8 TUVÜù8
9 WXYZ9
0 +&@/¤%$£¥§¿¡0
# #
For example:
• To enter an A, press 2 once.
• To enter a B, press 2 twice.
Tip! To enter a digit, you can press and hold the numeric
key.
To enter the second letter on the numeric keys directly,
press and hold the upper volume key and press the
desired numeric key. To enter the third letter, press the
lower volume key instead.
Note! If there is a pause of more than 60 seconds between
entering characters, the phone will return to the
standby menu.
To Enter Small Letters
Enter the letter, for example an ‘A’, and then
press . An ‘a’ appears.
Small letters now appear until you press
again.
To Check the First Characters
If you enter more characters than can be seen in the dis-
play, the first characters will be replaced by the sym-
bol. To check the first characters you have entered:
press the navigation key LEFT.
Creating Your Personal Phone Book
To Store a Phone Number
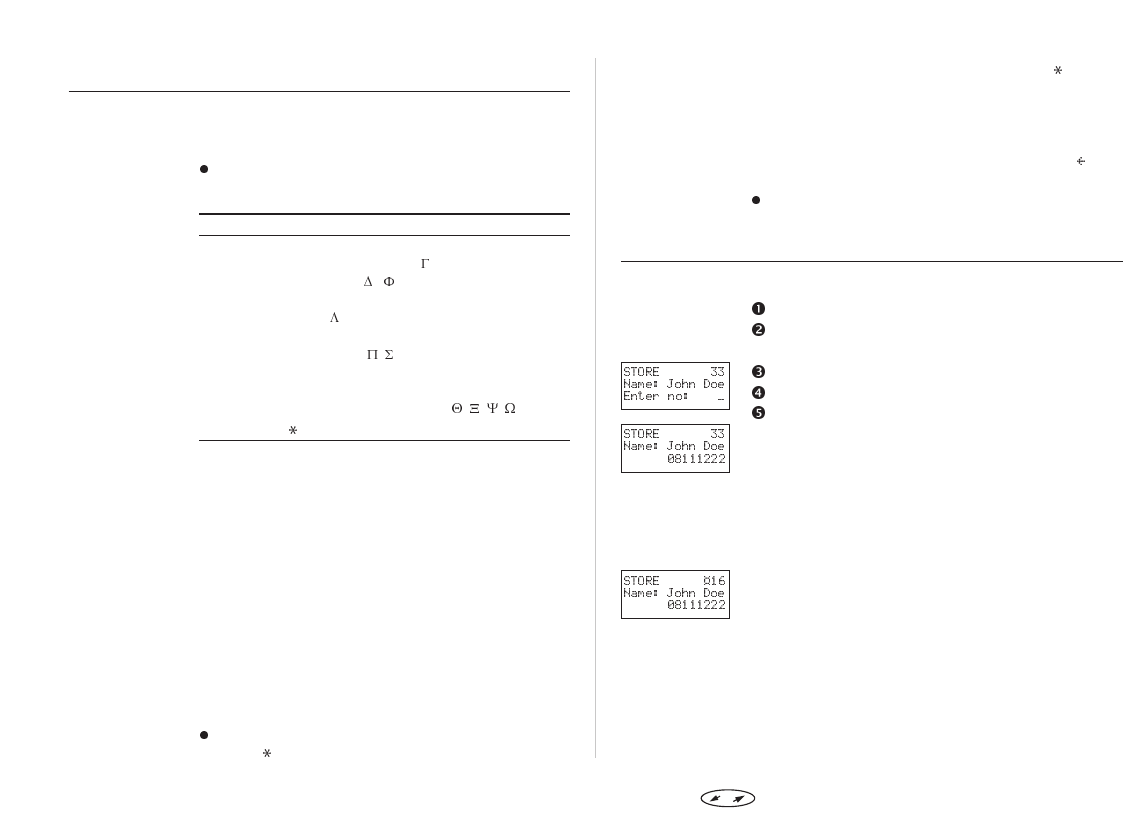
From the ‘Phone book’ menu, select ‘Store’.
Enter a name to accompany the phone number.
Use the numeric keys as described above.
Press the navigation key RIGHT.
Enter the phone number.
You now have four options:
– To save the number in the card memory, in the
first empty position (displayed in the top right-
hand corner):
• Press YES.
– To save the number in the card memory, in a
position you decide:
• Press the navigation key RIGHT, enter the
position and then press YES.
– To save the number in the phone memory, in
the first empty position:
• Press the navigation key RIGHT, press the #
key twice and then press YES.
– To save the number in the phone memory, in a
position you decide:
• Press the navigation key RIGHT, press the #
key once, enter the position and then press
YES.
16 Press to enter the menu system. See inside the cover.
Tip! If you enter a number in the scratch pad during a call,
you can store it in the Phone Book by selecting ‘Store’
from the ‘Phone book’ menu while you have the number
in the display.
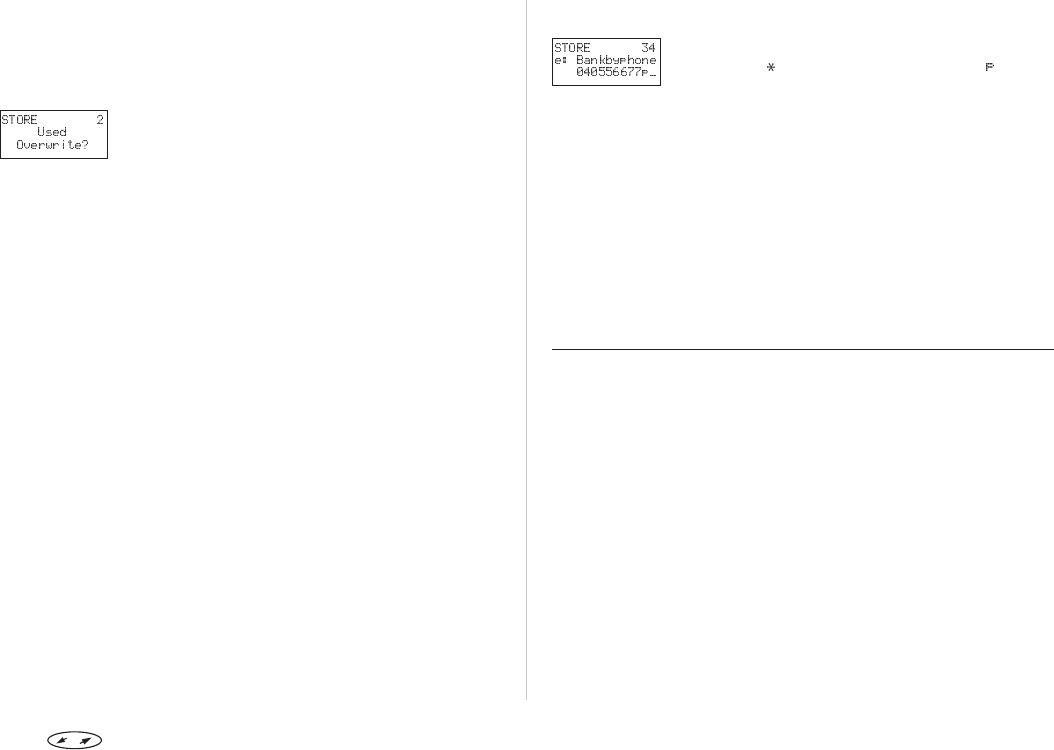
Overwrite Protection
If you try to store a phone number in a position which
already contains a phone number, the message ‘Used
Overwrite?’ appears in the display. You then have two
options.
To store the number in a different position:
Press NO.
Enter the new position number.
Press YES
To store the number in the selected position, thus eras-
ing the old number:
lPress YES.
When the Memories are Full
• If you try to store a phone number when all the
positions in the card memory are full, a position
number in the phone memory will be suggested on
the top row of the display.
• If both memories are full, no position number will
be suggested. If you still wish to store the phone
number, you have to erase the old number by en-
tering a position that is already occupied.
To Store a Number With a Tone Signal
Code
To use telephone banking services or control a phone
answering machine, you will need to use codes. These
codes are sent as tone signals (also called DTMF tones
or touch tones).
If you want to save the phone number in the Phone
Book with the codes:
Follow the instructions on how to store a phone
number until you enter the number.
After entering the phone number, press and
hold the key until the pause character ‘ ’
appears.
Enter the code.
If needed, insert another pause, another code
and so on.
Continue following the instructions on how to
store a phone number.
To make a call with tone signal codes, proceed as
described in ‘Making and Receiving Calls’. When you
make the call, the phone dials the number, waits until
the call is answered and then sends the code. If you in-
serted another pause and another code, it will pause
again, send the next code and so on.
Recalling a Phone Number
The Speed Dialling Facility
You can call the phone numbers that you store in the
positions 1–9 in the card memory by entering the posi-
tion number and then pressing YES. Therefore, you
should save positions 1–9 for important numbers.
For example:
If you want to call John, whose number is stored in posi-
tion 3 in the card memory:
Enter the digit 3.
Press YES.
To Recall a Phone Number Using the
Name
From the ‘Phone book’ menu, select ‘Name
recall’.
Press to enter the menu system. See inside the cover. 17
Enter the name you want to recall (or the first
letters of it) using the numeric keys as
described above.
You do not have to enter the entire name; the
first few letters will do. The phone matches the
letters with existing names in its memory.
Press YES.
The best match between the letters you entered
and the names in the Phone Book is displayed.
You can also see the storage position in
brackets.
If the name displayed is not the one you want,
press the navigation key until you find the
correct name and number.
Press YES to make the call.
Tip! You can also enter the name directly after pressing LEFT
from the empty standby display.
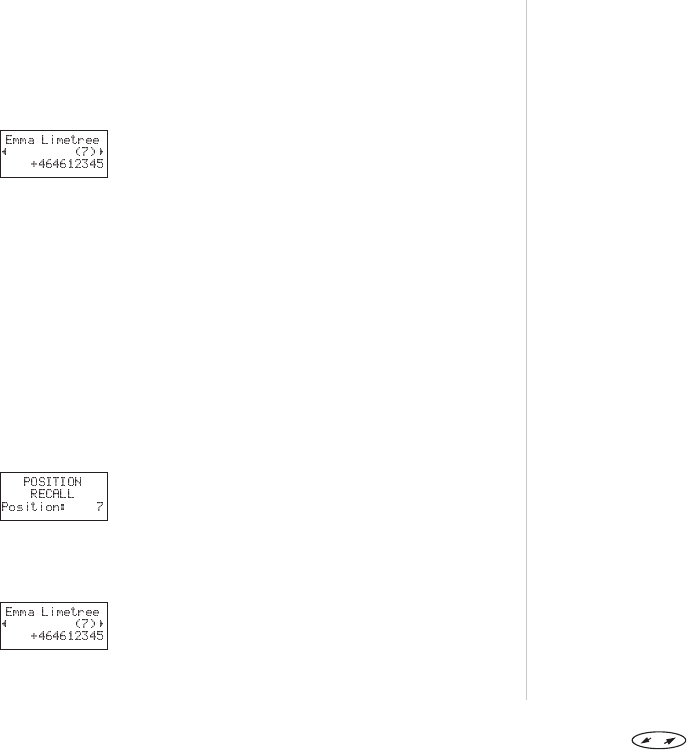
To Recall a Phone Number Using the
Position
If you know the memory position where you have
stored a certain phone number, you can recall the
number using the position.
From the ‘Phone book’ menu, select ‘Position
recall’.
Enter the position where the number is stored.
• For a position in the card memory, simply
enter the number.
• For a position in the phone memory, press
and hold the # key until the ‘¤’ character
appears and then enter the number.
Press YES.
The name and phone number now appear in the
display.
If you entered the wrong position number, press
the navigation key repeatedly until you find the
phone number.
To call the number, press YES.
Tip! You can also enter the position directly in the standby
display and then press the # key to recall the phone
number. Do not forget the ‘¤’ before the position if the
number is stored in the phone memory (to get the ‘¤’
character, press and hold the # key).
Hiding or Showing Your Number When
Making a Call
With most common subscriptions, the caller’s number
is sent when a call is made. This means that the receiver
can see your phone number when you make a call.
However, some operators offer subscriptions where
your phone number is normally hidden.
If you want to change the setting for a particular call,
this is possible provided the network you use supports
it.
To hide your phone number for a particular call, when
you recall a number from the Phone book:
Recall the phone number, but press NO instead
of YES.
The number is now shown in the standby dis-
play.
Press the navigation key RIGHT.
The ‘Special functions’ menu now appears.
Press YES to enter the ‘Special functions’ menu.
Press the navigation key repeatedly until ‘Hide
Id’ appears.
Press YES to make the call.
To show your number for a particular call, when you
recall a number from the Phone book:
Recall the phone number, but press NO instead
of YES.
The number is now shown in the standby
display.
Press the navigation key RIGHT.
18 Press to enter the menu system. See inside the cover.

The ‘Special functions’ menu now appears.
Press YES to enter the ‘Special functions’ menu.
Press the navigation key until ‘Send Id’ appears.
Press YES to make the call.
Keeping Your Phone Book Up to Date
As the people you know change jobs, move, marry etc.,
you might want to change the names and numbers in
your Phone Book, or perhaps delete some of the
entries.
To Edit an Entry in the Phone Book
There are two ways of finding the Phone Book entry you
wish to edit. You can use either the storage position or
the name.
To edit the entry using the position:
From the ‘Phone book’ menu, select ‘Edit’.
Enter the position number for the entry you
wish to edit.
• For a position in the card memory, simply
enter the number.
• For a position in the phone memory, press
and hold the # key until the ‘¤’ character
appears and then enter the number.
To select the entry, press YES.
You will now see:
• the name (displayed on the middle row),
• the phone number (displayed on the bottom
row),
• the storage position (displayed on the top
row).
To select the row you wish to edit, press the
navigation key RIGHT.
You will see the cursor on the right of the row
you selected.
Edit the row by using:
• the CLR key to erase,
• the numeric keys to enter letters or digits,
• the navigation key to move the cursor left (or
right when it is positioned in a row).
If needed, press the navigation key RIGHT to
select another row and continue editing.
To save the changes, press YES.
To edit the entry using the name:
From the ‘Phone book’ menu, select ‘Edit’.
Press the navigation key LEFT.
The display now shows ‘Find name’ in the
middle row.
Enter the name for the entry you wish to edit,
using the numeric keys. The more letters you
enter, the better the match.
To select the entry, press YES.
You can now continue from number 4 above.
Erasing a Phone Number
To erase a phone number from the Phone Book:
Recall the number using ‘Name recall’ or ‘Posi-
tion recall’.
Press and hold CLR. The question ‘Erase?’
appears.
To erase the number, press YES.
Note! You can also select ‘Erase’ from the ‘Phone book’ menu
and then enter the storage position.
If you want to erase all numbers from the phone
memory (not possible for the card memory), you can do
this as follows:
From the ‘Phone book’ menu, select ‘Erase all
from phone’.
To erase all phone numbers from the phone
memory, press YES.
Press to enter the menu system. See inside the cover. 19
Copying Phone Numbers between
Positions and Memories
As you fill up the Phone Book memories, you might
want to move entries from one memory to another or
between positions in the memories.
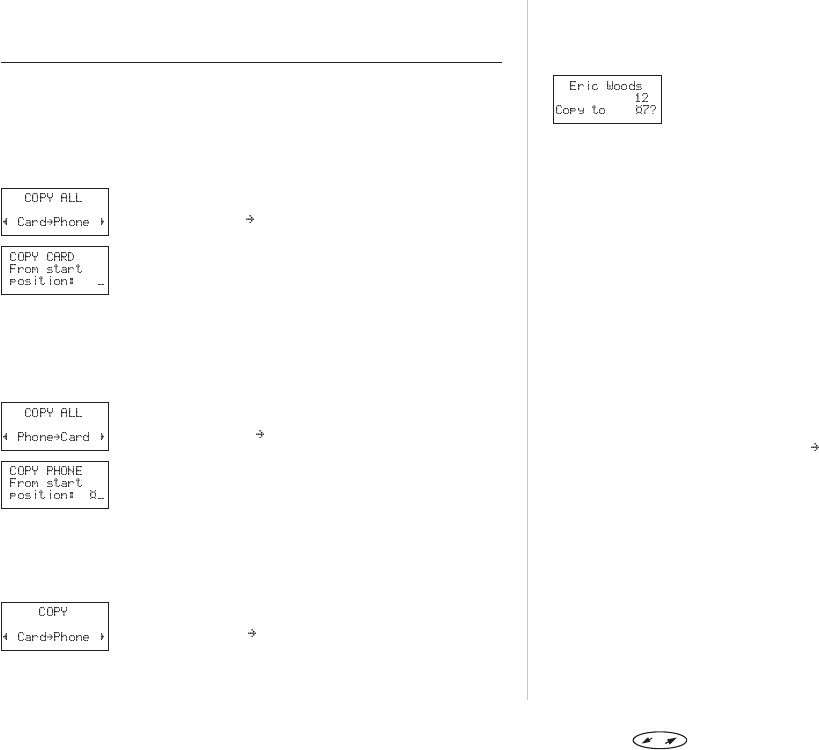
To Copy All Numbers from Card
Memory to Phone Memory
From the ‘Phone book’ menu, select ‘Copy all’.
Scroll to ‘Card Phone’ and press YES.
Enter the number of the first position in the card
memory you wish to copy and press YES.
Enter the number of the first position in the
phone memory you wish to copy to and press
YES.
To start the copying, press YES.
To Copy All Numbers from Phone
Memory to Card Memory
From the ‘Phone book’ menu, select ‘Copy all’.
Scroll to ‘Phone Card’ and press YES.
Enter the number of the first position in the
phone memory you wish to copy and press YES.
Enter the number of the first position in the card
memory you wish to copy to and press YES.
To start the copying, press YES.
To Copy Numbers from Card Memory
to Phone Memory One by One
From the ‘Phone book’ menu, select ‘Copy’.
Scroll to ‘Card Phone’ and press YES.
Enter the number of the first position in the
card memory you wish to copy and press YES.
Enter the number of the first position in the
phone memory you wish to copy to and press
YES.
To start copying, press YES.
The starting position in the card memory is dis-
played and the next empty position in the phone
memory is suggested.
For every entry on the card, from the start posi-
tion onwards, press:
•YES to copy.
•NO to go to the next position in the card
memory.
•CLR to copy to another position in either the
card or phone memory. Enter the number of
the position and press YES.
• Navigation key LEFT or RIGHT to move
between positions in the card memory.
To interrupt copying:
lPress CLR twice.
To Copy Numbers from Phone Memory
to Card Memory One by One
From the ‘Phone book’ menu, select ‘Copy’.
Scroll to ‘Phone Card’ and press YES.
To copy from the phone memory to the card memory
use the YES,NO and CLR keys as described above.
20 Press to enter the menu system. See inside the cover.
Sending and Receiving Text Messages
A very convenient feature of your Ericsson I 888 WORLD
is the Short Message Service (SMS). This allows you to
send and receive text messages consisting of up to 160
characters.
Using the Short Message Service, you do not have to
worry about whether the people you want to reach
check their answering machines or not. As soon as they
turn on their phone, the message will be waiting for
them.
Text messages can be received when the phone is in
standby mode, during a call or when incoming calls are
diverted to another phone number. If the recipient’s
phone is turned off when a message is sent, a notifying
message will be displayed soon after the phone is
turned on.
Apart from sending standard messages to phones, your
Ericsson I 888 WORLD is also prepared for sending fax
messages (group 3 and 4), X400 messages, e-mails and
telexes, via the Short Message Service. Check with your
network operator which message types you can use
and how.
Tip! Your I 888 WORLD comes with the Mobile Office Suite
software. The Mobile Office Suite makes it possible for
you to write and read SMS messages on your computer.
For more information on how this is done, please see
the chapter ‘The Mobile Office Suite’.
Note! The Short Message Service may not be available in all
networks.
Two Memories
The Messages Memory
If you do not want to read an incoming message at
once, it is automatically stored in the Messages
memory in the phone. This allows you to read it later
on.
If there are any unread incoming messages in the
messages memory, a letter icon ( ) will appear to the
left at the bottom of the display.
The Messages memory can hold up to 10 messages.
When all memory positions are full, the oldest read
message will be overwritten when a new message is re-
ceived.
If the Messages memory becomes full with unread
messages, new messages will automatically be stored
in the SIM card memory. If the SIM card memory
becomes full, the letter icon ( ) starts blinking.
Messages remain in the Messages memory until you
erase them (see ‘Erasing a Message,), until you insert a
different SIM card, or until the telephone needs the
memory space to store new messages
The SIM Card Memory
If you receive an important message and want to make
sure it is not erased from the messages memory, you
can store it in a memory on your SIM card. This means
that you can retrieve the message regardless of which
phone you use. Messages that are saved in the SIM card
memory remain there until you erase them.
If the SIM card memory becomes full, the letter icon
() starts blinking.
Press to enter the menu system. See inside the cover. 21
Setting the Phone for Text Messaging
If the phone number to your network service centre
cannot be retrieved from your SIM card, you must
specify the number yourself. Otherwise you cannot
reply to received messages or send your own
messages.
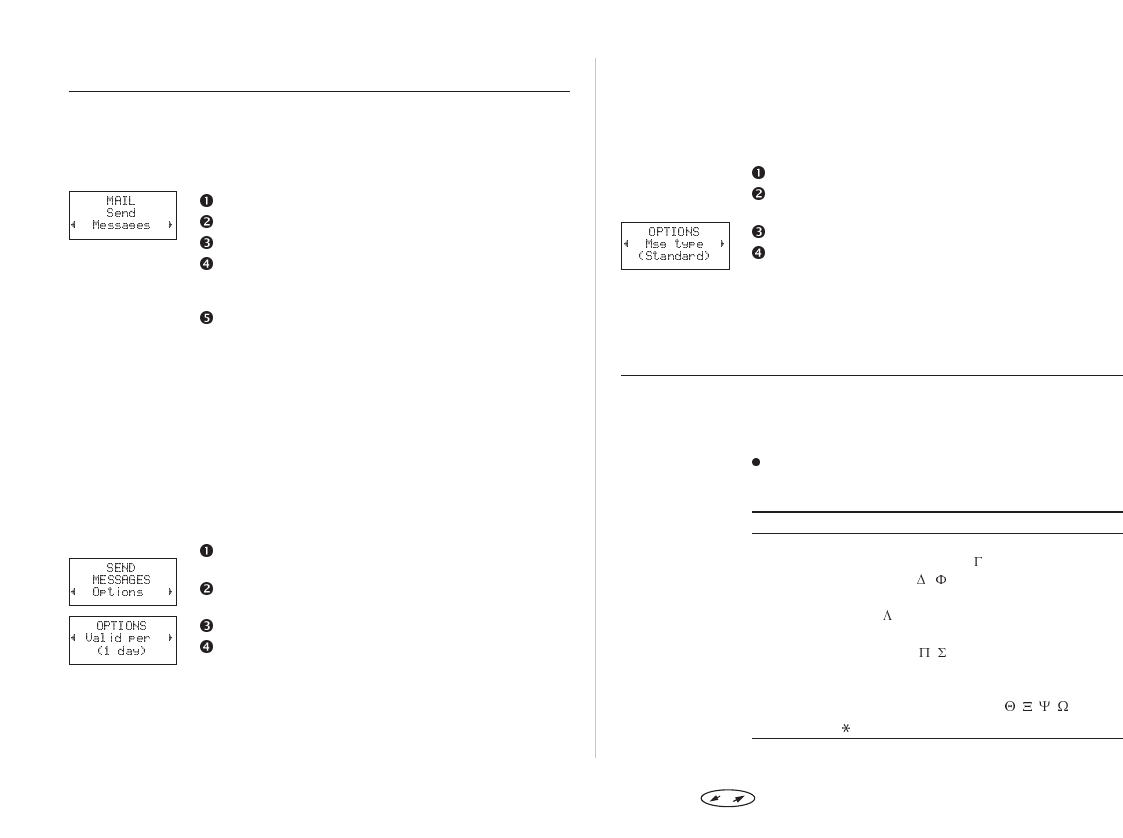
From the ‘Mail’ menu, select ‘Send messages’.
Scroll to ‘Options’ and press YES.
Scroll to ‘Serv cent’ and press YES.
If there is no number in the display, enter the
number of the service centre, including the
international prefix, and press YES.
To return to standby mode, press CLR.
Your phone is now ready to send and receive text
messages.
Note! Some network operators may only allow SMS to be sent
within their own network.
Setting Duration of Message
If your message cannot be delivered because the
recipient is not within reach of a network, you can
instruct your Service Centre to repeat the message for
one hour, 12 hours, one day, one week or the maxi-
mum period (determined by your service provider).
From the ‘Mail’ menu, select ‘Send messages’.
‘New’ appears.
Scroll to ‘Options’, using the navigation key, and
press YES.
Select the ‘Valid per’ option and press YES.
Scroll to the desired duration and press YES.
Changing Message Types
The phone is prepared for sending other types of
messages. Your network operator’s Service Centre may
offer the facility to convert a text message into a format
(fax, telex, voice, etc.) that suits the equipment that is
going to receive the message.
Consult your operator for further information about the
formats you can use.
To set the message type:
From the ‘Mail’ menu, select ‘Send messages’.
Scroll to ‘Options’, using the navigation key, and
press YES.
Scroll to the ‘Msg type’ option and press YES.
Select the required format, using the navigation
key, and press YES.
Note! Standard means an ordinary text message (SMS) to
other phones. Standard is the default message type.
Composing and Sending Messages
To Enter Letters
In order to compose your message, you have to know
how to enter characters using the numeric keys.
Press the appropriate key, 1–9, 0 or #, repeat-
edly until the desired character appears in the
display.
Press… to get…
1 Space-?!,.:;"'<=>( )1
2 ABCÅÄÆàÇ2
3 DEFèÉ3
4 GHIì4
5 JKL5
6 MNOÑÖØò6
7 PQRSß7
8 TUVÜù8
9 WXYZ9
0 +&@/¤%$£¥§¿¡0
# #
22 Press to enter the menu system. See inside the cover.
For example:
• To enter an A, press 2 once.
• To enter a B, press 2 twice.
Tip! To enter a digit, you can press and hold down the
numeric key.
To enter the second letter on the numeric keys directly,
press and hold the upper volume key and press the
desired numeric key. To enter the third letter, press the
lower volume key instead.
To enter small letters:
lEnter the letter, for example an ‘A’, and then
press . An ‘a’ appears.
Small letters will now appear until you press
again.
If you enter more characters than can be seen in the dis-
play, the first characters will be replaced by the sym-
bol. To check the first characters you have entered:
lPress the navigation key LEFT until you reach
the characters you want to view.
Note! If there is a pause of more than 120 seconds between
entering characters, the phone will return to the
standby menu.
Sending Messages
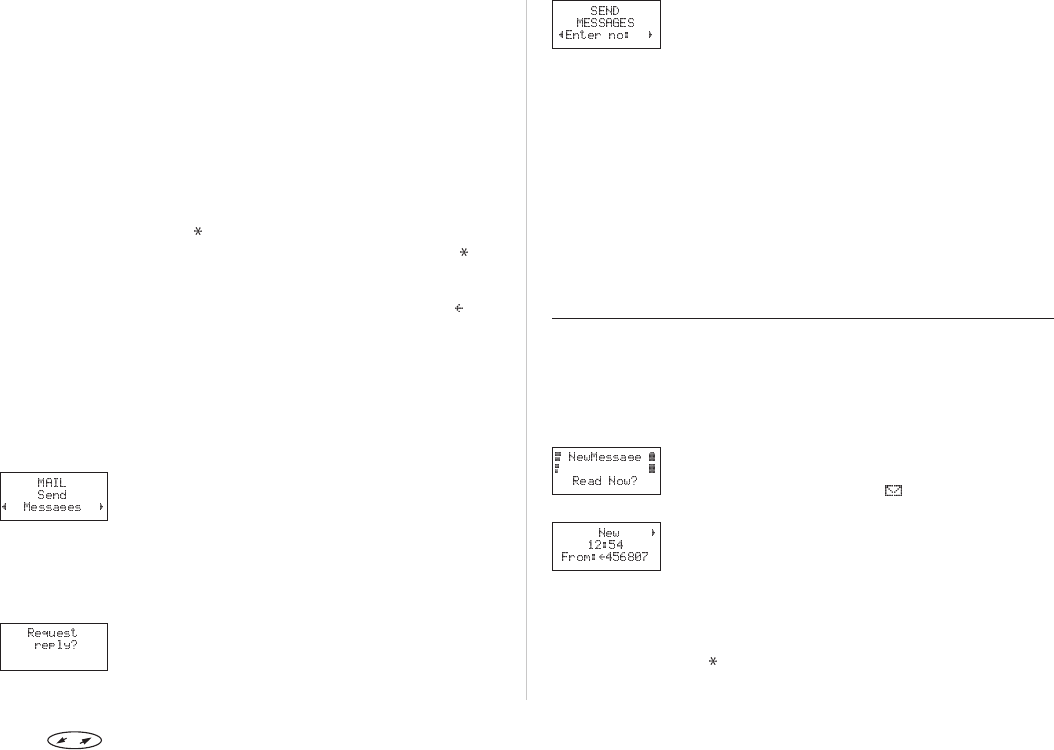
From the ‘Mail’ menu, select ‘Send messages’.
‘New’ appears.
Press YES. An empty display appears.
Enter your message. (See ‘To Enter Letters’).
You can scroll through the message text with
the navigation key and erase characters to the
left of the cursor or insert characters in the cur-
sor’s position.
When you have completed your message, press
YES. ‘Request reply?’ appears.
If you want the recipient to reply to the
message, press YES. If not, press NO.
Enter the recipient’s phone number or recall it
from the phone book. To access the ‘Phone
book’ menu press LEFT.
You now have two options:
• To send the message now, press YES.
• To store the message for later use, press NO.
The message is now stored in the messages
memory.
If you decide to send the message later, the message is
labelled ‘To Send’ instead of ‘Sent’ when you access the
message in the ‘Read messages’ menu.
Note! The same procedure is used with all types of messages,
for example e-mail, fax etc. Check with your network
operator which message types you can use.
Reading a Message
When you receive a message, you hear a sound and the
display informs you of it. The indicator light on the top
of the phone rapidly blinks green.
You now have two options:
• If you want to read the message at once, press YES
.
• If you want to read the message later on, press
NO. The message will be stored in the Messages
memory and a letter icon ( ) will appear on the
left at the bottom of the standby display.
If you pressed YES, you will see the first three lines of
the message, showing you who the message is from
and when it was received. ‘New’ stands for a new un-
read message.
If the message is older than 24 hours, the time will be
replaced with the date the message arrived. However,
you can toggle between the date and time by pressing
the key.
• To read the first line of the message, press YES.
Press to enter the menu system. See inside the cover. 23
• Scroll through the message using the navigation
key. RIGHT takes you forwards and LEFT takes you
backwards through the message.
• To move three lines forwards, press 3. To move
three lines backwards, press 1.
• To return to the beginning of the message, press
and hold LEFT.
The message ‘Reply?’ appears after the last line of the
message. If the caller wants you to reply, the displayed
message will say ‘Reply Requested Reply?’, provided
your network supports this.
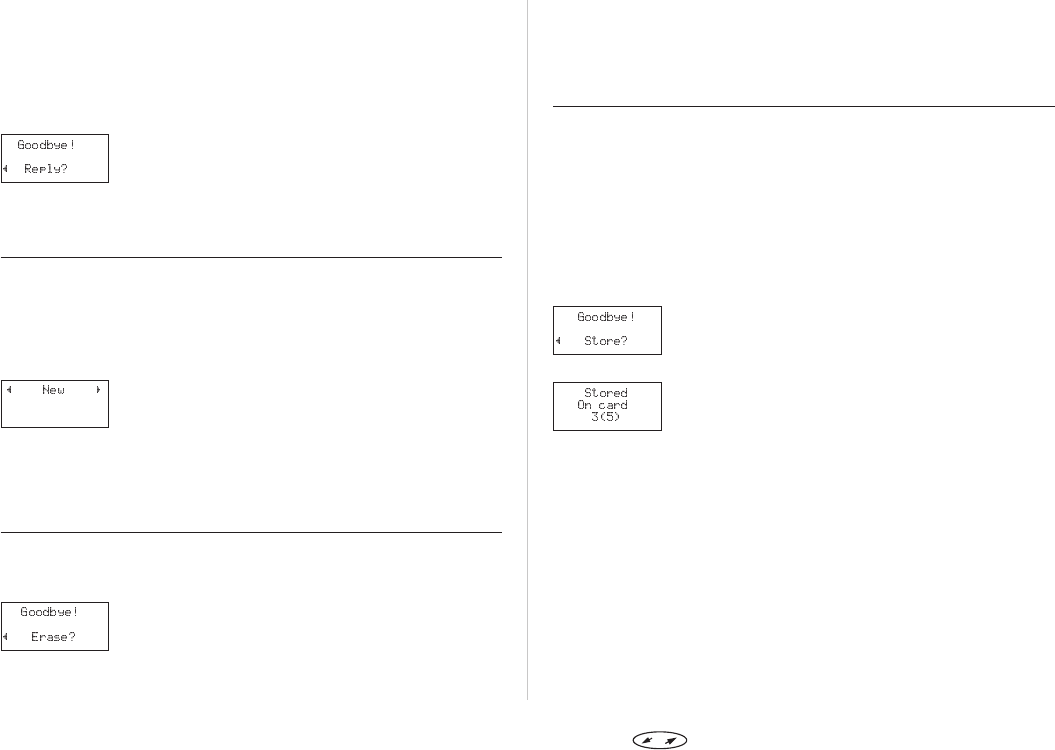
Replying to a Message
When you are reading a message, at the end you are
asked if you want to reply to the message. If you want
to do this:
lPress YES.
Your display now looks like the picture in the
margin.
• To enter your message, press YES and
proceed as described in ‘Composing and
Sending Messages’.
If you do not want to reply:
lPress NO.
Erasing a Message
When you are reading a message, at the end you are
asked if you want to reply to the message.
Press NO.
The message ‘Erase?’ appears.
To erase the message from the Messages
memory, press YES.
The next message automatically appears in the
message list.
Note! You can press CLR anywhere within the menu that
handles your message to erase it. When ‘Erase?’
appears, press YES.
Storing a Received Message
All incoming messages are stored temporarily in the
messages memory until the memory space is needed
for other purposes, such as storing new messages.
Even so, sometimes you may receive an important
message that you want to store more safely. This is
better done in the SIM card memory.
When reading the message and the question ‘Erase?’
appears:
Press NO.
The message ‘Store?’ appears.
To store the message in the SIM card memory,
press YES. The message is automatically moved
from the Messages memory to the SIM card
memory.
The display now shows the position of the message.
For example, if it is the third of five that the phone can
store.
Note! If the card memory is full, the text ‘Not stored Mem full’
appears. In this case you will have to erase one or more
messages, before you can store any new messages in
the SIM card memory.
Tip! You can also store messages you have composed your-
self on the SIM card. See the section ‘Sending Messages’
above.
24 Press to enter the menu system. See inside the cover.
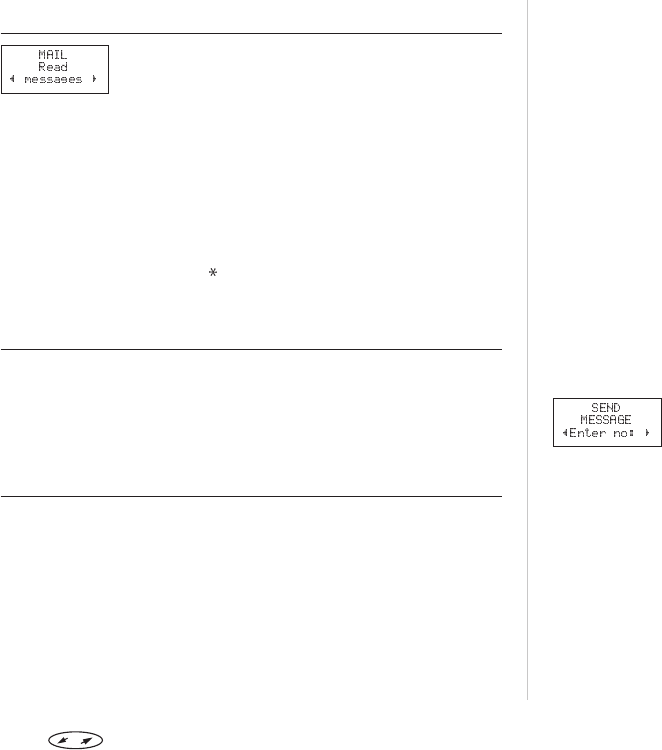
Reading Stored Messages
From the ‘Mail’ menu, select ‘Read messages’.
Scroll with the navigation key until you find the
message you are looking for.
• ‘New’ stands for a new unread message.
• ‘Old’ stands for a read message.
• ‘Sent’ stands for a sent message.
• ‘To Send’ stands for a composed, but not sent
message.
Press YES.
Read the message as described in ‘Reading a
Message’.
Note! If there is a in front of the message, this means that it
is stored on the SIM card.
Calling a Phone Number in a Message
To call a phone number found in a message:
lPress YES.
After the number has been called, the message is con-
sidered read and it remains in the Messages memory.
Frequently Used Messages
If you have one or more standard messages you use
often, you can store them on the SIM card, to be reused
whenever you want.
Storing Frequently Used Messages
To make sure your standard messages are not erased
when the messages memory becomes full, you should
store them in the SIM card memory. To do this:
From the ‘Mail’ menu, select ‘Read messages’.
The messages saved in your Messages memory
appear.
Scroll to the message you wish to store in the
SIM card memory, using the navigation key, and
press YES.
Press YES again. ‘Erase?’ appears .
Press NO. ‘Store?’ appears.
Press YES. The message is now moved from the
phone memory to the SIM card memory.
Sending Stored Messages
From the ‘Mail’ menu, select ‘Send message’.
‘New’ appears.
Scroll to the message you wish to send, using
the navigation key, and press YES. Now you can
edit your message, if you wish.
When the message is ready to be sent, press
YES. ‘Request reply?’ appears.
If you want the recipient to reply to the
message, press YES. If not, press NO .
Enter the recipient’s phone number or recall it
from the phone book. To access the ‘Phone
book’ menu, press LEFT.
To send the message now, press YES.
Press to enter the menu system. See inside the cover. 25

Communicating via the Modem
A very convenient feature of the I 888 WORLD is the
in-built modem (which equals a PC Card modem). With
this, you can connect a computer to your phone in or-
der to send and receive fax and e-mail messages,
browse the Internet and much, much more.
With the I 888 WORLD you can choose if you want to
connect to your computer via infrared link (IR) or via ca-
ble.
Note that to be able to use various communication
services you also need appropriate software, for
example a fax application, an e-mail application or an
Internet browser.
Your I 888 WORLD comes with a CD and a set of disk-
ettes, both containing a modem script and the Ericsson
Mobile Office Suite software, among other things. Note
that the CD contains additional items.
The Mobile Office Suite is a phone book manager and a
message manager. See the chapter ‘The Mobile Office
Suite’ for more information.
You will also find the Microsoft IrDA driver, the Micro-
soft Windows CE driver and modem script.
Before you Start
Before you can start using communication applications
there are a few things that need to be taken care of:
• Firstly, you need to make sure your computer is
configured for infrared communication. Most com-
puters are already configured, but if this is not the
case, please see your computer’s user manual for
more detailed information.
• Secondly, you need to install the Microsoft IrDA
driver and the Ericsson I 888 WORLD modem script
on your computer. These are found on the CD
and/or the diskettes that came with your phone.
Detailed instructions are found in the section ‘I-
nstalling the Infrared Modem’ below.
• For you to be able to use the above mentioned
services most phone network operators require
that you have separate fax and data subscriptions.
This way you never need to worry about whether
an incoming call is a fax, data or normal speech
call. If you do not already have separate fax and
data subscriptions, please contact your operator.
Note! Do not expose your in-built modem to electrostatic dis-
charge (ESD). The communication link may be lost and
could lead to unintentional loss of data. Should you
lose connection, you may need to restart your
computer and/or your mobile phone.
The Data Menus
Some of the communication features described in this
chapter require that you have the ‘Data menus’ in your
phone turned on. To turn them on:
In the ‘Settings’ menu, scroll to ‘Data menus’.
The current status (on or off) is now shown on
the bottom row of the display.
Press YES to change the status if needed (that is
from off to on or vice versa). Then press YES
again to confirm the setting.
26 Press to enter the menu system. See inside the cover.
Installing the Infrared Modem
Before you start
Make sure that the phone’s IR port is activated.
To activate the IR port:
In the menu system, scroll to ‘Activate IR port’
and press YES. (If the IR port is already acti-
vated, the display will read ‘Deactivate IR port’
instead. In this case, just press CLR to return to
the standby menu.)
For a few seconds the text ‘IR port activated’
appears in the display. The phone then returns
to standby mode.
Place your phone less than one metre from your
computer (or your H/PC) and make sure that the
infrared ports are aligned (within 30°).
The examples in this manual may differ from your PC. If
you require more information during the installation
process than provided by this User’s Guide, we suggest
that you consult your PC supplier or your computer’s
manuals.
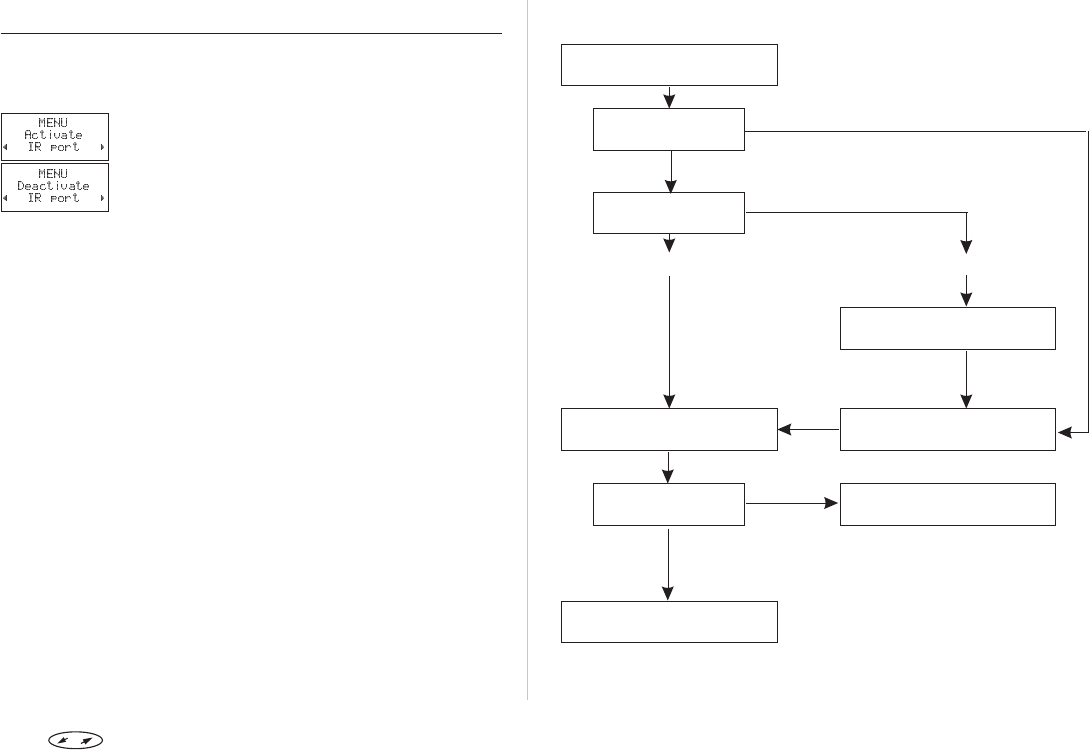
Installation Flowchart for Windows 95
We recommend that you use step1-4intheflowchart
below as a checklist in order to assure that your com-
puter has been configured properly for a successful in-
stallation of the infrared modem.
The boxes in the flowchart apply to the sections with
corresponding titles in this User’s Guide.
Press to enter the menu system. See inside the cover. 27
Step 1
Check Infrared Support
Which version?
Step 4
Install Infrared Modem
Communication OK?
You are now ready to use your
Infrared Modem,
Step 2
Uninstall Infrared Support 1.0
Step 3
Install Infrared Support 2.0
Installed?
Check Hardware
(See Trouble Shooting on CD)
YES NO
YES
NO
Version 2.0 Version 1.0
Insert
CD/Diskettes

Step 1 – Check Infrared Support
Before installing the infrared modem you also need to
check if the Microsoft Infrared support for Windows
version 2.0 has been installed.
To do this, and also to check the version of the existing
infrared support on your computer, do the following:
Under Settings in the Start menu, select Control
Panel.
Select the Add/Remove Programs applet.
Check the version of the Infrared Support for
Windows 95 in the list under the Install/Unin-
stall tab.
• Version 2.0
If you have version 2.0 installed you do not
need to install the infrared support. Go to sec-
tion ‘Step 4 – Install Infrared Modem’ to continue
the installation of the infrared modem.
• Version 1.0
If you have version 1.0, you need to uninstall
this version before installing infrared support
version 2.0. Go to ‘Uninstall Infrared Support’ to
continue the installation of the infrared modem.
• No Infrared Support Installed
Go to ‘Step 3 – Install Infrared Support’ to con-
tinue the installation of the infrared modem.
Step 2 – Uninstall Infrared Support
Under Settings in the Start menu, select Control
Panel.
Select the Add/Remove Programs applet.
Select the Microsoft Infrared Support for Win-
dows version 1.0.
Click the Add/Remove button.
Click OK.
Go to ‘Step 3 – Install Infrared Support’ to continue the
installation of the infrared modem.
Step 3 – Install Infrared Support
Insert the CD into your computer’s CD drive or
the diskette containing the Infrared support into
the diskette drive.
If you are using a diskette or if your CD does
not start automatically, select ‘Run’ in the ‘Start’
menu. Type A:\setup if you are using diskettes
or D:\setup if you are using a CD (could be an-
other drive). Click OK.
When the Setup dialogue appears on the screen,
click the Install Infrared Support for Windows 95
version 2.0 button.
Follow the instructions given on the screen
When the Add Infrared Device Wizard appears,
select the Built-in infrared port on laptop or
desktop and click Next.
When the next page of the Wizard appears on
the screen, select the COM port enabled for
infrared communication and click Next.
When the third and last page appears on the
screen, accept the default settings by clicking
OK.
After the installation you will return to the Setup dia-
logue where you can continue the installations.
28 Press to enter the menu system. See inside the cover.
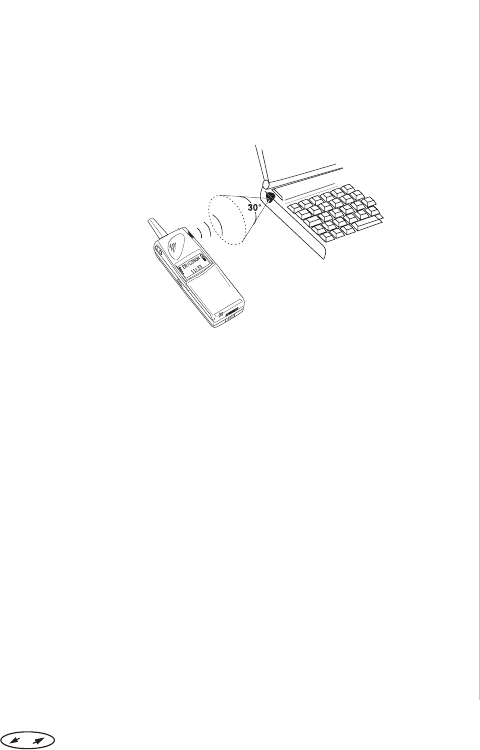
Step 4 – Install Infrared Modem
Insert the CD into your computer’s CD drive or
insert the diskette into the diskette drive.
Place the phone with the infrared modem next
to your PC. See illustration below. (The infrared
port may be positioned differently on your com-
puter.)
Close the Control Panel if it is open.
Open the Control Panel.
Double click the Infrared Monitor icon.
Select the Options tab and make sure that the
check box ‘Enable infrared communication on:’
is checked. In most cases the infrared communi-
cation is enabled on COM2 or COM3.
Tip! To check that the infrared communication is enabled,
click the Status tab. The message ‘One infrared device
is in range’ should be displayed. Your computer will
now discover the new hardware and a dialogue box will
appear.
Click Next.
When the next dialogue box appears select the
drive and folder containing the modem script.
A: if you are using diskettes or D: (could be
another drive) if you are using the CD. Click OK.
Tip! To check that the infrared modem has been installed
successfully, go to Control Panel and select Modems.
Ericsson I 888 WORLD should appear in the list under
the General tab.
Installation – Windows CE
Make sure that you have Microsoft H/PC Ex-
plorer or Windows CE Services installed on your
laptop. Also make sure that communication be-
tween your H/PC and your PC is established.
Insert the CD into your PC’s CD drive or insert
the diskette containing the Infrared support into
the diskette drive.
Installing from CD:
When the setup dialogue box appears on the
screen, click the ‘Install Infrared Modem for Win-
dows CE’ button.
Installing from diskette:
Select ‘Run’ in the ‘Start’ menu. Click ‘Browse’
and locate the Windows CE folder on your
diskette drive. In the Windows CE folder,
double-click ‘Install’.
The infrared modem will be installed automati-
cally on your H/PC.
Reset your H/PC. (Usually this is done by press-
ing a reset button placed in the backup battery
compartment.)
If you installed from the CD, you will return to the set-
up dialogue after the installation, where you can con-
tinue by installing the Mobile Office Suite application,
for example.
Press to enter the menu system. See inside the cover. 29
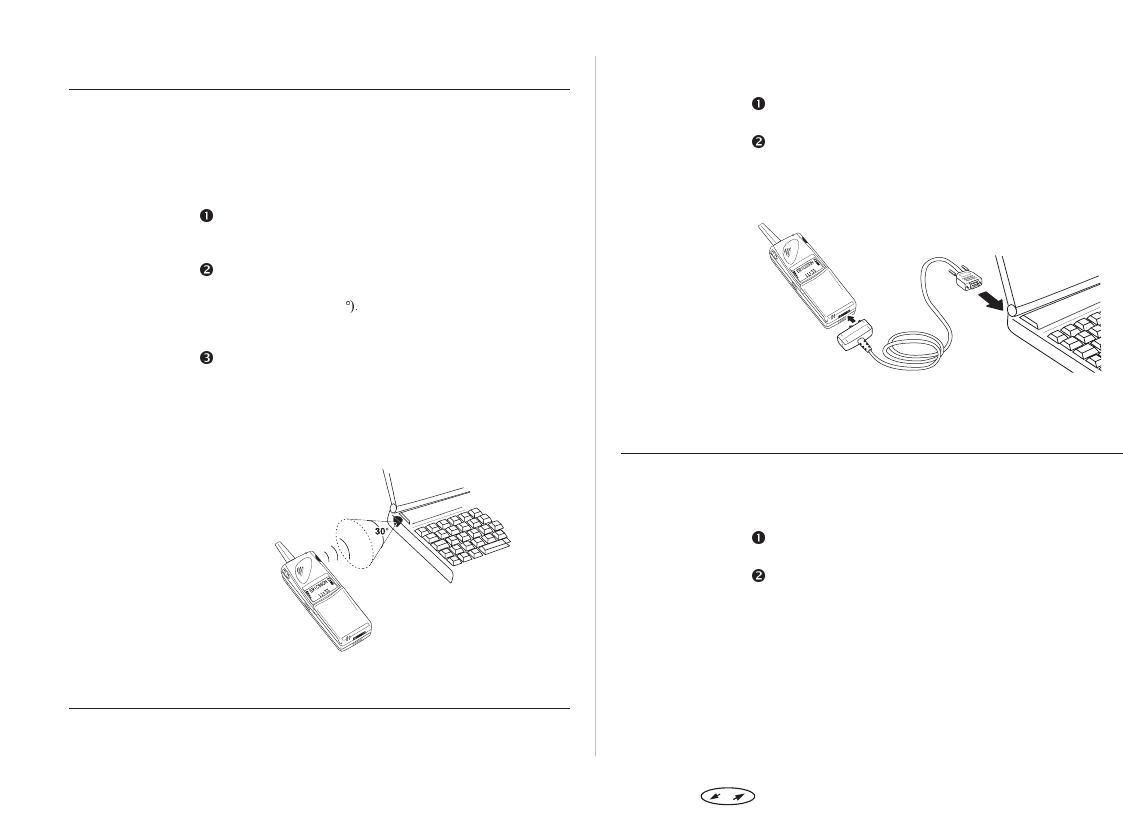
To Connect Using the IR Link
The IR feature of the I 888 WORLD allows you to con-
nect to a computer without using a cable. This option
requires that your computer has an IR port, and that the
operating system supports the IrDA standard for infra-
red communication (see above). To enable IR communi-
cation:
On your computer, start the infrared application
by double-clicking the icon in the ‘Control
Panel’.
Place the phone less than one metre from the
computer and make sure the IR ports are
aligned (within 30 Your PC will now establish
contact with your phone. This is indicated by
the infrared icon in the status bar.
Now you are ready to start infrared communica-
tion between your computer and your phone.
Note! Before disestablishing contact between your PC and
your I 888 WORLD, make sure that you close any com-
munication application on your PC.
To Connect Using the RS232 Cable
Using the RS232 cable, which is sold as an accessory, is
the most power efficient way to to use your I 888
WORLD together with a computer. To enable use of the
IrDA protocol, using the RS232 cable:
Connect the cable according to the picture
below.
Under the tab ‘Options’ in the Infrared Monitor
found in the Control Panel folder, select infrared
communication on the COM port you intend to
use.
Making Fax and Data Calls
Software-Initiated Fax and Data Calls
Fax and data calls are normally initiated from within the
computer software. Do the following:
Connect your computer to the phone, using the
IR port or the RS232 cable.
Start the appropriate software application on
your computer and follow the procedure that is
appropriate for the software.
Note! Make sure that you have selected the I 888 WORLD mo-
dem.
When a fax or data call is in progress, the phone display
shows the call type, that is ‘Fax’ or ‘Data’.
30 Press to enter the menu system. See inside the cover.
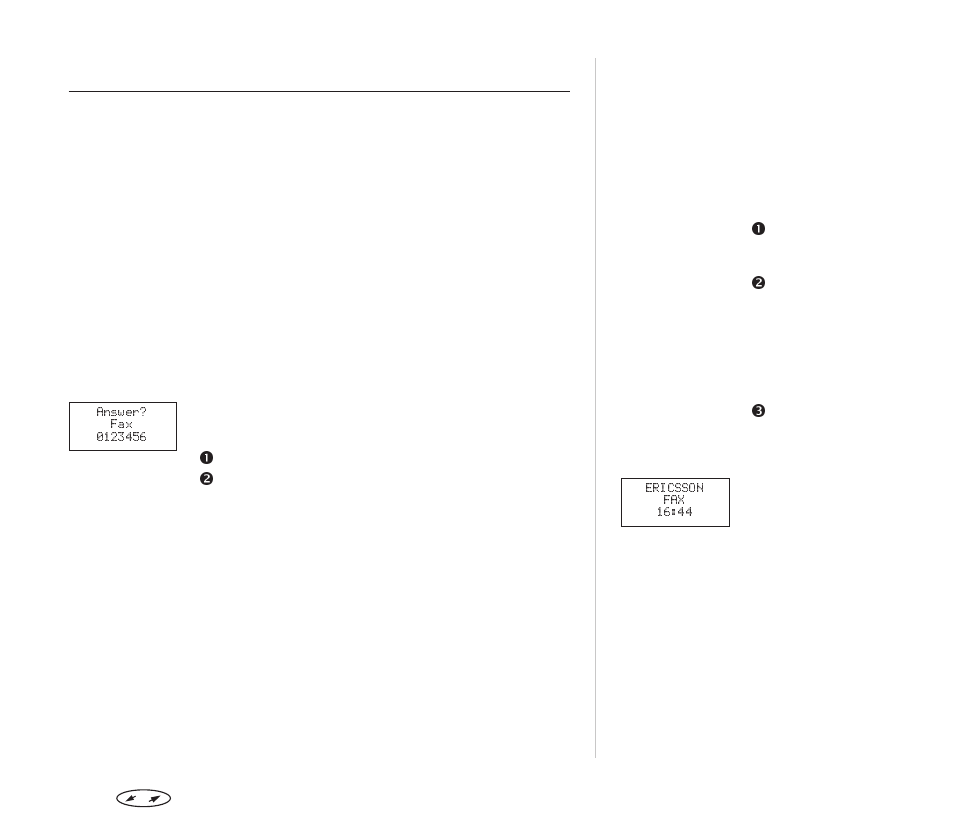
Receiving Fax and Data Calls
The procedure for receiving fax and data calls depends
on your network and subscription. If you have different
numbers for speech, fax and data calls, this is referred
to as multi numbering. This means that you can have
up to three numbers in your subscription. If you only
have one number for all call types, this is referred to as
single numbering.
Receiving Fax and Data Calls – Multi
Numbering
If your network and subscription support multi
numbering, the I 888 WORLD will display the type of in-
coming call. There are two possible types apart from
speech calls:
• Fax calls
• Data calls
The display shows the type of call on the middle row.
To receive a fax or data call:
Connect your computer to the phone.
Answer the call from within the software appli-
cation (if it does not answer automatically).
Receiving Fax and Data Calls – Single
Numbering
If your network and subscription only support single
numbering, the phone does not recognize the type of
incoming call. This means that the calling part has to
tell you if you are going to receive a fax or data call.
Do the following to prepare your phone for a certain
type of call:
In the menu system, scroll to ‘Next call type’
(the ‘Data menus’ must be turned on) and press
YES.
Select the type of call you are going to receive.
• If you select ‘Speech’, the next call will be
handled as a speech call.
• If you select ‘FAX’, the next call will be
handled as a fax call.
• If you select ‘Data’, the next call will be
handled as a data call.
Receive the call according to the instructions
above.
Note! The next call setting remains until you change it. The
current setting, if not a speech call, is shown on the
middle row of the standby display (see picture in the
margin).
Press to enter the menu system. See inside the cover. 31

The Mobile Office Suite
The Mobile Office Suite is a Phone Book Manager and a
Message Manager. Once installed on your computer,
the application allows you to organize the names and
telephone numbers that you store in your phone book.
It also allows you to write and read SMS messages on
your computer.
The Phone Book Manager
The Phone Book Manager allows you to dial other par-
ties, manage telephone numbers and names as well as
check the status of the phone. It consists of an Address
Book, a Dialler and a Phone Status Display.
For instructions on how to use the Phone Book
Manager, please consult the on-line help texts asso-
ciated with the application.
The Message Manager
The Message Manager makes it possible to create,
send, receive and organize SMS messages.
For instructions on how to use the Message Manager,
please consult the on-line help texts associated with
the application.
Installing the Mobile Office Suite
Before you start the installation, make sure you have in-
stalled the modem script according to the instructions
given the chapter ‘Communicating via the Modem’.
Close all applications on your computer.
Connect your mobile phone to the computer
using the IR port or the RS232 cable (do not for-
get to start the ‘Infrared’ application in the ‘Con-
trol Panel’).
Installation from a Diskette
Under ‘Settings’ in the ‘Start’ menu, select
‘Control Panel’.
Select ‘Add/Remove’ programs, and click the
‘Install’ button.
Insert the first installation disk.
Follow the instructions given on the screen.
If a modem other than the I 888 WORLD modem has
been selected, the Mobile Office Suite may be unable to
detect your phone. If this is the case, you will need to
change to the I 888 WORLD modem.
To do this:
Click ‘Cancel’.
Select the I 888 WORLD modem from the drop-
down list.
You will need to restart your computer before you can
start using the Mobile Office Suite. To access the Mobile
Office Suite, double-click its icon on the desktop.
Installation from a CD
An installation program will start automatically when
you insert the CD into your drive.
Click ‘Install Mobile Office Suite’.
Follow the instructions given on the screen.
Select the Ericsson I 888 WORLD modem from
the ‘Modem’ drop-down list if it is not already
selected.
You will need to restart your computer before you can
start using the Mobile Office Suite. To access the Mobile
Office Suite, double-click its icon on the desktop.
32 Press to enter the menu system. See inside the cover.

Uninstalling the Mobile Office Suite
Under ‘Settings’ in the ‘Start’ menu, select
‘Control Panel’.
Click ‘Add/Remove Programs’.
Select ‘Ericsson Mobile Office Suite’ from the list
of applications.
Click ‘Add/Remove’.
Follow the instructions given on the screen.
Press to enter the menu system. See inside the cover. 33

SIM Application Toolkit
Imagine that you hear about a new service that your
network operator is offering. You call your operator,
explain that you want to subscribe to the service and
suddenly, within seconds, you will have a new menu in
your phone that instantly lets you use the new service.
You do not need upgraded software for your phone and
you do not need to visit your network operator to get a
new SIM card. It is all taken care of over the air.
This is just one example of the added value services
that are made possible through the SIM Application
Toolkit. Your I 888 WORLD is prepared for these kind of
services.
What is SIM Application Toolkit?
The SIM Application Toolkit is the network operators'
way of offering customized services, independently of
the mobile phones and the mobile phone manufactur-
ers.
Since the SIM cards are owned by the network opera-
tors, the operators can offer unique services to their
customers by placing applications they have designed
directly on the SIM.
Note! The added value services residing on the SIM are de-
signed and run by the network operators and not the
mobile phone manufacturers. If you require further in-
formation about the toolkit, please contact your net-
work operator.
Compatibility
Added value services based on the SIM Application
Toolkit require four things in order to work:
• a mobile phone that supports the SIM Application
Toolkit. It has to be type approved as a GSM phase
2+ phone. Your Ericsson I 888 WORLD is such a
phone.
• a compatible SIM card supporting SIM Application
Toolkit. Contact your network operator if you are
unsure of whether your SIM cards supports it.
• a network operator offering services compliant to
the SIM Application Toolkit.
• an application that can be stored on the SIM card
and communicate with the phone.
Note! Phones that are compatible with the SIM Application
Toolkit also work with older non-compatible SIM cards.
Initialisation
A SIM card supporting the SIM Application Toolkit, does
not differ from a normal SIM card, and the initialisation
process is the same as for a normal SIM card.
❶Insert your SIM card according to the instruc-
tions in the chapter 'Preparing your Phone for
Use'.
❷Turn on your phone.
The SIM card will automatically check whether
your phone supports the toolkit. If so, a new
menu will appear presently in the first position
to the right of the standby display.
Proactive SIM
Normally, the phone requests something from the SIM.
The SIM Application Toolkit, on the other hand, pro-
34 Press to enter the menu system. See inside the cover.

vides a proactive SIM. This means that the SIM can tell
the handset to take certain actions instead. These ac-
tions could include:
• Display text from the SIM on the handset’s display
• Set up a call to a number held by the SIM
• Initiate a dialogue with the user
• Provide information from the phone to the SIM
• Send data in the form of SMS
Note! All these actions are executed from the SIM card and
consequently have nothing to do with the phone's soft-
ware.
Data Download to the SIM over the Air
Your network operator may at any time download new
data to your SIM card and phone over the air. This new
data couldconsist of, for example, new features or a
new menu.
The network operator can activate an application that
resides on the SIM just by sending an SMS to that par-
ticular SIM and thereby updating it.
Resetting your SIM card
When the operator updates your SIM card over the air,
the phone will notify you of it by showing a message in
your display and sounding a tone.
In order for your new SIM settings to be effectuated,
you have to turn off your phone and then turn it on
again.
Note! All functionality in will be disabled and you will not be
able to use your phone until you restart it.
New Menu
After a data download and after restarting your phone,
the proactive SIM will offer a new menu entry to the
phone and its menu system. The menu will offer you
new features and services, which can be used instantly
There can only be one new menu entry in the main
menu, but there can be several sub menus under the
new menu entry.
On Ericsson phones the new menu entry will appear in
the first position to the right of the standby display.
❶Press CLR to clear the Standby display.
❷Press the navigation key RIGHT to enter the
menu system and to reach the new menu.
Navigation and Action
• To enter the new menu or to select a function,
press YES.
• To scroll in the new menu, press the navigation
key RIGHT or LEFT
• To go back one level in the menu system or leave
a setting unchanged, press NO.
• To go back to the standby menu, press CLR.
SIM Card Initiated Features
Set up a SIM Card Initiated Call
The SIM card may prompt you to make a call. This could
happen even if you already are engaged in a call.
When this happens, the phone will notify you, by
producing a sound and showing a message in the dis-
play.
Press to enter the menu system. See inside the cover. 35

• If you are not engaged in a call, a second message
will be shown alternately in the display, asking
you whether you want to confirm and make the
SIM card initiated call.
If the number on the SIM card is stored with an
accompanying name, the phone will display that
information instead.
– If you want to make the SIM card initiated call
press YES.
– If you do not want to make the SIM card initiated
call (you may want to continue with an already
ongoing call) press NO.
• If you are already engaged in a call, you will be
prompted to either put the current call on hold or
disconnect it.
Alternately with that first message, there will be
another message in the display, asking you
whether you want to confirm and make the SIM
card initiated call.
If the number on the SIM card is stored with an
accompanying name, the phone will display that
information instead.
– If you want to make the SIM card initiated call
press YES.
– If you do not want to make the SIM card initiated
call (you may want to continue with an already
ongoing call) press NO.
Send a SIM Card Initiated SMS
The SIM card may prompt you to send an SMS (short
message). When this happens, proceed in the same way
as when you send a normal SMS. For more information,
please refer to the chapter 'Sending and Receiving Text
Messages'.
Details on Services Offered
As all services and functions that come with the SIM Ap-
plication Toolkit are network dependent, please con-
tact your network operator for details on services of-
fered by the SIM Application Toolkit.
Software Requirements
Your I 888 may need a software upgrade in order for
the SIM Application Toolkit to work properly.
If you are unsure of whether you got the proper soft-
ware for the SIM Application Toolkit, please contact
your Ericsson dealer or Ericsson local support centre, or
call:
• Europe, Middle East, Africa
+44 (0)1202 778333 (UK)
• Asia/Pacific, Australia, New Zealand
+61 (0)42 21 9742 (AUS)
• USA, Latin America
+44 (0)1202 773003 (UK)
36 Press to enter the menu system. See inside the cover.
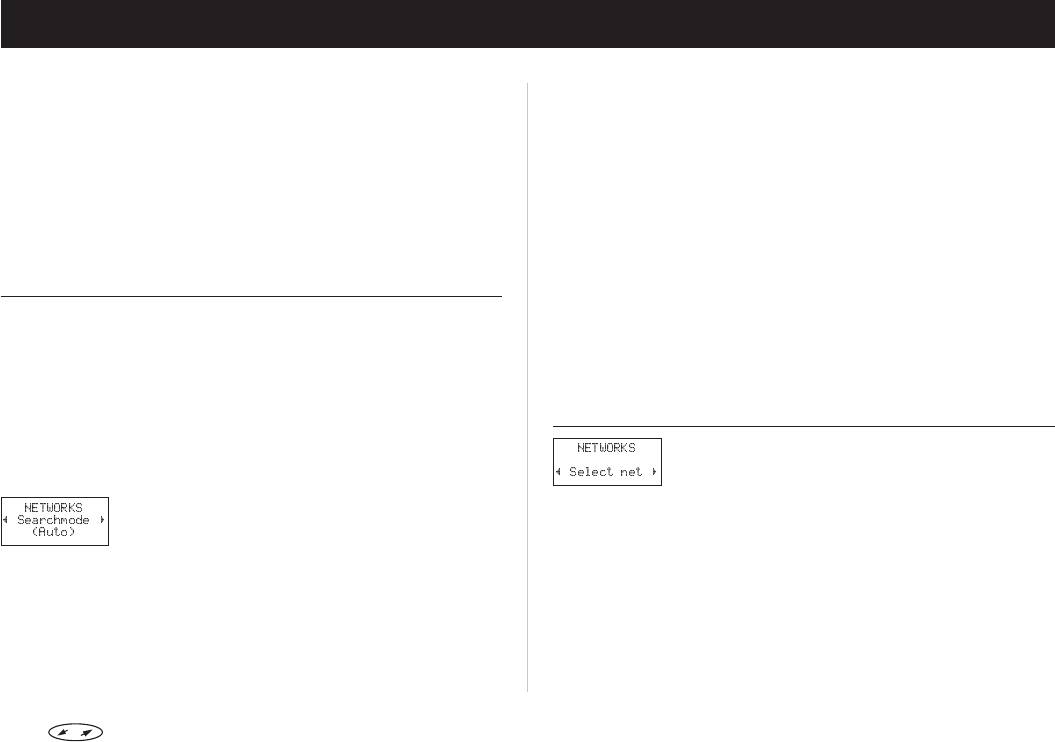
Networks
When you turn on the phone, it normally selects its
home network. If this is not within range, for example
when you are abroad, you may use another network,
provided your home network has an agreement that
allows you to do so. This is called roaming.
The ‘Networks’ menu includes a number of functions
which you can use to determine how the phone
searches for a network. You may also select a network
yourself from those within range.
Search Mode
Automatic Search Mode
The automatic search mode means that when you turn
on your phone, it searches for the last accessed net-
work first. If this is not available, the phone will
automatically search for another available network
within range.
The Automatic search mode is normally the default
setting when you buy your phone. However, if you
need to activate the automatic search mode, do the
following:
Scroll to the ‘Networks’ menu, using the naviga-
tion key, and press YES.
Scroll to ‘Searchmode’.
• If ‘(Auto)’ is visible on the bottom row of the
display, your phone is already set to Auto-
matic search mode.
• If ‘(Auto)’ is not visible, press YES.
Scroll to ‘Auto’ and press YES. The phone is now
set to Automatic search mode.
To return to standby mode, press CLR.
Note! The order of preference in which the phone selects a
network is determined by a list of preferred networks
on your SIM card, which you can edit at any time.
Manual Search Mode
The manual search mode means that when you turn on
your phone, it searches for the last accessed network. If
this is not available, the question ‘Select network?’ ap-
pears.
To activate the manual search mode, do the following:
From the ‘Networks’ menu, select ‘Searchmode’
and press YES.
Scroll to ‘Manual’ and press YES.
To return to standby mode, press CLR.
To select a network, see below.
Selecting a Network
From the ‘Networks’ menu, choose ‘Select net’.
The message ‘Please wait’ is displayed briefly.
If there is more than one network within range,
you can use the navigation key to scroll to the
other network(s).
When the network you wish to use is displayed,
press YES to select it.
Note! Together with the network name, you also get the
following information in the display:
• If the home network is within range and you are
using it when you start your network selection,
the name of the network is displayed with the
message ‘Current’.
Press to enter the menu system. See inside the cover. 37
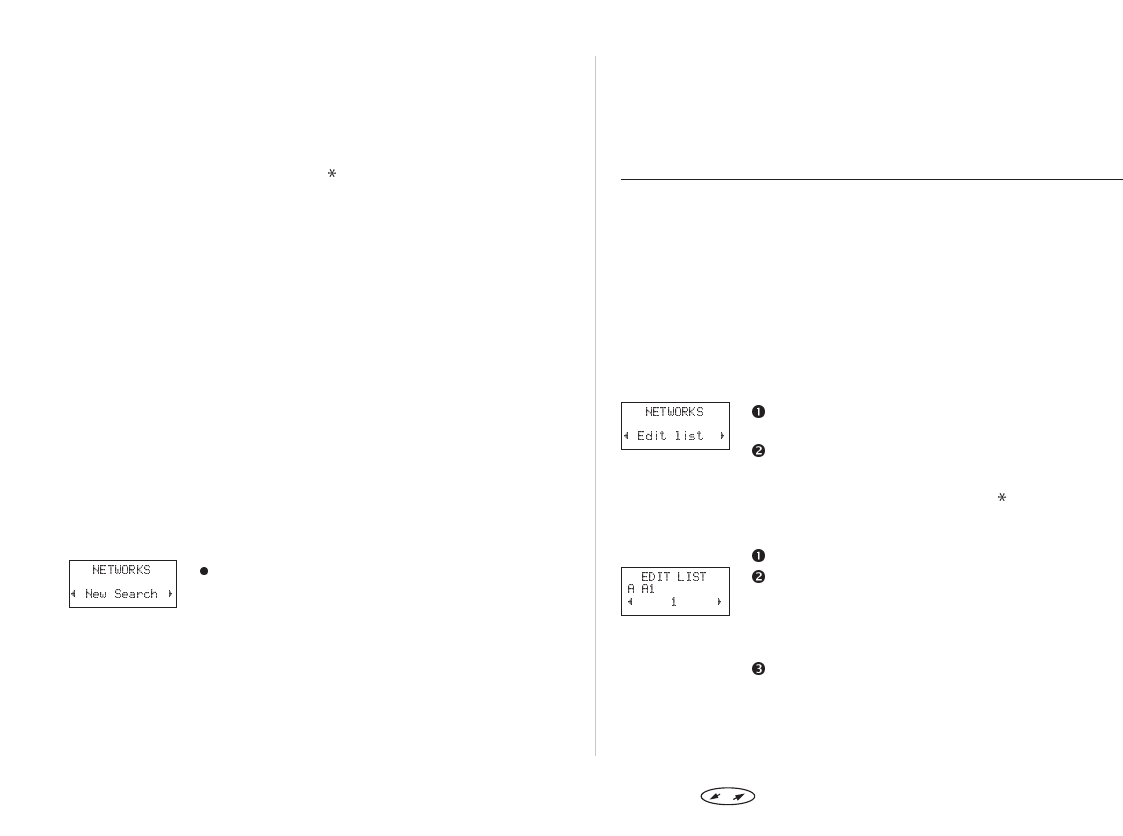
• If you are using another network and your home
network is available, the name of the home net-
work is displayed with the message ‘Home’.
• Instead of the full name of a country and a net-
work, an abbreviation is displayed when you use
the ‘Networks’ menu. To see the full name of a
network, press .
• If the home network is not within range, the name
of another network is displayed with the message
‘Current’, ‘Preferred’, ‘Available’ or ‘Forbidden’.
– ‘Current’ means that the network is currently
being used.
– ‘Preferred’ means that the name of the network is
included in a list of preferred networks on your
SIM card.
– ‘Forbidden’ means that the name of the network
is included in a list of forbidden networks on your
SIM card and that you are not allowed to use it.
You can, however, make emergency calls.
– ‘Available’ means that there is a network within
range, which is not on either the forbidden or
preferred list on your SIM card.
• If there is no network within range, the message
‘No network’ is displayed.
To Start an Automatic Network Search
An automatic network search can be started at any
time.
From the ‘Networks’ menu, select ‘New search’.
The phone automatically starts searching for a network
according to the list of preferred networks stored on
your SIM card.
Forbidden Networks
The names of the forbidden networks are stored on
your SIM card. If such a forbidden network is within
range, it will be omitted when the phone searches for a
network (automatic search mode).
If your home network and a forbidden network come to
an agreement that allows you to use the forbidden net-
work, you can select this network even though the
message ‘Forbidden’ is displayed.
List of Preferred Networks
You can create a list that defines in which order your
phone will select a network during automatic network
selection, when your home network is not within range.
The number of networks that can be stored in the list
depends on your SIM card.
The ‘Edit list’ function lets you review the networks in
the list. Apart from rearranging the order of the net-
works, you can add new networks to the list and delete
networks from it.
Reviewing the List of Networks
From the ‘Networks’ menu, select ‘Edit list’.
• The name of the first network is displayed.
You can scroll through the other networks in the
list by using the navigation key.
Note! To see a network’s full name, press .
Adding a Network to the List:
From the ‘Networks’ menu, select ‘Edit list’.
Scroll to the first free position in the list and
press YES. The question ‘Add net?’ appears.
If you scroll to a position that is already occu-
pied, you must press YES and then scroll with
the navigation key until ‘Add net?’ appears.
Press YES and scroll with the navigation key
until you find the desired network.
38 Press to enter the menu system. See inside the cover.
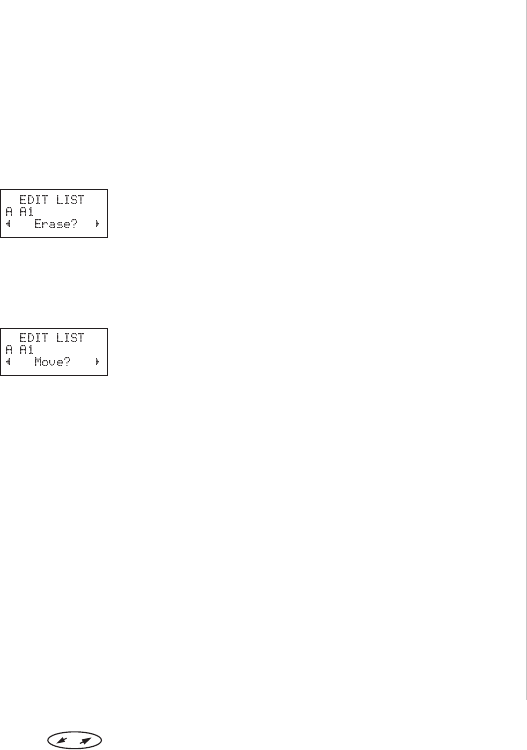
If the desired network does not appear, press
YES when the question ‘Other?’ appears. Then
enter the three-digit country number and the
two-digit network number.
Finally, to add the network to the list, press YES.
Erasing a Network from the List
From the ‘Networks’ menu, select ‘Edit list’.
Scroll to the network you wish to erase and
press YES.
Scroll until ‘Erase’ appears.
To delete the network from the list, press YES.
Rearranging the List
From the ‘Networks’ menu, select ‘Edit list’.
Scroll to the network you wish to move and
press YES.
’Move’ is displayed. Press YES and enter the new
position within the list.
Press to enter the menu system. See inside the cover. 39

Security
The Card Lock
Your SIM card is protected by a card lock. When you buy
your SIM card, you obtain a PIN (Personal Identity
Number).
Every time you turn the phone on, you have to enter
your PIN and then press YES, unless you turn this
feature off (see below).
If you enter your PIN incorrectly three times in a row,
the SIM card will be blocked. This is indicated by the
message ‘Card blocked Unblock?’. If this happens, see
’If Your SIM Card Is Blocked’ below.
Note! If your PIN starts with the same digits as the inter-
national emergency number 112 (in the Americas 911),
they will appear in the display, when you enter your
PIN.
To Change Your PIN
From the ‘Access’ menu, select ‘Change PIN
code’.
Enter your old (current) PIN and press YES.
Enter your new PIN and press YES.
At the prompt ‘Repeat new PIN’, enter your new
PIN a second time and press YES.
The message ‘New PIN’ confirms that the PIN
has been changed.
Note! If the message ‘Matching error’ appears, this means you
entered the new PIN incorrectly. If the message ‘Wrong
PIN’ appears, followed by ‘Enter Old PIN’, you entered
your old PIN incorrectly.
To Change Your PIN2
Depending on the network you use, some services
require that you enter a second PIN, the PIN2.
lSelect ‘Change PIN2 code’ from the ‘Access’
menu.
Follow the same procedure as described in ‘To Change
Your PIN’ above.
To Lock the SIM Card
Select ‘Lock card’ from the ‘Access’ menu.
Press YES.
Enter your PIN and press YES.
The message ‘Locked’ confirms that the card lock is
now activated.
To Unlock the SIM Card
Select ‘Unlock card’ from the ‘Access’ menu.
Press YES.
Enter your PIN and press YES.
The message ‘Unlocked’ confirms that the card lock is
now deactivated.
Note! This function only applies if your SIM card allows you to
deactivate the card lock.
If Your SIM Card is Blocked
To unblock the SIM card if you have entered the wrong
PIN (or PIN2) three times in a row:
Press YES.
Enter your PUK (or PUK2) (which you will find in
the information from your network operator).
40 Press to enter the menu system. See inside the cover.

Enter a new four- to eight-digit PIN (or PIN2).
Press YES.
Re-enter the new PIN (or PIN2) to confirm it.
Press YES.
Warning! If you enter the wrong PUK ten times in succession,
your card will be permanently blocked. If this happens,
you will have to contact your network operator.
The Phone Lock
The phone lock protects the phone against un-
authorized use in the event of theft. It is not activated
when you buy the phone. You should, however, acti-
vate it as soon as possible. You should also change the
default security code 0000 to any three- to eight-digit
personalized code.
There are two levels of locking the phone:
• Full Lock
• Autolock
If the ‘Full Lock’ is activated, you see the message
‘Phone locked’ briefly, each time you turn on the phone.
The message is followed by the prompt ‘Enter lock
code’. You then have to enter a security code and press
YES to be able to use the phone.
If the ‘Autolock’ is activated, the message ‘Phone
locked’ and the prompt ‘Enter lock code’ will not appear
until a different SIM card is inserted in the phone. After
the security code has been entered correctly, the phone
can be used with a new SIM card. You are not asked to
enter the security code until the original SIM card or a
different SIM card is inserted.
To Change the Security Code
lFrom the ‘Access’ menu, select ‘Phone lock
Change code’ and follow the steps described in
‘To Change Your PIN’.
To Lock/Unlock the Phone
From the ‘Access’ menu, select ‘Phone lock’.
The current setting ‘Full lock’, ‘Autolock’ or
‘Unlocked’ is shown in brackets.
Select the required setting.
Enter the security code and press YES.
‘Phone Lock’ is displayed together with the new
setting.
Call Barring/Restrict Calls
The ‘Call Barring’ service of the cellular network allows
you to bar different types of outgoing and incoming
calls. This means you can restrict the use of your
phone.
Note! This service may not be available on all networks or
may require a separate subscription.
The following calls can be barred:
• all outgoing calls,
• all outgoing international calls,
• all outgoing international calls except to your
home country,
• all incoming calls,
• all incoming calls when you are abroad (when
roaming).
To ensure that a call bar is not changed by someone
else, a password, which comes with your subscription,
is necessary in order to activate or cancel a call bar.
To Change the Call Barring Status
From the ‘Access’ menu, select ‘Barring’.
The first barring option is ‘All outgoing calls’. To
choose another barring option, use the naviga-
tion key.
Scroll to the option you want, using the naviga-
tion key, and press YES.
Press to enter the menu system. See inside the cover. 41

You now have three options:
• ‘Activate’, which sets a call bar,
• ‘Get status’, which lets you check the status
of a call bar,
• ‘Cancel’, which cancels the call bar.
Confirm your selection by pressing YES.
Enter your password and press YES.
There may be a short delay before the network
responds. In the meantime the message ‘Please wait’ is
displayed. This is followed by a message which informs
you whether the call bar is activated or not.
Note! If you divert incoming calls (see ‘Diverting Incoming
Calls’), you cannot activate some barring options. Like-
wise, if you bar calls, you cannot activate some call
divert options.
To Cancel All Call Bars
From the ‘Access’ menu, select ‘Barring’.
Scroll to ‘Cancel all’, using the navigation key,
and press YES.
The message ‘Please wait’ appears, followed by a
message that confirms that all call bars are cancelled.
To Change the Barring Password
The password for the Barring service comes with your
subscription. You can easily change the password as
often as you like.
From the ‘Access’ menu, select ‘Barring’.
Scroll to the ‘Change password’ option, using
the navigation key.
Enter the old (current) password and press YES.
Enter the new password and press YES.
Enter the new password a second time and
press YES.
The message ‘Please wait’ appears, followed by a
message that confirms that the password has been
changed.
The Keypad Lock
The Keypad Lock feature helps you to avoid accidental
dialling, which can happen if you keep your phone in
your pocket. You can choose between manual and
automatic keylock.
An icon in the shape of a key ( ) in the display informs
you that the keypad is locked.
Note! Calls to the international emergency number 112 (in
the Americas 911) can be made when the keypad is
locked. If the phone alarm rings, you can turn it off by
pressing any key.
The keypad remains locked until you:
• answer an incoming call,
• replace the battery,
• unlock the keypad.
To Lock the Keypad Manually
Scroll to the ‘Keylock’ menu, using the naviga-
tion key.
Press YES.
To Unlock the Keypad
lPress LEFT followed by YES.
The Automatic Keylock
Automatic keylock means that if no keys are pressed in
25 seconds, the keypad will be locked.
To set the automatic keylock:
From the ‘Settings’ menu, select ‘Keylock’.
Choose ‘Auto’, using the navigation key.
To confirm your selection, press YES.
Note! The Keypad lock is always disabled if the phone is
connected to vehicle handsfree equipment.
42 Press to enter the menu system. See inside the cover.

FixedDialling
FixedDiallingisawayofrestrictingoutgoingcalls.It
requiresaSIMcardthatallowsfixednumberstobe
stored.ThefixednumbersareprotectedbythePIN2.
•TheFixedDiallingfunctionallowscallstobemade
onlytofixednumbersstoredontheSIMcard.Ifan
attemptismadetocallothernumbers,themes-
sage‘Numbernotpermitted’appearsinthedis-
play.
•Itispossibletostorepartialnumbers,forexample
anareacode,oranareacodefollowedbythefirst
digitscommontoseveralnumbers.Storing
0123456allowscallstobemadetonumbersfrom
012345600to012345699.
•Numbersbeginningwiththeinternational‘+’sign
andcountrycodecanalsobestored,allowingyou
tomakecallsfromabroad.
•Numbersincludingquestionmarkscanbestored.
Forexample,storing01234567?0allowscallstobe
madetonumbersendingwithazerofrom
0123456700to0123456790.Toenteraquestion
markholddown#.
•TheFixedDiallingfunctiondoesnotprohibitcalls
totheinternationalemergencynumber112(inthe
Americas911)andtheServiceCentreofyournet-
workoperator.NetworkservicessuchasCallDi-
vertandCallBarringcannotbeused.
•Themaximumfixednumbersthatcanbestored
dependsonyourSIMcard.
ToActivateFixedDialling
Fromthe‘Access’menu,select‘Fixeddial’.
EnterthePIN2andpressYES.
Scrollto‘On’,usingthenavigationkey,and
pressYES.
ToCancelFixedDialling
Fromthe‘Access’menu,select‘Fixeddial’.
EnterthePIN2andpressYES.
Scrollto‘Off’,usingthenavigationkey,and
pressYES.
ToStoreFixedNumbers
Fromthe‘Phonebook’menu,select‘Fixed
numbers’.
Scrollto‘Store’,usingthenavigationkey,and
pressYES.
EnterthePIN2andpressYES.
Enterthename(optional)andthefixednumber
inthesamewayaswhenstoringanordinary
phonenumber.
ToEditaStoredFixedNumber
Fromthe‘Phonebook’menu,select‘Fixed
numbers’.
Scrollto‘Edit’,usingthenavigationkey,and
pressYES.
AfteryouhaveenteredthePIN2,youcanchangethe
positionnumber,thenameorthefixednumberinthe
samewayaswithanordinaryphonenumber.
Press toenterthemenusystem.Seeinsidethecover. 43

Diverting Incoming Calls
If you want to make certain that your incoming calls are
taken care of when you are unable to answer them, you
can use the Call Divert service to divert them to another
phone number.
The Call Divert service lets you:
• divert calls if you are already on the phone.
• divert calls that you do not answer within a
specified time limit (operator dependent).
• divert calls if your phone is turned off or if you are
unreachable
• divert all incoming calls.
You can also use any combination of the above.
The divert option ‘All calls’ means that all incoming
calls will be diverted to a number specified by you. If
you choose to divert all calls, an arrow ( ) is shown in
the display.
Note! If you activate the ‘All calls’ divert, all other diverts will
automatically be cancelled. They will, however, be acti-
vated again when you cancel the ‘All calls’ divert.
Activating a Call Divert
From the ‘Divert’ menu, scroll to the required
divert option, using the navigation key. The
options are ‘All calls’, ‘On busy’, ‘No reply’ and
‘Unreachable’, depending on your operator.
Scroll to the divert option you want, and press
YES.
To select ‘Activate’, press YES.
Enter the phone number to which you want your
calls to be diverted, including the area code,
and then press YES.
Note! If you used the divert option earlier and then cancelled
it, the phone number to which the calls were diverted
will be suggested. Press CLR if you want to erase this
number and enter a new one.
There may be a short delay before the network
responds. In the meantime, the message ‘Please wait’ is
displayed. This is followed by the message ‘On busy’,
‘All calls’ or ‘No reply’ – ‘Divert ON’, depending on which
divert option you choose. The selected phone number
is also displayed.
The display informs you of any activated call divert
each time you turn the phone on.
Diverting when the Data Menus are On
If you have turned on the ‘Data menus’, you can set call
diverts for your phone, fax and data numbers
respectively or for all three together. To divert, proceed
as described above.
For the fax and data numbers, there are only two divert
alternatives:
• all calls,
• unanswered.
44 Press to enter the menu system. See inside the cover.

Checking the Divert Status
To Check the Status of a Certain Call
Divert
From the ‘Divert’ menu, scroll to the call divert
you want, using the navigation key, and press
YES.
Scroll to the ‘Get status’ option.
To check the status, press YES.
The message ‘Please wait’ appears, followed by either
the phone number and ‘Active on’ if the call divert is
activated, or ‘Active Off’ if it is not activated.
To Check the Status of All Call Diverts
lFrom the ‘Divert’ menu, select ‘Check all’.
The message ‘Please wait’ appears, followed by infor-
mation about all call diverts, i.e. whether they are
activated or not.
Cancelling Call Diverts
To Cancel a Certain Call Divert
From the ‘Divert’ menu, scroll to the required
call divert, using the navigation key, and press
YES.
Scroll to ‘Cancel’.
To cancel the divert, press YES.
The message ‘Please wait’ appears followed by a
message which informs you that the call divert has
been cancelled.
To Cancel All Call Diverts
lFrom the ‘Divert’ menu, select ‘Cancel all’.
The message ‘Please wait’ appears, followed by a
message which informs you that all call diverts have
been cancelled.
Press to enter the menu system. See inside the cover. 45

Handling More than One Call
Your Ericsson I 888 WORLD allows you to handle more
than one call simultaneously. This means that you can
put a call that is in progress on hold, while you make or
answer a second call, and then switch between the two
calls. See also ‘Conference Calls’ at the end of this
chapter’.
The Call Waiting Service
To Activate the Call Waiting Service
To be able to receive a second call, you must activate
the ‘Call Waiting’ service.
From the ‘Access’ menu, select ‘Call Waiting’.
Scroll to ‘Activate’, using the navigation key.
To activate the call waiting service, press YES.
There may be a short delay before the network
responds. In the meantime, the message ‘Please wait’ is
displayed. This is followed by the message ‘Call Waiting
ON’.
To Cancel the Call Waiting Service
From the ‘Access’ menu, select ‘Call Waiting’.
Scroll to ‘Cancel’, using the navigation key.
To cancel ‘Call Waiting’, press YES.
With the ‘Get status’ option, you can check whether the
call waiting service is activated or not.
Receiving a Second Call
If the ‘Call Waiting’ function is activated, you will hear a
tone in the earpiece when a second call is received and
the message ‘Call wait’ will appear in the display.
To End Current Call and Accept Wait-
ing Call
Press NO to end the current call. The question
‘Answer?’ appears.
To answer the waiting call, press YES.
To Put Current Call on Hold and Accept
Waiting Call
lTo put the current call on hold and to answer
the waiting call, press YES. The message ‘1 on
hold’ appears.
To Reject Waiting Call
lTo reject the waiting call and continue the
current call, press 0 followed by YES.
The waiting call is cleared. If the caller’s network
supports it, the caller will hear a busy tone.
Note! If ‘Divert On busy’ is activated, the waiting call is
diverted to the number you have specified.
To Switch Between Two Calls
lTo switch between the active call and the call on
hold, press YES.
46 Press to enter the menu system. See inside the cover.

To End the Current Call
To end the current call, press NO. The message
‘Retrieve held call?’ appears and a beep sounds.
Press NO to end the held call, or press YES to
return to the held call.
Note! If you do not press YES or NO within three seconds, the
message ‘Retrieve held call?’ disappears from the
display. The held call is ended automatically.
Tip! You can automatically end the current call and retrieve
the held call by pressing 1 followed by YES.
Receiving a Third Call
Provided your ‘Call Waiting’ function is activated, you
may receive a third call when you are engaged in one
call and have a second call on hold. You will hear a tone
in the earpiece and the message ‘Call Wait’ appears in
the display.
To Accept the Call
Only one call at a time can be on hold. If you wish to
accept the third call, you must end one of the existing
calls.
To end the current call and accept the waiting call:
lPress 1, followed by YES.
The waiting call will become active and the held
call will remain held.
How to Reject the Call
lPress 0, followed by YES.
The third call is rejected. Provided the caller’s network
supports this function, the caller will hear a busy tone.
Note! If ‘Divert On busy’ is activated, the waiting call is
diverted to the number you have specified.
To Make a Second Call
While the first call is in progress, clear the
display by pressing CLR.
To put the current call on hold, press YES. The
message ‘1 on hold’ is displayed.
Enter the number you wish to call, or recall it
from the phone book, and press YES.
Connecting Two Calls – Explicit Call
Transfer
If you have one active call and one on hold, it is possible
to connect the two calls.
lPress 4 followed by YES.
The two calls are now connected to each other, and you
are disconnected from both calls.
This service may not be available in all networks.
Contact your operator to find out whether your net-
work supports it.
Conference Calls
The Conference call service allows you to have a joint
conversation with up to five people. You may put an
individual or a group of conference members on hold
while you add other people to the conference call. You
may also put conference members on hold while you
talk to someone privately.
The Conference Call service may not be available in all
networks. Contact your operator to find out whether
your network supports it.
Press to enter the menu system. See inside the cover. 47

To initiate a Conference Call
Call the first person you wish to include in the
conference call.
Put this person on hold by pressing YES.
Call the second person you wish to include in
the conference call.
Press 3, followed by YES, to include the two
persons in the conference.
You can put the conference group on hold and then add
a third member by repeating steps 2 to 4. It is possible
to add up to five members in this way.
Note! In the display, the last called number is referred to as
call number one, the one before as number two etc.
To Have a Private Conversation
If you wish to have a private conversation with one of
the members, you can put the other members on hold.
To do this:
Press 2.
Press the number of the member you want to
have a private conversation with. For example,
if you wish to talk to member number three,
press 3.
Press YES.
To join the member to the conference call again:
lPress 3 and then YES.
To Release one of the Members in a
Conference Call
Press 1.
Press the number of the member you want to
release. For example, if you wish to release
member number three, press 3.
To release the member, press YES.
Making a Call while a Conference Call
is in Progress
It is possible to make a call while you are participating
in a conference call. To do this:
To put the conference call on hold, pressYES.
Enter the number you wish to dial and press YES
To switch between the new call and the conference call:
lPress YES.
To end the new call and return to the conference call:
lPress 1, then YES.
See chapter ‘Handling More than One Call’ for more
details.
To End a Conference Call
lTo end the conference call, press NO.
48 Press to enter the menu system. See inside the cover.
Handsfree Calling
By using the Ericsson portable or vehicle handsfree
solutions, you can be on the phone without having to
use your hands to hold it.
The I 888 WORLD allows you to change the default set-
tings for the handsfree-related functions so that they fit
your own requirements.
Selecting Answering Mode
The submenu ‘Answering mode’ includes two func-
tions: ‘Any key’ and ‘Auto’.
• The ‘Any key’ function:
If you use the phone with handsfree equipment
and this function is turned on, you can answer an
incoming call by pressing any key, except the NO
key.
• The ‘Auto’ function:
If you choose the automatic answering mode, an
incoming call will be answered automatically after
one ring signal, if the phone is used with hands-
free equipment.
To select Answering Mode:
From the ‘Settings’ menu, select ‘Answering
mode’.
Choose preferred answering mode using the
navigation key.
To change the setting of the function you have
chosen, press YES.
To confirm your setting, press YES again.
Other Handsfree-Related Settings
Apart from the settings mentioned above, you can
change the following settings when using handsfree
equipment:
• ‘Ring level’
• ‘Ear volume’
• ‘Light’
Each of these settings can be specified separately when
you have your I 888 WORLD connected to handsfree
equipment and when you use the phone as a handheld
unit. This means that if you make one of these settings
when the phone is connected to handsfree equipment,
the settings when it is handheld are not affected and
vice versa.
To change a setting:
Connect the phone to the handsfree equipment.
Change the setting according to the instructions
in the chapter ‘Personalizing Your Phone’.
Note! The active flip can be temporarily disabled by pressing
and holding the side volume key while opening/closing
the flip.
Press to enter the menu system. See inside the cover. 49

Personalizing Your Phone
The Ericsson I 888 WORLD is much more than just an-
other mobile phone. It is your companion in both pro-
fessional and private life. As such, you most certainly
want to adjust the phone to your preferences.
You can do so by composing your own ring signal,
changing the key sound or changing the message
signal, among other things.
This chapter contains all the information you need to
get that little extra out of your phone.
Personal Settings
The ‘Settings’ menu includes a number of functions
which lets you adapt your phone to your own personal
needs in different situations. Note that some of the
settings depend on if you have external equipment
(e.g. handsfree equipment) connected to your phone or
not.
Changing the Earpiece Volume
From the ‘Settings’ menu, select ‘Ear volume’.
Use the navigation key or the volume keys at
the side of the phone to adjust the volume.
When you reach the desired volume, press YES .
Tip! During a call you can use the volume keys at the side of
the phone to adjust the volume.
Note! You can have independent volume settings when you
use the phone as a handheld unit and when you use it
with various handsfree equipment. This means that if
you set the earpiece volume when the phone is
connected to handsfree equipment, the volume setting
when the phone is handheld is not affected and vice
versa.
To Reset the Phone
It is possible to reset all menu settings to default. To do
this:
From the ‘Settings’ menu, select ‘Master reset’.
Enter the phone lock code. (The default code is
0000.)
Press YES.
To Display Your Phone Number
When you turn on your phone, your phone number will
be displayed, provided it can be retrieved from your
SIM card. If not, you can enter it yourself.
From the ‘Settings’ menu, select ‘Phone no’.
Enter the number.
Press YES.
Note! If your SIM card allows it, you can also enter your fax
and/or data number.
Changing the Greeting Text
When you turn on your phone, a greeting text appears
in the display. Instead of the default greeting, you can
have your phone display a welcome greeting that you
write yourself. However, some operators may not allow
the greeting text to be changed.
To enter your own greeting:
From the ‘Settings’ menu, select ‘Greeting’.
Scroll to ‘New text’, using the navigation key.
Press YES.
50 Press to enter the menu system. See inside the cover.

Write your new greeting, using the numeric
keys. For information on how to enter letters,
see chapter ‘ The Phone Book’.
To confirm your new greeting, press YES.
Note! The greeting function also lets you turn the greeting
text off.
Setting the Minute Minder
When the minute minder is activated, you hear a beep
once every minute, while you are on the phone.
To set the minute minder:
From the ‘Settings’ menu, select ‘Min minder’.
Choose between ‘On’ and ‘Off’, using the
navigation key.
To confirm your selection, press YES.
To Change the Display Light
The display light can be set to automatic, turned off or
turned on.
In automatic mode, the display light is turned off
automatically 20 seconds after the last key is pressed.
It is turned on again when a key is pressed or when a
call or message is received.
To set the display light:
From the ‘Settings’ menu, select ‘Light’.
Scroll to the desired display light setting, using
the navigation key, and press YES.
Note! You can have one setting when the phone is used as a
handheld unit and another when the phone is used with
a handsfree kit, powered from an external source. For
example, if you place the phone in a vehicle handsfree
holder, you can set the display light always to be on.
To Select Key Sound
You can choose whether to hear clicks, tones or
nothing (silent) when you press the keys.
From the ‘Settings’ menu, select ‘Key sound’.
Scroll to the desired key sound, using the
navigation key, and press YES.
Note! The only sound available for the side keys is the click
sound.
Changing the Message Signal
You can choose whether to hear clicks, tones or
nothing (silent) when you receive a text message (SMS).
From the ‘Settings’ menu, select ‘Mail alert’.
Scroll to the sound you want to hear when you
receive a message, using the navigation key.
To confirm your selection, press YES .
Changing the Ring Type
You can choose ring type from a list of different sounds
and melodies. You can also compose your own melody
(see below) by entering notes with the keypad.
To choose one of the pre-programmed ring types:
From the ‘Settings’ menu, select ‘Ring type’ .
Scroll with the navigation key until you find the
ring signal that you want. If you do not wish to
disturb other people, use the volume keys on
the side of the phone to scroll silently.
When you reach the desired ring type, press
YES.
Note! If the ‘Data menus’ are turned on (see chapter
‘Communicating via the Modem’), you can set the ring
signal type for speech (the display shows ‘Phone’ in the
middle row), fax and data calls respectively. If you have
the Two Line service (Alternate Line service), you can
also set different ring types for the two lines.
Press to enter the menu system. See inside the cover. 51

Composing Your Own Ring Signal
From the ‘Settings’ menu, select ‘Edit Melody’.
Clear the display by pressing CLR.
Use the keypad to
enter notes. The key-
pad now works as a
keyboard. Press and
hold a key to enter a
long note. Press 0 to
increase the note
one octave.
To listen to your melody, press YES. If you want
to save it, press YES again. If not, press NO and
continue editing.
The Ring Signal Level
The Ring level setting allows you to specify the level:
• when the phone is handheld.
• when the phone is connected to handsfree equip-
ment.
• when the phone is connected to a vibrating call
alert device.
To set the ring signal level:
If necessary, connect the phone to the external
equipment.
Scroll to the ‘Ring level’ menu, using the naviga-
tion key, and press YES.
Use the navigation key to set the ring signal
level.
• Pressing RIGHT increases the volume.
• Pressing LEFT decreases the volume.
The phone will ring once with the actual setting
as you press the navigation key, except for the
‘Off’ and ‘Step’ settings.
To save the setting, press YES.
Tip! Use the side keys to change the ring level silently.
Time and Date
The ‘Clock’ menu lets you set the time and date. It also
lets you activate the alarm function.
The time is shown continuously at the bottom of the
display when the phone is in standby mode.
The Clock
To change the time format:
From the ‘Clock’ menu, select ‘Clock mode’.
Select the clock mode you want, using the navi-
gation key.
Press YES.
To set the clock:
From the ‘Clock’ menu, select ‘Set clock’.
Enter the time in hours and minutes.
Press YES.
If you select the 12-hour format in the ‘Clock mode’
function, you can alternate between am and pm by
pressing #.
The Date
It is possible to have the date displayed in the middle of
the display when the phone is in standby mode.
52 Press to enter the menu system. See inside the cover.

To set the date format:
From the ‘Clock’ menu, select ‘Date mode’.
Scroll to the date format you want, using the
navigation key.
To select a date format, press YES.
To set the date:
From the ‘Clock’ menu, select ‘Set date’.
Enter the year (two digits).
Press YES.
Enter the month and day in the same way.
To confirm your setting, press YES.
Press to enter the menu system. See inside the cover. 53
Other Useful Features
Today’s networks are full of advanced features that can
help you in your daily life. You will access and benefit
from all of them, easily and conveniently, with your Er-
icsson I 888 WORLD, which is designed and prepared to
be the best tool available for that kind of services.
This chapter guides you through these features. Please
note that some of them are operator dependent.
Contact your operator for information on which
services you have access to.
The Answering Service
The Answering service of your network allows callers
to leave a voice message when you cannot, or do not,
wish to answer your calls.
Note! This service may not be available in all networks and
may require a separate subscription.
The ‘Voice mail’ function makes it easy to call your
answering service to listen to recorded voice
messages. You must activate the ‘Voice mail’ function
before using it.
Activating the Voice Mail
To enter the number to the answering service:
From the ‘Mail’ menu, select ‘Set VoiceM’.
Scroll to ‘New number’, using the navigation
key, and press YES.
Enter the new number and press YES.
To activate the Voice Mail function:
From the ‘Mail’ menu, select ‘Set VoiceM’.
Scroll to ‘On’, using the navigation key and
press YES .
Enter the number of your answering service.
To activate the function, press YES.
To change the number of the answering service:
From the ‘Mail’ menu, select ‘Set VoiceM’.
Scroll to ‘New number’, using the navigation
key, and press YES.
Enter the new number and press YES.
To Call the Answering Service
When you receive a voice mail, this is indicated in the
display by the text ‘Voicemail Check?’. You can now
check your message by pressing YES.
If you press NO, you can call the answering service at
any time later on to listen to your recorded messages.
To do this:
lFrom the ‘Mail’ menu, select ‘Voice mail’ and
press YES.
The phone will automatically call your voice
mail. Follow the instructions given to you by
your operator’s answering service.
Whenever you have a waiting voice mail, a symbol is
shown at the bottom of the display.
Further information about the use of the answering
service is found in the operating instructions supplied
by your network operator.
Tip! You can also call your voice mail number by pressing
and holding the 1 key in standby mode.
54 Press to enter the menu system. See inside the cover.

To Turn Off the Voice Mail
From the ‘Mail’ menu, select ‘Set VoiceM’.
Select ‘Off’ and press YES.
The Call Time/Call Cost
When you are on the phone, the display shows the
duration of a call.
By using the ‘Call info’ function in the ‘Settings’ menu
you can have the time displayed for all calls, both
incoming and outgoing. You can also have the call cost
or the number of call units displayed by selecting the
‘Cost’ option, provided your network and your SIM card
support this feature.
Call Information
To select what call information you want to be dis-
played in the ‘Info’ menu:
From the ‘Settings’ menu, select ‘Call info’.
Choose from ‘Time:Outg.’, ‘Time:All’ and ‘Cost’.
Confirm your selection by pressing YES.
To Check Time or Cost of the Last Call
You can check the time/cost of the last incoming (or
outgoing) call with the ‘Last call’ option in the ‘Info’
menu.
From standby, scroll to the ‘Info’ menu, using
the navigation key.
Press YES.
Depending on the setting in the ‘Call info’ func-
tion in the ‘Settings’ menu, you can use the navi-
gation key to check:
• The elapsed time of the last outgoing call.
• The elapsed time of the last incoming call
provided you have chosen the ‘Time:All’
option in the ‘Call info’ function in the
‘Settings’ menu.
To Check Total Call Time or Call Cost
From the ‘Info’ menu, select ‘Tot calls’.
Press YES.
Depending on the settings in the ‘Call info’ function in
the ‘Settings’ menu, you can check:
• The elapsed time of all outgoing calls.
• The elapsed time of all incoming and outgoing
calls.
• The cost (or the number of call units) of all incom-
ing and outgoing calls.
To Reset the Total Call Time/Cost
Meter
From the ‘Info’ menu, select ‘Tot calls’.
Press YES. The message ‘Reset?’ appears.
To reset the meter, press YES.
Note! If you choose the call cost option you must enter your
PIN2 to reset the meter.
To Determine the Call Cost
This function only appears if you have selected the
‘Cost’ option in the ‘Call info’ function in the ‘Settings’
menu.
lFrom the ‘Info’ menu, select ‘Price’.
The ‘Units’ option means that the number of call units
will be displayed during a call, and in the ‘Last call’ and
‘Tot calls’ functions.
The ‘Price’ function lets you enter and vary the price per
call unit. The price entered is stored on your SIM card.
To Enter the Price per Call Unit
From the ‘Settings’ menu, select ‘Call info’.
Press to enter the menu system. See inside the cover. 55
Scroll to ‘Cost’, using the navigation key, and
press YES.
To exit to standby mode, press CLR.
From the ‘Info’ menu, select ‘Price Units’ and
press YES. ‘New Price’ appears.
Press YES.
Enter the code for the desired currency, for
example GBP for Pound Sterling, and press YES.
Enter the price per call unit, for example 0.5,
and press YES. To enter the decimal point, press
#.
Enter your PIN2. (The PIN2 prompt may not
appear in some networks.)
To Revert to Displaying Call Units
From the ‘Info’ menu, select ‘Price’.
To select the ‘Units’ option, press YES.
To revert to displaying call units, press YES.
To Set a Credit Limit for Calls
Provided both your network and your SIM card support
this feature, you can enter a total amount of money that
can be used for making calls. This could be useful when
you, for example, lend your phone to someone, and do
not want their call costs to exceed an amount specified
by you. After a call is made, the cost is deducted from
this amount. When the amount reaches zero, no more
calls can be made.
From the ‘Info’ menu, select ‘Credit’.
To select ‘New credit’, press YES.
Enter the amount: for example, 30 pounds.
Press YES.
Enter your PIN2.
Press YES.
The Two Line Service
Two voice lines with different phone numbers, Line 1
and Line 2, may be assigned to your phone. This is use-
ful if you, for example, want to have one number for
your business calls and one for your private. The ability
to receive and send text messages (SMS), is only
available on Line 1.
The Two Line service (also called Alternate Line Service,
ALS) may not be available on all networks and may
require a separate subscription.
Selecting a Line
The line currently selected is indicated in the display
with the letter ‘L’ and a digit. For example, if line two is
selected, you will see ‘L2’ in the display.
To change to the line that is not currently selected:
Scroll to the ‘Change to’ menu.
To change to the line displayed in the bottom
row, press YES.
From now on, all outgoing calls are made on the
selected line. You can, however, receive calls on both
lines.
Note! Instead of accessing the menu system, you can press
and hold the 2 key to change line, provided the phone
is in standby mode. Clear the display first, using the
CLR key.
Receiving a Call on Line 1 or Line 2
When someone calls you, the question ‘Answer?’ is
replaced by ‘Line1?’ or ‘Line2?’ depending on which line
you have selected.
Note! If you are engaged in a call on one line, you must end
that call first before answering the call on the other line.
56 Press to enter the menu system. See inside the cover.

Different Settings for Each Line
You can have different settings for each line: for
example, the tone of the ring signal, call diverts, call
bars and call waiting function.
The call meters in the ‘Info’ menu show the call times
(call costs) for the line currently selected.
Changing the Name of the Two Lines
Your I 888 WORLD allows you to personalize the names
of the two lines. You might, for example, want to call Li-
ne 1 ‘Private’ and Line 2 ‘Work’. To change the name of
Line1:
From the ‘Settings’ menu, select ‘Line 1 Tag’ and
press YES.
Enter the name (maximum twelve characters),
using the numeric keys and press YES.
To change the name of Line 2, select ‘Line 2 Tag’
instead.
Calling Card or Credit Card Calls
When making international or long distance calls, you
may not want your operator to charge you for these
calls on your normal account. If you have a credit card
or a calling card, you may want to redirect the charges
to one of those accounts instead. Your I 888 WORLD is
all set for making this procedure as easy as possible for
you.
You can store two separate card numbers in your
phone. These numbers are protected by a four- to
eight-digit security code that you choose yourself. The
default code is 0000.
In order to be able to make Calling card calls, you have
to activate this function.
Activating the Calling Card Feature
From the ‘Access’ menu, select ‘Call cards
security’ and press YES.
Enter your security code and press YES. The
default code is 0000.
Scroll to ‘Call cards’, using the navigation key,
and press YES.
Scroll to ‘On’, using the navigation key, and
press YES.
The Call card function is now activated and the sub-
menu ‘Call card numbers’ will be visible in the ‘Phone
book’ menu.
To Change Security Codes
From the ‘Access’ menu, select ‘Call cards
security’ and press YES.
Enter your security code and press YES. The
default code is 0000.
Scroll to ‘Change code’, using the navigation
key, and press YES.
Enter your new code and press YES. The code
can consist of four to eight digits.
Confirm your new code, when ‘Repeat new
code’ appears in the display, and press YES.
Your security code is now changed.
Storing Credit or Calling Card Num-
bers
Your Ericsson I 888 WORLD allows you to store two call-
ing card numbers in the phone book menu.
This submenu is only visible if the Call card function is
activated in the ‘Access’ menu.
To store a calling card number:
From the ‘Phone book’ menu, select ‘Call card
numbers’ and press YES.
Press to enter the menu system. See inside the cover. 57

Enter your security code and press YES. The
default code is 0000. To change security codes,
see above.
Select card position (Card 1 or Card 2), using
the navigation key, and press YES.
Enter the access number (the phone number) to
the calling card server. The numbers are
entered in the same way as in the ordinary
Phone book.
Press the navigation key.
Enter the verification code to your calling card
server.
To store the calling card number, press YES.
Note! Since the dialling order may vary between calling card
servers, you can change the order yourself. Use the
or # key, when the ‘Called no.’ row flashes.
Dialling order means whether you have to dial your
verification code before or after the number you want
to dial.
Selecting the Card You Want To Use
If you have stored two card numbers, you must select
which card you wish to use before making a
Calling/Credit card call.
From the ‘Phone book’ menu, select ‘Call card
numbers’.
Enter your security code and press YES. The
default code is 0000.
Scroll to the card you wish to use, using the
navigation key, and press YES
Your settings for the card appear.
To select the card, press YES.
Note! If you only use one card number, this selection will not
have to be repeated every time you wish to make a
Calling/Credit card call.
Making a Credit or Calling Card Call
Enter the number you wish to dial, or retrieve it
from the Phone book.
To set up the call as a Credit/Calling Card Call,
press and hold YES.
The access number to the calling card server is called
and during the connecting phase, you are prompted to
send the called number (the number or the person you
want to call) and the verification code, in the order
chosen by you (see above).
To send the called number and the verification code
during the connecting phase, press YES when the dis-
play shows ‘Send’, or wait a few seconds and your
Ericsson I 888 WORLD will send them automatically.
Area Information
The ordinary Short Message Service can be defined as a
personal service with messages specifically and exclu-
sively directed to you. The Area Information (AI) is
another type of text message which is sent to all sub-
scribers in a certain cell of a network at the same time.
For example, the information may be a local road report
or a local taxi phone number.
Note! This feature may not be available in all networks.
To Turn On Area Information
From the ‘Mail’ menu, select ‘Area info’.
Press YES.
Scroll to ‘On’, using the navigation key, and
press YES.
You can now see Area information messages in your
display.
58 Press to enter the menu system. See inside the cover.

To Turn Off Area Information
From the ‘Mail’ menu, select ‘Area info’.
Press YES.
Scroll to ‘Off’, using the navigation key, and
press YES.
Area Information Message Types
Each type of Area Information message is identified by
a three-digit code. At present, the following message
types exist:
Code AI Message Type
000 Index
010 Flashes
020 Hospitals
022 Doctors
024 Pharmacy
030 Long-distance road reports
032 Local road reports
034 Taxis
040 Weather
050 District (base station identity)
052 Network information
054 Operator services
056 Directory enquiries (national)
057 Directory enquiries (international)
058 Customer care (national)
059 Customer care (international)
For information about the AI services you can use,
please refer to the information supplied by your net-
work operator.
Area Information Message List
You can decide which types of area information mes-
sages you wish to receive. The phone’s ‘Area Info’ list
can hold up to 20 codes.
To insert an Area Information code:
From the ‘Mail’ menu, select ‘Area info’.
Press YES.
Scroll to ‘Edit list’, using the navigation key, and
press YES.
The digits to the left indicate the position in the
list. You can scroll forwards and backwards
through the list with the navigation key.
To insert a code, scroll to the first empty
location, using the navigation key. Press YES.
Enter the new code. (You only need to enter 40
for 040, since the phone adds the leading zero
automatically.)
To erase or replace a code:
From the ‘Mail’ menu, select ‘Area info’.
Press YES.
Scroll to ‘Edit list’, using the navigation key, and
press YES.
Scroll to the code you wish to erase, and press
YES.
The message ‘Erase?’ appears.
• If you want to erase this code, press YES.
• If you want to replace the code, press the
navigation key RIGHT once, followed by YES.
Then enter the new code and press YES.
To Receive Area Information
When you receive Area information, the message is
stored in the phone memory. Please note that the
phone only stores one message per code. This means
that the message stored previously in a specific code
will be erased.
Provided ‘Area info’ is turned on, you can read the
messages with the ‘Area messages function in the mail
menu.
From the ‘Mail’ menu, select ‘Area messages’.
Press to enter the menu system. See inside the cover. 59

Scroll from one message to another by using the
navigation key.
To select a message, press YES.
The Alarm
The phone has an alarm function. When it is activated,
an icon in the shape of a bell ( ) is shown next to the
current time in the display.
The alarm rings at the set time even if the phone is
turned off. The illumination of the keys and the display
will flash. The volume of the alarm signal depends on
the setting of the ring signal.
The alarm will ring for 60 seconds and will be repeated
every nine minutes if you do not turn it off. After 60
minutes, the repeat function will be turned off.
To set the alarm:
From the ‘Clock’ menu, select ‘Set alarm’.
Scroll to the ‘New time’ option, using the naviga-
tion key.
Press YES.
Enter the time in hours and minutes.
Press YES.
Note! If you choose the 12-hour format in the ‘Clock mode’
function you can alternate between am and pm by
pressing and #.
To turn the alarm off:
Press any key to turn the alarm off when it
sounds.
If you do not want the alarm to be repeated,
press YES.
To turn the alarm function off:
From the ‘Clock’ menu, select ‘Set alarm’.
Scroll to ‘Off’, using the navigation key.
Press YES.
The Calculator
The phone’s built-in calculator can add, subtract, divide
and multiply.
An example of how to use the calculator:
In this example we are going to divide 134 by 32.
Scroll to the ‘Calculator’ menu and press YES.
Enter 134.
Scroll with the navigation key to the division
sign (/), and press YES.
Enter 32.
Scroll with the navigation key to the equal sign
(=) and press YES to get the answer.
You can also press # to get the answer.
To clear the display, press CLR.
To enter a decimal point:
lPress .
To multiply:
lPress twice.
60 Press to enter the menu system. See inside the cover.

Guidelines for Safe and Efficient Use
General
Your mobile phone is a radio transmitter and receiver.
When the phone is turned on, it receives and transmits
radio frequency (RF) energy. Depending on the type of
mobile phone you have bought, it operates in different
frequency ranges and employs commonly used modu-
lation techniques. The system that handles your call
when you are using your phone, controls the power
level at which your phone transmits.
Exposure to Radio Frequency Energy
The International Commission on Non-Ionizing Radia-
tion Protection (ICNIRP), sponsored by the World Health
Organization (WHO), published a statement in 1996
which sets limits for exposure to RF fields from hand-
held mobile phones. According to this statement,
which is based on the available body of research, there
is no evidence that mobile terminals meeting the rec-
ommended limits can cause any adverse health effects.
All Ericsson telephones conform to the ICNIRP recom-
mendations and international exposure standards,
such as:
• CENELEC European Pre-standard ENV50166-2
• ANSI/IEEE C95.1-1992 (USA, Asia-Pacific)
If you want to limit RF exposure even further, you may
choose to control the duration of your calls and operate
your phone in the most power efficient manner.
Efficient Phone Operation
How to use your phone for optimum performance with
minimum power consumption:
• Hold the phone as you would any other telephone.
While speaking directly into the mouthpiece, angle
the antenna in a direction up and over your shoul-
der. If the antenna is extendable/retractable, it
should be extended during a call.
•Do not hold the antenna when the phone is in
use. Holding the antenna affects call quality, may
cause the phone to operate at a higher power level
than needed and shorten talk and standby times.
Antenna Care and Replacement
•Do not bend the antenna since it is sensitive and
this will reduce its performance.
•Do not use the phone with a damaged antenna.
Take your phone to a qualified service centre for
repair. Use only the designated Ericsson antenna.
•Do not use an antenna designed for any other
type of telephone than the one you have bought.
Unauthorized antennas, modifications, or attach-
ments could damage the phone and may violate
the appropriate regulations.
Driving
Check the laws and regulations on the use of tele-
phones in the areas where you drive.
Press to enter the menu system. See inside the cover. 61

If you are going to use your mobile phone while driv-
ing:
• Give full attention to driving.
• Use hands-free operation, if available.
• Pull off the road and park before making or an-
swering a call if driving conditions so require.
RF energy may affect some electronic systems in motor
vehicles. In addition, some vehicle manufacturers for-
bid the use of mobile phones in their vehicles. Check
with your vehicle manufacturer's representative to be
sure your phone will not affect the electronic systems
of your vehicle.
Electronic Devices
Most modern electronic equipment, for example equip-
ment in hospitals and cars, is shielded from RF energy.
However, RF energy from telephones may affect some
electronic equipment.
Turn off your phone in health care facilities when
regulations posted in the areas instruct you to do so.
Do not use your mobile phone near medical equipment
without requesting permission.
Mobile telephones may affect the operation of some im-
planted cardiac pacemakers, equipment for people
with hearing impairments and other medically im-
planted equipment. Pacemaker patients should be
aware that the use of a mobile phone very close to a
pacemaker may cause the device to malfunction. Avoid
placing the phone over the pacemaker, i.e. in your
breast pocket. When using the phone, place it at your
ear opposite the pacemaker. If a minimum distance of
15 cm is kept between the phone and the pacemaker,
the risk of interference is limited. Contact your cardi-
ologist for more information.
Aircraft
•Turn off your phone before boarding any aircraft.
•Do not use it on the ground without crew permis-
sion.
To prevent interference with communication systems,
you must not use your phone while the plane is in the
air.
Power Supply
• Connect AC (Power supply) only to designated
power sources as marked on the product.
• To reduce risk of damage to the electric cord, re-
move it from the outlet by holding onto the AC
adapter rather than the cord.
• Make sure the cord is located so that it will not be
stepped on, tripped over or otherwise subjected to
damage or stress.
• To reduce risk of electric shock, unplug the unit
from any power source before attempting any
cleaning, then use a soft, damp cloth.
Children
Do not allow children to play with your phone since
they could hurt themselves or others or accidentally
damage the phone.
Blasting Areas
Turn off your mobile phone when in a blasting area or
in areas posted ‘turn off two-way radio’ to avoid inter-
fering with blasting operations. Construction crews of-
ten use remote control RF devices to set off explosives.
62 Press to enter the menu system. See inside the cover.

Potentially Explosive Atmospheres
Turn off your phone when in any area with a poten-
tially explosive atmosphere. It is rare, but your phone
or its accessories could generate sparks. Sparks in such
areas could cause an explosion or fire resulting in bod-
ily injury or even death.
Areas with a potentially explosive atmosphere are of-
ten, but not always, clearly marked. They include fuel-
ling areas, such as petrol stations, below deck on boats,
fuel or chemical transfer or storage facilities, and areas
where the air contains chemicals or particles, such as
grain, dust, or metal powders.
Do not transport or store flammable gas, liquid, or ex-
plosives in the compartment of your vehicle which con-
tains your phone and accessories.
Operating Temperature
This phone is designed for an operating temperature
range of -10º C to +55º C.
The operation is guaranteed in this range.
Product Care
•Do not expose your mobile phone to moisture or
extreme temperatures.
•Do not use any other accessories than Ericsson
originals. Failure to do so may result in loss of per-
formance, fire, electric shock or injury, and will
void the warranty.
•Do not attempt to disassemble the product. Doing
so will void warranty. This product does not con-
tain consumer serviceable components. Service
should only be performed by Authorized Service
Centres.
Press to enter the menu system. See inside the cover. 63

Warranty Conditions
If your Ericsson product requires warranty service you
should return the product to the dealer/retailer from
whom it was purchased. If your Ericsson product re-
quires warranty service when you are abroad, the serv-
ice is available in those countries listed on your Interna-
tional Warranty Certificate.
In the event of difficulty, details of our authorized serv-
ice network are available from your local Ericsson sub-
sidiary.
Our warranty
Ericsson warrants this product as being free of defects
in material, design and workmanship at the time of
original purchase and for a period of twelve (12)
months immediately thereafter.
What We Will Do
If, during the period of the warranty, this product mal-
functions in normal use and service due to defective de-
sign, materials or workmanship Ericsson willrepair or
replace, at its discretion, the product under the condi-
tions stated below.
Ericsson subsidiaries, authorised distributors or
authorised service centres in the countries listed on
your International Warranty Certificate will repair or re-
place this product in accordance with the terms and
conditions stipulated in these conditions of the war-
ranty. Certain products may not be available in certain
countries and in this event, a similar product will be de-
livered.
Conditions
The warranty will be granted only if the original
warranty certificate issued to the purchaser by
the dealer is presented, and if the said warranty
certificate stipulates the serial number of the
purchased product and the date of purchase of
the product. Ericsson reserves the right to ref-
use warranty service if this information has
been removed or amended after the original
purchase of the product. The original receipt/in-
voice will only be accepted as a proof of pur-
chase when presented to the dealer from whom
the product was purchased.
The warranty is not applicable in circumstances
other than defects in material, design and work-
manship. The warranty does not cover the fol-
lowing:
• Periodic checks, maintenance, repair and re-
placement of parts due to normal wear and
tear, exchange of faulty batteries or upgrad-
ing of software due to changes in network pa-
rameters.
• Damage to the product resulting from:
– Abuse or misuse, including but not limited to
failure to use the product for its normal pur-
poses or in accordance with Ericsson’s instruc-
tions for use and maintenance of the product,
or the installation or use of the product in a
manner inconsistent with the technical or
safety standards in force.
– Repairs performed by non-authorised service
workshops, or opening of the product by non-
authorised persons.
64 Press to enter the menu system. See inside the cover.

– Accidents, acts of God or any cause beyond the
control of Ericsson, including but not limited to
lightning, water, fire, public disturbances and
improper ventilation.
This product will not be considered defective in
materials, design or workmanship if it needs to
be adapted, changed or adjusted to conform to
national or local technical or safety standards in
force in any country other than that for which
the product was originally designed and manu-
factured. This warranty shall not reimburse such
adaptations, changes or adjustments, or at-
tempts to do so, whether properly performed or
not, nor any damage resulting from them, nor
any adaptation, change or adjustment to up-
grade the product from its normal purpose as
described in the product manual without the
prior written consent of Ericsson.
Repair or replacement under the terms of this
warranty shall not give a right to an extension
to, or a new commencement of, the period of
warranty. Repair or replacement under the
terms of this warranty may be fulfilled with
functionally equivalent reconditioned units. Re-
placed faulty parts or components will become
the property of Ericsson.
This warranty does not affect the purchaser’s ’s
statutory rights under applicable national legis-
lation in force, nor the purchaser’s rights
against the dealer arising from the sales/pur-
chase contract.
In the absence of applicable national legislation this
warranty will be the purchaser’s sole and exclusive
remedy. Ericsson, its subsidiaries and distributors shall
not be liable for any incidental or consequential
damages for breach of any express or implied warranty
relating to this product.
Press to enter the menu system. See inside the cover. 65

Index
A
Aircraft, 62
Alarm, 60
set the alarm, 60
turn the alarm function off, 60
turn the alarm off, 60
Alternate line service (ALS), 56
answered calls memory, 11
Calling Line Identification service (CLI), 11
clear memory, 11
recall number, 11
Answering Mode, 49
Answering Service, 54
check voice mail, 54
Voice Mail, 54
antenna
care and replacement, 61
Area Information, 58
Message List, 59
Message Types, 59
Receive Area Information, 59
B
Battery, 4
Attach the Battery, 4
Charge the Battery, 4
low battery alarm, 6
nickel cadmium type batteries, 5
nickel metal hydride battery , 5
Remove the Battery, 4
C
Calculator, 60
Call Barring
cancel call bars, 42
change password, 42
change status, 41
Call Information, 55
Call Cost, 55
Call Time, 55
Credit Limit , 56
Price per Call Unit, 55
Call Waiting Service, 46
Activate Call Waiting Service, 46
Cancel Call Waiting Service, 46
Calling Line Identification (CLI) service, 12, 18
hide your phone number, 12, 18
show your phone number , 12, 18
calls, 9
answer, 10
domestic, 9
international , 9
making, 9
receiving, 10
rejecting, 10
charger , 4
connect, 4
disconnect, 5
Children, 62
Clock, 52
Conference Calls, 47
Connecting Two Calls, 47
Credit Card Calls, 57
D
Data calls, 30
Data Menus, 26
Date, 52
Display, 0
Display Language, 7
Reset to English, 8
Display Light, 51
Display Your Phone Number, 50
Diverting Incoming Calls, 44
Activating a Call Divert, 44
Cancelling Call Diverts, 45
Checking the Divert Status, 45
Diverting when the Data Menus are On, 44
Driving, 61
DTMF tones, 13
E
Earpiece Volume, 13, 50
Efficient Phone Operation, 61
Electronic Devices, 62
Emergency calls, 7, 9
Entering Characters
Check the First Characters, 16
Enter Small Letters, 16
Erasing a Message, 24
Erasing a Phone Number, 19
Exposure to Radio Frequency Energy, 61
66

F
Fax calls, 30
Fixed Dialling, 43
Activate, 43
Cancel, 43
Edit Fixed Numbers, 43
Store Fixed Numbers, 43
G
Greeting Text, 50
GSM 1900, 2
GSM 900, 2
H
Handsfree Calling, 49
Handsfree-Related Settings, 49
hiding your phone number, 12, 18
I
international emergency number, 9
International Numbers, 15
country code, 15
international dialling prefix, 15
K
Key Sound, 51
Keypad Lock, 42
Automatic , 42
Manual, 42
Unlock, 42
L
Language, 7
last dialled numbers, 10
Light, 51
M
Menu System, 14
Message Signal, 51
Minute Minder, 51
Missed calls, 11
Who Called, 11
Mobile Office Suite, 32
Installing the Mobile Office Suite, 32
The Message Manager, 32
The Phone Book Manager, 32
Uninstalling the Mobile Office Suite, 33
Mute
microphone, 13
ring signal, 10
N
Networks, 37
Search, 37
Select, 37
O
Operators, 2
P
Personal Identity Number (PIN), 2
Personal Unblocking Key (PUK), 2
Phone Book, 15
Edit, 19
Entering Characters, 16
Ericsson Mobile Office Suite software, 15
name recall , 17
Phone Book Memories, 15
position recall, 18
Store a Phone Number, 16
PIN, 2
Change PIN, 40
PIN2, 2
Change PIN2, 40
Potentially Explosive Atmospheres, 63
Power Supply, 62
Product Care, 63
PUK, 2
R
Reading a Message, 23
Recalling a Phone Number, 17
Using the Name, 17
Using the Position, 18
Receiving Fax and Data Calls, 31
Multi Numbering, 31
Single Numbering, 31
Redialling a Number, 10
Automatic Redialling Function, 10
Redial Previously Called Numbers, 10
Replying to a Message, 24
Reset the Phone, 50
Restrict Calls, 41
Ring signal
changing ring type, 51
Composing your own ring signal, 52
Ring Signal Level, 8, 52
handsfree equipment, 8
To mute the ring signal, 10
vibrating call alert device, 8
Roaming
International, 2
S
Scratch Pad, 13
67

Security, 40
Call Barring, 41
Card Lock, 40
Keypad Lock, 42
Phone Lock, 41
security code (PIN), 2
Sending Messages, 23
SIM Application Toolkit, 34
Compatibility, 34
Details on Services Offered, 36
Initialisation, 34
SIM Card Initiated Features, 35
SIM Card
If Your SIM Card is Blocked, 40
Insert the SIM Card, 3
Lock the SIM Card, 40
Unlock the SIM Card, 40
speed dialling, 17
Subscriber Identity Module (SIM), 2
Subscription, 2
T
Text Messages, 21
Changing Message Types, 22
Enter Letters, 22
Messages Memory, 21
Read, 25
Send, 25
Setting the Phone for Text Messaging, 22
SIM Card Memory, 21
Store, 24
Write, 22
Tone Signals, 13
touch tones, 13
Turning Off the Phone, 7
Turning On the Phone, 7
Two Line Service, 56
Selecting a Line, 56
U
Unanswered Calls, 11
V
Voice Mail, 54
To Turn Off the Voice Mail, 55
68

First edition (October, 1998)
This user’s guide is published by Ericsson Mobile Communica-
tions AB, without any warranty. Improvements and changes to this
user’s guide due to typographical errors, inaccuracies of current in-
formation, or improvements to programs and/or equipment, may
be made by Ericsson Mobile Communications AB at any time
and without notice. Such changes will, however, be incorporated
into new editions of this manual.
All rights reserved.
©Ericsson Mobile Communications AB, 1998.
Publication number: EN/LZT 126 1472 R1A
Printed in Sweden.
The symbol on our products signifies that they have been certi-
fied according to the EMC directive 89/336/EEC, the Telecommuni-
cations directive 91/263/EEC, and the Low Voltage directive
73/23/EEC when applicable. The products fulfil the requirements
according to the following standards:
Cellular Phones and Accessories in Combination:
• ETS 300 342-1 EMC for European digital cellular telecommuni-
cations.
Accessories Without Direct Connection to a Cellular Phone:
• EN 50081 Electromagnetic compatibility, Generic Emission
Standard
• EN 50082 Electromagnetic compatibility, Generic Immunity
Standard.
CLASS 1 LED PRODUCT