HARRIS TR-411-A2 Cellular/PCS portable terminal User Manual Exhibit 8
HARRIS CORPORATION Cellular/PCS portable terminal Exhibit 8
HARRIS >
Exhibit 8

0RELOH3KRQH
5G
8VHU·V*XLGH
$
Para obtener una copia en español de esta Guía del Usuario, visite nuestra página
Web en www.ericsson.com/phones o, si se encuentra en Estados Unidos,
también puede llamar al 1-800-374-2776.
Register your new phone, purchase Ericsson original accessories,
and see the latest in products by visiting us at http://www.ericsson.com/phones

Document Conventions . . . . . . . . . . . . . . . . 1
Guidelines for Safe and Efficient Use . . . . . 2
Safety . . . . . . . . . . . . . . . . . . . . . . . . . . . . . . . . . . . . . . . . .2
Exposure to Radio Frequency Signals . . . . . . . . . . . . . . .2
Antenna Care . . . . . . . . . . . . . . . . . . . . . . . . . . . . . . . . .2
Phone Operation . . . . . . . . . . . . . . . . . . . . . . . . . . . . . .2
Driving . . . . . . . . . . . . . . . . . . . . . . . . . . . . . . . . . . . . . .3
Electronic Devices . . . . . . . . . . . . . . . . . . . . . . . . . . . . .3
Aircraft . . . . . . . . . . . . . . . . . . . . . . . . . . . . . . . . . . . . . .4
Blasting Areas . . . . . . . . . . . . . . . . . . . . . . . . . . . . . . . . .4
Potentially Explosive Atmospheres . . . . . . . . . . . . . . . . .4
For Vehicles Equipped with an Air Bag . . . . . . . . . . . . .4
Product Care and Operation . . . . . . . . . . . . . . . . . . . . . . .4
Battery Information . . . . . . . . . . . . . . . . . . . . . . . . . . . . . .5
FDA Consumer Update . . . . . . . . . . . . . . . . . . . . . . . . . .6
Getting Started. . . . . . . . . . . . . . . . . . . . . . . 11
Connecting and Removing Your Battery . . . . . . . . . . . . .11
Connecting Your Battery . . . . . . . . . . . . . . . . . . . . . . .11
Removing Your Battery . . . . . . . . . . . . . . . . . . . . . . . .11
Charging Your Battery . . . . . . . . . . . . . . . . . . . . . . . . . . .12
Your Charger . . . . . . . . . . . . . . . . . . . . . . . . . . . . . . . .12
Learning About Your Mobile Phone . . . . . 14
Highlights of Your Phone . . . . . . . . . . . . . . . . . . . . . . . 14
Data Operation . . . . . . . . . . . . . . . . . . . . . . . . . . . . . . 14
Voice Operation . . . . . . . . . . . . . . . . . . . . . . . . . . . . . 14
The Parts of Your Phone . . . . . . . . . . . . . . . . . . . . . . . . 15
Turning Your Phone On and Off . . . . . . . . . . . . . . . . . 15
Operating Your Phone . . . . . . . . . . . . . . . . . . . . . . . . . . 15
Voice Operation . . . . . . . . . . . . . . . . . . . . . . . . . . . . . 15
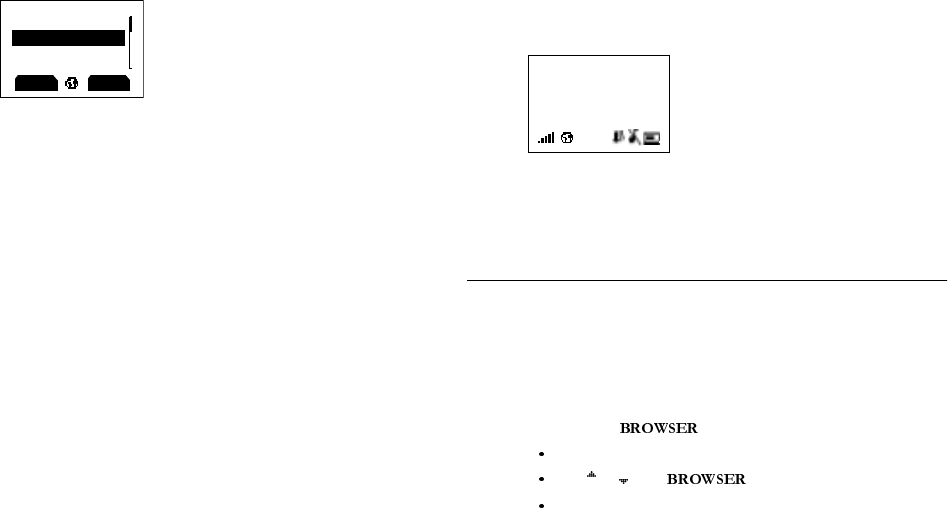
Browser Operation . . . . . . . . . . . . . . . . . . . . . . . . . . . 15
Wireless Modem Operation . . . . . . . . . . . . . . . . . . . . 16
Switching Between Modes of Operation . . . . . . . . . . . . 16
Switching From Voice to Browser Operation . . . . . . . 16
Switching from Browser to Voice Operation . . . . . . . . 17
Switching to Wireless Modem Operation . . . . . . . . . . 17
Accessories, Accessibility, and Internet . . . . . . . . . . . . . . 17
Technical Assistance/Ordering Accessories . . . . . . . . . 17
Accessible Solutions/Special Needs . . . . . . . . . . . . . . . 17
Internet . . . . . . . . . . . . . . . . . . . . . . . . . . . . . . . . . . . . 17
Voice Operation. . . . . . . . . . . . . . . . . . . . . . 18
Your Display in Voice Operation . . . . . . . . . . . . . . . . . . 18
Main Menu . . . . . . . . . . . . . . . . . . . . . . . . . . . . . . . . . . 19
Accessing Menus . . . . . . . . . . . . . . . . . . . . . . . . . . . . . . 19
Table of Contents
Voice Operation Display Messages . . . . . . . . . . . . . . . . . 19
Voice Calls . . . . . . . . . . . . . . . . . . . . . . . . . . . . . . . . . . 20
Using Your Phonebook . . . . . . . . . . . . . . . . . . . . . . . . 21
Answering Calls . . . . . . . . . . . . . . . . . . . . . . . . . . . . . . 21
Adjusting Ear Volume During a Call . . . . . . . . . . . . . . 22
Low Battery Power Alert . . . . . . . . . . . . . . . . . . . . . . . 23
International Calls . . . . . . . . . . . . . . . . . . . . . . . . . . . . 23
Voice Operation Key Functions . . . . . . . . . . . . . . . . . . . 23
Phonebook Menu . . . . . . . . . . . . . . . . . . . . . . . . . . . . . . 24
Find and Call . . . . . . . . . . . . . . . . . . . . . . . . . . . . . . . . 24
Find and DTMF . . . . . . . . . . . . . . . . . . . . . . . . . . . . . 24
Add New Contact . . . . . . . . . . . . . . . . . . . . . . . . . . . . 25
Find and Edit . . . . . . . . . . . . . . . . . . . . . . . . . . . . . . . . 25
My Number . . . . . . . . . . . . . . . . . . . . . . . . . . . . . . . . . 25
Position Organizer . . . . . . . . . . . . . . . . . . . . . . . . . . . . 25
Messages Menu . . . . . . . . . . . . . . . . . . . . . . . . . . . . . . . . 25
Check Voice Mail . . . . . . . . . . . . . . . . . . . . . . . . . . . . 25
Inbox . . . . . . . . . . . . . . . . . . . . . . . . . . . . . . . . . . . . . . 25
Send New Text . . . . . . . . . . . . . . . . . . . . . . . . . . . . . . 25
Unsent Items . . . . . . . . . . . . . . . . . . . . . . . . . . . . . . . . 26
Templates . . . . . . . . . . . . . . . . . . . . . . . . . . . . . . . . . . 26
Sent Items . . . . . . . . . . . . . . . . . . . . . . . . . . . . . . . . . . 26
Call Info Menu . . . . . . . . . . . . . . . . . . . . . . . . . . . . . . . . 26
Missed Calls . . . . . . . . . . . . . . . . . . . . . . . . . . . . . . . . . 26
Call Log . . . . . . . . . . . . . . . . . . . . . . . . . . . . . . . . . . . . 27
Call Timer . . . . . . . . . . . . . . . . . . . . . . . . . . . . . . . . . . 27
Options . . . . . . . . . . . . . . . . . . . . . . . . . . . . . . . . . . . . 27
Ongoing Call Menu . . . . . . . . . . . . . . . . . . . . . . . . . . . .27
Activate Scratch Pad . . . . . . . . . . . . . . . . . . . . . . . . . . .27
Hold Call . . . . . . . . . . . . . . . . . . . . . . . . . . . . . . . . . . .27
Switch Calls . . . . . . . . . . . . . . . . . . . . . . . . . . . . . . . . .27
Retrieve Call . . . . . . . . . . . . . . . . . . . . . . . . . . . . . . . . .27
Release All . . . . . . . . . . . . . . . . . . . . . . . . . . . . . . . . . .27
Activate/Deactivate . . . . . . . . . . . . . . . . . . . . . . . . . . .27
Settings Menu . . . . . . . . . . . . . . . . . . . . . . . . . . . . . . . . .27
Sounds . . . . . . . . . . . . . . . . . . . . . . . . . . . . . . . . . . . . .28
Profiles . . . . . . . . . . . . . . . . . . . . . . . . . . . . . . . . . . . . .28
Select Profile . . . . . . . . . . . . . . . . . . . . . . . . . . . . . . . .29
Call Options . . . . . . . . . . . . . . . . . . . . . . . . . . . . . . . .29
Display . . . . . . . . . . . . . . . . . . . . . . . . . . . . . . . . . . . . .31
Language . . . . . . . . . . . . . . . . . . . . . . . . . . . . . . . . . . .31
Clock . . . . . . . . . . . . . . . . . . . . . . . . . . . . . . . . . . . . . .31
Tools Menu . . . . . . . . . . . . . . . . . . . . . . . . . . . . . . . . . .32
Voice Memo . . . . . . . . . . . . . . . . . . . . . . . . . . . . . . . .32
Calendar . . . . . . . . . . . . . . . . . . . . . . . . . . . . . . . . . . . .32
Time Functions . . . . . . . . . . . . . . . . . . . . . . . . . . . . . .32
Games . . . . . . . . . . . . . . . . . . . . . . . . . . . . . . . . . . . . .32
Synchronization . . . . . . . . . . . . . . . . . . . . . . . . . . . . . .32
Calculator . . . . . . . . . . . . . . . . . . . . . . . . . . . . . . . . . .32
WAP Services Menu . . . . . . . . . . . . . . . . . . . . . . . . . . . .32
Homepage . . . . . . . . . . . . . . . . . . . . . . . . . . . . . . . . . .33
Enter URL . . . . . . . . . . . . . . . . . . . . . . . . . . . . . . . . . .33
Ericsson Mobile Internet . . . . . . . . . . . . . . . . . . . . . . .33
WAP Options . . . . . . . . . . . . . . . . . . . . . . . . . . . . . . .33
My Menu . . . . . . . . . . . . . . . . . . . . . . . . . . . . . . . . . . . .33
Select Profiles . . . . . . . . . . . . . . . . . . . . . . . . . . . . . . . .33
Ring Volume . . . . . . . . . . . . . . . . . . . . . . . . . . . . . . . .33
Alarm . . . . . . . . . . . . . . . . . . . . . . . . . . . . . . . . . . . . . .33
Customize . . . . . . . . . . . . . . . . . . . . . . . . . . . . . . . . . .33
Problem Solving . . . . . . . . . . . . . . . . . . . . . . . . . . . . . . .33
. . . . . . . . . . . . . . . . . . . . . . . . . . . . . . . . . . . . . . . . .34
Browser Operation . . . . . . . . . . . . . . . . . . . 35
When You Are Connected . . . . . . . . . . . . . . . . . . . . . . . .35
Your Phone’s Display in Browser Operation . . . . . . . . . .35
Content Window . . . . . . . . . . . . . . . . . . . . . . . . . . . . .35
Status Row . . . . . . . . . . . . . . . . . . . . . . . . . . . . . . . . . .36
Navigation and Item Selection . . . . . . . . . . . . . . . . . . .37
Browser Operation Key Functions . . . . . . . . . . . . . . . . . .40
Tools Menu . . . . . . . . . . . . . . . . . . . . . . . . . . . . . . . . . . .41
Home Page . . . . . . . . . . . . . . . . . . . . . . . . . . . . . . . . . .41
Voice Mode . . . . . . . . . . . . . . . . . . . . . . . . . . . . . . . . .41
Add Favorite . . . . . . . . . . . . . . . . . . . . . . . . . . . . . . . . .41
Display . . . . . . . . . . . . . . . . . . . . . . . . . . . . . . . . . . . . .42
Show URL . . . . . . . . . . . . . . . . . . . . . . . . . . . . . . . . . .42
Page Help . . . . . . . . . . . . . . . . . . . . . . . . . . . . . . . . . . .42
Reset Cache . . . . . . . . . . . . . . . . . . . . . . . . . . . . . . . . .42
Version Info . . . . . . . . . . . . . . . . . . . . . . . . . . . . . . . . .42
Local Settings . . . . . . . . . . . . . . . . . . . . . . . . . . . . . . . .42
Keypad Help . . . . . . . . . . . . . . . . . . . . . . . . . . . . . . . .42
Configuring Your Browser . . . . . . . . . . . . . . . . . . . . . . . .42
Entering the Network Settings Submenu . . . . . . . . . . 43
Configuring the NEI . . . . . . . . . . . . . . . . . . . . . . . . . . 43
Using Your New Subscription . . . . . . . . . . . . . . . . . . . 43
Configuring the Browser Gateway . . . . . . . . . . . . . . . 43
Problem Solving . . . . . . . . . . . . . . . . . . . . . . . . . . . . . . . 44
Wireless Modem Operation . . . . . . . . . . . . 45
Before You Start . . . . . . . . . . . . . . . . . . . . . . . . . . . . . . . 45
Computer Setup in Wireless Modem Operation . . . . . . 45
Initial Setup . . . . . . . . . . . . . . . . . . . . . . . . . . . . . . . . . . 45
Connecting to the Internet . . . . . . . . . . . . . . . . . . . . . . 46
Your Display in Wireless Modem Operation . . . . . . . . . 46
Wireless Modem Operation Key Functions . . . . . . . . . . 47
Disconnecting . . . . . . . . . . . . . . . . . . . . . . . . . . . . . . . . 47
Problem Solving . . . . . . . . . . . . . . . . . . . . . . . . . . . . . . . 47
Index. . . . . . . . . . . . . . . . . . . . . . . . . . . . . . . 50

1Document Conventions
Menu names are shown in the following typeface: .
Submenu names are shown in the following typeface:
Key names are shown in the following typeface: BACK.
Text that is seen in the phone’s display is shown in the following
typeface: displays.
When this guide instructs you to press a key, press and release
the key.
When this guide instructs you to press and hold a key, press and
hold the key for one to two seconds.
When this guide instructs you to press two keys, press one then
press the other. For example, press MENU 1 means press MENU
then press 1.
Press the down arrow for at least one second when you see this
symbol ( ).
Press the up arrow for at least one second when you see this
symbol ( ).
Document Conventions
The quick access shortcuts to your phone’s menu
and settings are identified by this shaded box.

Guidelines for Safe and Efficient Use 2
Since its introduction in the mid 1980s the mobile phone has been
one of the most exciting and innovative products ever developed.
Your phone can help you to stay in touch with your office, your
home, emergency services and others.
Safety
Exposure to Radio Frequency Signals
Your wireless handheld portable telephone is a low power radio
transmitter and receiver. When it is ON, it receives and also sends
out radio frequency (RF) signals.
In August, 1996, the Federal Communications Commission (FCC)
adopted RF exposure guidelines with safety levels for handheld
wireless phones. Those guidelines are consistent with the safety
standards previously set by both US and international standards
bodies:
ANSI C95.1 (1992)*
NCRP Report 86 (1986)*
ICNIRP (1996)*
Those standards were based on comprehensive and periodic
evaluations of the relevant scientific literature. For example, over 120
scientists, engineers, and physicians from universities, government
health agencies, and industry reviewed the available body of research
to develop the ANSI Standard (C95.1).
The design of your phone complies with the FCC guidelines
(and those standards).
* American National Standards Institute: National Council on
Radiation Protection and Measurements; International Commission on
Non-Ionizing Radiation Protection.
Antenna Care
Use only the supplied or an approved replacement antenna.
Unauthorized antennas, modifications, or attachments could
damage the phone and may violate FCC regulations.
Phone Operation
NORMAL POSITION: Hold the phone as you would any other
telephone with the antenna pointed up and over your shoulder.
TIPS ON EFFICIENT OPERATION: For your phone to operate
most efficiently:
Extend your antenna fully (where applicable).
Do not touch the antenna unnecessarily when the phone is in
use. Contact with the antenna affects call quality and may cause
the phone to operate at a higher power level than otherwise
needed.
Guidelines for Safe and Efficient Use

3Guidelines for Safe and Efficient Use
Driving
Check the laws and regulations on the use of wireless telephones in
the areas where you drive. Always obey them. Also, if using your
phone while driving, please:
Give full attention to driving – driving safely is your first
responsibility.
Use handsfree operation, if available.
Pull off the road and park before making or answering a call if
driving conditions so require.
In addition, Ericsson suggests the following safe driving tips if you
are using your phone while driving:
Get to know your wireless phone and its features such as speed
dial and redial.
Position your wireless phone within easy
reach.
Suspend conversations during hazardous
driving conditions or situations.
Do not take notes or look up phone
numbers while driving.
Dial sensibly and assess the traffic; if
possible, place calls when you are not moving or before pulling
into traffic.
Do not engage in stressful or emotional conversations that may
be distracting.
Use your wireless phone to call for help.
Use your wireless phone to help others in emergencies.
Call roadside assistance or a special wireless non-emergency
assistance number when necessary.
Electronic Devices
Most modern electronic equipment is shielded from RF signals.
However, certain electronic equipment may not be shielded against
RF signals from your wireless phone.
Pacemakers
The Health Industry Manufacturers Association recommends that a
minimum separation of six (6”) inches be maintained between a
handheld wireless phone and a pacemaker to avoid potential
interference with the pacemaker. These recommendations are
consistent with the independent research by and recommendations
of Wireless Technology Research.
Persons with pacemakers:
Should ALWAYS keep the phone more than six inches from
their pacemaker when the phone is turned ON.
Should not carry the phone in a breast pocket.
Should use the ear opposite the pacemaker to minimize the
potential for interference.
If you have any reason to suspect that interference is taking
place, turn your phone OFF immediately.
Hearing Aids
Some digital wireless phones may interfere with some hearing aids.
In the event of such interference, you may want to consult your
service provider (or call the customer service line to discuss
alternatives).

Guidelines for Safe and Efficient Use 4
Other Medical Devices
If you use any other personal medical device, consult the
manufacturer of your device to determine if it is adequately shielded
from external RF energy. Your physician may be able to assist you in
obtaining this information.
Turn your phone OFF in health care facilities when any regulations
posted in these areas instruct you to do so. Hospitals or health care
facilities may be using equipment that could be sensitive to external
RF energy.
Vehicles
RF signals may affect improperly installed or inadequately shielded
electronic systems in motor vehicles. Check with the manufacturer
or its representative regarding your vehicle. You should also consult
the manufacturer of any equipment that has been added to your
vehicle.
Posted Facilities
Turn your phone OFF in any facility where posted notices so require.
Aircraft
FCC regulations prohibit using your phone while in the air. Switch
OFF your phone before boarding an aircraft.
Blasting Areas
To avoid interfering with blasting operations, turn your phone OFF
when in a “blasting area” or in areas posted: “Turn off two-way
radio.” Obey all signs and instructions.
Potentially Explosive Atmospheres
Turn your phone OFF when in any area with a potentially explosive
atmosphere and obey all signs and instructions. Sparks in such areas
could cause an explosion or fire resulting in bodily injury or even
death.
Areas with a potentially explosive atmosphere are often but not
always clearly marked. They include fueling areas such as gasoline
stations; below deck on boats; fuel or chemical transfer or storage
facilities; vehicles using liquefied petroleum gas (such as propane or
butane); areas where the air contains chemicals or particles, such as
grain, dust, or metal powders; and any other area where you would
normally be advised to turn off your vehicle engine.
For Vehicles Equipped with an Air Bag
An air bag inflates with great force. DO NOT place objects,
including both installed or portable wireless equipment, in the area
over the air bag or in the air bag deployment area. If in-vehicle wireless
equipment is improperly installed and the air bag inflates, serious
bodily injury could result.
Product Care and Operation
This device complies with Part 15 of the FCC Rules. Operation is
subject to the following two conditions: 1) This device may not
cause harmful interference, and 2) This device must accept any
interference received, including interference that may cause
undesired operation.
Ericsson suggests you read and observe the following for safe care
and operation of your phone:

5Guidelines for Safe and Efficient Use
Do not allow children to play with your phone. They could
hurt themselves or others, or could accidentally damage the
phone. Your phone may contain small parts that could be
detached and create a choking hazard.
Do not expose your mobile phone to moisture or extreme
temperatures.
Only Ericsson original accessories are recommended. Failure to
use them may result in loss of performance or product damage,
and will void the warranty.
Do not attempt to disassemble the product. Doing so will void
warranty. This product does not contain consumer serviceable
components. Service should only be performed by Authorized
Service Centers.
Do not allow objects to fall on, or liquids to spill on products.
Connect AC (power supply) only to designated power sources as
marked on the product.
To reduce risk of damage, remove the electrical cord from the
outlet by pulling the AC adapter at the outlet rather than the
cord.
Make sure the electric cord is located so that it will not be
stepped on, tripped over, or otherwise subjected to damage or
stress.
To reduce risk of electric shock, unplug the unit from the power
source before attempting any cleaning. Once unplugged, use a
soft cloth lightly dampened with water for cleaning.
DANGER – Never alter the AC cord or plug. If the plug will
not fit into the outlet, have a proper outlet installed by
a qualified electrician. Improper connection can result in risk of
electric shock.
Don’t twist the antenna. Excess twisting will damage the
antenna.
Before a phone model is available for sale to the public, it must
be tested and certified to the FCC that it does not exceed the
limit established by the government-adopted requirement for
safe exposure. The tests are performed in positions and locations
(i.e., at the ear and worn on the body) as required by the FCC
for each model. Body worn measurements are made while the
phone is in use and worn on the body with an Ericsson
accessory. The design and composition of an accessory can
affect the body worn Specific Absorption Rate (SAR) levels for
the phone. Ericsson has not measured, and makes no
representation about the body worn SAR levels when the phone
is used with non-Ericsson accessories.
Battery Information
New Batteries
The battery packaged with your phone is not fully charged. For
maximum battery capacity, use your charger to condition the battery.
Recycling Your Battery
Your phone manufacturer is a member of the Rechargeable Battery
Recycling Corporation (RBRC), a non-profit service organization
designed to assist in the recycling of rechargeable batteries. Many
areas require the recycling of rechargeable batteries. In the U.S., call
1-800-822-8837 to find out how to recycle your battery. Outside the
U.S., contact your local retailer for recycling instructions.

Guidelines for Safe and Efficient Use 6
Battery Use and Care
A rechargeable battery has a long service life if treated properly.
A new battery, or one that has not been used for a long period of
time, should be conditioned before using your phone. Avoid
recharging a fully-charged or almost fully-charged battery. If your
phone shuts off due to low battery power, you should charge the
battery within 24 hours for the battery to reach full capacity.
Do not leave your battery where it may be subjected to
extremely hot or cold temperatures. This could reduce the
battery’s capacity.
Do not let the metal contacts on the battery touch another
metal object such as keys in your pocket. This could short-
circuit and damage the battery.
Do not attempt to take a battery apart.
Do not expose a battery to open flame. This could cause the
battery to explode.
Turn your phone OFF before removing the battery.
Use only the AC/DC adapter supplied with your battery
charger. Using a different adapter could be dangerous and will
void your phone warranty.
Never charge a battery when the ambient room temperature is
below 50°F (10°C) or above 105°F (40°C).
Do not allow the battery to be placed into the mouth. Battery
electrolytes may be toxic if swallowed.
FDA Consumer Update
The U.S Food and Drug Administration (FDA) has been receiving
inquiries about the safety of mobile phones, including cellular
phones and PCS phones.
The following summarizes what is known – and what remains
unknown – about whether these products can pose a hazard to
health, and what can be done to minimize any potential risk. This
information may be used to respond to questions.
Why the concern?
Mobile phones emit low levels of radiofrequency energy
(i.e., radiofrequency radiation) in the microwave range while being
used. They also emit very low levels of radiofrequency energy (RF),
considered non-significant, when in the stand-by mode. It is well
known that high levels of RF can produce biological damage
through heating effects (this is how your microwave oven is able to
cook food). However, it is not known whether, to what extent, or
through what mechanism, lower levels of RF might cause adverse
health effects as well. Although some research has been done to
address these questions, no clear picture of the biological effects of
this type of radiation has emerged to date. Thus, the available science
does not allow us to conclude that mobile phones are absolutely safe,
or that they are unsafe. However, the available scientific evidence
does not demonstrate any adverse health effects associated with the
use of mobile phones.
What kinds of phones are in question?
Questions have been raised about hand-held mobile phones, the
kind that have a built-in antenna that is positioned close to the user’s
7Guidelines for Safe and Efficient Use
head during normal telephone conversation. These types of mobile
phones are of concern because of the short distance between the
phone’s antenna – the primary source of the RF
– and the person’s head. The exposure to RF from mobile phones in
which the antenna is located at greater distances from the user
(on the outside of a car, for example) is drastically lower than that
from hand-held phones, because a person’s RF exposure decreases
rapidly with distance from the source. The safety of so-called
“cordless phones,” which have a base unit connected to the
telephone wiring in a house and which operate at far lower power
levels and frequencies, has not been questioned.
How much evidence is there that hand-held mobile
phones might be harmful?
Briefly, there is not enough evidence to know for sure, either way;
however, research efforts are on-going. The existing scientific
evidence is conflicting and many of the studies that have been done
to date have suffered from flaws in their research methods. Animal
experiments investigating the effects of RF exposures characteristic
of mobile phones have yielded conflicting results.
A few animal studies, however, have suggested that low levels of RF
could accelerate the development of cancer in laboratory animals. In
one study, mice genetically altered to be predisposed to developing
one type of cancer developed more than twice as many such cancers
when they were exposed to RF energy compared to controls. There is
much uncertainty among scientists about whether results obtained
from animal studies apply to the use of mobile phones. First, it is
uncertain how to apply the results obtained in rats and mice to
humans. Second, many of the studies that showed increased tumor
development used animals that had already been treated with cancer-
causing chemicals, and other studies exposed the animals to the RF
virtually continuously
– up to 22 hours per day.
For the past five years in the United States, the mobile phone
industry has supported research into the safety of mobile phones.
This research has resulted in two findings in particular that merit
additional study:
1 In a hospital-based, case-control study, researchers looked for an
association between mobile phone use and either glioma
(a type of brain cancer) or acoustic neuroma (a benign tumor of
the nerve sheath). No statistically significant association was found
between mobile phone use and acoustic neuroma. There was also
no association between mobile phone use and gliomas when all
types of types of gliomas were considered together.
It should be noted that the average length of mobile phone
exposure in this study was less than three years.
When 20 types of glioma were considered separately, however, an
association was found between mobile phone use and one rare
type of glioma, neuroepithelliomatous tumors. It is possible with
multiple comparisons of the same sample that this association
occurred by chance. Moreover, the risk did not increase with how
often the mobile phone was used, or the length of the calls. In fact,
the risk actually decreased with cumulative hours of mobile phone
use. Most cancer causing agents increase risk with increased
exposure. An ongoing study of brain cancers by the National
Cancer Institute is expected to bear on the accuracy and
repeatability of these results.1
2 Researchers conducted a large battery of laboratory tests to assess
the effects of exposure to mobile phone RF on genetic material.
These included tests for several kinds of abnormalities, including
mutations, chromosomal aberrations, DNA strand breaks, and
Guidelines for Safe and Efficient Use 8
structural changes in the genetic material of blood cells called
lymphocytes. None of the tests showed any effect of the RF except
for the micronucleus assay, which detects structural effects on the
genetic material. The cells in this assay showed changes after
exposure to simulated cell phone radiation, but only after 24
hours of exposure. It is possible that exposing the test cells to
radiation for this long resulted in heating. Since this assay is
known to be sensitive to heating, heat alone could have caused the
abnormalities to occur. The data already in the literature on the
response of the micronucleus assay to RF are conflicting. Thus,
follow-up research is necessary.2
FDA is currently working with government, industry, and
academic groups to ensure the proper follow-up to these industry-
funded research findings. Collaboration with the Cellular
Telecommunications Industry Association (CTIA) in particular is
expected to lead to FDA providing research recommendations and
scientific oversight of new CTIA-funded research based on such
recommendations.
Two other studies of interest have been reported recently in the
literature:
1 Two groups of 18 people were exposed to simulated mobile phone
signals under laboratory conditions while they performed cognitive
function tests. There were no changes in the subjects’ ability to
recall words, numbers, or pictures, or in their spatial memory, but
they were able to make choices more quickly in one visual test
when they were exposed to simulated mobile phone signals. This
was the only change noted among more than 20 variables
compared.3
2 In a study of 209 brain tumor cases and 425 matched controls,
there was no increased risk of brain tumors associated with mobile
phone use. When tumors did exist in certain locations, however,
they were more likely to be on the side of the head where the
mobile phone was used. Because this occurred in only a small
number of cases, the increased likelihood was too small to be
statistically significant.4
In summary, we do not have enough information at this point to
assure the public that there are, or are not, any low incident health
problems associated with use of mobile phones. FDA continues to
work with all parties, including other federal agencies and industry,
to assure that research is undertaken to provide the necessary answers
to the outstanding questions about the safety of mobile phones.
What is known about cases of human cancer that have
been reported in users of hand-held mobile phones?
Some people who have used mobile phones have been diagnosed
with brain cancer. But it is important to understand that this type of
cancer also occurs among people who have not used mobile phones.
In fact, brain cancer occurs in the U.S. population at
a rate of about 6 new cases per 100,000 people each year. At that
rate, assuming 80 million users of mobile phones (a number
increasing at a rate of about 1 million per month), about 4800 cases
of brain cancer would be expected each year among those
80 million people, whether or not they used their phones. Thus it is
not possible to tell whether any individual’s cancer arose because of
the phone, or whether it would have happened anyway. A key
question is whether the risk of getting a particular form of cancer is
greater among people who use mobile phones than among the rest of
the population. One way to answer that question is to compare the
usage of mobile phones among people with brain cancer with the use
of mobile phones among appropriately matched people without brain
cancer. This is called a case-control study.

9Guidelines for Safe and Efficient Use
The current case-control study of brain cancers by the National
Cancer Institute, as well as the follow-up research to be sponsored by
industry, will begin to generate this type of information.
What is FDA’s role concerning the safety of mobile
phones?
Under the law, FDA does not review the safety of radiation-emitting
consumer products such as mobile phones before marketing, as it
does with new drugs or medical devices. However, the agency has
authority to take action if mobile phones are shown to emit radiation
at a level that is hazardous to the user. In such a case, FDA could
require the manufacturers of mobile phones to notify users of the
health hazard and to repair, replace or recall the phones so that the
hazard no longer exists.
Although the existing scientific data do not justify FDA regulatory
actions at this time, FDA has urged the mobile phone industry to
take a number of steps to assure public safety. The agency has
recommended that the industry:
support needed research into possible biological effects of RF of
the type emitted by mobile phones;
design mobile phones in a way that minimizes any RF exposure to
the user that is not necessary for device function; and
cooperate in providing mobile phone users with the best
possible information on what is known about possible effects of
mobile phone use on human health.
At the same time, FDA belongs to an interagency working group of
the federal agencies that have responsibility for different aspects of
mobile phone safety to ensure a coordinated effort at the federal
level. These agencies are:
National Institute for Occupational Safety and Health
Environmental Protection Agency
Federal Communications Commission
Occupational Health and Safety Administration
National Telecommunications and Information Administration
The National Institutes of Health also participates in this group.
In the absence of conclusive information about any
possible risk, what can concerned individuals do?
If there is a risk from these products – and at this point we do not
know that there is – it is probably very small. But if people are
concerned about avoiding even potential risks, there are simple steps
they can take to do so. For example, time is a key factor in how
much exposure a person receives. Those persons who spend long
periods of time on their hand-held mobile phones could consider
holding lengthy conversations on conventional phones and reserving
the hand-held models for shorter conversations or for situations
when other types of phones are not available.
People who must conduct extended conversations in their cars every
day could switch to a type of mobile phone that places more distance
between their bodies and the source of the RF, since the exposure
level drops off dramatically with distance. For example, they could
switch to:
a mobile phone in which the antenna is located outside the
vehicle,
a hand-held phone with a built-in antenna connected to
a different antenna mounted on the outside of the car or built
into a separate package, or

Guidelines for Safe and Efficient Use 10
a headset with a remote antenna to a mobile phone carried at
the waist.
Again, the scientific data do not demonstrate that mobile phones are
harmful. But if people are concerned about the radiofrequency
energy from these products, taking the simple precautions outlined
above can reduce any possible risk.
Where can I find additional information?
For additional information, see the following websites:
Federal Communications Commission (FCC) RF Safety
Program (select “Information on Human Exposure to RF Fields
from Cellular and PCS Radio Transmitters”)
http://www.fcc.gov/oet/rfsafety
World Health Organization (WHO) International
Commission on Non-Ionizing Radiation Protection
(select Qs & As)
http://www.who.int/emf
United Kingdom, National Radiological Protection Board
http://www.nrpb.org.uk
Cellular Telecommunications Industry Association (CTIA)
http://www.wow-com.com
U.S. Food and Drug Administration (FDA) Center for Devices
and Radiological Health
http://www.fda.gov/cdrh/consumer/
Footnotes
1 Muscat et al. Epidemiological Study of Cellular Telephone Use
and Malignant Brain Tumors. In: State of the Science
Symposium;1999 June 20; Long Beach, California.
2 Tice et al. Tests of mobile phone signals for activity in genotoxicity
and other laboratory assays. In: Annual Meeting of the
Environmental Mutagen Society; March 29, 1999, Washington,
D.C.; and personal communication, unpublished results.
3 Preece, AW, Iwi, G, Davies-Smith, A, Wesnes, K, Butler, S, Lim,
E, and Varey, A. Effect of a 915-MHz simulated mobile phone
signal on cognitive function in man. Int. J. Radiat. Biol., April 8,
1999.
4 Hardell, L, Nasman, A, Pahlson, A, Hallquist, A and Mild, KH.
Use of cellular telephones and the risk for brain tumors:
a case-control study. Int. J. Oncol., 15: 113-116, 1999.
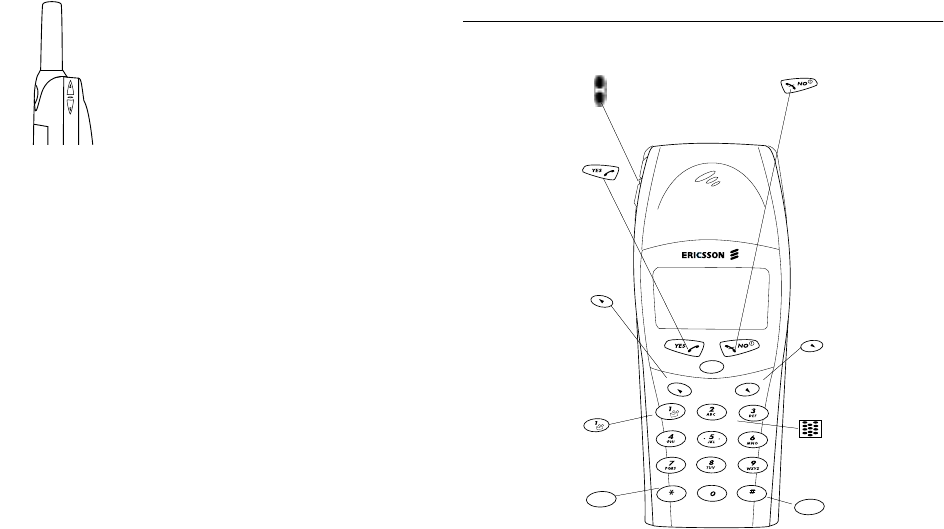
11 Getting Started
Note! Prior to assembling and using your phone, you may want to read
“Guidelines for Safe and Efficient Use” on page 2.
Connecting and Removing Your Battery
Note! You can find your phone’s model number by removing the battery
and looking on the back of the phone.
Connecting Your Battery
1 Place the battery over the back of the phone.
The label on the battery should face down.
Insert the top portion of the battery into the
phone. The tab on the bottom of the battery
should be pointing toward the bottom of the
phone.
2 Press down until you hear a click. The battery is
now connected.
Removing Your Battery
1 Remove the battery by pushing in on the tab of
the battery with your thumb.
2 Lift the battery up and out of the battery cavity.
Getting Started
Getting Started 12
Charging Your Battery
Your Charger
Your phone was packaged with either
a rapid or travel charger. It is important
that you fully charge your battery before
you use your phone. Both chargers supply
power to charge your battery while the
battery is attached to your phone. If your
phone is On, it can receive calls while using
either charger.
Note! attach the charger to a phone
that does not have a battery installed.
1 If you have a rapid charger, plug the
charger into a standard wall electrical
outlet. If you have a travel charger, connect the appropriate AC
power cord and phone charging cord to the travel charger.
2 Hold the phone with the display and keypad facing up.
3 Hold the small plug on the charger cord so the lightning bolt
symbol ( ) is up.
4 Align the small plug on the charger cord with the connector on
the bottom of your phone. The connector on the phone is above
the lightning bolt symbol ( ).
5 Press the plug into the connector until the plug “snaps” into place.
The icon is alternated with the icon when the phone is
powered on and the phone is charging.
Note! Do not twist while inserting or removing the small plug on the
charger cord!
6 Continue charging the phone until the battery is fully charged.
7 To disconnect the charger, lift the plug connected to the phone
upwards and pull it out.
Charge-Only Mode
If your phone is off, attaching the charger will cause the phone to
activate in charge-only mode. When this mode is activated, the
message Charging Only appears in the display. Your phone is
now fast (rapid) charging the battery. When your phone is fully
charged, Battery Charged appears in the display.
Note! You cannot make or receive calls when your phone is in charge-
only mode.
Slow (Trickle) Charging a Deeply Discharged
Battery
The battery could become deeply discharged (for example, when the
battery is stored for a long period). As a result, the phone may not
rapid
travel
rapid
travel
13 Getting Started
immediately activate charge-only mode when the charger is
connected.
1 Attach the charger to the phone for several hours to slowly charge
(trickle charge) the battery.
2 After trickle charging the battery for several hours the phone
should activate the charge-only mode automatically.
3 Continue charging the phone until the battery is fully charged.

Learning About Your Mobile Phone 14
Your Ericsson mobile phone features quad-mode technology.
For Voice Operation, it operates in three modes – two Digital ( )
modes (800 and 1900 MHz frequency bands) and one Analog ( )
mode (800 MHz range). The fourth mode of operation is data. The
Globe Icon ( ) means that you have established a connection with
the data network. The built-in browser allows you access to the
world of information on the Internet.
Highlights of Your Phone
Data Operation
Microbrowser for sending/receiving email and for Internet
access
Wireless Modem Operation
Tegic® T9® Text Entry
Server-based Contacts and Calendar
(dependent upon your service provider)
WAP page capability
Secure HDML page capability
Support for Phonebook download
Bookmark creation
Bitmap image support
Voice Operation
27 ring types (with musical melody ring options)
Editable musical ring melodies
Caller ID (last 40 numbers)
Quick call-back feature to respond to text messages
Storage for 400 numbers in the phonebook
Speed dial for 99 numbers including voice mail
Super dial for 9 numbers including voice mail
Dialing for 2 different calling cards
Quick access to the last 40 numbers dialed
Receives short message service (SMS) messages with 16KB of
storage
Quick access to voice mail service
Call duration reminder
Time and date
Stopwatch
Alarm
Profiles
Groups
Call Screening
Call Restrictions
User-customizable greeting
Multiple language support
Learning About Your Mobile Phone
15 Learning About Your Mobile Phone
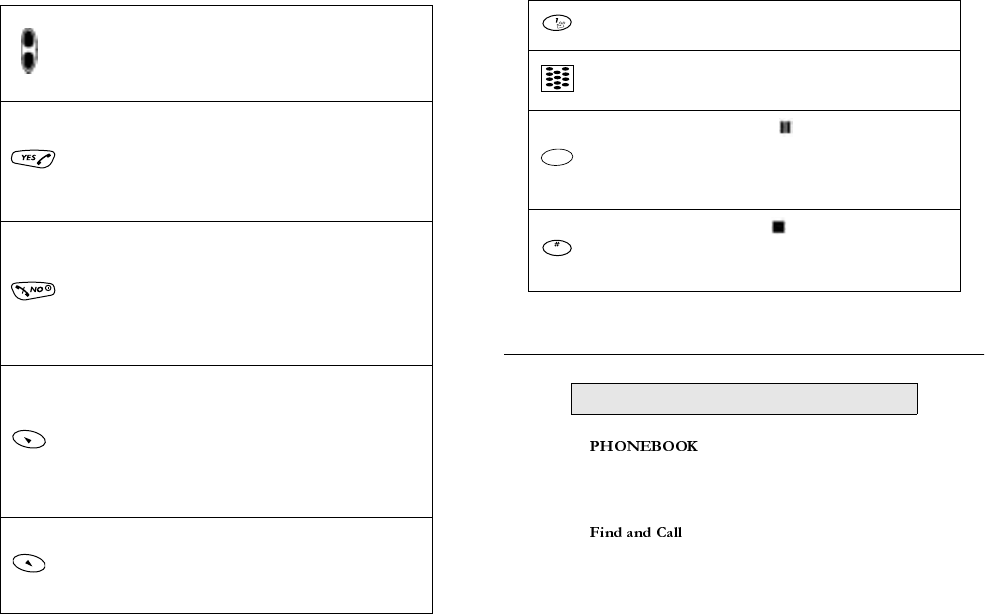
The Parts of Your Phone
The following is a list of the terms used in this user’s guide to
describe your Ericsson mobile phone:
Turning Your Phone On and Off
Turn your phone Off by pressing and holding NO until your phone
turns off. Turn your phone On by pressing and holding NO until
your phone turns on.
Operating Your Phone
You can use your Ericsson mobile phone in Voice, Browser, and
Wireless Modem Operation.
Voice Operation offers you all of the benefits of a traditional mobile
telephone, including placing and answering calls, and receiving voice
and text messages.
Browser Operation allows you to browse the Internet and view web
content on your Ericsson mobile phone.
Wireless Modem Operation allows you to use your phone as
a modem with your laptop or desktop computer to browse the
Internet, displaying web content on your computer screen.
Voice Operation
When you see a screen similar to the one shown below, your phone is
ready to make and receive voice calls.
For more information about Voice Operation, see “Voice Operation”
on page 9.
Browser Operation
Your phone includes a built-in browser that allows you to access
Internet content designed especially for mobile phones. This content
typically includes Email, Calendar, and Contacts.
NO
YES
CLEAR
77
Home
Dec31 12:12pm
1
2
3
4
65
8
10
11
12
7
9
a|A ,?!
CLR
Learning About Your Mobile Phone 16
While in Browser Operation, your phone displays information
(content) retrieved from the Internet via the digital network. The
content available to your phone is determined by your content
provider.
Email
Your content provider can enable email as an application for use with
your browser. If this feature is enabled, you can send and receive
email to anyone with an Internet email address.
Calendar
Your content provider can enable the calendar application for use
with your browser. If this feature is enabled, you can set meeting
reminders as Alerts and also set future appointments.
Contact List
Your content provider can enable the contact list for use with your
browser. If this feature is enabled, you can look up addresses to call,
view, or email.
The World
You have access to the world from your Ericsson mobile phone in
Browser Operation. This includes maps, games, stock quotes,
weather, and a host of other applications.
For more information on Browser Operation, see “Browser
Operation” on page 32.
Wireless Modem Operation
You can use your phone in Wireless Modem Operation when it is
powered on with the proper cable attached from your phone to your
computer. An Ericsson accessory kit may be required to use your
phone in Wireless Modem Operation. Your phone is in Wireless
Modem Operation when you see the following standby screen.
For more information about Wireless Modem Operation, see
“Wireless Modem Operation” on page 40.
Switching Between Modes of Operation
Switching From Voice to Browser Operation
There are three easy ways to switch from Voice Operation to Browser
Operation:
1 Press and hold the MENU key.
2 To select the menu tab:
Press MENU.
Press or until is selected.
Press YES.
3 Press MENU 5.
Menu
Inbox
.......................
Sites
2 Weather
1 News
Modem Mode
21 KB
Dec31 12:12pm

17 Learning About Your Mobile Phone
Note! The factory default setting for your phone’s power-on option is
Voice Operation.
Switching from Browser to Voice Operation
There are two easy ways to switch from Browser Operation to Voice
Operation:
1 Press and hold the MENU key.
or
2 To select Voice Mode from the menu:
Press MENU.
Press or until is selected.
Press YES to select .
Switching to Wireless Modem Operation
To switch from Voice or Browser Operation to Wireless Modem
Operation, see “Wireless Modem Operation” on page 40.
Accessories, Accessibility, and Internet
Technical Assistance/Ordering Accessories
North America - 1-800-ERICSSON (1-800-374-2776)
Latin America 1-305-755-6789
Other countries, call 1-919-472-7908
Accessible Solutions/Special Needs
For information on Accessible Solutions for individuals with Special
Needs, call the Ericsson Special Needs Center at 877-878-1996
(TTY) or 877-207-2056 (voice), or visit the Ericsson Special Needs
Center at http://www.ericsson-snc.com.
Internet
Visit Ericsson on the internet at http://mobile.ericsson.com.
Voice Operation 18
In Voice Operation, you can make and receive telephone calls; work
with your voice mail and messages; change your phone’s voice
settings; add, edit, or delete entries from your phonebook; and make
credit card calls.
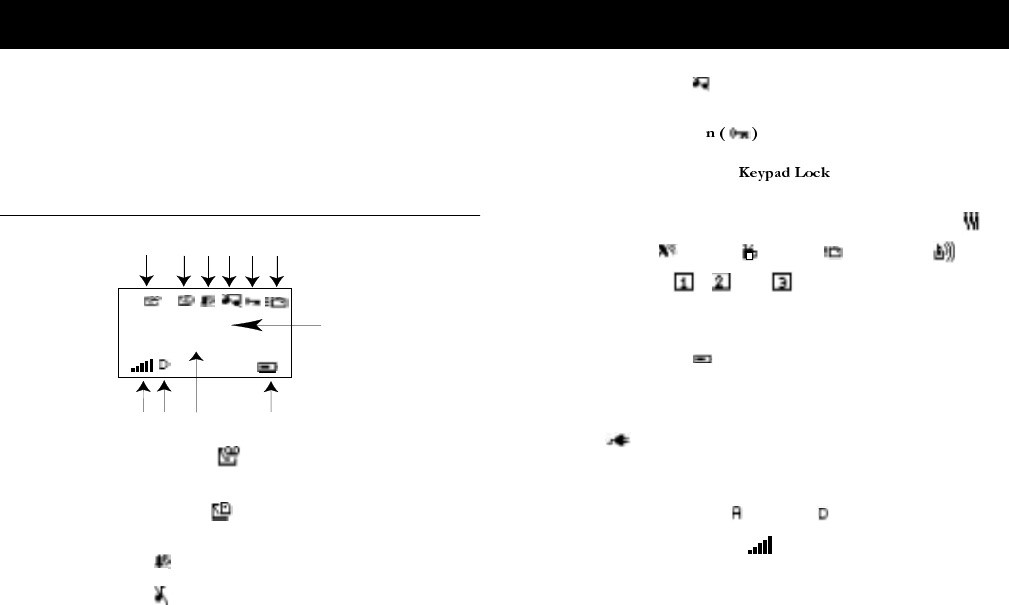
Your Display in Voice Operation
1 New Voice Mail Icon ( ) indicates the number of voice mail
messages that have not been heard.
2 New Text Mail Icon ( ) indicates the number of text messages
that have not been read.
3 Alarm Icon ( ) appears if the alarm is set.
4 Ringer Off ( ) Icon indicates that your phone will not make
ring sounds.
5 Phone Silent ( ) Icon indicates that your phone will not make
any keypad or ring sounds. Press MENU # to access Phone Silent.
6 Keypad Lock Ico indicates that pressing the keys has no
effect. The keypad is locked to prevent inadvertent key presses.
Press MENU * to toggle on and off.
7 Active Profile Icon indicates the currently-selected profile.
Possible profile icons include Normal (no icon), Discreet ( ),
Leisure ( ), Work ( ), Travel ( ), Handsfree ( ), and
My Profile , , and .
8 Standby Screen indicates that the phone is in standby mode and is
ready for use. The text label for your current network is displayed.
9 Battery Icon ( ) shows the relative strength of your battery. A
full icon indicates a fully-charged battery. If the phone is
connected to external power and the battery is charging, the
display alternates between the battery icon and the charging icon
().
10 Current Time is displayed.
11 Analog/Digital Channel Indicator shows whether the phone is
operating in analog ( ) or digital ( ) mode.
12 Signal Strength Icon ( ) shows the relative signal strength
from the wireless system. More bars indicate a stronger signal.
Voice Operation
123
4/5 67
8
10
11
12
77
12:12pm
Home
9
19 Voice Operation
Main Menu
The main menu has six icons that display the top-level menu
options. The corresponding title of the selected option is
displayed below the menu tabs when highlighted. Each menu is
represented by an icon.
You can use one of the menu tabs that appear when you press MENU
once from the Standby screen. Press YES to select or press , , or
MENU to scroll to the menu item you want to choose. You can also
press the number associated with the menu item to go directly to the
submenu.
Option 1 is the menu
(see “Phonebook Menu” on page 24).
Option 2 is the menu
(see “Messages Menu” on page 25).
Option 3 is the menu
(see “Call Info Menu” on page 26).
Option 4 is the menu
(see “Activate Scratch Pad” on page 27).
Option 5 is the menu
(see “Browser Menu” on page 37).
Option 6 is the menu
(see “Profiles Menu” on page 37).
Accessing Menus
Press MENU to access the main menu:
1 Press , , or MENU to scroll through menu, functions in menus,
and settings in a function.
2 Press YES to choose the menu, function, or setting that is selected.
3 Press NO to go back one level in the menu structure.
4 Press BACK to exit the menus completely.
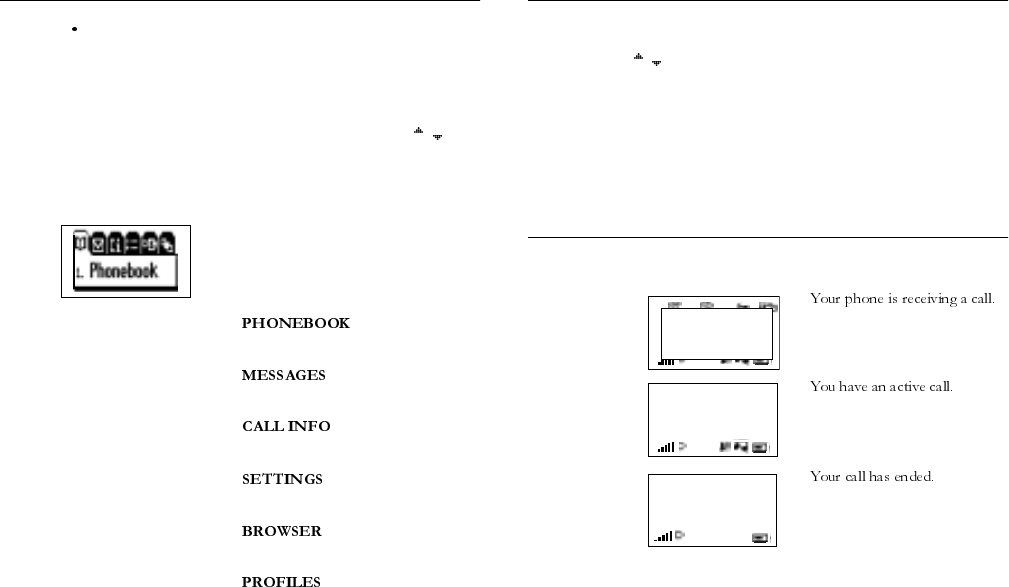
Voice Operation Display Messages
The following are common display messages on your mobile phone:
77
12:12pmDec31
Incoming Call
472-5573
Ongoing Call
5:06:25
Call ended.
5:06:25
Voice Operation 20
Note! Icons appearing on your phone’s display differ in Voice, Browser,
and Wireless Modem Operation.
Voice Calls
Placing a Call
1 Press the numeric keys to enter the phone number you want to
call. The number is shown in the display.
Note! You can press BACK to erase one or more digits in the display, or
press and hold BACK to erase all digits.
2 Press YES. Calling, along with the number you are dialing, or
the corresponding Phonebook name, is shown in the display while
your phone accesses the wireless network.
3 When the call is connected, Ongoing Call, along with your call
timer, is shown in your display. The phone number that you
dialed will remain on your screen after you end the call.
4 To end the call, press NO.
Redialing the Last Number You Called
Your telephone temporarily stores numbers you have previously
called. To view these numbers, press YES from the Standby screen
when no other digits are in the display. The last number you called is
shown in the display. Press or to scroll through other stored
numbers. You can place a call to a number shown in the display by
pressing YES to display the number. Then you can change or add
digits if appropriate. Press YES again to dial the number. You can
delete a number from the by pressing BACK. You
can save a phone number from the or
by pressing and holding YES while the
number is highlighted in the list and by pressing YES again to
confirm the addition of the number to your phonebook.
Stop and Pause Dialing
Stop and pause dialing lets you enter groups of numbers with stops
and pauses between each group of numbers. This feature is useful
when you need to dial a phone number and then another number,
such as an access number for an answering machine or voice mail
system.
A stop causes the phone to stop transmitting numbers until you
press any key except NO. You can enter a stop in a series of digits by
pressing and holding # until is shown in the display.
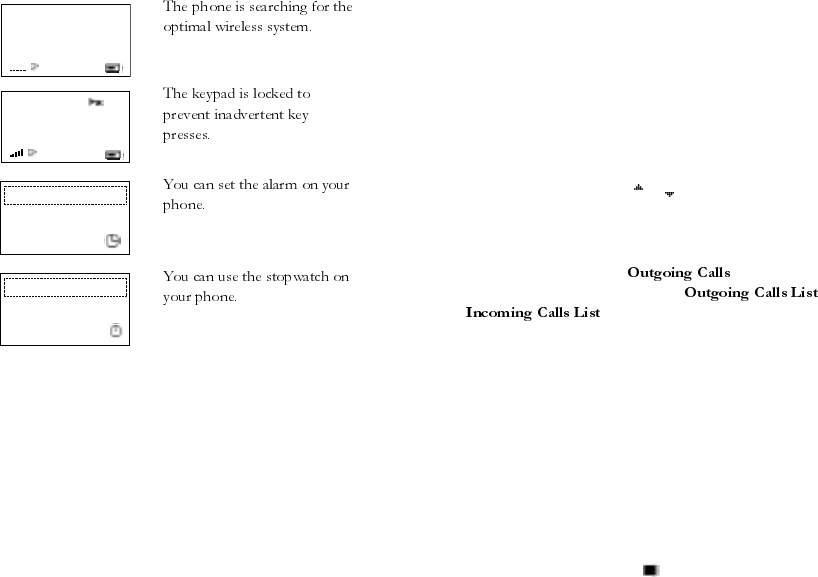
12:12pmDec31
Home
12:12pmDec31
Set Alarm
12:45 am
Stopwatch
00:00:00
Start?

21 Voice Operation
A pause temporarily suspends transmitting numbers for
approximately two seconds before sending the next series. You can
enter a pause in a series of digits by pressing and holding * until is
shown in the display. For example, if your office has a voice mail
system that requires you to dial a phone number, followed by your
extension, followed by an access code.
For example, you could enter the following:
555-1111 2222 33333.
When you press YES, your phone dials the number and then stops
transmitting tones. When your voice mail system asks for your
extension you would press any key except NO to transmit your
extension. The access code is sent after the pause. If the timing in
your voice mail system does not allow for pauses, you can enter
a stop instead of the pause, or use multiple pauses.
You can also store groups of numbers which can include stops and
pauses in a phonebook location. You can then dial the numbers by
entering the phonebook location and pressing YES.
Using Your Phonebook
Creating Phonebook Entries
You can add entries to your phonebook by doing the following:
1 Press MENU from the Standby screen to access the main menu.
2 Press to display the menu
3 Press to select .
4 Press or to scroll to the name and number line. Your phone
will automatically select the next unused position to store your
new phonebook entry. See the next section to learn how to enter
names in your phonebook.
5 Press YES to store the new entry.
Entering Letters and Symbols
Press the appropriate key, 0-9, #, or * repeatedly until the desired
letter, character, or digit appears in the display. For example, to enter
an A, press the numeric key 2 once. To enter a B, press the numeric
key 2 twice.
Answering Calls
Note! Character sets vary according to language selection.

Voice Operation 22
When your phone receives a call, the ringer sounds, Incoming
Call appears in the display, and the display and keypad backlight
illuminate. You can temporarily silence the ringer by pressing NO or
the upper or lower side keys, and still answer the call by pressing
YES. If you have Caller Number Identification (Caller ID) service
from your service provider, the caller’s phone number, or the
corresponding Phonebook name, is shown in the display.
Answer the phone by pressing YES. For information on adjusting
your answering preferences, see “Answer Option” on page 29.
Incoming Call is replaced by the call timer display once the call
is answered. End the call by pressing NO.
Call Waiting
If you have call waiting service from your service provider, press YES
to answer a call when you receive the call waiting signal. You can
switch between the two calls by pressing YES.
Note! Do not press NO until you are ready to end both calls.
Unanswered Calls
Your Incoming Calls shows the number of calls you have received
but did not answer. Press YES from the Missed Calls Indicator screen
to access Incoming Calls.
You can clear the number of missed calls from the display by pressing
any key except YES. If Caller Number Identification is available from
your carrier, unanswered calls will be stored in the
of the menu. Press YES from the Missed Calls
Indicator screen to access the Incoming Call Log, or access the log in
the menu. The icon indicates a missed or
unanswered call.
Temporarily Muting the Ring Tone
To temporarily mute the ring tone without answering the call, press
NO or the up or down side volume keys. Incoming Call is still
shown in the display, and you can still answer the call by pressing
YES. For information on adjusting your answering preferences, see
“Answer Option” on page 29.
Caller Number Identification
If your service provider has Caller Number Identification (Caller ID)
service, your phone shows the phone number of an incoming call in
the display. If the number is one that you have stored in your
phonebook with a name, the name and phone book position is
shown when your phone rings. If the Caller ID information is not
available, the message NO ID is shown in the display. The word
Anonymous may be shown if the Caller ID is restricted by the
service provider or by the caller.
Muting the Microphone During a Call
To mute the microphone during a call, press and hold the BACK
key. Mic Muted appears in the display when the call is muted.
Repeat this procedure to unmute the microphone.
Note! You cannot mute the microphone during an emergency call.
Adjusting Ear Volume During a Call
23 Voice Operation
To increase the ear volume during a call, press
the upper key on the side of your phone.
To decrease the ear volume during a call, press
the lower key on the side of your phone.
Low Battery Power Alert
The low battery alert sounds when your
battery is reaching its lowest operational
power level. The words Low Battery! will appear in the display.
When this happens, connect your phone to your Ericsson charger to
recharge your battery or replace it with
a fully charged battery. If leave your phone turned on, the phone
discharges the battery and then automatically turns off. Charge the
battery within 24 hours after a complete discharge so that the battery
can charge to full capacity.
International Calls
If allowed by your service provider, you can place international calls
with your phone just as you would from any other phone.
If you have difficulty completing international calls, check with your
service provider for information.
Voice Operation Key Functions
, ? !
#
a|A
*
a|A ,?!
CLR
Voice Operation 24
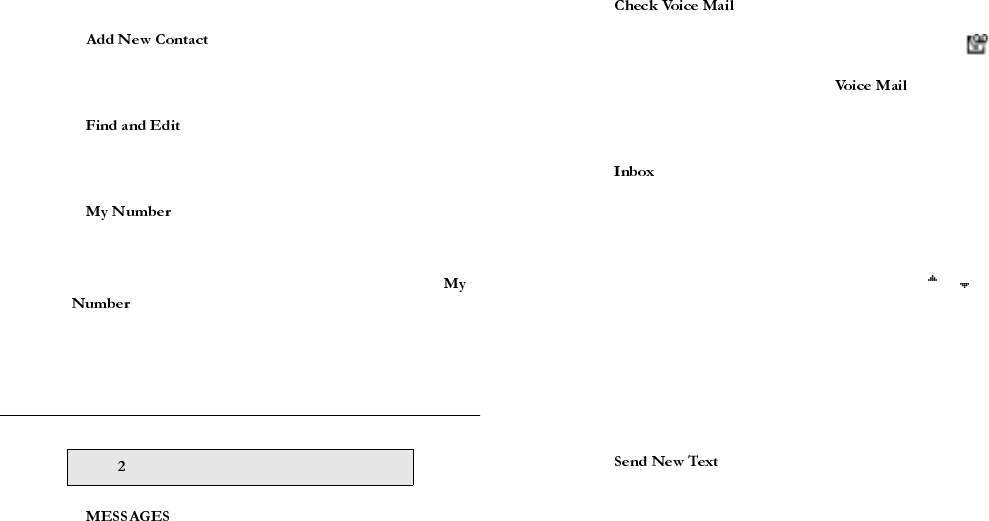
Phonebook Menu
The menu contains the following choices for
storing, organizing, recalling phone lists and group information.
Find and Call
The submenu allows you to dial a phone number by
the name stored with the phone number or by the phonebook
position number.
Find and DTMF
•Press either key to temporarily mute the ringer when
receiving a call.
•Press to change the earpiece volume during a call.
•Press to illuminate the backlight.
•Press to answer a call.
•Press to access last dialed number from the Standby
screen.
•Press to send a call after entering a phone number.
•Press to store menu settings.
•Press and hold to turn your phone On or Off.
•Press to end a call.
•Press to exit a menu.
•Press to temporarily mute the ringer when receiving
a call.
•Press to clear the current display text.
•Press to return to the Standby screen.
•Press to erase the last digit entered on the display.
•Press and hold to delete all digits or letters you entered.
•Press and hold to delete numbers in the Phone Book.
•Press and hold during a call to mute the microphone.
•Press to delete a text message.
•Press to go to the main menu.
•Press from the main menu to tab right through the
menus.
•Press and hold to switch to Browser Operation.
•Press and hold for quick access to voice mail
(if enabled).
•Press keys 1-9 for digit entry (if enabled).
•Press and hold keys 1-9 for Super dial (if enabled).
•Press and hold for a Pause ( ) character in a dial string
•Press to select or deselect items (group members,
am/pm, message alert options).
•Press MENU * for Keypad Lock.
•Press and hold for a Stop ( ) character in a dial string.
•Press to select or deselect group members.
•Press MENU # for Silent Mode.
MENU 1
a|A
*
,?!
25 Voice Operation
Add New Contact
The submenu allows you to store a phone
number and an accompanying name in your phonebook.
Find and Edit
The submenu allows you to change your phonebook
entries.
My Number
The submenu is used to display the wireless phone
numbers that correspond to the subscriptions that are programmed
into your phone.
Note! If your service provider allows multiple phone numbers, the
submenu allows you to switch between phone numbers.
Position Organizer
Messages Menu
The menu contains choices for specifying and
accessing message services that may be available from your service
provider (for example, text messages and voice mail).
Check Voice Mail
The submenu allows you to enter and access
your voice mail access number, if you have voice mail service from
your service provider. A number and the voice message icon ( )
appear in the Standby screen to indicate the number of new unread
voice messages. The two options for the submenu are
Call and Configure.
Inbox
The submenu allows you to display the list of read and
unread text messages you have received. The subject line or the first
few words of each message, is displayed. Press YES to view the
message. From this list, the user can choose to read a message, or
return to the previous menu.
You can scroll through the list of messages by using the or key.
Once a message is read, press YES to see the five options for the
selected message: Reply, Forward, Delete, Callback List, and Lock/
Unlock. Temporarily unavailable options are grayed out.
Note! Lock/Unlock toggles message auto deletion off and on. Unsent
and unread messages are automatically locked.
Send New Text
The submenu is used to enter and send a new text
message. To enter letters and symbols in your message, see “Entering
Letters and Symbols” on page 21.
Note! If your message approaches the maximum message length, you
will see a character countdown indicator in the upper left corner of
the screen.
When you forward a message, you will also forward the original
body of the message. However, when you reply to a message, you can
MENU
Voice Operation 26
choose to include the original, use a canned message, or start with a
blank message.
Note! The maximum message length varies according to service provider
Once you have entered the text you want included in your SMS,
press YES. You will be prompted with Send Now? to confirm that
you are ready to send the message. Press YES to send the message or
NO to save the message as a draft.
Note! To send a message, you must enter a 10-digit number (unless
Auto Prefix is enabled).
Unsent Items
The submenu allows you to display a list of saved
draft messages and messages that were not successfully sent. They are
displayed with the subject, if available, or the first few words of text
in the order in which they were created. You can scroll through the
list of messages by using the or key. The three options for a
selected message in the submenu are Send, Edit, and Delete.
Templates
allows you to use the 10 editable templates instead of
creating an original message. For example, a canned message is "I
will be <____> late for <____> on <____>." You can edit the canned
message text by scrolling to the blanks in the message using the or
key to quickly fill in the necessary information.
Once you have entered the text you want included in your SMS,
press YES. You will be prompted with Send Now? to confirm that
you are ready to send the message. Press YES to send the message or
NO to save the message as a draft.
Sent Items
The submenu allows you to display a list of sent
messages. The message list is displayed with the subject, if available,
or the first few words of the messages in the order they were sent.
You can scroll through the list of messages by using the or key.
The five options for a selected message in the submenu are
Resend, Forward, Delete, Update, and Lock/Unlock.
Note! Update allows you to replace a previously sent message if the
recipient has not yet read the original message and has a phone
that supports this option. If the previously sent message was
already read, then the updated message appears as a new message
to the recipient.
Call Info Menu
The menu allows you to view information and
establish dialing and answering preferences for your phone (some
selections available in this menu are dependent on your service
provider). It also enables you to view and edit system options and
call statistics.
Missed Calls
The submenu allows you to list the last 40 calls
received (if you have Caller ID service from your service provider).
MENU
27 Voice Operation
The latest call appears first. Use the or keys to scroll through the
last 40 received calls.
If the received number is stored in the phonebook with a name, the
name is also shown in the display. To dial the phone number shown
in the display, press YES twice. To edit the phone number, press YES
once, then press the or key to move the cursor left or right to the
digit(s) that you would like to change. Dial the new phone number
by pressing YES.
Call Log
The submenu allows you to view and edit the last 40
phone numbers that you have called. To dial the phone number
shown in the display, press YES twice. To edit the phone number,
press YES once, then press the or key to move the cursor left or
right to the digit(s) that you would like to change. Dial the new
phone number by pressing YES. You can also access the by
pressing YES from the Standby screen.
Incoming Calls
Call Timer
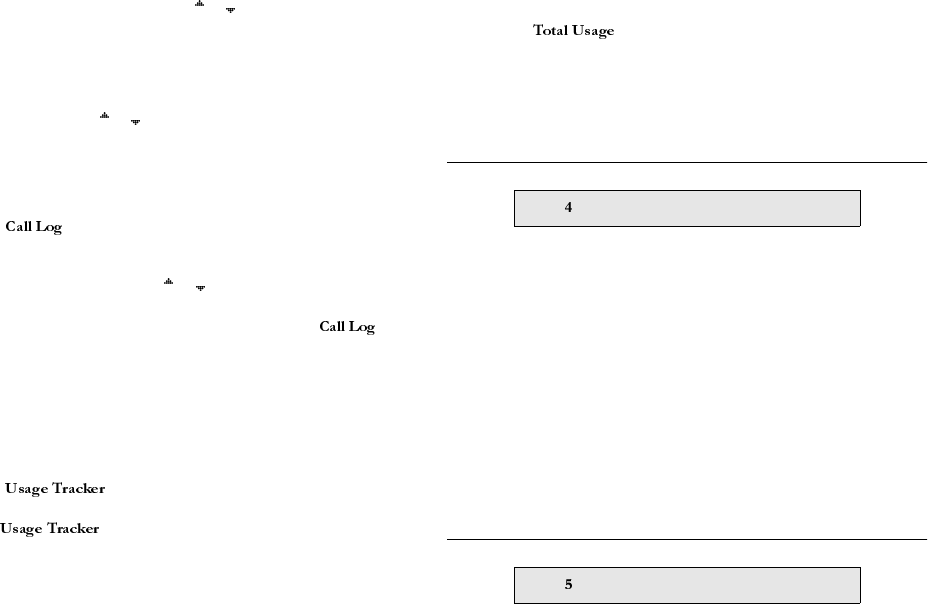
Usage Tracker
The submenu shows you the total hours and
minutes that you have used since you last reset your phone. To reset
the , press YES and Reset Usage Tracker?
appears in the display. Press YES again to confirm reset. Usage
Tracker has been reset! appears in the display.
Note! The actual time your service provider invoices may vary,
depending on items including network features and rounding off
for billing.
Total Usage
The submenu shows you the total number of calls and
the total hours and minutes that have been used.
Options
Ongoing Call Menu
Activate Scratch Pad
Hold Call
Switch Calls
Retrieve Call
Release All
Activate/Deactivate
Settings Menu
MENU
MENU

Voice Operation 28
Note! The profile icon ( ) refers to menu items that are profile-
dependent. Profile-dependent menu items indicate settings that
may be customized for every profile to suit a particular
environment. For more information about Profiles, see the
"Profile" section at the end of this chapter.
Sounds
Ear Volume
The submenu allows you to adjust the volume of the
earpiece using the menu setting. You can also adjust the volume
during a call by using the side volume keys. There are five volume
levels. You can make your selection by pressing or . Then press
YES to confirm your selection.
Edit Melodies
The submenu allows you to create a ring melody
using each key on your keypad as a note in your melody (1=C, 2=D,
3=E, 4=F, 5=G, 6=A, 7=B, 8=+C, 9=+D, 0=+, *=pause, #=#). Press #
to make the previous note sharp or flat.
Note! The + sign indicates an octave higher.
To clear your melody, press the key to select the location you want
to clear. Press BACK to delete the location. Press and hold BACK to
delete the entire melody.
The two options for Edit Melodies are My Melody 1 and My
Melody 2.
Note! Volume is the same as your current Ring Volume.
Key Sound
The submenu allows you to choose the sound made
when you press keys. The four options for Key Sound are Click,
Continuous, Burst, or Silent.
Ring Sound
The submenu allows you to choose the type of sound
or melody for the ringer. Each sound or melody is demonstrated as
you scroll through the selections. There are 27 ring sounds.
Message Alert
The submenu allows you to set the audible alert for
Emergency, Urgent, or Normal delivery for a particular message.
Profiles
Your Ericsson mobile phone has nine user-customizable profiles that
allow you to adapt to several different operating environments
throughout the day. Your phone has been designed to allow you to
easily switch into and out of each profile. Many features located
throughout your menu are profile settings. These settings are
indicated by the profile icon ( ). Each profile feature can be set to
a different value for every profile. The following tables outline your
default profile settings:
29 Voice Operation
In Normal profile, for example, you can program your phone’s
, , and volume to
a moderate level. When you attend a meeting, you can quickly
change from Normal profile to Meeting profile.
Note! Your current profile is indicated by the icon in the upper right
corner of the Standby screen. Your normal (default) profile does
not have an icon.
The menu contains the following submenus:
Select Profile
1 Use the submenu to select an operating profile
for your mobile phone. Active Profile Icon indicates the currently-
selected profile. Possible profile icons include Discreet ( ),
Leisure ( ), Work ( ), Travel ( ), Handsfree ( ), and
My Profile , , and .
2 When you use your Ericsson handsfree or mobile car kit, the
handsfree profile ( ) is automatically activated (see "Auto
Activate" below).
Note! You can also press and hold or to change your profile.
Call Options
Answer Option
The submenu allows you to select one of the
following methods for answering calls:
YES key - Press YES to answer calls.
YES YES YES
YES YES
Voice Operation 30
Any key - Press any key to answer calls.
Auto Answer - Calls will be answered automatically after one
ring while in handsfree profile (this option is only visible in
handsfree profile).
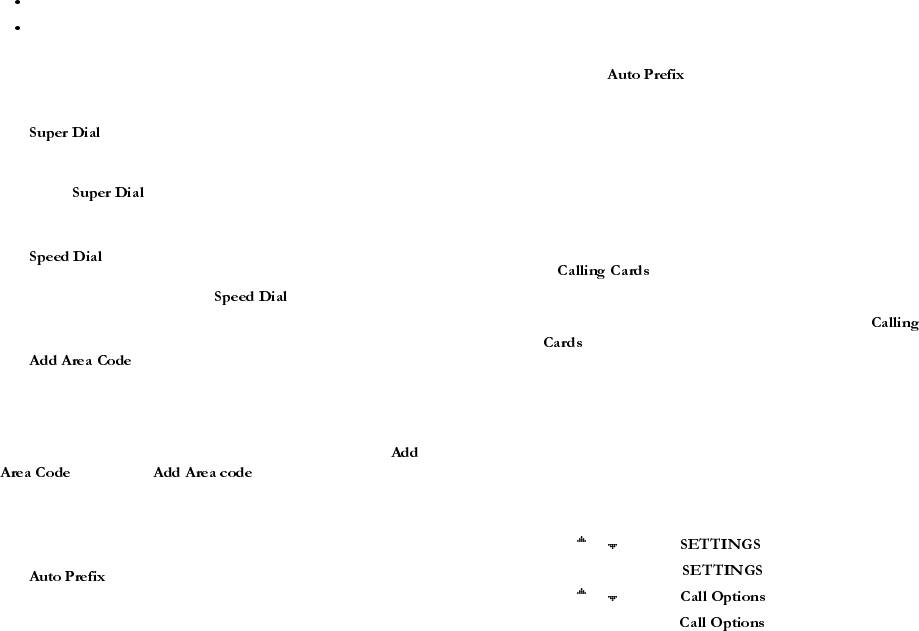
Super Dial
The submenu allows you to dial a phone number stored
in phonebook positions 1 through 9 by pressing and holding the
numeric key corresponding to the phonebook position. The two
options for are On and Off.
Speed Dial
The submenu allows you to dial a phone number stored
in a phonebook position by entering the 1- or 2-digit position and
pressing YES. The two options for are On and Off.
Add Area Code
The submenu allows you to store an area code that
will be automatically added to the 7-digit phone number you are
dialing. Enter the area code, then select On to activate the feature.
The two settings for this function are On and Off. The area code is
automatically added to the phone number you are calling when
is set to On. does not add the area code
to phone numbers shown in the display by Caller ID, but you may
edit those phone numbers.
Auto Prefix
The submenu allows you to store a 1- to 12-digit prefix,
which is automatically added to the dialed phone number. When
you dial a 4- or 5-digit phone number, the prefix is automatically
added to the phone number.
In order to send a number to office extensions, store the 3-digit
prefix in the submenu. You only need to dial the last 4
or 5 digits of the phone number.
For example, if you save 123 as the auto prefix and the function is
On, you can call 123-7654 by simply dialing 7654. The prefix 123 is
automatically added to the phone number after you press YES to dial
the phone number. The auto prefix is not added for phone numbers
longer than five digits.
Calling Cards
The submenu allows you to store calling card
numbers to use for making long distance calls.
Note! You will be prompted to enter your PIN to enter the
submenu.
Setting Up Your Calling Cards
To set up your calling cards, make sure you have the Calling Card
Access Numbers (numbers provided by your long distance carrier)
and the Verification Numbers (numbers you must enter to allow the
calling card call to be completed).
To set up your calling cards, complete the following steps.
1 Press MENU from the Standby screen to access the main menu.
2 Press or until the menu is highlighted.
3 Press YES to select the menu.
4 Press or until the submenu is highlighted.
5 Press YES to open the submenu.

31 Voice Operation
6 Press or until Calling Cards is highlighted
7 Press YES to open the Calling Cards submenu.
8 Press or until Default Card, Card 1 Setup, or Card 2 Setup is
highlighted.
9 Press YES to choose the highlighted selection.
You are prompted to enter your PIN and additional calling card
information.
To choose a card to be used as the default card when making calling
card calls, navigate to the submenu and select that
card.
Note! Only cards that have been set up will appear as options for Default
Card.
Making a Calling Card Call
1 Enter or recall the phone number you want to call.
2 Press and hold YES. The calling card number and the active calling
card are shown in the display.
3 Release the key after the number has been displayed.
If you are using stops between numbers, you must press YES or any
number key to send the next sequence of numbers. If you use pauses,
the numbers are sent automatically after the specified length of time
chosen for the dialing delay.
Display
The submenu is used to change the Backlight and Greeting
on the display of your phone.
Backlight
Use the submenu to set the display and keypad
backlighting to stay Off or to automatically turn On for 20 seconds
when a call is received or a key is pressed. The two settings for
are Auto and Off.
Greeting
Use the Greeting submenu to alter the information that is displayed
when your phone is powered on. You can select which of the three
options you prefer by pressing the * or # key to check or uncheck the
checkbox next to the highlighted item ( ). When you are finished,
press YES. If Greeting Text is checked, you will be prompted to edit
your power on greeting.
Language
The submenu allows you to select the display language
used in the phone display. The languages vary between markets.
Your mobile phone supports English, French, Spanish, Portuguese,
Russian, and Hebrew.
Note! Not all languages are available in every market.
Clock
The submenu allows you to set the time, time format,
stopwatch, and alarm on your phone. The clock will then appear on
your Standby screen.
Set Time
Enter the correct time using the keys on your keypad. Press any
number key to toggle am/pm while am/pm is blinking (if applicable).
Press YES to confirm the current time. You can press or to
Voice Operation 32
advance through the hours, minutes, and am/pm selection. Press YES
to confirm the current time.
Note! Removing your phone’s battery for an extended period of time will
cause a prompt to appear asking you to verify the current time and
date.
Set Date
Enter the correct date using the keys on your keypad. Keep in mind
that the date format is MM-DD-YY. You can press or to
advance through the month, day, and year selection. Press YES to
confirm the current date.
Time Format
Switch between am/pm and 24-hour time format. Change to time
format on your phone by pressing or until the format you want
is selected. Press YES to confirm your selection.
Note! Time format varies according to language selection.
Tools Menu
Voice Memo
Calendar
Time Functions
You can use the Clock on your phone much like an ordinary
Stopwatch. Press YES to start the Clcck when prompted. Press YES to
Pause the Clock once it has started. Press BACK to reset the
Stopwatch.
Games
Your phone has five different games fro your enjoyment. There are
help texts avaiblle ine ach game as a guide for you to get started.
Tetris®
Erix
Ballpop
E-maze
Solitaire
Synchronization
Calculator
Your Ericson phone has a built-in calculator, which can add,
subtract, divide, and multiply.
Press # to get +, -, x, /.
Press CLR to erase a figure to the left of the cursor.
Press * to enter a decimal point.
WAP Services Menu
MENU
MENU
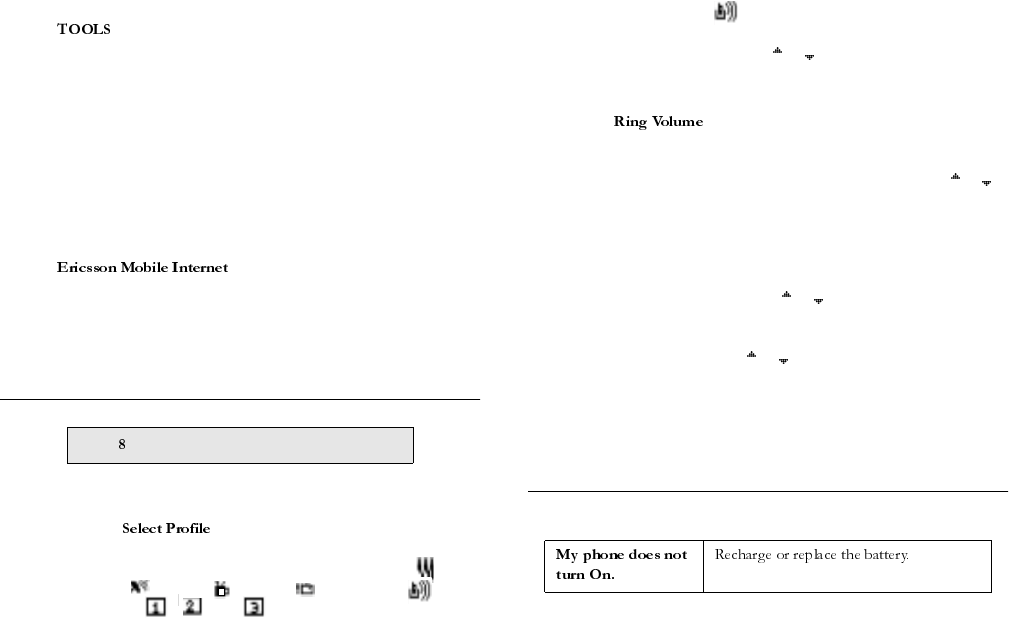
33 Voice Operation
When you select the Browser menu tab, your phone switches to
Browser Operation. Press MENU from your Home Page for the
menu, which will give you options for your browser. For
more information, see “Tools in the Browser” on page 35.
Homepage
Homepage takes you to the Homepage that you have specified.
Enter URL
Enter URL allows you to enter a URL address that you want to go
to.
Ericsson Mobile Internet
takes you directlyt to the Ericsson
Mobile Internet page.
WAP Options
My Menu
Select Profiles
1 Use the submenu to select an operating profile for
your mobile phone. Active Profile Icon indicates the currently-
selected profile. Possible profile icons include Discreet ( ),
Leisure ( ), Work ( ), Travel ( ), Handsfree ( ), and
My Profile , , and .
2 When you use your Ericsson handsfree or mobile car kit, the
handsfree profile ( ) is automatically activated (see "Auto
Activate" below).
Note! You can also press and hold or to change your profile.
Ring Volume
The submenu allows you to set the level of the ring
volume from Phone Silent to Increasing. The Increasing volume
setting rises in steps from the lowest to the highest level as the phone
continues to ring. You can make your selection by pressing or .
Then press YES to confirm your selection.
Note! You can access Phone Silent by pressing MENU #.
Alarm
Activate your alarm by pressing or until Activate is selected and
press YES. Enter the alarm time using the keys on your keypad. Press
any number key to toggle am/pm while am/pm is blinking (if
applicable). You can press or to advance through the hours,
minutes, and am/pm selection. Press YES to confirm the alarm time.
Customize
Problem Solving
MENU
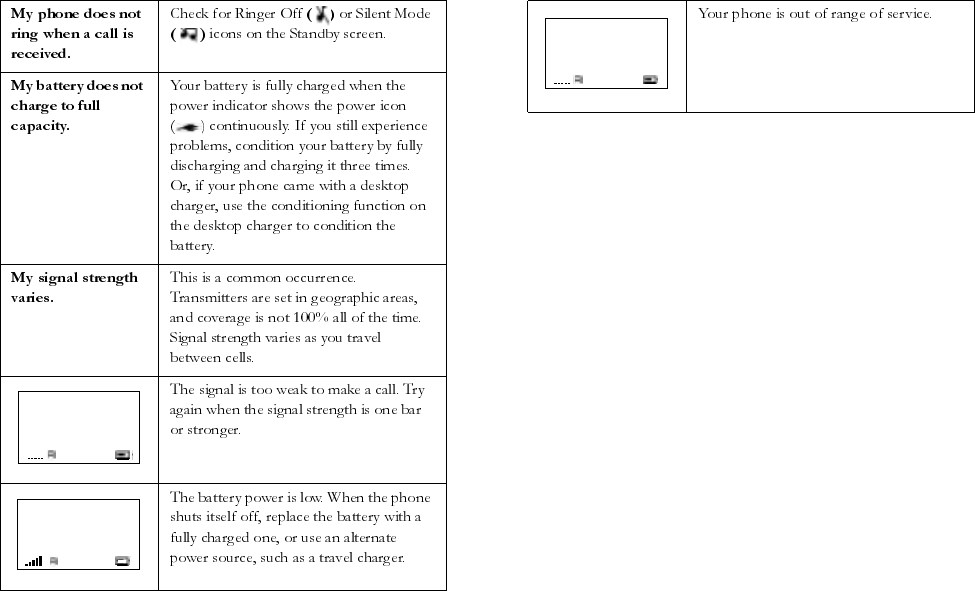
Voice Operation 34
Cannot place call
Low Battery

35 Browser Operation
s
When your phone is in Browser Operation, you are connected to the
Internet via the Cellular Digital Packet Data (CDPD) Network. Using
the built-in microbrowser, you can view specially-formatted web
content on your Ericsson mobile phone. This content appears in
English only. Surfing the web with your Ericsson mobile phone is
quick and easy.
Note! You cannot receive voice calls while you are in Browser Operation. If
you need to make an emergency call, press and hold MENU to
return to Voice Operation. You can then dial 911 for assistance.
When You Are Connected
Your Ericsson mobile phone is already loaded with a microbrowser.
The first time you launch your browser after power-up, you are
connected to your Home Page. The content of your Home Page is
designated by your service provider.
Note! You can return to your Home Page at any time by pressing MENU 1
or by pressing and holding BACK.
Your Phone’s Display in Browser Operation
The display in Browser Operation is separated into two areas, the
content window and the status row. The content window is the area
of the screen above the dotted line and the status row is the area
below the dotted line.
Content Window
When you browse the web, you can view different web pages, each
one called a card. There are three types of cards that you can see in
your content window: Information, Choice, and Text Input. Each
card operates a little bit differently. Once you familiarize yourself
with the browser, it is easy to recognize which type of card is being
displayed.
If a card contains more than one screen of text, there will be
a scrollbar on the right side of the Content Window (example on the
following page). While the scrollbar is displayed, you can scroll
through each line with a single press of the or key or by pressing
the up or down side volume keys. The scrollbar indicates how much
viewable information you have seen.
Information Cards
Information cards are intended for simply viewing text and graphics.
Browser Operation
.......................
Content
Window
Status
Row
Browser Operation 36
Choice Cards
Choice cards offer you a list of choices.
Text Input Cards
Text input cards enable you to enter text.
Status Row
There are four information types that are displayed in the status row,
depending on the type of card displayed in the content window: 1)
status messages, 2) soft keys, 3) time/date, and 4) icons.
Status Messages
Status messages are displayed when you are launching the browser
and at various times during operation.
These status messages include the following:
Connecting... means that your phone is trying to make a
connection with your content provider.
Sending))) means that information is being transmitted
from your handheld browser to your content provider.
Receiving((( means that you are receiving information
from your content provider.
Soft Keys
You can use soft keys for action on the current card. They are
displayed in reverse video on the status bar of your display.
To use the soft key functions, press the left (YES) or right (NO) key
that is under the text label on the screen. The soft keys on your
phone’s screen override the key names.
The Globe Icon ( ) indicates that you have established
a connection with the CDPD network. The alternates with
when your battery is low, with when you receive
a browser alert, or with when your alarm is set to "snooze."
Menu
Weather
Inbox
.......................
Partly cloudy with
afternoon showers.
Menu
Sites
2 Weather
Inbox
1 News
.......................
scrollbar
Back
Enter email address:
News
.......................
a...z
.......................
Connecting...
Connecting...
Menu
Inbox
.......................
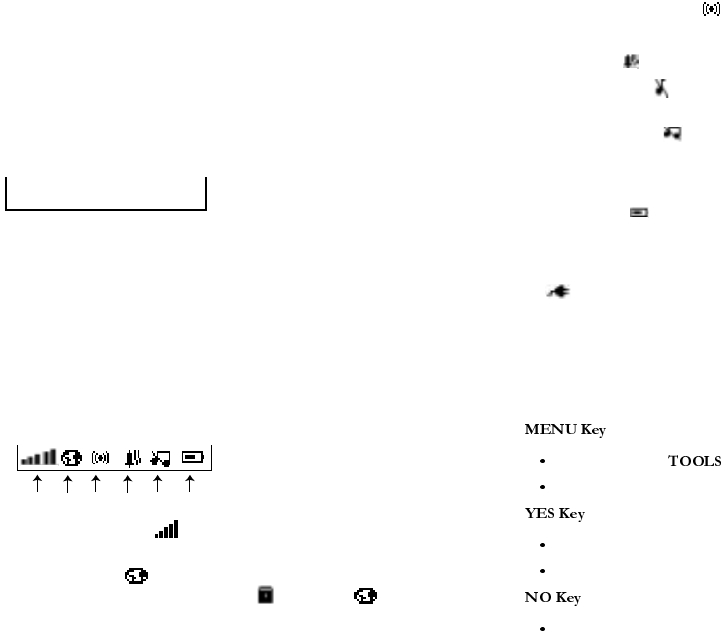
37 Browser Operation
Note! When using the soft keys, be sure to press and release the YES and
NO keys. Pressing and holding NO turns the phone off. Pressing
and holding YES sets a bookmark.
Time/Date
You can display the time and date at any time during your browser
session by pressing and holding the # key.
Icons
When the Browser Mode icons are displayed, it means that your
phone is conserving power (in "sleep mode"). Your phone is still
continuously checking the network for updates and will "wake up"
with an incoming alert or any key press.
Note! You can see the icon status row similar to the one below when you
press and hold *. You can see the time and date when you press
and hold #.
1 Signal Strength Icon ( ) shows the relative signal strength
from the wireless system. More bars indicate a stronger signal.
2 The Globe Icon ( ) indicates that you have established
a connection with the CDPD network. will replace when
an SSL connection is established.
3 The Browser Alert Icon ( ) indicates that there is new content
in your Inbox (for example, email, stock quotes).
4 Alarm Icon ( ) appears if the alarm is set.
5 Ringer Off Icon ( ) indicates that your phone will not make
alert sound.
6 Silent Mode Icon ( ) indicates that your phone will not make
keypad or alert sounds.
Note! To toggle Silent Mode on and off, press MENU #.
7 Battery Icon ( ) shows the relative strength of your battery.
A full icon indicates a fully-charged battery. If the phone is
connected to external power and the battery is charging, the
display alternates between the battery icon and the charging icon
().
Navigation and Item Selection
There are different ways to navigate through the cards that appear in
your content window, but there are several functions that operate the
same for Information Cards and for Choice Cards:
Press to access the menu.
Press and hold to switch to Voice Operation.
Press to select the left soft key option.
Press and hold to add a favorite.
Press to select the right soft key.
.......................
Dec25 10:11AM
.......................
12345/6 7

Browser Operation 38
Press and hold to power your phone on or off.
Press to return to the previous card.
Press and hold to return to the Home Page.
K
Press to scroll up a line.
Press to scroll down a line.
Press and hold to scroll up line by line continuously.
Press and hold to scroll down line by line continuously.
Press the lower side key to scroll down one page.
Press the upper side key to scroll up one page.
Press and hold the lower side key to continuously page down.
Press and hold upper side key to continuously page up.
Choice Cards
Choice Cards contain a list of items. The selected item is highlighted
in reverse video. Select an item by doing the following:
1 Highlight the item you want to choose by pressing or or by
pressing the digit key associated with the item number.
2 Press the right or left soft key corresponding to the action that you
want to take.
Information Cards
Press the right or left soft key corresponding to the action that you
want to take.
Text Input Cards
To navigate through your display properly when entering text:
Press BACK to delete the character to the left of the cursor.
Press and hold BACK to erase all of the text that you have
entered.
If the cursor is at the first text entry position, press BACK to
return to the previous card.
Press or to move the cursor left or right.
Press and hold or to repeatedly move the cursor left or
right.
Note! Press and hold # to display the time and date. Press and hold * in
text entry mode to display the full set of status icons.
There are a few things you need to know about text entry on your
Ericsson mobile phone.
Your Cursor
A vertical flashing cursor indicates character insert mode.
A reverse video cursor indicates character replacement mode.
Text that you enter replaces the text that is highlighted.
Entering Text
You can enter characters in four different modes. The active format
is displayed in the right soft key position. Change the format in
which characters are entered by pressing the right soft key.
1 mode allows you to enter alphabetic text.
Press the appropriate key, 0-9, or # repeatedly until the desired
letter, character, or digit appears in the display. For example, to
a...z
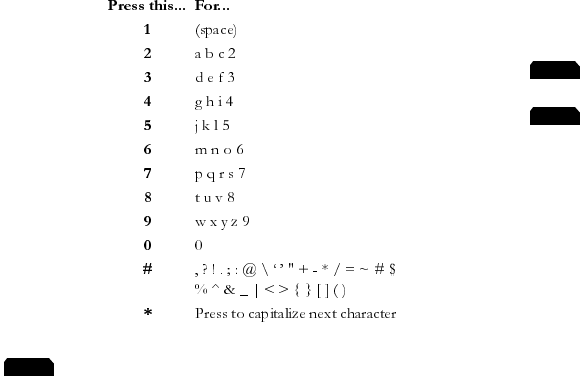
39 Browser Operation
enter an a, press the numeric key 2 once. To enter a b, press the
numeric key 2 twice.
2 mode allows you to select symbols and punctuation
from a list. You can switch to symbol entry by pressing the right
soft key until SYM is in the right soft key position. There are four
screens of symbols. Press the left soft key to switch between each
screen.
Press the digit key corresponding to the symbol that you want to
enter.
Your phone automatically switches back to the previously-used
method of text entry after you enter one symbol.
3 mode allows you to enter numbers by pressing the digit
key corresponding to the number that you want to enter.
4 mode allows you to use Tegic T9 text input. Tegic T9
text entry software allows you to quickly and easily enter words or
entire sentences with just one key press per letter. Tegic T9 text
entry software uses the phone’s internal dictionary to quickly scan
possible variations to determine the correct word.
If you enter all your letters and the word that you want does not
appear, press 0 to view other matches in your phone’s dictionary.
Keep pressing 0 until your word appears.
For example, to enter the word "ball", press 2, 2, 5, 5. After the first
2, your screen displays "c". After the second 2, your screen displays
"ca". After the first 5, your screen displays "cal". After the second
5, your screen displays "call". Press the 0 key until the word "ball"
is displayed.
Note! You will know that there is no word match in the T9 dictionary
when your key presses are no longer recognized by T9 text entry
mode. When this happens, backspace, switch to a...z mode,
and continue text entry.
SYM 1 . ? ! , ; : ‘ ’ "
SYM 2 . @ \ / | _ ~ $ ^
SYM 3 + - * / < > = % #
SYM 4 { } [ ] ( ) < > &
SYM
0...9
T9
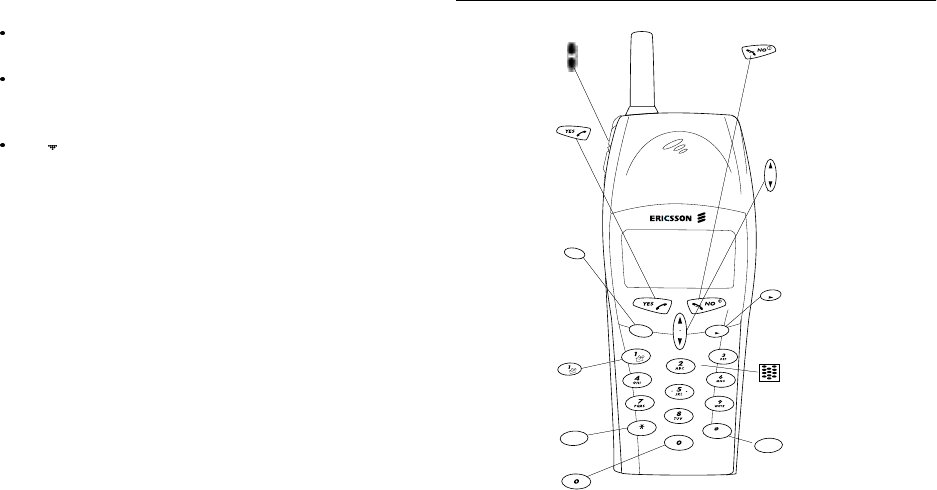
Browser Operation 40
If your word does not appear, you can add it into your phone’s
dictionary by doing the following:
Type the text that you want to enter into your phone’s
dictionary by using any of the non-T9 text entry modes.
With the cursor to the right of the last character (without
pressing a space) reselect T9 mode by pressing the right soft key
until T9 appears in the right soft key position.
Press to enter a space. Your word is added to your phone’s
dictionary when your phone is properly powered down.
Note! It may be helpful not to look at the screen until you are finished
entering the characters of the word you are trying to type as
a new word match may occur with each new character entered.
Browser Operation Key Functions
MENU
BACK
a|A
,?!
, ? !
#
a|A
*
BACK
MENU
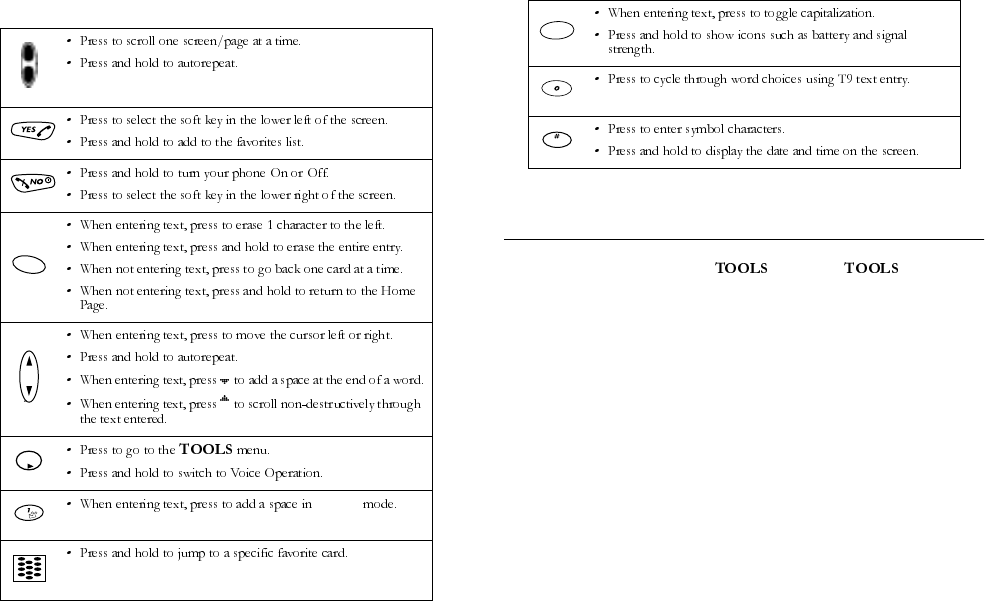
41 Browser Operation
Tools Menu
Press MENU to access the menu. The menu
contains the following submenus.
Home Page
Select Home Page to go directly to your Home Page.
Voice Mode
Select Voice Mode to switch to Voice Operation.
Add Favorite
Select Add Favorite to mark your favorite cards to return to them
easily. You can return to them by simply browsing your list of
favorites and selecting the one you want to visit.
To set a favorite, go to the page that you want to add and press MENU
3. If the page can be bookmarked, it appears in the favorites list in
your Home Page. To return to the favorite, select it from the
favorites list.
0...9
BACK
MENU
a|A
*
,?!

Browser Operation 42
Note! To quickly add a favorite, press and hold YES when you are on the
page that you want to add.
Note! Some pages cannot be added to your favorites list.
Display
Selecting allows you to set the size of the display font by
changing the number of lines of text that can be seen at one time in
the content window. The two options for Display are Normal 7pt.
and Large 8pt. Normal 7pt. is the default setting.
Show URL
Selecting allows you to display a card’s URL (Internet
address).
Page Help
Selecting allows you to display a card’s help (if available).
Reset Cache
Selecting clears previously-visited cards and reloads
your Home Page.
Version Info
Selecting Version Info allows you to view microbrowser version
information.
Local Settings
Selecting allows you to change browser-related
phone options:
Alert Sound – You can specify if you want sound associated
with your browser alert mechanism. The two options for Alert
Sound are Off and On.
Power Up Mode – You can specify whether your phone powers
up in Browser or Voice operation.
Security – Customer Service and Support uses this for
troubleshooting and debugging. You should not alter your
security options unless you are instructed to do so by your
content provider.
Channel Scan – You can set your power saving options to
conserve battery power. The three options for Channel Scan are
Normal, Persistent, and Periodic.
Network Settings – You can view and modify your CDPD
account information. You should not alter your network
settings unless you are instructed to do so by your content
provider.
Note! Contact your service provider for your Network Settings
password.
Keypad Help
Select Keypad Help to view help related to your phone’s keypad
mapping.
Configuring Your Browser
Your browser can be reconfigured for a new/second subscription.
Check with your service provider before making any changes to your
Browser Operation settings.
43 Browser Operation
Entering the Network Settings Submenu
To enter the Network Settings submenu, do the following while in
Browser Operation:
1 Press MENU 9 to select the menu.
2 Press 5 to select Network Settings.
3 Press 2 to select or press 1 to View.
4 Enter the password from your service provider (not needed for
viewing).
5 Press YES (not needed for viewing).
Note! Modifying these settings without the direction and guidance of
your service provider may result in less than optimal performance
from your browser or inability to connect to your Home Page.
Configuring the NEI
The NEI is an IP address that identifies the phone to the CDPD
network. This number is prescribed by the CDPD service provider.
Each phone has its own NEI. The phone can store two independent
NEIs, allowing the user to easily switch between two separate CDPD
service accounts. To configure a second NEI, do the following:
1 Enter the submenu as described above.
2 Press 1 to select the .
3 Press 4 to select .
4 Press the left soft key to edit the entry.
5 Press until the cursor is at the first position. Enter the NEI
numbers using leading zeroes. Press the left soft key to apply the
change.
6 After entering the IP address, press the left soft key to apply the
change.
Note! The “dots” are automatically added. Leading zeroes are necessary
where appropriate.
Using Your New Subscription
1 Enter the submenu as described above.
2 Press 1 to select from the .
3 Press 2 to select .
4 Press the left soft key to edit the entry.
5 Press 2 to set NEI2 as the active NEI.
Configuring the Browser Gateway
The Browser Gateway is the IP address of the gateway server to
which your phone will connect. The server stores web content for
your phone to access, including your Home Page. Your phone can
store two independent Browser Gateways, allowing you to easily
switch between gateways. Reading content from a new gateway
requires a new subscription. To add a second gateway, do the
following:
1 Enter the submenu as described above.
2 Press 4 to select .
3 To configure the second gateway, press 4 to select
4 Press the left soft key to edit the entry.
5 Press until the cursor is at the first position. Enter or modify the
IP address using leading zeroes.
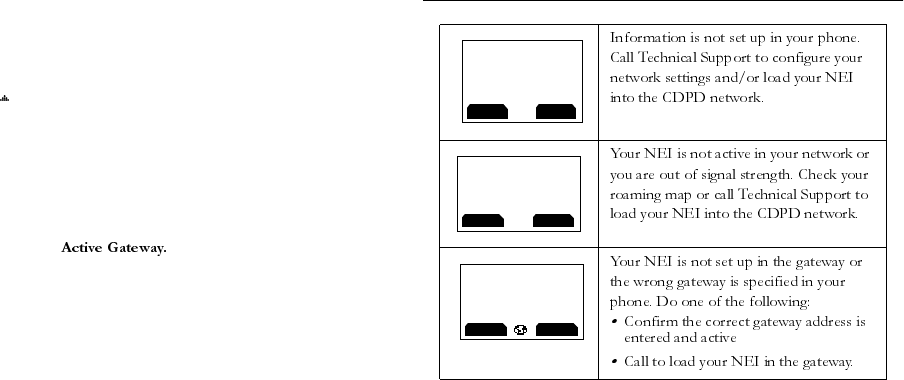
Browser Operation 44
Note! The “dots” are automatically added. Leading zeroes are necessary
where appropriate.
6 After entering the IP address, press the left soft key to apply the
change.
7 If a secondary gateway exists, press 5 to edit GW2 Secondary IP.
8 Press until the cursor is at the first position. Enter or modify the
IP address using leading zeroes.
Note! The “dots” are automatically added. Leading zeroes are necessary
where appropriate.
9 After entering the IP address, press the left soft key to apply the
change.
10 Press 1 to edit
11 Press 2 to apply Gateway 2. Your phone will then attempt to
connect to the gateway using your active NEI as your identity.
Note! You must have a subscription to the gateway for the active NEI.
Problem Solving
OK
Menu
.......................
UP.Link address is
not set up
Retry
Menu
.......................
Network not
responding
Retry
Menu
.......................
Server not
responding

45 Wireless Modem Operation
s
When your phone is in Wireless Modem Operation, it is behaving
like a wireless modem and is providing a connection to the Internet
similar to an Internet Service Provider (ISP).
Other Ericsson products can be used in conjunction with your
Ericsson Mobile Phone in Wireless Modem Operation including the
Ericsson Virtual Office (EVO). Check with your Office/System
Administrator and/or your service provider to learn more about
remote access enhancements.
Note! You cannot receive voice calls while you are in Wireless Modem
Operation. If you need to make an emergency call, end Wireless
Modem Operation by removing the cable from your phone. Then
switch to Voice Operation (if necessary). You can then dial 911 for
assistance.
Before You Start
Before setting up your phone for Wireless Modem Operation, make
sure that you have the required hardware and software components.
Ericsson Connectivity Kit
A functional serial port
An operating system that supports data access software, such as
Microsoft Windows 95® or Microsoft Windows 98®.
Note! In order to use your phone in Wireless Modem Operation, you
may have to first purchase an Ericsson Connectivity kit. This kit
includes an Ericsson serial interface cable to connect your Ericsson
mobile phone to your computer. It also contains a CD with the
necessary installation and configuration information.
Computer Setup in Wireless Modem
Operation
Your computer must be properly set up in order to successfully make
Wireless Modem calls from your computer through your phone (see
“Initial Setup” on page 45).
When your phone and computer are properly set up, you can run
Internet applications on your laptop (Internet browsers and email
applications) over the connection provided by your Ericsson mobile
phone (see “Connecting to the Internet” on page 46).
Initial Setup
Successful first-time setup of your phone and computer for Wireless
Modem Operation involves the following steps:
1 Connect your phone to your computer using an Ericsson serial
interface cable. The cable has a plug on one end that matches the
charging/handsfree connector on the bottom of your Ericsson
mobile phone. The other end of the cable has a 9-pin connector
that matches the standard 9-pin serial interface port connector.
Wireless Modem Operation

Some menus/features are operator dependent.
Wireless Modem Operation 46
Connect the charging/handsfree end of the cable to your Ericsson
mobile phone and the 9-pin connector end of the cable to the
serial port on your computer.
Note! If you are trying to connect to a 25-pin serial interface port on
your computer, you will need an adapter. You can purchase a 25-
pin serial interface port adapter at most computer supply stores.
2 Insert your installation CD into your computer and follow the
instructions on your computer screen. The CD will install all of
the necessary software components on your computer including
the Ericsson R280 Dialup Connection icon. Double clicking the
icon will allow you to connect to the Internet. (see “Connecting to
the Internet”).
Note! The installation wizard included on the CD should start
automatically. If the setup screen does not appear after you insert
the CD, do the following:
Make sure the CD is properly inserted into your computer.
Click on Start from the taskbar on your computer.
Click on Run.
Type X:\ setup (where X is your CD-ROM drive).
Click OK to start the installation.
Connecting to the Internet
Do the following to connect to the Internet:
1 Ensure that your Ericsson serial interface cable is connected to
your phone and to your computer, as described earlier in this
chapter.
2 Ensure that the install program from the CD has been properly
installed. If so, you should see an Ericsson R280 Dialup icon on
your desktop.
3 Ensure that your computer has been rebooted at least once since
the dial-up connection was created by the installation program.
4 Double-click on the Ericsson R280 Dialup icon on your desktop.
5 When prompted, select .
6 Once connected, you can use Internet applications on your
computer.
Your Display in Wireless Modem Operation
When your phone is in Wireless Modem Operation, your display
will look similar to this:
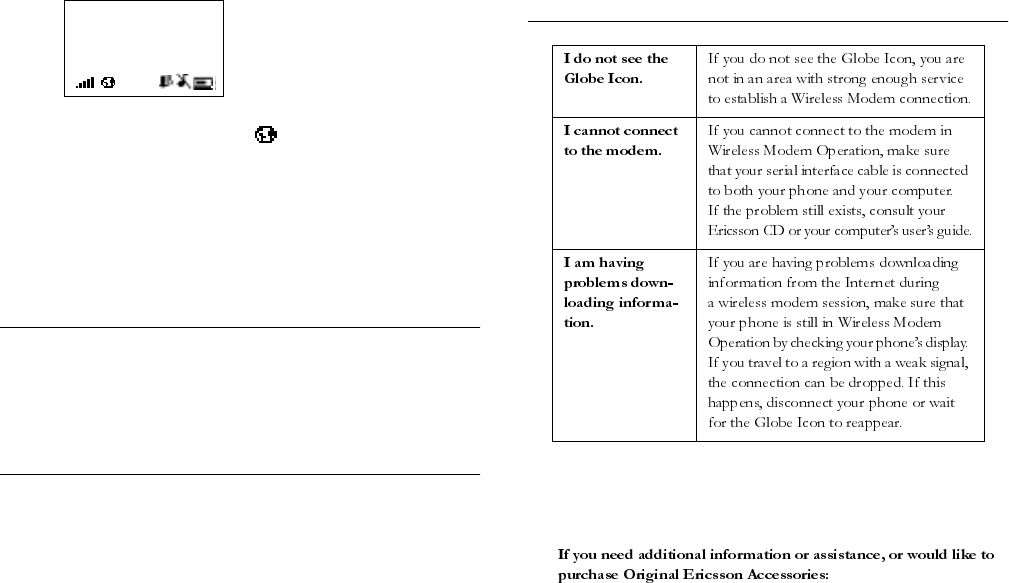
47 Wireless Modem Operation
When you see the Globe Icon ( ) on your phone’s display, you
know that you are connected to the Internet.
You will also see a kilobyte number under Modem Mode in your
display. This number indicates the number of bytes transferred
through your mobile telephone during a Wireless Modem session.
This number is reset to zero after the connection is disconnected.
Wireless Modem Operation Key Functions
The keys on your phone’s keypad do not have any functions when
you are in Wireless Modem Operation. Use the keys on your
computer’s keypad.
Disconnecting
Open the Ericsson Dialup Dialog Box and click on Disconnect to
end your Wireless Modem session. When your wireless session is
stopped or when your serial interface cable is disconnected from
your phone, your phone will exit Wireless Modem Operation and
return to the previously selected operation.
Problem Solving
in North America, call
1-800-ERICSSON (374-2776). In Latin America, call 1-305-755-6789.
All other countries, call 1-919-472-7908.
Modem Mode
21KB
Dec31 12:12pm

Wireless Modem Operation 48
For frequently asked questions about Wireless Modem Operation, visit
http://www.ericsson.com/phones.
49 Wireless Modem Operation

Index 50
A
Accessible Solutions 17
Accessing Menus 19
Active Profile Icon 18, 29, 33
Add Area Code 30
Entry 25
Add Favorite 41
Adjusting Ear Volume 22
Aircraft 4
Alarm Icon 18, 37
Alert Sound 42
Analog/Digital Indicator 18
Answer Option 29
Antenna Care 2
Assistance 33, 47
AutoPrefix 30
B
Backlight 31
Battery
Charging 12
Connecting 11
Icon 18, 37
Information 4
Low Battery Alert 23
New 4
Recycling 5
Removing 11
Use and Care 5
Blasting Areas 4
Browser
Alert Icon 37
Choice Cards 36, 38
Connecting To 35
Browser Operation 15
Connecting 35
Content Window 35
Globe Icon 36
Information Cards 35, 38
Item Selection 37
Key Functions 40
Navigation 37
Soft Keys 36
Status Row 36
Text Input Cards 36, 38
C
Call 26, 29
Entry 25
Call Info Menu 26
Incoming Calls 27
Outgoing Calls 27
Total Usage 27
Usage Tracker 27
Call Options Submenu
Add Area Code 30
Answer Option 29
Auto Prefix 30
Calling Cards 30
Speed Dial 30
Super Dial 30
Call Waiting 22
Caller Number Identification 22, 26
Calling Cards 30
Setting Up Your Calling Cards 30
Change
Profile 29, 33
Channel Scan 42
Charging 12
Battery 12
Index
51 Index
Charge-Only Mode 12
Slow Charging 12
Choice Cards 36, 38
Clock Submenu 31
Set Date 32
Set Time 31
Stopwatch 32
Time Format 32
Computer Setup in Wireless Modem
Operation 45
Configuring
Browser 42
Browser Gateway 43
NEI 43
Content Window 35
D
Data Operation
Highlights 14
Disconnecting
Wireless Modem Operation 47
Display 32
Browser Operation 35
Status Row 36
Voice Operation 18
Wireless Modem Operation 46
Display Menu
Show URL 42
Display Messages
Voice Operation 19
Display Size 42
Display Submenu
Backlight 31
Greeting 31
Document Conventions 1
Driving 3
E
Ear Volume 28
Adjusting 22
EditEntry 25
Melodies 28
Electronic Devices 3
Hearing Aids 3
Other Medical Devices 4
Pacemakers 3
Posted Facilities 4
Vehicles 4
Entering
Letters and Symbols 21
Network Settings Submenu 43
Exposure to Radio Frequency Signals 2
F
FDA Consumer Update 6
G
Globe Icon 37
Greeting 31
H
Highlights
Data Operation 14
Voice Operation 14
Home
Page 41
I
IconActive Profile 18
Alarm 18, 37
Battery 18, 37
Browser Alert 37
Browser Mode 36, 37
Globe 37
Keypad Lock 18
Missed Call 22
New Text Mail 18
New Voice Mail 18
Phone Silent 18
Ringer Off 18, 37
Signal Strength 18, 37
Incoming Calls 27
Information Cards 35, 38
Index 52
International Calls 23
K
Key Functions
Browser Operation 40
Voice Operation 23
Wireless Modem Operation 46
Key Sound 28
Keypad Help 42
Keypad Lock Icon 18
L
Learning About Your Mobile Phone 14
Letters
Entering 21, 39
Local Settings
Keypad Help 42
Local Settings Submenu 42
Alert Sound 42
Channel Scan 42
Network Settings 42
Power Up Mode 42
Security 42
Low Battery 23
M
Main Menu 19
Making Calling Card Calls 31
Menus
Accessing 19
Message Alert 28
Messages Menu 25
Voice Mail 34
Missed Call Icon 22
Mode
Switching 16
Muting
Microphone 22
Ring Tone 22
My Number 32
N
Network 42
NewText Mail Icon 18
Voice Mail Icon 18
O
Operating Your Phone 15
Operation
Browser 15
Voice 15
Wireless Modem 16, 45
Outgoing Calls 27
P
Page Help 42
Parts of Your Phone 15
Phone
Operation 2, 15
Parts 15
Silent 18
Turning On and Off 15
Phonebook 21
Creating Phonebook Entries 21
Entering Letters and Symbols 21
Using 21
Phonebook Menu 24
Add Entry 25
Call Entry 25
Edit Entry 25
Potentially Explosive Atmospheres 4
Power Up Mode 42
Problem 47
Battery Will Not Charge 34
Low Battery Power 34
No Service 34
Out Of Range 34
Phone Does Not Ring 34
Phone Does Not Turn On 33
Signal Strength Varies 34
Solving 33, 47
Weak Signal 34
53 Index
Product Care and Operation 4
Profiles Menu
Change Profile 29, 33
R
Receiving... 36
Recycling Your Battery 5
Redialing the Last Number 20
Reset Cache 42
Ring Sound 28
Ringer Off 18, 37
S
Safety 2
Aircraft 4
Antenna Care 2
Blasting Areas 4
Driving 3
Explosive Atmospheres 4
Exposure to Radio Frequency Sig-
nals 2
FDA Consumer Update 6
Phone Operation 2
Product Care and Operation 4
Vehicles Equipped with an Air Bag
4
Scrollbar 35, 36
Security 42
Send Message
Create 25
Sending... 36
Set Date 32
Time 31
Setting Up Your Calling Cards 30
Settings Menu 27
Clock 31
Display 32
Language 32
My Number 32
Sounds 28
Settings Submenu
Call Options 29
Show URL 42
Signal Strength Icon 18, 37
Silent Mode 37
Slow 12
Soft Keys 36
Soft keys 36
Sounds Submenu 28
Ear Volume 28
Edit Melodies 28
Key Sound 28
Message Alert 28
Ring Sound 28
Ring Volume 28
Special Needs 17
Speed Dial 30
Status Messages 36
Connecting... 36
Receiving... 36
Sending 36
Status Row 36
Icons 37
Soft Keys 36
Status Messages 36
Time/Date 37
Stop and Pause Dialing 20
Stopwatch 32
Super Dial 30
Switching
Browser to Voice 17
Modes 16
To Wireless Modem 17
Voice to Browser 16
Symbols 39
Entering 21
T
Technical Support 33, 47
Tegic T9 Text Entry 39
Text 38
Text Entry
Tegic T9 39
Index 54
Text Input Cards 36
Entering Text 38
T9 39
Your Cursor 38
Time Format 32
Time/Date 37
Tools Menu 41
Add Favorite 41
Display Size 42
Home Page 41
Local Settings 42
Page Help 42
Reset Cache 42
Version Info 42
Voice Mode 41
Total Usage 27
TTY Phone Number 17
Turning Your Phone On and Off 15
U
Unanswered Calls 22
Usage Tracker 27
Using Your New Subscription 43
V
Vehicles Equipped with an Air Bag 4
Version Info 42
Voice
Mail 34
Mode 41
Voice Calls 20
Placing 20
Redialing 20
Stop and Pause Dialing 20
Voice Operation 15, 18
Adjusting Ear Volume 22
Answering Calls 21
Call Waiting 22
Caller Number Identification 22
Display Messages 19
Highlights 14
International Calls 23
Key Functions 23
Muting the Microphone 22
Muting the Ring Tone 22
Problem Solving 33
Standby Screen 18
Unanswered Calls 22
W
Wireless Modem Operation 16, 45
Before You Start 45
Computer Setup 45
Connecting to the Internet 46
Disconnecting 47
Display 46
Initial Setup 45
Key Functions 46
Problem Solving 47
55 Index