HARRIS TR-421-A2 Dual Mode TDMA Cellular Transceiver User Manual 12182001 Manual
HARRIS CORPORATION Dual Mode TDMA Cellular Transceiver 12182001 Manual
HARRIS >
12182001 Manual

LZT 123 4598/16 R1
Important Information
THIS PHONE MODEL HAS BEEN CERTIFIED IN
COMPLIANCE WITH THE GOVERNMENT’S
REQUIREMENTS FOR EXPOSURE TO RADIO WAVES.
Your wireless phone is a radio transmitter and receiver. It is designed
to not exceed the limits for exposure to radio frequency (RF) energy
set by the Federal Communications Commission (FCC) of the U.S.
Government. These limits establish permitted levels of RF energy
for the general population. The guidelines are based on standards
that were developed by international scientific organizations
through periodic and thorough evaluation of scientific studies. The
standards include a safety margin designed to assure the safety of all
persons, regardless of age and health.
The exposure standard for wireless mobile phones employs a unit of
measurement known as the Specific Absorption Rate, or SAR. The
SAR limit set by the FCC is 1.6W/kg.* Tests for SAR are conducted
using standard operating positions accepted by the FCC with the
phone transmitting at its highest certified power level in all tested
frequency bands. Although the SAR is determined at the highest
certified power level, the actual SAR level of the phone while
operating can be well below the maximum value. This is because the
phone is designed to operate at multiple power levels so as to use
only the power required to reach the network. In general, the closer
you are to a wireless base station antenna, the lower the power
output.
Before a phone model is available for sale to the public, it must be
tested and certified to the FCC that it does not exceed the limit
established by the government-adopted requirement for safe
exposure. The tests are performed in positions and locations (i.e., at
the ear and worn on the body) as required by the FCC for each
model. The highest SAR value as reported to the FCC for this model
phone when tested for use at the ear is 0.93 W/kg and when worn
on the body is 0.88 W/kg. Body worn measurements are made while
the phone is in use and worn on the body with an Ericsson
accessory. Accessories can significantly affect SAR compliance. The
Federal Communication Commission requires that some
manufacturers' accessories be tested, and Ericsson has done so with
respect to its products. Ericsson has not tested non-Ericsson
accessories in conjunction with Ericsson phones. It is therefore
recommended that only Ericsson accessories be used in conjunction
with Ericsson phones.
The FCC has granted an Equipment Authorization for this model
phone with all reported SAR levels evaluated as in compliance with
the FCC RF exposure guidelines. While there may be differences
between the SAR levels of various phones, all mobile phones granted
an FCC equipment authorization meet the government requirement
for safe exposure.
SAR information on this model phone is on file with the FCC and
can be found under the Display Grant section of http://
www.fcc.gov/oet/fccid after searching on FCC ID AXATR-421-A2.
Additional information on Specific Absorption Rates (SAR) can be
found on the Cellular Telecommunications & Internet Association
(CTIA) web-site at http://phonefacts.net/.
* In the United States and Canada, the SAR limit for mobile phones used by
the public is 1.6 watts/kilogram (W/kg) averaged over one gram of tissue. The
standard incorporates a margin of safety to give additional protection for the
public and to account for any variations in measurements.

Para obtener una copia en español de esta Guía del Usuario, visite nuestra página
Web en www.ericsson.com/phones o, si se encuentra en Estados Unidos,
también puede llamar al 1-800-374-2776.
Register your new phone and see the latest in products
by visiting us at http://www.ericsson.com/phones
11/01
This manual is published by Ericsson Inc., without any warranty. Improvements and changes to this manual due to typographical errors,
inaccuracies of current information, or improvements to programs and/or equipment, may be made by Ericsson Inc. at any time and without
notice. Such changes will, however, be incorporated into new editions of this manual.
“Ericsson”, “Ericssonl” and “ERICSSON ORIGINAL ACCESSORIES” are each
registered U.S. Trademarks owned by Telefonaktiebolaget L M Ericsson of Sweden.
“Microsoft”, “Windows” and the design plus words “Microsoft Windows” are each either
registered and/or pending U.S. Trademarks owned by Microsoft Corporation of Redmond, Washington, U.S.A.
Trademarks referred to herein are trademarks of their respective companies.
T9 Text Input is licensed under one or more of the following: U.S. Pat. Nos. 5,818,437, 5,953,541, 5,187,480, 5,945,928, and 6,011,554; Canadian
Pat. No. 1,331,057; United Kingdom Pat. No.2238414B; Hong Kong Standard Pat. No. HK0940329; Republic of Singapore Pat. No. 51383;
Euro.Pat. No. 0 842 463 (96927260.8) DE/DK, FI, FR, IT,NL,PT.ES,SE,GB; and additional patents are pending worldwide.
©Ericsson Inc., 2001. All rights reserved
Publication number: AE/LZT 123 5640 PB1
Printed in USA
R300UM-R2-Br-AE.book Page i Monday, September 10, 2001 1:39 PM

R300UM-R2-Br-AE.book Page ii Monday, September 10, 2001 1:39 PM

i
Document Conventions . . . . . . . . . . . . . . . . 1
Getting Started. . . . . . . . . . . . . . . . . . . . . . . . 2
Connecting and Removing Your Battery . . . . . . . . . . . . . .2
Removing the Battery Cover . . . . . . . . . . . . . . . . . . . . . .2
Attaching The Battery . . . . . . . . . . . . . . . . . . . . . . . . . .2
Replacing the Battery Cover . . . . . . . . . . . . . . . . . . . . . .3
Charging Your Battery . . . . . . . . . . . . . . . . . . . . . . . . . . . .3
Your Charger . . . . . . . . . . . . . . . . . . . . . . . . . . . . . . . . .3
Learning About Your Mobile Phone. . . . . . . 5
Phone Highlights . . . . . . . . . . . . . . . . . . . . . . . . . . . . . . . .5
The Parts of Your Phone . . . . . . . . . . . . . . . . . . . . . . . . . .6
Turning Your Phone On and Off . . . . . . . . . . . . . . . . . . .6
Accessories, Accessibility, and Internet . . . . . . . . . . . . . . . .6
Technical Assistance . . . . . . . . . . . . . . . . . . . . . . . . . . . .6
Ordering Accessories . . . . . . . . . . . . . . . . . . . . . . . . . . . .6
Accessible Solutions/Special Needs . . . . . . . . . . . . . . . . .6
Internet . . . . . . . . . . . . . . . . . . . . . . . . . . . . . . . . . . . . . .6
Mobile Internet . . . . . . . . . . . . . . . . . . . . . . . . . . . . . . .6
Using Your Phone . . . . . . . . . . . . . . . . . . . . . 7
Standby Screen . . . . . . . . . . . . . . . . . . . . . . . . . . . . . . . . .7
Menu Navigation . . . . . . . . . . . . . . . . . . . . . . . . . . . . . . . 7
Main Menu . . . . . . . . . . . . . . . . . . . . . . . . . . . . . . . . . . . 8
Making, Ending and Answering Calls . . . . . . . . . . . . . . . 8
Making Calls . . . . . . . . . . . . . . . . . . . . . . . . . . . . . . . . . 8
Ending Calls . . . . . . . . . . . . . . . . . . . . . . . . . . . . . . . . . 9
Answering Calls . . . . . . . . . . . . . . . . . . . . . . . . . . . . . . 9
Three-Way Calls . . . . . . . . . . . . . . . . . . . . . . . . . . . . . . 9
Voice Dialing . . . . . . . . . . . . . . . . . . . . . . . . . . . . . . . . . . 9
Setting up Voice control . . . . . . . . . . . . . . . . . . . . . . . . 9
Recording Voice commands . . . . . . . . . . . . . . . . . . . . . 9
Using Voice control . . . . . . . . . . . . . . . . . . . . . . . . . . 10
Working with Your Call List . . . . . . . . . . . . . . . . . . . . . 10
Deleting a Number From Your Call list . . . . . . . . . . . 11
Call Redial . . . . . . . . . . . . . . . . . . . . . . . . . . . . . . . . . 11
Adding a Number to Your Phonebook . . . . . . . . . . . . 11
Unanswered Calls . . . . . . . . . . . . . . . . . . . . . . . . . . . . 11
Entering Letters and Symbols . . . . . . . . . . . . . . . . . . . 11
Stop and Pause Dialing . . . . . . . . . . . . . . . . . . . . . . . . 12
Temporarily Muting the Ring Tone . . . . . . . . . . . . . . 13
Muting the Microphone During a Call . . . . . . . . . . . . 13
Adjusting Ear Volume . . . . . . . . . . . . . . . . . . . . . . . . . 13
Low Battery Power Alert . . . . . . . . . . . . . . . . . . . . . . . 13
International Calls . . . . . . . . . . . . . . . . . . . . . . . . . . . 13
Table of Contents
R300UM-R2-Br-AE.book Page i Monday, September 10, 2001 1:39 PM

ii
Key Functions . . . . . . . . . . . . . . . . . . . . . . . . . . . . . . . . . 13
Phonebook Menu . . . . . . . . . . . . . . . . . . . . . . . . . . . . . . 15
Call contact . . . . . . . . . . . . . . . . . . . . . . . . . . . . . . . . . 15
Add contact . . . . . . . . . . . . . . . . . . . . . . . . . . . . . . . . . 15
Edit contact . . . . . . . . . . . . . . . . . . . . . . . . . . . . . . . . . 15
My numbers . . . . . . . . . . . . . . . . . . . . . . . . . . . . . . . . 16
Groups . . . . . . . . . . . . . . . . . . . . . . . . . . . . . . . . . . . . . 16
Calling cards . . . . . . . . . . . . . . . . . . . . . . . . . . . . . . . . 16
Options . . . . . . . . . . . . . . . . . . . . . . . . . . . . . . . . . . . . 17
Memory status . . . . . . . . . . . . . . . . . . . . . . . . . . . . . . . 17
Messages Menu . . . . . . . . . . . . . . . . . . . . . . . . . . . . . . . . 17
Call voicemail . . . . . . . . . . . . . . . . . . . . . . . . . . . . . . . 17
Received mail . . . . . . . . . . . . . . . . . . . . . . . . . . . . . . . . 18
Send new . . . . . . . . . . . . . . . . . . . . . . . . . . . . . . . . . . . 18
Unsent mail . . . . . . . . . . . . . . . . . . . . . . . . . . . . . . . . . 18
Templates . . . . . . . . . . . . . . . . . . . . . . . . . . . . . . . . . . 19
Sent mail . . . . . . . . . . . . . . . . . . . . . . . . . . . . . . . . . . . 19
Empty mailboxes . . . . . . . . . . . . . . . . . . . . . . . . . . . . . 19
Options . . . . . . . . . . . . . . . . . . . . . . . . . . . . . . . . . . . . 19
Memory status . . . . . . . . . . . . . . . . . . . . . . . . . . . . . . . 20
Call Info Menu . . . . . . . . . . . . . . . . . . . . . . . . . . . . . . . . 20
Missed calls . . . . . . . . . . . . . . . . . . . . . . . . . . . . . . . . . 20
Call list . . . . . . . . . . . . . . . . . . . . . . . . . . . . . . . . . . . . 21
Usage tracker . . . . . . . . . . . . . . . . . . . . . . . . . . . . . . . . 21
Options . . . . . . . . . . . . . . . . . . . . . . . . . . . . . . . . . . . . 21
Ongoing Call Menu . . . . . . . . . . . . . . . . . . . . . . . . . . . . 22
Turn on/off tones . . . . . . . . . . . . . . . . . . . . . . . . . . . . 22
Hold call . . . . . . . . . . . . . . . . . . . . . . . . . . . . . . . . . . . 22
Switch calls . . . . . . . . . . . . . . . . . . . . . . . . . . . . . . . . . . 22
Release active . . . . . . . . . . . . . . . . . . . . . . . . . . . . . . . . 22
Retrieve call . . . . . . . . . . . . . . . . . . . . . . . . . . . . . . . . . 22
Call info . . . . . . . . . . . . . . . . . . . . . . . . . . . . . . . . . . . . 22
Settings Menu . . . . . . . . . . . . . . . . . . . . . . . . . . . . . . . . . 22
Sounds & alerts . . . . . . . . . . . . . . . . . . . . . . . . . . . . . . 22
Profiles . . . . . . . . . . . . . . . . . . . . . . . . . . . . . . . . . . . . . 24
Call options . . . . . . . . . . . . . . . . . . . . . . . . . . . . . . . . . 25
Display . . . . . . . . . . . . . . . . . . . . . . . . . . . . . . . . . . . . . 26
Language . . . . . . . . . . . . . . . . . . . . . . . . . . . . . . . . . . . 27
Time and date . . . . . . . . . . . . . . . . . . . . . . . . . . . . . . . 27
Locks . . . . . . . . . . . . . . . . . . . . . . . . . . . . . . . . . . . . . . 28
Voice control . . . . . . . . . . . . . . . . . . . . . . . . . . . . . . . . 28
Networks . . . . . . . . . . . . . . . . . . . . . . . . . . . . . . . . . . . 28
Reset settings . . . . . . . . . . . . . . . . . . . . . . . . . . . . . . . . 29
Extras Menu . . . . . . . . . . . . . . . . . . . . . . . . . . . . . . . . . . 29
Calendar . . . . . . . . . . . . . . . . . . . . . . . . . . . . . . . . . . . . 29
Time . . . . . . . . . . . . . . . . . . . . . . . . . . . . . . . . . . . . . . 30
Games . . . . . . . . . . . . . . . . . . . . . . . . . . . . . . . . . . . . . 31
Calculator . . . . . . . . . . . . . . . . . . . . . . . . . . . . . . . . . . 32
Code memo . . . . . . . . . . . . . . . . . . . . . . . . . . . . . . . . . 32
Accessories . . . . . . . . . . . . . . . . . . . . . . . . . . . . . . . . . . 32
WAP Browser Menu . . . . . . . . . . . . . . . . . . . . . . . . . . . . 32
Launch browser . . . . . . . . . . . . . . . . . . . . . . . . . . . . . . 32
Browser help . . . . . . . . . . . . . . . . . . . . . . . . . . . . . . . . 32
Active gateways . . . . . . . . . . . . . . . . . . . . . . . . . . . . . . 32
R300UM-R2-Br-AE.book Page ii Monday, September 10, 2001 1:39 PM

iii
My shortcuts Menu . . . . . . . . . . . . . . . . . . . . . . . . . . . . .32
Edit shortcuts . . . . . . . . . . . . . . . . . . . . . . . . . . . . . . . .32
Problem Solving . . . . . . . . . . . . . . . . . . . . . . . . . . . . . . .33
Using Your Browser . . . . . . . . . . . . . . . . . . 34
Browser Features . . . . . . . . . . . . . . . . . . . . . . . . . . . . . . .34
Launching Your WAP Browser . . . . . . . . . . . . . . . . . . . .34
Exiting Your WAP Browser . . . . . . . . . . . . . . . . . . . . . . .35
Your WAP Browser Display . . . . . . . . . . . . . . . . . . . . . .35
Content Window . . . . . . . . . . . . . . . . . . . . . . . . . . . . .35
Status Row . . . . . . . . . . . . . . . . . . . . . . . . . . . . . . . . . .35
Tools Menu . . . . . . . . . . . . . . . . . . . . . . . . . . . . . . . . . . .37
Reload . . . . . . . . . . . . . . . . . . . . . . . . . . . . . . . . . . . . .37
Home . . . . . . . . . . . . . . . . . . . . . . . . . . . . . . . . . . . . . .37
Bookmarks . . . . . . . . . . . . . . . . . . . . . . . . . . . . . . . . . .37
Mark site . . . . . . . . . . . . . . . . . . . . . . . . . . . . . . . . . . .37
Show URL . . . . . . . . . . . . . . . . . . . . . . . . . . . . . . . . . .37
About Openwave . . . . . . . . . . . . . . . . . . . . . . . . . . . . .37
Advanced . . . . . . . . . . . . . . . . . . . . . . . . . . . . . . . . . . .37
Help . . . . . . . . . . . . . . . . . . . . . . . . . . . . . . . . . . . . . . .37
Exit Browser . . . . . . . . . . . . . . . . . . . . . . . . . . . . . . . . .37
Browser Key Functions . . . . . . . . . . . . . . . . . . . . . . . . . .38
Text Entry . . . . . . . . . . . . . . . . . . . . . . . . . . . . . . . . . . . .39
Guidelines for Safe and Efficient Use . . . . 41
Product Care and Maintenance . . . . . . . . . . . . . . . . . . . .41
Antenna Care . . . . . . . . . . . . . . . . . . . . . . . . . . . . . . . . . 41
Efficient Use . . . . . . . . . . . . . . . . . . . . . . . . . . . . . . . . . 41
Radio Frequency (RF) Exposure and SAR . . . . . . . . . . . 42
Driving . . . . . . . . . . . . . . . . . . . . . . . . . . . . . . . . . . . . . 43
Vehicles Equipped with an Air Bag . . . . . . . . . . . . . . . 43
Electronic Devices . . . . . . . . . . . . . . . . . . . . . . . . . . . . . 43
Pacemakers . . . . . . . . . . . . . . . . . . . . . . . . . . . . . . . . . 43
Hearing Aids . . . . . . . . . . . . . . . . . . . . . . . . . . . . . . . . 44
Other Medical Devices . . . . . . . . . . . . . . . . . . . . . . . . 44
Aircraft . . . . . . . . . . . . . . . . . . . . . . . . . . . . . . . . . . . . . 44
Blasting Areas . . . . . . . . . . . . . . . . . . . . . . . . . . . . . . . . 44
Explosive Atmospheres . . . . . . . . . . . . . . . . . . . . . . . . . . 44
Power Supply . . . . . . . . . . . . . . . . . . . . . . . . . . . . . . . . . 45
Children . . . . . . . . . . . . . . . . . . . . . . . . . . . . . . . . . . . . 45
Disposing of the Product . . . . . . . . . . . . . . . . . . . . . . . . 45
Emergency Calls . . . . . . . . . . . . . . . . . . . . . . . . . . . . . . 45
IMPORTANT! . . . . . . . . . . . . . . . . . . . . . . . . . . . . . . 45
Battery Information . . . . . . . . . . . . . . . . . . . . . . . . . . . . 46
Charging the Battery . . . . . . . . . . . . . . . . . . . . . . . . . . 46
Battery Use and Care . . . . . . . . . . . . . . . . . . . . . . . . . 46
Disposing of the Battery . . . . . . . . . . . . . . . . . . . . . . . 46
FCC Statement . . . . . . . . . . . . . . . . . . . . . . . . . . . . . . . 46
Limited Warranty . . . . . . . . . . . . . . . . . . . . . 47
Our Warranty . . . . . . . . . . . . . . . . . . . . . . . . . . . . . . . . 47
What We Will Do . . . . . . . . . . . . . . . . . . . . . . . . . . . . . 47
Conditions . . . . . . . . . . . . . . . . . . . . . . . . . . . . . . . . . . . 47
R300UM-R2-Br-AE.book Page iii Monday, September 10, 2001 1:39 PM

iv
International Service . . . . . . . . . . . . . . . . . . . . . . . . . . . . 48
Index . . . . . . . . . . . . . . . . . . . . . . . . . . . . . . . 49
R300UM-R2-Br-AE.book Page iv Monday, September 10, 2001 1:39 PM

Document Conventions
1
•Key names are shown in the following typeface: CLR.
•Text that is seen in the phone’s display is shown in the following
typeface: displays.
•When this guide instructs you to press a key, press and release
the key.
•When this guide instructs you to press and hold a key, press
and hold the key for one to two seconds.
•When this guide instructs you to press two keys, press and
release one, then press the other. For example, press CLR 1
means press CLR then press 1.
•Press the down arrow when you see this symbol ().
•Press the up arrow when you see this symbol ().
Document Conventions
R300UM-R2-Br-AE.book Page 1 Monday, September 10, 2001 1:39 PM
Getting Started
2
Note! Prior to assembling and using your phone, you may want to read
“Guidelines for Safe and Efficient Use” on page 41.
Connecting and Removing Your Battery
Note! You can find your phone’s model number by removing the battery
and looking on the back of the phone.
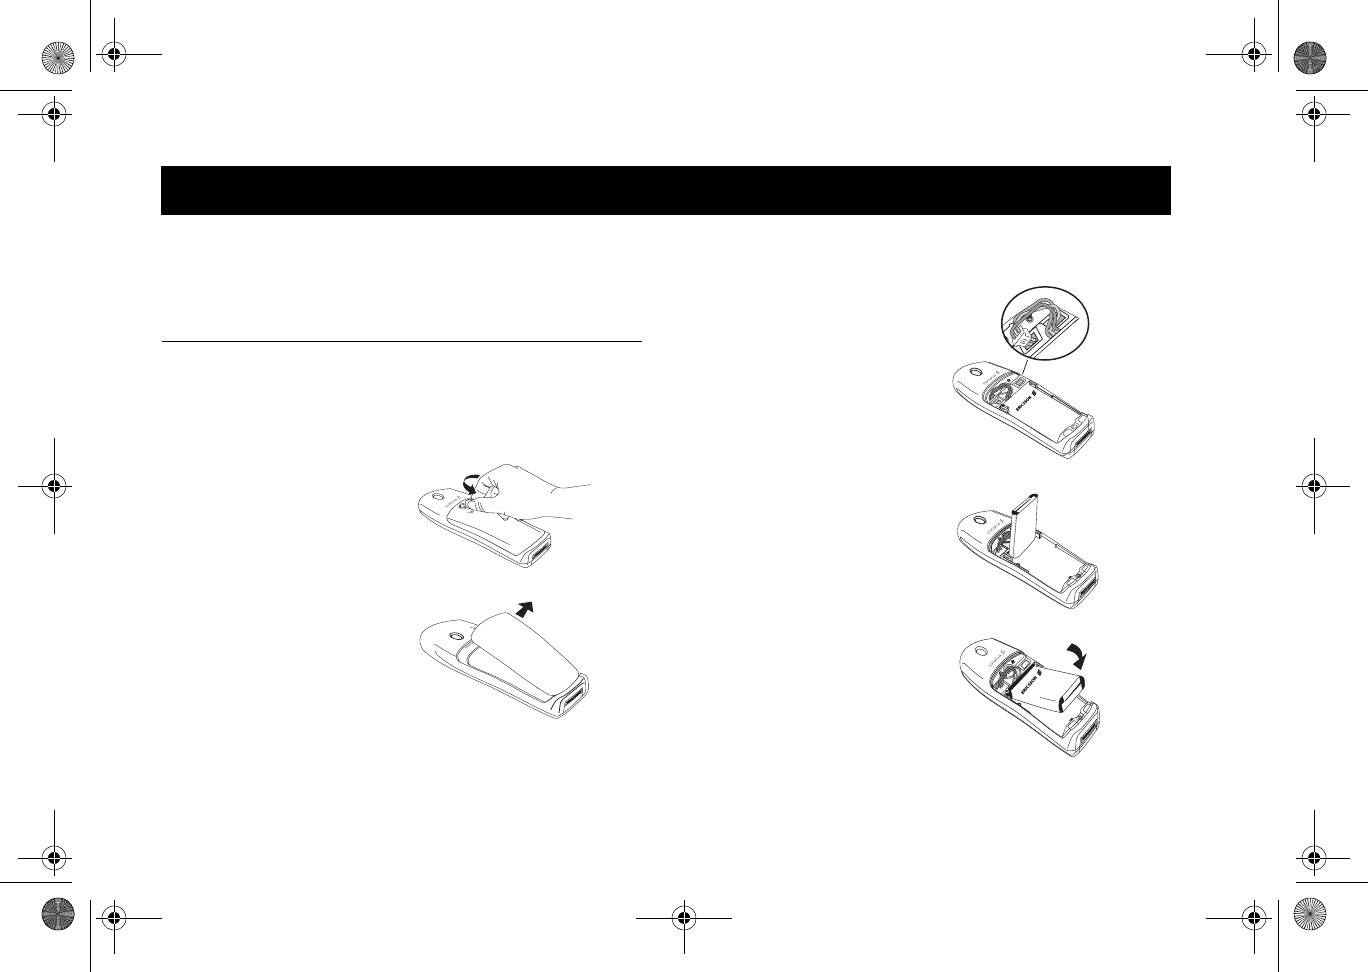
Removing the Battery Cover
Attaching The Battery
Getting Started
1 Use a coin to turn the
latch counterclockwise.
2 Once the screw has been
loosened sufficiently,
remove the battery cover.
1 Locate the connector at
the end of the blue, red,
and black wires. Insert
the plug as shown in the
diagram.
Note! The cable will only
properly fit one way.
Do not force it.
2 Holding the battery at
a perpendicular angle
(label side up), slip the
left side of the battery
into the hinge. Snap the
right side in.
3 Lower the battery until it
lays flat.
R300UM-R2-Br-AE.book Page 2 Monday, September 10, 2001 1:39 PM
Getting Started
3
Replacing the Battery Cover
1 Insert the cover, bottom first, on the back of the phone.
2 Turn the screw clockwise to tighten the back.
Charging Your Battery
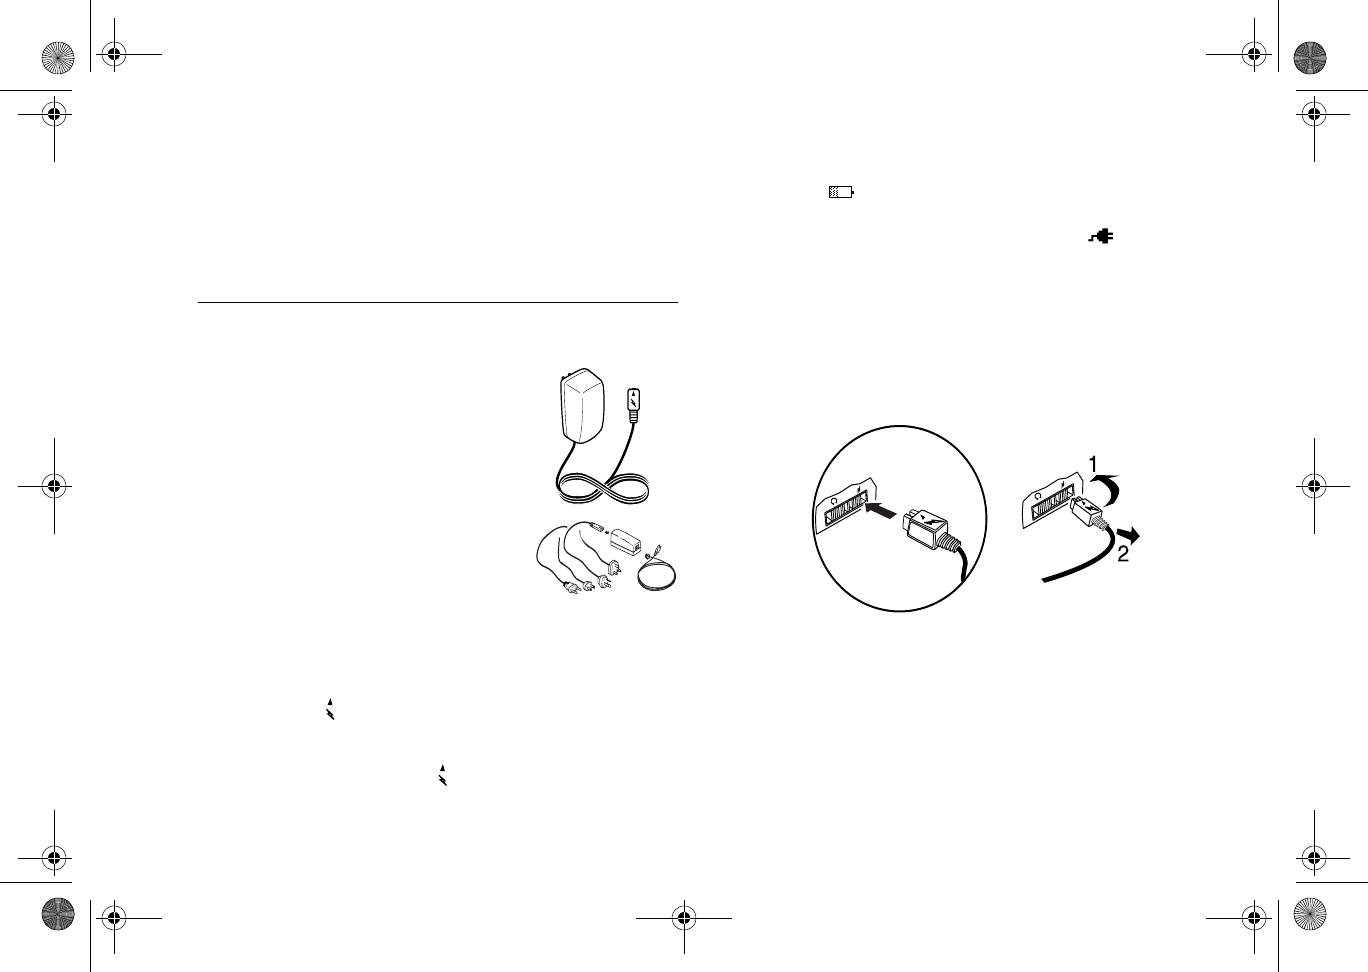
Your Charger
It is important that you fully charge your
battery before you use your phone. Both
chargers supply power to charge your
battery while the battery is attached to your
phone. If your phone is On, it can make or
receive calls while using either charger.
Note! Never attach the charger to a phone that
does not have a battery installed.
1 If you have a wall charger, plug the
charger into a standard wall electrical
outlet. If you have a travel charger,
connect the appropriate AC power cord
and phone charging cord to the travel charger.
2 Hold the phone with the display and keypad facing up.
3 Hold the small plug on the charger cord so the lightning bolt
symbol ( ) is up.
4 Align the small plug on the charger cord with the connector on
the bottom of your phone. The connector on the phone is above
the lightning bolt symbol ( ).
5 Press the plug into the connector until the plug “snaps” into place.
The icon continues to fill and empty until your battery is
fully charged. When charging is complete, the battery icon will
stop filling and emptying and will remain full ( ).
Note! The amount of battery power indicated by your battery icon is
an estimate that may vary depending on your charging and use
patterns. To ensure adequate power supply, keep your battery fully
charged or carry additional charged batteries.
Note! Severely discharged batteries may not immediately indicate
charging.
Note! Do not twist while inserting or removing the small plug on the
charger cord!
6 Continue charging the phone until the battery is fully charged.
7 To disconnect the charger, lift the plug connected to the phone
upwards and pull it out.
travel
wall
R300UM-R2-Br-AE.book Page 3 Monday, September 10, 2001 1:39 PM
Getting Started
4
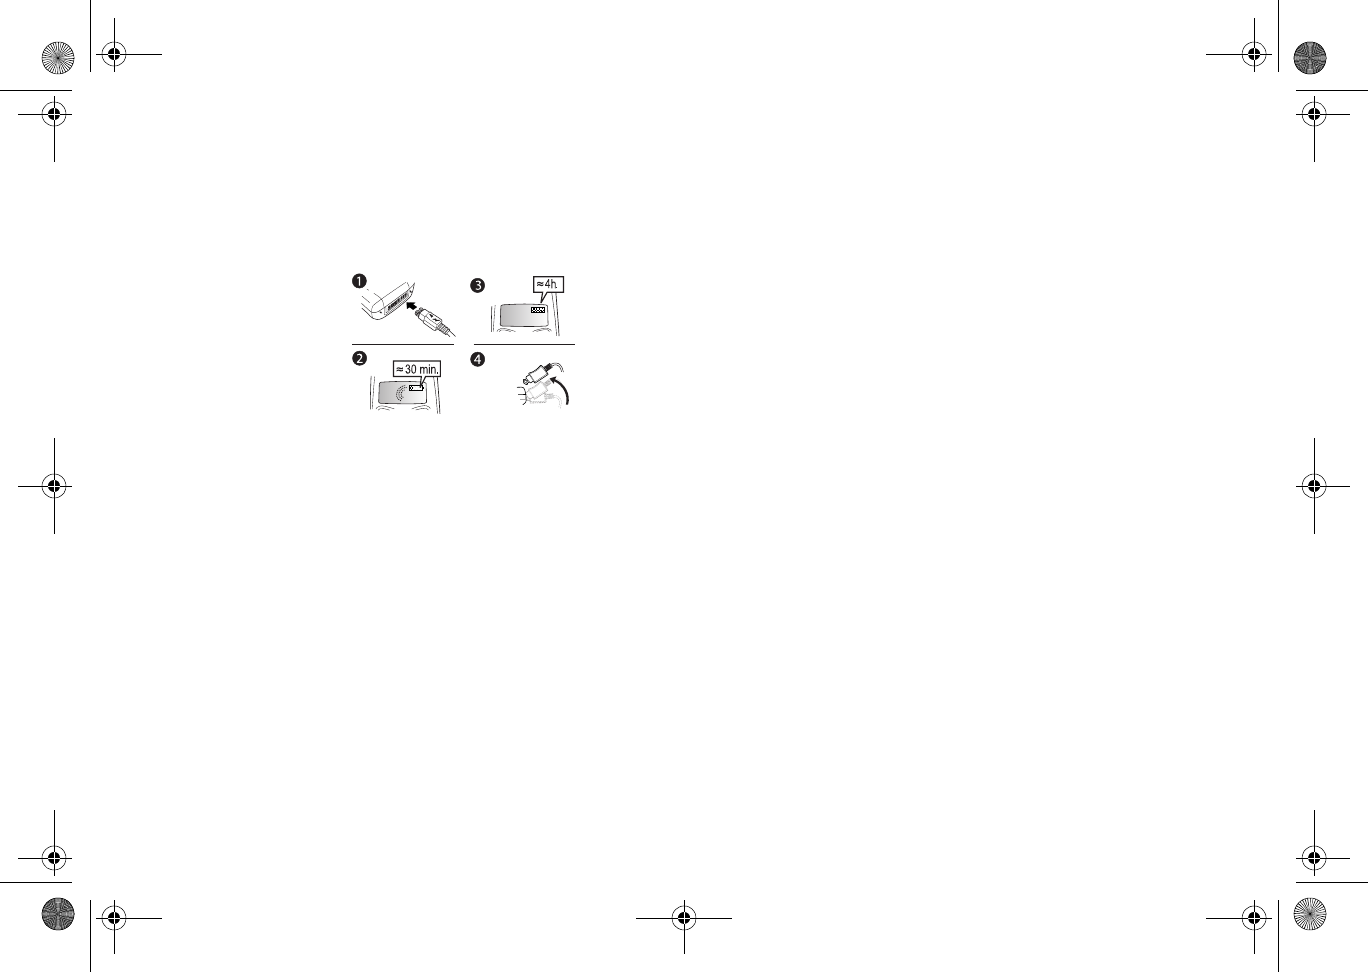
First Time Battery Use
Fully charge the battery before you use your phone for the first time.
Your battery can be charged whenever you want without affecting its
performance. You can also charge the battery when the phone is off.
Charge-Only Mode
If your phone is off, attaching the charger will cause the phone to
activate in charge-only mode.
Note! You cannot make or receive calls when your phone is in charge-
only mode.
Slow (Trickle) Charging a Deeply
Discharged Battery
The battery could become deeply discharged (for example, when
the battery is stored for a long period). As a result, the phone may
not immediately activate charge-only mode when the charger is
connected.
1 Attach the charger to the phone for several hours to slowly charge
(trickle charge) the battery.
2 After trickle charging the battery for several hours the phone
should activate the charge-only mode automatically.
3 Continue charging the phone until the battery is fully charged.
* It may take up to 30 minutes for a new or fully
discharged battery to indicate charging. It takes about
4 hours to fully charge a battery for the first time.
For optimal performance, do not allow your battery
to completely discharge.
*
*
R300UM-R2-Br-AE.book Page 4 Monday, September 10, 2001 1:39 PM

Learning About Your Mobile Phone
5
Your Ericsson mobile phone includes many useful features. Use
this User's Guide to learn more about these features.
Phone Highlights
•Voice activated dialing
•Calendar and Task Lists
•Calendar, Tasks, and Contacts list synchronization with
Microsoft Outlook™.
Note! Visit http://mobileinternet.ericsson.com to download
synchronization software for phonebook contacts and
calendar events.
•Vibrating alert
•Storage for over 500 numbers in your contact list
•Multiple ring types (with musical melody ring options)
•Editable musical ring melodies
•Quick access to the last 50 numbers dialed and received
•T9™ Text Input predictive text entry
•Quick callback feature to respond to text messages
•Superspeed dial™ for 9 numbers including voicemail
•Support for 3 different calling cards
•Two-way text messaging (SMS) with at least 16KB of storage
(service provider dependent)
•Quick access to voicemail service
•Call duration reminder
•Time and date
•Stopwatch
•Alarm
•Profiles
•Phonebook Groups
•Call Screening
•Call Restrictions
•User-customizable greeting
•Multiple language support
•Games
Learning About Your Mobile Phone
R300UM-R2-Br-AE.book Page 5 Monday, September 10, 2001 1:39 PM
Learning About Your Mobile Phone
6
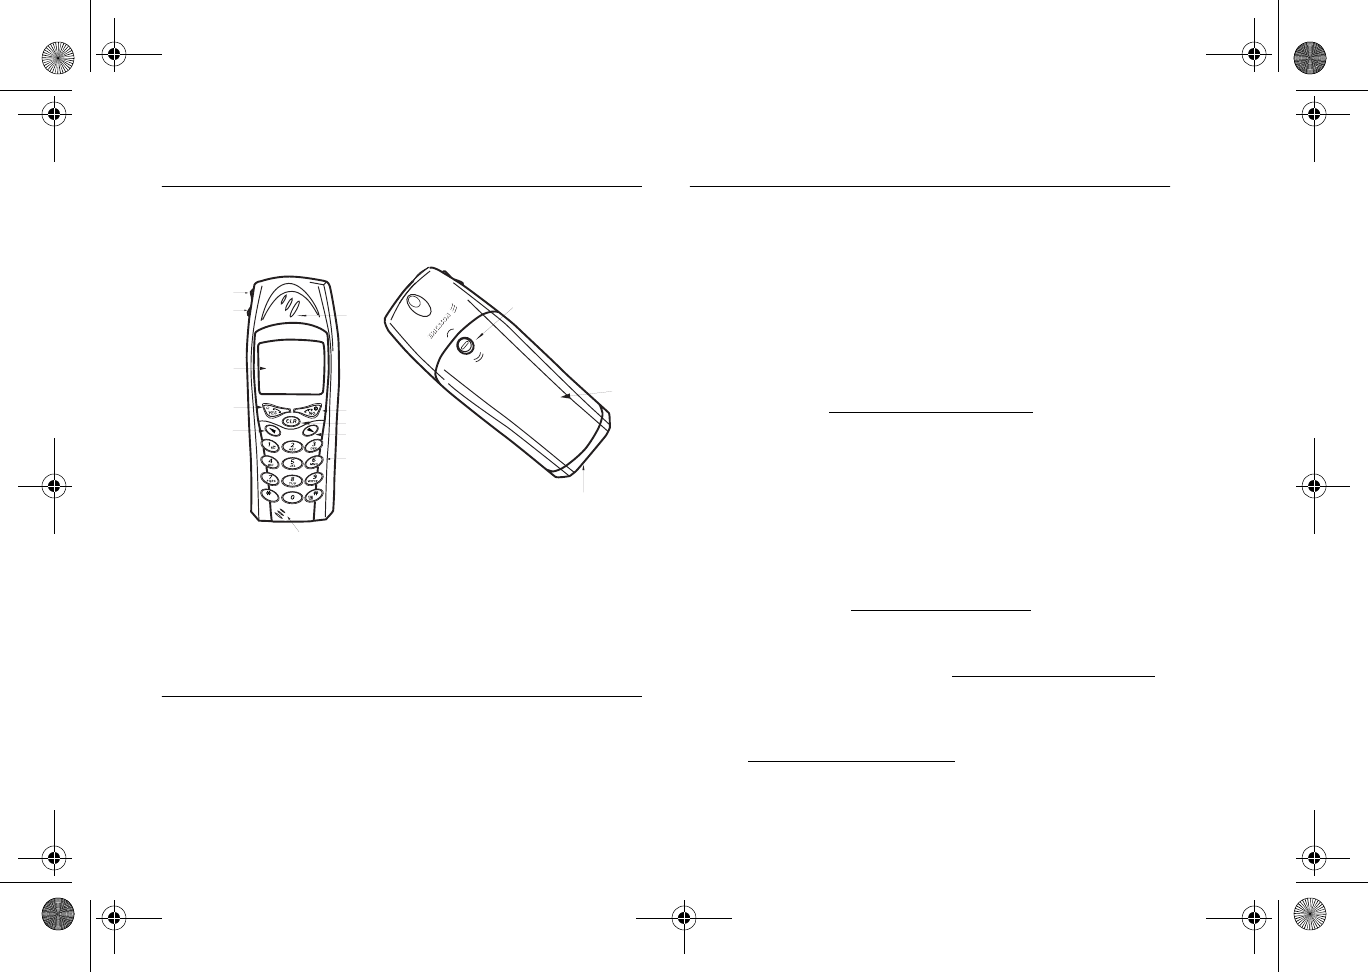
The Parts of Your Phone
The following is a list of the terms used in this user’s guide
to describe your Ericsson mobile phone:
Turning Your Phone On and Off
Turn your phone Off by pressing and holding NO until your phone
turns off. Turn your phone On by pressing and holding NO until
your phone turns on.
Accessories, Accessibility, and Internet
Technical Assistance
•North America - +1-800 ERICSSON (+1-800-374-2776)
•Latin America - +1-305-755-6789
•Other countries - +1-919-472-7908
Ordering Accessories
You can purchase Ericsson accessories by:
•Visiting http://www.ericsson.com/phones
•Calling +1 305 755-6789 (outside the U.S.)
+1-800-374-2776 (inside the U.S.)
•Visiting your local Ericsson retailer.
Accessible Solutions/Special Needs
For information on Accessible Solutions for individuals with special
needs call the Ericsson Special Needs Center at +1-877-878-1996
(TTY) or +1-877-207-2056 (voice), or visit the Ericsson Special
Needs Center at http://www.ericsson-snc.com
Internet
Visit Ericsson on the internet at: http://www.ericsson.com/phones.
Mobile Internet
Visit the Ericsson Mobile Internet at:
http://mobileinternet.ericsson.com for online access to synchronization
software, customer services, user’s guides, and other useful information.
2
6
9
10
11
4
1
12
13
3
5
7
8 1 Upper side key
2 Lower side key
3 Earpiece
4 Display
5 YES key
6 NO (ON/OFF) key
7 Clear (CLR) key
8 Up arrow navigation key
9 Down arrow navigation key
10 Keypad
11 Microphone
12 Battery release latch
13 Battery cover
14 Accessory connectors
14
a/A
R300UM-R2-Br-AE.book Page 6 Monday, September 10, 2001 1:39 PM

Using Your Phone
7
Your Ericsson mobile phone gives you the freedom to make and
receive telephone calls; work with your voicemail and messages;
change your phone’s settings; add, edit, or delete entries from your
phonebook; and make credit card calls.
Note! The voicemail feature is dependent on your service provider.
Standby Screen
When you see a screen similar to the one shown below, your phone
is ready to make and receive calls.
1 Alarm icon appears if the alarm is set.
2 Current time is displayed.
3 Missed calls indicator displays the number of missed calls.
4 Signal strength icon shows the relative strength from the wireless
system. More bars indicate a stronger signal.
5 Analog/digital channel indicator shows whether the phone is
operating in an analog ( ) or digital ( ) mode.
6 New voicemail icon indicates the number of voice messages that
have not been read.
7 New text message icon indicates the number of text messages
that have not been read.
8 Phone silent icon indicates that your phone will not make any
keypad or ring sounds.
9 Battery icon shows the relative strength of your battery. A full
icon indicates a fully charged battery.
Menu Navigation
You can navigate through the menus by doing the following:
•Press or from the Standby screen to access the Main menu.
•Press or to scroll through menus, submenus in menus, and
settings in a function.
•When in a menu, press the menu number to go directly to that
menu. For example, press or to access the Main menu,
then 5 to go to the Extras menu.
•Once in the submenu, press or to highlight the submenu
that you want to select. Press YES to select it. Press the number
associated with the menu item to go directly to that submenu.
For example, press or 43 to work with your Call options.
Using Your Phone
12
3
45 6 78
?
11:56pm
9
535
R300UM-R2-Br-AE.book Page 7 Monday, September 10, 2001 1:39 PM

Using Your Phone
8
•Press YES to choose the menu, function, or setting that
is selected.
•Press NO to go up one level in the menu structure.
•Press and hold to see possible options for that item.
To choose a text input method, press and hold # and then select
either multitap or T9. To lock your keypad, press and hold #
and select Lock keypad. To unlock your keypad, press CLR,
then press YES.
Main Menu
The Main menu has seven menu tabs that display the menu options
that correspond to the title of the selected option. Each menu is
represented by an icon. Making, Ending and Answering Calls
Making Calls
1 Press the numeric keys to enter the phone number you want
to call. The number is shown in the display.
Note! You can press CLR to erase one or more digits in the display,
or press and hold CLR to erase all digits.
2 Press
YES. Calling, along with the number you are dialing, or
the corresponding Phonebook name, is shown in the display while
your phone accesses the wireless network.
3 When the call is connected, Caller ID information (if supported
by your service provider) and your call timer, is shown in your
display. After the call, you will return to the Standby screen.
Option 1 is the Phonebook menu
(see “Phonebook Menu” on page 15).
Option 2 is the Messages menu
(see “Messages Menu” on page 17).
Option 3 is the Call info menu
(see “Call Info Menu” on page 20) when you
are not on a call.
Option 3 is the Ongoing call menu
(see “Ongoing Call Menu” on page 22) when
you are on a call.
Option 4 is the Settings menu
(see “Settings Menu” on page 22).
Option 5 is the Extras menu
(see “Extras Menu” on page 29).
Option 6 is the WAP browser menu
(see “WAP Browser Menu” on page 32).
Option 7 is the My shortcuts menu
(see “My shortcuts Menu” on page 32).
R300UM-R2-Br-AE.book Page 8 Monday, September 10, 2001 1:39 PM

Using Your Phone
9
Ending Calls
To end a call, simply press NO.
Answering Calls
When your phone receives a call, the ringer sounds, Answer?
appears in the display, and the display and keypad backlight
illuminate. If you have Caller ID service from your service provider,
the caller's phone number, or the corresponding Phonebook name,
is shown in the display. Answer the phone by pressing YES.
Answer? is replaced by the call timer display once the call is
answered. End the call by pressing NO.
You can temporarily silence the ringer by pressing NO and still
answer the call by pressing YES.
Note! This option is dependent on your service provider.
Three-Way Calls
You can create a conference call with two others using your Ericsson
mobile phone by doing the following:
1 Dial the first number you want to include in the conference,
then press YES.
2 When the first call is answered, dial the second number (the ring
tones will be audible) and press YES.
3 When the second party answers, press YES. All three parties will
be able to talk to and hear each other.
Note! This option is dependent on your service provider.
Voice Dialing
With your Ericsson mobile phone you can call someone simply
by speaking.
Setting up Voice control
To do this, you must first turn Voice control on by doing the
following:
1 Press or from the Standby screen until the Settings menu
is highlighted and press YES to select it.
2 Press or until Voice control is highlighted and press YES
to select it.
3 Press
YES to select VoiceSettings (already highlighted).
4 From the VoiceSettings submenu, you can turn on
VoiceCommands for Voice dialing (making calls) and for
Caller name (phonebook entries).
Recording Voice commands
When you turn on a Voice control feature, you will be prompted to
record the proper voice commands so that the phone will recognize
your voice when you speak.
To use Voice dialing, record the contact entry types (for example,
“Home”, “Work”, and “Mobile”). You will say individual names for
which you want to use Voice control when you enter these names in
your phonebook.
R300UM-R2-Br-AE.book Page 9 Monday, September 10, 2001 1:39 PM

Using Your Phone
10
Tips
•Try to record in an area where there is little or no background
noise.
•Try to record your voice with the same equipment that you
normally use with your phone. For example, if you normally
have your phone connected to a portable handsfree device when
using voice commands, record your voice commands when your
phone is attached to a portable handsfree device.
•If you plan to use voice functions handheld mode, hold the
phone up to the ear in the position that would normally be used
on a call.
•Begin speaking after the tone ends.
•You can record labels that are up to 8 seconds in duration.
Keep in mind that longer tags provide a higher recognition rate.
•Shorter tags may cause a lower recognition rate. For example,
the name “Tom” can easily be confused with “Tim”.
•Record your voice using the same tone and inflection as you
would when normally speaking. Try not to overpronounce or
speak too slowly when recording.
•When using Portable handsfree devices, you can easily activate
voice dialing by pressing the button near the microphone until
you hear a prompt.
Troubleshooting
If your phone cannot detect speech, one of the following might have
happened:
•You spoke too softly – try speaking more loudly.
•You held the phone too far away – hold it as you do during
acall.
•The voice command was too short – it should be around one
second long.
•You spoke too late or too soon – speak immediately after
the tone.
•You may want to re-record the voice command.
Using Voice control
Once you enable the options you want to use, you can use Voice
control. To use your voice, press and hold YES, then speak your
name or command after the beep. From the Standby screen, you
can say a name recorded in your Contacts list. Once you have said
a name, you will be prompted to say the number type (for example,
“Home”) if there is more than one number stored for that contact.
Working with Your Call List
Your Call list is a list of your last 50 incoming or outgoing calls.
You must turn your Call list on to see your last 50 incoming and
outgoing calls. You can view these numbers by simply pressing YES
from the Standby screen when no other digits are in the display. The
last number you called is shown in the display. Press or to scroll
through your Call list.
Indicates an incoming call in your Call list.
Indicates a missed call in your Call list.
Indicates an outgoing call in your Call list.
?
R300UM-R2-Br-AE.book Page 10 Monday, September 10, 2001 1:39 PM

Using Your Phone
11
Deleting a Number From Your Call list
You can delete a phone number from the Call list by pressing CLR
when the number is highlighted. Press YES to confirm the deletion
of the number to your Call list.
Call Redial
Press YES twice from the Standby screen to redial the most recent
number in your Call list if your Call list is turned on. If you want
to edit the number before placing the call, press and hold # for the
Options menu and select the Edit before call option. Then press
YES to place the call.
Adding a Number to Your Phonebook
To add a Call list number to your phonebook, do the following:
1 Press
YES from the Standby screen to access your Call list.
2 Press or until the number you want to store is highlighted.
3 Press and hold
# to access the Options list.
4 Press or until Add number is highlighted.
5 Press
YES to add the number to your Phonebook.
Unanswered Calls
Your Missed calls list, if turned on, shows the number of calls you
have received but did not answer.
You can see the number of calls you have received but did not answer on
top of your Standby screen. Press YES to view your Missed call list.
You can dial a missed call by pressing YES. If you choose NO when
prompted to view your missed calls, the missed calls icon ( ) will
remain on your screen until your view your Missed calls list.
If Caller ID is available from your service provider, this information
will be displayed in your Missed calls list. If Caller ID is not
available from your service provider, your Missed calls list will
show an incoming call, but will not display any additional
information. Press YES from the Missed Calls Indicator screen to
access the Missed calls list.
Entering Letters and Symbols
There are two methods for entering letters and symbols in your
Phonebook entries and text messages. The multitap method allows
you to use the numbers and letters assigned to your phone’s digit
keys to enter data. Predictive text entry allows you to enter text with
just one keypress per letter.
Multitap Method
Press the appropriate key, 0-9, #, or * repeatedly until the desired
letter, character, or digit appears in the display. For example, to enter
an A, press the numeric key 2 once. To enter a B, press the numeric
key 2 twice.
?
Press... For...
1Space . @ ? ! - & : ‘ ¿ ¡
2A B C 2 À Á Â Ã Ç
3D E F 3 È É Ê Ë
4G H I 4 Í Î Ï
5J K L 5
6M N O 6 Ñ Ó Ô Õ
7P Q R S 7
8T U V 8 Ù Ú Û Ü
9W X Y Z 9
0/ * - + = < > 0
R300UM-R2-Br-AE.book Page 11 Monday, September 10, 2001 1:39 PM

Using Your Phone
12
T9 Text Input
Predictive text input software allows you to quickly and easily enter
words or entire sentences with just one key press per letter. Predictive
text entry software uses the phone’s internal dictionary to quickly scan
possible variations to determine the correct word.
If you enter all your letters and the word that you want does not appear,
press 0 to view other matches in your phone’s dictionary. Keep pressing
0 until your word appears.
For example, to enter the word “ball”, press 2, 2, 5, 5. After the first 2,
your screen displays “c”. After the second 2, your screen displays “ca”.
After the first 5, your screen displays “call”. After the second 5, your
screen displays “call”. Press the 0 key until the word “ball” is displayed.
Note! You will know that there is no word match in the T9 dictionary
when your key presses are no longer recognized by T9 text entry
mode. When this happens, switch to the Multitap method and
continue text entry.
If your word does not appear, you can add it into your phone’s
dictionary by doing the following:
•Type the text that you want to enter into your phone’s
dictionary by using the Multitap method. Choose Multitap
method by pressing and holding # and then selecting Multitap.
•With the cursor to the right of the last character, enter a space
by pressing and holding 1. The word will be added to your
phone’s dictionary and you will be returned to T9 text input.
Note! It may be helpful not to look at the screen until you are finished
entering the characters of the word you are trying to type as a new
word match may occur with each new character entered.
Stop and Pause Dialing
Stop and pause dialing lets you enter groups of numbers with
stops and pauses between each group of numbers. This feature is
useful when you need to dial a phone number and then another
number, such as an access number for an answering machine or
voicemail system.
A stop causes the phone to stop transmitting numbers until you
press YES. You can enter a stop in a series of digits by pressing and
holding # for the Options menu, and then selecting Insert stop.
Then, a is shown in the phone number whenever there is a stop.
A pause temporarily suspends transmitting numbers for approximately
two seconds before sending the next series. You can enter a pause in
a series of digits by pressing and holding * until is shown in the
display or by pressing and holding # for the Options menu, and then
selecting Insert pause. For example, if your office has a voicemail
system that requires you to dial a phone number, followed by your
extension, followed by an access code, you could enter the following:
555-1111 2222 33333.
*Toggles between uppercase and lowercase
## @ ↵ & ∼ % $ ^
Note! Character sets vary according to language
selection.
Press... For...
R300UM-R2-Br-AE.book Page 12 Monday, September 10, 2001 1:39 PM
Using Your Phone
13
When you press YES, your phone dials the number and then stops
transmitting tones. When your voicemail system asks for your
extension you would press YES to transmit your extension. The
access code is sent after the pause. If the timing in your voicemail
system does not allow for pauses, you can enter a stop instead of the
pause, or use multiple pauses.
You can also store groups of numbers which can include stops and
pauses in a location. You can then dial the numbers by entering the
location and pressing YES.
Temporarily Muting the Ring Tone
To temporarily mute the ring tone without answering the call, press
NO. Answer? is still shown in the display, and you can still answer
the call by pressing YES.
Muting the Microphone During a Call
To mute the microphone during a call, press and hold the CLR key.
Microphone muted. appears in the display when the call is
muted. Press and hold CLR to unmute the microphone.
Note! You cannot mute the microphone during an emergency call.
Adjusting Ear Volume
To increase the ear volume during a call, press the upper key on the
side of your phone.
To decrease the ear volume during a call, press the lower key on the
side of your phone.
Low Battery Power Alert
The low battery alert sounds when your battery is reaching its lowest
operational power level. The words Attention! Battery low will
appear in the display. When this happens, connect your phone to
your Ericsson charger to recharge your battery or replace it with a
fully charged battery. If you leave your phone turned on, it will
remain on until the battery is completely discharged, and then it will
automatically turn off.
International Calls
If allowed by your service provider, you can place international
calls with your phone just as you would from any other phone. If
you have difficulty completing international calls, check with your
service provider for information.
Key Functions
•Press to change the earpiece volume during a call.
•Press from the Standby screen to display the status
screen (date, time, alarm time, active profile, and
vibrating alert).
•Press and hold to access Voice control from the
Standby screen.
R300UM-R2-Br-AE.book Page 13 Monday, September 10, 2001 1:39 PM
Using Your Phone
14
•Press to answer a call.
•Press to send a call after entering a phone number ( ).
•Press to access the Call list from the Standby screen.
•Press to choose a menu, submenu, or setting.
•Press twice to redial the last number called.
•Press and hold to access Voice Control from the
Standby screen.
•Press and hold from the Standby screen to turn your
phone off ( ).
•Press and hold from any menu screen to go to the
Standby screen.
•Press and hold to turn your phone on ( ).
•Press to end a call ( ).
•Press to go back one level in the menus.
•Press to leave a setting unchanged.
•Press to temporarily mute the ringer when receiving a
call.
•Press to clear the current display text.
•Press to erase the last digit entered on the display.
•Press and hold to delete all digits or letters you entered.
•Press to delete an item from a list.
•Press and hold to delete numbers in a list without
confirmation.
•Press and hold during a call to mute the microphone.
•Press to delete a text message.
•Press and hold from the Standby screen to set the phone
to silent or to enable key lock.
•Press to go to the main menu.
•Press from the main menu to tab through the menus.
•Press to scroll through menu items.
•Press to move right in text/phone number input.
•Press to go to the main menu.
•Press from the main menu to tab through the menus.
•Press to scroll through menu items.
•Press to move left in text/phone number input.
•Press and hold for quick access to voicemail ( ), if
enabled.
•Press keys 1-9 for digit entry (if enabled).
•Press and hold keys 1-9 for Super dial or Phonebook
contact access, depending on how your phone is
configured.
•Press to enter a *.
•Press and hold for a Pause ( ) character in a dial string
•Press to select or deselect items (group members,
am/pm, etc.).
•Press to change between uppercase and lowercase letters
(A/a).
•Press to enter a #.
•Press and hold to access the Options menu ( ).
Options vary depending on what function you are
currently using.
•Press to select or deselect items.
a/A
R300UM-R2-Br-AE.book Page 14 Monday, September 10, 2001 1:39 PM

Using Your Phone
15
Phonebook Menu
The Phonebook menu contains the following choices for storing,
organizing, and recalling contacts and group information.
Call contact
To call a phone number saved in your phonebook, use the
Call contact function. You can find the phonebook entry by
searching for either the first or last name, depending on the search
order you have set (see “Sort order” on page 17). Press or
until the number you want to dial is highlighted. Press YES to dial
the number.
Add contact
The Add contact submenu allows you to store several phone
numbers and an email address for a phonebook entry. Once you
have entered your contact information, scroll to the end of the
Add contact screen by pressing until Save and exit is
highlighted. To save the entry, press YES. To delete the entry and
proceed, press NO.
Note! The ability to store an email address for a contact is dependent
on your service provider.
Note! When you press YES, you will be prompted to add a voice
label to the entry. When you add a voice label to a phonebook
entry, the icon will appear next to the contact name in the
Phonebook list. For more information about Voice Labels, see
“Voice Dialing” on page 9.
Synchronizing Your Phone and PC
To enhance use of your Phonebook features, you may want to
purchase XTNDConnect PC or download a free abbreviated
version of XTNDConnect PC (does not include email capabilities).
XTNDConnect PC is a software application that allows you to
synchronize your contacts, calendar, tasks, and email between your
mobile phone and popular PC applications on your computer.
To use your Ericsson mobile phone with the XTNDConnect PC
program, you will need the following:
•A functional serial port on your computer
•Microsoft Windows 98/98 Se/Me/NT4/2000
•An Ericsson serial interface cable (RS232 Cable DRS-11
•Ericsson Mobile Phone Monitor (a software interface between
your mobile phone and the XTNDConnect PC software)
•Purchase XTNDConnect PC
(http://www.extendsystems.com/go/ericsson) or download a
free version of XTNDConnect PC for Ericsson phones only
(http://mobileinternet.ericsson.com).
Edit contact
The Edit contact submenu allows you to change your phonebook
entries. Once you have edited your contact, scroll to the end of the
Edit contact screen by pressing until Save and exit is
highlighted. To save the entry, press YES. To delete the edits and
proceed, press NO.
R300UM-R2-Br-AE.book Page 15 Monday, September 10, 2001 1:39 PM

Using Your Phone
16
My numbers
The My numbers submenu is used to display and switch between
the wireless phone numbers that correspond to the subscriptions that
are programmed into your phone.
Note! If your service provider allows multiple phone numbers,
the My numbers submenu allows you to switch between
phone numbers.
Groups
The Groups submenu allows you to organize the members of your
phonebook into categories. This feature can be used for call screening
if your network supports Caller ID. You can also send SMS messages to
all group members at one time.
To cr ea te a gr ou p, sel ec t Add group. You will be promtped to
enter a name for your group and then you will be prompted to
add members to your group from your Contact list. When you
are finished adding group members, press NO to return to the
Groups submenu.
Calling cards
The Calling cards submenu allows you to store calling card
numbers to use for making long distance calls. The two options
for the Calling cards submenu are Card setup and Set
callingcards.
Note! You will be prompted to enter your PIN to enter the Calling
cards submenu. The default PIN is 0000.
Card setup
To set up your calling cards, make sure you have the Calling Card
Access Numbers (numbers provided by your long distance service
provider) and the Verification Numbers (numbers you must enter
to allow the calling card call to be completed).
When you enter the Card setup submenu, you are prompted for
the following information: Your PIN; the Name of your calling card;
the Access number; the Dialing delay; Code first or Number first;
Verification number; and Dialing delay again.
Set calling cards
The Set callingcards submenu allows you to select which calling
card to use for a particular call. You can select a specific calling
card by pressing or until the calling card you want to use is
highlighted. If you select None, you will be prompted during call
origination to select the calling card to which the call will be
charged. Press YES to choose the highlighted selection.
Note! Only cards that have been set up will appear as options for your
default card.
Making a Calling Card Call
1 Enter or recall the phone number you want to call.
2 Press and hold YES. The calling card number and the active
calling card are shown in the display.
3 Release the key after the number has been displayed.
If you are using stops between numbers, you must press YES to send
the next sequence of numbers. If you use pauses, the numbers are
sent automatically after the specified length of time chosen for the
dialing delay.
R300UM-R2-Br-AE.book Page 16 Monday, September 10, 2001 1:39 PM

Using Your Phone
17
Options
Edit positions
The Edit positions submenu allows you to organize your
phonebook so that the phone numbers that you use most frequently
are easily available.
Sort order
The Sort order submenu allows you to specify how you would
like your phonebook entries displayed. The two options for the
Sort order submenu are By last name and By first name.
Long press
The Long press submenu allows you to specify what the outcome
will be of a “press and hold” on a digit key. The three options for
the Long press submenu are SuperSpd dial, Phb. Shortcut,
and Off.
Enabling Super spd dial allows you to press and hold keys 1
through 9 to dial the number corresponding to the phonebook
position. Enabling Phb. Shortcut allows you to press and hold
keys 2-9 and your list of phonebook entries corresponding to the
closest letter mapped to the key pressed will be displayed. Press YES
to dial the number.
Ask to save
The Ask to save submenu allows you to specify whether you want
to be prompted to save the last number dialed or received into your
phonebook. The options for Ask to save are On and Off.
Delete all
The Delete all submenu allows you to delete all of the phonebook
entries that are stored in your phone. When you select Delete all,
you will be prompted with Delete all contacts?. If you
press YES, you will be prompted for your phonelock code. You
must correctly enter your phonelock code to delete all of your
phonebook entries.
Memory status
The Memory status submenu allows you to see how many phone
numbers, email addresses, and voice labels are still vacant and how
many are being used. The number of entries used is listed first, and
the number of total positions is listed in parentheses.
Messages Menu
The Messages menu contains choices for specifying and accessing
message services that may be available from your service provider.
These message services include SMS (Short Messages Service) text
and voicemail.
Call voicemail
The Call voicemail submenu allows you to enter and access your
voicemail access number, if you have voicemail service from your
service provider. A number and the voice message icon ( ) appear
in the Standby screen to indicate the number of new unheard voice
messages.
R300UM-R2-Br-AE.book Page 17 Monday, September 10, 2001 1:39 PM

Using Your Phone
18
Received mail
The Received mail submenu allows you to display the list of read
and unread text messages. The first few words of each message, or
the subject, is displayed. Press YES to view the message. From this
list, the user can choose to read a message, or return to the previous
menu. You can scroll through the list of messages by using the or
key. Once a message is read, press YES to see the options for the
selected message: Reply, Delete, Read next, Lock, Forward
msg., and Call.
If there is an embedded phone number that is highlighted, you will
have the option of calling the number or saving the number. If there
is an embedded e-mail address that is highlighted, you will have the
option of sending the e-mail or saving the e-mail address. If there is
an embedded URL that is highlighted, you will have the option of
saving the URL. Temporarily unavailable options are grayed out.
Note! Lock/Unlock toggles Message auto deletion off and on. Unsent
and unread messages are automatically locked.
Send new
The Send new submenu is used to enter and send a new text
message or an email. To enter letters and symbols in your message,
see “Entering Letters and Symbols” on page 11.
Note! This option is dependent on your service provider.
Note! If your message approaches the maximum message length, you
will see a character countdown indicator in the upper left corner
of the screen.
When you forward a message, you will also forward the original
body of the message. However, when you reply to a message, you can
choose to include the original, use a canned message, or start with a
blank message.
Note! The maximum message length varies according to service provider.
Once you have entered the text you want included in your SMS,
press YES. You will prompted to enter the number. You can enter
anumber or you can press to choose a name/number from your
phonebook or to choose a group. Press YES to send the message or
NO to save the message as a draft.
Note! You can set delivery parameters, including Msg. receipt and
Priority, before a message is sent. To change these settings see
“Msg. read ack.” on page 20 and “Msg. priority” on page 20.
The default setting for Msg. receipt is Off and the default
setting for Priority is Normal.
Note! To send a message, you must enter a 10-digit number (unless
Auto prefix is enabled).
Unsent mail
The Unsent mail submenu allows you to display a list of saved
draft messages and messages that were not successfully sent along
with a count of the number of messages currently Unsent. The first
few words of each message, or the subject, is displayed. You can scroll
through the list of messages by using the or key. The five
options for a selected message in the Unsent mail submenu are
Send, Delete, Call, Read next, and View error.
Note! This option is dependent on your service provider.
R300UM-R2-Br-AE.book Page 18 Monday, September 10, 2001 1:39 PM

Using Your Phone
19
Templates
Templates allows you to use one of 10 editable templates instead
of creating an original message. For example, a canned message is
“I will be ___ late for ___ on ___.” You can edit the canned message
text by scrolling to the blanks in the message using the or key
to quickly fill in the necessary information. The following list
indicates your template options:
•Add new (Allows you to enter text and save as a new template)
•I will be home at ___.
•I will be at ___ until ___.
•I will be ___ late for ___ on ___.
•There is a meeting with ___ about ___ on ___.
•OK, I got it.
•Please call ___ at ___.
•Please call me back.
•Please get ___ from ___ by ___.
•Please pick me up from ___ at ___.
•See you later.
Once you have entered the text you want included in your SMS,
press YES. You will prompted to enter the number. You can enter
a number or you can press to choose a name/number from your
phonebook or to choose a group. Press YES to send the message or
NO to save the message as a draft.
Note! You can set delivery parameters, including Msg. receipt and
Priority, before a message is sent. To change these settings see
“Msg. read ack.” on page 20 and “Msg. priority” on page 20. The
default setting for Msg. receipt is Off and the default setting for
Priority is Normal.
Note! This option is dependent on your service provider.
Sent mail
The Sent mail submenu allows you to display and work with your
sent messages. The first few words of each message, or the subject,
is displayed. You can scroll through the list of messages by using the
or key. The four options for a selected message in the Sent
mail submenu are Forward msg., Delete, Call, Read next,
and Lock/Unlock, Send email to (if there is a highlighted
embedded email address), and Go to (if there is a highlighted
embedded email address).
Note! This option is dependent on your service provider.
Empty mailboxes
The Empty mailboxes submenu allows you to delete all messages
in your Received mail, as well as Unsent and Sent Messages.
Options
The Options submenu allows you to customize your voicemail and
messaging services.
Message alert
The Message alert submenu allows you to select how you would
like to be notified of a message. The three options for Message
alert are Click, Tone, and Silent.
Ch4-Menu Descriptions2.fm Page 19 Thursday, September 27, 2001 7:44 AM

Using Your Phone
20
Voicemail no.
The Voicemail no. submenu allows you to enter and edit your
voicemail access number.
Message type
The Message type submenu allows you to choose a specific message
type and specify if you would like to be able to change the type before
you send the message. The two options for the Message type
submenu are Set on send and Set default. When Set on send
is set to On, you are prompted for a Message type before you send
each message. When Set on send is set to Off, you choose a default
Message type and you are not prompted each time you send a message.
Msg. read ack.
The Msg. read ack. submenu allows you to choose whether or not
you would like to receive a confirmation that your message was sent
successfully. The two options for Msg. read ack. are Set on send
and Set default and the settings under both options are On and Off.
Msg. priority
The Msg. priority submenu allows you to select the priority of the
message you are sending. The two options for the Msg. priority
submenu are On and Off. You can choose to have Set on send
On or Off. The default priority of your message is Normal but
you can change the priority to Urgent when you choose the
Set default option.
Callback Number
The CallbackNumber submenu allows you to enter a phone
number in your text message for a return call. The options for
CallbackNumber are Set on send and Set default. The
settings for Set on send are On and Off. When you select Set
default, you are prompted to enter a default callback number.
Memory status
The Memory status submenu gives you valuable information about
what percentage of the phone’s memory is available for SMS messages.
The information is displayed as % locked, % memory free.
Call Info Menu
The Call info menu allows you to view call information on your
phone (some selections available in this menu are dependent on your
service provider). It also enables you to view and edit system options
and call statistics.
Note! Depending on whether a call is ongoing or not, either the Call
info or the Ongoing call menu is shown.
Missed calls
The Missed calls submenu allows you to list calls you have missed
(if you have Caller ID service from your service provider) along with
the time that the call was received. When a missed call is one day
old, the time that the call was received is replaced with the date that
the call was received. The latest call appears first. Use the or
keys to scroll through the your Missed calls list. The Missed
calls icon indicates a missed or unanswered call.
If the received number is stored in the phonebook with a name, the
name is also shown in the display. To dial the phone number shown
in the display, press YES once. To edit the phone number, press and
hold the key, then press the or to select Edit before call.
Press or to move the cursor left or right to the digit(s) that you
would like to change. When you are finished editing, you can dial
the new phone number by pressing YES.
?
R300UM-R2-Br-AE.book Page 20 Monday, September 10, 2001 1:39 PM

Using Your Phone
21
Call list
The Call list submenu allows you to view and call the last 50 phone
numbers that you have dialed, received calls from, or missed. To dial
the phone number shown in the display, press YES. If you want to
edit the number before placing the call, press and hold # for the
Options menu and select the Edit before call option. Then press
YES to place the call. You can also access the Call list by pressing
YES from the Standby screen.
Usage tracker
Last call
The Last call submenu gives you information about the duration
of your last phone call in hours, minutes, and seconds.
Total calls
The Total calls submenu shows you the total number of calls and
the total hours and minutes that you have used since you last reset
your phone.
Note! The actual time your service provider invoices may vary,
depending on items including network features and rounding
off for billing.
Outgoing time
The Outgoing time submenu shows you the total length of
all of your outgoing calls since you last reset your phone.
Incoming time
The Incoming time submenu shows you the total length of all
of your incoming calls since you last reset your phone.
SMS counter
The SMS counter submenu displays the total number of SMS
messages you have sent and/or received.
Clear
The Clear submenu allows you to reset your call time and/or your
call counter. The two options for the Clear submenu are Call
timers and SMS counter. Call timers resets the total time and
total number of calls, both outgoing and incoming. SMS counter
resets the total number of incoming and outgoing SMS messages.
Minute minder
The Minute minder submenu allows you to choose if you want to
hear a sound every minute during phone calls. The two options for
Minute minder are On and Off.
Options
The Options submenu allows you to customize your call
information.
Clear call list
Clear call list allows you to delete the list of your 50 most
recent calls.
Set call list
Set call list allows you to restart your Call list. The two options
for Set call list are On and Off.
R300UM-R2-Br-AE.book Page 21 Monday, September 10, 2001 1:39 PM

Using Your Phone
22
Ongoing Call Menu
The Ongoing call menu allows you to work with additional
incoming calls and set specifications for call retrieval and call release.
Note! Depending on whether a call is ongoing or not, either the
Call info or the Ongoing call menu is shown.
Turn on/off tones
The Turn on/off tones submenu allows you to make notes (digits
only) during a call without disturbing the person on the other end with
dialing tones. When you Turn off tones, you can use your phone as a
scratchpad and enter digits that will remain on the display after the call
has ended. When the call is complete, the tones will return to On.
Hold call
The Hold call submenu allows you to place a call on hold to set up
another call or to answer a waiting call. You can select Hold call
by pressing or until Hold call is highlighted and then select
it by pressing YES.
Switch calls
The Switch calls submenu allows you to change from one active
call to another. You can select Switch calls by pressing or
until Switch calls is highlighted and then select it by pressing YES.
Release active
The Release active submenu allows you to end the active call.
You can select Release active by pressing or until
Release active is highlighted and then select it by pressing YES.
Retrieve call
The Retrieve call submenu allows you to recover a held call and
make it active. You can select Retrieve call by pressing or
until Retrieve call is highlighted and then select it by pressing YES.
Call info
The Call info submenu allows you to return to the Call info
menu. You can select Call info by pressing or until Call info
is highlighted and then select it by pressing YES.
Settings Menu
The Settings menu allows you to work with your audible
and visual phone settings, as well as work with your networks and
phone security.
Sounds & alerts
Ring volume
The Ring volume submenu allows you to set the level of the ring
tone. The Ring volume setting rises in steps. You can increase or
decrease the Ring volume by or . Confirm your selection by
pressing YES.
Note! If you set the Ring volume to level one, you will hear only a
series of beeps when you receive an incoming call regardless of
the ring sounds you have set.
R300UM-R2-Br-AE.book Page 22 Monday, September 10, 2001 1:39 PM

Using Your Phone
23
Phone silent
The Phone silent submenu allows you to toggle Phone silent
On and Off. If Phone silent is on, your phone will not make
keypad or ring sounds.
Increasing ring
The Increasing ring submenu allows you to set your ring to
escalate in volume. The two settings for Increasing ring are On
and Off. You can toggle between On and Off by pressing or .
Confirm your selection by pressing YES.
Vibrating alert
The Vibrating alert submenu allows you to turn on your phone’s
vibrator to let you know when you are receiving a call. The three
options for Vibrating alert are On, On if silent, and Off. You
can toggle between all three options by pressing or . Confirm
your selection by pressing YES.
Ring sounds
The Ring sounds submenu allows you to customize your
incoming call sounds to specific callers or types of calls. The two
options for Ring sounds are Voice calls and Personal rings.
Alarm sound
The Alarm sound submenu allows you to adjust and customize
the notification that is heard when an alarm sounds. You can
scroll through the list by pressing or . Press * or # to select an
Alarm sound from the list.
Message alert
The Message alert submenu allows you to set the audible alert
for a received message. The three options for Message alert are
Silent, Click, and Tone.
My melodies
You can create or edit a ring melody using each key on your keypad
as a note (1=C, 2=D, 3=E, 4=F, 5=G, 6=A, 7=B, 8=+C, 9=+D, 0=+,
*=pause, #=#). Press # to make the previous note sharp or flat. Once you
personalize a melody, you can select it as one of the Ring sounds.
Note! The + sign indicates an octave higher.
To clear your melody, press the key to select the location you want
to clear. Press CLR to delete the location. Press and hold CLR to
delete the entire melody.
Note! Volume is the same as your current Ring volume.
Your phone comes with four melodies. You can edit your melodies
and you can also send them to a friend in a text message. The
My melodies submenu includes Edit and Send options.
Editing Ring Sounds
•Press a key to enter a note.
•Press 8 or 9 to make the note shorter or longer.
•There are six different lengths of notes.
•Press 0 to change the octave.
•Press # once to raise the note one semitone.
•Press # twice to lower the note one semitone.
•Press CLR to remove notes.
R300UM-R2-Br-AE.book Page 23 Monday, September 10, 2001 1:39 PM

Using Your Phone
24
•To listen to your melody, press YES.
•Press YES again to save and name it, or press NO to continue
composing.
Key sound
The Key sound submenu allows you to choose the sound made
when you press keys. The three options for Key sound are Silent,
Click, or Tone.
Access tone
You can choose if you would like to hear a sound when your phone
makes a voice connection.
Minute minder
The Minute minder submenu allows you to choose if you want to
hear a sound every minute during phone calls. The two options for
Minute minder are On and Off.
Voice privacy
The Voice privacy submenu allows you to block others from
eavesdropping on your telephone calls. The three options for the
Voice privacy submenu are On with tone, On but no tone,
and Off. When Voice privacy is enabled, you will see the Voice
privacy icon ( ) on your phone’s display during a call.
Note! This option is dependent on your service provider.
Profiles
Your Ericsson mobile phone has seven user-customizable Profiles
that allow you to adapt to several different operating environments
throughout the day. Your phone has been designed to allow you to
easily switch into and out of each profile. Many features located
throughout your menu are profile settings. Each profile feature can
be set to a different value for every profile.
The following settings can be customized for a particular profile:
Ring volume, Phone silent, Increasing ring, Vibrating
alert, Ring sounds, Message alert, Key sound, Accept
calls, Auto area code, Auto prefix, Answering mode,
Light, Text size, Profile name, and Accessories.
Select profile
The Select profile submenu allows you to choose a different
profile from the currently selected Profile. The options for the
Select profile submenu are Normal, Meeting, Car, Outdoors,
Port h-free (Portable handsfree), Home, and Work.
Edit profile
The Edit profile submenu allows you to customize your profiles by
specifying settings for specific items. For example, in Meeting profile,
you might want to set your Vibrating alert to On and your Ring
volume to Off. When you go into a meeting, you can select Meeting
profile. If you receive a call during your meeting, your phone’s Vibrating
alert feature will notify you of an incoming call, and your ringer will not
sound and disturb other meeting participants.
Note! The Normal profile cannot be renamed.
R300UM-R2-Br-AE.book Page 24 Monday, September 10, 2001 1:39 PM

Using Your Phone
25
View profile
The View profile submenu allows you to see the Profile name and
settings for the currently active Profile.
Reset profiles
The Reset profiles submenu allows you to reset all profile
attributes to their factory default values. If you select Reset
profiles, you will be prompted with Reset all profiles?.
Press YES to reset all profiles.
Call options
Accept calls
The Accept calls submenu allows you to specify the phone
numbers that you would like to accept calls from. The two options
for Accept calls are Accept options and Accepted list.
When you select Accept options, you can specify which callers
will cause your phone to ring. Your choices include From all,
From list, and From no one. The Accepted list option under
Accept calls allows you to customize your list of callers that will
cause your phone to ring.
Forward calls
You can use the Forward calls service to forward your incoming
calls when you are unable to answer. The three options for
Forward calls are Activate, Deactivate, and Setup.
Note! This option is dependent on your service provider.
Note! In order to activate Forward calls, you will need separate codes
from your service provider to turn Forward calls on and off.
Once you have entered these codes, select Activate, then enter the
number to which you want your calls forwarded. Your phone will
send the appropriate information to your service provider to set up
Forward calls.
Restrict calls
The Restrict calls submenu allows you to block specific calls from
being dialed or answered. The two options for Restrict calls are
Outgoing calls or Incoming calls.
Call waiting
If you have call waiting service from your service provider, press YES
to answer a call when you receive the call waiting signal. You can
switch between the two calls by pressing YES.
The three options for the Call waiting submenu are Activate,
Deactivate, and Setup. Setup allows you to customize your
Call waiting service.
Note! Call waiting is dependent on your service provider.
Note! When you select Setup, you will need to enter the code for
activating/deactivating Call waiting. This code is given to you
by your service provider.
Once you enter your code, select Activate to turn Call waiting
on and Deactivate to turn Call waiting off.
Note! During a call, you can also use the Switch calls option to
change between the two calls.
R300UM-R2-Br-AE.book Page 25 Monday, September 10, 2001 1:39 PM

Using Your Phone
26
Auto area code
The Auto area code submenu allows you to store an area code
that will be automatically added to the 7-digit phone number that
you are dialing. The two options for Auto area code are On and
Off. The area code is automatically added to the phone number you
are calling when Auto area code is set to On. When you select
On, you will be prompted for the area code you want to use.
Auto prefix
The Auto prefix submenu allows you to store a 1- to 12-digit
prefix, which is automatically added to the dialed phone number.
When you dial a 4- or 5-digit phone number, the prefix is
automatically added to the phone number. The two options for
Auto prefix are On and Off.
In order to send a number to office extensions, store the 3-digit
prefix in the Auto prefix submenu. You only need to dial the last
four or five digits of the phone number.
For example, if you save 123 as the auto prefix and the function is
On, you can call 123-7654 by simply dialing 7654. The prefix 123
is automatically added to the phone number after you press YES to
dial the phone number. The auto prefix is not added for phone
numbers longer than five digits.
Answering mode
The Answering mode submenu allows you to specify how you
want to answer your calls. The three options for Answering
mode are Normal, Any key, and Auto. Selecting Normal
indicates that pressing YES will answer a call. Selecting Any key
indicates that a call can be answered by pressing any key except NO.
Selecting Auto indicates that a call will be answered automatically
after one ring.
Auto retry
The Auto retry submenu allows you to automatically redial a
number without dialing, hanging up, and dialing again. The two
options for Auto retry are On and Off. You can toggle between On
and Off by pressing or . Confirm your selection by pressing YES.
Voice privacy
The Voice privacy submenu allows you to block others from
eavesdropping on your telephone calls. The three options for the
Voice privacy submenu are On with tone, On but no tone,
and Off. When Voice privacy is enabled, you will see the lock
icon ( ) on your phone’s display during a call.
Note! This option is dependent on your service provider.
Display
The Display submenu is used to change the Light, Text size,
and User greeting of your phone.
Light
The Light submenu allows you to set the display and keypad light.
The three settings for Light are On, Off, and Auto. When Light
is set to Auto, the display and keypad light will illuminate for
35 seconds when a call is received or when a key is pressed. If you
choose On, the Light will remain illuminated.
Text size
The Text size submenu allows you to change the display text size
to Small, Medium, or Large. Changing the text size alters the
number of lines of text that appear on your display. Small gives you
five lines of text, Medium gives you four lines of text, and Large
gives you three lines of text.
R300UM-R2-Br-AE.book Page 26 Monday, September 10, 2001 1:39 PM

Using Your Phone
27
User greeting
The User greeting submenu allows you to change the screen that
you see when you power-up or power-down your phone. The four
options for User greeting are Ericsson movie, My greeting,
My animation, and Off. You can download additional software to
change your power-up/power-down animation from
http://mobileinternt.ericsson.com.
Menu help
The Menu help submenu allows you to choose if you would like
a brief description of each top-level menu item to be displayed
after 10 seconds of inactivity. The options for Menu help are On
and Off.
Language
The Language submenu allows you to select the display language
used in the phone display. The languages vary between markets.
Menu language
The Menu language submenu allows you to select in which
language you would like the phone’s menu to appear. The options for
Menu language are English, Russian, Hebrew, Spanish,
French, and Portuguese.
Input language
The Input language submenu allows you to select in which
language you would like to be able to input text. The options for
Input language vary according to the T9™ Predictive setting.
Note! Not all languages are available in every market.
T9 Predictive
The T9 Predictive submenu allows you to determine whether
predictive text is displayed during text input. The options for
T9 Predictive are On and Off.
Time and date
The Time and date submenu allows you to set the time, time
format, stopwatch, and alarm on your phone. The clock appears on
your Standby screen.
Note! Replacing your phone’s battery causes a prompt to appear asking
you to verify the current time and date.
Set time
Use the Set time submenu to enter the correct time in the format
using the keys on your keypad. Press any number key to toggle am/pm
while am/pm is blinking (if applicable). Press YES to confirm the
current time. You can press or to advance through the hours,
minutes, and am/pm selection. Press YES to confirm the current time.
If you want to specify time zone information, press YES. To proceed
without changing the time zone information, press NO. You will be
prompted to turn DaylightSsavings time on or off. You can press or
to toggle between On and Off. Press YES to confirm your selection.
Time settings
Use the Time settings submenu to set additional time-related
settings. The four options for Time settings are Time format
(24 hour or am/pm), Time zone (±GMT), Daylight-saving
(On or Off ), and Auto time zone (On or Off).
Note! To synchronize your phone with your computer, be sure to set
both to the same time zone.
R300UM-R2-Br-AE.book Page 27 Monday, September 10, 2001 1:39 PM

Using Your Phone
28
Set date
Use the Set date submenu to enter the correct date using the keys
on your keypad. You will be prompted for month, day, and year
information. You can press or to advance through the month,
day, and year selection. Press YES to confirm the current date.
Date format
Use the Date format submenu to switch between date formats by
pressing or until the format you want is selected. Press YES to
confirm your selection.
Locks
Phonelock
The Phonelock submenu restricts you from making calls, except
emergency calls, each time you turn the phone on. To set your
Phonelock, you will be prompted to enter your security code.
Auto keylock
The Auto keylock submenu restricts you from using the keypad.
Auto keylock activates after 30 seconds of inactivity from the
Standby screen. The two options for Auto keylock are On and
Off. The keypad remains locked until you do one of the following:
•Remove and replace the battery.
•Receive a call (after the call is completed, the keypad is returned
to the locked state).
Note! The Keypad lock feature allows emergency number access even if the
keypad is locked. To unlock your keypad, press CLR, then press YES.
Voice control
The Voice control submenu allows you to work with your options
for making calls using your voice instead of using your phone’s keys.
For more information about Voice control, see “Voice Dialing” on
page 9.
VoiceSettings
Use the VoiceSettings submenu to turn voice control features
on or off and to record the commands for using these features.
VoiceCommands
Use the VoiceCommands submenu to review and edit your
voice commands. The options for VoiceCommands are Voice
dialing and Contacts. If the phone does not recognize your
commands, use the VoiceCommands submenu to record the
commands again.
Erase voice
Use the Erase voice submenu to delete all of your voice
recordings. You will be prompted before the recordings are
permanently deleted.
Networks
The Networks submenu allows you to prioritize and manually
select the systems from which you can obtain service. This can
include your public home system as well as private and residential
systems. This function is particularly useful if you have access to
more than one mobile system. Only systems that are currently
available can be selected. This varies depending on your geographic
location.
R300UM-R2-Br-AE.book Page 28 Monday, September 10, 2001 1:39 PM

Using Your Phone
29
Select network
The Select network submenu allows you to initiate a search for
anew network.
New private
The New private submenu allow you to search for private systems
that are not programmed into your phone. Once the search is
complete, you will be provided with a list of systems.
Priority
Priority allows you to change the order of the system types
for which your phone searches. Your default Priority is (1)
Residential, (2) Private, and (3) Public. This means that your
phone will look for service on a public system first, followed by a
private system, followed by a Residential system.
Roaming search
Roaming search allows your phone to look for an available
system for you to use when you are away from your home area.
Note! These options are dependent on your service provider.
Reset settings
The Reset settings submenu allows you to reset all of your phone
settings to the factory defaults. When you attempt to perform a
master reset, you will be prompted for your phonelock code. You
must enter the correct phonelock code before the reset can occur.
Extras Menu
Calendar
The Calendar submenu allows you to view and work with your
phone’s built-in calendar.
View today
The View today submenu allows you to work with your current
daily schedule.
View all tasks
The View all tasks submenu allows you to work with your entire
task list.
View month
The View month submenu allows you to work with your monthly
schedule.
View week
The View week submenu allows you to work with your weekly
schedule.
Add appointm.
The Add appointm. submenu allows you to add items to your
schedule. These appointments can be classified as the following:
Meeting, Date, Travel, Vacation, Phonecall, Anniversary,
and Miscellaneous.
R300UM-R2-Br-AE.book Page 29 Monday, September 10, 2001 1:39 PM

Using Your Phone
30
Add task
The Add task submenu allows you to add items to your action
item list. These items can be classified as the following: Phonecall,
Message, and Tasks.
Options
The Options submenu allows you work with the settings of your
calendar. The five options for the Options submenu are:
1 Status displays the amount of calendar memory used and
available for appointments and tasks.
2 Class View allows you to select whether you want to view only
public, to view only private, or to view both public and private
entries in your calendar.
3 Delete All allows you to permanently remove all appointments
and tasks stored in your calendar.
4 Reminders allows you to select whether or not you want your
phone to automatically power itself on if a reminder goes off while
it is powered down.
5 Profile Switch allows you to select whether you want to be
able to change your profile when you are entering time in your
calendar.
Synchronizing Your Phone and PC
To enhance use of your Phonebook features, you may want to
purchase XTNDConnect PC or download a free abbreviated
version of XTNDConnect PC (does not include email capabilities).
XTNDConnect PC is a software application that allows you to
synchronize your contacts, calendar, tasks, and email between your
mobile phone and popular PC applications on your computer.
To use your Ericsson mobile phone with the XTNDConnect PC
program, you will need the following:
•A functional serial port on your computer
•Microsoft Windows 98/98 Se/Me/NT4/2000
•An Ericsson serial interface cable (RS232 Cable DRS-11
•Ericsson Mobile Phone Monitor (a software interface between
your mobile phone and the XTNDConnect PC software)
•Purchase XTNDConnect PC
(http://www.extendsystems.com/go/ericsson) or download a
free version of XTNDConnect PC for Ericsson phones only
(http://mobileinternet.ericsson.com).
Time
Alarm clock
The Alarm clock submenu allows you to set a time for an audible
alarm. The two options for the Alarm clock submenu are Alarm
and Recurrent Alarm.
Time and date
The Time and date submenu allows you to set the time, time
format, stopwatch, and alarm on your phone. The clock appears
on your Standby screen.
Note! Replacing your phone’s battery causes a prompt to appear asking
you to verify the current time and date.
R300UM-R2-Br-AE.book Page 30 Monday, September 10, 2001 1:39 PM

Using Your Phone
31
Set time
Use the Set time submenu to enter the correct time in the format
using the keys on your keypad. Press any number key to toggle am/pm
while am/pm is blinking (if applicable). Press YES to confirm the
current time. You can press or to advance through the hours,
minutes, and am/pm selection. Press YES to confirm the current time.
If you want to specify time zone information, press YES. To proceed
without changing the time zone information, press NO. You will be
prompted to turn DaylightSsavings time on or off. You can press or
to toggle between On and Off. Press YES to confirm your section.
Time settings
Use the Time settings submenu to set additional time-related
settings. The four options for Time settings are Time format
(24 hour or am/pm), Time zone (±GMT), Daylight-saving
(On or Off), and Auto time zone (On of Off).
Note! To synchronize your phone with your computer, be sure to set
both to the same time zone.
Set date
Use the Set date submenu to enter the correct date using the keys
on your keypad. You will be prompted for month, day, and year
information. You can press or to advance through the month,
day, and year selection. Press YES to confirm the current date.
Date format
Use the Date format submenu to switch between date formats by
pressing or until the format you want is selected. Press YES
to confirm your selection. For example, you can choose from the
following formats for June 15, 2001:
•15-Jun-01
•15-06-01
•06/15/01
•010615
•15/06/01
•15.06.01
•01-06-15
Timer
The Timer submenu allows you to set a timer. Enter the time in the
timer and press YES. The timer will appear on the top line of your
display along with the timer icon.
Stopwatch
You can use the Stopwatch on your phone much like an ordinary
stopwatch. Press YES to start the Stopwatch when prompted. Press
YES to pause the Stopwatch once it has started. Press YES to restart
the stopwatch once it has been paused.
Games
Your phone has several different games for your enjoyment. There
are help texts available in each game as a guide for you to get started.
•Ballpop
•Erix
•E-maze
•Te t r is ®
Ch4-Menu Descriptions2.fm Page 31 Tuesday, September 11, 2001 2:30 PM

Using Your Phone
32
Calculator
Your Ericsson phone has a built-in calculator, which can add,
subtract, divide, and multiply.
•Press # to get +, -, x, /.
•Press CLR to erase a figure to the left of the cursor.
•Press * for a decimal point or for %.
•Press YES to compute the answer.
Code memo
The Code memo submenu allows you to store personal
information, like your computer password, in your phone. You
will only have to remember one password to access all personal
codes and passwords. You will be prompted to enter a 4-digit
password, followed by a 4- to 15-character check word. If an
incorrect password and/or check word is entered, incorrect code
information is displayed.
Accessories
The Accessories submenu allows you to work with the
Accessories currently connected to your phone.
WAP Browser Menu
Launch browser
The Launch browser submenu allows you to start your browser.
Browser help
The Browser help submenu gives you hints about using your
browser. Browser help screens will scroll across your display.
You will see More? at the bottom of your screen. If you want to
see more information, press YES. If you do not want to see more
information, press NO and you will be returned to the WAP
browser menu.
Active gateways
The Active gateways submenu allows you to choose the WAP
gateway that you want to use for browsing.
My shortcuts Menu
Edit shortcuts
The Edit shortcuts submenu allows you to set up easy access for
frequently used menu items. You can customize the items that will be
included in your Shortcuts list. Press * or # from your Edit shortcuts
list to check (select) or uncheck (deselect) items that you want to appear
in your Shortcuts list. When you check an item, you will be prompted
for a position number. Once you enter and confirm a position number,
you can shortcut to that item by pressing then YES then the
corresponding position number from the Standby screen. For example,
if you set Increasing ring as position number one in your Shortcuts
list, you can access that menu by pressing YES 1. You can also
deselect a list item by pressing either * or #.
R300UM-R2-Br-AE.book Page 32 Monday, September 10, 2001 1:39 PM
Using Your Phone
33
Problem Solving
My phone does not
turn On.
Recharge or replace the battery.
My phone does not
ring when a call is
received.
Check for Ringer Off () or Silent Mode
() icons on the Standby screen.
My battery does not
charge to full
capacity.
When charging your battery, the icon
continues to fill and empty and alternates
with the icon until your battery is
fully charged. When charging is complete,
the battery icon will stop filling and
emptying and will remain full ( ).
If you still experience problems, condition
your battery by fully discharging and
charging it three times.
My signal strength
varies.
This is a common occurrence.
Transmitters are set in geographic areas,
and coverage is not 100% all of the time.
Signal strength varies as you travel between
cells.
The battery power is low. When the phone
shuts itself off, replace the battery with
a fully charged one, or use an alternate
power source, such as a travel charger.
Battery low
11:56pm
Your phone is out of range of service.
11:56pm
R300UM-R2-Br-AE.book Page 33 Monday, September 10, 2001 1:39 PM

Using Your Browser
34
Your phone includes a built-in browser that allows you to access
Internet content designed specifically for mobile devices. WAP
(Wireless Application Protocol) is a global standard for advanced
mobile service. WAP allows you to access certain services on the
Internet from your mobile phone. This content typically includes
Email, Calendar, Contacts, Internet communication, e-commerce
and telephony services. Surfing the web with your Ericsson mobile
phone is quick and easy.
When you launch your browser, your phone automatically places
a data call to establish a connection to the Internet. While you are
connected, you will see a globe icon ( ) on the bottom row of
your display.
Note! While your browser is active, you cannot make or receive calls.
If you need to make a call, press and hold NO to return to the
WAP browser menu. Press and hold NO again to return to
the Standby screen and then dial the number.
After a period of inactivity (new content is not sent or received), the
phone call placed to establish your WAP connection automatically
ends and the globe icon disappears.
Browser Features
Your WAP Browser gives you the following features (depending
on your service provider):
•Microbrowser for sending/receiving email and for
Internet access
•Support for Phonebook download
•Bookmark creation
•Image support
•Automatic time out which disconnects data calls after periods
of inactivity.
Launching Your WAP Browser
There are two ways to launch your WAP Browser:
•Press or until the WAP browser menu is highlighted,
then press YES to select it. Press YES again to launch your
browser (Launch browser will already be selected).
or
•Press or , then 6 1.
Using Your Browser
R300UM-R2-Br-AE.book Page 34 Monday, September 10, 2001 1:39 PM
Using Your Browser
35
Exiting Your WAP Browser
There are two easy ways to exit your WAP browser:
Note! To make a call, press and hold NO to return to the WAP
browser menu. Press and hold NO again to return to the
Standby screen.
or
•Press # to enter the Browser options menu. Press or
until Exit browser is selected and then press YES.
Your WAP Browser Display
The display is separated into two areas, the content window and
the status row. The content window is the top area of the screen and
the status row is the bottom line of the screen.
Content Window
When you browse the web, you can view different web pages in
your content window. If a page contains more than one screen
of text, there will be a scrollbar on the right side of the content
window. You can scroll through each line with a single press of the
or key or view one page at a time by pressing the up or down
side volume keys.
Status Row
There are four types of information that are displayed in the status
row: 1) connection status, 2) soft keys, 3) icons, and 4) time/date.
Connection Status
Connection status is displayed when you are operating the browser
and at various times during operation.
Connection status includes the following:
•Connecting...
•Sending)))
•Receiving(((
content
window
status
row
Done
OK
left soft key right soft key
globe icon
scrollbar
Sites
2 Weather
3 Sports
1 News
Connecting...
R300UM-R2-Br-AE.book Page 35 Monday, September 10, 2001 1:39 PM
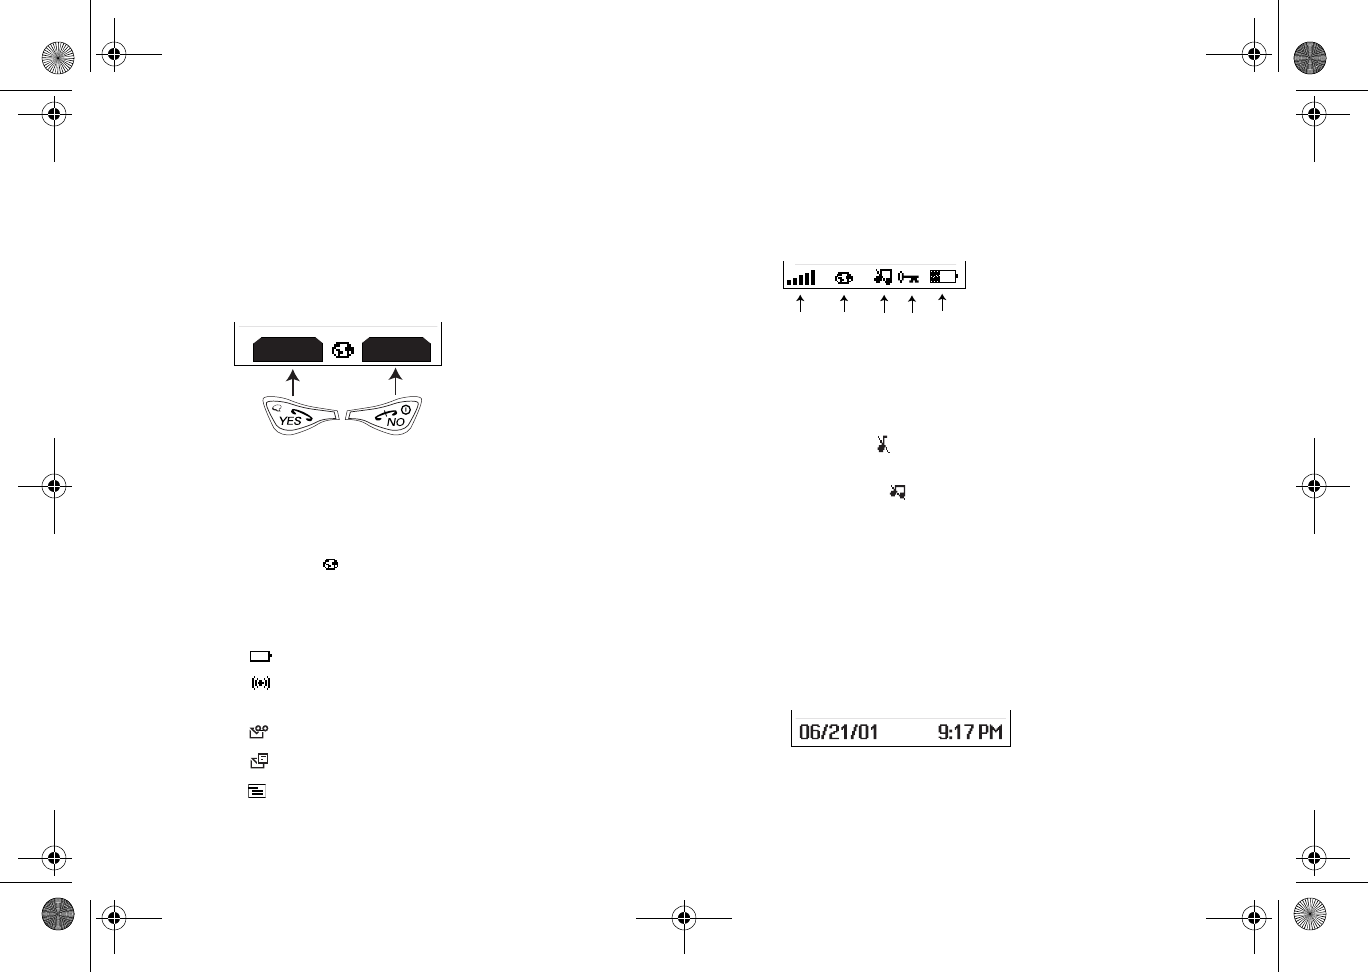
Using Your Browser
36
Soft Keys
Your phone is equipped with soft keys that allow you to take action
on the current page. The soft keys are displayed in reverse video on
the status row of your display. To use the soft key functions, press the
YES or NO key that is under the text label on your screen. The soft
keys on your screen override the key names. For example, press YES
to select Menu or press NO to select Received.
The soft key labels will vary according to the web content you
are viewing.
Note! When using the soft keys, be sure to press and release the YES
and NO keys. Pressing and holding NO exits the browser.
The globe icon ( ), located between the soft keys on the status
row of your display, indicates a connection to the WAP system. In
some instances, other icons alternate with the globe icon during a
WAP session.
• indicates low battery power.
• indicates that there is new content in your Inbox
(for example, email, stock quotes).
• indicates an incoming voicemail.
• indicates an incoming text message.
• indicates outgoing messages that have not been delivered.
Icons
When you press *, your soft keys and globe icon will disappear and
the bottom row of your display will switch to the icon display, as
shown below.
1 Signal strength icon shows the relative signal strength from the
wireless system. More bars indicate a stronger signal.
2 Globe icon indicates that you have established a connection with
the WAP network.
3 Ringer off icon ( ) indicates that your phone will not make
ring sounds.
4 Silent mode icon ( ) indicates that your phone will not make
any sounds.
5 Keypad locked icon indicates that your keypad will not
recognize key presses.
6 Battery icon shows the relative strength of your battery. A full
icon indicates a fully-charged battery.
Time/Date
When you press * a second time, the bottom row of your display will
switch to the time/date display as shown below.
When you press * a third time, the bottom row of your display will
switch back to your soft keys.
Inbox
Menu
1256
3/4
R300UM-R2-Br-AE.book Page 36 Monday, September 10, 2001 1:39 PM

Using Your Browser
37
Tools Menu
While you are browsing, you can reach different browsing options
by pressing and holding #. These options can include:
Reload
Select Reload to refresh a page.
Home
Select Home to return to your Home Page.
Bookmarks
Select Bookmarks to see the list of bookmarks that you have set.
Mark site
Select Mark site to set your bookmarks.
Show URL
Select Show URL to display the Internet address of the current page.
About Openwave
Select About openwave to display version information about
the browser.
Advanced
Offline services - Allows WAP content to be stored in the cache,
but not subject to the normal cache reclaiming mechanism.
Outbox - Allows standard WAP transaction requests (such as fetch
new mail, send an instant message, add an appointment) to be
queued and handled as one batch when service is available.
Restart browser - Clears the cache and attempts to connect to
your Home Page.
Encryption - A security code computed by your browser for
authentication. You should contact your content provider prior
to making any encryption changes.
Help
Select Help if you need assistance with the current page (if available).
Exit Browser
Select Exit browser if you want to end your Browser session and
return to the WAP browser menu.
R300UM-R2-Br-AE.book Page 37 Monday, September 10, 2001 1:39 PM
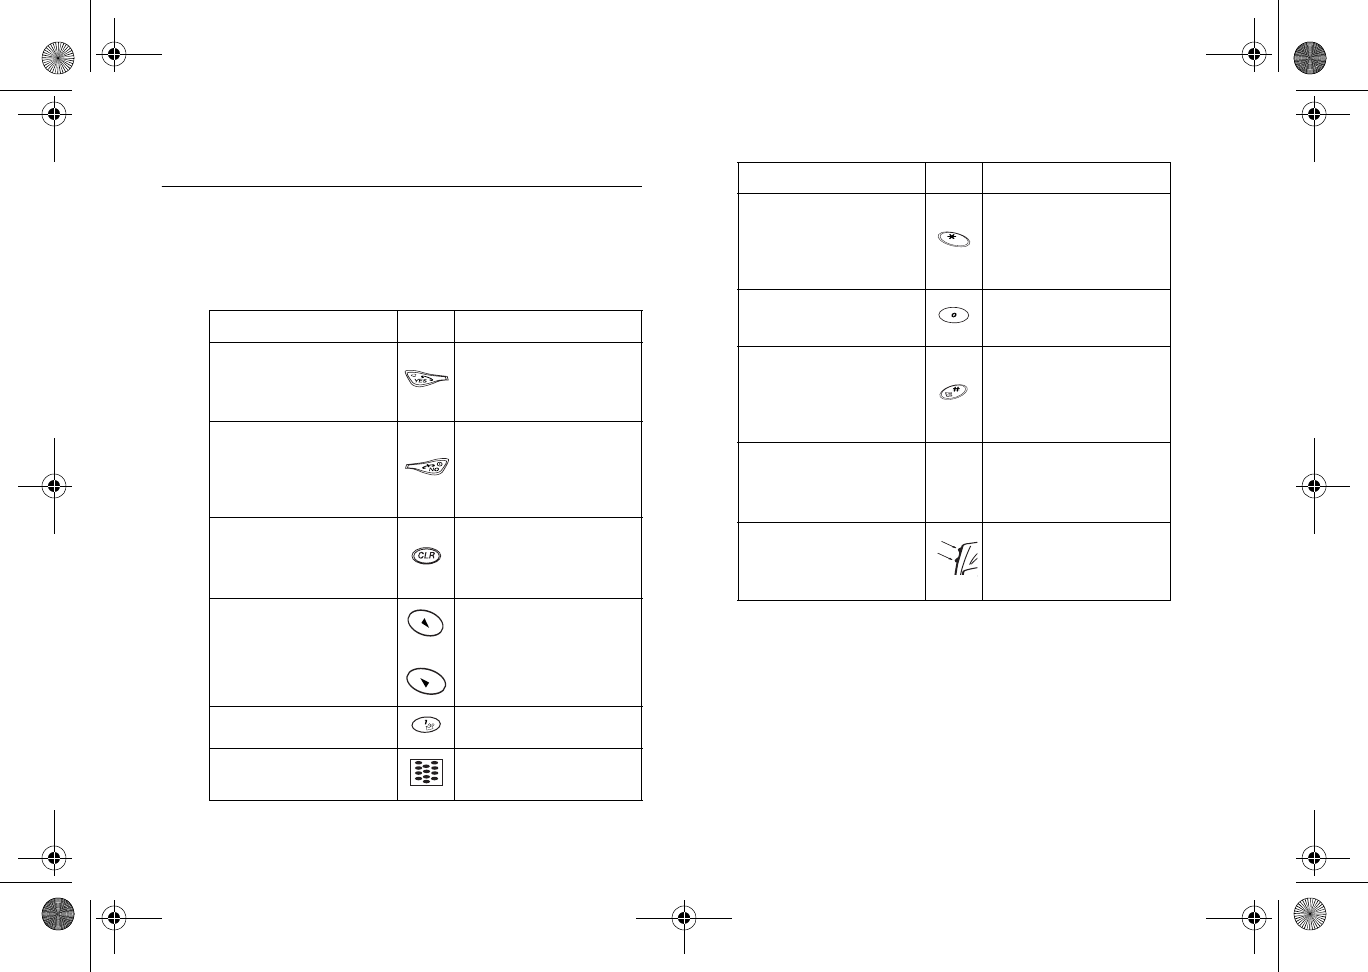
Using Your Browser
38
Browser Key Functions
Use the following table to help you with the different ways to
navigate through the pages that appear in your content window.
Some keys operate differently when you are navigating a page or
when you are entering text (see “Text En tr y” on page 39).
Page Navigation Text Input
•Press to select the left
soft key.
•Hold to set a bookmark
(if applicable).
•Press to select the left
soft key.
•Hold to set a bookmark
(if applicable).
•Press to select the right
soft key.
•Hold to exit browser
and return to the WAP
browser menu.
•Press to select the right
soft key.
•Hold to exit browser
and return to the WAP
browser menu.
•Press to return to the
previous page.
•Hold to return to
Home Page.
•Press to return to the
previous page.
•Hold to erase all
entered text.
•Press to move up or down
one line at a time.
•Hold to autorepeat.
•Press to add a space
at the end of a word.
•Press to scroll non-
destructively through
the text entered.
•Press to add a space.
•Hold to jump to a specific
favorite page. •Press for multitap text
entry
•Press to access status
information.
•Hold to show icons such
as battery and signal
strength.
•Press to toggle
capitalization.
•Press twice to display
the time.
•Press to cycle through
word choices while using
T9 text entry.
•Press for the Tools menu
(see “To ols Me nu” on
page 37).
•Press to enter symbol
characters.
•Hold for the Tools menu
(see “To ols Men u” on
page 37).
cursor
•Vertical and flashing
indicates text insert mode.
•Reverse video indicates
text overwrite mode.
•Press to scroll one
screen/page at a time.
•Hold to autorepeat.
•Press to scroll one
screen/page at a time.
•Hold to autorepeat.
Page Navigation Text Input
a/A
R300UM-R2-Br-AE.book Page 38 Monday, September 10, 2001 1:39 PM

Using Your Browser
39
Text Entry
You can enter characters in four different modes. The active format
is displayed in the right soft key position. Change the format in
which characters are entered by pressing the right soft key.
1 mode allows you to enter alphabetic text.
Press the appropriate key, 0-9, or # repeatedly until the desired
letter, character, or digit appears in the display. For example, to
enter an a, press the numeric key 2 once. To enter a b, press the
numeric key 2 twice.
2 mode allows you to select symbols and punctuation from a
list. You can switch to symbol entry by pressing the right soft key
until SYM is in the right soft key position. There are four screens
of symbols. Press the left soft key to switch between each screen.
Press the digit key corresponding to the symbol that you want
to enter.
Your phone automatically switches back to the previously-used
method of text entry after you enter one symbol.
3 mode allows you to enter numbers by pressing the digit
key corresponding to the number that you want to enter.
4 mode allows you to use Tegic T9 predictive text input.
Predictive text input software allows you to quickly and easily
enter words or entire sentences with just one key press per letter.
Predictive text entry software uses the phone’s internal dictionary
to quickly scan possible variations to determine the correct word.
If you enter all your letters and the word that you want does not
appear, press 0 to view other matches in your phone’s dictionary.
Keep pressing 0 until your word appears.
Press... For...
1Space . @ ? ! - & : ‘ ¿ ¡
2A B C 2 À Á Â Ã Ç
3D E F 3 È É Ê Ë
4G H I 4 Í Î Ï
5J K L 5
6M N O 6 Ñ Ó Ô Õ
7P Q R S 7
8T U V 8 Ù Ú Û Ü
9W X Y Z 9
0/ * - + = < > 0
*Toggles between uppercase and
lowercase.
## @ ↵ & ∼ % $ ^
a...z
SYM 1 . ? ! , ; : ‘ ’ "
SYM 2 . @ \ / | _ ~ $ ^
SYM 3 + - * / < > = % #
SYM 4 { } [ ] ( ) < > &
SYM
SYM
0...9
0...9
T9
T9
R300UM-R2-Br-AE.book Page 39 Monday, September 10, 2001 1:39 PM

Using Your Browser
40
For example, to enter the word “ball”, press 2, 2, 5, 5. After the
first 2, your screen displays “c”. After the second 2, your screen
displays “ca”. After the first 5, your screen displays “call”. After the
second 5, your screen displays “call”. Press the 0 key until the word
“ball” is displayed.
Note! You will know that there is no word match in the T9 dictionary
when your key presses are no longer recognized by T9 text
entry mode.
If your word does not appear, you can add it into your phone’s
dictionary by doing the following:
•Type the text that you want to enter into your phone’s
dictionary by using any of the non-T9 text entry modes.
•With the cursor to the right of the last character (without
pressing a space) reselect T9 mode by pressing the right soft key
until T9 appears in the right soft key position.
•Press to enter a space. Your word is added to your phone’s
dictionary when your phone is properly powered down.
Note! It may be helpful not to look at the screen until you are finished
entering the characters of the word you are trying to type as a new
word match may occur with each new character entered.
R300UM-R2-Br-AE.book Page 40 Monday, September 10, 2001 1:39 PM

41
Guidelines for Safe and Efficient Use
Please read this information before using your mobile phone.
Your mobile phone is a highly sophisticated electronic device. To get
the most out of your mobile phone, please read this text about
product care, and safe and efficient use.
Product Care and Maintenance
Do not expose your product to liquid or moisture or to humidity.
Do not expose your product to extreme high or low temperatures.
Do not expose your product to lit candles, cigarettes, or cigars, or to
open flames etc.
Do not drop, throw or try to bend the product as rough treatment
could damage it.
Do not paint your product as the paint could obstruct the earpiece,
microphone or any moveable parts and prevent normal use.
Do not attempt to disassemble your product. The product does not
contain consumer serviceable components. Only Ericsson service
partner should perform service.
Do not use any accessories other than Ericsson originals. Use of non-
Ericsson original accessories may result in loss of performance,
damage to the product, fire, electric shock or injury. The warranty
does not cover product failures which have been caused by use of
non-Ericsson original accessories.
Treat your product with care, keep it in a clean and dust-free place.
Antenna Care
Your phone is equipped with either an internal or external antenna.
To avoid impaired performance, please ensure that your mobile
phone’s antenna is not damaged.
Do not remove the antenna yourself. If your mobile phone’s antenna
is damaged, please take the product to an Ericsson service partner.
Only use an antenna that has been specifically designed for your
mobile phone. Use of unauthorized antennas, modifications, or
attachments could damage the mobile phone and may violate the
appropriate regulations, causing loss of performance and SAR levels
above the recommended limits (see below).
Efficient Use
For optimum performance with minimum power consumption
please:
•Hold the mobile phone as you would any other telephone.
While speaking directly into the mouthpiece, angle the antenna
in a direction up and over your shoulder.
•Do not touch the antenna when the mobile phone is in use.
Touching the antenna affects call quality, may cause the mobile
phone to operate at a higher power level than needed and may
shorten talk and standby times.
Guidelines for Safe and Efficient Use
R300UM-R2-Br-AE.book Page 41 Monday, September 10, 2001 1:39 PM

Guidelines for Safe and Efficient Use
42
•Do not use the product when the front and/or back cover is
removed from the unit.
•If your mobile phone is equipped with an infrared eye, never
direct the infrared ray at anyone’s eye and make sure that it does
not disturb any other infrared units.
•If your mobile phone is equipped with a retractable antenna,
Ericsson recommends that the antenna be kept fully retracted
(closed) while the phone is in use and worn on the body to
avoid the antenna touching, or coming in close proximity to,
the body.
Radio Frequency (RF) Exposure and SAR
Your mobile phone is a low-power radio transmitter and receiver.
When it is turned on, it emits low levels of radio frequency energy
(also known as radio waves or radio frequency fields).
Governments around the world have adopted comprehensive
international safety guidelines, developed by scientific
organizations*, e.g. ICNIRP (International Commission on Non-
Ionizing Radiation Protection), through periodic and thorough
evaluation of scientific studies. These guidelines establish permitted
levels of radio wave exposure for the general population. All Ericsson
mobile phone models are designed to operate within these stringent
levels. The levels include a safety margin designed to assure the safety
of all persons, regardless of age and health, and to account for any
variations in measurements.
Specific Absorption Rate (SAR) is the unit of measurement for the
amount of radio frequency energy absorbed by the body when using
a mobile phone. The SAR value is determined at the highest certified
power level in laboratory conditions, but the actual SAR level of the
phone while operating can be well below this value.
This is because the phone is designed to use the minimum power
required to reach the network. Therefore, the closer you are to a base
station, the more likely it is that the actual SAR level will decrease.
Variations in SAR below the radio frequency exposure guidelines do
not mean that there are variations in safety. While there may be
differences in SAR levels among mobile phone models, all mobile
phone models must be designed to meet radio frequency exposure
guidelines.
Accessories can significantly affect SAR compliance. For example,
the Federal Communication Commission in the U.S. requires that
some manufacturers' accessories shall be tested, and Ericsson has
done so with respect to its products. Ericsson has not tested non-
Ericsson accessories in conjunction with Ericsson phones. More
information on radio frequency exposure and SAR can be found on:
www.ericsson.com/health.
* Examples of radio-frequency exposure guidelines and standards
that Ericsson mobile phone models are designed to conform to:
•International Commission on Non-Ionizing Radiation
Protection (ICNIRP), “Guidelines for limiting exposure to
time-varying electric, magnetic, and electromagnetic fields
(up to 300 GHz)”, Health Physics, vol. 74, pp 494-522,
April 1998.
R300UM-R2-Br-AE.book Page 42 Monday, September 10, 2001 1:39 PM

43
Guidelines for Safe and Efficient Use
•99/519/EC, “Council Recommendation of 12 July 1999 on the
limitation of exposure of the general public to electromagnetic
fields (0 Hz to 300 GHz)”, Official Journal of the European
Communities, 1999.
•IEEE C95.1-1991, “Safety levels with respect to human
exposure to radio frequency electromagnetic fields, 3 kHz to
300 GHz”, The Institute of Electrical and Electronics Engineers
Inc. (IEEE).
•FCC Report and Order, ET Docket 93-62, FCC 96-326,
Federal Communications Commission (FCC), August 1996.
•Radiocommunications (Electromagnetic Radiation Human
Exposure) Standard 1999, Australian Communications
Authority (ACA), May 1999.
Driving
Please check if local laws and/or regulations, in the country/state
where you are, restrict the use of mobile phones while driving.
Law in many countries/states requires drivers to use a Hands Free
solution. If so, it is recommended that you use Ericsson Hands Free
solutions only with this Ericsson mobile phone model.
Ericsson is concerned about your safety. Always give full attention
to driving and pull off the road and park before making or answering
a call if driving conditions so require.
RF energy may affect some electronic systems in motor vehicles
such as car stereo, safety equipment etc. In addition, some vehicle
manufacturers do not allow use of mobile phones in their vehicles,
unless a Hands Free kit with an external antenna supports the
installation. Check with your vehicle manufacturer’s representative
to be sure that your mobile phone will not affect the electronic
systems in your vehicle.
Vehicles Equipped with an Air Bag
An air bag inflates with great force. Do not place objects, including
either installed or portable wireless equipment, in the area over the
air bag or in the air bag deployment area. If in-vehicle wireless
equipment is improperly installed and the air bag inflates, serious
injury could result.
Electronic Devices
Most modern electronic equipment is shielded from RF signals.
However, certain electronic equipment may not be shielded against
the RF signals from your mobile phone, therefore:
Pacemakers
The Health Industry Manufacturers Association recommends that
a minimum separation of six (6”) inches (15 cm) be maintained
between a handheld wireless phone and a pacemaker to avoid potential
interference with the pacemaker. These recommendations are
consistent with the independent research by and recommendations
of Wireless Technology Research.
R300UM-R2-Br-AE.book Page 43 Monday, September 10, 2001 1:39 PM

Guidelines for Safe and Efficient Use
44
Persons with pacemakers:
•Should ALWAYS keep the phone more than six inches from
their pacemaker when the phone is turned ON;
•Should not carry the phone in a breast pocket;
•Should use the ear opposite the pacemaker to minimize the
potential for interference.
•If you have any reason to suspect that interference is taking
place, turn your phone OFF immediately.
Hearing Aids
Some digital wireless phones may interfere with some hearing aids.
In the event of such interference, you may want to consult your
service provider or call your local Ericsson Certified Call Center
to discuss alternatives.
Other Medical Devices
If you use any other personal medical device, consult the
manufacturer of your device to determine if they are adequately
shielded from external RF energy. Your physician may be able to
assist you in obtaining this information.
•Turn your phone OFF in health care facilities when any
regulations posted in these areas instruct you to do so. Hospitals
or health care facilities may be using equipment that could be
sensitive to external RF energy.
•Turn your phone OFF in any facility where posted notices
so require.
Aircraft
•Turn off your mobile phone before boarding any aircraft.
•To prevent interference with communication systems, you
must not use your mobile phone while the plane is in the air.
•Do not use it on the ground without permission from the crew.
Blasting Areas
Turn off your mobile phone when in a blasting area or in areas
posted “turn off two-way radio” to avoid interfering with blasting
operations. Construction crews often use remote control RF devices
to set off explosives.
Explosive Atmospheres
Turn off your mobile phone when in any area with a potentially
explosive atmosphere. It is rare, but your mobile phone or its
accessories could generate sparks. Sparks in such areas could cause
an explosion or fire resulting in bodily injury or even death.
Areas with a potentially explosive atmosphere are often, but not
always, clearly marked. They include fuelling areas, such as petrol
stations, below deck on boats, fuel or chemical transfer or storage
facilities, and areas where the air contains chemicals or particles,
such as grain, dust, or metal powders.
Do not transport or store flammable gas, liquid, or explosives in the
same compartment of your vehicle that contains your mobile phone
and accessories.
R300UM-R2-Br-AE.book Page 44 Monday, September 10, 2001 1:39 PM

45
Guidelines for Safe and Efficient Use
Power Supply
Connect the AC power adapter only to designated power sources
as marked on the product.
To reduce risk of damage to the electric cord, remove it from the
outlet by holding onto the AC adapter rather than the cord.
Make sure the cord is positioned so that it will not be stepped on,
tripped over or otherwise subjected to damage or stress.
To reduce risk of electric shock, unplug the unit from any power
source before attempting to clean it.
The AC power adapter must not be used outdoors or in damp areas.
DANGER - Never alter the AC cord or plug. If the plug will not
fit into the outlet, have a proper outlet installed by a qualified
electrician. Improper connection can result in risk of electric shock.
Children
DO NOT ALLOW CHILDREN TO PLAY WITH YOUR
MOBILE PHONE OR ITS ACCESSORIES. THEY COULD
HURT THEMSELVES OR OTHERS, OR COULD
ACCIDENTALLY DAMAGE THE MOBILE PHONE OR
ACCESSORY. YOUR MOBILE PHONE OR ITS ACCESSORY
MAY CONTAIN SMALL PARTS THAT COULD BE
DETACHED AND CREATE A CHOKING HAZARD.
Disposing of the Product
The product should never be placed in municipal waste. Please check
local regulations for disposal of electronic products.
Emergency Calls
IMPORTANT!
This mobile phone, like any mobile phone, operates using radio
signals, cellular and landline networks as well as user-programmed
functions, which cannot guarantee connection under all conditions.
Therefore you should never rely solely on any mobile phone for
essential communications (e.g. medical emergencies).
Remember, in order to make or receive calls, the mobile phone must
be switched on and in a service area with adequate cellular signal
strength. Emergency calls may not be possible on all cellular phone
networks or when certain network services and/or mobile phone
features are in use. Check with your local service provider.
R300UM-R2-Br-AE.book Page 45 Monday, September 10, 2001 1:39 PM

Guidelines for Safe and Efficient Use
46
Battery Information
Charging the Battery
The battery delivered with your phone is not fully charged. We
recommend that you charge the battery for 4 hours before you use
the phone for the first time. If you are charging a new battery, or
a battery that has run out completely, it may take a while (up to
30 minutes) before you get any indication (the battery meter appears
in the display) that the battery is being charged.
Please note that you cannot turn on the phone before the indicator
lights up and the battery meter appears in the display.
The battery can only be charged in temperatures between +5°C
(+41°F) and +45°C (+113°F).
Battery Use and Care
A rechargeable battery has a long service life if treated properly.
A new battery or one that has not been used for a long time could
have reduced capacity the first few times it is used.
The talk and standby times depend on the actual transmission
conditions when using the phone. If the phone is used near a base
station, less power is required and talk and standby times are
prolonged.
Use only Ericsson original batteries and chargers. Using other
batteries and chargers could be dangerous, and the warranty does
not cover product failures which have been caused by use of non-
Ericsson original batteries and chargers.
•Do not expose the battery to extreme temperatures, never above
+60°C (+140°F). For maximum battery capacity, use the battery
in room temperature. If the battery is used in low temperatures,
the battery capacity will be reduced.
•Turn off your phone before removing the battery.
•Use the battery for the intended purpose only.
•Do not attempt to take the battery apart.
•Do not let the metal contacts on the battery touch another
metal object. This could short-circuit and damage the battery.
•Do not expose the battery to open flames. This could cause the
battery to explode.
•Do not expose the battery to liquid.
•Do not allow the battery to be put into the mouth. Battery
electrolytes may be toxic if swallowed.
Disposing of the Battery
The battery should never be placed in municipal waste. Please check
local regulations for disposal of batteries or call your local Ericsson
Certified Call Center for information.
FCC Statement
This device complies with Part 15 of the FCC rules. Operation is
subject to the following two conditions: (1) This device may not
cause harmful interference, and (2) This device must accept any
interference received, including interference that may cause
undesired operation.
R300UM-R2-Br-AE.book Page 46 Monday, September 10, 2001 1:39 PM

Limited Warranty
47
Thank you for purchasing this Ericsson Product. To get maximum
use of your new Product, we recommend that you follow a few
simple steps:
•Read the Guidelines for Safe and Efficient Use.
•Read all the terms and conditions of your Ericsson Warranty.
•Save your original receipt. You will need it for warranty repair
claims. Should your Ericsson Product need warranty service,
please return it to the dealer from whom it was purchased,
or contact your local Ericsson Certified Call Center or visit
www.ericsson.com/consumers to get further information.
Our Warranty
Ericsson warrants this Product to be free from defects in material
and workmanship at the time of its original purchase by a consumer,
and for a subsequent period of one (1) year.
Any Ericsson accessory is covered by a warranty period of one (1) year
from the date of its original purchase by a consumer in accordance
with the applicable terms and conditions stipulated herein.
What We Will Do
If, during the warranty period, this Product fails to operate under
normal use and service, due to improper materials or workmanship,
Ericsson subsidiaries, authorized distributors or Ericsson service
partners will, at their option, either repair or replace the Product
in accordance with the terms and conditions stipulated herein.
Conditions
1 The warranty is valid only if the original receipt issued to the original
purchaser by the dealer, specifying the date of purchase and serial
number, is presented with the Product to be repaired or replaced.
Ericsson reserves the right to refuse warranty service if this information
has been removed or changed after the original purchase of the
Product from the dealer.
2 If Ericsson repairs or replaces the Product, the repaired or replaced
Product shall be warranted for the remaining time of the original
warranty period or for ninety (90) days from the date of repair,
whichever is longer. Repair or replacement may involve the use of
functionally equivalent reconditioned units. Replaced faulty parts or
components will become the property of Ericsson.
3 This warranty does not cover any failure of the Product due to normal
wear and tear, or due to misuse, including but not limited to use in
other than the normal and customary manner, in accordance with
Ericsson’s instructions for use and maintenance of the Product. Nor
does this warranty cover any failure of the Product due to accident,
Limited Warranty
R300UM-R2-Br-AE.book Page 47 Monday, September 10, 2001 1:39 PM

Limited Warranty
48
modification or adjustment, acts of God, improper ventilation or
damages resulting from liquid.
4 Since the cellular system on which the product is to operate is
provided by a carrier independent from Ericsson, Ericsson will not be
responsible for the operation, availability, coverage, services or range
of that system.
5 This warranty does not cover Product failures due to improper repair
installations, modifications or service performed by a non-Ericsson
service partner or opening of the Product by non-Ericsson certified
persons.
6 The warranty does not cover Product failures which have been caused
by use of non-Ericsson original accessories.
7 Tampering with any of the seals on the Product will void the warranty.
8 THERE ARE NO EXPRESS WARRANTIES, WHETHER
WRITTEN OR ORAL, OTHER THAN THIS PRINTED
LIMITED WARRANTY. ALL IMPLIED WARRANTIES,
INCLUDING WITHOUT LIMITATION THE IMPLIED
WARRANTIES OF MERCHANTABILITY OR FITNESS
FOR A PARTICULAR PURPOSE, ARE LIMITED TO THE
DURATION OF THIS LIMITED WARRANTY. IN NO
EVENT SHALL ERICSSON BE LIABLE FOR INCIDENTAL
OR CONSEQUENTIAL DAMAGES OF ANY NATURE
WHATSOEVER, INCLUDING BUT NOT LIMITED TO LOST
PROFITS OR COMMERCIAL LOSS, TO THE FULL EXTENT
THOSE DAMAGES CAN BE DISCLAIMED BY LAW.
Some countries/states do not allow the exclusion or limitation of
incidental or consequential damage, or limitation of the duration
of implied warranties, so the preceding limitations or exclusions
may not apply to you.
This warranty gives you specific rights, and you may also have other
legal rights which may vary from country/state to country/state.
International Service
You can have your Ericsson Product serviced within the warranty
period in any country where an identical Product is sold by an
authorized Ericsson distributor. To find out if your Product is sold in
the country you are in, please call the local Ericsson Certified Call
Center. In order to be granted service, you have to present your
original receipt specifying the date of purchase and serial number.
Please observe that certain services may not be possible elsewhere
than in the country of original purchase, for example due to the fact
that your Ericsson Product may have an interior or exterior which is
different from equivalent models sold in other countries. It may not
be possible to repair SIM-locked Products.
R300UM-R2-Br-AE.book Page 48 Monday, September 10, 2001 1:39 PM

Index
49
A
Accessibility 6
Adjusting ear volume 13
Answering calls 9
Assistance 6
Asterisk key 14
Auto
Area code 26
Keylock 28
Prefix 26
Retry 26
B
Battery
Attaching 2
Charging 3
Connecting 2
disposal 46
information 46
Low 13
Removing 2
C
Call
List 21
Calling cards 16
Calls
Answering 9
Ending 9
Forward 25
International 13
List 10
Making 8
Missed 20
Restrict 25
Three-way 9
Unanswered 11
Charge-only mode 4
Charger 3
Clear key 14
D
Delete phonebook entries 17
Digit keys 14
Down arrow key 14
E
Ear volume 13
Edit phonebook positions 17
Ending calls 9
Entering letters and symbols 11
Multitap method 11
T9 text input 12
F
Forward calls 25
H
Hearing aids 44
I
International calls 13
Internet 5,6,27
K
Key functions 13
Keys
Asterisk 14
Clear 14
Digit 14
Down arrow 14
Lower side 13
No 14
One key 14
Pound 14
Index
R300UM-R2-Br-AE.book Page 49 Monday, September 10, 2001 1:39 PM

Index
50
Up arrow 14
Upper side 13
Yes 14
L
Letters and symbols 11
Locks 28
Low battery 13
Lower side key 13
M
Mail
Received 18
Send new 18
Sent 19
Templates 19
Unsent 18
Main menu 8
Making calls 8
Memory
Status 17,20
Menu Navigation 7
Message 19
Alert 19
Read ack. 20
Type 20
Microphone muting 13
Missed calls 20
Mobile Internet 6
Multitap text input 11
Muting
Microphone 13
Ring tone 13
My numbers 16
N
Networks 28
No key 14
O
One key 14
Ongoing Call Menu 22
P
Pacemakers 43
Parts of phone 6
Pause dialing 12
Phone 5
Phone silent 23
Phonebook
Adding a number 11
Sort order 17
Pound key 14
Powering on 6
Problem solving
Voice 33
Product
care 41
disposal 45
Profiles 24
R
Redial 11
Restrict calls 25
RF information 42
Ring
Sounds 23
Tone 13
Volume 22
S
SAR information 42
Special Needs 6
Standby screen 7
Stop and pause dialing 12
T
T9 text input 12,39
Technical Assistance 6
Templates 19
Three-way calls 9
Time and date 27
TTY Phone Number 6
R300UM-R2-Br-AE.book Page 50 Monday, September 10, 2001 1:39 PM

Index
51
U
Up arrow key 14
Upper side key 13
V
Voice 9
Control 9,28
Dialing 9
Privacy 24
Voicemail
Number 20
Working with 17
W
Web site 5
Y
Yes key 14
R300UM-R2-Br-AE.book Page 51 Monday, September 10, 2001 1:39 PM

R300UM-R2-Br-AE.book Page 52 Monday, September 10, 2001 1:39 PM

R300UM-R2-Br-AE.book Page 53 Monday, September 10, 2001 1:39 PM

R300UM-R2-Br-AE.book Page 54 Monday, September 10, 2001 1:39 PM

R300UM-R2-Br-AE.book Page 55 Monday, September 10, 2001 1:39 PM

R300UM-R2-Br-AE.book Page 56 Monday, September 10, 2001 1:39 PM

R300UM-R2-Br-AE.book Page 57 Monday, September 10, 2001 1:39 PM

R300UM-R2-Br-AE.book Page 58 Monday, September 10, 2001 1:39 PM

You can quickly access several commonly used menus by
simply pressing the or keys. The menus are organized
in a circle. Quickly access menus and settings using the
numbers that appear next to each menu and setting. For
example, access your Calendar by pressing or then
5to access the Extras menu. Then press 2 to select the
Calendar submenu.
* Depending on whether a call is ongoing or not, either
the Call info or the Ongoing call menu is shown.
1. Call contact
2. Add contact
3. Edit contact
4. My numbers
5. Groups
6. Calling cards
7. Options
8. Memory status
1. Call voicemail
2. Received mail
3. Send new
4. Unsent mail
5. Templates
6. Sent mail
7. Empty mailboxes
8. Options
9. Memory status 1. Missed calls
2. Call list
3. Usage tracker
4. Options
1. Turn on/off tones *
2. Hold call *
3. Switch calls *
4. Release active *
5. Retrieve call *
6. Call info *
1. Sounds & alerts
2. Profiles
3. Call options
4. Display
5. Language
6. Time and date
7. Locks
8. Voice control
9. Networks
0. Reset settings
1. Calendar
2. Time
3. Games
4. Calculator
5. Code memo
6. Accessories
1. Launch browser
2. Browser help
3. Active gateways
1. Edit shortcuts
R300UM-R2-Br-AE.book Page 1 Monday, September 10, 2001 1:39 PM

R300UM-R2-Br-AE.book Page 2 Monday, September 10, 2001 1:39 PM

Indicates an incoming call
in your Call list.
Indicates a missed call in
your Call list.
Indicates an outgoing call
in your Call list.
Your personal phonebook.
Handling of text and voice
messages.
Handling of call time and
call cost information.
Handling of ongoing calls.
Personal settings, profiles,
divert calls, networks and
voice control.
Indicates a phonebook
entry with a voice label.
?
R300d Icons
Calendar, synchronization,
alarm clock and other
extras.
A selection of your most
frequently used functions.
Your phone is operating
in Analog mode.
Your phone is operating
in Digital mode.
Your phone has an
alarm set.
Signal strength indicator
from the wireless system.
Your phone will not make
keypad or ring sounds.
You ringer is muted.
The relative strength of
your battery.
AE/LZT 123 5640 R2
R300QRC2.fm Page 4 Thursday, September 20, 2001 7:34 AM

A stop character in a group
of numbers.
A pause character in a
group of numbers.
You have received a text
message.
You have received a voice
message.
Voice privacy is enabled.
Technical Support
North America 1-800-ERICSSON
Latin America 305-755-6789
Elsewhere 919-472-7908
Making Emergency Calls
You can dial 911 (or your
emergency number) regardless
of call restrictions you have set.
Turn phone on/off
Press and hold NO
Answer a call
Press YES
End a call
Press NO
Place a call
Press the numeric keys to enter the
phone number you want to call.
Press YES.
Call voicemail
Press and hold 1
Visit us on the web at:
http://www.ericsson.com/phones
ERICSSONZ
R300UM-R2-Br-AE.book Page 5 Monday, September 10, 2001 1:39 PM

R300UM-R2-Br-AE.book Page 6 Monday, September 10, 2001 1:39 PM