HARRIS TR0001-E EDACS-300P User Manual Operator s Manual
HARRIS CORPORATION EDACS-300P Operator s Manual
HARRIS >
Contents
- 1. Users manual
- 2. users manual2
- 3. revised manual
- 4. revised Manual with RF exposure info
revised Manual with RF exposure info
EN/LZT 123 5652/1 R1A
Operator’s Manual
EDACS 300P
System/Scan Portable
Radio

2
Table of Contents
Safety Training Information...................................................................3
Operating Rules And Regulations..........................................................6
Operating Tips.........................................................................................7
User Interface..........................................................................................8
Basic Operation.....................................................................................11
Trunked Mode Operation.....................................................................13
Conventional Operation........................................................................19
Error Messages......................................................................................20
Programmable Alert Tones ..................................................................21
Changing The Battery Pack..................................................................22
The software contained in this device is copyrighted by Com-Net
Ericsson Critical Radio Systems, Inc. Unpublished rights are reserved
under the copyright laws of the United States.
NOTICE!
This manual is published by Com-Net Ericsson Critical Radio Systems, Inc., without
any warranty. Improvements and changes to this manual necessitated by typographical
errors, inaccuracies of current information, or improvements to programs and/or
equipment, may be made by Com-Net Ericsson Critical Radio Systems, Inc., at any
time and without notice. Such changes will be incorporated into new editions of this
manual. No part of this manual may be reproduced or transmitted in any form or by any
means, electronic or mechanical, including photocopying and recording, for any purpose,
without the express written permission of Com-Net Ericsson Critical Radio Systems,
Inc.
Copyright © 2000 Com-Net Ericsson Critical Radio Systems, Inc. All rights reserved.

3
SAFETY TRAINING INFORMATION
Your Com-Net Ericsson radio generates
RF electromagnetic energy during
transmit mode. This radio is designed
for and classified as “Occupational Use
Only” meaning it must be used only
during the course of employment by
individuals aware of the hazards and the ways to
minimize such hazards. This radio is NOT intended for
use by the “General Population” in an uncontrolled
environment.
This radio has been tested and complies with the FCC RF
exposure limits for “Occupational Use Only.” In addition,
your Com-Net Ericsson radio complies with the following
Standards and Guidelines with regard to RF energy and
electromagnetic energy levels and evaluation of such
levels for exposure to humans:
• FCC OET Bulletin 65 Edition 97-01 Supplement C,
Evaluating Compliance with FCC Guidelines for Human
Exposure to Radio Frequency Electromagnetic Fields.
• American National Standards Institute (C95.1 – 1992),
IEEE Standard for Safety Levels with Respect to Human
Exposure to Radio Frequency Electromagnetic Fields, 3
kHz to 300 GHz.
• American National Standards Institute (C95.3 – 1992),
IEEE Recommended Practice for the Measurement of
Potentially Hazardous Electromagnetic Fields – RF and
Microwave.
WARNING

4
CAUTION
To ensure that your exposure to RF
electromagnetic energy is within the
FCC allowable limits for occupational
use, always adhere to the following
guidelines:
• DO NOT operate the radio without a proper antenna
attached, as this may damage the radio and may also
cause you to exceed FCC RF exposure limits. A
proper antenna is the antenna supplied with this radio
by the manufacturer or an antenna specifically
authorized by the manufacturer for use with this radio.
• DO NOT transmit for more than 50% of total radio use
time (“50% duty cycle”). Transmitting more than 50%
of the time can cause FCC RF exposure compliance
requirements to be exceeded. The radio is
transmitting when the “TX” light appears in the display.
You can cause the radio to transmit by pressing the
“PTT” button.
• ALWAYS use Com-Net Ericsson authorized
accessories (antennas, batteries, belt clips,
speaker/mics, etc). Use of unauthorized accessories
can cause the FCC RF exposure compliance
requirements to be exceeded.
• ALWAYS keep the antenna at least 1 cm (0.4 inches)
away from the body when transmitting to ensure FCC
RF exposure compliance requirements are not
exceeded. To provide the recipients of your
5
transmission the best sound quality, hold the antenna
at least 5 cm (2 inches) from mouth, and slightly off to
one side.
The information listed above provides the user with the
information needed to make him or her aware of a RF
exposure, and what to do to assure that this radio operates
within the FCC RF exposure limits of this radio.
Electromagnetic Interference/Compatibility
During transmissions, your Com-Net Ericsson radio
generates RF energy that can possibly cause interference
with other devices or systems. To avoid such interference,
turn off the radio in areas where signs are posted to do so.
DO NOT operate the transmitter in areas that are sensitive
to electromagnetic radiation such as hospitals, aircraft, and
blasting sites.
6
OPERATING RULES AND REGULATIONS
Two-way FM radio systems must be operated in
accordance with the rules and regulations of the Federal
Communications Commission (FCC). As an operator of
two-way radio equipment, you must be thoroughly familiar
with the rules that apply to your particular type of radio
operation. Following these rules will help eliminate
confusion and will assure the most efficient use of existing
radio channels. This will provide a smooth operating radio
network.
When using the radio, remember these rules:
1. It is a violation of FCC rules to interrupt any distress or
emergency message. As the radio operates in much
the same way as a telephone "party line", always listen
and/or observe the absence of the “BSY” display to
make sure that the line is clear before sending any
messages. If someone is sending an emergency
message, such as reporting a fire or asking for help in
an accident, KEEP OFF THE AIR! Emergency calls
have priority over all other messages.
2. Use of profane or obscene language is prohibited by
Federal Law.
3. It is against the law to send false call letters or a false
distress or emergency message.
7
4. The FCC requires that conversations be brief and
confined to business. To save time, use coded
messages whenever possible.
5. Using the radio to send personal messages (except in
an emergency) is a violation of FCC rules. Send only
those messages essential for the business operation.
6. It is against the Federal law to repeat or otherwise
make known anything overheard on the radio.
Conversations between others sharing your channel
must be regarded as confidential.
OPERATING TIPS
The following conditions tend to reduce the effective range
of two-way radios and should be avoided whenever
possible.
• •Operating the radio in low terrain areas or
while under power lines or bridges.
•Operating the radio inside of a vehicle or inside metal
or steel framed building unless using an outside
antenna.
8
USER INTERFACE
This manual describes the basic functions and operation of
the EDACS 300P System/Scan portable radio. For more
detailed information about the features and operation, refer
to the appropriate EDACS 300P Maintenance Manual or
contact your System Administrator.
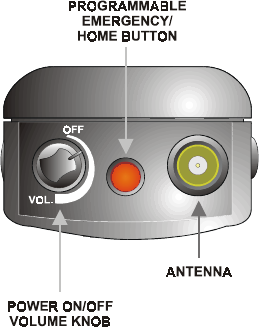
Figure 1. EDACS 300P Top View
9
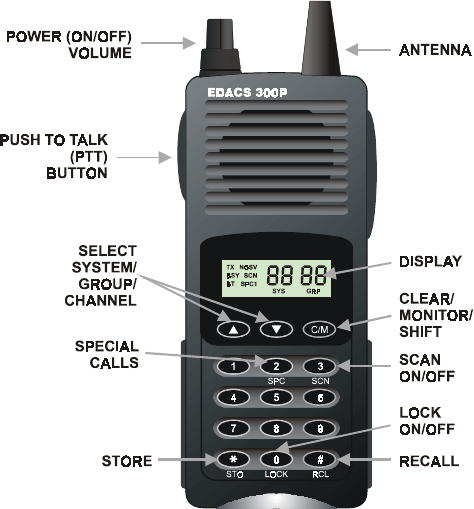
Figure 2. EDACS 300P System Model
10
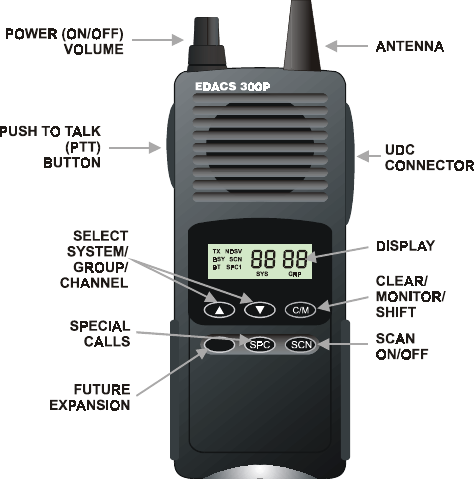
Figure 3. EDACS 300P Scan Model

11
Figure 4. EDACS 300P Belt Clip Location
BASIC OPERATION
Locking/Unlocking Keypad (System Model)
1. Press the C/M key.
2. Press and release the LOCK key.
Selecting System
1. Press and release the C/M key, then use the ▲ and ▼
keys to select the desired system.
2. The SYS field displays the current System selected.
12
Selecting Group/Channel
1. Press the ▲ and ▼ keys to ramp to the desired
group/channel.
Enabling/Disabling Scan
1. Press and release the SCN key to toggle Scan
ON/OFF. “SCN” is displayed when Scan is enabled.
Modifying Scan List
1. Select the desired Group/Channel to be
added/deleted. If the Group/Channel is currently in the
Scan list, “S” is displayed.
2. Press the
C/M key.
3. Press and release the SCN key.
4. If the selected Group/Channel was not in Scan list, it
will be added. If the selected Group/Channel was in
Scan list, it will be deleted.
Home/Emergency Key Definition
Pressing the red Home/Emergency button will perform one
of the four operations below, depending upon how the
radio was programmed.
1. The radio will switch to the programmed home System
and/or Group, and send an emergency transmission.
2. The radio will send an emergency transmission on the
System/Group shown in the display.

13
3. The radio will switch to the home System and/or
Group.
4. The button is not active.
Declaring Emergency
1. Press and hold the red Emergency/Home button. (The
length of time necessary to hold the Emergency button
is programmable. Check with the System
Administrator).
2. If programmed, an “E” is displayed in the SYS field
and/or an alert tone sounds.
3. Press the PTT button to transmit your message.
4. Release the PTT button when the transmission is
complete.
TRUNKED MODE OPERATION
For optimum communication, hold the radio
approximately three inches from your mouth and
speak into the microphone at a normal voice level.
IMPORTANT!
Transmitting a Call
Group Call
1. Select the desired System and Group.

14
2. Ensure that no one is transmitting on the selected
Group by observing the display for absence of the
“BSY” icon.
3. Press and hold the PTT button.
4. When the “TX” icon is displayed, speak into the
microphone.
5. Release the PTT button when the transmission is
complete. Wait for reply.
6. When the call is complete, press the C/M key to
disconnect and end the call.
Individual (LID) Call
1. Press the SPC key. The “SPC” icon will be displayed.
2. The SYS field displays “SP”. The GRP field displays
the last accessed special call number from the pre-
programmed list (SP 1, SP 2, etc.).
3. Scan Model: Press the ▲ or ▼ keys to scroll through
the pre-programmed special call list until the desired
number is displayed (SP 1, SP 2, etc.).
System Model: Press the ▲ or ▼ keys to scroll through
the special call list until the desired pre-programmed
number is displayed (SP 1, SP 2, etc.); or
Enter the LID number of the radio to be called.
(To recall the last individual (LID) number entered,
press the C/M key then press the #/RCL key.)
4. Press and hold the PTT button to initiate call.
5. When the “TX” icon is displayed, speak into the
microphone.

15
6. Release the PTT button when the transmission is
complete. Wait for reply.
7. When the call is complete, double click the C/M key to
disconnect and exit Special Call mode.
Phone Call
1. Press the SPC key. The “SPC” icon will be displayed.
2. The SYS field will display “SP”. The GRP field will
display the last accessed special call number (1, 2,
etc.) from the pre-programmed list.
3. Scan Model: Press the ▲ or ▼ keys to scroll through
the special call list until the desired pre-programmed
number is displayed.
System Model: Press the ▲ or ▼ keys to scroll through
the special call list until the desired pre-programmed
number is displayed (SP 1, SP 2, etc.); or
Enter the telephone number to be called. Complete
the phone number entry by pressing the * key.
(To recall the last phone number entered, press the
C/M key, the #/RCL key, and then the * key.)
4. Press and release PTT button to initiate call.
5. The “BSY” icon is displayed and DTMF tones are sent.
6. When the receiving party answers the call, press and
hold the PTT button and speak into microphone.
7. Release the PTT button when the transmission is
complete. Wait for reply.
8. When the call is complete, press the C/M key twice to
disconnect and exit Special Call mode.

16
Receiving a Call
1. Turn the radio on and select the desired System and
Group; or
Select the desired System and then turn Scan ON (if
the desired Group is in the Scan List).
2. The radio is now ready to receive calls.
3. When a call is received, the radio unsquelches on the
assigned channel and the “BSY” icon is displayed.
Depending upon the programming of the radio, a tone
may sound, indicating the type of call received.
4. Group Call: If programmed, the Group ID of the caller
will be displayed in the SYS and GRP fields.
Individual (LID) Call: If programmed, the LID number
of the caller (or just “id”) will be displayed in the SYS
and GRP fields.
Phone Call: “ph” or the last four digits of the phone
number will be displayed in the GRP field.
Emergency Call: “E” and the System number will blink
alternately in the SYS field.
5. Adjust the volume as necessary.
6. Respond by pressing the PTT button and speaking
into the microphone.
7. Press the C/M key twice to disconnect and end the
call.

17
Storing/Recalling Numbers (System Model)
Manually stored numbers are stored to the EDACS Scratch
Pad. The scratch pad options are programmed into the radio
and the phone number/LID number capability must be enabled
for the following features to function.
Storing Individual (LID) and Phone Numbers
1. Press the
SPC key.
2. The “SPC” icon will be displayed.
3. The SYS field will display “SP”. The GRP field will
display the last accessed special call number from the
pre-programmed list.
4. Enter the LID number or phone number to be stored.
(To recall the last number manually entered from the
keypad, press the C/M key and then press the #/RCL
key.) Up to four digits will be displayed (the last four
digits of a telephone number).
5. Complete the entry by pressing the # key for an
individual (LID) number or the * key for a phone
number.
6. Enter a digit from 0 to 9 to select a storage location.
7. Press the C/M key and then press the */STO key to
complete the storage procedure.
NOTE

18
8. Press the
C/M key twice to exit Special Call mode.
Recalling Stored Individual (LID) and Phone
Numbers
The special call mode must be exited to initiate the recall
procedure
1. Press the # key for an individual (LID) call or the * key
for a phone call.
2. Enter the desired storage location number (0-9).
3. Press the C/M key and then press the #/RCL key. Up
to four digits of the number (the last four digits of a
telephone number) will be displayed in the GRP field.
4. Individual (LID) Call: Press and hold the PTT button to
initiate the call. When signaling is complete, the
“TX” and “BSY” icons are displayed and the Call
Originate tone sounds. While still depressing the
PTT button, speak into the microphone.
Phone Call: Press and release the PTT button to
initiate the call. When signaling is complete, the
“BSY” icon is displayed and DTMF tones are sent.
When the receiving party answers the call, press
and hold the PTT button and speak into microphone.
5. Release the PTT button when the transmission is
complete. Wait for reply.
NOTE

19
6. When the call is complete, press the C/M key twice to
disconnect and exit Special Call mode.
CONVENTIONAL OPERATION
For optimum communication, hold the radio
approximately three inches from your mouth and
speak into the microphone at a normal voice level.
IMPORTANT!
Transmitting a Call
1. Turn the radio on and select the desired System and
Channel.
2. Ensure that no one is transmitting on the selected
Channel by pressing the C/M key twice (hold down the
second press) to monitor the channel and/or observe
the display for the absence of the “BSY” icon.
3. Press and hold the PTT button and speak into the
microphone.
4. Release the PTT button when the transmission is
complete. Wait for reply.
5. Press the C/M key twice to disconnect.
Receiving a Call
1. Turn the radio on and select the desired System and
Channel; or
20
Select the desired System and then turn Scan ON (if
the desired Channel is in the Scan List).
2. The radio is now ready to receive calls.
3. Press the
C/M key twice (hold down the second press)
to disable squelch and monitor the channel. Adjust
volume to desired level.
4. When the radio receives a call, the radio is
unsquelched and the message is heard.
ERROR MESSAGES
E3 If at anytime the Synthesizer is unable to load and
lock on the channel properly, an "E3" message will
be displayed in the SYS field and the GRP field will
be blanked. If the "E3" message is displayed on all
Systems, the radio has failed or has not been
programmed properly. The radio's buttons and keys
will still operate with an "E3" message displayed.
E9 An "E9" message indicates that the Personality has
not been programmed into the radio.

21
PROGRAMMABLE ALERT TONES
Name Tone Description
Power-Up (B) One Radio has passed self-test upon
power-up
Call
Originate (T) One short OK to talk; radio has acquired
channel
Call
Received (T) One
(Group)
One high, one
low (Indiv.)
Call has been received
Call
Queued (B) One short
high-pitched Call has been placed in queue for
processing
Autokey (B) one long beep Queued call received channel
assignment
System
Busy (T) Three short
medium-
pitched
System busy, all channels busy, or
receiving party engaged in call
Out of
Range/
System In-
operative
(T) one low-
pitched Radio out of range of repeater, or
radio inoperative
Call Denied (B) one low-
pitched Radio is not authorized on the system
or group
Carrier
Control
Timer
(B) Pulsed PTT pressed for pre-programmed
length of time. Release and re-key
PTT.
Low
Battery (B) one low-
pitched; 130
sec intervals
Low battery; needs charging
(T) = trunked mode only (B) = both trunked and conventional modes
22
CHANGING THE BATTERY PACK
When the “BT” icon is displayed, or the display remains
blank, the battery is low and needs charging.
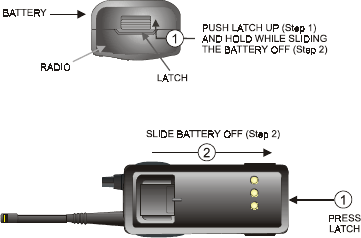
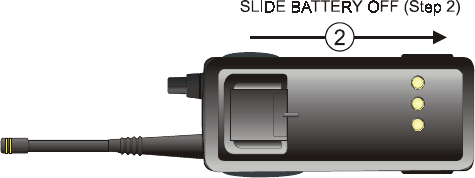
Removing the Battery Pack
Make sure the power to the radio is turned OFF.
1. Locate the latch on the bottom of the radio.
2. Press and hold the latch down, toward the back of the
radio, while sliding the battery towards the bottom of
the radio with your other hand.
3. Remove the battery pack from the radio.
Figure 5A & 5B. (5A) Belt Clip/D-Clip Location and
(5B) Removing the Battery Pack
23
Attaching the Battery Pack
Make sure the power to the radio is turned OFF.
1. Align the tabs on the back of the radio with the slots on
the battery pack.
2. Slide the battery pack towards the top of the radio until
it clicks into place.
Figure 6. Re-Installing the Battery Pack

24
WARRANTY
A. Com-Net Ericsson Critical Radio Systems, Inc. (hereinafter "Seller") warrants to the original
purchaser for use (hereinafter "Buyer") that Equipment manufactured by Seller shall be free from
defects in material, workmanship and title, and shall conform to its published specifications. With
respect to any Equipment not manufactured by Seller (except for integral parts of Seller’s Equipment
to which the warranties set forth above shall apply). Seller gives no warranty, and only the warranty,
if any, given by the manufacturer shall apply. Batteries are excluded from this warranty but are
warranted under a separate Nickel-Cadmium Battery Warranty.
B. Seller’s obligations set forth in Paragraph C below shall apply only to failures to meet the above
warranties (except as to title) occurring within the following periods of time from date of sale to the
Buyer and are conditioned on Buyer’s giving written notice to Seller within thirty (30) days of such
occurrence:
1. for fuses, incandescent lamps, vacuum tubes and non-rechargeable batteries, operable on arrival
only.
2. for parts and accessories (except as noted in B.1) sold by Seller’s Service Parts Operation, ninety
(90) days.
3. for all other Equipment of Seller’s manufacture, one (1) year.
C. If any Equipment fails to meet the foregoing warranties, Seller shall correct the failure at its option
(i) by repairing any defective or damaged part or parts thereof, or (ii) by making available at Seller’s
factory any necessary repaired or replacement parts. Any repaired or replacement part furnished
hereunder shall be warranted for the remainder of the warranty period of the Equipment in which it is
installed. Where such failure cannot be corrected by Seller’s reasonable efforts, the parties will
negotiate an equitable adjustment in price. Labor to perform warranty service will be provided at no
charge during the warranty period only for the Equipment covered under Paragraph B.3. To be
eligible for no-charge labor, service must be performed by an Authorized Service Center (ASC) or
other Servicer approved for these purposes either at its place of business during normal business
hours, for mobile or personal equipment, or at the Buyer’s location, for fixed location equipment.
Service on fixed location equipment more than thirty (30) miles from the Service Center or other
approved Servicer’s place of business will include a charge for transportation.
D. Seller’s obligations under Paragraph C shall not apply to any Equipment, or part thereof, which (i)
has been modified or otherwise altered other than pursuant to Seller’s written instructions or written
approval or, (ii) is normally consumed in operation or, (iii) has a normal life inherently shorter than
the warranty periods specified in Paragraph B, or (iv) is not properly stored, installed, used,
maintained or repaired, or, (v) has been subjected to any other kind of misuse or detrimental
exposure, or has been involved in an accident.
E. The preceding paragraphs set forth the exclusive remedies for claims (except as to title) based
upon defects in or nonconformity of the Equipment, whether the claim is in contract, warranty, tort
(including negligence), strict liability or otherwise, and however instituted. Upon the expiration of the
warranty period, all such liability shall terminate. The foregoing warranties are exclusive and in lieu
of all other warranties, whether oral, written, expressed, implied or statutory. NO IMPLIED OR
STATUTORY WARRANTIES OF MERCHANTABILITY OR FITNESS FOR PARTICULAR
PURPOSE SHALL APPLY. IN NO EVENT SHALL THE SELLER BE LIABLE FOR ANY
INCIDENTAL, CONSEQUENTIAL, SPECIAL, INDIRECT OR EXEMPLARY DAMAGES.
This warranty applies only within the United States.

25
NICKEL-CADMIUM BATTERY WARRANTY
A. Com-Net Ericsson Critical Radio Systems, Inc. (hereinafter "Seller") warrants to the
original purchaser for use (hereinafter "Buyer") that nickel-cadmium batteries sup-plied
by Seller shall be free from defects in material and workmanship, and shall conform to
its published specifications for a period of twelve (12) months from the date of
purchase.
B. For purposes of this warranty, batteries shall be deemed defective if (1) the battery
capacity is less than 80% of rated capacity, or (2) the battery develops leakage.
C. If any battery fails to meet the foregoing warranty, Seller shall correct the failure by
issuing a replacement battery upon receipt of the defective battery at an Authorized
Service Center (ASC). To obtain the name and address of an ASC, ask your
salesperson, consult the Yellow Pages, or call the number printed at the bottom of this
page.
D. Replacement batteries shall be warranted only for the remaining unexpired
warranty period of the original battery. This warranty becomes void if:
(1) The battery has been subjected to any kind of misuse, detrimental exposure, or
has been involved in an accident.
(2) The battery is used in equipment or service other than the radio equipment for
which it is specified.
E. The preceding paragraphs set forth the exclusive remedies for claims (except as to
title) based upon defects in or non-conformity of any battery, whether the claim is in
contract, warranty, tort (including negligence), strict liability or otherwise, and however
instituted. Upon the expiration of the warranty period, all such liability shall terminate.
The foregoing warranties are exclusive and in lieu of all other warranties, whether oral,
written, expressed, implied or statutory. NO IMPLIED OR STATUTORY
WARRANTIES OF MERCHANTABILITY OR FITNESS FOR PARTICULAR PUR-
POSE SHALL APPLY. IN NO EVENT SHALL THE COMPANY BE LIABLE FOR ANY
INCIDENTAL, CONSEQUENTIAL, SPECIAL, INDIRECT OR EXEMPLARY DAM-
AGES
26
NOTES
27
NOTES
Com-Net Ericsson
Critical Radio Systems, Inc.
P.O. Box 2000
Lynchburg, Virginia 24501
1-800-528-7711 (Outside USA, 1-804-592-7711) Printed in U.S.A.