HARXON HX-DU1603D Wireless Data Transceiver User Manual HX GG481A
HARXON CORPORATION Wireless Data Transceiver HX GG481A
HARXON >
Contents
- 1. Users Manual
- 2. Manual
- 3. Manual_revised
Manual_revised


[HX-DU1603D User Manual]
第 2 页 共 27 页
2. INTERFACE ............................................................................................................................................................ 5
2.1 SERIAL DATA LINE INTERFACE ................................................................................................................................ 5
2.2 RF INTERFACE ..................................................................................................................................................... 6
2.3 INSTRUCTION OF LED LIGHT ................................................................................................................................. 6
2.4 INSTRUCTION OF BUTTONS .................................................................................................................................... 6
3. FUNCTION AND OPERATING INSTRUCTIONS ................................................................................................... 7
3.1 ON/OFF ............................................................................................................................................................... 7
3.2 LEFT/RIGHT BUTTON ............................................................................................................................................ 7
3.3 UP/DOWN BUTTON ............................................................................................................................................... 7
3.4 DATA TRANSMITTING INDICATOR ........................................................................................................................... 7
3.5 POWER ON AND BLUETOOTH ONLINE INSTRUCTION ................................................................................................ 7
3.6 BATTERY CHARGE AND DISCHARGE INSTRUCTIONS ................................................................................................ 8
4. MENU SELECTIONS .......................................................................................................................................... 8
4.1 CHANNEL AND FREQUENCY ................................................................................................................................... 8
4.2 DATA PROTOCOL .................................................................................................................................................. 8
4.3 WIRELESS LINK RATE ............................................................................................................................................ 9
4.4 RADIO MODE ....................................................................................................................................................... 9
4.5 TRANSMITTING POWER ......................................................................................................................................... 9
4.6 BAUD RATE ........................................................................................................................................................ 10
4.7 DATA LINK ......................................................................................................................................................... 10
4.8 BLUETOOTH ....................................................................................................................................................... 10
4.9 LANGUAGE......................................................................................................................................................... 12
4.10 DEVICE STATUS ............................................................................................................................................... 12
5. RADIO CONFIGURATION SOFTWARE ........................................................................................................... 12
5.1 CONNECTING TO THE RADIO ............................................................................................................................... 12
5.2 CHANNELS SETTINGS ......................................................................................................................................... 15
5.3 TX/RX MODE(OPTIONAL) .............................................................................................................................. 16
5.4 CURRENT COMMUNICATION PROTOCOL, LINK RATE AND SERIAL BAUD(OPTIONAL) ............................................... 17
5.5 TX POWER SETTINGS(OPTIONAL) .................................................................................................................. 18
5.6 BLUETOOTH SETTINGS(OPTIONAL) ..................................................................................................................... 19
6. COMMON TROUBLES ......................................................................................................................................... 20
7. TECHNICAL SPECIFICATIONS ........................................................................................................................... 21
8. APENDIX ............................................................................................................................................................... 22
8.1 RADIO COMMUNICATION EXAMPLE(DATA LINK:UART) .......................................................................................... 22
8.2 BLUETOOTH COMMUNICATION EXAMPLE .............................................................................................................. 24

[HX-DU1603D User Manual]
第 3 页 共 27 页
Copyright Information
This products operation manual and all the related software are protected by Harxon
Corporation, and all rights reserved. All rights of this manual include copyright only belongs to
Harxon Corporation (short for Harxon as below), unless the copyright holders allowed, strictly
forbid to copy this manual by printing、duplicating、recording and other means.
Disclaimer
We strive to guarantee the accuracy and completeness of these manual contents when
compiling, but for possible errors or omissions, Harxon will not assume any responsibility. Due to
the continuous development of technology, Harxon reserves the rights to change the technical
specifications or functions of their products without any notification to users.
Battery warning
To ensure proper use of the battery please read the manual carefully before using it.
Do not expose to, dispose of the battery in fire.
Do not put the battery in a charger or equipment with wrong terminals connected.
Avoid shorting the battery.
Avoid excessive physical shock or vibration.
Do not disassemble or deform the battery.
Do not immerse in water.
Do not use the battery mixed with other different make, type, or model batteries.
Keep out of the reach of children.
Charge and discharge
Battery must be charged in appropriate charger only, never use a modified or damaged charger.
Storage
Store the battery in a cool, dry and well-ventilated area.
Disposal
Regulations vary for different countries. Dispose of in accordance with local regulations.

[HX-DU1603D User Manual]
第 4 页 共 27 页
Antenna Installation Warning
1. Any antenna only can be installed and maintained by professional technician. Please make
sure that the radio station is closed when you maintain or work nearby the antenna.
2. In general, radio will be connected to a directional (high-gain) antenna, and fixed to the edge
or top of a building or top of tower. According to the application and antenna gain, total hybrid
power may exceed 90W(ERP). Under normal circumstance, only the professional technicians
can close to the antenna area, anyone can’t touch the antenna or close to 2.3m in diameter
range of the antenna.
Antenna Gain vs Safe distance recommended
Antenna Gain: Maximum 4dBi
Safe distance: 1m
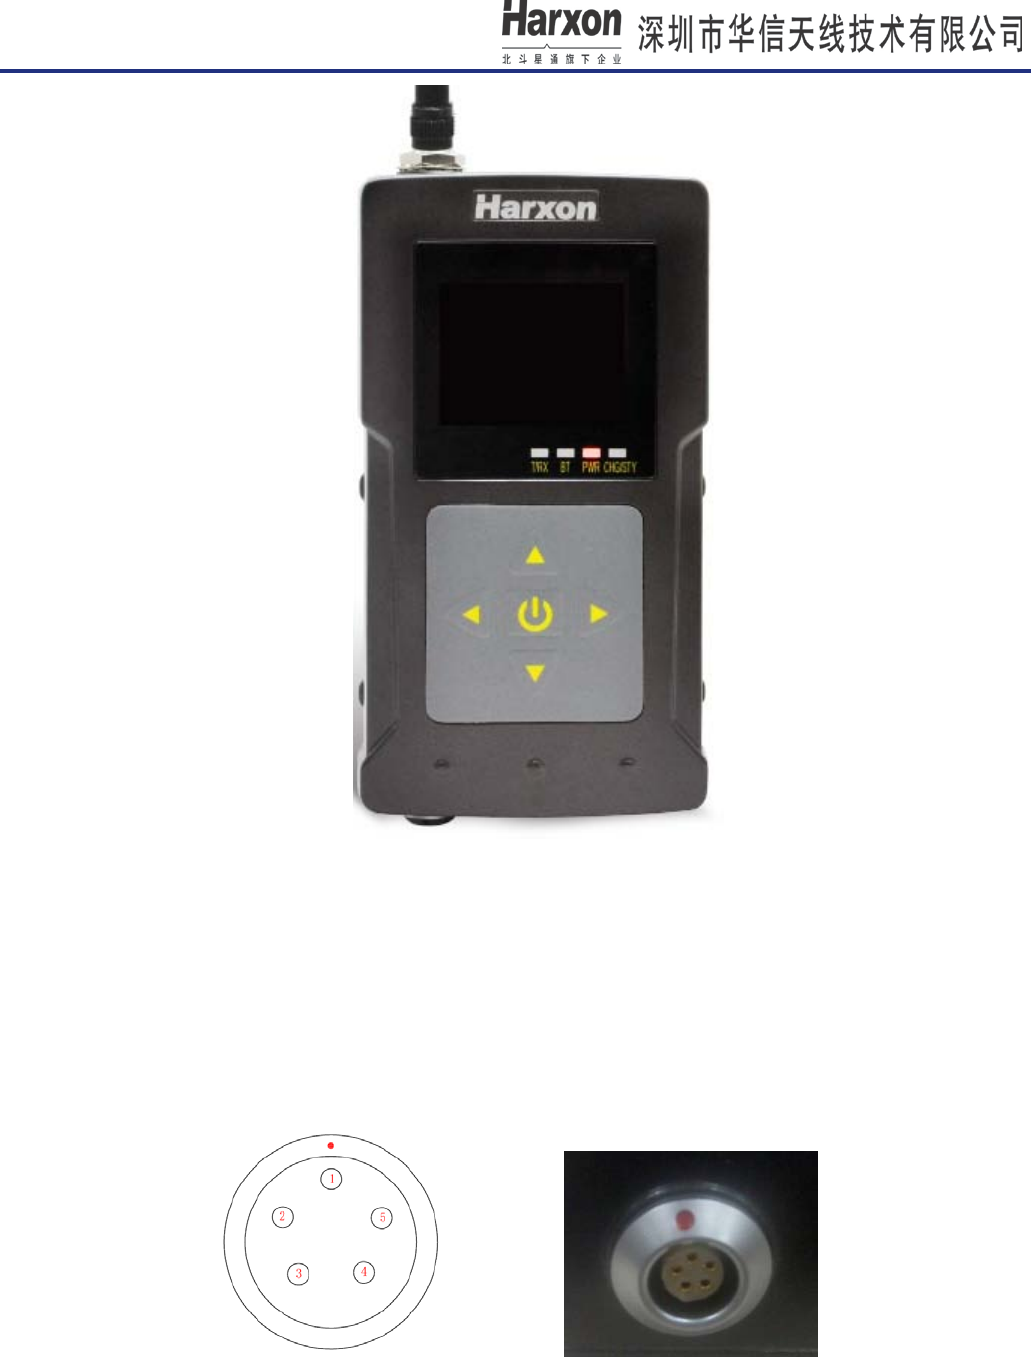
1. Summary
HX-DU1603D is an ex ternal half-duplex high-power radio modem, waterproof to IP67、
durable structure,which can apply to all outdoor weather conditions.
HX-DU1603D has 2 pieces of two color LED (Wireless transceiver indicator light:green
when receiving,red when transmitting;The power charge indicator:red when charging,green
when the battery is full)、2 pieces of single color LED(green when Bluetooth online,red when
power on)、1 OLED display screen and 5 pieces of push-button.
[HX-DU1603D User Manual]
第 5 页 共 27 页
2. Interface
2.1 Serial data interface
Interface type: asynchronous serial communication standard of RS232
Pin definitions:
[HX-DU1603D User Manual]
第 6 页 共 27 页
Pin 1------Power,7-9V DC;
Pin 2------power grounding,Power GND;
Pin 3------serial data receiver,RXD;
Pin 4------serial signal grounding;
Pin 5------serial data transmission,TXD.
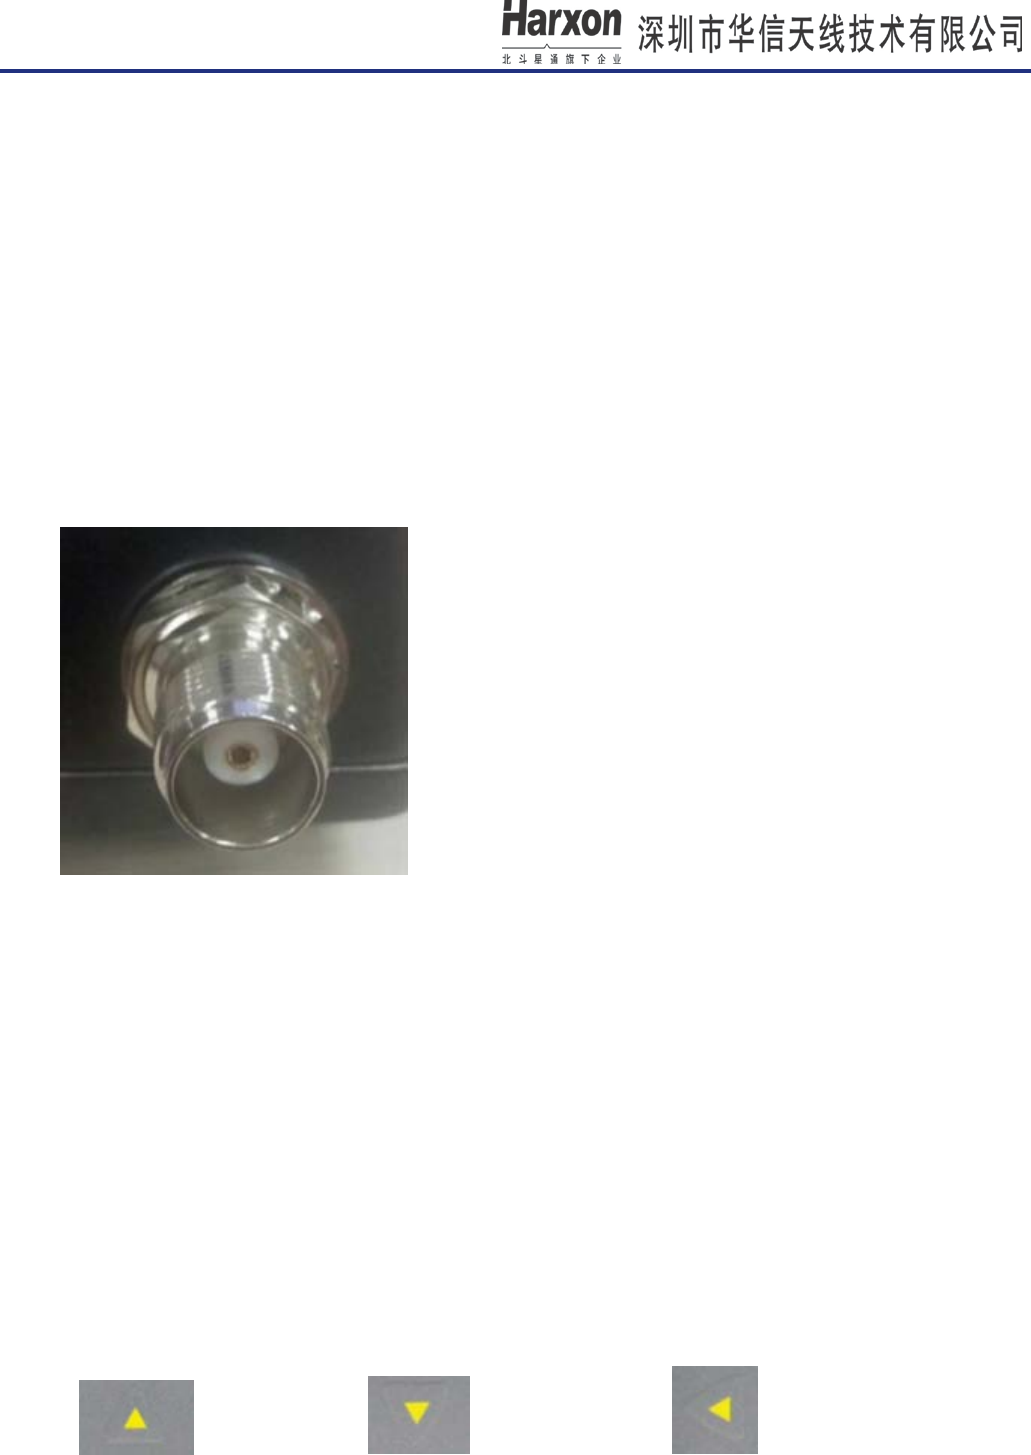
2.2 RF interface
HX-DU1603D RF interface is TNC female connector of 50Ω.
2.3 Instruction of LED light
A、TRX --Wireless transceiver indicator light;
B、BT --Bluetooth indicator light;
C、PWR --Power indicator light;
D、CHG/STY--Charging indicator light;
2.4 Instruction of buttons
A、UP ; B、DOWN ; C、LEFT

[HX-DU1603D User Manual]
第 7 页 共 27 页
D、RIGHT ; E、POWER BUTTON/CONFIRM BUTTON
3. Function and operating instructions
3.1 On/Off
(1)Long press the power button for 3-5 seconds to boot, Power indicator light shows red .
(2)Long press the power button for 3 seconds to shutdown.
(3)CONFIRM BUTTON.
3.2 Left/Right Button
Switch the menu functions by left/right button.
3.3 Up/Down Button
Switch the menu functions by up/down button.
3.4 Data transmitting indicator
Wireless t ransceiver i ndicator l ight t urns g reen w hen r eceiving。Wireless t ransceiver
indicator light turns red when transmitting.
3.5 Power on and Bluetooth online instruction
BT shows green when Bluetooth online,PWR shows red when power on
[HX-DU1603D User Manual]
第 8 页 共 27 页
3.6 Battery charge and discharge instructions
A. Charge voltage is DC9V,The maximum charge current is 1.5A;( please use the matching
adapter for c harging , t he c harging env ironment temperature i s between 0 an d 4 0 degrees
centigrade.)
B. When the battery is charging,CHG/STY turns to be red;when the battery is full,CHG/STY
turns to be green;
C.
4. Menu selections
Standard environment for lithium ion batteries: ambient temperature is 25℃, relative
humidity is 45-85%;
D. The charging time is about 8 hours.
E. Under high power 2W transmitting, the normal sustainable use time is around 8 hours;
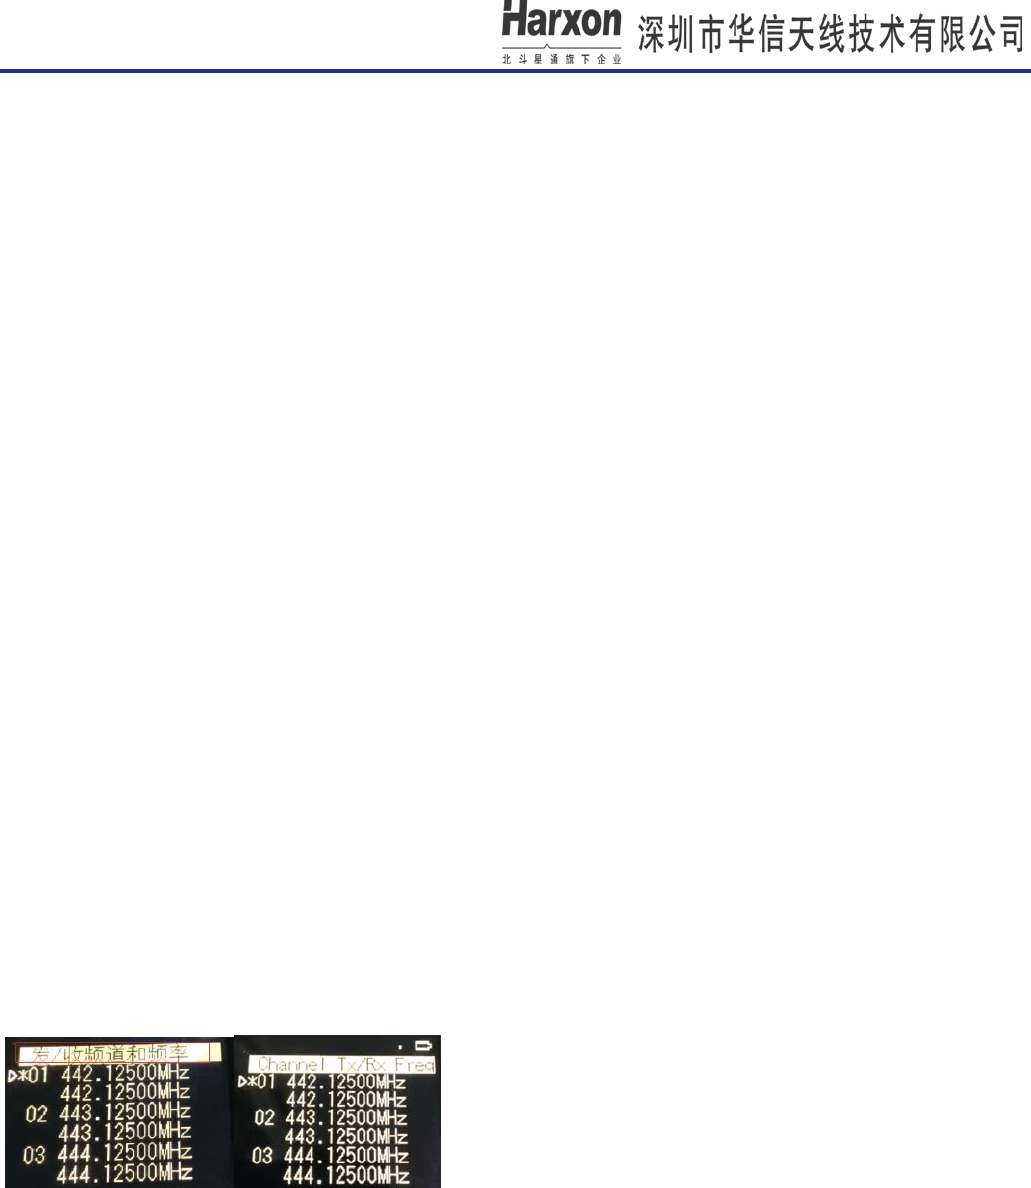
4.1 Channel and frequency
In this menu bar, you can set the current transceiver frequency and choose by the up/down button. When
you confirm the frequency by the confirm button, the symbol "*" will appear on the screen.
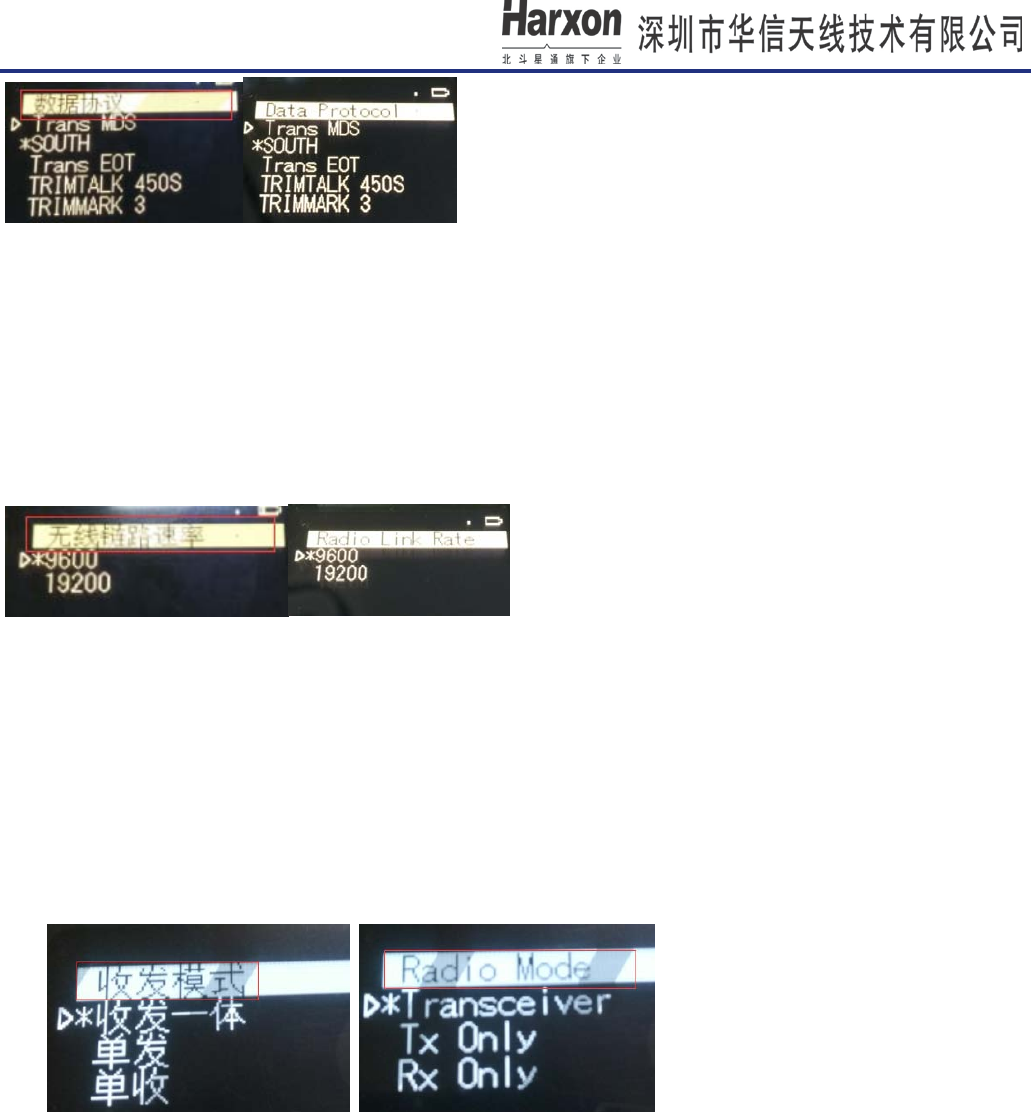
4.2 Data protocol
In this menu bar,you can set the Protocol, such as TRANSEOT,TRIMTALK,TRIMMK3, and choose by the
up/down b utton. When y ou c onfirm t he P rotocol by the c onfirm but ton, the s ymbol " *" w ill app ear on t he
screen.
[HX-DU1603D User Manual]
第 9 页 共 27 页
4.3 Wireless link rate
In this menu bar, you can set the air baud rate,which depends on the protocols。Such as, TRANSEOT
supports 4800,9600 air baud rate, TRIMMK3 supports 19200.and choose by the up/down button. When you
confirm the air baud rate by the confirm button, the symbol "*" will appear on the screen.
4.4 Radio Mode
In this menu bar, you can set the radio mode,for now it can be choose by Transceiver, TX only and RX
only by the up/down button,When you confirm the mode by the confirm button, the symbol "*" will appear on
the screen.
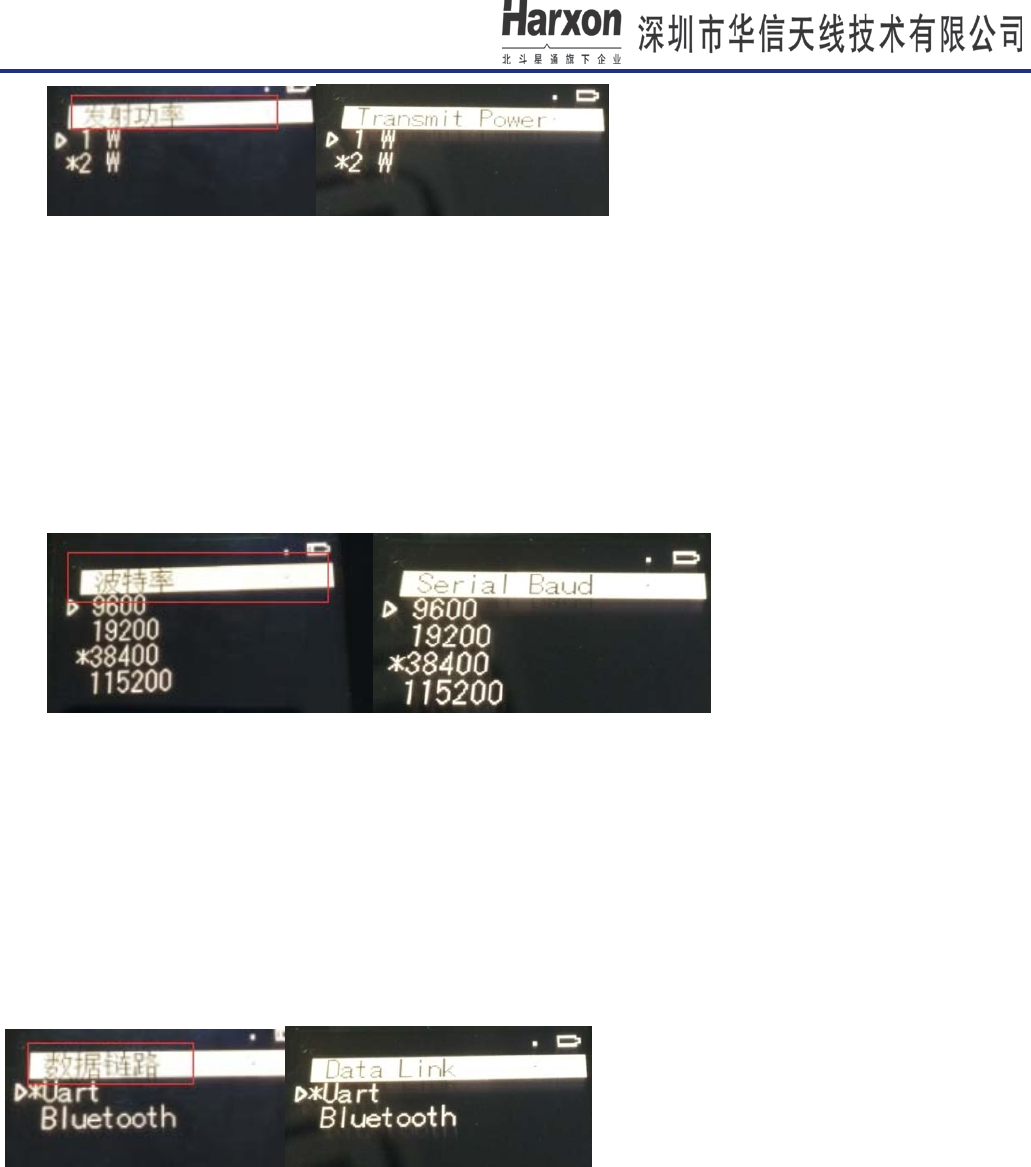
4.5 Transmitting power
In this menu bar,you can set the transmitting power, for now it supports 0.5W and 2W by the up/down
button,When you c onfirm t he t ransmitting pow er by the c onfirm button, the s ymbol " *" w ill a ppear on the
screen.
[HX-DU1603D User Manual]
第 10 页 共 27 页
4.6 Baud rate
In this menu bar,you can set the baud rate, for now it supports the baud rate of 9600、19200、38400、
115200 by the up/down button,When you confirm the baud r ate by the confirm button, the symbol "*" will
appear on the screen.
4.7 Data Link
In this menu bar,you can set the data link, for now it supports Uart and Bluetooth. If choosing Uart, you
can connect the radio with other devices by data line. If choosing Bluetooth, you can transmit data with the
terminal device which equipped with the Bluetooth functions.
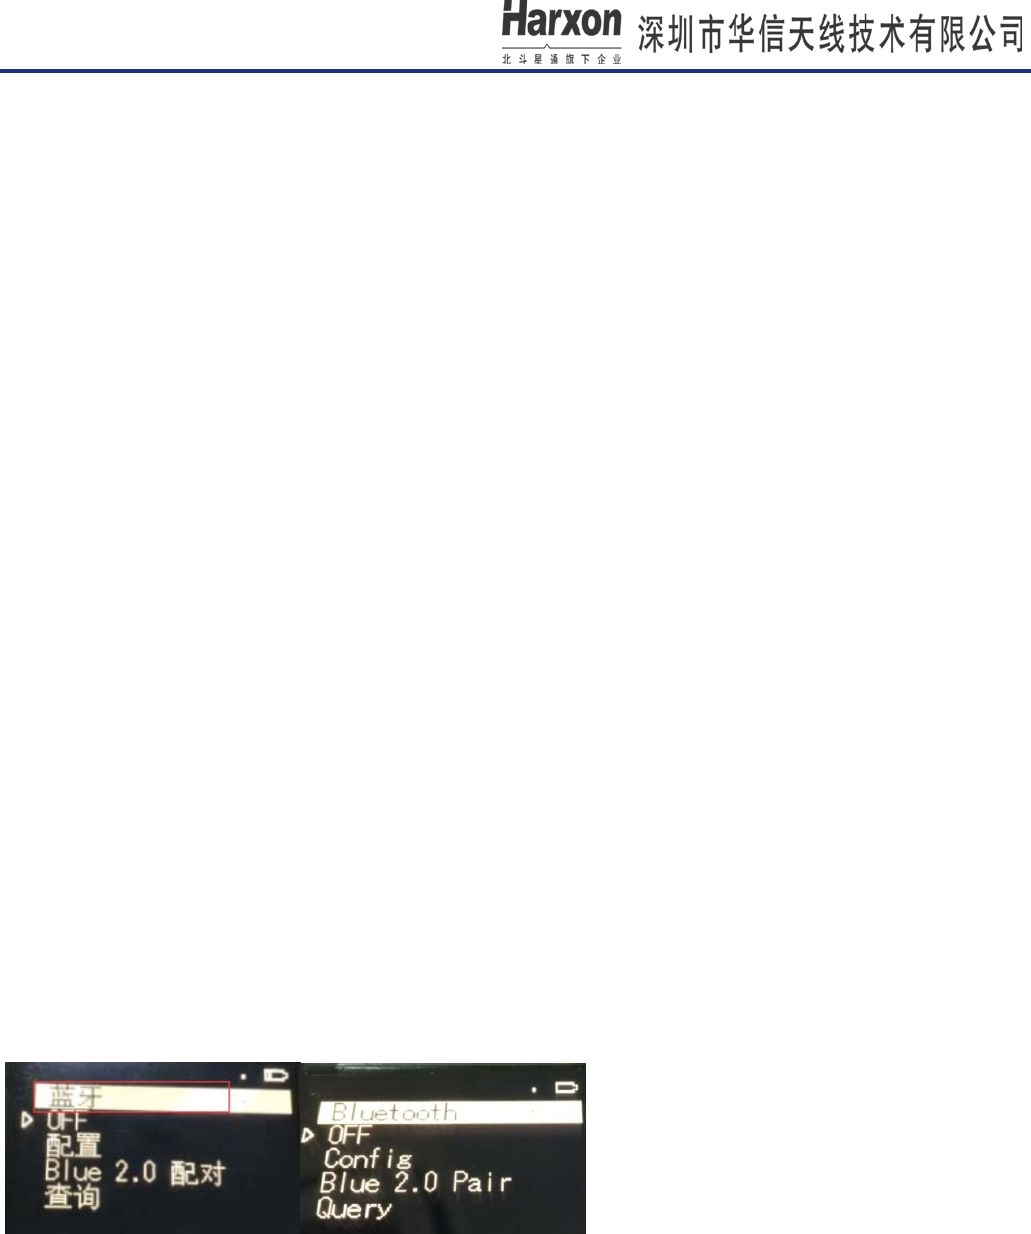
4.8 Bluetooth
4.8.1 ON/OFF
If menu ON/OFF switch to OFF, it means that Bluetooth power is on. If menu ON/OFF switch to ON, it
means that bluetooth power is off.
[HX-DU1603D User Manual]
第 11 页 共 27 页
4.8.2 Config
① Pair Clear
Launch it,so force radio cancel current or clear pairing.
Note-if bluetooth can’t pair with other blue terminals, so you can execute it for the next pairing.
② Pin Modify
Launch this operation, so we can change PIN of bluetooth2.0 device.
③ Rename
Launch this operation, so we can change device name of bluetooth2.0 device. The device name is
shown on a remote bluetooth device during device/service discovery.
4.8.3 Blue 2.0 Pair
① Slave Pair
At first, launch it and wait for other bluetooth terminal connecting. If paring successfully, BT led is on
and bluetooth icon appear on status bar of radio.
Note-Radio establishes a connection to a Bluetooth 2.0 device in free PIN.
② Master Pair
At f irst, l aunch it and device b egin t o s can bluetooth d evices nearby. After scanning over, current
menu w ill d isplay on c urrent s canning r esult. S elect t he dev ice t hat y ou want t o p air w ith. I f p air
successfully, BT led is on and bluetooth icon appear on status bar of radio.
Note-Radio establishes a connection to a Bluetooth 2.0 device in free PIN.
4.8.4 Query
Launch the query of name, address and PIN, the responding result will output it on the displaying screen.
[HX-DU1603D User Manual]
第 12 页 共 27 页
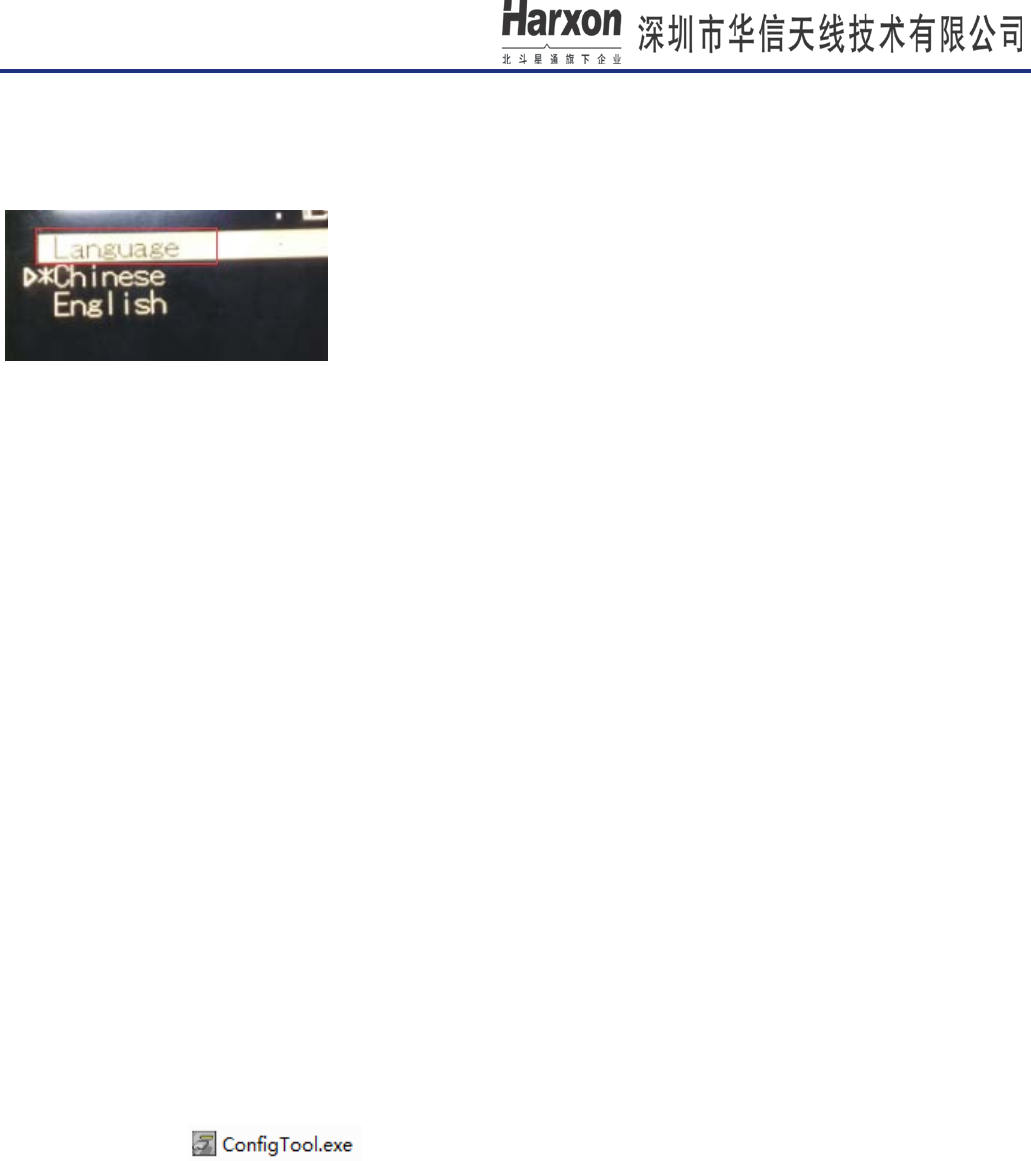
4.9 Language
Support Chinese and English
4.10 Device Status
In the Main Interface, you can see the information as model, firmware, version, S/N, modulation and B and
Width.
5. Radio Configuration Software
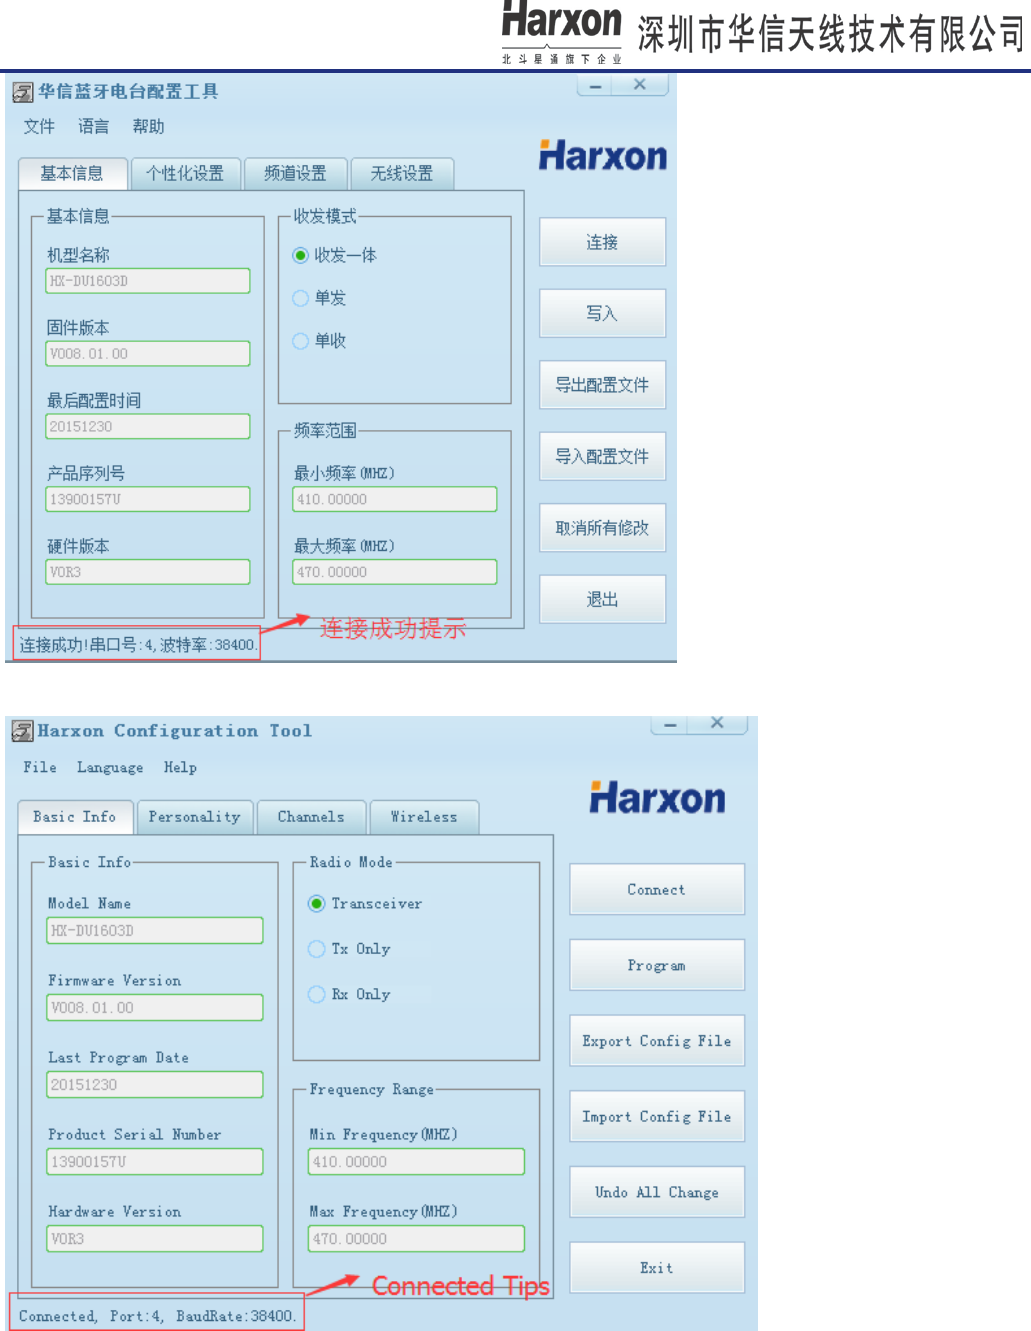
5.1 Connecting to the Radio
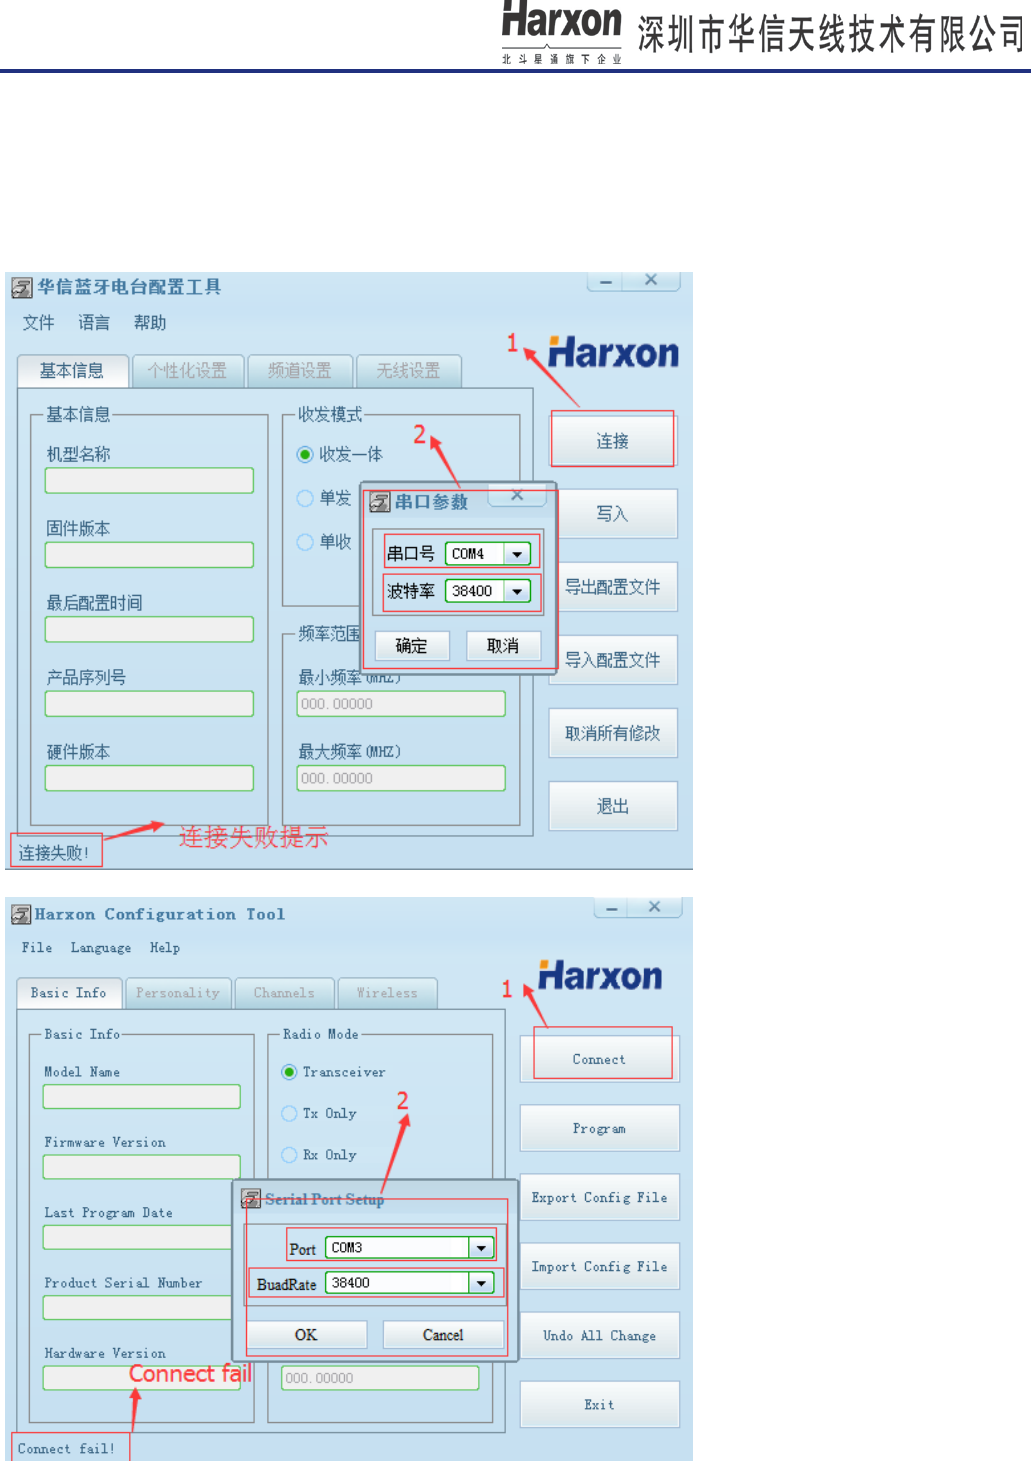
Start the software ,it will read radio all information automatically. If the software connects
successfully, the connected tips will display on the left bottom of software.
[HX-DU1603D User Manual]
第 13 页 共 27 页
[HX-DU1603D User Manual]
第 14 页 共 27 页
If software fails to communicate with radio, please click Connect, then select the COM port that the radio is
connected to and a baud rate (Please consult radio menu, Serial Rate), click OK key in Serial Port Setup
dialog tab to communicate with radio again.
Note-The default data rate is 38400bps.
[HX-DU1603D User Manual]
第 15 页 共 27 页
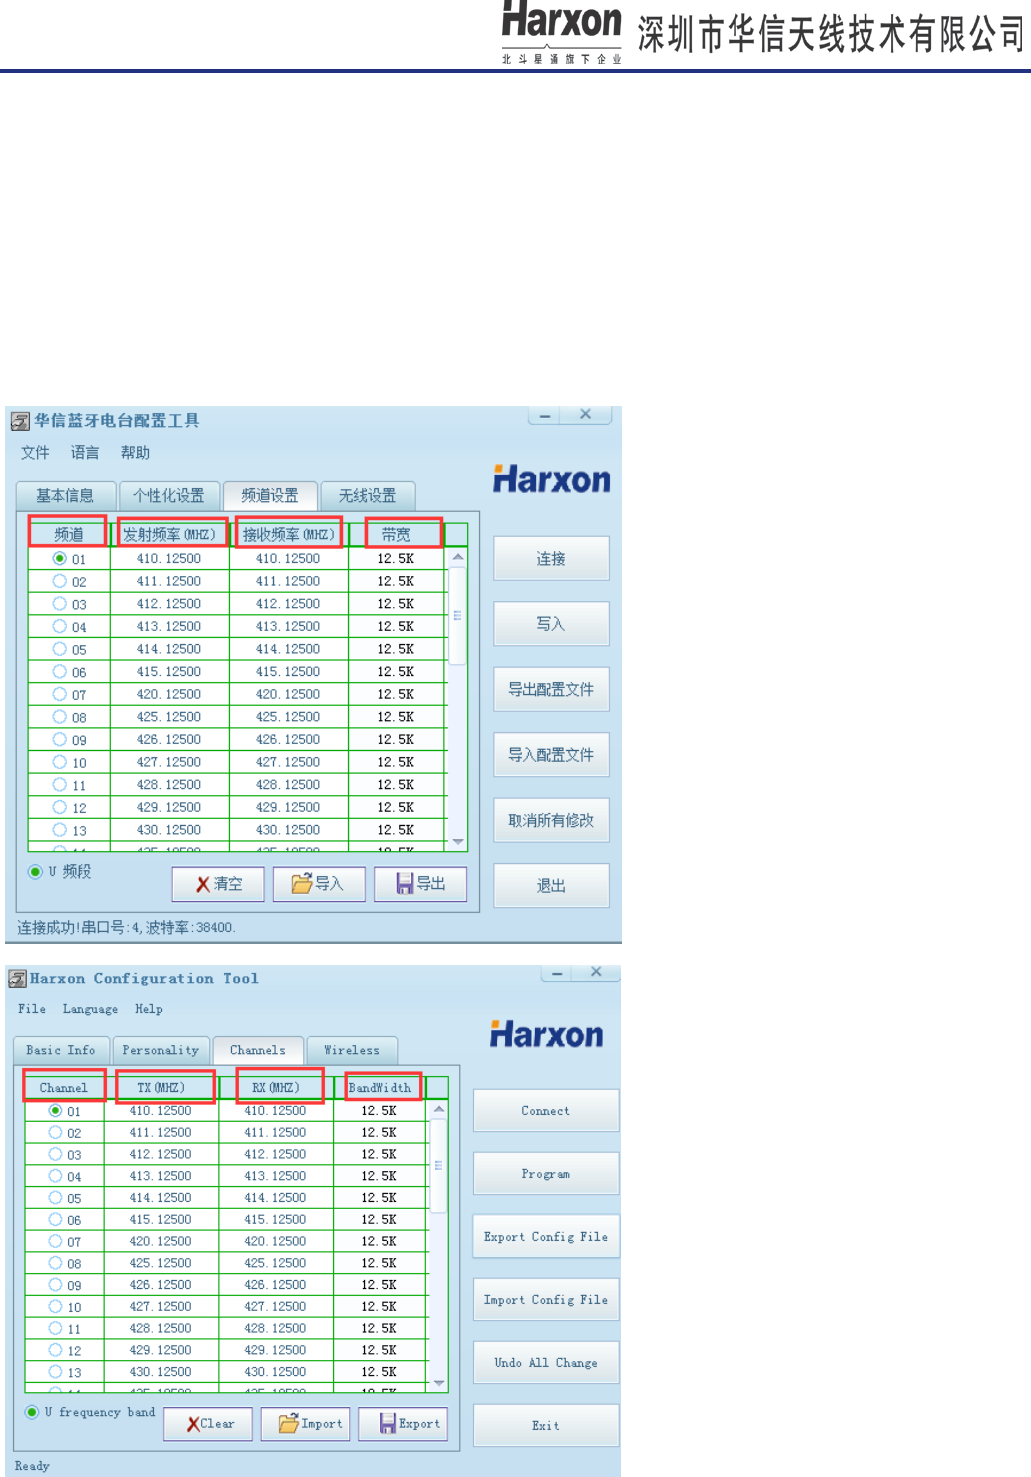
5.2 Channels Settings
We can set current channel, TX/RX frequency in Channels tab. The supported max number of channels
is 36, user can choose one channel from the channel list at a time.
Note1: The default count of channels is 36, if user need modify channels, the Channels tab is required.
Note2: Only local dealer and manufacturer have the right to edit the channel list based on your radio
license and loaded into your radio before delivery.
[HX-DU1603D User Manual]
第 16 页 共 27 页
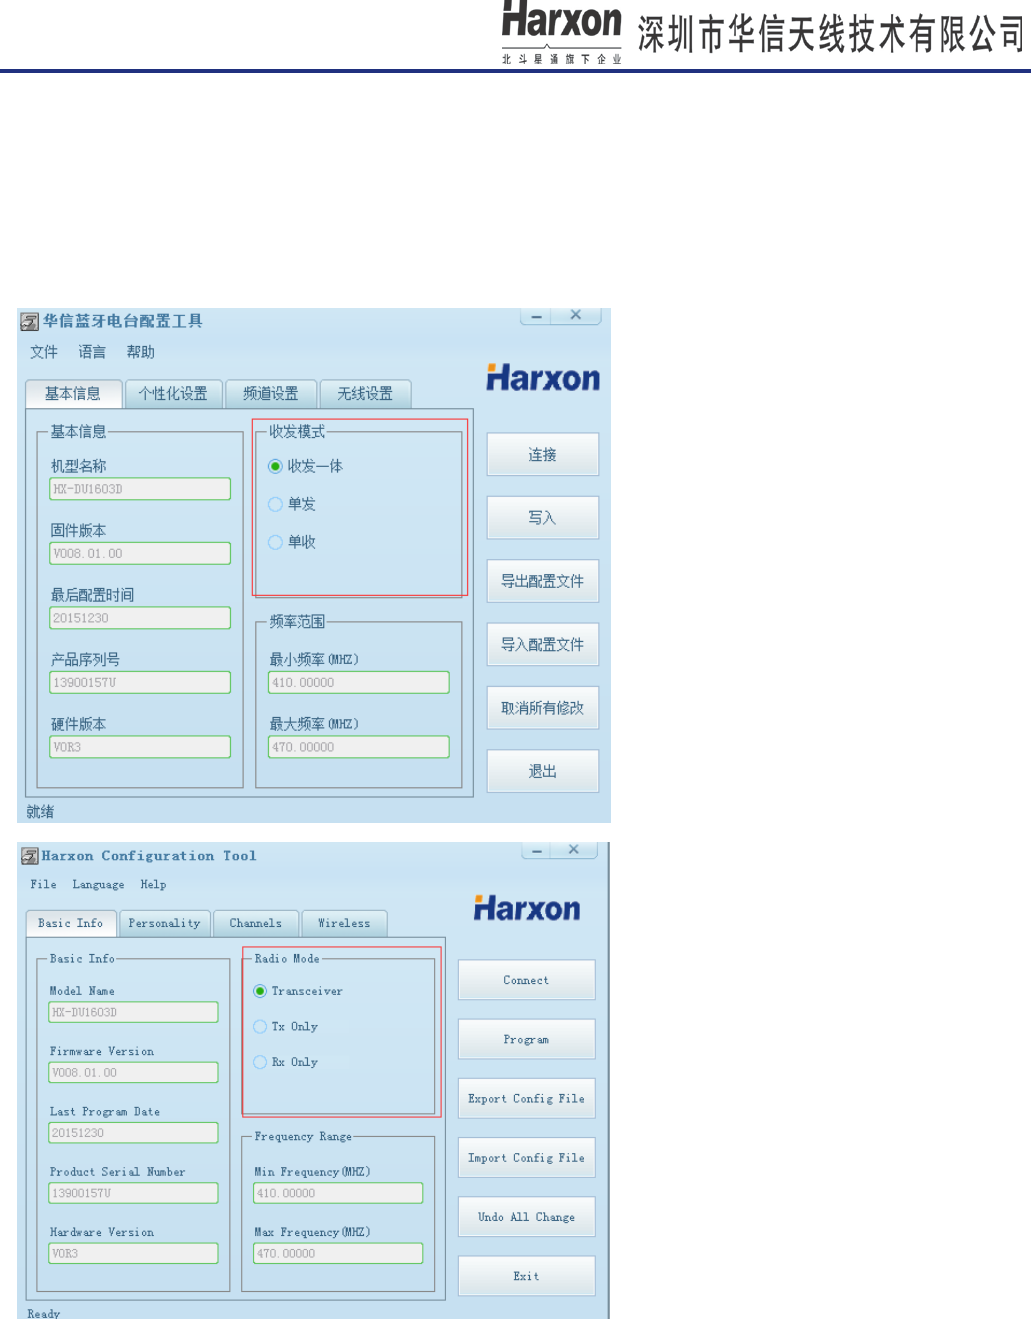
5.3 TX/RX Mode(optional)
(1)Transceiver:Radio can send data and receive data.
(2) Only Transmit:Radio can only send data.
(3) Only Receive:Radio can only receive data.
[HX-DU1603D User Manual]
第 17 页 共 27 页
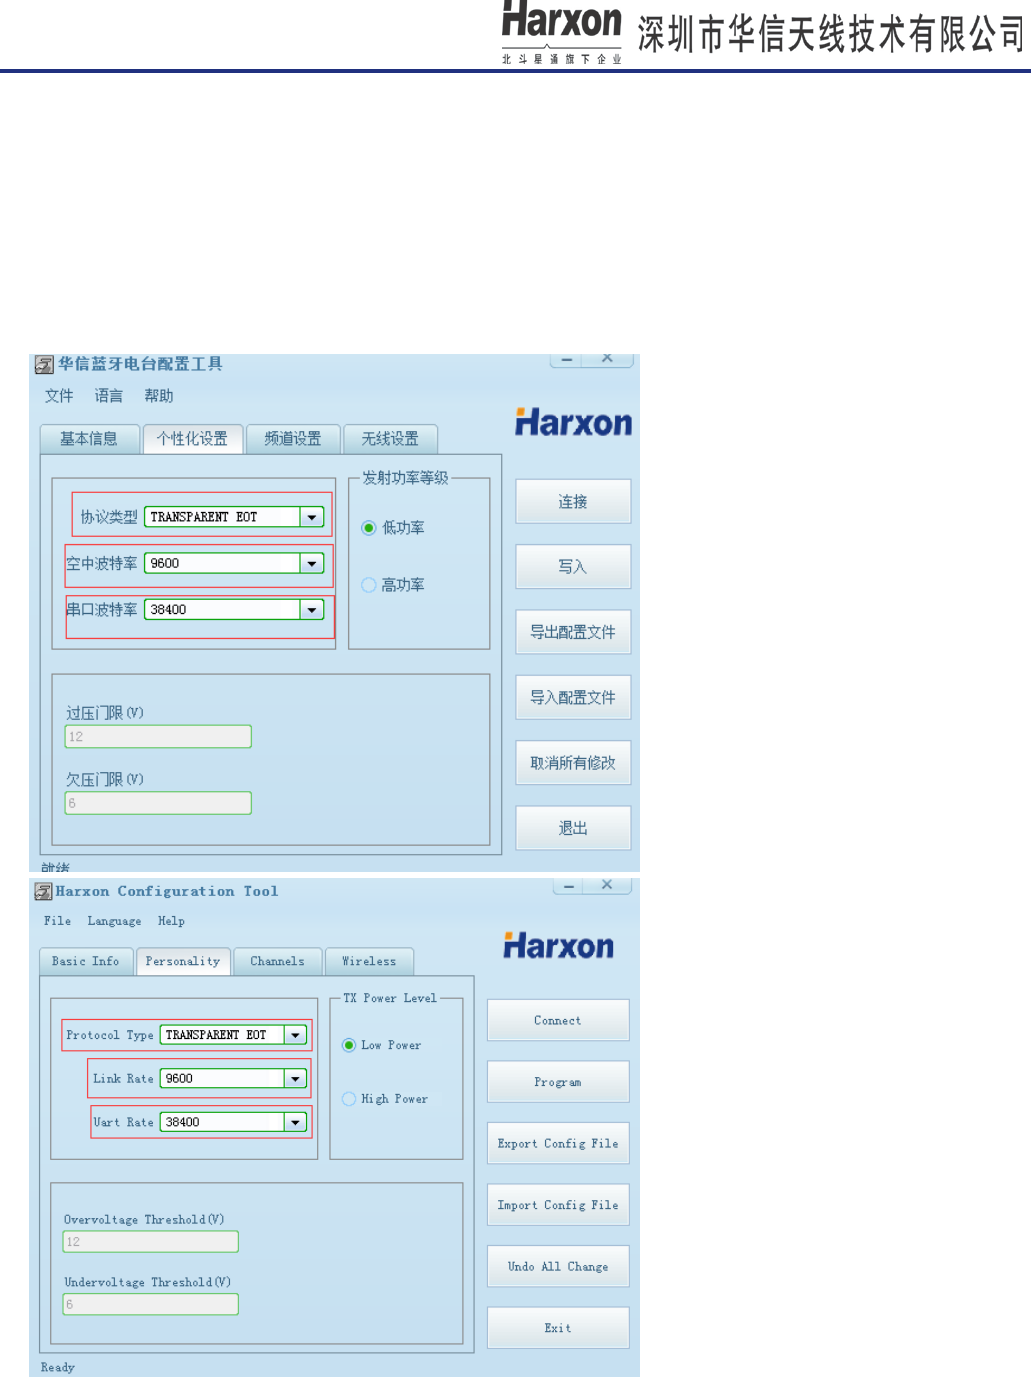
5.4 Current Communication Protocol, Link Rate and Serial Baud(Optional)
In the optional of Protocol Type, configure radio of current communication protocol. In the optional of
Link Rate, configure radio of current link rate. In the optional of Uart Baud, modify current serial rate
between radio and PC, or other terminals.The default baud rate between the computer and the radio is
38400.Select other rates (between 9600 and 115200) from the Uart Baud list.
[HX-DU1603D User Manual]
第 18 页 共 27 页
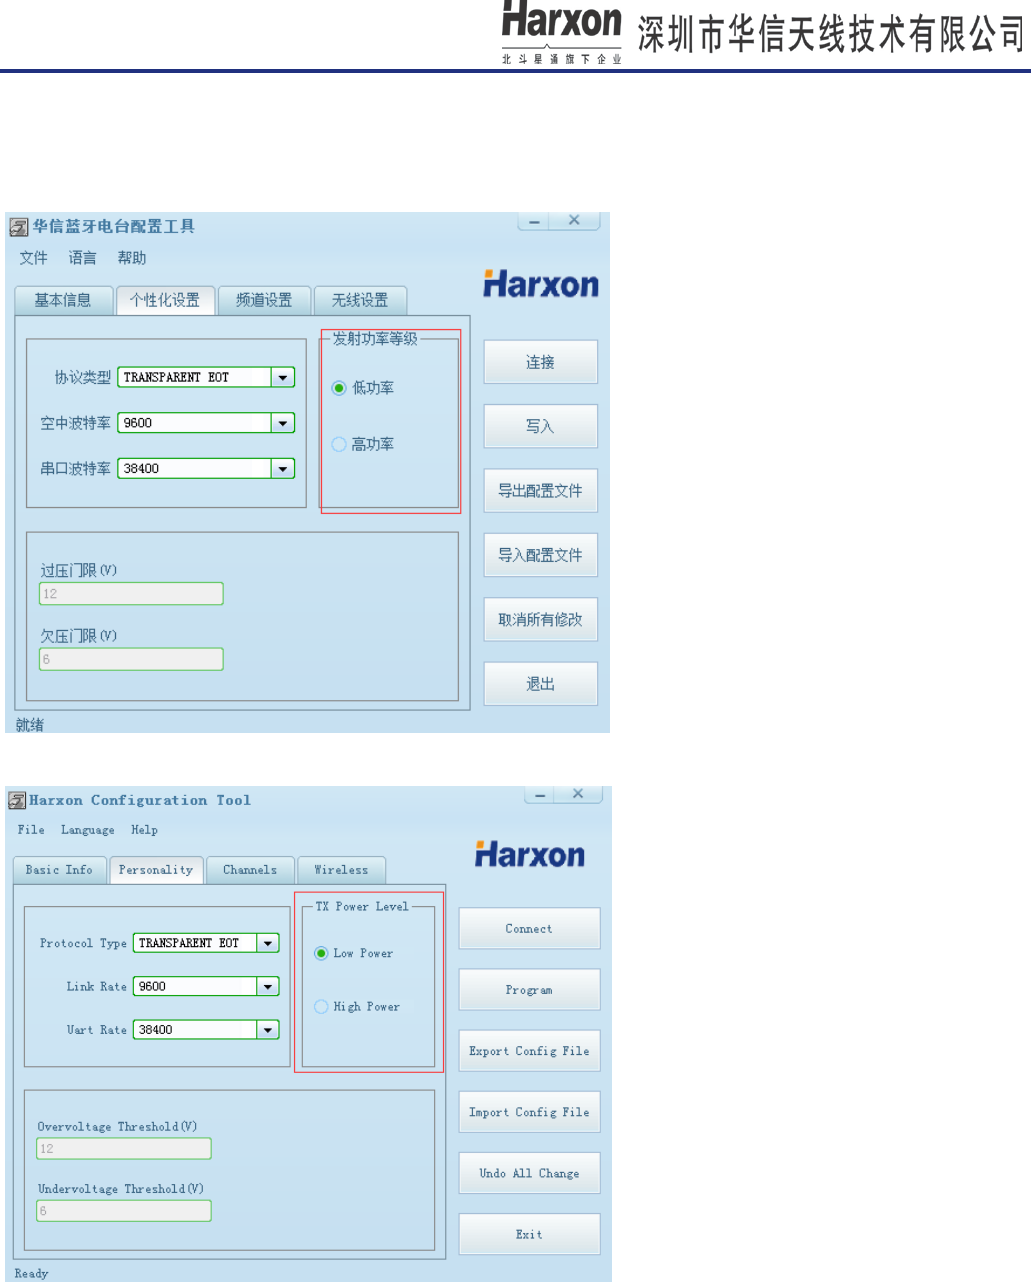
5.5 TX Power Settings(Optional)
In TX Power Level tab, user can select low power or high power as the current TX power.
[HX-DU1603D User Manual]
第 19 页 共 27 页
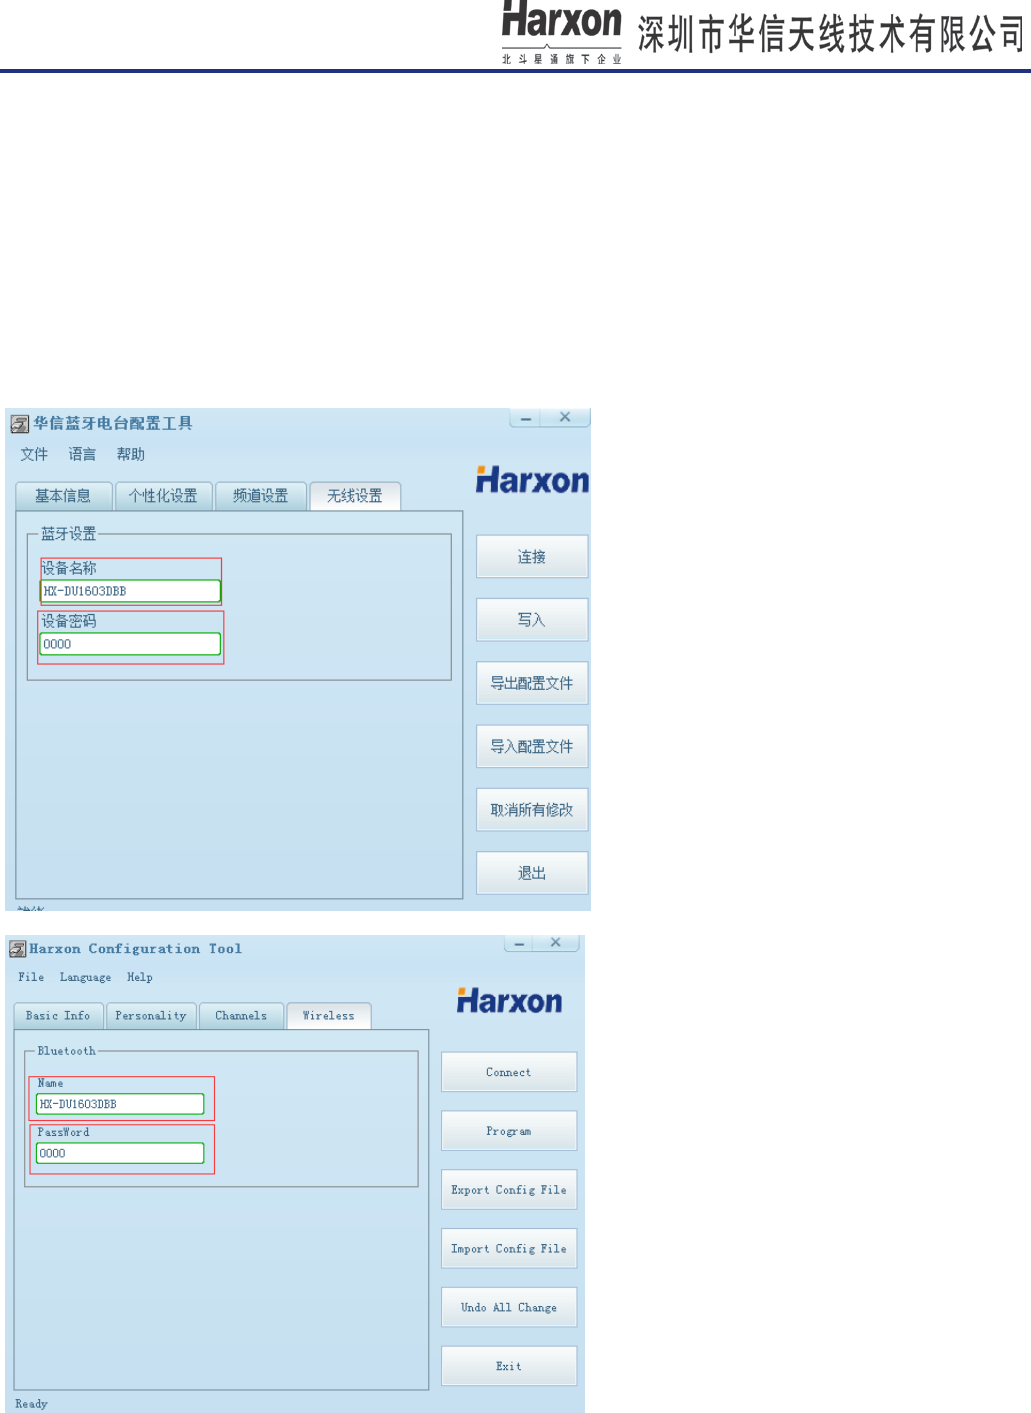
5.6 Bluetooth Settings(Optional)
In Wireless tab, we can modify the device name(Name) and PIN(Password). The device name is shown on a
remote Bluetooth device during/service discovery.It is limited to 12 characters.The Pin has a maximum length
of 4 alphanumeric characters; The factory-default is “0000”.
Note-The settings is only adapt to classic Bluetooth, not for Bluetooth low energy. We should execute it on
“Bluetooth/Config” of radio menu after modify it on configuration tools, so the settings is working.

[HX-DU1603D User Manual]
第 20 页 共 27 页
6. Common troubles
Troubles Probable reason Solution
Turn on Radio fail
① DC voltage is too slow from
external power supply(external
power supply).
② Power key to press long is not
stable.
③ If system is supplied by battery,
the battery probably has run out.
① If system’s power is from extern
power supply, please make sure
that DC voltage is 9V.
②If system is supplied by battery,
make charge for battery please.
③
Press power key and last about
3 to 5 seconds when turn on radio.
Software can’t connect to radio
① The parameter of serial is not as
same as radio.
② The current serial COM is taken
or busy.
① Select the serial baud is as
same as radio of Serial Baud, and
data bits:8,Even/Odd:none,
Stop bits:1,Flow control:None
② If the current serial COM is
taken, please free it, then select
and open it.
Radio can’t send or receive data
① communication parameter
between radio with others radio is
not the same.
② radio isn’t connected with
antenna.
① Make sure the fact that
communication parameter
between radio with others radio is
the same.
② Make sure that radio has
connected with antenna.
[HX-DU1603D User Manual]
第 21 页 共 27 页
7. Technical Specifications
General Specifications
Item Specification
Frequency Range 410-470MHz
Operating Mode Half-duplex
Channel Spacing 12.5KHz
Modulation GMSK/4FSK
Numbers of Channel 1-36
Operating Voltage 7.5V
Power Consumption
(typical)
High power
level
8.5W@7.5V DC
Low power
level
3.5W@7.5V DC
Standby 1.0W@7.5V DC
Frequency Stability ≤±1.0ppm
Dimension 150×83×31mm
Weight About 560g
Temperature(operation) -20~+40℃
Temperature(storage) -40~+85℃
Antenna port TNC, female
Antenna impedance 50ohm
Data interface 5pin LEMO,HGG.1B.305
Charging Time 8h
Continuous
Working Period
8h
Strand-by Time 35h
Water proof level IP67
[HX-DU1603D User Manual]
第 22 页 共 27 页
Transmitter Specifications
Item Specification
RF output power
High power
(2W)
33.5±0.5dBm@DC 7.5V
Low power
(0.5W)
27±1dBm@DC 7.5V
RF Power Stability ±1dB
Adjacent Channel
Power
>50dB
Receiver Specifications
Item Requirements
Sensitivity -115dBm@BER 10-3,9600bps
Adjacent Channel
Selectivity
>45dB@12.5KHz
Modem
Name Requirements
Data link Rate 19200bps、9600bps
Serial Baud rate 9600、19200、38400、115200bps
Bluetooth
Name Requirements
Bluetooth Core 2.0、2.1
Bluetooth antenna Internal Onboard Antenna
8. Apendix
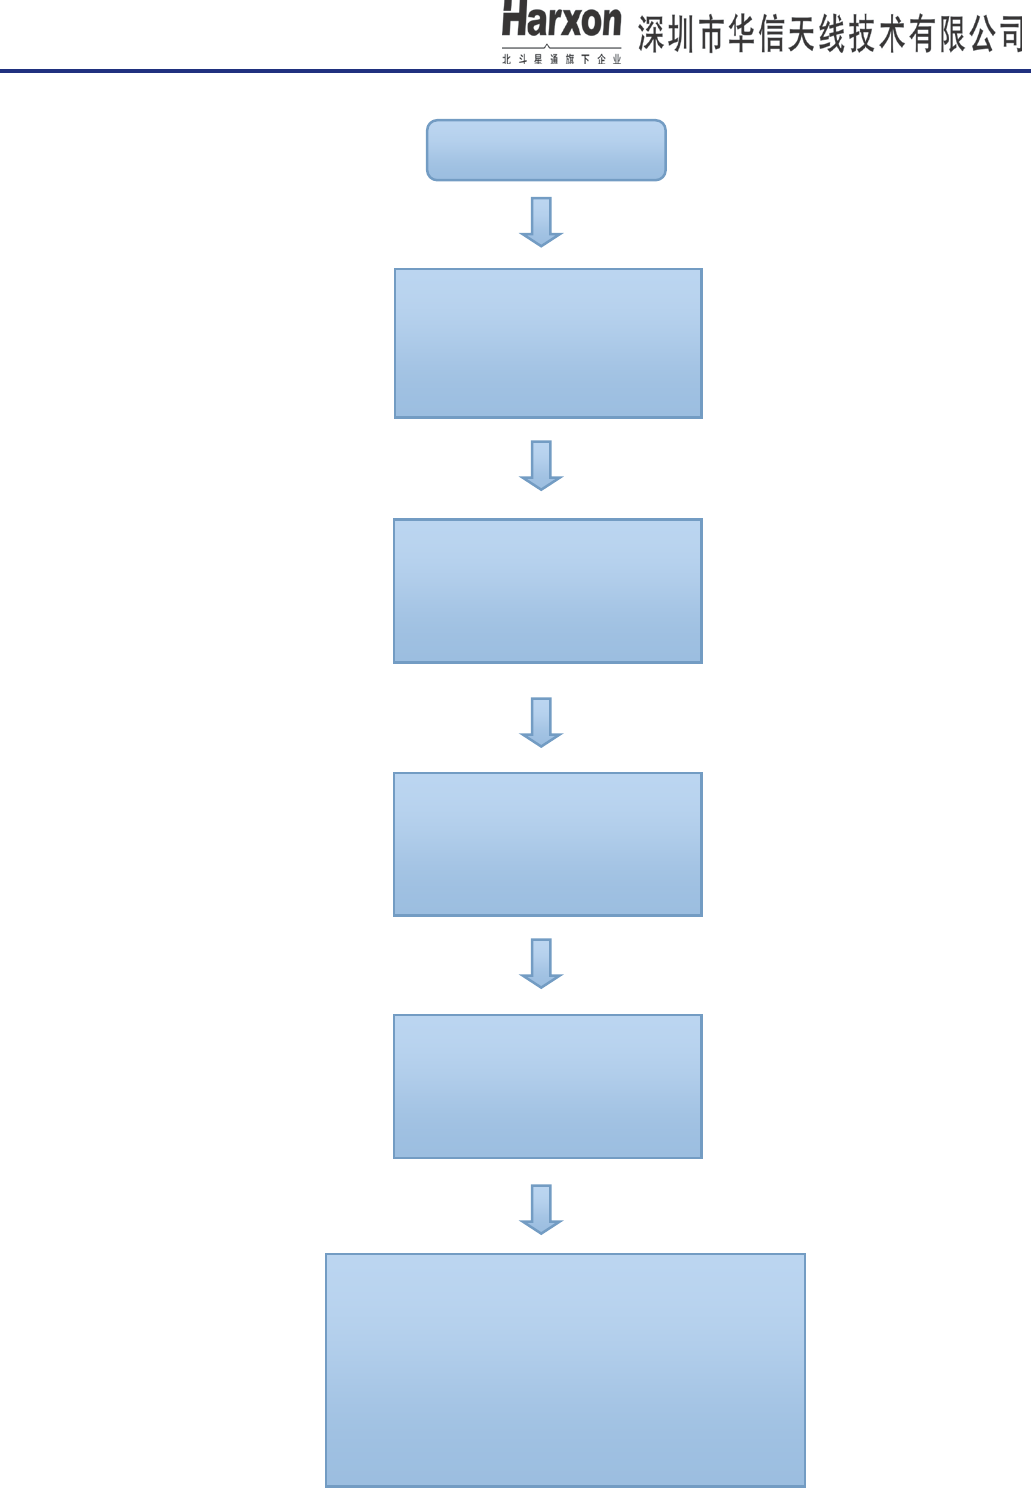
8.1 Radio Communication Example(Data Link:Uart)
The following configuration flow chart is for radio A and B
[HX-DU1603D User Manual]
第 23 页 共 27 页
Turn on radio A and B
Set radio A and B of TX/RX for
410.125 MHZ.
Set radio A and B of current
communication protocol for
TRANSEOT.
.
Set radio A and B of current link
rate for 9600,tx power is 0.5W,
Serial baud is 38400.
Radio A,B connected to PC via a serial cable, send
data to radio via serial assistant on setting up PC
connected with radio A. Then ,check whether serial
assistant with radio B outputs data or not.
If serial assistant with radio B didn’t output data,
please check whether the parameter of radio B is the
same as radio A or not.
Set radio A and B of data link
for Uart, Radio mode is
Transceiver.
[HX-DU1603D User Manual]
第 24 页 共 27 页
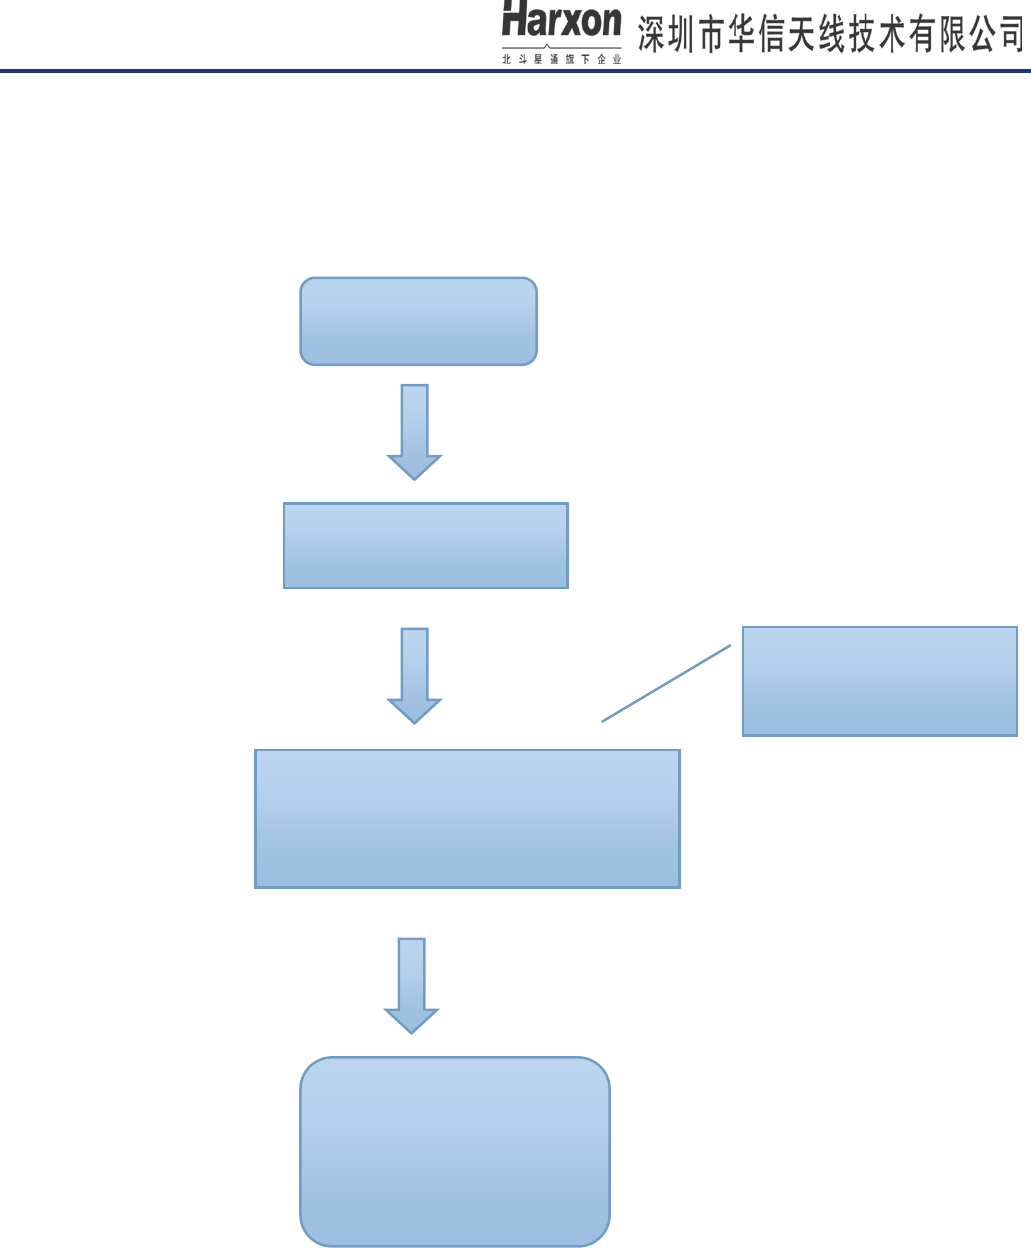
8.2 Bluetooth communication example
8.2.1 Slave mode communication
(1) At first, we should pair blue device in slave mode, the following chart for slave paring.
(2) After pairing success of slave mode, select Bluetooth on Data Link menu, then configure other radio
parameter, current TX/RX, Data protocol, Link rate, Radio mode. For example: TX=RX=410.125MHZ,Data
protocol:TRANSEOT,Link rate:9600,Radio mode:Transceiver.
Select menu “Blue 2.0 Pair”,
then enter.
Turn on Bluetooth
(ONOFF)
Note-you should had
better allow radio in slave
mode of waiting for pairing.
Select menu “slave mode”, then launch it and
waiting for pairing. If other bluetooth terminal
as master didn’t pair with radio in 5 minutes.
The radio will display on a pair overtime tip.
If pair successfully, the BT
led is on, blue icon display on
state bar of radio. If fail to
pair, the radio will display on
a pair overtime tip.
[HX-DU1603D User Manual]
第 25 页 共 27 页
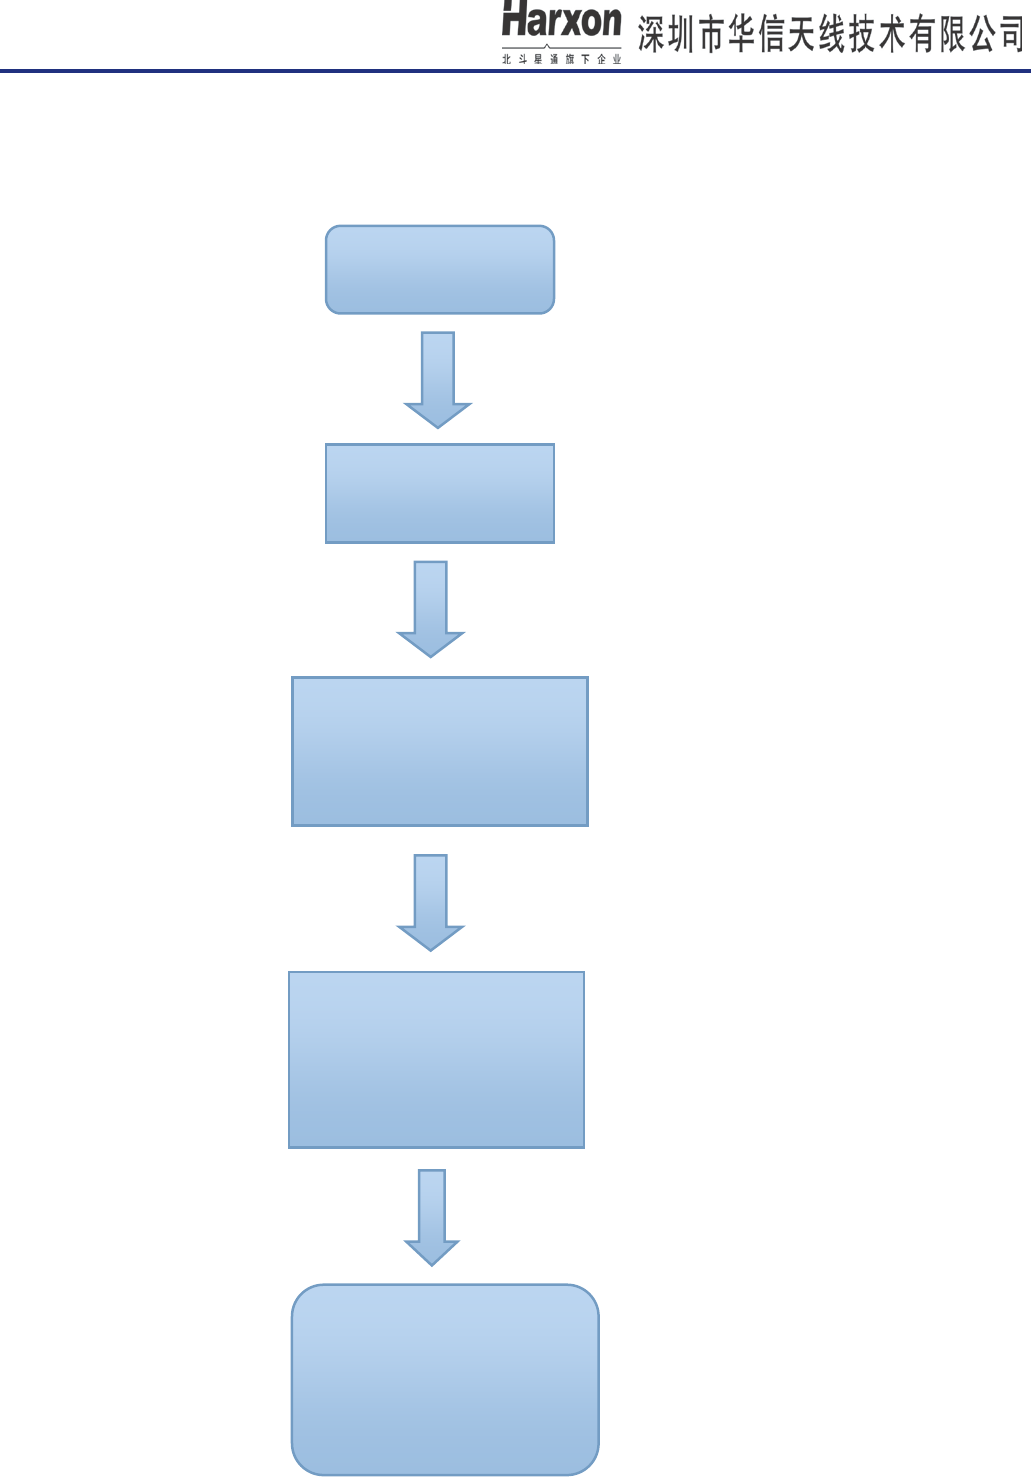
8.2.2 Master mode communication
(1) At first, we should pair blue device in master mode, the following chart for master paring.
Turn on Bluetooth
(ONOFF)
Select menu “Blue 2.0
Pair”, then enter.
Select menu“master pair”,
then launch it, at the same
time, device begin to scan
Bluetooth devices nearby.
After scanning over, current
menu will display on current
scanning result. Select the
device that you want to pair
with .
If pair successfully, the BT
led is on, blue icon display on
state bar of radio. If fail to
pair, the radio will display on
a pair failure tip.

[HX-DU1603D User Manual]
第 26 页 共 27 页
(2) After pairing success of master mode, select Bluetooth on Data Link menu, and then configure other
radio parameter, current TX/RX, Data protocol, Link rate, Radio mode. For example: TX=RX=410.125MHZ,
Data protocol:TRANSEOT,Link rate:9600,Radio mode:Transceiver.
FCC statements:
This device complies with part 15 of the FCC rules. Operation is subject to the following two
conditions: (1) this device may not cause harmful interference, and (2) this device must accept
any interference received, including interference that may cause undesired operation.
NOTE: The manufacturer i s not r esponsible for a ny r adio or TV i nterference c aused by
unauthorized modifications or changes to this equipment. Such modifications or changes could
void the user’s authority to operate the equipment.
NOTE: This equipment has been tested and found to comply with the limits for a C lass B
digital d evice, pur suant to p art 15 o f t he F CC R ules. These l imits are designed t o pr ovide
reasonable protection against harmful interference in a r esidential installation. This equipment
generates us es an d can r adiate r adio frequency ener gy and, i f no t i nstalled an d u sed i n
accordance w ith t he i nstructions, m ay c ause har mful i nterference t o r adio c ommunications.
However, there is no guarantee that interference will not occur in a particular installation. If this
equipment does c ause h armful i nterference t o r adio or t elevision r eception, w hich can b e
determined by t urning the eq uipment off and on, t he us er i s encouraged to t ry to c orrect the
interference by one or more of the following measures:
‐ Reorient or relocate the receiving antenna.
‐ Increase the separation between the equipment and receiver.
‐Connect the equipment into an outlet on a circuit different from that to which the receiver is
connected.
‐Consult the dealer or an experienced radio/TV technician for help.
[HX-DU1603D User Manual]
第 27 页 共 27 页
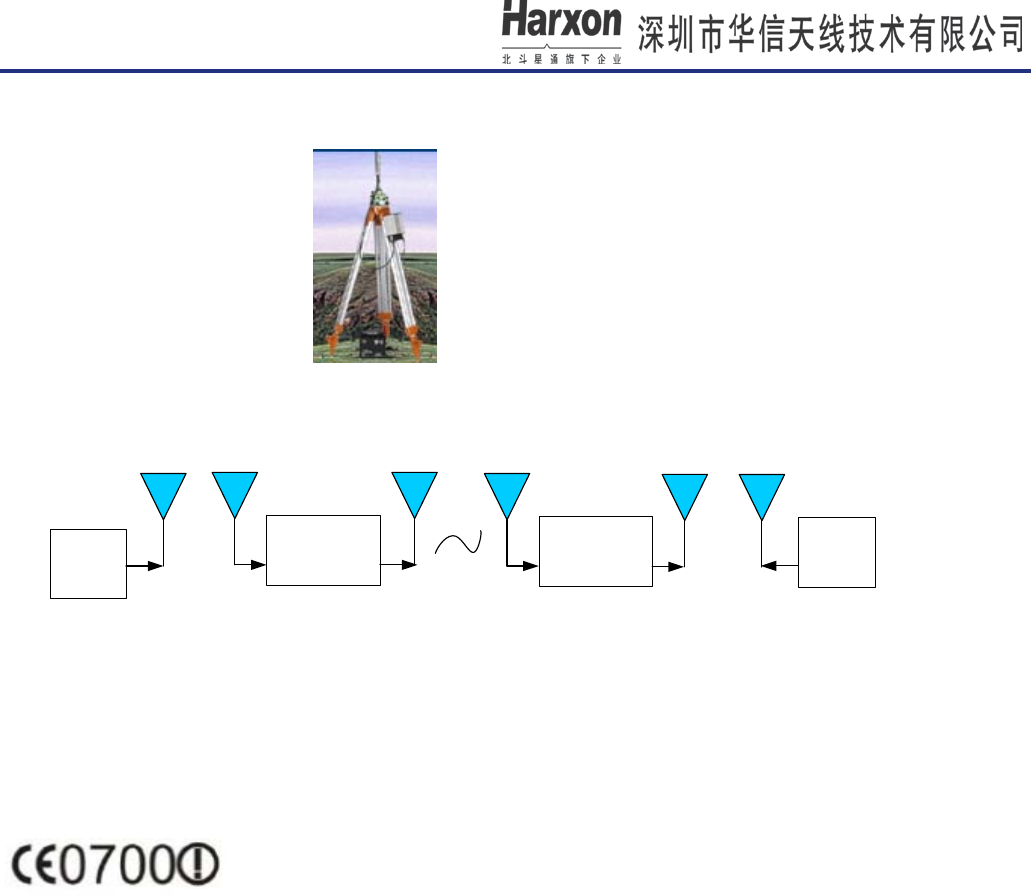
Installation
A、Mounting:Hanging on a tripod
B、communication as follows:
RTK
Wireless
Data
Transceiver
RTK
Wireless
Data
Transceiver
BT
antenna
BT
antenna
BT
antenna
BT
antenna
UHF
antenna
UHF
antenna
The SAR limit of USA (FCC) is 8 W/kg averaged over one gram of tissue. The Device has
also been tested against this SAR limit. The highest SAR value reported under this standard
during product certification for use when properly worn on the body is 5.380 W/kg(Occupational).
Simultaneous RF exposure is 5.496W/Kg (Occupational).
please refer to the training information for safety RF exposure under occupational operation.