HBC radiomatic E20004 Crane Remote Control Transmitter User Manual BE ECO L V2 1
HBC-radiomatic GmbH Crane Remote Control Transmitter BE ECO L V2 1
Contents
- 1. users manual
- 2. 1521 statement page
users manual
Operating Instructions
Radio Transmitter eco L
BE-ECO-L-V2-1.DOC [ Word 97 ] FL Page 1 / 16
HBC-radiomatic GmbH • D-74564 Crailsheim • GERMANY
All rights reserved through HBC-radiomatic GmbH. Technical changes made without notice. 2000-07-28
Radio Control System
HBC – Radio Controls
R
Ra
ad
di
io
o
T
Tr
ra
an
ns
sm
mi
it
tt
te
er
r
e
ec
co
o
L
L
Operating Instructions
Radio Transmitter eco L
Page 2 / 16 BE-ECO-L-V2-1.DOC [ Word 97 ] FL
HBC-radiomatic GmbH • D-74564 Crailsheim • GERMANY
28.07.2000 All rights reserved through HBC-radiomatic GmbH. Technical changes made without notice.
Radio Control System
Before proceeding with the installation, operation or maintenance of the radio control
equipment it is important that the installation, operating, and maintenance personnel
read this bulletin carefully in order to ensure the safe and efficient use of the crane or
machine.
Also, it is strongly recommended that the personnel responsible for the operation,
inspection, and servicing of the crane or machine on which this radio control is installed,
read this manual carefully.
If any instructions are unclear, contact the manufacturer or distributor of the radio control
before attempting to install or use the radio controller on a crane or a machine.
Note :
Electrical wiring diagrams have been packed with this manual to ensure
installations without any problems.
If these items are missing, contact the manufacturer or distributor before
attempting to install or use the radio control system to a machine.
Manufacturer : HBC-radiomatic GmbH
Haller Straße 49 - 53
D-74564 Crailsheim
Tel. +49 ( 0 ) 79 51 – 3 93 - 0
Fax +49 ( 0 ) 79 51 – 3 93 - 50
Printing errors, omissions and mistakes excepted ! – All details are subject to change without notice.
™radiomatic is a registered German trademark.
©2000 , HBC-radiomatic GmbH , D-74564 Crailsheim
Any duplication of operating firmware and any duplication of this documentation or parts of it without written
consent of HBC-radiomatic GmbH is prohibited.

Operating Instructions
Radio Transmitter eco L
BE-ECO-L-V2-1.DOC [ Word 97 ] FL Page 3 / 16
HBC-radiomatic GmbH • D-74564 Crailsheim • GERMANY
All rights reserved through HBC-radiomatic GmbH. Technical changes made without notice. 2000-07-28
Radio Control System
Table of Contents
1Helpful Hints.................................................................................4
2Safety Regulations .......................................................................5
2.1 Warning Notes...................................................................................5
2.2 Safety Notes Regarding Operation .....................................................6
2.3 Safety Notes when Operating the Transmitter.....................................6
2.3.1 Safety Notes Regarding Battery and Battery Charger.............6
2.4 Safety Notes Regarding Maintenance .................................................7
2.5 Certificates, Certifications .................................................................7
2.5.1 Nameplate.............................................................................7
3Description of the System and Application ..................................8
3.1 Specification .....................................................................................8
3.1.1 Dimensions and Operating Elements of eco L........................9
4Operation.................................................................................... 10
Enabling of the Proportional Outputs............................................... 11
Utilization of the START Key as "shift" Key...................................... 11
4.1 Battery Charger ............................................................................... 12
4.2 Special Operating Modes (Options).................................................. 13
4.2.1 Scanner .............................................................................. 13
4.2.2 tele-teach-in Battery TTB 05 ................................................ 13
5Maintenance............................................................................... 15
5.1 In Case of a Defect........................................................................... 15
6Trouble-Shooting........................................................................ 16
Operating Instructions
Radio Transmitter eco L
Page 4 / 16 BE-ECO-L-V2-1.DOC [ Word 97 ] FL
HBC-radiomatic GmbH • D-74564 Crailsheim • GERMANY
28.07.2000 All rights reserved through HBC-radiomatic GmbH. Technical changes made without notice.
Radio Control System
1Helpful Hints
Following symbols are used in the operating instructions at hand :
Warnings
This symbol will show situations that could be dangerous for people or machines.
Pay particular attention in reading the parts of this manual.
Be careful and try to avoid these situations.
Notes
This symbol will show important operating hints to guarantee a long working life
to the apparatus.
Do not forget to observe these notes. The radio control could become unreliable.
This symbol will show general information.
Others
This symbol will show regulations, e.g. notes on local, regional and federal
regulations on labor safety and accident prevention when operating a radio
controlled system.
This symbol will identify the "Operation" section.
This symbol will give you helpful maintenance notes in the corresponding section.
This symbol will identify the trouble-shooting section.
Operating Instructions
Radio Transmitter eco L
BE-ECO-L-V2-1.DOC [ Word 97 ] FL Page 5 / 16
HBC-radiomatic GmbH • D-74564 Crailsheim • GERMANY
All rights reserved through HBC-radiomatic GmbH. Technical changes made without notice. 2000-07-28
Radio Control System
2Safety Regulations
Ø Strictly observe and always adhere to the respective regulations on labor safety and
accident prevention when operating a radio controlled system !
Ø Retrofitting of a radio control to a crane or machine is considered to be a major
modification. The crane or machine must therefore be subject to an approval
inspection. The user of the crane or machine is responsible for a proper entry of this
inspection in the crane’s or machine’s inspection record.
Ø The commissioning of the radio equipment is only possible if you dispose of a
special authorization from the postal authorities.
Ø Before using the radio control, it is necessary to be familiarized with this system !
Therefore, only authorized and sufficiently instructed personnel who are familiar with
the instructions should be allowed to use the radio control.
Ø In case of a defect, an emergency situation and whenever a malfunction occurs in
the working area of the radio system, it is required that it be switched OFF
immediately until the cause of the defect has been located and repaired !
− Take out the key from the transmitter’s key switch.
− Disconnect the connecting cable from the receiver.
Ø Have defective radio systems repaired only by an expert. Use only original
replacement parts of the manufacturer for any repair.
2.1 Warning Notes
Ø The crane operator is required to control the crane in such a way that no danger
may possibly occur, even if the radio transmission is interrupted so that no
counteraction is possible anymore (e.g. for the turning of slewing tower cranes). If
necessary, stops limiting the slewing range may have to be installed on the slewing
tower crane in order to ensure that the crane may not be moved into a hazardous
area.
Ø The remote control transmitter may be switched ON only as long as a visual contact
exists with the crane.
Ø The minimum duration of the command and the response time are slightly increased
by the radio control (cf. specifications of the radio control system).
Ø The radio control transmitter may only be connected to machines suitable for the
installation of a radio control system via the appropriate cable connections.

Operating Instructions
Radio Transmitter eco L
Page 6 / 16 BE-ECO-L-V2-1.DOC [ Word 97 ] FL
HBC-radiomatic GmbH • D-74564 Crailsheim • GERMANY
2000-07-28 All rights reserved through HBC-radiomatic GmbH. Technical changes made without notice.
Radio Control System
2.2 Safety Notes Regarding Operation
Ø Before using the radio control system for the first time, read these operating
instructions completely and carefully.
Ø In case of a defect, an emergency situation and whenever a malfunction occurs in
the working area of the radio system, it is required to de-energize the radio
equipment immediately until the cause of the fault has been located and repaired !
− Switch OFF the transmitter via the key switch or the EMERGENCY-STOP
pushbutton.
− Disconnect the connecting cable from the receiver.
Ø During breaks and at the end of work, disconnect the transmitter by means of the
key switch or the EMERGENCY-STOP pushbutton.
Ø Be cautious when working with the radio control. – When using the radio control,
choose a stable location from which you can see the entire working area.
Ø Usage of radio remote control systems outside of manufacturer’s guidelines (section
3) may result in invalidity of the guarantee.
2.3 Safety Notes when Operating the Transmitter
Ø Before you start working, always verify the operation of the EMERGENCY-STOP
pushbutton.
Ø It is not allowed to leave a connected transmitter and not supervise it.
Ø In case of an emergency and in case of all sorts of problems in the working range of
the machinery or in case of a technical failure of the radio control, you must stop the
machine by pressing the EMERGENCY-STOP pushbutton !
Ø During breaks, disconnect the transmitter by means of the key switch or the
EMERGENCY-STOP pushbutton.
Ø At the end of work, switch OFF the transmitter by means of the key switch, pull out
the key and store it at a safe place.
Ø The operation of the transmitter is permissible only with the carrying set included
with the transmitter (possibility of mixing up the controls) !
2.3.1 Safety Notes Regarding Battery and Battery Charger
Ø Operate the battery charger at about room temperature and protect it against
overheating (e.g. direct sun radiation).
Ø Quick charging of NiCd batteries only in a temperature range between 50 °F and
104 °F (+10 °C and +40 °C).
Ø Protect the battery contacts against accidental shortening, i.e. do not store the
batteries in a tool box or carry them loosely in your pockets. A bunch of keys is
enough to shorten the battery. Use the protective caps delivered.
Ø Pay attention to correct polarity ! – After inserting the battery into the battery
compartment of the battery charger, the nameplate must be visible. Operation of the
transmitter will not be possible otherwise !
Ø The NiCd batteries are charged in the factory. Due to longer storage times, however,
the batteries may reach you partially charged or discharged. Therefore, they should
be charged before the first use. To charge the battery, remove it from the transmitter
and put it into the battery compartment of the battery charger.
Operating Instructions
Radio Transmitter eco L
BE-ECO-L-V2-1.DOC [ Word 97 ] FL Page 7 / 16
HBC-radiomatic GmbH • D-74564 Crailsheim • GERMANY
All rights reserved through HBC-radiomatic GmbH. Technical changes made without notice. 2000-07-28
Radio Control System
2.4 Safety Notes Regarding Maintenance
Ø Pay attention to smaller deficiencies. They are often the symptoms of a major defect
and may result in severe malfunctions of the radio system.
Ø Have defective radio systems repaired only by an expert. Use only original
replacement parts of the manufacturer for any repair.
2.5 Certificates, Certifications
This system made by HBC-radiomatic GmbH corresponds to the CE standards and has
an approval of the Federal Office for Homologations in the field of Telecommunications
(Federal Republic of Germany).
2.5.1 Nameplate
The nameplate indicates all important data of the radio equipment. Besides the service
voltage and radio frequency of the system, this plate also indicates the production
number which is necessary in case of possible further inquiries or spare part orders. It
also contains the European control number for Homologation in the Telecommunication.
Note : Please make sure that the nameplate is always clearly visible to allow
for a verification by the authorities.
Operating Instructions
Radio Transmitter eco L
Page 8 / 16 BE-ECO-L-V2-1.DOC [ Word 97 ] FL
HBC-radiomatic GmbH • D-74564 Crailsheim • GERMANY
2000-07-28 All rights reserved through HBC-radiomatic GmbH. Technical changes made without notice.
Radio Control System
3Description of the System and Application
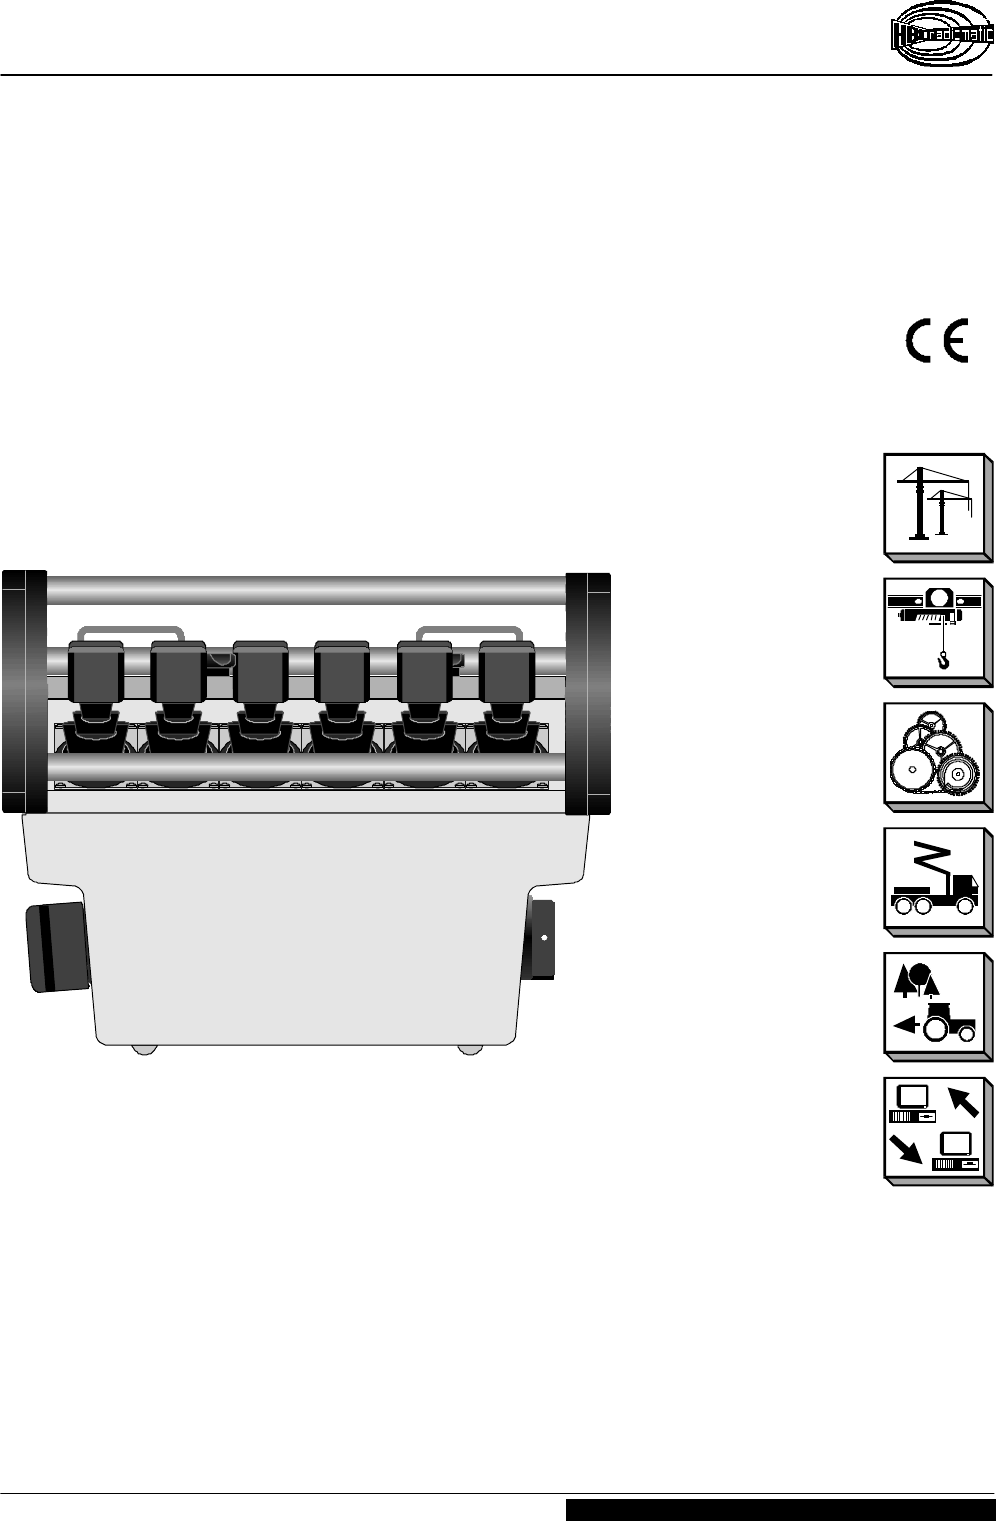
The system consists of a transmitter hosing with six linear levers, two selector switches,
a key switch and an EMERGENCY-STOP pushbutton, a battery charger with two
rechargeable NiCd batteries and a receiver with an antenna.
The radio transmitter eco L enables – in combination with a corresponding receiver –
control of small and medium loading cranes, hoists and working machines in
construction and industry.
The transmitter housing is made of glass-fiber reinforced ABS plastic with a built-in
antenna.
The system is equipped to control receivers with 6 operating commands and works
within a 30 cm or 70 cm frequency band.
State of the art radio technology complying with the latest guidelines of the regulations
on labor safety and the use of highly developed microprocessor technology guarantees
optimal operating safety, availability and longevity.
Following radio receivers can be controlled by this transmitter type :
FSE 707 PH FSE 717
3.1 Specification
General Technical Data
System eco L
Number of control commands 6
Unique system address over 65,000 possibilities
Transmitter Specific Technical Data
Transmitting power
(FuS 671/3 or 680/3) < 10 mW (synthesizer)
Type of battery FuB 05 AA (orange)
Voltage supply via NiCd battery 6 V DC / 600 mAh
Max. duration of operation 16 h ( 50 % ON)
8 h (100 % ON)
Housing material glass-fiber reinforced ABS plastic
Weight (approx.) 2,0 kg (4.4 lb.)
Operating temperature –25 °C ... +75 °C (–13 °F ... +167 °F)
Protection class IP 55
Operating Instructions
Radio Transmitter eco L
BE-ECO-L-V2-1.DOC [ Word 97 ] FL Page 9 / 16
HBC-radiomatic GmbH • D-74564 Crailsheim • GERMANY
All rights reserved through HBC-radiomatic GmbH. Technical changes made without notice. 2000-07-28
Radio Control System
3.1.1 Dimensions and Operating Elements of eco L
File: ECO-L.CDR [ Corel Draw 6.0 ] 02-2 1-2 00 0 FL
176 mm (6.9 ")
126 mm (4.9 ")
88 mm (3.5 ")
216 mm (8.5 ")
202 mm (8.0 ")
À
Á
Â
6 linear levers
2 selector switches
pushbuttonEMERGENCY-STOP
Ã
Ä
Å
Key switch "Transmitter ON"
Loop for carrying belt
Roll-over bar
À
Â
Å
Á
À
Â
Ä
Å
Ã

Operating Instructions
Radio Transmitter eco L
Page 10 / 16 BE-ECO-L-V2-1.DOC [ Word 97 ] FL
HBC-radiomatic GmbH • D-74564 Crailsheim • GERMANY
2000-07-28 All rights reserved through HBC-radiomatic GmbH. Technical changes made without notice.
Radio Control System
4Operation
Caution :
The operation of the transmitter is permissible only with the carrying set included
with the transmitter (possibility of mixing up the controls) !
1. Prior to the first initial start-up or
before you start working, a charged
FuB 05 AA battery must be inserted
into the battery compartment (item.
À). The battery supplies the voltage
required for the operation of the
transmitter (6 V DC).
Note :
After inserting the battery, the
nameplate must be visible.
Operation of the transmitter will
not be possible otherwise !
2. Unlock the EMERGENCY-STOP
pushbutton (item Á) by turning it.
3. Switch ON the radio transmitter via
the key switch (item Â).
The dual color LED flashes green, i.e.
the transmitter is operational.
A radio connection to the receiver is established when the red LED "HF/RF/H.F./HF" on
the receiver will be extinguished and the green LED "Si1" is illuminated (see radio status
panel of the receiver), i.e. the radio system is ready to operate and the control
commands may be input via the transmitter.
If the dual color LED on the transmitter flashes red and / or an acoustic signal comes,
this indicates that the battery is almost fully discharged. Now, you must replace the
discharged battery by a charged one and recharge the discharged battery (cf. "Battery
Charger", section 4.1).
Note :
If the discharged battery is not replaced by a charged one, the transmitter will
automatically be switched OFF after a few minutes.
If the transmitter was deactivated – unintentionally or intentionally – via the
EMERGENCY-STOP pushbutton following steps have to be carried out for further radio
transmission :
1. Switch OFF the transmitter via the key switch.
2. Unlock the EMERGENCY-STOP pushbutton.
3. Switch the transmitter ON again via the key switch.
Note :
The transmitter must always be switched ON via the key switch and not via the
EMERGENCY-STOP pushbutton.
Since switching OFF the transmitter when it is not used is quite often forgotten, it is
equipped with an automatic deactivation (auto OFF function). The transmitter will thus be
switched OFF automatically about 15 minutes after the last control command has been
input.
The automatic transmitter deactivation also helps to save the energy of the rechargeable
batteries.
Á
Â
Nameplate of battery
À

Operating Instructions
Radio Transmitter eco L
BE-ECO-L-V2-1.DOC [ Word 97 ] FL Page 11 / 16
HBC-radiomatic GmbH • D-74564 Crailsheim • GERMANY
All rights reserved through HBC-radiomatic GmbH. Technical changes made without notice. 2000-07-28
Radio Control System
Enabling of the Proportional Outputs
The "START" key must be depressed after the system has been activated and enabled
via S1 (at the receiver). It is not until this has been done that the functions of the
compact joysticks at the receiver will be enabled.
Utilization of the START Key as "shift" Key
The "RPM+" and "RPM–" keys have a dual function.
If the "START" key is kept depressed and the "RPM+" resp. "RPM–" key is also
activated, the "motor start" resp. "motor stop" command will be output.
Operating Instructions
Radio Transmitter eco L
Page 12 / 16 BE-ECO-L-V2-1.DOC [ Word 97 ] FL
HBC-radiomatic GmbH • D-74564 Crailsheim • GERMANY
2000-07-28 All rights reserved through HBC-radiomatic GmbH. Technical changes made without notice.
Radio Control System
4.1 Battery Charger
Fig. left shows battery charger type FLG 105 that is suitable for one each of the
battery types FuB 05 AA or FuB 3A (with adapter).
Charge Battery
1. Connect the net cable of the battery charger to the mains (cf.
nameplate of the battery charger).
2. Insert the battery into the battery compartment (item Á) (the
nameplate of the battery must be visible from outside).
=> The red LED (item À) is illuminated.
Display of the state of charge (red LED)
LED illuminated : ......................... The battery is being charged.
LED off or flashing : .................... The battery is charged,
i.e. ready for operation.
LED flashes when
inserting the battery : ................... The Battery is exhausted
or defective.
Remarks :
- A discharged FuB 05 AA battery is fully charged after about 4 hours. Overcharging
of the battery is prevented by the electronic that will limit the charging process to a
maximum of 5 hours.
- Quick charging of NiCd batteries only in a temperature range between 50 °F and
104 °F (+10 C and +40 C).
- Protect the battery contacts against accidental shortening, i.e. do not store the
batteries in a tool box or carry them loosely in your pockets. A bunch of keys is
enough to shorten the battery. Use the protective caps delivered.
- Operate the charging unit at about room temperature and protect it against
overheating (e.g. direct sun radiation).
++
LadungnurbeiZimmertemperatur!
Akkueinlegen.
Dauerlicht:Akkuwirdgeladen.
Blinken:Akkuentnehmen.
Betriebsanleitung beachten!
For roomtemperatureonly!
Insertbattery.
Steadylight:Charging.
Blinkinglight:Removebattery.
!See operating instructions
Á
À
Operating Instructions
Radio Transmitter eco L
BE-ECO-L-V2-1.DOC [ Word 97 ] FL Page 13 / 16
HBC-radiomatic GmbH • D-74564 Crailsheim • GERMANY
All rights reserved through HBC-radiomatic GmbH. Technical changes made without notice. 2000-07-28
Radio Control System
4.2 Special Operating Modes (Options)
In this section special operating modes are described. They are available as options with
certain radio systems.
If your radio system is not equipped with one of those operating modes (options) you
can leave out the corresponding section.
4.2.1 Scanner
With the option scanner, the transmitter and the receiver are equipped with 4 radio
frequencies each (refer to wiring diagrams).
If the radio channel used is currently occupied by another operator, another radio
channel may be selected via a rotary switch. The scanner in the receiver will
automatically follow the transmitter to the radio frequency selected.
After switching ON the transmitter (key switch ON, EMERGENCY-STOP pushbutton
unlocked) or after a frequency change during operation, it will last only a short time until
the receiver has "followed" the transmitter to the frequency selected.
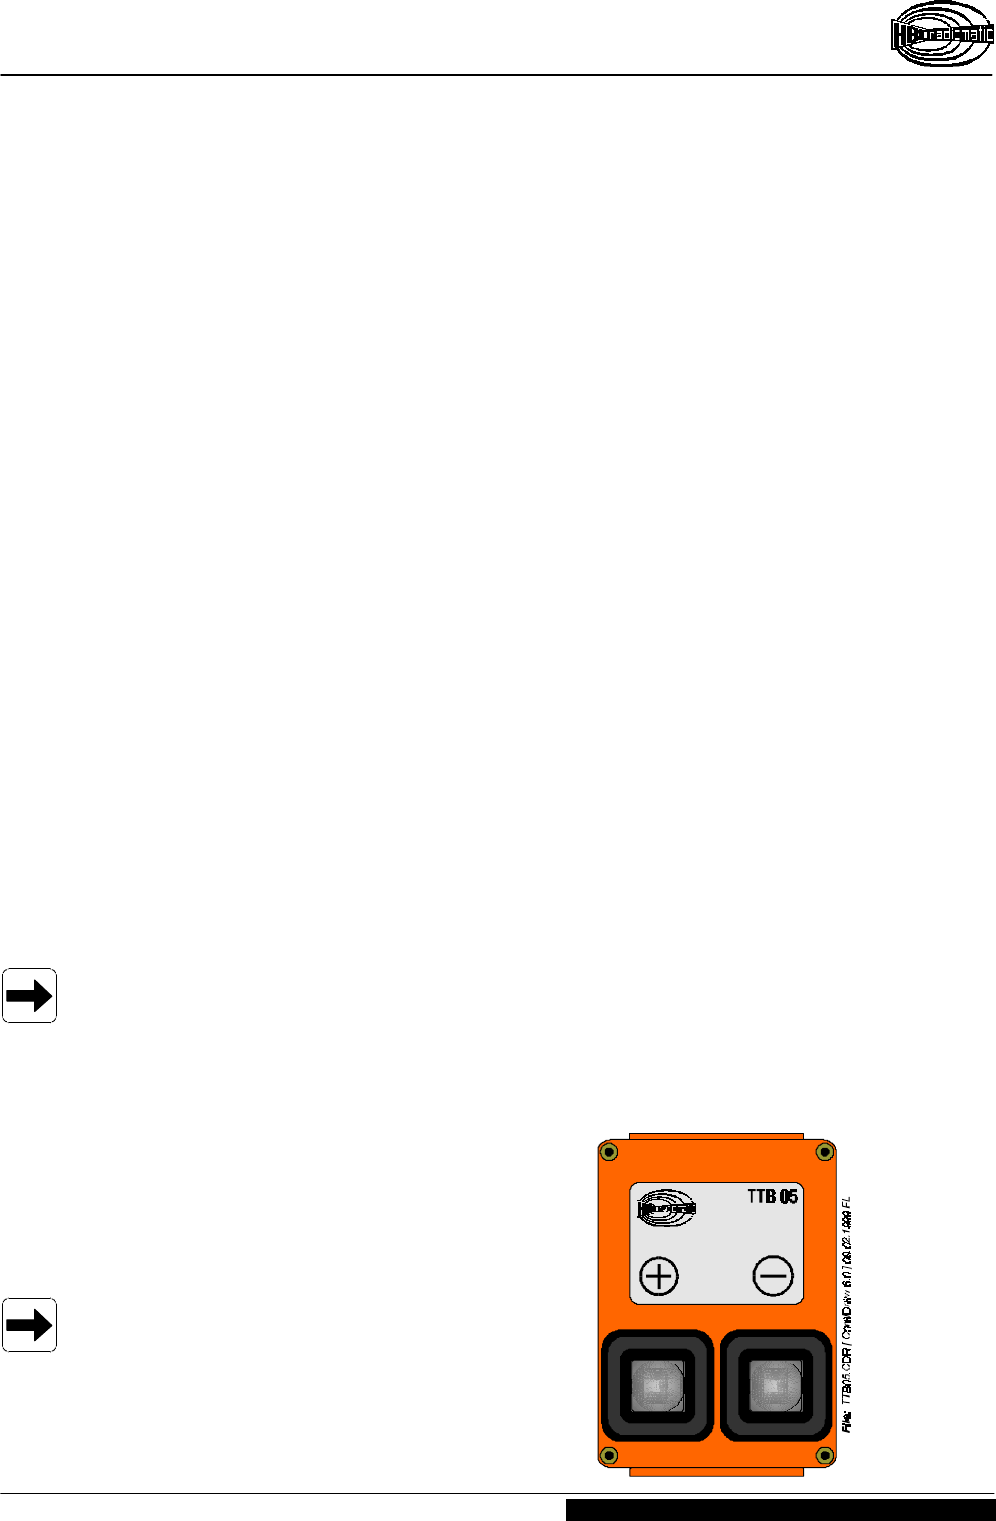
4.2.2 tele-teach-in Battery TTB 05
The eco L radio control features together with the FSE 717 radio receiver the so-called
tele-teach-in option.
This specific function allows you to input and store the minimum as well as maximum
speeds assigned to the individual linear lever functions in a simple manner.
The tele-teach-in option is available for all proportional functions (linear lever
commands).
Important note !
Your radio control system was already adapted to your specific crane by a
retailer respectively the manufacturer.
Should the crane movements nevertheless be executed in a jerky manner or too
fast, then please contact your retailer or the manufacturer in order to have the
settings adapted.
In the following, the programming of the minimum and
maximum speeds of the individual control functions will be
described by means of tele-teach-in.
The programming keys ("+" and "–") are located on the
TTB 05 tele-teach-in battery (see fig. right).
Note :
Please read the instructions at hand completely and
carefully before beginning with the programming !
Operating Instructions
Radio Transmitter eco L
Page 14 / 16 BE-ECO-L-V2-1.DOC [ Word 97 ] FL
HBC-radiomatic GmbH • D-74564 Crailsheim • GERMANY
2000-07-28 All rights reserved through HBC-radiomatic GmbH. Technical changes made without notice.
Radio Control System
Programming
1. Switch OFF the transmitter.
2. Insert a charged TTB 05 tele-teach-in battery into the transmitter.
3. Depress the programming keys "+" and "–" simultaneously and then switch ON the
transmitter. Keep the programming keys depressed until the green service LED of
the transmitter starts flashing quickly. Now, the control is in the tele-teach-in mode.
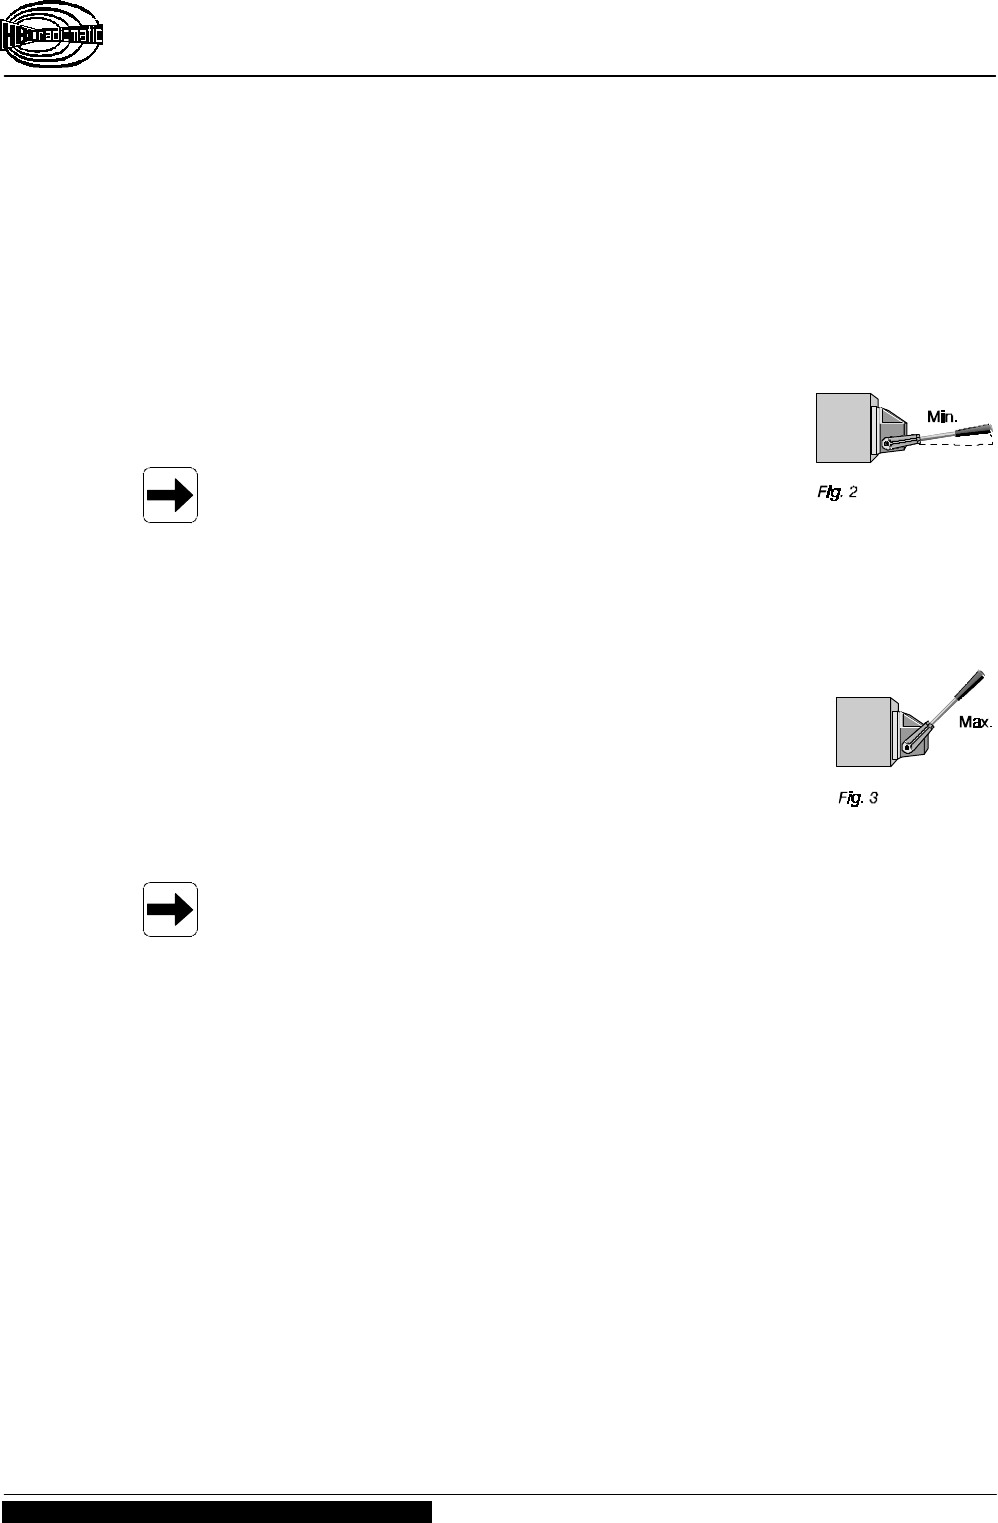
4. Setting the minimum speed (fig. 2)
Push the linear lever toward the desired function.
Note :
Do not move the linear lever beyond 50 % of the maximum
lever travel.
Then adjust the minimum speed by means of the "+" and "–" keys, i.e. by looking for
the minimum point when the hydraulic valve begins to react. It will be helpful to
observe the way the function is carried out as well as the movement of the lever of
the hydraulic valve (fig. 2).
5. Setting the maximum speed (fig. 3)
Push the linear lever toward the desired function by moving it to
its end position. Then adjust the maximum speed by means of the
"+" and "–" keys, i.e. by looking for the maximum point when the
hydraulic valve begins to react. In order to make use of the full
lever travel of the linear lever, do not actuate the "+" key any
longer after the hydraulic valve has reached its maximum travel
(fig. 3).
Note :
In the tele-teach-in mode, only execute one single function at the time, not all
linear levers in a diagonal way, as it is only possible to program one single
function at the time.
For all further linear lever functions, please repeat the steps beginning with item 3.
In order to verify the programmed settings, switch OFF the transmitter and then switch it
ON afterwards. Now, the transmitter is again in the normal operating mode.
In case of systems that offer creeping function, all the functions will have to be
programmed again in the creeping mode (switch set to the snail symbol).

Operating Instructions
Radio Transmitter eco L
BE-ECO-L-V2-1.DOC [ Word 97 ] FL Page 15 / 16
HBC-radiomatic GmbH • D-74564 Crailsheim • GERMANY
All rights reserved through HBC-radiomatic GmbH. Technical changes made without notice. 2000-07-28
Radio Control System
5Maintenance
The radio system is largely maintenance-free. The following items should nevertheless
be taken into account :
Ø Make sure that the EMERGENCY-STOP pushbutton moves easily.
Mortar residue and dirt may interfere with the operation of the switch or even render
it impossible.
Ø Inspect the rubber bellows of the linear levers regularly for leak-tightness.
Replace immediately if cracks appear since the penetration of dirt and humidity may
damage the function of the linear levers.
Ø The batteries of the transmitter should be completely discharged and charged again
on a regular basis.
Ø Never "clean" the transmitter with a pressure or with a steam cleaner.
If necessary, clean it with a fine brush or soft cloth, please.
Note :
Should any problems occur with the radio system contact your local dealer or the
manufacturer.
5.1 In Case of a Defect
Caution :
It is not permissible to use a defective radio system !
Ø Never try to carry out any repair on the electronic components of the radio system.
This would result in a rejection of possible warranty claims.
− It is recommended to have the unit sent to the manufacturer as fast as possible.
The unit will then be in the hands of an expert, an expert who is familiar with the
system and who has the required special replacement parts at his disposal.
− Always send in the transmitter and receiver together and enclose a detailed
description of the defect.
− Do not forget to state your phone number in addition to your address. This will
allow us to contact you directly, should we have any inquiries.
Ø In order to prevent any transport damages from occurring, please use the
specifically molded two-way packaging in which the unit was shipped to you from the
factory or pack the unit in a way so that it is protected against shocks. Please send
the unit to the following address, freight prepaid :
HBC-radiomatic GmbH
Haller Straße 49 - 53 • D-74564 Crailsheim
Ø Should you decide to personally return a defective radio system to the factory or to
your local dealer, then please make an appointment first.
Operating Instructions
Radio Transmitter eco L
Page 16 / 16 BE-ECO-L-V2-1.DOC [ Word 97 ] FL
HBC-radiomatic GmbH • D-74564 Crailsheim • GERMANY
2000-07-28 All rights reserved through HBC-radiomatic GmbH. Technical changes made without notice.
Radio Control System
6Trouble-Shooting
Note :
Check the functions with the cabin or the cable control unit first !
Trouble Possible Cause Remedy
No reaction whenever the
transmitter is switched ON. No operating voltage
present. − Charge battery or insert a
charged battery.
− Check battery contacts
for damage or
contamination.
Low battery detection
output already after a short
period of operation, i.e. the
dual color LED on the
transmitter illuminates red
− Battery not charged
or
− Battery defective
− Charge battery fully.
− Check if charging process
is executed properly.
− Check battery contacts.
− Verify operation with
a functional battery.