User manual

Philips Home Control
Confidential Philips Home Control,
2014
Page 1 of 11
Manual of
KWR174002/01BR,
KWR174002/01BRS,
KWR174002/01BRU
KWR174003/01BR,
KWR174003/01BRS &
KWR174003/01BRU

Philips Home Control
Confidential Philips Home Control,
2014
Page 2 of 11
FCC Statement
FCC Part 15.19
This device complies with Part 15 of the FCC Rules. Operation is subject to the
following two conditions:
(1) this device may not cause harmful interference and
(2) this device must accept any interference received, including interference that may
cause undesired operation.
NOTE:
This equipment has been tested and found to comply with the limits for a Class B
digital device, pursuant to Part 15 of the FCC Rules. These limits are designed to
provide reasonable protection against harmful interference in a residential installation.
This equipment generates, uses and can radiate radio frequency energy and, if not
installed and used in accordance with the instructions, may cause harmful interference
to radio communications. However, there is no guarantee that interference will not occur
in a particular installation. If this equipment does cause harmful interference to radio or
television reception, which can be determined by turning the equipment off and on, the
user is encouraged to try to correct the interference by one or more of the following
measures:
-- Reorient or relocate the receiving antenna.
-- Increase the separation between the equipment and receiver.
-- Connect the equipment into an outlet on a circuit different from that to which the
receiver is connected.
-- Consult the dealer or an experienced radio/TV technician for help.
Any changes or modifications not expressly approved by the party responsible for
compliance could void the user’s authority to operate the equipment.
No special accessory is required to enable the equipment to comply with the emission
limits.
RF exposure warning
The equipment complies with FCC RF exposure limits set forth for an uncontrolled
environment.
The equipment must not be co-located or operating in conjunction with any other
antenna or transmitter.

KWR174002/01BR &
KWR174003/01BR
Manual (Draft Version)
Status :Draft, For Review Page 3 of 11
Philips Proprietary &Confidential
Philips Home Control Company Restricted
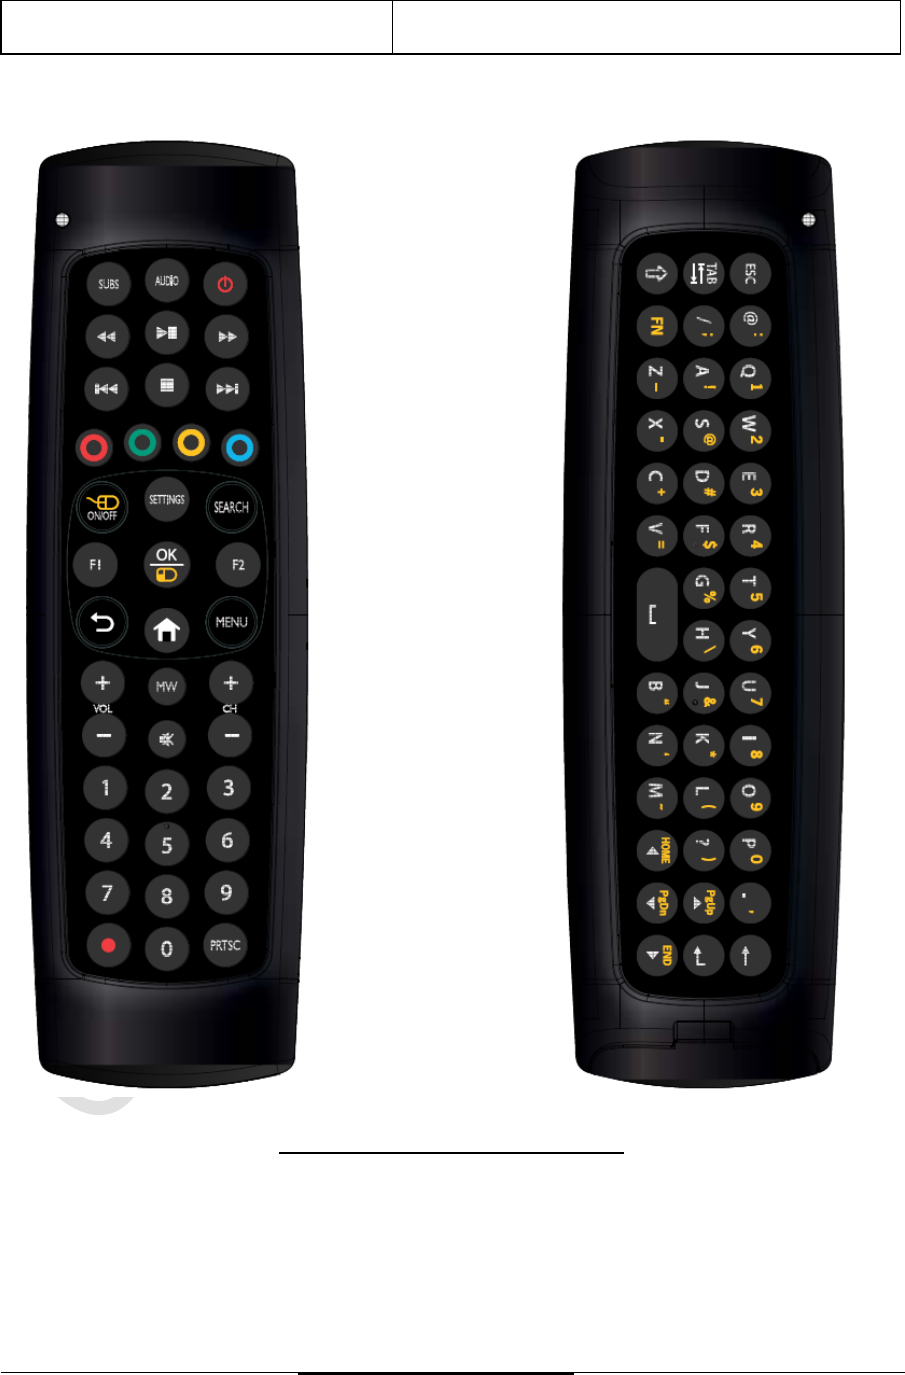
1. Product Description
1.1 Product Features
Dual button entry RC and KWR.
Number of keys: 42 for Keyboard, 40 for RC.
4 main functions. Remote control, mouse cursor control and QWERTY KB for text entry and
downstream data transfer.
3-D Gyro meter for motion pointing.
Infrared (IR).
Low voltage alert through LED blinks.
Compatible with USB RF4CE Receiver dongle for the RF portion.
KWR174002/01BR &
KWR174003/01BR
Manual (Draft Version)
Status :Draft, For Review Page 4 of 11
Philips Proprietary &Confidential
Philips Home Control Company Restricted
Product
Picture for illustration onl
y

KWR174002/01BR &
KWR174003/01BR
Manual (Draft Version)
Status :Draft, For Review Page 5 of 11
Philips Proprietary &Confidential
Philips Home Control Company Restricted
2. RF Functions
2.1 RF Pairing
1) Make sure RC is within 1m distance from the STB and no other RF RCs are present.
2) Make sure the Qwerty keyboard faces upwards.
3) Press and hold Keyboard W and Keyboard O keys together for at least 5 seconds.
4) The KEYBOARD LED will start blinking, and RC is now in pairing mode.
5) Activate pairing mode on STB (STB sends activate command or reset dongle power).
6) Once the pairing is successful, the KEYBOARD LED will be turned off; otherwise, the KEYBOARD
LED will stay lit till timeout.
There will be a 30 seconds timeout for RC to be in pairing mode. Previously paired receiver shall be
retained as long as the STB did not initiate the pairing. See Note below on different pairing scenarios.
User can start from Step 1 again if pairing failed.
Note:
When a previously paired RC starts pairing with
1. Different receiver
o Only upon successful pairing, the RC shall replace the previously paired receiver with the new
receiver.
o If the pairing process fails or pairing timeout occurs, the previously paired receiver will be retained.
2. Same receiver
o Previously paired information of the same receiver shall first be erased from the RC before pairing
process starts.
o If the pairing process fails or pairing timeout occurs, the previously paired receiver will not be
retained.
At any one time,
Only one RC is allowed to be in pairing mode, i.e. no concurrent pairing is allowed.
Each RC can only work with one receiver, i.e. 1-to-1 pairing.
2.2 RF Un-Pairing
The following steps for un-pairing:
1) Make sure the Qwerty keyboard faces upwards.
2) Press and hold Keyboard X and Keyboard UP keys together for at least 5 seconds.
3) The KEYBOARD LED will start blinking slowly after 5 seconds.
4) Reset the power or battery and the RC is ready to pair again.
2.3 Remote Idling, RF Link Timeout with connection
When detected no activity, the RC will enter SLEEP mode. During SLEEP mode, RF link will be
disconnected to preserve power. Pressing any key or any gesture action will resume the RC to
ACTIVE mode almost immediately. The key-press that resumes the RC from SLEEP mode will be
remembered and transmitted.
When the RC wakes up from SLEEP mode, there may be reconnection latency depending on the RF
link condition with the receivers.
Once the RF (2.4G) link has been established, the RC will execute upon ANY key-press. Key presses
prior to successful RF link connection will not be transmitted.

KWR174002/01BR &
KWR174003/01BR
Manual (Draft Version)
Status :Draft, For Review Page 6 of 11
Philips Proprietary &Confidential
Philips Home Control Company Restricted
2.4 RF Broken Link
RF link is broken when the RF (2.4G) connection is lost or when the receivers sleep or during system
shutdown states (S3, S4 or S5) or due to out-of-range.
2.5 RF ACTIVE / SLEEP
From RF ACTIVE >> SLEEP User action Remote Control action
No key-press for about 8 seconds. RF goes to SLEEP. In SLEEP mode, all LEDs are OFF.
No motion senses for about 8 seconds. RF goes to SLEEP. In SLEEP mode, all LEDs are OFF.
2.6 RF Auto Connection
When the RC wakes up or resumes from SLEEP mode or come back within range of a powered-on
paired receiver, the RF link will be reconnected automatically. No RF re-pairing is needed.
2.7 RF Out-of-Range
When the RF link is broken or out-of-range and is stationary, the RC goes to SLEEP immediately to
conserve power.
KWR174002/01BR &
KWR174003/01BR
Manual (Draft Version)
Status :Draft, For Review Page 7 of 11
Philips Proprietary &Confidential
Philips Home Control Company Restricted
3. Operational Features
3.1 Mode Switch
3.1.1 RC to Keyboard
When in RC mode, KEYBOARD keys will be locked to prevent accidental presses. KEYBOARD keys
can only be unlocked by tilting 90 degrees clockwise or anticlockwise. Once tilted more than 90
degrees, mouse cursor will stop moving if it is in Mouse mode.
If KEYBOARD keys are faced up upon power up, a command will be sent from the RC.
3.1.2 Keyboard to RC
When in KEYBOARD mode, user can change to RC mode by tilting 90 degrees clockwise or
anticlockwise. When in KEYBOARD mode, RC keys will be locked to prevent accidental presses.
Once tilted more than 90 degrees, mouse cursor will start moving if it is in Mouse mode.
If RC keys are faced up upon power up, a command will be sent from the RC.
3.2 Remote IR Keys
STANDBY is the only IR command key. With RC faced up and in a portrait orientation, pressing this
button will fire the respective IR codes from the IR LED of the remote.
3.3 Remote RF keys
Remote RF keys will be sent in the form of HID Keyboard keys.
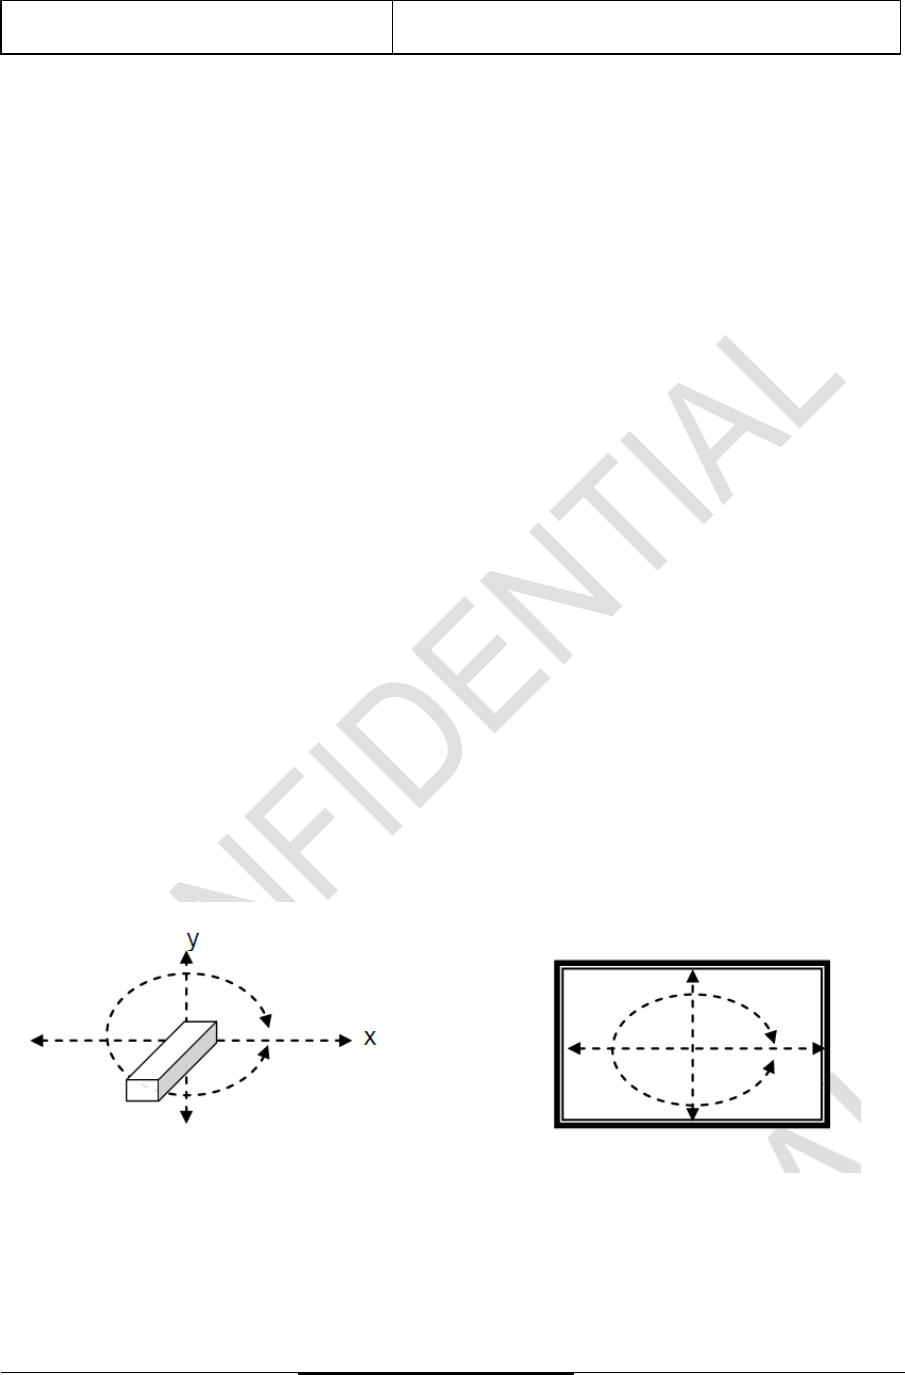
3.4 Motion Control Mouse Mode
Mouse mode allows user to use the 3-D gyroscope and accelerometer of the RC as a floating mouse
or joystick. In this mode, user is also expected to operate the remote control in free air and not laid
down and operating it in a stationary position.
The relative movement of panning and lifting (roll, yaw and pitch) will control the mouse cursor to
move in the same relative direction on the screen.
For mouse cursor control, toggle motion sensor ON:
- Move remote control in the air to use motion mouse control
- Press OK key will be Mouse Left Click function only, press and hold Mouse Left Click is supported
- Provides RAW data for gesture processing, enable/disable with downstream command from host.

KWR174002/01BR &
KWR174003/01BR
Manual (Draft Version)
Status :Draft, For Review Page 8 of 11
Philips Proprietary &Confidential
Philips Home Control Company Restricted
3.5 Keyboard Mode
The Qwerty keyboard will be held by both hands and used in landscape orientation.
The keyboard also supports secondary keys by using FN or SHIFT; this allows the keyboard to
support uppercase characters, symbols and digits with the limited number of Qwerty keys.
There are 2 ways of activating secondary keys:
1. Press and release FN or SHIFT key followed by pressing another key. For example, press FN then
Q will send „1‟, press SHIFT then Q will send “Q”. After “Q” is released and pressed again, „”q” will
be sent.
2. Press and hold FN or SHIFT key followed by pressing another key. For example, press and hold
FN and then press Q will send “1”, press and hold SHIFT and Q will send “Q”.
As long as the secondary key is pressed and held, the secondary character will have the same
repeating behavior as the normal primary key „press and hold‟.
To minimize accidental presses of the Qwerty keys while in RC or Mouse Cursor Control, the Qwerty
keys will be deactivated. When not in SLEEP mode and the keyboard side is detected faced down,
the Qwerty keys will be locked, key presses on the keyboard will be ignored. When device is not in
SLEEP mode and the keyboard side is detected faced up, the Qwerty keys are unlocked.
KWR174002/01BR &
KWR174003/01BR
Manual (Draft Version)
Status :Draft, For Review Page 9 of 11
Philips Proprietary &Confidential
Philips Home Control Company Restricted
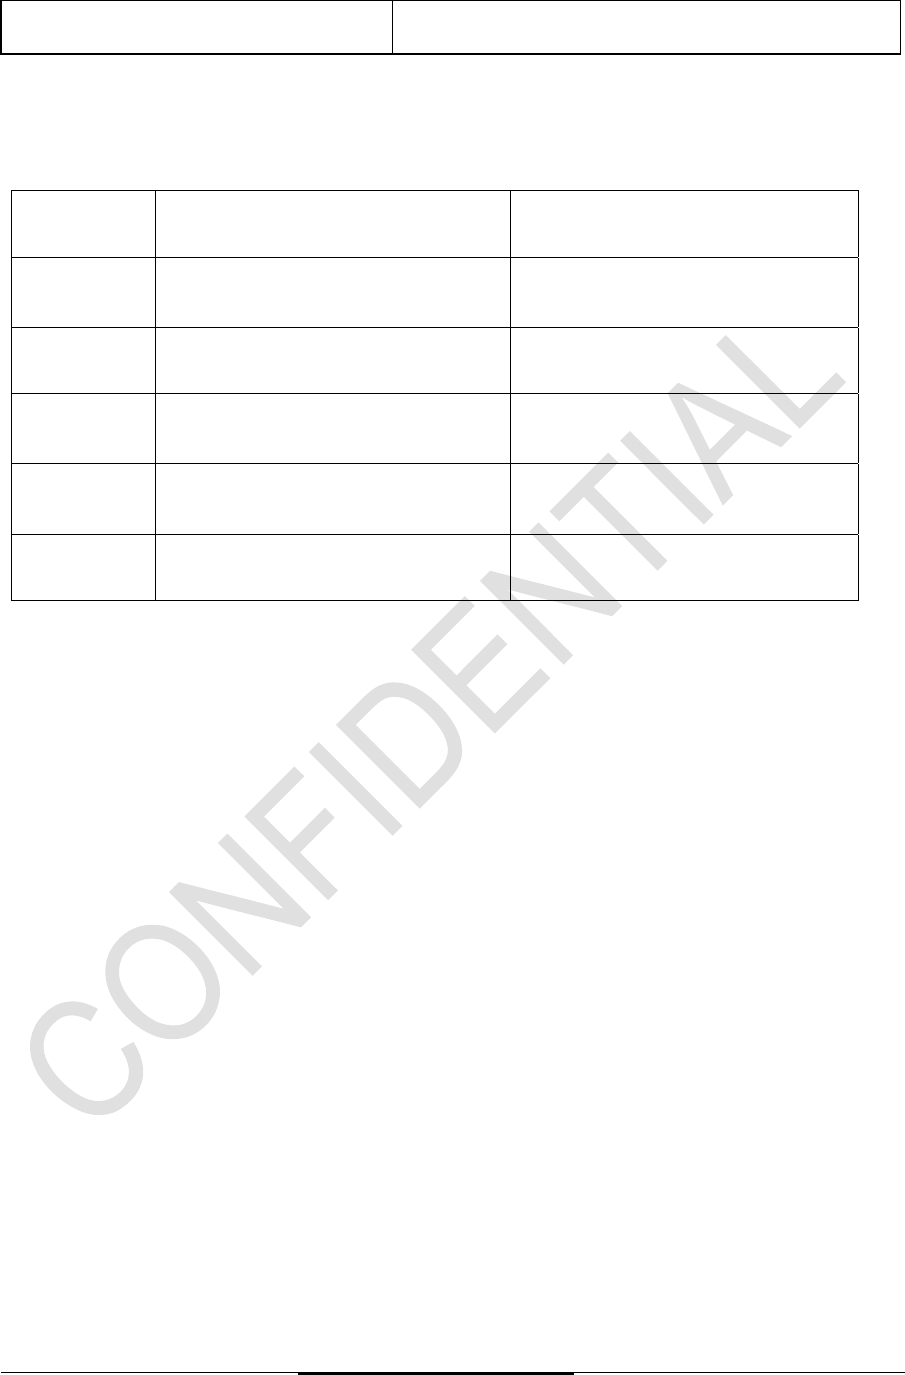
3.6 LED Indicator Behaviour
Total 2 Indicator backlit LED – Red and Blue LED:
Location
Indication purpose
Status description
BLUE LED
Indicate RF code transmission
1 short blink in blue each time a valid
key is pressed
RED LED
Indicate IR code transmission
1 short blink in red each time a valid
key is pressed
RED LED
Low battery warning
2 short blinks in red each time a valid
key is pressed
BLUE LED
Mouse Left Click
1 short blink in blue each time Mouse
Left Click is pressed
Blue LED Show successful RF pairing
Flashes rapidly in blue until pairing is
successful or time out occurs

KWR174002/01BR &
KWR174003/01BR
Manual (Draft Version)
Status :Draft, For Review Page 10 of 11
Philips Proprietary &Confidential
Philips Home Control Company Restricted
4. Non-Functional Requirements
.
4.1 Simultaneous Key Press (RC)
If more than one key-press is detected, the remote control will stop sending IR/RF code.
Example:
i. When Key 1 is pressed, Key 1 code is transmitted. Pressing Key 2, with Key 1 still pressed, RC will
stop transmitting Key 1 code. Then, releasing Key 2, with Key 1 still pressed, Key 1 code will be
transmitted again.
ii. When Key 1 is pressed, Key 1 code is transmitted. Pressing Key 2, with Key 1 still pressed, RC will
stop transmitting Key 1 code. Then, releasing Key 1, with Key 2 still pressed, Key 2 code will be
transmitted.
4.2 Simultaneous Key Press (Keyboard)
The remote support multiple key presses but only limited keys are able to do so. When two or more
remote KB keys that do not support simultaneous press are pressed simultaneously, the remote will
not send codes. When only one key is still pressed the remote will restart and send the code of this
key as per normal.
Workable 2 keys simultaneous key presses are;
SHIFT with any Alphabets: Capital Letters of the Alphabets
FN with keys with Blue options (numbers and symbols, etc.)
4.3 Consecutive Key Press (Keyboard)
When FN key is pressed or still pressed, the RC will not transmit or do any action. After release and
then press any keys that have alternate function on the same key, e.g. Q key shares the same as
Numeric ‘1’ key, the RC will transmit Numeric ‘1’ code.
E.g. FN key + Q key = Numeric ‘1’ key transmit
FN key + A key = Symbol ‘?’ key transmit
The same is true for SHIFT keys. For SHIFT, after release of the key, an alphabet key is pressed; the
RC will transmit the capital letter of the particular key.
4.4 LED Indicator
Blinking Definition
Short Blink: Approximately 10ms ON, then OFF.
Long Blink: 500ms ON, 500ms OFF.

KWR174002/01BR &
KWR174003/01BR
Manual (Draft Version)
Status :Draft, For Review Page 11 of 11
Philips Proprietary &Confidential
Philips Home Control Company Restricted
4.5 Stuck Key Timeout
Stuck key means a button has been pressed for a very long time in normal operating mode.
To preserve battery power, the remote will stop sending code and shut down at about 30 seconds
after the last key transition to consume minimal power. After all keys are released, the remote
resumes normal operation.
Exceptions:
- Mouse L click, navigation keys and “OK” key will not have stuck key timeout.
Typical Stuck Key Timeout is around +/- 20% tolerance, except for IR with exceptional long repeat
timings or RF long latency.
The application will have some mechanism to stop mouse data transmission to save battery life.
In TV Control Setup there are situation where a key is allowed to be pressed for longer than the stuck
key timeout.
4.6 Auto-repeating
All the buttons have auto-repeat function, that is, when a key is continually pressed, the RC will
transmit the corresponding code until the 30 seconds Stuck Key timeout.
4.7 Low Voltage Detection
The RC comes with 2 pairs of 2 pieces 1.5V batteries working in series to give a total maximum of
3.0V ~ 2.5V.
The depletion of the battery power will be in 2 stages.
Note: Remote side will only show low voltage indication when remote is flipped from KB to RC side at
least once when remote is in low voltage.
1) Stage 1, Working voltage (3.0V to 2.5V)
All keys and functions will work as normal.
2) Stage 2, Very Low voltage (2.5V and below)
Very Low voltage detection triggers from 2.5V and below.
No IR or RF codes will be sent from the RC.
Note: All the voltages have a 0.05V tolerance.