HENAN ESHOW ELECTRONIC COMMERCE RETEVISRT32 Walkie Talkie User Manual RT32
HENAN ESHOW ELECTRONIC COMMERCE CO., LTD Walkie Talkie RT32
Users Manual
RT32
RT32
PIC 01
2.T X/RX Icon
3.T X Power HI/LO
1
PIC 02
2

This set includes 2 walkie-talkie units: these are communication
devices which operate on mobile radio frequencies. They come
with 22 channels as well as a back-lit LCD screen, enabling you to
communicate over several kilometers free-of-charge.
NOTE: Please read these user instructions carefully before using
the equipment and retain for future consultation!
EN~Instructions for use
SPECIFIC RECOMMENDATIONS
·If you carry any kind of personal medical disease, consult a
doctor before use.
To avoid the risk of burns, do not use the device if the antenna
is damagedin any way.
Do not use the device in a potentially explosive environment
(e.g. around petrol pumps, on the lower deck of a boat or
around a fuel storage installation or chemical products)
Switch off the device if on an airplane or in a hospital.
Never use the device in close proximity to a radio to avoid
interference.
Remove the batteries if the device is not in use for an extended
period of time. Never mix used and new batteries
Leave the transmitter and antenna at least 31mm from y our face.
Direct the antenna upwards and speak normally.
·
·
·
·
·
·
·Clean the device with a damp cloth. Do not use cleaning agents
and solvents.
3

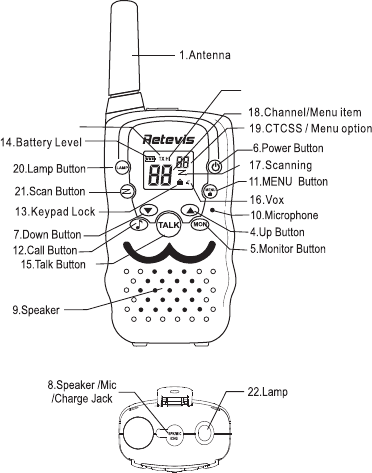
ITEM DESCRIPTION (Pic01,02)
1. Antenna
2. RX icon -Displayed when receiving
TX icon -Displayed when transmitting
3. TX power high or low
4. Up adjustor button (▲)
5. Continued reception (MON)
6. On / off button ( )
7. Down adjustor button (▼)
8. Earphone socket
9. Loud speaker
10.Microphone
11. Enter the menu settings (Menu)
12. Call button ( )
13. Keypad lock indicator
14. Battery level indicator
15. Push to talk (TALK) button
16. VOX indication
17.Scanning indication:
Displayed during scan mode
·Do not modify the device in any way. If the device damaged ,
please checked by a qualified professional.
·The device cannot be used to contact the emergency services.
4

20.Lamp Button
21.Scan Button
22.Lamp
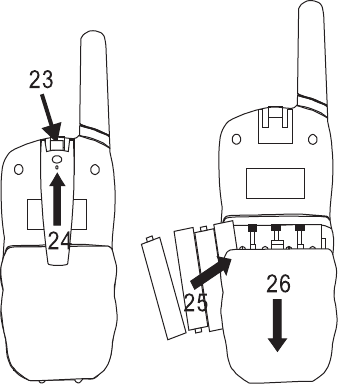
23. Belt attachment clip
24.
25. Batteries (not supplied)
26. Battery compartment
18.Channel/Menu item indication
19.CTCSS/Menu option-value
Belt attachment
To install the batteries
Remove the belt clip:there are a secret button to press, then take
the belt off.Open the battery compartment (26) and insert 4AAA
batteries (25)(not supplied),ensuring that the poles are correctly
alighed.The closed the lid
USING THE WALKIE TALKIE
1. Turning the divice on/off:
To turn the divice on or off, hold down the on/off button(6) for
3 seconds, a beep sound will be played to cofirm.
2.Adjusting the volume:
To increase the volume, press the Up adjustor button ▲(4) and
press the ▼(7) button to decrease volume.
Note: The volume level number is displayed on the screen.
5

3.Battery Charge Level/Low Battery Indication
The battery charge level is indicated by the number of squares
present inside the battery icon on the LCD screen.
Battery Full
Battery 2/3 charged
Battery 1/3 charged
Battery empty
When the battery charge level is low, the battery icon will flash
and a beep will be heard to indicate that the batteries need to be
replaced or recharged.
4. Receiving/Transmitting communications:
The devices are in ‘Reception’ mode when lit up, i.e. they are
ready to receive a call or sound transmitting on the activated
frequency.
·When you press the Call tone button (12), the device switches
to ‘Transmission’ mode. You are then transmitting a sound signal
to the other device.
·To send a voice message, press the TALK button (15) and
speak into the microphone (10). Continue to press the button
until you have finished transmitting your message.
Hold the Mic with a minimum distance of 25 mm from your face.
Note:
- The other device must be set to the same channel and same
CTCSS code.
6

5. Changing Channels
·Press the MENU button (11) once, the current channel
number flashes on the display.
·Press the ▲ button (4) or ▼ button (7) to change the channel .
·Press the TALK button to (15) confirm and return to stand-by.
Note: If no button is pressed within 15 seconds during setting,
the unit will return to standby .
6.CTCSS (Continuous Tone Coded Squelch System)
Licence free radio’s operating on the 400~470 MHZ frequency
band, like the Twintalker, have 8/20/22 available radio channels.
If there are many radio’s users in your neighborhood, there is a
chance that some of these users are operating on the same radio
channel. To prevent that you receive signals from other users,
sub-channels have been integrated.
Two radios only be able to communicate with each other not only
on the same channel but also set to the same sub-channels.
The sub-channels:continuous tone squelch system(CTCSS)
When using CTCSS, a low frequency tone(67-250Hz)will be
transmitted along with the voice signal. There are 99 available
tons to choose.
- When you finish the communication, please lose the hand, the
other device will email the beep to indicate that the this device is
ready to transmit.
7

.Note: To disable CTCSS, select code "0F” for CTCSS in the menu.
When pressing TALK button to confirm
7.CTCSS
·Press the MENU-button (11) twice: The current CTCSS code
flashes onthe display
·Press the ▲-button (4) or the ▼-button (7) to change to
another code.
·Press the TALK-button (15) to confirm and return to stand-by.
Note: To disable CTCSS, select code "0F” for CTCSS in the menu.
Whe pressing TALK button to confirm
8.Monitor
You can use the monitor feature to check for weaker signals in the
current channel.
·Press the MON-button to activate channel monitoring.
·Press the MON-button to stop channel monitoring.
Note: During channel monitoring the receiver circuit in the Radios
will not not listen to CTCSS codes.
9. VOX Selection
The radios is capable of voice activated (VOX) transmission. In
VOX mode,the radio will transmit a signal when it pick up your
voice or other sound around you. VOX operation is not
recommended if you plan to use your radio in a noisy or windy
environment.
8

Note: VOX mode will be overrided when you press the
TALK-button (15).
·Press the MENU(11) three times, the current VOX setting
flashes on the display and the VOX icon is displayed.
·Press ▲-button (4) to set the VOX sensitivity level between
1 and 3 (level 3 is the most sensitive level).
·Press ▼-button (7) until OF appears on the display, to turn
VOX off.
·Press the TALK -button (15) to confirm and return to stand-by.
10.Scanning for an active radio channel
·Press the SCAN-button (21):The ‘Scan’ function indicator (17)
will appear on the screen and the channel (18) will scan
continuously from 1 to 8/20/22.
·Press the ▼ -button (7) to start the channel scan from
8/20/22 to 1.
Once an active channel is found, the scanning will stops and you
can listen to the transmission.
When the transmission on the found channel stops, the scanning
will resume automatically.
NOTE: If you press the TALK button (15) while listening to a found
channel,the Radios will go back in stand-by on the found channel.
9

11. Call Tones
A call tone alerts others that you want to start talking.
11.1 Setting the Call Tone
The walkie talkies have 10 call tones.
·Press the MENU-button (11) four times, “CA”is displayed and
the current call toneis flashing.
·Press the ▲-button (4) or the▼-button (7) to change to another
Call Tone.
·Press the TALK-button (15) to confirm and return to stand-by.
11.2 Sending a call tone
Press the CALL-button (12) briefly. The call tone will be
transmitted on the set channel.
13.Key-Tone On/Off
When a button is pressed, the unit will beep briefly.
To set the key-tone.
·Press the MENU-button (11) six times.
·Press ▲ to enable (ON) or ▼ disable the Key Tones (OF).
·Press the TALK -button (15) to confirm and return to stand-by.
12.Setting the double channel monitor
·Press the MENU-button (11) five times ,until the “CH” displays
the current channel flashes.
·Press up or down key to set the scond channe or turn off.
·Press the TALK -button (15) to confirm and return to stand-by.
10

14.Roger Beep On/Off
After the TALK-button is released, the unit send out a roger beep
to confirm that you have stopped talking.
To set the Roger Beep.
·Press the MENU-button (11) seven times, “ro” will displays.
·Press ▲ to enable (ON) ▼ disable the Key Tone (OF)
·Press the TALK -button (15) to confirm and return to stand-by.
15.Setting the TX power high/low
·Press the MENU-button (11) eight times, “Pr” will be displayed
·Press up or down key to set the HIor LO lever.
·Press the TALK -button (15) to confirm and return to stand-by.
16.Button Lock
·Press and hold the MENU-button (11) for two seconds to
activate the Button lock mode. The button lock icon is displayed
on the LCD Screen.
·Press and hold Menu button until there are the Lock icon
displayed on the LCD Screen.The same step to unlock the button.
Note: The TALK-button (15), the CALL-button (12), MON-button (5)
and the on/off button (6) will still be functional when the Button
Lock is activated.But the other button deactivated.
17. Display back light
To activate the backlight of the LCD display, press any button .
The LCD backlight will light up for 5 seconds.
11

18.Earpiece connection
The Twintalker can be used with the included earpiece.
The connector is located on the top of the device.
Insert the earpiece plug into the connector (2.5mm jack).
The small button on the earpiece has the same function as the
TALK-button(15) on the unit.
When you use the microphone from the earpiece to talk into.
Note: Do not connect other earpieces. This may damage your
device.The connector is located on the top of the device.
20. BUILT-IN FLASH LIGHT
The radio flashlight can offer more convenient in the dark and
can send light signals.
19.Battery saving function:
When the device has not been used for 6 seconds, the economy
mode is automatically activated. This does not affect the reception
of transmissionsand the standard mode is automatically
reactivated as soon as a signal is detected.
12

Frequency 446.00625 446.01875 446.03125 446.04375
Channel 5 6 7 8
Frequency 446.05625 446.06875 446.08125 446.09375
Channel 1 2 3 4
Frequency 462.5875 462.6125 462.6375 462.5625
Channel 5 6 7 8
Frequency 462.6625 462.6875 462.7125 467.5625
Channel 1 2 3 4
Frequency 462.6000 462.6250 462.6500 462.6750
Channel 21 22
Frequency 462.7000 462.7250
Channel 17 18 19 20
Frequency 467.5875 467.6125 467.6375 467.6625
Channel 13 14 15 16
Frequency 467.6875 467.7125 462.5500 462.5750
Channel 9 10 11 12
EU Channel Frequency
USA Channel Frequency
13
FCC NOTICE AND DECLARATION
ThisdevicecomplieswithPart15oftheFCCRules.Operationissubjecttothefollowingtwoconditions:
1.Thisdevicemaynotcauseharmfulinterference,and
2.Thisdevicemustacceptanyinterferencereceived,includinginterferencethatmaycauseundesired
operation
Any modification to a walkie-talkie to receive transmissions from Service frequency bands voids the
certification of the scanning receiver, regardless of the date of manufacture of the original unit. In addition,
the provisions of FCC §15.23 shall not be interpreted as permitting modification of a scanning receiver to
receiver Cellular Radiotelephone Service the Cellular Radiotelephone transmissions.
Caution:
.TomaintaincompliancewiththeFCC’sRFexposureguideline,holdthetransmitterandantennaat
least1inch(2.5centimeters)fromthefaceandspeakatanormalvolume/pitch,withtheantenna
pointedupandawayfromtheface.
.ThisdevicecompliedwithFCCRFradiationexposurelimitssetforthanuncontrolledenvironment.
.Useonlytheantennasupplied.Unauthorizedantennas,modifications,orattachmentscoulddamage
thetransmitterandmayviolateFCCregulations.
Thisproductisauthorizedtooperateatadutyfactornottoexceed50%.Totransmit(talk),pushthe
PTT,toreceivecalls,releasePTTkey.Transmitting50%ofthetimeorlessisimportantbecausethe
radiogeneratesRFenergyonlywhenittransmits.Whenwornonthebody,alwaysusethe
manufacturer’sbeltclipandaccessoriesapprovedwiththisproduct.Usenon‐approvedaccessoriesmay
resultinexposurelevelswhichexceedtheFCC’sRFexposurelimits.
The device operates on GMRS (General Mobile Radio Service) frequencies, which require an FCC (Federal
Communications Commission) license. You must be licensed prior to transmitting on all channels, which comprise of
GMRS channels. Serious penalties could result for unlicensed use of GMRS channels, in violation of FCC rules, as
stipulated in the Communications Act's Sections 501 and 502 (amended).
You will be issued a call sign by the FCC, which should be used for station identification when operating the radio on
GMRS channels. You should also cooperate by engaging in permissible transmissions only, avoiding channel
interference with other GMRS users, and being prudent with the length of their transmission time. To obtain a license
or ask questions about the license application, contact the FCC at 1-888-CALL-FCC or go to the FCC's website:
http://www.fcc.gov and request form 605.