HIMS SENSEVIEW Video Magnification System User Manual
HIMS International Corporation Video Magnification System Users Manual
HIMS >
Users Manual

SenseView
User Manual
HIMS Co., Ltd.
TEL: +82-42-864-4460
FAX: +82-42-864-4462
E-mail: hims@himsintl.com
http://www.himsintl.com

User Manual
- 1 -
B
NOTE: This equipment has been tested and found to comply with the limits for a Class B digital device,
pursuant to part 15 of the FCC Rules. These limits are designed to pro-vide reasonable
protection against harmful interference in a residential installation.
This equipment generates, uses and can radiate radio frequency energy and, if not in-stalled
and used in accordance with the instructions, may cause harmful interference to radio
communications. However, there is no guarantee that interference will not occur in a particular
installation. If this equipment does cause harmful interference to radio or television reception,
which can be determined by turning the equipment off and on, the user is encouraged to try to
correct the interference by one or more of the following measures:
- Reorient or relocate the receiving antenna.
- Increase the separation between the equipment and receiver.
- Connect the equipment into an outlet on a circuit different from that to which the receiver is
connected.
- Consult the dealer or an experienced radio/TV technician for help.
CAUTION : Changes or modifications not expressly approved by the manufacturer responsible for
compliance could void the user’s authority to operate the equipment.
User Manual
- 2 -
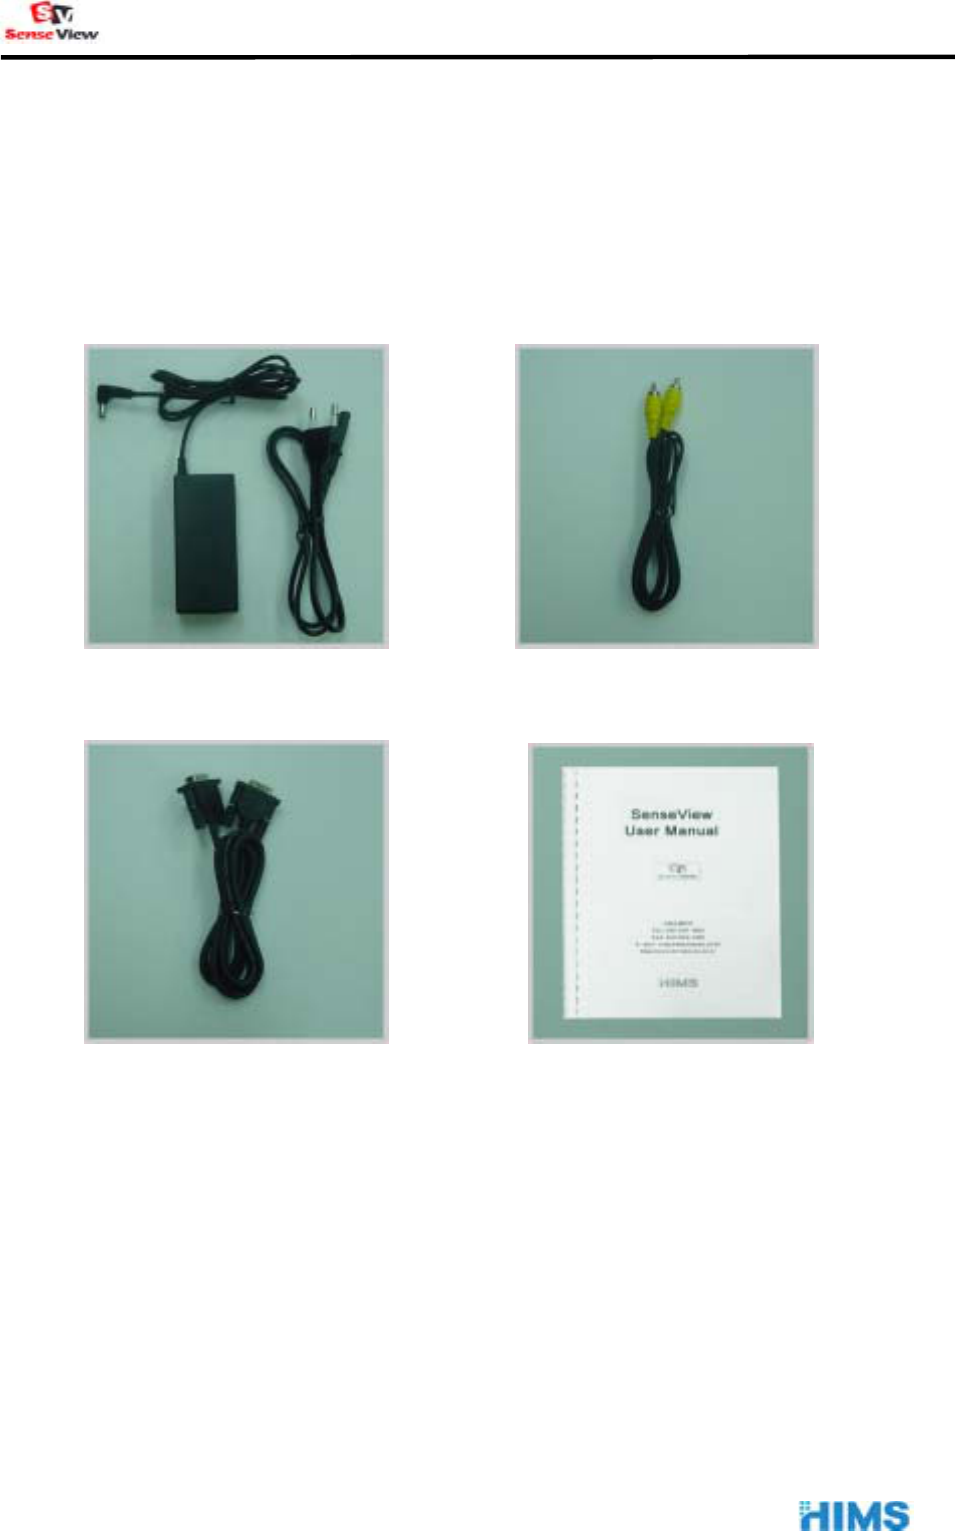
■ The SenseView Package (supplied accessories)
AC adaptor Cable for TV
Cable for PC connection User manual
If your package does not include all the listed items above, please contact
your retailer or HIMS Co., Ltd
User Manual
- 3 -
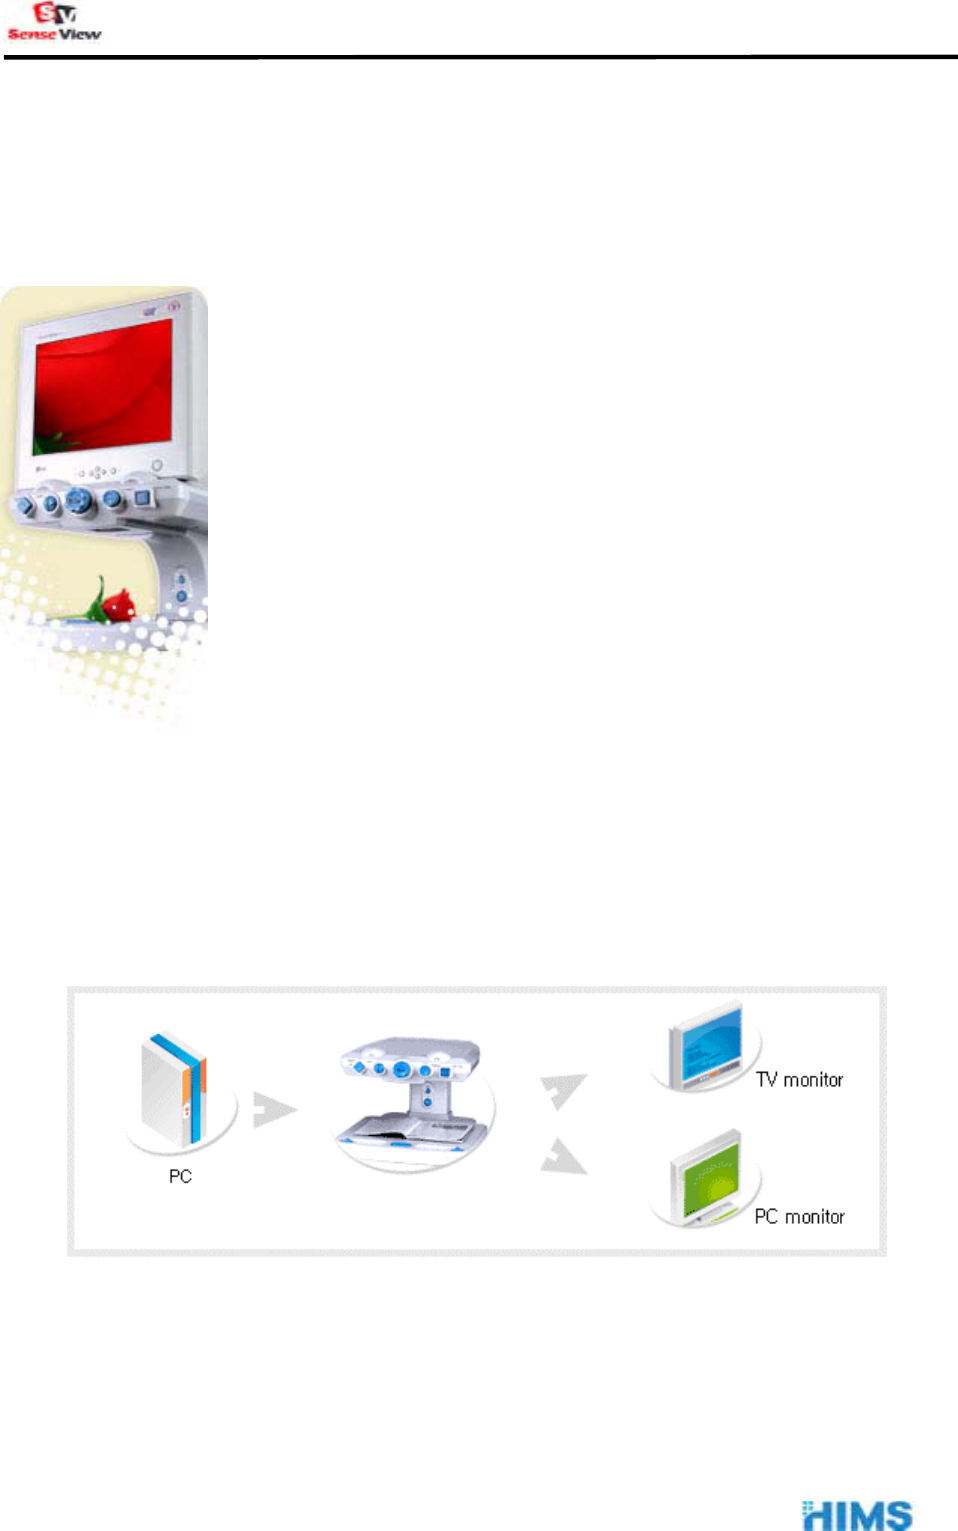
■ Overview
SenseView is the most modern and innovative video
magnifying system designed specifically for people with
low vision.
It has been designed many exciting features such as
durability, a rotary magnification dial, change the
magnification size incrementally and ergonomically placed
controls operated smoothly. Oversized easy glide
moveable reading table, with wrist rests, a new ergonomic
designed handles and easy set break enhance comfort
and controls, instant auto focus with intelligent focus lock,
bring image and text into bright, clear focus instantly.
1) Various Interfaces
Output designed with VGA, S-Video and Composite output for TV. It
incorporates connectivity to VGA monitor or TV. The input source can be
switched from CCTV to PC, or PC to CCTV by pressing a single switch.
SenseView
User Manual
- 4 -
2) Instant Auto Focus and Focus Lock Function
Instant auto focus with intelligent focus lock. Bring images and text into
bright, clear focus instantly, with no manual adjustment required. Lock mode
maintains focus even when the magnification is changed. Continuous auto
focus provides instant readability and vividness.
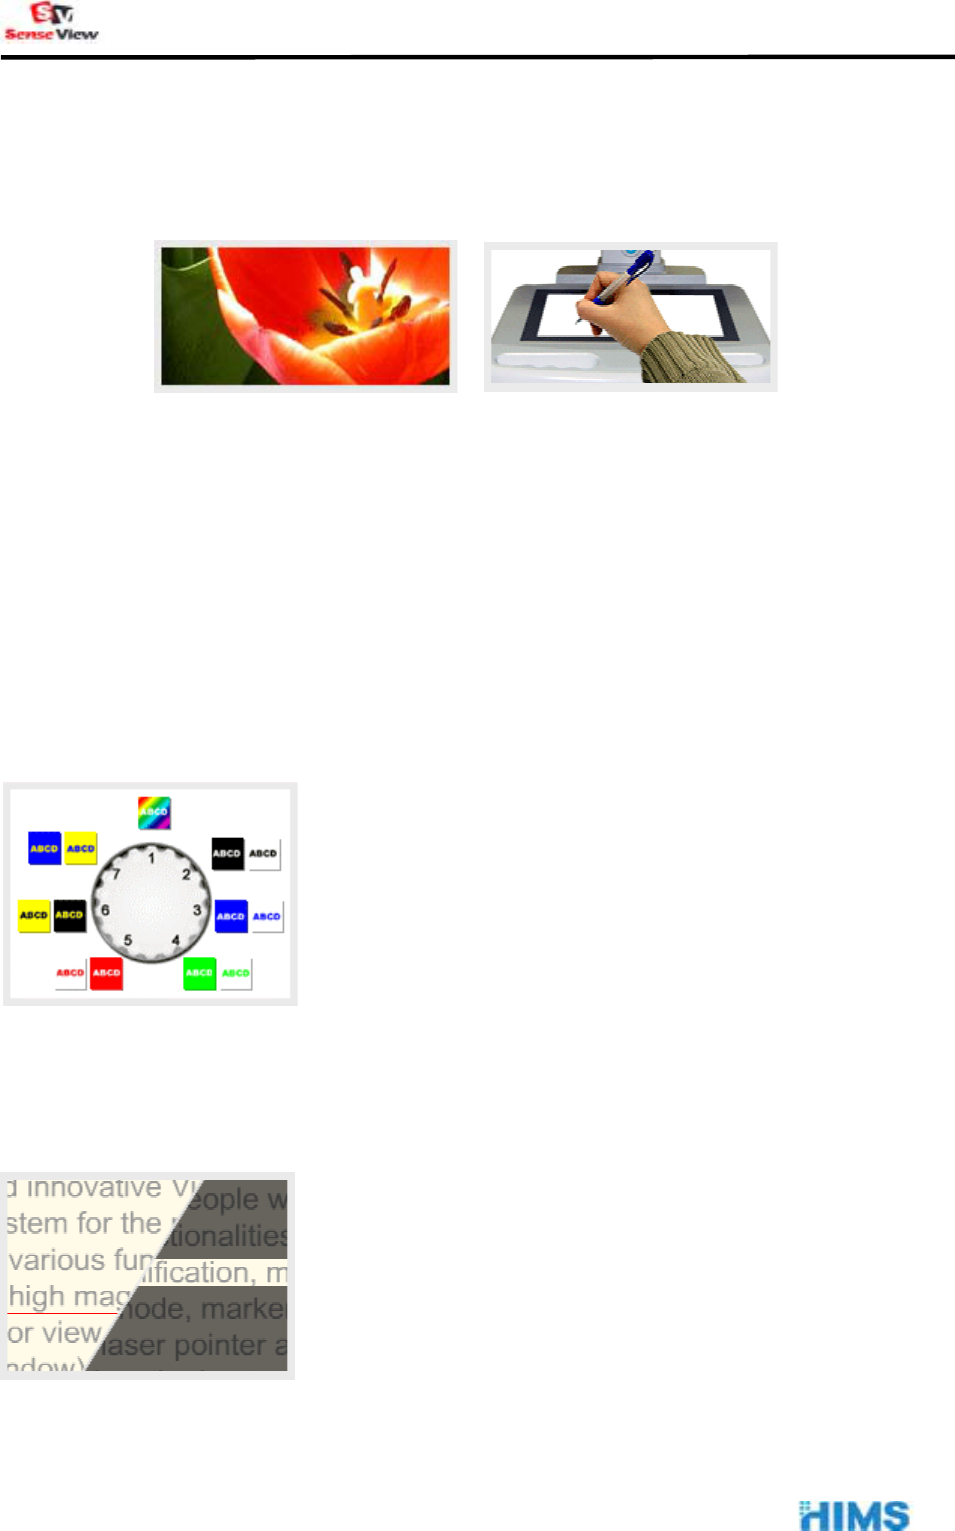
3) 21 Color Modes
SenseView designed with the low vision user in
mind, it provides full color, monochrome, high
contrast positive and high contrast negative. There
are 21 user selectable foreground / background
color mode display.
4) Line Marker and Window Marker
SenseView provides vertical and horizontal line
markers (adjust line and window size). Especially it
will guide old people in reading materials.
User Manual
- 5 -
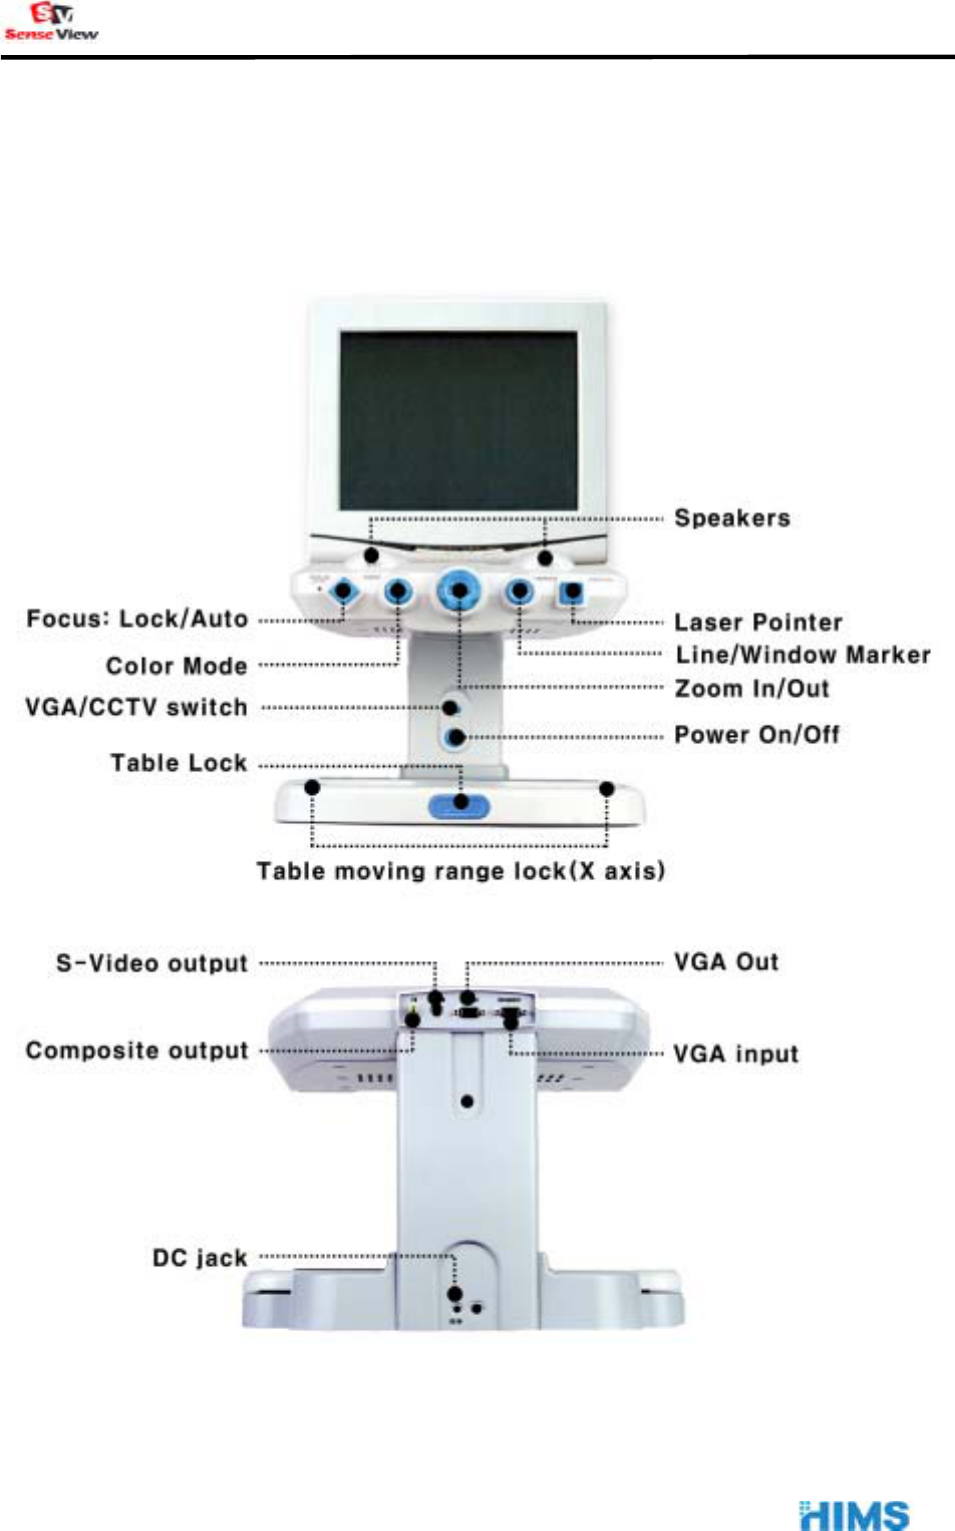
■ SenseView Overview
User Manual
- 6 -
■ Quick Start Guide
1) Installing the SenseView
(1) Place the SenseView on the table and facing the control panel
forward.
(2) Connect the AC adaptor (supplied) with DC IN (at the back side).
(3) Connect the monitor (or TV) with the SenseVeiw, using VGA cable
(supplied). SenseView users can either put momitor or tv on the
SenseView or beside SenseView.
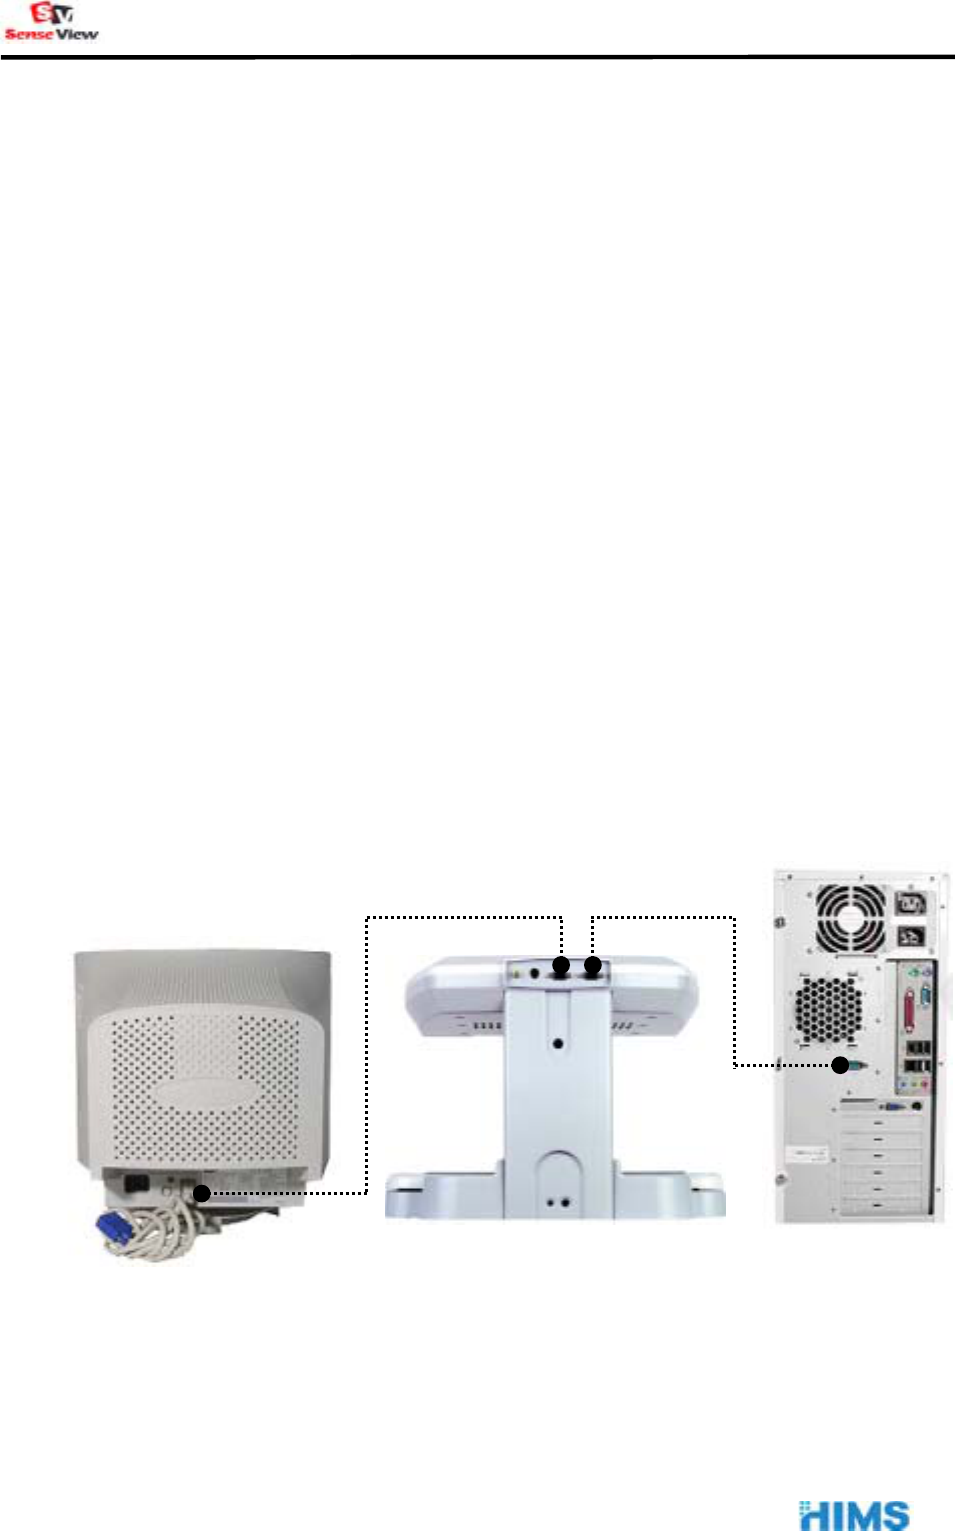
▶ Connecting the Monitor (include PC)
SneseView users want to use SenseView with the PC, SenseView has
to conncet with the monitor and the PC together. On the other hand
Monitor SenseView PC
User Manual
- 7 -
SenseView users does not want to use the PC, just conncet with the the
monitor.
① Connecting the monitor : Connect the VGA cable (the monitor
has the VGA cable) between the SenseView and the Monitor.
② Connecting the PC: Connect the PC with the SenseView, using
the PC connection cable (supplied).
※ The electricity supply to the Monitor and PC using their AC
adaptors.
※ Switching the monitor between the SenseView and the PC will
be illustrated “Senction12.”
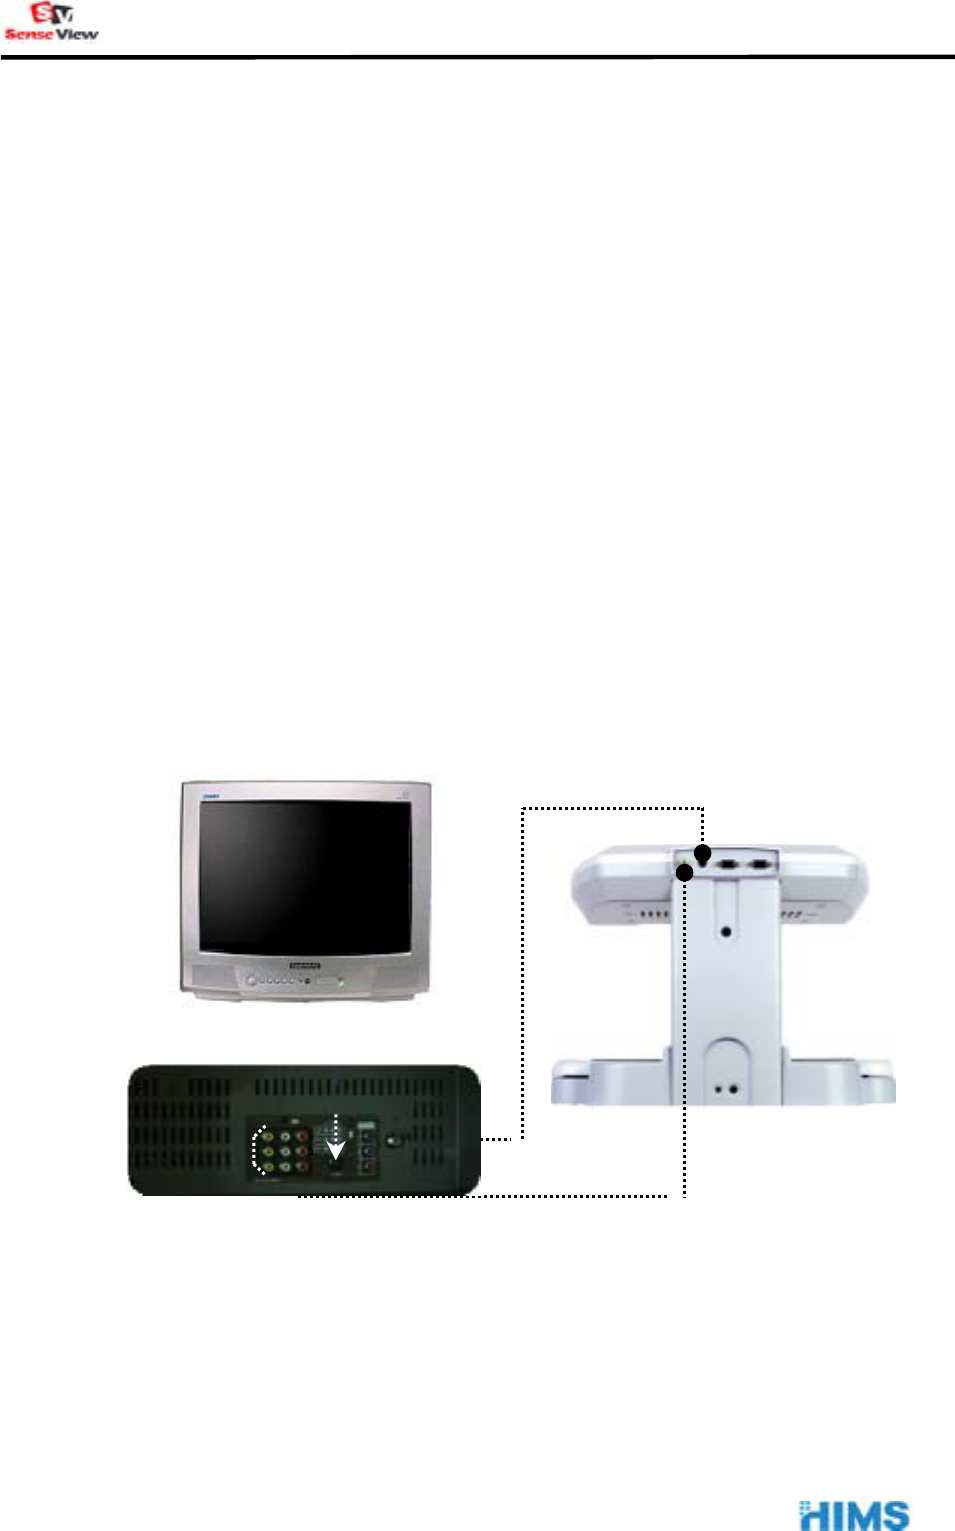
▶ Connecting the TV
The TV provides two(2) S-VIDEO jacks. The SenseView plug to one of
S-VIDEO jacks.
① Connecting the SenseView with Video In: Connect the TV cable
(supplied) between the SenseView (at the rear panel of the
SenseView, the yellow round jack) and one of the Video In
S-VIDEO
Video In
Rear panel of TV
TV
SenseView
User Manual
- 8 -
jacks( three small red jacks).
② Connecting the SenseView with the S-VIDEO jack: Connect the
TV cable (the user prepared) between the SenseView (at the rear
panel of the SenseView, the black round jack) and the TV (at the
rear panel of the TV, the stainless steel round jack).
③ The TV adjustment is required by the remote-controller. (The TV
user guide will provide the adjustment).
※ Some of the TVs may not have S-Video jacks.
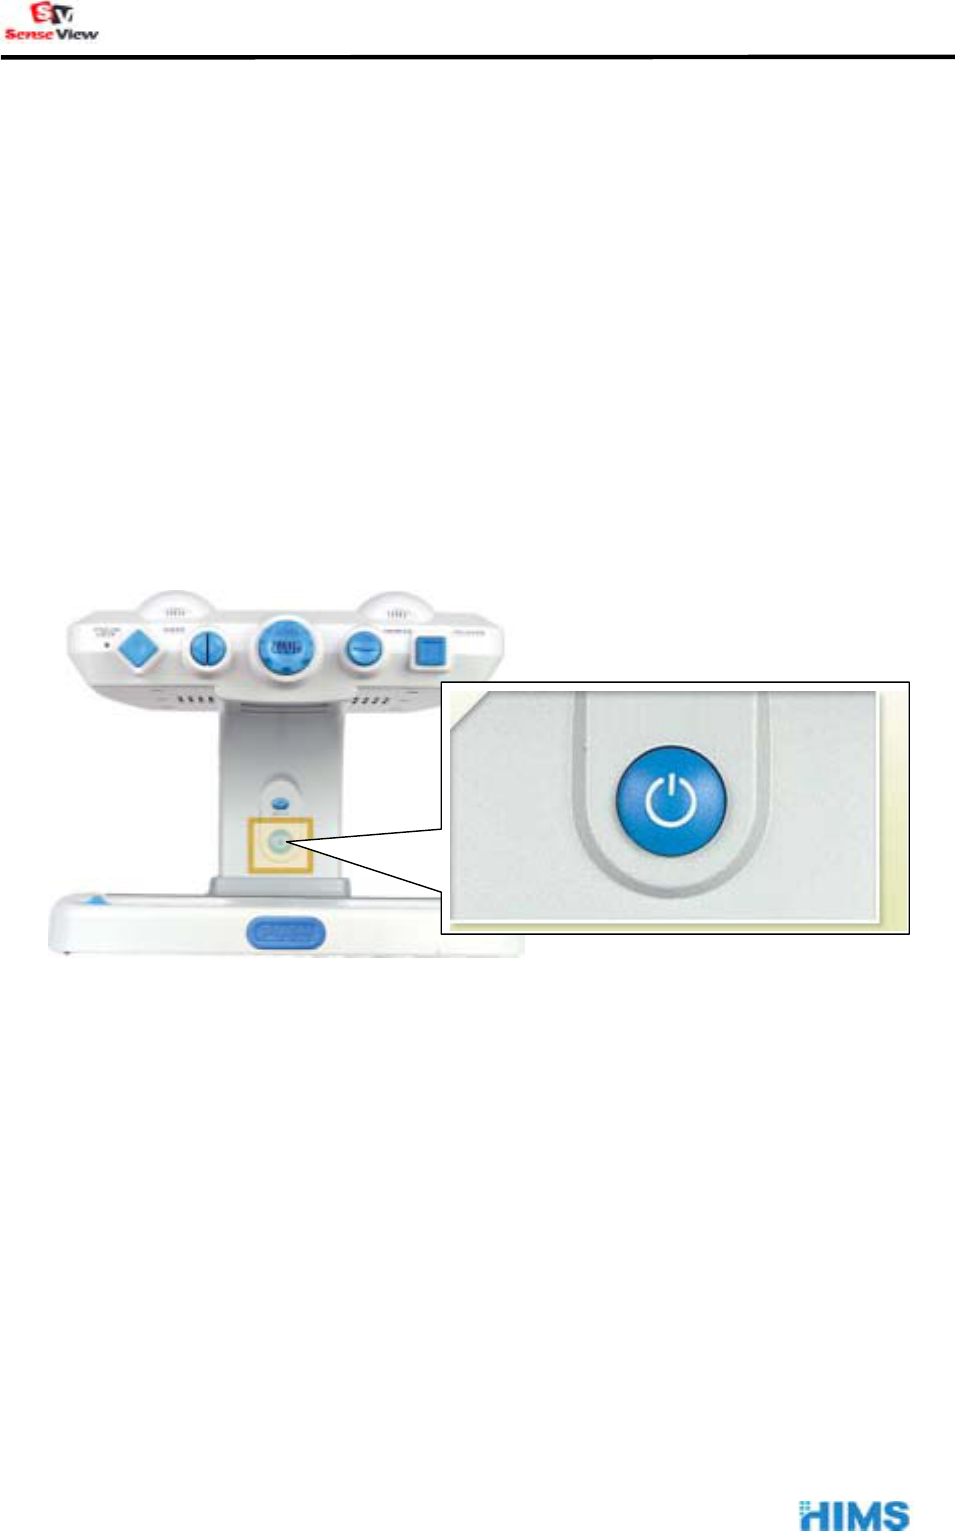
2) Power On / Off
Press the big blue button, your SenseView starts working. Press the
button again, the power is off.
User Manual
- 9 -
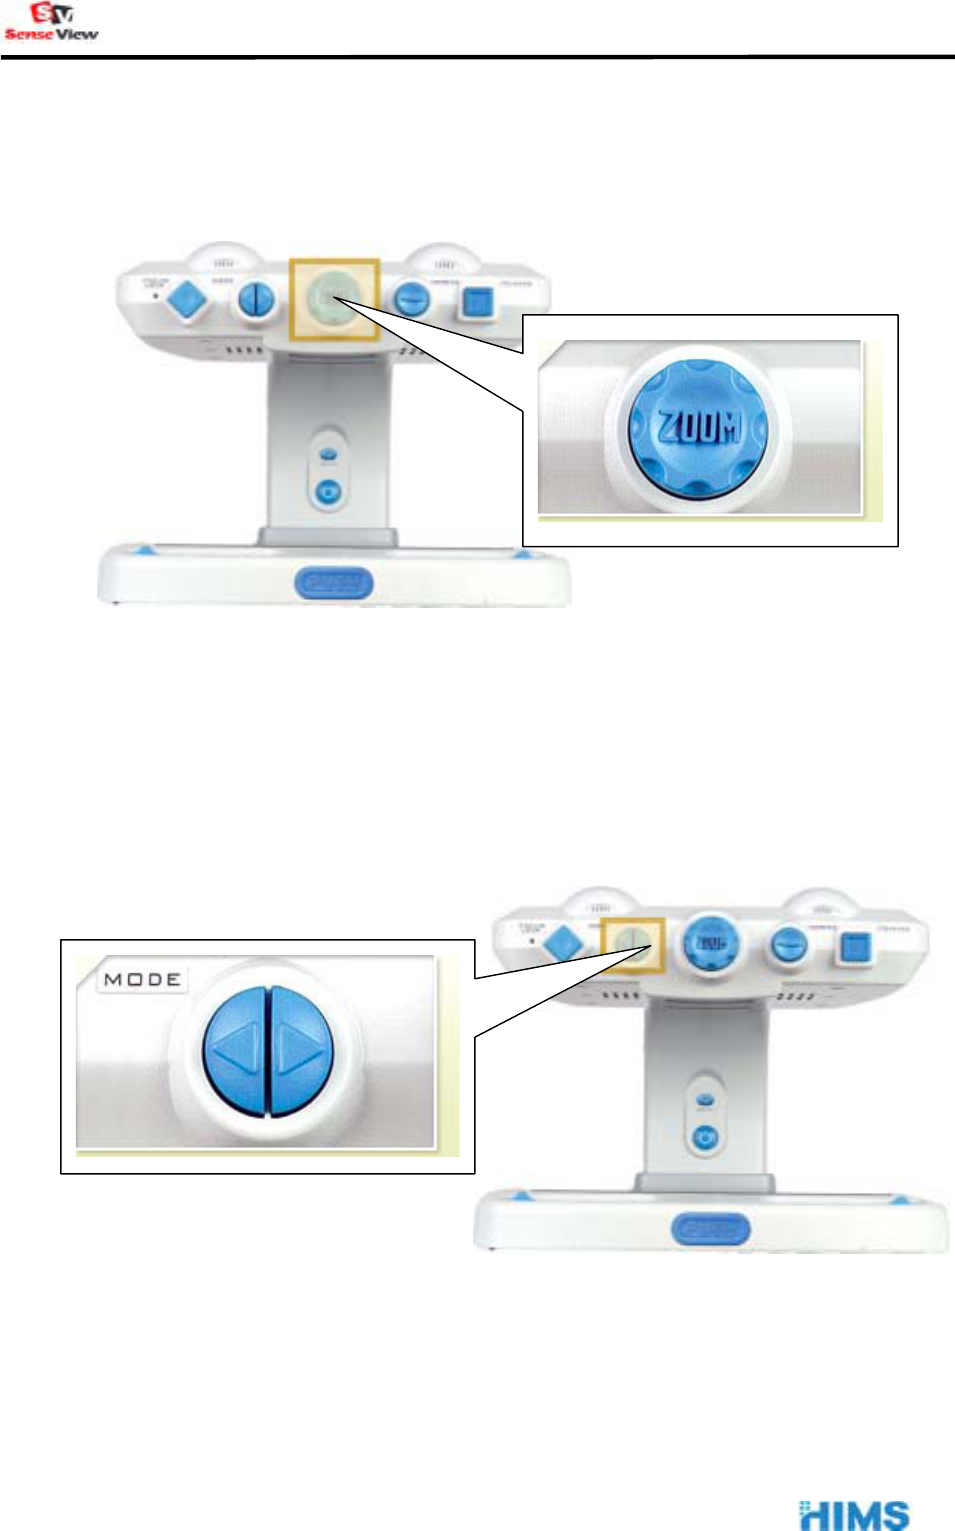
3) ZOOM IN/ZOOM OUT
Turn left and right the ZOOM DIAL, you can adjust ZOON IN/OUT.
① ZOOM IN : Turn the ZOOM DIAL Right
② ZOOM OUT: Turn the ZOOM DIAL Left
4) Selecting Color Modes
Press the blue arrow buttons. 21 color modes will be displayed on the
Screen.
Mode 1 to 21: Press the right arrow button.
User Manual
- 10 -
Mode 21 to 1: Press the left arrow button.
If you turn off the SeseView, the last mode will be saved.
The color modes are shown on the following table.
Normal High Contrast Negative
No. Text
color
Back
ground
color
No. Text
color
Back
ground
color
No. Text
color
Back
ground
color
1 Full color 2
High contrast
full color 3 Negative color
4 Black White 5 Black White 6 White Black
7 Blue White 8 Blue White 9 White Blue
10 Green White 11 Green White 12 White Green
13 Red White 14 Red White 15 White Red
16 Black Yellow 17 Black Yellow 18 Yellow Black
19 Blue Yellow 20 Blue Yellow 21 Yellow Blue
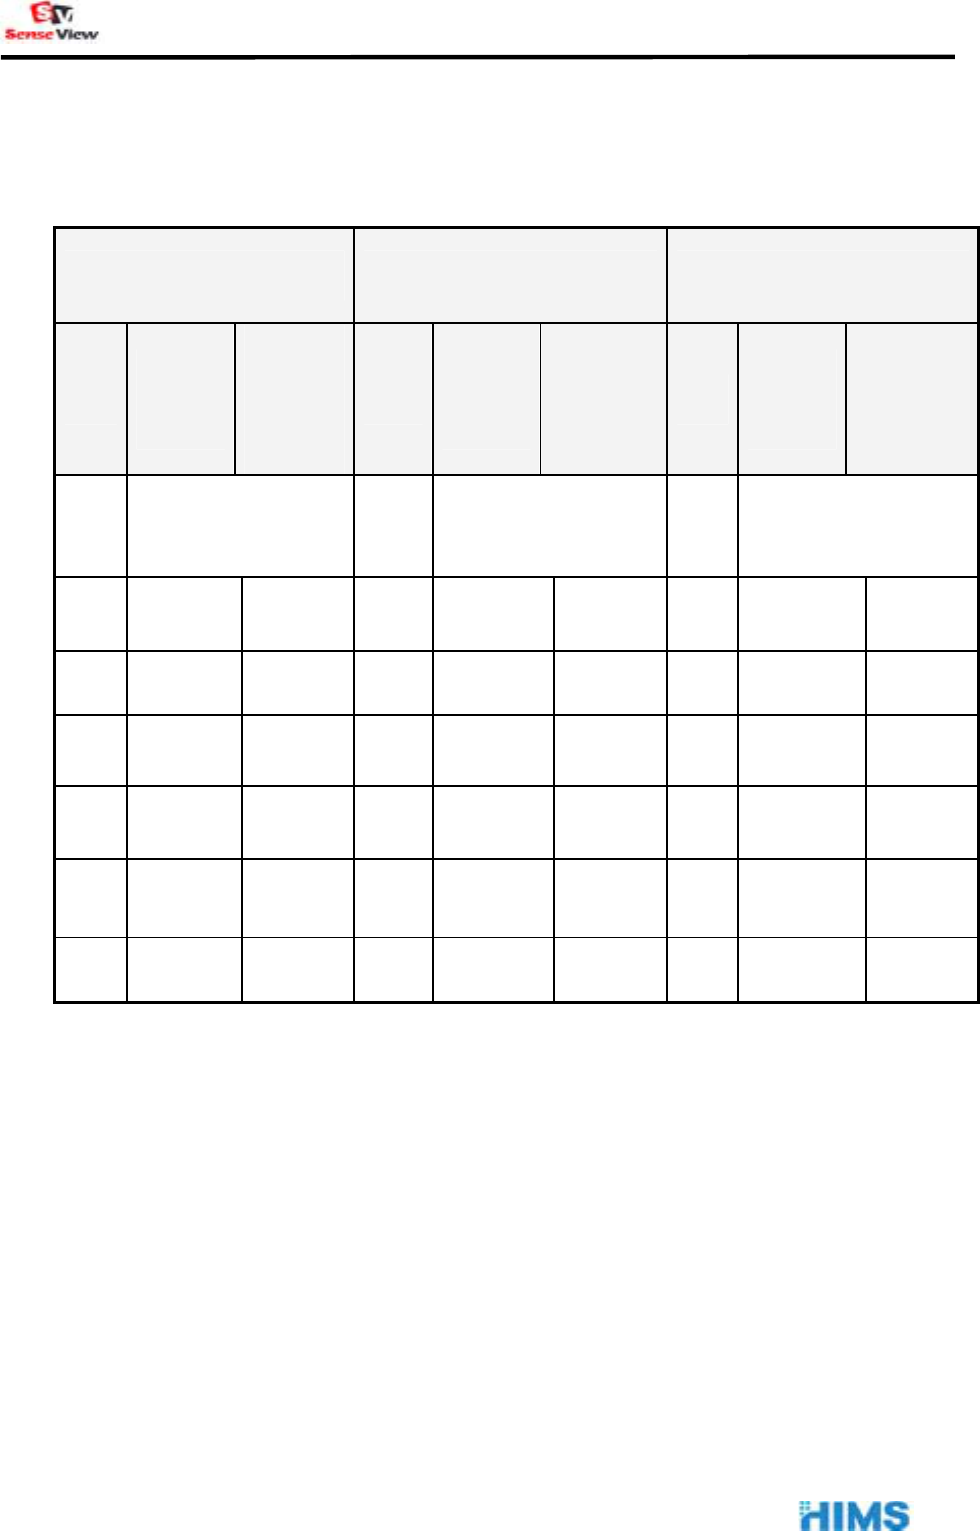
5) Auto Focus and Focus Lock
User Manual
- 11 -
Before you are writing, you press the Focus Lock first, and then you can
write something otherwise theSenseView will focus on your hand
automatically.
① FOCUS LOCK: Press the blue diamond button.
② Release FOCUS LOCK (Auto Focus Lock): Press the blue diamond
button again.
The SenseView power is off, the Focus Lock will be released. It turns to the
Auto Focus Lock.
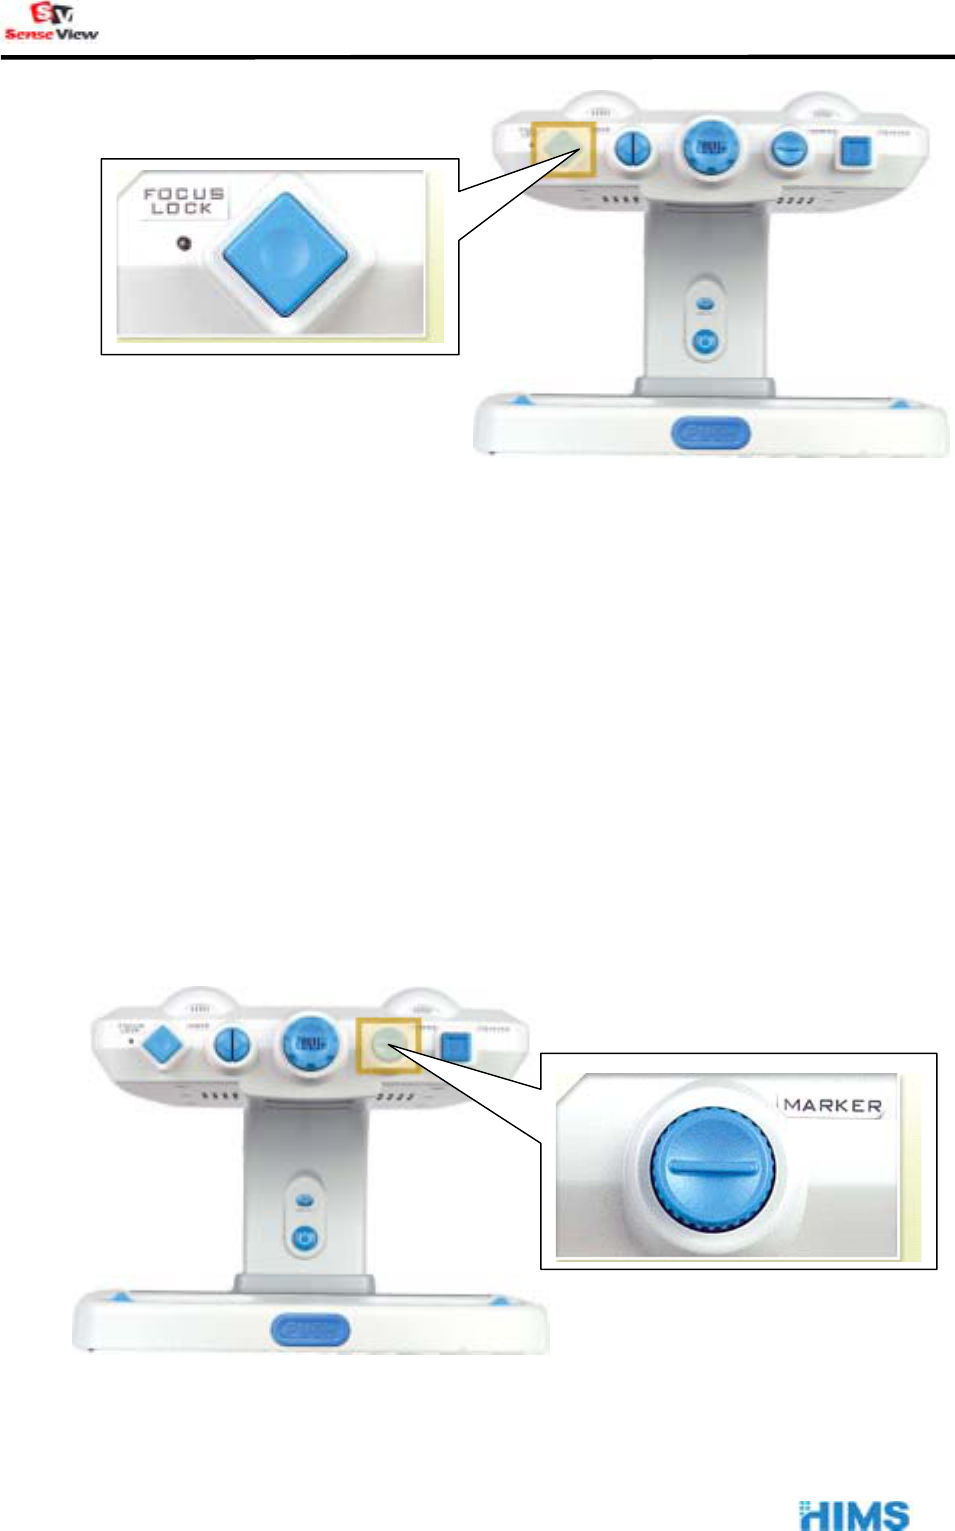
6) Line Marker and Window Marker
Line/Window maker will guide you in reading materials.

User Manual
- 12 -
① Horizontal Line Marker: Press the blue round button, the Horizontal
line will show up and then you turn the blue round button right and
left, the line will go down and up.
② Vertical Line Marker: Press the blue round button again, the
Vertical Line will show up and then you turn the blue round button
right and left, the line will go right and left.
③ Horizontal Window Marker: When the ‘Vertical Line Marker’ is on
the Screen, Press the ‘MARKER’ button again. The ‘Horizontal
Window Marker’ will show up and then you turn the ‘MARKER’
button right and left, the Horizontal Window Maker size will change
(getting bigger and smaller).
④ Vertical Window Marker: When the ‘Horizontal Window Marker’ is
on the Screen, Pressing the ‘MARKER’ button again. The ‘Vertical
Window Marker’ will show up and then you turn the ‘MARKER’
button right and left, the Vertical Window Marker size will change
(getting bigger and smaller).
⑤ You press ‘MARKER’ button again when the ‘Vertical Window
Marker’ is on the Screen, the marker will disappear.
When you read books, materials and any objects, the Line/Window
markers will help you to read rows or columns.
The SenseView is turned off, the markers will be released. You have to
set the markers up again when you turn the SenseView on.
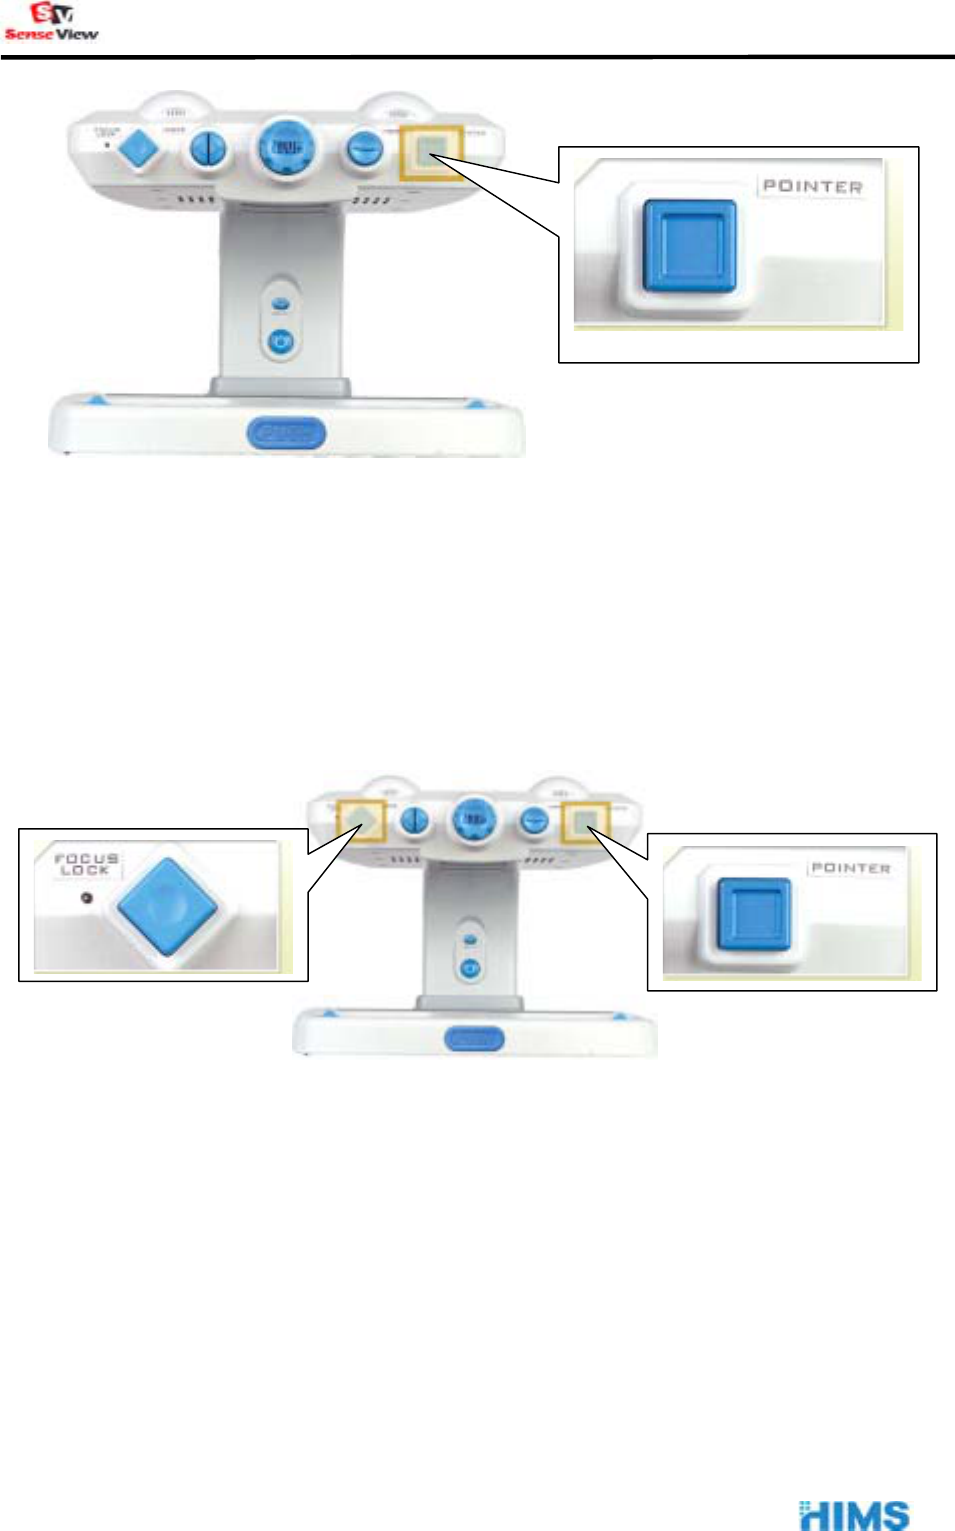
7) Pointer
User Manual
- 13 -
Press the blue square button, a laser beam will be shown on the objects.
It will guide you in reading materials. Press the button again, the laser
beam will disappear.
8) Setting the Beep Sound and Voice
When you turn the SenseView on, it will have no sound but the
SensView provides speech output feature by pressing ‘the FOCUS
LOCK’ button and ‘the POINTER’ button simultaneously.
There are 3 types of the sound outputs.
① Beep Sound Only: Press ‘the FOCUS LOCK’ button. While
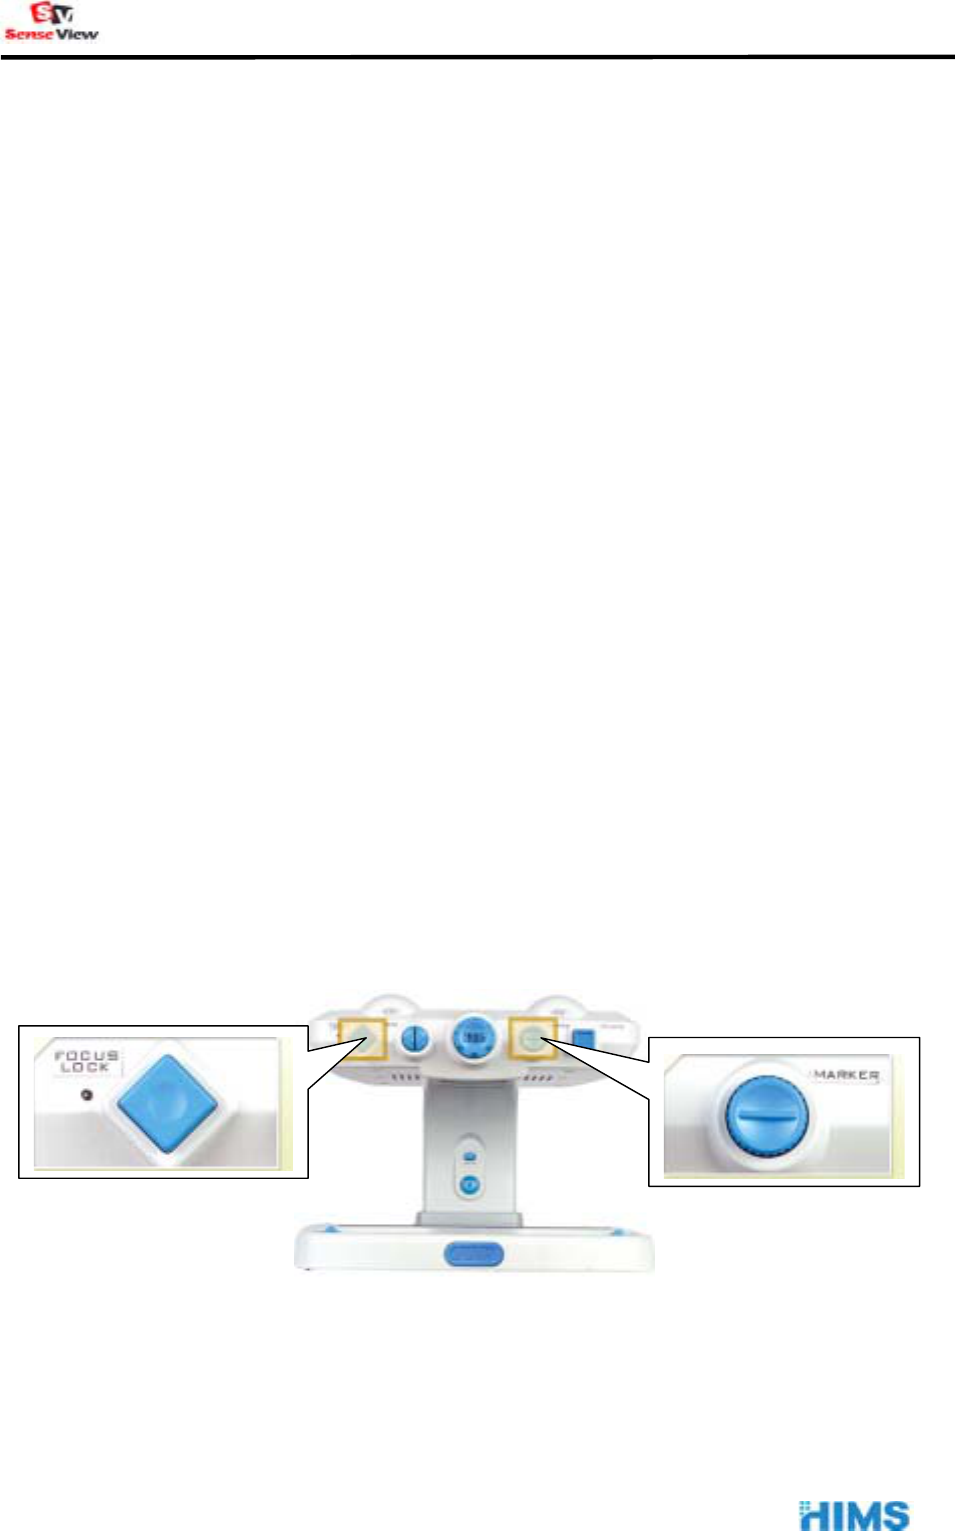
User Manual
- 14 -
pressing ‘the FOCUS LOCK’ button, press ‘the POINTER’ button
and then the Beep sound will come out when you press every
single function.
② Voice Output Only: When the ‘Beep’ sound is on, press and hold
‘FOCUS LOCK’ button and then press ‘POINTER’ button, then you
release both buttons simultaneously. The Voice output will come
up when you press every single function.
③ Beep and Voice Output: When the ‘Voice output’ is on, press and
hold ‘FOCUS LOCK’ button and then the press ‘POINTER’ button,
then you release both buttons simultaneously. The Beep and Voice
output both will come out.
④ If you press both buttons and release when Beep and Voice are on,
the both sound will not come out.
If you turn off and on the power again, it will turn to no sound mode
automatically.
9) Setting Date and Time
When you turn the SenseView on/off, Date/Time will not be displayed. If
you want to check Date/Time, you can set up as follows;

User Manual
- 15 -
① Checking Date and Time
Press and hold ‘FOCUS LOCK’ button, and the press ‘MARKER’
button and then release both buttons simultaneously. Date and
Time will be displayed on the top of the left corner of the screen.
If you press and hold ‘FOCUS LOCK’ button and press ‘MARKER’
button while date / time is displayed, the date / time will disappear.
② Setting Date and Time
a) When date and time are displayed on the screen, press
‘FOCUS LOCK’ button for more than 3 seconds.
b) Then ‘YEAR’ of date will blink. Turn the ‘MARKER’ dial to adjust
year. If the desired YEAR is displayed, press ‘FOCUS LOCK’
button once. ‘Year’ will be set and ‘MONTH’ will blink.
c) You can select desired MONTH by turning ‘MARKER’ dial and
press ‘FOCUS LOCK’ button in order to set MONTH. The
‘MONTH’ will be set and ‘DAY’ will blink.
d) You can select desired ‘DAY’ by turning ‘MARKER’ dial and
press ‘FOCUS LOCK’ button in order to set DAY. Then the
‘DAY’ will be set and ‘Hour’ will blink.
e) You can select desired ‘HOUR’ by tuning ‘MARKER’ dial and
press ‘FOCUS LOCK’ button in order to set HOUR. Then the
‘HOUR’ will be set and ‘MINUTE’ will blink.
f) You can select desired ‘MINUTE’ by tuning ‘MARKER’ dial and
press ‘FOCUS LOCK’ button in order to set MINUTE. Then the
‘MINUTE’ will be set and ‘SECOND’ will blink.
g) You can select desired ‘SECOND’ by tuning ‘MARKER’ dial and
press ‘FOCUS LOCK’ button in order to set SECOND. Then the
User Manual
- 16 -
‘SECOND’ will be set and DATE and TIME will blink 3 times.
The set date and time is saved and shown on the screen.
During setting date and time, turn ‘MARKER’ dial on clockwise in
order to increase the numbers, or turn it on counter-clockwise in
order to decrease the numbers.
The year can be set from the year 2000 to 2099.
While the Line/Window markers on; if you set TIME/DATE, the
Line/Window markers will be cancelled automatically.
You turn the SenseView off while the date and time is displayed,
the date and time will not be displayed if you turn it on again.
The date and time will not be lost even power is out.
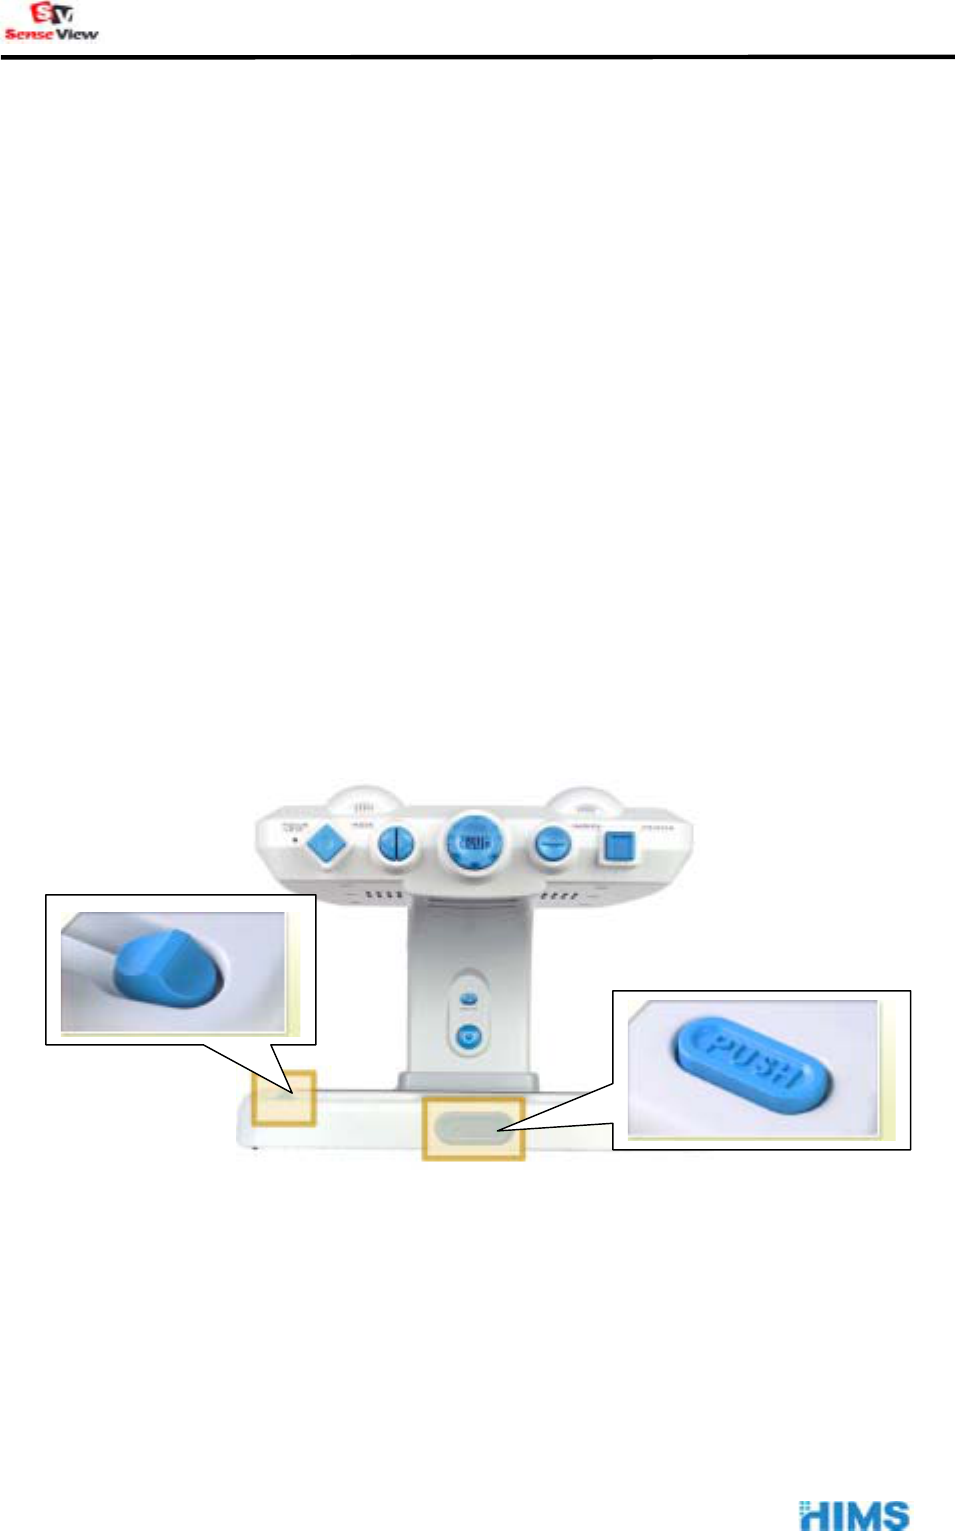
10) Table Locking and Table Moving Range Locking
When you read a newspaper or small novel, the moving table will travel
very short distance. In this case, you can set the table moving range by
moving the ‘Table Moving Range Lock (X-Axis)’. Press two (2) buttons
on both left front and right front of the moving table and move to the
User Manual
- 17 -
desired position by moving them to the right or left, and release the
buttons.
When you write something, press ‘PUSH’ button that is placed in front of
the table, will lock the table. Then the table will be hardly moved. It will
help you to write.
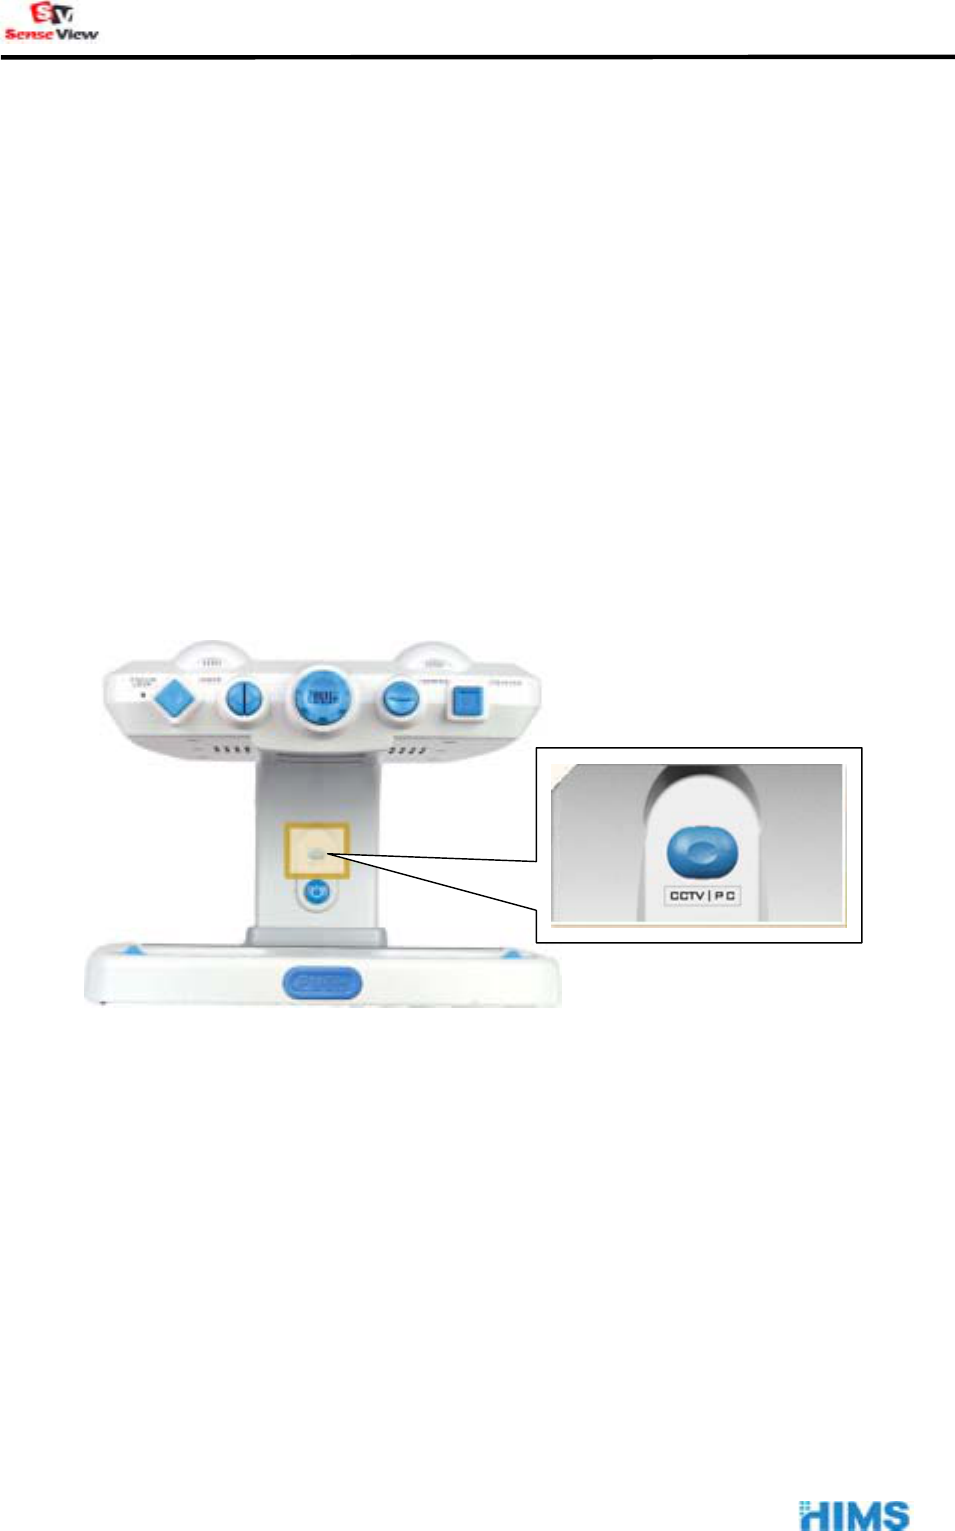
11) CCTV/PC Switching
You can display objects that on the table of the SenseView and the PC
on the monitor or TV. Please check the connecting among the
SenseView, the monitor (or TV) and the PC.
① Connecting the SenseView between the PC and the Monitor and
turn the PC on, the PC will be on the Monitor. It is the PC mode.
② While the PC mode, turn the SenseView on and then the
SenseView will be on the Screen. It is the SenseView mode.
User Manual
- 18 -
③ You press ‘CCTV/PC’ button, PC screen will be displayed on the
monitor again.
④ You press ‘CCTV/PC’ button again, the SenseView screen will be
displayed again.
■ Specifications
Magification 3x~70x(17" monitor)
Table moving range 300mm(x-axis) * 270mm(y-axis)
Power 12V/3A
Size 400mm(W) * 560mm(D) * 310mm(H)
Color Modes
- Full color mode, 6 monochrome modes (black/white,
blue/white, green/white, red/white, black/yellow,
blue/yellow)
- Normal, high contrast, negative mode for each color
modes
Weight 13 kg
Input Input from the computer (VGA, SVGA, XGA)
Input /
Output Output
- VGA output port for the monitor display
- Composite TV and S-Video output for TVdisplay
- Speaker (1W)

User Manual
- 19 -